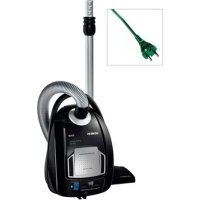
USER MANUAL VSQ4GP1265 SIEMENS
Register your product online
Safety information 2 Instruction manual 28 en Safety information 3 Instruction manual 33 fr Consignes de sécurité 5 Notice d'utilisation 38 nl Veiligheidsvoorschriften 7 Gebruiksaanwijzing 43 da Sikkerhedsanvisninger 8 Brugsanvisning 48 no Sikkerhetsanvisninger 10 Bruksanvisning 53 sv Säkerhetsanvisningar 11 Bruksanvisning 58 fi Turvaohjeet 13 Käyttöohje 63 es Consejos y advertencias de seguridad 14 Instrucciones de uso 68 pt Indicações de segurança 15 Instruções de utilização 73 el Υποδείξεις ασφαλείας 17 Οδηγίες χρήσης 78 tr Güvenlik bilgileri 18 Kullanım kılavuzu 83 pl Wskazówki dotyczące bezpieczeństwa 20 Instrukcja obsługi 88 hu Biztonsági útmutató 21 Használati utasítás 93 bg Указания за безопасност 23 Инструкция за употреба 98 ro Instrucțiuni de siguranță 24 Instrucțiuni de folosire 103 113 27 ar
Please keep this instruction manual. When passing the vacuum cleaner on to a third party, please also pass on this instruction manual.
Intended use
This vacuum cleaner is intended for domestic use and not for commercial use. Only use this vacuum cleaner in accordance with the instructions in this instruction manual. The manufacturer will not accept any responsibility for damage caused by improper use or incorrect operation.
Therefore, please note the following points.
The vacuum cleaner must only be operated with:
- Original replacement parts, accessories or special accessories
In order to prevent injuries and damage, the vacuum cleaner must not be used for:
Vacuum-cleaning persons or animals Vacuuming up:
- insects or spiders.
- hazardous, sharp-edged, hot or glowing substances. -damp or liquid substances.
- highly flammable or explosive substances and gases.
- ash, soot from tiled stoves and central heating systems.
- toner dust from printers and copiers.
This vacuum cleaner complies with the recognized rules of technology and the relevant safety regulations.
The appliance may be used by children over the age of 8 years and by persons with reduced physical, sensory or mental capacity or by persons with a lack of experience or knowledge if they are supervised or have been instructed on the safe use of the appliance and have understood the potential dangers of using the appliance. Children must never play with the appliance. Cleaning and user maintenance must never be carried out by children without supervision. Plastic bags and films must be kept out of the reach of children before disposal. Risk of suffocation.
Proper use
Only connect and use the vacuum cleaner in accordance with the specifications on the rating plate. Never vacuum without the dust bag or dust container, motor protection or exhaust filter.
This may damage the vacuum cleaner.
- Do not vacuum close to the head when using a nozzle and tube. This could cause injury!
- When vacuuming stairs, the appliance must always be positioned below the user.
- Do not use the power cord or the hose to carry or transport the vacuum cleaner. For safety reasons, if this appliance's mains power cable becomes damaged, it must be replaced by the manufacturer, their after-sales service department or a similarly qualified person.
- Fully extend the power cord when using the vacuum cleaner continuously for several hours.
- When disconnecting the appliance from the mains, pull on the plug itself to remove it; do not pull on the power cord.
- Do not pull the power cord over sharp edges or allow it to become trapped. Pull out the mains plug before carrying out any work on the vacuum cleaner.
- Do not operate the vacuum cleaner if it is damaged. Unplug the appliance from the mains if a fault is detected. For safety reasons, only authorized after-sales service personnel are permitted to carry out repairs and fit replacement parts to the vacuum cleaner.
- Protect the vacuum cleaner from the weather, moisture and sources of heat.
- Do not pour flammable substances or substances containing alcohol onto the filters (dust bag, motor protection filter, exhaust filter, etc.). The vacuum cleaner is not suitable for use on construction sites.
=> Vacuuming up building rubble could damage the appliance.
Switch off the appliance when it is not in use. At the end of its life, the appliance should immediately be rendered unusable, then disposed of in an appropriate manner.
Please note
The mains socket must be protected by at least a 16 amp circuit breaker.
If a circuit breaker is tripped when you switch on the vacuum cleaner, this may be because other electrical appliances which have a high current draw are connected to the same power circuit.
To prevent the circuit breaker from tripping, select the lowest power setting before switching the appliance on, and increase the power only once it is running.
■ Packaging
The packaging is designed to protect the vacuum cleaner from being damaged during transportation. It is made of environmentally friendly materials and can therefore be recycled. Dispose of packaging that is no longer required at an appropriate recycling point.
Old appliance
Old appliances still contain many valuable materials. Therefore, please take appliances that have reached the end of their service life to your retailer or recycling centre so that they can be recycled. For current disposal methods, please enquire at a retailer or your local council.
Disposal of filters and dust bags
Filters and dust bags are manufactured from environmentally friendly materials. Provided they do not contain substances that are not permitted in household waste, you can dispose of them with your normal household waste.
The appliance can be used by children aged 8 years and above and by persons with reduced physical, sensory or mental capabilities or lack of experience and knowledge if they have been given supervision or instruction concerning use of the appliance in a safe way and understand the hazards involved. Children shall not play with the appliance. Cleaning and user maintenance shall not be made by children without supervision.
The appliance can be used by children aged 8 years and above and by persons with reduced physical, sensory or mental capabilities or lack of experience and knowledge if they have been given supervision or instruction concerning use of the appliance in a safe way and understand the hazards involved. Children shall not play with the appliance. Cleaning and user maintenance shall not be made by children without supervision.
Dust bags and filters must be stored out of reach of children and must be disposed of properly. There is a risk of suffocation!
Proper use
Connection to the mains and operation of the vacuum cleaner only according to the rating plate. Never use without dust bag or filter, respectively. Motor protection filter - exhaust filter.
The vacuum cleaner can be damaged!
Avoid vacuuming dust close to the head. There is a risk of injury! The vacuum cleaner is intended for dry vacuuming only. Do not use the cable for pulling or carrying the vacuum cleaner. If the connection cable to the mains is damaged, it must be replaced by the manufacturer or its service agent or a similarly qualified person in order to avoid hazards. Before any work on the vacuum cleaner, pull the plug out of the mains. Do not work with a damaged vacuum cleaner. If a malfunction occurs, pull the plug out of the mains contact. To avoid danger, repairs and replacement of spare parts of the vacuum cleaner must only be carried out by authorized service. Keep the vacuum cleaner away from heat, climatic influences, and moisture. Do not place any filters in place of the dust bag or containing alcohol materials (dust bags, motor protection filter, exhaust filter, etc.). The vacuum cleaner is not suitable for construction site work.
Warning: On construction sites, the vacuum cleaner may be damaged.
Switch off the appliance when not in use. Before disposal, the appliance must be made unusable, then it must be disposed of according to regulations.
My appliance has a defect
The mains contact must be secured with a fuse of at least 16A.
If the fuse trips when switching on the appliance, the cause may be that the same electrical circuit is simultaneously connected to other electrical appliances with high power consumption.
The tripping of the fuse can be avoided by setting the lowest power level before switching on the appliance and then selecting a higher power level.
Disposal instructions
Packaging
The packaging is protected from damage during transport. It is made of environmentally friendly materials and can be recycled. Dispose of unnecessary packaging materials at the collection points for the recycling system "Green Point".
Disposal
Old vacuum cleaners still contain valuable materials. Therefore, take your old vacuum cleaner to your dealer or to the municipal collection points for recycling. Information on current disposal data can be obtained from your dealer or your local council.
Disposal of filters, filter bags, and dust bags
The filters, filter bags, and dust bags are made of ecological materials. If they do not contain substances banned for household waste, you can dispose of them together with normal household waste.
Please keep the operating instructions. If you give the vacuum cleaner to a third party, please also hand over the operating instructions.
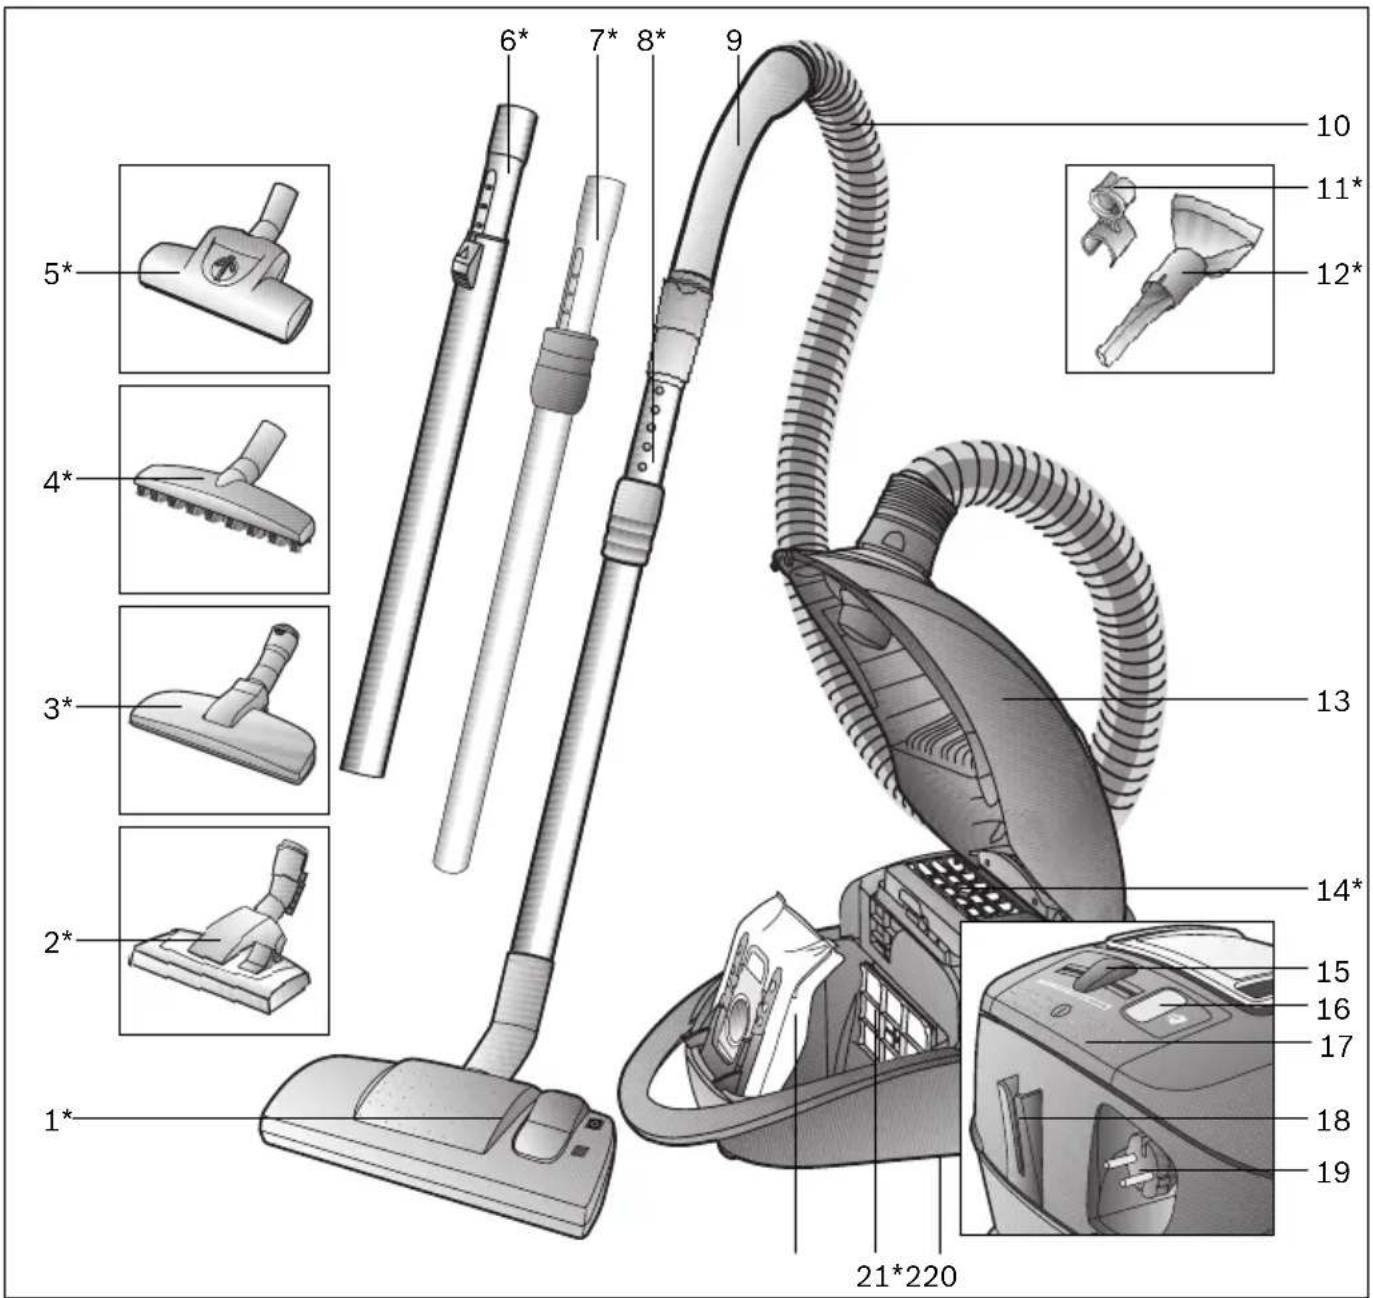
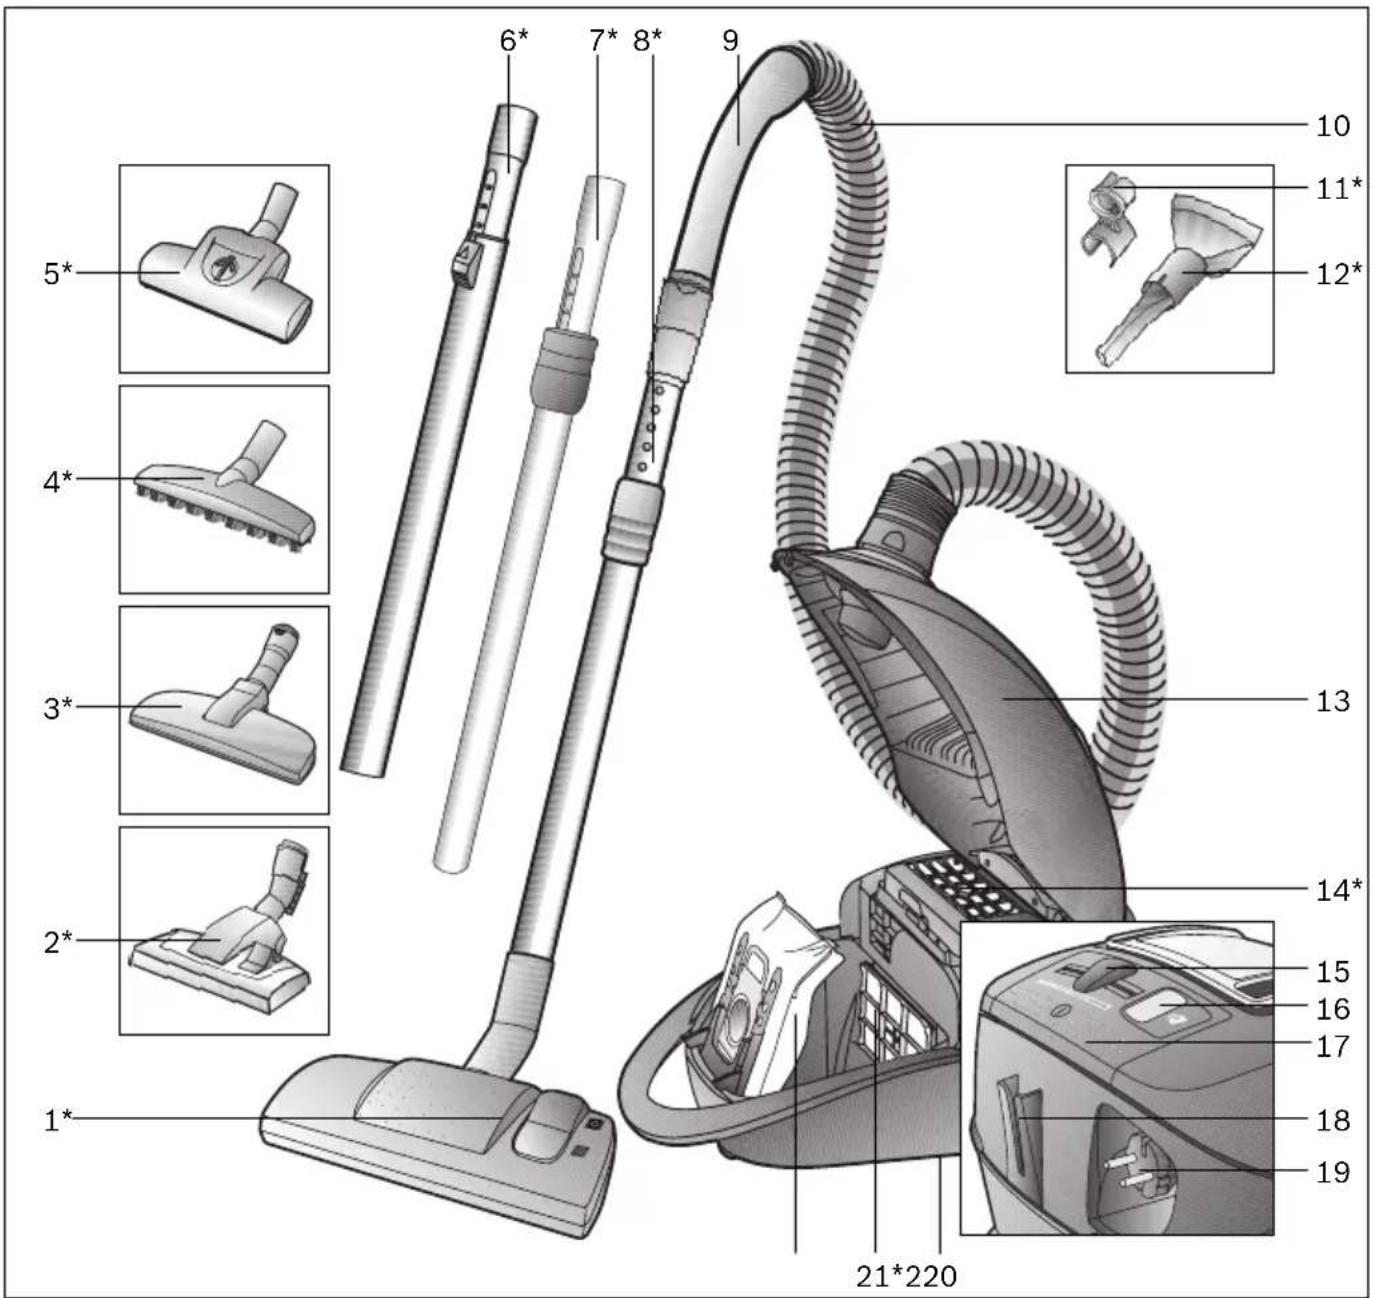
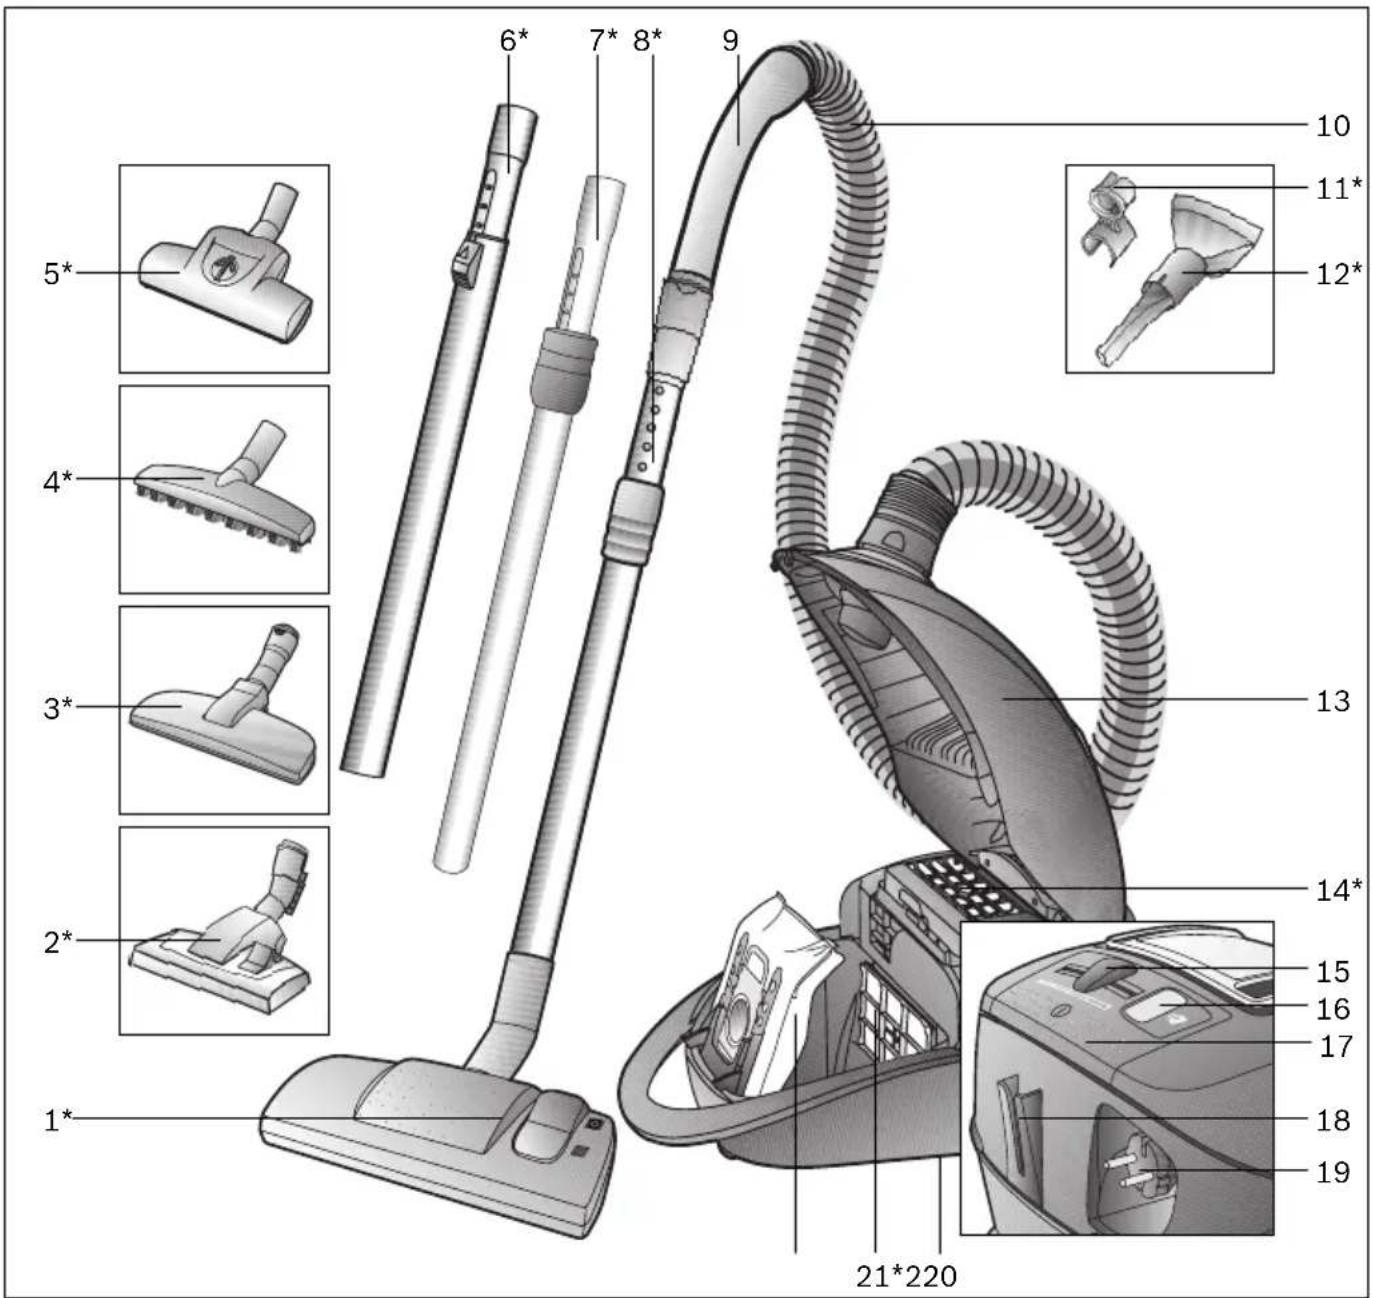
1 Adjustable floor tool 2 Adjustable floor tool with locking collar 3 Pet hair tool 4 Hard-floor brush 5 Turbo brush 6 Telescopic tube with sliding switch 7 Telescopic tube with adjusting sleeve 8 Telescopic tube with adjusting sleeve and locking collar 9 Handle 10 Flexible hose 11 Accessories holder for multi-purpose nozzle 12 Multi-purpose nozzle
13 Cover 14 Exhaust filter 15 Electronic slide control 16 Dust bag change indicator 17 ON/OFF button 18 Parking aid 19 Power cord 20 Storage aid (on underside of unit) 21 Motor protection filter 22 Dust bag
*Dependent on model
Congratulations on your purchase of a Siemens VSQ4 vacuum cleaner.
This instruction manual describes various VSQ4 models, which means that some of the equipment features and functions described may not be available on your model. You should only use original Siemens accessories, which have been specially developed for your vacuum cleaner to achieve the best possible vacuuming results.
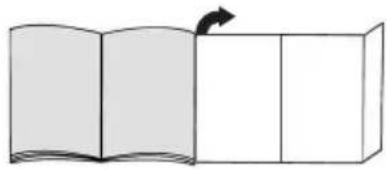
Fold out picture pages.
Before using for the first time
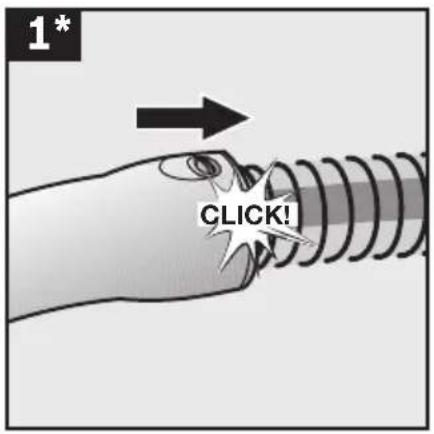
Figure 1*
Push the handle onto the flexible hose until it engages.
Setting up
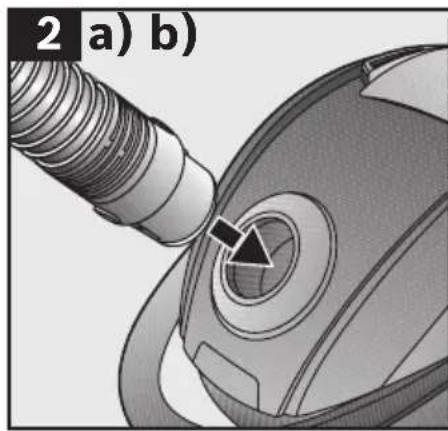
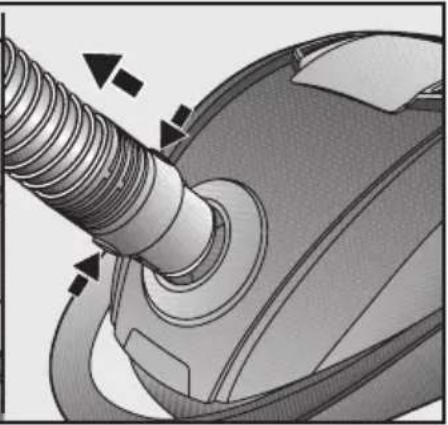
Figure 2
a) Push the flexible hose adapter into the opening on the vacuum cleaner until it engages. b) To remove the flexible hose, press the release button and pull the hose out.
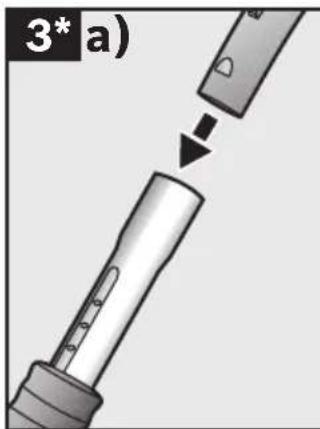
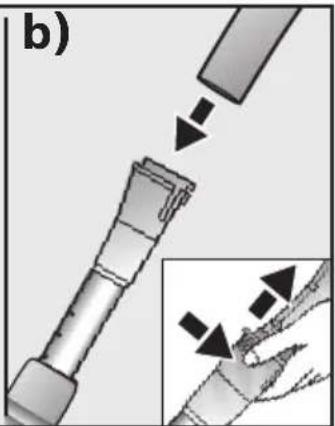
Figure 3*
a) Connect the handle and the telescopic tube together. b) Push the handle into the telescopic tube until it engages. To release the connection, squeeze the locking collar and pull the telescopic tube out.
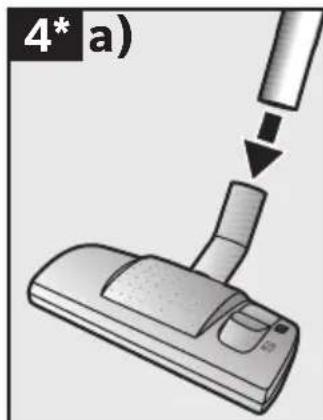
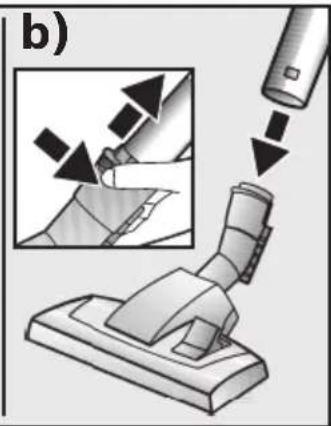
Figure 4
a) Connect the floor tool and the telescopic tube together. b) Push the telescopic tube straight into the connecting piece of the floor tool until it engages.
To release the connection, squeeze the locking collar and pull the telescopic tube out.
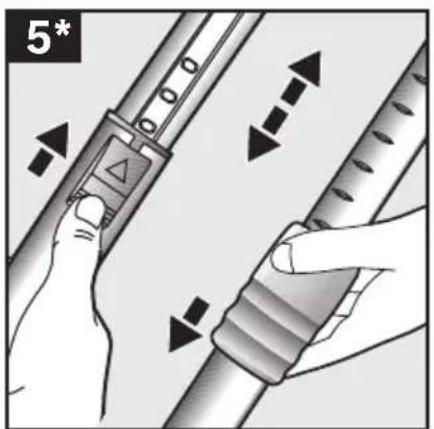
To adjust the length of the telescopic tube, adjust the adjusting sleeve/sliding switch in the direction of the arrow and adjust the tube to the required length.
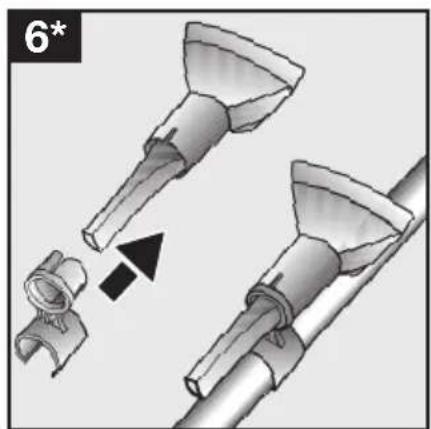
Attach the accessories holder to the multi-purpose nozzle and clip it onto the suction pipe/telescopic tube.
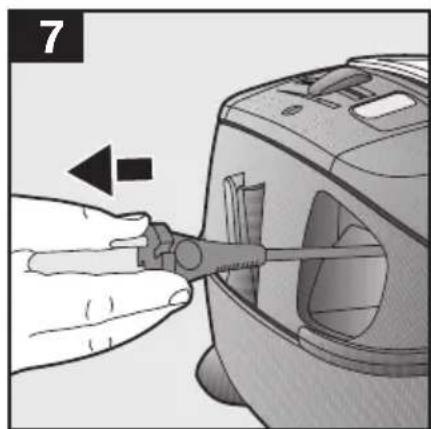
Take the mains plug, pull the mains cable to the required length and insert the plug into a socket.
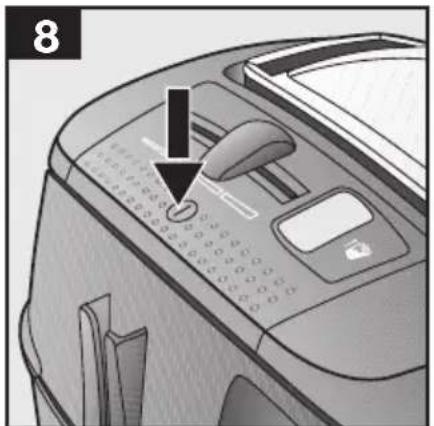
Press the ON/OFF button in the direction of the arrow to switch your vacuum cleaner on.
Vacuuming
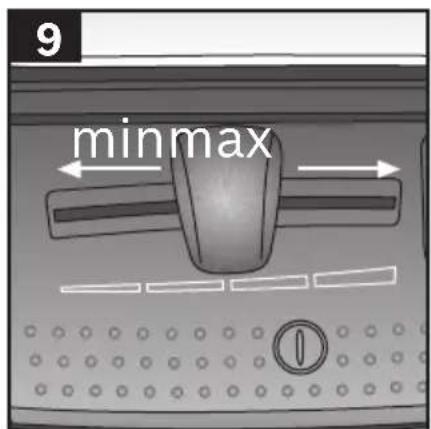
The required suction power can be selected infinitely variably by adjusting the slide control.
Lowest
suction range: For vacuuming delicate fabrics, e.g. curtains.
Low
Suction range: For daily vacuuming of lightly soiled floors.
Medium
Suction range: For vacuuming durable floor coverings, hard floors, and for heavily soiled surfaces.
High
Suction range: For vacuuming stubborn dirt and very heavily soiled surfaces.
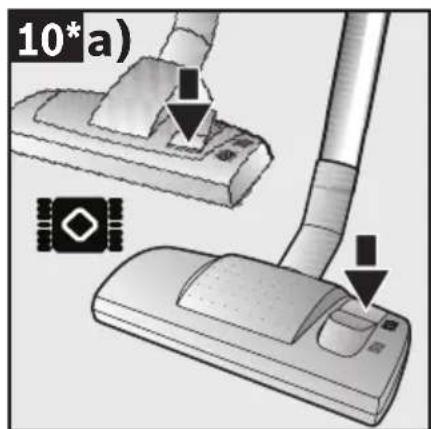
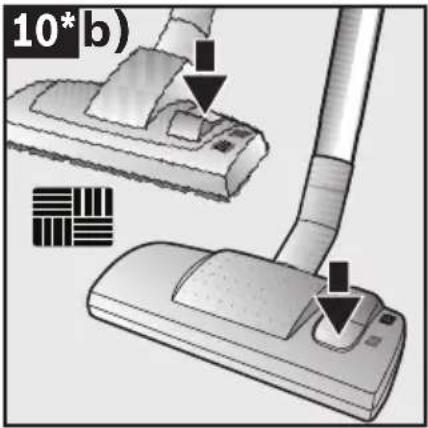
Figure 10
Adjusting the floor tool:
a) For vacuuming rugs and carpets => b) For vacuuming hard floors =>


Caution!
Floor tools are subject to a certain amount of wear, depending on the type of hard floors you have (e.g., rough, rustic tiles). Therefore, you must check the underside of the floor tool at regular intervals. Worn undersides of floor tools may have sharp edges that can damage sensitive hard floors, such as parquet or linoleum. The manufacturer does not accept any responsibility for damage caused by worn floor tools.
Turbo brush
If your vacuum cleaner is equipped with a turbo brush, please consult the accompanying instruction manual for notes on its use and maintenance.
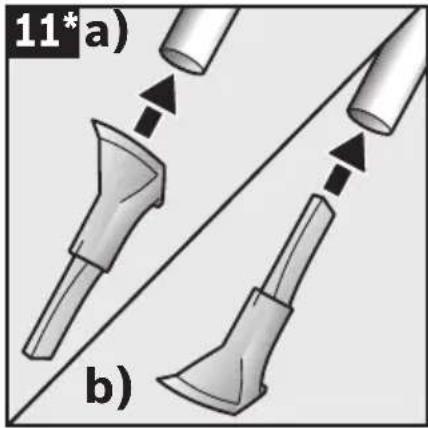
Figure 11*
Cleaning with accessories
Attach the nozzles to the tube or handle as required: a) Crevice nozzle for vacuuming crevices and corners, etc. b) Upholstery nozzle for vacuuming upholstered furniture, curtains, etc.
Pet hair tool
Floor tool for easy and thorough vacuuming of pet hair. - Push the telescopic tube into the connecting piece of the pet hair tool until it engages. Press on the locking collar and pull out the telescopic tube to disconnect. To clean, simply vacuum the tool using the suction pipe/telescopic tube.
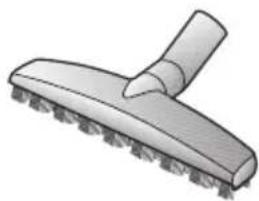
Hard-floor brush
For cleaning hard floor coverings (tiles, parquet flooring, etc.) - Connect the floor tool and the telescopic tube together.
Once you have switched off the vacuum cleaner, you can use the parking aid on the back of the vacuum cleaner if you wish to stop vacuuming for a short time.
To do this, slide the catch on the floor tool into the groove on the back of the vacuum cleaner.
When the work is done
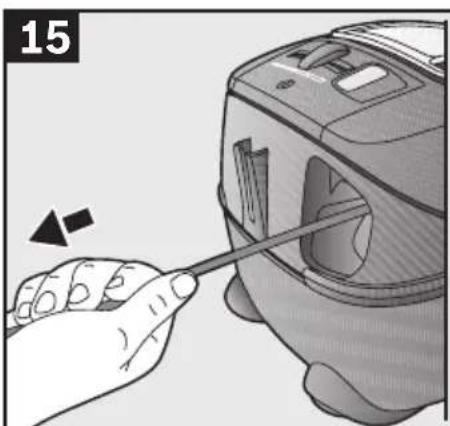
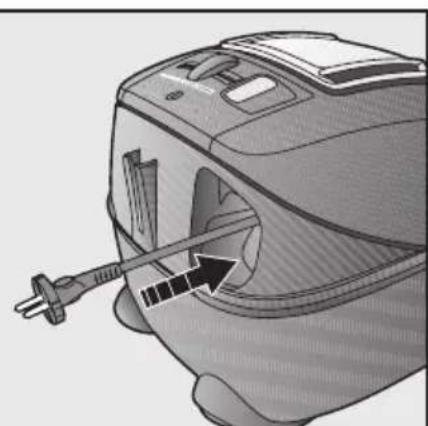
Unplug the vacuum cleaner. - Briefly pull the power cord and release. The cord rewinds automatically.
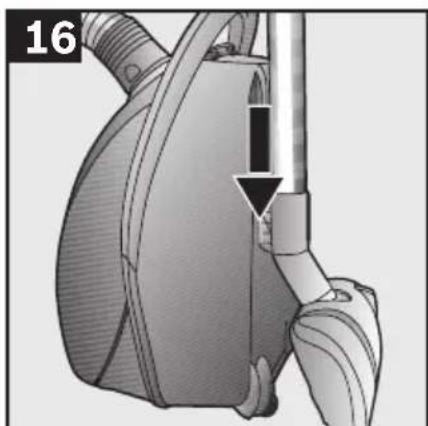
To store or transport the vacuum cleaner, use the storage aid on the underside of the vacuum cleaner.
Stand the vacuum cleaner up on its end. Slide the catch on the floor tool into the groove on the underside of the vacuum cleaner.
Changing the dust bag and filters
Replacing the dust bag
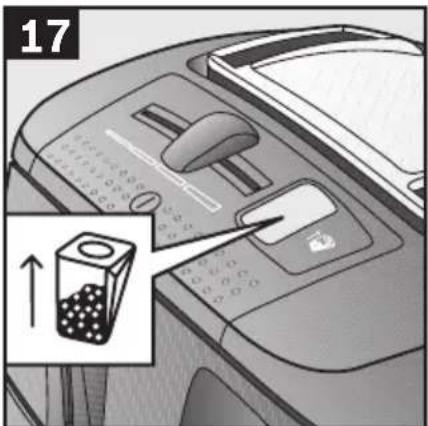
If the dust bag change indicator lights up brightly and evenly when the floor tool is lifted from the carpet and the highest suction power is selected, the dust bag must be changed, even though it may not yet be full. In this case it is essential to change the dust bag due to the type of material it contains.
First check that the nozzle, suction pipe and flexible hose are not blocked, as this would also lead to the dust bag change indicator being triggered.
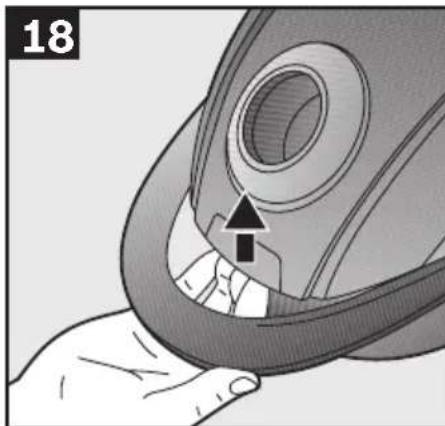
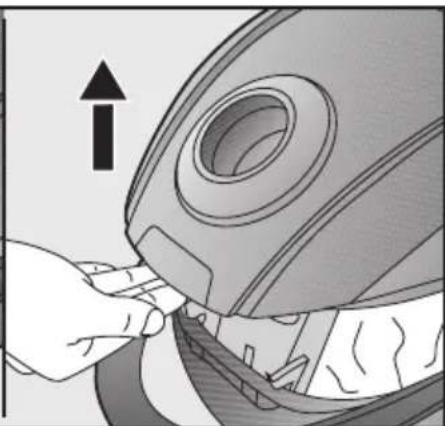
Open the lid by moving the locking lever in the direction of the arrow.
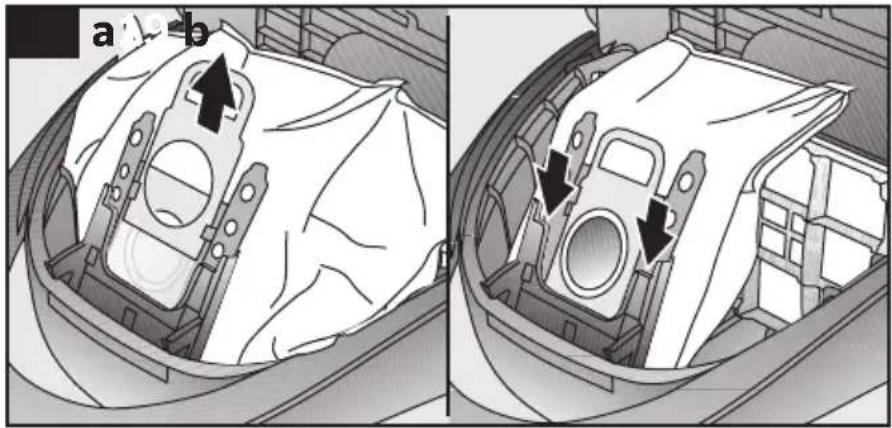
a) Seal the dust bag by pulling the sealing strip and then remove it. b) Insert a new dust bag into the holder and close the dust bag compartment lid.

Caution: the lid will only close when the dust bag is inserted.
Cleaning the motor protection filter
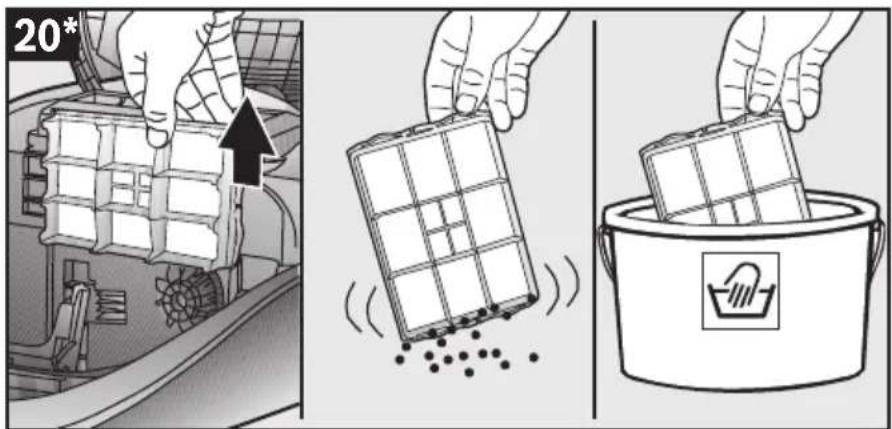
The motor protection filter should be cleaned regularly by knocking out the dirt and rinsing.
- Open the dust bag compartment lid (see Figure 18). Pull out the motor protection filter in the direction of the arrow. Clean the motor protection filter by tapping it. If it is very dirty, the motor protection filter should be rinsed.
The filter must then be left to dry for at least 24 hours.
After cleaning, slide the motor protection filter into the vacuum cleaner and close the dust bag compartment lid.
Cleaning the foam filter
If your appliance is fitted with a filter frame and foam filter, the foam filter should be cleaned at regular intervals by tapping out the dust or rinsing the filter.
- Open the dust bag compartment lid (see Fig. 18). Pull out the filter frame and foam filter in the direction of the arrow.
- Remove the foam filter from the filter frame and clean it by tapping out the dust. If the foam filter is very dirty, it should be rinsed. After rinsing it, allow the foam filter to dry for at least 24 hours. After cleaning, place the foam filter back in the filter frame, insert the filter frame with foam filter in the appliance and close the dust bag compartment lid.
Replacing the HEPA filter (motor protection filter)
If your vacuum cleaner is equipped with a HEPA filter, this should be replaced once a year.
- Open the dust bag compartment lid. Pull out the HEPA filter in the direction of the arrow and remove it from the appliance. Insert the new HEPA filter and close the dust bag compartment lid.
Caution: The vacuum cleaner must not be operated without the motor protection filter.
Replacing the exhaust filter
You must replace the exhaust filter in your vacuum cleaner once a year.
Replacing the micro-hygiene filter
- Open the dust bag compartment lid (see Figure 18).
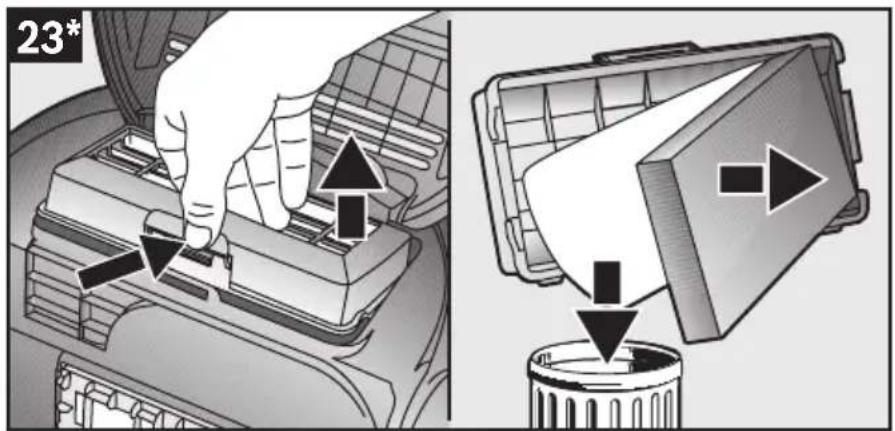
- Release the filter holder by pressing the locking tab in the direction of the arrow.
- Remove the foam filter and micro-hygiene filter. Insert the new micro-hygiene filter and foam filter into the filter holder. Insert the filter holder into the vacuum cleaner and clip into place.
Replacing the HEPA filter
You can order a new filter from our after-sales service using the following replacement part number: 574020
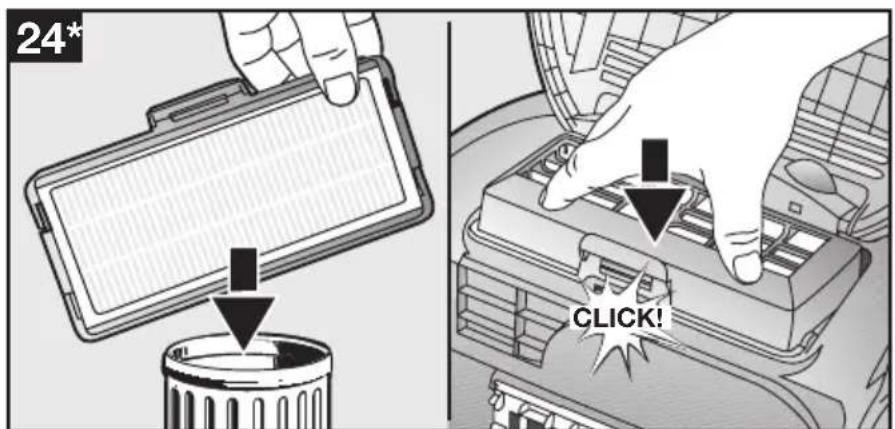
- Open the dust bag compartment lid (see Figure 18).
- Release the HEPA filter by pressing the locking tab in the direction of the arrow and remove it from the vacuum cleaner (see Figure 23). Insert the new HEPA filter and clip into place.
If you have used the vacuum cleaner for fine dust particles (such as plaster or cement), clean the motor protection filter by tapping it and, if necessary, replace the motor protection filter and the exhaust filter.
Care
Always switch off the vacuum cleaner and disconnect the power cord from the mains before cleaning the vacuum cleaner.
The vacuum cleaner and plastic accessories can be cleaned with a commercial plastic cleaner.
Do not use a scourer, glass-cleaning agent or all-purpose cleaning product.
Never immerse the vacuum cleaner in water.
The dust compartment can, if necessary, be cleaned with a second vacuum cleaner or simply wiped with a dry cloth or dusting brush.
Subject to technical modifications.
Optional accessories
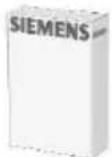
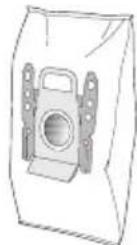
Replacement filter pack
Filter type GXXL (VZ41AFGXXL) For best performance: GXXLplus (VZ41GXXLP)
Contents: 4 filter bags with seal
1 micro-hygiene filter
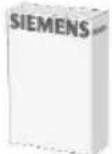
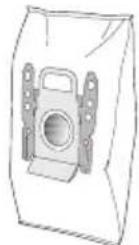
http://www.dust-bag-siemens.com
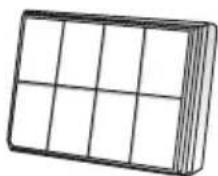
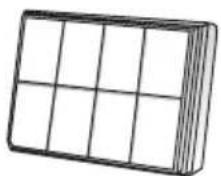
HEPA Filter VZ54000
additional filter for pure exhaust air. Recommended for those with allergies.
Replace every year.
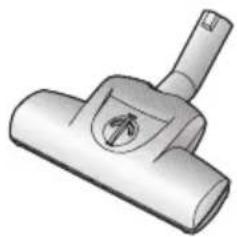
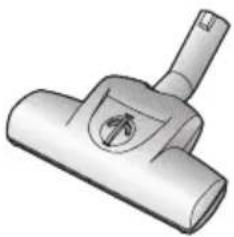
TURBO UNIVERSAL brush VZ102TBB
All in one brushing and vacuuming of short-pile pile rugs and carpets and all hard floor coverings. Especially suitable for picking up pet hair. The brush roller is driven by the air flow through the vacuum cleaner. No separate electrical connection is needed.
Hard-floor brush VZ123HD
For vacuuming hard floors (parquet flooring, tiles, laminate, etc.)
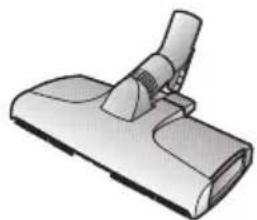
Washing brush VZ103WD
Suitable for use on all hard floors, such as parquet, laminate, stone, wooden floorboards, tiles, etc. (test the moist cleaning cloths on an inconspicuous area before using on hard floors which require particular care). Removes large particles of dirt while the moist cleaning cloth cleans the floor at the same time.
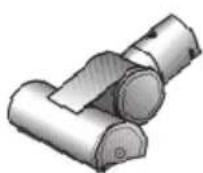
TURBO-UNIVERSAL brush for upholstery VZ46001
All-in-one brushing and vacuuming of upholstered furniture, mattresses, car seats, etc. Especially suitable for picking up pet hair. The brush roller is driven by the air flow through the vacuum cleaner.
No separate electrical connection is needed.
Readable and cleanable upholstery parts, when heavily soiled.
Power range
Power:
For cleaning upholstery with strong suction.
ΦHR. 10
PeryunipaneHa nooobataIIO3a:
a) 3a npaxon3cmykBaHe Ha Moketn
MOKETHNIPOOBNHaCTNJIKN = >
b) 3a npaxoHcMyKbaHe Ha
TBbPdN NOOBN HAcTNKN=


BHHMaHHe!
IIOOBNTE IIO3N B 3aBNCMOCT OT BnA TBbpA IOA (HaNP. rpaIaBn,pyCTNaAHN IAOUKN) Ce N3HOCBaT DO N3BeCTHa CTeTIeH. 3aTOBa Ha peoBHN INHTepBaN NOT BpeMe
Bne Tpr6Ba Da IIPOBepBAte Ib3raunTe ce qactn Ha 103ata. H3noceHN, IIb3raunCe qactn C ocTp n Pb6oBe MoTa Da IIpNCHHrYBpeXdAHN Bbpx CyBCTBHTeAHN TBbpN IOOBe KaTo NapKeT HAn AnHOJeM.
IPOH3BOADHTeAHT He POEMA OTROBOPHOCT 3a eBEHTyaAHN ΜEHT, KONTO CE TIPNUHBAAT OT N3HOCA IOOBA IIO3A.
Yetka "Turbo"
Ako BaWata npaxocmykaqka e cha6deHa c yeTa "Turbo", MoIa BIXKTe yka3aHn 3a n3PON3BaHTo n POnIbPjKaHTo B npINOxKeHIne yka3aHn 3a NaUnHa Ha noJ3BaHe.
Pnc.11xOu3cMyKBaHe cdoIbHHTeHH npHaJIeJXHOCTN.
IocTabete IIO3nte cnopei Baunite HuxkIn Bbpxy cmykaTeJIHATA Tp6a nn npkKaTa:
a)IIO3a 3aФугn 3a npaxoN3cMyKBaHe nO fуrgn Ibrn, nI np. b) IIO3a 3a TAnucepna 3a n3cMyKbaHe Ha npax ot TaNnucpaHn Me6eJI, 3aBeCN n dp.
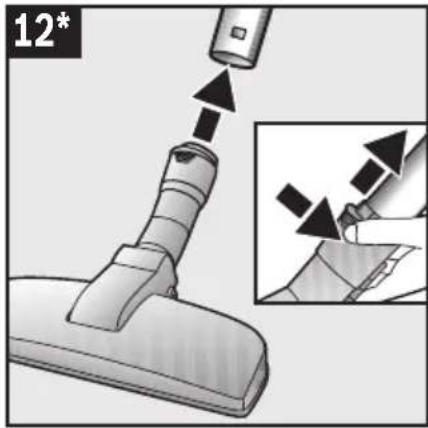
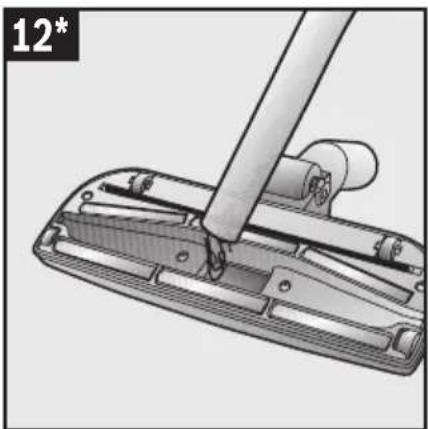
Fig. 12*
Nozzle for upholstery
To attach the nozzle for upholstery, insert the telescopic tube into the nozzle opening until it clicks. To release the connection, press the release button and pull out the tube. To remove the nozzle, simply pull it off with the help of the release button / telescopic tube.
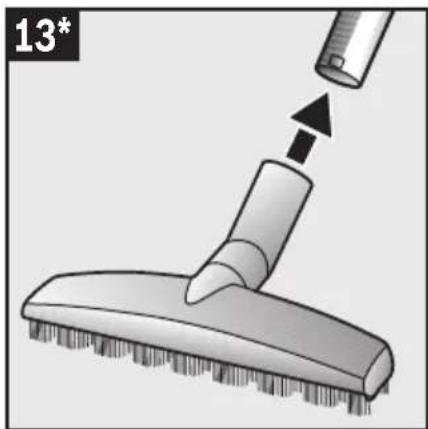
Fig. 13*
Nozzle for hard floors
To attach the hard floor nozzle (for parquet, laminate, etc.), insert the nozzle and the telescopic tube into each other.
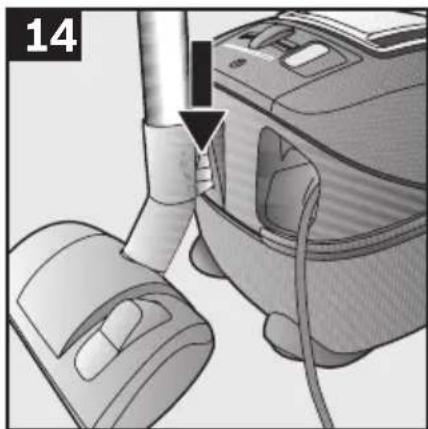
Fig. 14
For short pauses during vacuuming, you can use the parking aid on the rear side of the vacuum cleaner.
For this purpose, insert the hook of the floor nozzle into the recess on the rear side of the vacuum cleaner.
Maintenance
Fig. 15
Take the plug. Briefly press the cable rewind button and then release it. The cable winds up automatically.
Fig. 16
For parking / transporting the vacuum cleaner, you can use the parking aid on the bottom side of the vacuum cleaner. Place the vacuum cleaner in an upright position. Insert the hook of the floor nozzle into the recess on the bottom side of the device.
Filter replacement
The filter cartridge is dirty.
Fig. 17
If the installed filter cartridge is clogged, the maximum power of the appliance is reduced and the suction power is uneven. The filter cartridge must be replaced. To do this, you can do it without using any tools. In this case, the replacement is necessary due to the dirty filter material.
The filter cartridge, the suction hose, and the suction nozzles must not be blocked, as this would prevent the activation of the filter replacement indicator.
Fig. 18
To open the cover, turn the locking ring in the direction of the arrow.
Fig. 19
a) Remove the filter cartridge by turning it counterclockwise. b) Insert a new filter cartridge into the holder and close the cover of the dust container.
Attention: Close the cover only with a filter cartridge inserted.
Cleaning the motor protection filter
Clean the motor protection filter at regular intervals by tapping or brushing it!
Fig. 20*
Open the cover of the dust container (see Fig. 18). Remove the motor protection filter by pulling it in the direction of the arrow. Clean the motor protection filter by tapping it. In case of heavy soiling, wash the motor protection filter with water. Then let the filter dry for at least 24 hours. After cleaning, insert the motor protection filter back into the suction unit and close the cover of the dust container.
Cleaning the filter for the dust container
If your appliance is equipped with a filter frame for the dust container, the filter must be cleaned at regular intervals by tapping or brushing it!
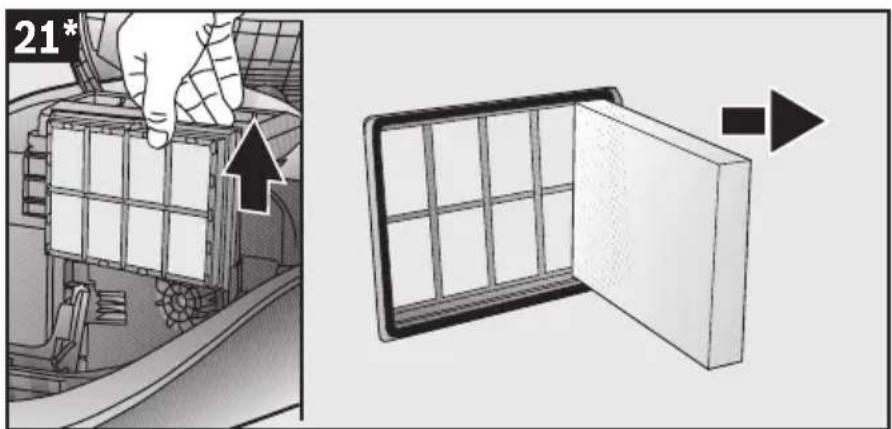
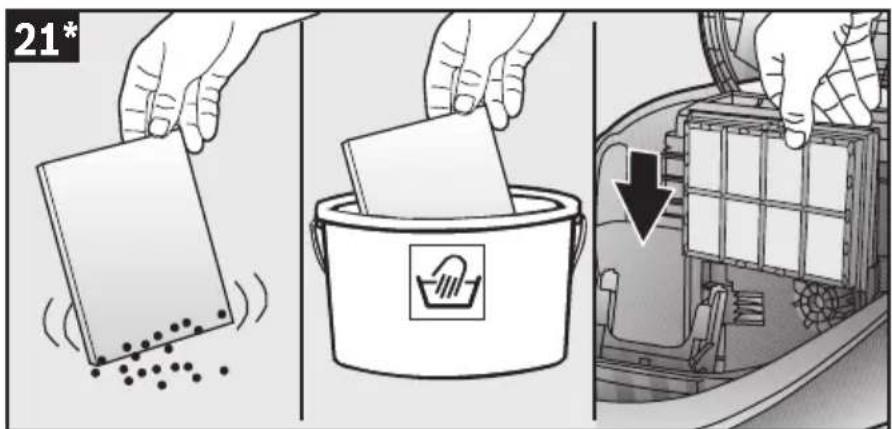
Fig. 21*
Open the lid of the dust compartment (see Fig. 18). Remove the filter frame from the foam material by pulling it in the direction of the arrow. Remove the filter from the foam material and insert it back through the opening. If the filter is heavily clogged, it should be cleaned. After cleaning, let the filter dry for at least 24 hours. After cleaning, insert the filter into the foam material frame, insert the frame with the filter into the appliance, and close the lid of the dust compartment.
Replacing the HEPA filter (protects the motor)
If your vacuum cleaner is equipped with a "HEPA" filter, it must be replaced once a year.
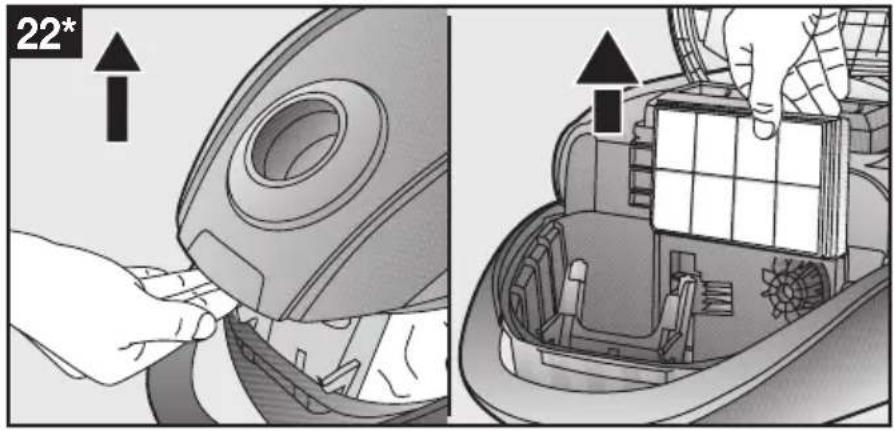
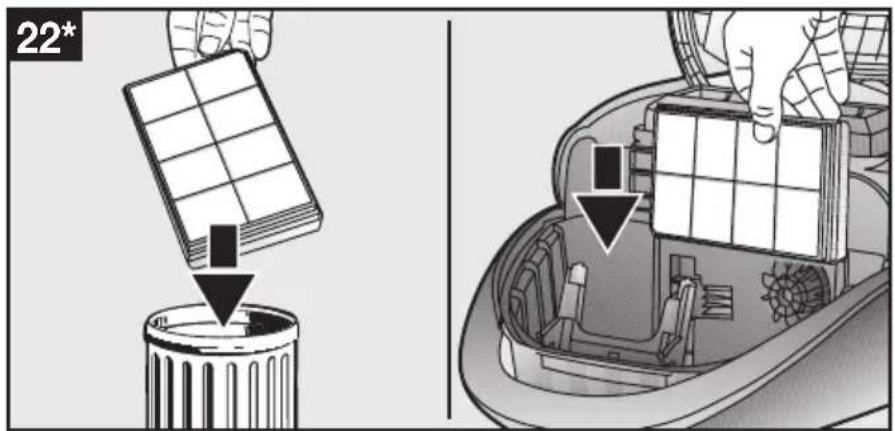
Fig. 22*
Open the lid of the dust compartment. Remove the HEPA filter by pulling it in the direction of the arrow and take it out of the appliance. Install the new HEPA filter and close the lid of the dust compartment. Caution: The vacuum cleaner must not be operated without the motor protection filter!
Replacing the exhaust filter
The exhaust filter of your vacuum cleaner must be replaced once a year.
Replacing the micro-hygienic filter
Fig. 23*
Open the lid of the dust compartment (see Fig. 18). Remove the filter holder by releasing the latch in the direction of the arrow. Remove the micro-hygienic filter from the filter holder. Install a new micro-hygienic filter into the filter holder. Insert the filter holder into the vacuum cleaner and secure it.
Replacing the "HEPA" filter
You can purchase a new filter through our service as a spare part with the following code: 574020
Fig. 24*
Open the lid of the dust compartment (see Fig. 18). Remove the "HEPA" filter by releasing the latch in the direction of the arrow and take it out of the vacuum cleaner (see Fig. 23). Install the new "HEPA" filter and secure it.
When cleaning the dust bag (e.g., on plaster, cement, etc.), clean the protective filter of the motor through suction. Replace the protective filter of the motor regularly.
Maintenance
Before cleaning the dust bag, the dust bag must be removed from the device. The dust bag and accessories made of plastic can be cleaned with a soft brush or a damp cloth.
Do not use cleaning agents, solvents, or universal cleaners.
Never immerse the dust bag in water.
If necessary, the motor protection filter can be cleaned with a second dust bag or simply wiped with a dry cloth for dust / dust brush.
Right to make technical changes reserved.
Special accessories
Replacement filter bag
Filter GXXL (VZ41AFGXXL) for optimal performance: GXXLplus (VZ41GXXLP)
Contents: 4 dust bags with closure device
1 micro-hygiene filter
http://www.dust-bag-siemens.com
HEPA filter VZ54000
Additional filter for cleaner air.
Replace this with the translated text. It is replaced annually.
Brush TURBO-UNIVERSAL VZ102TBB
Brushing and dust removal in one working operation. Can be used with furniture and upholstery.
Nozzles for all nozzles. Especially suitable for vacuuming animal hair.
The brush roller is driven by the suction air flow of the vacuum cleaner. It requires connection to the electrical mains.
Hard floor nozzle VZ123HD
For vacuuming dust from smooth floors (parquet, tiles, terracotta, etc.)
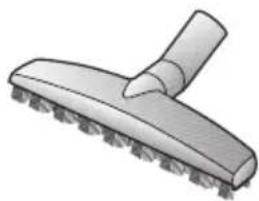
Spray nozzle VZ103WD
The nozzle is suitable for all types of hard floors and upholstery, such as parquet, laminate, dry wooden floors, stone floors, tiles, etc. (The pre-moistened cloth provides gentle wet cleaning of sensitive hard floors without any residue). Vacuuming coarse particles.
Moistening, and at the same time with the help of the attached cloth, the floor can be wiped wet.
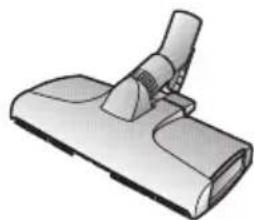
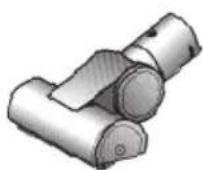
TURBO-UNIVERSAL ® - Brush for upholstery VZ46001
Brushing and vacuuming of soft furniture, mattresses, car seats, etc. in one working operation. Especially suitable for vacuuming animal hair.
The brush roller is driven by the suction air flow of the vacuum cleaner.
It requires connection to the electrical mains.
21 *
(1) 0. 1. 2.
124 4
y 1
4
15
y
1.5( 2.5) = 1
16
jlll Jlaai iSai ai jai jai
aiisoll Jwio gao gao
gagall jzj.
Jauuagaaa aai
A
1
jlaJ
17
J Laiy Jia 1
abgdo baa aag gail gall jae gaoaill
i 1
ailll jlll lgs gall aegg jg all
.
i
18
... + ω + 1
14
1
400 1
11
(a)
(b)
12*
y
Lolalilgall jyJy J
2.1gmm
J 1
yill llae baiol gll no sssall dll
jll 2gsslll gswall
y
aall / aagsslll sssll
13*
aaii
(a) y, g, g, g, g) 2
aagssssssssssssssssssssssssssssssssssssssssssssssssssssssssss
Loo
14
12 13 14 15 16 17 18 19 20
L4 : y = 3 θ = 1/2 θ = 1/2 ( θ - π /4)
aikll 1
6*
3
a 1
y
7
0
Jy jg jll yjgl. jll jll
s
1
8
0
1
p 1
#
9
0
p1iJyIggejllbeaillbuaaLxu
yj1
Jai
U
wlllglall
Jloll jie jillls
:
buiy
hugaiol 1jglbi
a 1
L 1
:
aill oaiyailgaiial
10*
0
mountain
(a)
0 <=
Sall
Therefore, in right triangle ABD:
three three <=
2.1.11
iis 1
g 1
C. {1,2,3} ↑, p,q ↓, r ↓
a
1.20 j1j
b
Ia Ie biai jialo syyuall dai. Lao ci
a a a a a a a a a a a a a
5
jlll lallls
10
40
Siemens 25
VSQ4
a 1
VQ4
10.2.3.4.5.6.7.8.9.10
y 1
Siemens
Kun

12
13
*jll 14
15
jilll 16
17
zkiollgogglc dcllwl 18
19
(2011) 20
*aai 21
22
zisso jolil jgill
2
3
4
5
9
10
11
Customer Service
DE Germany
AE United Arab Emirates
BSH Home Appliances FZE
Round About 13
Plot Nr MO-0532A
Jebel Ali Free Zone - Dubai
Tel.: 048814401
mailto:service-ua@bshg.com
www.siemens-home.ae
Republic of Albania
AERTECH SH.P.K.
Rr. Sami Frasheri
Pallati Avacionit te vjetar
Shkalla 1, Hyrja 2
Tirana
Tel.: 067 337 4106
Fax: 071 733 222
mailto:volina@ovi.com
HEATHERTON, Victoria 3202
Tel.: 1300 368 339
mailto:bshau-as@bshg.com
www.siemens-home.com.au
BA Bosnia-Herzegovina, Bosna i Hercegovina
"HIGH" d.o.o.
Gradačáčka 29b
71000 Sarajewo
Info-Line: 061 10 09 05
Fax: 033 21 35 13
mailto:delicnanda@hotmail.com
BE Belgique, Belgie, Belgium
BSH Home Appliances S.A.
European Trade Center Building, 5th floor
1784 Sofia
Tel.: 02 892 90 47
Fax: 02 878 79 72
mailto:informacia.servis-bg@bshg.com
bshg.com
www.siemens-home.bg
BH Bahrain,
Khalaifat Est.
P.O. Box 5111
Manama
Tel.: 017592233
mailto:service@khalaifat.com
BY Belarus, Belarus
LLC "BSH Household Appliances"
Tel.: 4957372962
mailto:mok-kdhl@bshg.com
CH Schweiz, Suisse,
www.siemens-home.com/ch
CY Cyprus, Kύπρος
BSH Ikiakes Syskeves-Service
39, Arh. Makaariou III Str.
2407 Egomi/Nikosia (Lefkosia)
Tel.:77 77 807
Fax:022658128
mailto:bsh.service.cyprus@
cytanet.com.cy
CZ Czech Republic
+17 snt/min (alv 23%)
FR France
BSH Electroménager S.A.S.
To arrange an engineer visit, to order spare parts and accessories or for product advice please visit: www.siemens-home.co.uk or call
Tel.: 0844 892 8999*
*Calls from a BT landline will be charged at up to 3 pence per minute. A call set-up fee of up to 6 pence may apply.
GR Greece, EAAac
BSH Ikiakes Siskeves A.B.E.
Central Branch Service
17 km E.O. Athinon-Lamias &
Potamou 20
14564 Kifisia
Unit 1 & 2, 3rd Floor
North Block, Skyway House
3 Sham Mong Road
Tai Kok Tsui, Kowloon
Hong Kong
Tel.: 2565 6151
Fax: 25656681
mailto:service.siemens@bshg.com
www.siemens-home.com.hk
HR Hrvatska, Croatia
BSH kućni uređaji d.o.o.
Kneza Branimira 22
10000 Zagreb
Tel.: 016403609
Fax: 016403603
mailto:informacije.servis-hr@bshg.com
bshg.com
www.siemens-home.com/hr
HU Magyarország, Hungary
www.siemens-home.com/hu
IE Republic of Ireland
BSH Home Appliances Ltd.
Unit F4, Ballymount Drive
Ballymount Industrial Estate
Walkinstown
Dublin 12
Service Requests, Spares and
Accessories
Tel.: 014502655
Fax: 014502520
www.siemens-home.com/ie
IL Israel,
C/S/B Home Appliance Ltd.
Uiel Building
- Hamelacha St.
Industrial Park North
71293 Lod
Tel: 089777222
Fax: 089777245
mailto:csb-serv@zahav.net.il
www.siemens-home.com.il
IN India, Bharat,
BSH Customer Service
Front Office
Shop No.4, Everest Grande,
Opp. Shanti Nagar Bus Stop,
Mahakali Caves Road,
Andheri East
Mumbai 400 093
IS Iceland
Smith & Norland hf.
Noatuni 4
105 Reykjavik
Tel.: 0520 3000
Fax: 0520 3011
www.sminor.is
IT Italia, Italy
www.siemens-home.com/it
KZ Kazakhstan, Kazakhstan
IP "Batkayev Ildus A."
B. Momysh-uly Str. 7
Chymkent 160018
Tel./Fax: 0252 31 00 06
mailto:evrika_kz@mail.ru
LB Lebanon,
Tehaco s.a.r.l
Boulevard Dora 4043 Beyrouth
P.O.Box 90449
Jdeideh 1202 2040
Tel.01255211
mailto:Info@Teheni-Hana.com
LT Lietuva, Lithuania
Baltic Continent Ltd.
Lukso g. 23
09132 Vilnius
Tel.:052741788
Fax:052741765
mailto:info@balticcontinent.It
www.balticcontinent.lt
LU Luxembourg
General Serviss Limited
Bullu street 70c
1067 Riga
Tel.: 07424137
mailto:bt@olimpeks.lv
Elkor Serviss
Brivibas gatve 201
1039 Riga
Tel.: 067 0705 20; -36
Fax: 067 0705 24
mailto:domoservice@elkor.lv
www.servisacentrs.lv
MD Moldova
S.R.L. Rialto-Studio
str. Lycceba 98
2012 Chisinau
Tel./Fax: 022 23 81 80
ME Crna Gora, Montenegro
Elektronika komerc
Ul. 27 Mart br. 2
81000 Podgorica
Tel./Fax: 020 662 444
Mobil: 069324812
11/12
MK Macedonia, Makeonna
GORENEC
Jane Sandanski 69 lok.3
1000 Skopje
Tel.: 022 454 600
Mobil: 070697463
mailto:gorenec@yahoo.com
MT Malta
Aplan Limited
The Atrium
Mriehel by Pass
BKR3000 Birkirkara
Tel.: 025495122
Fax:021480598
mailto:lapap@aplan.com.mt
NL Netherlands
www.siemens-home.com/pt
RO Romania
BSH Electrocasnice srl.
Sos. Bucuresti-Ploiesti,
nr. 19-21, sect. 1
13682 Bucuresti
Tel.: 021 203 9748
Fax: 021 203 9733
mailto:service.romania@bshg.com
www.siemens-home.com/ro
RU Russia, Россия
ООО "БСХ Бытовые Техника"
Сервис от производителя
Магат Капуская 19/1
119071 Москва
Тел.: 495 737 2962
mailto:mok-kdl@bshg.com
www.siemens-home.com/ru
SE Sweden, Sweden
BSH Home Appliances AB
Landsvägen 32
169 29 Solna
Tel: 0771112277
mailto: Siemens-Service-SE@
bshg.com
www.siemens-home.se
SG Singapore, 新加坡
BSH Home Appliances Pte. Ltd.
37 Jalan Pemimpin
Union Industrial Building
Block A, #01-03
577177 Singapore
Tel: 67515000
Fax: 67515050
mailto: bshsgp.service@bshg.com
SI Slovenija, Slovenia
BSH Hišni aparati d.o.o.
Litostrojska 48
1000 Ljubljana
Tel.: 015830700
Fax:015830889
www.siemens-home.com/tr
UA Ukraine, Ukraine
TOB "5CX NóbyToBa TexHika"
Tel.: 044 4902095
www.siemens-home.com.ua
US United States of America
BSH Home Appliances Corporation
1901 Main Street, Suite 600
Irvine, CA, 92614
Tel.: 866 447 4363
Fax:7149015360
mailto:HTB-Questions@
bshg.com
www.siemens-home.com
XK Kosovo
NTP GAMA
Rruga Mag Prishtine-Ferizaj
70000 Ferizaj
Tel.: 0290321434
Tel.: 0037744172309
mailto:a_service@
gama-electronics.com
XS Srbija, Serbia
BSH Kućni aparati d.o.o.
Milutina Milankovica 11a
11070 Novi Beograd
Tel.: 011 205 23 97
Fax: 011 205 23 89
mailto:informacije.servis-sr@
bshg.com
www.siemens-home.rs
For South Africa
BSH Home Appliances (Pty) Ltd.
15th Road Randjespark
Private Bag X36, Randjespark
1685 Midrand-Johannesburg
Tel.: 086 002 6724
Fax: 086 617 1780
mailto:applianceserviceza@
bshg.com
www.siemens-home.com
GB Conditions of guarantee
For this appliance the guarantee conditions as set out by our representatives in the country of sale apply. Details regarding same may be obtained from the dealer from whom the appliance was purchased. For claims under guarantee the sales receipt must be produced.
FR Conditions de garantie
This appliance is labelled in accordance with European Directive 2012/19/EU concerning used electrical and electronic appliances (waste electrical and electronic equipment - WEEE). The guideline determines the framework for the return and recycling of used appliances as applicable throughout the EU.