
HMB5051 - Built-in oven BOSCH - Free user manual and instructions
Find the device manual for free HMB5051 BOSCH in PDF.

| Product Type | Built-in microwave oven |
| Brand | Bosch |
| Model | HMB5051 |
| Appliance dimensions (W x H x D) | 28.5 x 19.9 x 16.5 inches (724 x 505 x 419 mm) |
| Recommended cutout dimensions | Width 28.5 in (724 mm), Height 19.9 in (505 mm), Minimum depth 21 in (533 mm) |
| Weight | Approximately 27 kg (60 lb) |
| Electrical supply | 120 V, 60 Hz, 15 A, grounded |
| Microwave power | Approximately 1000 W |
| Capacity | Approximately 1.5 cu ft (42 L) |
| Main functions | Microwave cooking, automatic defrost, reheating, timer, child lock |
| Cavity material | Stainless steel |
| Cleaning and maintenance | Clean with a damp cloth and mild detergent. Do not use abrasive products on the trim. |
| Safety | Child safety lock, automatic shutoff, mandatory grounding |
| Installation | Built-in alone or above a Bosch oven. Requires a specific trim kit. |
| Spare parts and repairability | Parts available via Bosch. Repair by an authorized technician. |
| General information | Compliant with UL and CSA standards. Limited warranty included. |
Frequently Asked Questions - HMB5051 BOSCH
User questions about HMB5051 BOSCH
0 question about this device. Answer the ones you know or ask your own.
Ask a new question about this device
Download the instructions for your Built-in oven in PDF format for free! Find your manual HMB5051 - BOSCH and take your electronic device back in hand. On this page are published all the documents necessary for the use of your device. HMB5051 by BOSCH.
USER MANUAL HMB5051 BOSCH
Trim Kit Models: HMT
HMB5050, HMB5051, HMB5060, HMB5061, HMT5051,
HMT5751, HMT5061

BOSCH
Invented for life
natural_image
Modern kitchen interior with marble flooring, stainless steel appliances, and large windows (no visible text or symbols)Table of Contents
Safety Definitions 3
IMPORTANT SAFETY INSTRUCTIONS .... 4
Appliance Handling Safety 4
Safety Codes and Standards 4
State of California Proposition 65 Warnings .... 4
Electric Safety 4
GROUNDING INSTRUCTIONS 4
Related Equipment Safety 5
Before You Begin 6
Trim Kits 6
Combination with Wall Ovens 6
Tools and Parts Needed 6
Parts Included 7
Power Requirements 7
Cabinet Cutout Dimensions 8
Outlet Area 8
Install Appliance 9
Prepare the Appliance 9
Prepare Cabinet Cutout 10
Connect to Electricity and Install the Appliance ..... 11
Bosch® Support 12
Before Calling Service 12
Data Plate 12
Service 12
Parts and Accessories 12
Questions?
1-800-944-2904
www.bosch-home.com
1901 Main Street, Suite 600
Irvine, CA 92614
We look forward to hearing from you!
Safety Definitions
WARNING
This indicates that death or serious injuries may occur as a result of non-observance of this warning.
CAUTION
This indicates that minor or moderate injuries may occur as a result of non-observance of this warning.
NOTICE: This indicates that damage to the appliance or property may occur as a result of non-compliance with this advisory.
Note: This alerts you to important information and/or tips.
IMPORTANT SAFETY INSTRUCTIONS
READ AND SAVE THESE INSTRUCTIONS
INSTALLER: LEAVE THESE INSTRUCTIONS WITH THE APPLIANCE AFTER INSTALLATION IS COMPLETE. IMPORTANT: SAVE THESE INSTRUCTIONS FOR THE LOCAL ELECTRICAL INSPECTOR'S USE.
WARNING
If the information in this manual is not followed exactly, fire or shock may result causing property damage or personal injury.
WARNING
Do not repair, replace or remove any part of the appliance unless specifically recommended in the manuals. Improper installation, service or maintenance can cause injury or property damage. Refer to this manual for guidance. All other servicing should be done by a qualified technician.
Appliance Handling Safety
Unit is heavy; two people or proper equipment may be needed to move it.
Do not lift appliance by door handle.
Hidden surfaces may have sharp edges. Use caution when reaching behind or under appliance.
CAUTION
Wear gloves to avoid cutting fingers on sharp edges during installation.
Safety Codes and Standards
This appliance complies with the latest version of one or more of the following standards:
• CAN/CSA C22.2 No. 61 - Household Cooking Ranges
• UL 858 - Household Electric Ranges
• CAN/CSA C22.2 No. 150 - Microwave Ovens
• UL 923 - Microwave Cooking Appliances
• UL 507 - Electric Fans
• CAN/CSA C22.2 No. 113 - Fans and Ventilators
- CSA C22.2 No. 64 - Household Cooking and Liquid-Heating Appliances
- UL 1026 - Electric Household Cooking and Food Serving Appliances
It is the responsibility of the owner and the installer to determine if additional requirements and/or standards apply to specific installations.
State of California Proposition 65 Warnings
WARNING
This product contains chemicals known to the State of California to cause cancer, birth defects or other reproductive harm.
Electric Safety
WARNING
Before you plug in an electrical cord or turn on power supply, make sure all controls are in the OFF position.
For appliances equipped with a cord and plug, do not cut or remove the ground prong. It must be plugged into a matching grounding type receptacle to avoid electrical shock. If there is any doubt as to whether the wall receptacle is properly grounded, the customer should have it checked by a qualified electrician.
If required by the National Electrical Code (or Canadian Electrical Code), this appliance must be installed on a separate branch circuit.
Installer – show the owner the location of the circuit breaker or fuse. Mark it for easy reference.
Before installing, turn power OFF at the service panel. Lock service panel to prevent power from being turned ON accidentally.
Be sure your appliance is properly installed and grounded by a qualified technician. Installation, electrical connections and grounding must comply with all applicable codes.
GROUNDING INSTRUCTIONS
This appliance must be grounded. Grounding reduces the risk of electric shock by providing a safe pathway for electric current in the event of a short circuit.
This appliance is equipped with a cord having a grounding wire with a grounding plug. The plug must be plugged into an outlet that is properly installed and grounded.
WARNING
Improper grounding can result in a risk of electric shock. Consult a qualified electrician if the grounding instructions are not completely understood, or if doubt exists as to whether the appliance is properly grounded. Do not use an extension cord. If the power supply cord is too short, have a qualified electrician install an outlet near the appliance.
IMPORTANT SAFETY INSTRUCTIONS
READ AND SAVE THESE INSTRUCTIONS
Related Equipment Safety
Remove all tape and packaging before using the appliance. Destroy the packaging after unpacking the appliance. Never allow children to play with packaging material.
Never modify or alter the construction of the appliance. For example, do not remove leveling legs, panels, wire covers or anti-tip brackets/screws.
Before You Begin
Trim Kits
WARNING
- Trim kits are designed for use only with the Bosch microwave oven models listed in table, do not alter or modify any part of this kit or oven.
- Unit is heavy and may require at least two people to lift or move.
Trim Kits Microwave Ovens
| 30" Cabinet HMT5051 HMB5050 | |
| HMB5051 | |
| HMT5061 HMB5060 | |
| HMB5061 | |
| 27" Cabinet HMT5751 HMB5050 | |
| HMB5051 | |
Combination with Wall Ovens
Your microwave oven can be installed into a cabinet or wall by itself or above any Bosch wall oven.
WARNING
To reduce the risk of fire and electric shock, install microwave at least 3/4" above designated oven.
Tools and Parts Needed
• Philips head screwdriver
• Torx screwdriver (T-20)
• 1/16" drill bit and drill
- Measuring tape
- Pliers
- Scissors
Parts Included
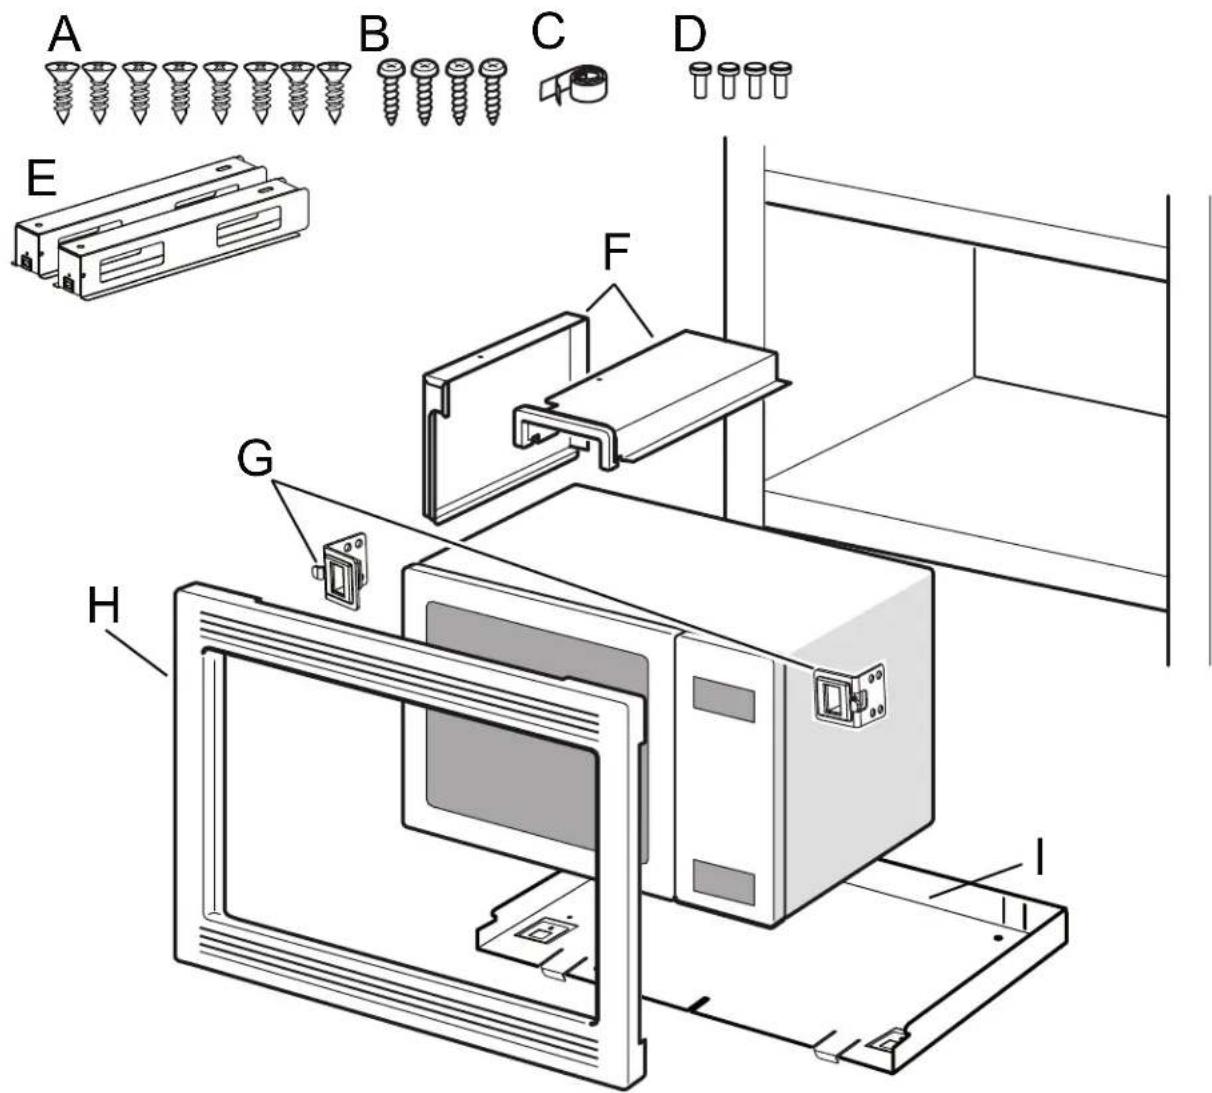
Parts included
| A Philips flat head screws (8) |
| B Torx pan head screws (4) |
| C Adhesive tape |
| D Torx head bolts (4) |
| E Base Supports (2) |
| F Air Ducts (2) |
| G Cabinet Fixing Brackets (2) |
| H Faceplate |
| I Baseplate |
Power Requirements
The outlet must be properly grounded in accordance with all applicable codes.
It can be installed in the back wall directly behind the appliance.
Electrical specifications: refer to the manual accompanying the microwave you purchased for specific wiring requirements.
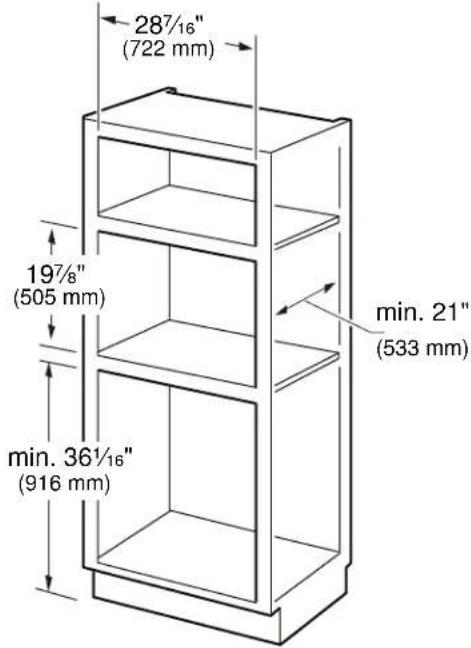
Cabinet Cutout Dimensions
Instructions are based on standard American cabinets.
27" Appliances
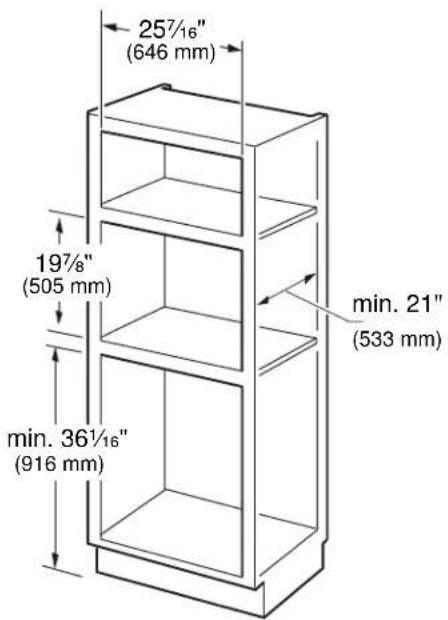
30" Appliances
Outlet Area
The outlet can be located anywhere within the shaded area.
27" Appliances
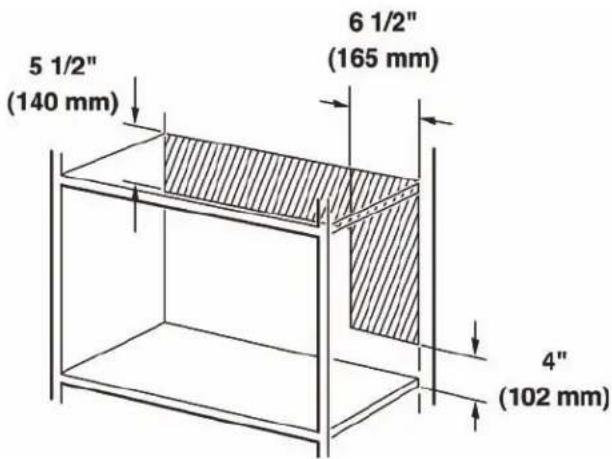
30" Appliances

Install Appliance
Prepare the Appliance
Prepare the appliance according to figures 1-7.
1
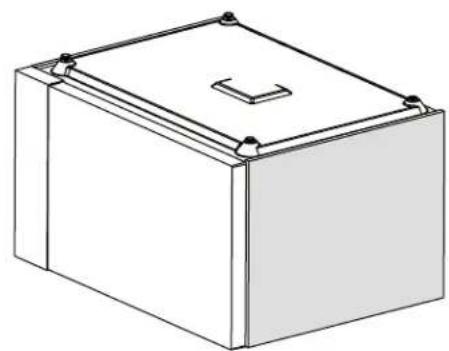
natural_image
3D line drawing of a rectangular box with a lid and mounting holes (no text or symbols)Using pliers, rotate as you pull out to remove the plastic microwave feet.
2
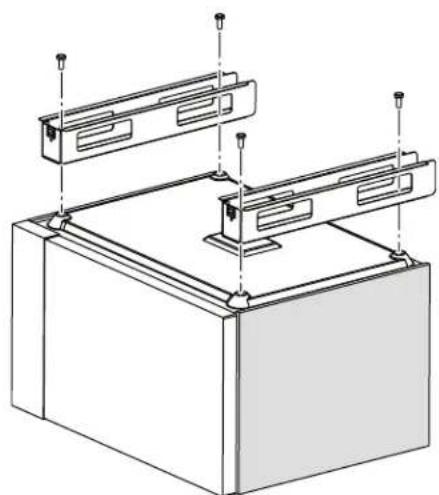
natural_image
Technical line drawing of a mechanical assembly with mounting brackets and mounting holes (no text or symbols)Attach base supports (E) with Torx pan head bolts (D).
3
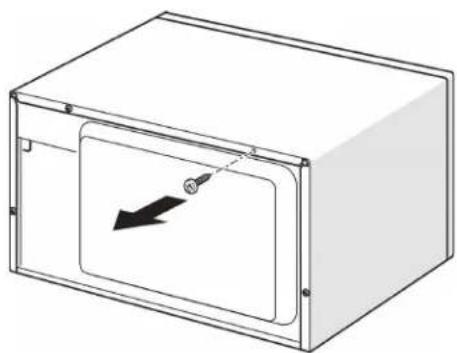
natural_image
Diagram of a rectangular device with a black arrow pointing to a circular component, no text or symbols present.Remove and save this T-20 Torx screw for air duct installation.
4
natural_image
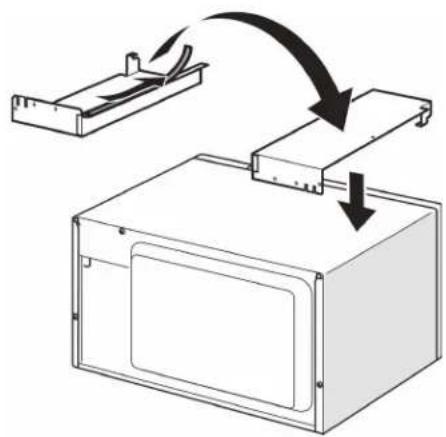
Diagram showing airflow or heat transfer from a device into a microwave oven (no text or symbols)Add tape (C) to air duct (F) and attach to Microwave, being careful to align screw hole from Fig. 3.
5
natural_image
Technical line drawing of a mechanical device with a central component and directional arrow (no text or symbols)Secure top air duct with T-20 Torx screw removed in Fig. 3.
natural_image
Diagram of a device with a curved arrow indicating flow or movement, showing internal components and directional arrows (no text or symbols)Add tape (C) to side air duct (F) and attach to microwave, being careful to align screw holes in top and rear of side air duct (F) with holes in top air duct (F).
natural_image
Technical diagram of a mechanical device with directional arrows indicating movement or force (no text or symbols present)Secure side air duct (F) to top air duct (F) using two T-20 Torx pan head bolts (B).
Prepare Cabinet Cutout
Prepare cabinet cutout according to figures 8-10.
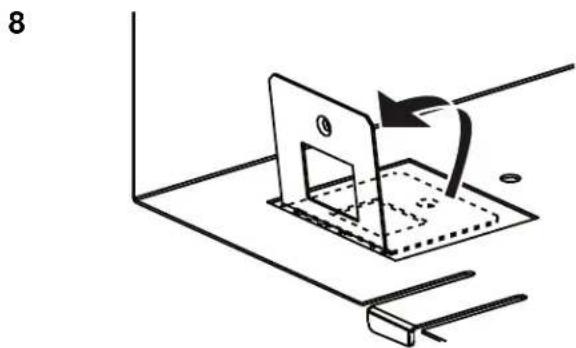
natural_image
Diagram of a mechanical device with a rotating arrow and base, no text or symbols presentFold up baseplate tabs to approximately 95 degrees.
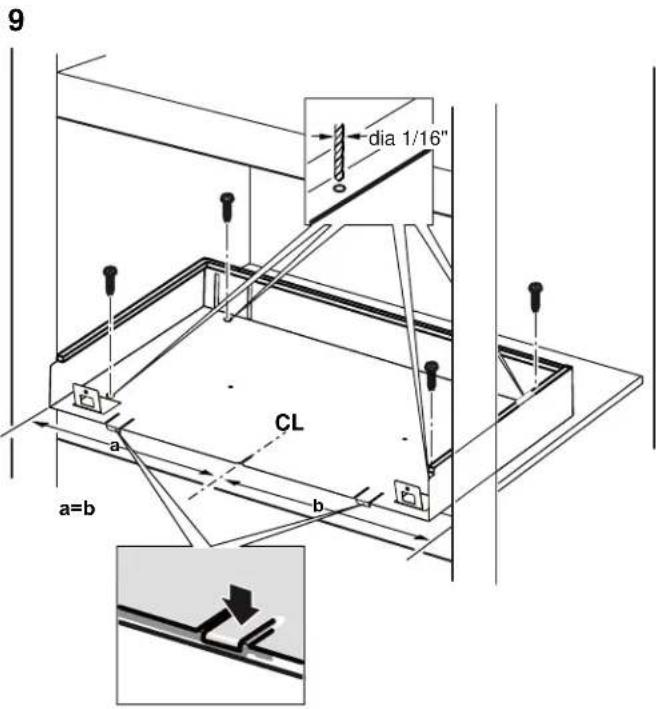
Align baseplate (I) with two tabs as shown and a center line drawn or scribed on the cabinet bottom and visible in center front slot.
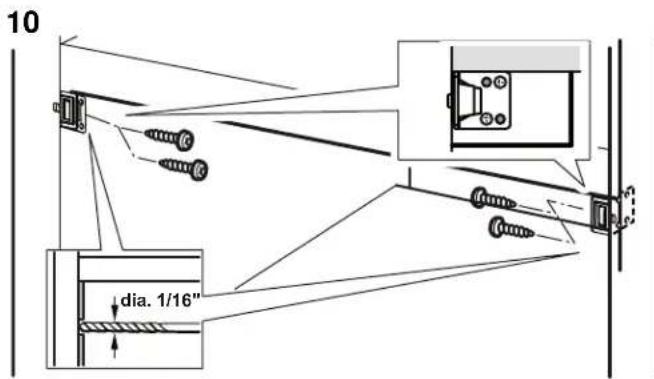
Drill pilot holes and attach cabinet fixing brackets (G) using two phillips flat head screws each side.
Note: A block of wood may need to be added behind the cabinet front, flush with the cabinet opening, to secure the bracket.
Connect to Electricity and Install the Appliance
Note: Two people may be needed for this installation.
11
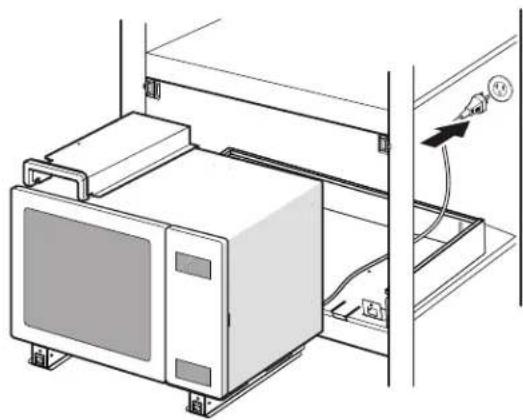
natural_image
Technical line drawing of a microwave oven mounted on a rack, with a control panel and power outlet (no text or symbols)Insert plug into three-prong, grounded outlet according to Figure 11. See "Power Requirements" in the section "Before you begin" for electrical specifications.
12
natural_image
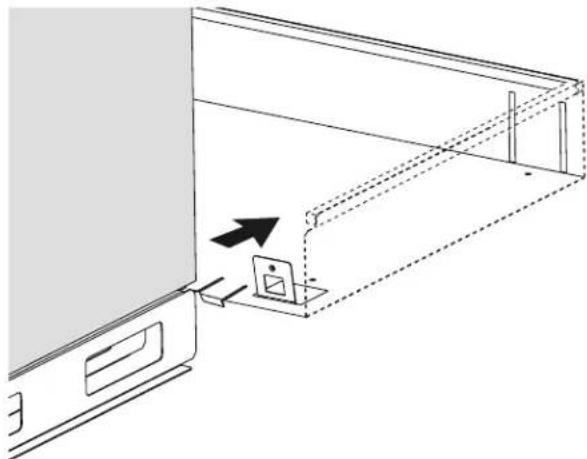
Diagram of a door panel with an open door and a close-up view showing a device (no text or symbols present)Slide the unit back so that the base supports fit over the baseplate tabs and align with the slots in the rear of the baseplate.
13
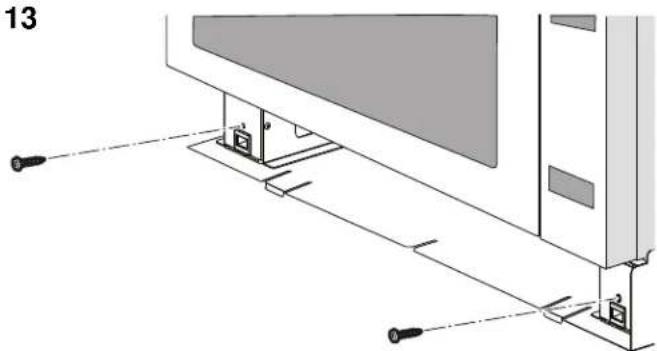
natural_image
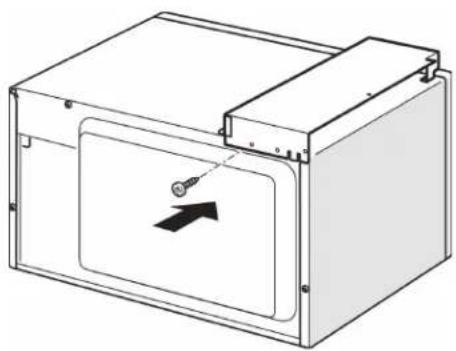
Technical diagram showing a mechanical assembly with mounting brackets and a vertical panel (no text or symbols)Secure Microwave in cutout by using two T-20 Torx pan head screws (B) to connect base supports (E) to base-plate (I).
14

natural_image
Diagram of a computer monitor with an open panel and directional arrow indicating orientation (no text or symbols)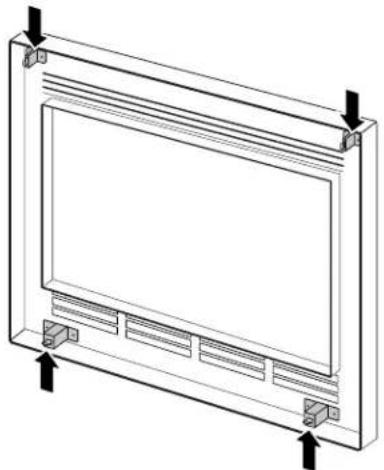
natural_image
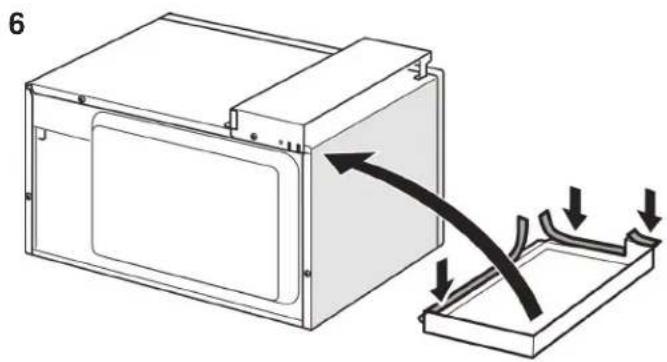
Technical line drawing of a rectangular frame with internal compartments and mounting points (no text or symbols)Note: Trim Kit attachment latches are vertical on top and horizontal on the bottom of the Trim Kit.
15
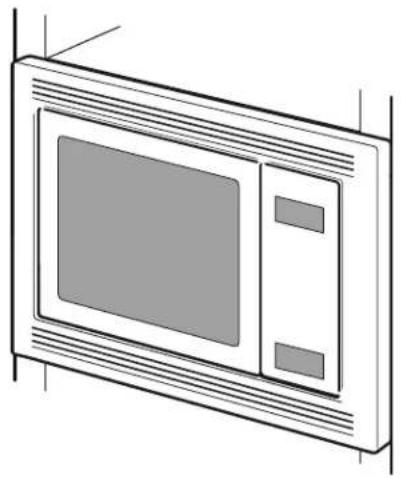
natural_image
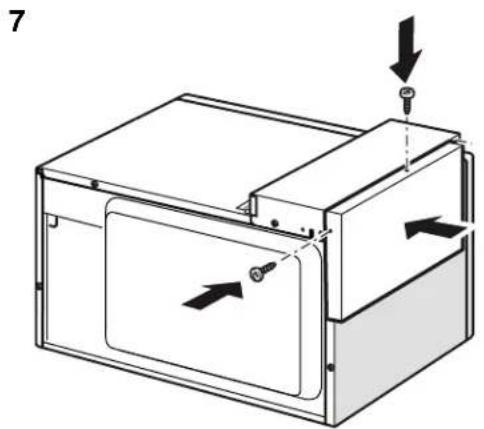
Line drawing of a microwave oven with front panel and side door (no text or symbols)WARNING
Refer to Use and Care manual for safety instructions prior to use of microwave.
Notes
- Now the installation is complete. Turn the breaker back on and test the microwave clock and operation functions.
- Do NOT clean decorative trim with abrasive cleaners.
Bosch® Support
Before Calling Service
See the Use and Care Manual for troubleshooting information. Refer to the "Statement of Limited Product Warranty" in the Use and Care Manual.
To reach a service representative, see the contact information at the front of the manual. Please be prepared with the information printed on your product data plate when calling.
Data Plate
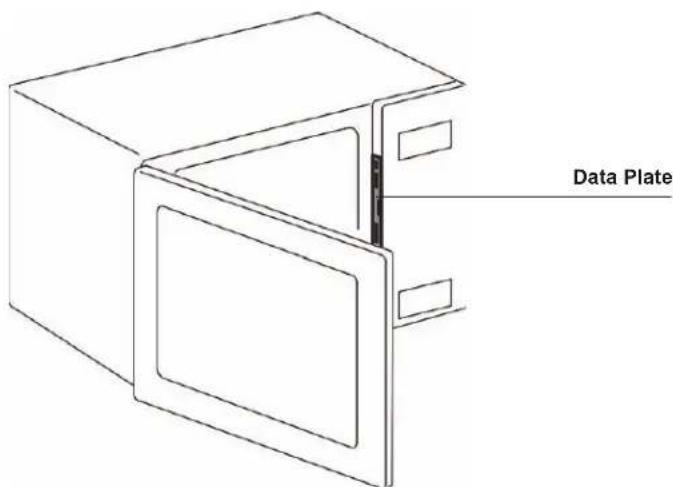
Keep your invoice or escrow papers for warranty validation if service is needed.
Service
We realize that you have made a considerable investment in your kitchen. We are dedicated to supporting you and your appliance so that you have many years of creative cooking.
Please don't hesitate to contact our Customer Support Department if you have any questions or in the unlikely event that your Bosch® appliance needs service. Our service team is ready to assist you.
USA
800-944-2904
www.bosch-home.com/us/support
Canada
800-944-2904
www.bosch-home.ca/en/support
Parts and Accessories
Parts, filters, descalers, stainless steel cleaners and more can be purchased in the Bosch® eShop or by phone.
USA
www.bosch-home.com/us/store
Canada
Marcone 800-482-6022
or
Reliable Parts 800-941-9217
Table de Matières
1901 Main Street, Suite 600
Irvine, CA 92614
Pièces incluses
E Supports de base (2)
F Conduit d'air (2)
natural_image
3D line drawing of a rectangular box with a lid and mounting holes (no text or symbols)natural_image
Technical line drawing of a rectangular appliance with mounting brackets and mounting holes (no text or symbols)natural_image
Diagram of a rectangular device with a black arrow pointing to a circular component, no text or symbols present.natural_image
Diagram showing a device being processed into a microwave oven, with arrows indicating process flow (no text or symbols present)natural_image
Technical line drawing of a mechanical device with a central component and directional arrow (no text or symbols)natural_image
Diagram of a device with a curved arrow indicating flow or movement, showing internal components and directional arrows (no text or symbols)natural_image
Technical diagram of a mechanical device with arrows indicating movement or force, no text or symbols presentnatural_image
Diagram of a mechanical device with a rotating arrow and base, no text or symbols presentnatural_image
Technical line drawing of a microwave oven mounted on a rack, with a pressure gauge attached (no text or symbols)natural_image
Diagram of a device panel with an arrow indicating direction, showing internal components and connection lines (no text or symbols)natural_image
Technical diagram showing a mechanical assembly with mounting brackets and a vertical panel (no text or symbols)natural_image
Diagram of a computer monitor with an open panel and directional arrow indicating orientation (no text or symbols)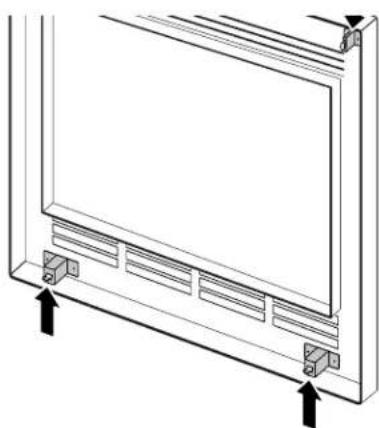
natural_image
Technical line drawing of a rectangular panel with mounting brackets and arrows indicating assembly or alignment (no text or symbols)natural_image
Line drawing of a microwave oven with control panel and door (no text or symbols)[NO TEXT]
AVERTISSEMENT
www.bosch-home.com/us/support
Canada
800-944-2904
www.bosch-home.ca/en/support
www.bosch-home.com/us/store
Canada
Marcone 800-482-6022
ou
Reliable Parts 800-941-9217
Contenido
1901 Main Street, Suite 600
Irvine, CA 92614
Partes incluidos
natural_image
3D line drawing of a rectangular box with a lid and mounting holes (no text or symbols)natural_image
Technical line drawing of a rectangular appliance with mounting brackets and mounting holes (no text or symbols)natural_image
Diagram of a rectangular device with a black arrow pointing to a circular component, no text or symbols present.natural_image
Diagram showing a device being processed into a microwave oven, with arrows indicating process flow (no text or symbols present)natural_image
Technical line drawing of a mechanical device with a central component and directional arrow (no text or symbols)natural_image
Diagram of a device with a curved arrow indicating flow or movement, showing internal components and directional arrows (no text or symbols)natural_image
Technical diagram of a mechanical device with arrows indicating movement or force, no text or symbols presentnatural_image
Diagram showing a mechanical device with an arrow indicating rotation, no text or symbols presentnatural_image
Technical line drawing of a microwave oven mounted on a shelf, with a hanging control panel and cable outlet (no text or symbols)natural_image
Diagram of a door panel with an arrow indicating direction, showing internal components and a small icon (no text or symbols)natural_image
Technical diagram showing a mechanical assembly with mounting brackets and alignment indicators (no text or symbols)natural_image
Diagram of a computer monitor with an open screen and directional arrow, no text or symbols present
natural_image
Technical line drawing of a window frame with mounting brackets and directional arrows indicating assembly or placement (no text or symbols)natural_image
Line drawing of a microwave oven with front panel and side door (no text or symbols)
ADVERTENCIA
www.bosch-home.com/us/support
Canadá
800-944-2904
www.bosch-home.ca/en/support
Piezas y accesorios
www.bosch-home.com/us/store
Canadá
Marcone 800-482-6022
0
Reliable Parts 800-941-9217

9000999546
05/14

BOSCH
Invented for life
1901 Main Street, Suite 600 • Irvine, CA 92614 • 800-944-2904
www.bosch-home.com • © 2012 BSH Home Appliances


- Table of Contents
- Safety Definitions 3
- IMPORTANT SAFETY INSTRUCTIONS .... 4
- Before You Begin 6
- Install Appliance 9
- Bosch® Support 12
- Safety Definitions
- WARNING
- CAUTION
- IMPORTANT SAFETY INSTRUCTIONS
- READ AND SAVE THESE INSTRUCTIONS
- Appliance Handling Safety
- Safety Codes and Standards
- State of California Proposition 65 Warnings
- Electric Safety
- GROUNDING INSTRUCTIONS
- Related Equipment Safety
- Before You Begin
- Trim Kits
- Combination with Wall Ovens
- Tools and Parts Needed
- Parts Included
- Power Requirements
- Cabinet Cutout Dimensions
- Outlet Area
- Install Appliance
- Prepare the Appliance
- Prepare Cabinet Cutout
- Connect to Electricity and Install the Appliance
- Notes
- Bosch® Support
- Before Calling Service
- Service
- USA
- Canada
- Parts and Accessories
- Table de Matières
- Pièces incluses
- AVERTISSEMENT
- Contenido
- Partes incluidos
- ADVERTENCIA
- Canadá
- Piezas y accesorios
Brand : BOSCH
Model : HMB5051
Category : Built-in oven