
Sherpa 100AC - Phone charger GOAL ZERO - Free user manual and instructions
Find the device manual for free Sherpa 100AC GOAL ZERO in PDF.
| Product Type | Smartphone charger and external battery with inverter |
| Brand | Goal Zero |
| Model | Sherpa 100AC |
| Dimensions | 19 × 2.54 × 14.4 cm |
| Weight | 898 g |
| Battery Type | Li-ion NMC (18650 LG Chem) |
| Battery Capacity | 25600 mAh @ 3.7 V |
| USB-C PD Input | 5V/9V/12V/15V/20V, up to 3A (60W max) |
| Solar Input (DC 8mm) | 14-22V, 50W max |
| USB-A Output | 2 ports, 5V/2.4A (12W max) each |
| USB-C PD Output | 2 bidirectional ports, 5V/9V/12V/15V/20V, up to 3A (60W max each, total 100W) |
| Qi Wireless Output | 5W max |
| AC Output (Inverter) | 100W, modified sine wave, 110V (USA) or 220V (International) |
| Charge Time (USB-C PD 60W) | Approximately 2.5 hours |
| Charge Time (Wall Charger 45W) | Approximately 3 hours |
| Charge Time (USB-A 2.4A) | Approximately 9 hours |
| Charge Time (Solar Nomad 28) | 7 to 14 hours |
| Battery Life Cycles | Several hundred cycles |
| Operating Temperature | 0 to 40 °C |
| Warranty | 12 months |
| Main Functions | Charging smartphones, tablets, laptops, USB and AC devices |
| Maintenance | Keep clean and dry, do not expose to moisture |
| Safety | Overvoltage, overheating, short-circuit protection |
| Spare Parts | Contact Goal Zero customer service |
Frequently Asked Questions - Sherpa 100AC GOAL ZERO
User questions about Sherpa 100AC GOAL ZERO
0 question about this device. Answer the ones you know or ask your own.
Ask a new question about this device
Download the instructions for your Phone charger in PDF format for free! Find your manual Sherpa 100AC - GOAL ZERO and take your electronic device back in hand. On this page are published all the documents necessary for the use of your device. Sherpa 100AC by GOAL ZERO.
USER MANUAL Sherpa 100AC GOAL ZERO
Make sure your Goal Zero Sherpa 100AC is fully charged before using or storing. Keep your Goal Zero Sherpa 100AC plugged in when not in use.
IMPORTANT NOTE: When solar recharging your Sherpa 100AC, take note of the voltages of the solar panels and do not exceed 22V. Individual solar panels, or solar panels chained in series in excess of 22V cannot be used with the Goal Zero Sherpa 100AC and can cause serious damage to the unit. For help on chaining solar panels, call our Customer Solutions Center at 888-794-6250.

IMPORTANT SAFETY INSTRUCTIONS

Read all instructions and cautions carefully before use to avoid personal injury or damage to the unit and any connected products
Observe all Input/Output connectors ratings: To avoid fire or electrical shock hazard, observe all ratings on unit, and products you intend to use; check manuals for more information.
Use in a ventilated area: Ensure proper ventilation while in use and do not obstruct fan openings on unit. Inadequate ventilation may cause damage to the unit. During storage do not stack anything on top of unit.
DO NOT operate in wet conditions: In order to avoid short circuits or electric shock do not allow unit to get wet. Let unit dry completely before using.
Keep the unit clean and dry: Inspect the unit for dirt, dust, or moisture on a regular basis.
Shock or Fire Hazard: This Sherpa 100AC generates the same potentially lethal AC power as a normal household wall outlet. Please use it carefully just like using a normal AC outlet on the wall.
DO NOT insert foreign objects into outputs or ventilation holes.
Any manipulation to the unit or its components will void all warranties.
Table of Contents
Get To Know Your Gear 2-3
Charging Your Sherpa 4
Using Your Sherpa 5-11
Troubleshooting 12-14
Technical Specifications 15
François 16
Deutsch 30
Espanol 44
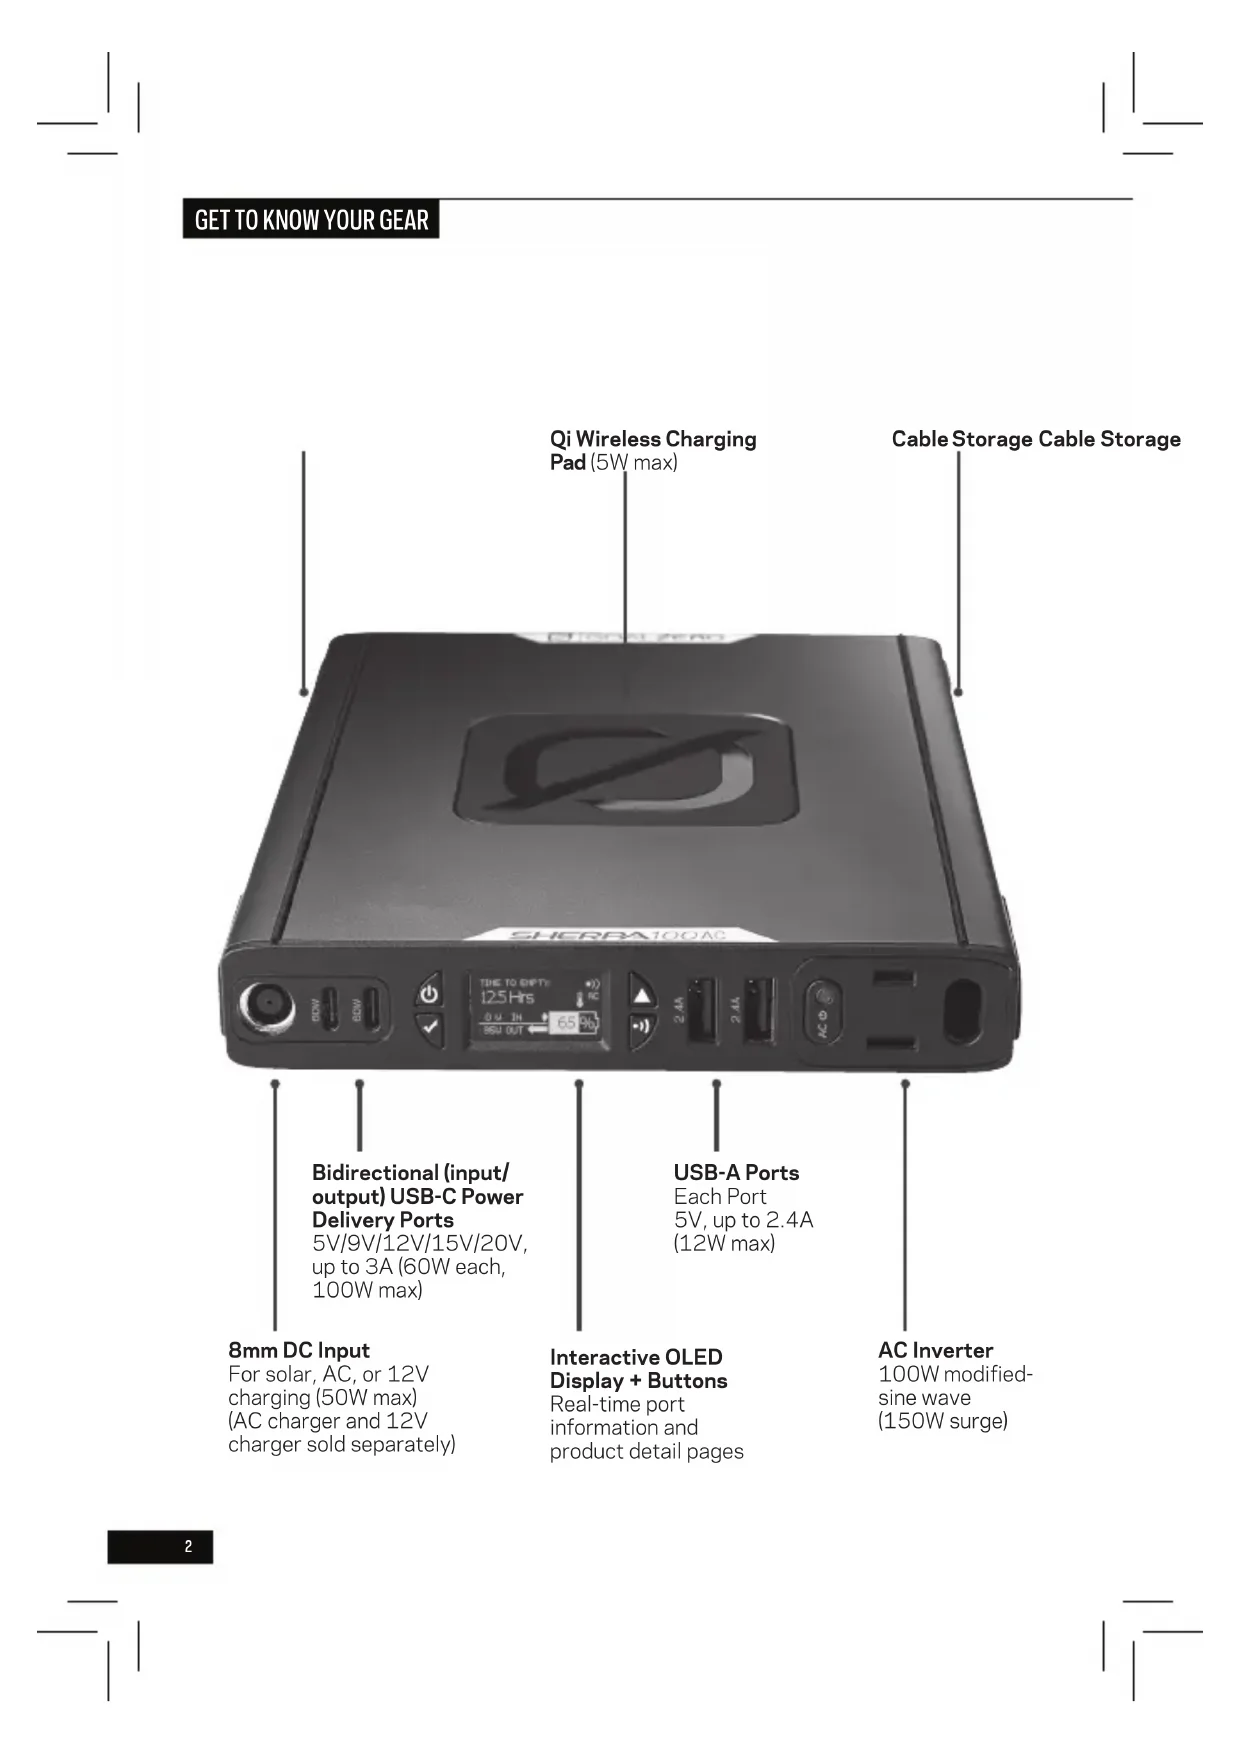
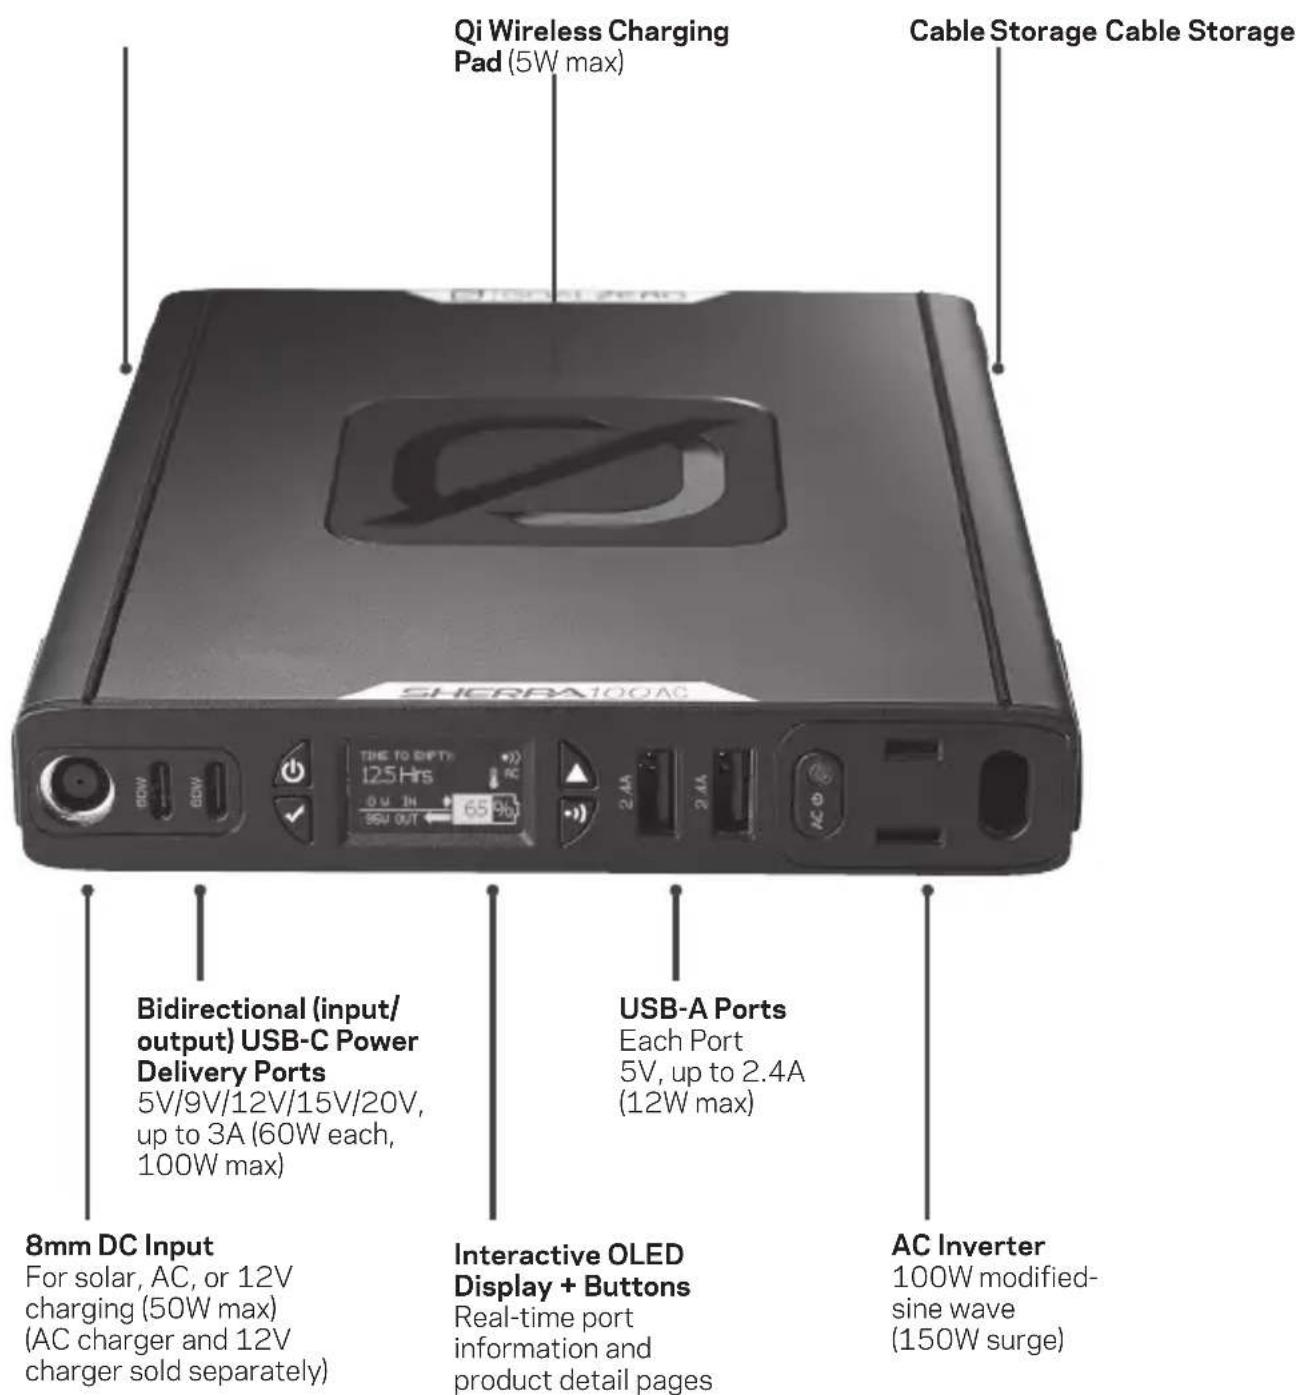
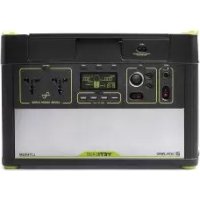
GET TO KNOW YOUR GEAR
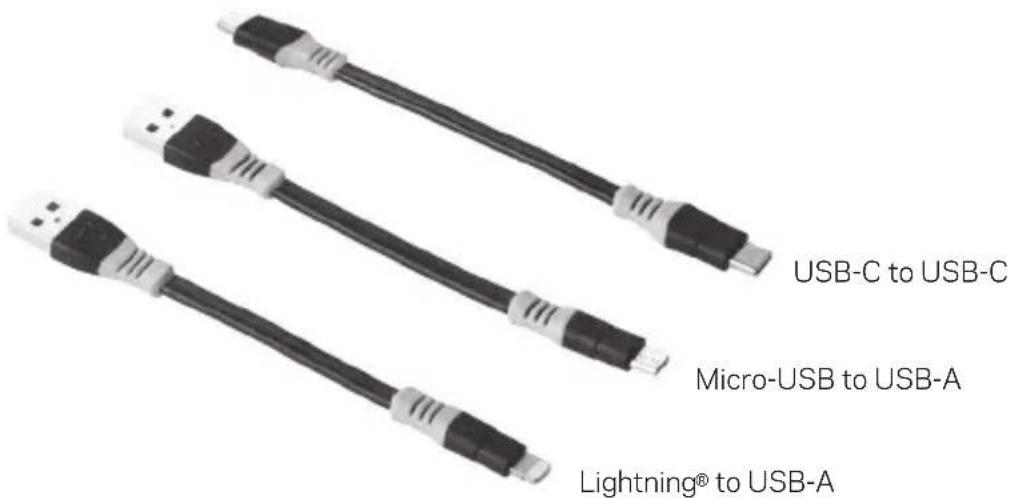
Included Cables:
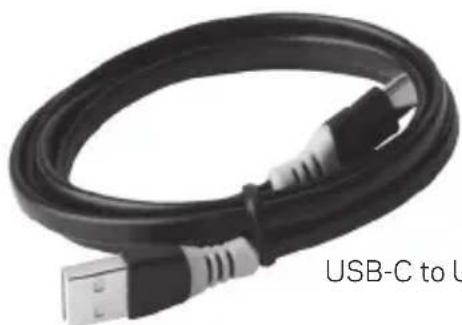
USB-C to USB-A
CHARGING YOUR SHERPA
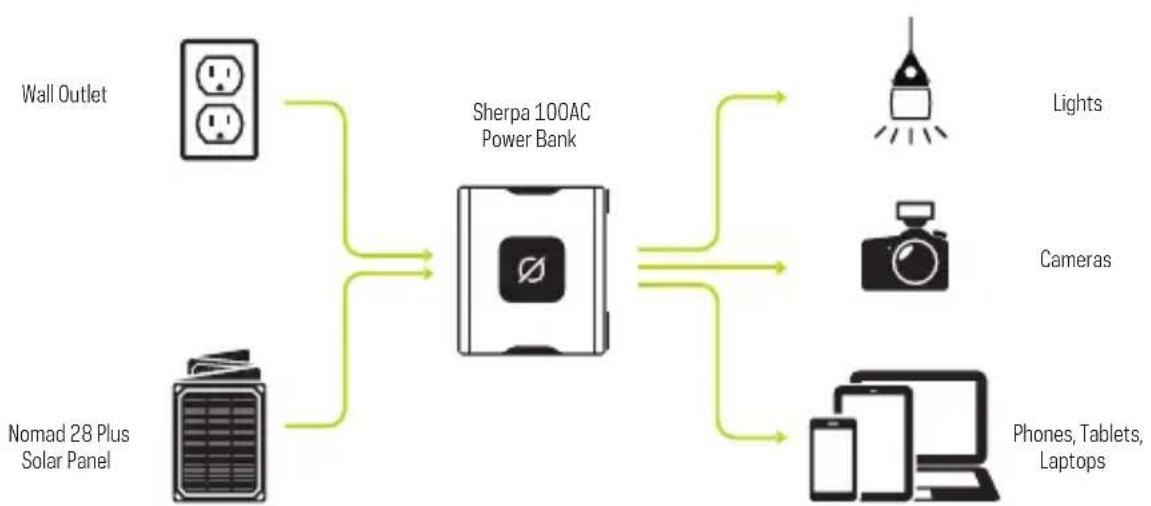
CHARGE ME NOW: Plug in and charge up before first use. The Sherpa has multiple inputs to choose from, 8mm DC for AC wall outlet and solar charging, and USB-C Power Delivery (60W Max).
FROM USB: Using the included USB-C cable and one of the USB-C Power Delivery (PD) ports on the Sherpa, plug into a USB port. We recommend using at least a 2.4A charger for a full charge in about 9 hours. You can also plug into a USB-C PD charger (up to 60W max) for a faster recharge.
*TECH TIP: Since USB-C PD ports are bidirectional, it's possible to charge in and charge out from the same port. In the Product Detail pages of the Sherpa, you can select a default function (auto, input, output) for each USB-C PD port.
FROM SOLAR: Pair the Sherpa with a Nomad or Boulder Solar Panel and charge up from the sun using the 8mm input. For the best solar charging experience, we recommend the Nomad 28 Plus Solar Panel or higher.
FROM AC or 12V: Looking to charge up from AC wall outlet or 12V? Accessories are available from GoalZero.com. Give our customer solutions center a call for help at 888-794-6250.
HOW IT WORKS
USING YOUR SHERPA
BUTTONS:

Press once to turn the Sherpa on/off. Press and hold to reset the Sherpa, watt-hour counter, and restore default settings of all ports.

Select/Scroll through settings.

Press once to view output screen. Press and hold to enable product detail pages.

Turn Qi wireless charging on/off.

Turn AC port on/off.
INTERACTIVE SCREENS:
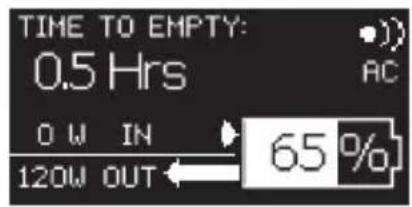
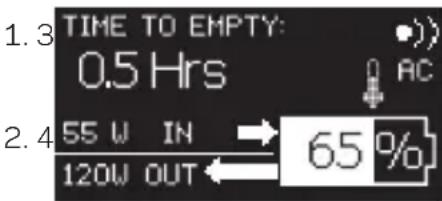
Main Page:
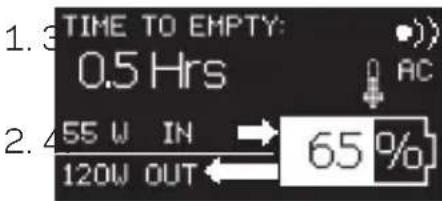
- Time to Empty/Full - How long the Sherpa will last at its current power draw or how long it will take to fully charge.
- Power (Watts) In/Out - Longer arrows indicate the bigger power draw. A blinking arrow indicates nearing power draw maximum.
- Icons - Wireless charging, AC Inverter, Over Temperature Warning
- Battery Level
USING YOUR SHERPA
INTERACTIVE SCREENS:
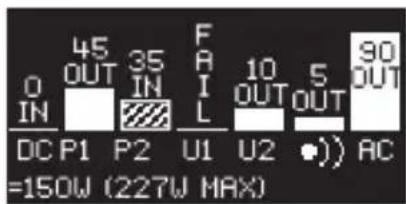
Outputs Page:
Access by pressing
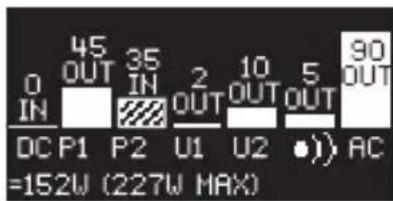
- The Output Page shows real-time information for each port, including inputs and outputs.
- A solid bar indicates the port is functioning as an output.
A lined bar indicates the port is functioning as an input to charge the Sherpa. - Ports are listed from left to right.
- Total wattage for all outputs is listed at the bottom of the screen.
*TECH TIP: If you have the Sherpa plugged into a high power source to charge it, you might notice the max wattage available increase.
USING YOUR SHERPA
INTERACTIVE SCREENS:
Product Detail Pages:
Access by pressing and holding
Scroll through pages by pressing
SINCE LAST RESET:
WATT HOURS IN:
5493
JATT HOURS OUT:
5174
-
A watt-hour output/output counter to monitor power consumption between resets.
-
Press and hold

to reset the counter.
8MMINPUT
WATTS 45
VOLTS 15.3
Real-time information on the 8mm input.
- Check this page when charging from solar to help with panel alignment toward the sun.
USING YOUR SHERPA
INTERACTIVE SCREENS:
Product Detail Pages:
Access by pressing and holding
Scroll through pages by pressing
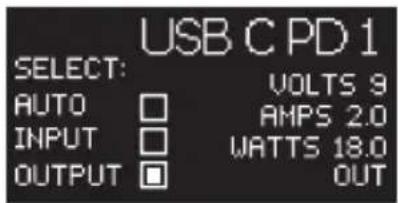

- Shows output or input information for the bidirectional USB-C Power Delivery ports.
-
Customize the USB-C Power Delivery ports to specific functions by pressing
-
AUTO: Default setting for both ports will automatically detect if a device is plugged in for charging or if the port is being used to charge the Sherpa.
- INPUT: This port will now only function as a way to charge the Sherpa.
- OUTPUT: This port will now only function as a way to charge other devices.
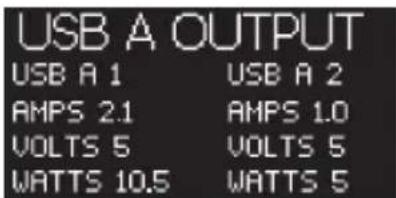
Real-time information for both USB-A ports.
USING YOUR SHERPA
INTERACTIVE SCREENS:
Product Detail Pages:
Access by pressing and holding
Scroll through pages by pressing

Real-time information on the AC output.
- Customize the setting of the AC inverter by pressing the.
- AUTO TIMEOUT: Default setting will shut the AC inverter off after 5 minutes of inactivity to save on power.
- NO TIMEOUT: Inverter will remain on until the Sherpa is turned off, the battery is drained, or AC button pressed.
USING YOUR SHERPA
INTERACTIVE SCREENS:
Product Detail Pages:
Access by pressing and holding
Scroll through pages by pressing
BATTERY
VOLTS 11.47
AHPS +4.5
TEMP113F 45C
Real-time information on the internal battery.
Device Info
FIRHWARE 2.8
HFG GOAL ZERO 20180915
Firmware and manufacturing date for the Sherpa.
Device Info
CYCLE COUNT 252
DESIGN CAPACITY 94.7 UH
LIFETIME WH IN 8742
LIFETIME WH OUT 7015
Detailed usage information for the Sherpa.
USING YOUR SHERPA
TIPS for LAPTOP CHARGING via USB-C PD:
We recommend using a USB-C to USB-C cable when recharging enabled laptops. Since USB-C PD ports are bidirectional, meaning they can function as an input to charge the Sherpa or an output to charge other devices, plugging in a laptop may cause the Sherpa to try charging from the laptop's internal battery, rather than charging the laptop. To fix this, select a default input or output setting from the USB-C PD Product Detail Page or try reconnecting the laptop.
PASSTHROUGH CHARGING:
It is possible to recharge other devices while the Sherpa is being charged. Plug the Sherpa into a power source and make sure it's still powered on, then plug the phone/laptop/tablet or other device into the Sherpa. Make sure to watch the output levels on the ports to ensure the Sherpa is pulling enough power to meet the power demands of what is plugged in.
*TECH TIP: If TIME TO EMPTY is displayed on the screen, the Sherpa will not have enough power to recharge. If TIME TO FULL is displayed, the Sherpa is pulling enough power to charge what's plugged in and itself.
TROUBLESHOOTING
Drawing Too Much Power
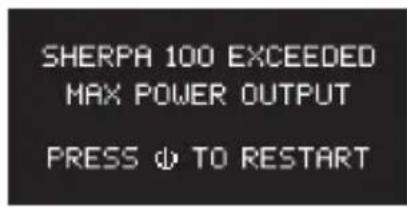
- The Sherpa can output 170W by utilizing all its ports at once. If that draw is exceeded, the Sherpa will stop working and this screen will be displayed.
*TECH TIP: If the Sherpa is charging from a high enough power source, you can achieve a higher max output.
- To avoid this shutdown, monitor power usage on the Main Page and Outputs Page and closely monitor what is being plugged in.
- The arrow on the Main Page indicating power out will begin to blink if the Sherpa is nearing shutdown.
Output Failure
-
This indicates an issue with a specific output on the Sherpa. To correct this issue:
-
Unplug the device from the Sherpa and check its technical specifications to ensure it isn't pulling too much power. The FAIL warning will remain if the device plugged in is not compatible.
- Turn the Sherpa off and on to reset the FAIL notice.
-
If the FAIL notice continues, call Goal Zero's customer service at 888-794-6250.
-
The remainder of the Sherpa ports will continue to work.
TROUBLESHOOTING
Overheating
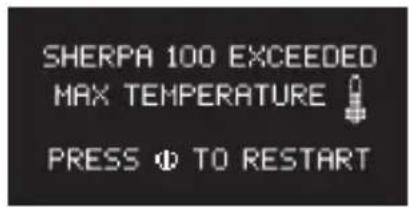

- The Sherpa is too hot and needs to cool down before it can be used again.
-
To avoid this shutdown, monitor the Main Page for the temperature warning icon.
-
When using the AC port, do not block the fan on the back of the Sherpa.
- When charging, allow the Sherpa to have proper ventilation.
Resetting the Sherpa

- Press and hold for 3 seconds to initiate reset.
- Continue holding for 8 seconds until the main page is shown.
- NOTE: this resets the Sherpa, watt-hour counter, and restores default settings on all ports.
TROUBLESHOOTING
Low Battery
BATTERY EMPTY -RECHARGE-
- The Sherpa's battery capacity has dropped to 2% and can no longer provide power.
Plug the Sherpa in and wait for it to reach at least 5% charge before attempting to use.
TECHNICAL SPECIFICATIONS
Sherpa 100AC
| Charge times: | |
| USB-C PD Source (60W) | 2.5 hrs |
| Wall charger (45W) | 3 hrs |
| USB-A (2.4A) 9 hrs | |
| Nomad 14 14-28 hrs | |
| Nomad 28 7-14 hrs | |
| Boulder 50 4-8 hrs | |
| Battery: | |
| Cell chemistry Li-ion NMC | |
| Cell type 18650 by LG chem | |
| Single Cell Equivalent Capacity | 25600mAh @ 3.7V |
| Lifecycles Hundreds of Cycles | |
| Shelf-life Charge every 3-6 months | |
| Management system | Charging and low-battery protection built-in |
Ports:
| Wireless Qi (output) 5W max | |
| USB A ports (output) 5V, up to 2.4A (12W max), regulated | |
| USB-C PD ports (input/output) | 5V,9V,12V,15V,20V up to 3A (60W each, 100W max), regulated |
| AC inverter US (output) | 110V, up to 0.9A (100W max), 60Hz, modified sine wave |
| AC inverter Int (output) | 220V, up to 0.45A (100W max), 50Hz, modified sine wave |
| Solar charging port (input, 8mm diameter) | 14-22V (50W max) |
| General | |
| Chainable no | |
| Weight 2.0 lbs (898 g) | |
| Dimensions 7.5 x 1.0 x 5.68 in (19.0 x 2.54 x 14.4 cm) | |
| Operating usage temp. | 32-104F (0-40C) |
| Certs | ### FC RoHS |
| Warranty 12 months | |
Be sure to activate your warranty at goalzero.com/warranty
A
RECHARGEZ-MOI MAINTENANT
#
Activer/Désactiver le port CA.
ÉCRANS INTERACTIFS:
Page principale :
Designed in the U.S.A.
Made in China
Sherpa is a trademark
of Goal Zero.
IC Caution.
This device contains licence-exempt transmitter(s)/receiver(s) that comply with Innovation, Science and Economic Development Canada's licence-exempt RSS(s). Operation is subject to the following two conditions:
- This device may not cause interference.
- This device must accept any interference, including interference that may cause undesired operation of the device.
This device complies with part 15 of the FCC Rules. Operation is subject to the following two conditions: (1) This device may not cause harmful interference, and (2) this device must accept any interference received, including interference that may cause undesired operation.
Any Changes or modifications not expressly approved by the party responsible for compliance could void the user's authority to operate the equipment.
Note: This equipment has been tested and found to comply with the limits for a Class B digital device, pursuant to part 15 of the FCC Rules. These limits are designed to provide reasonable protection against harmful interference in a residential installation. This equipment generates uses and can radiate radio frequency energy and, if not installed and used in accordance with the instructions, may cause harmful interference to radio communications. However, there is no guarantee that interference will not occur in a particular installation. If this equipment does cause harmful interference to radio or television reception, which can be determined by turning the equipment off and on, the user is encouraged to try to correct the interference by one or more of the following measures:
-Reorient or relocate the receiving antenna.
-Increase the separation between the equipment and receiver.
-Connect the equipment into an outlet on a circuit different from that to which the receiver is connected
-Consult the dealer or an experienced radio/TV technician for help.
RF warning for Portable device:
The device has been evaluated to meet general RF exposure requirement. The device can be used in portable exposure condition without restriction.

- IMPORTANT SAFETY INSTRUCTIONS
- Table of Contents
- GET TO KNOW YOUR GEAR
- CHARGING YOUR SHERPA
- HOW IT WORKS
- USING YOUR SHERPA
- BUTTONS:
- INTERACTIVE SCREENS:
- BATTERY
- Device Info
- TIPS for LAPTOP CHARGING via USB-C PD:
- PASSTHROUGH CHARGING:
- TROUBLESHOOTING
- Drawing Too Much Power
- Output Failure
- Overheating
- Resetting the Sherpa
- BATTERY EMPTY -RECHARGE-
- TECHNICAL SPECIFICATIONS
- A
- RECHARGEZ-MOI MAINTENANT
- #
- ÉCRANS INTERACTIFS:
- IC Caution.
Brand : GOAL ZERO
Model : Sherpa 100AC
Category : Phone charger