
Dynax 9TI - Camera KONICA MINOLTA - Free user manual and instructions
Find the device manual for free Dynax 9TI KONICA MINOLTA in PDF.
| Product type | Film SLR camera (film) |
| Brand | Konica Minolta |
| Model | Dynax 9Ti (limited titanium edition) |
| Weight (body only) | 825 g |
| Body materials | Magnesium alloy for structure, titanium for top cover |
| Coating | Non-slip rubber for a firm grip |
| Viewfinder | 100% field of view |
| Shooting mode | Single frame, continuous at 5.5 fps (4.5 fps in continuous autofocus tracking) |
| Maximum shutter speed | 1/12,000 s |
| Autofocus system | Phase-detection autofocus with local AF areas and center spot |
| Light metering | TTL (through-the-lens metering) with 4-zone, center-weighted, spot options |
| Built-in flash | Yes, pop-up (may not charge immediately with remote control) |
| Power source | 2 CR123A batteries (not included) |
| Customizable functions | 23 functions (release priority, rewind, film leader, etc.) |
| Eye-Start | Eye sensor activating autofocus and metering (configurable) |
| Rewind mode | Automatic or manual, fast (6 s) or quiet (9 s) for 36 exposures |
| Exposure compensation | +/- 3 EV in 1/2 or 1/3 stops |
| Bracketing | 5-frame sequence (normal, underexposure, overexposure configurable) |
| Dial lock | Customizable function to prevent accidental rotation |
| Maintenance | Clean with a soft, dry cloth. Avoid prolonged exposure to high heat. |
| Safety | Beware of high temperatures on metal parts in direct sunlight. The flash may not charge immediately with the IR-1N infrared remote control. |
| Compatible accessories | Data memory back DM-9, vertical control grip VC-9, IR-1N remote controller |
| User manual | Dynax 9 / Maxxum 9 manual supplemented by an addendum for 9Ti-specific functions |
Frequently Asked Questions - Dynax 9TI KONICA MINOLTA
User questions about Dynax 9TI KONICA MINOLTA
0 question about this device. Answer the ones you know or ask your own.
Ask a new question about this device
Download the instructions for your Camera in PDF format for free! Find your manual Dynax 9TI - KONICA MINOLTA and take your electronic device back in hand. On this page are published all the documents necessary for the use of your device. Dynax 9TI by KONICA MINOLTA.
USER MANUAL Dynax 9TI KONICA MINOLTA
In honor of being awarded the Japan Camera Grand Prix award for the -9 camera*, Minolta Co., Ltd. is proud to offer the DYNAX 9Ti / MAXXUM 9Ti (Titanium model) limited edition camera. One thousand cameras will be produced. This camera possesses all the same award winning features of the DYNAX 9 / MAXXUM 9 model, plus some additional features that will provide even more opportunities to enhance your photographic creativity and enjoyment.
Minolta, for the first time, employs a magnesium alloy for the camera base, and titanium for the upper shell of the SLR camera body to provide a slightweight and strong camera. Wet-type rubber is used to provide a non-slip touch. Other features such as a 100% viewfinder, top continuous drive speed of 5.5 frames per second (4.5 frames per second with autofocus tracking), shutter speeds up to 1/12000 second, and easy-to-operate controls are inherited from the DYNAX 9/MAXXUM 9 model.
To get the most from your camera, please familiarize yourself with both the DYNAX 9 / MAXXUM 9 manual and this manual.
^a Japanese version of DYNAX 9/MAXXUM 9
NOTES
-When using your camera with Wireless Controller IR-1N in single-frame mode with the camera's built-in flash, the built-in flash may not start charging until the IR-1N transmitting button is pressed and the first picture may not be taken. The shutter is released each time the button is pressed again. In both continuous and single-frame mode, the built-in flash will keep charging until either the built-in flash is down or the camera's main switch is moved to LOCK.
-Total camera weight is reduced to 825g by using titanium and magnesium alloys for the outer shell.
-When using the camera in bright sunlight on warm days, use caution. The temperature of the metal body can become very warm.
-Data Memory Back DM-9, Vertical Control Grip VC-9, and other accessories are available for use with the DYNAX 9Ti / MAXXUM 9 Ti camera.
-This manual replaces pages 91 to 102 in the DYNAX 9 / MAXXUM 9 manual, covering the custom functions. New features found in the Custom Functions include;
Cust 14 - The LED glowing time of self extended.
Cust 18-The PA/Ps creative program control is available with the front control dial, while the control of the exposure compensation is available with the rear control dial.
- Cust 22 - The AF Illuminator can be cam
- Cust 23 - To prevent accidental turning camera, the front/rear control dials can be disengaged when the exposure is not being metered.
CUSTOM FUNCTIONS
Use the custom functions to tailor the camera to your shooting style or preferences. The customizable functions are explained on pages 7-19 of this manual.
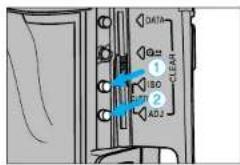
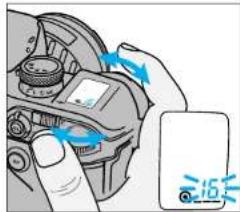
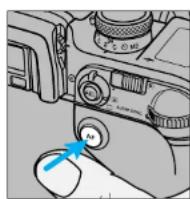
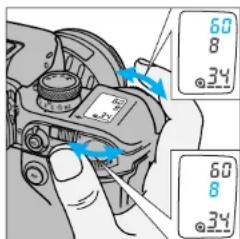
- Open the control panel door.
- Press the ISO button, then the adjust button ②
- Turn the front control dial to select the custom function number.
- Turn the rear control dial to select the desired setting.
- Press the shutter-release button partway down to enter the settings.
To reset the custom functions to their default setting (1)...
- Turn the main switch to LOCK.
- Open the control panel door.
-
Press the adjust button and turn the main switch to ON.
-
C-w i I I their default settings.
b 1 n k i n
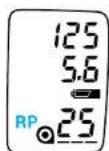
Cust 1 - AF/Release priority
1-AF priority
Shutter will not release until or appears in the viewfinder.
2 - Release Priority
Shutter releases even if the focus cannot be confirmed.
Use release priority when photographing moving
Subjects
- RP will appear in the data panel.
Cust 2 - Film Rewind Start
1-Automatic
Film is automatically rewound at the end of the roll.
2-Manual
User must press the manual-rewind button to initiate rewind.
Cust 3 - Film Tip
1 - Film is completely rewound into the cartridge.
2-Leader is left out of the cartridge after rewind.
3-Leader left out after rewind./Camera setup for Mid Reload.
CUSTOM FUNCTIONS
Mid Reload
Mid Reload decreases the chances of accidental double exposure when reloading a partially exposed roll of film.
-
Rel oading a partially exposed roll increrevious roll risk of film damage (scratches dust and grit.
-
Set custom function 3 to setting 3.
- Load the film.
The film is automatically a_fd_iv_iq_nm_eu_sdt^ob_of^ra_oma_ed_o1^d before the ISOCAT
- Open the control panel door, then press and hold the adjust button until 1 blinks in the data panel.
-
Turn either control dial until the frame number you want to advance the film to blinks in the data panel.
-
Advance the film a minimum of two frames past the last exposed frame.
-
Press the adjust button.
The film is automatically advanced to the desired frame.
Cust 4 - DX Memory
1 - DX Memory Off
Film speed is always set to the DX-coded ISO. Non-DX-coded film is set to the
previoussroll's ISO risk of film damage (scratch
2 - DX Memory On
Changes to the film speed for a DX coded roll are saved and applied to future rolls
with the same DX coded ISO. Use to consistently over/under-expose a specific film
type.
aFdvi n m eud st ofo r a maed 1. before the ISOCAT
Cust 5 - Release Lock (Film)
1 - Release Lock Off
2-Release Lock On
Shutter cannot be released unless film is loaded or the back cover is open.
- g b l i n k s i n t h e f r a m loaded.
CUSTOM FUNCTIONS
Cust 6 - Focus Hold Button (Lens)
The mounted lens must have a focus hold button.
1-Focus Hold
Pressing the focus-hold button on the lens locks the focus.
2-Spot Focus
Pressing the focus-held button on the lens selects the center focus sensor.
3-Continuous Focus
Select this setting when focusing on moving subjects.
Pressing the focus-hole button on the lens selects continuous focus.
Cust 7 - Eyepiece Sensor
1-Grip sensor activated
Eyepiece sensor is activated when the grip sensor is tripped.
2 - Main switch activated
Eyepiece sensor is activated when the main switch is in the ON position. Use this setting when the grip sensor is not being tripped (user wearing gloves).
- Slide the main switch to LOCK when the
Cust 8 - Frame Counter
1 - Frame counter in data panel counts up.
2-Frame counter in data panel counts down.
The frame count counts when
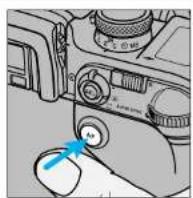
Cust 9 - AF Button
1 - Selectable focus area
Press the AF button and turn the control dial to specify the desired local focus area.
2-Spot Focus
Press the AF button to focus using the center focus sensor.
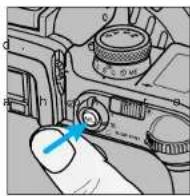
Cust 10 - AE-Lock Button
- AEL appears in the viewfinder when AE-lock button is active (down).
· SLOW sync is selected when the built -
·Manual shift is selected when the exp
1 - Press to activate, release to cancel.
cameraisnotbeinguse 2- Press once to activate, press again to
cancel.
T ur n i ng the buill -in fll
CUSTOM FUNCTIONS
Cust 11 - Bracketing Sequence
1-Metered exposure, Underexposure(s), Over-exposure(s)
A5 frame bracketin 1/2EVI increments Normal -0.5EV +0.5EV -1.0EV +1.0EV
2 - Underexposure(S), Metered exposure, Over-exposure(s)
A5 frame bracketin 1/2EV increments -1.0EV→-0.5EV→Normal +0.5EV→+1.0EV
Cust 12 - Rewind Speed
1 - Fast Rewind
Rewinds a 36 exposure roll in approximately 6 seconds.
2-Slow (silent) Rewind
Rewinds a 36 exposure roll in approximately 9 seconds.
Cust 13 - Meter/Data Panel Illuminator Display Duration
· Selecting longer display durations
50s eosed in the following order ...
2-10 sec
3-30sec
exposed in the following order ...
Cust 14 - AF Area Display
·Press and hold the AF button to displ Pressing the lens focus hold button

3 - Local focus areas display only when the AF button is pressed.
1 - Focus Area LEDs display the active focus area for 0.1 sec after the focus locks.
2-Focus Area LEDs display the active focus area for 0.6 sec after the focus locks.
CUSTOM FUNCTIONS
Cust 15 - Eyestart Switch
Dial-lock - Disengages the control dials to prevent an accidental turn of the control dials from changing the exposure settings.
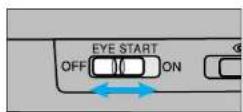
1 - Turns Eyestart on and off.
2-Turns Dial-lock on and off. Eyestart is always on.
3 -Turns Dial-lock on and off. Eyestart is always off.
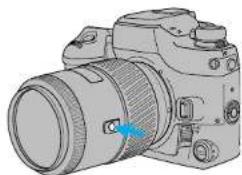
Cust 16 - Release Lock (Lens)
1 - Shutter cannot be released if a lens is not attached.
-
-
- appepears (blinks) in the data panel
-
2 - Shutter can be released if a lens is not attached.
Use when mounting the lens to a non-coupling lens mount (telescope, microscope etc.).
Cust 17 - AF Drive Speed
1 - Speed priority
2-Silent drive
Cust 18 - Control Dial Tasking
1-Default operation
| Exposure Mode | Control Dial Tasking | |
| Front Control Dial Rear | Control Dial | |
| P - M o d e | No function | No function |
| A - M o d e | Aperture | Aperture |
| S - Mode | Shutter speed | Shutter speed |
2-Creative Program
Creative program control (Pa/Ps) lets you override the exposure settings
selected by the camera In P- mode. A and S- mode operation does not change.
| Exposure Mode | Control Dial Tasking | |
| Front Control Dial Rear | Control Dial | |
| P - M o d e h e a n M o d e g e S - M o d e | Ps - shutter speed | Pa - aperture |
| shut Aperture - release | se b A p ture - n i s | |
| Shutter speed | Shutter speed | |
3 - Exposure Compensation Using Rear Control Dial - (PA Mode with Front Control Dial in P Mode)
Changes the tasking for the rear control dial to exposure compensation.
The exposure compensation value is d Exposures compensation dial must be Componation range is +/- 3 EV for bottom display in the view finder
| Exposure Mode | Control Dial Tasking | |
| Front Control Dial Rear Control Dial | ||
| P - M o d e | PA - aperture | Exposure |
| A - M o d e | Aperture | compensation |
| S - Mode | Shutter speed | |
CUSTOM FUNCTIONS
4 - Exposure Compensation Using Rear Control Dial - (Ps Mode with Front Control Dial in P Mode)
Changes the tasking for the rear control dial to exposure compensation.
· The exposure compensation value is
·Exposurescompensationdial must be
· Com p en s a t i o n r a n g e i s + / - 3 E V I or
·The bottom display in the view finder
| Exposure Mode | Control Dial Tasking | |
| Front Control Dial Rear | Control Dial | |
| P - M o d e | Ps - shutter speed | Exposure |
| A - M o d e | Aperture | compensation |
| S - Mode | Shutter speed | |
Cust 18-2 Creative Program
PA/Ps Mode Operation
After the AE system has been activated, you can change the shutter speed or aperture selected by the camera. Creative program remains active until the data panel displays disappears. 3 EV increments
es - not - show , the marks " + " or "
Custom Function Notes
CUS3 Refer to page 13 to change the data panel display duration.
While the aperture/shutter speed are displayed in P-mode...
Turn the front control dial to change the shutter speed.
·Apertureis adjusted
Turn the rear control dial to change the aperture.
·Shutter speed is adju
- The aperture and shutter speed change position of the exposure compensation dial.
- Flash can not attend Pmodeded with t h e P -Built-in and accessory flashes will not attend Pmodeded at rtive.
- P_A and P_S modes can not be selected when appears in the viewfinder.
- If the shutter speed or aperture blink dial until the blinking stops.
Wait until the displayed data disappears from the data panel or raise the built-in flash.
CUSTOM FUNCTIONS
Cust 19 - Control Dial - Exchanged Control
1- Unchanged from Cust 18.
2 - Front and rear control dial functions exchanged.
Cortrol dial tasking does not change for Focusing may be difficult without AF
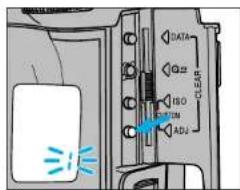
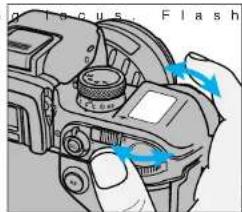
Cust 22 - AF Illuminator
1 - Fires if necessary.
2-Canceled
f o r . D. R a t h e n g a m y r s a s d r c c c a e n g o c o r u s f o m
Cust 20 - Flash Metering
1-4-Segment Flash Metering
2-Average metering
All flash metering segments are weighted evenly.
3-Spot Metering
Flash is motored by the segment corresponding to the currently selected Local Focus Area.
D o n o t r e c o m p o s e t h e i m a g e a f t l o k i n g f r o c u s. F l a s h d Offs u sure is T T L m e t e r e d
Cust 21 - Exposure Compensation Display
1 - No display
Exposure compensation value is not displayed in the data panel.
2-Display
Exposure compensation value is displayed in the data panel when the dial is operated.
Cust 23 - Front/Rear Control Dial Lock
Use dial lock to prevent the settings from being changed by accidental turning of the dial while carrying the camera. If dial lock is selected, the settings cannot be changed by rotation of the Front/Rear control dial when the camera is not metering. The operation of the Front/Rear control dial changes the settings only when the exposure is being metered (eg: when the shutter button is being pressed partway down, or when Eye-start is activating AF & AE).
4-Ofo sure is Tll metered Front/Rear dials are functional.
2-On
The settings cannot be changed by rotation of the front/rear control dials when the camera is not metering.
- Front / Rear control di a operations which use bottoms inside the control panel (eg: setting bracketing, reading stored data), and when AEL is displayed in the viewfiender.
In M mode, the shutter be changed while metering. Both the shutter speed and aperture will be displayed in the body data panel.
2-Slow (silent) Rewind
Fonction 4 (Cust 4) - Mémoire DX
1-Mémoire DX inactive
2-Programme decalable
Head Office 369 Britannia Road East, Mississauga, Ontario L4Z 2H5, Canada
Vancouver Branch 230-3771 Jacombi Road, Richmond, B.C. V6V 2L9, Canada
Minotta Hong Kong Limited Room 208, 2/F, Eastern Center, 1055 King's Road, Guarry Bay, Hong Kong
Minolta Singapore (Pte) Ltd. 10,Taban Gardens Crescent, Singapore 608923
Shanghai Minolta Optical Products Co.Ltd. 368 Minolta Road, Sopoliang, Shanghai, China
念 1999 Minolta Co., Ltd. under the Berne Convention and Universal Copyright Convention
- NOTES
- CUSTOM FUNCTIONS
- Cust 1 - AF/Release priority
- Cust 2 - Film Rewind Start
- Cust 3 - Film Tip
- Mid Reload
- Cust 4 - DX Memory
- Cust 5 - Release Lock (Film)
- Cust 6 - Focus Hold Button (Lens)
- 1-Focus Hold
- 2-Spot Focus
- 3-Continuous Focus
- Cust 7 - Eyepiece Sensor
- 1-Grip sensor activated
- - Main switch activated
- Cust 8 - Frame Counter
- Cust 9 - AF Button
- - Selectable focus area
- Cust 10 - AE-Lock Button
- - Press to activate, release to cancel.
- cameraisnotbeinguse 2- Press once to activate, press again to
- cancel.
- Cust 11 - Bracketing Sequence
- Cust 12 - Rewind Speed
- Cust 13 - Meter/Data Panel Illuminator Display Duration
- Cust 14 - AF Area Display
- Cust 15 - Eyestart Switch
- Cust 16 - Release Lock (Lens)
- Cust 17 - AF Drive Speed
- Cust 18 - Control Dial Tasking
- - Exposure Compensation Using Rear Control Dial - (Ps Mode with Front Control Dial in P Mode)
- Cust 18-2 Creative Program
- PA/Ps Mode Operation
- Custom Function Notes
- While the aperture/shutter speed are displayed in P-mode...
- Turn the front control dial to change the shutter speed.
- Turn the rear control dial to change the aperture.
- Cust 19 - Control Dial - Exchanged Control
- Cust 22 - AF Illuminator
- Cust 20 - Flash Metering
- Cust 21 - Exposure Compensation Display
- Cust 23 - Front/Rear Control Dial Lock
- Fonction 4 (Cust 4) - Mémoire DX
- 2-Programme decalable
Brand : KONICA MINOLTA
Model : Dynax 9TI
Category : Camera