Bark Control PBC1910765 - Anti-bark collar PETSAFE - Free user manual and instructions
Find the device manual for free Bark Control PBC1910765 PETSAFE in PDF.

User questions about Bark Control PBC1910765 PETSAFE
0 question about this device. Answer the ones you know or ask your own.
Ask a new question about this device
Download the instructions for your Anti-bark collar in PDF format for free! Find your manual Bark Control PBC1910765 - PETSAFE and take your electronic device back in hand. On this page are published all the documents necessary for the use of your device. Bark Control PBC1910765 by PETSAFE.
USER MANUAL Bark Control PBC1910765 PETSAFE
Operating Guide Manuel d'utilisation Gebruiksaanwijzing Manual de funcionamiento Guida all'uso Gebrauchsanweisung
PBC19-10765
Bark Control Collar
Collier anti-aboiements
Antiblafhalsband
Collar antiladridos
Collare antiabbaio
Anti-Bellhalsband
Please read this entire guide before beginning Veuillez lire ce manuel en entier avant de commencer Gelieve deze gids volledig door te lezey voordat u begint Por favor, este manual lea completo antes de empazar Si prega di leggere attentamente la guida al uso prima di utilizzare il collare Bitte lesen Sie die gesamte Betriebsanleitung vor dem Trainingsbeginn
IMPORTANT SAFETY INFORMATION
Explanation of Attention Words and Symbols used in this guide

This is the safety alert symbol. It is used to alert you to potential personal injury hazards. Obey all safety messages that follow this symbol to avoid possible injury or death.

WARNING indicates a hazardous situation which, if not avoided, could result in death or serious injury.

CAUTION, used with the safety alert symbol, indicates a hazardous situation which, if not avoided, could result in minor or moderate injury.

CAUTION, used without the safety alert symbol, indicates a hazardous situation which, if not avoided, could result in harm to your pet.

Not for use with aggressive dogs. Do not use this product if your dog is aggressive, or if your dog is prone to aggressive behaviour. Aggressive dogs can cause severe injury and even death to their owner and others. If you are unsure whether this product is appropriate for your dog, please consult your veterinarian or a certified trainer.

Please read and follow the instructions in this manual. Proper fit of the collar is important. A collar worn for too long, or made too tight on the pet's neck may cause skin damage. This is called bed sores; it is also called decubitus ulcers or pressure necrosis.
- Avoid leaving the collar on the dog for more than 12 hours per day.
- When possible reposition the collar on the pet's neck every 1 to 2 hours.
- Check the fit to prevent excessive pressure; follow the instructions in this manual.
- Never connect a lead to the electronic collar; it will cause excessive pressure on the contacts.
- When using a separate collar for a lead, don't put pressure on the electronic collar.
- Wash the dog's neck area and the contacts of the collar weekly with a damp cloth.
- Examine the contact area daily for signs of a rash or a sore.
- If a rash or sore is found, discontinue use of the collar until the skin has healed.
- If the condition persists beyond 48 hours, see your veterinarian.
For additional information on bed sores and pressure necrosis, please visit our website.
These steps will help keep your pet safe and comfortable. Millions of pets are comfortable while they wear stainless steel contacts. Some pets are sensitive to contact pressure. You may find after some time that your pet is very tolerant of the collar. If so, you may relax some of these precautions. It is important to continue daily checks of the contact area. If redness or sores are found, discontinue use until the skin has fully healed.
Thank you for choosing PetSafe ^ , the best selling brand of electronic training solutions in the world. Our mission is to be the most trusted brand in the pet ownership experience. We want to ensure your pet's safety by providing you with the tools and techniques to successfully train your pet. If you have any questions, please contact the Customer Care Centre. For a listing of Customer Care Centre telephone numbers in your area, visit our website at www.petsafe.net.
To get the most protection out of your warranty, please register your product within 30 days at www.petsafe.net. By registering and keeping your receipt, you will enjoy the product's full warranty and, should you ever need to call the Customer Care Centre, we will be able to help you faster. Most importantly, PetSafe® will never give or sell your valuable information to anyone. Complete warranty information is available online at www.petsafe.net.
Table of Contents
Components......4
Features......4
How the PetSafe® Bark Control Collar Works....5
Key Definitions....5
Fit the Bark Control Collar 6
To Insert and Remove the Battery 8
What to Expect During Use of the Bark Control Collar 9
Regular Maintenance 9
To Test the Bark Control Collar.... 10
Accessories 10
Frequently Asked Questions.... 11
Troubleshooting.... 12
To Discharge the Bark Control Collar 12
Battery Disposal 13
Compliance 13
Terms of Use and Limitation of Liability 14
Français....15
Nederlands 27
Español....40
Italiano....53
Deutsch....66
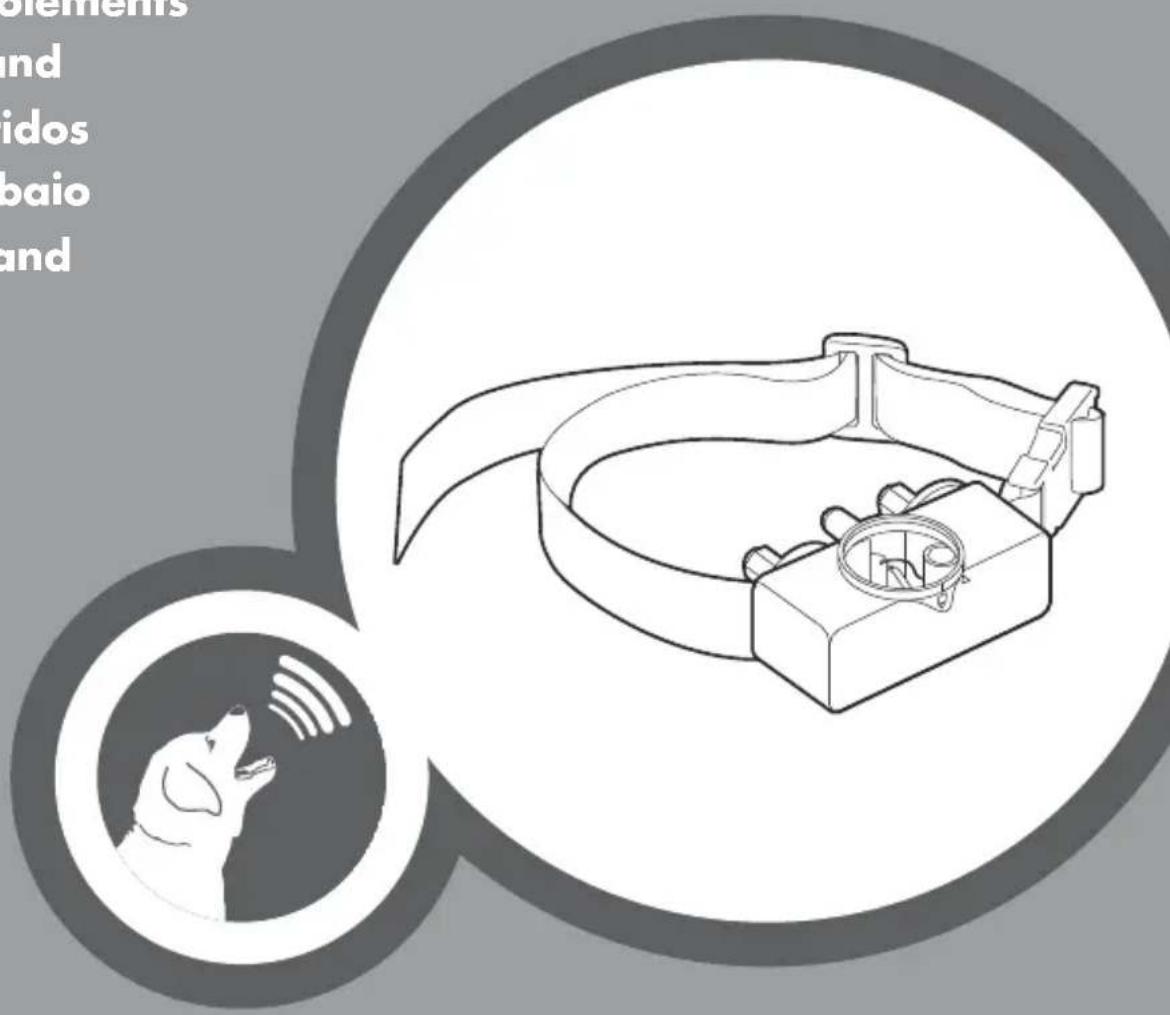
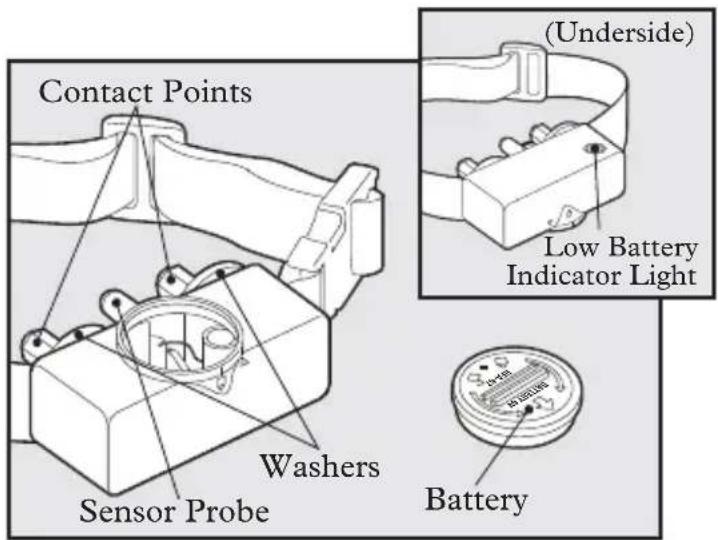
Components
natural_image
Technical line drawing of a mechanical clamp or bracket assembly (no text or symbols)PetSafe® Bark Control Collar
Operating Guide
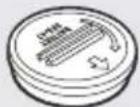
Battery
(PetSafe® RFA-67D-11)
Features
- 6 levels of static correction, automatically adjusts to your dog's temperament starting at the lowest level
- Waterproof
- Low Battery Indicator Light
How the PetSafe® Bark Control Collar Works
Effective pet training requires consistency. The PetSafe® Bark Control Collar automatically and consistently corrects excessive barking in dogs. When the vibration of your dog's bark triggers the sensor probe, a static correction is administered through the contact points. The Bark Control Collar starts with the lowest level of correction and then increases through 6 levels each time your dog barks within 30 seconds of the previous bark. If your dog does not bark again within 30 seconds, the Bark Control Collar resets itself to the lowest level of correction. Along with each static correction, there will be an audible beep. For safety, the Bark Control Collar shuts off for 3 minutes if your dog barks 15 times or more within 50 seconds.
Important: Before playing with your dog, remove the Bark Control Collar. The activity may cause your dog to bark, which could lead to him associating the play with the static correction.
Key Definitions
Contact Points: Deliver the safe static correction.
Sensor Probe: Detects the vibrations of your dog's barking.
Note: The Sensor Probe is not adjustable.
Low Battery Indicator: The Indicator Light will begin flashing when battery is low.
Fit the Bark Control Collar
Important: The proper fit and placement of your Bark Control Collar is important for effective operation. The Contact Points must have direct contact with your dog's skin on the underside of his neck.
To assure a proper fi t, please follow these steps:
-
Make sure that the battery is not installed in the Bark Control Collar.
-
Start with your dog standing comfortably.
-
Place the Bark Control Collar on your dog's neck close to the ears. Centre the Contact Points underneath your dog's neck, touching the skin.

natural_image
Illustration of two dogs: one standing and eating, the other sitting and crossed with a prohibition symbol (no text or labels)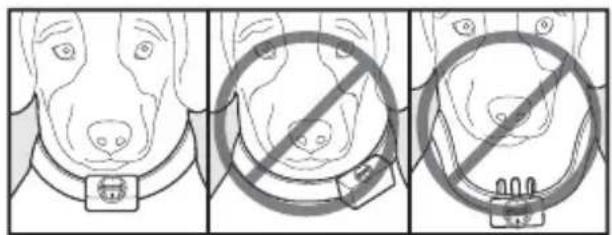
CAUTION You may need to trim the hair in the area of the Contact Probes. Never shave the dog's neck; this may lead to a rash or infection..
-
Check the tightness of the Bark Control Collar by inserting one finger between the end of a Contact Point and your dog's neck. The fi t should be snug but not constricting.
-
Allow your dog to wear the Bark Control Collar for several minutes then recheck the fi t. Check the fi t again as your dog becomes more comfortable with the Bark Control Collar.

natural_image
Illustration of a dog being fed with food, showing two stages of eating (no text or symbols present)CAUTION You should not make the collar any more tight than is required for good contact. A collar that is too tight will increase the risk of pressure necrosis in the contact area.
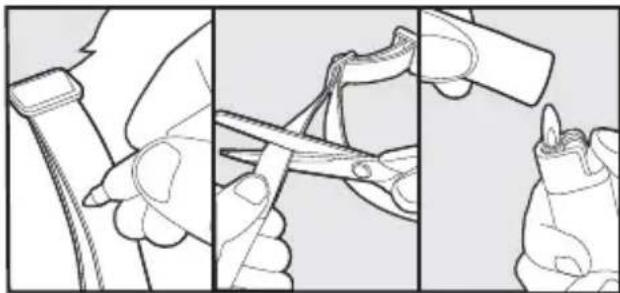
- Trim the collar as follows:
a. Mark the desired length of the Bark Control Collar with a pen. Allow for growth if your dog is young or grows a thick winter coat.
b. Remove the Bark Control Collar from your dog and cut off the excess.
c. Before placing the Bark Control Collar back onto your dog, seal the edge of the cut collar by applying a flame along the frayed edge.
natural_image
Three-step illustration showing a hand holding a tool, cutting a piece into a pair of scissors (no text or symbols present)Care and Cleaning
- Your dog's neck and the Contact Points must be washed weekly with a damp cloth.
- Be sure that your pet's neck is thoroughly dry before placing the Receiver Collar back on his neck.
CAUTION Risk of skin damage.
- For comfort, safety and effectiveness of this product, please ensure that you check the fit of your pet's collar frequently. If any skin irritation is observed, discontinue the use of the collar for a few days. If the condition persists beyond 48 hours, see your veterinarian.
- Do not attach a lead to the collar. This can result in pulling the Contact Points too tightly against your pet's neck. Attach a lead to a separate, non-metallic collar or harness, making sure the extra collar does not put pressure on the Contact Points.
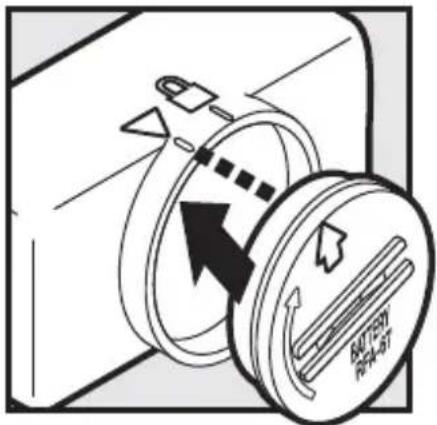
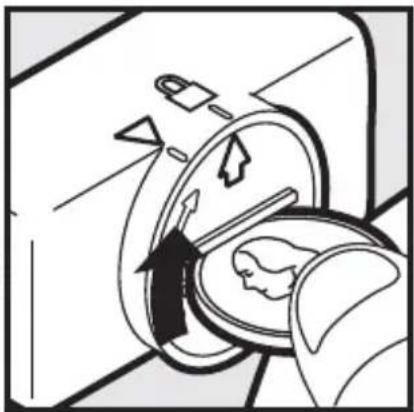
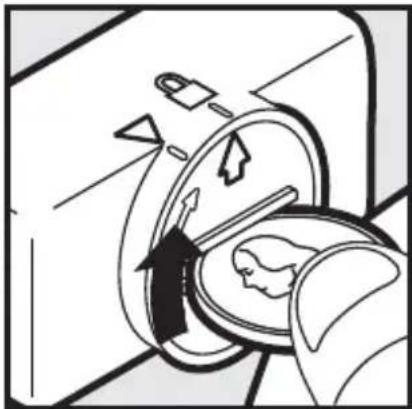
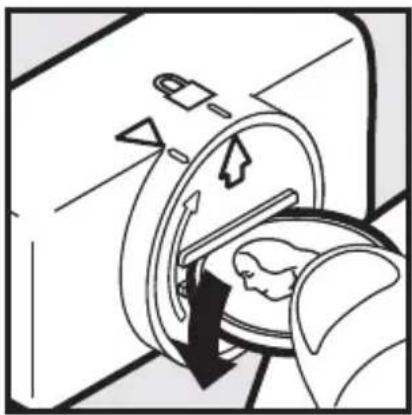
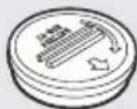
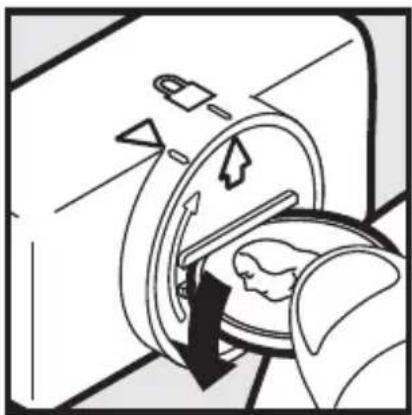
To Insert and Remove the Battery
Note: Do not install the battery while the Bark Control Collar is on your dog.
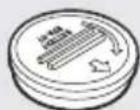
This Bark Control Collar utilizes a replaceable PetSafe® battery (RFA-67D-11). This unique battery is designed to make battery replacement easier and increase water protection.
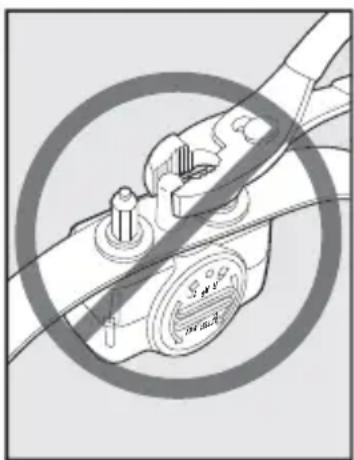
To insert the battery, align the symbols on the battery (arrow) and Bark Control Collar (triangle). Use a large coin to turn the battery clockwise until the arrow lines up with the lock symbol on the housing.
To remove the battery, turn the battery counter-clockwise using a large coin.
natural_image
Diagram of a medical procedure showing a patient undergoing CT scan with arrows indicating motion (no text or labels)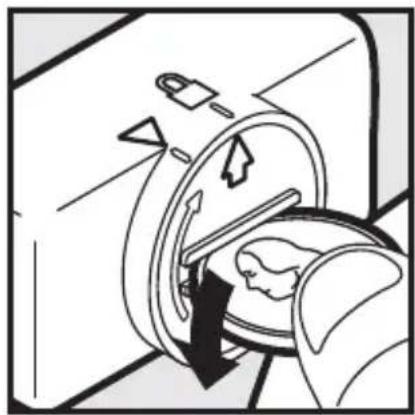
natural_image
Diagram of a mechanical device with arrows indicating motion or force, showing internal components and directional arrows (no text or symbols)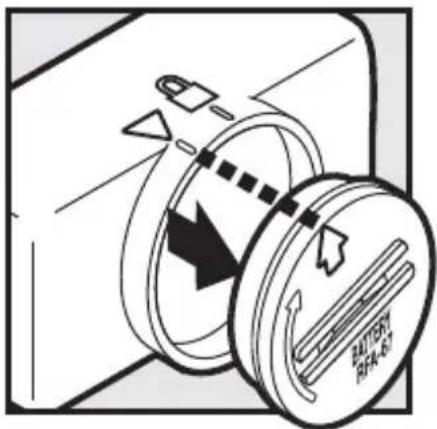
⚠ WARNING DO NOT attempt to cut into or pry open the battery. Be sure to discard the used battery properly.
A replacement PetSafe® battery (RFA-67D-11) can be found through our Customer Care Centre and at many retailers. For a listing of Customer Care Centre telephone numbers or a retailer near you, visit our website at www.petsafe.net.
Battery Life
Average battery life is 3 to 6 months, depending on how often your dog barks. However, due to your dog's learning process, your first battery may not last as long as replacement batteries.
Low Battery Indicator
During normal operation the Indicator Light remains off. As the product is used, the battery will be drained to a weakened state. At this point, the Indicator Light will begin to flash to show that it is time to change the battery.
What to Expect During Use of the Bark Control Collar
Important: Do not leave your dog alone the first few times he receives a static correction.
Place the Bark Control Collar properly on your dog and wait nearby until he barks. Most dogs will understand very quickly that the Bark Control Collar is disrupting their urge to bark and will relax and stop barking. Some dogs will bark more, and as the static correction from the Bark Control Collar may be surprising or startling, some dogs may vocalize in response to the initial correction.
Rarely, a dog may get into a bark-correction-bark-correction cycle that could be quite overwhelming. If this happens, reassure your dog with calm, soothing tones. As your dog relaxes, he will understand that if he becomes quiet, he will not receive any more static corrections. The small minority of dogs that have this reaction will only have it the first time they wear the Bark Control Collar.
You should notice a reduction in your dog's barking within the first couple of days that he wears the Bark Control Collar. At this point, some dog owners feel that the problem has been solved, but in most cases the learning process is still not complete. Most dogs will “test” this new learning experience and will increase their attempts to bark. This usually occurs during the second week a dog wears the Bark Control Collar. If this does occur, remain consistent and do not alter your use of the Bark Control Collar. You must place the Bark Control Collar on your dog in every situation when you expect him to be quiet. If your dog is not wearing the Bark Control Collar, he may resume barking and his learning would suffer a setback.
Regular Maintenance
- Check Contact Points for tightness weekly. Note: Do not adjust the factory preset Sensor Probe.
- Clean Contact Points weekly.
- Check your dog's neck for irritation and wash neck weekly.
natural_image
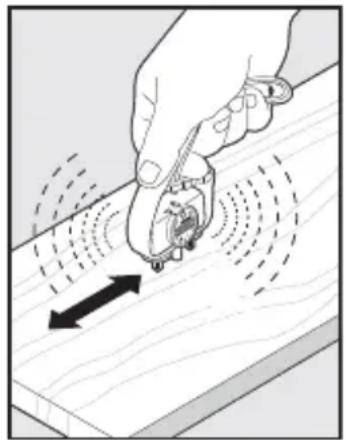
Diagram of a hand using a tool to adjust or install a mechanical component, enclosed in a circular frame (no text or symbols visible)To Test the Bark Control Collar
Slide the Sensor Probe across a rough surface for at least 25 cm (10 in). The Bark Control Collar should beep. If your Bark Control Collar doesn't beep during this test, see “The Bark Control Collar does not beep” in the “Troubleshooting” section, and continue with the second step.
natural_image
Illustration of a hand using a tool to cut or mark a wooden surface with motion arrows (no text or symbols)Accessories
To purchase additional accessories for your PetSafe® Bark Control Collar, visit our website at www.petsafe.net to locate a retailer near you and for a listing of Customer Care Centre telephone numbers in your area.
| Component Part Number | |
| Battery - two pack RFA-67D-11 | |
| Replacement Collar RFA-68 | |
| Accessory Pack (Extra Contact Points, washers, and battery) | RFA-118 |
| Frequently Asked Questions | |
| Will my dog stop barking completely? | ·The Bark Control Collar effectively and humanely stops most barking when it is worn. It should only be worn during periods of unwanted barking. |
| Will another dog's bark set off the Bark Control Collar? | ·No. |
| Will it hurt my pet? | ·No. The static stimulation is designed to get your pet's attention, but not punish him. The initial static correction may startle your dog; most pets will only receive a few static corrections during normal usage. |
| Will the Bark Control Collar work for my dog? | ·The Bark Control Collar is safe and effective for all breeds and sizes of dogs, though it may be too large for dogs under 3.6 kg (8 lbs) to wear comfortably. ·The system should only be used with pets who are over 6 months of age. If your pet is injured or its mobility is otherwise impaired, contact your veterinarian or professional trainer before use. |
| Can I attach a lead to the Bark Control Collar? | ·No. This can result in pulling the Contact Points too tightly against your pet's neck. Attach a lead to a separate, non-metallic collar, making sure the extra collar does not put pressure on the Contact Points. |
| Troubleshooting | |
| The Bark Control Collar does not beep. | Test the Bark Control Collar (see “To Test the Bark Control Collar” section).If your Bark Control Collar does not beep during this test, try the same test on a rougher surface.Ensure that the battery is properly installed.Replace the battery.If the Bark Control Collar still does not beep, contact the Customer Care Centre. |
| My dog keeps barking (does not respond to the static correction). | Tighten the Bark Control Collar and/or trim your dog’s hair where the Contact Points touch his neck to ensure good skin contact.Test the Bark Control Collar (see “To Test the Bark Control Collar” section).Replace the battery.Contact the Customer Care Centre. |
| The Indicator Light keeps fl ashing. | Replace the battery.If the light continues to fl ash with a new battery, contact the Customer Care Centre. |
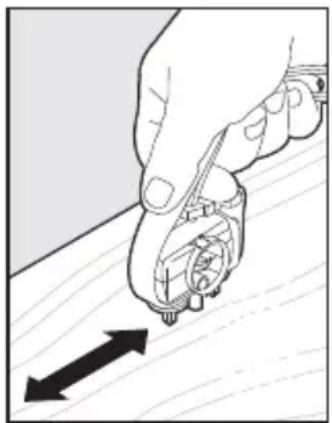
To Discharge the Bark Control Collar
Important: Avoid touching the Contact Points and Sensor Probe unless the Bark Control Collar is completely discharged.
After battery removal, the Bark Control Collar retains some stored energy and may activate 2 or 3 additional times. To completely discharge the Bark Control Collar, slide the Sensor Probe across a table or hard surface several times, until the Bark Control Collar stops beeping.
natural_image
Illustration of a hand using a tool to cut or snap on a wooden surface, with an arrow indicating the direction (no text or symbols present)
Battery Disposal
Separate collection of spent batteries is required in many regions; check the regulations in your area before discarding spent batteries. Please see page 8 for instructions on how to remove the battery pack from the product for separate disposal. This device operates on 1 lithium manganese battery of the 6 Volt, 220mAh capacity; replace only with equivalent battery.

Important Recycling Advice
Please respect the Waste Electrical and Electronic Equipment regulations in your country. This equipment must be recycled. If you no longer require this equipment, do not place it in the normal municipal waste system. Please return it to where it was purchased in order that it can be placed in our recycling system. If this is not possible, please contact the Customer Care Centre for further information. For a listing of Customer Care Centre telephone numbers, visit our website at www.petsafe.net
Compliance CE
This equipment has been tested and found to comply with the EU Electromagnetic Compatibility and Low Voltage Directive. Unauthorized changes or modifications to the equipment that are not approved by Radio Systems® Corporation could void the user's authority to operate the equipment, and void the warranty.
This equipment has been tested and found to comply with the EU Electromagnetic Compatibility and Low Voltage Directive. Unauthorized changes or modifications to the equipment that are not approved by Radio Systems® Corporation could void the user's authority to operate the equipment, and void the warranty.
This product is in compliance with the provisions of the EMC and LV directives. The Declaration of Conformity can be found at: www.petsafe.net/customercare/eu_docs.php
Canada
Canadian Compliance Operation is subject to the following two conditions: (1) This device may not cause interference and (2) This device must accept any interference, including interference that may cause undesired operation of the device.
Modifi cations or changes could void the user's authority to operate this equipment.
This Class B digital apparatus complies with Canadian ICES-003.
Australia
This device complies with the applicable EMC requirements specified by the ACMA (Australian Communications and Media Authority).
Terms of Use and Limitation of Liability
1. Terms of Use
Use of this Product is subject to your acceptance without modification of the terms, conditions and notices contained herein. Use of this Product implies acceptance of all such terms, conditions and notices. If you do not wish to accept these terms, conditions and notices, please return the Product, unused, in its original packaging and at your own cost and risk to the relevant customer care centre together with proof of purchase for a full refund.
2. Proper Use
This Product is designed for use with pets where training is desired. The specific temperament or size/weight of your pet may not be suitable for this Product (please refer to “How the System Works” in this Operating Guide). Radio Systems Corporation recommends that this Product is not used if your pet is aggressive and accepts no liability for determining suitability in individual cases. If you are unsure whether this Product is appropriate for your pet, please consult your veterinarian or certified trainer prior to use. Proper use includes, without limitation, reviewing the entire Operating Guide and any specific Caution statements.
3. No Unlawful or Prohibited Use
This Product is designed for use with pets only. This pet training device is not intended to harm, injure or provoke. Using this Product in a way that is not intended could result in violation of Federal, State or local laws.
4. Limitation of Liability
In no event shall Radio Systems® Corporation or any of its associated companies be liable for (i) any indirect, punitive, incidental, special or consequential damage and/ or (ii) any loss or damages whatsoever arising out of or connected with the misuse of this Product. The Purchaser assumes all risks and liability from the use of this Product to the fullest extent permissible by law. For the avoidance of doubt, nothing in this clause 4 shall limit Radio Systems® Corporation’s liability for human death or personal injury or fraud or fraudulent misrepresentation.
5. Modification of Terms and Conditions
Radio Systems® Corporation reserves the right to change the terms, conditions and notices governing this Product from time to time. If such changes have been notified to you prior to your use of this Product, they shall be binding on you as if incorporated herein.
natural_image
Technical line drawing of a mechanical clamp or bracket assembly (no text or symbols)Collier anti-aboiements de PetSafe®

Pile
(PetSafe® RFA-67D-11)
Caractéristiques
natural_image
Illustration of two dogs facing each other, one holding a dog and the other with a crossed-out circle (no text or symbols)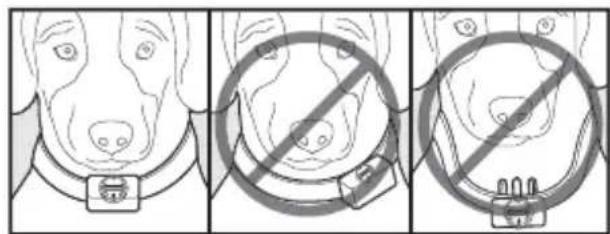
ATTENTION
natural_image
Illustration of a dog being fed with a small object, showing two different stages of feeding (no text or symbols present)ATTENTION
natural_image
Three-step illustration showing a person using a tool to cut a cable, then to draw a clip (no text or symbols present)Entretien
natural_image
Diagram of a medical procedure showing a patient undergoing CT scan with arrows indicating motion (no text or labels)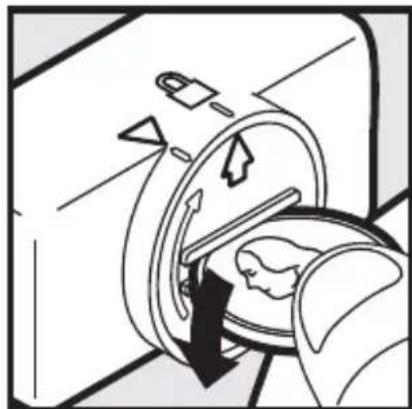
natural_image
Diagram of a mechanical device with arrows indicating motion or force, showing internal components and directional arrows (no text or symbols)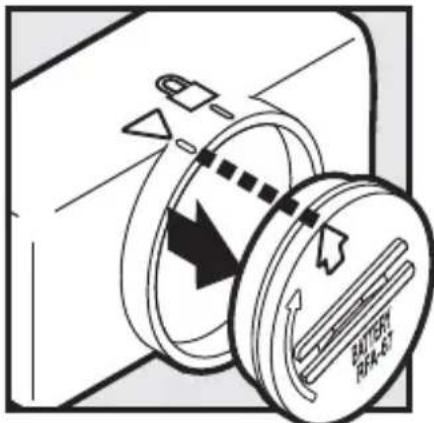
natural_image
Diagram of a hand using a tool to adjust or install a mechanical component, enclosed in a circular frame (no text or symbols visible)Pour tester le collier anti-aboiements
natural_image
Illustration of a hand using a tool to cut or mark on a wooden surface with motion arrows (no text or symbols)Accessoires
natural_image
Hand holding a small mechanical component with an arrow indicating direction (no text or symbols)
natural_image
Technical line drawing of a mechanical clamp or bracket assembly (no text or symbols)PetSafe® antiblafhalsband
Gebruiksaanwijzing
Batterij
(PetSafe® RFA-67D-11)
Kenmerken
natural_image
Illustration of two dogs: one standing and one sitting, separated by a diagonal line (no text or symbols)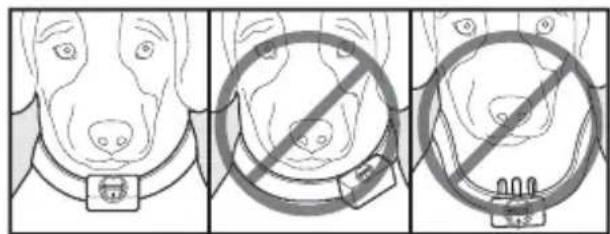
natural_image
Illustration of a dog being held by hands, showing two different expressions (no text or symbols present)natural_image
Three-step illustration showing a person using a tool to cut a cable, then to draw a clip (no text or symbols present)natural_image
Diagram of a mechanical device with arrows indicating motion or force direction (no text or symbols)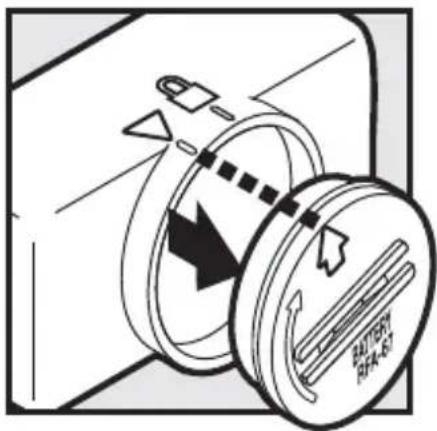
⚠ WAARSCHUWING
natural_image
Diagram of a hand using a tool to adjust or install a mechanical component, enclosed in a circular frame (no text or symbols visible)Testen van de antiblafhalsband
natural_image
Illustration of a hand using a tool to interact with a wooden surface, showing motion arrows (no text or symbols)Accessoires
natural_image
Hand holding a small mechanical component with an arrow indicating downward motion (no text or symbols)
natural_image
Technical line drawing of a mechanical clamp or bracket assembly (no text or symbols)Collar antiladridos de PetSafe®
natural_image
Illustration of two dogs facing each other, one standing and one sitting, separated by a diagonal line (no text or symbols)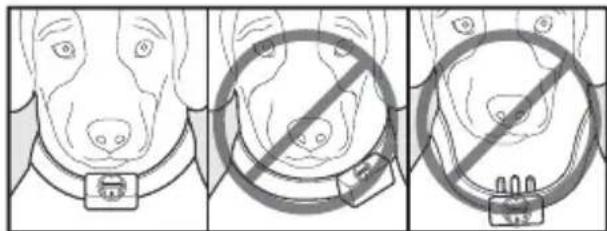
ATENCIÓN
natural_image
Illustration of a dog being fed with a cup, showing two different stages of feeding (no text or symbols present)ATENCIÓN
natural_image
Three-step illustration showing a hand holding a tool, cutting a cable, and adjusting a tool with scissors (no text or symbols present)Cuidado y Limpieza
natural_image
Diagram of a mechanical device with arrows indicating motion or force, showing internal components and directional arrows (no text or symbols)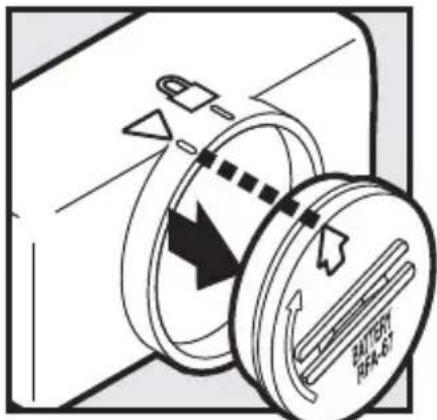
natural_image
Diagram of a car interior showing airflow direction and valve placement (no text or symbols)
natural_image
Illustration of a hand using a tool to interact with a wooden surface, showing motion arrows (no text or symbols)Accesorios
natural_image
Hand holding a mechanical tool with a ruler, pointing downward with an arrow (no text or symbols visible)
natural_image
Technical line drawing of a mechanical clamp or bracket assembly (no text or symbols)Guida all'uso
Batteria
(PetSafe® RFA-67D-11)
Caratteristiche
natural_image
Illustration of two dogs: one eating and one eating with a prohibition symbol (no text or labels)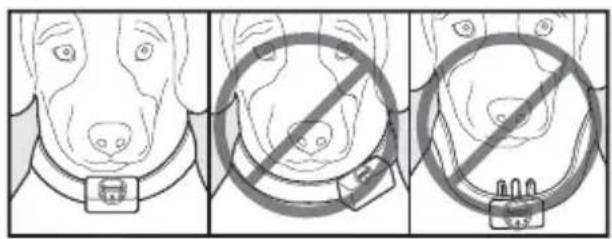
ATTENZIONE
natural_image
Illustration of a dog being fed with a small object, showing two different expressions (no text or symbols present)ATTENZIONE
natural_image
Three-step illustration showing a person using a tool to cut a cable, then to draw a clip (no text or symbols present)natural_image
Diagram of a mechanical device with arrows indicating motion or force direction (no text or symbols)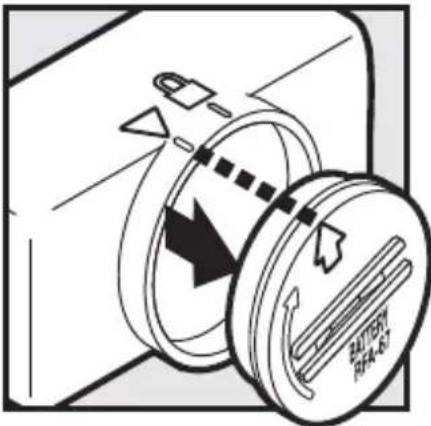
natural_image
Diagram of a mechanical device with arrows indicating motion or force direction (no text or symbols)
natural_image
Diagram of a hand using a tool to interact with a circular mechanical device (no text or symbols visible)natural_image
Illustration of a hand using a tool to cut a wooden surface with motion arrows indicating movement (no text or symbols)Accessori
natural_image
Hand holding a small mechanical component with an arrow indicating direction (no text or symbols)
Schlüsseldefinitionen....69
natural_image
Technical line drawing of a mechanical clamp or bracket assembly (no text or symbols)PetSafe® Anti-Bell-Halsband
Gebrauchsanweisung

Batterie
(PetSafe® RFA-67D-11)
Funktionen
Schlüsseldefi nitionen
natural_image
Illustration of two dog illustrations: one with a bite and another with a prohibition symbol (no text or symbols present)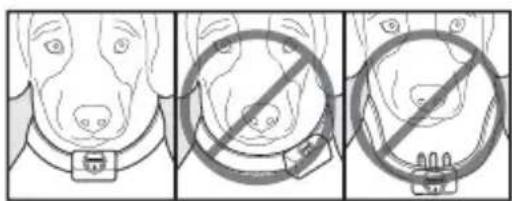
natural_image
Illustration of a dog being held by hands, showing two different positions (no text or symbols present)natural_image
Three-step illustration showing a hand holding a tool, cutting a cable into a clip, and adjusting the tip of a tool (no text or symbols present)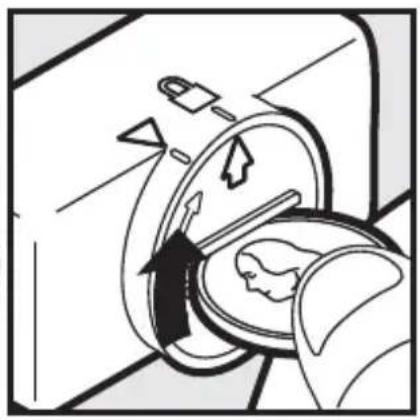
natural_image
Diagram of a medical procedure showing a patient undergoing a procedure with arrows indicating direction (no text or labels)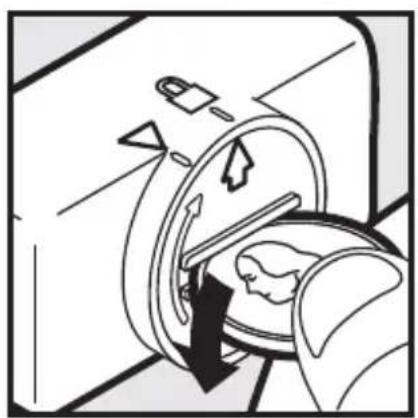
natural_image
Diagram of a medical procedure showing a patient undergoing CT scan with arrows indicating motion (no text or labels)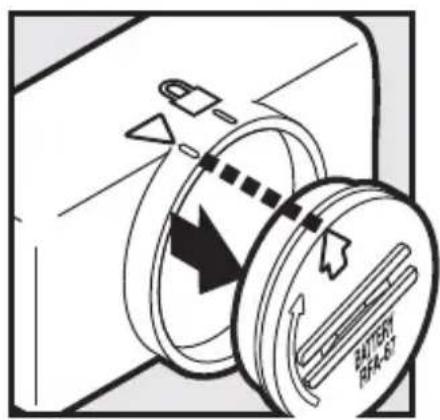
WARNING
natural_image
Diagram of a hand using a tool to adjust or install a mechanical component, enclosed in a circular frame (no text or symbols visible)Testen des Anti-Bell-Halsbands
natural_image
Illustration of a hand using a tool to interact with a wooden surface, showing motion arrows (no text or symbols)Zubehör
natural_image
Illustration of a hand using a tool to cut or mark a piece of paper or tape, with an arrow indicating the process (no text or symbols present)
Batterieentsorgung
10427 Electric Avenue
Knoxville, TN 37932 USA
(865) 777-5404
www.petsafe.net
400-1169-19
©2010 Radio Systems Corporation