
CM210710 - Coffee machine GAGGENAU - Free user manual and instructions
Find the device manual for free CM210710 GAGGENAU in PDF.
User questions about CM210710 GAGGENAU
0 question about this device. Answer the ones you know or ask your own.
Ask a new question about this device
Download the instructions for your Coffee machine in PDF format for free! Find your manual CM210710 - GAGGENAU and take your electronic device back in hand. On this page are published all the documents necessary for the use of your device. CM210710 by GAGGENAU.
USER MANUAL CM210710 GAGGENAU
natural_image
Front view of a kitchen appliance cabinet with control panel and door controls (no text or symbols)Use and Care Manual. 4
Read this manual thoroughly for important safety and operating instructions before using this appliance.
IMPORTANT SAFETY PRECAUTIONS 6
Overview 8
Controls 8
Appliance components 8
Before using your appliance for the first time 10
General 10
Switching on the appliance 11
Filling up the pipe system 11
Selecting the language 11
Controls 12
Preparation 15
General 15
Using espresso/ coffee beans 15
Adjusting the grinding unit 16
Using ground coffee 16
Preparing hot water 17
Steam for heating drinks 17
Preparing frothy milk 18
Changing settings / programming 19
Programming 19
Language 20
Water hardness 20
Water filter 21
Temperature 23
Current time 23
Timer 23
Standby mode 24
Displaying number of brews 24
RESET function 24
System messages 25
Cleaning the appliance 26
Daily cleaning 26
Cleaning program 27
Cleaning the nozzle 29
Descaling the appliance 30
Draining hot water 32
Trouble shooting 33
⚠️ IMPORTANT SAFETY PRECAUTIONS
WARNING: to avoid risk of fire and electric shock that can exist in all electrical appliances, basic safety precautions, including the following, should always be practiced:
When using electrical appliances, basic safety precautions should always be followed, including the following:
- Read all instructions.
- Do not touch hot surfaces. Use handles or knobs.
- To protect against fire, electric shock and personal injury, do not immerse cord, plug or appliance in water or other liquids.
- Close supervision is necessary when any appliance is used by or near children. When children become old enough to use the appliance, it is the legal responsibility of the parents or legal guardian to ensure that they are instructed in safe practices by qualified persons.
- Unplug from outlet when not in use and before cleaning. Allow the appliance to cool before putting on or taking off parts, and before cleaning the appliance.
- Do not operate any appliance with a damaged cord or plug or after the appliance malfunctions, or has been damaged in any way. Return appliance to the nearest authorized service facility for examination, repair or adjustment.
- The use of accessory attachments not recommended by the appliance manufacturer may result in fire, electric shock, or personal injury.
- Do not use outdoors.
- Do not let the cord hang over the edge of a table or counter, or touch hot surfaces.
- Do not place on or near a hot gas or electric burner, or in a heated oven.
- To disconnect, turn any control to "off" then remove plug from wall outlet.
- Do not use appliance for other than intended use.
- Use extreme caution when dispensing hot steam as described in this manual.
SAVE THESE INSTRUCTIONS
HOUSEHOLD USE ONLY
⚠️ CAUTION
This appliance is designed for domestic use and for processing normal quantities of food and not for industrial use. Any servicing other than cleaning and user maintenance should be performed by an authorized service representative.
☐ Do not immerse base in water or try to disassemble.
☐ To reduce the risk of fire or electric shock, do not open the enclosure. Repair should be done by authorized service personnel only.
☐ Check voltage to be sure that the voltage indicated on the name plate agrees with your voltage.
☐ Do not use the inner compartment for storing heavy parts and do not load.
☐ To prevent fingers or hands from being pinched or crushed, carefully push back the inner compartment into the appliance.
☐ Never use warm or hot water to fill the water container! Use cold water only.
- Keep your hands and the cord away from hot parts of the appliance during operation.
☐ Never clean with scouring powders or hard implements.
□ Never use a steam cleaner.
☐ Carefully read the operating instructions and save these instructions.
☐ Do not touch the grinder!
☐ Do not allow persons (also children) with restricted physical sensory perception or mental abilities or with lack of experience and knowledge to operate the appliance unless they are supervised or have been instructed in the use of the appliance by somebody who is responsible for their safety.
A short power supply cord is provided to reduce the risk resulting from becoming entangled in or tripping over a longer cord.
Extension cords are available and may be used if care is exercised in their use. If an extension cord is used,
- the marked electrical rating of the extension cord should be at least as great as the electrical rating of the appliance, and
- the longer cord should be arranged so that it will not drape over the counter of a table top where it could be pulled on by children or tripped over unintentionally.
This appliance has a polarized plug (one prong is wider than the other). As a safety feature, this plug will fit into a polarized outlet only one way. If the plug does not fill fully into the outlet, reverse the plug. If it still does not fit, contact a qualified electrician. Do not modify the plug in any way.
Overview
Controls
1 Power switch
2 Function selector
coffee / steam / hot water
3 ⏻ On/Off button
4 cafe button
5 Rotary knob for adjusting the filling quantity
- / -
- Display with function buttons (6b)
7 Rotary knob for adjusting the coffee strength
0 - 0
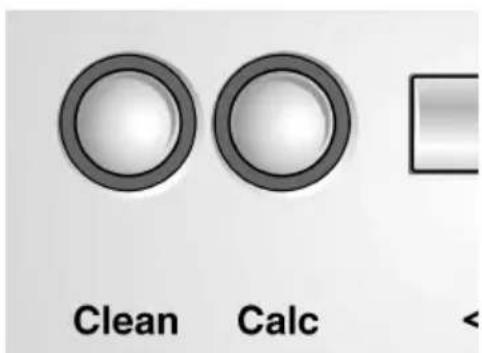
8 Clear button
9 Calc descaling button
Appliance components
10 Height-adjustable
coffee outlet
11 Recessed grip for inner compartment
12 Hinged nozzle (frothing milk/steam/hot water)
a Sleeve
b Nozzle
13 Rotary knob for adjustable grinding degree
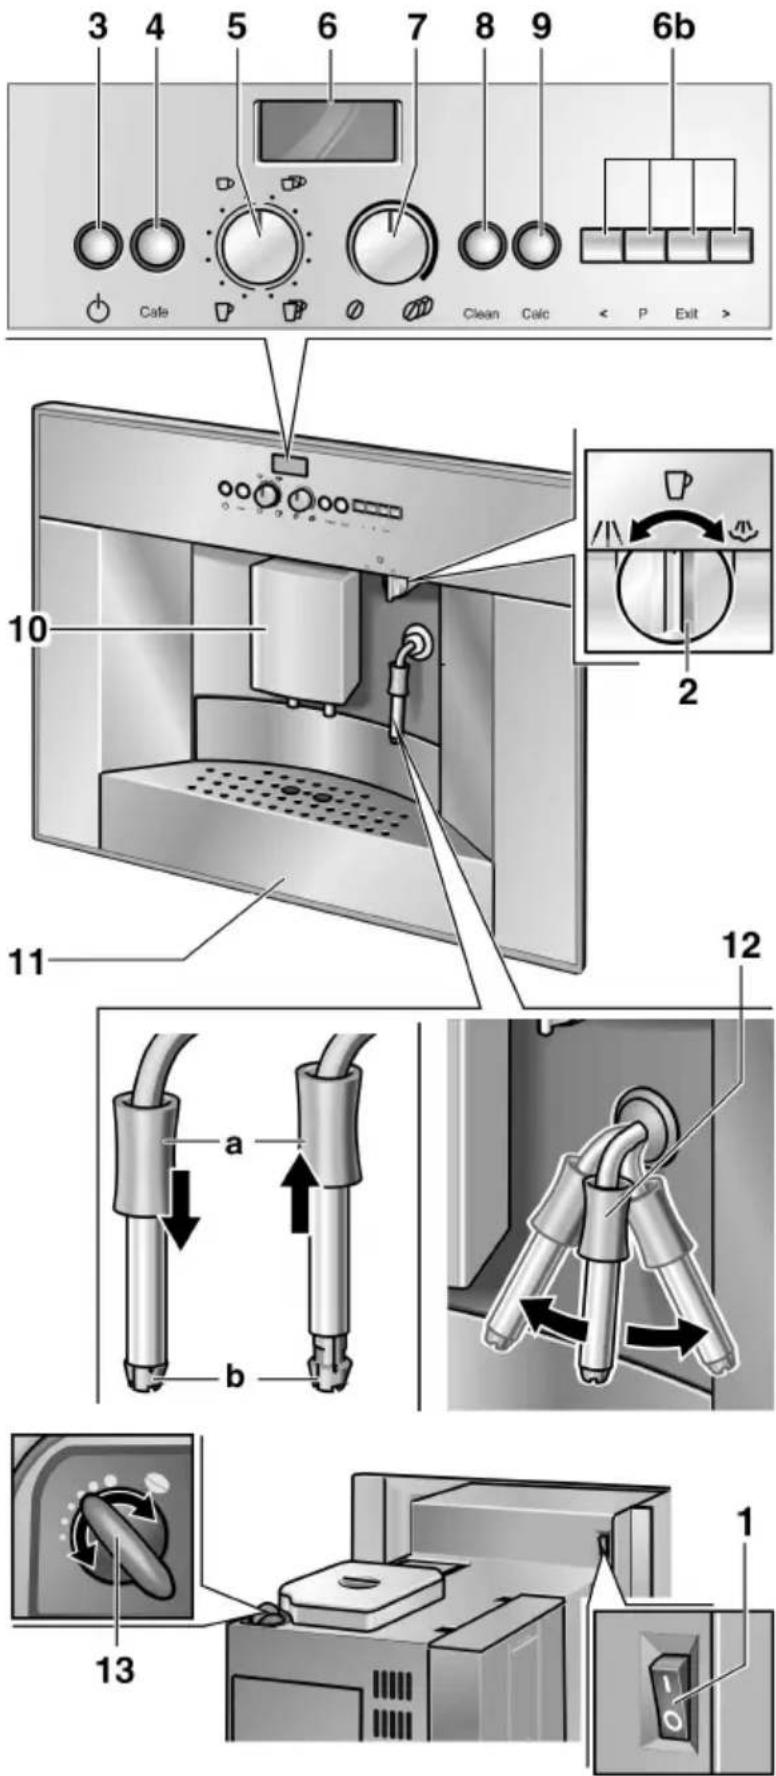
text_image
3 4 5 6 7 8 9 6b Cafe Clean Calc < P Exit > 10 2 11 12 a b 13 1Appliance components
15 Door for brewing unit
16 Ground coffee bypass with cover and cleaning tabled duct
17 Fresh whole bean container with aroma cover
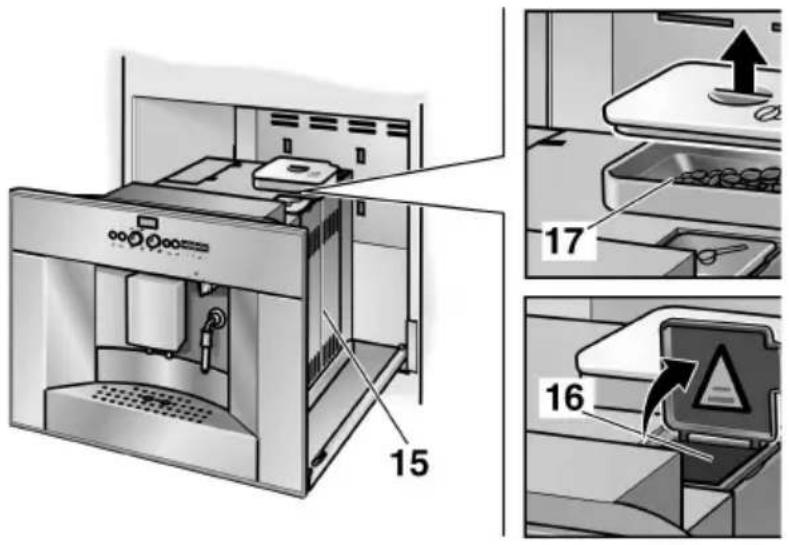
text_image
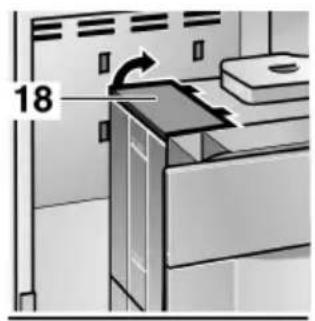
Technical diagram of a kitchen appliance with numbered parts and warning labels18 Lid for water tank
19 Removable water tank
20 Water Filter
text_image
18
natural_image
Technical line drawing of a kitchen appliance with control panel and ventilation unit (no text or symbols)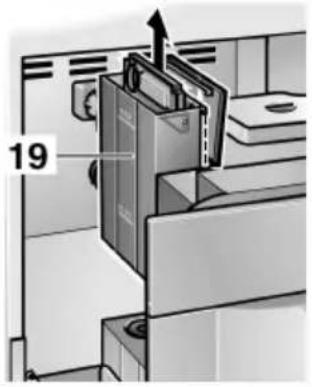
text_image
19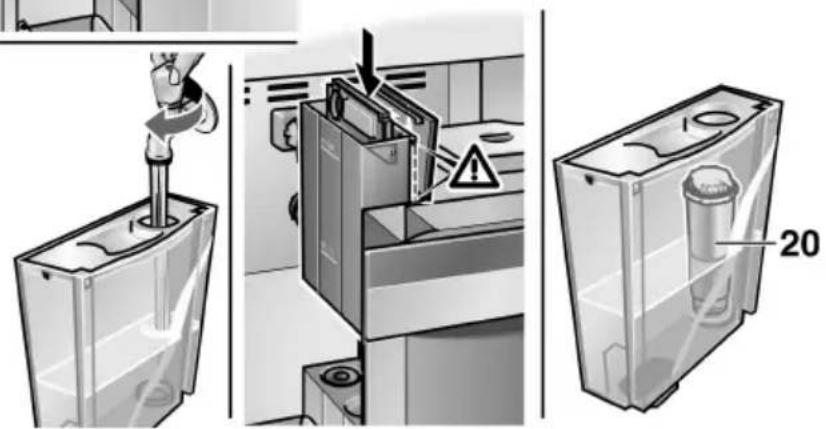
text_image
Technical diagram showing a device assembly process with labeled components and warning indicatorsAppliance components
21 Coffee dreg tray (dishwasher-safe)
22 Splash guard
23 Tray (for residual water)
24 Grille
25 Sensor contacts
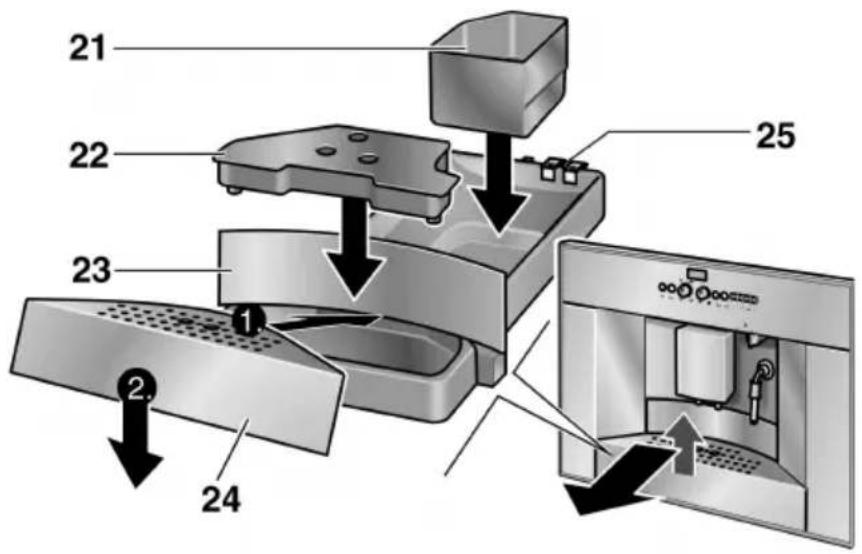
text_image
21 22 23 24 25 1Before using your appliance for the first time
General
Fill the respective containers with pure water and coffee beans only.
Do not use coffee beans which have been glazed, caramelized or treated with other additives containing sugar.
Ascertain the water hardness with the enclosed test strip. If a hardness value other than 3 is indicated, switch on the appliance and program accordingly (see page 20).
Switching on the appliance
COFFEE
☐ Take hold of the appliance by the recessed grip 11 and pull forwards.
☐ Connect the coiled cable to the chassis.
☐ Fill water tank 19 with cold fresh water. Do not fill above “max. mark.
☐ Fill the bean container 17 with coffee beans.
☐ Set power switch to I.
☐ Return the inner compartment into original position.
☐ Set function selector to □.
□ Press button 🔊.
The appliance is ready for use when the illuminated rings on button and on the Cate button are lit green.
Note: If the appliance is being used for the first time or has not been operated for a prolonged period, the first cup of coffee will not have the full aroma.
Filling up the pipe system
When switched on for the first time, the water pipe system in the appliance may have to be refilled:
☐ Press the Code button.
FILL UP PRESS PIPE-SYS CAFE
PIPE-SYS FILLS UP
Selecting the language
LANGUAGE ENGLISH
To change the display to the desired language:
☐ Hold down buttonP on the display for at least 3 seconds.
☐ Press buttonP until the display flashes.
□ Select the desired language with < or > .
☐ Press buttonP to save the language.
☐ Press the Exit button.
Controls
natural_image
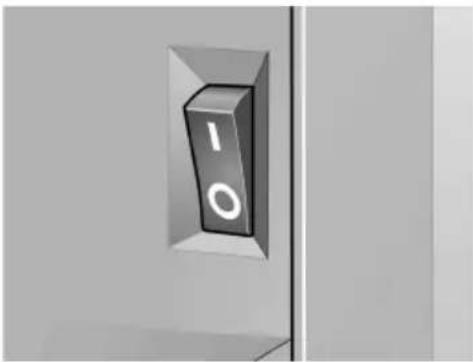
Close-up of a black 3D button labeled 'I O' on a metallic surface (no additional text or symbols)Power switch
The power switch on the rear of the appliance switches the power supply on or off.
When the power switch has been switched on, the illuminated ring on button ⏻ is lit green.
The appliance is in standby mode.
CAUTION
Do not press the power switch while the appliance is operating.
Do not switch off the appliance until it is in standby mode.
natural_image
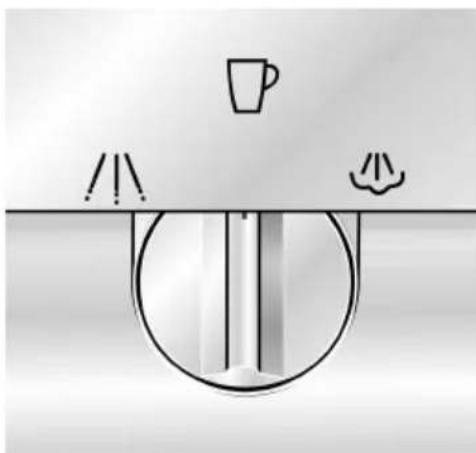
Simple line drawing of a balance scale with a cup, beer mug, and spoon (no text or symbols)Function selector
Coffee, hot water or steam can be selected by rotating function selector.

WARNING

Avoid the risk of scalding!
When the function selector is set to ☐ or ☐, the nozzle may spurt slightly. Escaping water or steam is very hot.
Do not touch nozzle 12 or direct at people!
COFFEE
WATER
ON
UNIT IS MIND HEATING STEAM
STEAM ON
The settings are displayed:
Coffee on position
Hot water on A position
Steam on position
Displays during the brief heating up period for Steam on.
text_image
< P Exit >
text_image
CafeUNIT IS HEATING
UNIT IS RINSI NG
text_image
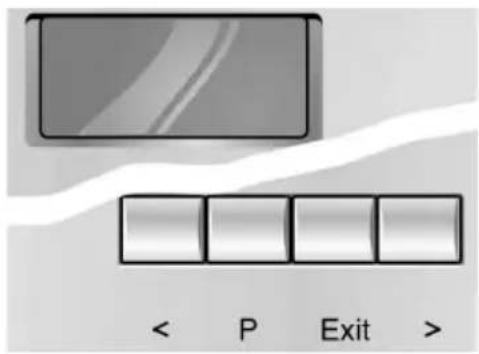
CafeDisplay
Display indicates the settings, the processes which are running and any messages issued by the appliance.
The appliance has been programmed with standard settings for optimum operation. These settings can be changed – see chapter “Changing settings / programming”.
ON/OFF Button 🔊
The appliance is switched on or set to standby mode with button ⏻ .
When button ⏻ is pressed, the appliance heats up and is then rinsed. The illuminated ring on button ⏻ flashes during this process.
The appliance is not rinsed if:
- the appliance was still warm when switched on or - coffee was not discharged before the appliance was switched to "standby" mode.
Heating and washing processes are displayed.
While coffee is being brewed, button ⏻ is assigned a stop function. The process is terminated by pressing button ⏻ .

4 hours after the last coffee was brewed, a rinsing process is automatically initiated and the appliance switches to "standby" mode. These settings can be changed – see chapter "Changing settings / programming".
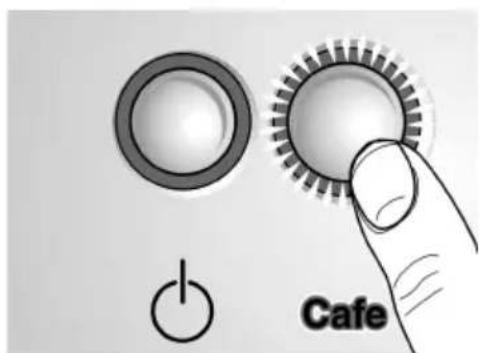
Cafe button
Espresso or coffee can be brewed by pressing the Corte buton. The green illuminated ring flashes while espresso or coffee is being brewed.
If the Care button is pressed again, the coffee brewing process is terminated.
natural_image
Close-up of a circular dial indicator with directional arrows and coffee cups, no readable text or symbolsESPRESSO
2 ESPRESSO
natural_image
Simple clock icon with curved arrows and coins below (no text or symbols)NORMAL PLUS
text_image
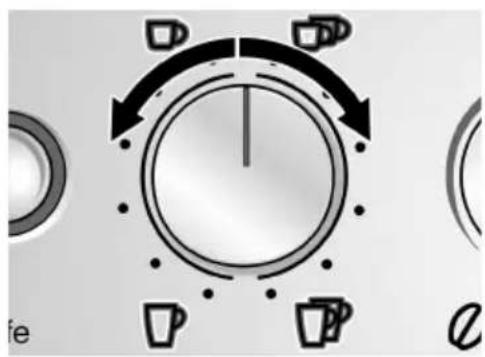
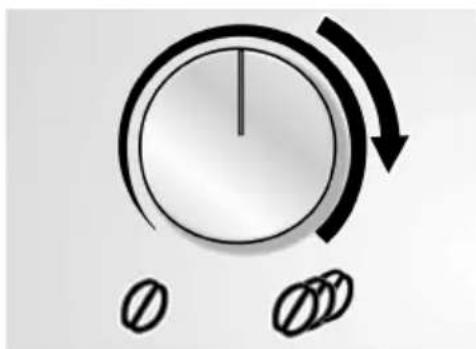
Clean CalcRotary knob for adjusting the filling quantity
$$ \square - \square / \square - \square $$
The amount of liquid can be adjusted by the rotary knob - / - .
One of 6 settings can be selected by turning the knob in an counter-clockwise direction:
SMALL ESPRESSO ESPRESSO SMALL COFFEE COFFEE LARGE COFFEE XXL COFFEE
One of 6 settings can be selected for 2 cups by turning the knob in a clockwise direction:
2 SMALL ESPRESSO 2 ESPRESSO 2 SMALL COFFEES 2 COFFEES 2 LARGE COFFEES 2 XXL COFFEES
Height adjustable coffee dispenser 10 has two nozzles for filling 2 cups.
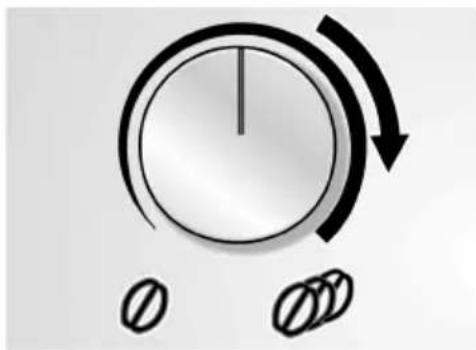
Rotary knob 0 - 0 for adjusting the coffee strength
The amount of ground coffee can be selected by the rotary knob 0 - 0
VERY MILD MILD NORMAL NORMAL PLUS STRONG VERY STRONG
The selected coffee strength is displayed.
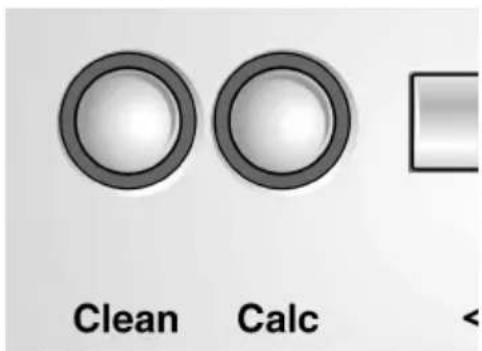
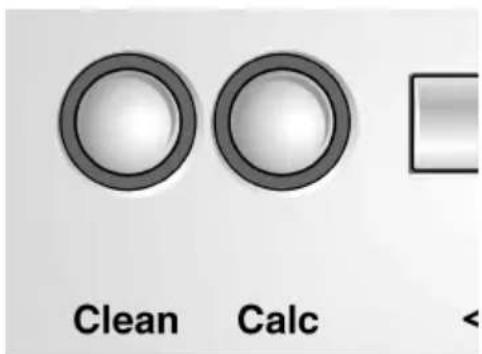
clean button cal: descaling button
If the appliance requires cleaning or descaling, the illuminated ring lights up on the button or the descaling button – see chapter “Cleaning the appliance” or “Descaling the appliance”.
Preparation
General
This fully automatic espresso/coffee machine grinds fresh coffee for each brewing process.
Preferably use a mixture of espresso and coffee beans. Store or deep-freeze in cool, air-tight and sealed containers. Deep-frozen coffee beans can also be ground.
Do NOT use very oily or very dark-roasted coffee beans – This may cause a risk of malfunction.
When using very oily beans, pour the beans onto a plate and let some of the sticky oils evaporate (this will not harm the aroma of the coffee).
Tip: To preheat cups, especially small, thick-walled espresso cups, with hot water and rinse out.
Using espresso/coffee beans
natural_image
Illustration of a coffee machine with a cup pouring liquid, showing control panel and side arm (no text or symbols)□ Set function selector to □.
☐ Select the desired amount of coffee and number of cups with rotary knob ☐ - ☐ / ☐ - ☐ .
☐ Select the preferred coffee strength with rotary knob
∅ - ∅
☐ Place the cup(s) under the dispenser. If required, adjust the height of the dispenser.
☐ Press the button. The brewing process now runs automatically.
Tip: If brewing coffee simultaneously for 2 cups, select STRONG or VERY STRONG.
The brewing process can be terminated by pressing the ☐ button or button ☐ again.
Note: If ADD BEANS is displayed despite a full container, press the Code button again.
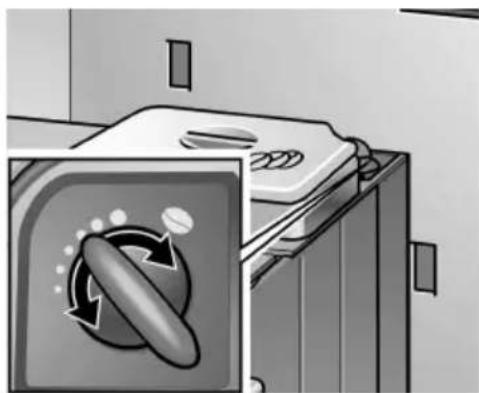
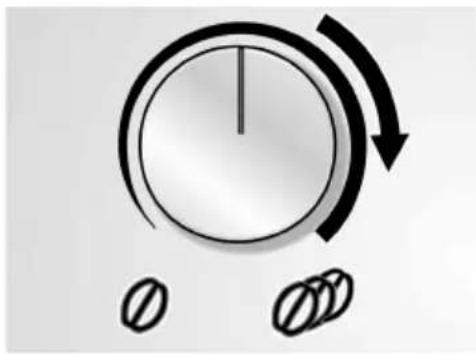
Adjusting the grinding unit
natural_image
Illustration of a washing machine with a circular button labeled 'Recycle' (no text or symbols on the device itself)Using ground coffee
natural_image
Illustration of a hand using a tool to insert or remove material from a mechanical component (no text or symbols visible)☐ The desired degree of ground coffee can be selected with the Rotary knob for degree of ground coffee.
CAUTION
Adjust the degree of grinding only while the grinding unit is running! Otherwise the appliance may be damaged.
☐ Take hold of the inner compartment by the recessed grip 11 and pull forwards.
☐ Press the Code button.
☐ While the grinding unit is running, turn the knob to select the degree of grinding: the smaller the dots the finer the ground coffee. The new setting will not become apparent until the second or third cup of coffee.
☐ Return inner compartment into original position.
☐ Select the desired amount with the rotary knob ☐ - ☐ / ☐ - ☐ .
☐ Place cup(s) under the dispenser. If required, adjust the height of the dispenser.
☐ Take hold of the inner compartment by the recessed grip 11 and pull forwards.
☐ Add one to two level scoops of medium-fine ground coffee to the ground coffee duct.
CAUTION
Do not add whole beans or instant coffee! Add a maximum two scoops of coffee.
☐ Close the cover on the ground coffee duct.
☐ Return inner compartment into original position.
☐ Press the Code button.
i Repeat the process for another cup of preground coffee.
Note: If coffee is not brewed within 90 seconds, the brewing chamber is emptied automatically in order to prevent overfilling. The appliance is rinsed.
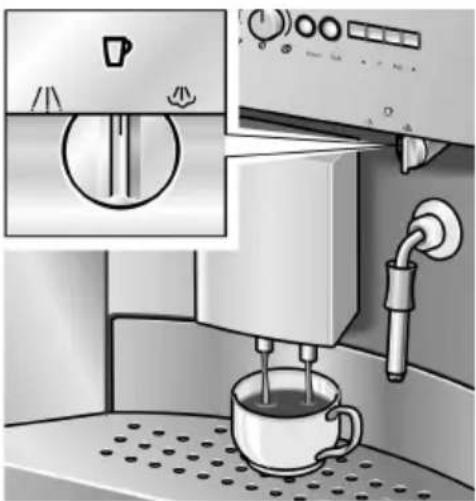
Preparing hot water
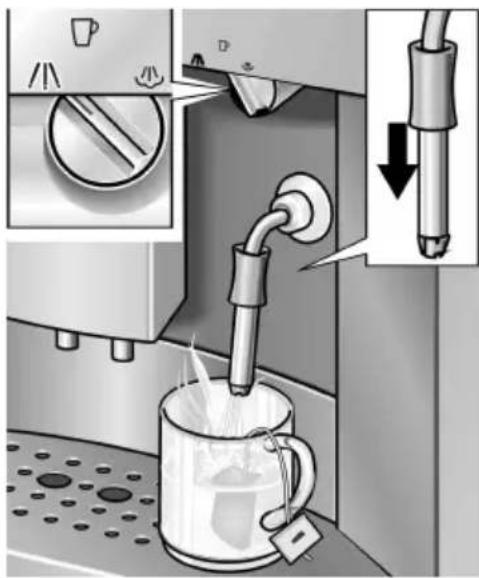
text_image
Diagram illustrating a coffee machine's water drop process with labeled components and directional arrows indicating flow or movement.Steam for heating drinks

text_image
Diagram illustrating coffee machine operation with labeled parts and directional arrows indicating process steps☐ Push down the sleeve a on nozzle.
☐ Place an appropriate cup under the nozzle.
☐ Rotate function selector to and fill the cup.

WARNING

Avoid the risk of scalding!
When the function selector is set to ☐, the nozzle may spurt slightly. Escaping water is very hot.
Do not touch nozzle 12 or direct at people!
☐ End the process by rotating the function selector back to ☐ position.
☐ Push up the sleeve a on nozzle.
☐ Immerse nozzle deep into the liquid which is to be heated.
☐ Slowly rotate function selector to ♦. The appliance now heats up for approx. 20 seconds. Then the liquid is heated.

WARNING

Avoid the risk of scalding!
When the function selector is set to ♦, the nozzle may spurt slightly. Escaping steam is very hot.
Do not touch nozzle 12 or direct at people!
☐ End the process by rotating the function selector back to ☐ position.
Note: When nozzle has cooled down, clean immediately. Dried residue is difficult to remove.
Preparing frothy milk
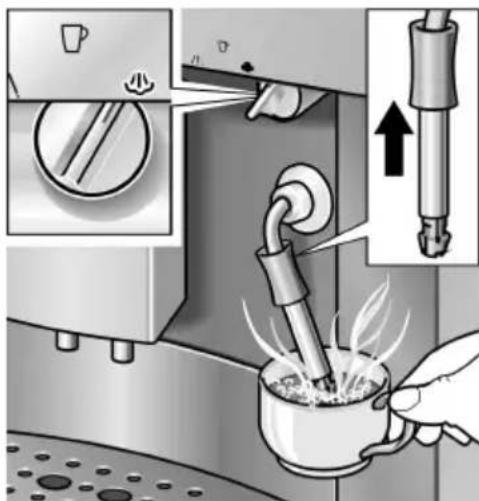
natural_image
Illustration of a coffee machine being heated by a hand using a pipette, with an arrow indicating the process (no text or symbols present)☐ Push down the sleeve a on nozzle.
☐ Fill a cup approx. 13 full of milk.
☐ Immerse nozzle approx. 34 " (2 cm) into the milk.
☐ Slowly rotate function selector to 🚙. The appliance now heats up for approx. 20 seconds. Then the milk is frothed.

WARNING

Avoid the risk of scalding!
When the function selector is set to ♦, the nozzle may spurt slightly. Escaping steam is very hot. Do not touch nozzle 12 or direct at people!
☐ The frothy milk can be optimized by rotating the cup slowly.
☐ End the process by rotating the function selector back to ☐ position.
Note: When nozzle has cooled down, clean immediately – see “Cleaning the appliance / Cleaning the nozzle”. Dried residue is very difficult to remove and impairs formation of the frothy milk.
Tip: Preferably use semi-skimmed milk.
Changing settings / programming
text_image
< P Exit >The appliance has been set so that coffee can be brewed without any additional programming.
These basic settings can be changed with the function buttons under the display.
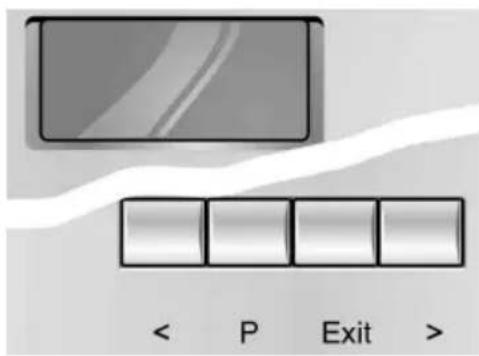
< Selection button
P Access to programming mode / Save settings
Evil Terminate programming
Selection button
CAUTION
Do not switch off the appliance during programming. Otherwise changes will not be saved.
Programming
The appliance must be switched on before the standard settings can be changed.
The following settings can be changed:
- Language
- Water hardness
- Filter
- Temperature
- Current time
- Timer function
- Energy saving mode
Factory settings have a grey background in this chapter – see example opposite.
LANGUAGE
ENGLISH
Language
LANGUAGE ENGLISH
To change the display to the desired language:
☐ Hold down buttonP on display for at least 3 seconds.
☐ Press buttonP until the display flashes.
☐ Select the desired language with < or >.
☐ Press buttonP to save the setting.
☐ Press the Exit buton. Back to standby.
i The following other languages are available:
LANGUE FRANCAIS
LINGUA ITALIANO
SPRAK SVENSKA
IDO IOMA ESPANOL
TAAL NEDERL.
JASYK RUSSKI Y
SPRACHE DEUTSCH
Water hardness
HARDNESS WATER 1
☐ Ascertain the water hardness with the supplied test strip, e.g.: - hardness 2.
☐ Hold down button P on display for at least 3 seconds.
□ Select HARDNESS WATER with < or > .
☐ Press button P until the number in the display flashes.
☐ Select the ascertained hardness with < or >.
☐ Press button P to save the setting.
☐ Press the Exit buton. Back to standby.
HARDNESS WATER 2
Note: It is important for the descaling program that the water hardness is set correctly.
HARDNESS WATER 3
If external water softeners are used in the domestic water system or if filtered water is used, select HARDNESS WATER ]
HARDNESS WATER 4
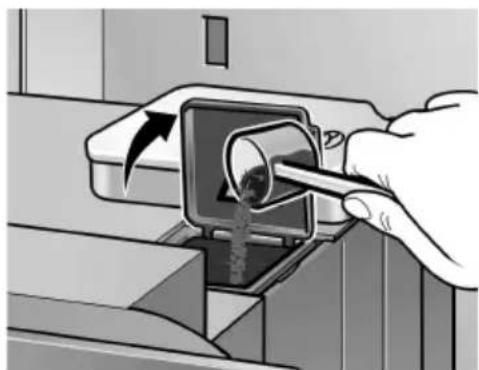
Water filter
The filter 20 reduces calcification, protects the appliance and extends the service life of the appliance.
Inserting or changing the filter
The appliance must be switched on.
☐ Place a receptacle with a minimum capacity of 0.5 qt. under the nozzle 12.
☐ Insert or remove the filter 20 with provided tool.
FILTER YES/NEW
FILTER NO/OLD
☐ Hold down buttonP on display for at least 3 seconds.
□ Select FILTER with or > .
☐ Press buttonP, the display flashes.
□ Select FILTER YES / NEW with or > .
☐ Press buttonP to save the setting.
☐ Turn function selector to ⚠️.
Note: The appliance is automatically rinsed (approx. 2 minutes), water runs into the receptacle and may be slightly discoloured, do not drink.
☐ TURN ON COFFEE is displayed, turn function selector 2 back to position.
The water hardness can still be indicated in the display program, however the setting is not activated.
Removing the filter
The appliance must be switched on.
☐ Unscrew the filter 20 with the provided tool in an counter-clockwise direction.
☐ Hold down button ^P on display for at least 2 seconds.
□ Select FILTER YES/NO with or > .
☐ Press buttonP, display flashes.
□ Select FILTER NO/OLD with or > .
☐ Press buttonP to save the setting.
☐ Press the Exit button. Back to standby.
Important
- Replace the filter after approx. two months or after approx. 400 brews.
- Do not insert the filter if the UNIT CALCIF message lights up. First descale the appliance.
– Before descaling the appliance, take the filter out of the water tank. - When the filter has been inserted, it must be rinsed. Follow the displayed instructions.
- If the appliance is always operated with an inserted filter, it should be descaled once or twice a year, even if the descale message is not displayed.
- If softened water from a domestic descaling unit is used, a filter should not be inserted.
Re-order the filter quoting order no. 461732.
Temperature
TEMP NORMAL
TEMP HIGH
TEMP MAXIMUM
Current time
TIME -- : --
TIME 14:39
Timer
ON AT -- : --
ON AT 07:45
The coffee temperature can be set with this function.
☐ Hold down buttonP on display for at least 3 seconds.
□ Select T E N P. with or > .
☐ Press buttonP until the display flashes.
☐ Change the setting with< or > .
☐ Press buttonP to save the setting.
☐ Press the Exit button. Back to standby.
The current time is programmed with this function.
This is required when using the timer function. The time is displayed in 24h mode.
☐ Hold down buttonP on display for at least 3 seconds.
□ Select TIME with or > .
☐ Press buttonP – hours display flashes.
☐ Change the setting with< or > .
☐ Press buttonP – minutes display flashes.
☐ Change the setting with< or > .
☐ Press buttonP to save the setting.
☐ Press the Exit button. Back to standby.
The set time will be deleted
- if the main plug is disconnected,
- if the appliance is switched off with the power switch 1,
- if there is a power failure.
The current time must be set again.
This function is used to set the time at which the appliance automatically switches on.
☐ Hold down buttonP on display for at least 3 seconds.
□ Select ON RT with< or > .
☐ Press buttonP, hours display flashes.
☐ Change the setting with< or > .
☐ Press buttonP, minutes display flashes.
☐ Change the setting with< or >.
☐ Press buttonP to save the setting.
☐ Press the Exit button. Back to standby.
De-activating the setting:
☐ Set the time to - - : - - with or > .
Note: The current time must be set for this function to run.
The switch-on time is retained even if there is a power failure or the main power switch 1 is turned off.
Standby mode
OFF IN 4 HOURS
OFF IN 2 HOURS
This function is used to specify after how many hours following the last brew the appliance automatically switches to standby mode.
☐ Hold down button P on display for at least 3 seconds.
□ Select OFF IN with < or > .
☐ Press buttonP, hours display flashes.
☐ Change the setting with< or >.
☐ Press buttonP to save the setting.
☐ Press the Exit button. Back to standby.
The switch-off time is retained even if there is a power failure or the power switch 1 is actuated.
Displaying number of brews
NO. BREWS -- - 86
The number of brewed espressos, coffees and preground coffees is displayed here. The number of brews are counted automatically.
☐ Hold down button P on display for at least 3 seconds.
□ Select NO. BREWS with< or > .
☐ Press the Exit button. Back to standby.
i This number cannot be changed!
RESET function
Possible from "standby" mode only
☐ Simultaneously hold down< and > for at least 3 seconds – all saved settings are deleted.
The display indicates the messages in the German language after the RESET function.
System messages
The appliance indicates processes and messages on display 6.
| Meaning Remedial action | ||
| ADD WATER | No water. | Pour fresh, cold water into the water tank. |
| Note:There is always a small amount of water left in the water tank. | ||
| Water tank is missing or not inserted correctly. | Insert water tank. | |
| ADD BEANS | No coffee beans. | Add coffee beans to the bean container 17. |
| Note:The ADD BEANS display is lit until coffee is brewed again. | ||
| FILL UP / PR PIPE-SYS / CAFE | Water pipe system in the appliance is empty. | Press button. |
| SYSTEM TOO HOT | System heated up by Steam on. | Allow system to cool down by letting out some hot water . |
| EMPTY TRAYS | Tray 23 and coffee dreg tray 21 are full, or contacts 25 soiled. | Remove, empty, and re-insert tray and coffee dreg tray. Clean and dry contacts. |
| TRAYS MISSING | Tray 23 and coffee dreg tray 21 are missing. | Insert tray and coffee dreg tray. |
| Note: If coffee dreg tray 21 is missing only, the display indicates no message. | ||
| CLEAN UNIT | The illuminated ring on the can button is lit red. | Run cleaning program – see chapter “Cleaning the appliance”. |
| UNIT CALCIF. | The illuminated ring on the can descaling button is lit red. | Run descaling program – see chapter “Descaling the appliance”. |
| FILTER CHANGE | The filter 20 is no longer effective after 400 brews or approx. 2 months. | Change filter (order no. 46 1732) or continue operating the appliance without filter. Change settings. |
| CLOSETHE DOOR | Door of brewing unit 15 is not closed. | Close door of brewing unit. |
| TURN ONCOFFEE | Set function selector to position. | |
| Note: While the messages ADD WATER, CLOSE THE DOOR, EMPTY TRAYSOR TRAYS MISSING are displayed, coffee cannot be brewed. | ||
Cleaning the appliance
Daily cleaning

WARNING

Avoid the risk of electric shock!
Pull out the mains plug before cleaning the appliance.
CAUTION
Do not use scouring agents.
Never immerse the appliance in water!
Do not use a steam cleaner!
☐ Wipe the outside of the appliance with a damp cloth.
☐ Rinse out the water tank and fill with fresh water.
☐ Remove and empty tray 23 and coffee dreg tray 21. Only the coffee dregs tray 21 may be cleaned in the dishwasher!
□ Clean sensor contacts.
☐ Wipe out the interior of the appliance (trays).
Note: If the appliance is switched on in a cold state with On/Off button ⏻ or is set to standby after brewing coffee, the appliance is automatically rinsed. The system therefore cleans itself.
Cleaning program
CLEAN UNIT
If the illuminated ring on the Clean button is lit red and the message CLEAN UNI Tis indicated on display when the appliance is switched on, the appliance must be cleaned as quickly as possible.
Clean the appliance with the enclosed cleaning tablet.
Do not drop in the cleaning tablet until you are prompted to do so.

WARNING

Use care when handling and using cleaning tablet!
Do not place the tablet in mouth. Keep under lock and key and out of the reach of children. Avoid contact with skin and eyes. Do not drink liquid.
If tablet comes into contact with eyes, immediately wash eyes with plenty of water and consult a doctor.
If a tablet is swallowed, seek medical advice immediately and produce packaging or label.
These tablets have been specially developed for this appliance and are available from customer service (order no. 31 0575).

While the cleaning program is running, the illuminated ring on the 📄 button flashes.
CAUTION
Never interrupt the cleaning program!
Never use descaling tablets or other descaling agents.
CLEAN UNIT
COF
While the cleaning program is running – approx.
F 5 minutes – processes and instructions are indicated on display.
Start cleaning program
□ Completely fill water tank 19.
☐ Hold down/er button for at least 3 seconds.
☐ Empty and re-insert tray 23 and coffee dreg tray 21.
Note: The appliance is automatically cleaned. Wait for the next display (approx. 1 minute).
EMPTY TRAYS
UNIT IS CLEANING
PILL IN || CLOS DUCT THE
PRESS CAFE
UNIT IS CLEANING
EMPTY TRAYS
COFFEE
☐ Take hold of the inner compartment by the recessed grip 11 and pull forwards.
Insert a cleaning tablet into the duct 16.
Close the cover on the ground coffee duct.
☐ Return the inner compartment into original position.
☐ Press the Code button.
Note: The appliance is automatically cleaning. Wait for the next display (approx. 10 minutes).
☐ Empty and re-insert tray 23 and coffee dreg tray 21.
The cleaning process is complete. The illuminated ring on Open button goes out. The appliance is ready for use again.
Cleaning the nozzle
CAUTION
Clean the nozzle after each use.
Place a suitable receptacle under the nozzle.
□ Briefly set function selector to .

WARNING

Avoid the risk of scalding!
When the function selector is set to ☐, the nozzle may spurt slightly. Escaping water is very hot.
Do not touch nozzle or direct at people!
natural_image
Illustration showing a hand holding a tool with a loop handle, alongside a close-up of the tool's tip and base (no text or symbols present)☐ Set function selector to position.
☐ Wipe the outside of the nozzle after it has cooled down.
☐ Dismantle the nozzle to clean thoroughly.
Proceed as follows:
□ Unscrew the nozzle with a coin.
☐ In particular, clean the tip of the nozzle with a brush and pointed implement.
□ Clean all parts with hot water and detergent, rinse and dry (dishwasher-safe).
Descaling the appliance
UNIT
CALCIF.
If the illuminated ring on the Cak button is lit red and the message UNIT CALCIFs.displayed when the appliance is switched on, descale the appliance immediately. If the appliance is not descaled as instructed, it may be damaged.
Note:
If you use a filter 20 and the message UNIT CALCIF. is displayed, the filter is NOT activated in the settings. Follow the instructions "Change settings/ programming – Filter".
If the appliance is always operated with an inserted filter, it should be descaled once or twice a year, even if the descale message is not displayed.

WARNING

Use care storing and handling descaling agent!
Do not place the descaling agent in mouth. Keep under lock and key and out of the reach of children. Avoid contact with skin and eyes. Do not drink liquid. If a descaling agent comes into contact with eyes, immediately wash eyes with plenty of water and consult a doctor. If a descaling agent is swallowed, seek medical advice immediately and produce packaging or label.
CAUTION
Never descale the appliance with vinegar or vinegar-based agents!
Do not use cleaning tablets.
Never interrupt the descaling program!

Specially developed and suitable agents are available from customer service.

The illuminated ring on the Calc descaling button flashes while the descaling program is running.
CAUTION
FILTER NO/OLD
The descaling program starts in FILTER NO/OLD programming mode only.
Never descale the appliance while the filter is inserted.
UNIT CALCIF.
COFF
While the descaling program is running – approx.
35 minutes – processes and instructions are indicated on display. The specified times may differ.
EMPTY TRAYS
Start descaling program
☐ Hold down the descaling button for at least 3 seconds.
☐ Empty and re-insert tray 23 and coffee dreg tray 21.
☐ Fill the water tank with water and add descaling agent
or
☐ add 0.5 qt. of ready-prepared descaling mixture.
☐ Place a large receptacle under nozzle.
☐ Set function selector to position.
DESCALER// TURN ON IN TANK // WATERLI
Note: The appliance is automatically descaled. Descaling solution flows at intervals into the receptacle. Wait for the next message on display (approx. 10 minutes).
☐ Set function selector to position.
UNIT DE- SCALING
Note: The appliance is automatically descaled.
Descaling solution flows at intervals into the tray 23.
Wait for the next message on display (approx. 10 minutes).
TURN ON COFFEE
☐ Empty and re-insert tray 23 and coffee dreg tray 21.
☐ Rinse out the water tank, fill with fresh water up to max and re-insert.
☐ Empty the receptacle and place back under the nozzle.
UNIT DE- SCALING
EMPTY TRAYS
ADD WATER
| TURN ONWATER |
| UNIT DE-SCALING |
| TURN ONCOFFEE |
| UNIT DE-SCALING |
| EMPTY / / CLEANTRAYS / / CONTACT |
| UNIT ISRINSI NG |
| COFFEE |
☐ Set function selector to position.
Note: The appliance is automatically rinsed. Water flows at intervals into the receptacle. Wait for the next message on display (approx. 4 minutes).
☐ Set function selector to position.
Note: The appliance is automatically rinsed. Water flows at intervals into the tray 23. Wait for the next message on display (approx. 4 minutes).
☐ Empty tray 23 and coffee dreg tray 21.
☐ Clean and dry contacts 25.
☐ Re-insert tray 23 and coffee dreg tray 21.
☐ Wipe splashes off the nozzle and appliance.
Note: The appliance is automatically rinsed.
The descaling process is complete. The illuminated ring on _c descaling goes out. The appliance is ready for use again.
Draining hot water
The descaling program requires a specific water temperature before it can start. If the water temperature is too high, drain hot water first!
☐ Place a receptacle under the nozzle.
☐ Set function selector to position. Water runs into the receptacle.
☐ Set function selector to position.
The required temperature has been reached. The descaling process can start.
Trouble shooting
| Malfunction Cause Remedial action | ||
| ADD BEANSis displayed despite a full bean container. | Grinder has still not been filled automatically. | Press the C# buton. |
| The beans are too big or too oily – they do not slide into the grinding unit. | Use less oily or smaller beans.To remove big beans use a vacuum cleaner. | |
| No hot water or steam discharge. | Nozzle is blocked. Thoroughly clean nozzle. | |
| Froth insufficient or too runny. | Sleeve a on nozzle 12 not in correct position. | Push down sleeve a on nozzle 12. |
| Unsuitable milk. Use cold semi-skimmed milk. | ||
| Coffee is running a drop at a time. | Degree of grinding too fine. Select a coarser degree of grinding. | |
| The beans are too oily. Use less oily beans. | ||
| Preground coffee too fine. Use a coarser ground coffee.To rinse the appliance, follow the instructions “Using ground coffee” on page 16, but do not add coffee powder in the duct. | ||
| Coffee has no “crema” (layer or froth). | Unsuitable type of coffee. Change the type of coffee. | |
| Beans no longer fresh. Use fresh beans. | ||
| Degree of grinding not appropriate for coffee beans. | Optimize degree of grinding. | |
| Grinding unit is not grinding coffee beans. | Beans are not falling into the grinding unit (too oily). | Gently tap the bean container. |
| Descaling program does not start. | Current programming set to FILTER YES/NE# CHANGE FILTER display. | Set programming to FILTER NO/OLD Before descaling the appliance, always remove the filter! |
| System too hot. | Draw off some of the hot water. | |
| Cleaning program does not start. | System too hot. | Draw off some of the hot water. |
| FILTER CHANGE displayed. | Change filter. | |
| Grinding unit is making a loud noise. | Foreign objects in the grinding unit (e.g. grit which also occurs in superior types of coffee). | Contact Customer Service.Note: Ground coffee can still be prepared. |
| Display ERROR 1 | Appliance to cold. Wait until the appliance has warmed up to room temperature. | |
| Display ERROR 5orERROR 8 | Technical malfunction. Switch | OFF the device at the power switch 1 for at least 10 seconds. |
| If malfunctions cannot be eliminated, always call Customer Service! | ||
Sommaire
MISES EN GARDE IMPORTANTES 38
Vue d'ensemble 40
text_image
Technical diagram of a kitchen appliance with labeled parts and warning indicatorstext_image
Technical diagram illustrating the installation steps of a kitchen appliance, showing component positioning and safety warning.natural_image
Close-up of a black 3D button labeled '10' on a metallic panel (no additional text or symbols)natural_image
Simple line drawing of a bowl with a cup, water droplets, and a spoon above it (no text or symbols)text_image
< P Exit >
text_image
CafeAPPAR. EN CHAUFFE
RIMCAGE APPAREIL
text_image
CafeEcran
natural_image
Close-up of a circular dial indicator with directional arrows and coffee cups, no readable text or symbols present.EXPRESSO
2 EXPRESSO
natural_image
Simple clock icon with curved arrow and three small circles below (no text or symbols)NORMAL PLUS
text_image
Clean CalcThe selected coffee strength is displayed.
Touche de nettoyage
natural_image
Illustration of a coffee machine with a cup and control panel (no text or symbols)natural_image
Illustration of a refrigerator with a circular button labeled 'Recycle' (no text or symbols on the main image)natural_image
Illustration of a hand using a tool to remove or remove material from a mechanical component (no text or symbols visible)natural_image
Illustration of a coffee machine with a water tap and a mug, showing a hand valve mechanism (no text or symbols present)natural_image
Illustration of a coffee machine being heated by a hand using a steaming cup, with a close-up of the lid showing the tip (no text or symbols present)text_image
Diagram illustrating coffee machine operation with labeled components and directional arrow indicating process flow
AVERTISSEMENT

text_image
< P Exit >natural_image
Illustration of a mechanical device with a curved handle and a rod inserted, no visible text or symbols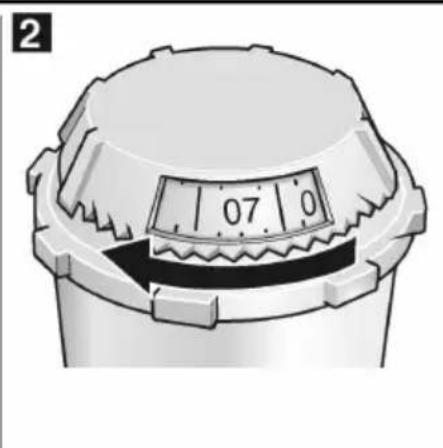
natural_image
Close-up of a mechanical component with a dial and textured top (no visible text or symbols)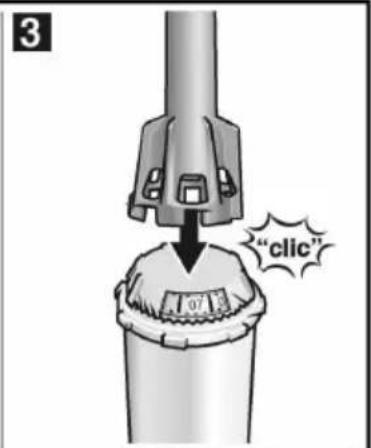
text_image
3 "click"
natural_image
Mechanical assembly diagram showing a rotating shaft and housing component (no text or symbols)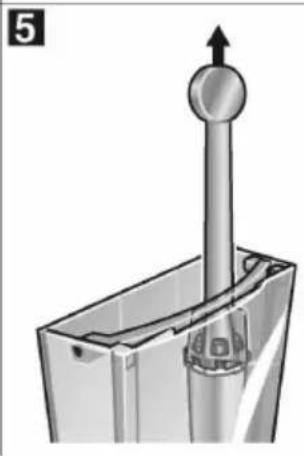
natural_image
Mechanical component diagram showing a vertical rod inserted into a housing with a circular head, no text or symbols present
natural_image
Diagram of a hand pouring liquid into a transparent plastic container (no text or symbols)FILTRE OUI/NEUF
natural_image
Illustration showing a hand holding a tool with a loop handle, alongside a close-up of the tool tip and its magnified view (no text or symbols present)text_image
Technical diagram of a kitchen appliance with labeled parts and warning indicators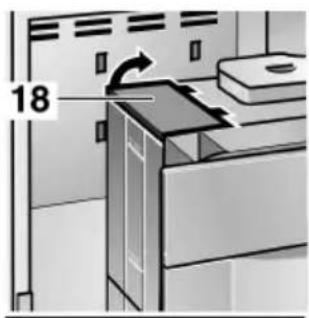
text_image
18
natural_image
Illustration of a kitchen or oven unit with control panel and ventilation system (no text or symbols visible)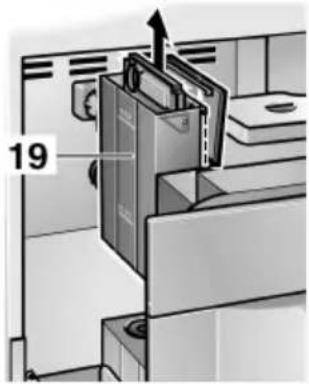
text_image
19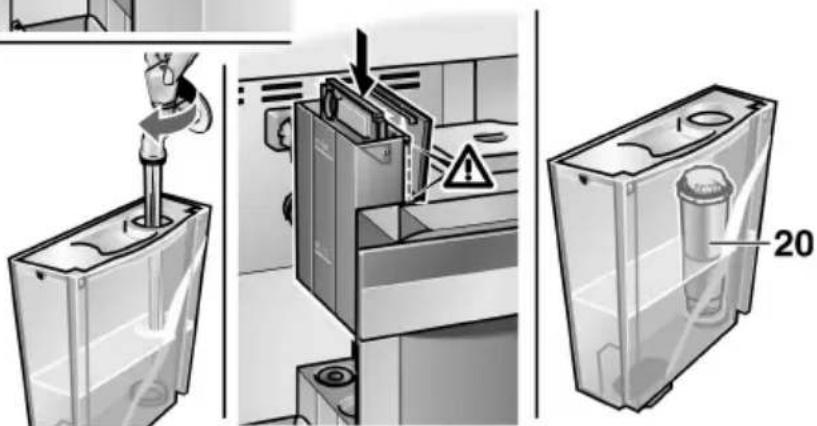
text_image
Diagram illustrating a mechanical assembly process with labeled components and warning indicatorsnatural_image
Close-up of a black 3D button labeled '10' on a metallic panel (no additional text or symbols)Interruptor de red
natural_image
Simple line drawing of a container with a cup, warning symbols, and a small mouth (no text or labels)text_image
< P Exit >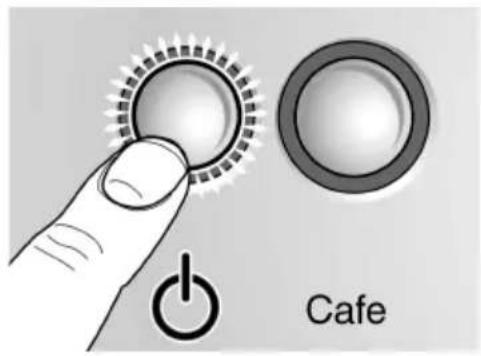
text_image
CafeAPARATO CALENT.
APARATO LAVANDO
natural_image
Close-up of a circular dial indicator with directional arrows and coffee cups, no readable text or symbols present.EXPRESSO
2 EXPRESSO
natural_image
Simple clock icon with curved arrows and three small circles below (no text or symbols)NORMAL
text_image
Clean Calcnatural_image
Illustration of a coffee machine with a cup and side arm, no visible text or symbolsnatural_image
Illustration of a kitchen appliance with a circular button labeled 'Spiral' and a plus symbol, no text or symbols present.natural_image
Illustration of a hand using a tool to press or install a mechanical component, no text or symbols visibletext_image
Diagram illustrating a coffee machine setup with labeled components and a magnified view showing the drop in liquid.text_image
Diagram illustrating coffee brewing process with labeled components and directional arrownatural_image
Illustration of a coffee machine being heated by a hand using a steaming cup, with a close-up of the lid showing the tip (no text or symbols present)text_image
< P Exit >natural_image
3D rendering of a mechanical component with a curved handle and a metallic rod inserted (no text or symbols visible)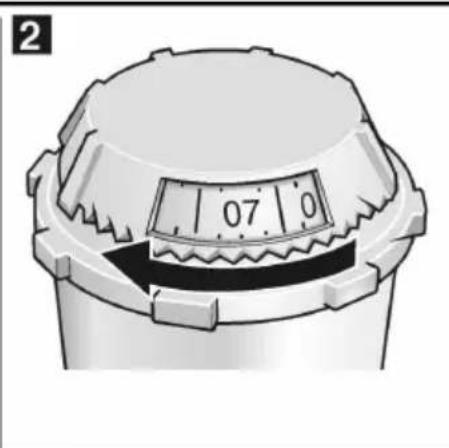
natural_image
Close-up of a mechanical component with a dial and textured base, no visible text or symbols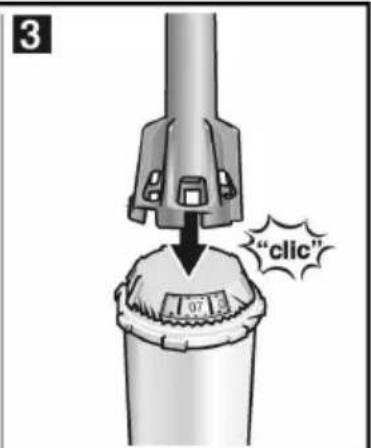
text_image
3 "click"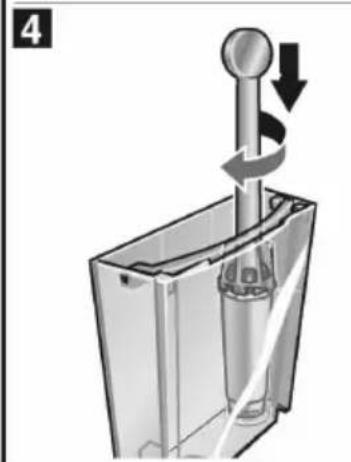
natural_image
Mechanical assembly diagram showing a rotating shaft and housing component (no text or symbols)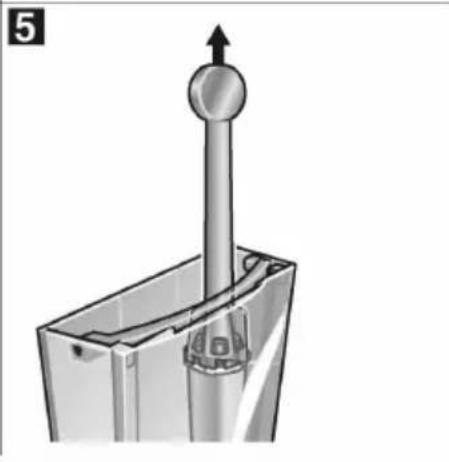
natural_image
Mechanical component diagram showing a vertical shaft inserted into a housing with a circular head, no text or symbols present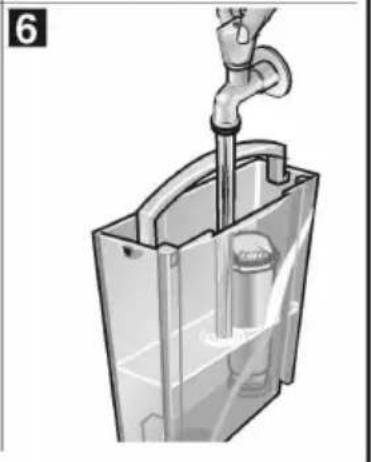
natural_image
Illustration of a hand piping a pipe into a transparent container with a valve inside (no text or symbols)FILTRO SI/NUEVO
FILTRO MO/VI EJO