
HLFN647S - Oven PANASONIC - Free user manual and instructions
Find the device manual for free HLFN647S PANASONIC in PDF.
| Product Type | Built-in electric oven |
| Brand | Panasonic |
| Model | HLFN647S |
| External dimensions (W x D x H) | 595 mm x 575 mm x 595 mm (23 27/64 in x 22 41/64 in x 23 27/64 in) |
| Cavity volume | 70 L (74 pt) |
| Net weight | 33.5 kg (73 55/64 lb) |
| Power supply voltage | 120 V/240 V ~ or 120 V/208 V ~, 60 Hz |
| Electrical power | 3,260 W (240 V) / 2,450 W (208 V) |
| Cooking functions | Defrost, Dual grill, Dual grill with fan, Radiant grill, Conventional cooking, Conventional cooking with fan, Bottom heating |
| Timer and programming | Adjustable clock, Cooking timer (up to 10 h), Delayed start, End of cooking, Reminder function |
| Interior lighting | Oven lamp with special bulb 120 V ~ 25 W |
| Oven door | Removable for easy cleaning |
| Interior grid | Removable, 5 positioning levels |
| Supplied accessories | Oven rack, Enameled baking tray, Removable grid, Screw packet (2 screws + 2 caps) |
| Cleaning | Removable door and removable grid; use a soft cloth and mild detergent; do not use steam cleaner, abrasive products or metal scrapers |
| Safety | Mandatory grounding; automatic shut-off after 10 h; locking of rotary knobs; automatic cooling system |
| Installation | Built-in or free-standing; requires a separate branch circuit 120/240 V or 120/208 V; cabinet fixing included |
| Maintenance | Clean after each use; remove door and grid for full access; replace bulb with original model |
| Spare parts and repairability | Contact Panasonic service center or an authorized dealer for spare parts and repairs |
| General information | Domestic use; user and installation manual included (80 pages) |
Frequently Asked Questions - HLFN647S PANASONIC
User questions about HLFN647S PANASONIC
0 question about this device. Answer the ones you know or ask your own.
Ask a new question about this device
Download the instructions for your Oven in PDF format for free! Find your manual HLFN647S - PANASONIC and take your electronic device back in hand. On this page are published all the documents necessary for the use of your device. HLFN647S by PANASONIC.
USER MANUAL HLFN647S PANASONIC
Operating and Installation Instructions
ELECTRIC BUILT-IN OVEN Household Use
Operating and Installation Instructions EN-1 - 25
Thank you for purchasing a Panasonic appliance.
- This appliance is intended for household use only.
- Please read these instructions carefully before attempting to install, operate or service this appliance.
- For optimum performance and safety, please read these instructions carefully and follow safety precautions when using this appliance.
- Before using this appliance please pay extra attention to "Safety Precautions" (pages EN-2 - 4).
Keep this Operating and Installation Instructions for future use.
Safety Precautions 2-4
Parts Identification 5-6
- Accessories 6
Using the Oven. 7-14
- Function Setting 7
Before Using the Oven 8
While Using the Oven 8 - Operations 9 - 12
Rack Placement Warning 12
Cooking Advice and Instructions 13-14 - Tips for Energy Saving 14
Cleaning and Maintenance. 15-16
- Cleaning the Oven Door. 15
- Cleaning the Inside of the Oven 15 - 16
Bulb Replacement 16
Troubleshooting 17
Specifications 18
For Installer
Installation Instructions 19-25
· Introduction 19
- Electrical Connection 19 - 22
- Installing the Oven 23 - 25
Securing the Oven to a Cabinet 25
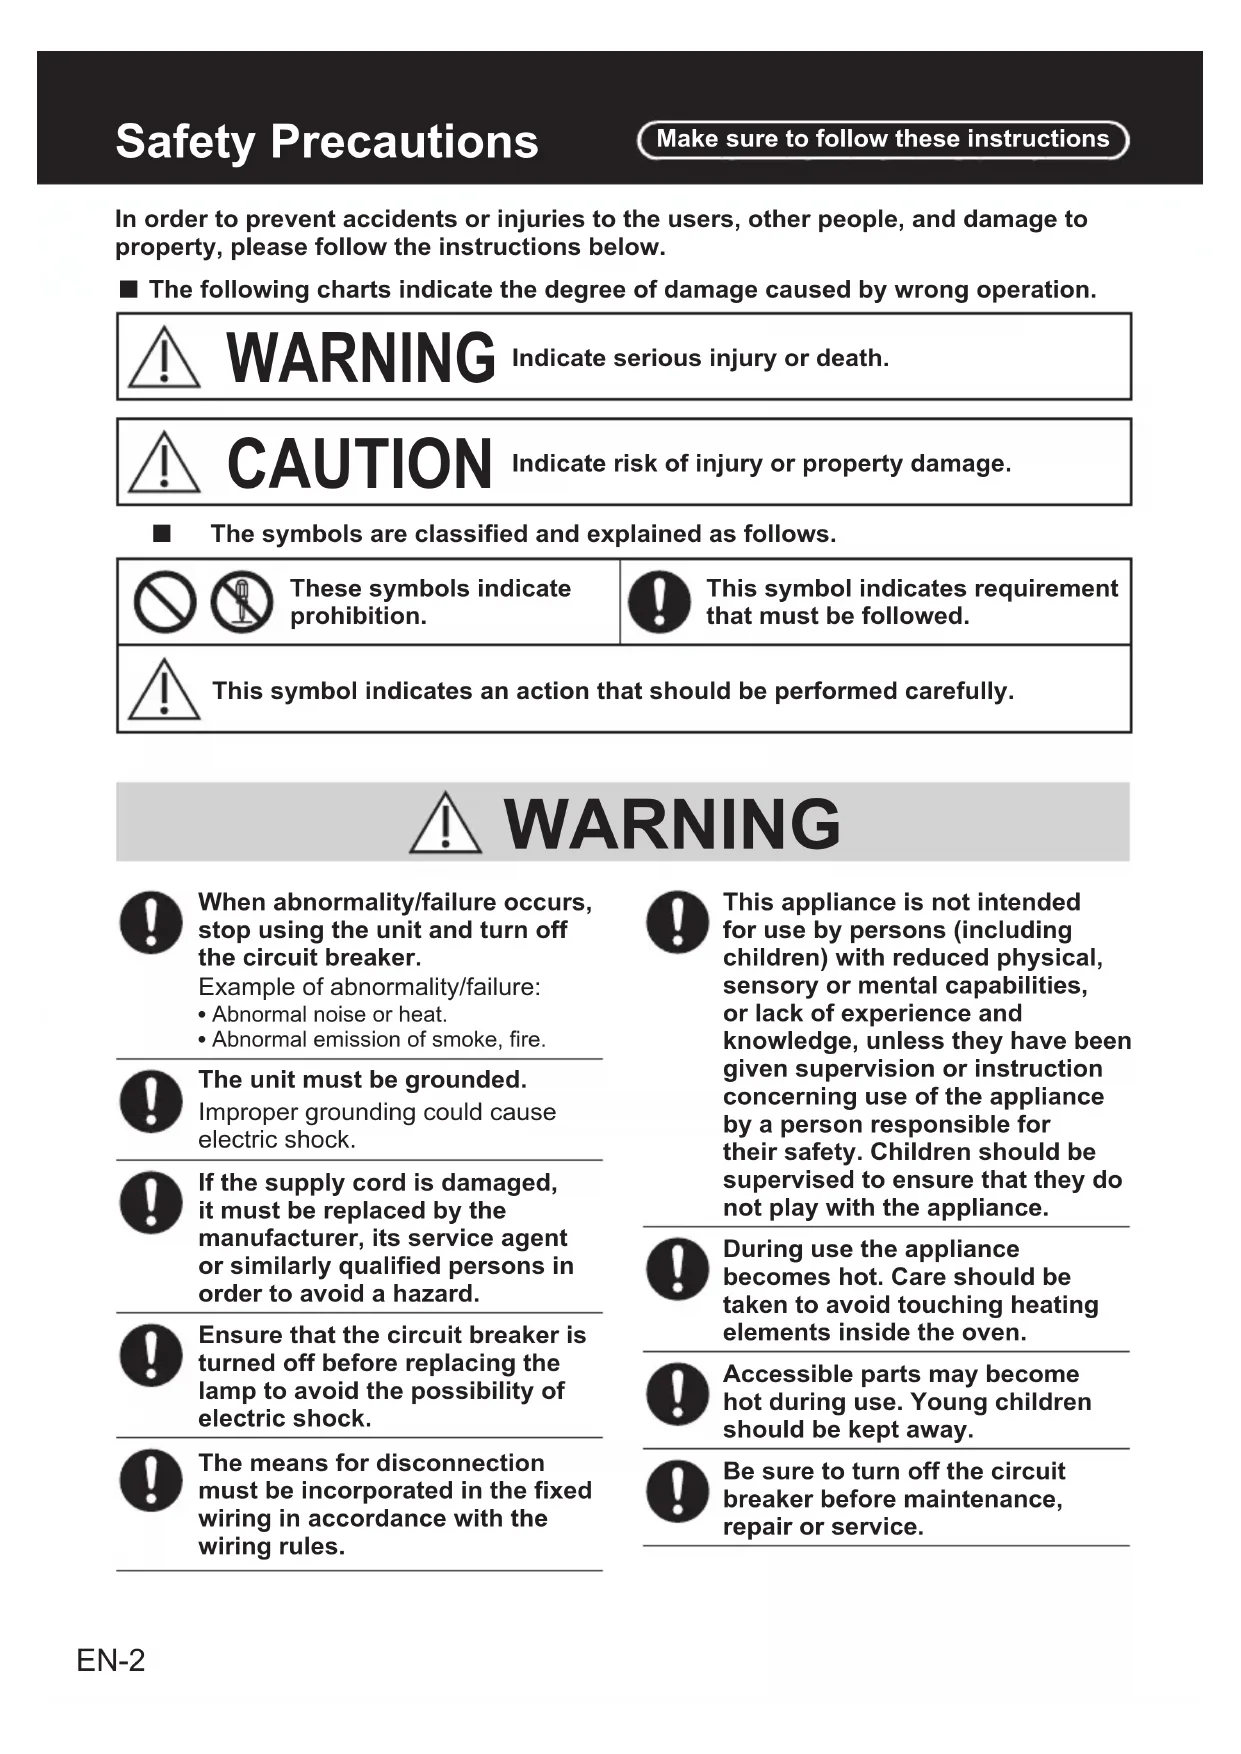
In order to prevent accidents or injuries to the users, other people, and damage to property, please follow the instructions below.
The following charts indicate the degree of damage caused by wrong operation.

WARNING
Indicate serious injury or death.

CAUTION
Indicate risk of injury or property damage.
The symbols are classified and explained as follows.


These symbols indicate prohibition.

This symbol indicates requirement that must be followed.

This symbol indicates an action that should be performed carefully.

WARNING

When abnormality/failure occurs, stop using the unit and turn off the circuit breaker.
Example of abnormality/failure:
Abnormal noise or heat.
Abnormal emission of smoke, fire.

The unit must be grounded.
Improper grounding could cause electric shock.

If the supply cord is damaged, it must be replaced by the manufacturer, its service agent or similarly qualified persons in order to avoid a hazard.

Ensure that the circuit breaker is turned off before replacing the lamp to avoid the possibility of electric shock.

The means for disconnection must be incorporated in the fixed wiring in accordance with the wiring rules.

This appliance is not intended for use by persons (including children) with reduced physical, sensory or mental capabilities, or lack of experience and knowledge, unless they have been given supervision or instruction concerning use of the appliance by a person responsible for their safety. Children should be supervised to ensure that they do not play with the appliance.

During use the appliance becomes hot. Care should be taken to avoid touching heating elements inside the oven.

Accessible parts may become hot during use. Young children should be kept away.

Be sure to turn off the circuit breaker before maintenance, repair or service.

WARNING

Do not connect the power voltage other than 120V / 240V or 120V / 208VAC , may cause fire or electric shock.

The appliance must not be installed behind a decorative door in order to avoid overheating.

Do not disassemble the unit for reconstruction.

Do not discard the packaging or any part of it, or leave it unattended. It can constitute a suffocation hazard for children, especially the plastic bags.

CAUTION

Installation and servicing must be carried out by competent persons in accordance with the regulation in force.

Before the appliance is operated, all the protective film applied must be removed (apart from the Name Plate).

Take care that no objects are stuck in the door of the oven.

The appliance becomes very hot during use. Suitable heat-proof gloves should be worn when handling.

All cooking operations must take place with the door closed.

When the oven is first switched on, it may emit an unpleasant smell. This is due to the bonding agent used for insulating panels within the oven. Please heat up the new empty appliance with the conventional cooking function, at 480^ (250^) for 15 - 20 minutes in order to remove any manufacturing residues. Be sure to ventilate when performing this heating. It is normal that there will be a slight smoke and odors.

Never obstruct the openings and slits provided for ventilation and heat release.

Spray cleaner is not to be used for cleaning.

Do not use harsh abrasive cleaners or sharp metal scrapers to clean the oven door glass, since they can scratch the surface, which may result in shattering of the glass.

A steam cleaner is not to be used.

Do not use this appliance for heating rooms.

Do not rest any weight or sit on the open door of the appliance.

The Name Plate with the technical data, serial number and brand name has been visibly affixed to the appliance. DO NOT REMOVE THE NAME PLATE FOR ANY REASON.

Do not allow residues of sugary foods (such as jam) to set inside the oven since they might damage the enamel lining of the oven.

CAUTION

Do not use plastic kitchenware or containers. The high temperatures inside the oven could melt the plastic and damage the appliance.

Do not use sealed tins or containers in the appliance. Over pressure may occur inside the containers during cooking, creating a danger of explosion.

Do not leave the appliance unattended during cooking process where fats or oils could be released. Fats and oils may catch fire.

Do not cover the bottom of the oven with aluminum or tin foil sheets during cooking and do not place pans or trays on it to avoid damage to the enamelled surface.

If the surface is still very hot during cooking, do not pour water directly onto the trays. The steam could cause severe burns and damage to enamelled surface.

Do not insert pointed metal objects into any aperture in the appliance.

Do not modify this appliance.

Do not replace the parts of the appliance with spare parts other than authorized Panasonic parts.

Do not put inflammable material inside the oven; if it is switched on by accident, it may cause a fire.
Note:
Contact the Panasonic service center or authorized dealer for maintenance and repair.
Parts Identification
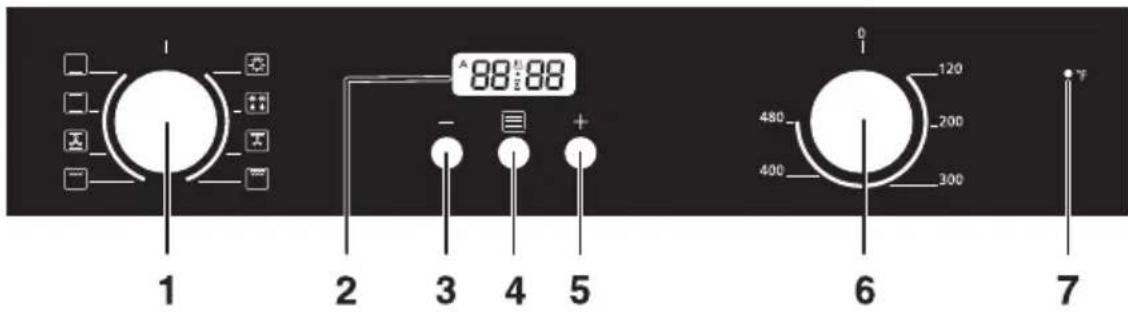
Control Panel
- Function Setting Knob
- Pop-up rotary knob, push to release/lock to avoid turning.
- Main Display
- Minus Key Push Button
- Timer Setting Mode Push Button
-
Plus Key Push Button
-
Temperature Setting Knob
-
Pop-up rotary knob, push to release/lock to avoid turning.
-
Indicator Light
-
Will light on after Temperature Setting Knob is turned and Timer Setting Mode Push Button is pressed, then will go off when the set temperature has been reached.
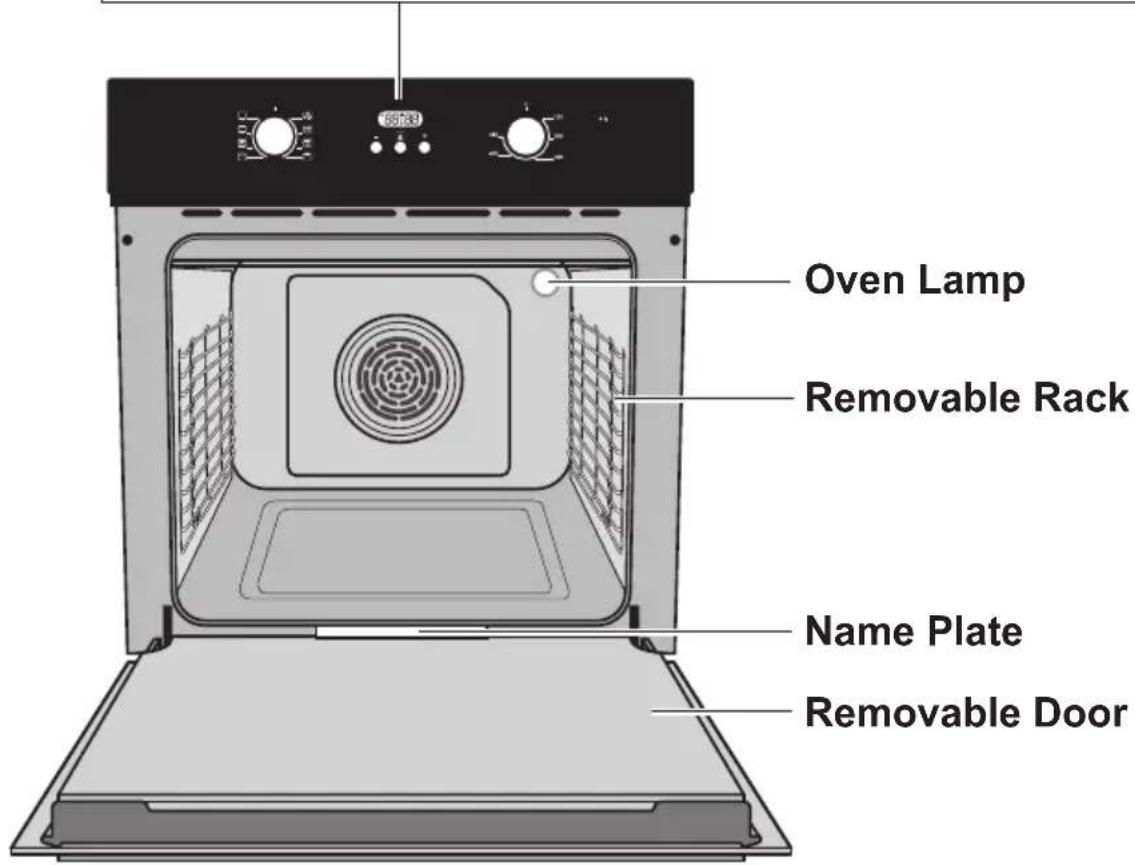
Parts Identification
Accessories
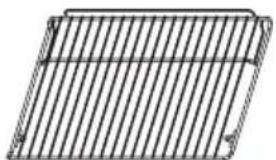
Wire Shelf
For roasting and grilling.
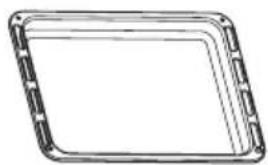
Enamel Baking Tray
For cooking large quantities of food such as moist cakes, pastries, frozen food etc., or for collecting fat/spillage and meat juices.
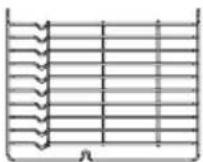
Removable Rack
The shelf and tray support rails on the right and left sides of the oven and can be removed when cleaning the oven walls.
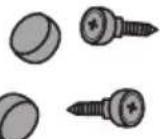
(a) (b)
Screw Pack
a. Screw Cap (2 pieces)
b. Screw (2 pieces)
Note:
- Contact the Panasonic service center or authorized dealer for maintenance and repair.
- Use original Panasonic accessories only.
Function Setting
To select the desired cooking function, turn the knob to the related symbol.
| Symbol | Function description |
| Oven Lamp Enables the user to observe the progress of cooking without opening the door. | |
| Defrost The circulation of air at room temperature enables quicker thawing of frozen food, (without the use of any heat). It's a gentle but quick way to speed up the defrosting time and thawing of ready-made dishes and cream filled product, etc. | |
| Double Grilling with Fan The inside radiant element and top element are working with the fan. | |
| Double Grilling The inside radiant element and top element are working. | |
| Radiant Grilling The inner grill element switches on and off to maintain the temperature. | |
| Conventional Cooking with Fan Combination of the fan and both heating elements provides more even heat penetration, saving up to 30 - 40 % of energy. Dishes are lightly browned on the outside and still moist inside. ■ Note: This function is suitable for grilling or roasting big pieces of meat at a higher temperature. | |
| Conventional Cooking The top and bottom elements work together to provide conventional cooking. | |
| Bottom Heat A concealed element in the bottom of the oven provides a more concentrative heat to the base of food without browning. This is ideal for slow cooking dishes such as casseroles, stews, pastries and pizzas where a crispy base is desired. | |
Before Using the Oven

CAUTION

Before the appliance is operated, all the protective film applied must be removed (apart from the Name Plate).

When the oven is first switched on, it may emit an unpleasant smell. This is due to the bonding agent used for insulating panels within the oven. Please heat up the new empty appliance with the conventional cooking function, at 480^ (250^) for 15 - 20 minutes in order to remove any manufacturing residues. Be sure to ventilate when performing this heating. It is normal that there will be a slight smoke and odors.
Note:
Before the first operation, remove all accessories and clean with soft cloth and mild detergent.
While Using the Oven

CAUTION

All cooking operations must be carried out with the door fully closed.

Do not cover the bottom of the oven with aluminum or tin foil sheets during cooking and do not place pans or trays on it to avoid damage to the enamel coating surface.
Note:
The appliance is equipped with a cooling system which comes into operation when temperature sensor detects 130^ (55^) during cooking. The fan causes a steady outflow of air from above the door. If the temperature drops to below 113^ (45^) , the fan will stop its operation.
Operations
Clock Setting
After connecting the oven to the power supply, the symbol will be visible on the display. The hour is flashing.
- Press or adjust the hour. (Hour should be within 0 - 23.)
- Press , the minutes will flash.
- Press or adjust the minutes. (Minute should be within 0 - 59.)
- Press to finish the clock setting.
Note:
To modify clock setting, press -nd sultaneously for approximately 3 seconds.
The hour will flash, and follow steps 1 - 4 above.
Function Setting
- Rotate "Function Setting" knob to choose the cooking function that you require.
- Rotate "Temperature Setting" knob to choose the cooking temperature that you require.
Note: Skip this step if you select "Oven Lamp" or "Defrost" function.
- Press for approximately 3 seconds to start cooking. will be visible on the display, indicating the heating is in progress.
- Press twice, and will be visible on the display.
- Press or adjust duration of cooking in hours. (Hour should be within 0 - 10.)
- Press , and the minutes will flash.
- Press or + adjust duration of cooking in minutes. (Minute should be within 0 - 59.)
- Press to start the countdown. Current time and will be visible on the display.
- If steps 4 - 8 are omitted, the default cooking time will be 10 hours. (This means the oven will shutdown automatically after 10 hours.)
Note:
- You may press twice to see the countdown time.
- Beep will sound when the countdown reaches 10, and the oven will shut down automatically. Press any button to stop the beep and A will go off.
- The oven lamp will light on for all the cooking functions.
and functions are not for heating.
Start/Cancel Function
- For every function, press approximately 3 seconds to start operating the function.
- To cancel the function, press and multaneously for approximately 3 seconds.
Reminder Function
This function helps to remind you the cook time has completed for your next action. In standby mode,
- Press for approximately 3 seconds to start cooking. will be visible on the display, indicating the heating is in progress. (Be sure that cooking function and temperature setting knobs have been rotated to your requirements.)
- Press once, will be visible flashing on the display.
- Press or adjust the hour setting. (Hour should be within 0 - 23.)
- Press , the minutes will flash.
- Press or adjust the minutes setting. (Minute should be within 0 - 59.)
- Press to finish the Reminder settings. Current time and will be visible on the display.
Note:
- You can press to see the countdown of the Reminder.
- Beep will sound when the Reminder reaches will pass. Press any button to stop the beep and will go off.
- Please refer to steps 4. - 8. on page 9 to set the duration of cooking after the reminder beep sounds. Otherwise, the heating will continue until you cancel the operation or the oven will enter standby mode after a total of 10 hours.
Delay Function/End Function
Only when the current time has been set, Delay Function/End Function can be used for either of 2 cases below:
To delay start of cooking, after setting the end time of cooking and the cooking duration time. The cooking starts automatically and end at the time pre-programmed.
To start cooking immediately after setting the end cooking time to shutdown the oven automatically when the cooking is completed.

For 3se
In standby mode,
- Press for approximately 3 seconds to start cooking. will be visible on the display, indicating the heating is in progress. (Be sure that cooking function and temperature setting knobs have been rotated to your requirements.)
- Press twice, will be visible on the display.
- Press or + adjust the duration (hours) of cooking. (Hour should be within 0 - 10.)
- Press , the minutes will flash.
- Press or adjust the duration (minutes) of cooking. (Minute should be within 0 - 59.)
- Press to finish the setting of the cooking duration.
- Press 3 times again, will be visible on the display.
- Press or adjust the end hour time.
- Press , the minutes will flash.
- Press or adjust the end minutes time.
- Press to start the Delay Function. Current time and A will be visible on the display.

Note:
- You can press twice to see the countdown of the Delay.
- Beep will sound when the countdown reaches 0. Will fast and cooking will finish automatically. Press any button to stop the beep and A will go off.
Example: If you place your food (uncooked) in the oven at current time 12·00, and you want to cook for 1 hour and end the cooking at 17·00,
In steps 3 - 5 set the cooking time as 01.00,
In steps 7 - 9 set the end time as 17:00.
Result: Cooking will start at 16:00. It will begin to countdown by delay timer. Eventually, your oven will shutdown automatically at 17:00, with beep sound.

Forase
In standby mode,
- Press for approximately 3 seconds to start cooking. will be visible on the display, indicating the heating is in progress. (Be sure that cooking function and temperature setting knobs have been rotated to your requirements.)
- Press 3 times, will be visible on the display.
- Press or adjust the end hour time.
Using the Oven
- Press the minutes will flash.
- Press or adjust the end minutes time.
- Press to start the End Function. Current time and will be visible on the display.
Note:
- You can press times to see the end of cooking time.
- Beep will sound when the countdown reaches 0. We'll fast and cooking will finish automatically. Press any button to stop the beep and A will go off.
Example: If you place your food (uncooked) in the oven at current time 12 · 00 , and you want the cooking to be competed at 13 · 00 , In steps 3 - 5 set end time as 13 · 00 .
Result: Cooking will start at 2.00. Eventually, your oven will shutdown automatically at 13.00, with beep sound.
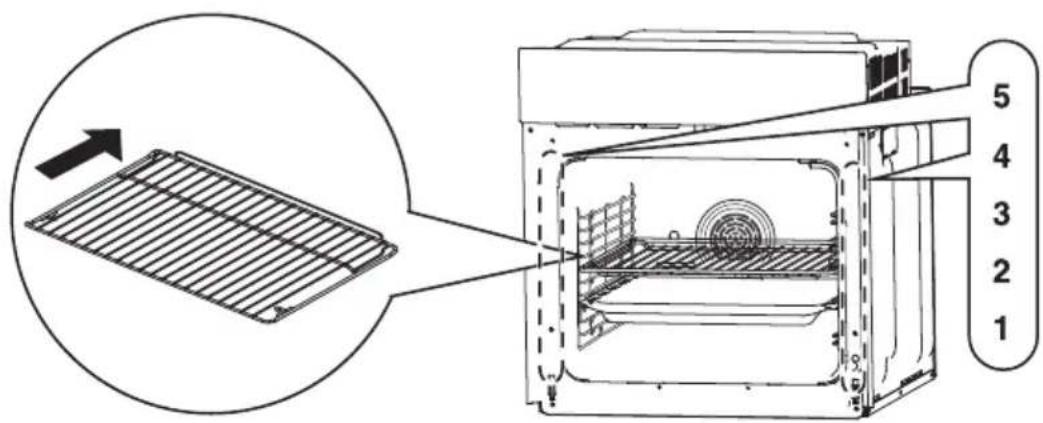
Rack Placement Warning
To ensure the Wire Shelf or Enamel Baking Tray operates safely, correct insertion and correct placement between the oven rack are necessary.
Alternatively, you can refer to the level numbering which is embedded at front of the oven when the door is opened. (There are total 5 levels.)
This will ensure that during careful removal of the Wire Shelf or Enamel Baking Tray, hot food items should not slide out from the back.
CAUTION

Use oven gloves as the oven and accessories will be extremely hot.
Cooking Advice and Instructions
General Advice
We recommend preheating the oven before putting the food in. Do not place foods inside the oven until "F" on the control panel lights off to confirm that the set temperature has been reached.
For cooking on several levels, we recommend using a fan-assisted function to achieve uniform cooking at all heights.
In general, it is not possible to shorten the cooking time by increasing the temperature (the food could be well-done on the outside but undercooked inside).
For best cooking results, we recommend placing a suitable cookware in the center of Wire Shelf or Enamel Baking Tray.
To prevent excessive amounts of condensation from forming on the internal glass, hot food should not be left inside the oven for too long after cooking.
Advice for Cooking Meat
It is recommended to preheat and cook at 320^ (190 °C) or lower to suppress smoke when cooking foods with a lot of fat.
Cooking time, especially for meat, varies according to the thickness and quality of the food and to consumer taste.
We recommend using a meat thermometer when roasting meat. (Thermometer is not supplied with the oven.)
Advice for Cooking Cakes and Biscuits
Use dark metal molds for cakes. They help to absorb the heat better.
The temperature and the cooking duration depend on the quality and consistency of the mixture.
Check whether the cake is cooked right through. At the end of the cooking time, insert a metal skewer into the highest point of the cake then take it out. If the batter does not stick to the metal skewer, the cake is cooked.
If the cake collapses when it comes out of the oven, on the next occasion reduce the set temperature by about 50^ (10^) , selecting a longer cooking time if necessary.
Advice for Defrosting
We recommend positioning frozen foods in a lid-less container.
The food must be defrosted without its wrapping.
Lay out the foodstuff in a single layer to be defrosted evenly, not overlapping.
When defrosting meat, we recommend using Wire Shelf positioned on the level-2 of the rack with the food on it and Enamel Baking Tray positioned on the level-1. This way, the liquid from the defrosting food drains away from the food.
The most delicate parts can be covered with aluminum foil.
Advice for Cooking with the Grill and the Fan-assisted Grill
Using the Grill function, meat can be grilled even when it is put in the cold oven; preheating is recommended if you wish to change the effect of the cooking.
With the Fan-assisted Grill function, however, we recommend that you preheat the oven before grilling.
Tips for Energy Saving
To save energy during use of the oven, the following instructions may be followed:
- All cooking operations must be carried out with the oven door fully closed.
- Do not open the oven door frequently during cooking in progress, as this will allow heat to be dispersed from the oven.
- When the oven is not in use, switch it off completely.
- Keep the inside of the oven clean at all times.
Cleaning and Maintenance
Cleaning the Oven Door
The glass door should always be kept thoroughly clean. Use absorbent kitchen roll; remove stubborn dirt with a damp sponge and an ordinary detergent.
- Do not use a steam cleaner for cleaning the oven.
- Do not use abrasive or corrosive cleaner for cleaning the glass door.
- Do not use rough or abrasive material or sharp metal scrapers to clean the oven's glass door since they may scratch the surface.
Cleaning the Inside of the Oven
For the best maintenance, clean the oven regularly when it has been cooled down after each cooking.
- Take out all removable parts.
- For easier cleaning, the oven door can be removed.
Removing the Door from Oven
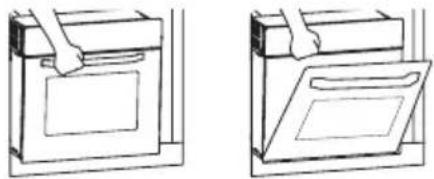
Removable door allows full access to entire interior of the oven for easier and quicker maintenance.
To remove the door, open the door to the maximum angle. Then pull the buckle at the door hinge backward. (Figure 1) (Total 2 buckles at both sides of the door.)
- Close the door to an angle approximately 15^ . Lift up and slowly pull the door out from the oven. (Figure 2)
- When cleaning is completed, reverse the above procedures to return the door to its original position.
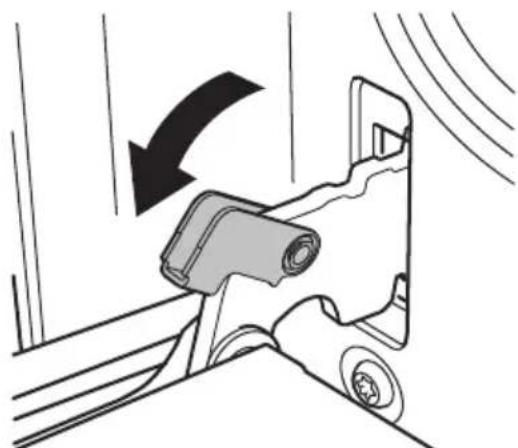
Figure 1
Note:
The oven should be operated at the maximum heat setting for 15 - 20 minutes after use of specific cleaning detergents to burn off the residues left inside the oven. During this process, accessible part may get hotter than usual and children should be kept away.
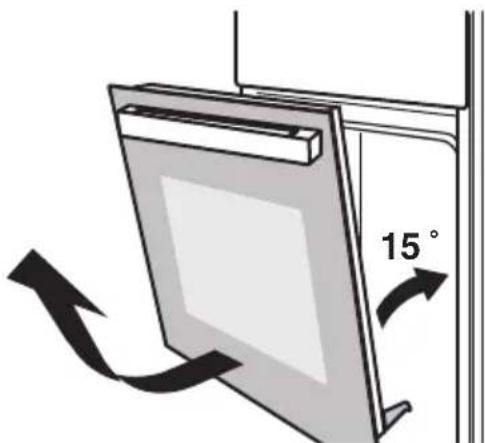
Figure 2
Cleaning and Maintenance
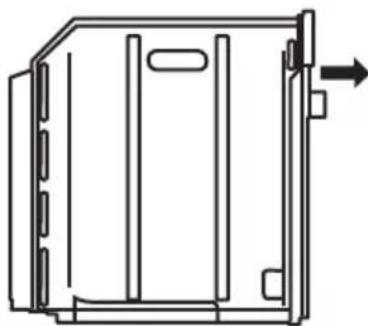
Removing the Rack from Oven
Removing the rack will make it easier to clean the side wall of the oven.
- To remove the rack, unscrew 1 piece of screw at the bottom side of wall using a ^+ screwdriver. (Figure 1)
- Then, lift up the rack to an angle approximately 90^ , and slowly pull the rack out from the oven. (Figure 2)
- When cleaning is completed, reverse the above procedures to return the rack to its original position.
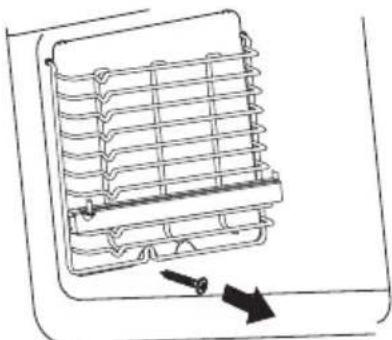
Figure 1
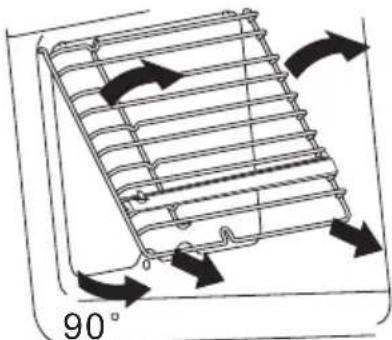
Figure 2
Bulb Replacement
The bulb used in the oven lamp is a special bulb that has high temperature resistance (120 V ~ 25 W). So, buying a genuine bulb from an authorized dealer is necessary.
For replacement, proceed as follows:
- Turn off the circuit breaker.
- Unscrew the covering glass in counterclockwise direction. (Figure 1)
- Unscrew the bulb in counterclockwise direction and replace the bulb with a new one of the same type. (Figure 2)
- Screw the covering glass in clockwise direction after bulb replacement is completed.
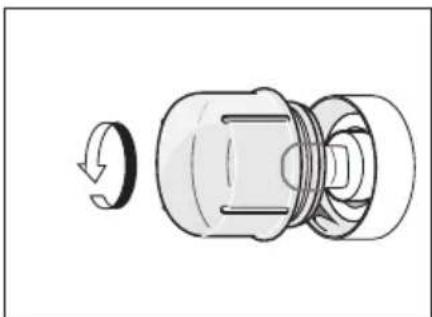
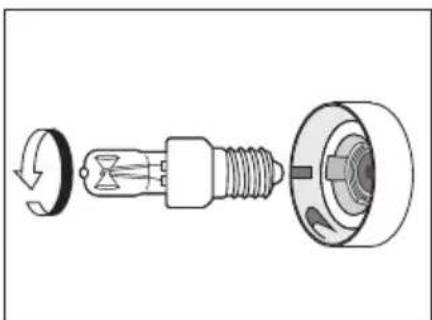
Figure 1
Figure 2
Troubleshooting
| Problem Possible | Causes and Solution |
| The oven display stays OFF. | Turn off the power, and 1 minute later, turn on the power. If the condition persists, contact a qualified technician or an authorized service center. |
| Cooling fan continues to run after oven is turned off. | The cooling system comes into operation when temperature sensor detects 130°F (55°C) during cooking, and it will continue to work after cooking is finished. If the temperature drops to below 110°F (45°C), the fan will stop its operation. |
| Oven is not heating. (1) | Check the circuit breaker or fuse box to your house. (2) Make sure there is proper electrical power to the oven. (3) Make sure the oven temperature has been selected. (4) Make sure the oven function has been selected. |
| Oven is not cooking evenly. | (1) Verify food is not in the oven during preheating. (2) Verify the cooking mode. (3) Refer to the operating instructions for tips on the best rack position to use. (4) Check that the appropriate temperature is set for the recipe. |
| Oven temperature is too hot or too cold. | (1) Check that the appropriate temperature is set for the recipe. (2) The heating elements are not working. If condition persists, contact a qualified technician or an authorized service center. |
| Oven lamp is not working properly. | Replace or reinsert the lamp bulb if loose or defective. Touching the bulb with fingers may cause the bulb to burn out. |
| Clock and the reminder function are not working properly. | Make sure there is proper electrical power to the oven. See Clock Setting (p. 9) and Reminder Function (p. 10). |
| Excessive moisture is in the oven. | When cooking is finished, open the door slowly staying from the oven as far as possible to prevent the body from being burned by steam. |
| Enamel coating of the oven cavity has removed. | When oven racks are removed and replaced, always tilt them upward and do not force them to prevent the enamel from chipping. Even if a small area of the cavity enamel has removed, it does not affect using. However, the soonest replacement is recommended to prevent the metal under the enamel coating from rusting. |
| The oven is not turned on. | Check the circuit breaker and the fuse, and reset the circuit breaker or replace the fuse if it is tripped or blown. If the condition persists, contact a qualified technician or an authorized service center. |
| The oven lamp is dimming. | (1) This may be caused by the voltage instability when the higher power level is used for cooking. It does not indicate a problem with your oven. (2) Wipe and clean the covering glass of the lamp to get the maximum brightness. |
Specifications
| Model HL-FN647S | |
| Voltage 120 V/240 V ~ | 120 V/208 V ~ |
| Wattage 3260 W | 2450 W |
| Frequency 60 Hz | |
| Outside Dimensions (W x D x H) Approx. | 595 mm × 575 mm × 595 mm (23 27/64 in. × 22 41/64 in. × 23 27/64 in.) |
| Oven Cavity Volume Approx. 70 L (74 qt.) | |
| Net Weight Approx. 33.5 kg (73 55/64 lb.) |
Introduction

WARNING

If the information in this manual is not followed exactly, a fire or explosion may result causing property damage, personal injury or death.

RISK OF ELECTRIC SHOCK WITHOUT ELECTRICAL GROUNDING CONNECTION
You must disconnect the neutral from the grounding lead. Connect the appliance in accordance with local electrical codes.
For model rated up to 4.3kW connect to a 20 A fuse or circuit breaker.
Please read these instructions. They will save you time and effort and help to ensure optimum oven performance.
Be sure to observe all WARNINGS. These installation instructions are intended for use by a qualified installer.
In addition to these instructions, the oven shall be installed in accordance with Canadian Electric Code C22.1-latest edition/Provincial and Municipal codes and/or local codes.
These shall be carefully followed at all times.
NOTE: IF INSTALLING YOUR OVEN IN CANADA PLEASE CHECK TO MAKE
SURE THAT YOU HAVE A MODEL WITH THE CANADIAN LISTING MARK, AS SHOWN ON THE RIGHT.

Electrical Connection

WARNING

The means for disconnection must be incorporated in the fixed wiring in accordance with the wiring rules.
Electrical Supply
Before installing the oven have a qualified electrician verify that your home is provided with adequate electrical service and that the addition of the oven will not overload the branch circuit on which it is to be installed.
A separate 3-wire or 4-wire single phase, 120V / 240V 60Hz , or a 120V / 208V 60Hz branch circuit is required.
For hook-up of the oven you will need to have an approved junction box installed where it will be easily reached through the front of the cabinet where the oven will be located. The oven has 130cm (51 3/16 in.) of conduit. Allow 130 to 150cm (51 3/16 to 59 1/16 in.) of slack in the line so that the oven can be moved if servicing is ever necessary.
DO NOT shorten the flexible conduit.
Wiring Requirements
When making the wire connections, use the entire length of the conduit provided (130 cm (51 3/16 in.)). The conduit must not be cut.
Before making connections make sure the power is off and read and observe the following:
- A separate 3-wire or 4-wire, single phase, 120V / 240V , 60Hz or 120V / 208V , 60Hz branch circuit is required for the oven.
- The oven must be connected with Copper or Aluminum wire.
- Wiring must conform to Canadian Electrical Code C22.1- latest edition.
- Wire size (Copper or Aluminum wire) and connections must be suitable for the rating of the appliance as per the National Electrical Code requirements. The flexible armored cable extending from the oven should be connected directly to the junction box.
- The junction box should be located so as to allow as much slack as possible between the junction box and the oven so it can be moved if servicing is ever required.
- A U.L. listed conduit connector must be provided at each end of the power supply cable.

WARNING
ELECTRICAL SHOCK HAZARD
Failure to follow these instructions could result in serious injury or death.

The electrical power to the oven branch circuit must be shut off while line connections are being made.

Electrical ground is required on this appliance. The free end of the green wire (the ground wire) must be connected to a suitable ground. This wire must remain grounded to the oven.

Check with a qualified electrician if you are in doubt as to whether the appliance is properly grounded.

Do not use an extension cord with this appliance.

If cold water pipe is interrupted by plastic, non-metallic gaskets, union connections or other insulating materials, DO NOT use for grounding.

DO NOT ground to a gas pipe.

DO NOT have a fuse in the NEUTRAL or GROUNDING circuit. A fuse in the NEUTRAL or GROUNDING circuit could result in an electrical shock.

CAUTION

Do not repair or replace any part of the appliance unless specifically recommended in the manual.
All other servicing should be done by a qualified technician. This may reduce the risk of personal injury and damage to the oven.
Never modify or alter the construction of the appliance by removing panels, wire covers, screws, or any other part of the appliance.
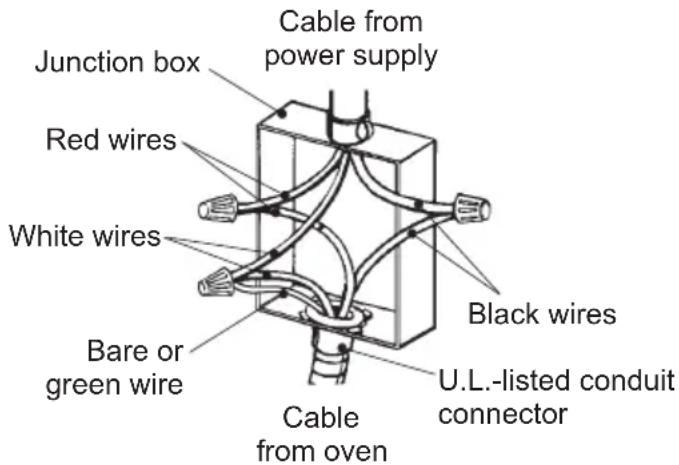
Wiring Connections
Be sure your appliance is properly installed and grounded by a qualified technician. Ask your dealer to recommend a qualified technician or an authorized repair service.
This appliance is manufactured with a green GROUND wire connected to the oven chassis. After making sure that the power has been turned off, connect the flexible conduit from the oven to the junction box using a U.L. listed conduit connector. Figures 1 and 2 and the instructions provided below present the most common way of connecting the ovens.
Your local codes and ordinances, of course, take precedence over these instructions.
Complete electrical connections according to local codes and ordinances "WARNING" Risk of Electric Shock, frame grounded to neutral of appliance through a link.
Grounding through the neutral conductor is prohibited for new branch-circuit installations (1996 NEC); mobile homes; and recreational vehicles, or in an area where local codes prohibit grounding through the neutral conductor. For installations where grounding through the neutral conductor is prohibited:
- Disconnect the ground from the neutral at free end of conduit;
- Use grounding terminal or lead to ground unit; and
- Connect neutral terminal or lead to branch circuit neutral in usual manner.
3-Wire Branch Circuit
Refer to Figure 1, where local codes allow the connection of GROUND wire from the oven to the branch circuit NEUTRAL wire (gray or white colored wire):
- If local codes permit, connect the green GROUND wire from the oven and the white wire from the oven to the branch circuit NEUTRAL wire (gray or white colored wire).
- Connect the red and black leads from the oven to the corresponding HOT Wires in the junction box.
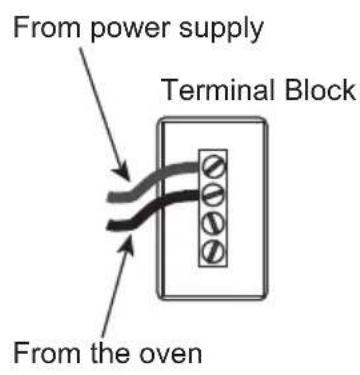
- Connect the local codes and power supply codes using a terminal.
- The terminal uses a thing adapting to the wire of the cord.
Grounded Neutral
Figure 1
4-Wire Branch Circuit
Refer to Figure 2:
- Disconnect ground from neutral at free end of conduit.
- Connect the green GROUND wire from the oven to the GROUND wire in the junction box (bare or green colored wire).
- Connect the red and black leads from the oven to the corresponding HOT Wires in the junction box.
- Connect the white wire from the oven to the NEUTRAL (gray or white) wire in the junction box.
- Connect the local codes and power supply codes using a terminal.
- The terminal uses a thing adapting to the wire of the cord.
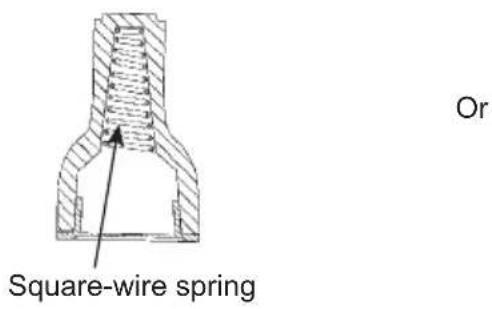
Important: Use twist-on connector with square-wire spring
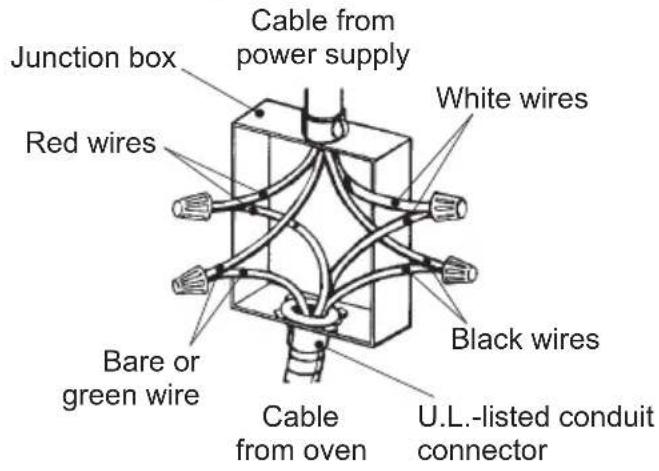
Ungrounded Neutral
Figure 2
Installing the Oven
Choosing Oven Location
Carefully select the location where the oven will be placed. The oven should be located for convenient use in the kitchen, but away from strong drafts.
Strong drafts may be caused by open doors or windows, or by heating and/or air conditioning vents or fans. Make sure that electrical power can be provided to the location selected.
Installation Notes
- Do not slide oven across floor. Damage to floor covering or floor could result.
- The oven support surface must be a minimum 2 cm (25/32 in.) thick plywood platform. It must support 50 kg (110 1/4 lb).
The platform must be solid, level and flush with the bottom of the cabinet cut out.
- Use extreme caution when moving or installing the oven. It is very heavy.
DO NOT LIFT THE OVEN BY THE DOOR HANDLE, remove the door for easier handling and installing.
See REMOving THE DOOR in the maintenance section of the Operating Instructions. - Be very careful when moving or installing the oven to avoid damage to the oven frame or damage to the cabinets.
- Be sure to level the oven. An oven that is not level may provide poor or inconsistent baking results.
- Be careful when placing oven. DO NOT pinch the conduit between the oven back.

WARNING

Before installing or removing, turn power OFF at the service panel. Lock service panel to prevent power from being turned ON accidentally.
Know how to disconnect the power to the oven at the circuit breaker or fuse box in case of an emergency.

Securely fasten oven to cabinet using the screws provided. Failure to do so could result in oven moving or tipping during use and causing damage to the oven or cabinets or personal injury.

CAUTION

Do not remodel the oven.

CAUTION

We recommend installing the oven with the help of a second person.

The base on which the oven is resting must be completed as shown in below illustration.

Never exert pressure on the handle during installation into the cabinet.
Unsuitable Suitable
Positioning the Oven
1. Take note of general dimensions required for the installation.
The figure below shows the general dimensions of the appliance.
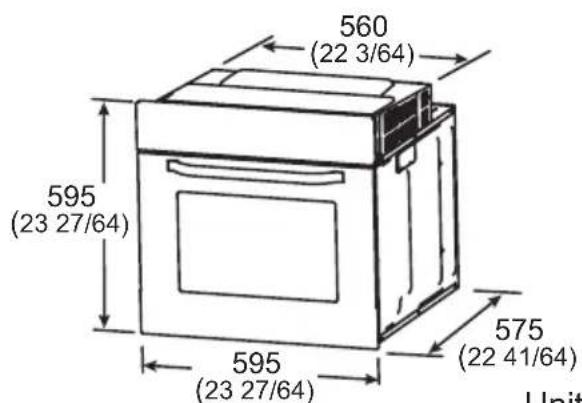
Unit: mm (in.)
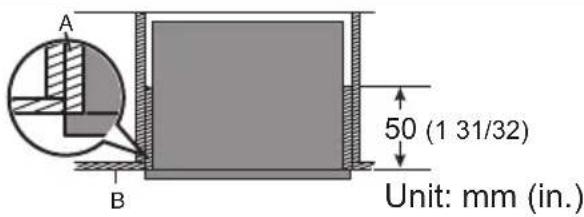
2. Flush fit and Proud fit
For the best integration within a kitchen, install this appliance in a standard 600 mm (23 5/8 in.) wide cabinet that gives a flush fit with the surrounding cabinet fronts. A recess of 25 mm (63/64 in.) is ideal. It can also be installed using a proud fit with the surrounding cabinet.
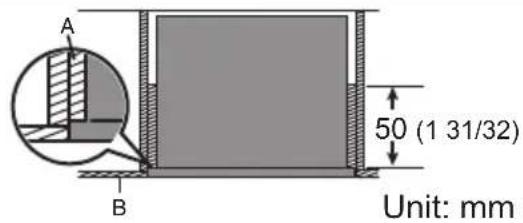
Flush fit (top view) Proud fit (topview)
A: Infill panel recessed 25mm (63/64 in.) from external cabinet / door to accommodate for a flush fit.
B:Cabinetdoor.
A: Infill panel aligned with cabinet / door to accommodate for a proud fit.
B:Cabinetdoor.
3. Before moving the appliance for installation, check that the cabinet has following inner space dimensions.
| Flush fit Proud fit | |
| Attach the electrical supply junction box to the top right corner. Electrical supply junction box 25 (63/64) 570 (22.7/16) minimum 560 (22.3/64) Unit: mm (in.) | Attach the electrical supply junction box to the top right corner. Electrical supply junction box 570 (22.7/16) minimum 560 (22.3/64) Unit: mm (in.) |
Note:
The oven is designed for mounting into any kitchen cabinet as long as it is heat resistant.
Securing the Oven to a Cabinet
Fix the oven to the cabinet with 2 pieces of provided screws as illustrated below. Attach 2 screw caps for finishing appearance.
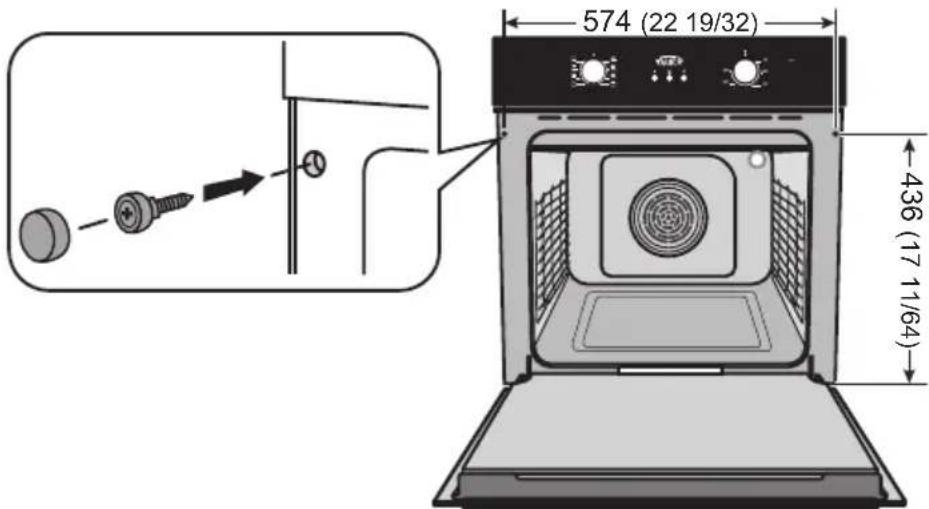
Unit: mm (in.)
Note:
To locate the fixing holes, open the oven door and look at the side frame of the oven.
Tables des matières

- Operating and Installation Instructions
- Operating and Installation Instructions EN-1 - 25
- Safety Precautions 2-4
- For Installer
- WARNING
- CAUTION
- Note:
- Parts Identification
- Accessories
- Wire Shelf
- Enamel Baking Tray
- Removable Rack
- Screw Pack
- Function Setting
- Before Using the Oven
- While Using the Oven
- Operations
- Clock Setting
- Start/Cancel Function
- Reminder Function
- Delay Function/End Function
- For 3se
- In standby mode,
- Forase
- Using the Oven
- Rack Placement Warning
- Cooking Advice and Instructions
- General Advice
- Advice for Cooking Meat
- Advice for Cooking Cakes and Biscuits
- Advice for Defrosting
- Advice for Cooking with the Grill and the Fan-assisted Grill
- Tips for Energy Saving
- Cleaning and Maintenance
- Cleaning the Oven Door
- Cleaning the Inside of the Oven
- Removing the Door from Oven
- Removing the Rack from Oven
- Removing the rack will make it easier to clean the side wall of the oven.
- Bulb Replacement
- Troubleshooting
- Specifications
- Introduction
- Electrical Connection
- Electrical Supply
- Wiring Requirements
- ELECTRICAL SHOCK HAZARD
- Do not repair or replace any part of the appliance unless specifically recommended in the manual.
- Wiring Connections
- 3-Wire Branch Circuit
- 4-Wire Branch Circuit
- Refer to Figure 2:
- Installing the Oven
- Choosing Oven Location
- Installation Notes
- Positioning the Oven
- Take note of general dimensions required for the installation.
- Flush fit and Proud fit
- Before moving the appliance for installation, check that the cabinet has following inner space dimensions.
- Securing the Oven to a Cabinet
- Tables des matières
Brand : PANASONIC
Model : HLFN647S
Category : Oven