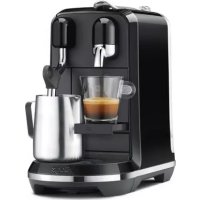
Nespresso Creatista Uno - Coffee machine SAGE - Free user manual and instructions
Find the device manual for free Nespresso Creatista Uno SAGE in PDF.



User questions about Nespresso Creatista Uno SAGE
0 question about this device. Answer the ones you know or ask your own.
Ask a new question about this device
Download the instructions for your Coffee machine in PDF format for free! Find your manual Nespresso Creatista Uno - SAGE and take your electronic device back in hand. On this page are published all the documents necessary for the use of your device. Nespresso Creatista Uno by SAGE.
USER MANUAL Nespresso Creatista Uno SAGE
Congratulations on your purchase of the Nespresso Sage Creatista Uno, the machine that allows you to make cafe quality milk coffees.
Nespresso is an exclusive system creating the perfect Espresso, time after time. Each parameter has been calculated with great precision to ensure that all the aromas from each capsule can be extracted, to give the coffee body and create an exceptionally thick and smooth crema.
CAUTION: When you see this sign, please refer to the important safeguards to avoid possible harm and damage.
INFORMATION: when you see this sign, please take note of the advice for the correct and safe usage of your coffee machine.
BNE500/SNE500 Specifications/ techniques
220-240V,50Hz,1300-1600W
Pmax 19 bar
\~5,2kg
1.51

17.0cm
30.9cm

Sage Creatista Uno

CAUTION: the safety precautions are part of the appliance. Read them carefully before using your new appliance for the first time. Keep them in a place where you can find and refer to them later on.
CAUTION: when you see this sign, please refer to the safety precautions to avoid possible harm and damage.
INFORMATION: when you see this sign, please take note of the advice for the correct and safe usage of your appliance.
- The appliance is intended to prepare beverages according
to these instructions.
- Do not use the appliance for anything other than its intended use.
- This appliance has been designed for indoor and non-extreme temperature conditions use only.
- Protect the appliance from direct sunlight effect, prolonged water splash and humidity.
-
This is a household appliance only. It is not intended to be used in: staff kitchen areas in shops, offices and other working environments; farm houses; by clients in hotels, motels and other residential type environments; bed and breakfast type environments.
-
This appliance may be used by children of at least 8 years of age, as long as they are supervised and have been given instructions about using the appliance safely and are fully aware of the dangers involved. Cleaning and user maintenance shall not be made by children unless they are older than 8 and they are supervised by an adult.
- Keep the appliance and its cord out of reach of children under 8 years of age.
- This appliance may be used by persons with reduced physical, sensory or mental capabilities, or whose experience or knowledge is not sufficient, provided
they are supervised or have received instruction to use the appliance safely and understand the dangers.
Children shall not use the device as a toy.
- The manufacturer accepts no responsibility and the warranty will not apply for any commercial use, inappropriate handling or use of the appliance, any damage resulting from use for other purposes, faulty operation, non-professionals repair or failure to comply with the instructions.
EN Safety Precautions
Avoid risk of fatal electric shock and fire.
In case of an emergency: immediately remove the plug from the power socket.
- Only plug the appliance into suitable, easily accessible, earthed mains connections. Make sure that the voltage of the power source is the same as that specified on the rating plate. The use of an incorrect connection voids the warranty.
The appliance must only be connected after installation.
- Do not pull the cord over sharp edges, clamp it or allow it to hang down.
- Keep the cord away from heat and damp.
- If the supply cord is damaged, it must
be replaced by the manufacturer, its service agent or similarly qualified persons, in order to avoid all risks.
- If the cord or the plug are damaged, do not operate the appliance; return the appliance to Nespresso or to a Nespresso authorised representative.
- If an extension cord is required, use only an earthed cord with a conductor cross-section of at least 1.5mm^2 or matching input power.
- To avoid hazardous damage, never place the appliance on or beside hot surfaces such as radiators, stoves, ovens, gas burners, open flame, or similar.
Always place it on a horizontal, stable and even
surface. The surface must be resistant to heat and fluids, like water, coffee, descaler or similar liquids.
- Disconnect the appliance from the mains when not in use for a long period. Disconnect by pulling out the plug and not by pulling the cord itself or the cord may become damaged.
Before cleaning and servicing, remove the plug from the mains socket and let the appliance cool down. - Never touch the cord with wet hands.
- Never immerse the appliance or part of it in water or other liquid.
-
Never put the appliance or part of it in a dishwasher.
Electricity and water together is dangerous and can lead to fatal electrical shocks. -
Do not open the appliance. Hazardous voltage inside!
- Do not put anything into any openings. Doing so may cause fire or electrical shock!
Avoid possible harm when operating the appliance.
- Never leave the appliance unattended during operation.
- Do not use the appliance if it is damaged or not operating perfectly. Immediately remove the plug from the power socket. Contact Nespresso or Nespresso authorised representative for examination, repair or adjustment.
- A damaged appliance can cause electrical shocks, burns and fire.
Always completely close the handle and never open it
Safety Precautions

during operation. Scalding may occur.
- Do not put fingers under coffee outlet, risk of scalding.
- Do not put fingers into capsule compartment or the capsule shaft. Danger of injury!
Water could flow around a capsule when not perforated by the blades and damage the appliance.
- Never use a damaged or deformed capsule. If a capsule is blocked in the capsule compartment, turn the machine off and unplug it before any operation. Call Nespresso or Nespresso authorised representative.
- Fill the water tank only with fresh and potable water.
- Empty water tank if the appliance will not be used for an extended time
(holidays, etc.).
- Replace water in water tank when the appliance is not operated for a weekend or a similar period of time.
- Do not use the appliance without the drip tray and drip grid to avoid spilling any liquid on surrounding surfaces.
- Do not use any strong cleaning agent or solvent cleaner. Use a damp cloth and mild cleaning agent to clean the surface of the appliance.
- To clean machine, use only clean cleaning tools.
- When unpacking the machine, remove the plastic film and dispose.
- This appliance is designed for Nespresso coffee capsules available exclusively through Nespresso or your
Nespresso authorised representative.
- All Nespresso appliances pass stringent controls. Reliability tests under practical conditions are performed randomly on selected units. This can show traces of any previous use.
- Nespresso reserves the right to change instructions without prior notice.
- This machine contains magnets.
Dscaling
- Nespresso descaling agent, when used correctly, helps ensure the proper functioning of your machine over its lifetime and that your coffee experience is as perfect as the first day.
SAVE THESE INSTRUCTIONS
Pass them on to any subsequent user. This instruction manual is also available as a PDF at nespresso.com
Rinse the water tank before filling it with potable water.
2 Fill the water tank with potable water.
Place the water tank, insert the drip tray and the capsule container in position. For your safety, operate the machine only with drip tray and capsule container in position.
4 Plug the machine into the power outlet.
Turn the machine ON by pressing the Lungo, Espresso, Ristretto, or Steam button. The buttons will flash while the machine heats up. Heating up takes approximately 3 seconds. The Lungo button will illuminate once heated.
Place empty jug under the coffee outlet. Press Lungo button to begin cycle. Once done, discard the liquid from the jug. Rinse the jug.
Setting your water hardness, dip the Water Hardness Test Strip in and out of the water tank. Wait 1 minute. Press and hold the temperature button and the milk froth level button for 5 seconds to set the water hardness level. Pressing temperature button increases the level and pressing milk froth button decreases the level. Set the water hardness according to the results on the Test Strip. For further information refer to page 28. Press any button not blinking to save and exit.
To turn OFF your machine, press and hold the Ristretto and Steam buttons together for 0.5 second until machine is off. Steam wand purges when the machine turns off.
1 Fill the water tank
with potable water.
Füllen Sie den
Wassertank mit
Trinkwasser.
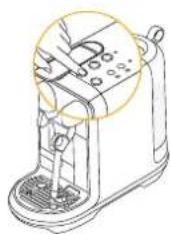
Turn the machine ON by
pressing Ristretto, Espresso, Lungo, or Steam button. The buttons will flash while the machine heats up. Heating up takes approximately 3 seconds.
Place a cup under the coffee outlet. Use the cup support if required. PUSH the cup support to unlock.
To ensure hygienic conditions, it is highly recommended to not reuse a used capsule. Um optimal Hygienebedingungen
Preparation will stop automatically or press the coffee button before completing the extraction, to stop the coffee flow. Lift the Lever to eject the capsule.
TIP: This machine is optimised for pasteurised whole or semi skrimmed milk, refrigerated & freshly opened. Milk Temperature and Milk Froth may be adjusted to suit different milk types.
1 Fill the water tank with fresh potable water.
To accommodate smaller cups, use the cup support. PUSH the cup support to unlock.
CAUTION: Do not fill milk jug above the maximum level marked on the inside & outside of the jug.
3 Fill the milk jug with enough fresh cold milk from the fridge. Minimum and maximum levels are marked on the inside and outside of the milk jug.
Füllen Sie den
Lift the steam wand & position in the centre of the milk jug.
Ensure the milk jug is making contact with the temperature sensor located in the drip tray.
Press one of the coffee buttons to start the coffee extraction.
Milk Temperature Setting
1=cool/kalt
2=ideal/ideal
3=hot/heiβ
Milk Froth Level Setting
9 Start milk frothing by pressing steam button.
When milk frothing is complete, lift the steam wand, wipe with a clean damp cloth. Remove the jug.
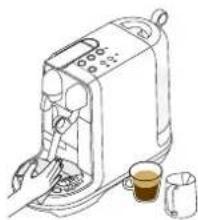
1 Allow steam wand to return to its down position & it will auto purge to rinse itself.
Pour milk into the coffee to finish your drink.
1 Fill the water tank with fresh potable water.
To accommodate a Latte Macchiato glass, push the cup support in until it locks.
Fill the milk jug to the marked maximum level with fresh cold milk from the fridge.
CAUTION: Do not fill milk jug above the maximum level marked on the inside & outside of the jug.
Set milk froth level at 3 and temperature level at 2.
Ensure the milk jug is making contact with the temperature sensor located in the drip tray.
5 Lift the steam wand & position in the centre of the milk jug and press the Steam button to begin milk frothing.
When milk frothing is completed, lift the steam wand, wipe with a clean damp cloth.
Allow steam wand to return to its down position & it will auto purge to rinse itself.
Pour milk into the Latte Macchiato glass. Rinse the jug.
U Place the Latte Macchiato glass under the coffee spout.
Press the Espresso button to start the coffee extraction.
Drucken Sie die
Lift the Lever & insert your capsule. Press and hold one coffee button you want to adjust among Ristretto, Espresso, and Lungo.
Release the button after desirable shot duration.
Adjusted coffee volume will be saved for next use.
Any coffee can be programmed
To reset factory settings:

- Turn the machine ON.
- Press and hold the Lunge button and the Ristretto button for 5 seconds.
- Press the Lungo button or the Ristretto button to confirm. Press any button not blinking to exit the mode.
- After a Factory Reset, the machine will restart in the Ready Mode.
Turn off the machine by pressing and holding Ristretto button and Steam button together for 0.5 seconds.
Remove the water tank. Place the empty Milk Jug under the coffee outlet.
Press and hold the.
Espresso button and the Lungo button together for 5 seconds.
Press the Espresso button or the Lungo button to start emptying cycle. Press any button not blinking to exit the mode.
When the pump stops, empty & wipe dry the capsule bucket & drip tray.
Energy efficient: Machine minimises power use when not making a drink. After 10 mins of no use, the machine enters sleep mode. Restart by pressing Ristrello, Espresso, Lungo, or Steam button.
Empty the drip tray and the capsule container every day. Remove cup support by first removing the capsule bucket, then unlocking the cup support, pulling the cup support forward & lifting it upwards to disengage from the machine. Clean cup support and wipe inside machine with a clean damp cloth. Remove the water tank and lid and clean them both with odorless detergent and rinse with warm water. Refill the water tank with fresh potable water.
Rinse the milk jug & dry after each use, if required, wash the jug with mild detergent. The jug is dishwasher safe.
Fill the milk jug with potable water between the min & max marks. Press the Steam button to start steaming. When complete discard the hot water, then wipe the steam wand with a clean damp cloth.
Do not use any strong or abrasive solvent, sponge or cream cleaner. Do not put the parts in the dishwasher. Only the milk jug is dishwasher safe.
Dry all the parts with a soft clean cloth and reassemble all parts. Clean the coffee outlet and inside the machine regularly with a clean damp cloth.
Never immerse the appliance or part of it in water or any other liquid.
It is recommended that you perform this monthly to prevent steam tip blockages or when the steam wand clean alert LED is on.
When it flashes, do manual steaming by pressing and holding the Steam button for 3 seconds.
W
1 Remove the pin cleaning tool
located in the back of the machine, under the water tank.
Unscrew and remove the steam tip.
Use the pin cleaning tool to clear each hole of the steam tip.
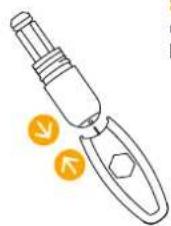
Use the pin cleaning tool to remove the steam tip cap.

5 Rinse the steam tip and
cap to remove any milk residue, then wipe them with a clean dry cloth. Inspect the seals for damage. Do not put these parts in the dishwasher.
Reassemble steam tip and return it onto the steam wand.
Setzen Sie die
Put the pin cleaning tool and water tank back in place. Press and hold the Steam button for 3 seconds to begin steam purge.
Duration approximately 15 minutes
Read the important safeguard on the descending package and refer to the table for the frequency of use. The descending solution can be harmful. Avoid contact with eyes, skin and surfaces. Never use any product other than the Nespresso descailng kit available at the Nespresso to avoid damage to your machine. The following table will indicate the descending frequency required for the optimum performance of your machine, based on water hardness. For any additional questions you may have regarding descending, please contact the Nespresso.
Dscing: Removes scale build-up, maintains coffee taste and prevents machine damage. Frequency will depend on your water hardness & amount of use. The descale alert LED will flash when descending is due. If you continue to use the machine, the descale alert LED will switch to solid on, after which, the machine will not function until descending is performed.
Open and close the capsule lever to remove any used capsule. Empty and clean capsule bucket, drip tray and water tank. And put them back on the machine.
Ensure there is 500ml /17 fl.oz.of water and drip tray is inserted. Place descending agent in the water.
Place a 1L/34 fl.oz container under the coffee outlet and steam wand.
Make sure the machine is off. Press and hold the Ristretto button and the Steam button together for 5 seconds to enter the descending mode. The Ristretto and the Steam buttons will be solid on. Press any button not illuminated to exit the mode. Press the Ristretto button or the Steam button to start the descending process. Both buttons will blink.
5 Milk froth level LED will indicate the progress of t descalling process
Once finished, discard liquid from the container. Empty water tank and rinse clean.
Fill water tank to MAX with potable water.
Place a 1L/34 fl.oz. container under the coffee outlet and steam wand. Press the Ristretto button or the Steam button to start rinse cycle.
Once finished, discard liquid from the container. Repeat 6-8. When the second rinse cycle is finished, the Ristretto button and the Steam button will flash 3 times, and the machine will be turned off.
Rinse drip tray and water tank. And put them back on the machine.
by pressing the Lungo, Espresso, Ristretto, or Steam button. Heating up takes approximately 3 seconds.
Schaften Sie das
Setting your water hardness, dip the Water Hardness Test Strip in and out the water tank.
Wait 1 minute. Press and hold the temperature button and the milk froth button for 5 seconds to set the water hardness level. Pressing temperature button increases the level and pressing milk froth button decreases the level. Set the water hardness according to the results on the Test Strip. Press any button not blinking to save and exit.
| Buttons not illuminated - Check the water tank. If empty, fill with potable water. - Machine tums OFF automatically. See paragraph on «Energy Saving Concept». - Press the Ristretto, Espresso, or Lungo button to turn to «ON-mode». | - Check the outlet: plug, voltage, fuse. |
| No steam or hot water - Press the Ristretto, Espresso, or Lungo button to turn to «ON-mode». - Check the descale alert LED or the steam wand cleaning alert LED is on. If on, descale or clean the steam wand. - Do a manual purge by pressing and holding the Steam button for 3 seconds. | - Check the outlet: plug, voltage, fuse. |
| No coffee, no water, unusual coffee flow - Check if the water tank is correctly positioned, if empty, fill with potable water. | - Descale the machine, if necessary. |
| Coffee is not hot enough - Preheat cup. - Descale the machine, if necessary. | |
| The capsule lever does not close completely - Empty the capsule container. - Check that no capsule is blocked inside the machine (Note: do not put your finger inside the machine). | |
| Leakage (water under the machine) - Empty drip tray if full. - Check drip tray is securely inserted. | - If problem persists, call Nespresso. |
| No coffee flow, water goes directly into the capsule bucket (despite inserted capsule) - Ensure capsule lever is closed. - Empty capsule bucket and check that no capsule is blocked inside the machine. (NOTE: do not put finger inside the machine) If problem persists, call the Nespresso. | |
| Buttons flashing - Check the water tank. If empty, fill with potable water and brew a coffee. - Check steam tip for blockages. Use pin cleaning tool stored under the water tank to unlock each of the holes. | - Descale machine, if necessary. - Complete a Clean Steam Wand cycle, if necessary. |
| Descale alert LED is on - Descale the machine. | |
| Machine is ON but ceases to operate - Power machine off by holding the Ristretto, Espresso, or Lungo button. - Wait 60 minutes and turn on. | - If problem persists, call Nespresso. |
| Machine turns to OFF mode - To save energy the machine will turn to OFF mode after 10 minutes of non use. See paragraph on «Energy Saving Concept». | - Press Ristretto, Espresso, or Lungo to turn to «ON-mode». |
Fehlerbehebung

| Milk steam cycle does not start | - Check if the water tank is correctly positioned, if empty, fill with potable water. - Check steam tip for any blockages and ensure wand is lowered. | |
| Quality of froth not up to standard | - Be sure to use pasteurised whole or semi-skimmed milk at refrigerated temperature (about 4-6 °C / 39-43 °F). For a better result, the milk must be newly opened. - Check the milk froth setting. | - Use the Sage milk jug provided. - Clean both the milk jug and steam wand after each use. - Clean the steam wand. |
| Steam is very wet | - Use cold, potable water. Do not use highly filtered, demineralised or distilled water. | |
| Milk overflows | - Fill jug with appropriate milk volume. - Minimum fill level as marked on the inside & outside of the jug. - Maximum fill level as marked on the inside & outside of the jug. | - To stop overflow, either reduce the initial volume of milk and/or reduce the froth level. This varies depending on milk type. |
| Milk temperature is too hot | - Be sure to use the Sage milk jug provided. - Check the milk jug is positioned correctly on the milk jug temperature sensor. - Check the temperature sensor in the drip tray is clean. | - Decrease the milk temperature setting. |
| Milk temperature is not hot enough | - Preheat cup. - Use the Sage milk jug provided. - Check the milk jug is positioned on the milk jug temperature sensor. | - Increase the milk temperature setting. - Check the steam tip for blockages. |
| Clean Steam Wand alert LED is on | - It alerts when the machine detects that steam wand is blocked or after the machine has done 90 cycles. | - Clean the Steam Wand. |
As we may not have foreseen all uses of your appliance, should you need any additional information, in case of problems or simply to seek advice, call Nespresso or your Nespresso authorised representative. Contact details for Nespresso or Nespresso authorised representative can be found in the Welcome to Nespresso folder in your machine box or at www.nespresso.com
Your appliance contains valuable materials that can be recovered or can be recyclable. Separation of the remaining waste materials into different types facilitates the recycling of valuable raw materials. Leave the appliance at a collection point. You can obtain information on disposal from your local authorities.
Sage guarantees this product against defects in materials and workmanship for a period of 2 years. The warranty period begins on the date of purchase and Sage requires presentation of the original proof of purchase to ascertain the date. During the warranty period, Sage will either repair or replace, at its discretion, any defective product at no charge to the owner. Replacement products or repaired parts will be warranted only for the unexpired portion of the original warranty or six months, whichever is greater. This limited warranty does not apply to any defect resulting from negligence, accident, misuse, or any other reason beyond Sage's reasonable control, including but not limited to: normal wear and tear, negligence or failure to follow the product instructions or the safety precautions, improper or inadequate maintenance, scale deposits or lack of descaling, connection to improper power supply, unauthorized product modification or repair, use for commercial purposes, fire, lightning, flood or other external causes.
This warranty is valid only in the country of purchase or in such other countries where Sage sells or services the same model with identical technical specifications. Warranty service outside the country of purchase is limited to the terms and conditions of the corresponding warranty in the country of service. Should the cost of repairs or replacement not be covered by this warranty, Sage will advise the owner and the cost shall be charged to the owner. This limited warranty shall be the full extent of Sage's liability however caused. Except to the extent allowed by applicable law, the terms of this limited warranty do not exclude, restrict or modify the mandatory statutory rights applicable to the sale of this product and are in addition to those rights. If you believe your product is defective, contact Sage or Nespresso for instructions on how to proceed with a repair.
Please visit our website at www.nespresso.com for contact details.