The Nutri Juicer Cold BJE430 - Juicer SAGE - Free user manual and instructions
Find the device manual for free The Nutri Juicer Cold BJE430 SAGE in PDF.
User questions about The Nutri Juicer Cold BJE430 SAGE
0 question about this device. Answer the ones you know or ask your own.
Ask a new question about this device
Download the instructions for your Juicer in PDF format for free! Find your manual The Nutri Juicer Cold BJE430 - SAGE and take your electronic device back in hand. On this page are published all the documents necessary for the use of your device. The Nutri Juicer Cold BJE430 by SAGE.
USER MANUAL The Nutri Juicer Cold BJE430 SAGE
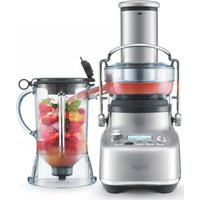
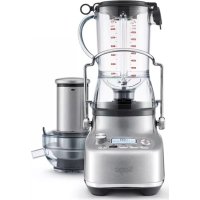
the Nutri Juicer® Cold*
BJE430


QUICKGUIDE
KURZANLEITUNG

GUIDERAPID
SNELSTARTGIDS

GUIA RAPIDA

Contents
2 Important Safeguards
5 Components
6 Assembly
8 Functions
9 Care & Cleaning
10 Troubleshooting
11 Guarantee
SAGE®
RECOMMENDS SAFETY FIRST
At Sage® we are very safety conscious. We design and manufacture consumer products with the safety of you, our valued customer, foremost in mind. In addition we ask that you exercise a degree of care when using any electrical appliance and adhere to the following precautions.
IMPORTANT SAFEGUARDS
READ ALL INSTRUCTIONS BEFORE USE AND SAVE FOR FUTURE REFERENCE
-
A downloadable version of this document is also available at sageappliances.com
-
Before using for the first time ensure your electricity supply is the same as shown on the label on the underside of the appliance.
- Remove and safely discard any packaging materials before first use.
- To eliminate a choking hazard for young children, safely discard the protective cover fitted to the power plug.
- This appliance is for household use only. Do not use the appliance for anything other than its intended use. Do not use in moving vehicles or boats. Do not use outdoors. Misuse may cause injury.
- Fully unwind the power cord before operating.
- Position the appliance on a stable, heat resistant, level, dry surface away from the edge and do not operate on or near a heat source such as a hot plate, oven or gas hob.
- Vibration during operation may cause the appliance to move.
- Do not let the power cord hang over the edge of a bench or table, touch hot surfaces or become knotted.
- Always ensure the appliance is turned OFF, unplugged at the power outlet and has been allowed to cool before cleaning, attempting to move or storing.
- Always turn the appliance to the OFF position, switch off at the power outlet and unplug
at the power outlet when the appliance is not in use.
- Do not use the appliance if the power cord, plug, or appliance becomes damaged in any way. If damaged or maintenance other than cleaning is required, please contact Sage Customer Service or go to sageappliances.com
- Any maintenance other than cleaning should be performed by an authorised Sage® service centre.
Children should not play with the appliance. - Cleaning of the appliance should not be carried out by children unless they are 8 years or older and supervised.
- The appliance and its cord should be kept out of reach of children aged 8 years and younger.
- The installation of a residual current safety switch is recommended to provide additional safety when using all electrical appliances. Safety switches with a rated operating current not more than 30mA are recommended. Consult an electrician for professional advice.
- Always ensure the appliance is properly assembled before use. The appliance will not operate unless properly assembled.
-
Do not use the appliance on a sink drain board.
-
Keep hands, fingers, hair, clothing as well as spatulas and other utensils away from moving or rotating parts during operation.
- Do not use the appliance for anything other than food and/or beverage preparation.
- In order to avoid the possible hazard of the appliance starting by itself due to inadvertent resetting of the overload protection, do not attach an external switching device (such as a timer) or connect the appliance to a circuit that can regularly switch the appliance on and off.
- Carefully read all instructions before operation and save for future reference.
- The appliance can be used by persons with reduced physical or mental capabilities or a lack of experience and knowledge, only if they have been given supervision or instruction concerning use of the appliance in a safe way and understand the hazards involved.
- This appliance shall not be used by children.
- Do not leave the appliance unattended when in use.
-
Do not push food into the feed chute with your fingers or other utensils. Always use the food pusher provided. Do not place hand or fingers into the food chute when it is attached to the appliance.
-
Do not juice stone fruit unless seeds and/or stones have been removed.
- Make sure the stainless steel filter basket has stopped rotating and the motor has completely stopped before releasing the safety locking arm and/or attempting to move the appliance, when the juicer is not in use, and before disassembling, cleaning and storing.
- Any significant spillage onto the surface under or around the appliance, or onto the appliance itself, should be cleaned and dried before continuing to use the appliance.
- Be careful when handling the stainless steel filter basket as the small cutting blades at the base of the filter basket are very sharp. Mishandling may cause injury.
- Remove rind from all citrus fruit before juicing.
- Do not use the appliance if the rotating sieve (filter basket) or lid is damaged.
- Always make sure juicer cover is clamped securely in place before motor is turned on. Do not unfasten interlock arm while juicer is in operation.

The symbol shown indicates that this appliance should not be disposed of in normal household waste.
It should be taken to a local authority waste collection centre designated for this purpose or to a dealer providing this service. For more information, please contact your local council office.

To protect against electric shock, do not immerse the power plug, cord or stance in water or any liquid.
SAVE THESE INSTRUCTIONS

Components
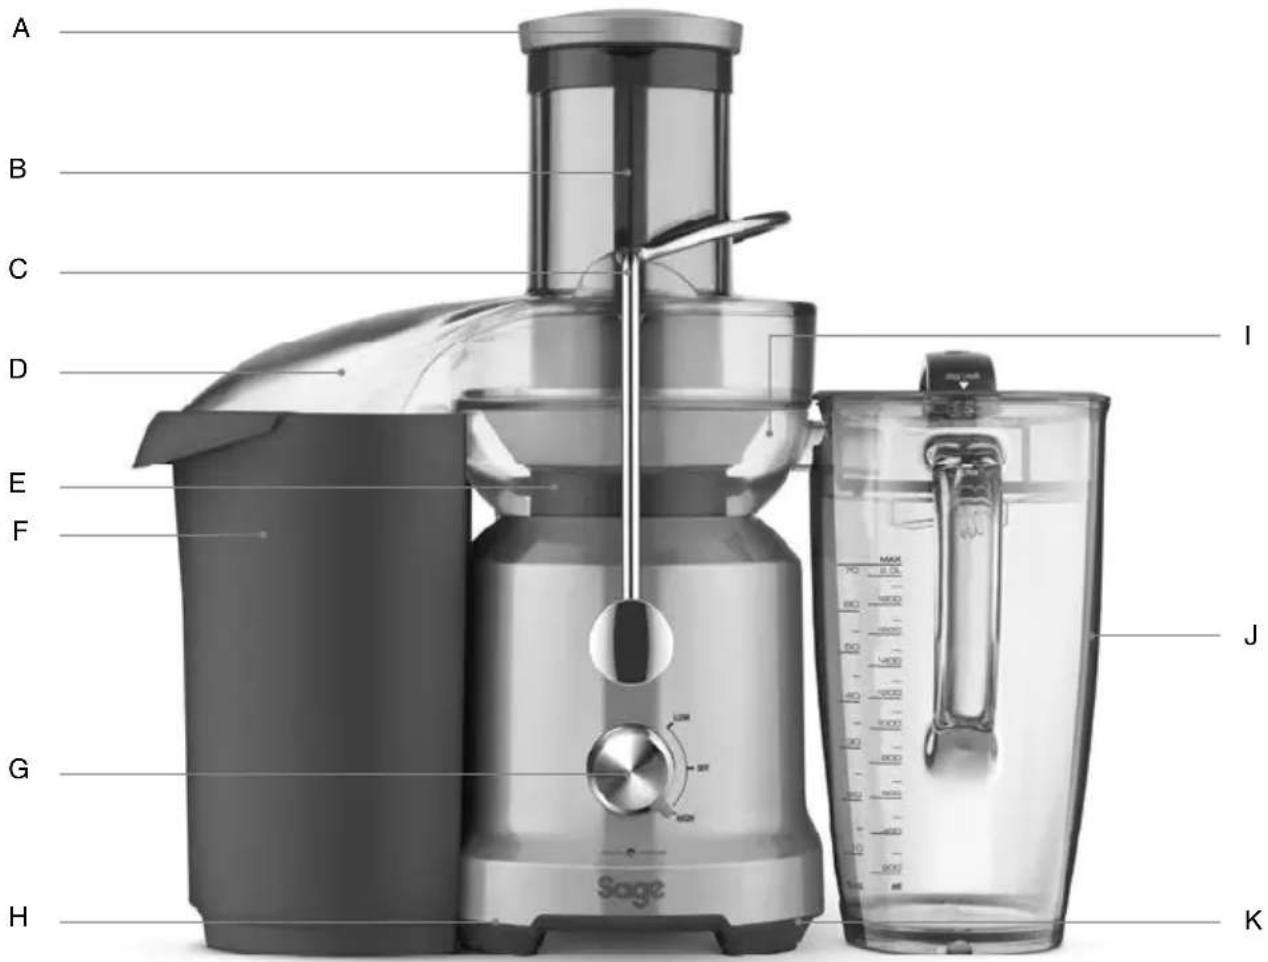
A. Food pusher (not dishwasher safe)
B. Wide feed chute
C. Interlocking safety arm
D. Juicer cover (not dishwasher safe)
E. Stainless steel fiiter basket (top shelf dishwasher safe)
F. Pulp container (dishwasher safe)
G. 2 speed control and off dial H. Cord storage
I. Filter bowl surround (dishwasher safe)
J. 2 litre juice jug and sealing lid (dishwasher safe)
K. Overload Protection LED

Assembly
BEFORE FIRST USE
Before using your juicer for the first time, remove and safely discard any packaging materials and promotional stickers and labels.
Ensure the appliance is switched off at the power outlet and the power cord is unplugged.
Wash the fi tter bowl surround, fi tter basket, juicer cover, food pusher, pulp container and juice jug and lid in warm, soapy water with a soft cloth.
Rinse and dry thoroughly.
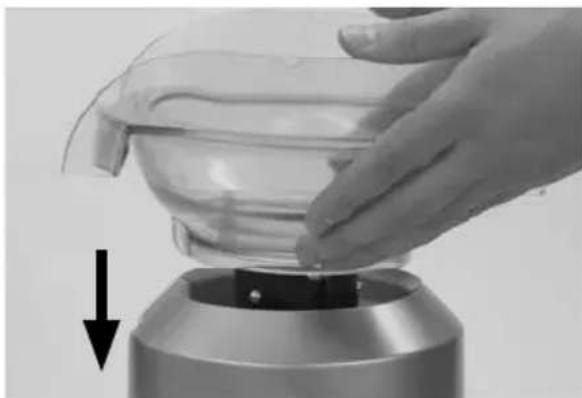
- Place motor base on a flat, dry surface such as a bench top. Ensure that the juicer is switched to OFF at the dial, and the power cord is unplugged.
- Place filter bowl surround on top of the motor base.
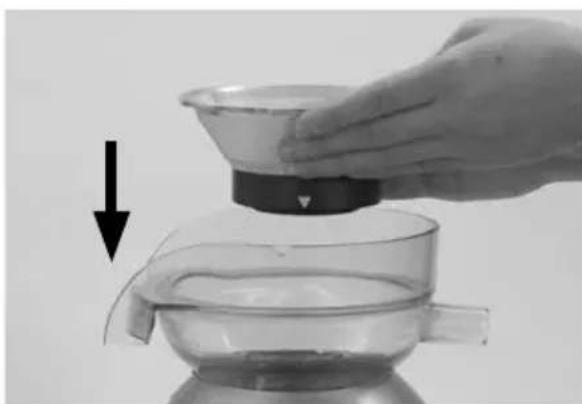
- Align the arrows at the base of the stainless steel fiiter basket with the arrows on the motor drive coupling and push down until it clicks into place to create a secure fi t with the motor base.
- Place the juicer cover over the fi iter bowl surround, positioning the lower part of the feed chute over the stainless steel fi iter basket.
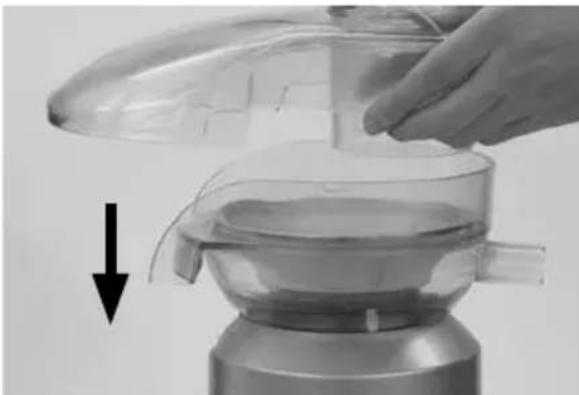
- Raise the safety locking arm up and locate into the two grooves on either side of the juice cover.
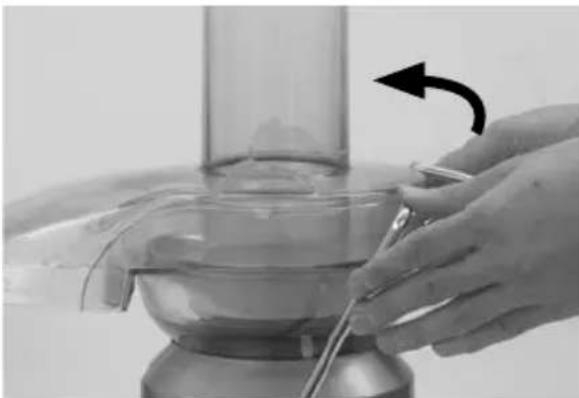
- The safety locking arm should now be in a vertical position and locked into place on top of the juice cover.
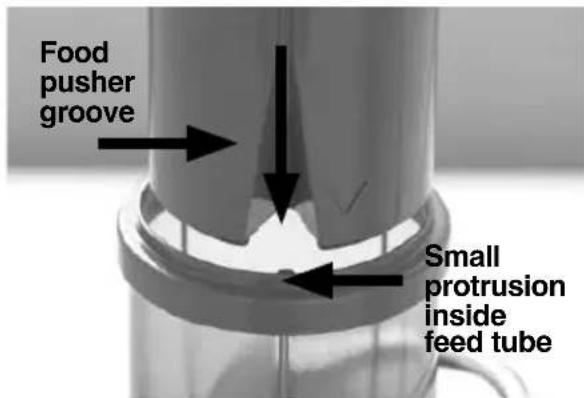
- Slide the food pusher down the food chute by aligning the groove in the food pusher, with the small protrusion on the inside of the top of the feed tube.
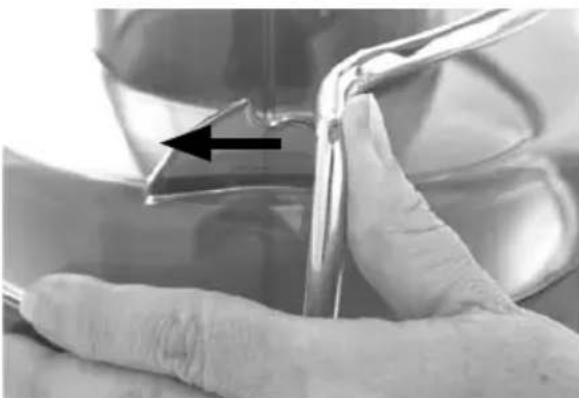
- Place the pulp container into position by tilting the motor base slightly to the right. Insert the pulp container under the juicer cover on the left hand side ensuring it is supported by the juicer cover and motor base.
- Place the juicer jug under the juice spout on the right hand side of the juicer, and place the lid to avoid splatter.
JUICE JUG
Juice can be preserved in the juice jug for up to 3 days by following these steps.
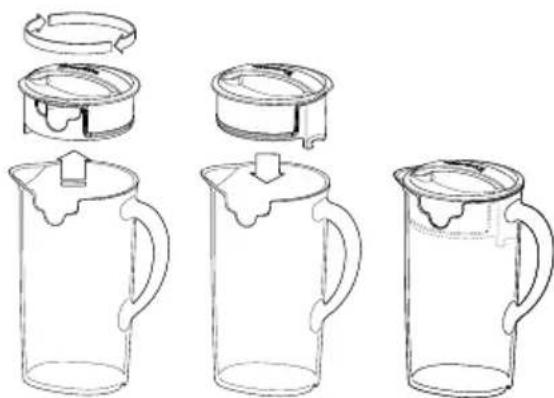
- Lift the lid off the jug and rotate 180^ .
- Press down firmly to replace the lid.
- Store juice in the fridge.

NOTE
Storage time depends on the ingredients being juiced and the freshness of the fruit prior to juicing. Juice must be stored in the refrigerator between 2^ to 4^ .

Functions
-
Plug the power cord into a 220-240V power outlet. Turn the power ON at the power outlet. Adjust the speed to the desired setting. Turn the dial to either the LOW or HIGH setting depending on the type of fruit or vegetable being juiced. Use the speed selector as a guide for juicing different fruits and vegetables.
-
With the motor running, place food into the feed chute and use the food pusher to gently guide food down. To extract the maximum amount of juice, always push the food pusher down slowly.
SPEED SELECTOR GUIDE
| Apples HIGH | |
| Apricots (stone removed) LOW | |
| Beetroot (trimmed) HIGH | |
| Blueberries LOW | |
| Broccoli HIGH | |
| Cabbage HIGH | |
| Carrots HIGH | |
| Cauliflower HIGH | |
| Celery HIGH | |
| Cucumber (peeled optional) LOW | |
| Cucumber, soft skinned | HIGH |
| Fennel | HIGH |
| Grapes (seedless) | LOW |
| Kiwi Fruit (peeled, optional) | LOW |
| Mangoes (peeled, stone removed) | LOW |
| Melons (peeled) | LOW |
| Nectarines (stone removed) | LOW |
| Oranges (peeled) | LOW or HIGH |
| Peaches (stone removed) | LOW |
| Pears (stalks removed) | LOW (Soft pears) HIGH (Firm pears) |
| Pineapple (peeled, optional) | HIGH |
| Plums (stone removed) | LOW |
| Raspberries | LOW |
| Tomatoes | LOW |
| Watermelon (peeled) | LOW |

WARNING
Never use fingers, hands or utensils to push food down the feed chute or to clear the feed chute. Always use the food pusher provided.
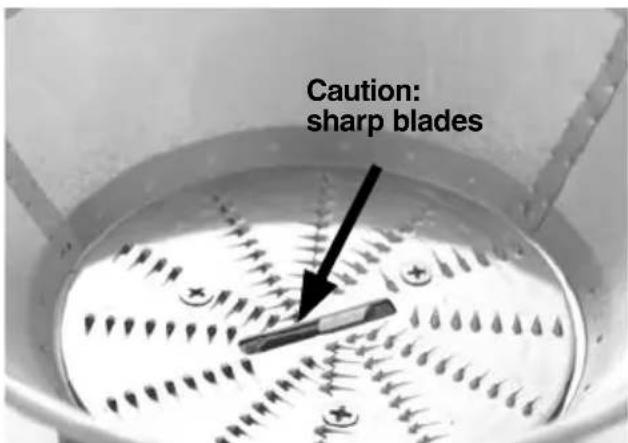
The stainless steel filter basket contains small sharp blades to cut and process fruit and vegetables. Avoid touching the blades when handling the filter basket.

Care & Cleaning
Ensure the juicer is turned off by turning the juicer dial to the OFF position. Then switch the appliance off at the power outlet and unplug the power cord.
CLEANING
Rinse all parts after use (except the motor base) under running water to clear away the majority of juice and pulp. Wash in warm soapy water with a soft cloth.
To avoid food drying on to the blades, mesh or transparent parts, rinse and wash as soon as possible after use.
PULP CONTAINER
To minimise cleaning, you can line the pulp container with a biodegradable bag to collect the pulp.
MOTOR BASE
Do not immerse the motor base in liquids. To clean the motor base, wipe with a soft, damp cloth then dry thoroughly. Wipe any excess food particles from the power cord.
CLEANING AGENTS
Do not use abrasive scouring pads or cleaners on either the motor base or the jug, as they may scratch the surface. Use only warm soapy water with a soft cloth.
DISHWASHER
Wash all parts (except the motor base) in warm soapy water with a soft cloth.
The filter bowl surround, stainless steel filter basket, pulp container and juice jug are dishwasher safe. Wash on a standard cycle, on the top shelf only.
The juice cover and food pusher are not dishwasher safe.
FILTER BASKET
To ensure consistent juicing results, always clean the filter basket thoroughly immediately after use.
If pulp is left to dry, it may clog the fine pores of the filter mesh, which can effect juicing performance.
The filter basket can be soaked in hot soapy water for 10 minutes, if necessary.
Hold the filter basket under running water and use brush (supplied with the juicer) in a circular motion to clear away pulp from the inside of the basket, including the blades. Turn over to brush away pulp from the outside of the basket, and repeat if necessary.
After cleaning, hold up towards a light source to check that the fine mesh pores are not blocked. If blocked, soak the filter basket in hot water with 10% lemon juice to loosen, and brush under running water again. Do not soak the filter basket in bleach, harsh chemicals or abrasive cleansers.
Always treat the filter basket with care, as it can be easily damaged. Do not use if there is any damage or deformation to the filter mesh. Filter basket can be washed in the dishwasher (top shelf).
The centre of the filter basket has an array of small, sharp blades. Do not touch these blades when handling the filter basket.
STUBBORN FOOD STAINS
Discolouration of the plastic may occur with strongly coloured fruit and vegetables. To help prevent this, wash parts immediately after use.
If discolouration does occur, the plastic parts can be soaked in water with 10% lemon juice or they can be cleaned with a non-abrasive cleaner.
| Juicer will not work when switched ON | ·The safety locking arm may not be correctly engaged in the vertical operating position. Check the top cover is properly aligned and the locking arm is located firmly into the two grooves on either side of the juicer cover. ·Motor overload protection may have operated (see below). |
| Overheating with excessive loads | ·The juicer is equipped with an internal self-resetting overload to prevent the motor from damage under heavy or continuous loads. If the motor suddenly stops working, turn the ON/OFF dial to OFF, and unplug the unit from the power outlet. Allow the juicer to cool for up to 30 minutes before operating again. NOTE: The unit MUST be unplugged from the power outlet in order for it to cool properly and be reset. ·Despite this overload protector, we suggest juicing in smaller batches using a more gentle pressure to push produce down the chute in order to protect the motor. |
| Excess pulp building up in the stainless steel filter basket | ·Stop juicing, disassemble to scoop excess pulp off the juicer cover. Reassemble and continue juicing. Alternating soft and hard ingredients may help avoid this. |
| Pulp too wet and reduced extracted juice | ·The cleaner the filter, the better the juice yield, and dryer the pulp. Be sure to thoroughly clean the juicer as soon as possible after each use. Remove the stainless steel filter basket and thoroughly clean mesh walls with a cleaning brush. Rinse the filter basket under hot water. If the fine mesh holes are blocked, soak the basket in a solution of hot water with 10% lemon juice to unlock the holes or wash in the dishwasher. This will remove excess fibre build up (from fruit and vegetables) which could be inhibiting the flow. |
| Juice leaks between the rim of the Juicer and the juicer cover | ·Try a slower juicing speed and push the food pusher down the feed chute more slowly. |
| Juice sprays out from spout | ·The juice is being extracted too fast: try a slower juicing speed (if possible) and push the food pusher down the feed chute more slowly. |
| Motor appears to stall when juicing | ·Wet pulp can build up under the juicer cover and stall the juicer if the juicer is used excessively without cleaning. If this occurs, disassemble and follow the cleaning instructions to clean the filter bowl surround, the stainless steel filter basket and the juicer cover. ·The juicer will automatically stop operating if either too much food is being processed at one time or the pieces are not small enough. Try trimming the food or cutting into smaller pieces of even size and processing a smaller amount per batch. To continue juicing, reset the juicer by turning the juicer OFF and back ON. ·Allow the motor to reach full speed before putting ingredients in the chute. Pressing ingredients down before the juicer reaches full speed can cause the motor to stall or overload. Use gentle to moderate pressure on the pusher. Lower pressure produces a better juice yield. ·Hard fruit and vegetables will put excess strain onto the motor if a low speed is selected. Refer to the juicing guide to determine the correct speed for the fruit and vegetables selected for juicing. |
| Unit stops & overload protection LED flashes | ·This indicates the motor speed is slowed down to an inefficient level. This may be caused by too heavy pushing force on the pusher or too much pulp sticking onto the lid or in the pulp bin. Using moderate pushing force on the food pusher or regularly cleaning the lid and pulp bin can prevent this situation from happening. |
| Overload Protection LED is on | ·This indicates motor overload protection is activated. To reset the unit, unplug the unit from power and let the motor cool down for 10 to 15 minutes, and plug the power on again. |

Guarantee
2 YEAR LIMITED GUARANTEE AND 5 YEAR LIMITED MOTOR GUARANTEE
Sage Appliances guarantees this product for domestic use in specified territories for 2 years for all parts of the product and 5 years for the product's motor from the date of purchase against defects caused by faulty workmanship and materials. During this guarantee period Sage Appliances will repair, replace, or refund any defective product (at the sole discretion of Sage Appliances).
All legal warranty rights under applicable national legislation will be respected and will not be impaired by our guarantee. For full terms and conditions on the guarantee, as well as instructions on how to make a claim, please visit www.sageappliances.com.

Inhalte
www.sageappliances.com
Registered in Germany No. HRB 81309 (AG Dusseldorf).
Registered in England & Wales No. 8223512.
-
Aufgrund kontinuierlicher Produktverbesserungen kann das auf dieser Verpackung dagestelle Produkt leicht vom tatsächlichen Produkt abweichen.
-
Due to continued product improvement, the products illustrated or photographed in this document may vary slightly from the actual product.
-
En raison de son amélioration continue, le produit représenté sur cet emballage peut différer légarement du produit réel.
Aca t i s t t t t t t t t t t t t t t t t t t t t t t t t t t t t t t t t
Copyright BRG Appliances 2019.