SRU5108 - Remote control PHILIPS - Free user manual and instructions
Find the device manual for free SRU5108 PHILIPS in PDF.
User questions about SRU5108 PHILIPS
0 question about this device. Answer the ones you know or ask your own.
Ask a new question about this device
Download the instructions for your Remote control in PDF format for free! Find your manual SRU5108 - PHILIPS and take your electronic device back in hand. On this page are published all the documents necessary for the use of your device. SRU5108 by PHILIPS.
USER MANUAL SRU5108 PHILIPS
2.1 General functions 4
2.2 Dedicated Audio functions 6
2.3 Dedicated DVR functions 6
2.4 Dedicated DVD functions 6
2.5 Dedicated SAT functions 6
3 Getting started 7
3.1 Battery installation 7
3.2 Code setup 7
3.3 Programming combo devices 8
3.4 Copy Volume / Mute buttons from another device 8
4 Using the remote control 9
4.1 Controlling devices requiring separate Power On / Off buttons 9
4.2 Controlling combo devices 9
5 Keep updated for future devices 10
5.1 Learning commands 10
5.2 Clearing commands 11
5.3 Tips on learning 11
6 Troubleshooting 12
7 Limited Lifetime Warranty 13

Notes
- The remote control powers on in TV mode.
- Codes are stored in the permanent remote control memory so you will not lose any codes stored while you are changing batteries
- The remote control automatically turns off if buttons are pressed for more than 30 seconds. This will save your batteries in case the remote control gets stuck in a place where the buttons remain pressed (e.g., between the sofa cushions).
- Some buttons on the remote control might have functions that are referred to by different names on the device you are controlling. E.g. PREV.CH may be called RECALL or DISPLAY. These differences depend on the brand and model of your device. Also, this remote control can only operate features that exist on your device. E.g., your device must have PREV.CHAN ability for the PREV.CH button to operate this feature.
- The RECORD (●) button must be pressed twice to record. For some brands of DVRs, you might need to press the RECORD (●) once, then press it again for three seconds.

eannnnnne
1 Your Philips remote control
Congratulations on your purchase of this Philips universal remote control. Philips universal remote controls enable you to combine more than one remote control into one or replace a broken or lost remote control.
We focused on making this remote control consumer friendly. We have highlighted the DVR (Tivo/Replay) buttons in blue and the AUDIO buttons in red for easy referencing on the keypad. In addition to DVR and AUDIO functionality we have included Satellite functionality.
The remote control is equipped with the most common functions for operating your devices. However, if you miss certain functions, this remote control can 'learn' these functions from the original remote control.
Please carefully read this user manual to become familiar with your Philips universal remote control.
To fully benefit from the support that Philips offers, register your product at www.philips.com/welcome.
- At 'www.philips.com/welcome', select 'Register my product' and follow the on-screen instructions for registration.
2 Button functions
2.1 General functions
Zone 1

LEARN. Used to setup learning functions.
BACKLIGHT (品) .Turns the backlighting On / Off.
SETUP
(Red light Indicator) ......- Used for setting up the remote control.
-Lights up when any button is pressed.
POWER ()Turns devices On/Off.
Zone 2

Device mode buttons.... Selects device to be operated.
Zone 3 (Outer ring)

MENU. Brings up the menu screen.Use with the UP,DOWN,LEFT and RIGHT navigation buttons.
GUIDE. Displays on-screen program or channel guides.
INFO Displays / selects on-screen channel information.
EXIT Exits menu functions.
Zone 4 (Inner ring)

SELECT OK.... Selects menu items for the device you are controlling.
(I) UP / DOWN,
(-) LEFT / RIGHT......... Navigation buttons.
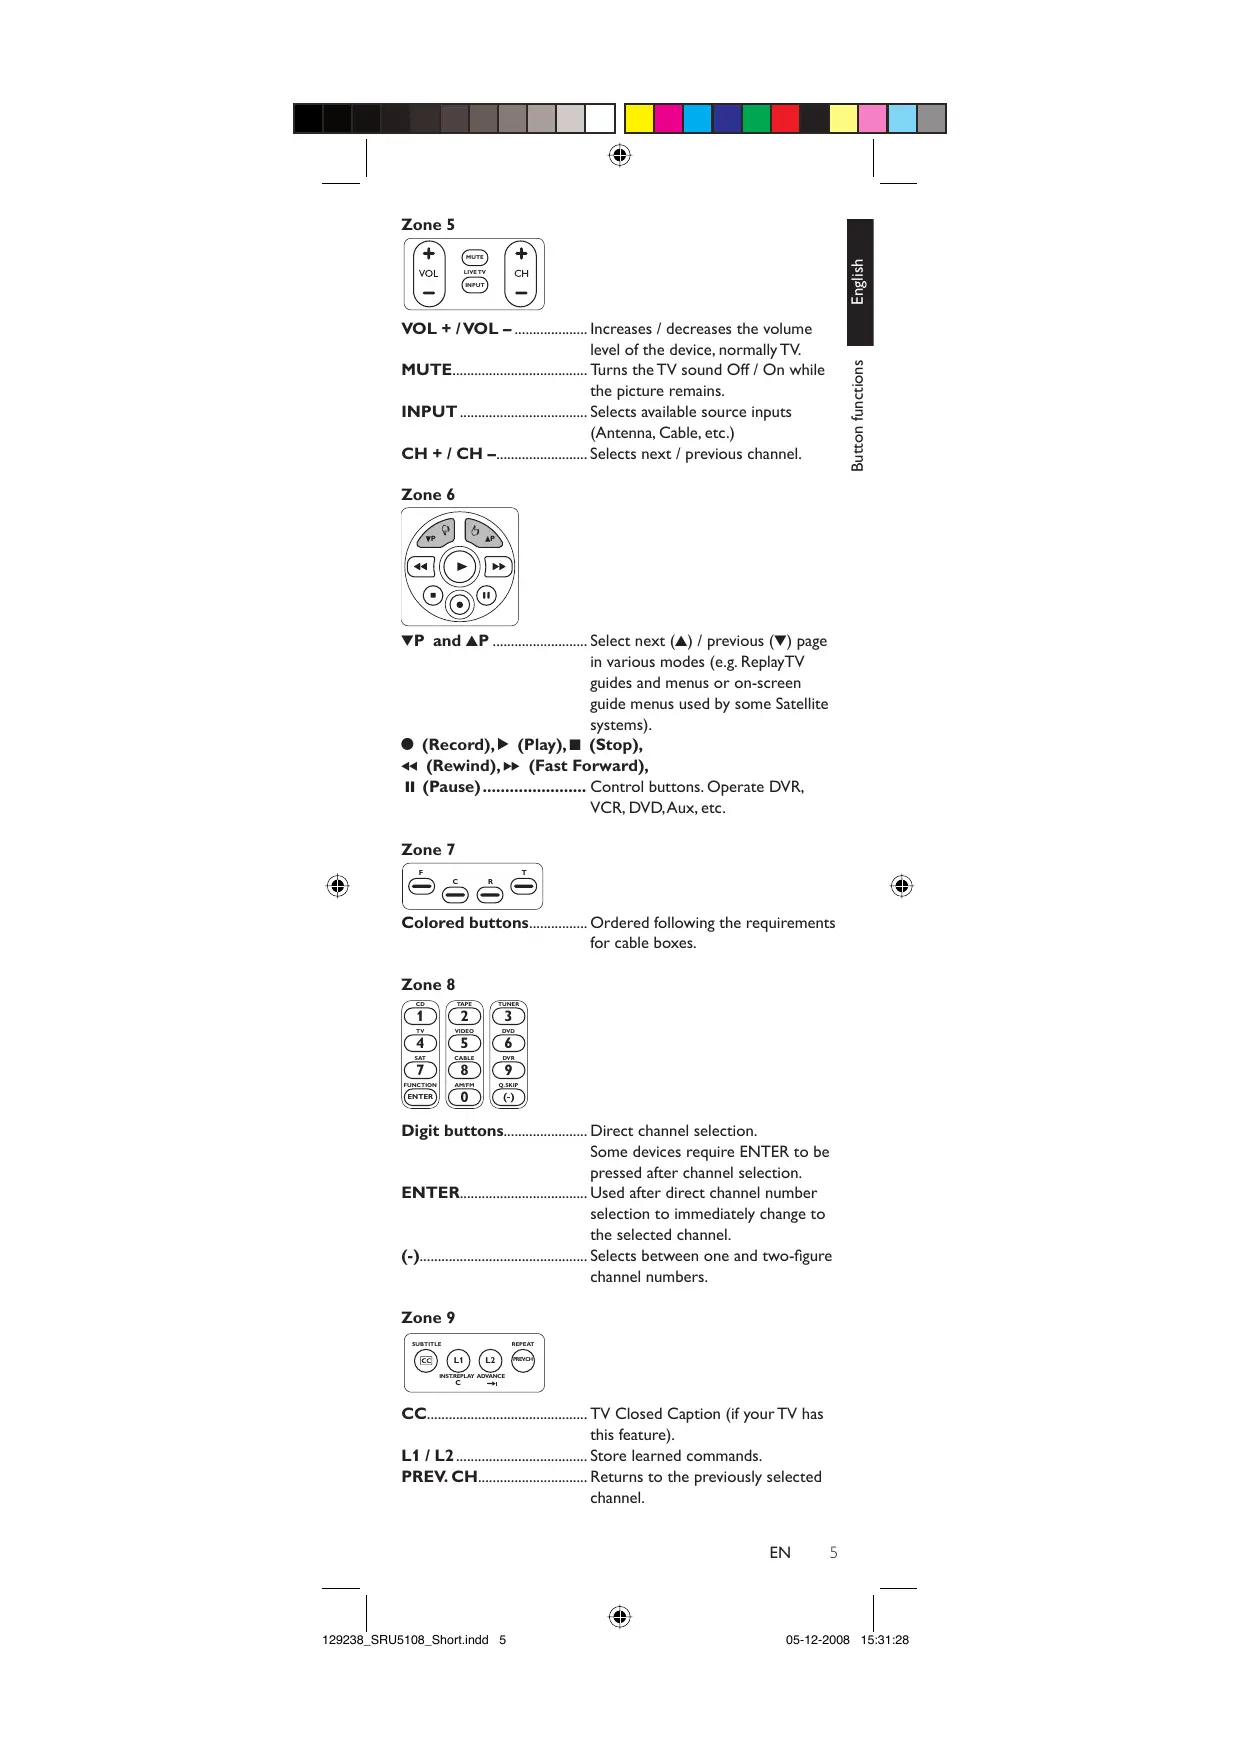
Zone 5

VOL + /VOL - Increases / decreases the volume level of the device, normally TV.
MUTE. Turns the TV sound Off / On while the picture remains.
INPUT.... Selects available source inputs (Antenna, Cable, etc.)
CH + / CH -.. Selects next / previous channel.
Zone 6

P and P . Select next () / previous () page in various modes (e.g. ReplayTV guides and menus or on-screen guide menus used by some Satellite systems).
(Record), (Play), (Stop),
(Rewind), (Fast Forward),
II (Pause) Control buttons. Operate DVR, VCR, DVD,Aux,etc.
Zone 7

Colored buttons.... Ordered following the requirements for cable boxes.
Zone 8

Digit buttons....... Direct channel selection. Some devices require ENTER to be pressed after channel selection.
ENTER. Used after direct channel number selection to immediately change to the selected channel.
(-).... Selects between one and two-figure channel numbers.
Zone 9

CC. TV Closed Caption (if your TV has this feature).
L1 / L2. Store learned commands.
PREV.CH.... Returns to the previously selected channel.

Note
For some devices of certain brands, the POWER (①) button only turns the device Off. In order to turn the device On, press any of the digit buttons.
2.2 Dedicated Audio functions - labeled in red
When you select Audio mode by pressing the AUDIO button (zone 2) all red Audio function buttons will become active.
· + / - Set the speaker level in Test Tone mode.
- DSP ON / OFF - Activates the receiver's DSP (Digital Signal Processing) mode.
- DSP MODE - Cycles through the various DSP modes.
- F, C, R, T (Front, Center, Rear, Test) - T activates Test Tone mode. F, C and R respectively select front, center and rear speakers. Use the red + and - buttons to adjust the speaker level.
- AM / FM - Selects AM / FM band on your audio receiver.
- CD,TAPE,TUNER,TV,VIDEO,DVD,SAT,CABLE and
DVR - Select the audio receiver's input source.
- FUNCTION - Cycles through the various audio sources.
2.3 Dedicated DVR functions - labeled in blue (Tivo* code is 0738 / Replay* code is 0938)
When you select DVR mode by pressing the DVR button (zone 2) all blue DVR function buttons will become active.
T.CENTRAL - TiVo button for TiVo Central.
- CH GUIDE - TiVo Live Guide - the TiVo Program Guide.
- DISPLAY - Brings up the Channel Banner.
- CLEAR - Exits / clears on-screen menu displays.
- LIVE TV - Goes to Live TV broadcast.
- - Thumbs Up / Down. Set your Thumbs ratings.
- P▼ and P▲ - Select previous (▼) / next (▲) page in Replay TV guides and menus.
Q. SKIP - Skips 30 seconds of a recorded or delayed show.
- SUBTITLE - Turns the subtitles On / Off.
- INST. REPLAY - Replays the last 7 seconds (Replay) or 8 seconds (Tivo) of a program.
ADVANCE - Catches you up to the live broadcast.
- REPEAT - Repeats current chapter / track.
- Tivo and Replay are registered trade marks of their respective owners.
2.4 Dedicated DVD functions
- INPUT - Activates the DVD player's Setup menu.
- CH + / - Selects next / previous chapter or track on a disc.
- SUBTITLE - Turns the subtitles On / Off.
- REPEAT - Repeats current chapter / track.
2.5 Dedicated SAT functions
- INPUT - Selects TV or SAT input.
- P▼ and P▲ - Select previous / next on-screen guide menu.
3 Getting started
3.1 Battery installation
- Insert 2 AA type Alkaline batteries, noting the + and - configuration in the battery compartment.

3.2 Code setup
The SETUP button is used to setup the remote control. Refer to 'Code Tables' (on separate sheet) to find the code(s) for your device(s).
3.2.1 Code search by brand
Lets you search for a code for a specific brand within the code library for a particular manufacturer.
1 Turn on the device (TV, DVR, etc.) you wish to operate.
2 Press and hold the SETUP button until the red light indicator remains lit, then release the SETUP button.
3 Press and quickly release the desired mode button (TV, DVR, etc.).
The red light indicator flashes off once.
4 Press and release the digit button (0-9) corresponding to the desired brand (see table on code list sheet).
The red light indicator flashes off once.
5 Press the CH + button (or POWER (O) or PLAY () - DVR only) repeatedly until the device changes channel.
- The red light indicator flashes off with each button press.
6 Press and release the MUTE button to install (store) the code. Code search by brand is now complete.

Notes
- When all codes under a brand have been searched for, the red light indicator flashes rapidly for 3 seconds.
- If you accidentally overshoot the required code in step 5, press the CH - button to backtrack through the library until the device changes channel. Pressing the CH + button changes the search direction to forward again.
3.2.2 Direct code entry
1 Turn on the device (TV, DVR, etc.) you wish to operate.
2 Press and hold the SETUP button until the red light indicator remains lit, then release the SETUP button.
3 Press and release the desired mode button (TV, DVR, etc.).
The red light indicator flashes, then remains lit.
4 Enter the 4 digit code from the code tables (on separate sheet).
5 With the device turned on, press several buttons to test if the device responds.
If the device responds properly, you have successfully found a valid code for your device.
EN 7
6 Repeat steps 1 to 4 for other devices you wish to set up the remote control for.
Write your codes down here for easy reference later.
Device
Code
TV
AUDIO
DVR
SAT

Notes
- After a valid code entry, the red light indicator turns off. For an invalid code, the red light indicator flashes first, then turns off. In this case you have to enter Setup mode again and enter a new code.
- If some buttons do not operate your equipment, try one of the other codes for your brand.

Note
You can store any kind of code under any mode (except TV). For example: you can store a DVR code under the CBL button, or a DVD code under the DVR button, etc. However, you can only store TV codes under the TV button.
If you wish to store a DVR code under e.g. the CBL button:
- First follow the procedure for 'Direct code entry' (chapter 3.2.2) and press CBL in step 3.
- Enter any DVR code in step 4.
- Then follow the steps for 'Code search by brand' (chapter 3.2.1).
- If the device does not have a CH + button, use the PLAY (▶) - DVR only - or POWER (◇) button instead.
Code Search starts from the currently stored 4 digit number under that mode.
3.3 Programming combo devices
For Combo Devices, in many cases a single code operates both parts of the device (e.g.TV and DVD). In other cases you need to set up two codes. For example, if you have a TV / DVD combo, you need to set up one code under the TV button to control the TV part and a separate code (under any other Mode button) to control the DVD part.
3.4 Copy Volume / Mute buttons from another device
When setting the remote control up for your devices, the remote control copies the Volume / Mute settings as follows:
- If a device has its own Volume / Mute buttons in the remote control database, then these buttons will be used.
- If a device has no Volume / Mute buttons in the remote control database, the Volume / Mute buttons of the TV will be used automatically.
You can change which Volume / Mute buttons are used for a device (e.g. use the Volume buttons of the amplifier to control the volume of the DVD player).
3.4.1 Setting Volume / Mute control for all devices to any single device
You can set all devices to use the Volume / Mute buttons of a single device without needing to change to that device mode.
1 Press and hold the SETUP button until the red light indicator turns on, then release the button.
2 Press and hold the MUTE button until the red light indicator flashes off, then release the button.
3 Press and release the desired device Mode button (TV, DVR, etc.) for Volume / Mute control, the red light indicator flashes then remains lit.
4 Press and release the MUTE button.
The red light indicator turns off.
- The red light indicator will blink rapidly for three seconds if the device you have selected has no Volume / Mute control.
- All other devices will now use the Volume / Mute buttons of the selected device.
5 Press and release the MUTE button.
The red light indicator turns off.
- The selected device will now use its own Volume / Mute control.
4 Using the remote control
4.1 Controlling devices requiring separate Power On / Off buttons
Some devices (e.g. certain RCATVs) require separate Power On and Power Off buttons to turn the device on and off. The equivalent button functions can be found on your Philips remote control.
1 Turn on the device by pressing the corresponding Mode button for more than 1 second.
2 Press and release the POWER (O) button to turn off the device.

Notes
- This method can be applied similarly to any device and is available for all device modes.
Note that this feature is not supported by all codes.
4.2 Controlling combo devices
Some combo devices (e.g. TV / DVR, TV / DVD, DVD / DVR, etc.) have separate buttons on the original remote control to select the part of the combo device to be controlled.
For example, if your combo device is a TV / DVD then its original remote control might have separate TV and DVD buttons for selection of the combo part you wish to operate. The equivalent button functions can be found on your Philips remote control by using the device Mode and SETUP buttons.
Example of DVD.
1 Set up the remote control for a device (in this example DVD) as described in chapter 3.2.1 'Code search by brand'.
2 Select DVD by pressing the DVD mode button for more than 1 second.
- The remote control sends out the 'Select DVD' command.
3 Press and immediately release the SETUP button. Then press and immediately release the DVD mode button to select DVR.
- The remote control sends out the 'Select DVR' command.

Notes
- This method can be applied similarly to all Combo devices (TV / DVR, TV / VCR, DVD / DVR, etc.) and is available for all device modes.
Note that this feature is not supported by all codes.
5 Keep updated for future devices
5.1 Learning commands
The learning feature allows you to 'learn' the remote control functions from your original remote control.
For example: you may want to use your remote control to operate the RANDOM PLAY feature from your original CD remote control.

1 Press and hold the SETUP button until the red light indicator turns on, then release the button.
2 Press and release the desired mode button (TV, DVR, etc.).
The red light indicator flashes, then remains lit.
3 Press and release the LEARN button.
- The red light indicator flashes, then remains lit.
4 Press and release the button on the SRU5108 that you wish to learn a new function (e.g. POWER).
5 Point both remote controls facing each other by approximately 1 inch apart (refer to chapter 5.4 'Tips on learning').
6 Press and hold the button from which you wish to learn on the original remote control (e.g. POWER) until the red light indicator flashes once and then remains lit.
- If there is a learning problem, the red light indicator flashes for three seconds and then remains lit. If this happens, repeat steps 4 to 6.
7 Repeat steps 4 to 6 for other buttons you wish to learn a new function.
8 Press and release the SETUP button when all desired remote control commands have been learned.
Code Learning is now complete.
5.2 Clearing commands
5.2.1 Clearing all learned commands under a mode
Clearing learned commands can be useful if, for example, you replace your CD player with another brand or model. If you had learned a feature from your old CD player's original remote control on to this remote control (such as RANDOM PLAY), that feature would no longer work for your new CD player.
1 Press and hold the SETUP button until the red light indicator turns on, then release the button.
2 Press and release the Mode button for the mode you wish to clear learned functions from (TV, DVR, etc.).
The red light indicator flashes off.
3 Press and release the LEARN button twice.
The red light indicator flashes off.
4 Press and release the SETUP button.
- The red light indicator turns off. All learned commands under that mode are now cleared.
5.2.2 Master clear - Clearing all learned commands under all modes
1 Press and hold the SETUP button until the red light indicator turns on, then release the button.
2 Press and release the LEARN button twice.
The red light indicator flashes off.
3 Press and release the SETUP button.
- The red light indicator turns off. All learned commands, stored in the remote control memory have now been cleared.
5.3 Tips on learning
You can only learn one device type under a Mode button.
For example, you can only learn TV codes under the TV mode button, DVR codes under the DVR mode button, etc. If you are trying to learn from a 'universal' remote control, it might have more than one code type stored under a Mode button.
Try learning from another remote control to see if there's a problem with the type or brand of remote control you are trying to learn from.
- Some functions from some types of remote controls might not be learned.
- No functions may be stored under the LEARN, SETUP or BACKLIGHT ( ) buttons.
- Only one original device type can be learned per individual mode.
Use fresh batteries for both the SRU5108 and the original remote control. - Keep at least three feet away from incandescent or low-energy lights when learning.
- Place both remote controls on a flat surface (like a coffee table) and aim them in such way that the IR transmitter of the original remote control points at the IR transmitter of the SRU5108.
- Keep about 1 inch in between the remote controls.
You may need to adjust the height of one of the remote controls to achieve this.
- Do not move or change the distance between the two remote controls until you have learned all the required buttons for the selected mode.
- When learning, do not release the button being learned until the red light indicator has flashed off for half a second.
- Avoid learning your original remote control Volume / Mute buttons unless you are sure these operate the same device e.g. some original DVD remote controls include TVVolume / Mute button control and can have two different types of code.
- Avoid learning your original remote control DVR control buttons unless you are sure these operate the same device e.g. some original TV remote controls include DVR button control and can have two different types of code.
- If you have continual problems learning from your original remote control, try clearing all learned commands as described in chapter 5.2.1 'Clearing all learned commands under a mode'.
6 Troubleshooting

Note
This remote control operates the common features of most but not all models and brands of IR (Infrared) controlled Audio / Video equipment. This remote control may provide functions that are not available on your equipment.
The remote control does not operate your product. Try the following hints to remedy the problem:
Make sure you selected the correct device mode.
- Set up the remote control with a new code.
Install new batteries.
- Check if you selected the correct device mode.
The remote control does not operate some features of your product
- Use the L1 and L2 buttons to learn the remote control commands that are not available.
The red light indicator flashes after you program a product code
- The remote control did not accept the code.
Try to program the code again or try a different code.
When you have additional questions about setup, usage, advanced features, spare parts, warranty, etc. of the SRT5108/27, see www.philips.com/support.
For further help with setup, please call: 919-573-7854.
7 Limited Lifetime Warranty
The manufacturer warrants that this product shall be free from defects in material, workmanship and assembly, under normal use, in accordance with the specifications and warnings, for as long as you own this product.
This warranty extends only to the original purchaser of the product, and is nontransferable. Defective products, together with the dated proof of purchase, must be returned to the place of purchase for repair or replacement.
THERE ARE NO OTHER EXPRESS WARRANTY.
Incidental and consequential damages are disclaimed where permitted by law.
This warranty gives you specific legal rights, and you may also have other rights which vary from state to state.
Made in China. Quality Assured in USA.
Ledgewood, NJ 07852
FCC Compliancy
This device complies with Part 15 of the FCC Rules. Operation is subject to the following two conditions:
- This device may not cause harmful interference.
- This device must accept any interference received, including interference that may cause undesired operation.

Caution
User changes or modifications not expressly approved by the party responsible for compliance could void the user's authority to operate the equipment.
All rights reserved. Reproduction in whole or in part is prohibited without the prior written consent of the copyright owner.
The information presented in this document does not form part of any quotation or contract, is believed to be accurate and reliable and may be changed without notice. No liability will be accepted by the publisher for any consequence of its use. Publication there of does not convey nor imply any license under patent- or other industrial or intellectual property rights.
November 2008
FC
www.philips.com
N'MW/RR/RD/4908