
Defender 360 3in1 Deluxe - Car seat Harmony - Free user manual and instructions
Find the device manual for free Defender 360 3in1 Deluxe Harmony in PDF.

| Product Type | 3-in-1 Car Seat (with built-in harness and booster mode) |
| Brand | Harmony |
| Model | Defender 360 3in1 Deluxe |
| Installation Orientation | Forward-facing only |
| Child Weight - Harness Mode | 10 to 29.5 kg (22 to 65 lb) |
| Child Height - Harness Mode | 68.6 to 144.8 cm (27 to 57 in) |
| Minimum Age - Harness Mode | 1 year |
| Child Weight - Booster Mode | 18.1 to 50 kg (40 to 110 lb) |
| Child Height - Booster Mode | 86.4 to 144.8 cm (34 to 57 in) |
| Restraint System | Height-adjustable 5-point harness |
| Recline Adjustment | Yes, via front handle |
| Headrest Adjustment | Yes, one-hand (red button) |
| Installation Methods | Universal Anchorage System (UAS) or vehicle 3-point seat belt |
| Top Tether | Mandatory in harness mode |
| Safety Standards | CMVSS 213 (harness), CMVSS 213.2 (booster) |
| Airplane Use | Harness mode only |
| Cover Care | Machine washable in cold water, air dry. Do not bleach. |
| Warranty | 1-year limited (parts and labor) |
| Customer Service | 1-877-306-1001 or www.harmonyjuvenile.com |
Frequently Asked Questions - Defender 360 3in1 Deluxe Harmony
User questions about Defender 360 3in1 Deluxe Harmony
0 question about this device. Answer the ones you know or ask your own.
Ask a new question about this device
Download the instructions for your Car seat in PDF format for free! Find your manual Defender 360 3in1 Deluxe - Harmony and take your electronic device back in hand. On this page are published all the documents necessary for the use of your device. Defender 360 3in1 Deluxe by Harmony.
USER MANUAL Defender 360 3in1 Deluxe Harmony
This child restraint is designed for use by children who meet the following requirements:
WITH HARNESS:
Mass: 10 - 29.5kg (22 - 65 pounds)
Height: 68.6 - 144.8 cm (27 - 57 inches)
WITHOUT HARNESS:
Weight: 18.1 - 50 kg (40 - 110 pounds)
Height: 86.4 - 144.8 cm (34 - 57 inches)
FAILURE TO PROPERLY USE THIS CHILD RESTRAINT INCREASES THE RISK OF SERIOUS INJURY OR DEATH IN A SHARP TURN, SUDDEN STOP OR CRASH. KEEP INSTRUCTIONS FOR FUTURE USE.

IF YOU HAVE ANY PROBLEMS, PLEASE DO NOT RETURN THIS PRODUCT TO THE PLACE OF PURCHASE. PLEASE CONTACT HARMONY CUSTOMERSERVICE AT 1-877-306-1001 ORAT
WWW.HARMONYJUVENILE.COM
WELCOME TO THE HARMONY FAMILY!
Thank you for choosing the Harmony® Defender 360° 3-in-1 Deluxe Car Seat. You have chosen one of the safest and most comfortable options available for your child on the market.
At Harmony, we pride ourselves on bringing the most innovative, feature-rich products to our valued customers. We have designed this child restraint to be safe, comfortable and easy-to-use so that you can have peace of mind knowing your family is well protected.
Although it is not possible to predict if the use of a child restraint will prevent injury or death in the event of a collision, extensive testing has shown that this child restraint, when used properly, can reduce the risk of a child's injury or death in most accidents.
Please take the time to read and understand all the instructions and warnings for this child restraint. The safety of your child depends on the proper installation and use of this child restraint.
REMEMBER TO ALWAYS BUCKLE UP AND DRIVE SAFELY!
Harmony Juvenile Products
Website: www.harmonyjuvenile.com
Mailing Address: 2450 Cohen Street Montreal, Quebec, Canada H4R 2N6
Telephone: 1-877-306-1001
TABLE OF CONTENTS
Welcome to the Harmony family! 1
Registration information 4
If you need help. 5
Warnings 5
General warnings 5
Usage warnings 8
Injury warnings 9
Vehicle warnings 10
Certifications 11
Airbag warnings 12
Damage warnings 12
Mass and height limitations 13
With built-in harness 14
Without built-in harness 14
Maximum height 15
Parts list 16
Vehicle seating positions 19
Safe vehicle seat belt systems 20
Unsafe vehicle seat belt systems 21
Assembling/disassembling child restraint 22
Preparing child restraint for use 23
Adjusting harness shoulder straps 24
Adjusting crotch strap position 24
Recline 26
Installing child restraint in harness mode:
UAS or vehicle seat belt 27
UAS (Universal Anchorage System) 27
Installing with UAS system. 28
Installing with lap-and-shoulder or lap-only belt system.... 29
Using Top Tether. 30
Installation safety check. 31
Installing locking clip. 32
Using child restraint with built-in harness 33
Securing child in child restraint 34
Removing child from child restraint 35
Using child restraint in booster mode
(without internal harness) 36
Removing/installing harness 36
Preparing booster seat for use 37
Securing child and booster seat in vehicle 38
Installation - booster with backrest 40
Installation - booster without backrest 42
Installing/removing shoulder belt guide. 43
Using shoulder belt guide. 43
Entanglement with vehicle seat belt 44
Installing cup holder (when applicable) 45
Aircraft installation 45
Instruction manual storage 45
Removing/installing fabric seat cover 46
Care and maintenance 47
Warranty 48
REGISTRATION INFORMATION
REGISTER YOUR CHILD RESTRAINT TODAY! Child restraints could be recalled for safety reasons. You must register this restraint to be reached in a recall, and to be eligible to receive replacement parts while under warranty.
The model number, serial number and manufacturing date can be found on a label on the underside of the child restraint base.
Visit www.harmonyjuvenile.com/register to register your child restraint online, mail-in the registration card or send your name, address, the restraint's model number, manufacturing date and date of purchase to:
Harmony Juvenile Products
2450 Cohen Street
Montreal, Quebec, H4R 2N6, Canada
or call: 1-877-306-1001
or register online:
http://www.harmonyjuvenile.com/register
For recall information, any questions you may have, or to make a change of address or contact information, please call Customer Service at 1-877-306-1001 or visit us online at www.harmonyjuvenile.com.
PLEASE DO NOT SEND IN YOUR REGISTRATION CARD IF YOU HAVE REGISTERED YOUR RESTRAINT ONLINE.
IF YOU NEED HELP
Please fill in the information below for future reference. The model number and manufacturing date can be found on a label on the underside of the child restraint.
Model Number:
Manufacture Date:
Date of Purchase:
Our Customer Service Department is standing by to help you with any questions or concerns you may have regarding installation, use, care and/or parts. Please have your product's model number and manufacturing date available when contacting us.
WARNING
GENERALWARNINGS
WARNING!
The safety of your child and the effectiveness of this child restraint depend on:
- Selecting a suitable location for the child restraint in your vehicle.
- Properly routing the UAS or vehicle seat belt.
- Properly securing both your child and the child restraint in the vehicle using the harness system, or a seat belt designed to restrain both the child restraint and your child. Many seat belts are NOT safe to use with this child restraint. Please review the sections "Safe/Unsafe vehicle seat belt systems" carefully. If in doubt about installing this child restraint, consult the vehicle owner's manual or call the Harmony Customer Service Department.
WARNING!
FAILURE TO PROPERLY READ, FOLLOW AND USE THESE INSTRUCTIONS AND THE CHILD RESTRAINT LABELS INCREASES THE RISK OF SERIOUS INJURY OR DEATH IN A SHARP TURN, SUDDEN STOP OR CRASH. Your child's safety depends on the proper installation and use of this child restraint. Even if this child restraint seems easy to install and use on your own, it is VERY IMPORTANT to read and understand these instructions and the vehicle owner's manual.
Follow all labels on this child restraint and in these written instructions. DO NOT INSTALL OR USE THIS CHILD RESTRAINT UNTIL YOU READ AND UNDERSTAND THE INSTRUCTIONS IN THIS MANUAL AND IN YOUR VEHICLE OWNER'S MANUAL.
NO CHILD RESTRAINT CAN GUARANTEE PROTECTION WHEN THE VEHICLE IS SERIOUSLY IMPACTED. However, when correctly installed, a child restraint will substantially improve the chances for survival and reduce the risk of serious injury in most crashes.
Carefully follow the instructions in this manual and in your vehicle owner's manual. If there is a discrepancy between the two, the vehicle owner's manual must take precedence with regards to UAS, seat belts, top tethers and/or airbags.
! USE THIS CHILD RESTRAINT FORWARD-FACING ONLY.
! DO NOT USE THIS CHILD RESTRAINT without properly assembling it.
! DO NOT allow children to play with this child restraint.
! NEVER leave children alone in a vehicle under any circumstance.
It is recommended that children are not left in their child restraint system unattended.
! Set a good example by ALWAYS wearing your seat
belt. Make it a firm rule that the vehicle does not move until everyone is buckled up. MAKE NO EXCEPTIONS.
! Harmony Juvenile Products advises against loaning or passing along a child restraint. DO NOT USE A SECOND-HAND CHILD RESTRAINT or a child restraint whose history you do not know.
! To prevent injury due to deterioration, hidden damage, etc., discontinue use of this child restraint if it is older than TEN (10) YEARS. There is an expiry date for use of this child restraint indicated on the underside of the child restraint base. STOP USING THE CHILD RESTRAINT AND THROW IT AWAY after the date indicated. Please dispose of the unit in a way others cannot reuse it (e.g. use a dark trash bag, do not sell to a thrift shop or in a garage sale, etc.).
! Store the child restraint in a safe place when not in use. DO NOT place heavy objects on top of the child restraint while in storage.
!DO NOT remove any stickers or warnings as they contain important information.

WARNING!
!ALWAYS ASSIST YOUR CHILD WHEN GETTING INTO AND OUT OF THE CHILD RESTRAINT.
INVER LET YOUR CHILD LEAN ON THE ARMREST WHEN GETTING INTO OR EXITING THE CHILD RESTRAINT TO PREVENT THE SEAT FROM TIPPING.
!ENSURE THAT THE CHILD
RESTRAINT IS LEVEL, STABLE AND DOES NOT ROCK SIDE-TO-SIDE. IF THE CHILD RESTRAINT IS NOT STABLE, TRY ANOTHER SEATING LOCATION.
! DO NOT ADD ANYTHING BEHIND OR UNDER THE CHILD RESTRAINT.
Harmony Juvenile Products recommends keeping your child in a forward-facing car seat with a harness until they reach the top height or mass limit allowed by your car seat's manufacturer. Once your child outgrows the forward-facing car seat with a harness, it's time to travel in a booster seat, but still in the back seat.
Transport Canada recommends that children under the age of 13 years be placed in the back seat of the vehicle and away from active front airbags.
According to accident statistics, CHILDREN ARE SAFER WHEN PROPERLY RESTRAINED IN THE REAR SEATING POSITIONS THAN IN THE FRONT SEATING POSITION.
Please study the section "Vehicle seating positions".
Many local police and fire departments frequently hold safety inspection events to ensure that child restraints are properly installed. Please contact your local emergency services department to see if and when they offer this service.
! THE TOP TETHER MUST ALWAYS BE USED WHEN
USING THIS CHILD RESTRAINT WITH HARNESs. Failure to use the vehicle seat belt AND top tether, or UAS AND top tether, or to adjust it properly can result in your child striking the vehicle's interior in a sharp turn, sudden stop or crash, which may result in serious injury or death.
! DO NOT use any load bearing contact points other than those described in the instructions and marked in the child restraint.
! DO NOT allow others to install or use this child restraint unless they read and understand all the instructions and labels.
! DO NOT GIVE THIS CHILD RESTRAINT to someone else without also giving them this instruction manual. Additional instruction manuals can be downloaded directly from www.harmonyjuvenile.com.
! To ensure proper child restraint use, keep and store this instruction manual and refer to it when necessary.
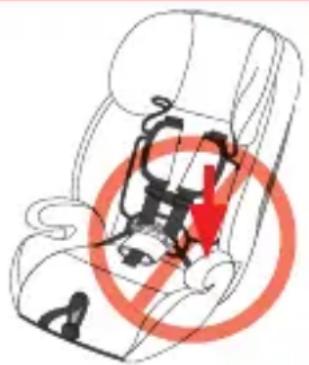
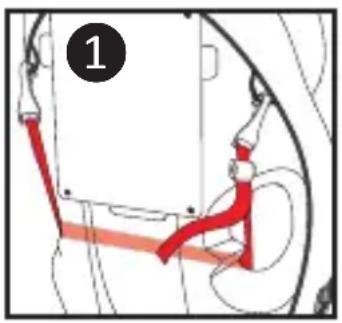
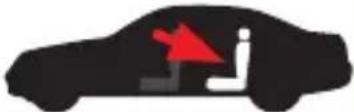
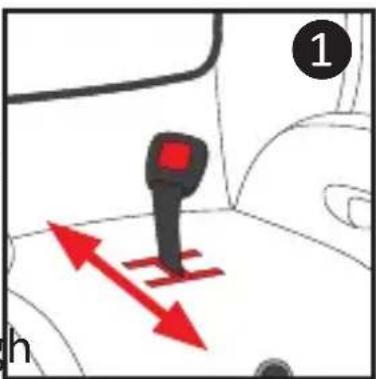
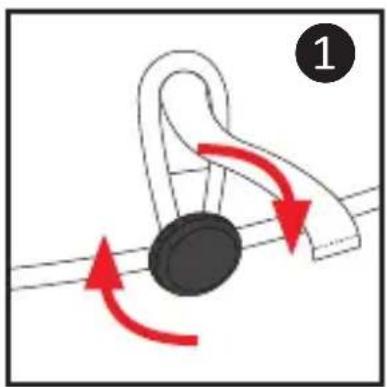
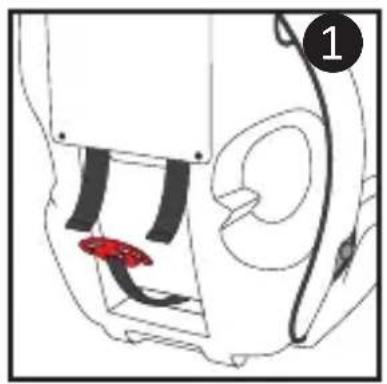
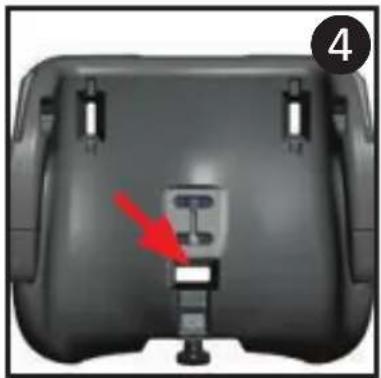
! DO NOT LEAVE A CHILD RESTRAINT UNSECURED IN YOUR VEHICLE. In a collision, sharp turn or sudden stop, an unsecured child restraint can injure other occupants. Remove it or make sure that it is securely
attached with the vehicle seat belt AND top tether, or UAS AND top tether, even when not in use. If not using UAS and/or top tether, make sure UAS and top tether connectors are properly stored on back of the child restraint 1.
INJURYWARNINGS
! INJURIES MAY OCCUR EVEN IF YOU ARE NOT IN A CRASH if the child restraint is not properly installed or if your child is not properly secured in the child restraint.
! The rigid items and plastic parts of a child restraint 9
shall be so located and installed that they are not liable, during everyday use of the vehicle, to become trapped by a movable seat or in a door of the vehicle.
! DO NOT leave folding vehicle seats unlatched. In the event of a sharp turn, sudden stop or crash, a loose seat back could prevent the child restraint from protecting the child as well as it should.
! It is recommended that any luggage or other loose objects liable to cause injuries in the event of a collision shall be properly secured. In the event of a sharp turn, sudden stop or crash, loose objects will keep moving, potentially causing serious injuries.
! The child restraint shall not be used without the cover. It MUST always be used with the fabric cover provided by the manufacturer.
! The seat cover should not be replaced with any other than the one recommended by the manufacturer.
! PARTS OF THE CHILD RESTRAINT COULD BECOME HOT ENOUGH TO BURN THE CHILD IF LEFT IN THE SUN. Contact with these parts can injure your child. ALWAYS touch the surface of any metal or plastic parts before putting your child in the child restraint. Cover the child restraint with a towel or blanket when the vehicle is parked in direct sunlight. KEEP AWAY FROM SUNLIGHT, OTHERWISE IT MAY BE TOO HOT FOR THE CHILD'S SKIN.
VEHICLEWARNINGS
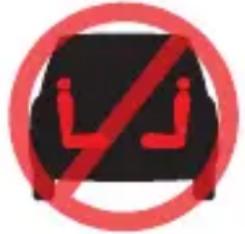
! DO NOT use this child restraint with 2-point vehicle belts (lap-belt only or shoulder-belt only). Your child would be seriously injured in the event of a crash.
! DO NOT use this child restraint with unsafe vehicle seat belts listed in section "Unsafe vehicle seat belt systems" of this manual.
! DO NOT use this child restraint if it can't be properly
installed. It is possible that your vehicle has no suitable seating position for this child restraint due to seat belt type, airbag system and/or lack of location of a tether strap anchor. Read and follow these instructions, and your vehicle owner's manual carefully.
! NEVER attach two UAS lower connectors to the same anchor point.
CERTIFICATIONS
This child restraint conforms to the Canadian Motor Vehicle Safety Standards (CMVSS) 213 and 213.2 and IS CERTIFIED for use in the following classes of vehicles ONLY: multi-purpose passenger vehicles, passenger cars, and trucks. Harmony Juvenile Products has also validated compliance through independent laboratory testing.
WHEN USED WITH HARNESS SYSTEM: This child restraint conforms to Canada Motor Vehicle Safety Standards (CMVSS) 213 and IS CERTIFIED for use in passenger motor vehicles and aircraft.
WHEN USED WITHOUT HARNESS SYSTEM: This child restraint (booster seat) conforms to Canada Motor Vehicle Safety Standards (CMVSS) 213.2 and IS CERTIFIED for use in passenger motor vehicles only. This child restraint is NOT CERTIFIED for aircraft use when used as a booster WITHOUT the harness.
! Only suitable for use in the listed vehicles fitted with 3-point with retractor safety-belts.
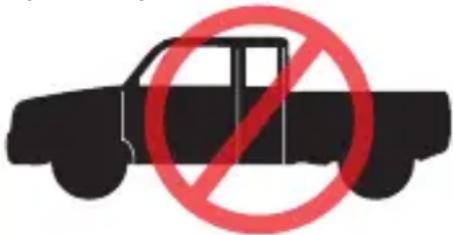
This child restraint must NOT be used in homes, boats, buses, motorcycles, motor homes, or any other vehicles that have non-forward-facing seats, missing seat belts, or whose seat belts do not meet the requirements of this child restraint.
This child restraint is compatible with vehicle child restraint Universal Anchorage Systems (UAS).
AIRBAGWARNINGS
! NEVER PLACE THIS CHILD RESTRAINT IN A VEHICLE SEATING LOCATION THAT HAS AN ACTIVE FRONTAL AIRBAG. An inflating airbag may cause serious injury or death. Refer to your vehicle owner's manual for information about airbags and child restraint installation.
This child restraint may be used in a rear seating position equipped with side impact airbags providing they are:
- Roof mounted;
- "Curtain" type deployment;
- Will NOT interfere with, impact or in any way reposition the child restraint when inflated.
! If a vehicle's front seat location must be used, ALWAYS disable the airbag. Failure to disable the airbag system can result in serious injury or death. Follow the vehicle owner's manual for instructions on disabling the front airbag system.
Please refer to your vehicle owner's manual for airbag type, and for appropriate use with child restraints.
DAMAGE WARNINGS
! DO NOT USE A CHILD RESTRAINT THAT HAS BEEN IN AN ACCIDENT OF ANY KIND. An accident can cause damage to the child restraint that you cannot see.
! DO NOT use this child restraint if it is damaged in any way or has missing parts.
! NEVER use a cut, frayed or damaged vehicle seat belt, UAS belt, or harness.
! DO NOT tamper with or modify the child restraint, including the buckles, harness system or UAS, for any reason. Any unauthorised or additions to the device without the approval of the Type Approval Authority can cause serious injury or death in a sharp turn, sudden stop, or crash.
!DONOT use anything to raise the child restraint off the vehicle seat. Untested modifications, such as adding extra padding, could affect the safety of the child restraint and result in serious injury or death in a crash.
! DO NOT, EXCEPT AS DESCRIBED IN THESE INSTRUCTIONS, MODIFY YOUR CHILD RESTRAINT, DISASSEMBLE ANY PART OR CHANGE THE WAY THE VEHICLE SEAT BELTS ARE USED. This includes any accessories or parts by other manufacturers as non-tested accessories can affect the safety of the child restraint.
MASS AND HEIGHT LIMITATIONS
WARNING!
THIS CHILD RESTRAINT HAS DIFFERENCES IN INSTALLATION AND USAGE DEPENDING ON THE MASS AND HEIGHT OF YOUR CHILD. FAILURE TO USE THIS CHILD RESTRAINT WITHIN THESE GUIDELINES MAY INCREASE THE RISK OF SERIOUS INJURY OR DEATH.
WARNING: Verify your child's height and mass frequently. DO NOT guess before choosing the proper setup for your child.
FOR MAXIMUM SAFETY:
If child is between 10 - 29.5 kg (22 - 65 pounds) and shoulders are below the upper harness slots, Harmony Juvenile Products recommend use of the built-in harness or booster with backrest for as long as possible.
Harmony Juvenile Products recommends that you ALWAYS confirm provincial laws with local authorities. Laws vary from province to province regarding minimum/maximum child restraint requirements for age, mass and height.
WITH BUILT-IN HARNESS
To use this child restraint, your child MUST MEET ALL of the following requirements:
- Mass: Between 10 - 29.5 ~kg (22 - 65 pounds).
- Height: Between 68.6 - 144.8 cm (27 - 57 inches).
- At least one (1) year old.
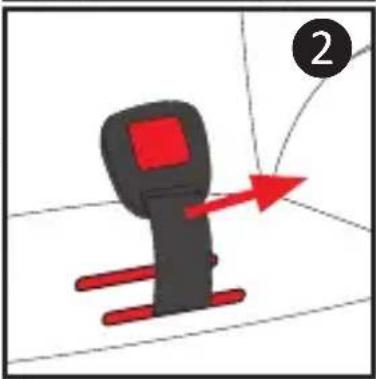
- ShouldersareBELOW top harness slots 1.
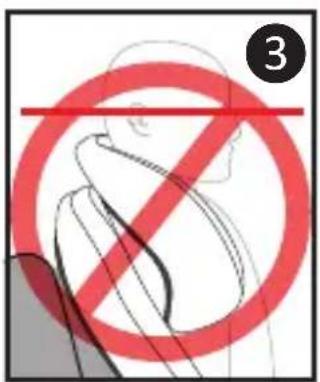
- Child'searsMUST BE BELOW top of the headrest. If tops of ears are above the top of the headrest at its maximum height, the child is too large for the child restraint ②.
WITHOUT BUILT-IN HARNESS
To use this booster seat, your child MUST MEET ALL of the following
requirements:
Mass:
Between 18.1 - 50 kg (40 - 110 pounds).
- Height:
Between 86.4 - 144.8 cm (34 - 57 inches).
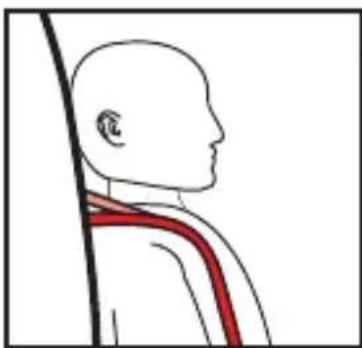
ShoulderbeltMUST
lie across the MIDDLE of the child's shoulder and chest 1, and lap portion MUST be positioned low across child's hips 2
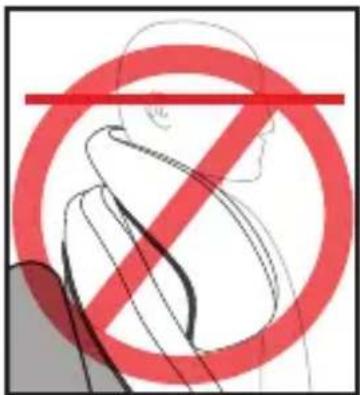
- Child'searsMUST BE BELOW the top of the booster seat (with backrest) 3 or the top of the vehicle seat back/vehicle headrest (without backrest) 4. If tops of ears are above the top of the booster seat or vehicle seat back/vehicle headrest, child is too large for the booster seat.
MAXIMUMHEIGHT
WARNING!
With Back Support: Child is too tall when top of ears (mid-point of child's head) are above the top of the child restraint/booster seat headrest at its maximum height.
Without Back Support: Child is too tall when top of ears (mid-point of child's head) are above the top of the vehicle headrest.
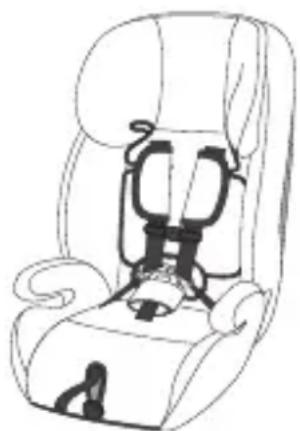
PARTS LIST
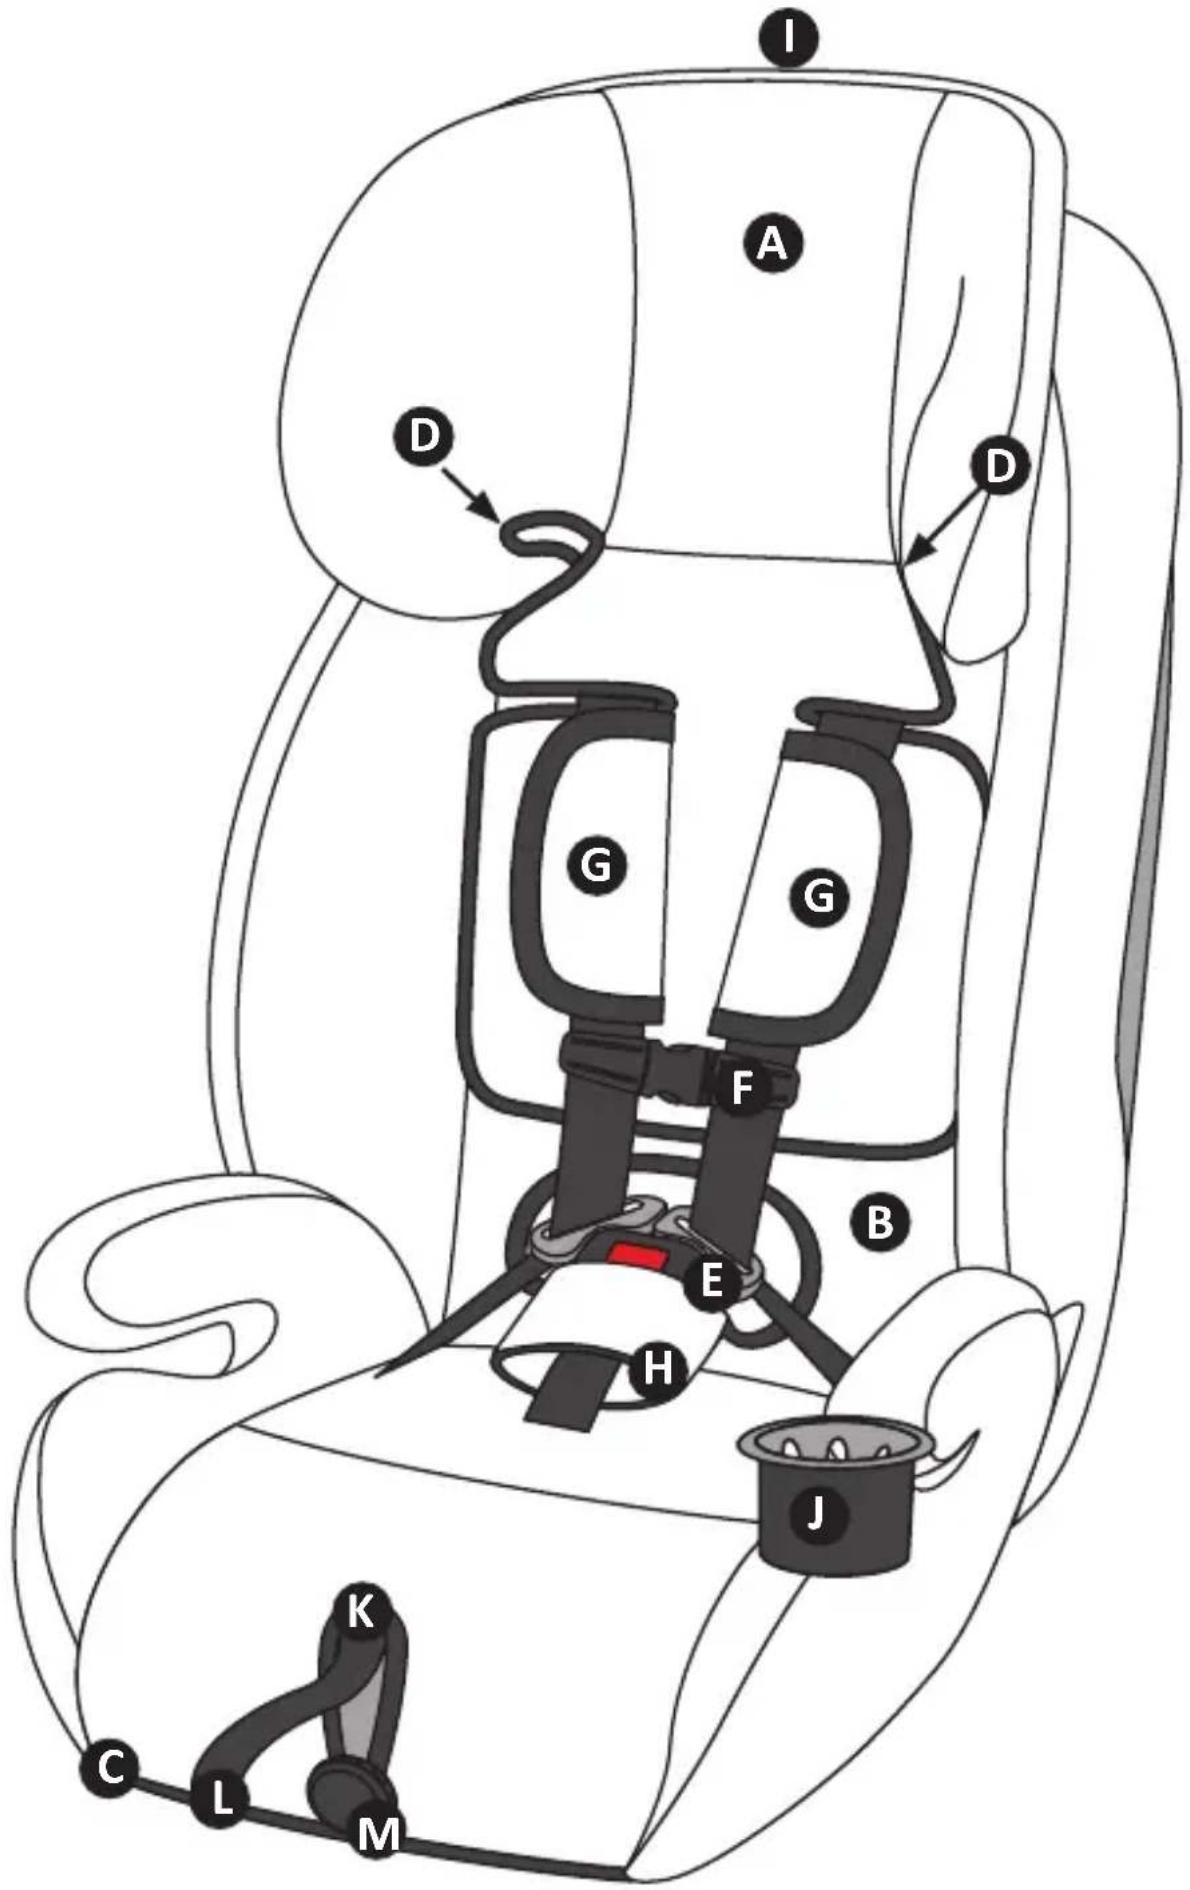
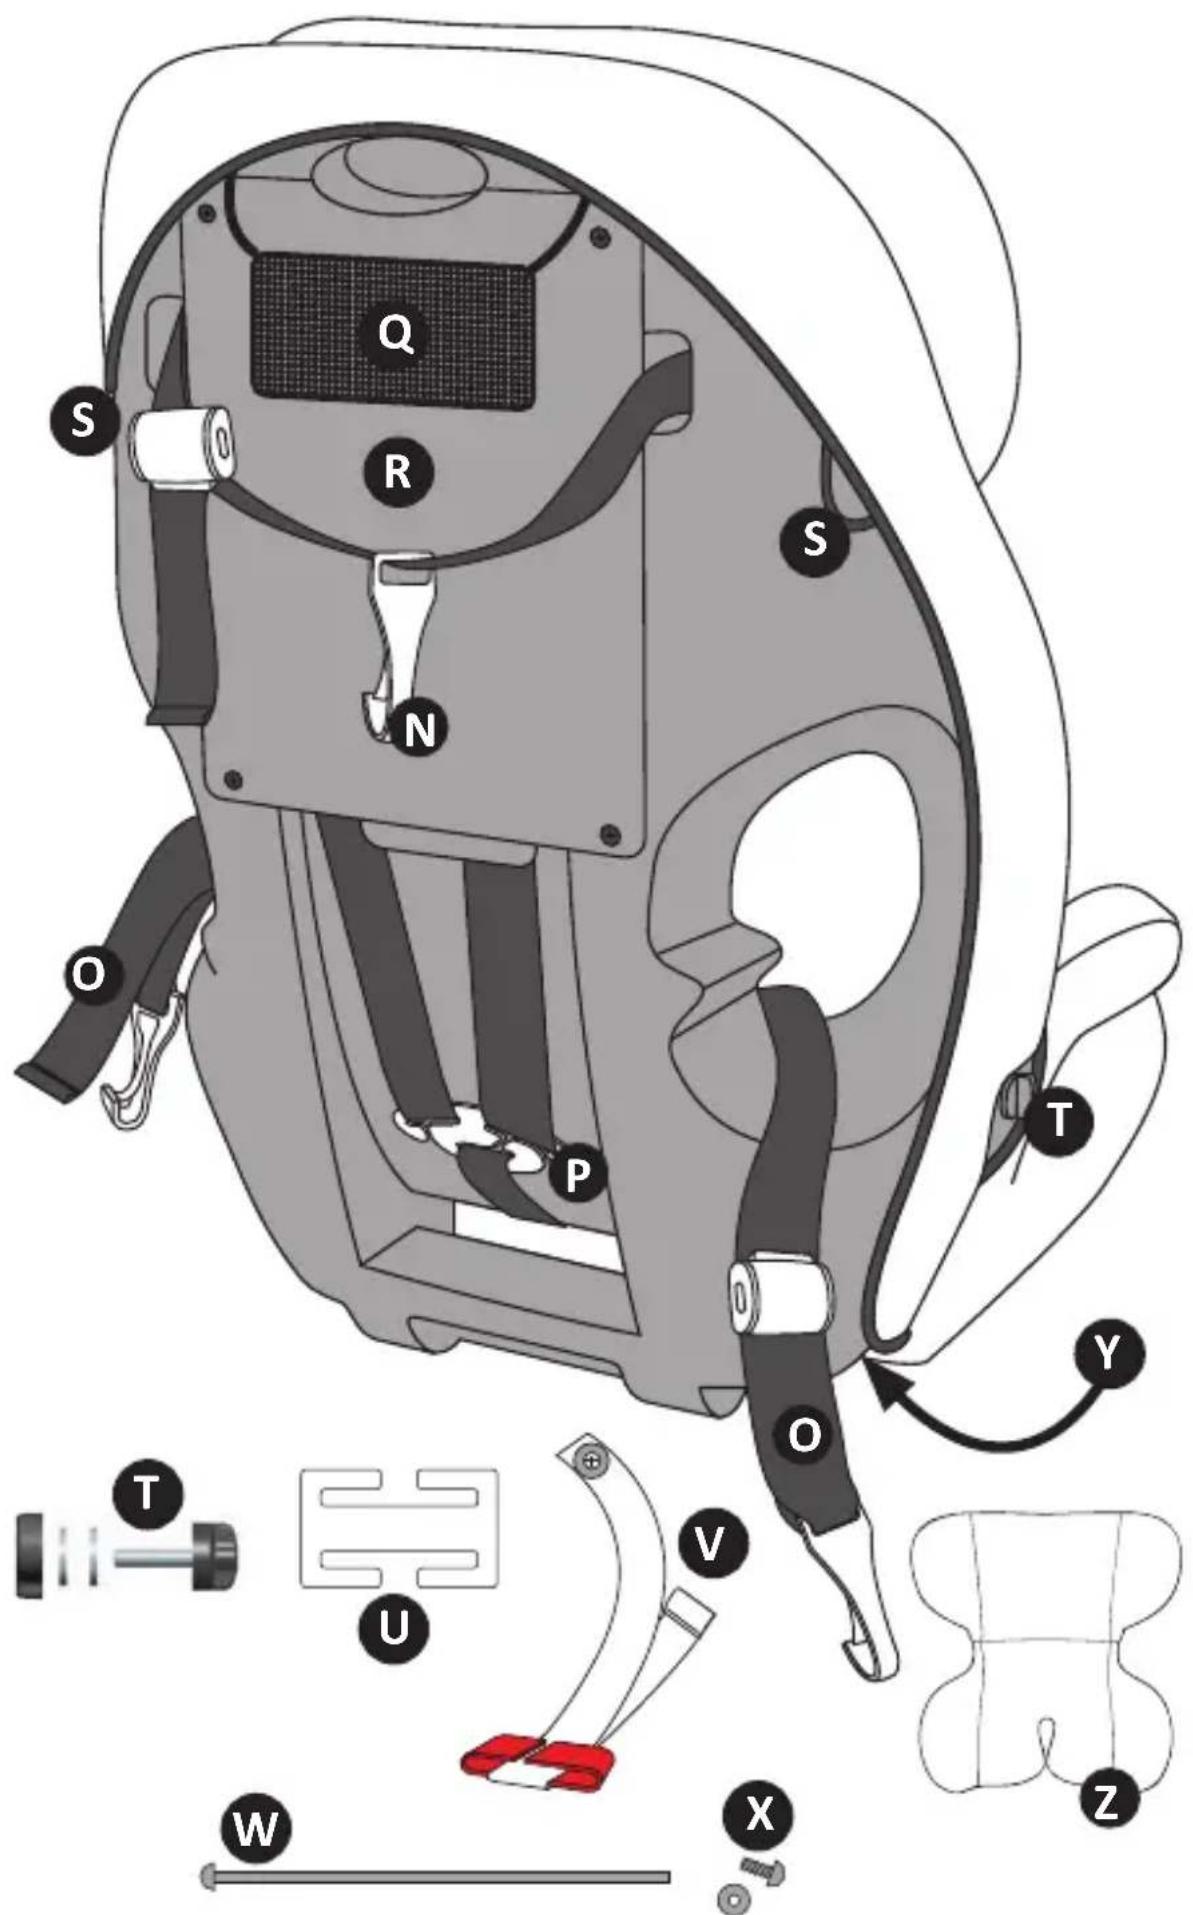
A. Headrest fabric cover (pre-Installed)
B. Backrest fabric cover (pre-Installed)
C. Base fabric cover (pre-Installed)
D. Shoulder belt guides
E. Harness straps, buckle and clips
F. Chest clip
G. Shoulder pads
H. Crotch strap and pad
I. 1-hand headrest height adjustment handle (under headrest fabric)
J. Cup holder
K. Metal up-front harness adjustment button (above strap)
L. Up-front harness adjustment strap
M. Recline knob
N.TopTether
O. "UAS" system
P. Harness splitter plate
Q. Mesh storage pouch
R. Backrest plate
S. UAS storage loops
T. Screw with plastic knob, washers and plastic encased inner bolt (x2)
U. Locking clip
V. Shoulder belt guide with 1.3 cm (0.5 inch) screw (for Backless Booster mode)
W. 22.3 cm (8.8 inch) backrest connector rod (pre-Installed in base of backrest)
X. 1.3 cm (0.5 inch) connector rod screw and washer
Y. Base plate with instruction manual storage
2. Infant insert pad (when applicable)
TO PURCHASE REPLACEMENT PARTS:
In Canada or the United States, please
contact us at www.harmonyjuvenile.com
or by calling 1-877-306-1001.

IF YOU HAVE ANY PROBLEMS, PLEASE DO
NOT RETURN THIS PRODUCT TO THE PLACE
OF PURCHASE. PLEASE CONTACT HARMONY
CUSTOMER SERVICE AT 1-877-306-1001 OR AT
WWW.HARMONYJUVENILE.COM
PARTS LIST
PARTS LIST
VEHICLE SEATING POSITIONS

WARNING!
FAILURE TO PROPERLY SECURE YOUR CHILD AND THE CHILD RESTRAINT IN YOUR VEHICLE INCREASES THE RISK OF SERIOUS INJURY OR DEATH IN THE EVENT OF A SHARP TURN, SUDDEN STOP OR CRASH.

WARNING!
IMPROPER PLACEMENT OF THE CHILD RESTRAINT INCREASES THE RISK OF SERIOUS INJURY OR DEATH. Some seating positions in your vehicle may NOT be safe for this child restraint. Some vehicles have NO seating positions which are compatible with this child restraint due to seating surface, seat belt type and/or airbag system. Read and follow these instructions, and your vehicle owner's manual carefully.

WARNING!
Children aged 13 and under MUST ride in the rear seats, away from front airbags. The only exception is if the airbags are turned off. When using a child restraint in a vehicle with active airbags, refer to the vehicle owner's manual for additional installation instructions and precautions. For rear seat installation, adjust the front seat forward
enough to ensure the child's feet do not hit the backrest of the front seat.

WARNING!
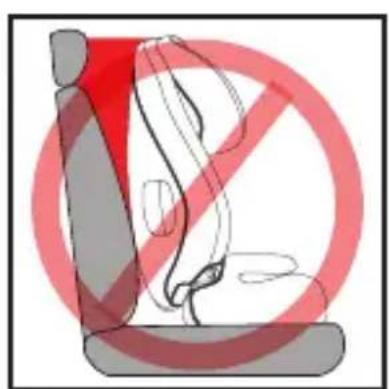
Only use this child restraint in forward-facing vehicle seats. Side-facing or rear-facing seats in vans, station wagons or trucks CANNOT be used.
THE VEHICLE SEAT MUST FACE FORWARD. DO NOT
use the child restraint with the following vehicle seats:
- Seats which face sides of vehicle.
- Seats which face rear of vehicle.
- Rear seats of small extended cab pickup trucks.
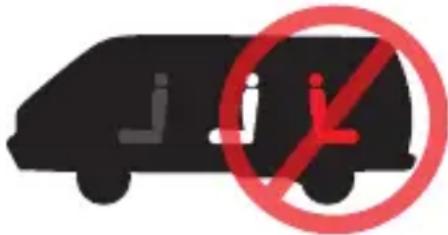
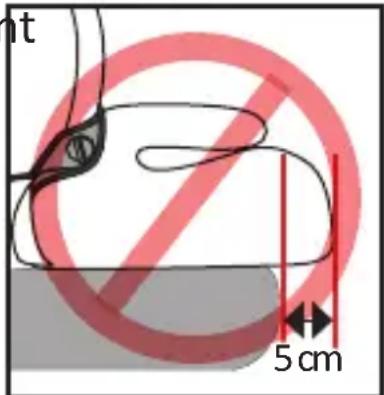
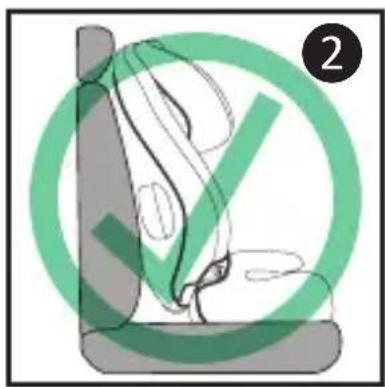
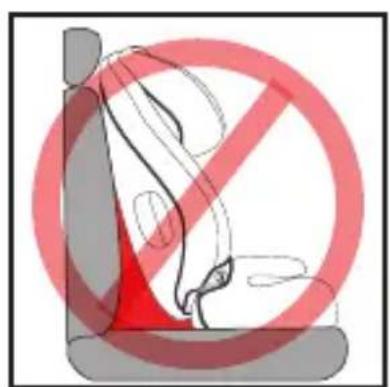
- The front of the child restraint MUST NOT hang over the edge of the vehicle seat by more than 5 cm (2 inches).
Refer to the vehicle owner's manual for child restraint installation instructions for your specific vehicle.
! DO NOT use this child restraint in a seating position where the vehicle seat belt or seat belt buckle is not easily accessible with the child restraint secured in place.
SAFE VEHICLE SEAT BELT SYSTEMS

WARNING!
SEAT BELTS DIFFER FROM VEHICLE TO VEHICLE AND FROM SEATING LOCATION TO SEATING LOCATION WITHIN THE SAME VEHICLE. NOT ALL VEHICLE SEAT BELTS CAN BE USED WITH THIS CHILD RESTRAINT.
You must determine if your vehicle's seat belts are compatible for use with this child restraint. If you are unsure, consult your vehicle owner's manual or call Harmony Juvenile Products.
! This child restraint is suitable for use in the listed vehicles fitted with 3-point with retractor safety-belts (lap-and-shoulder).
Review your vehicle owner's manual for vehicle seat belt use with child restraints.
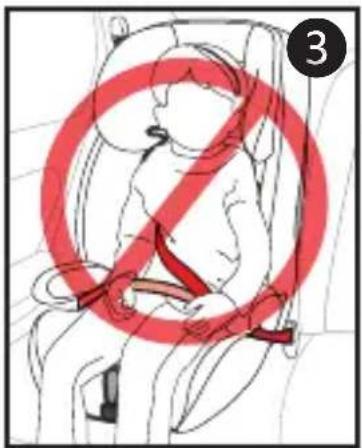
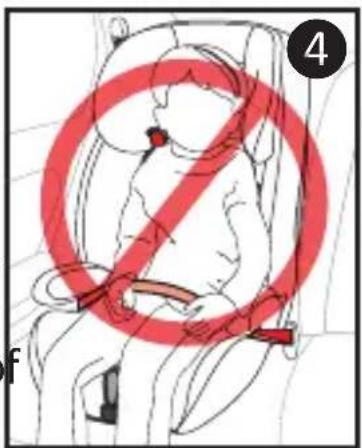
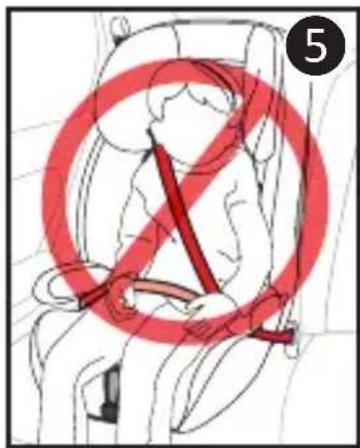
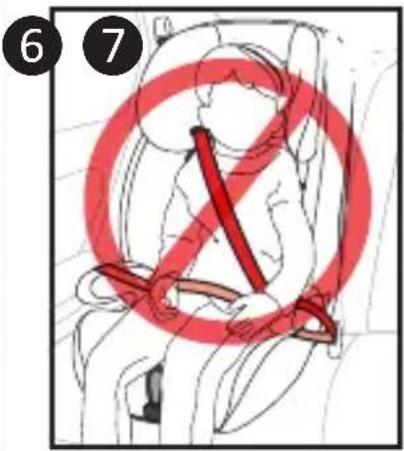
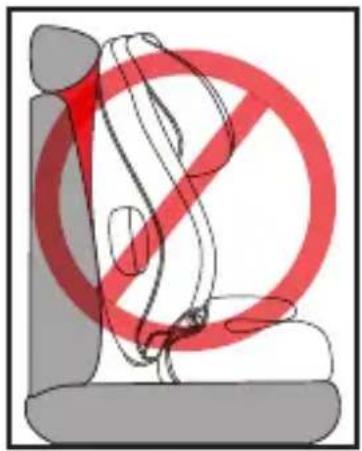
UNSAFE VEHICLE SEAT BELT SYSTEMS
This child restraint can be installed properly using MOST vehicle 3-point lap-and-shoulder seat belts. However, some vehicle seat belts are not safe to use as their anchoring points for the lap belt may not allow for a secure installation. NEVER use any unsafe vehicle seat belt systems.
DO NOT USE ANY OF THE FOLLOWING VEHICLE SEAT BELT SYSTEMS WITH THIS CHILD RESTRAINT:
! NEVER use a lap-only belt.
NEVER use a non-locking vehicle seat belt (ELR). This seat belt type locks only when the vehicle slows, changes direction or stops suddenly.
NEVER use motor driven automatic seat belts.
NEVER use a vehicle seat belt system where the lap and shoulder belts have independent retractors.
NEVER use a vehicle seat belt system with top or bottom anchorage points attached to the door in any way.
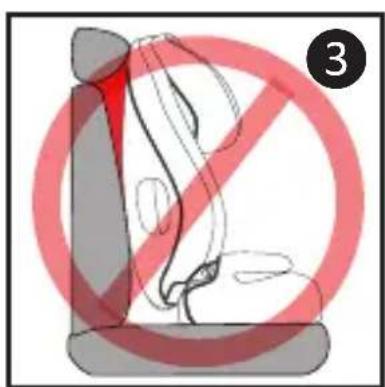
NEVER use lap belts whose anchor points are forward of the seat crease.
NEVER use a seat belt system whose anchor points allow the child restraint to slide from side to side when buckled in.
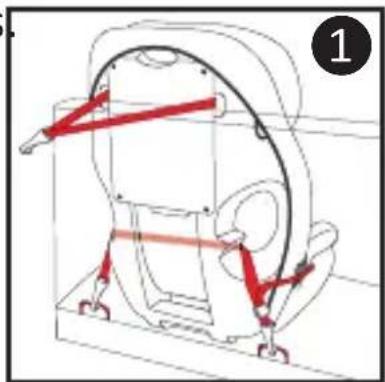
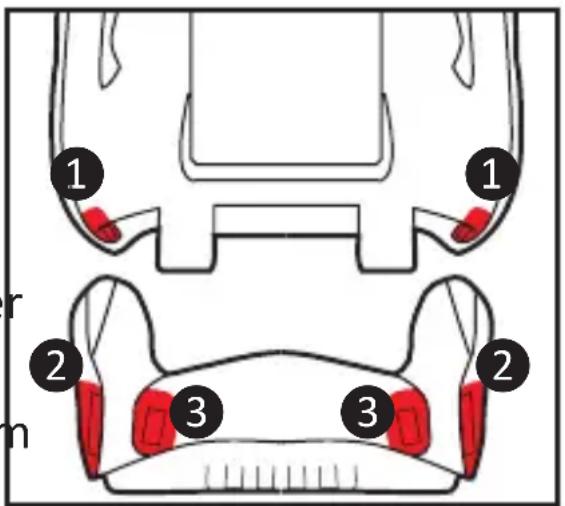
ASSEMBLING/DISASSEMBLING CHILD RESTRAINT
Adult assembly: 2 x Phillips Screwdrivers required.
- Locate both sets of screws with plastic knob, washers and plastic encased inner bolts ("Parts list - T") in the hardware bag and set aside.
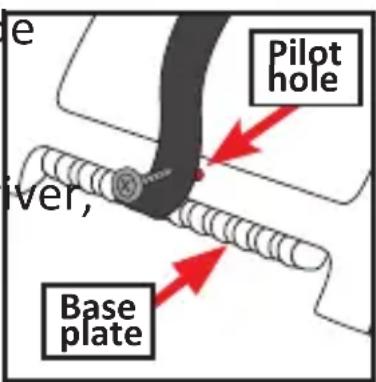
- Locate the 1.3 cm (0.5 inch) connector rod screw and washer ("Parts list - X") in the hardware bag and set aside.
- Identify the 22.3 cm (8.8 inch) backrest connector rod ("Parts list - W") pre-installed in base of backrest. Remove and set aside.
- Place the backrest and base face down and slide the base plate between the two backrest anchor
points. Pass the 22.3 cm (8.8 inch) connector rod through assembly. Insert the washer and 1.3 cm (0.5 inch) screw on opposite side and tighten 1.
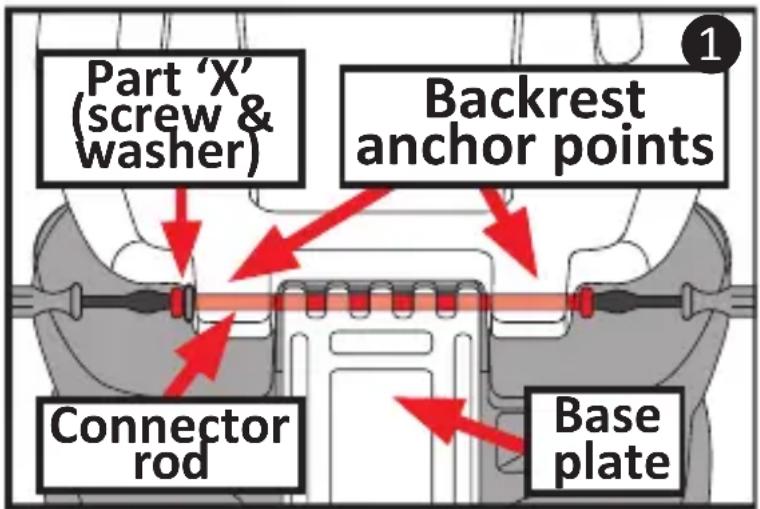
TIP: If connector rod does not pass through easily, make sure it is aligned with holes and tap screw head lightly to guide it through the plastic.
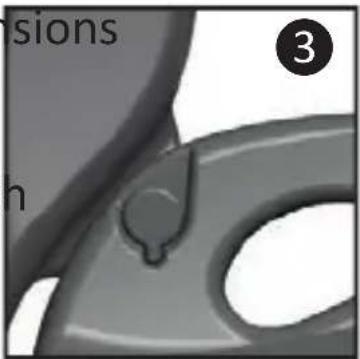
- Turn assembly face-up and pull the backrest up into the vertical position. Pull up-front adjuster tight to hold the backrest in place.
Connect the backrest to the base in the upright position, ensuring that the backrest inserts snugly around the outside of the armrest grooves. Insert screw, washers (x2) and inner bolt as indicated in each

armrest 2. Ensure that the bolt is properly aligned with the indentation 3. Secure assembly by turning screw clockwise until tight 4.
TIP: Stretch backrest ext. out slightly to help guide them around the armrest grooves.
TIP: If screws do not pass through easily, make sure that the screw holes are aligned and tap screw head lightly to guide it through the armrest plastic.
WARNING: Ensure that all THREE connection points are secure and tight. DO NOT over tighten. CHECK FREQUENTLY.
PREPARING CHILD RESTRAINT FOR USE
WARNING!
INCORRECT USE OF THE HARNESSE SYSTEM IS THE MOST COMMON MISTAKE PEOPLE MAKE. IT IS VERY IMPORTANT TO READ, UNDERSTAND AND FOLLOW ALL INSTRUCTIONS AND WARNINGS. DO NOT MISTAKE COMFORT FOR SAFETY. THE HARNESSE SYSTEM MUST BE SNUGLY ADJUSTED AT ALL TIMES.
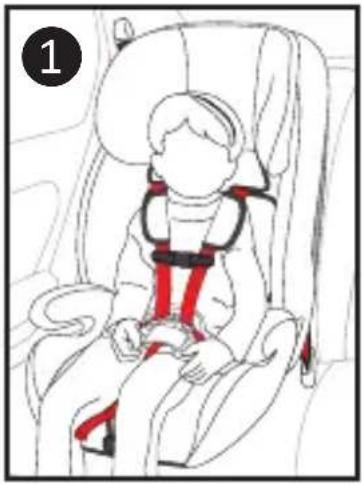
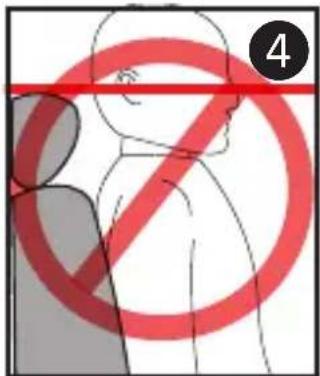
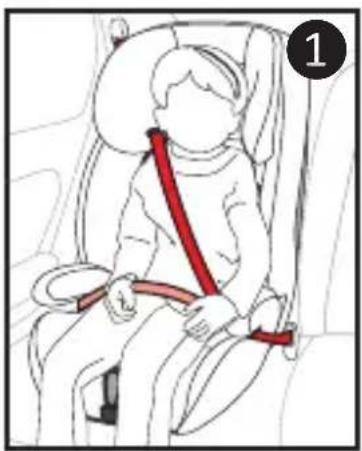
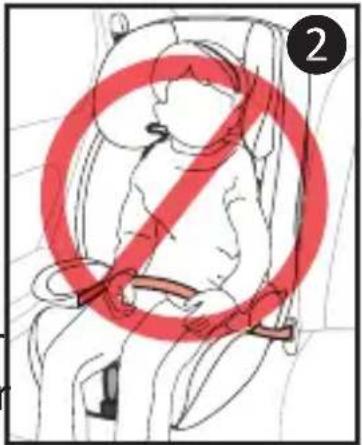
WARNING: The shoulder harness must be EVEN OR SLIGHTLY ABOVE the child's shoulders 1. If the upper most harness position is below the child's shoulders, DO NOT use this child restraint with harness.

! ENSURE the harness height is correct for your child's size. VERIFY OFTEN.
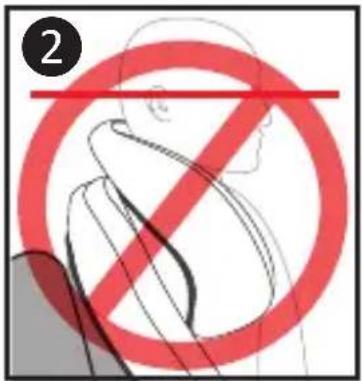
!WARNING: DO NOT use this child restraint if the midpoint of your child's head is above the top of the child restraint's headrest at its maximum height ② .
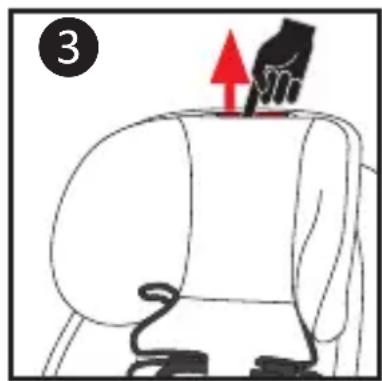
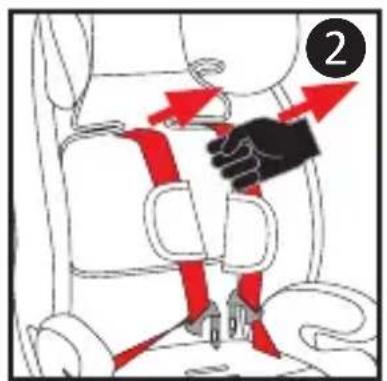
- Loosen harness system by pushing the up-front metal harness adjuster at the front of the seat JUST ABOVE the adjustment strap (under the fabric) 1 and by simultaneously pulling the chest harness straps towards you 2
- Have your child sit in the child restraint with their back flat against the backrest.
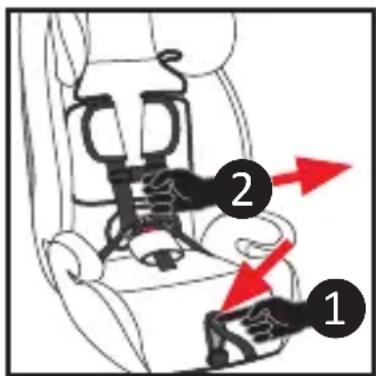
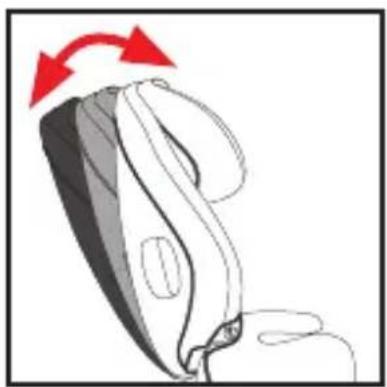
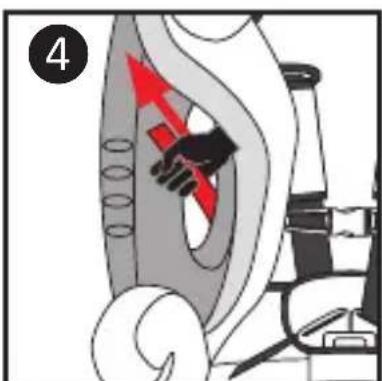
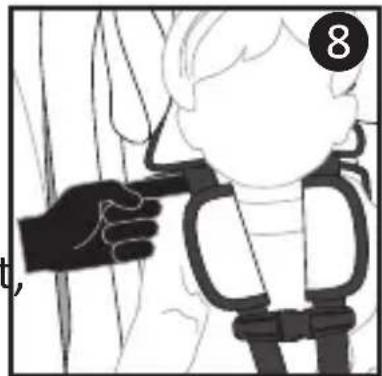
- Reach into the opening on the top of the headrest fabric pad and find the RED one-hand headrest height adjustment button.
- Squeeze button and lift the headrest until the shoulder straps are at or just above your child's shoulders 3
- Release the button and listen for a 'click' to make sure harness is locked in place.
!WARNING: To ensure headrest is locked in position, gently push down on headrest.
WARNING!
FAILURE TO ADJUST THE HARNESSTRAPS CORRECTLY COULD RESULT IN SERIOUS INJURY OR DEATH.
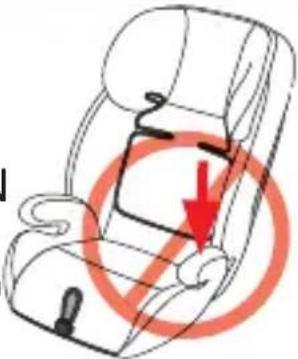
ADJUSTING CROTCH STRAP POSITION
The crotch strap has two (2) positions.
- Remove fabric crotch pad.
- Push the buckle down through the fabric seat pad
towards the plastic base of the child restraint.
- Lift the fabric seat pad on the base of the child restraint to expose the buckle and slot positions.
- Guide the crotch strap through the plastic base to the desired slot position 1.
! ENSURE that the strap is COMPLETELY in the desired slot and the harness strap is NOT twisted. Gently pull upwards to ensure it is firmly in place.
!ENSURE that the buckle is facing FORWARD 2.
- Push the buckle upwards through the fabric seat pad.
- Replace fabric seat pad and fabric crotch pad.
WARNING!
FAILURE TO REINSTALL THE CROTCH STRAPS CORRECTLY COULD RESULT IN SERIOUS INJURY OR DEATH.
REMEMBER to check the shoulder straps and crotch strap position frequently and move them to the next position when necessary. The harness straps MUST be in the height position EVEN WITH or JUST ABOVE the shoulders, and the crotch strap
MUST be in the slot at or immediately in front of your child. The harness pads and crotch pads are optional and are not a safety feature.
TIP: For children over 18.1kg (40 pounds), requiring more harness length, remove black EPP pad under fabric on base of unit and infant insert (if applicable).
WARNING!
YOUR CHILD RESTRAINT RECLINES TO ENSURE PROPER INSTALLATION INTO YOUR VEHICLE. THE CHILD RESTRAINT MUST BE INSTALLED SO THAT ALL OF ITS SURFACE AREA IS IN CONTACT WITH YOUR VEHICLE SEAT.
Place the child restraint in the desired seating position (see "Vehicle seating positions") and turn the front recline adjust knob 1 to recline the backrest UNTIL THE BACKREST LIES FLUSH ON THE VEHICLE SEAT BACK 2.
WARNING: Remove the vehicle headrest and/or mesh storage pouch if it inhibits the child restraint from lying flush against the vehicle seat back ③ .
INSTALLING CHILD RESTRAINT IN HARNESSE MODE: UAS OR VEHICLE SEAT BELT
You can install the child restraint using EITHER the UAS or vehicle seat belt.
UAS: The lower Universal Anchorage System (UAS) is used for installing the child restraint WITHOUT using the vehicle seat belts.
! The UAS can ONLY be used if your vehicle has the UAS anchors installed and designated UAS seating positions. Check your vehicle owner's manual to see which seating positions may be equipped with UAS.
Vehicle Seat Belts: If UAS is not an option, you MUST use the vehicle's lap-only or lap-and-shoulder belt to install the child restraint in your vehicle.
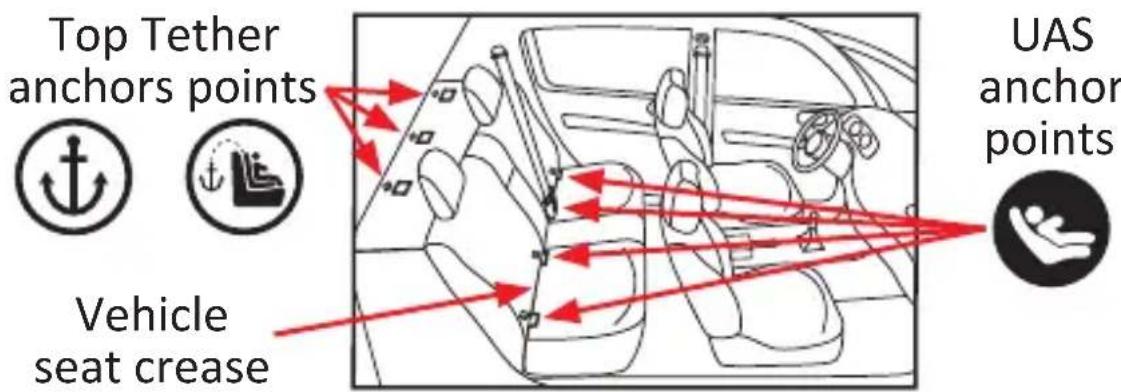
UAS (UNIVERSAL ANCHORAGE SYSTEM)
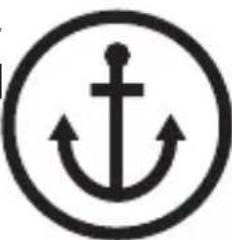
If your vehicle is equipped with UAS, the vehicle UAS anchorage points may be visible at the seat crease. If not visible, they may be marked with this symbol.
Check your vehicle owner's manual for your vehicle's exact UAS locations, anchor identifications and usage requirements for use with a child restraint.
! Use vehicle belt (NOT UAS connectors) for installations with children weighing more than 22.68 ~kg (50 pounds).
WARNING: CONSULT YOUR VEHICLE OWNER'S MANUAL FOR THE EXACT PLACEMENT OF THESE ELEMENTS IN YOUR VEHICLE, AND FOR MAXIMUM UAS WEIGHT ALLOWANCES PRIOR TO INSTALLATION AS SOME MANUFACTURERS HAVE LOWER MAXIMUM WEIGHT ALLOWANCES FOR UAS USAGE.
INSTALLING WITH UAS SYSTEM
-
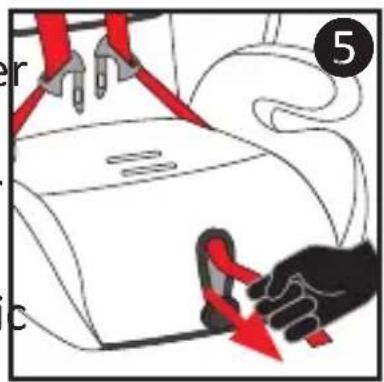
Unhook UAS from storage loops For ease of installation, extend UAS to its maximum length. Ensure the UAS strap is NOT twisted and that the UAS connectors are facing down 1.
-
Place the child restraint flush against a forward-facing vehicle seat, centered between the UAS anchors. Adjust the recline as necessary (see "Recline").
-
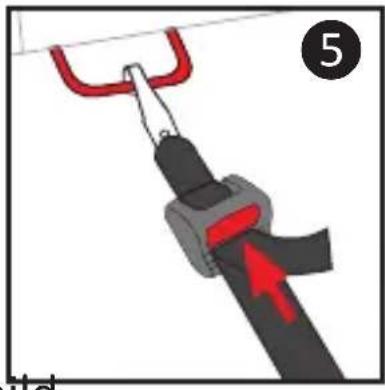
Fasten UAS hooks to vehicle lower anchors ensuring the hooks are facing downwards 2. Pull firmly to be sure that they are attached. BELT MUST LAY FLAT AND NOT BE TWISTED.
-
Tighten UAS by placing your knee on the child restraint base and by using your full weight to push the child restraint down as you simultaneously pull upwards on the free end of the adjustment belt 3
TIP: If you are not able to tighten UAS using the method above, try pulling the UAS strap up through the belt path (under the fabric) ④ , then tighten.

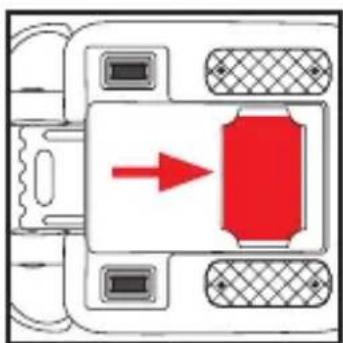
- Should you need to loosen the UAS, push the UAS release button 5.
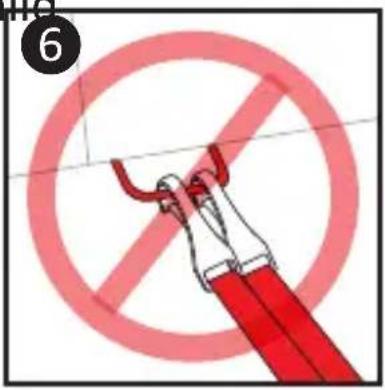
WARNING: NEVER put two UAS connectors on one vehicle UAS anchor unless specifically allowed by the manufacturer 6.
- Secure the top of the ch restraint using the top tether strap (see "Using top tether").
! Conduct a safety check for a secure installation (see "Installation safety check"). Perform this test every time you drive with your child and whenever you readjust the child restraint as your child grows.
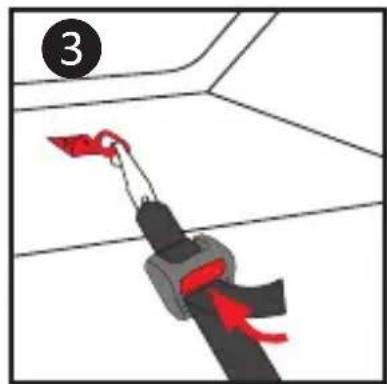
INSTALLING WITH LAP-AND-SHOULDER OR LAP-ONLY BELT SYSTEM
If a UAS installation is not an option, then use the following belt-only installation method.
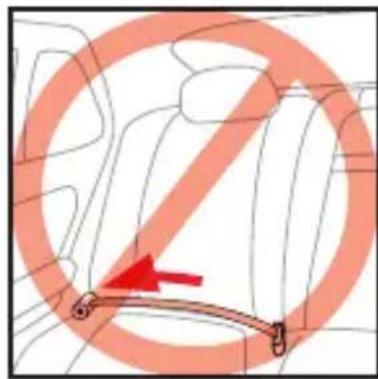
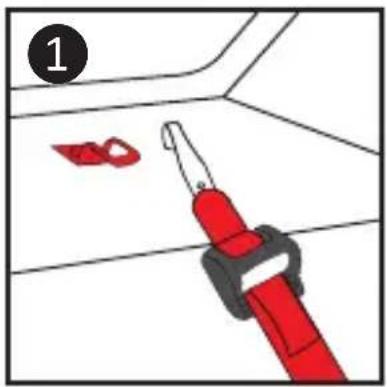
WARNING: UAS must be stored when using the vehicle belt. Clip both UAS hooks to the fabric loops on each side of the backrest 1.
- Place the child restraint flush against the back of a forward-facing vehicle seat. Adjust the recline as necessary (see "Recline").
-
Thread the vehicle seat belt through the belt slot opening and out the other side. See illustrations for proper routing path of Lap-and-Shoulder Belt 2 or Lap-Only Belt 3.
-
Buckle the vehicle seat belt. The vehicle seat belt MUST NOT be twisted.
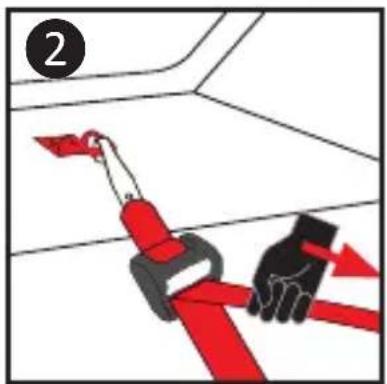
To engage vehicle seat belt retractor:
-
Pull out the full length of the seat belt (until you cannot pull out any more slack). This locks the retractor.
-
Tighten vehicle seat belt by placing your knee on the seat base and by using your full weight to push the child restraint down 4 as you simultaneously release the extra belt length until seat belt is taunt and has no slack 5.
- The locked seat belt retractor will not allow you to add any length to the belt until you unbuckle the seat belt.
For more information on how to tighten the belt for your seat belt system, see your vehicle owner's manual.
- Secure the top of the child restraint using the top tether strap (see section “Using Top Tether”).
USING TOP TETHER
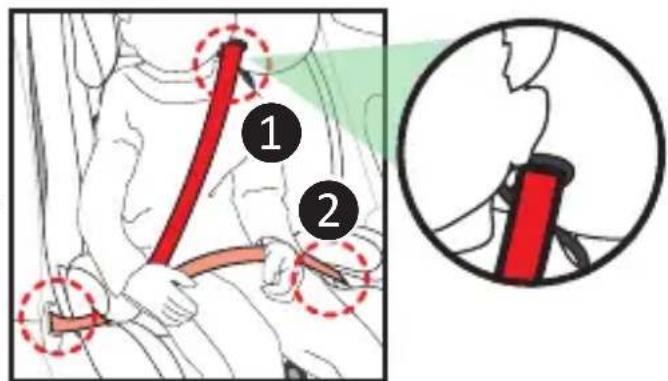
! THE TOP TETHER MUST BE USED AT ALL TIMES WHEN USING CHILD RESTRAINT IN HARNESSE MODE. Using your child restraint with the Top Tether strap properly anchored to the vehicle, as indicated in these instructions, may reduce the chance and severity of injury or death to your child in the event of a sudden stop or crash.
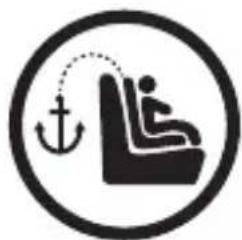
All UAS seating positions have Top Tether anchors. Check your vehicle owner's manual for Top Tether anchor locations. If your vehicle is not equipped with a Top Tether anchor, it may be possible to have one installed. Contact your vehicle dealership or a certified mechanic for the proper anchor location and installation.
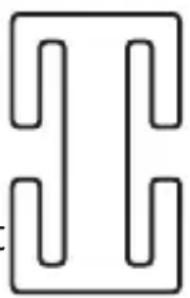
Your vehicle's Top Tether Anchor Points may be identified using one of these symbols:
- Check that the Top Tether is securely attached to the child restraint.
- Fasten Top Tether clip to anchor point ensuring the clip is facing downwards and the strap is not twisted ① .
- With the child restraint installed with the UAS or vehicle seat belt, tighten the Top Tether strap securely by pulling on the free end of the Top Tether strap ②.
- To loosen, press the Top Tether release button 3.
!WARNING: Ensure that Top Tether strap is NOT twisted.
INSTALLATION SAFETY CHECK
Perform this test EVERY TIME you drive with your child and whenever you readjust the child restraint as your child grows:
Rock the child restraint back and forth and side to side to make sure the UAS or vehicle seat belt does not lengthen or loosen, and the child move easily 1.
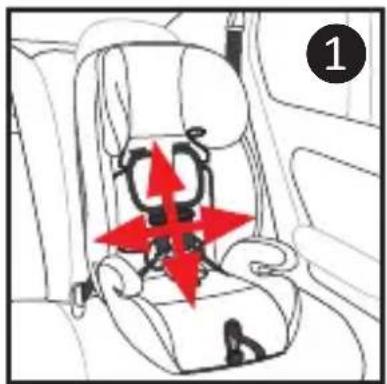
The back of the child restraint (connection point) should not move more than 2.5 cm (1 inch) in any direction.
Check to ensure that side bolts and backrest connector rod are tightly secured.
If the child restraint is loose or not properly secured, repeat procedure OR find another location for the child restraint (see "Vehicle seating postions").
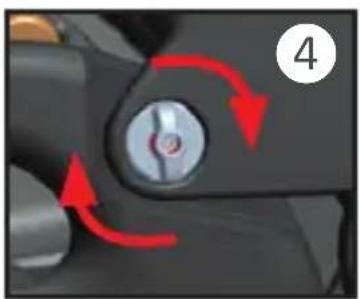
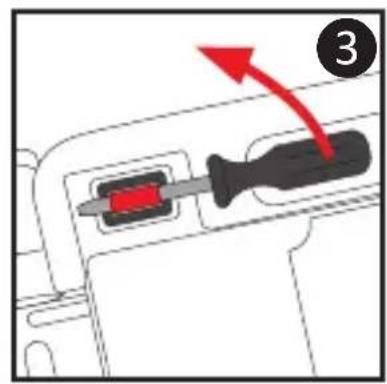
INSTALLING LOCKING CLIP
A locking clip is used to prevent certain vehicle seat belts from loosening before a sudden stop or crash. The locking clip can ONLY be used on a vehicle lap-and-shoulder belt. A locking clip will not fix all types of vehicle seat belt problems.
If your vehicle's 3-point lap-and-shoulder seat belt is equipped with an Emergency Locking Retractor (ELR) that is NOT convertible to function as an Automatic Locking Retractor (ALR), then the locking clip MUST be used.
If you have any questions about the specific type of seat belt system in your vehicle and/or its operation, consult your vehicle owner's manual.
-
Follow the steps to properly secure vehicle lap-and-shoulder seat belt (see "Installing with lap-and-shoulder or lap-only belt system").
-
Once seat belt is attached and properly adjusted, grasp the two straps (lap and shoulder) together as close to the vehicle belt buckle plate as possible. Unbuckle the belt without allowing it to slip.
-
Attach the locking clip around both lap and shoulder belts 1.
-
Position the locking clip about 2.5cm (1 inch) from vehicle belt's buckle plate.
-
Rebuckle belt. Check that the lap belt does not move by pulling hard. If belt loosens or lengthens, repeat the procedure.

Test installation to see if child restraint is secure. The child restraint should NOT be able to move in any direction where it connects to the vehicle. If the child restraint can be moved more than 2.5 cm (1 inch) in any direction at the connection point, then unbuckle the seat completely and repeat the steps above until secure (see "Installation safety check"). If you have any questions, please contact Harmony Juvenile Products customer service.
! Store locking clip when not in use.
! DO NOT use locking clip in booster mode.
USING CHILD RESTRAINT WITH BUILT-IN HARNESSE
WARNING!
FAILURE TO FASTEN AND TIGHTEN THE HARNESSE SYSTEM CORRECTLY MAY CAUSE THE CHILD TO BE EJECTED FROM THE RESTRAINT SYSTEM IN CASE OF A SHARP TURN, SUDDEN STOP OR CRASH CAUSING SERIOUS INJURY OR DEATH. In a crash, the child restraint will provide NO protection for your child unless the harness straps are properly secured. DO NOT mistake comfort for safety. Harness system MUST be snugly adjusted. Follow these instructions carefully.
Incorrect use of the harness system is the most common mistake people make. It is VERY important to read, understand and follow ALL instructions and warnings. DO NOT mistake comfort for safety. The harness system MUST be snugly adjusted at all times.
! Snugly adjust the harness provided with this child restraint around your child. A snug strap is one with no slack. It should not press on the child's flesh or cause your child's body to be in an unnatural position. You should only be able to slide ONE FINGER between the shoulder straps and the child's shoulder.
! Avoid unnecessary bulky clothing.
SECURING CHILD IN CHILD RESTRAINT
-
Adjust harness height ("Preparing child restraint for use").
-
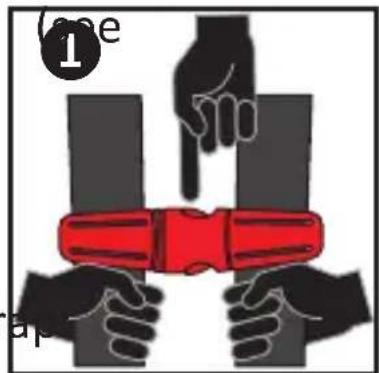
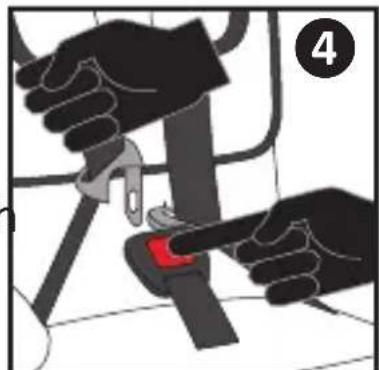
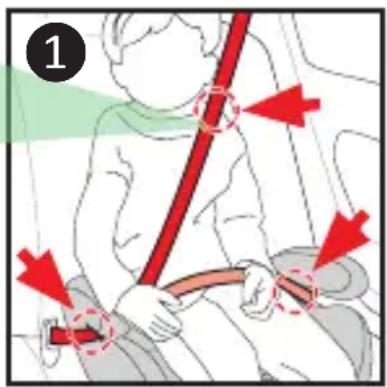
Open harness chest clip by pressing in pin clips while pulling apart the two-piece chest clip 1.
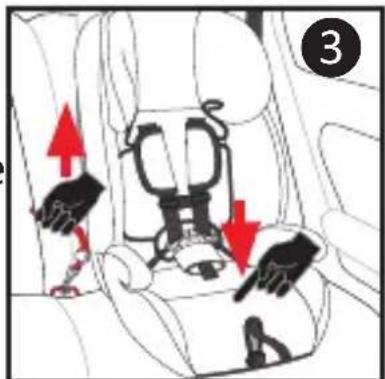
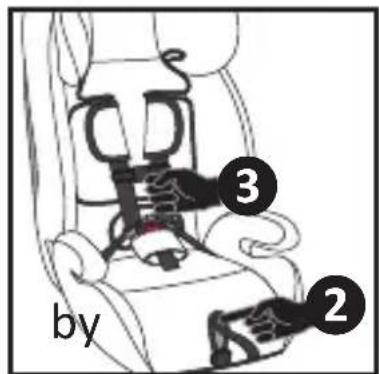
- To loosen the harness stir Push the up-front metal harness adjuster at the front of the seat just ABOVE the adjustment strap (under the fabric) 2 and simultaneously pull the chest strap towards you 3.
- Unbuckle harness straps pressing on the RED buckle release button and by pulling the buckle clips out 4. Move harness straps to the side.
- Place child in child restraint with child's back flat against back of the backrest.
- Adjust headrest height so that the bottom of the headrest is even with the top of the child's shoulders.
- Place harness straps over child's shoulders and insert buckle clips into buckle until they 'click' into place 5.
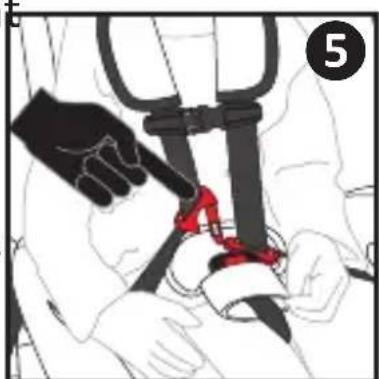
! ENSURE that harness clips and buckle are properly fastened by gently tugging on each.
!ENSURE that the straps are NOT twisted.
! DO NOT use child restraint if the harness does not lock.
- Re-fasten chest clip 6
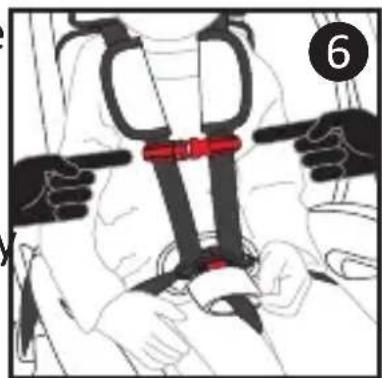
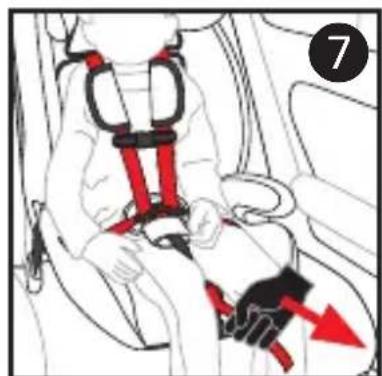
- Tighten harness system by gently pulling on the up-front harness adjuster strap until all slack is removed from the system 7.
! ENSURE straps are flat and snug against child's shoulders and thighs. You should NOT be able to slide more than one finger between the strap and the child's shoulder ⑧ .
A snug strap should not allow any slack. It lies in a relatively straight line without sagging. It should not press the child's flesh or cause your child's body to be in an unnatural position.
- Position the chest clip at mid-chest in line with your child's armpits and away from your child's neck.
REMOVING CHILD FROM CHILD RESTRAINT
- Open harness chest clip by pressing in pin clips while pulling apart the two piece chest clip.
- Loosen the harness system by pressing on the up-front metal harness adjuster, and simultaneously pulling the shoulder straps towards you.
- Unbuckle harness by pressing on RED buckle release button.
USING CHILD RESTRAINT IN BOOSTER MODE (WITHOUT INTERNAL HARNESS)
REMOVING/INSTALLING HARNESS
WARNING: The BASE seat cover can be removed without removing the harness.
- Open chest clip and harness buckle.
- Face the rear of the child restraint and remove the harness straps from the splitter plate 1.
- Pull shoulder straps out of their respective slots in the backrest 2.
- Lie child restraint on its side and find the metal locking
plate for each harness strap on the underside of the base of the child restraint. Place a screwdriver under the loop of the strap and pry up to unlock the metal locking plate from the plastic base ③. Turn each metal plate so that it can slide up and out through the plastic seat base.
-
Repeat procedure for top tethe removal.
-
Store complete harness system for future use.
-
Store crotch buckle under fabri seat pad in the indentation in the plastic seat base 4.
- Pull the up-front adjustment strap as far as it will go. This will lock the splitter plate into the base of the seat 5.
- Roll strap tightly, secure roll with an elastic band and store rolled strap under the fabric seat pad in the opening of the up-front adjuster.
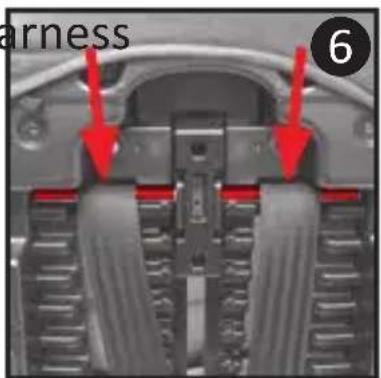
To reinstall, remove backrest plate and repeat these steps in reverse order. When re-inserting the shoulder straps through the backrest, ensure the straps are ABOVE the metal bars inside the slots in the backrest 6. Reinstall backrest plate once harness is properly reinstalled.
PREPARING BOOSTER SEAT FOR USE
WARNING!
INCORRECT USE OF THE VEHICLE'S 3-POINT LAP-AND-SHOULDER SEAT BELT SYSTEM IS THE MOST COMMON MISTAKE PEOPLE MAKE. IT IS VERY IMPORTANT TO READ, UNDERSTAND AND FOLLOW ALL INSTRUCTIONS AND WARNINGS. DO NOT MISTAKE COMFORT FOR SAFETY. THE VEHICLE'S 3-POINT LAP-AND-SHOULDER SEAT BELT MUST BE SNUGLY ADJUSTED AT ALL TIMES.
!ENSURE the vehicle shoulder belt's position is correct for your child's size. VERIFY OFTEN.
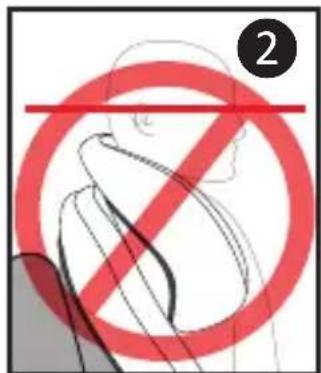
!WARNING: DO NOT use this booster seat if the midpoint of your child's head is above the top of the booster seat headrest at its maximum height.
WARNING!
!ALWAYS ASSIST YOUR CHILD WHEN GETTING INTO AND OUT OF YOUR CHILD RESTRAINT/BOOSTER SEAT.
NEVER LET YOUR CHILD LEAN ON THE ARMREST WHEN GETTING INTO OR EXITING THE BOOSTER SEAT TO PREVENT THE SEAT FROM TIPPING.
!ENSURE THAT THE BOOSTER SEAT IS
LEVEL, STABLE AND DOES NOT ROCK SIDE-TO-SIDE. IF THE BOOSTER SEAT IS NOT STABLE, TRY ANOTHER SEATING LOCATION. IN VEHICLES WITH WIDE, FLAT SEATS, A ROLLED TOWEL CAN BE USED ON THE OUTBOARD (DOOR) SIDE TO ADD STABILITY TO THE BOOSTER SEAT. DO NOT ADD ANYTHING BEHIND OR UNDER THE BOOSTER SEAT.
SECURING CHILD AND BOOSTER SEAT IN VEHICLE
WARNING!
FAILURE TO PROPERLY SECURE YOUR CHILD IN THE BOOSTER SEAT INCREASES THE RISK OF SERIOUS INJURY OR DEATH IN THE EVENT OF A SHARP TURN, SUDDEN STOP OR CRASH. In a crash, the booster seat provides NO protection for your child unless the vehicle 3-point lap-and-shoulder belt is properly secured. Follow these instructions carefully to properly secure your child.
!DONOT use this booster seat if it can't be properly leveled, stabilized, and installed as per this instruction manual. It is possible that your vehicle has no suitable seating position for this booster seat due to seating surface, seat belt type and/or airbag system. Read and follow these instructions, and your vehicle owner's manual carefully.
!DONOT use infant insert in booster mode (when applicable).
WARNING: You MUST use the vehicle 3-point lap-and-shoulder belt when restraining the child in the booster seat. UAS WILL NOT secure your child in the booster seat ① .
WARNING: Vehicle belts MUST be tight, adjusted to the child's body, and should not be twisted 1.
NEVER use a vehicle lap-only belt to secure child in booster seat ② .
! NEVER USE A LOOSE SHOULD BELT.
NEVER position the shoulder belt under the child's arm ③ or place the shoulder belt behind the child's back ④ .
! Lap portion of lap-and-shoulder belt MUST be low and snug across the hips, with the pelvis firmly engaged, just touching the child's thighs. The lap portion MUST NOT be lying across the child's stomach as this can cause major injuries to the child in case of a sharp turn, sudden stop or crash.
! DO NOT allow the child to slouch, slide down in the seat, or create slack in the belt system ⑤ . If child will not keep vehicle belt properly positioned, DO NOT use this booster seat.
! DO NOT position vehicle belt over top of the armrests 6.
! The vehicle seat headrest should not create a gap between vehicle seat and booster seat ⑦. If so, remove the vehicle headrest.
! DO NOT use any load bearing contact points other
than those described in the instructions and marked in the child restraint.
IF IN DOUBT ABOUT THESE POINTS OR ANY QUESTIONS RELATED TO INSTALLATION, PLEASE CONTACT HARMONY JUVENILE PRODUCTS.
INSTALLATION - BOOSTER WITH BACKREST
WARNING!
DUE TO VARYING ANGLES OF VEHICLE SEAT BELT RETRACTORS, EXCESS SLACK IN THE VEHICLE BELT SYSTEM MIGHT NOT BE REMOVED AUTOMATICALLY. Once the lap and shoulder portions of the seat belt are properly positioned and the buckle is attached, FEED ANY REMAINING SLACK OF THE SEAT BELT MANUALLY BACK INTO THE RETRACTOR TO TIGHTEN THE WHOLE SYSTEM.
- Place the booster seat flush against a forward-facing vehicle seat. The vehicle seat MUST be equipped with a 3-point lap-and-shoulder belt. Booster must be level, stable and not rock side-to-side (see "Vehicle seating positions").
- Place child in the booster seat with child's back flat against the back of the booster seat.
- Adjust headrest height so that the bottom of the
headrest is even with the top of the child's shoulders.
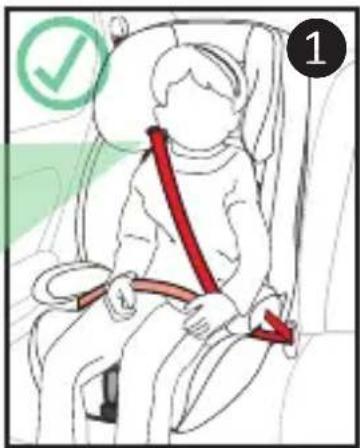
- Thread shoulder belt portion of the 3-point lap-andshoulder belt system
through the shoulder belt guide ① and ensure that shoulder belt lies across child’s shoulder and chest, and NOT across child’s face or neck.
-
Thread both sides of the lap belt under BOTH armrests. Thread the lower end of the shoulder belt under the armrest on the buckle side ②. ENSURE that the belt is snug across the child's hips. It is important to ensure that any lap strap is worn low down, so that the pelvis is firmly engaged, just touching their thighs and is NOT across their stomach.
-
Buckle the vehicle seat belt into place and ensure it is secure by gently pulling on it.
! BOTH SIDES OF THE LAP BELT MUST PASS UNDER BOTH ARMRESTS, AND THE LOWER END OF THE SHOULDER BELT MUST PASS UNDER THE ARMREST ON THE BUCKLE SIDE.
! Any straps holding the restraint to the vehicle should be tight, any straps restraining the child should be adjusted to the child's body, and all straps should not be twisted.
! NEVER USE A VEHICLE LAP-ONLY BELT WHEN USING THIS BOOSTER SEAT.
WARNING: To avoid possible entanglement hazard, see "Entanglement with vehicle seat belt".
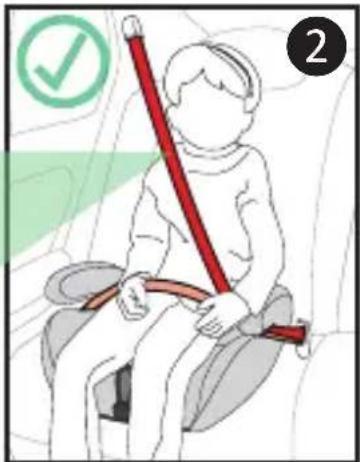
INSTALLATION - BOOSTER WITHOUT BACKREST
See "Assembling/disassembling child restraint" for instructions for removing the backrest. Once backrest is removed, turn recline knob clockwise until end is reached to retract the base plate on the bottom of the seat.
-
Place the booster seat flush against a forward-facing vehicle seat. The vehicle seat MUST be equipped with a 3-point lap-and-shoulder belt. Booster must be level, stable and not rock side-to-side (see "Vehicle seating positions").
-
Place child on the booster seat with child's back flat against the vehicle seat.
-
Thread both sides of the lap belt under BOTH armrests. Thread the lower end of the shoulder belt under the armrest on the buckle side 1. ENSURE that the belt is snug across the child's
hips. It is important to ensure that any lap strap is worn low down, so that the pelvis is firmly engaged, just touching their thighs and is NOT across their stomach.
- Buckle the vehicle seat belt into place and ensure it is secure by gently pulling on it.
! BOTH SIDES OF THE LAP BELT MUST PASS UNDER BOTH ARMRESTS, AND THE LOWER END OF THE SHOULDER BELT MUST PASS UNDER THE ARMREST ON THE BUCKLE SIDE.
! Any straps holding the restraint to the vehicle should be tight, any straps restraining the child should be adjusted to the child's body, and all straps should not be twisted.
! NEVER USE A VEHICLE LAP-ONLY BELT WHEN USING THIS BOOSTER SEAT.
!WARNING: To avoid possible entanglement hazard, see "Entanglement with vehicle seat belt".
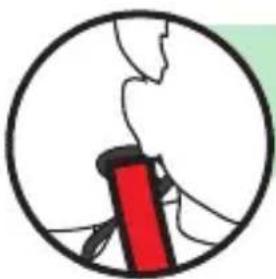
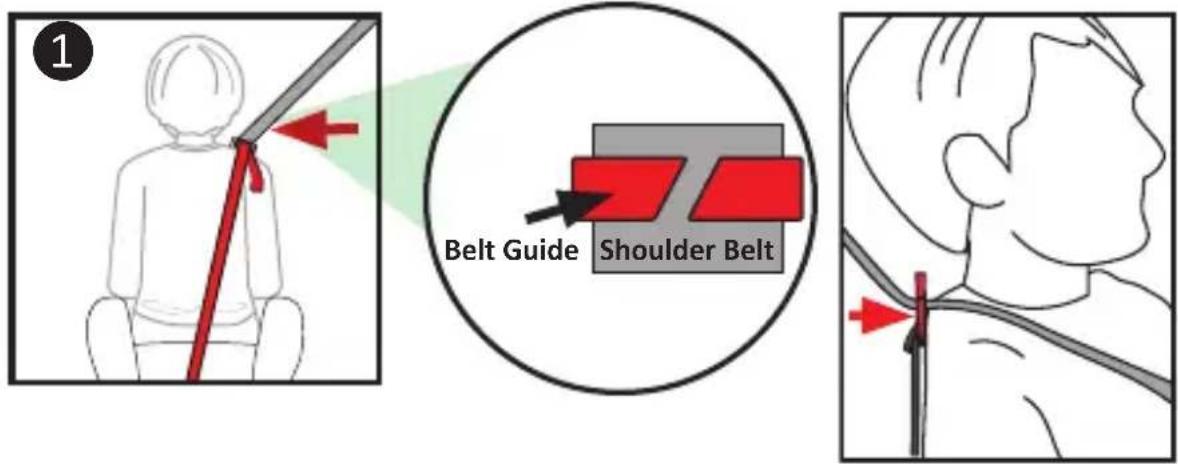
! THE VEHICLE'S SHOULDER BELT MUST LIE ACROSS THE CHILD'S SHOULDER AND LAY ACROSS THE CHEST - NOT THE FACE OR NECK. If the belt does not lie properly across the child's shoulder and chest, the RED shoulder belt guide ("Parts list - V") MUST be used to ensure proper placement (see "Using shoulder belt guide").
INSTALLING/REMOVING SHOULDBELT GUIDE
TO INSTALL
- Locate the shoulder belt guide strap and screw ("Parts list - V") in the storage pouch.
- Using a Phillips screwdr attach belt guide strap to booster seat base by screwing into the pre-drilled hole in the back of the seat base.
! Before tightening screw, make sure belt strap is pointing upwards and that the RED belt guide opening is facing forward. DO NOT overtighten screw.
TO REMOVE
- Remove vehicle seat belt from RED belt guide clip.
- Unscrew shoulder belt guide from the back of the base.
It is recommended to store the unused shoulder belt guide along with any other parts from the child restraint for future use.
USING SHOULDER BELT GUIDE
- Slide the vehicle's shoulder belt into the RED clip ensuring it is flat. Position the belt guide just above the child's shoulder 1.
! THE VEHICLE'S SHOULDER BELT MUST LIE ACROSS THE CHILD'S SHOULDER.
! OPENING OF RED BELT GUIDE CLIP MUST FACE FORWARD.
! All straps MUST be tight and NOT twisted. ALL slack MUST be removed from lap and shoulder portions of the vehicle belt to ensure a snug fit. THE LAP BELT PORTION MUST PASS UNDER BOTH ARMRESTS AND BE POSITIONED LOW ON THE HIPS.
ENTANGLEMENT WITH VEHICLE SEAT BELT
WARNING: To avoid possible entanglement and choking with your vehicle's shoulder belts, Harmony Juvenile Products recommends that the following precautions are taken when installing your booster seat:
- Pull the shoulder portion of the vehicle seat belt all the way out until the retractor locks.
2.SLOWLY let the seat belt retract until it is snug against your child. - ENSURE that the seat belts do not press on the child's flesh or push the child's body into an unnatural position.
- Do the same for all unused vehicle seat belts.
! Teach your child that seat belts are not toys and should NEVER be played with, regardless of whether the car is in motion or not.
! ALWAYS be aware of what your children are doing in the back seat.
INSTALLING CUP HOLDER (WHEN APPLICABLE)
- The cup holder can be installed on either side of the child restraint.
- Locate the opening in the end of either armrest.
- Insert cup holder clip into the opening and push in until locked into place. Ensure that the fabric does not interfere with the

installation. If so, gently pull down on the fabric while installing cup holder.
- Pull out to remove.
AIRCRAFT INSTALLATION
This child restraint is certified for use in aircraft ONLY when used WITH the harness.
This child restraint is NOT CERTIFIED for aircraft use when used as a booster WITHOUT the harness.
IMPORTANT POINTS TO REMEMBER:
- Contact your airline before using this child restraint on the aircraft in order to comply with their restrictions and regulations.
- Install this child restraint on an aircraft in the same way it is installed in an automobile with a lap belt.
- Check that the aircraft seat belt holds the child restraint securely in place at all times. If it does not, DO NOT use this child restraint.
INSTRUCTION MANUAL STORAGE
Store your instruction manual in the storage section provided in the base plate on the bottom of your child restraint.
REMOVING/INSTALLING FABRIC SEAT COVER
TOREMOVE
See "Removing/Installing harness".
THE HARNESS DOES NOT NEED TO BE REMOVED IN ORDER TO REMOVE THE HEAD AND BASE FABRIC COVERS.
HEADREST:
- Gently slide fabric downwards off the top of the headrest.
- Unhook the elastic loops from each headrest shoulder belt guide opening on the bottom of the headrest.
BACKREST:
- Undo the fabric hook-and-loop fastener tabs (x2) 1 along the bottom sides of the backrest (where the backrest meets the base).
- Gently slide fabric cover off the backrest.
- Remove EPE foam from backrest fabric.
BASE:
- Undo the fabric hook-and-loop fastener tabs (x4) 2 3 as indicated.
- Gently slide the fabric cover off the plastic base from the back of the child restraint towards the front of the seat. Make sure that recline knob does not get caught on fabric as you remove seat pad.
TO INSTALL
To reinstall fabric pads, repeat previous steps in reverse order.
TIP: For ease of fabric pad installations, turn recline knob counterclockwise to open gap at base of backrest to
facilitate passing the hook and loop tabs through the gap to secure.
! CAUTION: Reinstall harness system if applicable (see "Removing/installing harness").
CARE AND MAINTENANCE
CLEANING YOUR SEAT PAD:
- MACHINE WASH SEPARATELY using cold water - delicate cycle.
DO NOT BLEACH. - DRIP DRY to prevent cover from shrinking.
! DO NOT wash EPE foam pad insert under seat pad.
CLEANING THE PLASTIC SHELL:
- SPONGE CLEAN using warm water and mild soap.
- TOWEL DRY.
- DO NOT use solvents, abrasive cleaners, or disassemble child restraint in any way, except as instructed.
CLEANING HARNES AND UAS STRAPS:
- Spot clean with a damp cloth. DO NOT BLEACH. DO NOT immerse the straps in water. Doing so may weaken the straps.
CLEANING METAL AND PLASTIC HARNESS PARTS:
- Use mild soap and cool water on a damp cloth.
! NEVER lubricate the buckle. If buckle or harness adjuster sticks or will not remain tight, check for foreign objects such as food, dirt, etc. Remove objects with tweezers and/or clean with a cotton swab. If you cannot get the harness to remain tight with the buckle securely locked, DO NOT USE this child restraint. Call Harmony Juvenile Products to purchase a replacement harness or buckle.
WARRANTY
This child restraint was manufactured by Harmony® Juvenile Products (HJP). HJP warrants this product to the original retail purchaser as follows:
LIMITED 1-YEAR WARRANTY
This child restraint is warranted against defective materials and workmanship for ONE (1) YEAR from the date of original purchase. An original receipt is required to validate your warranty. HJP will, at its option, provide replacement parts for this product or replace this product. HJP reserves the right to discontinue or change fabrics, parts, models or products, or to make substitutions.
To make a claim under this warranty, you must contact HJP Customer Service at www.harmonyjuvenile.com, or call 1-877-306-1001, or write to 2450 Cohen Street, Montreal, Quebec, Canada, H4R 2N6.
Proof of purchase is required and shipping charges are the responsibility of the consumer.
WARRANTY LIMITATIONS
This warranty does not include:
- Damages which arise from negligence, misuse, or use not in accordance with this instruction manual.
- Damage and wear arising from excessive stress.
- Replacement of fabric as a result of natural wear or fading of the fabric as a result of exposure to the sun or UV radiation.
The use of non-Harmony branded covers, inserts, toys, accessories or tightening devices is not approved by HJP. Their use could cause this child restraint to fail federal safety standards or perform worse in a crash. Their use automatically voids the HJP warranty.
LIMITATIONS OF DAMAGES
The warranty and remedies as set forth above are exclusive and in lieu of all others, oral or written,
expressed or implied. In no event will HJP or the retailer selling this product be liable to you for any damages, including incidental or consequential damages, or loss of use arising out of the use or inability to use this product.
PLEASE REGISTER THIS CHILD RESTRAINT WITHIN 30 DAYS OF PURCHASE TO EXPEDITE WARRANTY CLAIMS AND TO VERIFY ORIGINAL DATE OF PURCHASE.
harmony®
DEFENDER 360^ SIÈGE D'AUTO DE LUXE 3-EN-1 MANUEL D'INSTRUCTIONS
Harmony Juvenile Products
Site web: www.harmonyjuvenile.com
Adresse postale: 2450 rue Cohen Montreal, Quebec, Canada H4R 2N6
Telephone: 1-877-306-1001
TABLE DES MATIÈRES
Harmony Juvenile Products
2450 rue Cohen
Montréal, Québec, H4R 2N6 Canada
