Perfect Care Aqua Pro GC9330 - Iron PHILIPS - Free user manual and instructions
Find the device manual for free Perfect Care Aqua Pro GC9330 PHILIPS in PDF.
User questions about Perfect Care Aqua Pro GC9330 PHILIPS
0 question about this device. Answer the ones you know or ask your own.
Ask a new question about this device
Download the instructions for your Iron in PDF format for free! Find your manual Perfect Care Aqua Pro GC9330 - PHILIPS and take your electronic device back in hand. On this page are published all the documents necessary for the use of your device. Perfect Care Aqua Pro GC9330 by PHILIPS.
USER MANUAL Perfect Care Aqua Pro GC9330 PHILIPS
natural_image
Black and white steam iron with handle and side arm (no visible text or symbols)English 6
Español 16
Français 21
Nederlands 31
Suomi 41
Dansk 50
Ελληνικα 60
69
© 2017 Rh. (2005) Applications worldwide
4201012763172082021

H Kayttöopas
SV Användarhandbok
DA Brugervejledning
No BrakemindBox
He, wodniz

text_image
Labeled diagram of a steam iron with numbered parts and a close-up inset showing internal components.Quick Start Guide
Edine Ixtertan elting / 3. la de l'icio rápido / Guide se stemarige rapide / Guida di avio rápido / Snelstanglos / Manuel de l'icio rápido / Fia-altohuspas / Snolobstartguide / Lynvej edning / Humiguel edning / Onglydcypfyoing brasilg / 15 s o Fa-cu-lig plt
G2400 CC35D
Start here / Her stane / Conce quai / Conconce d / Come inblas / Boqir hier / Correccuaul / Aio to losa / Bor a hal / Stan hier / Stan hier / Econjotis cib / po ore mrc
text_image
Instructional steps for shoe repair or cleaning, showing step-by-step instructions with numbered labels and iconsthe Vorwenden / Use / Utilien / Utilien / Gebuk / Ulluxio / Kayo / Amirada / Brca / Brux / Kalkon / 2018
text_image
Illustration showing three steps of a medical procedure: surgical, check, and take-down with arrows indicating direction.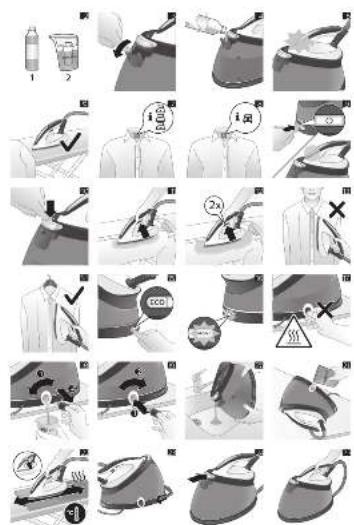
text_image
Medical procedure image showing step-by-step steps for using a hair iron, with numbered instructions and safety symbols.DE-CALC / DE-CALC / DE-CALC / DE-CALC / DE-CALC / DE-CALC / DE-CALC / KALKINPOISTO / DE-CALC / DE-CALC / DE-CALC / Αφαίρεση αλάτων / DE-CALC
text_image
DE CALC HOT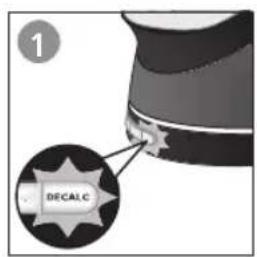
text_image
1 DECALC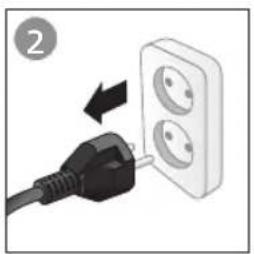
natural_image
Illustration of a black plug inserted into a white electrical outlet with two outlets, showing an arrow indicating power or connection (no text or symbols present)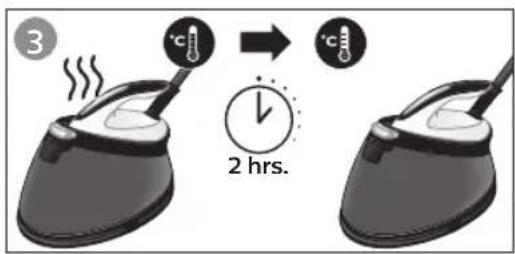
text_image
3 °C → °C 2 hrs.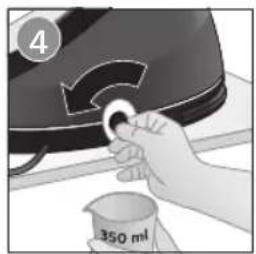
natural_image
Hand placing a circular object into a container labeled '350 ml' (no text or symbols on the object itself)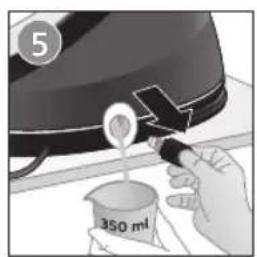
text_image
5 350 ml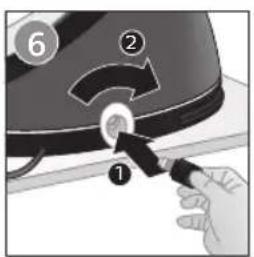
text_image
Diagram showing a hand pressing a button on a device with numbered labels 1, 2, and 6 indicating steps of operation.Storage / Aufbewahrung / Almacenamiento / Rangement / Conservazione / Opbergen / Armazenamento / Säilytys / Förvaring / Opbevaring / Oppbevaring / Αποθήκευση / ΠΩΠΧ
text_image
1
natural_image
Illustration of a black plug inserted into a white electrical outlet with two outlets, showing an arrow indicating insertion (no text or symbols present)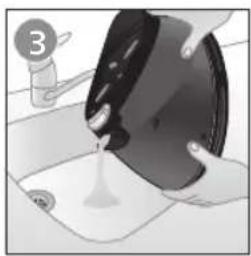
natural_image
Illustration of hands washing a dish with a water droplet (no text or symbols)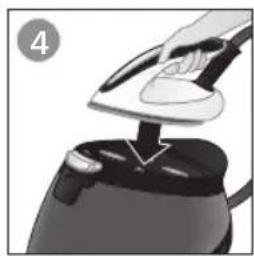
natural_image
Illustration of a hand using a steam iron to press down a kettle (no text or symbols visible)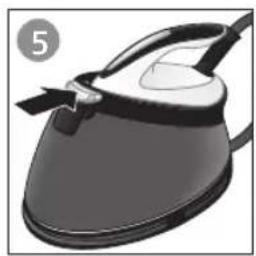
natural_image
Illustration of a steam iron with a black handle and spout, shown in grayscale (no text or symbols)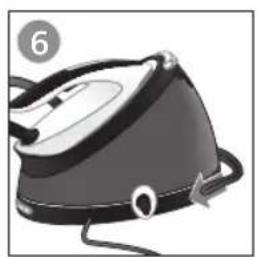
natural_image
Illustration of a steam iron with a numbered label (6) in the top-left corner, showing no text or symbols on the device itself.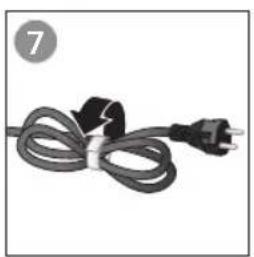
natural_image
Coiled black cable with a power outlet, no text or symbols visible
natural_image
Illustration of a steam iron with handle and spool (no text or symbols)
natural_image
Illustration of a person's lower torso holding a medical or fitness device (no text or symbols visible)6 English
Introduction
Congratulations on your purchase and welcome to Philips! To fully benefit from the support that Philips offers, register your product at www.philips.com/welcome.
Read this user manual, the important information leaflet, and the quick start guide carefully before you use the appliance. Save them for future reference.
Product overview (Fig. 1)
1 Steam supply hose
2 Steam trigger/Steam boost
3 'Iron ready' light
4 Soleplate
5 Iron platform
6 Carry lock release button
7 Water tank filling door
8 Supply hose storage compartment
9 EASY DE-CALC knob
10 Mains cord with plug
11 DE-CALC light
12 On/off button with pwer on and shut-off light
13 ECO button with light
Important
Perform the descaling process regularly for great steam and a prolonged lifetime of the appliance.
Recommended water to use
Distilled or demineralized water (Fig. 2) if you live in an area with hard water.
Preparing for use
Type of water to use
This appliance has been designed to be used with tap water. However, if you live in an area with hard water, fast scale build-up may occur. Therefore, it is recommended to use distilled or demineralized water to prolong the lifetime of the appliance.
Warning: Do not use perfumed water, water from the tumble dryer, vinegar, starch, descaling agents, ironing aids, chemically descaled water or other chemicals, as they may cause water spitting, brown staining or damage to your appliance.
Filling the water tank
Fill the water tank before every use or when the water level in the water tank drops below the minimum level. You can refill the water tank at any time during use.
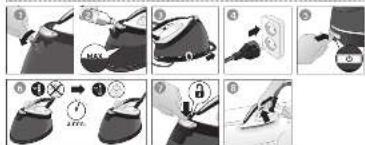
1 Open the water tank filling door (Fig. 3).
2 Fill the water tank up to the MAX indication (Fig. 4).
3 Close the water tank filling door ('click').
Water tank empty light (specific types only)
When the water tank is almost empty, the 'iron ready' light starts to flash (Fig. 5).
Fill the water tank and press the steam trigger to let the appliance heat up again. When the 'iron ready' light lights up continuously, you can continue steam ironing.
Using the appliance
OptimalTEMP technology
Warning: Do not iron non-ironable fabrics.
The OptimalTEMP technology enables you to iron all types of ironable fabrics, in any order, without adjusting the iron temperature and without sorting your garments.
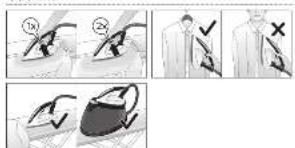
It is safe to just rest the hot soleplate directly on the ironing board (Fig. 6) without putting back to the iron platform. This will help reduce the stress on your wrist.
- Fabrics with these symbols (Fig. 7) are ironable, for example linen, cotton, polyester, silk, wool, viscose and rayon.
- Fabrics with this symbol (Fig. 8) are not ironable. These fabrics include synthetic fabrics such as Spandex or elastane, Spandex-mixed fabrics and polyolefins (e.g. polypropylene). Prints on garments are not ironable either.
Ironing
1 Place the steam generator on a stable and even surface.
Note: In order to ensure safe ironing we recommend to always place the base on a stable ironing board.
2 Make sure that there is enough water in the water tank (see 'Filling the water tank').
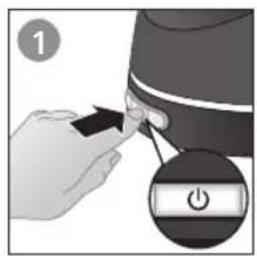
3 Put the mains plug in an earthed wall socket and press the on/off button to switch on the steam generator. Wait until the 'iron ready' light lights up continuously (Fig. 9). This takes approx. 2 minutes.
4 Remove the water supply hose from the water supply hose storage compartment.
5 Press the carry lock release button to unlock the iron from the iron platform (Fig. 10).
6 Press and hold the steam trigger to start ironing (Fig. 11).
7 For best ironing results, after ironing with steam, perform the last strokes without steam.
Warning: Never direct steam at people.
For more powerful steam, you can use the turbo steam mode.
1 Press and hold the on/off button for 5 seconds until the light turns white.
2 The appliance returns to normal steam mode automatically after 15 minutes to save energy.
3 Otherwise, to switch back to normal steam mode at any time, press and hold the on/off button for 2 seconds until the light turns blue again.
Steam boost function
Use the steam boost function to remove stubborn creases.
1 Press the steam trigger twice quickly (Fig. 12).
Vertical ironing
Warning: Hot steam is emitted from the iron. Never attempt to remove wrinkles from a garment while someone is wearing it (Fig. 13). Do not apply steam near your or someone else's hand.
You can use the steam iron in vertical position to remove wrinkles from hanging fabrics.
1 Hold the iron in vertical position, press the steam trigger and touch the garment lightly with the soleplate and move the iron up and down (Fig. 14).
Safe rest
Resting the iron while rearranging your garment
While rearranging your garment, you can rest the iron either on the iron platform or horizontally on the ironing board (Fig. 6). The OptimalTEMP technology ensures the soleplate will not damage the ironing board cover.
8 English
Energy saving
Eco mode
By using the ECO mode (reduced amount of steam), you can save energy without compromising on the ironing result.
1 To activate the ECO mode, press the ECO button (Fig. 15). The green ECO light goes on.
2 To deactivate the ECO mode, press the ECO button again. The green ECO light goes out.
Auto shut-off
- To save energy, the appliance switches off automatically when it has not been used for 10 minutes. The light in the on/off button starts to flash.
- To activate the appliance again, press the on/off button. The appliance then starts to heat up again.
Warning: Never leave the appliance unattended when it is connected to the mains. Always unplug the appliance after use.
Cleaning and maintenance
Descaling the appliance
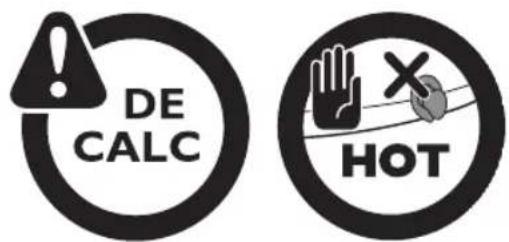
Perform the descaling procedure when the EASY DE-CALC light starts to flash (Fig. 16). This helps to prolong the lifetime of the appliance and optimizes the ironing performance.
Note: If your water is hard, increase the descaling frequency.
Warning: To avoid the risk of burns, unplug the appliance and let it cool down for at least two hours before you perform the descaling procedure (Fig. 17).
Tip: When you perform the descaling procedure, place the appliance on the edge of the table top or near the sink. Water may flow out of the appliance when the EASY DE-CALC knob is being opened.
1 Hold a cup (with a capacity of at least 350 ml) under the EASY DE-CALC knob and turn the knob anticlockwise. Remove the EASY DE-CALC knob and let the water with scale particles flow into the cup. (Fig. 18)
2 When no more water comes out of the appliance, reinsert the EASY DE-CALC knob and tighten it (Fig. 19).
Descaling the soleplate
If you do not descale your appliance regularly, you may see brown stains coming out of the soleplate due to scale particles. Descale the soleplate by following the procedure below. We advise you to perform the procedure twice for better results.
1 Make sure the appliance is cool and clean the soleplate with a damp cloth.
2 Empty the water tank through the filling door (Fig. 20). Tilt the appliance and remove the EASY DE-CALC knob.
3 Pour 500ml distilled water into the DE-CALC opening and tighten the EASY DE-CALC knob (Fig. 21).
4 Fill up the water tank halfway. Switch on the appliance and wait for 5 minutes.
5 Keep the steam trigger pressed continuously while you iron a few pieces of thick cloth in a back-and-forth motion for 3 minutes (Fig. 22).
Warning: Hot, dirty water (about 100-150 ml) comes out of the soleplate.
6 Stop cleaning when no more water comes out of the soleplate or when steam starts coming out of the soleplate.
7 Unplug the steam generator and let it cool down for at least two hours. Remove the EASY DE-CALC knob and let the remaining water flow out. Tighten the EASY DE-CALC knob.
Storage
1 Switch off the appliance and unplug it.
2 Pour the water out of the water tank through the filling door (Fig. 20).
3 Fold the supply hose.
4 Wind the supply hose inside the supply hose storage compartment (Fig. 23).
5 Fold the mains cord and fasten it with the Velcro strip.
6 Place the iron on the iron platform and lock it by pushing the carry lock release button (Fig. 24).
7 You can carry the appliance with one hand by the handle of the iron when the iron is locked on the iron platform (Fig. 25).
Troubleshooting
This chapter summarizes the most common problems you could encounter with the appliance. If you are unable to solve the problem with the information below, visit www.philips.com/support for a list of frequently asked questions or contact the Consumer Care Center in your country.
Problem Cause Solution
| Dirty water, brown stains or white flakes come out of the soleplate. | Scale has built up inside the appliance because it has not been descaled regularly. | Descale the appliance and the soleplate (see chapter 'Cleaning and maintenance'). |
| You have put chemicals or additives in the water tank. | Never use chemical or additives with the appliance. If you have already done so, follow the procedure in chapter 'Cleaning and maintenance' to remove the chemicals. | |
| There is no or little steam. The appliance has not heated up sufficiently. | Wait until the iron ready light stays on continuously. This takes approx. 2 minutes. | |
| There is not enough water in the water tank. | Fill the water tank up to the MAX indication. | |
| Scale has built up inside the appliance because it has not been descaled regularly. | Descale the appliance and soleplate (see chapter 'Cleaning and maintenance'). | |
| Water leaks from the soleplate. | Steam condenses into water in the hose when you use steam for the first time or have not used it for a long time. | This is normal. Hold the iron away from the garment and press the steam trigger.Wait until steam instead of water comes out of the soleplate. |
| The ironing board cover becomes wet, or there are water droplets on the floor/garment. | Steam has condensed on the ironing board cover after a long ironing session, or your board cover is not designed to cope with the high steam rate. | Replace the ironing board cover if the foam material has worn out. We also advise you to use a layer of felt material in the board cover to prevent water droplets. |
| The surface under the base of the appliance becomes wet, or steam and/or water comes out from under the EASY DE-CALC knob. | The EASY DE-CALC knob is not tightened properly. | Switch off the appliance and wait 2 hours for it to cool down. Unscrew and reattach the knob to make sure it is tightened. |
| The rubber sealing ring of the EASY DE-CALC knob is worn. | Contact an authorized Philips service center for a new EASY DE-CALC knob. | |
| The iron does not heat up and the amber DE-CALC light flashes. | The appliance reminds you to perform the descaling procedure. The light flashes after approximately one month of use. | Perform the descaling procedure, following the instructions in section 'Descaling the appliance'. |
10 English
Problem Cause Solution
| The steam generator produces a loud pumping sound. | There is not enough water in the water tank. | Fill the water tank up to the MAX indication and press the steam trigger. |
Warranty and support
If you need information or support, please visit www.philips.com/support or read the international warranty leaflet.
Einführung
www.philips.com/support
תַרְשָׁה בְּרִיָה
www.philips.com/support