
EQ.9 s400 - Coffee maker SIEMENS - Free user manual and instructions
Find the device manual for free EQ.9 s400 SIEMENS in PDF.

| Product type | Automatic espresso machine |
| Brand | Siemens |
| Model | EQ.9 s400 |
| Dimensions (H x W x D) | 39.2 x 31.6 x 47.0 cm |
| Empty weight | 10 - 12 kg |
| Power supply | 220-240 V ~, 50/60 Hz, 1500 W |
| Maximum pump pressure | 19 bar |
| Water tank capacity | 2.3 L (without filter) |
| Bean hopper capacity | 290 g |
| Grinder type | Adjustable ceramic grinder |
| Main functions | Coffee beans or ground coffee, integrated milk system, frother, hot water, customization (user profiles, up to 6 profiles with 10 drinks each), aromaDoubleShot function, simultaneous 2 cup preparation |
| Available drinks | Ristretto, Espresso, Café Crème, Cappuccino, Latte Macchiato, Café au lait, Milk froth, Hot milk, Hot water |
| Drink settings | Coffee intensity (5 levels + ground coffee), temperature, cup size, milk/coffee ratio, Latte Macchiato pause |
| Maintenance and cleaning | Automatic cleaning of the milk system after each milk-based drink, service programs: descaling, cleaning, calc'nClean (combined), rinsing the milk system, manual cleaning of the brewing unit and milk tank. Dishwasher-safe parts (60 °C max) |
| Safety | Child safety (lock via milk button), frost protection, permanent magnets (safety distance 10 cm for electronic implants) |
| Spare parts and accessories | Cleaning tablets (TZ80001N), descaling tablets (TZ80002N), water filter (TZ70003), maintenance kit (TZ80004), adapter for milk carton (TZ90008) |
| General information | Household use only, max altitude 2000 m, cord length 100 cm |
Frequently Asked Questions - EQ.9 s400 SIEMENS
User questions about EQ.9 s400 SIEMENS
0 question about this device. Answer the ones you know or ask your own.
Ask a new question about this device
Download the instructions for your Coffee maker in PDF format for free! Find your manual EQ.9 s400 - SIEMENS and take your electronic device back in hand. On this page are published all the documents necessary for the use of your device. EQ.9 s400 by SIEMENS.
USER MANUAL EQ.9 s400 SIEMENS
Fully automatic espresso machine
ABTOMaTnuecka KoCpeMaIIHHa TI923..., TI924...
siemens-home.bsh-group.com/welcome
en Instruction manual 6
fr Mode d'emploi 35
nl Gebruiksaanwijzing 65
pl Instrukcja obstugi 95
cs Navod k pouzitf 125
ru IpaBnla noJb3OBaHna 154
Register your product online
A
B
C
E
D
F

G
1
2


4
5
6


7
8
Table of contents

Intended use 7

Important safety information. . . 7

Environmental protection 9
Saving energy 9
Environmentally-friendly disposal

Getting to know your appliance 9
Included in delivery 9
Assembly and components .10
Controls .10

Accessories. 11

Before using for the first time . 12
Installing and connecting the
appliance. 12
Commissioning the appliance .12

Operating the appliance. 14
Selecting a drink 14
Preparing coffee using freshly ground beans. 15
Preparing coffee using ground coffee 15
Preparing drinks with milk. 16
Dispensing hot water. 17
Adjusting beverage settings. 17
Setting the grinding level. 19

Customising 19
Creating a user profile .19 Editing or deleting user profile.20 Saving individual drinks .20

Childproof lock 21
Activating the child-proof lock . . . . .21
Deactivating the child-proof lock . . . .21

Settings 21
Changing settings 21
Starting the "Water filter" or "frost protection" programme. 23

Daily care and cleaning .24
Cleaning agent 24
Cleaning the appliance. 25
Cleaning the milk system 26
Cleaning the brewing unit. 26

Service programmes 27
Rinse milk system 28
Descaling 29
Cleaning 29
calc'nClean. 30

Trouble shooting 31

Customer service.34
Technical data 34
E number and FD number 34
Guarantee 34

Intended use
Check the appliance for damage after unpacking it. Do not connect the appliance if it has been damaged in transport.
This appliance is intended for domestic use only.
Only use the appliance indoors at room temperature and up to 2000 m above sea level.

Important safety information
Please read carefully, follow and retain the operating instructions. When passing on the appliance, enclose these instructions.
This appliance can be used by children aged from 8 years and above and by persons with reduced physical, sensory or mental capabilities or lack of experience and knowledge if they have been given supervision or instruction concerning use of the appliance in a safe way and if they understand the hazards involved. Keep children under 8 years of age away from the appliance and connecting cable and do not allow them to use the appliance. Children shall not play with the appliance. Cleaning and user maintenance shall not be made by children unless they are older than 8 years and supervised.
Warning
Danger of electric shock!
The appliance may only be connected to a power supply with alternating current via a correctly installed socket with earthing. Ensure that the protective conductor system of the domestic electricity supply has been correctly installed.
- Connect and operate the appliance only in accordance with the specifications on the rating plate. If the power cord of this appliance is damaged, it must be replaced by customer service.
- Do not use if the power cable or appliance is damaged. If a fault occurs, pull the mains plug or switch off the mains voltage immediately.
- To prevent hazards, the appliance may be repaired by our customer service only.
- Never immerse the appliance or mains cord in water.
The plug and socket connection of the appliance must not come into contact with liquids.
Please note the special information on cleaning in the instructions.
Warning
Hazard due to magnetism!
The appliance contains permanent magnets which may affect electronic implants, e.g. heart pacemakers or insulin pumps. Persons wearing electronic implants must maintain a minimum distance of 10 cm from the appliance and from the following parts upon removal: milk container, milk system, water tank and brewing unit.
Warning
Risk of suffocation!
Do not let children play with packaging material. Store small parts safely as they can be easily swallowed.
Warning
Risk of burns!
The milk system becomes very hot. After use, allow it to cool down first before touching it.
After use, surfaces may still be hot for a certain period.
- Freshly prepared beverages are very hot. Leave to cool a little if necessary.
Warning
Risk of injury!
- Improper use of this appliance may result in injury.
- Do not reach into the grinding unit.

Environmental protection
Saving energy
If the appliance is not being used, switch it off.
Set the interval for automatic switch-off to the smallest value.
If possible, do not interrupt coffee or milk froth dispensing. Stopping a process prematurely results in higher energy consumption and the drip tray fills up more quickly.
- Descale the appliance regularly to avoid a build-up of limescale. Limescale residue results in higher energy consumption.
Environmentally-friendly disposal
Dispose of packaging in an environmentally-friendly manner.

This appliance is labelled in accordance with European Directive 2012/19/EU concerning used electrical and electronic appliances (waste electrical and electronic equipment - WEEE). The guideline determines the framework for the return and recycling of used appliances as applicable throughout the EU.
Please ask your dealer about current disposal routes.

Getting to know your appliance
This section provides an overview of the scope of delivery, the assembly and the components of your appliance. It also introduces you to the different controls.
Note: Depending on the appliance model, individual details and colours may differ.
How to use these instructions:
The cover pages of the operating instructions can be folded out towards the front. The illustrations are identified using numbers that are referred to in the operating instructions.
Example: Fig. 1
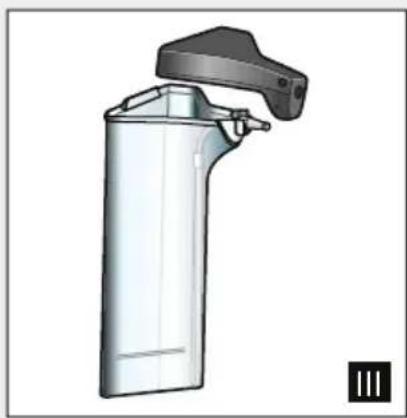
Included in delivery
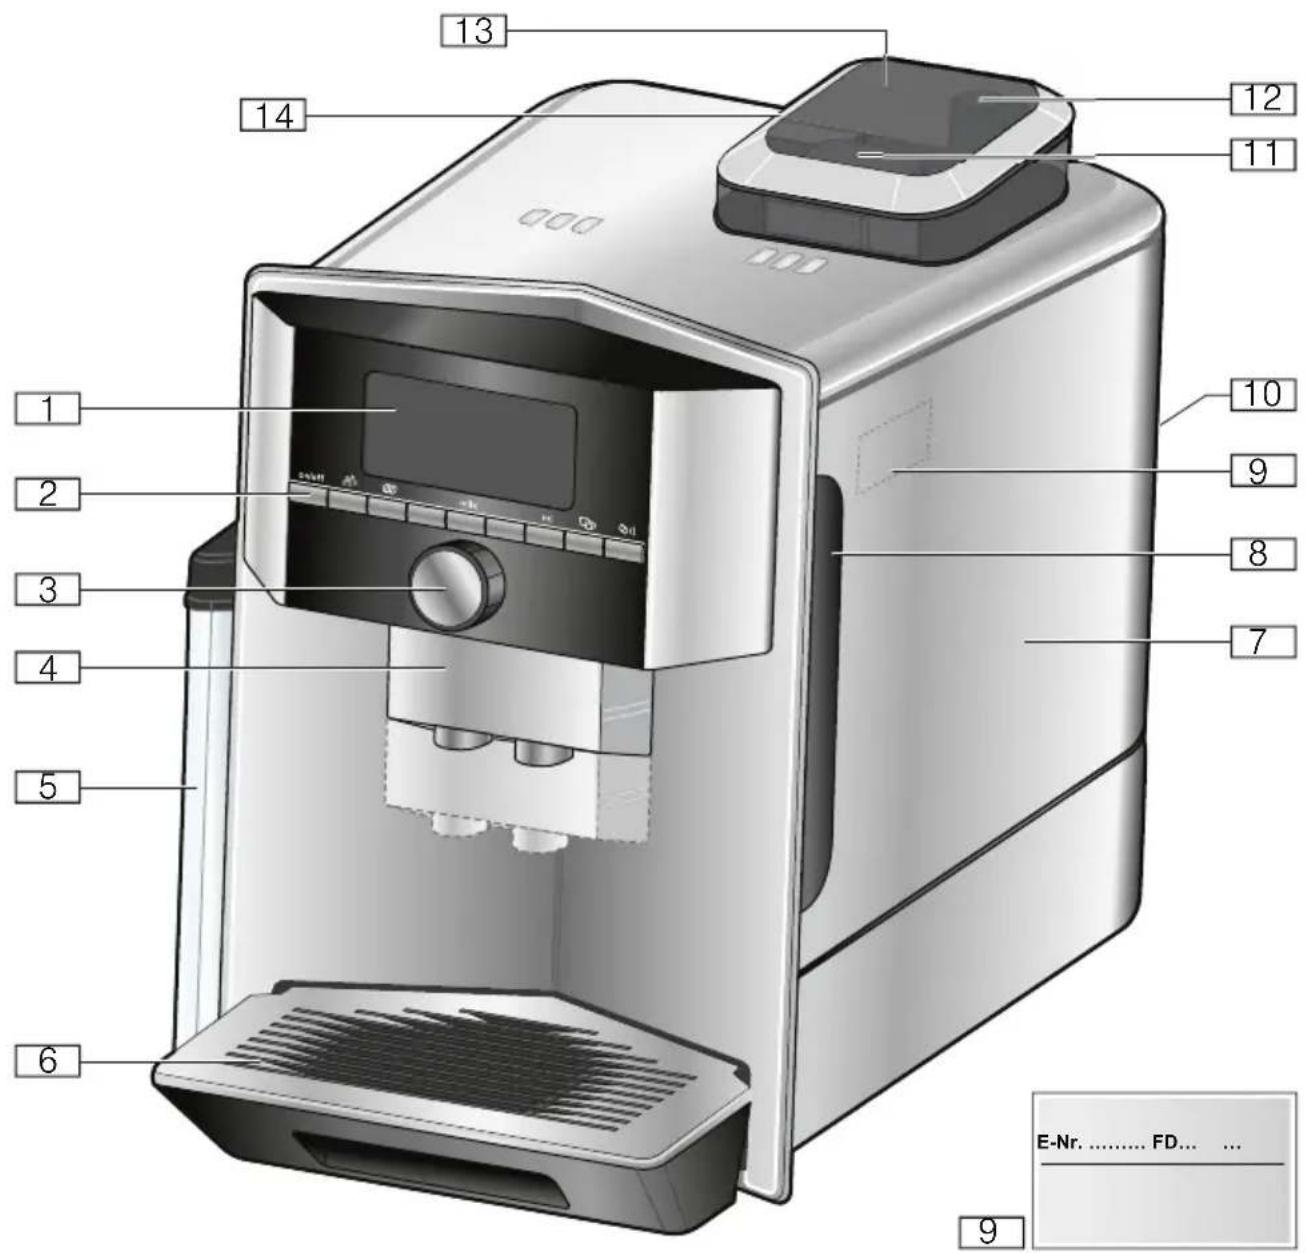
Fig. 1
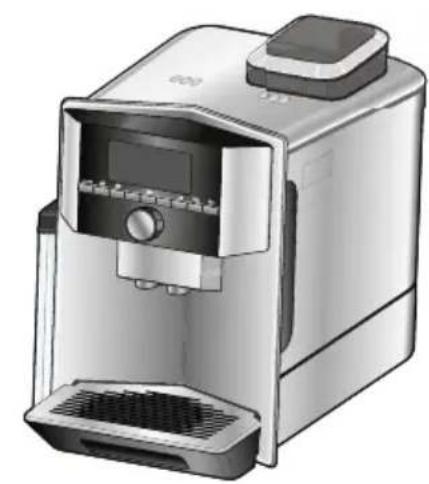
A Fully automatic coffee machine
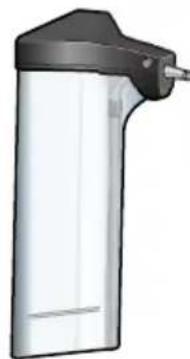
B Milk container (container, lid, riser, connection hose)
C**Adapterformilk carton
D **Water filter
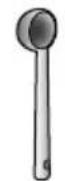
E Measuring spoon
Water hardness testing strip
GOperating instructions
The item marked with ** is only supplied with certain appliances.
Assembly and components
Fig. 2
1Display
2Control panel
3 Rotary selector/start-stop (rotate and press to navigate)
4 Outlet system (coffee, milk, hot water), height adjustable
5 Milk container (container, lid, riser, connection hose)
6Drip tray (coffee grounds container, drip plate)
9Rating plate
7Brewing chamber cover
8Water tank
10 Recessed grip on water tank
11Grind compartment (ground coffee/cleaning tablet)
12 Rotary selector for grinding level setting
13Aroma lid
14Bean container
Controls
| Button Meaning | |
| on/off Switches the appliance on and off The appliance rinses automatically when it is switched on and off. The appliance is not rinsed if: ■ it is still warm when switched on, or ■ coffee was not dispensed before the appliance was switched off. The appliance is ready for use when the symbols for drink selection and the on/off button light up on the display. | |
| Customising The appliance provides the option of saving and calling up customised settings for coffee drinks. → "Customising" on page 19 | |
| Coffee strength Adjusting the coffee strength. → "Adjusting beverage settings" on page 17 | |
| milk Briefly press: Setting for share of milk in the drink in % As a drink or as an ingredient in certain coffee drinks. → "Adjusting beverage settings" on page 17 Press and hold for at least 4 seconds: Child-proof lock → "Childproof lock" on page 21 | |
| ml | Drink quantity in millilitres. → "Adjusting beverage settings" on page 17 |
| Two drinks | Preparation of two drinks simultaneously. Position cups next to one another under the cof-fee dispenser. → "Adjusting beverage settings" on page 17 |
| i | Menu settings/service programmes Briefly press /i button to call up service programmes. Briefly press /i button again to return to the drink selection. If no selection is made within approx. 10 seconds, the appliance will automatically return to the drink selection. Note: Press and hold /i button for at least 5 seconds to call up the menu settings directly. |
| Navigation buttons For navigating in the display. | |
Display
The display 1 shows the selected drinks, settings and setting options, as well as messages about the appliance's operating status.
Additional information is shown in the display; this is hidden after a short period of time or once the information is confirmed by pressing a button.
The display also prompts the user to perform certain actions.
The individual steps for performing the action are shown in the display.
If the action required was carried out, e.g. "Fill water tank", the corresponding message will disappear.
Rotary selector
The rotary selector 3 has a range of different functions.
Rotation: navigate in the display and change settings.
- Pressing: start beverage preparation or service programme, confirm menu selection.
- Pressing while drink is being dispensed: prematurely stop dispensing.

Accessories
The following accessories are available from retailers or from customer service:
Accessory Order number
| Retail Customer service |
| Cleaning tablets TZ80001N |
| Dscaling tablets TZ80002N |
| Water filter TZ70003 00575491 |
| Care set TZ80004 00576330 |
| Adapter for milk car- TZ90008 00577862 ton |
The contact data for customer service in all countries can be found at the back of these instructions.

Before using for the first time
In this section, you will learn how to commission your appliance. Before you can use your new appliance, you must make some settings.
Note: Only use the appliance in frost-free areas. If the appliance was transported or stored at temperatures below 0^ , you must wait for at least 3 hours before using it.
Installing and connecting the appliance
- Remove any protective plastic film.
- Place the appliance on a level, water-resistant surface which can bear the weight.
- Using the mains plug, connect the appliance to an earthed socket that has been correctly installed.
Commissioning the appliance
Setting the language
Notes
Language selection appears automatically when the appliance is switched on for the first time.
You can change the language at any time. "Settings" on page 21
- Switch on appliance with on/off button. The preset language appears in the display.
- Use the rotary selector to select the desired display language.
- Confirm with the right-hand navigation button. The setting has been saved.
Setting the water hardness
It is important to set the water hardness correctly so that the appliance indicates in good time when the descending programme should be run. The preset water hardness is level 4.
You can check the water hardness using the enclosed test strip or by asking your local water supplier.If a water softening system is installed in the house, please select "Softening device".
The table shows the allocation of the levels to the different degrees of water hardness:
| Level Water hardness German (°dH) French (°fH) | |
| 1 | 1-7 1-13 |
| 2 | 8-14 14-25 |
| 3 | 15-21 26-38 |
| 4 | 22-30 39-54 |
Subsequent changes to the water hardness can be made at any time.
"Settings" on page 21
- Briefly immerse the enclosed test strip in fresh tap water, leave it to drip and read off the result after one minute.
- Use the rotary selector to set the water hardness determined.
- Confirm with the right-hand navigation button.
The reminder "Fill bean container" lights up briefly.
4. Either confirm with the right-hand navigation button or wait a few seconds.
The reminder "Please fill water tank" lights up. Fill the water tank.
Filling the bean container
This appliance can be used to prepare coffee drinks from coffee beans or ground coffee (not instant coffee).
- Open the lid 13 of the bean container 14.
- Add beans.
- Close the lid again.
Notes
- Coffee beans that have been glazed or caramelised or treated with other sugary additives will block the brewing unit. Only use pure bean mixes that are suitable for use in fully automatic coffee or espresso machines.
Never use unroasted coffee beans.
The coffee beans are freshly ground for each brewing operation.
Store coffee beans in a sealed container in a cool place to ensure optimum quality. - Coffee beans can be kept in the bean container for a number of days without losing their aroma. Only ever add the ground coffee shortly before beverage preparation. "Preparing coffee using ground coffee" on page 15
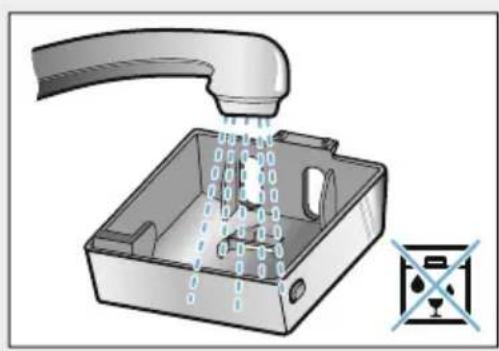
Filling the water tank
Important: Fill the water tank with fresh, cold, still water on a daily basis. Prior to operation, check whether the water tank has been sufficiently filled.
- Hold the recessed grip 10 on the side of the water tank 8 and gently tilt out the water tank to the side.
- Use the handle to remove the water tank and then rinse out.
- Fill the water tank with water up to the "max" marking.
- Re-insert the water tank in the holder and tilt back to the starting position. The brand logo lights up on the display. The appliance heats up and rinses. Some water will run out of the outlet system.
The appliance is ready for use when the symbols for the beverages and the on/off button light up on the display.
Notes
- When the appliance is used for the first time, after running a service programme or if it has not been operated for a long period, the first beverage will not have the full aroma and should not be consumed.
After starting up the appliance for the first time, you will consistently achieve a suitably thick and stable "crema" only after the first few cups have been dispensed.
If the appliance is in use for a long period of time, water droplets will form on the ventilation slots. This is normal.

Operating the appliance
In this section, you will learn how to prepare your appliance for beverage preparation and how to prepare hot drinks. It features information on adjusting the beverage settings and adjusting the grinding level.
Selecting a drink
Use the rotary selector to select the desired drink.
The display shows the name of the drink and the currently active values (e.g. strength or cup size).
The drink selected can be prepared with the pre-set values or first adjusted to individual taste. "Adjusting beverage settings" on page 17
If no controls are activated within approx. 5 seconds, the appliance will exit settings mode. The settings made will be automatically stored.
You can choose from the following drinks:
| Coffee |
| Cappuccino |
| Latte Macchiato |
| Caffe Latte |
| Milk froth |
| Warm milk |
| Hot water |
Note: For a number of settings, coffee is prepared in two steps ("aromaDoubleShot"). Wait until the procedure is fully completed.
Tip: Preheat cups, above all small, thick-walled espresso cups, e.g. using hot water.
Preparing coffee using freshly ground beans
You can choose between Ristretto,
Espresso Doppio, Espresso and Coffee.
The preparation of coffee drinks with
milk is explained in a separate section. "Preparing drinks with milk"
on page 16
The appliance is switched on. The water tank and bean container have been filled.
- Place a cup under the outlet system.
- Use the rotary selector to select the desired drink.
The name of the drink and the currently active values are shown on the display.
- To change the settings for the selected drink. "Adjusting beverage settings" on page 17 "Settings" on page 21
- To begin dispensing the drink, press the rotary selector.
The coffee is brewed and then dispensed into the cup.
Note: To prematurely stop dispensing the drink, press the rotary selector again.
Preparing coffee using ground coffee
You can also operate this appliance using ground coffee. Do not use instant coffee. The preparation of coffee drinks with milk is explained in a separate section. "Preparing drinks with milk" on page 16
The appliance is switched on. The water tank has been filled.
- Place a cup under the outlet system.
- Use the rotary selector to select the desired drink.
- Press the button.
-
Use the rotary selector to select "Ground coffee".
-
Press the button.
- Remove the aroma lid 13 of the bean container 14 and open the grounds compartment 11.
- Add the ground coffee; do not press firmly. Add no more than two level measuring spoons.
Caution!
Do not place coffee beans or instant coffee in the grounds compartment.
- Close the grounds compartment and the aroma lid.
The name of the drink and the currently active values are shown on the display. - To change the settings for the selected drink. "Adjusting beverage settings" on page 17 "Settings" on page 21
- To begin dispensing the drink, press the rotary selector. The coffee is brewed and then dispensed into the cup.
Notes
Any grounds residue in the grounds shaft should be directed down the shaft using a soft brush.
To prematurely stop dispensing the drink, press the rotary selector again.
For another drink with ground coffee, repeat the procedure.
- When ground coffee is used, the aromaDoubleShot function is not available.
Preparing drinks with milk
This appliance features an integrated milk system. The milk system can be used to prepare coffee drinks with milk, as well as milk froth and warm milk. You can choose between Espresso Macchiato, Cappuccino, Latte Macchiato and Caffe Latte.
Notes
While milk is being prepared, you may hear a whistling sound. These noises are emitted for technical reasons and are normal.
Dried milk residues are difficult to remove, therefore always perform cleaning. "Cleaning the milk system" on page 26
Warning
Risk of burns!
The milk system becomes very hot. After use, always let it cool down before you touch it.
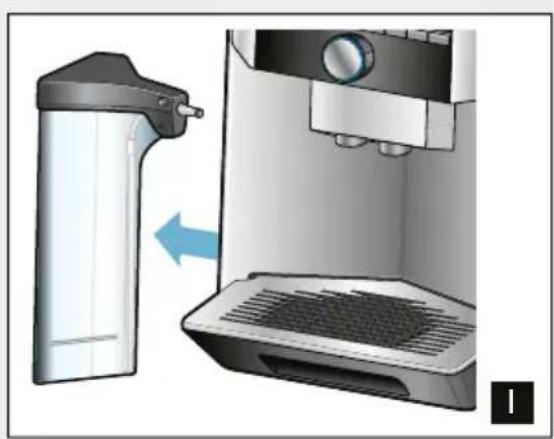
Using the milk container
The milk container 5 has been designed especially for use together with this appliance. It is intended solely for use in the household and for storing milk in the refrigerator.
Important: The milk container can only be connected if the milk system is installed in the outlet system with an adapter and hose. ( Fig. 3)
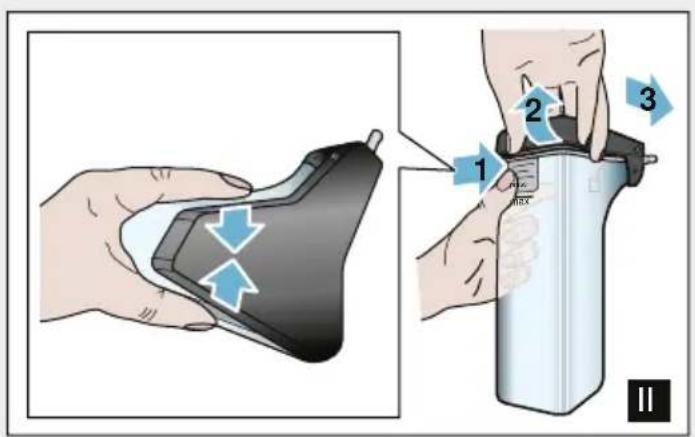
- To remove the lid, press the marking and remove the lid. ( Fig. 7)
- Pour in the milk.
- Press the lid onto the milk container until it engages.
- Connect the milk container on the left of the appliance. The milk container must engage.
Coffee drinks with milk
The appliance is switched on. The water tank and bean container have been filled.
The milk container filled with milk is connected.
- Place a cup or a glass under the outlet system.
- Use the rotary selector to select the desired drink.
The name of the drink and the currently active values are shown on the display.
- To change the settings for the selected drink.
"Adjusting beverage settings" on page 17 "Settings" on page 21
- To begin dispensing the drink, press the rotary selector.
The milk is dispensed into the cup or glass first. The coffee is then brewed and dispensed into the cup or the glass.
Note: Pressing the rotary selector once can prematurely stop the dispensing of milk or coffee; pressing the rotary selector twice stops the drink dispensing completely.
Milk froth or warm milk
The appliance is switched on. The water tank has been filled.
The milk container filled with milk is connected.
- Place a cup or a glass under the outlet system.
- Select "Milk froth" or "Warm milk" with the rotary selector.
The name of the drink and the currently active values are shown on the display.
- To change the settings for the selected drink.
"Adjusting beverage settings" on page 17 "Settings" on page 21
- To begin dispensing the drink, press the rotary selector.
Milk froth or warm milk is dispensed into the cup or glass.
Note: To prematurely stop dispensing the drink, press the rotary selector again.
Dispensing hot water
Note: Before dispensing hot water, clean the milk system and remove the milk container. If the milk system is not cleaned, the dispensed water may contain small quantities of milk. "Cleaning the milk system" on page 26
Warning
Risk of burns!
The outlet system becomes very hot. After use, always let the outlet system cool down before you touch it.
The appliance is switched on. The water tank has been filled.
- Place a cup under the outlet system.
- Remove the milk container, if connected.
- Select "Hot water" with the rotary selector.
- To change the settings for the selected drink. "Adjusting beverage settings" on page 17 "Settings" on page 21
- To begin dispensing the drink, press the rotary selector. Hot water is dispensed into the cup.
Note: To prematurely stop dispensing the drink, press the rotary selector again.
Adjusting beverage settings
Once you have selected a drink, you can adjust certain values depending on the drink. To do so, please use the following buttons and the rotary selector:
| Button Function Selection | ||
| Selecting coffee strength, ground coffee | mild | extra strong |
| normal | doubleShot strong + | |
| strong | doubleShot strong ++ | |
| very strong | Ground coffee | |
| Milk Milk/coffee mixing ratio Setting share of milk in % (only for coffee drinks with milk) | ||
| ml Cup size Adjustment of volume in ml increments. Not available for Ristretto. | ||
| Two cups at once Place two cups under the outlet. | ||
The factory settings are shown in orange on the display. The currently selected settings are backlit.
Adjusting the coffee strength or selecting ground coffee
A coffee drink is selected.
- Press the button.
- Use the rotary selector to set the coffee strength or select ground coffee.
- Press the button or the rotary selector to confirm.
doubleShot function
The longer coffee is brewed, the more bitter substances and undesirable aromas are released. This has a negative effect on the taste and makes the coffee less easily digestible. The appliance therefore has a special doubleShot function for extra strong coffee. When half the volume has been prepared, a second portion of coffee beans is ground and brewed, so that in each case only the pleasant and beneficial flavours and aromas are released.
Note: The doubleShot function can be selected for all coffee drinks except for:
■ drinks with a small volume of coffee, e.g. Ristretto
coffee drinks with milk and a small volume of coffee
a small volume of coffee, e.g. setting 200 ml "Caffe Latte" with a 90% share of milk (10% share of coffee)
■ preparation with ground coffee
dispensing two cups
Adjusting the milk/coffee mixing ratio
A coffee drink with milk is selected.
- Press the milk button.
- Use the rotary selector to set the share of milk in %.
Example: When a value of 30% is configured, 30% milk and 70% coffee will be dispensed.
- Press the milk button or the rotary selector to confirm.
Selecting cup size
A drink is selected.
- Press the ml button. The preset volume depends on the type of beverage.
- Use the rotary selector to adjust the desired volume in ml increments.
- Press the ml button or the rotary selector to confirm.
Notes
The volume cannot be changed for ristretto.
The volume dispensed can fluctuate depending on the quality of the milk.
Preparing two cups at once
A coffee drink or a coffee drink with milk is selected.
- Press the button.
- Place two pre-heated cups on the left and right below the outlet system.
- To begin dispensing the drink, press the rotary selector.
The selected drink will be brewed and will then be dispensed into the two cups.
Notes
The drink is prepared in two steps (two grinding operations). Please wait until the process is fully completed.
The aromaDoubleShot function is not possible in the selection.
Setting the grinding level
This appliance features an adjustable grinder. This enables the grinding level of the coffee to be individually changed.
Warning
Risk of injury!
Do not reach into the grinding unit.
Caution!
The appliance may be damaged! Only adjust the grinding level when the grinder is running!
When the grinder is in operation, use the rotary selector 12 to set the grinding level.
Finer grinding level: turn anticlockwise. (Fig. a)
Coarser grinding level: turn clockwise. (Fig. b)
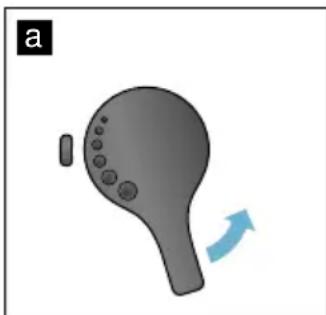
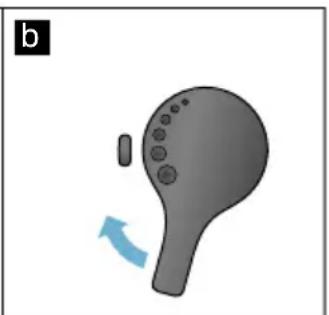
Notes
The new setting will not become apparent until the second cup of coffee.
- For dark roast coffee beans, choose a finer grinding level; for lighter beans, choose a coarser grinding level.
PCustomising
User profiles can be created in the customising menu. In the user profiles, individual beverages can be stored under names of your choice.
Creating a user profile
- Press button. The menu appears.
- Use the rotary selector to select a new profile.
- Press the right-hand navigation button to confirm the selection.
- Use the rotary selector to select a background picture.
- Press the right-hand navigation button to confirm the selection. The user name can be entered.
- Use the rotary selector to select the desired letter. Press the rotary selector to save the letter. The letter is saved.
Once the user name has been entered in full:
- Press the right-hand navigation button to save the user name.
- Press the right-hand navigation button again to save the profile. The user profile picture appears.
An individual beverage can be saved for the user created immediately afterwards.
en Customising
Saving individual beverages:
- Use the rotary selector to select the user created.
- Press the rotary selector. "change beverages" appears.
- Press the right-hand navigation button to create the beverage.
- Use the rotary selector to select the desired beverage.
The selected beverage can be adjusted in line with personal preference.
"Adjusting beverage settings" on page 17
5. Press the rotary selector. A prompt appears for you to confirm the selection.
6. Press the right-hand navigation button to confirm the selection.
7. Press button. The settings are completed. The appliance is ready for use again.
Note: The appliance can store up to 6 profiles each with 10 drinks.
Editing or deleting user profile
- Press the button. The menu appears.
- Use the rotary selector to select the desired profile.
-
Press the left navigation button to delete the profile.
-
or - Press the right navigation button to edit the settings in the profile. The settings in the profile can be changed as described. → "Creating a user profile" on page 19
-
Press the button. The appliance is ready for use again.
Saving individual drinks
A drink that is currently being dispensed can be saved directly in a new or an existing profile using the individual settings.
- Press and hold button for at least 5 seconds.
If profiles have not yet been saved, a new profile appears immediately. - If profiles are already saved and the individual drink is to be saved in a new profile, use the rotary selector to select a new profile.
- or - If the individual drink is to be saved in an existing profile, use the rotary selector to select the desired profile.
- Press the right-hand navigation button to confirm.
If a new profile is created, enter name and select background picture. Confirm the entries.
Info: If a profile is already available, select it and save the drink.
- Press button.
The appliance is ready for use again.
Note: To exit the menu automatically, select "Leave profiles automatically" under "User profiles". "Settings" on page 21

Childproof lock
The appliance can be locked to protect children against scalding and burns.
Activating the child-proof lock
Press and hold the milk button for at least 4 seconds.
"Child-proof lock activated" appears in the display.
It is no longer possible to operate the appliance.
Deactivating the child-proof lock
Press and hold the milk button for at least 4 seconds.
"Child-proof lock deactivated" appears in the display.
The appliance can be used in the usual way.

Settings
This menu is used for changing settings individually, accessing information and starting a programme.
Changing settings
- Press and hold the / i button for at least 5 seconds to open the "Menu". The different setting options will appear in the display.
- Make the desired setting using the rotary selector. The current setting is highlighted in colour on the display.
- Press the navigation button under "select".
- Use the rotary selector to change the setting.
- Press the navigation button under "confirm". The setting has been saved.
- Press the / i button to exit the "Menu".
The drink selection appears on the display.
Notes
- You can switch to the previous level by pressing the navigation button under "back".
The setting procedure can be aborted by pressing the navigation button under "abort".
Press the / i button to exit the menu at any time.
If no entry is made within approx. 2 minutes, the menu closes automatically and the settings are not saved.
The following settings are available:
| Settings Possible settings Explanation | ||
| Language Different languages Setting the language to be used for display texts. | ||
| Beverage settings | ||
| Espresso / Cof-fee temperature | ■ normal | Setting the temperature for coffee drinks. The setting is effective for all preparation types. |
| ■ high | ||
| ■ max. | ||
| Hot water tempera-ture | ■ >70°C | Setting the temperature for hot water. The setting is effective for all preparation types. |
| ■ >80°C | ||
| ■ >85°C | ||
| ■ >90°C | ||
| ■ max. | ||
| Latte Macchiato pause | ■ min | Setting the pause between milk and coffee dis-pensing. |
| ■ 5s | ||
| ■ 10s | ||
| Preparation of Cappuccino | ■ first milk | Setting that determines whether milk or coffee should be brewed and dispensed first. (Cappuc-cino) |
| ■ first coffee | ||
| Reset beverage settings | ■ back | Return to factory setting. |
| ■ confirm | ||
| User profiles ▪ Leave profiles automat- cally | □ Delete all profiles | Setting that determines whether user profiles are to be exited automatically or deletion of all user profiles. |
| Water hardness ▪ 1 (soft) | □ 2 (medium) | Setting in line with the hardness of the local water supply. The preset water hardness is level 4 (very hard). The water hardness can, for example, be requested from your local water supplier. It is important to set the water hardness cor-rectly, so that the appliance indicates accurately when the descaling programme should be run. If a water softening system is installed in the house, please select the "Softening device" setting. |
| □ 3 (hard) | ||
| □ 4 (very hard) | ||
| □ Softening device | ||
| Switch off after 5 minutes up to 8 hours | □ | Setting that determines how long the appliance should wait after the last beverage preparation before it automatically switches itself off. The factory setting is 30 minutes. |
| Brightness display Level 1 up to level 10 Standard setting 7 | □ | Setting that governs the brightness of the dis-play |
| Beverage info Shows the volume of drinks dispensed since the appliance was commissioned. For technical reasons, the counter does not represent a precise number of cups. | ||
| Factory settings Appliance reset to factory settings | Reset all your own settings to the condition when delivered. |
| Demo mode■ on off | For presentation purposes only. The setting "off" must be activated for normal operation. The setting is only possible in the first 3 minutes after switching on the appliance. |
| Child-proof lock■ activate■ Child-proof lock activated To switch off, press milk | Setting that governs whether the child-proof lock is activated or deactivated. → "Childproof lock" on page 21 |
Starting the "Water filter"or "frost protection" programme
- Briefly press the /i button.
- The rotary selector can be used to select the "Water filter" or "frost protection" programme. The current setting is marked on the display.
Note: The rotary selector can also be used to select a service programme. "Service programmes" on page 27
Water filter
A water filter lessens limescale deposits and reduces impurities in the water. The appliance also does not need to be descaled so often. Water filters are available from retailers or from customer service. "Accessories" on page 11
If a water filter is inserted, the appliance will show when it needs to be changed. The display shows the relevant prompt.
Inserting or replacing a water filter
A new water filter must be rinsed before it can be used.
- Select "Water filter" in the Settings menu.
-
Use the navigation button to select "insert" or "replace".
-
Use the measuring spoon to press the water filter firmly into the empty water tank.
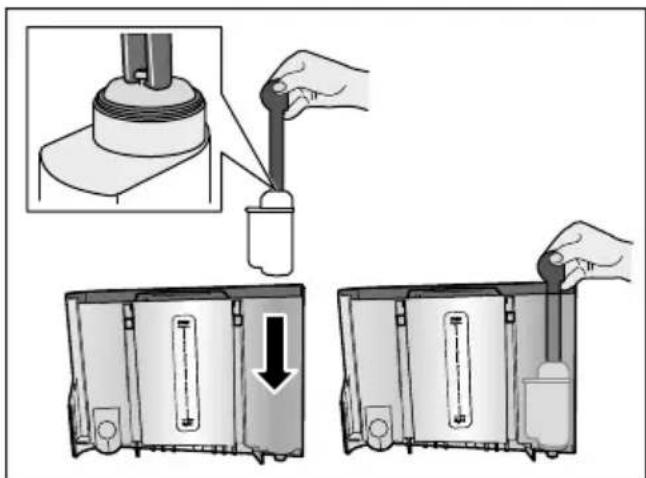
- Fill the water tank with water up to the "max" marking.
- Place a container with a capacity of at least 1.0 l under the outlet and confirm. Water will now flow through the filter. The filter is rinsed.
- Then empty the container. The appliance is ready for use again.
Notes
Rinsing the filter automatically activates the interval for display of the filter change. After this interval or after 2 months at the latest the filter will no longer be effective. It needs to be replaced for reasons of hygiene and to prevent a build-up of limescale (which could damage the appliance).
If the appliance has not been used for a prolonged period (for example, while you are on holiday), the inserted filter should be rinsed before the first time the appliance is used again. To do this, simply dispense a cup of hot water.
Removing the water filter
If a new water filter is not inserted, the "Water filter" function must be deactivated.
- Select "Water filter" in the Settings menu.
- Select and confirm the setting "remove".
- Remove the water filter from the water tank.
- Re-insert the water tank. The appliance is ready for use again.
Frost protection
A service programme to prevent frost damage during transportation and storage. This programme completely empties the appliance. The appliance must be ready for use.
- Press the rotary selector to start the programme.
- Empty the water tank and re-insert it.
- The appliance emits steam.
- Empty the drip tray and thoroughly clean the appliance.
The appliance can now be transported or stored.

Daily care and cleaning
With good care and cleaning, your appliance will remain fully functioning for a long time to come. In this section, you will learn how to correctly clean and care for your appliance.

Warning
Risk of electric shock!
Before cleaning the appliance, pull out the mains plug. Never immerse the appliance in water. Do not use a steam cleaner.
Cleaning agent
Please observe the following information to ensure that the different surfaces are not damaged by using the wrong type of cleaning agent.
Do not use:
Harsh or abrasive cleaning agents.
Any cleaning agents containing alcohol or spirits.
Hard scouring pads or sponges.
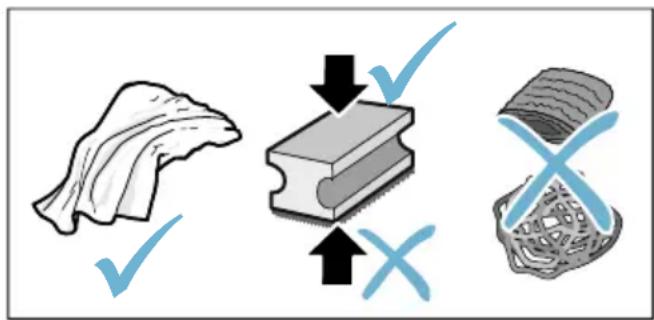
Notes
New sponge cloths may contain salts. Salts can cause rust film on stainless steel. Wash new sponge cloths thoroughly before use.
Always remove any limescale, residues of coffee or milk, cleaning or descending solution immediately. This residue may cause corrosion to form.
Caution!
Not all of the appliance's components can be cleaned in the dishwasher.
→Fig.5-8
Not dishwasher-safe:
| Outlet system cover |
| Brewing chamber cover |
| Brewing unit |
| Water tank |
| Aroma lid |
Dishwasher- safe:
| Drip plate |
| Drip tray |
| Coffee grounds container |
| Coffee grounds slider, red |
| Brewing unit cover, red |
| Measuring spoon |
| Milk system, all parts |
| Milk container, all parts |
Cleaning the appliance
- Wipe down the outside of the appliance with a soft, damp cloth.
- Clean the display using a micro-fibre cloth.
- Any grounds residue in the powder compartment should be pushed down using a soft brush.
Notes
If the appliance is cold when switched on or if it is switched off after dispensing coffee, it rinses automatically. The system is therefore self-cleaning.
If the appliance has not been used for a prolonged period of time (e.g. while you are on holiday), clean the entire appliance thoroughly, including the coffee outlet, water tank, milk system, brewing unit and trays.
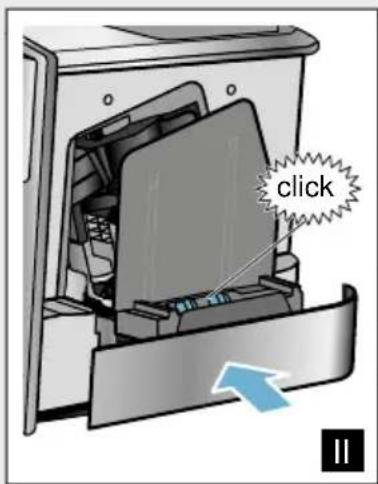
Cleaning the drip tray and coffee grounds container
Fig. 5
Note: The drip tray and coffee grounds container should be emptied and cleaned every day in order to prevent deposits.
- Pull the drip tray with the coffee grounds container forwards and out.
- Remove the drip plate and clean with a brush.
- Empty and clean the drip tray and coffee grounds container.
- Wipe out the interior of the appliance (intake trays).
Cleaning the milk container
→Fig.7
Note: For reasons of hygiene, the milk container must be cleaned regularly
- Dismantle the milk container into its individual parts.
- Clean all parts of the milk container or put them in the dishwasher.
Cleaning the milk system
The milk system is automatically cleaned with a short jet of steam directly after preparing a milk drink.
Warning
Risk of burns!
The outlet system becomes very hot. After use, always let the outlet system cool down before you touch it.
Manually clean the milk system on a weekly basis or more frequently if required. For particularly thorough cleaning, the milk system can be additionally rinsed with water. "Rinse milk system" on page 28
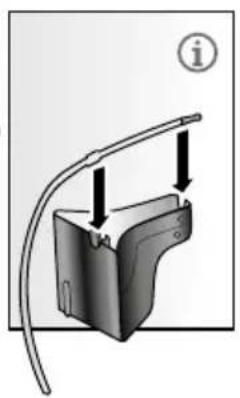
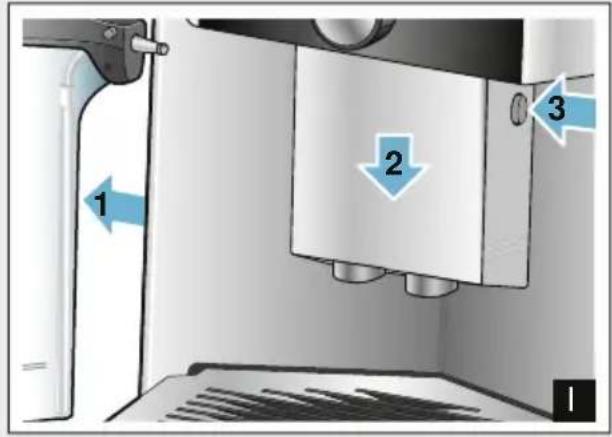
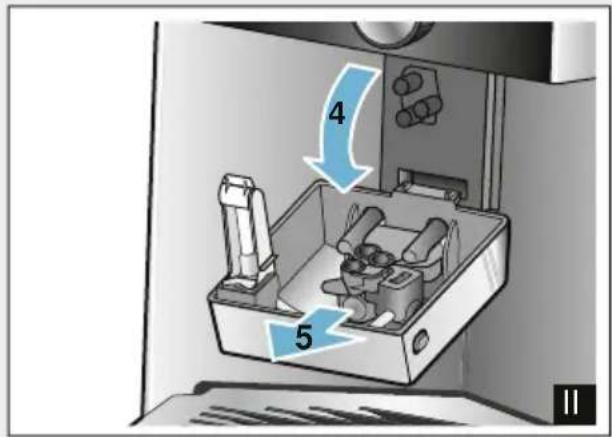
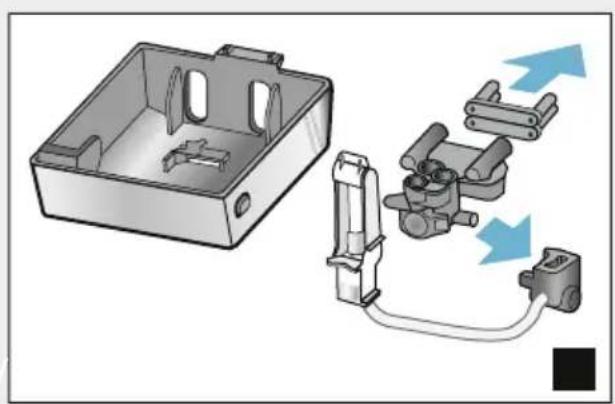
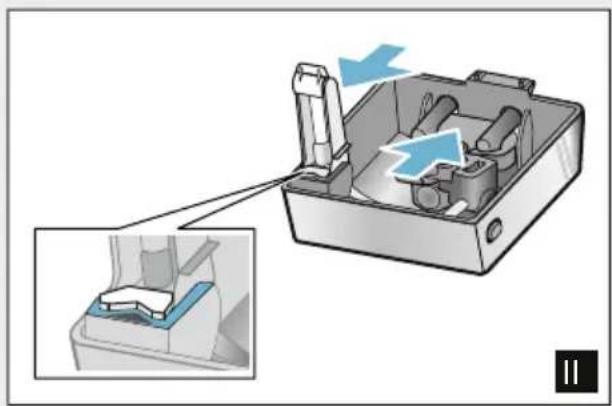
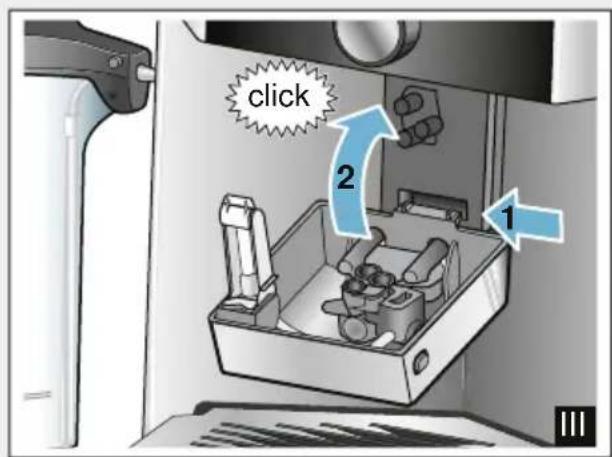
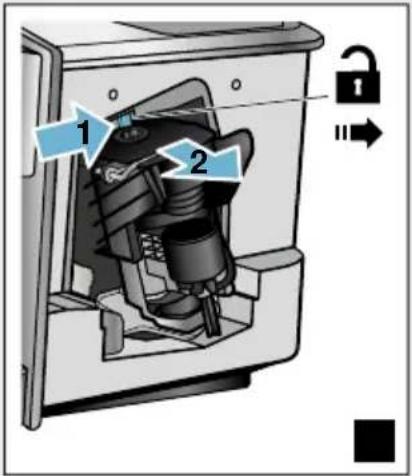
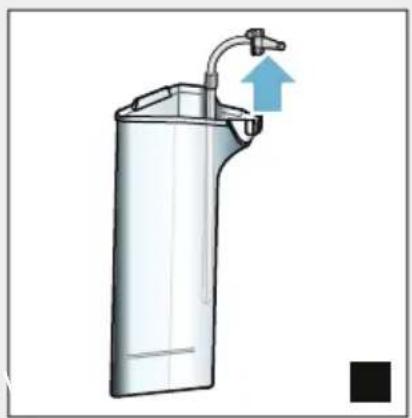
Removing the milk system Fig.3:
- Remove the milk container from the appliance.
- Slide the outlet system to the bottom position.
- Press the unlocking mechanism at the top right.
- Fold the cover down towards the front and remove.
- Remove the milk system and dismantle into individual parts.
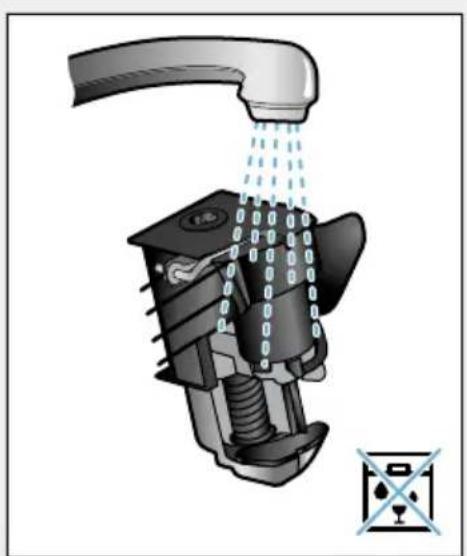
- Clean the individual parts with detergent solution and a soft cloth Fig. 6.
- Rinse all parts with clean water and leave to dry.
Notes
All parts of the milk system can be cleaned in the dishwasher. Detergent residues in the milk system must be thoroughly removed following the rinsing process.
Important: The outlet system cover is not dishwasher-safe.
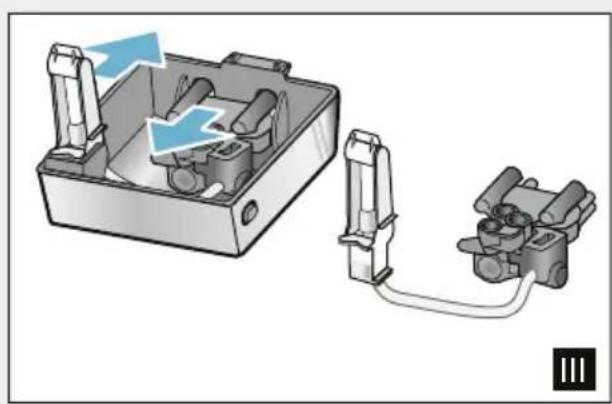
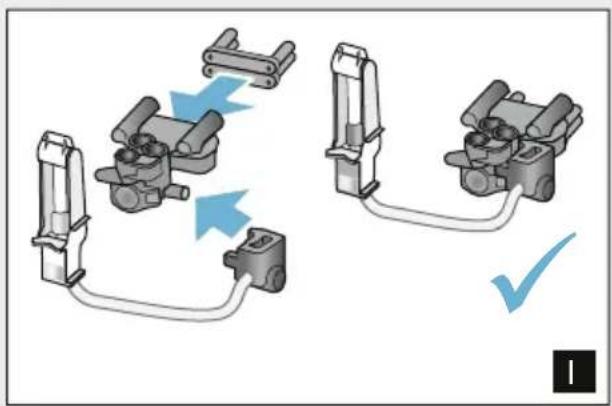
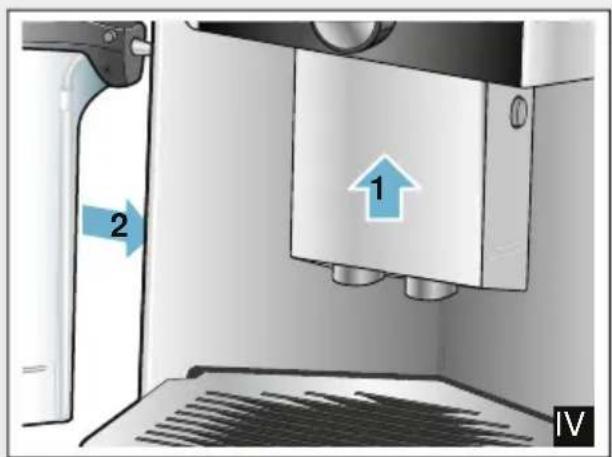
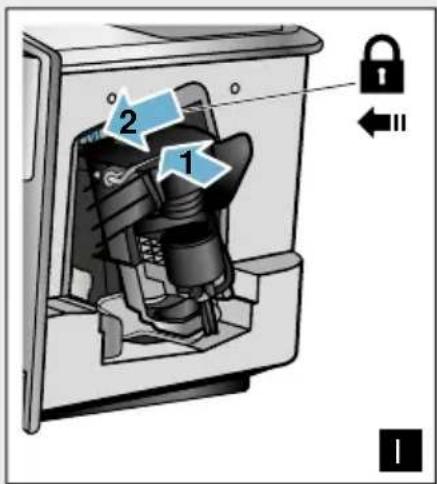
Inserting the milk system: Fig. 3:
- Assemble the individual parts of the milk system.
- Insert the milk system into the cover.
- Slide the outlet system to the bottom position.
- Position the cover at the bottom and pivot it upwards until it engages.
Cleaning the brewing unit
→Fig.4,→Fig.8
In addition to the automatic cleaning programme, the brewing unit should be removed regularly for cleaning.
Caution!
Clean the brewing unit without detergent and do not put it in the dishwasher.
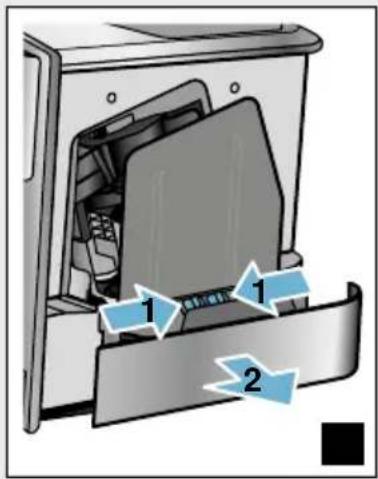
Remove the brewing unit:
- Switch the appliance off.
- Remove the water tank.
- Slide both red locking sliders towards one another and remove the cover.
- Remove, clean and dry the coffee grounds slider (red) and the brewing unit cover (red).
- Slide the red lock to the right across the brewing unit.
- Carefully remove the brewing unit and clean thoroughly under running water.
- Clean the interior of the appliance thoroughly with a damp cloth, removing any coffee residues.
- Allow the brewing unit and the interior of the appliance to dry.
Insert the brewing unit:
- Push the brewing unit into the appliance in the direction of the arrow. The arrow is located on top of the brewing unit.
Position the brewing unit from above, suspend on the guide rails and push into the appliance. - Slide the red lock to the left across the brewing unit.
- Insert the coffee grounds slider (red) and the brewing unit cover (red).
- Insert the cover until it engages.
- Insert the water tank.

Service programmes
Every so often - the exact frequency depends on usage and water hardness - one of the following messages will appear in the display in place of the coffee selection:
Rinse milk system
Run descending program urgently!
Run cleaning program urgently!
Run calc'nClean program urgently!
The appliance should immediately be cleaned or descaled using the appropriate programme. Alternatively, the two processes Descale and Clean can be carried out together using the calc'nClean function. Failure to carry out the service programme according to the instructions may damage the appliance.
You can also start the service programmes at any time without having to wait for a reminder to appear in the display. Press the 念 /i button, select the desired programme and run it.
Notes
- Important: If descending is not performed on the appliance in good time, the following appears "Descending programme overdue. Device will shortly be locked!". Immediately perform the descending process in accordance with the instructions. If the appliance is locked, it can only be operated again once descending has been carried out.
Caution! For each of the service programmes, use descaling and cleaning agents as described in the instructions and observe the (relevant) safety information. - Do not drink the liquids.
- Never use citric acid, vinegar or any vinegar-based agents to descale the appliance.
For cleaning and descaling, only use the tablets intended for such purpose. They have been specially developed for this appliance, and new stocks can be ordered through customer service. "Accessories" on page 11
- Never insert descending tablets or other products into the grounds compartment.
- Never interrupt the service programme.
Prior to starting a service programme, remove, clean and re-insert the brewing unit. Rinse the milk system.
At the end of a service programme, wipe down the appliance using a soft, damp cloth to immediately remove any descaler residue. This residue may cause corrosion.
- New sponge cloths may contain salts. Salts can cause rust film on stainless steel, so cloths must always be washed out thoroughly before use.
Using a water filter increases the intervals until a service programme needs to be performed.
If one of the service programmes is interrupted, e.g. by a power failure, proceed as follows: The appliance automatically starts a special rinsing process.
1. Rinse out the water tank.
2. Pour in fresh, still water up to the "max" marking and confirm. The programme starts and rinses the appliance.Duration: approx. 2 minutes.
3. Empty, clean and re-insert the drip tray.
4. Empty, clean and re-insert the milk container. The programme has finished. The appliance is ready for use again.
5. Press / i button to close the programme.
Rinse milk system
The milk system is automatically cleaned with a short jet of steam directly after preparing a milk drink.
For particularly thorough cleaning, the milk system can be additionally rinsed with water.
Duration: approx. 2 minutes
- Press the /i button to open the menu.
- Use the rotary selector to select "Rinse milk system".
- Press the rotary selector to start the programme.
- Empty, clean and re-connect the milk container.
- Place an empty glass under the outlet system and confirm. The programme runs.
- Empty, clean and re-connect the milk container.
- Empty the glass. The programme has finished. The appliance is ready for use again.
- Press the / i button to exit the programme.
The milk system should also be subject to thorough manual cleaning at regular intervals. "Cleaning the milk system" on page 26
Descaling
Duration: approx. 21 minutes
The line at the bottom of the display indicates in how many minutes the water tank will need to be rinsed and refilled with water, for example.
- Press the / i button to open the menu.
- Use the rotary selector to select "Descale".
- Press the rotary selector to start the programme.
The instructions in the display guide you through the programme.
4. Empty the drip tray and re-insert.
5. Empty, clean and re-connect the milk container.
6. Remove the water filter (if present) and confirm.
7. Fill the empty water tank with lukewarm water up to the marking "0.5 l". Dissolve 1 descaling tablet in the water.
8. Place a container with a capacity of at least 1.0 l under the outlet system and confirm.
9. Press the rotary selector.
The programme runs.
Duration: approx. 19 minutes
Info: If there is not enough descending solution in the water tank, you will be asked to: Refill with still water and confirm.
-
Rinse out the water tank and (if removed) re-insert the water filter.
-
Pour in fresh still water up to the "max" marking and re-insert the water tank.
The programme runs.
Duration: approx. 2 minutes
12. Empty the container and confirm.
13. Empty the drip tray and re-insert.
14. Empty, clean and re-connect the milk container.
The programme has finished. The appliance is ready for use again.
- Press the / i button to exit the programme.
Cleaning
Duration: approx. 6 minutes
- Press the /i button to open the menu.
- Use the rotary selector to select "Clean".
- Press the rotary selector to start the programme.
The instructions in the display guide you through the programme.
- Empty the drip tray and re-insert.
- Open the grounds compartment, add a cleaning tablet, close the grounds compartment and confirm.
- Place a container with a capacity of at least 1.0 l under the outlet system and confirm.
The programme runs.
Duration: approx. 5 minutes
7. Empty the container and confirm.
The programme has finished. The appliance is ready for use again.
8. Press the / i button to exit the programme.
Duration: approx. 26 minutes
calc'nClean combines the functions "Descale" and "Clean". If the two programmes are due close together, the appliance suggests this service programme automatically.
The line at the bottom of the display indicates in how many minutes the water tank will need to be rinsed and refilled with water, for example.
-
Press the /i button to open the menu.
-
Use the rotary selector to select "calc'nClean".
-
Press the rotary selector to start the programme.
The instructions in the display guide you through the programme.
-
Empty the drip tray and re-insert.
-
Empty, clean and re-connect the milk container.
-
Open the grounds compartment, add a cleaning tablet, close the grounds compartment and confirm.
-
Remove the water filter (if present) and confirm.
-
Fill the empty water tank with lukewarm water up to the marking "0.5 l". Dissolve 1 descaling tablet in the water.
-
Place a container with a capacity of at least 1.0 l under the outlet system and confirm.
The programme runs.
Duration: approx. 19 minutes
Info: If there is not enough descending solution in the water tank, you will be asked to: Refill with still water and confirm.
-
Rinse out the water tank and (if removed) re-insert the water filter.
-
Pour in fresh still water up to the "max" marking and re-insert the water tank.
The programme runs.
Duration: approx. 7 minutes
-
Empty the container and confirm.
-
Empty the drip tray and re-insert.
-
Empty, clean and re-connect the milk container.
The programme has finished. The appliance is ready for use again.
- Press the / i button to exit the programme.

Trouble shooting
Faults often have simple explanations. Before calling the customer service, please refer to the fault table and attempt to correct the fault yourself.
Please read through the safety information at the beginning of these instructions.
Fault table
| Problem Reason Solution | ||
| Coffee or milk froth quality var-ies widely. | Build-up of limescale in the appliance. | Descale the appliance as described in the instructions. |
| No hot water dispensed. The milk system or the intake of the milk system is soiled. | Clean the milk system or the intake. → "Cleaning the milk system" on page 26 | |
| Too little or no milk froth. The milk system or the intake of the milk system is soiled. | Clean the milk system or the intake. → "Cleaning the milk system" on page 26 | |
| Unsuitable milk. Do not use milk that has already been boiled. Use cold milk with a fat content of at least 1.5%. | ||
| Build-up of limescale in the appliance. | Descale the appliance as described in the instructions. | |
| No intake of milk by the milk system. | The milk system is assembled incorrectly. | Correctly assemble all parts. → Fig. 3 |
| Incorrect connection sequence for milk container and milk sys-tem. | Connect the milk system to the outlet system first, then the milk container. | |
| The individually selected per-cup quantity is not reached. Coffee dispensing slows to a trickle or stops completely | The grinding level is too fine. The ground coffee is too fine. | Set a coarser grinding level. Use coarser ground coffee. |
| Heavy build-up of limescale in the appliance. | Descale the appliance as described in the instructions. | |
| Air in the water filter. Immerse the water filter in water until no more air bubbles escape; insert the filter again. | ||
| No coffee dispensed, only water. | An empty bean container is not detected by the appliance. | Add coffee beans Note: The appliance will adjust to the coffee beans on the next dispensing process. |
| The coffee shaft on the brewing unit is blocked. | Clean the brewing unit. → "Cleaning the brewing unit" on page 26 | |
| The appliance no longer responds. | Fault in the appliance. Press and hold on/off button for 10 seconds. | |
| Coffee has no "crema". Unsuitable type of coffee. Use a type of coffee with a higher proportion of robusta beans. | ||
| The beans are no longer freshly roasted. | Use fresh beans. | |
| The grinding level is not suitable for the coffee beans. | Set a finer grinding level. | |
| The coffee is too "acidic". The grinding level is set too coarse or the ground coffee is too coarse. | Set a finer grinding level or use finer ground coffee. | |
| Unsuitable type of coffee. Use a darker roast. | ||
| The coffee is too "bitter". The grinding level is set too fine or the ground coffee is too fine. | Set a coarser grinding level or use coarser ground coffee. | |
| Unsuitable type of coffee. Change the type of coffee. | ||
| The coffee tastes burnt. The brewing temperature is too high | Reduce the temperature. → "Adjusting beverage settings" on page 17 | |
| The grinding level is set too fine or the ground coffee is too fine. | Set a coarser grinding level or use coarser ground coffee. | |
| Unsuitable type of coffee. Change the type of coffee. | ||
| The water filter does not stay in position in the water tank. | The water filter is not secured correctly. | Immerse the water filter in water until no more air bubbles escape; insert the filter again. Firmly press the water filter straight down into the tank connection. |
| The coffee grounds are not compact and are too wet. | The grinding level is set too fine or coarse, or not enough ground coffee has been used. | Set a coarser or finer grinding level or use 2 level measuring spoons of ground coffee. |
| Water dripped onto the inner floor of the appliance when the drip tray was removed. | Drip tray removed too early. Wait a few seconds after the last drink was dispensed before removing the drip tray. | |
| The drip tray cannot be removed. | The coffee grounds container is very full. The coffee grounds slider becomes stuck. | Clean the interior of the brewing unit. → "Cleaning the appliance" on page 25 Correctly insert the coffee grounds slider. |
| The outlet system cannot be assembled or disassembled. | Incorrect sequence Connect the outlet system (with milk system) first, then connect the milk system; alternatively, on disassembly first remove the milk container and then the outlet system. | |
| Display shows "Fill bean container". Displayed although the bean container 14 is already full, or the grinder is not grinding any coffee beans. | Beans are not falling into the grinding unit (beans too oily). | Gently tap the bean container. Possibly change the type of coffee. When the bean container is empty, wipe it with a dry cloth. |
| Display shows: "Empty drip tray" even if the drip tray is empty - what to do? | Emptying is not detected when the appliance is switched off. | When the appliance is switched on, remove and re-insert the drip tray. |
| The drip tray is soiled. Clean the drip tray thoroughly. | ||
| Display shows "Refill with still water" or "Remove filter" | Water tank wrongly inserted. Insert water tank correctly. | |
| Carbonated water in the water tank. | Fill the water tank with fresh tap water. | |
| Float is stuck in the water tank. Remove the water tank and clean thoroughly. | ||
| New water filter not rinsed according to the instructions. | Rinse the water filter according to the instructions and then switch on. | |
| Air in the water filter. Immerse the water filter in water until no more air bubbles escape; insert the filter again. | ||
| Water filter is old. Insert a new water filter. | ||
| Very frequent display that descaling is necessary. | Water is too hard. Insert water filter and activate according to the instructions. → "Starting the "Water filter"or "frost protection" programme" on page 23 | |
| Display shows "Clean brewing unit". | Brewing unit soiled. Clean the brewing unit. | |
| Too much ground coffee in the brewing unit. | Clean the brewing unit.Add no more than 2 level measuring spoons of ground coffee. | |
| The brewing unit mechanism is stiff. | Clean the brewing unit.→ "Daily care and cleaning" on page 24 | |
| If you are unable to solve the problem, always call the hotline. You will find the telephone numbers at the back of these instructions | ||

Customer service
Technical data
Electrical connection (voltage - frequency) 220 - 240V ,50 / 60Hz
Power rating 1500 W
Maximum static pump pressure 19 bar
Maximum capacity of water tank (without filter) 2.3 I
Maximum capacity of bean container 290g
Length of power cable 100cm
Dimensions (H x W x D) 39.2 x 31.6 x 47.0 cm
Weight, empty 10 - 12kg
Type of grinder Ceramic
E number and FD number
When calling us, please give the full product number (E no.) and the production number (FD no.) so that we can provide you with the correct advice. These numbers can be found on the rating plate 9. ( Fig. 2)
To save time, you can make a note of the data for your appliance and the telephone number for customer service here, should this be required.
E no.
FD
Number
Customer service
The contact data for customer service in all countries can be found at the back of these instructions.
Guarantee
The guarantee conditions for this appliance are as defined by our representative in the country in which it is sold. Details regarding these conditions can be obtained from the dealer from whom the appliance was purchased. The bill of sale or receipt must be produced when making any claim under the terms of this guarantee.
Changes reserved.
Table des matieres

Length netsnoer 100 cm
Afmetingen (H× B× D) 39,2 x 31,6 x 47,0 cm
PnroToBHeHne KoFeHOro HAnNTKa n3 CBExKeMoIOTbIX KoFeHbIX 3epeH . . .164
PnroToBHeHne KofoeHOro HAnNTka n3 MoIOTOrO Kofoe. 164
PnroToBHeHne HAnrKOB C MoJOKOM 165
PnroToBleHne ropeuB BOdbI 166
I3MeHHe HacTpoE KaNTKOB 166
HacrpoKa cTepeHn nomola. 168

PepcoHaJIIn3aunr. 168
Co3aHne npoФnIЯ noJIb3OBaTeJIЯ 168
Oboaotka nIy ydaJIeHne npoФnIЯ noJIb3OBaTeJI .169
CoxpaHHeNHe B pAmrTn INHINBnDyaJIbHbIX
HaNTKOB. 169

Блоковka Ддя 6e3oNaChocTN dete..170
BkJIoueHnE 6JOKnPoBKn JIa
6e30nacHOCTn DeTei 170
BbIKIIOUeHHe 6IoKInpOBKn IJIa
6e3oNaChOCTn DeTei 170

Hactpoien 170
U3MeHeHne yCTaHOBOK. 170
3aynck npoqpaMMbI «ΦnJIbTpДЯВODbl» IIN «3aunTa OT 3aMep3aHnA».172

EKeIHeBHy IyOIOuHcTka..173
UHCTaIeecpeDcTBo. 173
OuicTka npnbopa 174
OuNCTKa CnCTeMbI NoJaU MoJOKa .. 175
OuicTka 3aBapouHoro 6loKa 175

CepBnchIbe nporpaMMbl. 176
PpOMbIBKa CnCTeMbI NODaUN MOJOKa. 177
YdaJIeHHe HaKInn 178
OuInCTka. 178
calc'nClean 179

UTo DeJaTb B Cnyuae HenCnpaBNoCTn? 180

Cnyk6a cepBnca. 183
TexHnueckne xapaKtepeNCTnKn. 183
Homep E n homep FD 183
YcnoBna rapaHTnHoro 06CnyXuBaHn .183

Приименке по
Ha3HaueHnIO
Pacnakyte n ocmotpnte np6op. He noKlouaTe np6op, eCNI OH 6bl NOBpeJdeH BO BpeM TpaHCnOpTnpOBKn.
3TOT npi6op npeHa3NaueH TOIbKO IJIa DOMaSHHeRO IcIOJIb3OBaHNr N B 6bITOBbIX YCNOBnX.
IcnoJIb3yIte npIbOp TOLbKO BHyTpI NOMEUeHn Ipr KOMHaTHoI TempeAtpye Ha BbICote He Bblwe 2000 m haD yPOBHeM MOpra.

Baxkhble npabnla
TEXHNIK6e3OpaCHOCTN
BHHMaTeIbHo O3HaKOMbTecb C
HnCTpyKcIeN NO 3KcIpyaTuN,
Pn paOte pyKOBoDCTByuTEcb
yKa3aHnA Mn DaHHO
HnCTpyKcIu N COxpaHnTe ee
dJaDaJIbHeNWeRo
INcNoJIb3OBaHn. IpePaBaJ
PnpOp dpyrIm LnUam,
PpIIaRaIte DaHHyU
HnCTpyKcIu.
IpeDynpexKdEHne OnaCHOCTb, CB3aHHa C MaHnTHbIM NOJeM!
Прибор сODEржNT NOCTOHHbIM MaHNT, KOTOpbI MOKeT BO3dEiCTBOBaTb Ha эл ekТpoHHbIe IMnlaHTaHTbI, HapnIpMep, KapdnoCTmMyJIaTOpbl N INHCyIINHOBbIe NOMbl. JIncaM, IOnlb3yUoUImCЯ əJIeKTPoHHbIMN ImnlaHTaTaMn, CLeNyET HaxODITbcr Ha paCCTOarHn He meHee 10 cm ot pri6opa, a TAKKe Ppi pa36Opke OT CLeDyUOxu xuaTei pri6opa: EMKOCTb ДЯ MOLOKa, CNCTema IOnaun MoLOka, pe3epByap ДЯ BODbl N 3aBapOuHbI bIOk.
!IpeDynpexKdeneHne Onachoctb ydyusbja!!
He pa3pewaIte DeTm nIpaTb C ynaKOBko. XpaHnte MeIknne DeTaII B HAdeJxHOM MecTe, TaK KaK pe6eHOK MoXeT INX npOrIOTnTb.
O noIb3OBaHHn DaHHoH NHCTpyKcHn No 3KcNlyatauH:
B HaçaIe HNCTpyKcIIN NO 3KcπLyataIINMeOTcR pa3BOpaunBaembIe CtpaHnCbl. IJIIOCTpaIIN O6O3HaueHbI HOMepAMN,Ha KOTOpoe CoedePkaTcR CcbIKN B TeKCTe IHCTpyKcIIN NO 3KcπLyataIIN. PpimEp: pnc.1
Komplektaçaн
Puc. 1
A ABTomatnuecka KofemaunHa
B EMKoCTb Ia MOnOka (EMKOCTb, KpbIshKa, NOpBeMHaTpy6Ka, COeINHHTelbHaT py6Ka)
C** AanTepIy naketa MoIoka
D**ΦNJIbTpДЯIBAJBOJbl
E Мернан loЖкдЯ MONOTOro Kode
F INHДИКаTOPнЯ NOLOСKaДЯ ONpeДeJIeHЯ JECTKOCTN BOДы
G INHCTpyKUry NO 3KcNlyaTaUIN
I03nC O6o3HaueHneM ** IMeETcB KOMnKeTe TOJbKO ONpeJeHbIX np6opOB.
Kohctpykuia KOMnoHeTbI
Puc. 2
1DnucnJe
2 PanaheIb ynpaBneHn
3 NOBOPOTHbI nepeKJIouaTeIb/start stopp (HaBnraunnyTem BpauneHn HaKaTna)
4 Peryu npyembln NO BbICOTe DncpeHcep (Kofoe,MOLOKO,TOpaB ABOda)
5 EMKOCtBДЯMOJOKa(EMKOCTb, KpbIuKa,IOJBemHaTpy6Ka, COeINHITelHaTpy6Ka)
6 IOnIOH (eMKoCTbДЯ KOΦeHON rUuN, KaIeJIbHaŋ peWetka)
9TnnoBaTa6nUka
7KoKyx KInIaTnJIbHnKa
8 Pe3epByap IJI BODJI
10 YToJIeHHa pyUka pe3epByapa Inra BOIbl
11 OtceK dIy MOnOTOro KoOe (MOJOT. KoOe/Ta6JIeTKa dIy OUnCTKn)
12 NOBOPOTbI NepeKJIouaTeIb InHACTpOuKN CTeNeH NOMOJa
13KpbIka , coXpaHIOUa apOMaT
14EMKocTbDnla3epeH
Злем entblу упраьени
| Khoанka 3нauчениe | |
| on/off | Вьлочение и вьклочение п riбора При Вьлочении и вьклочении п riбора п riоизвдпся с erg abTomatuningcaя помывka. Прибор He п riоизвдпrt ромывку, ecли: ■ B MOMENT Вьлочения п riбор eши Горачи; ■ Pered Вьлочениem Кофе He rotobvilся. Прибор rotob к paбote, ecли на диспee CBETATССМВОЛы Ддя Вьбора habNTКOB и Khoанka on/off. |
| ПИПперсоналзацига ПИПперсоналзацига ПИПперсоналзацига ПИПперсоналзацига ПИПперсоналзацига ПИПперсоналзацига ПИПперсоналзацига ПИПперсоналзацига ПЛПперсоналзацига ПИПперсоналзацига ПИПперсоналзацига ПИПперсоналзацига ПИПперсоналзацига ПИПперсоналзацига ПИПперсоналзацига ПИПрелость кофe Hасторь крелость кофe. → "Измене有很大 поек有很大 поек" Ha STPANUZA 168 | |
| ПИПперсоналзацига ПИПперсоналзацига ПИПперсоналзацига ПИПперсоналзацига ПИПперсоналзацига ПИПперсоналзацига ПИПперсоналзацигa ПИПперсоналзацигa ПИПперсоналзацигa ПИПперсоналзацигa ПИПперсоналзацигa ПИПперсоналзацигa ПИПперсоналзацигa ПИПперсоналзацигa ПИПперсоналзацигa ПИПперсоналзацигa ПИПперсоналзацигa ПИПперсоналзацигa ПИПперсоналзацигa ПИПперсоналзацигa ПИПперсоналзацигa ПИРперсоналзацигa ПИПперсоналзацигa ПИПперсоналзацигa ПИПперсоналзацигa ПИПперсоналзацигa ПИПперсоналзацигa ПИПперсоналзацигa ПИПпERST-ФI ПИПпERST-ФI ПИПпERST-ФI ПИПпERST-ФI ПИПпERST-ФI ПИПпERST-ФI ПИПпERST-ФI ПИПпERST-ФI ПИПпERST-ФI ПИПпERST-ФI ПИПпERST-ФII ПИПпERST-ФII ПИПпERST-ФII ПИПпERST-ФII ПИПпERST-ФII ПИПпERST-ФII ПИПпERST-ФII ПИПпERST-ФII ПИПпERST-ФII ПИПпERST-ФII ПИПпERST-ФI ПИПпERST-ФI ПИПпERST-ФI ПИПпERST-ФI ПИПпERST-ФI ПИПпERST-ФI ПИПпERST-ФI ПИПпERST-ФI ПИПпERST-ФI ПИПпERST-ФIF ПИПпERST-ФIF ПИПпERST-ФIF ПИПпERST-ФIF ПИПпERST-ФIF ПИПпERST-ФIF ПИПпERST-ФIF ПИПпERST-ФIF ПИПпERST-ФIF ПИПпERST-ФIF ПИПпERST-ФII ПИПпERST-ФII ПИПпERST-ФII ПИПпERST-ФII ПИПпERST-ФII ПИПпERST-ФII ПИПпERST-ФII ПИПпERST-ФII ПИПпERST-ФII ПИПпERST-ФIF ПИПпERST-ФIF ПИПпERST-ФIF ПИПпERST-ФIF ПИПпERST-ФIF ПИПпERST-ФIF ПИПпERST-ФIF ПИПпERST-ФIF ПИПпERST-ФIF ПИПпERST-ФF ПИПпERST-ФIF ПИПпERST-ФIF ПИПпERST-ФIF ПИПпERST-ФIF ПИПпERST-ФIF ПИПпERST-ФIF ПИПпERST-ФIF ПИПпERST-ФIF ПИПпERST-ФIF ПИПпERST-ФIP ПИПпERST-ФIF ПИПпERST-ФIF ПИПпERST-ФIF ПИПпERST-ФIF ПИПпERST-ФIF ПИПпERST-ФIF ПИПпERST-ФIF ПИПпERST-ФIF ПИПпERST-ФIF ПИПпERST-ФIT ПИПпERST-ФIF ПИПпERST-ФIF ПИПпERST-ФIF ПИПпERST-ФIF ПИПпERST-ФIF ПИПпERST-ФIF ПИПпERST-ФIF ПИПпERST-ФIF ПИПпERST-ФIF ПИПпERST-ФIL ПИПпERST-ФIF ПИПпERST-ФIF ПИПпERST-ФIF ПИПпERST-ФIF ПИПпERST-ФIF ПИПпERST-ФIF ПИПпERST-ФIF ПИПпERST-ФIF ПИПпERST-ФIF ПИПпERST-ФIFF ПИПпERST-ФIF ПИПпERST-ФIF ПИПпERST-ФIF ПИПпERST-ФIF ПИПпERST-ФIF ПИПпERST-ФIF ПИПпERST-ФIF ПИПпERST-ФIF ПИПпERST-ФIF ПИПпERST-ФFF ПИПпERST-ФFF ПИПпERST-ФFF ПИПпERST-ФFF ПИПпERST-ФFF ПИПпERST-ФFF ПИПпERST-ФFF ПИПпERST-ФFF ПИПпERST-ФFF ПИПпERST-ФFF ПИПпERST-Фff ПИПпERST-ФFF ПИПпERST-ФFF ПИПпERST-ФFF ПИПпERST-ФFF ПИПпERST-ФFF ПИПпERST-ФFF ПИПпERST-ФFF ПИПпERST-ФFF ПИПпERST-ФFF ПИПпERST-ФIF ПИПпERST-ФIF ПИПпERST-ФIF ПИПпERST-ФIF ПИПпERST-ФIF ПИПпERST-ФIF ПИПпERST-ФIF ПИПпERST-ФIF ПИПпERST-ФIF ПИПпERST-Фff ПИПпERST-ФFF ПИПпERST-ФFF ПИПпERST-ФFF ПИПпERST-ФFF ПИПпERST-ФFF ПИПпERST-ФFF ПИПпERST-ФFF ПИПпERST-ФFF ПИПпERST-ФIF ПИПпERST-ФFF ПИПпERST-ФFF ПИПпERST-ФFF ПИПпERST-ФFF ПИПпERST-ФFF ПИПпERST-ФFF ПИПпERST-ФFF ПИПпERST-ФFF ПИПпERST-ФIF ПИПпERST-Фff ПИПпERST-ФFF ПИПпERST-ФFF ПИПпERST-ФFF ПИПпERST-ФFF ПИПпERST-ФFF ПИПпERST-ФFF ПИПпERST-ФFF ПИПпERST-ФIF ПИПпERST-ФFF ПИПпERST-ФIF ПИПпERST-ФFF ПИПпERST-ФFF ПИПпERST-ФFF ПИПпERST-ФFF ПИПпERST-ФFF ПИПпERST-ФFF ПИПпERST-ФFF ПИПпERST-ФIF ПИПпERST-ФFF ПИПпERST-Фff ПИПпERST-ФFF ПИПпERST-ФFF ПИПпERST-ФFF ПИПпERST-ФFF ПИПпERST-ФFF ПИПпERST-ФFF ПИПпERST-ФFF ПИПпERST-ФIF ПИПпERST-ФIF ПИПпERST-ФFF ПИПпERST-ФFF ПИПпERST-ФFF ПИПпERST-ФFF ПИПпERST-ФFF ПИПпERST-ФFF ПИПпERST-ФFF ПИПпERST-ФIF ПИПпERST-ФIF ПИПпERST-Фff ПИПпERST-ФFF ПИПпERST-ФFF ПИПпERST-ФFF ПИПпERST-ФFF ПИПпERST-ФFF ПИПпERST-ФFF ПИПпERST-Фff ПИПпERST-ФFF ПИПпERST-ФFF ПИПпERST-Фff ПИПпERST-ФFF ПИПпERST-ФFF ПИПпERST-ФFF ПИПпERST-ФFF ПИПпERST-ФFF ПИПпERST-ФFF ПИПпERST-Фff ПИПпERST-ФFF ПИПпERST-Фff ПИПпERST-ФFF ПИПпERST-ФFF ПИПпERST-ФFF ПИПпERST-ФFF ПИПпERST-ФFF ПИПпERST-ФFF ПИПпERST-ФFF ПИПпERST-Фff ПИПпERST-ФFF ПИПпERST-Фff ПИПпERST-Фff ПИПпERST-ФFF ПИПпERST-ФFF ПИПпERST-ФFF ПИПпERST-ФFF ПИПпERST-ФFF ПИПпERST-ФFF ПИПпERST-ФFF ПИПпERST-ФFF ПИПпERST-Фff ПИПпERST-Фff ПИПпERST-ФFF ПИПпERST-ФFF ПИПпERST-ФFF ПИПпERST-ФFF ПИПпERST-ФFF ПИПпERST-ФFF ПИПпERST-Фff ПИПпERST-ФFF ПИПпERST-ФIF ПИПпERST-ФFF ПИПпERST-ФFF ПИПпERST-ФFF ПИПпERST-ФFF ПИПпERST-ФFF ПИПпERST-ФFF ПИПпERST-ФFF ПИПпERST-Фff ПИПпERST-ФFF ПИПпERST-ФIF ПИПпERST-ФIF ПИПпERST-ФFF ПИПпERST-ФFF ПИПпERST-ФFF ПИПпERST-ФFF ПИПпERST-ФFF ПИПпERST-ФFF ПИПпERST-Фff ПИПпERST-ФFF ПИПпERST-ФFF ПИПпERST-ФIF ПИПпERST-ФIF ПИПпERST-ФFF ПИПпERST-ФFF ПИПпERST-ФFF ПИПпERST-ФFF ПИПпERST-ФFF ПИПпERST-Фff ПИПпERST-ФFF ПИПпERST-ФFF ПИПпERST-ФFF ПИПпERST-Фff ПИПпERST-ФFF ПИПпERST-ФFF ПИПпERST-ФFF ПИПпERST-ФFF ПИПпERST-ФFF ПИПпERST-Фff ПИПпERST-ФFF ПИПпERST-ФFF ПИПпERST-ФFF ПИПпERST-ФIF ПИПпERST-ФIF ПИПпERST-ФFF ПИПпERST-ФFF ПИПпERST-ФFF ПИПпERST-ФFF ПИПпERST-Фff ПИПпERST-ФFF ПИПпERST-ФFF ПИПпERST-ФFF ПИПпERST-ФFF ПИПпERST-Фff ПИПпERST-ФFF ПИПпERST-ФFF ПИПпERST-ФFF ПИПпERST-ФFF ПИПпERST-ФIF ПИПпERST-ФIF ПИПпERST-ФFF ПИПпERST-ФFF ПИПпERST-ФFF ПИПпERST-Фff ПИПпERST-ФFF ПИПпERST-ФFF ПИПпERST-ФFF ПИПпERST-ФFF ПИПпERST-ФFF ПИПпERST-ФIF ПИПпERST-ФIF ПИПпERST-ФFF ПИПпERST-ФFF ПИПпERST-Фff ПИПпERST-ФFF ПИПпERST-ФFF ПИПпERST-ФFF ПИПпERST-ФFF ПИПпERST-ФFF ПИПпERST-ФFF ПИПпERST-ФIF ПИПпERST-ФIF ПИПпERST-ФFF ПИПпERST-Фff PИПпERST-ФFF PИПпERST-ФFF PИПпERST-ФFF PИПпERST-ФFF PИПпERST-ФFF PИПпERST-ФFF PИПпERST-ФFF PИПпERST-ФFF PИПпERST-ФFF PИПпERST-ФFF PИПпERST-Фff PИПпERST-ФFF PИПпERST-ФFF PИПпERST-ФFF PИПпERST-ФFF PИПпERST-ФFF PИПпERST-ФFF PИПпERST-ФFF PИПпERST-ФFF PИПпERST-ФFF RiRiRiRiRiRiRiRiRiRiRiRiRiRiRiRiRiRiRiRiRiRiRiRiRiRiRiRiRiRiRiRiRiRiRiRiRiRiRiRiRiRiRiRiRiRiRiRiRiRiRlRiRiRiRiRiRiRiRiRiRiRiRiRiRiRiRiRiRiRiRiRiRiRiRiRiRiRiRiRiRiRiRiRiRiRiRiRiRiRiRiRiRiRiRiRiRiRiRiRiRrRiRiRiRiRiRiRiRiRiRiRiRiRiRiRiRiRiRiRiRiRiRiRiRiRiRiRiRiRiRiRiRiRiRiRiRiRiRiRiRiRiRiRiRiRiRiRiRiRiRtRiRiRiRiRiRiRiRiRiRiRiRiRiRiRiRiRiRiRiRiRiRiRiRiRiRiRiRiRiRiRiRiRiRiRiRiRiRiRiRiRiRiRiRiRiRiRiRiRiR1RiRiRiRiRiRiRiRiRiRiRiRiRiRiRiRiRiRiRiRiRiRiRiRiRiRiRiRiRiRiRiRiRiRiRiRiRiRiRiRiRiRiRiRiRiRiRiRiRiRikRiRiRiRiRiRiRiRiRiRiRiRiRiRiRiRiRiRiRiRiRiRiRiRiRiRiRiRiRiRiRiRiRiRiRiRiRiRiRiRiRiRiRiRiRiRiRiRiRiRie | |
Dncnne
Ha nucnnee 1 OTo6paXaOTcBbIopaHHbIe HAnNTKN, HAcTpoNkN INxBO3MOXHOCTN, a TaKKe COO6uEHNr OpeKIme pa60TbI np6opap.
Ha nCnlee oTo6paKaetcI
DOIOHnTeBHa HOpMaun, KOtopa
CHOBa Ncye3aET uepe3 KOpOTKoe BpeM
IIIN PocLe NOITBePKeJdeHn HaKaTneM
KHONK.
Ha nucnnee noBnIOTc TaKke 3anpoCbI K BblOJIHeHIO DeICTBn.
OTeJIbHbIe 3TaIbI DeIcTbN OTo6paKaIOTcHa DInCnIee.
Iocne BbINOJIHHeHn HxKHO DeIcTBnHa npImep, «3aONHnTb KOHTeHep IJABOdbI» COOTBeTCTByIOUeE COO6UeHneNCue3aET C DnCnJIe.
Topya Boda noctynaet Buakky.
Yka3aHHe: UTo6bI npexKeBpeMeHHO 3aKoHcHTb npriTOBJIeHne HaNTKa, CHOBa HaxMITE Ha NOBOPOTbI nepeKnIOuAtel.
H3meHeHne HacTpoE K HanNTKOB
Iocne BbIbopa HaNITKa MOXHO N3MeHHTb 3HaueHnHaCTpOeK B 3aBNCIMOCTN OT HaNITka. IcNoJIb3yIte JIЯ 3TOrO CJIeDyIOUe KHOJKN I NOBOPOTbI INpeKeJIIOuAteJIb.
BbI6paH KoΦeINHbI HAnITOK.
- Haxmte KhoNky 00
2.ПОВОРТьIMпepeклioчаTelem BblIOJIHnteHaCTpoIkyKpeIoCTN KoOe IINBbIepeNTeMOJToBkOKe.
3.ДЯ NOДТВЕРЖDEHЯ NaKMITE KHOПКУ 00 ИИ NOBOPOTHBI INepeKJIIOUaTeJIb.
ФункцariaromaDouble Shot
YemdoJIbWe 3aBapnBaeTcKoFe,TeM
60JIbWe TOpbKnx BeueCTB n
HexeIaTeJIbHbIX apOMaTOB IOnaJaET B
HaIITOK.3To OTpNcaTeJIbHO Cka3bIBaETCR
Ha Bkyce N DeJaet KOFe MeHee npnTHbIM
dIy yNoTpe6JIeHnra. PoTOMy dIa
PnIroTOBLeHnry OueHb KpeNKoTO KOFe
Pnp6Op OChaSeH CpeUaJIbHO FyHKuNei
aromaDouble Shot.Pocne npnroTOBLeHnra
POJOBnHi PnIroTAbINBaEMORO
KOLInueCTBa KoFeinHbIe 3epHa
NEpeMaJIbBAIoTcR n MOnOTbIKoFe
3aBapnBaEtc R eIe pa3,B pe3yJIbTaTe
YeRo POJLyuaeTcR Bkychbl KoFe C
PnIaTHbIM apOMaTOM.
Yka3aHHe:ФyHKuIaromaDouble Shot MOKET 6bITb BbIOpaHaДЯ BCex KoOeINHbIX HAnNTKOB KpOME:
HaHNTKOB C MaJIbIM KOJInueCTBOM KOpe, HApPImep, pNCTpeTTO
KoΦeHbIX HaINTKOB C MOJOKOM MAnOTo KOJIuYeCTBa KoΦe
MaIOrO KOJIuYeCTBa KoΦe, HAnpImep, Prn HacTpoiKe «KoΦe C MoIOKOM» 200 Ml CdoJeMoloka 90% (doJr KoΦe 10%)
ПриноTOВленьи ИЗ MONOTOrO Kofoe
PnIroTOBHeHnAByXaWeK
HactpoJa COOTHOseHnMoJOKa N Kofoe
BbIbpaH KoΦeHbI HAnITOK c MoJOKOM.
BbI6op pa3mepa YaushKn
HaHTOK BbIopaH.
- HaxmTe KhoNky ml. IpeBapntbHo NaCTpoEHHO KoIInueCTBO 3aBnCt OT Tnna HAnrTa.
- BbIbePte HxHoe KOJIueCTBO C NOMOuBIO NOBOPOTHO IpeKJIouaTeIaIaMn B Ml.
- Дя подтберждени HaЖмITE KHOПКу ml nIN NOBOPOTьн NepeKJIIOUcaTeJB.
Yka3aHn
Дя ристпетто КоличесТВО ИЗМEHHTb HeBO3MOXHO.
HaJIbAeMOe KOJIuYeCTBO MOKeT MeHrTbCRA 3aBnCmOCTN OT KaueCTBa MOnIOKa.
PnroToBJIeHHe DByx ChaWeK cpa3y
Bb6paH KoFeHbH HaNTOK NJI KcFeHbH HaNTOK C MONOKOM.
- HaxMMTe KhoNky
- NocTaBbTe IBe IIOOrpeTbe YauKn CneBa n Cnpaba NOI dncneHcep.
- UTo6bI Haayatb npnroTOBneHne HAnNTka, HaxMITE Ha NOBOPOTbI NepeKIOUaTeJIb.
Bb6paHHbHnTOK 3aBapnBaETcN pa3nBaETc3aTeM B O6e YaawKn.
Yka3aHn
HaHTOK nprirotabInBaetcB Dba 3Tana (Dba npocecca CmaIbBaHnKaOpe).PdoXdnte,POka npocecc POnHOCTbIO He 3aKOHuTcra.
■Пи Вьоборe 品 Функця aromaDouble Shot He pa6oTaet.
Hac tropona ctenen nomona
CoxpaHHeB NaMaTn HNDVBdyaJIbHbIX HaNTKOB
ToIbKO UTO npnroTOBLeHHbI HaHNTOK MOxHO HAprrMyIO COxpaHHTb BMeCTe C INHINBnDyAaBhBMn HAcTPOiKaMn B HOBOM IIN NmEoiueMcra IpOphiJIe.
- YdepxnBaIte HaxaToN KHOkny MInHmym 5 cekyHd. Ecn Hn Odnn PpOΦnIb eue He COxpaHeN, Cpa3y NpOBNTcHOBbl npOΦnIb.
- EcIn yXe ImEOTcOxpaHHeHHbIe npoФnIn, a HnINBnDyalbHbI HaNtOK DOJKeH 6bITb COxpaHEn B HOBOM npoФnIe, BbIePnte NOBOPOTbIM NepeKJIouaTeIeM HObI INpOΦnIb. -IN - EcIn nHdINBnDyalbHbI HaNtOK DOJKeH 6bITb COxpaHEn B IMeHOUeMCa npoФnIe, BbIePnte NOBOPOTbIM NepeKJIouaTeIeM HyXhbl pOΦnIb.
- HaxmTe npaByIO HaBnraUHHyO KHONKy IJIa IOJTBepKJeHNA. EcIn CO3daetC HOBbI pOoHb, BBeINTe IMr N BbIePnte oHOBOBp INcyHOK. IOnTBePNTe BBeJeHHbIe DaHHbIe. IHOpMaun: ecIn npoHb yKe HMeETc, BbIePnte erO n COxpaHNTe HAnITOK.
- HaxMMTe KhoNky.
Pn6op cHOba rOtOB k pa6ote.
Yka3aHne:ДЯ aBTOMaTnueCKOBOBIXOda
m3 MeHIO yCTaHOBInTe B pa3DeJIe
«IpoФиIIN NOJb3OBaTeJIeN» OIcIHO
ABTOMaTnueCKN 3aKOHuNTb IpoФиЛb>.
→ "HaCtpoiKn" Ha cTpaHnua 170

Блоковka за 6e3onacnoctn DeTei
YTO6bI npedotBpataTb OwnapnBaHne n OXoRy dTeen, npNoOp MOxHO 3a6loKnpOBaTb.
YdepnBaTe HkaToi KHOIpKy milk MNHmym 4 cekyHdbI.
Ha nucnnee noBntcA «BloKupOBka ot DeTei DeaAKTbUPOBaHa».
Tenepb npio6opom MOxHO nOJIb3OBaTbcra, KaK o6buHO.

Hac troponk
MeHIO CnyKNT IINHINBnDyaJIbHOrO
N3MeHeHn HAcTpoEK, Bbl3OBA
NHOpMaun Nnn 3aNycka npOrpaMMbl.
Изменистановok
- YdepnBaIte HaxaToi KHOnKy Oj/IMNHmym 5 CekyHdbI Dnla BXOda B «MeHIO».
Ha nucnlee noBATc pa3nHbE BO3MOXHOCTN Ia HAcTPOKn. - BbInOnHnTe HxKHyIO HaCTpOyKy IOBOPOTbIM NepeKIOUaTeJeM.
TeKyuaHaCTpoKa BblJeIeTcHa DaICnIeU CBETOM. - Haxmte HabraunOHHyo KHONky noHdkauee «Bbipatb»
- NOBOPOTHBIM NepeKJIIOUaTeJeM N3MeHnTe HAcTPOIky.
- Haxmte HaBnraOnHnyo KHO npIu Hndkaunei OoTBePdntb>.
YctaHOBKa COxpaHeHa B NaMaTn. - HaxMMTe KONKy /i, yTOObI BbInTuN3 MEHIO.
Ha dincnilee noBNTcMaHIO BbIOpa HAnNTka.
Yka3aHHa
HaKaTHeM HABnIraCuHOnHONKHOJIOI INDnKaUeN «Ha3aD» MoXHOBepHyTbCn Ha npEdbIyuyn yPOBeHb.
HaKaTHeM HABnIraCUNHOHONKHOJNOI INDnKaUeN «PpeBaTb» MOxHO npeBaTb IPOueDpy HaCTpoiKN.
HaKaTnEM KHOPIK Oj/IMOxHOBJIIO6OJ MOMeHT BbIITN N3 MeHIO.
EcIn B TeueHne IprimepeHo 2 MmHyT He 6yDyT BBeDeHbI 3HaueHnA, MeHIO aBTOMaTnueCKN 3aKpbIbAeTCr N HAcTPOIN He COxpaHraOTcR.
Bo3MOxHbI cJeDyUoUne HaCTpOuKN:
| Установки Bo3MOxHbIe yCTaHOBKII ПОЧЕHINЯ | ||
| ЯStylek | РаStyleнные яStyleКи | Ностroyка яStyleКи, на koTopOM bdyt otobpa-жаться TEKCTы HaДИСПЛЕ. |
| Нстroyки Дду habITKOB | ||
| Згпесco / Tempe- ratya kofoe | ■ HорMaльн. | Нстroyka tempepatуры дду кофейных habITKOB. |
| ■ ВсOCкay | Нстroyka DeiCTBiteLha dду BCex CSnoCobO» | |
| ■ МAKC. | ПрогOTOBLeHIN. | |
| Temperatypa roPauyew BODI | ■ >70°C | Нстroyka temperatypbI roPauyew BODI. |
| ■ >80°C | Нстroyka DeiCTBiteLha dду BCex CSnoCobO» | |
| ■ >85°C | ПрогOTOBLeHIN. | |
| ■ >90°C | ||
| ■ MAKC. | ||
| ЛалтМaknato nay3a | ■ МИN. | Нстroyka пay3ы мExdUу рOЗлВOM мОLOKAиkofoe. |
| ■ 5c | ||
| ■ 10c | ||
| При�OTOBLeHne kaPunHо | ■ ВнauJaLE мОLOKO | Нстroyka toro, bdyet Ль ВнauJaLE priRTOBLeHо |
| ■ ВнauJaLE коfoe | и рaSNTTO мОLOKO пIIM KOFe. (KanuYHo) | |
| ОtmeNsTb HabTPOKm Dду habITKOB | ■ ИЗад | ВocStaHOBLeHne habTroykn prOu3BODITEJI. |
| ■ РДТВeRdYtB | ||
| Пробиим польЗовate- leй | ■ АВTomATuYeCKn 3aKOnCHtB prOФиь | Нстroyka abTomATuYeCKoro 3aKpbltna prOphi- leim польЗовATEJиу уdALeHIN BCex prOphi- lein. |
| ■ YdAInTb BCE prOФиь | ||
| ЖecTKOcTb BODI | ■ 1 (мяrkaj) | Нстroyka StelenHi JozEckKCTM BOdI B DaHHom |
| ■ 2 (срEDня) | MeCTe. | |
| ■ 3 (жecTKaJ) | ПредВарITeLbHO uCTaHOBLeH peXIM JozEckKCTM | |
| ■ 4 (очЕь жectKaJ) | BOdI 4 (очЕь жectKaJ). JozEckKCTb BOdI MOXHO | |
| ■ СИSTema умЯгHeHЯ BOdI | Тakke 3aIproCSrB, haprimep, B MeCTHoi BOdo- СнabЖaJOSeI opraHn3aZIM. | |
| ■ | Правиьнай HabTroyka JozEckKCTM BOdI BaXHa | |
| ■ | Дду СВОБРЕMuHOrO NaIOMUHaHЯ O HeO6XOД- MocTl YdALeHIN RaKIN. | |
| ■ | Если B Дду ИмeETcR yCTaHOBKa dду UmЯгЧЕHIN | |
| BOdI, to Tpe6yETcHabTroyka «СИSTEMA умЯгЧe- HIN RA BoDl». | ||
| Выкючть чepee3 | 5 MInHyT | Нстroyka PerinoDA BvEmHi, lo nIcTeUHm KOTo- poroПроб вotOMATuYeCKn OTKIIOuaETcR nOcIe |
| До | PRIOTOBLeHIN pOcIeNDHeR O HApITKa. | |
| 8 ChacOB | PRIOTOBLeHIN pOcIeNDHeR O HApITKa. | |
| ■ | PRIeBaRitGEbHЯ HabTroyka BvEmHi - | |
| 30 MInHyT. | 30 MInHyT. | |
| ЯPkOstb DiisCnpeя | РекIM 1 - 10 | Hastroyka aprKoCTn DiisCnpeя |
| Стадртная HabTroyka 7 | ||
| Инфорmaция о habIT- kax | Индikация КОЛчeCTBA habITKOB, кOTopoe 6blNo priRTOBLeHо C haHala BVOda pri- бoga в дeйCTbIe. ПО ТEXNUECKM priUnHAM CHTYHK He BeDeT OTChET «C ToUHOCTbIou doЧашки. | |
| Hactpoиka npoɪzboɪn- Teɪla | ВocstahOBJIeHne 3aBoJcknix установok пriбора | Сбрес BCsex сббCTBENHbIX HabТpoeK I Bo3Врат K СоCTОгИЮ пri ПОCTaВК. |
| Демо-ржим | ■ BKЛ. ■ ВИКЛ. | ТолъкВ вцелax пезэнции. HabТpoиь«ВыкЛ.» ДOLЖнA 6ыть 3aДeйСТВОВаHA дЯ НормальНого ржIMа раБоТь. HabТpoиь BAЗМоЖнA толъкВ перьVE 3 мИнУт пОсLEВКлчЕня пriбора. |
| БлOKировka OT deteɪ | ■ Актувачи ■ БлOKировka дЯ 3aДиТь deteɪ akтувироваHA. ДЯ BыкЛюЧЕня наЖмITE Ha milk. | Hactpoиь KA bKЛчЕня ил BAktlчЕня 6лOKи- ровидя 6e3OpaSCHoctn deteɪ. → "БлOKировka dЯ 6e3OpaSCHoctn deteɪ" Ha CTpaHица 170 |
3anyck npoqpaMMbl «ФиьтдлвBoDbl» Ин «3aunta OT3amep3aHnA»
- KopOTKO HaxMITE KHONKy 品 /i.
- ПоворOTьIMпepeКлючateTeJEMMOЖHO BbIbpaTbПрогpamMy «ФильТРДЯ BOДы»ИИ «3aцNTaOTЗамерзаня». TekyшанachtpoиKa BbldeJIeTcHа ДИСПЛee.
YkaaHne: IOBOPOTbIM
pepeKIOUaTeIeM MOxHO TaXKe BbIbpaTb cepBnCHyO nporpaMMy. "CepBnCHbIe npoRpaMMbl" Ha cTpaHnca 176
ΦnIbTpДЯ BOIby
Фильтг Дя BОдь CHИЖаET OБра3OBaHne HaKIN, a TaKKe B 3HaЧNTeьнй Меpe Oчицael BODу OT 3aГрЗнEH.N. KpOMe TOrO, He HuxHO TAK YaCTO ydaJIaTb HaKINb N3 npIbOpa.ФильтгДЯ BODы можно npnOpeCTN B MaRa3InHax INI Nuepe3 CepBnCHyU CnyK6y.
"PpHnHaJnEeKHOCTn" Ha cTpaHnua 160
EcnBCTaBHeN pIbTp IJRA BObl, np6Op cnHaHn3npyET, KOrda eRo Tpe6yETc3aMeHnTb. Ha DnCpIee NOBJIeTc4 COOTBeTCTByUOuN 3aIPOC.
YcTaHOBka HnH 3aMeHa FnIbTp a JnA BOdbl
IpeenncnoB3OBAHnEMHOBOrOΦnIbTpA DnRA BODI eRO HxKHO IpOMbITb.
- B MeHIO HacTpOeK BbIbepnTe «ΦnJIbTpДЯ BOДbl>.
- HabiragauHHOH KOHNKOB BbIepuTe «BCTaBNTb» IIN «3aMeHHTb».
3.Прочно BCTaBbTeФиьTpДЯВODbl Pn NOMOuMМерHOn loKKn BpyToI pe3epByapДЯВODbl.
- 3aIeTe BOyBpeepByap IJIb BOIbI DO OTMeTKI «MaKc.»
- POnCTaBbTe EMKoCTb OObemOM MNH.1,0 nI pOJ dNcpeHcep I NOdTBePdIte. Boda TeueT uee3 qnlbTp. NIdet npombIBKa qnlbTp a.
- No OKOHuaHn ONOpOXHnTe emKOCTb. PnpOOP CHOba rOtOB K paOte.
Yka3aHn
He npirodblI MblbB NocydomoeyHOn Ma-

Kokyx dncnneHcepa
KoJyX KInIaTnIbHnka
3aBapOuHbI 6Jok
Pe3epByap dIa B0di
Kpbioka, coxpaHIOUa apOMaT
PnroHbI nIyMbITbB NocydomoeyHO MaHHe:

Kanenbna pewetka
POnDIOH
EmKocTBdIa KoFeHOnrUuN
MaKc.60 C
Ckpe6ok dna kofeHOn rUu, KpacHO CBeta
KoJyX 3aBapOuHoro 6Ioka, KpaCHoro UBeTa
Mepna loxka dIy moIOTOro Kope
CnCTema noaun MOIoka, Bce qactn
EMKOCbIJa MOJOKa, BCEaCTN
Ounstka npnbopa
OuHCTHa POnIOHa H eMHOCTn IJIa KoΦeHOrI rUzN
Pnc. 5
Yka3aHHe: IOnIOH n EMKoCTb IJI KooPeHoi rUuH NHyXHO ONOPOXHATb N OUYIaTb KaXdbI DeHb BO I36eXaHne CLOE B OTIOKeHn.
- BbHbTe NOdONC eMKoCTbIO dIra KOeHOn rUuN, NOTaHyB INx BnpeiD.
- CHIMITE NOДОн И OЧИCTTE ΚЕТКО.
- OnopoxHnTe n OunchTe POndoH n eMKoCTb dJa KofoeHOr rUu.
- Постпто вутpeнquee постразьо npибopa (гизда дя подонов).
OuHCTka eMKoCTn Ia MoJOKa
Pnc.7
Yka3aHne: IIO rIrHeHnueCKM COO6paXeHnM eMKoCTb IIN MOnoka CLeDyET peYJrPHO OUnuTaT
- Pa36epeIte emKocTb Inla MoIoka HaOTdeJIbHbIe YactN.
- OuHCTIe BCE qaCTn EMKoCTn IJI MOLOKa IIN IOMeCTIe INX B NOCyDOMOeHu MoSHHy.
OuHCTKa CnCTeMbI NOJaU MOnJoka
Cnctema noaun MOJOKa HeNOCpeIcTBeHNO Nocne npiroTOBJeHn MOLOUHO HAnITKa OUnsaeTcKpATKObpeMeHHNondauee ctpu napa.
IpeDynpEckJeHne Onachoctb oXora!!
IncnHcep cTaHOBntcOueHb TOpaHm.
Pocne nCpOJIb3OBaHn ChauAna
DOxNITecb OxJaXdEHNr DnCpeHcepa,
IpeJde yem 6paTbc 3a Hero.
CnCTemy NOdaH MOnoka HuyKHO OunuTaB BpyHyO eJxHeJeIbHo, PnH Heo6XoIMOCtN DaJce YaSe.IJr Oco60 TuaTeJIbHO OUnCTKN MOxHO IpOMbITb CnCTemy NOdaH MOnoka BOIo. "PpOMbIBKa CnCTEmbl NOdaH MOnoka" Ha cTpaHnca 177
Pa36opKa CnCTeMbI NoJaU MOnoka pnc. 3.
- OToCoeHnHte OT npHOBpa emKoCTb JIa MoJOKa.
- Iepemecntte nucnncHcep B caMOe HxKHee NOJoxKeHne.
- HaxMMte pa36JIOKUPyUOyU KHOJky Cnpaba BBepxv.
- Onyctte Bnepei n CHMnTe KOxyx.
- BbHbTe cNCTeMy noaun MoIoka n pa36epnte ee Ha OTdJIbHbIe yactn.
- OuHCTnTe DeTaJIbMbIbHbIM pAcTBOPOM IN MmKoN TKaHbIO DNC. 6
7.ПROMOTe BCE DeTaHn UHCTOu BOoN N DaHTe NM BbICOXHyTb.
Yka3aHn
Bce yactn cnCTemblnoaun MOLOKa MOxHOMbITb BNOCyDOMOeHOn MaunHe. Nocne npombIKN TuaTeJIbHO ydaIInTe OCTaTKMblbHOro pactbopa n3 CNCTemblnoaunMOLOKa.
Baxkno. Koxyx DnCpeHcepa He npufoJeH dIa MbITb B IOcYDOMOeHOn MaUNHe.
YCTaHOBNTe CNTeMy NODaH MOnOKa pnc. 3.
- BbINOJIHnTE c6OpKy OTdIeIbHbIX uacteN CNTTEMblIOaunMOJOKa
- YctaHOBInTe CnCTeMy NOpauN MOLOKa B KOxVX.
- Nepemecnte duCnEhcep B caMOe HxKHeI NOJOKeHne.
- BCTaBbTe KOxy CHN3y N, NOHAB BBepx, 3aФИКСИPyIte.
OuNTka 3aBapouHoro 6Ioka
Pnc.4,→pnc.8
IOnOHnTeHbHO KaBTOMaTHueCKo InporpaMMe OuNCTKn HeOxOdmo peYyIaRHO CHMaTb DJIa OUNCTK 3aBapouhbl 6lOk.
BHHMaHne!
Дя Oунstkn 3aBapOuHOro 6Ioka 3aIpeuaetcN IcNoIb3OBaTb MOIOUne CpeICTBa N MbITb eRO B NOCyIOMoeuHOM MaUNHe.
I3BleueHne 3aBapouHoro 6noka
- Bbiklouynte npnbop.
- BbHbTe pe3epByap Ira BOdbI.
- NpeBnHbTe npyK npny o6a KpaChbIX nHKcaTopa n CHMNTe KOxyX.
- BbIbTe, BbIMoTte n BbICyUInTeCKpe6OK dIa KoPeHOn rUuN (KpaCHbI) n KoxyX 3aBapOuHOrO bloka (KpaCHbI).
- NpeBnHbTe BnpaBO KpaHbI ΦHKcTOp Hd 3aBaPOuHbIM OLOKOM.
- OctopoxHO BbHbTe 3aBapOHyB 6nok 3aBapuBaHnI N TuaTeMbHO IpomOnTe eRo NOI pOToUHO BOdON.
ru CepBnchbIe npOrpaMMbl
- TшаTeьно OчиCTNe BHyTpEHHeepocTpaHCTBO npnbopa BlaJHoI TKaHbU n ydaJIte OCTaTKN KoФe npnIX HAnuHn.
- Поождпe, пoka 3аВарочьй 6лOK И BHyTpEnHee пocstpaHCTBO пибopa BBICOXHyT.
YctaHOBka 3abapouHoro 6loka
- BCTaBbTe 3aBapOuHbI 6LoK B npIoOp B HApPaBJIeHn CTpeJkn. CTrpeJka HaxoINTcA C BepXHei CTOpOHbI 3aBapOuHOrO 6Loka. YCTaHOBInTe CBepxU 3aBapOuHbI 6LoK, BCTaBbTe Ero B HApPaBJIIOUne I 3aDbNbTe B npIoOp.
2.ПеревиньтБлев КрасныйФИКcaTOpНадЗавapOUHbIM6LOKOM. - BcTaBbTe cKpe6ok dIy KoPeHOn IyUu (KpaChbI) N KoxyX 3aBaPouHOrO bloka (KpaChbI).
- BCTaBbTe n 3aΦnKcnpynte Koxyx.
- BCTaBbTe KOHTeHep dIy BOdbl.

CepBnchbIe npoRpaMMbl
B 3aBnCmOCTN OT JXeCTKoCTN BObI N CTepeHn H3HOca PnpbOpa YpeE3 OnpedeJIeHHbI EpOMeKytKN BpeMeHn Ha DnCJIeB BmecTO OKHa BblOpa KoFe 6yDet NOBJIaTbCra OJHa I3 CLeDyUOuNX INHdNKaun:
PombyBka MoIou.CNCTeMbI
CpouHOBbIIOJIHNITbIpOgrpaMMy ydaJIeHnHaKInn
CpoHOBbIIOJIHNITb npOprpAMMy OuNCTKIN
CpouHo BbIIOJIHITb IpOgrpaMMy Calc'nClean
PnpbOp Heo6xOIMo HemeJeHNO OuNCTnTb Pn NOMOUI COOTBETCTByIOUeI PpOrpaMMblnn YdaJIITb HaKINb. YdaJIeHne HaKINn I OUnCTKy MOXHO NO BbIOpy OBeENHTb FyHKUeN Calc'nClean. Pn HApUweHn yKa3aHn NO BbIOnHeHIO CepBnCHOH PpOrpaMMbl BO3MOJHO NobpeJdeHne PnpOba.
CepBnchIe npOrpaMMbIMoXHO TaKKe 3aNyCTnTb BJIHObOJ MOMENT 6e3 3aNpoca Ha DnCnIee.HaxMnte KHONKy /i, BBIOEpeHT HxKHyIO npOrpaMMy I BBINOHNHe ee.
Yka3aHn
Baxho.EcIn CBOeBpeMeHNO He OunchTb npOpOT HaKUnn,Ha DnCnlee NOBtCg «DaBHO nopa BblOnHtbpOprpAMMy ydaJeHn HaKUnn. PnpOp BCKope 6ydet 3a6loKupoBaH!. HemeJeHNO BblOnHte pOceCC ydaJeHn HaKUnn COIlaChO INCTpyKUnn. EcIn npOp 6LOkUPOBaH,IM MOxHo 6yDet CHOba IOnb3OBaTbCg TOJbKO NocLe BblOnHeHHOro IpOcecca ydaJeHn HaKUnn.
BHHMaHHe!ДЯΚKaJDoI cepBnCHoI npOrpaMMbI NcNoJIb3yIe CpeIcTBA dJaYdaJIeHnHaKInnN OChCTKn B COOTBETCTBnC INHCTpyKcIeN, COJIIOJa Pn 3Tom (COOTBETCTByIOUne) yKa3aHnI NO TEXHnke 6e3ONaCHOCTN.
He neiTe npImeHReMbIe XnDKoCTN.
Дя удалени накини kateropочicken 3anpeuaetca nCNoIb3OBaTb JIMMOHHU KNCJOTy, yKCyc NIN CpeDCTBa Ha OCHOBE yKCcyca.
Дя удаленин haКипи n OчИСТКI npибopa ИспОлььЗуИTe TOLьКО NOДхОДЯшпЕ ДЯ 3TOGO Ta6ЛeТКИ.Он CпeцальНо рaЗpa6OTаны ДЯ ДaHHOrO npибopa, IX MOЖHO ДОПОЛHNTeЛьНо пиОБpeCTn uepe3 cepВиСнHyO cLnyK6y. → "ПинадлжХOCHTN" Ha CTpaHnUca 160
Kateropnueckn 3anpeuaeTcraPpykaTb TaIeTKn dny ydaJeHnHaKnII n IpOChne cpeDCTBa B OTceKdNMOJOTOrKOffe.
HnB Koem clyuae He npepbIbaTe cepBnCHyIO npoPpAMMy.
Ipeed 3aynckom cepBnCHOn npoPamMbI BblbTe, OuNCTHTe IN BCTaBbTe 6paTHO 3aBapOuHbI 6JOk. IpomoyTe cnCTEmy nOdaun MoLoKa.
I OKOHuaHn CepBnCHOn IpoPpAMMbI npOTpuTe pnpbOp MrgkOu BnaXHOu TkaHeBOu CaTKeKoU, UTo6bU cpa3y Je yCTpaHHTb OCTaTKn PACTBOPa Dny UdaJIeHnHaKnH. PoT TaKIMN OCTaTKaMn MOrYt O6pa3OBbIBaTbcR OuaRn Kopp03nn.
B HObIx ry6uatabx caIΦeTKax MOryT coIepKataCn. CoI N MOryT npINBeCTN K O6pa3OBAHnIO HaJIeTa pXkABuHbI Ha CTAJIbHbIX DeTaIaIX, I03TOMy Nepei NCNoJIb3OBAHnEM ry6uatabx caIΦeTOK INx CJIeDyET TuaTeJIbHO IpOMblTb.
Pn nCnOJb3OBaHn nnIbTp a JnBODbl nHTepBaJIb BpeMeHn DoBblONHeHn CJeDyIOUeN cepBnCHOn npoRpaMMbl yBeJIuNBAIoTcra.
Ecln,Ha npimep,BCJeDCTBne nepeboeB 3HePrcna6xeHn 6bla octaHOBLeHa OHa n3 cepBnCHbIX npoPamM, DeiCTByIte CJIeNyIOUIM o6pa30m. Pnpop aBTOMatNueckn 3aynctnt npoPamMy cPeuaJIbHOJ pOMBKn.
- ПомоITE KOHTeHepДЯ BOДы.
- 3aIeIte CBeKyIO HeRa3nPoBaHHyO BDO IO OTMeTKN «MaKc.» I NOITBepDInTe KHOKNoIpOrpaMMA 3aNyCTuTcN npOMoET npi6Op.IpoDoJXitJIbHoCTb npi6JI. 2 MInHyTbl.
- OnopoxHHTe NOdoH, ouNCTHTe IN BCTaBbTe eRo o6paTHO.
- Onopoxhnte emKOCTb dIa MoJOKa, ouNCTnTe N BCTaBbTe ee o6paTHo. Iporpamma 3aBepseHa. Pnpob cHOBa rOTOB K paOte.
- HaxMMTe KhoNky 念 /i nla BbIXOda n3 npoIpaMMbl.
PpOmbiBka cnCTeMbI PoJaCuMoJOKa
CnCTema NODaun MOLOKa HENOCpeIcTBeHHO NocLe PnIROTOBJIeHn MOLOHOr HAnITka OUnsaeTcK KpaTKOBpemeHHo NODaueN CTpyu napa. JINOCO60 TuaTeNbHO OUnCTKN MOXHO DOnONHTeNbHO IpOMbITb CNCTEmy NODaun MOLOKA BOOn.
PpOdoJXKHTeJIbHOCTb npH6I.2 MmHyT
- HaxMMTe KHOJky 念 /i , uTO6bI OTKpbITb MEHIO.
2.ПОВОРТьIMпeрключateleм Bblберпг «ПромыВka молоч. CNTeMbI>. - HaxmTe Ha IOBOpOTbI INepeKIOUaTeIb IJIa 3aNycka npOrpaMMbl.
- Onopoxhnte emKocTb IJRA MOJOKa, OUHCTHTe IN CHOBA NOIDCOEINHHTe.
- NocTaBbTe NycToi CtaKaH NOd INcPHeHcep I NODTBepDInTe KHOINKOJ. HauHaeTc BblOpIHeHne IpOprpAMMbI.
- Onopoxhnte emKoctbДЯ MOLOKa, OuHCTHTe n CHOBA NOIDCOEINHNTe.
ru CepBnchbIe npoRpaMMbl
- OnopoxHnTe cTaKaH.
IporpaMa 3aBepWeHa. Pn6Op cHOBa
rotOB K pa6Ote. - Haxmte KhoNky /i I nBbIXOda n3 npoRpaMMbl.
Дононштельно hyжно peгунярно TшаTeьнho Oчицатb сnteMy noDAuN MOnOKa BpyHyIO. "OuNTKa cnteMbI noDAuN MOnOKa"Ha CTpaHnua 175
YdaJIeHneHaKnPi
IpoJOnKInTeNbHocTb np6JI.21 MNHyT CToPoka Bn3y Ha dinCJIeE nOKa3bIBaet, HApnPmEp, Upe3 cKO bKO MnHyT HyXHO Ipomblb pe3epByap IIN BAdbI N DOaBNTb BOy.
- HaxMMTe KHOIIKy 念 / i , UTO6bl OTKpbITb MEHIO.
2.ПоворOTьМпеpeКluчateЛeм BblберпTe «Удаленue HaKINu» - Haxmte Ha noBopOtHbI nepeKIOUaTeIb dIy 3aNycka npoPamMbI.
Pporpamma copoBoxdaetc yKa3aHnMa Ha dncnnee.
- Onopoxhnte noDIOH n BCTaBbTe erO o6paTHo.
- Onopoxhnte emKoCTb dIa MoJOKa, OuHCTnte n CHOBA NOcOeDHHnte.
- 13BJIeKInTe ΦnIbTp IJIa BOIbI (Ipn HAIuH) n NOITBepdnte KHOJkoN.
- HanoHnTe nycToKoHTeHep dIy BOdBi TeNIOB BOOJ DO OTMeTKI «0,5 n». PactbOpTe B Hei 1 TabJeTky dIy ydaJIeHnHaKnI.
- ПОДСТаБTe EMKOCTb OБьEMOM MInH. 1,0лпOD ДИССЕСР И ПОДТВЕРДITE.
- Haxmnte Ha NOBOPOTbIe nepeKIOUaTeIb.
HaunHaetc BblOJIHeHne npoRpaMMbl.
PpOJOnKHTeIbHOCTb Pn6JI. 19 MInHyT
HnΦopMaun: EcIn B KOHTeHepE IBA BoI CNIuKOM MaIO CpeDCTBa IydaJIeHNHaKIN, NOBNTcCooTBETCTByUoN 3aIpc. DObabTe HeRa3nPOBaHHyO BDOY IN OJTDBePdnte.
10.ПомоTe KOHTeHepДЯ BOdBi N (ecIи OH 6bl BbIHyt) yCTaHOBNTe O6paTHOФINbTpДЯBOdBi.
11.3aIeITe CBExkyo HeRa3npoBaHHyIO BDO IO OTMeTKN «max» I YCTaHOBNTe Ha MeCTO KOHTeINHeP DJIa BOIbI.
HaunHaeTcBbINOJHHeHne IpOpamMbI.
PpOdoJXtJIbHOCTb Pnp6I. 2 MInHyT
12. Onopoxhnte emKoCTb I NOtBepdnte.
13. Onopoxhnte noDIOH IN BCTaBbTe eRO o6paTHO.
14. Onopoxhnte emKoCTb JIA MOLOKA, OuHCTnte n CHOBA NOcOeHNHTe.
Прогамma 3аьершena. Ппбор сюва Готов к paбote.
15.HaKMnte KHOKNy /i I nIe BbIXOda n3 npoRpaMMbl.
OuHCTka
PpOdoJKNTeJIbHOCTb npu6I. 6 MmHyT
- Haxmte KhoNky /i, yTo6bl OTKpbITb MeHIO.
- ПоворOTьМпеpeКЛIOUaTeJIeM BbIepeNTe «ОчИстka».
- Haxmte Ha noBOpOTbI nepeKIOuAtel Jn 3aNycka npoPamMbI.
Iporpamma co npoBxkaeTcnyka3aHnMa Na dncnnee.
- OnopoxHnTe IODIOH IN BCTaBbTe eO O6paTHo.
- OTKpoIte OTceK IJIЯ MOnOTOrO KoΦe, NOLOXKe TAbIeTKy IJIЯ OuNCTKN, 3aKpoIte OTceK I NODTBePdNTe KHOIIKOJ.
6.ПОДСТаБTe EMKOCt b OБьeMOM MnH. 1,0л пд ДИССЕнсЕРи ПОДТВЕрДNTe. HaunHaETcBbINOJIHHeNHe IpOpRaMMbl. PpOДОЛЖИТьHOCt b PpIbI.5 MmHyT - Onopokhnte emKoctb n noDTBepdnte. Pporpamma 3aBepseHa. Pn6op cHOba roTob K pa6ote.
- Haxmte KhoNky /i I nIy BbIXOda n3 npoPamMbI.
calc'nClean
PpOdoJXHTeJIbHOCTb np6I. 26 MmHyT
Iporpamma Calc'nClean obbeHnHaBt B ce6e yHKuN «YdaJIeHne HaKnHn» n «OunCTka».EcIn cPOK dJa BbIOJHeHn OBeHX npOrpAMM npIMepHO COBnaJaet, npNoop aBTOMaTnueckn npEJaRaet 3Ty cepBnCHyU npOrpAmMy.
Ctpoka Bn3y Ha dincnee NOKa3bIbAeT, HapnpMep, chepe3 cKoJIbKO MInHyT HxHNO npOMbITb pe3epByap IJRA BObl NdoabNTb BOdy.
- HaxMMTe KHONky 念 /i , uTo6bl OTKpbITb MEHIO.
- ПоворOTьIM порключatelem Bblберпг «Очnstka».
- Haxmte Ha noBopOtHbI nepeKIOUaTeIb IJIaIyCKa IporpaMMbl. IporpAMMa cOpOBoxJaetcYka3aHnMn Ha dncnnee.
- Onopoxhnte noDIOH n BCTaBbTe erO o6paTHo.
- OnopoxHnTe eMKoCTb IJI MOJOKa, OuNCTnTe n CHOba IODcoEINHnTe.
- OTKpoIte OTceK IJIa MOnOTOro KoΦe, NIOJXTe TaBLeTky IJIa OUnCTKN, 3aKpoIte OTceK I NODTBepdnte KHOIIKOJ.
7.ИЗВЛЕКИТЕФИЛБТРДЯВОДБI(приНаличи)И NOДТВЕРДИТЕ KHOПКОИ. - HanoHInTe NcyToKoHTeHep IJBA BoIbI TeNIOB ODo JO OTMeTKN «0,5n>.PactBOpTe B Hei 1 Ta6JeTKy IJRA ydaJIeHnHaKIN.
- ПОДСТАБТЕ EMKOCTь OБьEMOM MИH. 1,0л под диссери поТВердпг. Haunhaetса Вынолненue nporpaMMbl. ПроДOLЖNTeBJHOCTь рпбл. 19 MInHyT
HhOpMaun: EcIn B KOHTeHepe InB OdbI CnUkOM MaIO CpeDCTBa IydaJIeHNHaKIN, NOBNTcCooTBETCTByIOuN 3aPoc. Jo6aBbTe HeRa3NPOBaHHyO BDOY INoDTBepDNTe.
10.ПROMOHTe KOHTeHepДЯ BOdBi N (ecIIN OH 6bl BbHyT) yCTaHOBNTe O6paTHOФИbTpДЯ BOdBi.
11.3aJIeITe CBeJxU HeRa3nPoBaHHyO BOy Do OTMeTKN «max» I yCTaHOBITe Ha MeCTO KOHTeHep DЯ BObl.
Haunhaetc BbIIOJIHeHne nporpaMMbl. PpOdoJXHTeJIbHOCTb npNoI.7 MmHyT
- Onopoxhnte emKoCTb I NOtBepdnte.
- OnopokHNTe NOIDOH IN BCTaBbTe eO O6paTHO.
- Onopoxhnte emKoCTb dJa MOLOka, OuHCTnTe n CHOBa IOnCOeINHtE. IporpaMma 3aBepWeHa. PnpOp cHOba rTOB K paOte.
- Haxmte KhoNky /i I JIy BbIXOda n3 nporpaMMbl.

www.siemens-home.bsh-group.com
AE 048030501
LI 052741788
AL 0662064794
LU 26349300
AT 0810550522
LV 067425232
AU 1300368339
ME 050432575
BA 033213513
MK 022454600
BE 070222142
NL 0884244020
BG 029315062
NO 22660600
CH 0434554095
PL 801 191 534
CN 4008899999
PT 214250720
Call rates depend on the network used
RO 021 203 9748
CZ 0251095546
RU 88002002962
DE 091170440044
SE 0771 11 22 77 (local rate)
DK 44898985
SK 0244452041
EE 06278730
SL 012007017
ES 902118821
TR 4446688
FI 0207510700
Calls charged at local or mobile rate
XS 0112139552
GR 18182 (AotriXpewon)
HR 013028226
HU 003614895461
IE 014502655
0.03 € per minute at peak. Off peak 0.0088 € per minute.
IL 089777222
IS 05203000
IT 800 018 346 (Line Verde)
BSH group is a Trademark Licensee of Siemens AG. Manufacturer's Service for Siemens Home Appliances.
DE Deutschland, Germany
AE United Arab Emirates,
BSH Home Appliances FZE Round About 13. Plot Nr MO-0532A
Jebel Ali Free Zone - Dubai
Tel.: 04 881 4401
mailto:service.uae@bshg.com www.siemens-home.bsh-group.com
Gate 1, 1555 Centre Road
Clayton, Victoria 3168
Tel.: 1300 167 425*
Fax:1300306818
mailto. aftersales.au@bshg.com
www.siemens-home.bsh-group.com/au
- Mo-Fr: 24 hours
BA Bosnai Hercegovina, Bosnia-Herzegovina
"HIGH" d.o.o.
Gradačka 29b
71000 Sarajevo
Tel.: 061 10 09 05
Fax:033213513
mailto:bosch_siemens_sarajevo@yahoo.com
BE Belgique, Belgie, Belgium BSH Home Appliances S.A.-N.V.
www.siemens-home.bsh-group.com/be
BH Bahrain,
Khalaifat Est.
P.O.Box 5111
Manama
Tel.: 017400553
mailto.service@khalaifat.com
BY Belarus, Benapycb
OOO"BCX BbITOBaTeXHnKa
ten:4957372962
mailto:mok-kdhl@bshg.com
CH Schweiz, Suisse, Svizzera, Switzerland
BSH Hausgeräte AG
www.siemens-home.bsh-group.com/ch
CY Cyprus, Kuppos
BSH Ikiakes Syskeves-Service
39, Arh. Makaariou III Str.
2407 Egomi/Nikosia (Lefkosia)
Tel.: 7777 8007
Fax:022658128
mailto: bsh.service.cyprus@
cytanet.com.cy
CZ Ceska Republika, Czech Republic
BSH domaci spotbrebc s.r.o
Firemniservisdomacich spotrebicu
Radlická 350/107c
15800 Praha 5
Tel. 0251 095 546
www.siemens-home.bsh-group.com/cz
DK Danmark, Denmark
BSH Hvidevarer A/S
Telegrafvej 4
2750 Ballerup
Tel.: 44898028
BSH-Service.dk@bshg.com
www.siemens-home.bsh-group.com/dk
ES Espana, Spain
BSH Home Appliances Ltd. Grand Union House Old Wolverton Road Wolverton Milton Keynes MK12 5PT To arrange an engineer visit, to order spare parts or accessories or for product advice please visit www.siemens-home bsh-group.com/uk Or call Tel.:0344892899* * Calls are charged at the basic rate, please check with your telephone service provider for exact charges.
HK Hong Kong, 香港
BSH Home Appliances Limited
Unit 1 & 2, 3rd Floor,
North Block, Skyway House,
3 Sham Mong Road
Tai Kok Tsui, Kowloon
Hong Kong
Tel.: 2565 6151
Fax: 2565 6681
mailto:siemens.hk.service@bshg.com
www.siemens-home.bsh-group.com/hk
IE Republic of Ireland
BSH Home Appliances Ltd.
M50 Business Park
Ballymount Road Upper
Walinstown
Dublin 12
To arrange an engineer visit, to order spare parts and accessories or for product advice please call Tel.: 01450 2655
www.siemens-home.bsh-group.ie
Calls are charged at the basic rate, please check with your telephone service provider for exact charges.
IL Israel,
C/S/B/ Home Appliance Ltd.
1, Hamasger St.
North Industrial Park
Lod, 7129801
Tel.: 08 9777 222
Fax: 08 9777 245
mailto:csb-serv@csb-ltd.co.il
www.siemens-home.bsh-group.com/ij
IN India, Bharat,
BSH Household Appliances
Mfg. Pvt. Ltd.
Arena House,
Main Bldg. 2nd Floor,
Plot No. 103, Road No. 12,
MIDC, Andheri East
Mumbai 400 093
Toll Free 1800 209 1850
www.siemens-home.bsh-gr
Mo-Sa: 8.00am to 8.00pm
(exclude public holidays)
IS Iceland
Smith & Norland hf.
Noatuni 4
105 Reykjavik
Tel.: 0520 3000
Fax: 0520 3011
www.sminor.is
IT Italia, Italy
BSH Flottadompatci S. A.
Via.M.Nizzoli 1
20147 Milano (MI)
Numero verde 800 018 346
mailo:info.it@siemens-home.
bsh-group.com
www.siemens-home.bsh-group.com/it
LB Lebanon, jLl
Tehaco s.a.r.l.
Boulevard Dora 4043 Beyrouth
P.O. Box 90449
Jdeideh, 1202 2040
Tel.: 01 255 211
mailto:Info@Teheni-Hana.com
LU Luxembourg
BSH electromagners S.A.
13-15, ZI Breedeweues
1259 Senningerberg
Tel.: 26 349 821
Fax: 26 349 315
Reparaturen: lux-repair@bshg.com
Ersatzteile: lux-spare@bshg.com
www.siemens-home.bsh-group.com/lu
MK Macedonia,Makeonna
GORENEC
Jane Sandanski 69 lok.3
1000 Skopje
Tel. 02 2454 600
Mobil: 070697463
mailto:gorenec@yahoo.com
MT Malta
Aplan Limited
The Atrium
Mriehel by Pass
BKR3000 Birkirkara
Tel.: 025495122
Fax:021480598
mailto:lapap@aplan.com.mt
NL Nederlande, Netherlands
www.siemens-home.bsh-group.nl
NO Norge, Norway
www.siemens-home.bsh-group.com/no
PL Polska, Poland
www.siemens-home.bsh-group.pl
PT Portugal
BSHP Electrodomésticos,
www.siemens-home.bsh-group.com/pt
RO Romania, Romania
BSH Electrocasnice srl.
Sos. Bucuresti-Ploiesti,
nr.19-21,sect.1
13682 Bucaresti
Tel.: 021 203 9748
Fax:0212039733
mailto:service.romania@bshg.com
www.siemens-home.bsh-group.com/ro
RU Russia, Poccn
OOO"BCX BbITOBBIE PnI6Opbl
CepBnC OT npOn3BODntenr
Manar Kanyxckan,15
119071 MockBa
ten:8(800)2002962
mailto.mok-kdhl@bshg.com
www.siemens-home.bsh-group.ru
SE Sverige, Sweden
BSH Home Appliances AB
Landsvagen 32
169 29 Solna
Tel.: 0771 1955 00 local rate
Tel.: 0771 11 22 77 local rate
mailto:Siemens-Service-SE@bshg.com
www.siemens-home.bsh-group.com/se
SK Slovensko, Slovakia
www.siemens-home.bsh-group.com/tr
- Cagrìmerkezini sabit hatlardan
aramanin bedeli sehir icücretlendirme,
Cep telefonlarindan isekullianlan
www.siemens-home.bsh-group.com/ua
KK Kosovo
SERVICE-GENERAL SH.P.K.
Rruga Mag Prishtine-Ferizaj
70000 Ferizaj
Tel.: 0290 321 434
Tel. 0290 330 723
mailto:a_SERVICE@
gama-electronics.com
ZA South Africa
BSH Home Appliances (Pty) Ltd.
15th Road Randjespark
Private Bag X36, Randjespark
1685 Midrand-Johannesburg
Tel.: 086 002 6724
Fax:0866171780
mailto:applianceserviceza@bshg.com
www.siemens-home.bsh-group.com/za
BSH Hausgeräte GmbH
Carl-Wery-StraBe 34,81739 Munchen,GERMANY
siemens-home.bsh-group.com

- Table of contents
- Intended use
- Important safety information
- Warning
- Danger of electric shock!
- Hazard due to magnetism!
- Risk of suffocation!
- Risk of burns!
- Risk of injury!
- Environmental protection
- Saving energy
- Environmentally-friendly disposal
- Getting to know your appliance
- How to use these instructions:
- Included in delivery
- Assembly and components
- Controls
- Display
- Rotary selector
- Accessories
- Before using for the first time
- Installing and connecting the appliance
- Commissioning the appliance
- Setting the language
- Notes
- Setting the water hardness
- Filling the bean container
- Filling the water tank
- Operating the appliance
- Selecting a drink
- Preparing coffee using freshly ground beans
- Preparing coffee using ground coffee
- Caution!
- Preparing drinks with milk
- Using the milk container
- Coffee drinks with milk
- Milk froth or warm milk
- Dispensing hot water
- Adjusting beverage settings
- Adjusting the coffee strength or selecting ground coffee
- doubleShot function
- Adjusting the milk/coffee mixing ratio
- Selecting cup size
- Preparing two cups at once
- Setting the grinding level
- PCustomising
- Creating a user profile
- en Customising
- Editing or deleting user profile
- Saving individual drinks
- Childproof lock
- Activating the child-proof lock
- Deactivating the child-proof lock
- Settings
- Changing settings
- Starting the "Water filter"or "frost protection" programme
- Water filter
- Inserting or replacing a water filter
- Removing the water filter
- Frost protection
- Daily care and cleaning
- Risk of electric shock!
- Cleaning agent
- Cleaning the appliance
- Cleaning the drip tray and coffee grounds container
- Cleaning the milk container
- Cleaning the milk system
- Cleaning the brewing unit
- Service programmes
- Rinse milk system
- Descaling
- Cleaning
- Trouble shooting
- Customer service
- Technical data
- E number and FD number
- Guarantee
- Table des matieres
- Приименке по
- Ha3HaueHnIO
- Baxkhble npabnla
- TEXHNIK6e3OpaCHOCTN
- IpeDynpexKdEHne OnaCHOCTb, CB3aHHa C MaHnTHbIM NOJeM!
- !IpeDynpexKdeneHne Onachoctb ydyusbja!!
- O noIb3OBaHHn DaHHoH NHCTpyKcHn No 3KcNlyatauH:
- Komplektaçaн
- Kohctpykuia KOMnoHeTbI
- Злем entblу упраьени
- Dncnne
- H3meHeHne HacTpoE K HanNTKOB
- ФункцariaromaDouble Shot
- HactpoJa COOTHOseHnMoJOKa N Kofoe
- BbI6op pa3mepa YaushKn
- Yka3aHn
- PnroToBJIeHHe DByx ChaWeK cpa3y
- Hac tropona ctenen nomona
- CoxpaHHeB NaMaTn HNDVBdyaJIbHbIX HaNTKOB
- Блоковka за 6e3onacnoctn DeTei
- Hac troponk
- Изменистановok
- Yka3aHHa
- 3anyck npoqpaMMbl «ФиьтдлвBoDbl» Ин «3aunta OT3amep3aHnA»
- YkaaHne: IOBOPOTbIM
- ΦnIbTpДЯ BOIby
- YcTaHOBka HnH 3aMeHa FnIbTp a JnA BOdbl
- Ounstka npnbopa
- OuHCTHa POnIOHa H eMHOCTn IJIa KoΦeHOrI rUzN
- OuHCTka eMKoCTn Ia MoJOKa
- OuHCTKa CnCTeMbI NOJaU MOnJoka
- IpeDynpEckJeHne Onachoctb oXora!!
- OuNTka 3aBapouHoro 6Ioka
- BHHMaHne!
- ru CepBnchbIe npOrpaMMbl
- CepBnchbIe npoRpaMMbl
- PpOmbiBka cnCTeMbI PoJaCuMoJOKa
- YdaJIeHneHaKnPi
- OuHCTka
- calc'nClean
- ES Espana, Spain
- HK Hong Kong, 香港
- IE Republic of Ireland
- IL Israel,
- IN India, Bharat,
- IS Iceland
- IT Italia, Italy
- LB Lebanon, jLl
- LU Luxembourg
- MK Macedonia,Makeonna
- MT Malta
- NL Nederlande, Netherlands
- NO Norge, Norway
- PL Polska, Poland
- PT Portugal
- RO Romania, Romania
- RU Russia, Poccn
- SE Sverige, Sweden
- SK Slovensko, Slovakia
- KK Kosovo
- ZA South Africa
Brand : SIEMENS
Model : EQ.9 s400
Category : Coffee maker