Series 6000 S6640 - Shaver PHILIPS - Free user manual and instructions
Find the device manual for free Series 6000 S6640 PHILIPS in PDF.
User questions about Series 6000 S6640 PHILIPS
0 question about this device. Answer the ones you know or ask your own.
Ask a new question about this device
Download the instructions for your Shaver in PDF format for free! Find your manual Series 6000 S6640 - PHILIPS and take your electronic device back in hand. On this page are published all the documents necessary for the use of your device. Series 6000 S6640 by PHILIPS.
USER MANUAL Series 6000 S6640 PHILIPS
natural_image
Black Philips Series 6000 electric shaver with three rotary dials and control buttons (no text or symbols on the device body)
natural_image
Illustration of an open book with a grid and an arrow indicating rotation (no text or symbols)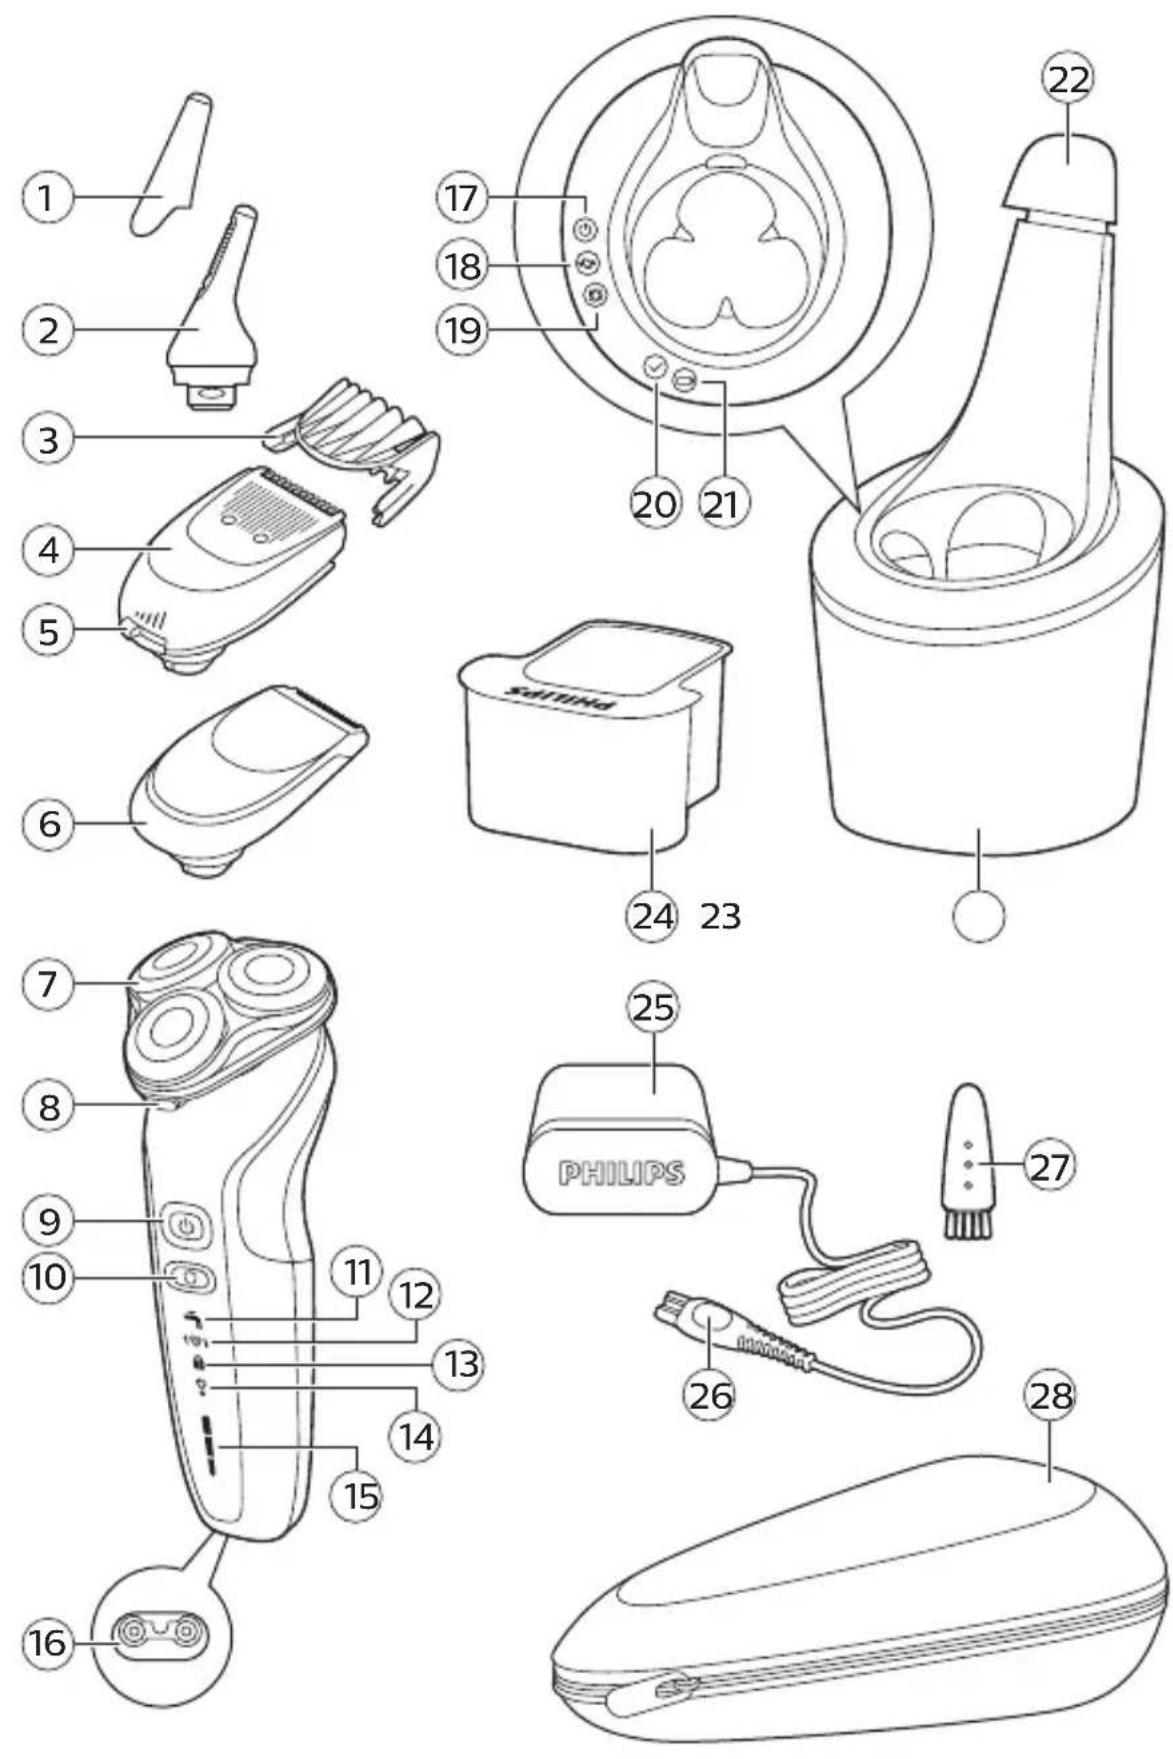
text_image
Technical diagram of a hairdryer with numbered parts and labeled components including Philips, a 24-pin device, and a 28-pin box.English 6
Deutsch 38
Español 72
Français 106
Nederlands 139
한국어 173
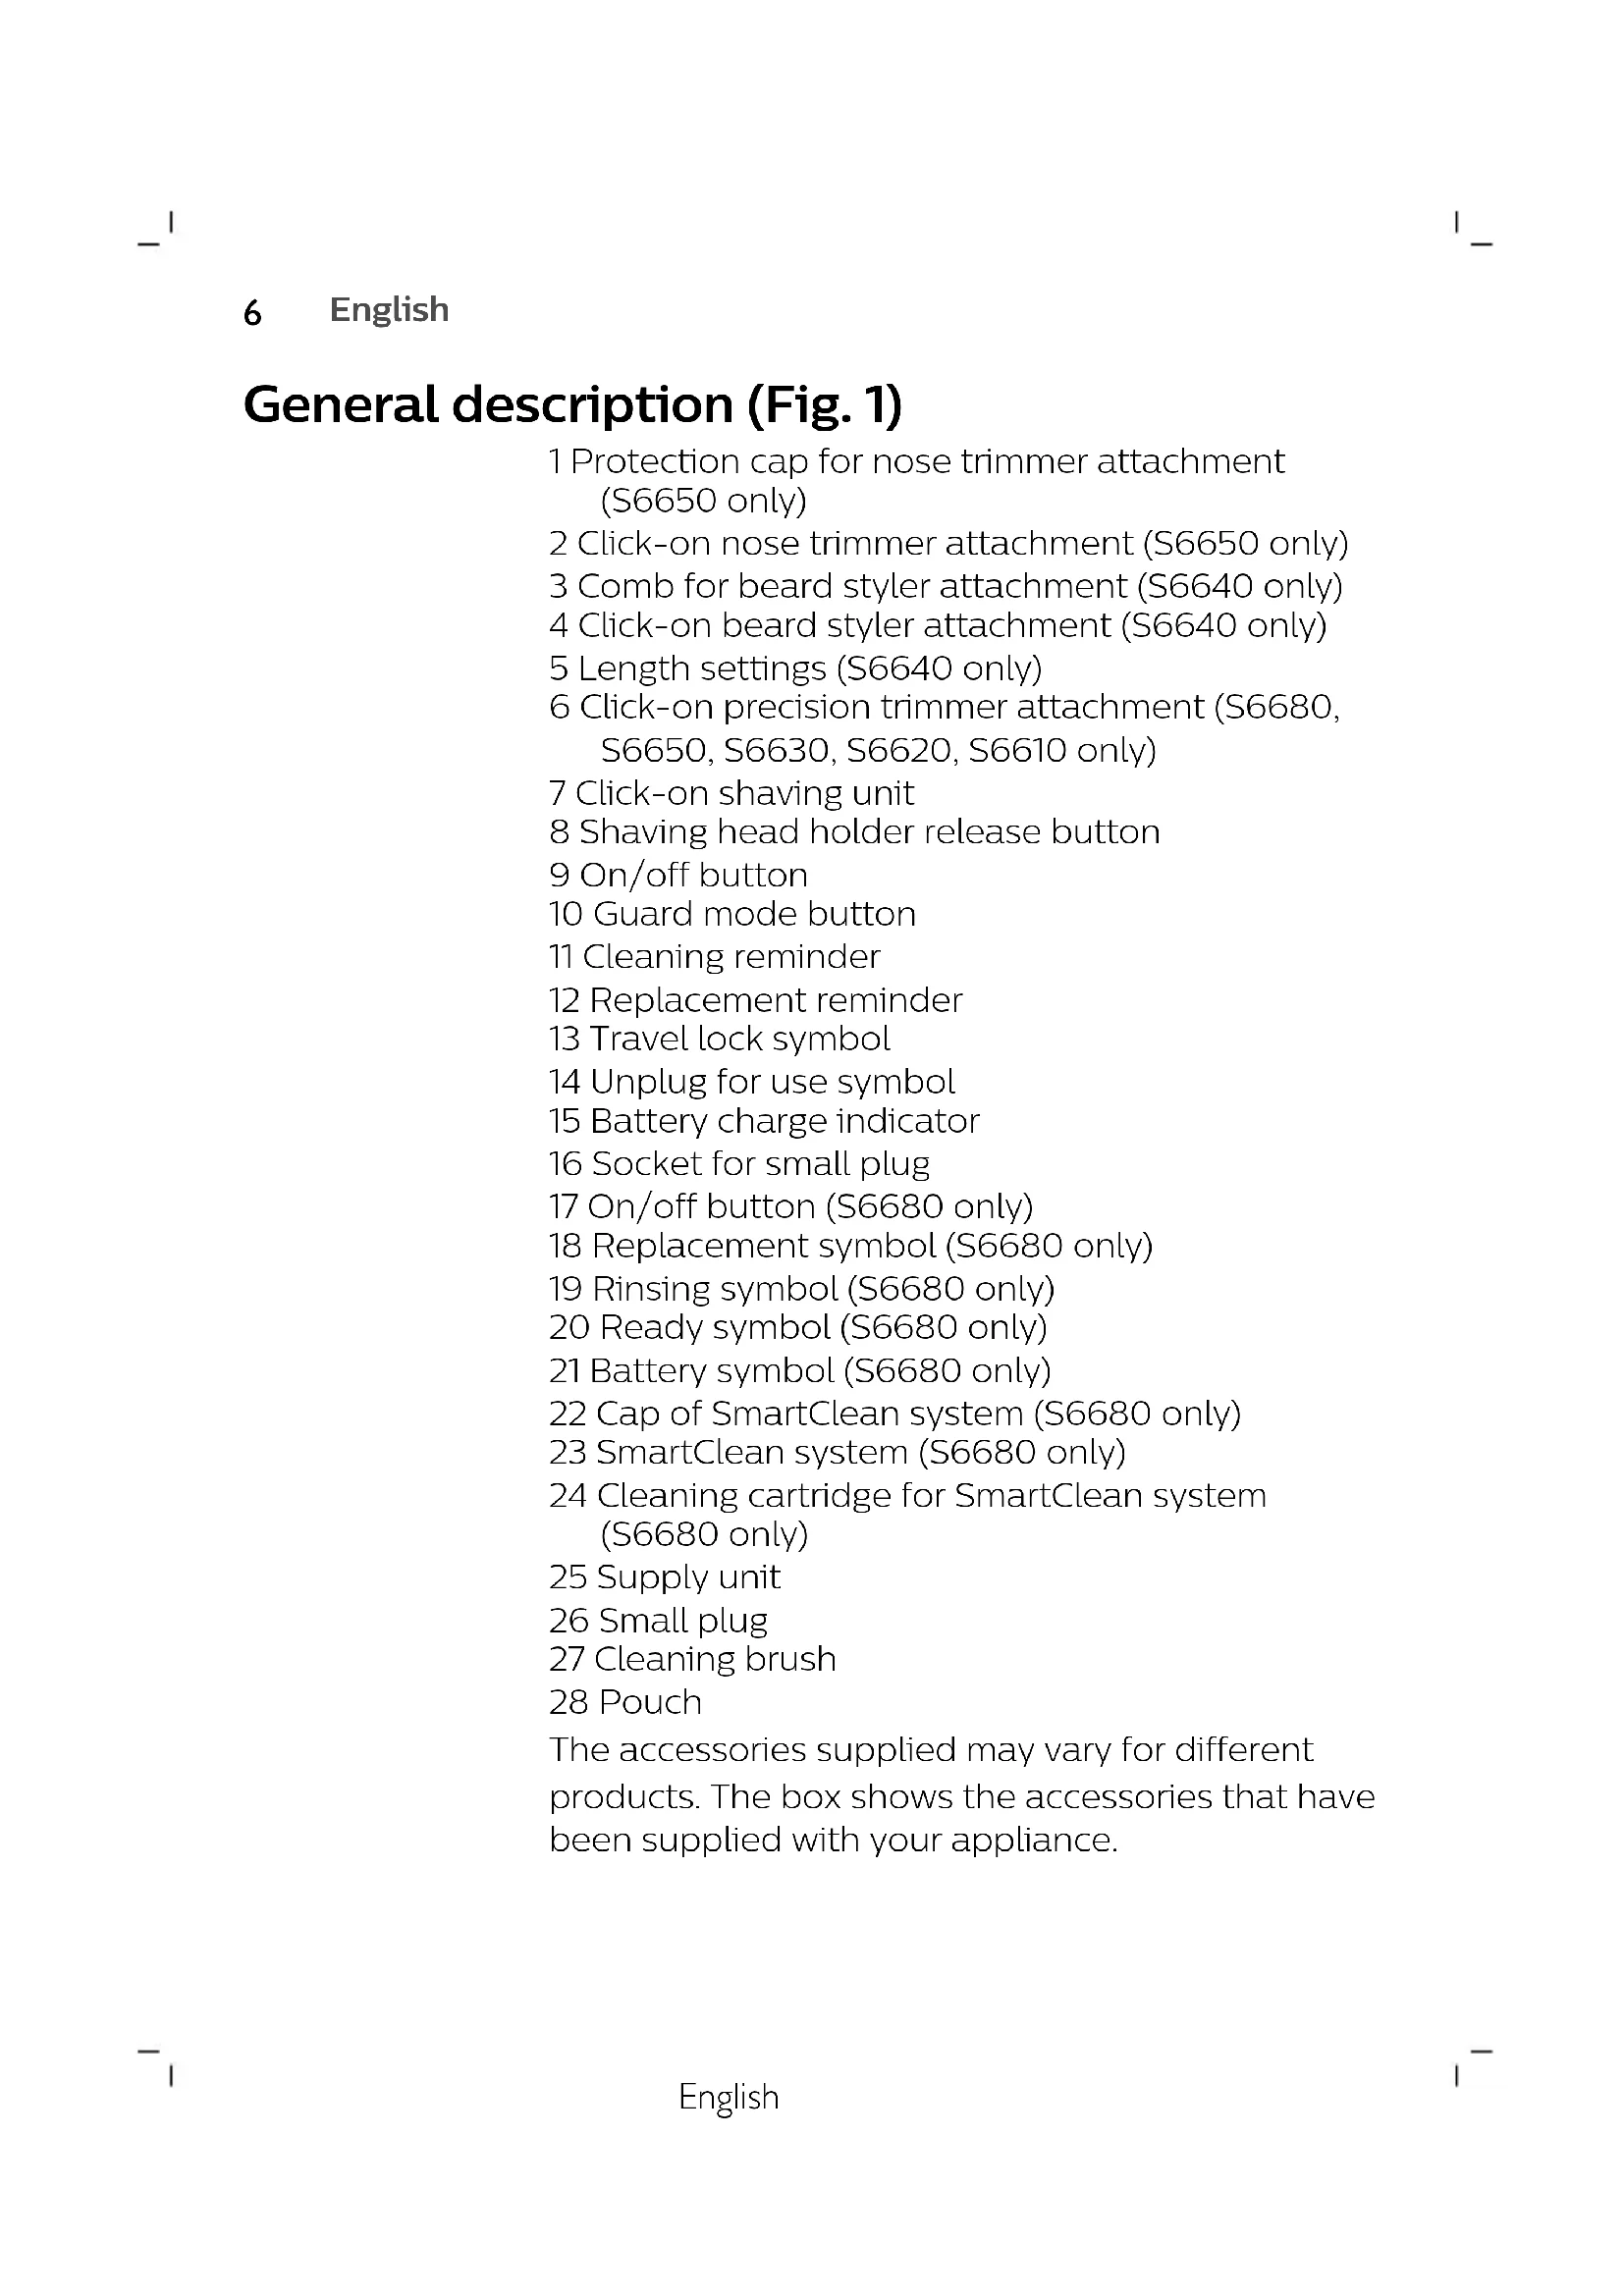
General description (Fig. 1)
1 Protection cap for nose trimmer attachment (S6650 only)
2 Click-on nose trimmer attachment (S6650 only)
3 Comb for beard styler attachment (S6640 only)
4 Click-on beard styler attachment (S6640 only)
5 Length settings (S6640 only)
6 Click-on precision trimmer attachment (S6680, S6650, S6630, S6620, S6610 only)
7 Click-on shaving unit
8 Shaving head holder release button
9 On/off button
10 Guard mode button
11 Cleaning reminder
12 Replacement reminder
13 Travel lock symbol
14 Unplug for use symbol
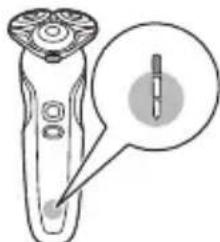
15 Battery charge indicator
16 Socket for small plug
17 On/off button (S6680 only)
18 Replacement symbol (S6680 only)
19 Rinsing symbol (S6680 only)
20 Ready symbol (S6680 only)
21 Battery symbol (S6680 only)
22 Cap of SmartClean system (S6680 only)
23 SmartClean system (S6680 only)
24 Cleaning cartridge for SmartClean system (S6680 only)
25 Supply unit
26 Small plug
27 Cleaning brush
28 Pouch
The accessories supplied may vary for different products. The box shows the accessories that have been supplied with your appliance.
Introduction
Congratulations on your purchase and welcome to Philips! To fully benefit from the support that Philips offers, register your product at
www.philips.com/welcome.
Please read this user manual, as it contains information about the features of this shaver as well as some tips to make shaving easier and more enjoyable.
Important safety information
Read this important information carefully before you use the appliance and save it for future reference.
Danger

natural_image
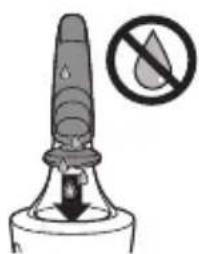
Prohibition sign showing a faucet without spraying water, enclosed in a circle (no text)- Keep the supply unit dry.
Warning
- To charge the battery, only use the detachable supply unit (HQ8505) provided with the appliance.
- The supply unit contains a transformer. Do not cut off the supply unit to replace it with another plug, as this causes a hazardous situation.
English
- This appliance can be used by children aged from 8 years and above and persons with reduced physical, sensory or mental capabilities or lack of experience and knowledge if they have been given supervision or instruction concerning use of the appliance in a safe way and understand the hazards involved. Children shall not play with the appliance. Cleaning and user maintenance shall not be made by children without supervision.
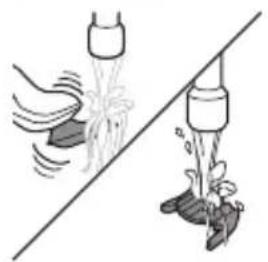
- Always unplug the shaver before you clean it under the tap.
- Always check the appliance before you use it. Do not use the appliance if it is damaged, as this may cause injury. Always replace a damaged part with one of the original type.
- This appliance contains batteries that are non-replaceable.
- Do not open the appliance to replace the rechargeable battery.
Caution

natural_image
Prohibition sign of a faucet with diagonal line and diagonal lines (no text)- Never immerse the cleaning system or the charging stand in water and do not rinse it under the tap.
- Never use water hotter than 60^ C to rinse the shaver.
- Only use this appliance for its intended purpose as shown in the user manual.
- For hygienic reasons, the appliance should only be used by one person.
- Never use compressed air, scouring pads, abrasive cleaning agents or aggressive liquids such as petrol or acetone to clean the appliance.
- If your shaver comes with a cleaning system, always use the original Philips cleaning fluid (cartridge or bottle, depending on the type of cleaning system).
- Always place the cleaning system on a stable, level and horizontal surface to prevent leakage.
- If your cleaning system uses a cleaning cartridge, always make sure the cartridge compartment is closed before you use the cleaning system to clean or charge the shaver.
- When the cleaning system is ready for use, do not move it to prevent leakage of cleaning fluid.
- Water may drip from the socket at the bottom of the shaver when you rinse it. This is normal and not dangerous because all electronics are enclosed in a sealed power unit inside the shaver.
- Do not use the supply unit in or near wall sockets that contain an electric air freshener to prevent irreparable damage to the supply unit.
Electromagnetic fields (EMF)
This Philips appliance complies with all applicable standards and regulations regarding exposure to electromagnetic fields.
General
- This shaver is waterproof. It is suitable for use in the bath or shower and for cleaning under the tap. For safety reasons, the shaver can therefore only be used without cord.
- The supply unit is suitable for mains voltages ranging from 100 to 240 volts.
- The supply unit transforms 100-240 volts to a safe low voltage of less than 24 volts.
The display
Battery charge indicator
Quick charge: When the battery is empty and you connect the shaver to a wall socket, the lights of the battery charge indicator light up white one after the other repeatedly. When the battery contains enough energy for one shave, the bottom light of the battery charge indicator starts flashing white slowly.
natural_image
Illustration of a handheld electric shaver with a close-up inset showing the blade and starburst pattern (no text or symbols)As charging continues, each light flashes and then lights up continuously to indicate to what level the battery has been charged.
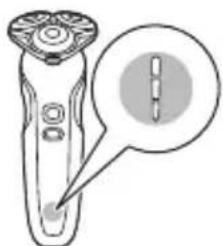
Battery fully charged
natural_image
Line drawing of a handheld electric shaver with a magnified inset showing internal components (no text or symbols)When the battery is fully charged, all lights of the battery charge indicator light up white continuously.

natural_image
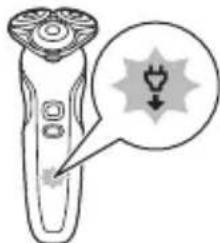
Illustration of a handheld electric shaver with a starburst symbol and a downward arrow, no text or symbols present.Note: When you press the on/off button while the shaver is still connected to the wall socket, the 'unplug for use' symbol lights up (see "Unplug for use" reminder').
Note: When the battery is full, the display switches off automatically after 30 minutes.
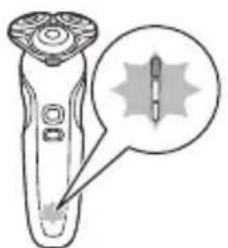
Battery low
natural_image
Illustration of a handheld electric shaver with a close-up of its tip and screwdriver (no text or symbols)When the battery is almost empty, the bottom light of the battery charge indicator flashes orange. At this point there is enough energy left for one shave.
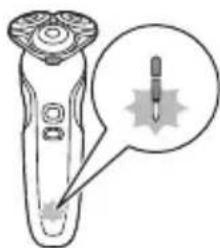
Remaining battery charge
natural_image
Illustration of a handheld electric shaver with a close-up inset showing the blade (no text or symbols)The remaining battery charge is indicated by the lights of the battery charge indicator that light up continuously.
'Unplug for use' reminder
natural_image
Illustration of a handheld electric shaver with a starburst symbol and power button icon (no text or labels)The ‘unplug for use’ reminder flashes to remind you to disconnect the shaver from the wall socket before you can switch it on.
Travel lock

natural_image
Illustration of a handheld electric shaver with a lock icon and a starburst symbol (no text or labels)When you are going to travel, you can lock the shaver to prevent it from accidentally switching on.
12 English
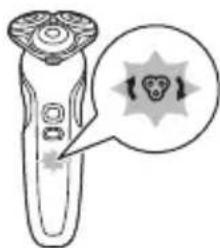
Replacement reminder
natural_image
Illustration of a hand holding a small object with a starburst symbol and a speech bubble containing a skull (no text or labels present)For maximum shaving performance, we advise you to replace the shaving heads every two years. The shaver is equipped with a replacement reminder which flashes to remind you to replace the shaving heads.
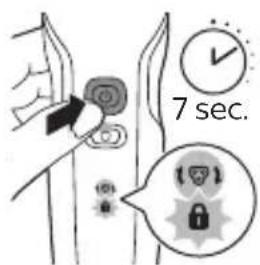
Note: After replacing the shaving heads, you should reset the replacement reminder by pressing the on/off button for 7 seconds. If you do not reset the replacement reminder, the shaver resets automatically after 9 shaves.
Cleaning reminder

natural_image
Illustration of a handheld device with a faucet symbol and a magnified view of the handle (no text or labels)Clean the shaver after every use for optimal performance (see 'Cleaning and maintenance'). When you switch off the shaver, the cleaning reminder flashes to remind you to clean the shaver.
Guard mode

natural_image
Hand holding a button with an electrical symbol (no text or labels)This setting lowers the rotation speed of the shaver (see 'Shaving with guard mode').
Charging
Charge the shaver before you use it for the first time and when the display indicates that the battery is almost empty.
Charging takes max. 1 hour. A fully charged shaver has a shaving time of up to 60 minutes.
Note: You cannot use the shaver while it is charging.
Quick charge
After approx. 3 minutes of charging, the shaver contains enough power for one shave. The bottom light of the battery charge indicator starts flashing white slowly when the quick charge is finished.
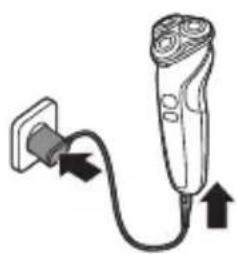
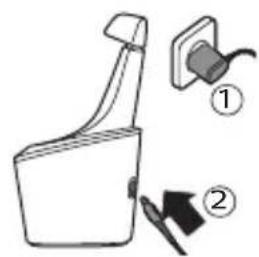
Charging with the supply unit
natural_image
Illustration of a handheld device connected to a plug, with arrows indicating cable or connection (no text or symbols)1 Make sure the shaver is switched off.
2 Put the small plug in the shaver and put the supply unit in the wall socket.
The display of the shaver indicates that the shaver is charging.
3 After charging, remove the supply unit from the wall socket and pull the small plug out of the shaver.
Charging in the SmartClean system (specific types only)
text_image
Diagram showing a spray gun with labeled parts: one emitting a plug and another with a tool, both marked with numbered annotations.1 Put the small plug in the back of the SmartClean system.
2 Put the supply unit in the wall socket.
natural_image
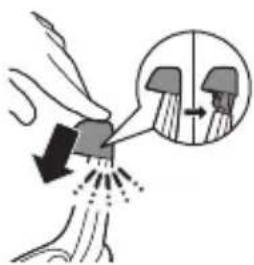
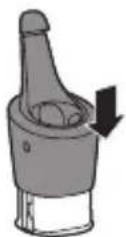
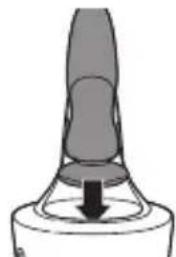
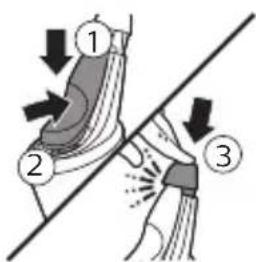
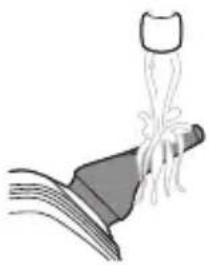
Diagram showing a hand spraying water with arrows indicating flow direction, and a magnified inset showing a cross-section of a device (no text or symbols present)3 Press to open the SmartClean system cap, to be able to place the shaver in the holder ('click').
4 Hold the shaver upside down above the holder. Make sure the front of the shaver points towards the SmartClean system holder.
text_image
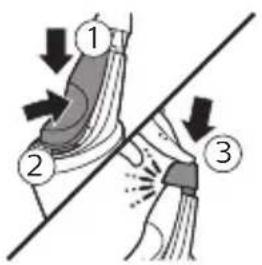
Diagram showing three labeled mechanical or structural components with directional arrows indicating motion or force directions.5 Place the shaver in the holder, tilt the shaver backwards and press down the SmartClean system cap to connect the shaver ('click').
The battery symbol flashes to indicate that the appliance is charging. When the battery is fully charged, the battery symbol lights up continuously.
Using the shaver
Always check the shaver and all accessories before use. Do not use the shaver or any accessory if it is damaged, as this may cause injury. Always replace a damaged part with one of the original type.
- Use this shaver for its intended household use as described in this manual.
- For hygienic reasons, the shaver should only be used by one person.
- Trimming is easier when the skin and hair are dry.
- Do not place the SmartClean system near water and make sure it does not get wet.
Note: This shaver is waterproof. It is suitable for use in the bath or shower and for cleaning under the tap. For safety reasons, the shaver can only be used without cord.
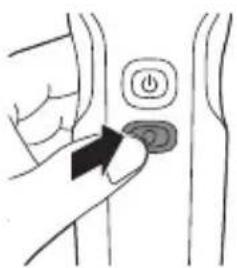
Switching the shaver on and off
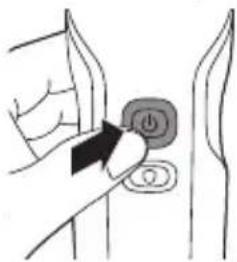
natural_image
Line drawing of a hand pressing a button on a curved surface (no text or symbols)1 To switch the shaver on or off, press the on/off button once.
The display lights up for a few seconds to show the battery status.
Shaving
Skin adaptation period
Your first shaves may not bring you the result you expect and your skin may even become slightly irritated. This is normal. Your skin and beard need time to adapt to any new shaving system. To allow your skin to adapt to this new appliance, we advise you to shave regularly (at least 3 times a week) and exclusively with this appliance for a period of 3 weeks.
Shaving tips
- For the best results on skin comfort, pre-trim your beard if you have not shaved for 3 days or longer.
Guard mode
- Activate the guard mode to reduce the rotation speed of the shaver (see 'Shaving with guard mode').
Dry shaving
1 Switch on the shaver.
2 Move the shaving heads over your skin in circular movements to catch all hairs growing in different directions. Make sure each shaving head is fully in contact with the skin. Exert gentle pressure for a close, comfortable shave.
Note: Do not press too hard, as this can cause skin irritation.
3 Switch off and clean the shaver after each use (see 'Cleaning and maintenance').
Wet shaving
For a more comfortable shave, you can also use this shaver on a wet face with shaving foam or shaving gel.
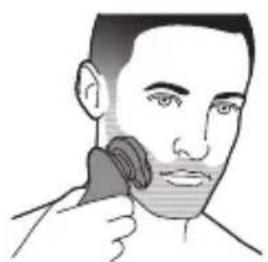
natural_image
Illustration of a person applying a product to their face (no text or symbols)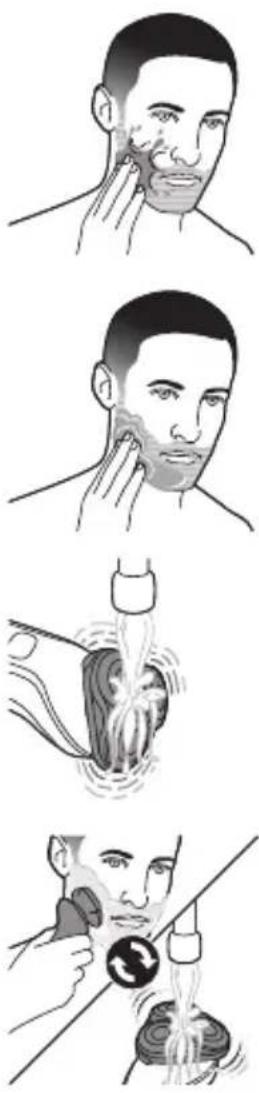
1 Apply some water to your skin.
2 Apply shaving foam or shaving gel to your skin.
3 Rinse the shaving unit under the tap to ensure that the shaving unit glides smoothly over your skin.
4 Switch on the shaver.
5 Move the shaving heads over your skin in circular movements to catch all hairs growing in different directions. Make sure each shaving head is fully in contact with the skin. Exert gentle pressure for a close, comfortable shave.
Note: Do not press too hard, this can cause skin irritation.
Note: Rinse the shaving unit regularly to ensure that it continues to glide smoothly over your skin.
6 Switch off and clean the shaver after each use (see 'Cleaning and maintenance').
7 Dry your face.
Note: Make sure that you rinse all foam or shaving gel off the shaver.
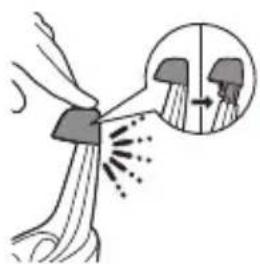
Shaving with guard mode
1 Switch on the shaver.
natural_image
Hand holding a button with an arrow pointing to it, next to a circular icon (no text or symbols)2 Press the guard button once if you want to shave at a lower, more gentle speed.
3 Move the shaving heads over your skin in circular movements to catch all hairs growing in different directions. Make sure each shaving head is fully in contact with the skin. Exert gentle pressure for a close, comfortable shave.
4 Switch off the guard mode by pressing the guard button once.
Note: The shaver automatically starts operating at normal speed when you switch it on again.
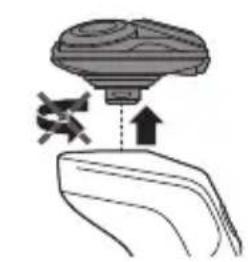
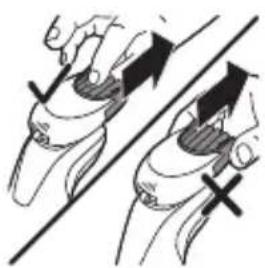
Using click-on attachments
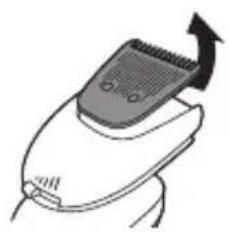
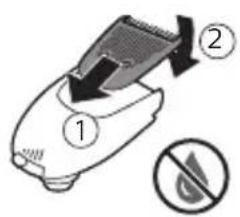
Removing or attaching click-on attachments
natural_image
Illustration of a robotic arm with a hand and a gear, showing motion direction (no text or symbols)1 Make sure the shaver is switched off.
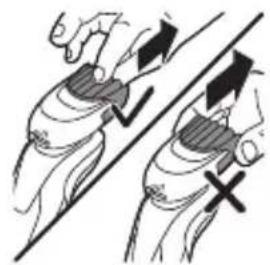
2 Pull the attachment straight off the appliance.
Note: Do not twist the attachment while you pull it off the appliance.
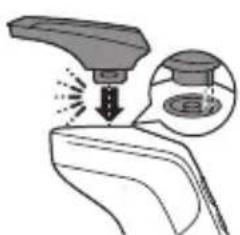
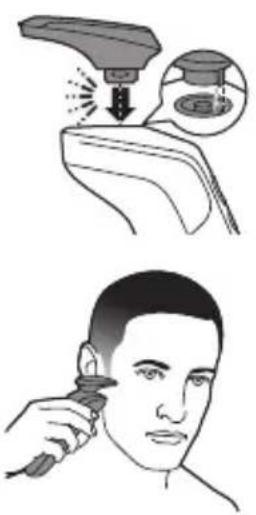
natural_image
Diagram showing a spray gun interacting with a surface, with an inset magnified view of the spray (no text or symbols)3 Insert the lug of the attachment into the slot in the top of the appliance. Then press down the attachment to attach it to the appliance ('click').
Using the precision trimmer attachment (specific types only)
You can use the precision trimmer attachment to touch up your beard, sideburns and moustache.
1 Attach the attachment to the appliance ('click').
2 Switch on the appliance.
3 Hold the precision trimmer perpendicular to the skin and move it downwards while exerting gentle pressure.
4 Switch off the appliance and clean the attachment after use.
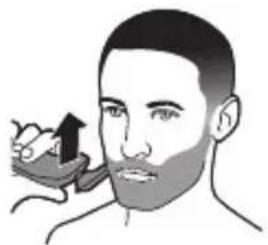
Using the beard styler attachment with comb (specific types only)
You can use the beard styler attachment with the comb attached to style your beard at one fixed setting or at different length settings. You can also use it to pre-trim any long hairs before shaving for a more comfortable shave.
The length settings on the beard styler attachment correspond to the remaining hair length after cutting and range from 1 to 5 mm (3/64 - 3/16 in).
1 Attach the attachment to the appliance ('click').
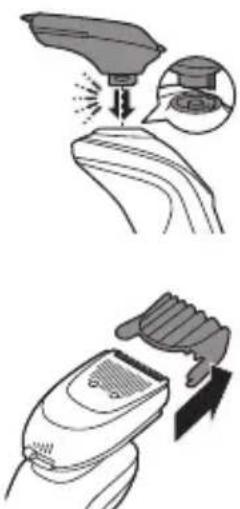
2 Slide the comb straight into the guiding grooves on both sides of the beard stylist attachment ('click').
text_image
Diagram showing a hairpin with labeled parts and directional arrows indicating motion or movement.3 Press the length selector and then push it to the left or right to select the desired hair length setting.
4 Switch on the appliance.
natural_image
Illustration of a person's face with a pointing arrow, no text or symbols present5 Move the appliance upwards while you exert gentle pressure. Make sure the front of the comb is in full contact with the skin.
6 Clean the attachment after use.
Using the beard styler attachment without comb
You can use the beard styler attachment without the comb to contour your beard, moustache, sideburns or neckline at a length of 0.5 mm (1/32 in).
natural_image
Illustration of two hands holding a device with directional arrows indicating movement or force (no text or symbols)1 Pull the comb off the beard styler attachment. Note: Grab the comb in the center to pull it off the beard styler attachment. Do not pull at the sides of the comb.
2 Switch on the appliance.

natural_image
Illustration of a person applying a product to their neck (no text or symbols)3 Hold the beard styler attachment perpendicular to the skin and move the appliance downwards while you exert gentle pressure.
4 Clean the attachment after use.
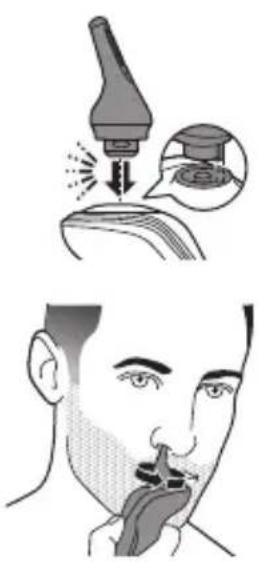
Using the nose/ear trimmer attachment (specific types only)
You can use the nose/ear trimmer attachment to trim your nose and/or ear hair.
natural_image
Illustration showing a medical procedure on a tooth with an applicator and magnified view of the tooth (no text or symbols present)Trimming nose hair
When trimming nose hair, make sure your nostrils are clean.
1 Attach the attachment to the appliance ('click').
2 Switch on the appliance.
3 Carefully insert the attachment into one of your nostrils.
Do not insert the attachment more than 0.5 cm into your nostrils.
4 Slowly move the attachment around to remove all unwanted hairs in your nostrils.
5 Clean the attachment after use.
Trimming ear hair
When trimming ear hair, make sure your outer ear channels are clean and free from wax.
1 Attach the attachment to the appliance ('click').
2 Switch on the appliance.
3 Slowly move the attachment along the rim of the ear to remove hairs that stick out beyond the rim.
4 Insert the attachment into the outer ear channel.
Do not insert the attachment more than 0.5 cm into your ear channel, as this could damage the eardrum.
natural_image
Line drawing of a person's face with a medical device attached to the ear (no text or symbols)5 Slowly turn the attachment around to remove all unwanted hairs from your outer ear channel.
6 Clean the attachment after use.
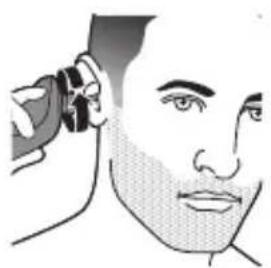
Travel lock
You can lock the shaver when you are going to travel to prevent it from switching on accidentally.
Activating the travel lock
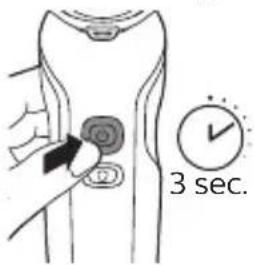
text_image
3 sec.1 Press the on/off button for 3 seconds to use the travel lock mode.
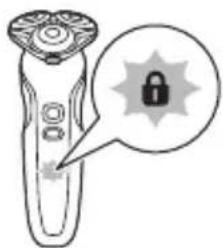
natural_image
Illustration of a handheld electronic device with a lock icon and a starburst symbol (no text or labels)While you activate the travel lock, the indications on the display light up briefly. When the travel lock is activated, the travel lock symbol flashes.
Deactivating the travel lock
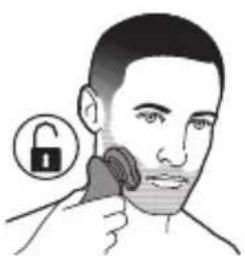
natural_image
Illustration of a person using a handheld device to interact with a lock icon (no text or symbols present)1 Press the on/off button for 3 seconds. While you deactivate the travel lock, the indications on the display light up briefly. The shaver switches on and is now ready for use again.
Note: The shaver unlocks automatically when it is connected to a wall socket.
Cleaning and maintenance
Cleaning the shaver under the tap
Clean the shaver after every shave for optimal performance.
Be careful with hot water. Always check if the water is not too hot, to prevent burning your hands.
22 English
natural_image
Illustration of a hand holding a medical device with tubing and tubing (no text or symbols)Never dry the shaving unit with a towel or tissue, as this may damage the shaving heads.
While rinsing the shaving unit, water may drip out of the base of the shaver. This is a normal occurrence.
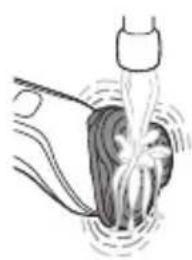
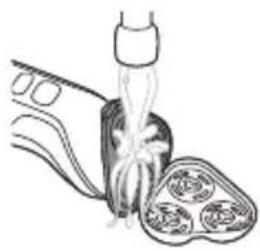
1 Switch on the shaver.
2 Rinse the shaving unit under a warm tap. You can also clean the shaving unit with the cleaning brush supplied.
natural_image
Illustration of a hand holding a decorative object with a black arrow pointing to it (no text or symbols present)3 Switch off the shaver. Press the release button to open the shaving unit.
natural_image
Illustration of a pipette dispensing liquid into a container with three samples (no text or symbols)4 Rinse the hair chamber under the tap. You can also clean the inside of the shaving unit with the cleaning brush supplied.

natural_image
Illustration of a medical procedure showing a surgical tool interacting with a patient's ear canal (no text or symbols present)5 Rinse the shaving head holder under a warm tap. 6 Carefully shake off excess water and let the shaving head holder air-dry completely.
natural_image
Diagram of a biological structure with arrows indicating direction (no text or labels)7 Close the shaving head holder ('click').
Cleaning the shaver in the SmartClean system (specific types only)
Keep cleaning cartridges out of reach of children. Do not take internally. Avoid contact with eyes. In case of eye contact, thoroughly flush with cold water. If irritation persists, get medical attention.
- Only use the shaver, SmartClean system and cleaning cartridge provided to charge or clean the shaver.
- For optimal cleaning results, replace the cleaning cartridge every 3 months.
- Other Philips shavers may not work with this SmartClean system.
- To avoid evaporation, do not expose cleaning fluid to direct sunlight.
- The SmartClean system thoroughly cleans but does not disinfect your shaver, therefore, do not share the shaver with others.
- Place the SmartClean system on a flat, stable and fluid-resistant surface to avoid any leakage. Be careful not to tip or move the SmartClean system when it is ready for use.
- Use this product for its intended household use as described in this manual.
Preparing the SmartClean system for use

Caution: Do not tilt the SmartClean system to prevent leakage.
Note: Hold the SmartClean system while you prepare it for use.
1 Put the small plug in the back of the SmartClean system.
2 Put the supply unit in the wall socket.
3 While holding the SmartClean system with one hand, press the button on the side of the SmartClean system and lift the top part of the SmartClean system.
4 Pull the seal off the cleaning cartridge.
5 Place the cleaning cartridge in the SmartClean system.
6 While holding the SmartClean system with one hand, gently push the top part of the SmartClean system back down ('click').
text_image
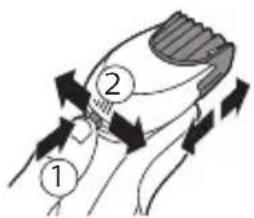
Diagram showing a droplet tip with a downward arrow and a prohibition symbol indicating water droplets.Using the SmartClean system
Note: If you use the shaver with shaving foam, shaving gel or pre-shave products, briefly rinse the shaver with warm water before you clean it in the SmartClean system.
natural_image
Diagram of a mechanical joint or bracket with an inset showing a cross-section of a gear or tool (no text or symbols present)Caution: Always shake excess water off the shaver before you place it in the SmartClean system.
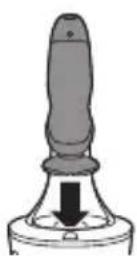
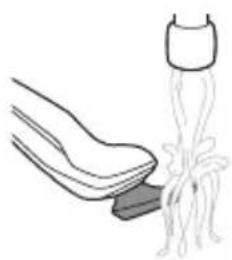
1 Press to open the SmartClean system cap, to be able to place the shaver in the holder ('click').
natural_image
Simple line drawing of a mechanical component with a downward arrow indicating force or direction (no text or symbols)2 Hold the shaver upside down above the holder. Make sure the front of the shaver points towards the SmartClean system holder.
text_image
Diagram showing three labeled mechanical or structural components with directional arrows indicating movement or force direction.3 Place the shaver in the holder, tilt the shaver backwards and press down the SmartClean system cap to connect the shaver ('click'). The battery symbol on the SmartClean system starts to flash, which indicates that the shaver is charging.
natural_image
Line drawing of a hand holding two circular buttons with power and spiral symbols (no text or labels)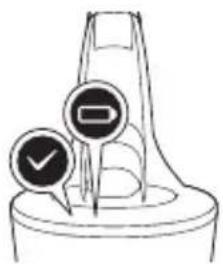
natural_image
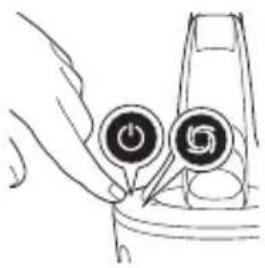
Simple line drawing of a funnel with two circular indicators (no text or symbols)4 Press the on/off button on the SmartClean system to start the cleaning program.
During the cleaning phase, the cleaning symbol flashes. When the cleaning phase is done (after approx. 10 minutes), the cleaning symbol lights up continuously.
Next, the ready symbol lights up continuously.
30 minutes after the cleaning program and charging are done, the SmartClean system switches off automatically.
The battery symbol lights up continuously to indicate that the shaver is fully charged. Charging takes approx. 1 hour.
5 To let the shaver dry, you can leave it in the SmartClean system until your next shave. You can also remove the shaver from the SmartClean system, shake off excess fluid, open the shaving unit and let the shaver air-dry. Press to open the SmartClean cap, to remove the shaver from the holder ('click').
Note: Note: If you press the on/off button of the SmartClean system during the cleaning program, the program stops. In this case, the cleaning or drying symbol goes out.
Note: Note: If you disconnect the SmartClean system from its power supply, the cleaning program stops.
Thorough cleaning
1 Switch off the appliance.

2 Press the release button to open the shaving unit.
3 Pull the shaving head holder off the bottom part of the shaving unit.
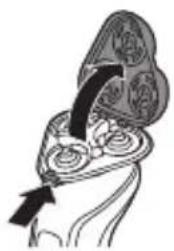
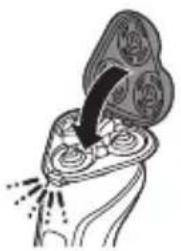
4 Turn the retaining rings counterclockwise and remove them.
5 Remove the shaving heads from the shaving head holder. Each shaving head consists of a cutter and guard.
Note: Do not clean more than one cutter and guard at a time, since they are all matching sets. If you accidentally put a cutter in the wrong shaving guard, it may take several weeks before optimal shaving performance is restored.
6 Clean the cutter and guard under the tap.

7 Put the cutter back into the guard.
8 Place the shaving heads in the shaving head holder.
Note: Make sure that the projections of the shaving heads fit exactly into the recesses of the shaving head holder.
9 Place the retaining rings back onto the shaving head holder and turn them clockwise ('click').
Note: Hold the shaving head holder in your hand when you reinsert the shaving heads and reattach the retaining rings. Do not place the shaving head holder on a surface when you do this, as this may cause damage.
- Each retaining ring has two recesses and two projections that fit exactly in the projections and recesses of the shaving head holder.

natural_image
Illustration of two hands holding a tray with a downward arrow and a spark effect, no text or symbols present10 Reinsert the hinge of the shaving head holder into the slot of the shaving unit. Close the shaving head holder.
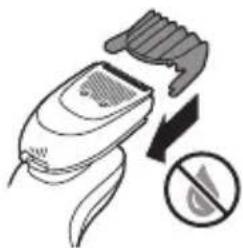
Cleaning the beard styler attachment
natural_image
Illustration of two hands holding a tool with directional arrows indicating movement (no text or symbols)Clean the beard styler attachment after each use.
1 Pull the comb off the beard styler attachment.
Note: Grab the comb in the center to pull it off the beard styler attachment. Do not pull at the sides of the comb.
natural_image
Illustration of two different methods for spraying water, showing a hand pouring liquid onto a surface and another method spraying water onto a foot (no text or symbols present)2 Rinse cut hairs off the cutting unit with lukewarm water.
3 Rinse cut hairs off the comb.
natural_image
Illustration of a hairdryer with a brush and arrow indicating rotation (no text or symbols)4 Remove the cutting unit from the beard styler attachment. By pushing the cutting unit off the beard styler attachment, you can remove any hairs that have accumulated inside the beard styler. You can also rinse the bottom of the cutting unit.

natural_image
Simple line drawing of a medical procedure with a tube inserted into a device (no text or symbols)5 Rinse cut hairs out of the beard styler attachment.
6 Carefully shake off excess water and let the comb, cutting unit and beard styler attachment air-dry before you use them again.
text_image
Diagram showing a hairbrush with labeled parts and a prohibition symbol indicating no text or symbols.7 When the cutting unit is dry, attach it to the beard styler attachment.
natural_image
Illustration of a hairdryer with a downward arrow and a prohibition symbol (no text or labels)8 When the comb is dry, attach it to the beard styler attachment.
9 For optimal performance, lubricate the teeth of the attachment with a drop of sewing machine oil every six months.
Cleaning the precision trimmer attachment
Never dry the precision trimmer attachment with a towel or tissue, as this may damage the trimming teeth.
Clean the precision trimmer attachment after each use.
natural_image
Line drawing of a foot stepping on a rope with a bag attached (no text or symbols)1 Switch on the appliance with the precision trimmer attachment attached.
2 Rinse the attachment under a warm tap.
3 After cleaning, switch off the appliance.
4 Carefully shake off excess water and let the attachment air-dry completely.
For optimal performance, lubricate the teeth of the attachment with a drop of sewing machine oil every six months.
Cleaning the nose trimmer attachment
Clean the nose trimmer attachment every time you have used it.
1 Make sure the appliance is switched off.
natural_image
Illustration of a funnel pouring liquid into a bottle (no text or symbols)2 Rinse the cutting element with hot water.
3 Switch on the appliance and rinse the cutting element once more to remove any remaining hairs. Then switch off the appliance again.
4 Carefully shake off excess water and let the nose trimmer attachment dry.
Tip: For optimal trimmer performance, lubricate the trimmer teeth with a drop of sewing machine oil every six months.
Replacement
Replacing the shaving heads

For maximum shaving performance, we advise you to replace the shaving heads every two years. Replace damaged shaving heads immediately. Always replace the shaving heads with original Philips shaving heads ('Ordering accessories').
natural_image
Illustration of a handheld electric shaver with a star-shaped warning symbol (no text or labels)Replacement reminder
The replacement reminder indicates that the shaving heads need to be replaced. The shaving unit symbol lights up when you switch off the shaver.
1 To replace the shaving heads, remove the shaving heads from the shaving head holder one by one. See 'Thorough Cleaning' for the instructions on how to remove the retaining rings and shaving heads.
2 To reset the replacement reminder, press and hold the on/off button for approx. 7 seconds. If you do not reset the replacement reminder, the shaver resets automatically after 9 shaves.
text_image
7 sec.32 English
Storage
natural_image
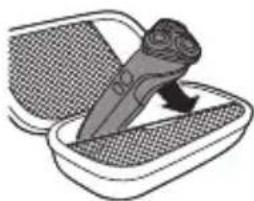
Illustration of a kitchen knife cutting into a rectangular container with a handle (no text or symbols)Note: We advise you to let the appliance dry before you store it in the pouch.
Ordering accessories
To buy accessories or spare parts, visit www.philips.com/parts-and-accessories or go to your Philips dealer. You can also contact the Philips Consumer Care Center in your country (see the international warranty leaflet for contact details).
The following accessories are available:
- SH50 Philips shaving heads
- RQ111 Philips beard styler
- Precision trimmer
- RQ575 Philips cleansing brush
- HQ8505 supply unit
Note: The availability of the accessories may differ by country.
Recycling
- Do not throw away the product with the normal household waste at the end of its life, but hand it in at an official collection point for recycling. By doing this, you help to preserve the environment.
- This product contains a built-in rechargeable battery which shall not be disposed of with normal household waste. Please take your product to an official collection point or a Philips service center to have a professional remove the rechargeable battery.
- Follow your country's rules for the separate collection of electrical and electronic products and rechargeable batteries. Correct disposal helps prevent negative consequences for the environment and human health.
Removing the rechargeable battery
Only remove the rechargeable batteries when you discard the appliance. Before you remove the batteries, make sure that the appliance is disconnected from the wall socket and that the batteries are completely empty.
Take any necessary safety precautions when you handle tools to open the appliance and when you dispose of the rechargeable battery.
1 Check if there are screws in the back of the appliance. If so, remove them.
2 Remove the back and/or front panel of the appliance with a screwdriver. If necessary, also remove additional screws and/or parts until you see the printed circuit board with the rechargeable battery. If there are wires that need to be cut in order to reach the rechargeable battery, only cut one at a time.
3 Remove the rechargeable battery.
Warranty and support
If you need information or support, please visit www.philips.com/support or read the international warranty leaflet.
Warranty restrictions
The shaving heads (cutters and guards) are not covered by the terms of the international warranty because they are subject to wear.
Troubleshooting
This chapter summarizes the most common problems you could encounter with the appliance. If you are unable to solve the problem with the information below, visit www.philips.com/support for a list of frequently asked questions or contact the Consumer Care Center in your country.
Shaver
Problem Possible cause Solution
| The appliance does not work when I press the on/off button. | The appliance is still attached to the wall socket. For safety reasons, the appliance can only be used without cord. | Unplug the appliance and press the on/off button to switch on the appliance. |
| The rechargeable battery is empty. | Recharge the battery. | |
| The travel lock is activated. | Press the on/off button for 3 seconds to deactivate the travel lock. | |
| The shaving unit is soiled or damaged to such an extent that the motor cannot run. | Clean the shaving heads thoroughly (see 'Thorough cleaning') or replace them. | |
| The appliance does not shave as well as it used to. | The shaving heads are damaged or worn. | Replace the shaving heads. |
Problem Possible cause Solution
| Hairs or dirt obstruct the shaving heads. | Clean the shaving heads in the regular way or clean them thoroughly (see 'Thorough cleaning'). | |
| I replaced the shaving heads, but the replacement reminder is still showing. | You have not reset the replacement reminder. | To reset the replacement reminder, press and hold the on/off button for more than 7 seconds. |
| A shaving head symbol has suddenly appeared on the display. | This symbol is the replacement reminder. | Replace the shaving heads. |
| Water is leaking from the bottom of the appliance. | During cleaning, water may collect between the inner body and the outer shell of the appliance. | This is normal and not dangerous because all electronics are enclosed in a sealed power unit inside the appliance. |
SmartClean system
Problem Possible cause Solution
| The SmartClean system does not work when I press the on/off button. | The SmartClean system is not connected to the wall socket. | Put the small plug in the SmartClean system and put the supply unit in the wall socket. |
| The cleaning cartridge is empty. The replacement symbol flashes to indicate that you have to replace the cleaning cartridge. | Place a new cleaning cartridge in the SmartClean system. |
Problem Possible cause Solution
| The shaver is not entirely clean after I clean it with the SmartClean system. | You have not placed the shaver in SmartClean system properly, so there is no electrical connection between SmartClean system and the shaver. | Press down the top cap ('click') to ensure a proper connection between the shaver and the SmartClean system. |
| The battery of the shaver is not charged sufficiently. | If the battery of the shaver is not charged sufficiently, the SmartClean system may not work properly. The shaver needs to be able to switch on briefly during the rinsing phase. Charge the shaver for a short time before you use the SmartClean system to clean your shaver. | |
| The cleaning cartridge needs to be replaced. | Replace the cleaning cartridge. | |
| You have used another cleaning fluid than the original Philips cleaning cartridge. | Only use the original Philips cleaning cartridge. | |
| The hole of the drain of the cleaning cartridge is blocked. | Remove the cartridge from the SmartClean system and push the hairs down the drain with a toothpick. |
Problem Possible cause Solution
| The shaver is not fully charged after I charge it in SmartClean system. | You have not placed the shaver in the SmartClean system properly, so there is no electrical connection between the SmartClean system and the shaver. | Press down the top cap ('click') to ensure a proper connection between the shaver and the SmartClean system. |
natural_image
Prohibition sign showing a faucet without raindrops, enclosed in a circle (no text)natural_image
Prohibition sign of a faucet without any text or symbolsnatural_image
Line drawing of a handheld electric shaver with a close-up inset showing the screwdriver tip (no text or symbols)natural_image
Line drawing of a handheld electric shaver with a magnified inset showing the internal component (no text or symbols)natural_image
Illustration of a handheld electric shaver with a star-shaped button and arrow indicating action (no text or symbols)natural_image
Illustration of a handheld electric shaver with a close-up inset showing the tip and screwdriver (no text or symbols)natural_image
Line drawing of a handheld electric shaver with a close-up inset showing the blade (no text or symbols)natural_image
Illustration of a handheld electric shaver with a starburst symbol and a downward arrow (no text or labels)natural_image
Illustration of a handheld electric shaver with a lock icon and a starburst symbol (no text or labels)natural_image
Illustration of a handheld device with a starburst symbol and a magnified view of its internal features (no text or labels)natural_image
Illustration of a handheld device with a magnified view showing a faucet symbol (no text or labels)natural_image
Hand pressing a button on a vertical line, with a power button icon above (no text or symbols)natural_image
Illustration of a handheld electric shaver connected to a plug, with arrows indicating charging direction (no text or symbols)text_image
Diagram showing a spray bottle with two labeled parts: one with a plug and arrow, the other with a tool.natural_image
Diagram showing a hand holding a tool with arrows indicating motion or force, and a magnified inset showing a mechanical component (no text or symbols)text_image
Diagram showing three labeled mechanical or structural components with directional arrows indicating movement or force direction.natural_image
Line drawing of a hand pressing a button on a curved surface (no text or symbols)natural_image
Illustration of a person applying makeup to their ear (no text or symbols present)Schutzmodus
natural_image
Illustration of a person applying facial massage to the neck area (no text or symbols)natural_image
Illustration of a person applying facial contour or mask to the cheek area (no text or symbols)natural_image
Illustration of a medical procedure showing fluid flow through a tube (no text or symbols)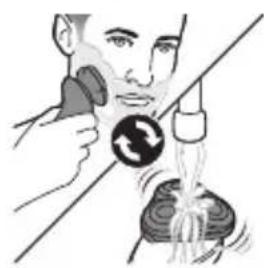
natural_image
Illustration of a person using a handheld device to interact with a circular button (no text or symbols present)text_image
Diagram showing a hand pressing a button labeled 'b' on a device panel, with an arrow indicating the action.natural_image
Diagram showing a robotic arm with motion arrows and a magnified inset of a mechanical component (no text or symbols)natural_image
Line drawing of a person using a handheld device to apply facial hair (no text or symbols)natural_image
Illustration of a spray gun on a curved surface with an inset showing the spray gun (no text or symbols present)natural_image
Illustration of a hand using a handheld electric shaver to clean or remove a surface (no text or symbols)text_image
Diagram showing hair styling technique with numbered steps and directional arrows indicating hair movementnatural_image
Illustration of a person's face with a pointing arrow and a small object above their mouth (no text or symbols)natural_image
Illustration of two hand tools with directional arrows indicating movement or force (no text or symbols)natural_image
Line drawing of a person holding a small object near their face (no text or symbols)natural_image
Illustration of a person applying a medical or cosmetic device to their face (no text or symbols visible)natural_image
Illustration of a handheld electric shaver with a lock icon and a magnified view of the lock (no text or symbols)natural_image
Illustration of a person using a handheld device to interact with a lock icon (no text or symbols present)natural_image
Illustration of a medical procedure showing fluid flow through a bottle (no text or symbols)natural_image
Diagram of a biological structure with arrows indicating direction (no text or symbols)natural_image
Illustration of a pipette dispensing liquid into a container with three compartments (no text or symbols)natural_image
Illustration of a hand pouring liquid into a container with a decorative pattern (no text or symbols)natural_image
Diagram of a biological structure with a central arrow pointing to a multi-layered structure (no text or labels)text_image
Diagram illustrating three steps of cleaning a spray bottle, showing removal, cleaning, and refueling with numbered instructions.text_image
Diagram illustrating three steps of cleaning a spray bottle, showing removal, cleaning, and refueling with numbered instructions.
natural_image
Diagram showing a mechanical joint or bracket with an inset close-up of a gear (no text or symbols present)text_image
Technical diagram showing a mechanical component with three labeled parts and directional arrows indicating motion or force.natural_image
Line drawing of a hand holding two circular buttons with 'Power' and 'Control' symbols, no text or labels presentnatural_image
Simple line drawing of a funnel with three circular icons (no text or symbols)natural_image
Illustration of a hand holding a decorative object with a black arrow pointing to it (no text or symbols present)natural_image
Diagram showing two mechanical components with arrows indicating direction, no text or symbols presentnatural_image
Medical illustration showing surgical procedure with catheter and sutured implant (no text or labels)natural_image
Illustration of two hands holding a tool with directional arrows indicating movement or force (no text or symbols)natural_image
Illustration of two spray bottles spraying water onto a diagonal surface, with footprints visible (no text or symbols)natural_image
Illustration of a hairdryer with a brush and arrow indicating rotation (no text or symbols)natural_image
Simple line drawing of a medical procedure with tubing and a bulb (no text or symbols)text_image
Diagram showing a hairpin with labeled parts and a prohibition symbol indicating no usage.natural_image
Illustration of a hairdryer with a downward arrow and a prohibition symbol (no text or labels)natural_image
Illustration of a shoe being lifted by a spring, showing the foot and ankle (no text or symbols)natural_image
Illustration of a bottle pouring liquid into a container (no text or symbols)natural_image
Illustration of a remote control device with a starburst symbol and a speech bubble containing a skull (no text or labels present)Ersatzanzeige
natural_image
Illustration of a knife inside a tray with a mesh pattern, no text or symbols presentnatural_image
Prohibition sign showing a faucet without raindrops, enclosed in a circle (no text)natural_image
Prohibition sign showing a faucet without a shower, enclosed in a circle (no text or symbols)natural_image
Line drawing of a handheld electric shaver with a close-up inset showing the screwdriver tip (no text or symbols)natural_image
Illustration of a handheld electric shaver with a magnified inset showing internal components (no text or symbols)natural_image
Illustration of a handheld electric shaver with a star-shaped indicator light and a downward arrow (no text or symbols)natural_image
Illustration of a hand holding a small object with a screwdriver icon, no text or symbols presentnatural_image
Line drawing of a handheld electric shaver with a magnified inset showing the blade (no text or symbols)natural_image
Illustration of a handheld electric shaver with a warning symbol (no text or labels)natural_image
Illustration of a handheld electronic device with a lock icon and a starburst symbol (no text or labels)natural_image
Illustration of a handheld electric shaver with a star-shaped warning symbol (no text or labels)natural_image
Illustration of a hand holding a small object with a faucet symbol, no text or labels presentnatural_image
Hand pressing a button on a door panel with an 'Power' button (no text or symbols beyond the icon)natural_image
Diagram of a handheld electric shock absorber with plug and cable, showing wiring connection (no text or symbols)text_image
Diagram showing a spray gun with labeled parts: one emitting a plug and another with a tool, both marked with numbered annotations.natural_image
Diagram showing a hand holding a tool with arrows indicating motion or force, and a magnified inset showing a mechanical component (no text or symbols)text_image
Diagram showing three labeled mechanical or structural components with directional arrows indicating movement or force direction.natural_image
Line drawing of a hand pressing a button on a curved surface (no text or symbols)natural_image
Illustration of a person applying makeup to their face (no text or symbols)Afeitado en seco
natural_image
Line drawing of a person applying facial massage to the neck area (no text or symbols)natural_image
Illustration of a person applying facial cream to their cheek (no text or symbols)natural_image
Diagram of a medical procedure showing fluid flow through a vessel with a bottle (no text or labels)natural_image
Illustration of a person using a rotary phone to interact with a device, no text or symbols presentnatural_image
Hand pressing a button on a device (no text or symbols visible)natural_image
Illustration of a satellite with an antenna and a falling object, no text or symbols presentnatural_image
Illustration of a robotic arm with motion arrows and a magnified inset showing a mechanical component (no text or symbols)natural_image
Diagram showing a robotic arm interacting with a surface, with an inset magnified view of the contact area (no text or symbols present)natural_image
Illustration of a person using a handheld tool to apply facial hair (no text or symbols present)natural_image
Illustration of a hand holding a device with an inset showing a magnified view of the device (no text or symbols present)natural_image
Illustration of a hand using a handheld electric shaver to lift a surface (no text or symbols)text_image
Diagram illustrating hairpin insertion process with labeled parts 1 and 2natural_image
Illustration of a person applying a toothpaste to their face (no text or symbols present)natural_image
Illustration of two hands holding a device with directional arrows and a cross mark, no text or symbols presentnatural_image
Line drawing of a person applying makeup to their ear (no text or symbols)natural_image
Illustration of a mechanical device with a downward arrow and magnified inset showing a circular component (no text or symbols)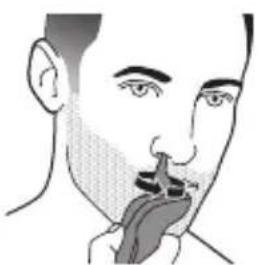
natural_image
Illustration of a person's face showing nasal and oral airway (no text or symbols)natural_image
Illustration of a person receiving a medical or cosmetic procedure with a device attached to the ear (no text or symbols visible)Bloqueo para viajes
natural_image
Illustration of a handheld electric shaver with a lock icon and a speech bubble (no text or symbols on the device itself)natural_image
Illustration of a person using a padlock to interact with their ear (no text or symbols present)natural_image
Illustration of a medical procedure showing fluid flow through a bottle (no text or symbols)natural_image
Illustration of a decorative ornamental object with swirling patterns and a black arrow pointing to it (no text or symbols)natural_image
Illustration of a pipette dispensing liquid into a container with three samples (no text or symbols)natural_image
Illustration of a hand holding a bottle and a container with a spoon (no text or symbols)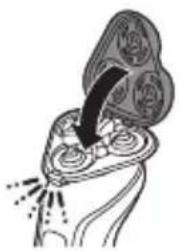
natural_image
Illustration of a medical procedure with arrows indicating direction (no text or symbols)text_image
Diagram showing a droplet on a bottle with a prohibition symbol indicating no droplet.natural_image
Diagram of a mechanical joint or bracket with an inset showing a cross-section of a gear (no text or symbols present)natural_image
Simple line drawing of a mechanical component with a downward arrow indicating force or direction (no text or symbols)text_image
Diagram showing three labeled parts of a mechanical or structural component with directional arrows indicating movement or force.natural_image
Line drawing of a hand holding two circular buttons with a power button, mounted on a device (no text or symbols)
natural_image
Simple line drawing of a funnel with two circular buttons labeled '✓' and 'D' (no text or symbols beyond the icons)natural_image
Illustration of a stylized bird head with ornamental patterns and a black arrow pointing to its wing (no text or symbols)natural_image
Diagram showing two mechanical components with arrows indicating direction, no text or symbols presentnatural_image
Diagram showing two stages of a biological or mechanical process, with no visible text or symbols.natural_image
Illustration of two hands holding a tray with a downward arrow and a spark effect, no text or symbols presentnatural_image
Illustration of two hands performing a rope knot or cable operation, with no text or symbols present.natural_image
Illustration of two hands spraying water onto a surface, one with spray and the other with liquid (no text or symbols)natural_image
Line drawing of a hairdryer with a brush and arrow indicating rotation (no text or symbols)natural_image
Simple line drawing of a fish being fed with a small object, no text or symbols presenttext_image
Diagram showing a hairbrush with labeled parts and a prohibition symbol indicating no text or symbols.natural_image
Illustration of a hairdryer with a downward arrow and a prohibition symbol (no text or labels)natural_image
Illustration of a hand pressing down on a piece of dough with a bag partially visible (no text or symbols)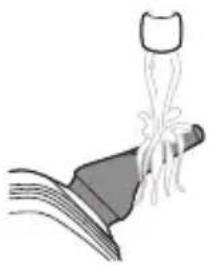
natural_image
Illustration of a bottle being poured into a container (no text or symbols)natural_image
Line drawing of a remote control device with a star-shaped symbol and a speech bubble containing a skull (no text or labels)natural_image
Illustration of a knife inside a container with a handle, showing a tool and arrow (no text or symbols)natural_image
Prohibition sign showing a faucet without spraying water, enclosed in a circle (no text)natural_image
Prohibition sign showing a faucet without spraying water, enclosed in a circle (no text)natural_image
Line drawing of a handheld electric shaver with a close-up inset showing the blade and screw (no text or symbols)natural_image
Line drawing of a handheld electric shaver with a magnified inset showing internal components (no text or symbols)natural_image
Illustration of a handheld electric shaver with a star-shaped button and arrow indicating action (no text or symbols)natural_image
Line drawing of a handheld electric shaver with a close-up inset showing the screwdriver tip (no text or symbols)natural_image
Line drawing of a handheld electric shaver with a close-up inset showing the blade (no text or symbols)natural_image
Illustration of a handheld electric shaver with a starburst symbol indicating power or current (no text or labels)natural_image
Illustration of a handheld electric shaver with a lock icon and a speech bubble (no text or symbols)natural_image
Illustration of a handheld electronic device with a starburst symbol and a speech bubble containing a heart-like symbol (no text or labels present)natural_image
Illustration of a handheld device with a faucet symbol and a magnified inset showing the faucet (no text or labels)natural_image
Hand holding a button with an 'Power' icon, pointing to a circular button (no text or symbols present)natural_image
Illustration of a handheld electric shaver connected to a plug, with arrows indicating cable or wiring (no text or symbols)text_image
Diagram showing a spray bottle with two labeled parts: one with a plug and label ①, and another with a tool and label ②.natural_image
Diagram showing a hand holding a device with arrows indicating motion, and a magnified inset showing internal components (no text or symbols)text_image
Diagram showing three labeled mechanical or structural components with directional arrows indicating movement or force direction.natural_image
Line drawing of a hand pressing a button on a vertical surface, no text or symbols presentnatural_image
Illustration of a person applying a hair accessory to their face (no text or symbols)natural_image
Illustration of a person applying facial massage to the ear (no text or symbols)natural_image
Illustration of a person applying facial care to their face (no text or symbols)natural_image
Illustration of a medical procedure showing fluid flow through a bottle (no text or symbols)natural_image
Illustration of a person using a handheld device to interact with a circular device (no text or symbols visible)natural_image
Hand pressing a button on a surface, showing a black arrow pointing to the button (no text or symbols present)natural_image
Illustration of a satellite with a satellite above a hand, showing no text or symbolsnatural_image
Illustration of a robotic arm with motion arrows and a magnified inset showing a mechanical component (no text or symbols)natural_image
Diagram showing a mechanical component with an arrow indicating force or direction, and a magnified inset showing a circular component (no text or symbols)natural_image
Illustration of a person using a hairdryer to apply a product (no text or symbols present)natural_image
Illustration of two hands holding a device with directional arrows indicating movement (no text or symbols)natural_image
Line drawing of a person applying a cotton or cotton product to their neck (no text or symbols)natural_image
Illustration of a laboratory setup with a funnel and droplet, showing a test tube and a graduation cap (no text or symbols)natural_image
Illustration of a person's face showing nasal and oral airway (no text or symbols)natural_image
Illustration of a person's face with a medical device inserted, showing no text or symbolsnatural_image
Illustration of a handheld electric shaver with a lock icon and a speech bubble (no text or symbols on the device itself)natural_image
Illustration of a person using a handheld device to interact with a lock icon (no text or symbols present)natural_image
Diagram of a hand holding a bottle with liquid flowing through a bulb-like structure (no text or symbols)natural_image
Illustration of a hand holding a stylized object with a black arrow pointing to it (no text or symbols present)natural_image
Illustration of a hand pouring liquid into a container with three petri dishes (no text or symbols)natural_image
Illustration of a hand pouring liquid into a container with a bulb-like structure (no text or symbols)natural_image
Diagram of a biological structure with arrows indicating direction (no text or labels)text_image
Diagram showing two methods of cleaning a spray bottle: one with a cross mark and the other with an electrical socket labeled ① and ②.natural_image
Illustration of a hand holding a tool with an inset showing a magnified view of the tool tip (no text or symbols present)natural_image
Simple line drawing of a mechanical component with a downward arrow, no text or symbols present.text_image
Diagram showing three labeled mechanical or structural components with directional arrows indicating motion or force direction.natural_image
Line drawing of a hand holding two circular buttons with 'Power' and 'Spiral' symbols, next to a device (no text or labels)natural_image
Simple line drawing of a funnel with two circular icons labeled '✓' and 'D' (no text or symbols beyond the icons)natural_image
Illustration of a biological structure with a central arrow pointing to a textured surface (no text or symbols)text_image
Diagram showing a circular mechanical or fluid system with two directional arrows labeled 1 and 2, indicating rotational or flow paths.
natural_image
Diagram showing two mechanical components with arrows indicating direction, no text or symbols presentnatural_image
Medical illustration showing surgical procedure with needle insertion and catheter insertion (no text or labels)natural_image
Abstract diagram with a circular shape and arrowhead, no text or symbols presenttext_image
Illustration showing a person using a computer with a speech bubble containing a brain icon and a 'X' symbol, likely indicating a warning or instruction.natural_image
Illustration of two hands holding leafy greens with a magnified view of the green leaf (no text or symbols)natural_image
Illustration of a hand gripping a wrist with directional arrows indicating movement (no text or symbols)natural_image
Illustration of two spray bottles spraying water onto a diagonal surface, with no text or symbols present.natural_image
Illustration of a hairdryer with a brush and arrow indicating rotation (no text or symbols)natural_image
Simple line drawing of a medical procedure with tubing and a bulb (no text or symbols)text_image
Diagram showing a hairbrush with labeled parts and a prohibition symbol indicating no effect.natural_image
Illustration of a hairbrush cutting into a toothbrush with a prohibition symbol (no text or labels)natural_image
Illustration of a shoe being lifted by a bag (no text or symbols)natural_image
Illustration of a mechanical component with a handle and spring, no text or symbols presentnatural_image
Illustration of a handheld electric shaver with a star-shaped warning symbol (no text or labels)natural_image
Illustration of a knife pressing down on a textured surface inside a container (no text or symbols)natural_image
Prohibition sign showing a faucet without raindrops, enclosed in a circle (no text)natural_image
Prohibition sign showing a faucet without raindrops, enclosed in a circle (no text)natural_image
Illustration of a handheld electric shaver with a star-shaped button and magnified detail (no text or symbols)natural_image
Line drawing of a handheld electric shaver with a magnified inset showing internal components (no text or symbols)natural_image
Illustration of a handheld electric shaver with a starburst symbol and arrow indicator (no text or labels)natural_image
Illustration of a handheld device with a screwdriver and a magnified view of its tip (no text or symbols)natural_image
Illustration of a handheld device with a magnified inset showing a screwdriver tip (no text or symbols)natural_image
Illustration of a handheld electric shaver with a starburst symbol and arrow pointing to it (no text or labels)natural_image
Illustration of a handheld electric shaver with a lock icon and a starburst symbol (no text or labels)natural_image
Illustration of a handheld device with a star-shaped symbol and a speech bubble (no text or labels)natural_image
Illustration of a handheld electric shaver with a magnified view showing a faucet symbol (no text or labels)natural_image
Hand holding a button with an arrow, pointing to a circular icon (no text or symbols present)natural_image
Diagram of a plug connected to a handheld device with an arrow indicating cable or connection (no text or symbols present)text_image
Diagram showing a spray bottle with two labeled parts: one with a plug and label ①, and another with a tool and label ②.natural_image
Diagram showing a hand holding a tool with arrows indicating motion, and an inset magnified view of a mechanical component (no text or symbols)text_image
Diagram illustrating three steps of a hairpin or grip mechanism with labeled arrows indicating movement and shading.natural_image
Illustration of a hand pressing a button on a curved surface (no text or symbols)natural_image
Illustration of a person using a hairdryer to apply product (no text or symbols)natural_image
Illustration of a person applying facial massage to the ear (no text or symbols)natural_image
Illustration of a person applying facial contour or mask to the neck area (no text or symbols)natural_image
Diagram of a hand holding a bottle with liquid flowing through a bulb-like structure (no text or symbols)natural_image
Illustration of a person using a handheld device to interact with a circular device (no text or symbols visible)natural_image
Hand pressing a button on a vertical surface, with a power button and circular button nearby (no text or symbols)text_image
Diagram illustrating a mechanical or electrical process with labeled components and directional arrows, showing hand positioning and tool insertion.natural_image
Illustration of a robotic arm with motion arrows and a magnified inset showing a circular component (no text or symbols)natural_image
Illustration of a medical or laboratory procedure showing a syringe inserted into a device with an inset magnified view (no text or symbols)natural_image
Line drawing of a person receiving a hairpin (no text or symbols)natural_image
Illustration of two hand positions with arrows indicating movement or force direction (no text or symbols)natural_image
Line drawing of a person applying a cotton or cotton product to their neck (no text or symbols)natural_image
Illustration of a laboratory probe tip with an arrow indicating motion, accompanied by a magnified inset showing a graduation cap (no text or symbols present)natural_image
Illustration of a person's face showing nasal and oral airway (no text or symbols)natural_image
Line drawing of a person's face with a medical device attached to the ear (no text or symbols)natural_image
Illustration of a handheld electronic device with a lock icon and a magnified view of its lock (no text or symbols present)natural_image
Illustration of a person using a handheld device to mask or brush (no text or symbols present)natural_image
Diagram of a medical procedure showing fluid flow through a vessel with a pipette (no text or labels)natural_image
Illustration of a decorative object with swirling patterns and an arrow pointing to it (no text or symbols)natural_image
Illustration of a pipette dispensing liquid into a container with three petri dishes (no text or symbols)natural_image
Illustration of a hand holding a bread roll and a bottle with noodles (no text or symbols)natural_image
Diagram of a biological structure with arrows indicating direction (no text or labels)text_image
Diagram showing a droplet on a bottle with a prohibition symbol indicating no droplets.natural_image
Diagram of a mechanical joint or bracket with an inset showing a close-up view of a joint detail (no text or symbols present)natural_image
Simple line drawing of a mechanical component with a downward arrow indicating force or direction (no text or symbols)text_image
Diagram showing three labeled mechanical or structural components with directional arrows indicating motion or force directions.natural_image
Line drawing of a hand holding two circular buttons with 'Power' and 'Spiral' symbols, no text or labels present
text_image
Diagram showing three circular icons with check and cross symbols, likely indicating approval or verification points.natural_image
Illustration of a biological structure with a curved arrow pointing to a circular region (no text or symbols)natural_image
Diagram showing two mechanical components with arrows indicating direction, no text or symbols presentnatural_image
Medical illustration showing a surgical procedure with an anatomical view of the needle and a catheter (no text or labels)natural_image
Abstract diagram with a central circular shape and an arrow pointing downward, resembling a mechanical or architectural component (no text or symbols)text_image
Medical illustration showing a hand holding a device with a magnified view of a brain lesion marked with an 'X' symbol.chemical
Chemical structure diagram showing a triangular arrangement of rings with a checkmark indicating a specific site or reaction step.natural_image
Illustration of two hands holding a leaf with a downward arrow and a spark effect, no text or symbols presentnatural_image
Illustration of two hands holding a wrist with directional arrows indicating movement or force (no text or symbols)Maak de baardstyler na elk gebruik schoon.
natural_image
Illustration of two hands spraying water onto a surface, one with spray and the other with spray (no text or symbols)natural_image
Illustration of a hairdryer with a curved arrow indicating rotation (no text or symbols)natural_image
Simple line drawing of a medical procedure with tubing and a pipette (no text or symbols)text_image
Diagram showing a hairbrush with labeled parts and a prohibition symbol indicating no text.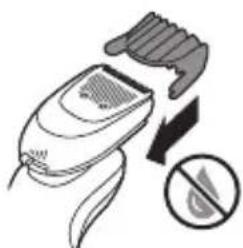
natural_image
Illustration of a hairdryer with a downward arrow and a prohibition symbol (no text or labels)8 Bevestig de droge kam op de baardstyler.
natural_image
Illustration of a hand pressing down on a small object with a bottle (no text or symbols)natural_image
Illustration of a bottle pouring liquid into a container (no text or symbols)natural_image
Illustration of a handheld electric shaver with a starburst symbol and a speech bubble containing a skull (no text or labels)Vervangingsherinnering
natural_image
Illustration of a knife cutting through a plastic container with a handle (no text or symbols)natural_image
Prohibition sign showing a faucet without a shower, enclosed in a circle (no text or symbols)natural_image
Prohibition sign showing a faucet without a shower, enclosed in a circle (no text or symbols)natural_image
Illustration of a handheld electric shaver with a close-up of its tip and starburst pattern (no text or symbols)natural_image
Line drawing of a handheld electric shaver with a magnified inset showing internal components (no text or symbols)natural_image
Illustration of a remote control device with a star-shaped symbol and a speech bubble containing a skull (no text or labels)natural_image
Illustration of a handbrush with a faucet symbol and a magnified inset showing the faucet (no text or labels)natural_image
Hand pressing a button on a device (no text or symbols visible)natural_image
Illustration of a handheld electric shaver connected to a power outlet (no text or symbols)text_image
Diagram showing a spray bottle with two labeled parts: one with a plug and label ①, and another with a tool and label ②.natural_image
Diagram showing a hand holding a tool with arrows indicating motion, alongside an inset magnified view of a mechanical component (no text or symbols)text_image
Diagram illustrating three stages of a climbing process with directional arrows and labeled parts 1, 2, and 3.natural_image
Illustration of a hand pressing a button on a vertical surface, with no visible text or symbolsnatural_image
Illustration of a person applying a hair product to their face (no text or symbols)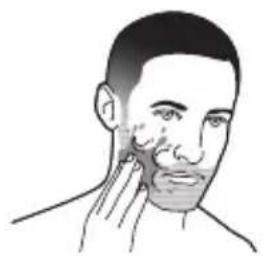
natural_image
Illustration of a person applying facial care to their cheek (no text or symbols)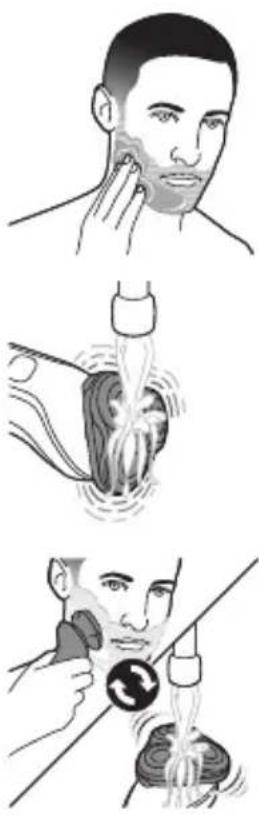
text_image
Illustration showing three steps of facial massage technique: eye, hand washing, and mouth massage with a circular button.natural_image
Hand pressing a button on a car interior (no text or symbols visible)보호 모드로 면도
natural_image
Illustration of a hand holding a small object with an upward arrow, no text or symbols presentnatural_image
Illustration of a robotic arm with motion arrows and a magnified inset showing a mechanical component (no text or symbols)natural_image
Illustration of a robotic arm with motion arrows and a magnified inset showing a graduation cap (no text or symbols)natural_image
Illustration of a person using a hairdryer to apply facial hair (no text or symbols present)natural_image
Illustration of a spray gun on a surface with an inset showing the tip and base (no text or symbols)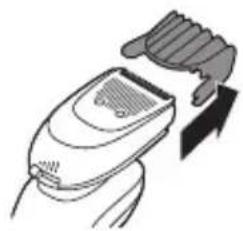
natural_image
Illustration of a hand holding a hairdryer with a downward arrow indicating compression (no text or symbols)text_image
Diagram showing hairpin insertion process with labeled parts 1 and 2, indicating hairpin insertion directionnatural_image
Illustration of a person applying a toothpaste to their face (no text or symbols present)natural_image
Illustration of two hands holding a device with directional arrows indicating movement (no text or symbols)natural_image
Line drawing of a person applying a cotton swab to their neck (no text or symbols)natural_image
Illustration of a laser cutting tool emitting laser beams onto a surface, with an inset showing the same component (no text or symbols present)natural_image
Illustration of a person's face showing nasal and oral airway (no text or symbols)natural_image
Illustration of a person's face with a medical device attached to the ear (no text or symbols visible)natural_image
Illustration of a handheld electric shaver with a lock icon and a magnified view of the lock (no text or symbols)natural_image
Illustration of a person using a handheld device to interact with a lock icon (no text or symbols present)natural_image
Anatomical illustration of a human head and neck with internal organs, showing fluid flow or movement (no text or labels)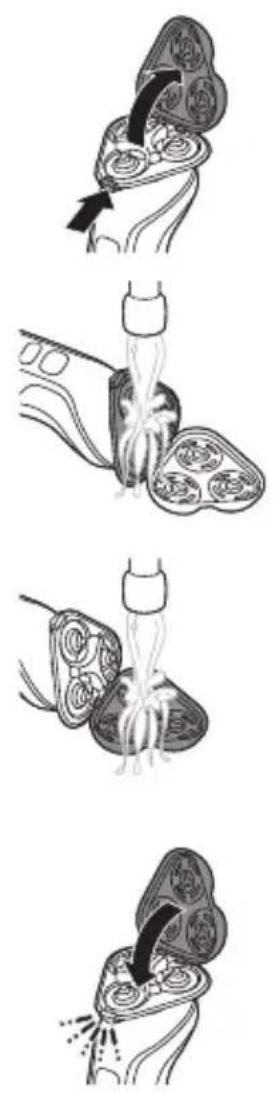
natural_image
Simple line drawing of a paintbrush with a cross mark, no text or symbols present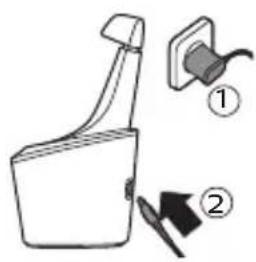
text_image
Diagram showing a spray gun with labeled parts: one emitting a plug and another with a tool, both marked with numbered annotations.
text_image
Diagram of a mechanical component with numbered parts and directional arrows indicating motion or forcenatural_image
Illustration of a traditional embroidered crown with ornate patterns and a black arrow (no text or symbols)1 제품 전원을 끄십시오.