USER MANUAL Powerplayer PerfectPro
Product name: Powerplayer
Art.nr.: PP800L
Prime Europe B.V. hereby declares that this model PP800L is in compliance with the essential requirements and other relevant provisions of Directive 2014/53/EU and also fulfills all the relevant provisions of EC/EU Directives: 2011/65/EU.
The EU declaration of conformity is available at the following internet address:
http://www.perfectpro.nl/support/ce-docs/
Important safety instructions 3
Power Supply 4
AC Mains Operation 4
Lithium Battery Operation and Charging 4
User Safety Precautions 5
Using The Device For The First Time 6
Controls 7
DAB Mode 11
Operating the radio 11
Selecting a station 11
Secondary services 11
Display modes 12
Finding new stations 12
Manual tuning 12
Dynamic Range Control (DRC) settings 13
Prune stations 13
FM Mode 14
Operating the radio 14
Manual tuning 14
RDS station service 14
Display Modes 15
Scan sensitivity setting 15
Preset Stations 15
Storing preset stations in DAB and FM modes 15
Recalling preset stations in DAB and FM modes 16
Bluetooth 16
Pairing Bluetooth with your mobile phone 17
Playing music from your mobile phone 18
Display modes 18
Device List - Connect to the paired device 18
Restart Bluetooth pairing 18
USB Mode 19
Insert and remove a USB memory device 19
Playing music files 20
File searching 20
Play mode 20
Information function 21
Aux In Mode 21
Setting The Clock 22
Time format 22
Auto update 22
Equaliser 23
Setting up your My EQ profile 23
Setting alarm clock 24
When alarm sounds 25
Alarm clock activation in Standby mode 26
Disabling alarms 26
Snooze timer 26
Sleep timer 26
Language 27
Software update 27
Software version 27
System 28
Backlight 28
Warranty 29
Specifications 29
Power requirements 29
Frequency coverage 29
Circuit features 29
Bluetooth 29
Environmental note 30

WARNING! WARRANTY BECOMES VOID ONCE THE DEVISE CABINET HAS BEEN OPENED OR ANY MODIFICATIONS TO THE ORIGINAL DEVICE HAVE BEEN MADE. NEVER OPEN THE DEVICE CASING. THE MANUFACTURER WILL NOT ACCEPT ANY LIABILITY FOR DAMAGE RESULTING FROM IMPROPER HANDLING. THE TYPE PLATE IS LOCATED ON THE BOTTOM OF THE DEVICE.

Bluetooth
The Bluetooth® word mark and logos are registered trademarks owned by Bluetooth SIG, Inc. and any use of such marks is under license.
IMPORTANT SAFETY INSTRUCTIONS
- Read these instructions.
- Keep these instructions.
- Heed all warnings.
- Follow all instructions.
- Clean only with dry cloth.
- Do not block any ventilation openings. Install in accordance with the instructions.
- Do not install near any heat sources such as radiators, heat registers, stoves or other apparatus (including amplifiers) that produce heat.
- Do not defect the safety purpose of the polarized or grounding - type plug. A polarized plug has two blades with one wider than the other. A grounding type plug has two blades and a third grounding prong. The wide blade or the third prong is provided for your safety. If the provided plug does not fit into your outlet, consult an electrician for replacement of the obsolete outlet.
- Protect the power cord from being walked on or pinched particularly at plug, convenience receptacles, and the point where they exit from the apparatus.
- Only use attachments/accessories specified by the manufacturer.
- Use only with the cart, stand, tripod, bracket, or table specified by the manufacturer, or sold with the apparatus. When a cart is used, use caution when moving the cart/ apparatus combination to avoid injury from tip-over.
- Unplug this apparatus during lightning storms or when unused for long periods of time.
- Refer all servicing to qualified service personnel. Servicing is required if the apparatus has been damaged in any, such as power-supply cord or plug is damaged, liquid has been spilled or objects have fallen into the apparatus, the apparatus has been exposed to rain or moisture, does not operate normally, or has been dropped.
- To reduce the risk of fire or electric shock, do not expose this appliance to rain or moisture.
- Do not remove the cover; there are no user-serviceable parts inside.
- No naked flame sources shall be placed on the apparatus.
- For outdoors use, to avoid electric shock, use battery only during a raining day or the weather is wet. To prevent electric shock, if the radio has been exposed to rain or water, the power supply cord and plug must be completely dried before plugging into the mains socket outlet.
- The power plug should be close to the apparatus, and easy to be approached that during emergency, to disconnect the power from the apparatus, just unplug the power plug from the AC power slot.
- The marking information is located at the back of the apparatus.
- This apparatus is provided with protection against splashing water (IP65).
- In case of malfunction due to electrostatic discharge or fast transient (burst), remove and reconnect the power supply.
- The apparatus must be used in a moderate climate.
- To prevent possible hearing damage, do not listen at high volume levels or long periods.
- Under the environment with Conducted Immunity disturbance / Radiated Immunity, the radio may malfunction. It will automatically recover to normal when the Conducted Immunity disturbance / Radiated Immunity stopped.
POWER SUPPLY
AC Mains Operation
- Before plugging the AC power plug into the AC mains power socket, be sure the voltage is correct.
- AC power cord storage and power plug storage is designed to store the cord and the plug when the Powerplayer is not in use.
NOTE:
In order to disconnect the Powerplayer from the AC mains power completely, the AC power plug should be removed from the AC mains power socket completely and it shall remain readily operable and should not be obstructed during intended use.
In case of malfunction due to electrostatic discharge or fast transient (burst), remove the AC power plug from AC mains power socket and reconnect the AC power plug after approximately one minute.
LITHIUM BATTERY OPERATION AND CHARGING
NOTE ON FIRST USE: BEFORE OPERATING THE POWER PLAYER FOR THE FIRST TIME ALWAYS FIRST FULY CHARGE THE BATTERY.
The Powerplayer can be operated by the built-in Lithium battery. During operation on battery power the approximate power level of the battery is displayed in the LCD display of the radio.
When the battery power level is very low, the battery symbol flashes on the display. Under this condition, the battery should be recharged as soon as possible to continue normal operation of the Powerplayer.
Charging time from empty to full battery is approximately 5-6 hours (at room temperature with radio in Standby mode). The Powerplayer can be charged in Standby mode as well as in On mode while playing music. While playing music the charging time will be longer than in Standby mode.
The Powerplayer, for additional safety, will not start charging when the battery is already full or nearly full.
NOTE ON PLAYING TIME ON BATTERY POWER: The achieved playing time on battery power depends on many factors such as: selected volume level, music type (bass heavy music consumes more energy), selected music source (DAB, FM, Bluetooth or AUX-IN), selected EQ setting, ambient temperature and age of the battery. Depending on these variables a playing time of approximately 18 to 24 hours on a medium set volume level can be achieved.
NOTE ON LITHIUM BATTERY LIFE: If the Powerplayer is not used for any extended period of time, always first charge the built-in battery until it is full. The optimum working life from the built-in battery will be obtained if it is kept topped up by recharging after each use of the Powerplayer, even if it is only partially discharged. The battery's working life will be reduced if the product is left in a discharged condition for a long period of time.
WARNING:
Do not attempt to replace or repair the built-in lithium battery. If you have any doubts about the built-in lithium battery, please contact the service department of Perfectpro for further assistance.
WARNING:
Danger of explosion if the battery is incorrectly replaced.
Do not expose the battery to excessive heat such as sunshine, fire or the like.
Batteries should not be disposed of by incineration and with household waste.
Disposable batteries should be taken to a suitable recycling centre if possible.

The internal rechargeable lithium-polymer battery used in this device is able to supply power for a long period of time. However, even lithium-polymer batteries reach a point where they cannot be recharged. If the battery does not recharge after several attempts, it may be drained (have a too low charge), please contact service@perfectpro.eu for repair information.
However, if you do not want us to replace the battery, you will need to dispose of used batteries/ device in accordance to the laws and regulations in your area. In addition, you can contact your local electronics retailers or recycling centre for disposal.
User Safety Precautions
- Check the room temperature range is 0^ - 45^ ( 32^ - 113^ Fahrenheit) before charging the battery.
- Do not attempt to disassemble the plastic covering or any parts of the device, as the materials inside may be toxic and may damage skin and clothes.
- Do not puncture, crush, modify, throw or cause any unnecessary shock to your battery, as the battery used in this device may present a risk of fire, explosion, or chemical burn if mistreated.
- Do not leave, charge or use the battery in a car under direct sunlight, near fire or a heated source.
Do not immerse, throw, wet the battery in water/ seawater.
- Do not use or charge the battery if it appears to be abnormally hot, discoloration, deformation or abnormal conditions is detected during use, charge or storage.
- Do not leave a charging battery unattended. Keep the battery away from babies and children.
USING THE DEVICE FOR THE FIRST TIME
- Place the radio on a flat surface.
- Carefully extend the antenna located on the top of the radio. Adjust the antenna so it is vertically extending above the radio.
- Plug the AC power cord into the AC socket. The radio will start up and the display will show "PerfectPro Powerplayer" for a second. Then the radio will automatically perform an auto scan of the Band III DAB channels and the FM band in the back ground.
- When the scan is completed, the 10 strongest FM stations and the first 10 DAB stations will be stored as presets. The radio will switch to standby with the updated clock and date showing on the display.
- If no signals are found, the clock will not be updated. It may be necessary to relocate the radio to a position giving better reception.
CONTROLS
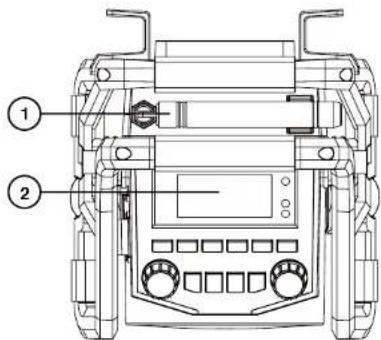
1. Antenna
2. LCD
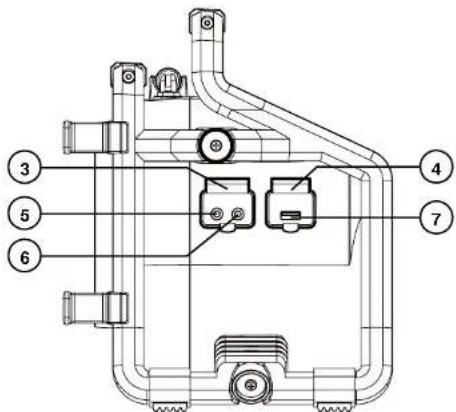
3. Rubber cover Phones/AUX-In
4. Rubber cover USB
5. Phones jack
6. AUX-In jack
7. DC Out USB
CONTROLS
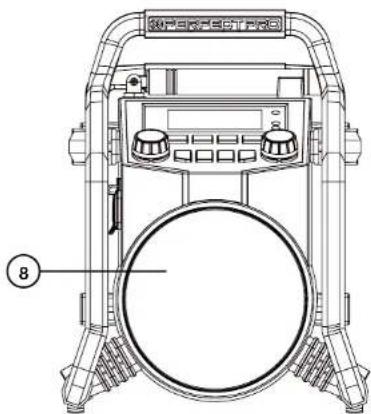
8. Speaker
CONTROLS
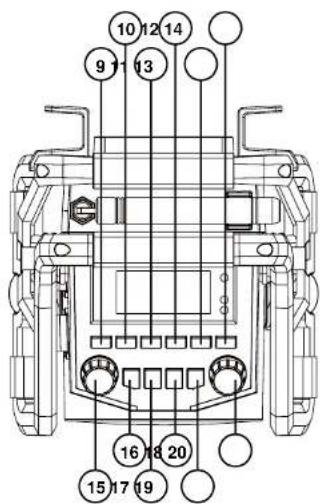
- Preset 1
- Preset 2
- Preset 3/Backward
- Preset 4/Forward
- Preset 5/Play/Pause
- Preset
- Volume / Equaliser knob
- Power
- Menu
- Source
- Info
- Tuning / Select knob
CONTROLS
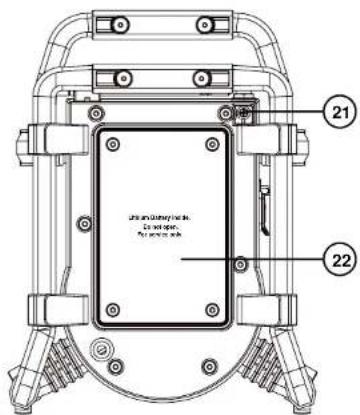
- Antenna Screw
- Battery cover
DAB MODE
Operating the radio
- Carefully extend the antenna. Press the Power button to switch on the radio.
- If this is the first time to switch on, the radio will be in DAB mode.
- The first station (in numeric-alpha order 0...9...A...Z) in the list of stations found will be played. The display will show the station name.
If the radio has been used before, the last used station will be selected.
- If no signals are detected, "No stations found" will be displayed. It may be necessary to relocate the radio to a position giving better reception.
You should then carry out an auto scan to find stations, please refer to the section "Find new stations - DAB".
Selecting a station
- Press the Power button to switch on the radio.
- The display shows the name of the radio station currently selected.
- Rotate the Tuning / Select knob to scroll through the list of available stations.
- When the desired station name appears on the display, press the Tuning / Select knob to select the station. The display will show the station name while playing.
Note: If after selecting a station the display shows "Service not available", it may be necessary to relocate the radio to a position giving better reception.
Secondary services
- Certain radio stations have one or more secondary services associated with them. If a station has a secondary service associated with it, then the secondary service will appear immediately after the primary service as you turn the Tuning / Select knob.
- Press the Tuning / Select knob to select the secondary service. Most of secondary services do not broadcast continually and if the selected service is not available, the radio will re-tune to the associated primary service.
Display modes
In DAB mode, the radio can display a range of information on the display.
Press the Info button to cycle through the various modes.
a. Scrolling text Displays scrolling text message such as artist/track name, phone in number, etc.
b. Program Type Displays type of station being listened to e.g. Pop, classic, News, etc.
c. Signal strength Displays the signal strength of radio reception. The clear unfilled rectangle indicates minimum signal level required for satisfactory reception.
d. Multiplex name & frequency Displays name of multiplex to which the current station belongs. And to displays channel number and frequency for the currently tuned DAB station.
e. Bit rate & audio type Displays the digital audio bit rate.
f. Date Displays the date of today.
Finding new stations
Should you wish to use your radio for DAB reception in a new location, or if no stations were detected during the initial scan, you can follow this procedure to allow your Powerplayer to find out which DAB radio stations are available. Also, from time to time, new stations may become available. You may proceed to find new stations as follows:
- Press the Source button to DAB mode.
- Press the Tuning / Select knob, the radio will perform a scan of the Band III DAB channels.
As new stations are found, the station counter on the right-hand side of the display will increase and stations will be added to the list.
Manual tuning
Manual tuning allows you to tune the radio directly to various DAB Band III channels.
- Press the Menu button, the display shows "Manual tune", then press the Tuning / Select knob.
- Rotate the Tuning / Select knob to select the desired DAB channel. Press the Tuning / Select knob to tune the chosen frequency.
-
The signal strength display with an open bar shows the minimum signal strength needed for good DAB reception. The signal strength bars will go up or down showing the changing signal strength as you adjust the antenna or the radio position.
-
When a DAB signal is found, the display will show its signal strength. Any new radio stations found will be added to the list stored in the radio.
- Press the Tuning / Select knob to return to normal DAB service.
Dynamic Range Control (DRC) settings
DRC can make quieter sounds easier to hear when the radio is used in a noisy environment.
- In DAB mode, press the Menu button, the display shows "Manual tune".
- Rotate the Tuning / Select knob until the display shows "DRC". Press the Tuning /
Select knob.
- Rotate the Tuning / Select knob to select required DRC setting (default is Off).
DRC off DRC is switched off. Broadcast DRC will be ignored.
DRC high DRC is set to high as sent by broadcaster.
DRC low DRC level is set to low that sent by broadcaster.
- Press the Tuning / Select knob to confirm the setting. The display will return to normal radio display.
Note: Not all DAB broadcasts use the DRC function. If the broadcast does not provide DRC information, the DRC setting in the radio will have no effect.
Prune stations
If you move to a different part of the country, some of the stations which were listed may no longer be available. Also, from time to time, some DAB services may stop broadcasting, or may change location or frequency. The Prune stations function will delete the unavailable DAB stations from your station list.
- In DAB mode, press the Menu button, the display shows "Manual tune".
- Rotate the Tuning / Select knob until the display shows "Prune".
- Press the Tuning / Select knob to enter the setting.
- Rotate the Tuning / Select knob to select between "Yes" or "No" (default is No).
Select "Yes" to enable this function if required, otherwise, select "No".
- Press the Tuning I Select knob to confirm your setting. The display will return to normal radio display.
Note: If you have moved the radio to a different part of the country, you should also carry out a search for new stations (please see the section "Finding new stations - DAB").
FM MODE
Operating the radio
- Press the Power button to turn on the radio.
- Select the FM waveband by pressing the Source button.
- If this is the first time to switch to FM mode, the station in preset 1 will be played. If the radio has been used before, the last listened station will be played.
- To seek station, press the Tuning / Select knob. The scan stops automatically when it finds a station of sufficient strength.
- After a few seconds, the display will update and show station name if RDS information is being received.
- To find other stations, press the Tuning / Select knob again.
- To seek station in an opposite direction, rotate the Tuning / Select knob clockwise (to scan from low frequency to high frequency) or rotate anti-clockwise (to scan from high frequency to low frequency), and press the Tuning / Select knob.
- When the waveband end is reached, the radio will recommence tuning from the opposite waveband end.
Manual tuning
- Press the Power button to turn on the radio.
- Select the FM band by pressing the Source button.
- Rotate the Tuning / Select knob to reach the required FM station.
The radio will change the frequency in steps of 50kHz
- Rotate the rubber antenna to get the best reception. If the radio is tuned to a station of sufficient signal strength with RDS information present, the display may change to show the station name.
- When the waveband end is reached, the radio will recommence tuning from the opposite waveband end.
RDS station service
RDS (Radio Data System) is an information system which inaudible digital information is transmitted in addition to the normal FM radio program. When the radio is receiving a RDS station and the reception strength is sufficient, the station name will appear in the display. It may take some time before the RDS information is available.
Display Modes
When you are listening to a FM station with RDS system, repeatedly press the Info button to cycle through the information. This will only function if the reception level is sufficient and clear.
a. Radio text Displays the message about the station being listened to as ticker text.
b. Program type Displays the type of station being listened to, e.g. Pop, Classic, News, etc.
c. Frequency Displays the frequency of the station being listened to.
d. Date Displays the date of today.
Scan sensitivity setting
The radio will normally scan all stations from FM broadcasts including the weaker signals. However, you may wish the Auto-scan to find only those stations with strong enough signals to give good reception.
- Press the Power button to turn on the radio.
- Select the FM band by pressing the Source button.
- Press the Menu button, the display shows "Scan setting".
- Press the Tuning / Select knob, display will show "Strong stations only?"
- Rotate the Tuning / Select knob to select between "Yes" or "No" (default is Yes). The "Yes" option will allow the radio to find strong signals only when scanning.
- Press the Tuning / Select knob to confirm your setting. The display will return to normal radio display.
PRESET STATIONS
Storing preset stations in DAB and FM modes
There are 20 memory presets in the radio, 10 for DAB and 10 for FM. Presets are remembered by the radio in the event of a power failure.
For preset 1-5:
- Press the Power button to turn on the radio.
- Press the Source button to select the desired waveband.
- Tune to the required station
- Press and hold the required Preset button until the display shows for example "Preset 01 Stored".
- Repeat step 3 and 4 for the remaining presets.
For preset 6-10:
- Press the Power button to turn on the radio.
- Press the Source button to select the desired waveband.
-
Tune to the required station
-
Press and hold the Preset button until the display shows the list of presets.
- Turn the Tuning / Select knob until you reached the required preset number (1-10).
- Press the Tuning / Select knob to store the preset.
Stations stored in the preset memories can be over-written by following the above procedure.
Recalling preset stations in DAB and FM modes
For preset 1-5:
- Press the Power button to turn on the radio.
- Press the Source button to select the desired waveband.
- Briefly Press the required Preset button, the display will show, e.g. "P1", at the end of first line.
For preset 6-10:
1. Press the Power button to turn on the radio
2. Press the Source button to select the desired waveband.
3. Briefly Press the Preset button, the display will show the list of presets
4. Turn the Tuning / Select knob until you reached the required preset number (1-10).
5. Press the Tuning / Select knob to select the preset. The display will return to normal radio display.
BLUETOOTH
The Bluetooth mode on your Powerplayer allows you to play audio, play sound from video files and stream music from Bluetooth capable devices such as your mobile phone, computer, tablet etc. through your Powerplayer loudspeaker.
- When a Bluetooth enabled device such as your Powerplayer is in a
'discoverable' state other Bluetooth devices can detect, pair with or connect to it.
- 'Bluetooth pairing' occurs when two Bluetooth enabled devices agree to establish a connection and communicate with each other.
- The Bluetooth connected LED on the panel will blink fast with short intervals when it is discoverable or when it is trying to connect to a previously paired Bluetooth device. When a device is paired with and connects to the radio, the blue Bluetooth connected LED will blink slow with long intervals.
Bluetooth connectivity performance may vary depending on the connected Bluetooth devices. Please refer to the Bluetooth capabilities of your device before connecting to your Powerplayer. All features may not be supported on some paired Bluetooth devices.
A Bluetooth connection can provide a link for audio up to a distance of approximately ten metres. When pairing two Bluetooth enabled devices, for convenience, we recommend they should be no more than 2 to 3 metres apart. The presence of other functioning Bluetooth devices during connection may lead to operational difficulties.
Bluetooth is a short-range radio communication system and generally Bluetooth devices can communicate with each other clearly within a regular sized room or office. The reliability of a Bluetooth connection between different rooms will greatly depend upon the construction of the building.
Bluetooth communication range may be substantially reduced if the signal passes through a solid object. Human bodies, brick and concrete walls, heavy furniture or bookcases will all reduce the operational range of your Bluetooth devices to a greater or lesser extent. Glass, dry-wall or wood panelled walls and office partitions may have a less severe but noticeable effect. Metal pipes, foil-lined plasterboard, metal window frames and domestic wiring can also have an effect. You should position your Bluetooth devices closer to each other if you observe communication difficulties.
WiFi networks and cordless phones generally use similar radio frequencies to Bluetooth and may interfere with one another. If any interference is noticed, then try relocating the Powerplayer or one of the other devices.
The Bluetooth capabilities of your Powerplayer enable it to receive audio from many Bluetooth capable devices including mobile phones, personal computers and tablets. Only one Bluetooth device can be connected to your Powerplayer at a time. It supports the following Bluetooth profiles and functionality.
- Your Powerplayer supports A2DP (Advanced Audio Distribution Profile) which is a audio connection that streams music from PCs, mobile phones etc. SBC and AAC audio codecs are supported.
- Your Powerplayer supports AVRCP (Audio Video Remote Control Profile) that allows your radio to control music playback from the connected device.
Note: Some mobile phones may temporarily disconnect from your Powerplayer when you make or receive calls. Some devices may temporarily mute their Bluetooth audio streaming when they receive text messages, emails or for other reasons unrelated to audio streaming. Such behaviour is a function of the connected device and does not indicate a fault with your Powerplayer.
Pairing Bluetooth with your mobile phone
- Press the Power button to turn on the radio.
- Select Bluetooth mode by pressing the Source button.
- The LCD display will show "Pairing" when radio is not yet paired with your mobile phone.
- In your mobile phone open the Setting menu and select Bluetooth, then select "Powerplayer" in the Bluetooth devices list (Bluetooth pairing instructions may vary per type of mobile phone, please check your mobile phone manual).
- When Bluetooth pairing is successful, the LCD display will show "Connected".
- After that, the LCD display will show the connected mobile phone's name to indicate the connected device to the radio.
Playing music from your mobile phone
- Press the Power button to turn on the radio.
- Select Bluetooth mode by pressing the Source button.
- Start playing music by using the media players in the paired mobile phone.
- Playback can be controlled from the mobile phone or by pressing the
buttons (preset buttons 3, 4 and 5) on the radio.
- After music playback started, the name of the song will be displayed in the LCD.
Display modes
In Bluetooth mode, the radio can display a range of information of the current playing music on the display. Press the Info button to cycle through the various types.
a. Title Displays scrolling song's name of the current playback music.
b. Artist Displays the artist's name of the current playback music.
c. Album Displays the album name of current playback music.
Device List - Connect to the paired device
In the Powerplayer, you can select the Bluetooth device from the device list to connect again. The device names would be shown if the name of the Bluetooth devices were configured in the mobile devices. Please refer to the user manual of your mobile device for the configurations.
The device lists can be checked as below:
- In Bluetooth mode, press the Menu button to enter the system setting.
- Rotate the Tuning / Select knob until "View details" is displayed; press the Tuning
/ Select knob to select the setting.
- Rotate the Tuning / Select knob until "Paired Device List" is displayed; press the
Tuning / Select knob to select the setting
- Rotate the Tuning / Select knob to view the name of the devices.
- Press the Tuning / Select knob to start Bluetooth reconnection. The Powerplayer will automatically connect to this mobile device.
Note: There can be up to 8 device names to be stored in the Powerplayer. If there are more than 8 mobile devices have been connected and stored into the Powerplayer, the earliest paired device name will be erased.
Note: If you have ever deleted the "Powerplayer" from your connected mobile device, the auto reconnection will be unsuccessful.
Restart Bluetooth pairing
The Bluetooth function can be set to operate in different ways as below:
- In Bluetooth mode, press the Menu button to enter the system setting.
-
Rotate the Tuning / Select knob to select "Bluetooth Discoverable" option and press the Tuning / Select knob to select the setting.
-
The LCD display will show "Pairing" and the radio's Bluetooth is free for any mobile phone connection as it is in discoverable mode now.
Note: "Discoverable" is the option that force the Bluetooth of this Powerplayer to disconnect from your mobile phone and enter the "discoverable mode". This is the way to allow the Bluetooth pairing to another device. If no new device is paired, the Bluetooth will automatically try to connect to the last device when it is switched off and on again.
The Auto-Power management function will be activated in Bluetooth mode. If there is no signal from Bluetooth for a period of over 15 minutes, the radio will automatically switch to standby mode. Pressing the Power button will wake up the unit.
USB MODE
CONDITIONS TO PREVENT MOIST FROM ENTERING THE RADIO!! KEEP THE RUBBER COVER CLOSED UNDER THESE CONDITIONS.
USB memory devices can be used with the radio for playback of MP3, AAC, FLAC and WAV files.
The radio has been tested with a range of USB memory devices up to 32GB. However, there are many different USB memory device variants available and not all of them can be guaranteed to work in this radio. Memory must use the FAT or FAT32 filing system in order to operate in this radio.
Audio formats supported for playback are MP3, AAC, FLAC and WAV. Playback does not support files encoded using WMA lossless, WMA voice, WMA 10 professional, or files of any format that have DRM protection.
The USB socket are located on the side behind the rubber cover. Make sure the rubber cover is closed well after use to prevent moist and dirt from entering the radio. The USB memory device should not be removed during playback as damage or corruption of files may occur.
USB memory devices are not included with this radio.
Note: When the radio is playing a USB stick, the batteries will be charged in low current mode. Once the USB stick is removed normal charging will continue.
Insert and remove a USB memory device
Carefully insert a USB memory device into the USB socket. To remove the USB memory device, simply pull the device out.
Playing music files
- Press the Power button to turn on the radio.
- Press the Source button to select the USB. The display shows "Loading...Please wait". It may take some time before the radio has read in the folders and files data on the memory device.
- After reading the USB memory device, the radio will start to play the first file (song) in the first folder. If no USB memory device is inserted, the display will show "NO DEVICE MOUNTED!" respectively.
- To pause the playback, press the (Preset 5) button. Press the (Preset 5) button again to resume the playback from pause position.
- To skip to the next file, press the▶(Preset 4) button.
- To skip to the previous file, press the (Preset 3) button.
- While the file is playing, press and hold down either the▶I (Preset 4) button
- ori(Preset 3) button. Release the button when the desired part of the file is reached.
- To skip to the next folder, presses the Folder + (Preset 2) button.
- To skip to the previous folder, presses the Folder - (Preset 1) button.
File searching
- Press the Menu button to enter USB playback screen.
- Rotate the Tuning / Select knob to search the desired folder. Press the Tuning / Select knob to select the folder.
The display will show the first file of the selected folder.
- Rotate the Tuning / Select knob to search the desired file. Press the Tuning / Select knob to select the file. The radio will start to play the selected file.
The radio supports a limited number of folders and files in the searching:
| Mode | Max. no. of folders supported | Max. no. of files supported | |
| Stop | 999 (with folder name) | 9999 (with file name) | |
| Play(1-99)(100) | 999 9999 with folder name) | (1-999 with file name)999 without folder name) | (1000-9999 without file name) |
Play mode
During USB memory device is playing,
1. Press the Menu button.
2. Rotate the Tuning / Select knob until the display shows "Music setting". Press the Tuning / Select knob.
3. Rotate the Tuning / Select knob to the desire play mode and press the Tuning / Select knob to confirm.
The radio will step through the following options:
Normal play Repeat one Repeat directory Repeat all Repeat shuffle
Normal Play Playback in sequential order one to another.
Repeat one Repeatedly play the file you are listening to.
Repeat directory Repeatedly play the files within the folder you are listening to.
Repeat all Repeatedly play all files in the USB memory device.
Repeat shuffle Play all files in the USB once in random order.
The selected Play Mode is indicated on the right of the top line of the display by an icon. No icon is shown when in Normal Play mode.
During USB memory device playback, the title and the current playing time of the current playing music will be shown. Press the Info button to cycle through the following information (only if this information is present with the file on the memory device):
Play time Artist name Album name Bitrate of the music File name Play time again.
AUX IN MODE
A 3.5mm stereo Aux In socket is provided on the side behind the rubber cover, for connecting an external audio device such as MP3 player or CD player (not included with this radio).
- Connect an audio source to the Aux In socket.
- Press the Source button to select Aux input. Display will show "Aux In".
- Play the external player.
- Adjust the volume of both the radio and the player for comfortable listening.
- After use, close the rubber cover to prevent moist or dust from entering into the sockets and radio.
Notes: Never use the Aux In socket in rainy or moist conditions to prevent moist from entering the radio. Keep the rubber cover closed under these conditions.
The Auto-Power management function will be activated in Aux input mode. If there is no signal from the Aux input jack for a period over 15 minutes, the unit will automatically switch to standby mode. The operation indicator and the LCD will go off in such case. Pressing the Power button will wake up the unit.
SETTING THE CLOCK
The clock can be set in system menu. If no buttons are pressed for 30 seconds, the radio will exit the clock setup and the setting is cancelled.
- Press the Power button to switch on the radio.
- Press the Menu button to display current menu.
- Rotate the Tuning / Select knob to select "System settings" and press the knob to enter system menu.
- Then "Equaliser" will be displayed, rotate the Tuning / Select knob to select "Time/ Date" and press the knob to confirm.
- Select "Set Time/Date" and press the knob again to enter date time settings.
- Press the Tuning / Select knob to confirm, the day flashes on the display.
- Rotate the Tuning / Select knob to set the current day.
- Press the Tuning / Select knob to confirm, the month flashes.
- Rotate the Tuning / Select knob to set the current month
- Press the Tuning / Select knob to confirm, the year will then flash on the display.
- Rotate the Tuning / Select knob to set the current year.
- Rotate the Tuning / Select knob to set the hour.
- Press the Tuning / Select knob to confirm, the minute digits flash.
- Rotate the Tuning / Select knob to set the minute.
- Press the Tuning / Select knob to confirm and finish the clock setting.
The time format can be select and set to either 12-hour or 24-hour format.
- Press the Power button to switch on the radio.
- Press the Menu button to display current menu.
- Rotate the Tuning / Select knob to select "System settings" and press the knob to enter system menu.
- Then "Equaliser" will be displayed, rotate the Tuning / Select knob to select "Time/ Date" and press the knob to confirm.
- Rotate the Tuning / Select knob to select "12/24-hour format" and press the knob.
- Rotate the Tuning / Select knob to select "12" or "24" hour format, then press the knob again to confirm and finish the setting.
Auto update
The radio can receive the latest time information from either DAB- or FM-signal, then synchronise the current date/time of the radio.
- Press the Power button to switch on the radio.
- Press the Menu button to display current menu.
-
Rotate the Tuning / Select knob to select "System settings" and press the knob to enter system menu.
-
Then "Equaliser" will be displayed, rotate the Tuning / Select knob to select "Time/ Date" and press the knob to confirm.
- Rotate the Tuning / Select knob to select "Time auto update" and press the knob.
- Rotate the Tuning / Select knob to select
"Update from DAB" Radio will automatically synchronize the date/time from current DAB station.
"Update from FM" Radio will automatically synchronize the date/time from current FM station.
"No update" Radio will stop updating date/time from any of the radio stations.
7. Press the knob again to confirm and finish setting.
Note: If reception is good and you have selected the "Update from DAB" or "Update from FM" option from Auto Update option, the time will be automatically updated. Time synchronisation can take several minutes. The automatic time setting is always activated when the radio is switched from standby to last played radio mode.
EQUALISER
The sound on Powerplayer can be adjusted to suit your personal taste for the material that you are listening to. The radio can be set to loudness EQ mode or by setting the treble and bass levels to your own preferences which can be accessed from the My EQ menu item.
- Press the Power button to switch on the radio.
- Press the Menu button to display current menu.
- Rotate the Tuning / Select knob to select "System settings" and press the knob to enter system menu.
- Rotate the Tuning / Select knob until "Equalizer" is highlighted, press the knob to confirm.
- Rotate the Tuning / Select knob to cycle through Loudness On, Loudness Off, My EQ and My EQ profile setup.
Note: The Loudness function enables to get compensation on lower and higher frequency. The effect will be more audible when the radio is in a lower volume level (Dynamic Loudness).
Setting up your My EQ profile
If you would want to set up a custom treble and bass setting, please follow the below steps.
1. Press the Power button to switch on the radio.
2. Press the Volume / Equaliser knob to enter the "Equaliser" menu; or
- Press the Menu button to display current menu.
- Rotate the Tuning / Select knob to select "System settings" and press the knob to enter system menu.
- Rotate the Tuning / Select knob until "Equaliser" is highlighted, press the knob to confirm.
- Rotate the Tuning / Select knob to select "My EQ profile setup" then press the knob again.
- Rotate the Tuning / Select knob to select "Bass", then press the knob to enter bass configuration menu.
- Rotate the Tuning / Select knob to adjust the bass level from “-10” to “+10”, then press the knob again to confirm the bass setting.
- If you wish to set treble, rotate the Tuning / Select knob to select "Treble" in the menu of "My EQ profile setup", then press the knob to enter treble configuration menu.
- Rotate the Tuning / Select knob to adjust the treble level from “-10” to “+10”; then press the knob again to confirm the treble setting.
- If you wish to setup the dynamic level, rotate the Tuning / Select knob to select "Dynamic level" in the menu of "My EQ profile setup", then press the knob to enter dynamic level configuration menu.
- Rotate the Tuning / Select knob to adjust the level, then press the knob again to confirm the level setting.
The "Dynamic Level" is mostly effective in the so called mid tone area and can be set, to user preference, to harden or soften the sound image.
SETTING ALARM CLOCK
Powerplayer has two separate alarms which can be set to wake you to either the radio or a buzzer alarm. In the event of a power interruption Powerplayer has built in memory that will retain your alarm settings.
Ensure that the time is set correctly before setting the alarms.
- With Powerplayer switched on, press the Menu button to access the menu for the current mode. Rotate the Tuning / Select knob until 'Main menu' is highlighted on the display. Press the knob to enter the 'Main menu'.
- Rotate the Tuning / Select knob until 'Alarm' is selected on the display. Press the knob to see the current alarm settings. If no change is required, press the Menu button to exit.
- Rotate the Tuning / Select knob until the desired alarm (1 or 2) is highlighted on the display. Press the knob to enter alarm setup.
- Rotate the Tuning / Select knob until 'Time' is highlighted on the display. Press the knob to adjust the alarm time.
-
Rotate the Tuning / Select knob to choose the alarm hour. Press the knob to confirm the setting.
-
Rotate the Tuning / Select knob to choose the alarm minute. Press the knob to confirm the setting. The display will then return to the alarm setting menu. If the sound system has been set to use a 12 hour clock format, there will also be an option here for setting AM or PM for the alarm time.
- Rotate the Tuning / Select knob to highlight 'Enable' and press the knob. The display will show the Frequency options for the alarm. The alarm frequency options are as follows: 'Off' - the alarm will be disabled 'Daily' - the alarm will sound everyday 'Once' - the alarm will sound once 'Weekends' - the alarm will sound only at weekends 'Weekdays' - the alarm will sound on weekdays only. Rotate the Tuning / Select knob to choose the required alarm frequency option. Choosing Off will disable the alarm. Press the knob to confirm the selection.
- The alarm can be set to buzzer, DAB radio or FM radio. For whichever radio mode is selected, the radio alarm may be set to any of the stations, which have been stored as presets or to the station most recently listened to. Rotate the Tuning / Select knob to highlight the current 'Mode' option for the alarm, then press the knob if you wish to change it. Rotate the Tuning / Select knob to highlight either 'Buzzer' or the required radio mode. Press the knob to confirm the selection.
- If setting the alarm to a radio option, rotate the Tuning / Select knob to highlight the 'Preset' option then press the knob if you wish to change it. Choose from either the radio station 'Last listened' to, or from the presets 1 - 10. Scroll to the chosen option and press the knob to confirm the selection. Note that you can only set the alarm to use a preset which has already been stored.
- Rotate the Tuning / Select knob until the 'Volume' option is highlighted on the display and press the knob if you wish to change it. The sound system uses the saved volume setting for each alarm when it sounds. Rotate the knob to set the required volume and then press the knob to confirm the setting.
- In order to store the alarm settings rotate the Tuning / Select knob until 'Save' is highlighted. Press the knob to store the alarm settings. Your radio will show 'Alarm saved' and will then go back to the list of alarms with the new alarm setting shown in the display. If you decide not to save the settings, press the Menu button. Active alarms are shown using small alarm indicators at the top of the playing displays and at the bottom on the clock display when in standby.
Note: If you make a mistake at any point while setting the alarms, use the Menu button to go back to the previous screen.
WHEN ALARM SOUNDS
The buzzer or radio alarm will sound at the selected times for up to 60 minutes unless cancelled. The volume used for the alarm will be as specified during the alarm setting procedure. If the radio cannot connect to the specified radio station, the buzzer alarm will be used instead.
To cancel an alarm, press the Power button to return to standby mode. The alarm icon will flash at the top of the playing mode displays, and the radio will automatically switch back to stand-by mode when the 60 minutes have elapsed.
Note: If the radio is switched on because of an alarm you can control basic functions such as volume and selecting presets.
ALARM CLOCK ACTIVATION IN STANDBY MODE
When the radio is connected to mains and in standby mode, pressing repeatedly the Source button can activate or deactivate the Alarm 1 and Alarm 2.
DISABLING ALARMS
- To disable a single alarm enter the alarm setup menu and rotate the Tuning / Select knob until the desired alarm is highlighted on the display. Press the Tuning / Select knob.
- Rotate the Tuning / Select knob until the 'Enable' option is highlighted on the display. Press the knob.
- Rotate the Tuning / Select knob to highlight 'Off' and press the knob.
- Rotate the Tuning / Select knob until the 'Save' option is highlighted on the display then press the knob to save the new setting. The chosen alarm will now be disabled.
SNOOZE TIMER
- The buzzer or radio alarm can be silenced for 5 minutes by pressing the Tuning / Select knob. Should you wish for a longer snooze duration this can be extended Pressing the knob again while the sound system is snoozed will set the available snooze time to 5, 10, 15 or 30 minutes.
- While the snooze timer is active the remaining snooze time is shown next to the flashing alarm icon on the clock display.
- In order to cancel the Snooze timer while the alarm is suspended, press the Power button.
SLEEP TIMER
Your radio can be set to turn off after a preset time has elapsed. The sleep timer setting can be adjusted between 5 and 120 minutes in 5-minute increments.
- Press the Power button to switch on your radio.
- Access the menu for the current mode by pressing the Menu button. Rotate the Tuning / Select knob until 'Main menu' is highlighted on the display. Press the knob to enter the 'Main menu'.
- Rotate the Tuning / Select knob until 'Sleep' is highlighted on the display then press the knob.
- Rotate the Tuning / Select knob until the required sleep time setting is selected. Press the knob to confirm the setting. The sleep timer can be set to between 5 and 120 minutes, or to Off.
Powerplayer will switch into stand-by mode after the preset time has elapsed. An active sleep timer is shown using a small timer indicator at the top of the playing displays.
This indicator also shows the sleep time remaining before the radio switches itself into standby mode.
To cancel the sleep time before the preset time has elapsed and to turn off the sound system, press the Power button to turn the unit off manually.
LANGUAGE
The radio can be configured to a different language.
- Press the Power button to turn on the radio.
- Press the Menu button, and then rotate the Tuning / Select knob until the display shows "System settings".
- Press the Tuning / Select knob; rotate the Tuning / Select knob until the display shows "Language".
- Press the Tuning / Select knob to enter the language adjustment menu.
- Rotate the Tuning / Select knob until the desired language appears on the display (default is English).
- Press the Tuning / Select knob to confirm your choice. The display will change to the chosen language.
SOFTWARE UPDATE
From time to time, new software features for your radio may be developed. Powerplayer has therefore been designed to allow its internal software to be updated using USB connection.
You should not attempt to update your radio unless it is recommended to you by Customer Services. Updating the software may remove all radio station presets and alarm settings from Powerplayer.
SOFTWARE VERSION
The software display cannot be altered and is just for your reference.
- Press the Power button to turn on the radio.
- Press the Menu button, and then rotate the Tuning / Select knob until the display shows "System settings".
- Press the Tuning / Select knob; rotate the Tuning / Select knob until the display shows "SW version".
- Press the Tuning / Select knob to view the software version.
- Press the Tuning / Select knob back to the last menu and press the Menu button to return to the normal radio display.
SYSTEM
If the radio fails to operate correctly, or some digits on the display are missing or incomplete, carry out the following procedure.
- Press the Power button to switch on the radio.
- Press the Menu button,
- Rotate the Tuning / Select knob until the display shows "System settings". Press the Tuning / Select knob.
- Rotate the Tuning / Select knob until the display shows "Factory reset". Press the Tuning / Select knob.
- Rotate the Tuning / Select knob to select between "Yes" or "No".
Select "Yes" if you wish to reset the radio, otherwise select "No".
- Press the Tuning / Select knob to cause the factory reset
- A full reset will be performed. All presets and the station list will be erased. All settings will be set to the default values. The display will show "Powerplayer PerfectPro" for a few seconds, and then the radio will automatically perform an auto scan of the Band III DAB channels and the FM band.
In case of malfunction due to electrostatic discharge; reset the product as above to resume normal operation. If you are not able to perform the reset operation as above, remove and reconnect the power supply.
BACKLIGHT
LCD backlight configuration
- Press the Power button to turn on the radio.
- Press the Menu button, and then rotate the Tuning / Select knob until the display shows "System settings".
- Press the Tuning / Select knob; rotate the Tuning / Select knob until the display shows "Backlight".
- Press the Tuning / Select knob to enter the LCD backlight adjustment menu.
- Rotate the Tuning / Select knob to select "Radio on" which is used to set up the backlight behaviour in on mode;
- Or rotate the Tuning / Select knob to select "Radio standby" to set up the backlight behaviour in radio standby mode.
- Press the Tuning / Select knob to confirm your choice.
- Rotate the Tuning / Select knob to choose the options from High/Medium/Low/off.
- Press the Tuning / Select knob to confirm the selection.
WARRANTY
This radio has a 2 year limited warranty.
WARNING! Warranty becomes void once the radio cabinet has been opened or any modifications or alterations to the radio have been made!
The terms of the warranty of this radio do not cover the following:
- Damage caused by misuse, abuse, neglect, alterations, accidents or unauthorized repair.
Normal wear and tear.
Never open the device casing. The manufacturer will not accept any liability for damage resulting from improper handling. The type plate is located on the bottom of the device.
SPECIFICATIONS
Power requirements
Mains: 230 volts AC, 50/60Hz
Built-in Lithium Polymer Battery: 11.1V, 4000mAh
Frequency coverage
DAB 174,928-239,200 MHz
FM87.5-108MHz
Circuit features
USB socket 5V 1A for charging mobile phones via authorised USB cable
Loudspeaker 1 x 76mm
Output power 1 x 15 Watts
Aux-In socket 3.5 mm, stereo
Headphone socket 3.5 mm, stereo
Aerial System DAB Telescopic aerial
FM Telescopic aerial
Bluetooth
Version 4.1 Supports Bluetooth profiles A2DP, AVRCP and HFP.
The company reserves the right to amend the specifications without notice.
Environmental note

This product has been manufactured with high quality parts and materials which can be reused and recycled.
Therefore, do not throw the product away with normal household waste at the end of its service life. Take it to a collection point for the recycling of electrical and electronic device. This is indicated by this symbol on the product, in the operating manual and on the packaging.
Please find out about collection points operated by your local authority.
Help protect the environment by recycling used products.

This device is noise-suppressed according to the applicable EU directives.
This product fulfills the European directives 2005/32/EC and 2014/53/EU.
This device conforms to the safety regulation DIN EN 60065 (VDE 0860) and therefore the international safety regulation IEC 60065. Never open the device casing. The manufacturer will not accept any liability for damage resulting from improper handling. The type plate is located on the bottom of the device.

CONTENU
Preselections de stations 15
ALS HET ALARM KLINKT