
SRU 7140 - Universal remote PHILIPS - Free user manual and instructions
Find the device manual for free SRU 7140 PHILIPS in PDF.

User questions about SRU 7140 PHILIPS
0 question about this device. Answer the ones you know or ask your own.
Ask a new question about this device
Download the instructions for your Universal remote in PDF format for free! Find your manual SRU 7140 - PHILIPS and take your electronic device back in hand. On this page are published all the documents necessary for the use of your device. SRU 7140 by PHILIPS.
USER MANUAL SRU 7140 PHILIPS
Register your product and get support at
SRU 7140
www.philips.com/welcome
| EN | User Manual | 4 |
| FR | Manuel d'utilisation | 11 |
| DE | Bedienungsanleitung | 18 |
| NL | Gebruikershandleiding | 25 |
| DK | Brugervejledning | 32 |
| SV | Anvanderhandbok | 39 |
| NO | Brukerhändbok | 46 |
| SU | Käytöohje | 53 |
| IT | Manuale d'uso | 60 |
| ES | Guía de usuario | 67 |
| PR | Manual do uso | 74 |
| GR | Öðnyíés χρήσεως | 81 |
| RU | PykoBOADCTBO NO 3KCPNAyataúni | 88 |
| TR | Kullanüm klavuzu | 95 |
Quick, Clean & Easy Setup
www.philips.com/urc
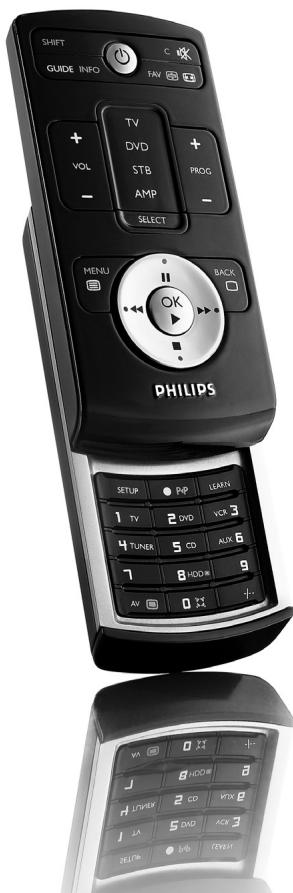
Your Remote Control
Congratulations on your purchase and welcome to Philips!
To fully benefit from the support that Philips offers, register your product at www.philips.com/welcome
| DIGIT | TV | VCR/DVD | CABLE/SAT |
| 1 | PHILIPS | PHILIPS | PHILIPS |
| 2 | SONY, AKAI, PANASONIC, SHARP, TOSHIBA, JVC, DAEWOO | SONY, AKAI, PANASONIC, SHARP, TOSHIBA, JVC, DAEWOO | PACE, ECHOSTAR |
| 3 | THOMSON, BRANDT | THOMSON, BRANDT | THOMSON, UNIVERSUM, LASAT |
| 4 | FERGUSON, BAIRD, TELEFUNKEN, SABA, NORMENDE | FERGUSON, TELEFUNKEN, SABA, NORMENDE | FERGUSON, TELEFUNKEN, SABA, NORMENDE |
| 5 | GRUNDIG, BLAUPUNKT | GRUNDIG, BLAUPUNKT | GRUNDIG |
| 6 | NOKIA, FINLUX, ITT, LUXOR, DANTAX, BEKO, PROSONIC | NOKIA, FINLUX, ITT | NOKIA, FINLUX, ITT, HIRSHMANN |
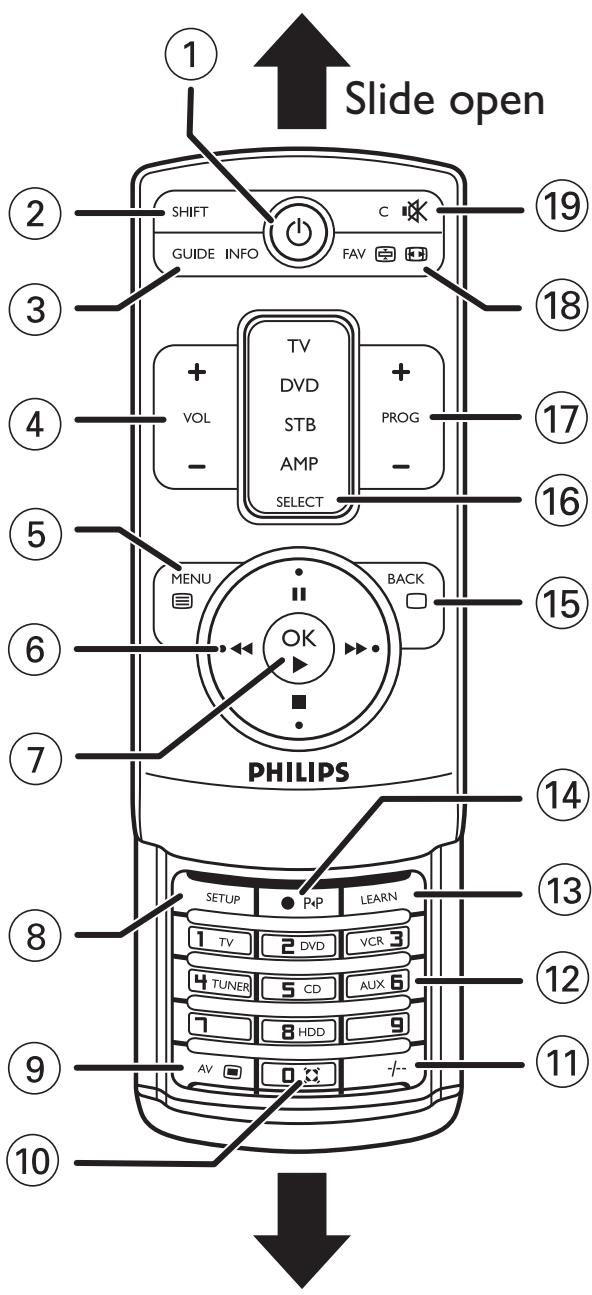
Table of contents
- Introduction 4
- Key functions 4-5
- Installing the remote control 6-7
Inserting the batteries 6
Setting the remote control 6-7
- Advanced features 8-9
Volume control punch through. 8
Code learning 8-9
Clearing all learned functions for a device mode 9
- Troubleshooting 10
- Information for the consumer 102
1. Introduction
Congratulations on your purchase of this Philips universal remote control. After installing the remote control it can operate the most commonly-used functions of almost any brand of TV, DVD player/recorder, video recorder, amplifier/ receiver, CD player and STB (set-top box, satellite or cable decoder).
You can find information about how to prepare this remote control for use in the section 'Installing the remote control'.
2. Key functions
The illustration on page 3 gives an overview of all the keys and their functions. This remote control can only operate features that are installed on your devices.
General controls
(1) (Standby) ..... turns TV, DVD player/ recorder, video recorder.
amplifier/receiver, CD player or STB (set-top box, satellite or cable decoder) on or off.
② SHIFT accesses extra functions.
③ GUIDE displays Electronic Program Guide (TV, STB).
INFO
- displays on-screen channel information (TV, STB, DVD).
④ VOL(ume) +/- changes the volume level of the TV.
(5) MENU. - displays the menu screen.
目
- turns Teletext on (TV, STB).
Cursor keys. - cursor up, down, left, right in a menu.
VCR/DVD control keys
- operate your VCR / DVD even when TV is selected.
1
- pause.
- rewind / wind
- stop.
⑦ OK - confirms your selection.
- play (VCR, DVD).
⑧ SETUP . used to set up the remote control.
User Manual
(9) AV. switches between external (audio / video) inputs of your equipment (TV, STB).
- picture setting options (TV, STB)
10 sound setting options (TV,STB)
11 + selects between one- and twofigure channel numbers (TV, STB).
12 Number keys. for direct channel selection (TV, STB, AMP).
Source selection keys
select TV, DVD, VCR, TUNER, CD, AUX or HDD (Hard Disk Drive) mode (AMP).
13 LEARN. .sets up learning functions.
14 record. Press twice to start recording. For some brands, press once, then press again for three seconds.
P4P
- selects previous channel.
15 BACK - jumps back one level in the menu or turns off the menu (TV, STB, DVD).
□
- turns Teletext off.
16 SELECT selects TV, DVD, STB or AMP mode.
PROG(ram) +/- selects next / previous channel (TV, STB).
18 FAV selects next / previous favorite station (TV, STB).
图
stops at the current Teletext picture (TV, STB).
图
selects wide screen TV (TV, STB).
19 C. clears entries (TV,STB,DVD)
Mute)
turns off the TV sound.
Using the Shift key
The SHIFT key is used to access additional functions for the current device mode e.g. Menu, Exit, cursor, etc.
Not all codes have shifted functions. To access additional functions:
1 Press SELECT to select the desired device mode (TV, DVD, STB or AMP).
The device mode indicator lights up in the selector window.
2 Press and release SHIFT.
The device mode indicator remains lit to indicate shifted mode.
3 Press other keys to find out which functions are available for the selected device mode.
Only functions featured on the original remote control are available.
4 Press and release SHIFT to switch back to normal mode.
If no key is pressed in shift mode, the remote control returns to normal (non-shifted) mode after 20 seconds.
Installing the remote control
4s!l8u3
Inserting the batteries
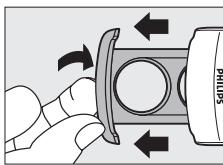
1 On the remote control bottom part you will find a little recess. Place a finger(nail) in the recess and pull out the battery compartment.
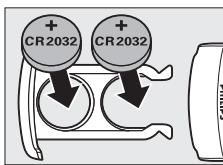
2 Place two CR2032 Lithium batteries into the battery compartment as shown. Make sure to place the text side of the batteries upwards.
3 Slide the compartment back and click it firmly into place.
Notes:
- The remote control automatically turns off if buttons are pressed for more than 30 seconds.
- Codes are stored in the remote control memory while you are changing batteries so you will not lose any codes.
Setting the remote control
This is only necessary if your device does not respond to the SRU7140. If that is the case, the SRU7140 does not recognize the brand and / or model of your device and you need to program the remote control to do so.
You can set up the remote control either by entering the code for your brand of device directly, or by searching through the library of codes until you find a code that works for your device.
You can store any kind of code under any device mode (except TV). E.g. you can store a VCR code under AMP, or a DVD code under STB, etc. However, you can only store TV codes under TV. Setting a device mode with any code will automatically delete any previously learned commands for that device mode.
Manual code entry
1 Look up the brand of your device in the code list (separate sheet). One or more codes are shown for each brand. Make a note of the first code.
2 Manually switch on the device.
3 Press SELECT to select the desired device mode (TV, DVD, STB or AMP).
The device mode indicator lights up in the selector window.
4 Press and hold SETUP until the device mode indicator blinks and then remains lit, then release the key.
5 Use the number keys to enter the 4 digit code, noted in step 1.
After a valid code entry, the indicator turns off. If the code is invalid, the indicator flashes.
6 Point the remote control at the device and check that it responds as it should.
If the device responds, no further programming is required. The remote control is now ready to operate your device.
7 Make a note of your code!
- If some buttons do not operate your device, try one of the other codes for your brand.
Code Search
If your device does not respond after you have tried all the codes for your brand, or if your brand is not listed, try searching for your code using code search. Code Search starts from the currently stored code.
Automatic Code Search
The remote control will automatically search for the right code for your device.
1 Manually turn on the device.
2 Press SELECT to select the desired device mode (TV, DVD, STB or AMP).
The device mode indicator lights up in the selector window.
3 Press and hold SETUP until the device mode indicator blinks and then remains lit, then release the key.
4 Press and release PROG + once.
- The remote control now starts emitting all known Program + commands to your device one by one. The device mode indicator turns off with each command sent.
If the device does not use a PROG+ key then the (Standby) key can be used instead.
- If you accidentally go past the code required, press PROG - to go back until the device responds.
5 Press and release (Mute) to install the code.
- When all the codes for a specific brand have been searched the device mode indicator blinks rapidly for 3-seconds.
Programming with Brand Search
Allows you to search for a code for a specific brand in the code library for a particular manufacturer.
You can find the table of the code library on page 2.
1 Manually turn on the device.
2 Press SELECT to select the desired device mode (TV, DVD, STB or AMP).
The device mode indicator lights up in the selector window.
3 Press and hold SETUP until the device mode indicator blinks and then remains lit, then release the key.
4 Press the numeric key (1-6) corresponding to the desired brand (see table).
- Pressing '0' performs Code Search as described before.
5 Press and release PROG + (or (in case of VCR) or ) repeatedly until the device responds.
The device mode indicator turns off with each command sent.
If you accidentally go past the code required, press PROG - to go back until the device responds.
6 Press and release (Mute) to install the code.
- When all the codes for a specific brand have been searched the device mode indicator blinks rapidly for 3-seconds.
Programming combo device codes
Some combo devices (e.g. TV/VCR, TV/DVD, DVD/VCR, etc.) require you to set up two different source selection keys to control both parts of the combo device. For example, if you have a TV/DVD combo, you might need to set up one code under the TV key to control the TV and a separate code under the DVD key to control the DVD.
Advanced features
Volume control punch through
In most home entertainment systems, the volume is controlled by one device only (usually TV or amplifier). This means you always have to switch to TV or AMP mode to adjust the volume of any other device.
If the sound comes from e.g. the TV speakers, the remote control should be in TV mode to adjust the volume of e.g. the set-top box.
The 'Volume control punch through' feature enables you to set the remote control's VOL +/- and (Mute) keys to also adjust the sound of other devices in your system, even those that do not have a volume control of their own.
1 First decide which source selection key you wish to set up for volume control (e.g. AMP).
2 Press SELECT to select the device mode to set for volume control (TV, DVD, STB or AMP).
The device mode indicator lights up in the selector window.
3 Press and hold SETUP until the device mode indicator blinks and then remains lit, then release the key.
4 Press and hold (Mute) until the device mode indicator blinks once, then release the key.
5 Press and release (Mute).
The device mode indicator turns off.
- All other devices will now punch-through to the selected source (AMP) for volume/mute control.
The indicator blinks rapidly for 3 seconds if the source you have selected has no volume/mute control.
- Reset Volume/Mute control to factory default by repeating above sequence.
Code learning
If you miss certain functions from your original remote control, this remote control can learn these functions from the original remote control.
Tips on learning functions
Only one original remote type should be learned per individual mode.
- First clear all learned functions for a device mode (TV, DVD, STB or AMP) to make sure there are no previously learned functions for that mode. For this, refer to 'Clearing all learned functions for a device mode'.
- Place the remote controls head-to-head so the IR transmission LED's on both remote controls are directly in line with each other. You may need to adjust the height of either remote to achieve this.
- Do not move or change the distance between the remote controls while learning.
- You can store a function under any of the available keys, except under LEARN, SELECT, SHIFT and SETUP.
Some functions of some types of remote control might not be learned.
Use fresh batteries for both the learning and the original remote control.
English
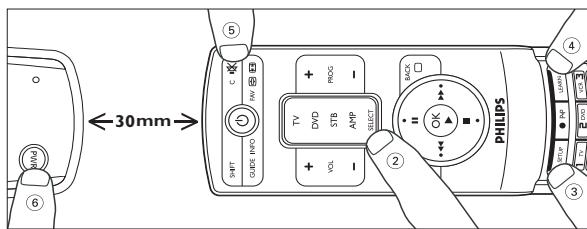
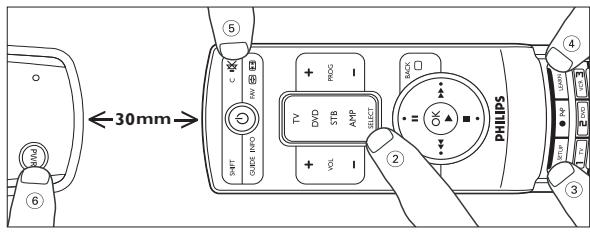
1 Place both remote controls on a flat surface (like a coffee table) and aim them head-to-head with about 30~mm in between. You may need to adjust the height of one of the remote controls to achieve this.
2 Press SELECT to select the desired device mode (TV, DVD, STB or AMP).
The device mode indicator lights up in the selector window.
3 Press and hold SETUP until the device mode indicator blinks and then remains lit, then release the key.
4 Press LEARN.
The device mode indicator blinks once, then remains lit.
5 Press the key you wish to learn a new function to (target key). E.g. (Standby). For additional (shifted) functions, first press SHIFT, then press the function key. See 'Using the SHIFT key'.
6 Press and hold the key you wish to copy on the original remote control (learn key, e.g. POWER) until the device mode indicator blinks once and then remains lit.
If there is a learning problem, the indicator blinks for 3 seconds and then remains lit. If this happens, repeat steps 5 to 6.
7 Repeat steps 5 to 6 for other functions from the selected device you wish to learn to this remote control.
8 Press and release SETUP when all desired functions are learned. Code learning is now complete.
9 Repeat above steps for other devices you wish your remote control to learn from.
Clearing all learned functions for a device mode
1 Press SELECT to select the device mode (TV, DVD, STB or AMP) of which you wish to clear all learned functions.
The device mode indicator lights up in the selector window.
2 Press and hold SETUP until the device mode indicator blinks and then remains lit, then release the key.
3 Press and release LEARN twice.
The device mode indicator blinks.
4 Press and release digit key 1.
The device mode indicator turns off and all learned functions for this mode are now cleared from the remote control memory.
Troubleshooting
| Problem | Solution |
| Remote control does not operate your product. | Learn the device button for the product to operate the required functions of the product. See 'Code learning'. |
| Program the remote control with a new code. | |
| Install new batteries (you might have to reprogram your remote control after installing new batteries). | |
| Remote control does not operate some features of your product. | Remote control may not be compatible with your product. |
| Program the remote control with a new code. | |
| Device mode indicator blinks for 3 seconds after you program a product code. | Remote control may not be able to operate all features of your product or key names might be different than on your product. |
| Remote control did not accept the code. | |
| Try to program the code again or try a different code. |
Sommaire
DVD-Player/Recorder,
Videorecorder,Verträker/
UcTaHOBka 6aTapeek .90
HactpoiknnybTa Y 90-92
- 100AHTeBhIe yHKuH 92-94
CkBo3Ha peryMPOBka rPOMKoCTn. 92
CunTbIbAHne KOIOB 93-94
C6poc Bcex yCTaHOBAAeHHbIX ΦyHKLIM
ApeKIma yCTpOInCTBa 94
- YcTpaHeHne HncnPaBHOCTe 94
1. BBeDeHne
I034pAbAem C nokyIkoYnHBePcAaBHO rnybTa AY Philips. IocAe HacTPOkN pUbT AMyoet YnpabAraTb Hau6Oae qacto NcIOA3yEmbIM FyHKUaMn TaKx UcTPOiCTB PpaKTHeckn AIO6o MapKn, KaK TeAEuB3Op, npOnrPbBaTeA/b/YcTPOiCTBO 3aIncn DVD, yCTPOiCTBO 3aIncn BnDeo, ycNAITeA/b/peCnBep, npOnrPbBaTeA b KOMnAaT-DnCKOB IN STB (TeAEpiNCTaBka, cnTyTHNKOBb INN Ka6eAbHbN dEkoep).
HΦopMaIIO O TOM, KaK HAcTpOHT pyABT Y nepeA nCIOA3OBaHHeM, BbI HaIeTe B pa3deE 'HaCTpoIka npAte Y
2.ФУнКUМ NKHONOK
Ha ctpaHnue 3 Bbl haAte Te o63Op BCex KHOJOK IN XyHKU.
PbT DY MoKeT ynpabAIB ToAko TEmN yHKUAMN, KOtOpbie
yKa3aHb B HacTPOiKax np6opa.
OCHOBhIe KHONKynpaBAeHna
① (Standby).......BKNIOaET/BbIKIOaET TeAEBN3Op, DVD npoINrPBbIaTeIb/peKOpAep, yCTPOIcTBO 3aIINCH BnIeO, ycNNTeIb/peCINBep, npoINrPBbIaTeIb KOMNaKT-DnCKOB NIM STB (TeAEpNCtTaBky, cnyTHNIKOBBI INN Ka6eAbHbI dEKOaep).
② SHIFT. 10CTyI K DOIOAHTeAbHbIM yHKLIaM.
③ GUIDE -Ot6paKeHHe ΘeKtpOnHOro TnDa TeIeporpaMM (TB,TeIepnCTabKa). INFO -BbVeDeHHe Ha kPaH INΦOpMaun O KaHaAe (TB,TeIepnCTabKa, DVD npOirpbBaTeA).
④ VOL +/-. peYyInpOBka rPOMKoCTn TeAeBv3Opa.
⑤ MENU -Отображени Экранно Meю.
[ ] -ВКALEЧENе TeLETeKCTa (TB, TeLEnpicTbKa).
⑥ Khonkn ynpabaenn Kypcopom . - BBepx, BHN3, BAEBO, BnpaBO B MeHIO. Khonkn ynpabaenn BuaeomarHHTofoHOM, DVD npOHrpBbATEaem
- ynpabAeHnE BAneOMaHnToΦOHOM n DVD npoIrpblBaTeAeM,daKe B peKIMe ynpabAeHnI TeAeBn3OpOM.
II -nay3a.
- NOVCK Ha3a/Dbpepe
- OCTaHOBNTb.
PykoBOdTOI NO 3KcNlayaTaunH
(BNaeOMaFHNToΦOH, DVD
PONrPbBaTeAb).
⑧ SETUP. NaCTPOMa NvMbTa AY.
9 AV -pepeKIOUeHne MeJdy BHeIHHIMN
(ayANO/BNDAe)BXOaMn
O6OpdyObaHn
(TB, TeAe npCt aBKN).
-napaMeTpblHaCTpoiKn
n3o6paKeHnHa
(JavaTkiN dNCK) (AMP).
13 LEARN. yctaHObKa oOyauoIHX OyHKLm.
14 3aHcB. HaxMMTe DBaXDbI, yTo6bl
HaHaTb 3aPiNcB. AYyCTPOINCTe
HEKOTOpbIX MapOK Heo6xOdIMO
HkaTb KHOINy OINH pa3, 3aTEM
HaKaTb CHOBa n yAePxNBA Tb B
TeueHne 3 ckyH△
- Bb6op IpeAduyeo KaHaAa.
15 BACK. -BO3BpaueHne B MeHIO Ha OdNH
yPOBeHbHa3aIbMbIXOaN3
(TB, TeAenpiNCTaBka,
DVD npoirpblBaTeAb).
-OTKIAUChHeTeAeTeKCTa.
16 SELECT. Bb6op TV (TB), DVD
(DVD nponprbibaTeA),
STB(TeAenpncTaBKn)nn
AMP (ycnntTeA).
17 PROG +/-. .BbIbOp cAeAIOUeero/IpeAIIuEero
kaHaaaa (TB, TeIeIepnCTaBaKa).
18 FAV. BbIbOp cAeayUoSeI/npaDbIyUeI
AIO6HMOI CTaHUN
(TB, TeλeπpιctaВka).
OCTaHOBka TeKyuIeero N3O6paKeHnA
TeaTeKCTa (TB, TeenPnctabka).
BbI6op WnpoKo3KpaHnHOro TB
(TB, TeAe npCt aBka).
19 C. c6poc yctaHOBaeHHbIX npaMeTPOB
(TB, TeAenpncTaBka,
DVD nponprpbBaTeAb)
OHa Heo6xOaMa ToA bKO B TOM Cyaue,ecn yCTpoiCTBO He peaHpyeHT Ha pa60Ty nA bTa SRU7140.3To 03Naaee,4To nA bT SRU7140 He hAcTpoeH Ha pa60Ty c DaHHOI TOpROBOM MapKo HmM MoDeAio YCTPOICTBA I erO Heo6xOaMo HO AchtPOnTb.
BbMOKTe HAcTpoNTb PnBb T A, N16o NocpeaCTBOM BBeDeHnA KOa TOpROBo MApKn YcTPOiCTBa HAnpRMyO, N16o BoBbPab IOAOX0ARII DAA BAWei MOeAM KOa I3 6a3bl DaHHbIX.
BbMOKeTe CoXpaHnTB IO6oB KOa B IO6oM peXnMe (KpOmeTV (TB).HaPnIMep,MOxHO CoXpaHnTB KOA VCR (BUNeOMaHnHToOH) BpeXnMe AMP (ycuNTa),nn DVD (DVD npOnrpbBaTea) B peXnMe STB (TeaepnCTaBA).OHaKO, KOa TV (TB) coXpaHraTcToABko BpeXnMe TV (TB).
Hacroka pexima yctpoiCTBa npn nmoosn HeKOTOPORo KoDa aBToMaTneCKn npINBOaNT K c6pocy Bcex yCTaHOBAnHHbIX KOMaHd, 3TORo peXima.
Bog koga BpyHyio
1 HaIaHTe Ha3BaHHe TOpROBm MapKn BaIeO YoCTpoIcTBA B CInCKe KOIOB (Ha OTaeIbHOM InCTe).AJa KaJDoTropROBm MapKn Yka3AH NO KpaIHeM Mpe OdIH KOd. 3aIIuHTe HauDeHHbI KOd.
2 BkAIOHTe yCTPOINCTBO BpyHHyIO.
PykoBOdTO NO kcnayataun
3 HaKMMTe KHOKNy SELECT yTO6bI Bb6paTb Heo6xOaMmBpeKMM yCTpoiCTBa (TV (TB), DVD (DVD npOnIrPbIBaTeA), STB (TeAenpncTabKa) mN AMP (ycnNTeA).
Ha nanei Bb6opa 3aropntc INnAkaTOp peKIma yctpoiCTBa.
4 Haxmte I ydeepnBaIte KhoNkY SETUP do tex nop, noka He 3aropntc Hndikatop peKMa ycTpoiCTBa, 3aTeM OTNyctnte.
5 Icnoa3yTe uHpObBie KHOHKn,HTo6bl BBcTn YeTbipex3HaHHb Ko4, KaK OINcaHO B nyHKTE I.
IocAe BVeEHen IpaBnBHoT KOa INHAnKaTop nOraChET. INHAnKaTOp pexIma HauHcT MInTaT, ecM KOd BVeEe HBepeHO.
6 HanpaBbTe nyA bT dy Ha yCTpoiCTBO n npOBepbTe, npabnHa Hn peakunyaYCTPOiCTBa.
Ecn yctpoiCTBO peaHpyeT,daIbHeIWe HacTpoKn He Tpe6yeTc. IyABT DY TOTOB K INCIOA3OBAHNIIO.
7 3aannneTKeoI
- Ecam ynpabAeHne kakmnn-AN60 KNOHpKaMn HapuSeHo, nonpo6yIte BBeCTN dpyrOJ KOa, NOxOJaIIN DA TOpROBOMapKn BaIero yCTPOnCTBa.
Понькoga
ECN yCTpoiCTBO He peaHpyeT Ha KOMaHNbI pNbTa AY nocAE BBeEHnB CEX NpeueHCAnEHbIX KOOB DAaHHOI TOPROBOI MAPKIN,AN6O ECN DAA Hee He npNBEdEO HO KAa,ONpOByTe HauTT ero npn NOMOuPiONcKa KOa.
IyBbY aBTOMaTnueeCKn HauHHe T NcK BepHOr KoHa.
1 BkAIOHTe yCTPOINCTBO BpyHnyI.
2 HaKMnTE KHOIky SELECT,TO6bbl Bb6paTb Heo6xOaMmBpeKMM yCTpoiCtBa (TV TB),DVD (DVD npOnIrPbIBaTeA),STB (TeAenpncTabKa) mN AMP (ycnAnTe).
B OkHe BbI6opa 3aIopNTcN INHAnKaTOp peKIma ycTpoiCTBa.
3 Haxmnte n yedepnBaTte KhoNkY SETUP do Tex nop, noKa He 3aoropntc INHdkatop peKIMa yCTpOCTBA, 3aTeM OTNyCTnTe.
4 Haxmte n OTnycnte KhoNky PROG +.
IyBt dy HaHnHaet 3aInCbBaTb B yCTpOJcTB0 IO OAnOH BCE HBeCTHbIe KOMaHbI. IocAE OTnpaBkn KaKDoi KOMaHbI INHdNKaTOp peKIMa rachET.
- Ecam B yctpoiCTBe HET KHOIIKN PROG+,TOraBMeCTo Hee MOKHO NcIIOAb3OBAbTKHONKY (PeknM OXnAHaNIA).
ECANBbClyaHNOIPONcyTmHHeo6XoMlbIKoA,HaKMnTE PROG-,HTO6bBepHyTbCkNKOMOMyKOdy.
5 HaKMnTe n OTnCyTne KHOIky (3ByK BblkA) YTO6bl BBecTN KOa.
KoTaBce KoDbI AAn DaHHoT TopROBo MApKn HaAeHbI, HAnKaTOp peKIma yCTpOInCTBa 6yTeMnTaB B TeueHne 3 ceKyHd.
PporgpammmpoabHne npn nomoOn noncka TOproBoM MapKu
ПоьвягетИСКаТБ КОДОпpeДeЕнHoМарКВБибИМOTeke KODOBДАй KOHкрETHOrI ПОИЗБОДNTeЯ.
Ha cTpaHnue 2 Bb HauDeTe Ta6Ntuy KoOOB.
1 BkIIOHTe yCTPOINCTBO BpyHnyIO.
2 HaKMnTe KHOIky SELECT, YTo6bI Bb6paTb Heo6xoAIMmbi peKMM yCTpoIcTBa (TV (TB), DVD (DVD npOnIrPbIBaTeAb), STB (TeAenpncTaBa) mN AMP (ycnnteAb).
Ha naneBbIbopa 3aIopNTcN INdikKaTOp peKIMaYcTPOJCTBa.
3 HauKMnTe n ydeepKnBaTKe KhoNkY SETUP do Te np, noKa He 3aRopNTcNnAnkatOp peKmMa yctpOInCTBa, 3aTeM OTIyCtnte.
PykoBoADCTBO NO 3KcIIaTaCuH
4 HaKMMTe UΦPBOVU KHOIky (1-6), COOTBETCTBYIOUyTO TopROBOmape yCTPOINCTBa (CM.Ta6AUUY).
Hakatne Khoikn 0'3ayncKaet noick KoDa, kak onicaHo Bblie.
5 Haxmata NOTyckaHTe KhoNky PROG ^+ (MVA BnAeomamHHToHa)NMA),NOKa yCTpoiCTBO He HaHHe pearpoBaTb.
- Nocae OTnipabKAn KaKDoi KOMaHbI INHAnKaTOp peKIMa raChET.
- EcaBb CyaHnHO npoIyCTmH Heo6XoIMbIK KOa, HauKMITE PROG - ,TTo6bl BepHyTbCk NICKOMOMY KOdy.
6 HaxmTe n OTnyctte KhoNky (3Byk BbIKA.) YTO6bl BBectn KOa.
Korda BCE KoDbI dAaHHOI ToproBOI MapKn HaJeHbI, INDAKATOP peKIMa yCTpOiCTBa HauINHaET MInrTaB B TeueHne 3 ceKyHd.
PporpaMnpoBaHne Kogob gA KOM6HHpOBaHHbIX yCtpoiCTB
AЯ HeKoTOpbIx yCtpoiCTB (HaPnIMep, TeLEBn3Opa c BIneOMaHnITofoHOM, TeLEBn3Opa c DVD npOnIrpbBaTeAem, DVD npOnIrpbBaTeAry N BIneOMaHnITofoHa) Heo6xoAnMo HAcTPOINb ABe pa3HbIe KHOJIKN Bi6Opa nCTouHnKa, YTO6bl ynpABAArTB o6eMn YacTAMN yCtpoiCTBa. HanpImep, AIA TseLEBn3Opa c DVD npOnIrpbBaTeAEM MoKeT IOHaO6MbTcra YCTaHOBVt b OAnH KOd AIA KHOJIKN yIpabAEHnIa TELEBn3Opor m AnpyTo - AIA KHOJIKN yIpabAEHnIa DVD npOnIrpbBaTeAem.
AoIOAHHTeAhbIbe yHKnH
CkBo3Ha peryAHPOBKa rPOMKoCTN
B 60aIbIHHCTBe DOMaIbHIX CNTeM pa3BaIeEHINr pROMKoCTb peYIaIpyETcT OToIbKO OAnHM YCTPOINCTBOM (O6bIHO KHOKNkAMn yIpaBAAEHNr TEAEIBN3OpOM IuN YCNAITeAEM). 3TO O3HaHaET HeoXoAMIOCTb NocToAHNOr PepeKIOHeHNr B pexIM TV (TB) IAm AMP (ycnIteA) dAperyIaIpoBaHINr rPOMKoCTn dpYrTOr oYCTPOINCTBa.
ECM 38yK INCXOANT, HAnpIMeP, IN3 ANHAMIKOB TeAeBn3Opa, TO AIAI TOTO, UTO6blpeRyNtPOBaTb rPoMkoCTb, HAnpIMeP, TeAePnCTaBKN, Heo6xOAMIMO nepeKAnOHTbCB B peKIM TV (TB).
ФнкияСКВОЗнoipeуampoBKNI rPOMKOCTN'no3BOAЯTeHACTpONb KHOJKNIpyaTaNyVOL+/-N 3ByK BbIKA.,YTO6blpeYAMPOBaTb TaKke 3ByKApYnX yCTPoINCTB CnCTeMbl,daKeTex,yKOTOpbIX Het OTaEaHOrO peYaTOpa rPOMKOCTN.
1 HaHaHa BbIbepHTe, Ha KaKoN IcTOUHmK YCTaHOBnTb peryAITop rPOMKoCTn (HaNPIMep, Ha YCNHTeAB).
2 HaKMnTE KHOIky SELECT, UTo6bI BbIbpaTb, Ha KaKoI nCTOuHIM YcTaHOBNTb peYrAITOp rPOMKocTN (TV (TB), DVD (DVD npOnIrpBbIaTeA), STB (TeAnepnctBaKa) IAM (ycuAnTeA).
Ha naneBb6opa 3aoropntc HAnikKaTOp peKIMa yCTPOIcTBA.
3 HauKmIte n yadepKnBaIte KhoNkY SETUP do Tex nop, noka He 3aRopITcN INHdIkaTOp peKIMa YCTPOJCTBA, 3aTEM OTNyCTnTe.
4 HaxmTe ydepnBaIte KhoNkY (3ByK BbIa), noka He 3AmrAeT INdikatop peKIMa YcTpoCTBa, 3aTeM OTnycTne.
5 HaKMnTe n OTnyCTnTe KHOHky (3ByK BbIKA).
- INHnKaTOp pexnMa yCTpoiCTBa noracHet.
Bce ocTaNbHbIe yCTpoiCtBa hAcTpoeHbI Ha peryAunIO n OTKluOyeHne 3Byka uepe3 BbI6paHHbI NcTOUHnK (ycuNTa).
IHHaKAtop 6yddet MInraTb TteHHe 3cekyHa,ecn y Bbl6paHHoro ICTOCHNka Het KHOPIKIOTKAIOeHnI nperyuPOBKNrPOMKoCTn.
Повтося посанов ВьшпpoцудpyпрИвeETК cбposу Habtropeok OTKLOЧени и ретулровг范围内 BOЗВрашеник Заворсим Habtroponи до ymoанhaHIO.
PykoBoOCTBO no 3KcnIyatauHn
CHTbIbAHne KOAOB
ECAM BAM HeoMbl KaKHe-AN60 yHKUH TOrO pYbTa A, KOTOpB 6bI 3aMeHn Ha YHbepcaHbHbI, 3TOT pYbT MoKeT HAcTpONb IN PnP NOMOu PNpAbdyuero.
Cobetb no cHTbIbAHnO yHKn
AaKaKdOropeKIMMaMOKHOnCHTaTbToAkoOHyfHKUIO CTOrOpybTa AY,KOtOpBb6bIAzameHeHa yHnBepcAusbHbI.
- AAHaayaa ydaaNTe BCE cunTaHHbIe fHKUIN DAApeKIMa yctpoiCTBa (TV (TB), DVD (DVD npoInpBbIaTeA), STB (TeaepnCTabKa) mAm AMP (ycuNTeA),yTO6bIy6eAnTbcra, yTO A3TOr peKIMa He octaIOCb paHee coXpaENHbIX fHKUIN. AA 3TOr cMOtpn pa3dE #C6poc Bcex yCTaHOBeHHbIX fHKUIN dApeKIMa yctpoiCTBa#.
ПОLOЖNTe ПУБТБДУ ряДOMТAK,ЧТОБСВЕТДИОДHBIE INДКATOBПИ-песдч#OбOвx ПУБTOB6blI napaMELHbI.Bo3MOXHO,BAMпиДETCDAЯЗTORO OTPERYIMPOBaTb ПОLOЖENHe ODAHOrO 3NpyABTOB.
BoBpemCnTbBaHnHe He CAneAyeTpepeBnraTb NyTbI HmN 3MMeHrTp paCtOaHnE MeKdy HmN.
BbIMoKeTe coXpaHHTb CHTaHHyO yHKLIIO Ha IIO6oINKHOIIke, KpOME KHOIOK LEARN, SELECT, SHIFT IN SETUP.
HeKOTOpBIE HK NOnpeAeEHbIX TINOB NyABTOB AY HeMOrT 6blTb CHTaHbl.
- O60x nIyABTOB IcIOA3yIe rOaHbIe 6aTapeKn.
1 PiooKHe 06a npbTa Y Ha pOBHyIO TOpN3OHTaBHyIO POBepXHOCTb (HaPpIMep, Ha JyPhAaHbHi CTOnIK) HApPaBbTe IV dpYr Ha dpyra Ha pacCTOHHI PImepeHO 30 MM.Bo3MOxHIO, Bam pNAdETcA4 3Toro OTpepyAmPOBaTb PiooXHeHne ODHOr IO N3 PnBTOB.
2 HaxmTe KhoIky SELECT, YTo6bI BbIbpaTb Heo6xOaMmbi peKIM yCTpoIcTBa (TV (TB), DVD (DVD npOnIrPbIBaTeA), STB (TeaenpncTabka) nn AMP (ycnnte).
Ha nαHeMn BbIbopa 3aIopntcHnAnKaTOp peKIma yCTpOiCTBa.
3 Haxmte n ydeepnbaite KhoNky SETUP do tex nop, noKa He 3aropntc INdikatop peHima ycTpoiCTBa, 3aTeM OTIyCTnte.
4 Haxmnte KhoNkY LEARN.
- INHДИКaTOPpeKIMa yCTpoiCTBa MmHTeN 3aIopNTcA.
5 HaKMnTe Ty KHOIky, KOToPoB BbXoTNe IOTOM Bb3bBaTb CHTaHHyIO fYHKUIO (ueAeBaJ KHOIka). HApnPmEp, KHOIky () (PeKIM OKnDaHna).
A yCTaHOBKN DIOOANHTeAbHbIX fYHKUIN HaKMNTe ChaHaA KHOIky SHIFT,3aTeM LcEAByIO KHONKy.
Cm. NcnoAo3oBaHnE KHOJKN SHIFT
6 HaKMnTe n yApEKNBaTKe KHOIky Ha 3aMeHEnHOM nyAte, c KOToPoN CHTbIbAeTCyHKUma (CHTbIbAeMaJ KHOIka, HapPIMep, POWER),do Tex np, noka He MInrHeT n He 3aRopITcN HAnNKATOp peKIMa yCTpOCTBA.
Ecn npn CHTbBaHmB O3NHkA np6Ma, HNkA TOp 6yET MntaTb B TeHHe 3 cekyHa a 3aTeM octaHcTcRopeTb. Ean 3TO npOn3oWAn, NOBTOPNTe pNHTbl 5,6.
7IOBTOPTe 3aTbI 5,6AAY CHTbIbAHNA DpyTNX Heo6xOaMbIX yHKU BbIbpaHHoro YcTpoiCTBa.
PykoBOdTOI NO 3KcNlayaTaun
8 HauKMnTe n OToNcyTne KHOnKy SETUP, KOrda BCE Heo6xOaMbIe fYHKcIM CNHTaHbI. CHTbIBaHne KOaOB 3aBepeHcHo.
9 NobTOpnTe OINcaHHyO BblSe IPOUeApy AAN CHITbHaHNA FHKcIaDpynx YCTPOINCTB.
C6poc Bcex yCTaHOBaeHHbIX ΦyHKuH N AIApeKIma yCTpoiCTBa
1 HaKMnTe KhoNkY SELECT, ABy BbIbOpa ycTpoiCtBa (TV (TB), DVD (DVD npOnIrPbIbAteA), STB (TeAenpIcTaBka) mAm AMP (ycmntA), AAn C6PoCa BCex CHTaHbIx fHyKl.
Ha nane Bb6opa 3aogntcraHAnKaTOp peKIma yCTpoiCTBa.
2 HaKMITE uyepeKIMBaTe KHOPIKY SETUP do Te np, noka He 3aROpNTcI INdKaTOp peKIMa yCTpOINCTBa, 3aTeM OTNcyTte.
3 ABaKDbI HaKMnTe N OTnYCTnTe KHOIIKY LEARN.
- INHAnKaTOp peKIma yCTpoNcTBa HauHHeT MURaTb.
4 HaKMnTe n OTnyCTnTE LIOΦpOByIO KHOInky 1.
- INHnKaTOp peKIMa yCTPOINCTBa nOraCHeT, a BCE cHTaHHbIe ΦyHKUIM AIA 3TOrO peKIMa 6yDt CTePTbI I3 pAmrTn PylbTa △V.
YcTpaHEnHe HncnPaBHOCTeI
English: Information to the Consumer
Disposal of your old product
Your product is designed and manufactured with high quality materials and components, which can be recycled and reused.
When this crossed-out wheeled bin symbol is attached to a
product it means the product is covered by the European Directive 2002/96/EC.
Please inform yourself about the local separate collection system for electrical and electronic products.

Please act according to your local rules and do not dispose of your old products with your normal household waste.
The correct disposal of your old product will help prevent potential negative consequences for the environment and human health.
Guarantee certificate
Certificat de garantie
Garantieschein
Garantiebewijs
Garantibevis
Garanticertifikat
Garantibevis
Takuutodistus
Certificato di
garanzia
Certificado de
garantia
Certificado de
garantia
Eyyunon
TapaNTn
Garanti belgesi

year
année
Jahr
jaar
ano
ar
vuosi
ano
anno
xpóvoç
ROA
sene
warranty
garantie
Garantie
garantie
garantia
garanti
takuu
garantia
garanzia
Eyyunon
raPANTn
garanti
Type:
Serial nr:
Date of purchase - Date d'achat - Kaufdatum - Koopdatum - Inköpsdat - Køpedatum - Kjøpedato - Ostopaivä -
Dealer's name, address and signature