Gelateria Pro 850 - Ice machine Solis - Free user manual and instructions
Find the device manual for free Gelateria Pro 850 Solis in PDF.

User questions about Gelateria Pro 850 Solis
0 question about this device. Answer the ones you know or ask your own.
Ask a new question about this device
Download the instructions for your Ice machine in PDF format for free! Find your manual Gelateria Pro 850 - Solis and take your electronic device back in hand. On this page are published all the documents necessary for the use of your device. Gelateria Pro 850 by Solis.
USER MANUAL Gelateria Pro 850 Solis
natural_image
Exterior view of a modern stainless steel coffee maker with a side grater and control panel (no visible text or symbols)natural_image
Black-and-white photo of a dessert with ice cream and garnish, served in a martini glass (no text or symbols visible)natural_image
Close-up of a laboratory glassware device with digital display and control buttons (no readable text or symbols)natural_image
Metal bucket with handle, no visible text or symbols
natural_image
Pure white rectangular shape with no text, numbers, or symbolsnatural_image
White plastic pipe fitting with a cylindrical top and flanged side (no text or symbols)
natural_image
Close-up of a black textured brush with a circular end, no visible text or symbolsnatural_image
Hand placing a white cylindrical object into a metal bucket (no text or symbols visible)natural_image
Close-up of a kitchen appliance with a lid and control panel, showing no visible text or symbols.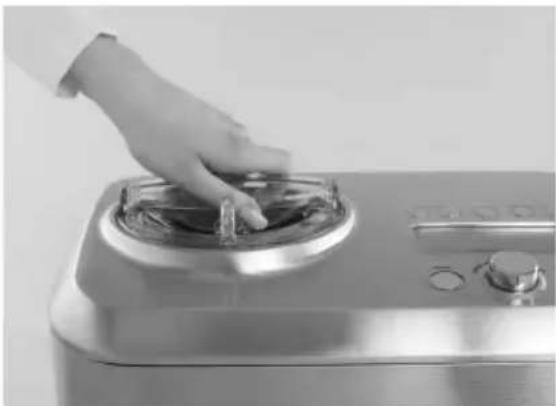
natural_image
Hand placing a glass pan into a kitchen appliance (no visible text or symbols)natural_image
Hand pressing down on a stainless steel kitchen grater (no visible text or symbols)natural_image
Black-and-white photo of a dessert with ice cream, chocolate sauce, and garnish (no text or symbols visible)BASISREZEPT FÜR VANILLE-EIS
Ergibt ca. 1 Liter
- Zutaten
1/3 Tasse (80g) Zucker
- Zubereitung
APFEL-STREUSEL EISCREME (APPLE CRUMBLE)
Ergibt ca. 1 Liter
- Zutaten
natural_image
Black-and-white photo of a dessert with ice cream and garnish, served in a martini glass (no text or symbols visible)▲ DESCRIPTION DE L'APPAREIL
natural_image
Close-up of a laboratory appliance with glassware and digital display (no visible text or symbols)natural_image
Metal bucket with a handle, isolated on white background (no text or symbols)
natural_image
Simple white rectangular object with a horizontal handle, no visible text or symbols.natural_image
Pure white 3D geometric shape resembling a pipe fitting or valve (no text or symbols)
natural_image
Close-up of a black textured brush with a circular end, no visible text or symbolsnatural_image
Hand placing a white object into a bucket (no text or symbols visible)natural_image
Close-up of a kitchen appliance with a central lid and two arrows pointing to the lid area (no text or symbols visible)
natural_image
Hand placing a small fan into a metallic kitchen appliance (no visible text or symbols)natural_image
Hand pressing a button on a stainless steel kitchen grater (no text or symbols visible)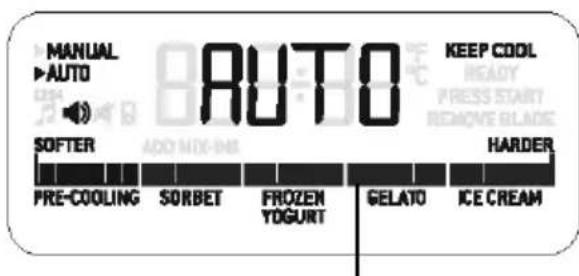
text_image
MANUAL AUTO AUTO SOFTER PRE-COOLING SORBET FROZEN YOGURT GELATO ICE CREAM KEEP COOL READY PRESS START REMOVE BLADE HARDER▲ QUESTIONS / REPONSES
natural_image
Black-and-white photo of a martini glass with ice cream and garnish (no text or symbols visible)RECETTE DE BASE POUR LA GLACE A LA VANILLE
pour env. 1 litre
- ingrédients
2 tasses (500 ml) de crème fleurette
GLACE AU CRUMBLE AUX POMMES
pour env. 1 litre
- ingrédients
GLACE AU CARAMEL SALE
pour env. 1 litre
- ingrédients
GLACE ITALIENNE (GELATO) AUX PISTACHES
pour env. 1 litre
- ingrédients
GLACE ITALIENNE (GELATO) AU CHOCOLAT ET AUX NOISETTES
pour env. 1 litre
- ingrédients
GLACE ITALIENNE (GELATO) AU CHOCOLAT ET A LA MENTHE
pour env. 1 litre
- ingrédients
YOGOURT GLACE AU CITRON ET AU MIEL
pour env. 1 litre
- ingrédients
108 Description of parts
110 Display
111 Accessories for the Ice Cream Machine
112 Important safety precautions
115 Your SOLIS Gelateria Pro is fitted with these extras
116 Before starting operation
117 Ice cream preparation in AUTOMATIC mode
120 Ice cream preparation in MANUAL mode
121 "KEEP COOL" function
121 Turning off the machine
121 "PRE-COOL" function
123 Cleaning and care
124 Storage
125 Tips for perfect ice cream
126 Tips for making ice cream when using warm ingredients
127 Vital ingredients for delicious ice cream
128 Questions and answers
131 Technical specifications
132 Disposal / SOLIS Helpline
133 Recipes

natural_image
Black-and-white photo of a dessert with ice cream and chocolate toppings, served in a martini glass (no text or symbols visible)▲ DESCRIPTION OF PARTS
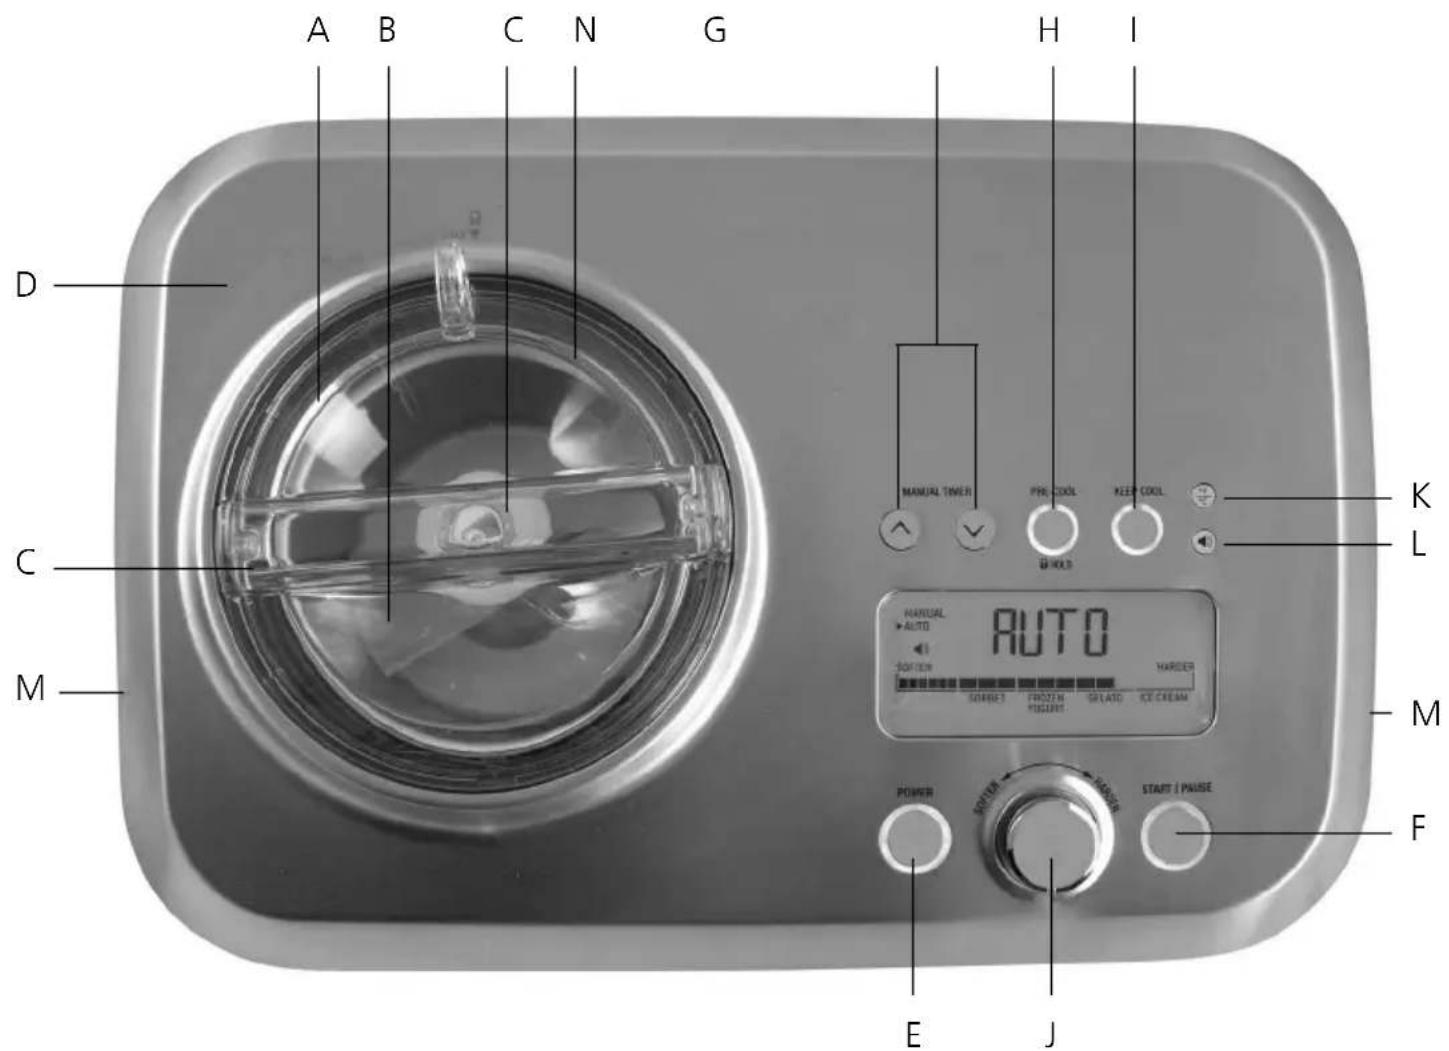
A Anodized ice cream bowl with handle for easy use. Attention: This bowl is not dishwasher safe and must not be stored in the freezer.
B Paddle for preparation of ice cream mixture. Will even reach the mixture directly at the inner walls of the bowl. Attention: Paddle is dishwasher safe but must not be placed in freezer.
C Lid, can be completely removed and half opened with loop.
D Stainless steel housing
E POWER button. Turns appliance on and off.
F START/PAUSE button. Starts and stops the preparation process.
G MANUAL-TIMER buttons. Preparation time between 5 and 180 minutes can be set manually using the √ and ∧ buttons.
H PRE-COOL button for pre-cooling the appliance down to -10 to -30°C. Also serves as HOLD button for activating and deactivating child lock.
I KEEP-COOL button for chilling ice cream mixture. Will chill the mixture for up to 3 hours and repeatedly stir it.
J Consistency selection dial (Automatic timer). The dial has four different consistency settings: Sorbet, Frozen Yogurt, Gelato (italian ice cream) and regular ice cream. Turn the dial to the left for softer textured desserts, turn it to the right for harder textured desserts.
K Temperature unit button for choosing between Celsius and Fahrenheit. Your SOLIS Gelateria Pro has the ability of choosing between temperature units. Pressing the button once will display temperature, pressing the °F button again enables you to change units from Celsius to Fahrenheit. Note: Pressing the °F button while temperature is displayed will instantly change temperature units.
L Volume button: Your SOLIS Gelateria Pro features a sound signal when ice cream preparation has finished. You can manually set the volume and choose between loud, soft and silent mode. Also, you can set the appliance to play a melody at the end.
M Handles for easy use
N Ice cream bowl chamber
text_image
A B C N G H I D C M MANUAL TIMER PHC COOL KEEP COOL K L HUNTUAL AUTO MANUAL WATER SOFTION HARDER SOFTION FROZEN THUSANT SLATO ICE CREAM M POWER START / PAUSE F E J
natural_image
Close-up of a laboratory glassware setup with a digital display and control buttons (no visible text or symbols)Reset to factory settings
- To reset to factory settings, press the KEEP COOL button for 5 seconds while the appliance is in standby mode. Attention: This is only possible during standby mode.
▲ DISPLAY

text_image
Z Y X • MANUAL • AUTO 1234 SOFTER ADD MIX-INS PRE-COOLING SORBET FROZEN YOGURT GELATO ICE CREAM T Q S P O AUTO °F °C KEEP COOL READY PRESS START REMOVE BLADE HARDER R U V WO LCD display shows current settings and preparation status. Furthermore, the display will alternately show operating time and temperature in ice cream bowl.
P Consistency / ice cream sort display bar, reaching from „SOFTER“ on the far left to „HARDER“ on the far right.
Q Cooling display bar
R KEEP COOL indicator. Illuminates when KEEP COOL function has been set. KEEP COOL will chill the mixture for up to 3 hours and repeatedly stir it.
S ADD MIX-INS indicator. Flashes when individual, solid ingredients can be added.
T PRE-COOLING indicator. Illuminates when pre-cooling function has been set and compressor is cooling the machine. COOLING will illuminate when machine is in preparation phase.
U READY indicator. Illuminates when pre-cooling is completed or when mixture has reached correct temperature or when set time in MANUAL mode is up.
V PRESS START illuminates at end of pre-cooling phase to indicate that machine has cooled down enough to start ice cream preparation.
W REMOVE BLADE illuminates when ice cream preparation has finished and blade can be removed from the bowl.
X Signal volume display. Indicates current volume: loud 🔊, soft 🔊 or silent 🔊. When set to ⏻, machine will play a melody. 🔊 indicates that child lock is on.
Y Arrow next to the AUTO indicator will illuminate when the AUTOMATIC-function is set.
Z Arrow next to the MANUAL indicator will illuminate when the MANUAL-function is set.
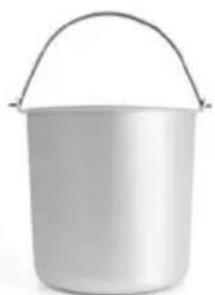
▲ ACCESSORIES FOR THE ICE CREAM MACHINE
natural_image
Metal bucket with a handle, isolated on white background (no text or symbols)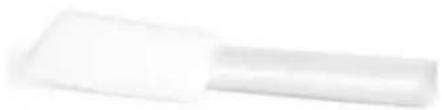
natural_image
Pure white rectangular object with no visible text, numbers, or symbolsAnodized ice cream bowl Scraper for removing mixture from bowl
natural_image
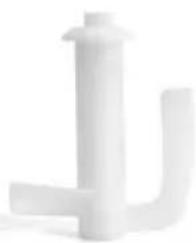
Pure white abstract geometric shape resembling a stylized letter or symbol (no text or symbols present)
natural_image
Close-up of a black brush with serrated texture and a circular end (no text or symbols)Paddle Bottle brush for cleaning
paddle and bowl
▲ IMPORTANT SAFETY PRECAUTIONS
Please read through this user manual thoroughly before using your SOLIS Gelateria Pro, so that you become familiar with your appliance and can use it safely. We thoroughly recommend that you keep these instructions and, if you pass the appliance on, that you also hand these instructions to the new owner.
For your own safety, please observe the following safety measures when using electrical appliances:
- To avoid electric shock, neither the ice cream machine, power cable nor plug are allowed to come into contact with water or other fluids. Water can enter the housing and damage the appliance! If the appliance or power cable should come into contact with water, immediately pull the plug out from the socket using dry rubber gloves.
- Before using the appliance, check that the voltage stated on the appliance matches your mains voltage.
- Place the appliance while in function on a stable, level and dry surface, like a table or bench. Vibration during operation may cause the appliance to move. There fore do not place the ice cream machine near the edge of a bench or table during operation. Please maintain a minimum distance of 15 cm to adjacent walls to avoid overheating your machine.
- Do not leave the power cable hanging over table edges so that it can not be pulled. Make sure that it does not come into contact with hot surfaces, such as hot-plates or a radiator, or that they come into contact with the appliance. Fully unwind the cord before use.
- Keep the appliance away from hot gas, hot ovens and other heat-emitting appliances or heat sources. Never use the appliance on a hot or wet surface. Never place the appliance near moisture, heat and naked flames. Keep the appliance away from moving parts or appliances.
- Your SOLIS Gelateria Pro is fitted with a compressor that always requires an up-right position. Never separate appliance from feet and always place on feet with the opening facing upwards. Always use and store appliance standing on feet.
- Never carry the appliance by the power cable and do not place it on the power cable.
- We recommend that you do not use an extension cable with this appliance. Do not place the appliance directly underneath a power socket.
-
Unplug the appliance when it is not in use or unattended, and before cleaning. We recommend the use of a residual current device (RCD safety switch) to ensure additional protection during the use of electrical appliances. It is advisable to use a safety switch with a rated residual operating current of 30 mA maximum. For professional advice consult an electrician.
-
Do not make any adjustments to the appliance, cable, plug or accessories.
- Do not leave the ice cream machine unattended when in use. Incorrect use may cause injury!
- Never take hold of an appliance that has fallen into water. Always take the plug out of the power socket before removing the appliance from the water. Do not use the appliance again until you have had it's ability to function safely checked by SOLIS or a SOLIS approved service centre.
- Never place the ice cream machine in a place where it could fall into water (e.g. next to a sink).
- Place the appliance so that it is never exposed to direct sunlight.
- Never put sharp or pointed objects and tools into the appliance openings. The appliance may become damaged – danger of electric shock!
- Do not shake or relocate the appliance while it is in operation.
- Only use the appliance as described in this manual. Only use with the provided accessories, incorrect accessories can lead to damage of the appliance.
- This appliance is only for domestic use and is not suitable for commercial use.
- The ice cream machine is not for outdoor use. Do not use in moving vehicles or boats.
- Check your ice cream machine before each use.
- In order to avoid electric shock, do not use the appliance if the cable or plug are damaged or the appliance is otherwise faulty, dropped or damaged. Never attempt repairs yourself, but take your appliance to SOLIS or a SOLIS approved service centre in order to get it inspected or mechanically and electrically repaired.
- People with limited physical, sensory or mental capacities (including children) are not permitted to use the ice cream machine, except when supervised by a person responsible for their safety or are instructed by this person, exactly how to use the appliance.
- The machine can be operated by children older than 8 years when they have been properly instructed how to correctly operate the machine and safety hazards have been pointed out to them which they have completely understood.
- The machine should not be cleaned by unsupervised children.
- Children must be supervised to avoid them playing with the machine.
- Ensure that the SOLIS Gelateria Pro is properly assembled before using it. How this is done you can learn from this manual.
-
Only use the included paddle and ice cream bowl with this machine.
-
Always ensure that the machine is turned off and unplugged before mounting the paddle.
- Always ensure that the paddle is properly attached to the shaft before using the ice cream machine.
- Never cover up the air vents while the machine is in use.
- Always turn off the machine by pressing the START/PAUSE button and then the POWER button before resetting, disassembling or cleaning the machine. Then, disconnect the power plug from the outlet and wait until the motor, the compressor and the paddle have come to a stop. This also applies when the machine is not in use.
- Use the ice cream machine and paddle with caution. Never reach into the ice cream bowl or touch the paddle while the machine is in use. While machine is in use, no body part, hair, clothing or kitchen tool must come in proximity of the rotating paddle.
- Should any objects (f.e. scraper or kitchen tools) fall into the ice cream bowl during use, press the START/PAUSE button, unplug the machine and remove the object only after motor and paddle have come to a stop.
- When removing the ice cream from the ice cream bowl, turn off the machine with the START/PAUSE and the POWER button, unplug it and wait until motor, compressor and paddle have come to a stop.
- Always remove paddle before cleaning.
- Only use the SOLIS Gelateria Pro for preparing ice cream and sorbet.
- Never use the ice cream machine without foods or liquids in the ice cream bowl.
- Never put ingredients directly into the ice cream bowl chamber. Ingredients must only be put into the ice cream bowl.
- Always check if the ice cream bowl chamber and the outer surface of the ice bowl are absolutely clean and dry before using the machine.
- Do not pour any hot or boiling liquids in the bowl. Liquids must always cool down before being put into the ice cream bowl.
- Keep the machine clean. Please refer to notes given in the „Maintenance and cleaning“ section of this manual. Only the paddle can be cleaned in the upper drawer of the dishwasher. Other parts must not be placed in the dishwasher.
- Even when the machine is not in use, the lid should only be removed for short periods of time.
- Never store explosive or flammable substances like aerosol containers (deodorant sprays, hair sprays etc.) in the ice cream machine.
▲ YOUR SOLIS GELATERIA PRO IS FITTED WITH THESE EXTRAS
AUTOMATIC MODE
The built-in automatic mode will stir and cool down ingredients to the desired temperature and consistency. Choose one of the pre-programmed functions: Sorbet, Frozen Yogurt, Gelato (italian ice cream) and Ice-Cream (classic ice cream). A signal will sound when preparation has finished.
MANUAL MODE
Allows manual setting of preparation time if recipe states an exact duration of time.
CHOICE BETWEEN 4 ICE CREAM VARIETIES AND CONSISTENCIES
Your SOLIS Gelateria Pro has four pre-programmed ice cream functions - choose between Sorbet, Frozen Yogurt, Gelato or classic ice cream.
PRE-COOL FUNCTION
Pre-cooling your machine before preparation is advised, especially if you want to shorten preparation time. This optional function will cool the machine down to -10^ to -30^ in 5 – 10 minutes.
KEEP COOL FUNCTION
When desired consistency is reached, the KEEP COOL function will avoid melting of the mixture. In this setting, compressor and paddle motor will operate at intervals to ensure desired consistency.
CHILD LOCK 🔒
With the child lock, you can assure that children won't change machine settings during operation. Press the PRE-COOL / HOLD 🔒 button for 2 seconds during operation to activate child lock. To turn off this feature, press the PRE-COOL / HOLD button for another 2 seconds.
ADD MIX-INS
Solid ingredients like chocolate chunks or fresh fruit that can not be added right at the start but can be added through the hinged opening later on. Your SOLIS Gelateria Pro will emit an acoustic signal and the ADD MIX-INS indicator will flash to notify that you can add your solid ingredients.
ACOUSTIC „DONE“ SIGNAL
Your machine will emit an acoustic signal once ice cream preparation has finished. You can individually set the volume of this signal: loud, soft or silent.
When you choose the ⏻ setting, a little melody will sound at the end.
- Attention: Your SOLIS Gelateria Pro is fitted with a compressor that always requires an upright position. Never separate appliance from feet and always place on feet with the opening facing upwards. Always use and store appliance standing on feet.
- Before using your ice cream machine for the first time, please remove all stickers. Assure that all accessories and appliance parts have been removed from the packaging before disposing of it.
- Remove lid, ice cream bowl and paddle from the machine. Clean these parts with some mild washing-up liquid and warm water and carefully rinse everything. Dry all the parts.
▲ ICE CREAM PREPARATION IN AUTOMATIC MODE
- Mount the paddle to the shaft in the ice cream bowl.
- Add prepared mixture or ingredients following the order given in the recipe into the ice cream bowl. Wipe eventual remains off the rim of the ice cream bowl.
- Note: Always insert the paddle into the ice cream bowl before adding the ingredients. While filling the ice cream bowl, it should always be removed from the bowl chamber. This will avoid ingredients spilling into the bowl chamber.
- Attention: It is very important that the paddle is mounted to the shaft firmly and exactly. Otherwise, the ingredients can not be churned.
natural_image
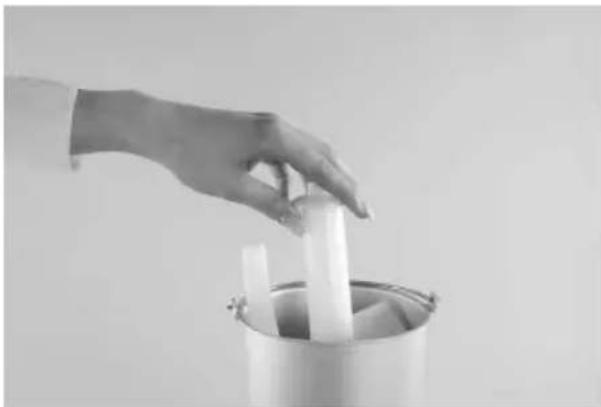
Hand placing a white cylindrical object into a metal bucket (no text or symbols visible)- Check if the bowl chamber and outer surface of ice cream bowl are absolutely dry before inserting the bowl into the bowl chamber.
- Insert the ice cream bowl into the bowl chamber.
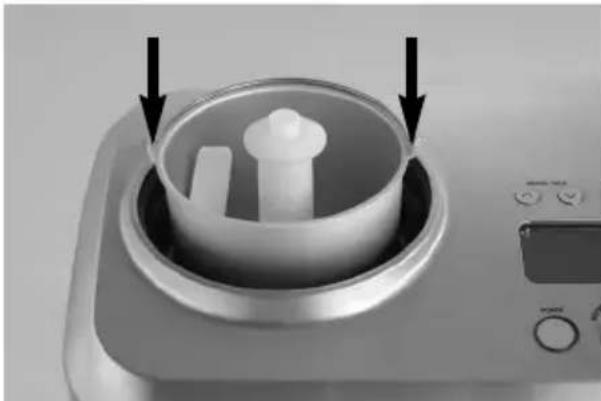
- There are two notches in the bowl chamber. When inserting the bowl into the chamber, be careful to ensure that the joints of the bowl handles lock into these notches.
natural_image
Close-up of a kitchen appliance with a lid and control panel, showing no visible text or symbols.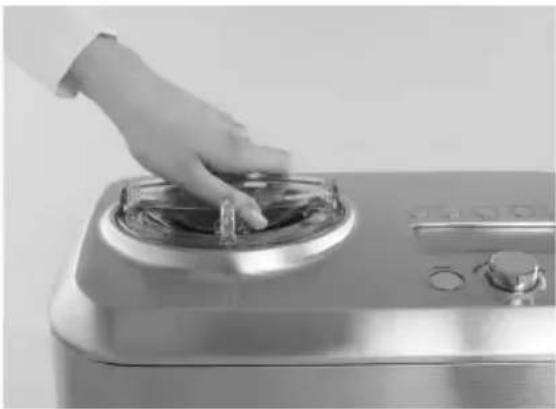
natural_image
Hand placing a glass lid onto a stainless steel kitchen grater (no text or symbols visible)-
Place the lid on the ice cream bowl. To close the lid, place it in a way that the marking ALIGN ∧ on the lid aligns with the marking ALIGN ∨ (open lock) on the appliance and turn it clockwise to the LOCK ∨ (closed lock) position. Attention: Please don't open the lid while the machine is in use unless explicitly mentioned in the recipe. If you need to add ingredients while the machine is churning, open the smaller lid using the loop.
-
Completely unwind the power cord and plug the power plug into a suitable power outlet.
-
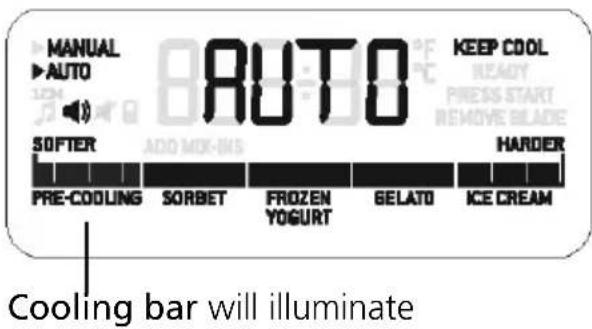
Press the POWER button to turn on the machine. The POWER button will illuminate white. AUTO will appear on the LCD-display. The Cooling bar and Consistency bar will illuminate as well. The small arrow to the left should point to AUTO, indicating that AUTOMATIC mode is switched on. To ensure that the machine is in AUTOMATIC mode, turn the consistency dial. Only in AUTOMATIC mode you can set hardness of the ice cream mixture.
text_image
MANUAL AUTO AUTO SOFTER PRE-COOLING SORBET FROZEN YOGURT GELATO ICE CREAM KEEP COOL READY PRESS START REMOVE BLADE HARDER Cooling bar will illuminate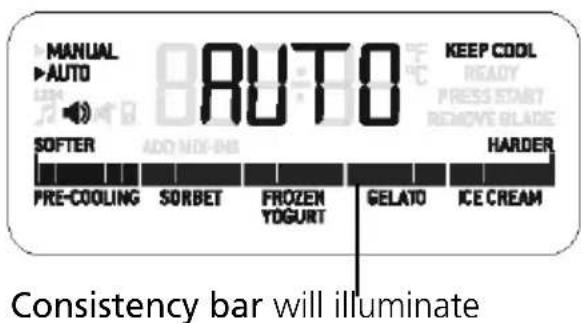
text_image
MANUAL AUTO SOFTER PRE-COOLING SORBET FROZEN YOGURT GELATO ICE CREAM AUTO KEEP COOL READY PRESS START REMOVE BLADE HARDER Consistency bar will illuminate
natural_image
Hand pressing down on a kitchen sink with a control knob (no text or symbols visible)USING THE CONSISTENCY SELECTION DIAL
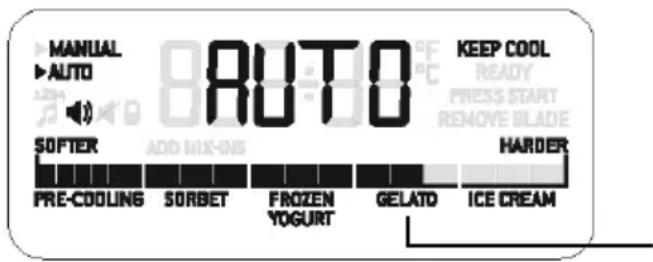
- To set the machine to the desired consistency, turn the dial to the left or right. Softer, less frozen ice cream varieties like Sorbet are to the left of the bar. Harder ice cream varieties like classic ice cream are to the right of the bar.
text_image
MANUAL AUTO 8000 SOFTER ADD MIXING PRE-COOLING SORBET FROZEN YOGURT GELATO ICE CREAM KEEP COOL READY PRESS START REMOVE BLADE HARDERThis consistency setting has been determined
STARTING ICE CREAM PREPARATION
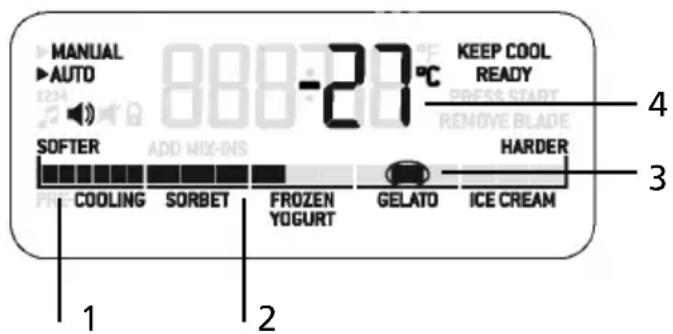
- To begin ice cream preparation, press the START/PAUSE button. The button surround will illuminate red. The rectangles in the Cooling bar will illuminate successively to indicate that the machine is beginning preparation. The ice cream machine will now cool and churn the mixture until the desired consistency has been reached. The Cooling bar will scroll from the left to the right until the mixture is cooled enough for the first rectangle to illuminate permanently. The further the cooling of the mixture progresses, the more rectangles will permanently illuminate in the Cooling bar – until they reach the desired hardness. Depending on the temperature of the ingredients it might take a little time for the Cooling bar to begin illuminating. As soon as the mixture reaches the desired hardness the last rectangle will flash, serving as the endpoint of the setting. The display will alternately state elapsed preparation time and current cooling temperature.
text_image
MANUAL AUTO 888-27°C KEEP COOL READY SOFTER ADD MIX-INS HARDER COOLING SORBET FROZEN YOGURT GELATO ICE CREAM 1 2 3 4- Cooling status
- Currently reached consistency hardness
- Desired hardness
- Operation time / temperature
- As soon as the desired setting is reached, the compressor and motor will stop and the display will state READY and REMOVE BLADE. The acoustic signal will sound to indicate that ice cream preparation has finished. (Unless silent mode is activated). Note: To stop preparation at any point while the machine is in use, you can press the START/PAUSE button. The red light surrounding the START/PAUSE button will flash. To resume operation, press the button again and the red control light should illuminate permanently.
▲ ICE CREAM PREPARATION IN MANUAL MODE
• Proceed as described in points 1 - 10 on pages 117 and 118.
- Press the POWER button to turn on the machine. The POWER button will illuminate white. AUTO will appear on the LCD-display to indicate that the machine is in AUTOMATIC mode. The Cooling bar and Consistency bar will illuminate as well. The ice cream machine and display will always start in the last mode or setting that was used.
- Press the MANUAL TIMER buttons √ or ∧ to get to MANUAL mode. The little arrow to the upper left should point to MANUAL.
- By repeatedly pressing the √or △buttons you can increase or decrease preparation time in 5-minute steps. You can set preparation time between 15 and 180 minutes. The set time will show up on the display.
- The mixture averagely requires approx. 50 minutes to turn into ice cream by cooling and churning.
- Press the START/PAUSE button to start ice cream preparation. The red light surrounding the button will illuminate to indicate that ice cream preparation is beginning.
- As soon as the set time has expired the compressor and motor will stop and READY will appear on the display.
Note:
- If you press the START/PAUSE button again during preparation, the time and operation of the machine will be stopped. The red light surrounding the button will flash. To resume, press the button again.
- If you want to reset the timer, press the START/PAUSE button for 2 seconds to delete the timer-setting.
- The timer can be reset anytime.
CONSISTENCY SELECTION DIAL
- Consistency can not be set in manual mode.
„KEEP COOL“ FUNCTION
- The KEEP COOL function will keep the frozen dessert cooled and churned for up to 3 hours.
a) After preparation, press the KEEP COOL button. The button surround will illuminate and the display will state KEEP COOL.
b) In this mode, the appliance will cool and churn the ice cream mixture to maintain the desired consistency. Additionally, the compressor and paddle will turn on at intervals.
NOTE: In KEEP COOL mode, the compressor and motor will turn on at intervals to check the consistency of the mixture. The paddle will only turn if the mixture does not have the desired consistency anymore. - The KEEP COOL function can be switched on or off at any time by pressing the KEEP COOL button.
Exact time setting of the „KEEP COOL“ function in MANUAL mode:
- Pressing the KEEP COOL button in MANUAL mode will stir and churn the mixture for set time. A red light will illuminate and the display will state KEEP COOL when function is selected. The paddle will turn as soon as the mixture does not have the set consistency anymore.
- To turn off the machine, you have to press the START/PAUSE button and, after that, the POWER button - all control lights as well as the display will go out. You should always unplug the machine when not in use.
„PRE-COOL“ FUNCTION
- The PRE-COOL function decreases preparation time by lowering the temperature in the ice cream machine. It can be switched on optionally and is ideal to use if you have to prepare a mixture outside of the ice cream bowl or if you want to speed up ensuing ice cream preparation.
- You can either add the ice cream mixture into the bowl and put it in the chamber right from the start or you can put it into the bowl and then into the chamber once the display states READY.
a) Attach the paddle to the shaft in the ice cream bowl.
b) Plug the machine into a suitable power outlet.
- Note: The PRE-COOL function can only be switched on while the machine is in standby mode, meaning the machine is plugged in and switched on by pressing the POWER button but the START/PAUSE button has not yet been pressed.
c) To activate the PRE-COOL function press the PRE-COOL button while the machine is in standby mode. The control light surrounding the button will change from white to red to indicate that the machine is working in pre-cooling mode and will lower inside temperature to -10^ to -30^ in 5 - 10 minutes.
d) In PRE-COOL mode, the display will state the temperature in the ice cream bowl chamber, the PRE-COOLING (T) indicator will illuminate and the rectangles in Cooling bar (Q) will illuminate one after another to indicate that the machine is in PRE-COOL mode.
e) The display will state READY and PRESS START will flash as soon as optimal temperature is reached. Add the prepared ice cream mixture into the bowl and put it into the bowl chamber (provided it is not inserted already) and start preparation with the START/PAUSE button.
- Note: If the START/PAUSE button is not pressed after the READY indicator has illuminated, the paddle will start turning after 15 minutes. However, this will not start ice cream preparation. Ice cream preparation only starts after the START/PAUSE button is pressed.
f) After 20 minutes, the machine will automatically go from PRE-COOL back to standby mode. The pre-cooling function can be switched off manually, either by pressing the PRE-COOL button again or by pressing the START/PAUSE button which stops the pre-cooling function.
- Remember:
To start ice cream preparation, in any case the START/PAUSE button has to be pressed after pre-cooling.
The PRE-COOL function can not be activated when the START/PAUSE button has been pressed earlier.
▲ CLEANING AND CARE OF YOUR SOLIS GELATERIA PRO
- Before you start cleaning, please check if the ice cream machine is turned off and unplugged. The ice cream machine is turned off when the light surrounding the POWER button and the entire control panel have gone out. Please wait for the compressor to completely cool out before cleaning the appliance.
CLEANING THE STAINLESS STEEL HOUSING
- Wipe clean the housing and the display using a soft, damp cloth. Do neither use dry kitchen towels/cloths for the display nor aggressive or abrasive cleaners or scrubbing sponges to clean the housing and appliance accessories as they might scratch the surfaces.
Note: Never immerse the machine in water and never place it in dishwasher. Ensure that the buttons and display do not come in contact with water or cleaning agents.
-
To clean the ice cream bowl chamber, the machine needs to be at room temperature. Wipe clean the bowl chamber with a damp cloth, eventually using some washing-up liquid. Carefully remove possible remains of cream, milk, chocolate etc. with a soft cloth.
-
All surfaces must be completely dry before inserting the plug back into the power outlet.
CLEANING THE ICE CREAM BOWL
- Outside of the bowl chamber, fill half the ice cream bowl with warm water and add mild washing-up liquid. Leave the water in the ice cream bowl for approx. 10 - 20 minutes before cleaning it with a soft sponge and rinsing it with clear water. Only reinsert the ice cream bowl into the machine when it is completely dry.
• Attention: The ice cream bowl must not be cleaned in the dishwasher!
CLEANING THE LID
- The lid can be cleaned in warm water with mild washing-up liquid and a soft sponge. Do not use aggressive, abrasive cleaners or scrubbing sponges as they might scratch the surface of the lid. Only put the lid back on the ice cream bowl when it is completely dry.
CLEANING THE PADDLE
- Rinse the paddle with warm water and mild washing-up liquid. You can clean the middle section of the paddle and remove any ice cream remains with the enclosed bottle brush. Let the paddle dry completely before putting it into the ice cream bowl.
- Attention: The paddle can be cleaned in the top drawer of the dishwasher.
▲ STORAGE
- Check if the machine is turned off and unplugged.
- Check if the housing and all appliance parts are absolutely clean and completely dry.
- Put the paddle into the ice cream bowl which in turn you should place in the bowl chamber.
- Place the lid on the ice cream bowl.
- Store the appliance in an upright position in a dry, dark place. Optimally, use the original packaging. Do not place anything on top of the appliance.
▲ TIPS FOR PERFECT ICE CREAM
- Please consider that preparation time of your ice cream depends on multiple factors: Room temperature, temperature of ingredients and whether or not the appliance is pre-cooled. The cooler the ingredients, the quicker ice cream preparation will be. Usually, preparing ice cream will take approx. 50 minutes.
- If you are preparing a recipe using warm ingredients, preparing the ice cream mixture one day in advance is advisable. If this is impossible, you should let the mixture cool out for at least 4 hours before putting it into the ice cream machine.
- Always remove the ice cream bowl from the machine when putting in the ingredients. Only put back the ice cream bowl after that.
- The recipes listed in this recipe book use cream, milk, eggs and sugar. When required due to health, allergies or a diet, similar foods can be used to replace these ingredients. However, please consider that this might change the taste and consistency of the ice cream.
- Most ice cream varieties increase in volume during cooling and churning. When not mentioned otherwise, all ice cream recipes listed in this recipe book will result in approx. 1 litre of frozen dessert. Should you desire to prepare other ice cream recipes, use a maximum amount of 700ml of ingredients to ensure that the mixture has enough room to gain in volume.
- Alcohol inhibits the mixture from freezing. Thus, it is advisable to add alcohol to the mixture just at the end of the preparation process.
- At the end of preparation, the consistency of the ice cream will usually be so soft that you can easily poke a spoon into it. If you want to serve the ice cream as scoops or on waffles or cones, putting it into the freezer for another two hours before serving is recommended.
- If you want to store the ice cream in the freezer, an air-tight container should be used. This will prevent ice crystals from forming. Covering the ice cream with baking paper will also counteract ice crystals.
- Note: Never place the ice cream bowl in the freezer!
- Homemade ice cream will taste best when consumed fresh, meaning within one week after preparation. However, it may be stored for up to two weeks in the freezer.
- If you want to serve ice cream directly from the freezer, you should let it stand at room temperature for 5 to 10 minutes.
▲ TIPS FOR MAKING ICE CREAM WHEN USING WARM INGREDIENTS
Classic, creamy ice cream is made from a warm mixture of milk, cream and eggs.
With these tips, this variation will be particularly successful:
- Ensure that all ingredients are absolutely fresh.
- The eggs should be at room temperature. The recipes use medium-sized eggs, approx. weighing 59g.
• Measure all ingredients before starting preparation and have them ready. - Either use an egg whisk or an electric mixer. Whisk the egg yolks and the sugar until you have a lightly coloured, fluffy, thick mixture.
- For heating, use a saucepan with a heavy bottom.
- When heating cream/milk, do not let it boil! Take the cream/milk off the stove once little bubbles form at the side of the saucepan.
- While heating the cream/milk, whisk up the mixture of eggs and sugar. Only starting doing this when the cream/milk is heated up might cause the cream/milk getting too hot or separating later on.
- Ensure that the mixture is permanently stirred with a wooden spoon until it thickens. A wooden spoon with a flat bottom is suited best for this. To check if the mixture has reached the right consistency, dip the spoon into the mixture. When you take the spoon out of the mixture, run your finger down the back of spoon. If you can see a finger mark, the mixture is thick enough. Remove the saucepan from the stove.
- If the mixture separates or congeals, the heat was too high. In this case, you will need to start again.
- Do not leave the mixture unattended while cooking!
- The egg mixture will take approx. 5 - 15 minutes to thicken, depending on the quantity.
- Let the egg mixture cool out at room temperature and stir it occasionally to release heat until no steam is visible. When the egg mixture is cooled, place it in the fridge until it is well chilled.
- Cover the surface of the ice cream mixture with a cling film to avoid skin forming on top.
- To cool the ice cream mixture even quicker, you can transfer it into a metal bowl and, inturn, place the bowl in a cold water bath. Permanently stir the mixture until it is well chilled.
▲ VITAL INGREDIENTS FOR DELICIOUS ICE CREAM
Making delicious ice cream yourself from fresh, tasty ingredients that you can enjoy whenever you want becomes easy with the SOLIS Gelateria Pro ice cream machine. These are the basic ingredients:
EGGS
- The recipes use medium sized eggs, weighing approx. 59g. The eggs give the mixture volume, stabilize and emulsify it.
- Attention: Avoid using older eggs, especially if not cooking the egg mixture. Pregnant women are advised not to consume ice cream made with raw eggs.
SUGAR
- The recipes use raffinated sugar which easily dissolves and prevents forming of ice crystals.
- As a general rule: The more sugar you add, the lower the freezing point of the water in the mixture will be. This prevents the mixture from becoming a hard, large clump that is difficult to portion.
MILK
- The recipes use whole milk. Using skimmed milk is possible but will produce different results. Skimmed milk should only be used in recipes where cooking the mixture is not required. Skimmed milk increases the risk of the mixture separating during heating.
CREAM
- The recipes use liquid cream. Cream will make the mixture softer and more creamy.
- Reduced fat cream can only be used in recipes where heating the mixture is not required, as the risk of the mixture separating is high.
▲ QUESTIONS AND ANSWERS
| QUESTION | ANSWER |
| The ice cream does not freeze. | You did not press the START/PAUSE buttonDoes the mixture contain alcohol? Too much was added, or too early.Be careful to ensure air circulation around the machine. We recommend a minimum distance of 15cm between appliance and adjacent items/the wall. |
| The paddle does not move. | The paddle doesn’t move when the PRE-COOL function is selected for the first 5 minutes.Check if the paddle is properly fitted onto the shaft. If the shaft doesn’t move either, please contact a SOLIS service center. |
| The lid does not lock. | The paddle and ice cream bowl are not properly positioned - ensure the handles of the bowl are inserted into the grooves in the bowl chamber and the paddle is fixed to the shaft. |
| The ice cream dessert is not frozen in stated time. | The mixture was too warm when added into the bowl.Different ingredients and quantities affect freezing time. Ingredients such as eggs or alcohol require a little more time. |
| The ice cream bowl can not be removed after preparation. | Ingredients may have spilt over the bowl’s side into the bowl chamber. Turn off the machine and let the ice cream melt for 10 to 20 minutes. Remove bowl and clean the inside of the bowl chamber. |
| How do I prepare very soft ice cream (soft serve)? | The varieties of ice cream on the hardness indicator only serve as a rough guide. Try out the softest setting, „Sorbet“. Should the ice cream turn out too soft, you can use a harder setting. |
| I want my ice cream even harder! | Remove finished ice cream from the bowl, place in an air-tight container and put in freezer for 1 to 2 hours or as long as it takes for ice cream to reach desired hardness. |
| Can I not add my mix-ins directly to the mixture? | We recommend adding mix-ins at the end when the ADD MIX-INS indicator is flashing. Note: Often ingredients will blend when added too early. |
| My ice cream machine seems to vibrate briefly. | The built-in compressor is mounted on special rubber feet to minimize noise and vibration during use. When no cooling is necessary, the compressor will automatically turn off and small vibrations could occur for 1 - 2 seconds. This is absolutely normal. |
| The control panel does not work. | Did you activate the child lock? Press the HOLD button ☑ for 2 seconds to deactivate the child lock. |
| The ice cream machine does not remember it's last setting. | The built-in computer will only remember settings when the START/PAUSE button was pressed. |
| Temperature is displayed in Fahrenheit. | Press the °F button to change temperature unit to Celsius. |
| Ice cream is not cooled although compressor is on. | Is the PRE-COOL function activated?To increase compressor life, a self timer is built in. Please allow 3 minutes for the compressor to reactivate. |
| My ice cream has many ice crystals in it. Why?When I get my ice cream from the freezer it is very hard. Why?Can I put the ice cream bowl into the freezer? | Some desserts have a higher water content which will make the mixture more icy.Homemade ice cream always is harder than bought ice cream, as it contains less air. We recommend taking the ice cream out of the freezer 5 to 10 minutes before serving.We do not recommend placing the ice cream bowl in the freezer. The ice cream will freeze solid in the bowl and be very difficult to remove. Please never use any sharp or metal tools to remove ice cream from the bowl, as this might scratch the surface. |
▲ TECHNICAL SPECIFICATIONS
Model-Nr. Type 850
Product description Ice cream machine
Voltage/Frequency 220-240V \~ / 50Hz
Output 170-200 watts
Measurements approx. 42 x 27 x 29 cm (W x H x D)
Weight approx. 13,2 kg

DISPOSAL

EU 2002/96/EC
Directions for proper disposal of the product according to EU directive 2002/96/EU
Please dispose of this appliance like a cooling device. At the end of its working life this equipment must not be disposed of as an household waste. It must be taken to special local community waste collection centres or to a dealer providing this service. Disposing of electrical and electronic equipment separately avoids possible negative effects on the environment and human health deriving from an inappropriate disposal and enables its components to be recovered and recycled to obtain significant savings in energy and resources. In order to underline the duty to dispose of this equipment separately, the product is marked with a crossed-out dustbin.
SOLIS reserves the right to carry out technical and visual changes and modifications to improve the product at any time.

text_image
044 (Only for customerSOLIS HELPLINELPLINE:
044 874164 14
(Only for customers(Only forelastomers in Switzerland)
This item stands out due to its long-life cycle and reliability. Despite this through, if a made motivation ever occurs, simply give us a call. Often a breakdown can be easily and quickly remembered with the right tip or technique without having to straight away send off the device for repair. We will give you all the advice and practical support you require.
Keep the original packaging in a safe place so that you may use it in the event that transportation or shipping of the product becomes necessary.
SOLIS AG
Solis-House • CH-8152 Glattbrugg-Zurich • Switzerland
Phone +41 44 874 64 54 • Fax +41 44 874 64 99
info@solis.ch • www.solis.ch • www.solis.com
Recipes
Note: One cup in these recipes equals a cup size of 250 ml.
The spoon test mentioned in some of the recipes works as follows: To test consistency, dip a wooden spoon into the crème. Take it out and run your finger down the back of the spoon. A visible finger mark should remain.
In this case, the mixture is thick enough.
SOLIS would like to wish you every success!

natural_image
Monochrome photo of a cocktail in a martini glass with ice cream and cinnamon sticks (no text or symbols visible)BASIC VANILLA ICE CREAM
Makes approximately 1 litre
- Ingredients
2 cups (500ml) pouring cream
1 cup (250ml) milk
1 vanilla bean, split and seeds scraped with a spoon or
1 teaspoon vanilla extract
5 egg yolks
1/2 cup (125g) sugar
- Method
- Place cream, milk and vanilla bean and seeds into a medium heavy-based sauce - pan. Heat until mixture just starts to simmer.
- Meanwhile beat egg yolks and sugar in a bowl until pale and thick.
- Remove vanilla bean from the saucepan.
- Slowly whisk hot cream into the egg mixture.
- Clean saucepan and return mixture back to a low heat. Stir constantly with a wooden spoon until mixture has thickened and coats the back of the spoon. If spoon-test is successful, remove the saucepan from the heat.
- Pour mixture into a heatproof bowl, cover and refrigerate until well chilled.
- Pour mixture into ice cream bowl. Set ice cream maker to desired setting and start the freezing process.
- If you don't want to eat the ice cream immediately, transfer the ice cream to a freezer safe container and store the ice cream for up to 1 week in the freezer.
QUICK VANILLA ICE CREAM
Makes approximately 1 litre
- Ingredients
1 cup (250ml) pouring cream
1 1/4 cups (310ml) whole milk
3/4 cup (175ml) sweetened condensed milk
1 teaspoon vanilla extract
- Method
- Place cream, milks and vanilla extract into a large jug and stir to combine. Refrigerate in the fridge until cold.
- Pour mixture into ice cream bowl. Set ice cream maker to desired setting and start the freezing process.
- If you don't want to eat the ice cream immediately, transfer the ice cream to a freezer safe container and store the ice cream for up to 1 week in the freezer.
CHOCOLATE ICE CREAM
Makes approximately 1 litre
- Ingredients
2 cups (500ml) pouring cream
1/2 cup (125ml) milk
4 egg yolks
1/3 cup (80g) caster sugar
- Method
- Place cream, milk and chocolate into a medium heavy-based saucepan. Heat until mixture just starts to simmer.
- Meanwhile beat egg yolks and sugar in a bowl until pale and thick.
- Slowly whisk hot chocolate cream into the egg mixture.
- Clean saucepan and return mixture back to a low heat. Stir constantly with a wooden spoon until mixture has thickened and coats the back of the spoon. If spoon-test is successful, remove the saucepan from the heat.
- Pour mixture into a heatproof bowl, cover and refrigerate until well chilled.
- Pour cold mixture into ice cream bowl. Set ice cream maker to desired setting and start the freezing process.
- If you don't want to eat the ice cream immediately, transfer the ice cream to a freezer safe container and store the ice cream for up to 1 week in the freezer.
TIP: For a bigger chocolate treat, add 1/4 cup grated dark chocolate once machine specifies „ADD MIX-INS“.
STRAWBERRY AND RHUBARB ICE CREAM
Makes approximately 1 litre
- Ingredients
1 1/2 cups (375ml) pouring cream
1/2 cup (125ml) milk
4 egg yolks
1/3 cup (80g) caster sugar
- Fruit mixture
250g fresh strawberries
200g rhubarb, cut into 2cm pieces
1/4 cup (60g) caster suger
- Method
- To make the ice cream base, place cream and milk into a medium heavy-based saucepan. Heat until mixture just starts to simmer.
- Meanwhile beat egg yolks and sugar in a bowl until pale and thick.
- Slowly whisk hot cream into the egg mixture.
- Clean saucepan and return mixture back to a low heat. Stir constantly with a wooden spoon until mixture has thickened and coats the back of the spoon. If spoon-test is successful, remove the saucepan from the heat.
- Pour mixture into a heatproof bowl, cover and refrigerate until well chilled.
-
To make fruit mixture, blend strawberries until smooth then push through a fine sieve to remove seeds. Place strawberry puree, rhubarb and sugar into a small saucepan; stir constantly over a low heat until the sugar has dissolved. Increase heat and simmer, stirring occasionally until the mixture has reduced to 1 cup. Do not over stir or the rhubarb will break down too much. Refrigerate until cold.
-
Once both mixtures are cold, gently fold together before churning.
- Pour mixture into ice cream bowl. Set ice cream maker to desired setting and start the freezing process.
- If you don't want to eat the ice cream immediately, transfer the ice cream to a freezer safe container and store the ice cream for up to 1 week in the freezer.
APPLE CRUMBLE ICE CREAM
Makes approximately 1 litre
- Ingredients
1 1/4 cups (310ml) pouring cream
3/4 cup (180ml) milk
1/2 cup (125ml) sweetened condensed milk
1/4 teaspoon ground cinnamon
- Ingredients for apple mixture
1 granny smith apple, peeled, cored and thinly sliced
2 tablespoons caster sugar
1 tablespoon water
- Ingredients for crumble
1/4 cup (60g) plain flour
2 tablespoons soft brown sugar
1/4 tablespoon baking powder
1 tablespoon rolled oats
40g butter (unsalted)
- Method
To make the crumble:
Preheat oven to 200^ C. Line a baking tray with baking paper. Combine crumble ingredients in a bowl and rub together with fingertips until butter is mixed through other ingredients. Spoon mixture onto baking tray and bake in oven for about 10 – 15 minutes or until golden. Allow crumble to cool on tray.
To make apple mixture:
Combine sliced apple, sugar and water into a small saucepan; stir over a medium heat until the sugar has dissolved. Cover and cook for 5 minutes or until apples are tender; remove from heat and allow to cool. Refrigerate until well chilled.
To make ice cream:
- Place cream, milk, condensed milk and cinnamon into a large jug. Stir until combined. Pour into ice cream bowl, set ice cream maker to desired setting and churn.
- Once machine specifies „ADD MIX-INS“, add apple mixture and 1/2 cup of the crumble mixture. Wait until the ice cream preparation has finished.
- If you don't want to eat the ice cream immediately, transfer the ice cream to a freezer safe container and store the ice cream for up to 1 week in the freezer.
COOKIES AND CREAM ICE CREAM
Makes approximately 1 litre
- Ingredients
1 cup (250ml) pouring cream
1 cup (250ml) milk
1/2 cup (125ml) sweetened condensed milk
1 teaspoon vanilla extract
6 chocolate cream filled cookies, crushed
- Method
- Place cream, milks and vanilla extract into a large jug and stir to combine. Refrigerate until cold.
- Pour cold cream into ice cream bowl. Set ice cream maker to desired setting and churn.
- Once machine specifies „ADD MIX-INS“, add crushed cookies. Wait until the ice cream preparation has finished.
- If you don't want to eat the ice cream immediately, transfer the ice cream to a freezer safe container and store the ice cream for up to 1 week in the freezer.
SALTED CARAMEL ICE CREAM
Makes approximately 1 litre
- Ingredients
1 1/2 cups (375ml) milk
7 egg yolks
1 cup (250g) sugar
3 tablespoons water
1 1/4 cups (310ml) pouring cream
1 teaspoon fine sea salt
- Method
- Place milk into a medium heavy-based saucepan. Heat until milk just starts to simmer.
- Meanwhile beat egg yolks in a bowl until pale and thick. Slowly whisk hot milk into the eggs. Set aside.
- Combine sugar and water in a saucepan and stir over low heat until the sugar has softened and started to dissolve. Increase heat to a medium-high heat, brush down sides of saucepan to dissolve any sugar crystals and cook without stirring until the toffee starts to turn a rich golden colour. Remove from heat and carefully pour in cream. Note: Mixture may splatter at this stage!
- Return mixture to a low heat and stir until any lumps have dissolved.
- Add egg mixture and salt and cook, stirring until mixture coats the back of a wooden spoon. If spoon-test is successful, remove the saucepan from the heat.
- Pour mixture into a heatproof bowl, cover and refrigerate until well chilled.
- Pour mixture into ice cream bowl. Set ice cream maker to desired setting and start the freezing process.
- If you don't want to eat the ice cream immediately, transfer the ice cream to a freezer safe container and store the ice cream for up to 1 week in the freezer.
HONEY ICE CREAM
Makes approximately 1 litre
- Ingredients
2 cups (500ml) pouring cream
1 cup (250ml) milk
6 egg yolks
1/2 cup (125g) good quality honey
- Method
-
Place cream and milk into a medium heavy-based saucepan. Heat until mixture just starts to simmer.
-
Meanwhile beat egg yolks and honey in a bowl until pale and thick.
-
Slowly whisk hot cream into the egg mixture.
-
Clean saucepan and return mixture back to a low heat. Stir constantly with a wooden spoon until mixture has thickened and coats the back of the spoon. If spoon-test is successful, remove the saucepan from the heat.
-
Pour mixture into a heatproof bowl, cover and refrigerate until well chilled.
-
Pour mixture into ice cream bowl. Set ice cream maker to desired setting and start the freezing process.
-
If you don't want to eat the ice cream immediately, transfer the ice cream to a freezer safe container and store the ice cream for up to 1 week in the freezer.
PISTACHIO GELATO
Makes approximately 1 litre
- Ingredients
2 cups (500ml) milk
1/2 cup (125ml) pouring cream
1/2 teaspoon vanilla extract
5 egg yolks
1/2 cup (125g) sugar
3/4 cup shelled pistachios, roasted and chopped
- Method
- Place cream, milk and vanilla extract into a medium heavy-based saucepan. Heat until mixture just starts to simmer.
- Meanwhile beat egg yolks and sugar in a bowl until pale and thick.
- Slowly whisk hot milk/cream mixture into the egg mixture.
- Clean saucepan and return mixture back to a low heat. Stir constantly with a wooden spoon until mixture has thickened and coats the back of the spoon. If spoon-test is successful, remove the saucepan from the heat.
- Pour mixture into a heatproof bowl, cover and refrigerate until well chilled.
- Pour mixture into ice cream bowl. Set ice cream maker to desired setting („Gelato“) and start the freezing process.
- Add chopped pistachios once machine specifies „ADD MIX-INS“. Wait till the end of the ice cream making process.
- If you don't want to eat the ice cream immediately, transfer the ice cream to a freezer safe container and store the ice cream for up to 1 week in the freezer.
CHOCOLATE HAZELNUT GELATO
Makes approximately 1 litre
- Ingredients
2 cups (500ml) milk
1/2 cup (125ml) chocolate hazelnut spread (e.g. Nutella)
1/2 teaspoon vanilla extract
5 egg yolks
1/2 cup (125g) sugar
3/4 cup roasted hazelnuts, finely chopped
- Method
-
Place milk, hazelnut spread and vanilla extract into a medium heavy-based saucepan. Heat until spread has melted and mixture just starts to simmer.
-
Meanwhile beat egg yolks and sugar in a bowl until pale and thick.
-
Slowly whisk hot milk/chocolate mixture into the egg mixture.
-
Clean saucepan and return mixture back to a low heat. Stir constantly with a wooden spoon until mixture has thickened and coats the back of the spoon. If spoon-test is successful, remove the saucepan from the heat.
-
Pour mixture into a heatproof bowl, cover and refrigerate until well chilled.
-
Pour mixture into ice cream bowl. Set ice cream maker to desired setting („Gelato“) and start the freezing process.
-
Add chopped hazelnuts once machine specifies „ADD MIX-INS“. Wait till the end of the ice cream making process.
-
If you don't want to eat the ice cream immediately, transfer the ice cream to a freezer safe container and store the ice cream for up to 1 week in the freezer.
MINT CHOCOLATE GELATO
Makes approximately 1 litre
- Ingredients
1 1/2 cups (375ml) milk
1/2 cup (125ml) pouring cream
120g good quality dark chocolate, chopped
2-3 drops peppermint essence
5 egg yolks
1/3 cup (80g) sugar
60g good quality dark chocolat, finely chopped (extra)
- Method
- Place milk, chocolate and peppermint essence into a medium heavy-based saucepan. Heat until chocolate has melted and mixture just starts to simmer.
- Meanwhile beat egg yolks and sugar in a bowl until pale and thick.
- Slowly whisk hot milk/chocolate mixture into the egg mixture.
- Clean saucepan and return mixture back to a low heat. Stir constantly with a wooden spoon until mixture has thickened and coats the back of the spoon. If spoon-test is successful, remove the saucepan from the heat.
- Pour mixture into a heatproof bowl, cover and refrigerate until well chilled.
- Pour mixture into ice cream bowl. Set ice cream maker to desired setting („Gelato“) and start the freezing process.
- Add finely chopped chocolate once machine specifies „ADD MIX-INS“. Wait till the end of the ice cream making process.
- If you don't want to eat the ice cream immediately, transfer the ice cream to a freezer safe container and store the ice cream for up to 1 week in the freezer.
PASSIONFRUIT GELATO
Makes approximately 1 litre
- Ingredients
2 cups (500ml) milk
1/2 cup (125ml) pouring cream
1/2 teaspoon vanilla extract
5 egg yolks
1/2 cup (125g) sugar
2 - 3 passionfruit
- Method
-
Place cream, milk and vanilla extract into a medium heavy-based saucepan. Heat until mixture just starts to simmer.
-
Meanwhile beat egg yolks and sugar in a bowl until pale and thick.
-
Slowly whisk hot milk/cream mixture into the egg mixture.
-
Clean saucepan and return mixture back to a low heat. Stir constantly with a wooden spoon until mixture has thickened and coats the back of the spoon. If spoon-test is successful, remove the saucepan from the heat.
-
Pour mixture into a heatproof bowl, cover and refrigerate until well chilled.
-
Pour mixture into ice cream bowl with passionfruit pulp. Set ice cream maker to desired setting („Gelato“) and start the freezing process.
-
If you don't want to eat the ice cream immediately, transfer the ice cream to a freezer safe container and store the ice cream for up to 1 week in the freezer.
LEMON SORBET
Makes approximately 1 litre
- Ingredients
3/4 cup (180g) sugar
1 1/2 cups (375ml) water
3/4 cup (180ml) fresh lemon juice, chilled
1 small egg white, lightly beaten
- Method
- Combine sugar and water in a saucepan over a low heat. Cook, stirring, until the sugar has dissolved. Increase heat and simmer for 2 minutes.
- Remove from heat and allow to cool. Refrigerate until needed.
- Pour sugar syrup, lemon juice and egg white into ice cream bowl. Set ice cream maker to desired setting („Sorbet“) and start the freezing process.
- If you don't want to eat the ice cream immediately, transfer the ice cream to a freezer safe container and store the ice cream for up to 1 week in the freezer.
Tip: To make this recipe without using the eggwhite, we recommend using the MANUAL setting and allow approximately 60 minutes for churning. Mixture will make approximately 700ml sorbet once churned.
PINK GRAPEFRUIT SORBET
Makes approximately 1 litre
- Ingredients
3/4 cup (180g) sugar
1 1/2 cups (375ml) water
3/4 cup (180ml) fresh ruby red grapefruit juice, chilled
1 small egg white, lightly beaten
- Method
- Combine sugar and water in a saucepan over a low heat. Cook, stirring, until the sugar has dissolved. Increase heat and simmer for 2 minutes.
- Remove from heat and allow to cool. Refrigerate until needed.
- Pour sugar syrup, grapefruit juice and egg white into ice cream bowl. Set ice cream maker to desired setting („Sorbet“) and start the freezing process.
- If you don't want to eat the ice cream immediately, transfer the ice cream to a freezer safe container and store the ice cream for up to 1 week in the freezer.
Tip: To make this recipe without using the eggwhite, we recommend using the MANUAL setting and allow approximately 60 minutes for churning. Mixture will make approximately 700ml sorbet once churned.
PEAR AND VANILLA SORBET
Makes approximately 1 litre
- Ingredients
3/4 cup (180g) sugar
3/4 cup (180ml) water
1 vanilla bean, split and seeds scraped
900g soft pears
1/4 cup (60ml) lemon juice
1 small egg white, lightly beaten
- Method
- Combine sugar, water and vanilla bean and seeds in a saucepan over a low heat. Cook, stirring, until the sugar has dissolved. Increase heat and simmer for 2 minutes.
- Remove from heat and allow to cool. Refrigerate until needed.
- Peel and core pears. Blend or process until pureed. Push mixture through a sieve and discard pulp. You will need 11/2 cups liquid.
- Discard vanilla bean and combine vanilla sugar syrup, pear juice, lemon juice and egg white into ice cream bowl.
- Set ice cream maker to desired setting („Sorbet“) and start the freezing process.
- If you don't want to eat the ice cream immediately, transfer the ice cream to a freezer safe container and store the ice cream for up to 1 week in the freezer.
Tip: To make this recipe without using the eggwhite, we recommend using the MANUAL setting and allow approximately 60 minutes for churning. Mixture will make approximately 700ml sorbet once churned.
RASPBERRY SORBET
Makes approximately 1 litre
- Ingredients
3/4 cup (180g) sugar
3/4 cup (180ml) water
300g frozen raspberries
1 tablespoon lime juice
1 small egg white, lightly beaten
- Method
- Combine sugar and water in a saucepan over a low heat. Cook, stirring, until the sugar has dissolved. Increase heat and simmer for 2 minutes.
- Remove from heat and allow to cool. Refrigerate until needed.
- Place raspberries in a bowl and allow to just thaw. Blend or process raspberries and their juices until smooth. Push mixture through a fine sieve to remove seeds.
- Pour raspberry puree, lime juice, sugar syrup and egg white into ice cream bowl. Set ice cream maker to desired setting („Sorbet“) and start the freezing process.
- If you don't want to eat the ice cream immediately, transfer the ice cream to a freezer safe container and store the ice cream for up to 1 week in the freezer.
Tip: To make this recipe without using the eggwhite, we recommend using the MANUAL setting and allow approximately 60 minutes for churning. Mixture will make approximately 700ml sorbet once churned.
Quantities can be increased to 1 cup sugar, 1 cup water, 500g raspberries, 2 tablespoons lime juice. Mixture will make approximately 1 litre sorbet once churned.
QUICK FROZEN YOGURT
Makes approximately 1 litre
- Ingredients
750g flavoured yogurt of your choice
- Method
- Place yogurt into the ice cream bowl. Set ice cream maker to desired setting ("Frozen Yogurt") and churn.
- If you don't want to eat the ice cream immediately, transfer the ice cream to a freezer safe container and store the ice cream for up to 1 week in the freezer.
YOGURT BERRY FREEZE
Makes approximately 1 litre
- Ingredients
500g fresh strawberries
2 cups (ca. 500ml) natural yogurt
1/2 cup (125g) sugar
- Method
-
Blend or process strawberries until pureed. Remove seeds if desired by pushing through a fine sieve.
-
Combine strawberries, yogurt and sugar into the ice cream bowl. Set ice cream maker to desired setting („Frozen Yogurt“) and churn.
-
If you don't want to eat the ice cream immediately, transfer the ice cream to a freezer safe container and store the ice cream for up to 1 week in the freezer.
BANANA FROZEN YOGURT
Makes approximately 1 litre
- Ingredients
1 1/2 cups (ca. 375g) mashed ripe bananas – about 3 large
2 teaspoons lemon juice
2 cups (ca. 500ml) vanilla yogurt
1 - 2 tablespoons honey, to taste
- Method
- Combine bananas, lemon juice, yogurt and honey into the ice cream bowl. Set ice cream maker to desired setting („Frozen Yogurt“) and churn.
- If you don't want to eat the ice cream immediately, transfer the ice cream to a freezer safe container and store the ice cream for up to 1 week in the freezer.
LEMON HONEY FROZEN YOGURT
Makes approximately 1 litre
- Ingredients
1/3 cup (80ml) lemon juice
1/4 cup (60ml) honey
2 1/2 cups (ca. 625ml) vanilla yogurt
- Method
- Combine lemon juice and honey in a small saucepan. Cook over a low heat until the honey has melted. Remove from heat. Refrigerate until cold.
- Combine honey mixture and yogurt in a jug; mix well. Pour mixture into the ice cream bowl. Set ice cream maker to desired setting („Frozen Yogurt“) and churn.
- If you don't want to eat the ice cream immediately, transfer the ice cream to a freezer safe container and store the ice cream for up to 1 week in the freezer.