
MNRG17W - Soy milk machine MIDEA - Free user manual and instructions
Find the device manual for free MNRG17W MIDEA in PDF.

| Product Type | Soy Milk Maker / Extractor and Blender for Plant Milks |
| Brand | Midea |
| Model | MNRG17W |
| Dimensions (L x W x H) | 237 x 184 x 337 mm (9.3 x 7.3 x 13.3 in) |
| Power Supply | 120 V ~ 60 Hz |
| Motor Power | 130 W |
| Heating Power | 1000 W |
| Minimum Capacity | 1.4 L (48 oz) |
| Maximum Capacity | 1.7 L (56 oz) |
| Preparation Functions | Nut milk, rice/cereal milk, tofu, oatmeal, soup/purée, blended drink |
| Control Type | Electronic with LED indicators, menu selection and start/cancel |
| Milk Chamber Material | Food-grade plastic |
| Safety | Overflow sensor, overheat protection, automatic shut-off, grounded plug |
| Cleaning | Do not immerse the motor unit or milk chamber; clean blades and interior with a damp cloth; wash accessories by hand |
| Included Accessories | Pulp container with handle, filter, mixer, graduated cup (4 oz/120 ml), tofu mold, 2 discs, fine mesh strainer, power cord |
| Intended Use | Household only, for use at altitudes below 1500 m |
Frequently Asked Questions - MNRG17W MIDEA
User questions about MNRG17W MIDEA
0 question about this device. Answer the ones you know or ask your own.
Ask a new question about this device
Download the instructions for your Soy milk machine in PDF format for free! Find your manual MNRG17W - MIDEA and take your electronic device back in hand. On this page are published all the documents necessary for the use of your device. MNRG17W by MIDEA.
USER MANUAL MNRG17W MIDEA
NRG^TM Nut Rice Grain Milk Extractor and Blender
Rated voltage: 120V-60 Hz
Rated power: Motor: 130 W
Heating: 1000 W
Frequency: 60Hz
Capacity: Min 48 oz (1.4 L)
Max 56 oz (1.7 L)
Warning notices: Before using this product, please read this manual carefully and keep it for future reference. The design and specifications are subject to change without prior notice for product improvement. Consult with your dealer or manufacturer for details.
version A - 10 - 2017
USER MANUAL

Table of Contents
1 MILK MAKER SAFETY 3
2 OPERATING REQUIREMENTS 4
Electrical Requirements 4
Location Requirements 5
3 PARTS AND FEATURES 6
4 MILK MAKER USE 8
Processing Functions 8
Controls. 9
Making Nut, Rice or Grain Milk 9
Making Tofu. 11
5 RECIPES 14
6 MILK MAKER CARE 16
16
Storage 17
7 TROUBLESHOOTING 17
Specifications
| Model Dimensions Power Voltage Capacity | |||||
| MNRG17-W 9 | 3/4" x 7/4" 13/4" | xMotor: 130 W Heating: 1000 W | 120V-60 Hz Min 48 oz (1.4 L) Max 56 oz (1.7 L) | ||
Milk Maker Safety
1
To prevent injury to the user or other people and property damage, the instructions shown here must be followed. Incorrect operation due to ignoring of instructions may cause harm or damage. The level of risk is shown by the following indications.

This symbol indicates the possibility of death or serious injury.

This symbol indicates the possibility of injury or damage to property.
When using electrical appliances, basic safety precautions should always be observed, including the following:
- Read all instructions before use.
- To protect against risk of electrical shock, do not immerse the electric cord, plug, milk chamber or processor in water or other liquids.
- Unplug from outlet when not in use, before putting on or taking off parts, and before cleaning. Make sure the motor stops completely and allow it to cool before disassembling.
- Never unplug the appliance by pulling the power cord. Always grip the plug firmly and pull straight out from the receptacle.
- Do not operate unattended.
- Close supervision is necessary when any appliance is used by or near children.
- Avoid contact with moving parts.
- Do not operate any appliance with a damaged cord/plug, after the appliance malfunctions, or if it is dropped or damaged in any manner. Return appliance to the nearest authorized service facility for examination, repair, electrical, or mechanical adjustment.
- The use of attachments not recommended or sold by the manufacturer may cause fire, electric shock, or injury.
- Do not use outdoors.
- Do not let cord hang over the edge of table or counter, or touch hot surfaces.
-
Do not place on or near a hot gas or electric burner, or in a heated oven.
-
To disconnect, turn control to Off, and wait until motor stops before removing plug from the electrical outlet.
- Always connect power cord to appliance first, then plug cord into the electrical outlet.
SAVE THESE INSTRUCTIONS
THIS APPLIANCE IS FOR HOUSEHOLD USE ONLY
Operating Requirements
2
Electrical Requirements
Ensure the voltage of your electrical wall outlet corresponds to the voltage listed on the appliance.
Grounded Plug
As a safety feature, this product is equipped with a grounded plug, which will only fit into a 3-prong outlet. Do not attempt to defeat this safety feature. Improper connection of the grounding conductor may result in the risk of electric shock.
Consult a qualified electrician if you are in doubt as to whether the outlet is properly grounded.
Power Supply Cord
The power supply cord should only be plugged into a 120V AC electrical wall outlet.
If the electric circuit is overloaded with other appliances, your appliance may not operate properly. It should be operated on an electrical circuit separate from other appliances.
- To connect power: Attach the power cord plug to the appliance first, and then plug the cord into the wall outlet.
- To disconnect power: Turn the control to the Off position, and then grasp the power cord by the plug to remove it from the wall outlet.
Short Cord Instructions
A short power supply cord is provided to reduce the risk of becoming entangled in or tripping over a longer cord.
Longer extension cords are available and may be used if care is exercised in their use.
If a longer extension cord is used:
- The marked electrical rating of the extension cord should be at least as great as the electrical rating of the appliance. If the electrical rating of the extension cord is too low, it could overheat and burn.
- The resulting extended cord should be arranged so that it will not drape over the counter top or tabletop where it can be pulled on by children or tripped over.
Location Requirements
- Use milk maker only at altitudes less than 4921 ft (1500 m). Use at altitudes greater than 4921 ft (1500 m) may result in raw soymilk, overflow and paste.
- Required clearance from other appliances is 12^ ( 30 cm) .

Parts and Features
3
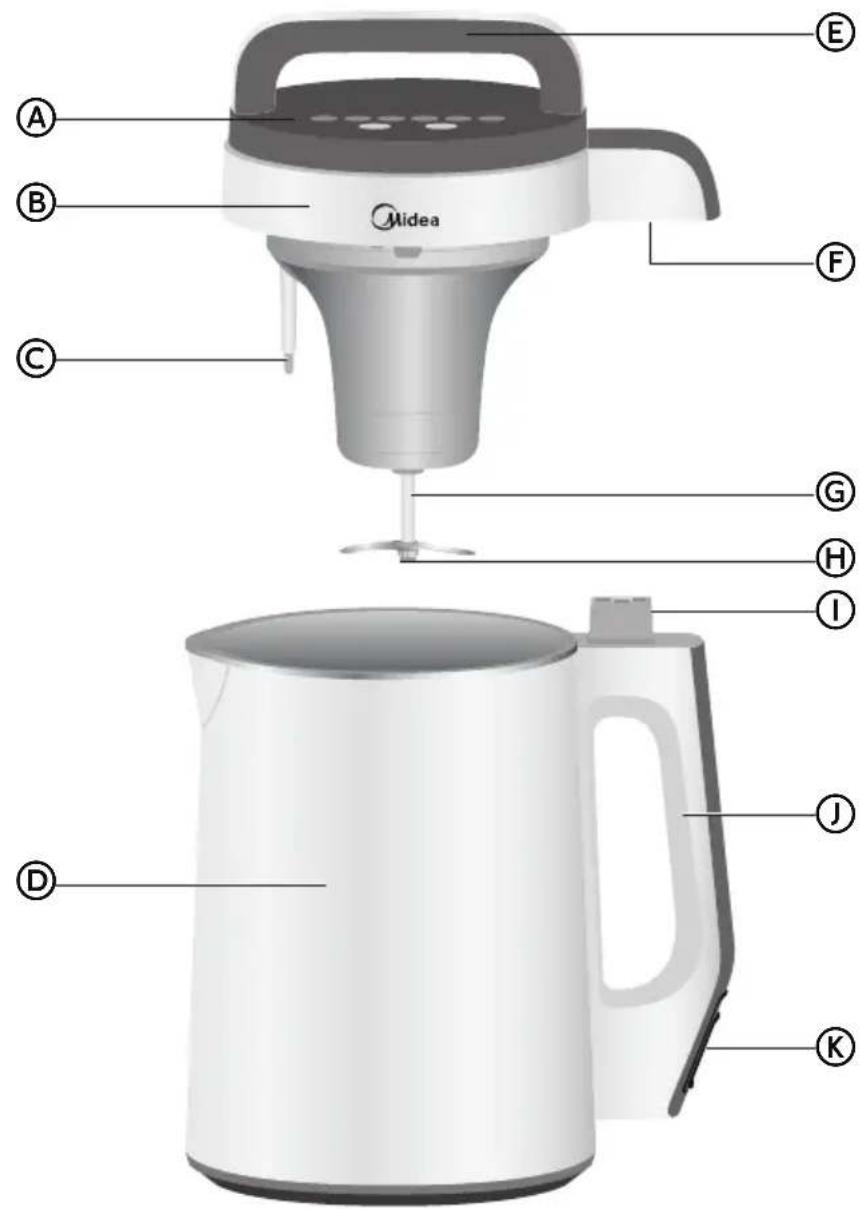
A Control Panel
B Processor
Overflow Sensor
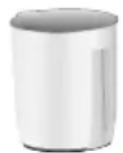
Milk Chamber
E Processor Handle
F Processor Plug
G Motor Shaft
Grinding Blade
① Plug Receptacle
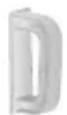
J Milk Chamber Handle
K Power Cord Receptacle
Attachments and Utensils
A

B
D


F
H

E


Pulp Container
Blender

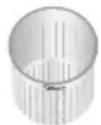
Tofu Mold


Pulp Container Handle
4 oz Measuring Cup

Disc (2)

Filter

Power Supply Cord

Fine-mesh Nut Milk Bag
NOTES:
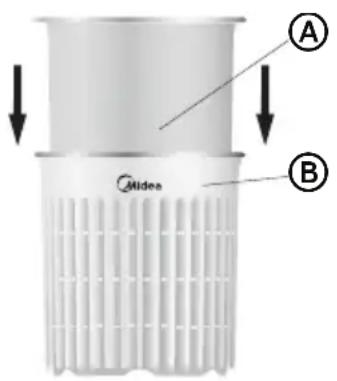
- Install the handle to convert the pulp container to a pitcher for the nut milk.


Pulp Container

Pulp Container
handle
- Strain the processed milk through the filter to separate the milk from the pulp. Use the blender to stir and press the pulp.
- To avoid the risk of the contents overflowing the milk maker, the overflow sensor reduces power to the milk maker when it senses the temperature of the contents is becoming overheated.

CAUTION
During heating, there will be some hot spatters coming from the milk maker.

CAUTION
- Homemade nut milk should last about a week, if refrigerated. The Midea NRG milk maker heats the water during processing, which pasteurizes the milk.
- Do not use the milk maker to reheat cold nut milk, reheat cold paste or boil water.
Processing Functions
Processing times vary depending on the processing function selected. Thicker milks and oatmeal require a longer processing time, and some functions both stir and heat.
For optimum results, use the ratio of liquid to solid recommended in your recipe. However, the ratio can be adjusted to suit your personal taste.
Your model has a capacity of 48 oz to 56 oz (1.4 L to 1.7 L).
| Processing Function | Time (minutes) | Main Ingredients |
| Tofu 33 | Soybeans and Gypsum Powder | |
| Nut Milk 30 | Nut of choice: Almonds, Cashews, Walnut, Pecans etc. See recipe later in this section. | |
| Rice/Grain Milk 30 | White Rice, Brown Rice, or Quinoa | |
| Oatmeal 28 | Rolled Oats | |
| Soup/Puree* 26 | Fruit or Vegetable of choice See recipe later in this section. | |
| Smoothie (stir only)* | 3 | Fruit and Milk or Juice of choice See recipe later in this section. |
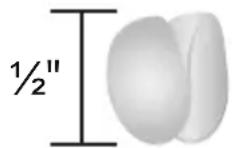
*Dice food into 12 " pieces no larger than the size of a peanut.
Controls
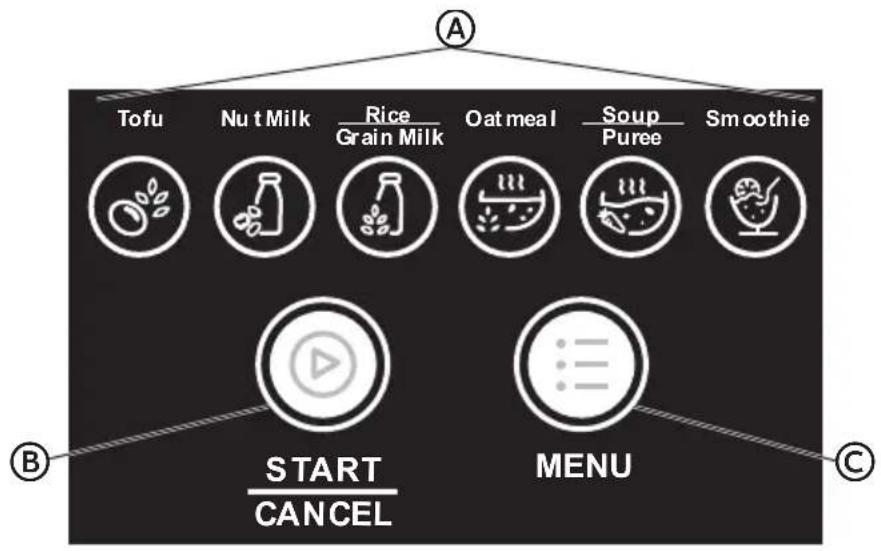
A Function LED Indicators
B Start/Cancel Control
Menu Control
Making Nut, Rice or Grain Milk
Your milk maker uses dried bean pulping technology, so soy beans do not REQUIRE pre-soaking before processing. However, soaking the soybeans (legumes), nuts, rice or grain before processing will result in a greater milk yield.
WARNING - Food Poisoning
- Soybean milk must be boiled before drinking.
- If kept at room temperature, fresh soybean milk should be drunk within 6 hours. Failure to do so can result in food poisoning or sickness.
NOTE: Before first use, remove the pulp container from the milk chamber, and then clean all the parts that come into direct contact with food.
- Clean and prepare food for processing.
- Measure the prepared food and add it to the milk chamber.
NOTE: Use the 4 oz. measuring cup (provided) to precisely measure ingredients. For optimum results, use only the ingredients in the amounts specified in your recipe.
- Fill the milk chamber with room-temperature tap water until the water level is between the minimum and maximum water-level lines.
NOTES:
- Use room-temperature tap water. Using distilled or purified water, or hot water will result in over-boiling causing a burnt taste.
- You can control the consistency of the nut, rice or grain milk by adding a little more or less water as long as the water level falls between the minimum and the maximum water level marks.
-
Using too much or too little water will adversely affect the milk making process.
-
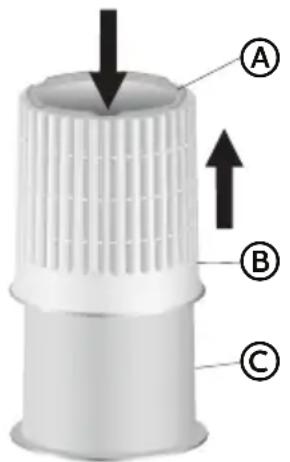
Plug the processor into the milk chamber. Make sure the plug on the processor is fully inserted into the plug receptacle on top of the milk chamber handle to complete the electrical connection.
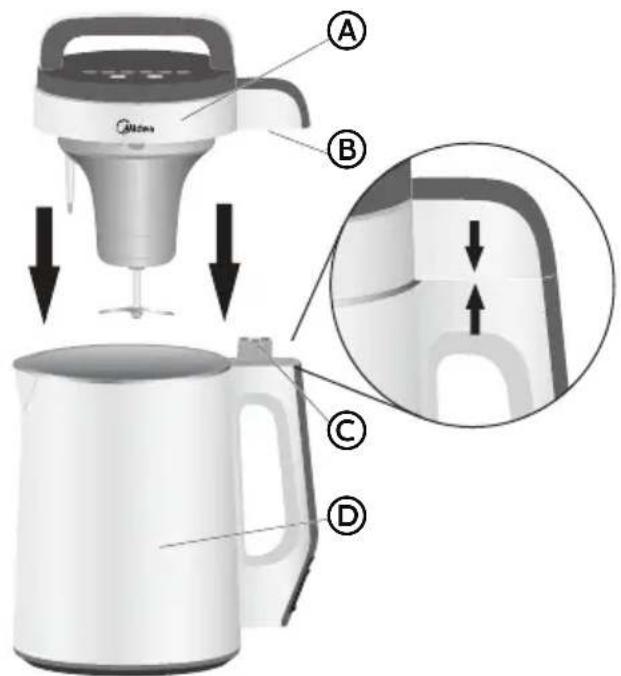
A Processor
B Processor Plug
Plug Receptacle
Milk Chamber
WARNING - Electric Shock
- Plug into a grounded 3 prong outlet.
- Do not remove ground prong.
- Do not use an adapter.
Failure to follow these instructions can result in death, fire or electric shock.
- Plug the power cord (provided) into the receptacle in the chamber handle, and then plug the other end into a grounded 3-prong electrical outlet. The milk maker will beep and the control lights will flash to indicate that the power is on.

A Plug Receptacle
B Plug
- Press the MENU control. With each press of the MENU control, a processing function icon will illuminate.
- Press START/CANCEL to select the desired function and begin processing.
NOTE: If you unintentionally select the wrong function, press and hold START/CANCEL for 3 seconds to cancel the function, and then press MENU to reselect.
- The milk maker will process according to the function selected. The function light will flash and a tone will sound to indicate processing is complete.
NOTE: During the warming phase of the process, it is normal for the processor to stir intermittently.

WARNING -Burn
- Allow time for the hot milk to drain from the processor and into the milk chamber.
- Carefully remove the processor from the milk chamber so that hot milk does not contact skin.
Failure to do so can result in burns.
- Unplug the power supply cord from the wall outlet. Wait 30 seconds for the processor to drain before lifting the processor from the milk chamber.

CAUTION
The milk will be hot.
- Holding the filter or the fine-mesh bag over the container, pour the processed milk through the filter or bag into a container.
NOTES:
- The filter or milk bag acts as a strainer to separate the liquid from the solids.
-
Use the blender to stir and press the liquid from the pulp.
-
Flavor the milk, if desired. Add a pinch of sea salt, brown sugar, vanilla, or any other favorite flavors.
-
Allow milk to cool before serving.

CAUTION
Soybean milk must be boiled before drinking. If kept at room temperature, fresh soybean milk should be drunk within 6 hours.
Making Tofu
- Wash and prepare the amount of soybeans specified in your Tofu recipe.
- Using the 4 oz measuring cup (provided), measure the soybeans and place them into the milk chamber.
-
Add room-temperature water to the maximum fill line.
-
Plug the processor into the milk chamber. Connect the power cord to the milk chamber receptacle, and then plug into the wall outlet.
- Press MENU to select TOFU from among the processing functions, and then press START/CANCEL to begin processing.
- While the soybeans are processing, add gypsum powder to a container (larger than 2 L). To the gypsum powder, add 5 oz to 7 oz (15 g to 20 g) room-temperature water. Shake well to mix.
NOTE: This step must be completed before removing the soybean milk.
- Once the soybean milk is processed, strain the processed milk through the filter into the pulp container to separate the milk from the pulp. Use the blender to stir and press the milk from the pulp.
NOTE: If desired, you may add sugar or flavoring to the soybean milk at this point.
- Quickly pour the HOT, filtered soybean milk into the gypsum powder solution. The soybean milk must be hot when it is added to the gypsum solution to produce the correct tofu pudding consistency.
NOTE: Pour the soybean milk into the gypsum solution. DO NOT pour the gypsum solution into the soybean milk.
- Let the mixture stand for approximately 10 minutes. Once the tofu pudding has solidified, the tofu is ready to eat or mold.
Molding Tofu
- With the Midea logo facing upward, insert a disc into the tofu mold cylinder to create the bottom of the tofu mold.
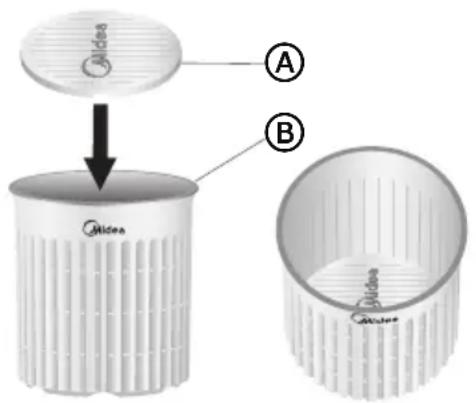

Disc

Tofu Mold
- Place the tofu mold onto a rimmed receptacle such as a cake pan or cookie sheet to capture the liquid being pressed out of the tofu pudding.
- Place the fine-mesh bag (provided) inside the tofu mold to act as a liner.
- Spoon the solidified tofu pudding into the nut milk bag.
-
Turn the other disc so that the Midea logo is facing downward and gently press the disc into the tofu pudding.
-
Fill the pulp container with water and place it on top of the disc to compress the tofu pudding. The hot liquid in the tofu pudding will flow out through the spaces in the mold.
A Pulp Container
B Tofu Mold
- Allow the pulp container to remain in place for a minimum of 112 to 2 hours. It can remain in place longer, depending on your firmness preference.
NOTES: To decrease the molding time, you may place a heavier object on top of the water-filled pulp container. - After molding, remove the water-filled pulp container and pour out the water. Replace the pulp container into the tofu mold, and then turn the mold upside down.
- Lightly press downward on the bottom disc while pulling up on the tofu mold to push out the molded tofu.
A Bottom Disc
B Tofu Mold
Pulp Container
Recipes
5
Almond Milk
Yield: 44 oz. (1.3 L)
3 c. raw, Whole Almonds
5% c. Water
Directions
- Rinse, and then soak 3 c. raw, whole almonds in a bowl overnight or for 8-12 hours.
NOTE: The longer you soak the almonds, the creamier the milk. Soaked almonds will last 5 days, if refrigerated.
- Place 3 c. soaked almonds and approximately 512 c. water into the milk chamber.
- Follow the instructions in the "Making Nut, Rice or Grain Milk" section to process, cool and strain the milk.
Flavor the Almond Milk (Optional)
14 c. Raw Honey
½ Tbsp. Ground Cinnamon
½ Tbsp. Vanilla Extract
Dash of Nutmeg (optional)
Directions
- Pour 3 c. almond milk into a pitcher.
- In a small saucepan over med-high heat, place 14 c. raw honey, 12 Tbsp. ground cinnamon, 12 Tbsp. vanilla extract and a dash of nutmeg (optional).
- Heat until the honey is just melted.
- Pour the honey mixture into the almond milk, and then stir until well combined.
- Place the pitcher into the refrigerator and chill for at least 2 hours. Stir well before serving.
Tomato Vegetable Soup
Yield: 7 - 8 cups
7 c. peeled, seeded and chopped Tomato
1 c. finely chopped Carrot
3/4 c. finely chopped Onion
1 (13.75 ounce) can Chicken Broth
1 Tbsp. White Sugar
2 tsp. Sea Salt
1 c. 2% Milk
2 tsp. Dried Basil
1 / 2 tsp. Celery Salt
1½ tsp. Ground Black Pepper
1/4 tsp. Garlic Powder
Directions
- Add the tomatoes, carrots, and onion to the milk chamber.
- Stir in the chicken broth, sugar, and salt.
- Season with basil, celery salt, black pepper, and garlic powder.
- Press MENU to select Soup/Puree, and then press START/CANCEL to begin processing.
Smoothie/Fruit Puree
Yield: 7-8 cups
4 c. Orange Juice
2 c. Strawberries (frozen)
1 c. Blueberries (fresh, washed)
Directions
- Add orange juice, frozen strawberries and fresh blueberries to the milk chamber.
- Press MENU to select Smoothie, and then press START/CANCEL to begin processing.

WARNING - Electric Shock
- DO NOT immerse processor in water or allow water to enter the processor.
DO NOT immerse milk chamber in water.
Failure to follow these instructions can result in death, fire or electric shock.
Cleaning
If you have not recently used the milk maker, clean it well before using.
Clean the milk maker thoroughly after each use. Proper cleaning will ensure it produces great results for many years.

CAUTION
Do not use harsh or abrasive materials to clean or dry the exterior, because they may damage or dull the finish.
- Unplug the power cord from the milk maker handle.
- Remove all milk and nut, rice or grain paste or other food from the milk chamber.
- Clean the interior of the milk chamber with tap water taking care to not immerse the base of the chamber in water.
- Rinse the grinding blades under running water taking care to not allow water to enter the processor.


Processor

Grinding Blades
- Using a soft, damp cloth, wipe any residue from the exterior of processor.
NOTE: If residue is allowed to dry on exterior surfaces, it may damage the finish.
- Using a soft dry cloth thoroughly dry both the exterior and interior of the milk maker.

- Hand wash the attachment parts with warm, sudsy water, rinse and dry thoroughly.
NOTE: The accessory attachments are NOT dishwasher safe.
Storage

CAUTION
- Do not store the milk maker while it is still hot or plugged into a wall outlet.
-
Do not tightly wrap the power cord around the appliance.
-
Disconnect, clean and thoroughly dry the milk maker. See "Cleaning."
- Store in a dry, well-ventilated location.
NOTE: Excess humidity may reduce the life of the appliance.
Troubleshooting
7
| Problem Possible Cause Solution | ||
| Milk maker will not operate. | Milk maker is not plugged into a working electrical outlet. | Plug the power cord into a grounded 3-prong electrical outlet. |
| Power cord is not inserted correctly into the milk chamber handle receptacle. | Check the power cord connection at the container handle. | |
| Control is not turned ON. Press Start/Cancel. | ||
| The indicator does not illuminate. | The processor plug is not firmly seated in the milk chamber receptacle. | Check this electrical connection. See “Parts and Features.” |
| The milk maker heats but does not stir. | The milk maker is in the heating stage of the process. | Wait a few minutes. |
| The soybean milk is not cooked thoroughly or the beans or rice cannot be broken into pieces. | Used too much or too little water. | Add water until the water level is between the minimum and maximum water lines. |
| Used too much or too little of the solid ingredients. | Use only the recommended amounts of each ingredient | |
| NOTE: Good results require a specific ratio of solid to liquid. | ||
| The function selected does not match the food being processed. | Select the function appropriate for the food being processed. | |
| The milk maker is operating for too long a time. | The overflow sensor is not clean. | Clean the processor and the overflow sensor. See “Cleaning.” |
| The water temperature is too cold. | Use room temperature tap water. | |
| Used too much water. Add water | water until the water level is between the minimum and maximum water lines. | |
| All the LED indicators flash continuously and an alert tone sounds. | Used too much water. Add only the recommended amounts of both ingredients and water to the processing chamber. Plug in and turn on to confirm that it is functioning normally. | |
| Problema Causa posible Solución | |
| La móvil para hacer leche no funciona. | La móvil para hacer leche no está conectada a un tomacorriente electrico de pared que funciona. |
| El cable de alimentación no está insertado correctamente en el receptáculo del mango de laámara de leche. | |
| El control no está encendido. | |
| Elindicador no se illumina. | El enchufe del procesador no estáfirmamente asentado en el receptáculo de laámara de leche. |
| La móvil para hacer leche se calienta, pero no revuelve. | La móvil para hacer leche está en la etapa de calentimiento del proceso. |
| La leche de soya no se cocina bien o los granos o el arroz no seSEOSEOSEOSEOSEOSEOSEOSEOSEOSEOSEOSEOSEOSEOSEOSEOSEOSEOSEOSEOSEOSEOSEOSEOSEOSEOSEOSEOSEOSEOSEOSEOSEOSEOSEOSEOSEOSEOSEOSEOSEOSEOSEOSEOSEOSEOSEOSEOSEOSEOSEOSEOSEOSEOSEOSEOSEOSEOSEOSEOSEOSEOSEOSEOSEOSEOSEOSEOSEOSEOSEOSEOSEOSEOSEOSEOSEOSEOSEOSEOSEOSEOSEOSEOSEOSEOSEOSEOSEOSEOSEOSEOSEOSEOSEOSEOSEOSEOSEOSEO SEOSEOSEOSEOSEOSEOSEOSEOSEOSEOSEOSEOSEOSEOSEOSEOSEOSEOSEOSEOSEOSEOSEOSEOSEOSEOSEOSEOSEOSEOSEOSEOSEOSEOSEOSEOSEOSEOSEOSEOSEOSEOSEOSEOSEOSEOSEOSEOSEOSEOSEOSEOSEOSEOSEOSEOSEOSEOSEOSEOSEOSEOSEOSEOSEOSEOSEOSEOSEOSEOSEOSEOSEOSEOSEOSEOSEOSEOSEOSEOSEOSEOSEOSEOSEOSEOSEOSEOSEOSEOSEOSEOSEOSEOSEOSEOSEOSEOSEOSEOseoSEOSEOSEOSEOSEOSEOSEOSEOSEOSEOSEOSEOSEOSEOSEOSEOSEOSEOSEOSEOSEOSEOSEOSEOSEOSEOSEOSEOSEOSEOSEOSEOSEOSEOSEOSEOSEOSEOSEOSEOSEOSEOSEOSEOSEOSEOSEOSEOSEOSEOSEOSEOSEOSEOSEOSEOSEOSEOSEOSEOSEOSEOSEOSEOSEOSEOSEOSEOSEOSEOSEOSEOSEOSEOSEOSEOSEOSEOSEOSEOSEOSEOSEOSEOSEOSEOSEOSEOSEOSEOSEOSEOSEOSEOSEOSEOSEOSEOSEOSEQEOSEOSEOSEOSEOSEOSEOSEOSEOSEOSEOSEOSEOSEOSEOSEOSEOSEOSEOSEOSEOSEOSEOSEOSEOSEOSEOSEOSEOSEOSEOSEOSEOSEOSEOSEOSEOSEOSEOSEOSEOSEOSEOSEOSEOSEOSEOSEOSEOSEOSEOSEOSEOSEOSEOSEOSEOSEOSEOSEOSEOSEOSEOSEOSEOSEOSEOSEOSEOSEOSEOSEOSEOSEOSEOSEOSEOSEOSEOSEOSEOSEOSEOSEOSEOSEOSEOSEOSEOSEOSEOSEOSEOSEOSEOSEOSEOSEOSEOSEOEOSEOSEOSEOSEOSEOSEOSEOSEOSEOSEOSEOSEOSEOSEOSEOSEOSEOSEOSEOSEOSEOSEOSEOSEOSEOSEOSEOSEOSEOSEOSEOSEOSEOSEOSEOSEOSEOSEOSEOSEOSEOSEOSEOSEOSEOSEOSEOSEOSEOSEOSEOSEOSEOSEOSEOSEOSEOSEOSEOSEOSEOSEOSEOSEOSEOSEOSEOSEOSEOSEOSEOSEOSEOSEOSEOSEOSEOSEOSEOSEOSEOSEOSEOSEOSEOSEOSEOSEOSEOSEOSEOSEOSEOSEOSEOSEOSEOSEO SEO SEOSEOSEOSEOSEOSEOSEOSEOSEOSEOSEOSEOSEOSEOSEOSEOSEOSEOSEOSEOSEOSEOSEOSEOSEOSEOSEOSEOSEOSEOSEOSEOSEOSEOSEOSEOSEOSEOSEOSEOSEOSEOSEOSEOSEOSEOSEOSEOSEOSEOSEOSEOSEOSEOSEOSEOSEOSEOSEOSEOSEOSEOSEOSEOSEOSEOSEOSEOSEOSEOSEOSEOSEOSEOSEOSEOSEOSEOSEOSEOSEOSEOSEOSEOSEOSEOSEOSEOSEOSEOSEOSEOSEOSEOSEOSEOSEOSEOSEO SEOleo |
make yourself at home