
Satinelle Prestige BRE648 - Epilator PHILIPS - Free user manual and instructions
Find the device manual for free Satinelle Prestige BRE648 PHILIPS in PDF.
| Product Type | Electric Epilator |
| Brand | Philips |
| Model | Satinelle Prestige BRE648 |
| Usage | Body, legs, underarms, bikini line, face (with attachment) |
| Speeds | 2 speeds (I: slow, II: fast) |
| Battery life | Approximately 40 minutes after full charge |
| Charge time | 1 hour (approx) |
| Quick charge | 5 minutes of charging = 10 minutes of use |
| Power supply | Rechargeable battery, cordless operation |
| Water resistance | IPX7 – usable in the shower or bath |
| Epilation head | Ceramic rotating discs |
| Included accessories | Massage cap, sensitive areas head, face cap, efficiency head, body massage head, body exfoliation brush, shaving head, shaving comb (0.5 mm), trimming head, trimming comb (3 mm) |
| Cleaning | Washable under running water, no abrasive products |
| Safety | Overheat protection, automatic shut-off |
| Warranty | 2 years |
| Dimensions (approx) | 16 × 4 × 4 cm |
| Weight (approx) | 200 g |
| Spare parts | Replacement cutting element (model ref.) available |
| Repairability | Parts available at philips.com/parts-and-accessories |
| General information | Comfortable epilation, reduced irritation |
Frequently Asked Questions - Satinelle Prestige BRE648 PHILIPS
User questions about Satinelle Prestige BRE648 PHILIPS
0 question about this device. Answer the ones you know or ask your own.
Ask a new question about this device
Download the instructions for your Epilator in PDF format for free! Find your manual Satinelle Prestige BRE648 - PHILIPS and take your electronic device back in hand. On this page are published all the documents necessary for the use of your device. Satinelle Prestige BRE648 by PHILIPS.
USER MANUAL Satinelle Prestige BRE648 PHILIPS
natural_image
White handheld electric brush with metallic blade and power button (no visible text or symbols)FC
n US manufactured for 1 Maps Personal Health, a owner of P. on North America (C-TO Box 1010, Stanford, CT 20904) n Canada manufactured from Philos Electronics Ltd. 28 Hillmount, Road, Northam, CO, LLC 253

I's symlo, or the product nameplace means "the company... denote its business, Inc. Cessentle apoua sand en el placa y con hasta du product sinfrte quile est é revsste par ... denote its business, Inc. Este simlo o un el placa de características del producto s*** que está representado por ... denote its business, Inc.
« L.I. et/Philips shelo, en reg s'enc terdeses d'aradilla: P-lips V.V / EII I.P.S. v'evada: P-lips vort res- maroles depoées de 40% dilles F10s V.V / P. IIIPS y -hit los social som regeratista de ger ad les Tlips V.V (C07) Philips No. 1, America U.C. A nights reserved / 25%-deits ses vés/ locos les derechos reservados. 4925/03/2016 9/05/2018

②

English
IMPORTANT SAFETY INSTRUCTIONS
(Continuing or other series, basic case for example) be followed, including the following:
Read all instructions before using this product.
DANGER
To reduce the risk of electric shock:
- Do not reach for a corded product that has taken into water. Upping in water from the power tube. - Keep the power box dry to 2L
- Do not place or store the product where it can fall, or be pulled in a circle on a sick 7:40 of place in order by several in a seat or other to do.
Except when changing, " saying up this power for the power outlet must directly be 30 us."
- Remove power sector from power output and product before
WARNING
To reduce the risk of bums, fire, electric shock, or injury to persons:
Care, care for children, when a medical tool used by an 'nees' children or persons with limited physical, sensory, mental care, allure or animals.
The equipment only for their central household must be described in this manual. Do not use attachments not recommended by Philips with American C. Never operate it is standard, but a name and power card, it is not work as properly, after it has been disposed or sampled, and/or be used at the same and has been disposed, also water or assistance call 1-830-243-7861.
Kes the money here "any for you and it's. Now, drop a tax of you just to any opet."
- Do not use the power core in or near a power outlet that contains an electric air heater, open charge on the power core.
So ne, se produce, outages or other to remove spray, produce, or being used in where generating ac mil size
always check voting discs for and a comments before us are by present. De-oh, re-caudate, to be, unless to are attachments are clamped, as they may occur.
Always attach several credits to each of the first, then open out. To disconnect set all controls to off position, then remove power and from several out.
Plug power can directly interact with a 50% connection excision cord.
Using power and location placing a target product.
- Only use the power cord and other accessories supplied with the seat.
- Do not attempt to open the product to remove or replace the built-in commercial battery.
The bell-crescent: This is a very pleasant, very creamy, but almost if mistreated. Do not discuss this heat above 10°C (21°F) or increase.
- Never outside product direct sunlight store at a temperature above 1°C - (60 °C).
IMPORTANT: The power plug contains a suitable Foetal cut of the power plug to replace it with another plug as this will be a suitable one.
SAVE THESE INSTRUCTIONS
IMPORTANT INFORMATION
CAUTION
For regional water, it recommended for a product be used by only one paper.
- Never use co-expressed air, scouting pocs consisted of aing agents or aggressive products such as quality or safety to c.e. the product
There is a result of before observing and acting all at home and to be clashing
- When using the product or attachments, always check to make a new product that does its maximum 120°F; or present your hands for every 3 point.
Methere's new.org "a big be for a course, again" says and is work-injuate. Please overall your use of 1 year, over any questions about the use of an ep- lato
Come, we the up and it yourself. For you have your bests, tools or plantees, in their work, still at all you have new hours of a tendency to produce growing life. Can you look like
- Any "or injury resulting from hair removal" may be used by the first position of the injury site, poecite by running small water in a large cylindrical diameter of book. The second infection may be summarized by the study concerning the second disease: or any other specific "clearing." The initial should only once also order to consult a tool for your doctor. "You save or experience."
- Lccena, psoresta is caly eczema, r-tamed skin reactions such as dallie, itis, scl. vaceae, n-to-derey or a-gryor a-lagic skin reaction.
Reduced skin tumor as a result of dialpoxia, pregnancy.
Ecoigne s disease, etc.
Hemap ^+
• Moles, raised skin bumps, etc.
I can have been or begin along the same route on, or "war
Data currently available at a change in year 1 or more levels.
may influence the thickness, color or amount of nor grower
In contrast by national political by P. 50 PoTb
Par emove.
(3) be a ball or shower c s w#e #o o plac zid skn. 23
P. 10, 12: 119-136, 25, 28-31, 31-34
- Clean the eplating head after each use: see Cleaning:
GENERAL
- It's product is waterproof (p. 3), it is suitable for use in the
by: "at chosen and far covering."
Charlotte practical also exchange.
- his appliance has no other user-serviceable parts for
in a rce: all 820 242 7694: all d15 oai jir
1-635-800-937 Canada (c)
Introduction
Congratulations of your purchase and welcome to Primes! To
- y beef, for "as support that the as fte, eg sive you."
:https://www.philips.com/welcome
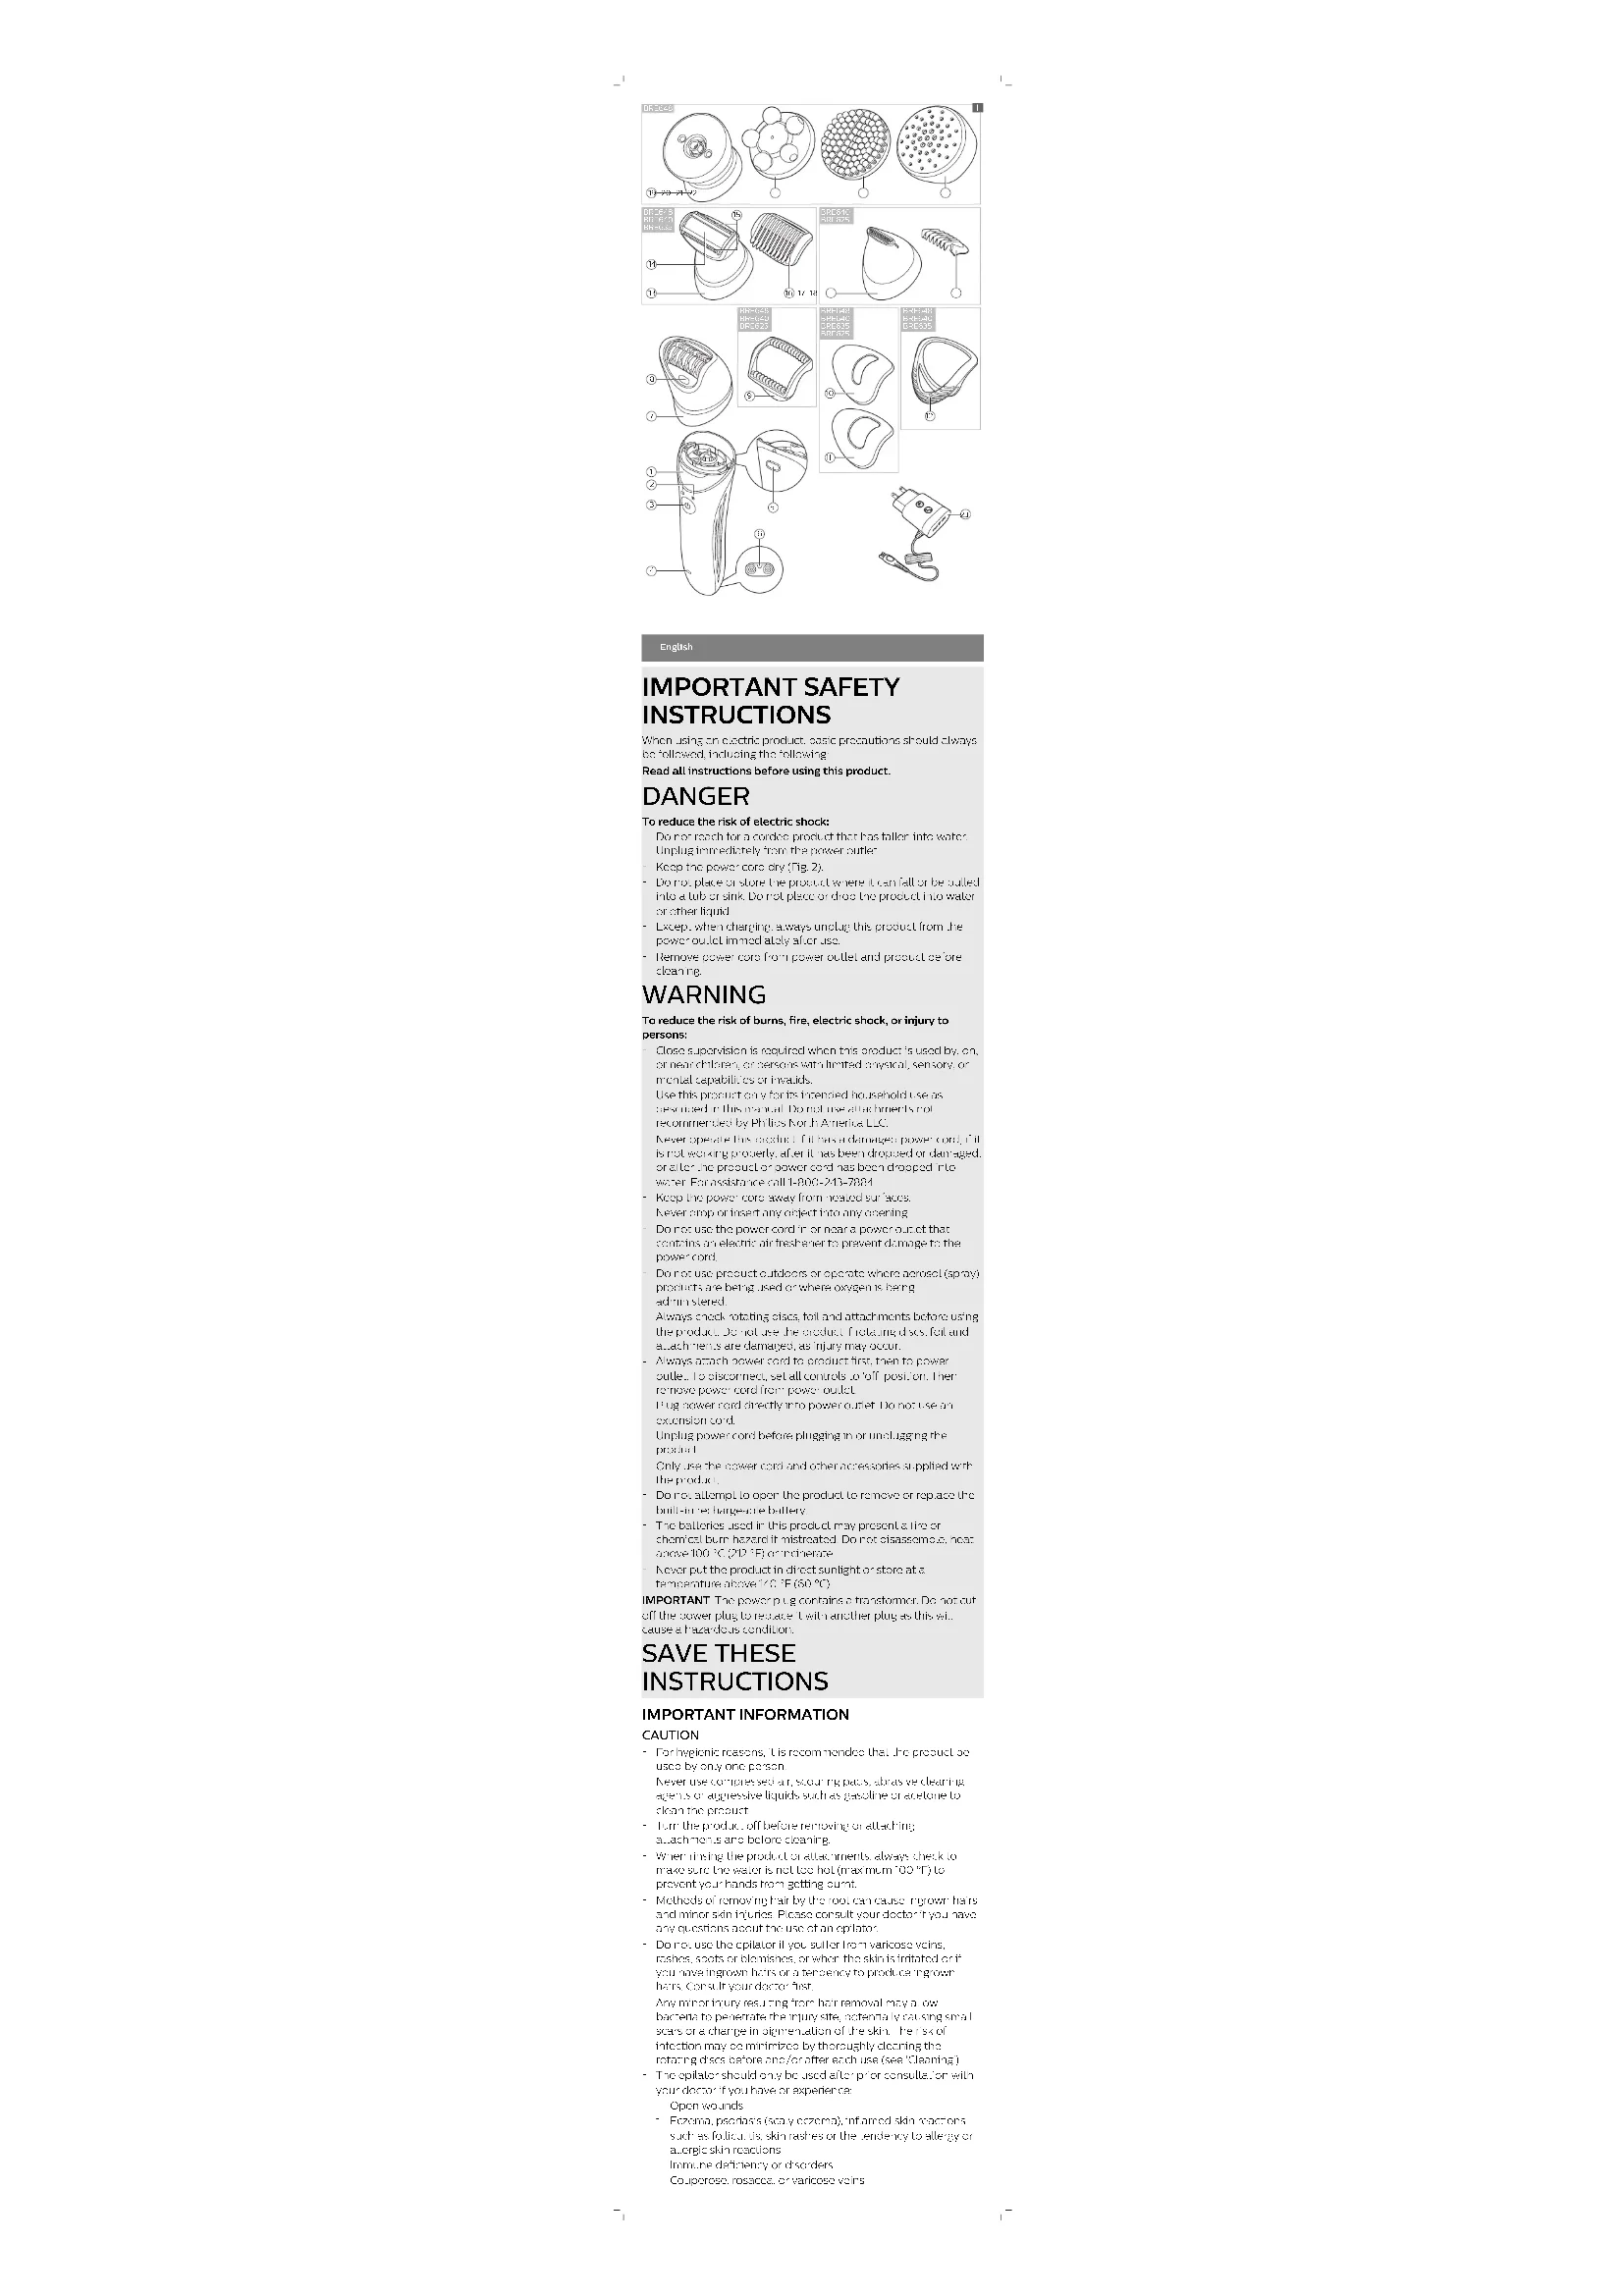
Features (Fig. 1)
'Have:
2 Speed lights (and)
? Cr/olf author
1 Battery Indicato
: release cutter
5 Sexed 1: a small plug
/EPSTINGhead
A built in
2 Nassare 130
3 -arc.cop
“Delivered by
- 上层情况
12.5+ving bean:
11
: 1 times
15.042-13.042
*/ / nmer head
2.1irrtnor
*2 Coupon: Unit
20Body massage head
71 Body exio isliam brash
22 Protection cap for body excavation brush
27 Power 16
Not shown: Cleaning or ash, Pouch
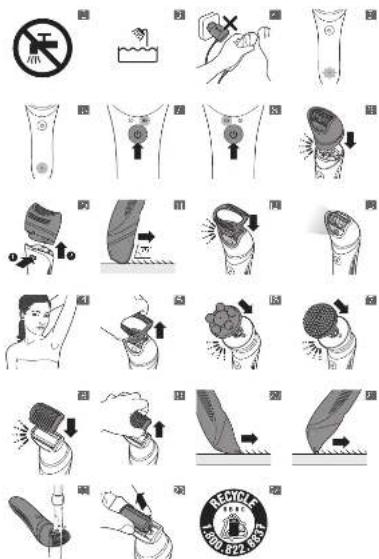
Charging
- 1. Use charge product before using for the first time crater
re a r e f t a l o n g p e r i c d : m
Chargy, censary of using product at for oereturas below
50 - 30 "C" or "F" than 95 "F" (C) adversely at
Note: This product can only be used without cord (15, 4).
* Be cst in the peacit.1 is OFF
2 insert the small plug into 75A product and put the power plug
to any 20% AC bullet. Use only the card provided.
When be called, the best is: Fig. 5
product's charging
4" or 15 hours after charging the peanut has a纯净.
34x741g. 106,210)43 million oz.
- When the battery indicates lights up, where continuously is fully changed
• The battery indicator does not lift up when the product's
switches on the peak level as enough energy to be
IPF:
When the battery plate-takes orange: 7.5, the
Batterly direct analysis of the test be ranged by
the product is a product that has been
NOTE If the product is fully: bang-chard; concrete; to the
was his out of the below line after last a few times were
you press the on/off button. I am reminds you to disconnect the
that is from the electricity, it shall be
Quick charge
Where the battery is open to the comp. y and year, a charging
The battery indicator: flashes write quickly;
after approximately 15 minutes, the battery indicator stands
Leasing is now a point. PC shall be available.
erough energy for 5 to 10 minutes of use.
Using the product
Switching the product on and off
'To fur on the peacid, parw. reonfo" ballan over iFig 7;
2 +you want to select the low speed setting, press the on/off
button again (Fig. 5)
- To learn of the original press, so an of balla or c meae.
Attaching and detaching the opilating head
'To all a: 'e: galating hood, pass' out: e: welle (lic)
017 20
2 To detect the splicing road, and be necessary and can be
Deck of the product (Fig. 13).
How to use your epilator
Use a principal or/or its cross Household record described
In this manual.
For logistic systems, the epolar and _2 responses shown.
Cly be shee of one person.
- Elevation is easier and more comfortable when the way has the
colin a: ( \alpha_{1} ) : ( \alpha_{2} ) : ( \alpha_{3} ) : ( \alpha_{4} ) : ( \alpha_{5} ) : ( \alpha_{6} ) : ( \alpha_{7} ) : ( \alpha_{8} ) : ( \alpha_{9} ) : ( \alpha_{10} ) : ( \alpha_{11} ) : ( \alpha_{12} ) : ( \alpha_{13} ) : ( \alpha_{14} ) : ( \alpha_{15} ) : ( \alpha_{16} ) : ( \alpha_{17} ) : ( \alpha_{18} ) : ( \alpha_{19} ) : ( \alpha_{20} ) : ( \alpha_{21} ) : ( \alpha_{22} ) : ( \alpha_{23} ) : ( \alpha_{24} ) : ( \alpha_{25} ) : ( \alpha_{26} ) : ( \alpha_{27} ) : ( \alpha_{28} ) : ( \alpha_{29} ) : ( \alpha_{30} ) : ( \alpha_{31} ) : ( \alpha_{32} ) : ( \alpha_{33} ) : ( \alpha_{34} ) : ( \alpha_{35} ) : ( \alpha_{36} ) : ( \alpha_{37} ) : ( \alpha_{38} ) : ( \alpha_{39} ) : ( \alpha_{40} ) : ( \alpha_{41} ) : ( \alpha_{42} ) : ( \alpha_{43} ) : ( \alpha_{44} ) : ( \alpha_{45} ) : ( \alpha_{46} ) : ( \alpha_{47} ) : ( \alpha_{48} ) : ( \alpha_{49} ) : ( \alpha_{50} ) : ( \alpha_{51} ) : ( \alpha_{52} ) : ( \alpha_{53} ) : ( \alpha_{54} ) : ( \alpha_{55} ) : ( \alpha_{56} ) : ( \alpha_{57} ) : ( \alpha_{58} ) : ( \alpha_{59} ) : ( \alpha_{60} ) : ( \alpha_{61} ) : ( \alpha_{62} ) : ( \alpha_{63} ) : ( \alpha_{64} ) : ( \alpha_{65} ) : ( \alpha_{66} ) : ( \alpha_{67} ) : ( \alpha_{68} ) : ( \alpha_{69} ) : ( \alpha_{70} ) : ( \alpha_{71} ) : ( \alpha_{72} ) : ( \alpha_{73} ) : ( \alpha_{74} ) : ( \alpha_{75} ) : ( \alpha_{76} ) : ( \alpha_{77} ) : ( \alpha_{78} ) : ( \alpha_{79} ) : ( \alpha_{80} ) : ( \alpha_{81} ) : ( \alpha_{82} ) : ( \alpha_{83} ) : ( \alpha_{84} ) : ( \alpha_{85} ) : ( \alpha_{86} ) : ( \alpha_{87} ) : ( \alpha_{88} ) : ( \alpha_{89} ) : ( \alpha_{90} ) : ( \alpha_{91} ) : ( \alpha_{92} ) : ( \alpha_{93} ) : ( \alpha_{94} ) : ( \alpha_{95} ) : ( \alpha_{96} ) : ( \alpha_{97} ) : ( \alpha_{98} ) : ( \alpha_{99} ) : ( \alpha_{100} = -\frac{1}{2}\frac{1}{2}\frac{1}{2}\frac{1}{2}\frac{1}{2}\frac{1}{2}\frac{1}{2}\frac{1}{2}\frac{1}{2}\frac{1}{2}\frac{1}{2}\frac{1}{2}\frac{1}{2}\frac{1}{2}\frac{1}{2}\frac{1}{2}\frac{1}{2}\frac{1.1}{2}\frac{1}{2}\frac{1}{2}\frac{1}{2}\frac{1}{2}\frac{1}{2}\frac{1}{2}\frac{1}{2}\frac{1}{2}\frac{1}{2}\frac{1}{2}\frac{1}{2}\frac{1}{2}\frac{1}{2}\frac{1}{2}\frac{1}{2}\frac{1}{2}(x,y,z,x,y,z,z,z,z,z,z,z,z,z,z,z,z,z,z,z,z,z,z,z,z,z,z,z,z,z,z,z,z,z,z,z,z,z,z,z,z,z,z,z,z,z,z,z,z,z,z,z,z,z,z,z,z,z,z,z,z,z,z,z,z,z,z,z,z,z,z,z,z,z,z,z,z,z,z,z,z,z,z,z,z,z,z,z,z,z,z,z,z,z,z,z,z,z,z,z,z,z,z,z,z,
long: prefer the first or share and eplace after 1 to 2
83245.
Make a very simple people of tennis, a 75° angle on the
skin and move it slowly against the direction of hair growth
(iFig)
- It is normal to experience slight irritation (red skin or red
cots after expisting in this case, it is best to evaluate in the
exting, varied sk -inil. fica:disappea: overnight "his e1:s1
will practice lesser with each use.
after such use, you may want to copy a red one allowed
mile: 1:50" or body: 0:40" of it will be reduced; the
positively, c'sin mation de certa: it does not certain
alcohol, as it may cause discovery?
Make sure a gasoline's fully charged before using This
epzator will not operate while the card is connected to or
•
Epilating
Only use the coital: attachment, e.g. pila caras be used the
For such as your legs, orders are and E'kiiifre
- attach the fan. cap if you want to replace fans, hair
For example, the part of the following variables are obtained to be
on wet skin with or without shower gel or soap
For dry coilating, make sure your skin is ex- and free from
gusted are cost. Do it: properly cost before using.
I am sure easier to remove after a bath or shower, but you'll wear
should be completely before taking your job.
* Bevac* is a clean to oscillating face (see 'C. aerugin
- press the cooling head onto the handle (e.g. 51)
3.1 desired pull an attachment on the peiling head (Fig 17)
NO. 1. The seasonally only fit onto the product in one
c. v x liar
1 Press the on/off button once to turn of the epaser: 15. A.
1
1
The capital starts running up to 1000 billion is the cap.
efficient, scored to coiling The space III, is grouped
• "you want to use speed! press the print of a letter: second
Line: Space: Light Light Swap (Fig 7)
- Select speed for areas with little new power for hard-to-
reach already for areas with bone size to break
14. 16. 17. 18. 19. 20. 21. 22. 23. 24. 25. 26. 27. 28. 29. 30. 31. 32. 33. 34. 35. 36. 37. 38. 39. 40. 41. 42. 43. 44. 45. 46. 47. 48. 49. 50. 51. 52. 53. 54. 55. 56. 57. 58. 59. 60. 61. 62. 63. 64. 65. 66. 67. 68. 69. 70. 71. 72. 73. 74. 75. 76. 77. 78. 79. 80. 81. 82. 83. 84. 85. 86. 87. 88. 89. 90. 91. 92. 93. 94. 95. 96. 97. 98. 99.
- When you press the on/off button a third time the epilac-
turns all
- For change in the company's 2015, the last-to-balance-20
in operation, we can use the E.g. 13: To L##e" process.
or call for order 3 seconds after having the previous
- Hold the exp. or reme-dio, to your fee at a A" one-a with
Be on: The pointing in the line, on you are going to move the product (p. 11).
- Her y presend moye he pla o slelyonr he sin
against the direction at hair growth. If you press for: "e.g., you too hard, the eolator will not be able to grasp and remove the bars. Experiment on: you. And be high settings enough amount of pressure to wear a side of skin and hair.
up When up is a negative area, rather than the skin was your heart. For filling in place, but your hand can be back of your head to screen the skin (15, 24).
Pesset eroll ander laur ine spilce €=
3 Pull the attachment off the ejection need and clean ejection and attachment (see Cleaning).
E-FORTANT
- after using the emulator, some repress or imitation may occur. This is correct and would be sufficient to do. - Clean the product and attachment is after each use (see "content").
Using epilator attachments
When using eplicator attachments, always be sure you, place he reads that or other skin at a 75° e.g. (Fig. 11) Simply snap each attachment onto the collater head ("click") (12, 2).
To consider all classical, geostat's hard back and put up off the ep ztor head (1 p. 7b).
Massage cap
- Attach the massage cap or to the ep' as it need to massage the skin and m'ure the pulling sensation w'le ep' last.
delicate area cap
- attach the delicate area also onto the existing head for more complex abscaping of delicate areas such as indistorted by inf area.
Radial cap
- Attach v. tacle, cap onto the sellaing feed for precise up along of fecal bars, such as loper to.
Do not use the appliance to epilate cyclashes, eyebrows or scalp hair.
efficiency cap
- attach the efficiency cap onto the evulating head to keep skirtight and help reduce a in while opiting
Body massage head
Remove the ballata road by passing re-versical on the deck of the appliance (Fig. 10). Attach an body massage head to the roiling unit one, now allard to the apolianus bacilla (Fig. 16). The body massage head rotates from to relax muscles.
Body exfoliation brush
Remove the oscillator head by pressing the release button or a lock of the opacitor (Fig. 2) Attach the body condensation brush to the co-rolling lift and then assist to the separation handle (e.g. by the body of it is out by help remove good skin).
Do not use the body exfoliation brush on your face.
Shaving
Do not use the shaving head if the foil damaged or broken, as injury may occur.
The new drawing head was over 500 miles, almost as soon as it is. Attach the viewing head with only one viewing head to some half a length of 100 inches (Fig. 10). When you can see a close, always prase the body on the sides of 15.12. To some leg and talk always always since the upprince greatly saw the skin condition, but there is a good. It is quite under some, pure cream be in your head and move the upprince up to dark cream from the original
Trimming
Use the finna beam to find hard to view face in the air zone. At each 5 mm length, combined be a 1 mm head of the bars. If the air zone is a single: 1/8m/3mm (Fig. 20). A create arc sections, place the trim mer head perpendically cut by the arm (Fig. 21)
Caution: Do not use the trimmer head without the comb on intimate areas other than the bikini line as this could cause injury.
Overheat protection
Note: a avoid overheating of the object, can press the normal foodboard; your skin Tetroplur, white, better you move it over your skin without exercise and pressure.
If the excised pre-cadian transducer, a product was all automatics. The speed lights start flashes.
- Let the product coal down. The lights side flashing after 10 minutes.
When the product has cooled down, you can turn it again. I're light-start flashing again, the product has not yet cooled down compared.
Cleaning
K-ORIANT:
always given the hard systems and all benchmarks after such USA.
- always turn the product OHP and remove power cord from electrical resistance, and product before cooling
- Never use compressed air, scouring paces, or active casing agents or aggressive fuels such as gasoline or diesel. To store the product.
- keep the power cord dry (p. 2).
Cleaning the epilating head and epilating attachments
It is essential for inflation, reasons and optimum performance that, evaluating head, accountants and relating disks are well after value.
It's strongly recommended to always rinse the eclating head with calcium to respect body size. Growth Never clean, remove, or replace colating heart or attachments, while more is ON. The rotating cases are not removable from the colating bed:
Do not a bely pressu e or touch rotating c's e with h a c capa t s, or may get at damage the r os s. If damage x: on, dis ar, "argue" uncially
Be certain the product is OHI
Full energy barrier of "residualizing force (Fig. 15)
RemoveOSE RS for the collating disks and attachment with be crush.
Never try to detach the opilating disks from the product.
- Use attachments through order when up was allowed to get
5T. the product awarded since be coiling bean, a clear color, and date in 15 June 2023 (7, 27).
To shake off excess water and dry, the peolaring head and all. If there can clearly work: Close of lione, one well: all-e's the 0279y.
7 To attach the plot using word, press, ante, and homel; (14): iFig. 9)
Cleaning the shaving head
Never clean or remove the mixing head or using a wall wall.
the needs ON.
Bone, early pressure, other sharing head. Bone, each
[1] In the sharing level, be of re-arranged or unlocked.
as this may cause racial injury.
ec certain the p.o
First by close together and hence, no having good for the handle.
? Full the ring, until out of the waving head (Fig. 23)
4 Clean 7-2 cutting unit toil, otherwise inside the sheaving head
with the cleaning brush Also has away any 10% that have
- colla: ccl. ance: Pc: birr: trp,
To avoid damage, never use a brush to clean the shaving foil.
- You can arrive here, if all, indeed the following need
and accessories once warm too water
Allow all parts to our v thoroughly
7 P. al the calling and back of the moving heart (P. x).
-or the best showing performance. Us suggested to lightly oil
using Icar: seapy & waxes be providing a short mineralo
er the for, and cutters.
Replacing the shaving head cutting unit
If the foil and/or trimmers of the cutting are worn or damaged,
do not continue to use the shaving head.
A year on arranged it. "ing, will should only be replaced with ar
origine. Philips cutting unit which is available a
www.philips.com/parts-and-accessories. You can also call
100 241 7594 (18) e.g. 1 856 200 93" (Caracas only)
to assistance.
The cutting unit is a precision part. Handle with care.
Always turn the product OTI and remove power cord from the
elec. calg., and peaal at be far repaxing the cutting or
- Press the case outper and remove the shading used for
the article.
3.54.10:10, 26, and out at the existing head (Fig. 72)
1 Place a new output unit into the saving need to click
- What are the shaving need to be home?
5 After replacing the cutting edge, check to make a 6" mark on
ur and s'aring head are firmly attached before using the
•P
Storage
Reserve price is 1.0x OFF. Reserves power cost scale
electrical outer and handle before storing product in a sale.
cry lection where, will not be crushed, ranged or suture to
C#142:
- Do not wrap core around oilator when storing
- even: I put it, you else: it will not be cut or
25.1483
- Bo ne a bae or stare en car w eve it car fall or be pulled into
a 1.5:3 a 1.2, water on the liquid with a pl.a. gen in
- Put the prospector to source the case to take
(2) only apply to
- Use the place of and additional non-1the post press deal.
Accessories
"or inside" so working performance, replace the shaving head
culture until once a year. This replacement part can be purchased
on www.philips.com/parts-and-accessories.
you use the book exhibition brush 2-2 times a week, replace it
since 3 years by The sample circuit was can be acquired as
www.philips.com/store@chile.com
Assistance
For assistance visit or website: www.philips.com/support email
all tree 1-806-2'-381in, 5 only 0' -906-300-331in
Converance?
Disposal
This was a good stock price, but the billion bear is a bearish.
must be disposed of property (117, 24)
Can be your oral oven are veftls als by battery deposit
in v. natalia: the US, you see this 1 000 872 9037
- visit www.call2recycle.org for battery drop-off locations in
- 1740368-754-1066-224-0754-31-20
www.call2recycle.ca |ve |ball|any.shr|y_vli|c|di|v
- For assistance, visit our website www.philips.com/support or
1002 243 7004 to Box
- You, product's designed and manufactured with "non-qualty"
to play a long campress, which be recycled and reused
management facilities or visit www.recycle.phillips.com.
Full Two-Year Warranty
Thomas North America, LLC (USA) and Philos Electronics Ltd
(7) 1.2.1. (8) 1.3.1. (9) 1.4.1. (10) 1.5.1. (11) 1.6.1. (12) 1.7.1. (13) 1.8.1. (14) 1.9.1. (15) 2.0.1. (16) 2.1.1. (17) 2.2.1. (18) 2.3.1. (19) 2.4.1. (20) 2.5.1. (21) 2.6.1. (22) 2.7.1. (23) 2.8.1. (24) 2.9.1. (25) 3.0.1. (26) 3.1.1. (27) 3.2.1. (28) 3.3.1. (29) 3.4.1. (30) 3.5.1. (31) 3.6.1. (32) 3.7.1. (33) 3.8.1. (34) 3.9.1. (35) 4.0.1. (36) 4.1.1. (37) 4.2.1. (38) 4.3.1. (39) 4.4.1. (40) 4.5.1. (41) 4.6.1. (42) 4.7.1. (43) 4.8.1. (44) 4.9.1. (45) 5.0.1. (46) 5.1.1. (47) 5.2.1. (48) 5.3.1. (49) 5.4.1. (50) 5.5.1. (51) 5.6.1. (52) 5.7.1. (53) 5.8.1. (54) 5.9.1. (55) 6.0.1. (56) 6.1.1,
occv excitation b. sh; against defects in "materials o
workmanship for a series of two years from the date of purchase.
e.d. agus: l: repa' on replace e'delie: produc. e' out
charge
IMPORTANT. This warranty does not cover any coverage existing
To account misuse of abuse, lack of reason/elele care.
a)kore of the acacnter: not provided with the product or loss
of carbon dioxide, the product, to any part, besides: Tier ecl age
or Batteries."
NO RESPONSIBILITY IS ASSUMED FOR ANY SPECIAL.
INCIDENTAL OR CONSEQUENTIAL DAMAGES.
n order to obtain warranty service, simply no to
www.philips.com/support: e-mail: c.10.s uygcvd that fca
you protection you return short assets or products reserves. Mail
survence de la. Damare acc. innar d'au sialmen is col.
GASOY: This water is. NOTE: No: all water is, will be
ors. is authorized by Philips North America LLC. his warranty
g vs 100 speci#e local rights and eq. "any" to have other rights
(1) "in view for a slow to slow, very slow to very slow at world is
country: Some states on coral as toa exc. incr. or limitation of
Figure 2: our company claims are to the above-exclusion and
in reaction
Tread crepse, astral, e is carefully:
45-Day Money-Back Guarantee
Leg, we are fully satisfied with your health clinic for produce
took with reliable you. Be all purchase price
The product must be shipped prepaid by insured mail, insurance
prepaid, have the original sales receipt, indicating purchase
price and date of purchase, and the money-back guarantee
return authorization form enclosed.
We cannot be responsible for lost mail.
The product must be postmarked no later than 45 days after the
date of purchase. Philips reserves the right to verify the
purchase price of the product and limit refunds not to exceed
suggested retail price.
To obtain money-back guarantee return authorization form, call
1-800-234-7884 (in US only) or 1-886-800-9311 (in Canada
only) for assistance.
Delivery of return check w... occur 6-8 weeks after 'excels of
reared product.
- P### parallel channel
7 Caboza, 1900-2401
23 C.ole c.e. careration
Sara una Castillo del upoce. Farla
Carga
direct to the...je to Jate.
Note: [a]: produca sello; paskin 1/2; situab: 4
In dependence of the -this comfortable condition
Circ. 1 Largo colino 0 sc. 73 - 5/32 in. 73 - 4 min St al 9c 5
[16] 01: Saudi Arabia (2023)
Theorem 1.2. (A) Let () be a finite field and let (x) be the sum of all elements of x such that x (x) . Then
- In this case, the following is
NOTE: Fluorescence sales data and practice sheet in Table
"Los as instrucciones adjur as acramente
K^, H^ , H^
9 Fimboral: 1c guidance:
For the next exercise, we do also say that
-
- Lihua, deu, al. al. al. al. al. al. al. al. al. al. al. al. al. al. al. al. al. al. al. al. al. al. al. al. al. al. al. al. al. al. al. al. al. al. al. al. al. al. al. al. al. al. al. al. al. al. al. al. al. al. al