
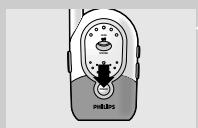
SBCSC477 - Headphones PHILIPS - Free user manual and instructions
Find the device manual for free SBCSC477 PHILIPS in PDF.

| Product type | Baby monitor |
| Brand | Philips |
| Model | SBC SC477 |
| Transmission technology | DECT (Digital Enhanced Cordless Telecommunications) |
| Range in open field | 300 meters maximum |
| Range indoors | Approximately 50 meters depending on obstacles |
| Power supply parent unit | Rechargeable NiMH battery pack (included) + mains adapter 230 V~, 50 Hz |
| Power supply baby unit | 4 alkaline LR6 (AA) 1.5 V batteries (not included) or mains adapter |
| Battery life parent unit | Up to 16 hours |
| Battery life baby unit on batteries | Up to 30 hours (nightlight off) |
| Main functions | Audio monitoring, two-way intercom, nightlight, sound level LED indicators |
| Settings | Volume parent and baby unit, baby unit microphone sensitivity (via single control) |
| Visual indicators | Sound level indicators (5 LEDs), battery indicator, DECT connection indicator |
| Out of range alarm | Yes, audible alarm and flashing red indicator |
| Cleaning and maintenance | Clean with a damp cloth. Do not use near a source of moisture. |
| Safety | Place baby unit at least 1 meter away from the child, never cover the device |
| Spare parts | Suitable NiMH rechargeable battery pack only |
| Reference number | SBC SC477 |
| Operating temperature | 0 °C to 40 °C |
| Included accessories | Parent unit, baby unit, charging base, 2 mains adapters, NiMH battery pack, belt clip |
Frequently Asked Questions - SBCSC477 PHILIPS
User questions about SBCSC477 PHILIPS
0 question about this device. Answer the ones you know or ask your own.
Ask a new question about this device
Download the instructions for your Headphones in PDF format for free! Find your manual SBCSC477 - PHILIPS and take your electronic device back in hand. On this page are published all the documents necessary for the use of your device. SBCSC477 by PHILIPS.
USER MANUAL SBCSC477 PHILIPS
Instructions for use
English 4
Nederland (Netherlands)
Phone: 0900 8406
Norge (Norway)
Phone: 2274 8250
Philips is dedicated to producing caring, reliable products that new moms and dads really need. Products whose reliability and operating quality bring reassurance. You can trust this Philips baby monitor to provide round-the-clock support by ensuring you can always hear your baby clearly, no matter where you are in the house.
Philips Baby Care, Taking care together
Important information
Please read this guide carefully before using the baby monitor, and keep it for future reference. This baby monitor is intended as an aid. It is not a substitute for responsible and proper adult supervision and should not be used as such.
- Make sure the Baby Unit and adapter cable are always out of reach of the baby, at least one metre away.
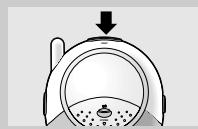
- Never place the Baby Unit inside the baby's bed or playpen!
- Never cover the baby monitor (with a towel, blanket, etc.).
- Clean the baby monitor with a damp cloth.
- Never use the baby monitor near water.
Safety precautions
- Check if the voltage indicated on the type plate of the adapters correspond to the local mains voltage before connecting to the mains power supply.
- Do not use the set in moist places or close to water.
- Do not expose the set to extreme heat or light.
Contents
Help line 2
General 4
Important information 4
Product illustration on inside flap 5
Getting the baby monitor ready 6
Monitoring your baby 8
Using the family intercom system 9
Explanation of features 11
Problem solving 12
Technical specifications 13
Resetting to default factory settings 14
Product illustration on inside flap
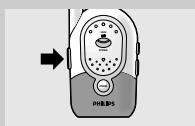
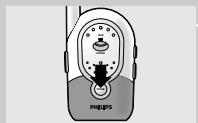
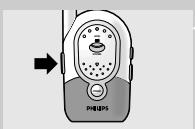
A) Baby Unit
1 night light button
2 night light
3 TALK button
4 battery check light lights red when battery power is low
5 DECT system check light
blinks red: connection not OK
lights red: no connection for more than 2 minutes, the system check alarm on the Parent Unit beeps
blinks green: searching for connection
blinks green fast: transmitting sound
lights green: connection OK
6 loudspeaker
7 microphone
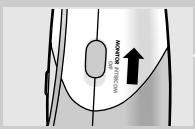
8 MONITOR / INTERCOM power on switch
9 battery compartment cover
10 DC power supply socket
11 AC power adapter
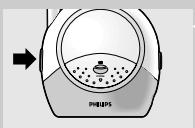
B) Parent Unit
12 sound-level lights
13 battery check light lights red when battery power is low
14 DECT system check light
blinks red: connection not OK
lights red: no connection for more than 2 minutes, the system check alarm on the Parent Unit beeps
blinks green: searching for connection
blinks green fast: transmitting sound
lights green: connection OK
15 TALK button
16 microphone
17 loudspeaker
18 POWER button
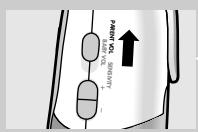
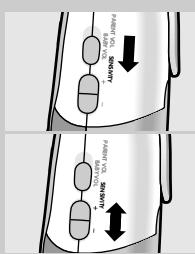
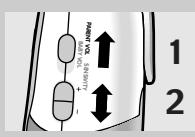
Single Point Control
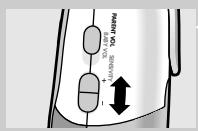
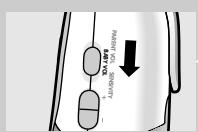
19 mode switch selects Parent Vol(ume), Baby Vol(ume) and Baby Sensitivity
20 up (+)/down (-) adjusts sensitivity and volume of selected unit
21 charging base
22 charging light
23 DC power supply socket
24 AC power adapter
25 belt clip
26 battery compartment cover

Getting the baby monitor ready
Baby Unit
For your convenience the Baby Unit can be mains or battery operated.
Mains operated use
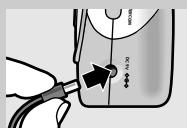
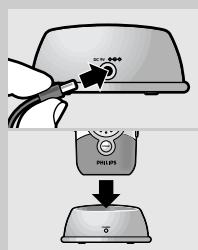
1 Connect the AC power adapter (11) to a mains socket and the cord to the DC power supply socket (10) of the Baby Unit.
2 The Baby Unit is now ready for mains operated use.
Battery operated use
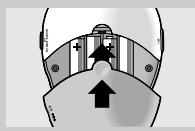
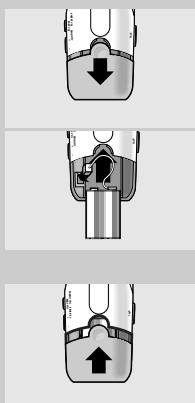
1 Remove the battery compartment cover (9).
Push on the round part, keep it down and slide the cover downwards.
2 Insert four 1.5V, LR6 (AA) Alkaline batteries noting the + and - configuration inside the battery compartment.
(The batteries are not included; we recommend non-rechargeable Philips Alkaline batteries).
3 Put the battery compartment cover back in place. Put the cover on the compartment and slide the cover upwards until it clicks.
4 The Baby Unit is now ready for battery operated use.
The Baby Unit operates for up to 30 hours on fresh batteries (Philips Alkaline batteries, Baby night light switched off).
5 When the battery check light (4) flashes red, the battery power is low. Install new batteries if this happens.
Tips:
- Switch off the Baby night light to save battery power, when the Baby Unit is battery operated.
- Remove empty batteries from the Baby Unit.
Battery back-up
As soon as the batteries are inserted battery back-up will be activated. In case of mains failure during mains operated use the unit will automatically switch to battery operated use. As soon as the mains supply is back on the unit switches to mains operated use again.
Parent Unit
The Parent Unit comes with and uses high performance rechargeable battery pack. The battery pack must first be inserted and charged before the Parent Unit can be used outside the charging base (21).
Note: Never operate the Parent Unit without a battery pack!
Without the battery pack, the unit might not work correctly.

Mains operated use / charging the battery pack
1 Remove the battery compartment cover (9).
Push on the round part, keep it down and slide the cover downwards.
2 Insert the battery pack (without the battery pack, the unit might not work correctly):
Plug the connector of the cable into the connector on the left side of the battery compartment.
Place the side with the connection cable in the top of the battery compartment.
3 Put the battery compartment cover back in place. Put the cover on the compartment and slide the cover upwards until it clicks.
If the rechargeable battery pack begins to lose its effectiveness, replace it with a new battery pack. Use rechargeable NiMH battery packs only!
4 Connect the AC power adapter (24) to a mains socket and the cord to the DC power supply socket (23) of the charging base.
5 Place the Parent Unit inside the charging base.
The red charging light (22) lights.
The Parent Unit can be operated now, but you should leave it in the charging base until the battery pack is fully charged (at least 14 hours).
When the battery pack is fully charged, the Parent Unit can be taken out of the charging base and used cordlessly for up to 16 hours.
When the battery check light (13) flashes red, the battery power is low.
Place the Parent Unit inside the charging base to recharge the battery pack.
Note: Never operate the Parent Unit without a battery pack!
Without the battery pack, the unit might not work correctly
Disposal of batteries
Dispose of used batteries in an environmentally friendly manner.
Do not mix old and new batteries, or different types of batteries.
Remove Baby Unit batteries if the baby monitor is not to be used for long periods.


Monitoring your baby
Switching on the units
1 Position the Baby Unit at least one metre away from your baby.
Never place the Baby Unit inside the baby's bed or playpen.
2 Set the MONITOR/INTERCOM power on switch (8) on the Baby Unit to MONITOR.
The DECT system check light (5) blinks (green).
3 Switch on the Parent Unit by pressing the POWER button (18).
The DECT system check light (14) blinks (green).
DECT system check lights of Baby Unit and Parent Unit light continuously (green) when both units have established a connection.
Note: The Parent Unit beeps when it is (accidentally) switched off.
Adjusting loudspeaker volume
Parent Unit
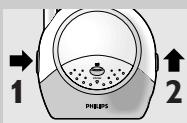
1 Set the Single Point Control mode switch (19) on the Parent Unit to PARENT VOL.
2 Press the Single Point Control +/- button (20) on the Parent Unit to increase/decrease the loudspeaker volume of the Parent Unit.
The sound-level lights (12) on the Parent Unit give visual feedback about the setting for approximately 3 seconds.
0 lights = monitoring baby silently
5 lights = maximum
Note: A high pitched noise may occur in case the units are too close to each other. To avoid this you should set the Parent Unit volume to 0 before placing the units close to each other.
Baby Unit
3 Set the volume/sensitivity selection switch (19) on the Parent Unit to BABY VOL.
4 Press the Single Point Control +/- button (20) on the Parent Unit to increase/decrease the loudspeaker volume of the Baby Unit.
The sound-level lights (12) on the Parent Unit give visual feedback about the setting for approximately 3 seconds.
0 lights = speaker off
5 lights = maximum
Note: You can only change the Baby Unit volume if the connection between the Baby Unit and Parent Unit is established.
Adjusting microphone sensitivity
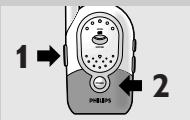
1 Set the Single Point Control mode switch (19) on the Parent Unit to BABY SENSITIVITY.
2 Press the Single Point Control +/- button (20) on the Parent Unit to increase/decrease the microphone sensitivity of the Baby Unit.
The sound-level lights (12) on the Parent Unit give visual feedback about the setting for approximately 3 seconds.
0 lights = minimum level
5 lights = maximum level (continuous transmission)
Note: When set to maximum level (continuous transmission), the Baby Unit monitors continuously and all sounds, regardless of level, can be heard on the Parent Unit. Battery operating time may decrease to approximately 8 hours during continuous transmission.
Note: You can only change the Baby Unit sensitivity if the connection between the Baby Unit and Parent Unit is established
Using the family intercom system
Talking back to comfort your baby
1 Set up both units to MONITOR your baby's sounds.
2 Adjust the loudspeaker volume level of the Baby Unit, using the Single Point Control switch and buttons, to a level you prefer.
3 On the Parent Unit, press and hold the TALK button (15) and talk clearly into the microphone.
While the TALK button on the Parent Unit is being pressed, no sounds from the Baby Unit can be heard on the loudspeaker of the Parent Unit.
Note: Wait with talking until the system check light is blinking green.
Note: In case the loudspeaker volume of the Baby Unit is set to 0 the system check light will light red, while pressing the TALK button.
4 Release the TALK button when finished.
Two way intercom
Your SBC SC477 is suited for use as a two-way intercom.
1 Set the MONITOR / INTERCOM power on switch (8) on the Baby Unit to INTERCOM.
The DECT system check light blinks (green).
2 Switch on the Parent Unit by pressing the POWER button.
3 Wait for an established connection (system check lights green).
4 Adjust the loudspeaker volume level of the Baby Unit to a level you prefer.
5 Adjust the loudspeaker volume level of the Parent Unit to a level you prefer.
6 On the Parent Unit, press and hold the TALK button (15) and talk clearly into the microphone.
Note: Wait with talking until the system check light is blinking green.
Note: In case the TALK button is pressed on the Parent Unit, and the loudspeaker volume of the Baby Unit is set to 0, the system check lights will light red.
Note: In case the TALK button is pressed on the Baby Unit, and the loudspeaker volume of the Parent Unit is set to 0, the Parent Unit will beep to indicate this.
7 Release the TALK button (15) when you are finished.
8 On the Baby Unit, press and hold the TALK (3) button and talk clearly into the microphone.
9 Release the TALK (3) button when you are finished.
While the TALK button on either unit is being pressed, a signal from the other unit cannot be heard. In other words, only one person should speak at a time.
Explanation of features
Monitoring baby silently
- Set the Single Point Control mode switch (19) on the Parent Unit to PARENT VOL and adjust the volume of the Parent Unit to the lowest level with the Single Point Control +/- button (20).
The sound-level lights (12) visually alert you to baby's sounds. The more sound your baby makes, the more lights light.
Checking that the units have established a connection
- Check that the DECT system check light (14) on the Parent Unit lights continuously (green) to confirm that the connection between both units is reliable.
The light flashes red and the system check alarm on the Parent Unit beeps when:
- the units are not in touch;
- out of range;
- if there is interference.
Switching on the night light
- Push the Baby Unit's night light button to switch the night light on and off.
Switch off the night light when operating the Baby Unit on batteries to conserve power.
Operating range
- The SBC SC477 baby monitor has an open air operating range of up to 300 metres. Walls, ceilings, large objects and even glass will decrease the operating range. Depending on your local circumstances the operating range can decrease down to approximately 50 metres. The system check function (lights 5, 14 and beeping sound on the Parent unit) will in principle indicate to you the reliability of the connection between the Parent unit and Baby unit and whether you are out of range.
| Problem solving | ||
| If a fault occurs, first check the points listed below. If you are unable to remedy a problem by following these hints, contact the helpline (see next paragraph) or consult your dealer. Under no circumstances should you try to repair the set yourself as this will invalidate the guarantee. | ||
| Problem | Possible cause | Solution |
| DECT system check light does not light | Parent Unit: unit is not turned on. Baby Unit: unit is not turned on. Batteries are low. Power adapter is not plugged in or batteries are exhausted. | Press POWER button. Switch on with MONITOR/INTERCOM power switch. Replace/recharge batteries. Plug in power adapter or replace batteries. |
| DECT system check light of Parent Unit keeps blinking green | Battery pack not inserted into Parent Unit. | Put battery pack in Parent Unit. |
| High pitched noise | Units are too close to each other. Volume too high. | Move Parent Unit away from Baby Unit. Decrease the Parent Unit volume. |
| Parent Unit batteries do not charge | Battery life is at an end. | Replace rechargeable battery pack, using only NiMH rechargeable battery pack. |
| No sound | Volume on Parent Unit is set too low. Sensitivity setting on Baby Unit too low. Units are out of range. | Increase Parent Unit volume. Adjust sensitivity level of Baby Unit. Move Parent Unit closer to Baby Unit. |
| DECT system check light is red (blinking) | No power to one of both units. | Check MONITOR/INTERCOM power switch on Baby Unit. Baby Unit and POWER switch on Parent Unit. |
| Battery check light is blinking | Batteries are low or empty. Parent Unit: Baby Unit: | Recharge battery pack. Replace or remove batteries. |
| Talk-back not working * | Speaker volume of Baby Unit is set to 0. Set speaker volume to 1 or higher. | |
| Intercom function not working * | Baby Unit is in the baby monitor mode. | Set Baby Unit in the intercom mode. |
| Speaker volume of Baby Unit is set to 0. | Set speaker volume to 1 or higher. | |
| Units too far away from each other. | Decrease distance between units. | |
| DECT system check light (flashing red)/ System check alarm beeps on Parent Unit | Units too far away from each other. | Decrease distance between units. |
| Batteries are low. | Replace/recharge batteries. | |
| Units cannot establish a connection, even when close to each other. | Try solving the problem by using the factory initialisation mode. | |
*) In talk/intercom function, when either the Parent or Baby Unit is transmitting, the other unit can only receive and not transmit. The TALK function of the Parent Unit has priority over that of the Baby Unit. When both switches are pressed simultaneously, the Parent Unit TALK function will be activated.
Technical specifications
| Power supply: | - Battery pack; rechargeable NiMH for Parent Unit (included) |
| - Optional batteries 4 x 1.5V; AA for Baby Unit (not included) | |
| - AC power adapter 230V AC, 50 Hz | |
| Operating range: | Up to 300 metres in ideal conditions. Range will be affected by walls, doors, etc. Indoors the range may decrease to 50 meters |
| Operating temperature: | 0 °C to 40 °C |
| Standard: | Digital Enhanced Cordless Telecommunications (DECT) |
Only use the AC power adapter included or a type that complies with safety standard EN60950 and has the following specification: 9 Volt DC/ 200 mA.
Resetting to default factory settings
Factory Initialisation mode
With this mode both units can be reset to the default factory settings.
Factory Initialisation can be used if problems occur which can not be solved by following the suggestions in chapter 'Problem solving'.
1 Make sure the units are within a range of 1 metre from each other.
2 Switch off both units.
Note: The units have to be put in Factory Initialisation mode together. Therefore step 4 should be executed within 5 seconds after the DECT system check light on the Baby unit starts blinking (step 3).
3 Keep TALK button on Baby Unit pressed for at least 6 seconds, while turning on the power (power on switch to MONITOR or INTERCOM).
The DECT system indicators will blink alternatively red/green.
4 Keep TALK button on Parent Unit pressed for at least 6 seconds, while pressing the POWER button.
The DECT system indicators will blink alternatively red/green.
When the units have found each other (normally within 30 - 120 seconds) this will be indicated by a 'beeping' sound from both units. Then connection will be re-established.
Note: By executing the factory initialisation mode Parent Volume, Baby Volume and Baby Sensitivity are automatically reset to their factory default settings. Personal preferences need to be set again.
Factory default settings are:
-Parent Volume:3 lights
- Baby Volume: 3 lights
- Baby Sensitivity: 3 lights
Need Help?
In case you have any questions about the SC477, please contact our helpline for assistance! You can find the number in the list on page 2.
Before you call, please read this manual carefully.
You will be able to solve most of your problems.
The model number of the baby monitor is SBC SC477.
Date of purchase:
day /month /year
Votre baby phone
SBC SC477
Single Point Control
Battery operated use
Specifications techniques
Digital Enhanced Cordless Telecommunications (DECT)
Single Point Control
- Coloque o selector de modos de controlo passo a passo (19) on the Parent Unit to PARENT VOL and adjust the volume of the Parent Unit to the lowest level with the Single Point Control +/- button (20).
Padrao: Digital Enhanced Cordless Telecommunications (DECT)
15 koumi ouiia (Talk)
16 μkρόφωνo
17
18 kouμπI POWER
EeYxO eVoc onmuiou (Single Point Control) 19 diaKoTTns EMILOync LEIToupyiacs duatotnra EMILOync Parent Vol(ume), Baby Vol(ume) kai Baby Sensitivity 20 auXnon (+) /muicwn (-) puoiie Tnv Evuaiooia kai Tnv Evtaon TNS EIIeYevns movadac
21 Baoon opictions
22 luxvia φóptiŋs
23 uno0xni ouvexouc pEuHaTos
24 metaoxnmuatiotns evaalaoosoevou peuato
25 KlaTzwoyns
26 Kanaki θηκης μηταριών
2 Evepytooiote kai tig duo movadegs
15 TALK (tale) trykknap
16 mikrofon
17 højttaler
Philips Baby Care, Taking care together
Viktig informasjon
-Parent Volume:3 lys
- Baby Volume: 3 lys
- Baby Sensitivity: 3 lys
Trenger du hjelp?
I tilfelle du har spørsmål om SC477, vennligst Kontakt vår hjelpelinje assistanse! Du kan finne nummeret på listen på side 2.
För du ringer, ber vi deg lese dette bruksanvisingen nøye.
Single Point Control
DECLARATION OF CONFORMITY
We, Philips Consumer Electronics, B.U. Accessories: Building SBP6 (manufacture's name)
P.O.Box 80002,5600 JB Eindhoven, The Netherlands (manufacture's address)
declare under our responsibility that the radio product:
Philips (name)
SBC SC477/00H,105H,184H,100,105,184 (type or model)
DECT Baby Monitor (product description)
to which this declaration relates is in conformity with the following standards:
EN301406
EN 301489-1
EN301489-6
EN 60950 (2000),
EN 60065 ed.6
Title and/or number and date of issue of the standards)
following the provisions of 1999/5/EC (R&TTE Directive).
Eindhoven, 30 October 2002
(place, date)

P. Frantzen. General Quality Officer (signature, name and function)
Guaranteee certificate
Garantiebewijs
Certificado de garantia
Garantibevis
Certificat de garantie
Certificado de garantia
Eyyunon
Garantibevis
Garantieschein
Certificato di garanzia
Garanticertifikat
Takuutodistus
1
year warranty
année garantie
Jahr Garantie
jaar garantie
aano garantia
anno garanzia
Xpovoc Eyyunon
ar garanti
ar garanti
ar garanti
vuosi takuu
ano garantia
Type: SBC SC477
Serial nr:
Date of purchase - Date de la vente - Verkaufsdatum - Aankoopdatum - Fecha de compra - Date d'acquisito - Data da adquiricao - Hμερομηνia αγοράς - Inköpsdatum - Anskaffelsesdato - Kjøpedato - Oatopävä -
Dealer's name, address and signature
Nom, adresse et signature du revendeur
Name, Anschrift und Unterschrift des Handlers
Naam, adres en handtekening v.d. handelaar
Nombre, direction y firma del distribidor
Nome, indirizzo e firma del fornitore
Ovopatentwvo, Siuehovn kai utoypaftou ept. npountheutn Aterforsaljarens namn, adress och signatur Forhandlerens navn, adresse og underskritt Forhandlerens navn, adress og underskritt Jalleenmyyjan nimi, osoite ja alekirjoitus Nome, moradae assinatune da loja
6 month guarantee on rechargeable batteries
6 mois de garantie sur les piles rechargeables
6 meses de garantia para las pilas recargables
6 Monate Garantie auf wiederauffladbare Batterien
6 maanden garantie op oplaadbare batterijen
Garanzia di 6 messi sulle batterie ricaricabili
Pilhas recarregáveis com 6 mezes de garantia
Eyyunon 6 μννωv Ε Σ επαναφορτιόμενες μπατapiες
6 maneders garanti à laddningsbara batterier
6 manedes garanti à genopladelige batterier
6 manedes garanti à de opladbare batteriene
Ladattavilla akulla on 6 kuukaiden takuq
- Philips Baby Care, Taking care together
- Important information
- Safety precautions
- Contents
- Product illustration on inside flap
- A) Baby Unit
- B) Parent Unit
- Single Point Control
- Getting the baby monitor ready
- Baby Unit
- Mains operated use
- Battery operated use
- Battery back-up
- Parent Unit
- Mains operated use / charging the battery pack
- Disposal of batteries
- Monitoring your baby
- Switching on the units
- Adjusting loudspeaker volume
- Adjusting microphone sensitivity
- Using the family intercom system
- Talking back to comfort your baby
- Two way intercom
- Explanation of features
- Monitoring baby silently
- Checking that the units have established a connection
- Switching on the night light
- Operating range
- Resetting to default factory settings
- Factory Initialisation mode
- Need Help?
- Votre baby phone
- Viktig informasjon
- Trenger du hjelp?
- DECLARATION OF CONFORMITY
- 1
Brand : PHILIPS
Model : SBCSC477
Category : Headphones