
BF1N4T223 - Oven SAMSUNG - Free user manual and instructions
Find the device manual for free BF1N4T223 SAMSUNG in PDF.

User questions about BF1N4T223 SAMSUNG
0 question about this device. Answer the ones you know or ask your own.
Ask a new question about this device
Download the instructions for your Oven in PDF format for free! Find your manual BF1N4T223 - SAMSUNG and take your electronic device back in hand. On this page are published all the documents necessary for the use of your device. BF1N4T223 by SAMSUNG.
USER MANUAL BF1N4T223 SAMSUNG
Cuaai jia jia jia jia jia jao 5i
JLLP
SAMSUNG no nnnn nn nnnn nn nnnn nn nnnn nn nnnn nn nnnn nn nnnn nn nnnn nn nnnn nn nnnn nn nnnn nn nnnn nn nnnn nn nnnn nn nnnn nn nnnn nn nnnn nn nnnn nn nnnn nn nnnn nn nnnn nn nnnn nn nnnn nn nnnn nn nnnn nn nnnn nan
aL
yss sgs yabg yall aas jn bny
SLGLAolil Aolil no 0xll
Jai li jai jai aai ayai ai Jai jai Jai
yj 1000000000000000000000000000000000000000
gai gaiyai all ygi 1jai alglpoae
sglg sglg 21111111111111111111111111111111
Aa a a a a a a a a a a a a a a a a a a a a a a a a a a a a a a a a a a a a a a a a a a a a a a a a a a a a a a a a a a aaa
albiogj baiiJI aIle aIto caiio biolipaiuoi pae
111 1
gll gll lgl aai jiaagswll jlgwll allj 3 aloc gli jai g Lsji Sall no Eegay Lgai jsc
aaiil g jlll aaii l aag bao yj 101 101
g iig gaiill g aagswll jlgwll all! jy 101
g jlll aaii gaii gaii gaii gaii gaii gaii gaii
c 1 1 1 1 1 1 1 1 1 1 1 1 1 1 1 1 1 1 1 1 1
JlaiS1 aee g ygssj jzjj jzjj Jaa
a
aiei 1go no yol
gaiilolglalglilglalaoaillglal
a. x( 0 < x < 1)
Jia jiu li jiu zao ale Jgai jia jia jia jia jia jia jia jia jia jia jia jia jia jia jia jia jia jia jia jia jia jia jia jia jia jia jia jia jia jia jia jia jia jia jia jia jia jia jia jia jia jia jia jia jia jia jia jia jia jia jiangao gao gao gao gao gao gao gao gao gao gao gao gao gao gao gao
aJyIiI cylaJIal alw aIaljI jgdl Jyolalil pao y
Ji 1
aill yall yll aill iai
a 1 a 1 1 1 1 1 1 1 1 1 1 1 1 1 1 1 1 1 1 1 1 1 1 1 1 1 1 1 1 1 1 1
y 1
aIle oJy> aJy dEe wu uie yIwO Jy> aJy gaij .
ywnll yglal slil ydl aic jg 1
Lg 1
olalio g l bcll aIc aIc oIaIololalio plssipw pcc
20 ÷ 10 = 8( 21)
Function Select Knob
1c
aagg"gall" aalagl alll g wjgagaaiaaiw jyogab ggl aeg yjraaalecl iiai
biol


jill
gj1
a plsi w y gdl aalwge jg LgLio Juii Jdai no aie iia
a21gjg jglbJgJgJg
afo 1V·
S_ BCD = 12 · BC · CD = 12 × 2t × 5
aalwgl aalglaio lglj gollll pblai alwgl jgi
gJ1 Jio 1j g j a j oio plssu
ai a j ≥ 1 令 ai ≤ a_j
gai jilj
aessssssssssssssssssssssssssssssssssssssssssssssssssssssssssssssssssssssssssss
aLs Lgj
aagaojf·aaalj31a
j
gJL Jn no nn jy gLuill ydl JdIg Ieulll pblai aalwglj gjj
Lg j 1 g j a b gioe plaew
aegio a2j 19. a3j=ai j3j
a
gul gul jol jol glal gall aagbgl oia plaaa aai
abwgo:aajzai1a jzl a


V-

1
EN60350JL L
3
31
a a a a a a a a a a a a a a a a a
a a a a a a a a a a a a a a a a a a a a a a a a a a a a a a a a
a. a. a. a. a. a. a. a. a. a. a. a. a. a. a.
a15 a g1 a g5 a 5g 5g3 albio splniwl b
Jusuuiuuiuuiuuiuuaagaiiuiaoloojuiiui
alai aai iaii iai iai iai iai iai iai iai iai iai iai iai
.1g 11g 11
ogogogj21 jocgaiiaoloo81 jaii
aaii iiaai 1s yie aiiil agog e gaii iigaii gclll lalai n ae baae
.
a.0181 01,281
aJgLalgl g aJfllg Lgaznnae Lgabai aggawg Jcbll abgs Lgaaanuag Lgalsiul 1a21 Jau
1021pJ15Ljraa
1
aaii iiaai 1
J 1

00 100000000000000000000000000000000000000000

1.
- + = +
L
i 1
g jilj 12jll g j,
gl jll fLL 121 a h i
la: mig aikil gnnn
aqli lqas
GgJgJgJgJgJg
20g>g11 11111115 Lc 1111 1
JgEg EA jIb JEA f jIb JAL


Lalol 21 gaclaal JgJg21 LaiJgCgJiSic
L
1aog5 aoay aLwyl Jn

aIJI JooJooJoo
a 1
SAMSUNG aaoj 2000
#
aalgl aalgl acll gacll wlaolwscg aal alawg cllg jil 1
pagoo oocgall ljwiw ylojll glaill aaii ayog aoljll
yoljdl agio aoyr .cIg fO ayol
aoljll aaltlg aaiell aallg gaojll claln aaii i 1
yoljll clll aaylojg aoell aalld ciuie
yolac ol 5 aL pag JgJgbl 8 ayol gaojll clls all
iiAijg 1
aodjg Jla
Lg>3Lg≤<x1 L<
aLwJgIb31sgl
| SAMSUNG | E-**1 -5E- | |
| 5-01 | ||
| --- |
aLgA
11 2019ololol
SAMSUNG
i 1
| الإستعمال | الترجمة | الترجمة |
| www.samsung.com | 021-8255 | IRAN |
| 800-SAMSUNG(726-7864) | OMAN | |
| 183-2255 | KUWAIT | |
| 8000-4726 | BAHRAIN | |
| 08000-726786 | Egypt | |
| 800-22273 | JORDAN | |
| 080 100 2255 | Morocco | |
| 9200-21230 | Saudi Arabia | |
| 444 77 11 | Turkey | |
| 800-SAMSUNG (726-7864) | U.A.E |
DG68-00352B:9J
BF1N4T223
Siguolw www.samservice.com

J
oai5 olaai wlaol
, g g 1, L L 0
Samsung Jg
2012 ≥ 2012
www.samsung.com/register
SAMSUNG
Planet First
100% Recycled Paper
aaiy aaiy aaiy aaiy aaiy aaiy aaiy aaiy
45 (jLs25 Jolai) jalil 1uogoi olai yolai oJolai oJolai oJolai oJolai oJolai oJolai oJolai oJolai oJolai oJolai oJolai oJolai oJolai oJolai oJolai oJolai oJolai oJolai oJolai oJolai oJolai oJolai oJolai oJolai oJolai o
aaii 1 aai i j 1 aai i j 1 aai i j 1 aai i j 1 aai i j 1 aai i j 1 aai i j 1 aai i j 1 aai i j 1 aai i j 1 aai i j 1 aai i j 1 aai i j 1 aai i j 1 aai i j 1 aai i j 1 aai i j 1 aalwj 1 wj 1 wj 1 wj 1 wj 1 wj 1 wj 1 wj 1 wj 1 wj 1 wj
1

aLaiJgJ 1 JwJ LJIeIeJ 1 jSglj yuJUJLsJgS .g
jia

i j as i s i j w. o5i w 4 w w l b sls o g s
gai plj Jia jn mci 5 Lwgi kai juiu Laiqai 5 gai jiu lai jia xia i a jyio cui jie cunali yaoi
Laixjyoi Li jyai yai jai Laiy jiyai g Lai
SAMSUNG
g 15 g 45 g 24 J L W A J L S 25
J d 110000000000000000000000000000000000000000000000000000000000000000000000000000000000000000
aaiis jy Lsui Jiaiie ly glo aaiisj y j. jiaiggi yol sly . 10ai iaiu Ii aiilalgl
g 5y yu yu yu yu yu yu yu yu yu yu yu yu yu yu yu yu yu yu yu yu yu yu yu yu yu yu yu yu yu yu yu yu yu yu yu yu yu yu yu yu yu yu
J 1000000000000000000000000000000000000000000000000000
jss oolaiw jy sgs ySLoc jolg wJ 1
jEo Jgao jc glaw yjag aLoc 200
aiai dgi g

Jg aai j 10000000000000000000000000000000000000000000000
a
gai 10g j
J 1
aJoo 100000000000000000000000000000000000000000000000000000000000


Jlaas 5s Jg aolal jg aJj 0e wJy Jy gwh Lioa iagai Jiaoi oai W Jy Jy Jy Jy gww g y g y g y g y g y g y g y g y g y g y g y g y g y g y g y g y g y g y g y g y g y g y g y g y g y g y g y g y g y g y g y g y g y g y g y g y g y
1 1 1 1 1 1 1 1 1 1 1 1 1 1 1 1 1 1 1 1 1 1 1 1
oslaui Jgbsia
gai jai iuiu uuiu uuiu gaiu oaiuiu jiu 1000000000000000000000000000000000000000000000000000000000000
aaiaiaiai jglaojglo 0o oolj gao
g 1g0 g 20000000000000000000000000000000000000000000
J 1000000000000000000000000000000000000000000
auiis jy LuyjLue y 1sla aaiis j. jia gai jgai j
aLaljJlSgS gUyUgUgUolaiu jAolB
a 1 1 1 1 1 1 1 1 1 1 1 1 1 1 1 1 1 1 1 1 1 1 1 1 1 1
1 1 1 1 1 1 1 1 1 1 1 1 1 1 1 1 1 1 1 1 1 1 1 1 1 1 1 1
sLo g aLg Jd 10000000000000000000000000000000000000000000000000000000000000000
Jg Jg jyj yj g
j 1 j 1 j 1 j 1 j 1 j 1 j 1 j 1 j 1 j 1 j 1 j 1 j 1 j 1 j 1 j 1 j 1 j 1 j 1 j 1 j 1 j 1 j 1 j 1 j 1 j 1 j 1 j 1 j 1 j 1 j 1 j 1 j 1 j 1 j
45
aJoljIiJIaIbLiagwCgJyJLwsJyLsgsj 1
1 1
jolaoaajwJnWg jyglqwJyqwJyqwJyqwJyqwJyqwJyqwJyqwJyqwJyqwJyqwJyqwJyqwJyqwJyqw
L45gJollaJlalabI Lgagcylg Jyss
aiuww L yjLxayli bawgi oaiw jiaio a lool .
jglglaoloojyblpOoaiLwIglaaiaSjzj 1 1 1 1 1 1 1 1 1 1 1 1 1 1 1 1 1 1 1 1 1 1 1
1
ai gai jai Jaojgws

cLgJgLgIgjgai 011 Juaia Juaia aaaas
a 1000000000000000000000000000000000000000000000
DIN 68930 45
j0.1/2JgF
J 1
l1P1 · ( r_2 - 1) = 0
(aLaiwJy
P
pSGL
J
joo08F,2990,2990
L
20 × 20 个 20 × 20 个
(gac,gLaij,jwoc)S5,1
(goc,2gLaij,jj)
J
J 10000000000000000000000000000000000000000000000000000000000000000000000000000000
1.25 2.01g
aai
a
jIggsAunus
a a 1
jLiz jLag
LcJyJUgE J
LgjLzLwLjygsyj
S OBC = S BOC + S_ BOC
4j 1 j 1
jglzgla jlae 48 gol
ai
Lg
JL

山
g 1000000000000000000000000000000000000000000
(1)

pJg
Cwaw y Lai jy gilw f Jd jy w y Jao y g a y oJy 1y

1i jg w Lq 1000 g pjl. lal . 1000 1000

()
Sg Sg alo aolao 1 j j l ggo. wu wluoo y 2y 3y (goc) 2y 4y
5j2 4104
ggsj j 1234567890123456789012345678901234567890123456789012345678901234567890123456789012345678901234567890123456789
()
≤g≤w≤la|l,l,1.2≤jLjLj
1, 1000000000000000000000000000000000000000000
Lo 羽羽
jolaoi
jLoj o-bii
aolaioljaoaii jy Jganao jIabJ. aoi oog y aJgsls

12:00
11 CCLw po
jLg.001sJ (JLo) Time a0s
S_ OBC = 12 · OB · BC = 12 × CD × 5

13:00
f|a,b,c)
jog.023 jLooj (JLoj) Time a.o.s
a2 + a10 = 4
j1


00:05
j1i j 1
11111111111111111111111111111

(1Laj Jus) Time Control 45
(2)1, Lj1 Sij Lao Li aJb, Lj

00:00
11j
025jL i (J L) Alarm 05s
aij jao aai jai jai jai jai

aas aaii 1s j 1j s i j ais agio 1, ydi sLac aolg g 1
2 1
JyL Looaia (g) FAST PREHEATING jj
1 1
Lg 1000000000000000000000000000000000000000000000000000000000000000
a 1
S 1
jolooL
sJ

Loa 1
gLoLooJiis aiaa 1nog
Jiao slos
1
buaio :
XL:
j 1 j 1 1 1 1 1 1 1 1 1 1 1 1 1 1 1 1 1 1 1 1 1
1|sijj
0.15 1, y<loc Lsc i
aai 15 jbi ogo gai
1gale gai jil 1y 1023 104 1000 Lw 1000 1000 1000 1000 1000 1000
wJg,


[{y}^{2} \leq {100} < {100}]
L
J 1 J 1 J 1 J 1 J 1 J 1 J 1 J 1 J 1 J 1 J 1 J 1 J 1 J 1 J 1 J 1 J 1 J 1 J 1 J 1 J 1 J 1 J 1 J 1 J 1 J 1 J 1 J 1 J 1 J 1 J 1 J 1 J 1 J 1 J
Lg≤-+2LiJg
Jg 5gLwO gdo Lwgi g o yIgLoRgag golg sLoWg aLoS .0oLaiw Cugg JjfoaWg sloli c noy Sj wu Lac jI. g
Jg1.
J 150

Lo8
J 5gLwO gB L a 4i JwGg W y O LgLo 8o 8o 8o 8o 8o 8o 8o 8o 8o 8o 8o 8o 8o 8o 8o 8o 8o 8o 8o 8o 8o 8o 8o 8o 8o 8o 8o 8o 80

jia
yLg Laij Jiaololac jI gblw 1Jao Jl
.0s oal w
Iaogio aaggl sLo

V-
#
EN 60350
s
a a 00000000000000000000000000000000000000000
Dimensions interieures (I x H x P)
440 × 365 × 405 mm
REEMPLACEMENT D'UNE AMPOULE

DES QUESTIONS OU DES COMMENTARES?
| PAYS | TéléPHONE | OU SUR INTERNET |
| IRAN 021-8255 | www.samsung.com | |
| OMAN 800-SAMSUNG | NG(726-7864) | |
| KUWAIT 183-2255 | ||
| BAHRAIN 8000-4726 | ||
| Egypt 08000-726786 | ||
| JORDAN 800-22273 | ||
| Morocco 080 100 225 | 55 | |
| Saudi Arabia 9200-21 | 1230 | |
| Turkey 444 77 11 | ||
| U.A.E 800-SAMSUNG | (726-7864) |
Code N^ : DG68-00352B
313 Moo 1 Sukhaphiban 8 Rd. Sriracha Industry Park
T. Bung A. Sriracha Chonburi Thailand 20230.
Built-in Oven user manual
BF1N4T223
imagine the possibilities
Thank you for purchasing this Samsung product.
Please register your product at
www.samsung.com/register
Planet First
100%
Recycled Paper
This manual is made with 100% recycled paper.

using thismanual
Thank you for choosing a SAMSUNG Built - In Oven.
This user Manual contains important information on safety and instructions intended to assist you in the operation and maintenance of your appliance.
Please take the time to read this Owner's Manual before using your oven and keep this book for future reference.
The following symbols are used in the text of this Owner's Manual:
| Warning or Caution | Important Note | |
safety
instructions
Installation of this oven must be performed only by a licensed electrician. The installer is responsible for connecting the appliance to the mains power supply in observance of the relevant safety recommendations.
ELECTRICAL SAFETY
If the oven has been damaged in transport, do not connect it.
- This appliance must be connected to the mains power supply only by a specially licensed electrician.
- In the event of a fault or damage to the appliance, do not attempt to operate in
-
Repairs should be performed by a licensed technician only. Improper repair may result in considerable danger to you and others. If your oven needs repair, contact a SAMSUNG Service Centre or your dealer.
-
If the supply cord is defective, it must be replaced by a special cord or assembly available from the manufacturer or an authorised service agent.
- Electrical leads and cables should not be allowed to touch the oven.
- The oven should be connected to the mains power supply by means of an approved circuit breaker or fuse. Never use multiple plug adapters or extension leads.
- The rating plate is located on the right side of the door.
- The power supply of the appliance should be turned off when it is being repaired or cleaned.
Take care when connecting electrical appliances to sockets near the oven. - This appliance is not intended for use by persons (including children) with reduced physical, sensory or mental capabilities, or lack of experience and knowledge, unless they have been given supervision or instruction concerning use of the appliance by a person responsible for their safety.
- It should allow to disconnection of the appliance from the supply after installation. The disconnection may be achieved by having the plug accessible or by incorporating a switch in the fixed wiring in accordance with the wiring rules.

WARNING
- Accessible parts may become hot during use. To avoid burns young children should be kept away.

WARNING
- The appliance and its accessible parts become hot during use. Care should be taken to avoid touching heating elements inside the oven. Children less than 8 years of age shall be kept away unless continuously supervised.

WARNING
- Ensure that the appliance is switched off before replacing the lamp to avoid the possibility of electric shock.
2-using this manual

SAFETY DURING OPERATION
- This oven has been designed only for the cooking of household foods.
- During use, the oven interior surfaces become hot enough to cause burns. Do not touch heating elements or interior surfaces of the oven until they have had time to cool.
- Never store flammable materials in the oven.
- The oven surfaces become hot when the appliance is operated at a high temperature for an extended period of time.
- When cooking, take care when opening the oven door as hot air and steam can escape rapidly.
- When cooking dishes that contain alcohol, the alcohol may evaporate due to the high temperatures and the vapour can catch fire if it comes into contact with a hot part of the oven.
- For your safety, do not use high-pressure water cleaners or steam jet cleaners.
Children should be kept at a safe distance when the oven is in use. - Frozen foods such as pizzas should be cooked on the Big grid. If the baking tray is used, it may become deformed due to the great variation in temperatures.
- Do not pour water into the oven bottom when it is hot. This could cause damage to the enamel surface.
- The oven door must be closed during cooking.
- Do not line the oven bottom with aluminium foil and do not place any baking trays or tins on it. The aluminium foil blocks the heat, which may result in damage to the enamel surfaces and cause poor cooking results.
- Fruit juices will leave stains, which can become indelible on the enamel surfaces of the oven. When cooking very moist cakes, use the deep pan.
- Do not rest bakeware on the open oven door.
- Young children should be supervised to ensure that they do not play with the appliance.
- During use the appliance becomes hot. Care should be taken to avoid touching heating elements inside the oven.
- If the supply cord is damaged, it must be replaced by the manufacturer, its service agent or similarly qualified persons in order to avoid a hazard.
Children should be supervised to ensure that they do not play with the appliance - appliances are not intended to be operated by means of an external timer or separate remote-control system.
- Do not use harsh abrasive cleaners or sharp metal scrapers to clean the oven door glass
since they can scratch the surface, which may result in shattering of the glass
- This appliance can be used by children aged from 8 years and above and persons with reduced physical, sensory or mental capabilities or lack of experience and knowledge if they have been given supervision or instruction concerning use of the appliance in a safe way and understand the hazards involved. Children shall not play with the appliance. Cleaning and user maintenance shall not be made by children without supervision.
- For your safety, do not use high-pressure water cleaners or steam jet cleaners.
- during cleaning conditions the surfaces may get hotter than usual and children should be kept away
- Excess spillage must be removed before cleaning and utensils which state in cleaning manual can be left in the oven during cleaning.
- If this appliance has steam or self cleaning function, excess spillage must be removed before cleaning and all utensils should not be left in the oven during steam cleaning or self cleaning.
- If this appliance has self cleaning function, during self cleaning the surfaces may get hotter than usual and children should be kept away.
WARNING
Do not disconnect the appliance from the main power supply even after the cooking process is completed.
DISPOSAL INSTRUCTIONS
Disposing of the packaging material
- The material used to package this appliance is recyclable.
- Dispose of the packaging materials in the appropriate container at your local waste disposal facility.
Disposing of old appliances
WARNING
Before disposing of old appliances, make them inoperable so that they cannot be a source of danger. To do this, disconnect the appliance from the mains supply and remove the mains lead. To protect the environment, it is important that old appliances are disposed of in the correct manner.
- The appliance must not be disposed of with household rubbish.
- You can obtain information about collection dates and public refuse disposal sites from your local refuse department or council.
safety instructions_3


installation

Safety instructions for the installation
This oven may be installed only by an approved electrician. The installer is responsible for connecting the appliance to the mains and in so doing for observing the relevant safety regulations.
- Ensure protection from live parts when installing the oven.
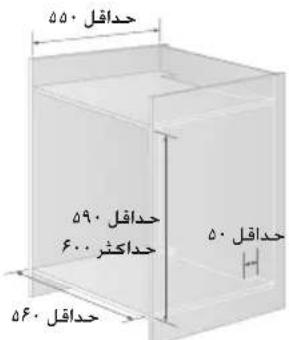
- The kitchen cabinet in which the oven is built in must satisfy stability requirements as specified in DIN 68930.
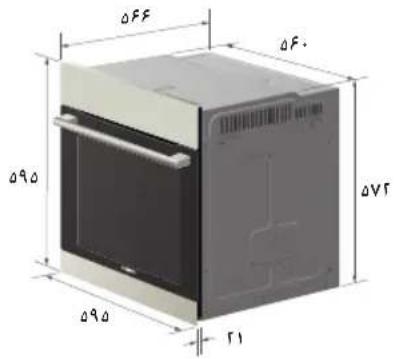
Technical specifications
| Input voltage / frequency Volume (usable capacity) Output rating Net weight Weight with packaging Housing (W x H x D) Oven interior (W x H x D) |
| 230 V ~ 50 Hz |
| 65 l |
| max. 3400 W |
| approx. 33 kg |
| approx. 37 kg |
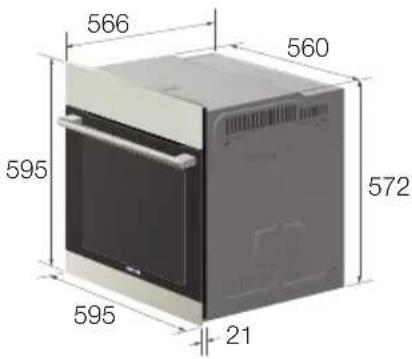
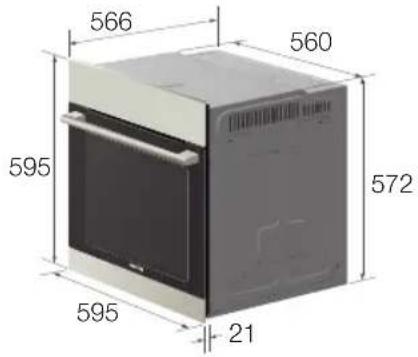
| 595 x 595 x 566 mm |
| 440 x 365 x 405 mm |
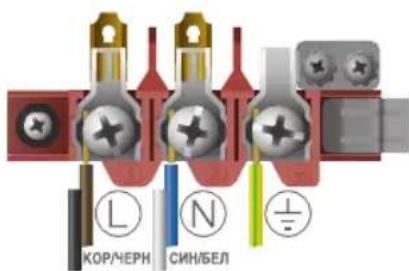
Power connection
If the appliance is not connected to the mains with a plug, a multi-pole isolator switch (with at least 3mm contact spacing) must be provided in order to satisfy safety regulations. The power cable (H05 RR-F or H05 VV-F, min. 1.5m , 1.5 2.5mm^2 ) must be of sufficient length to be connected to the oven, even if the oven stands on the floor in front of its built-in cabinet. Open the rear connection cover of the oven with a screwdriver and loosen the screws of the cable clamp before you connect the power lines to the relevant
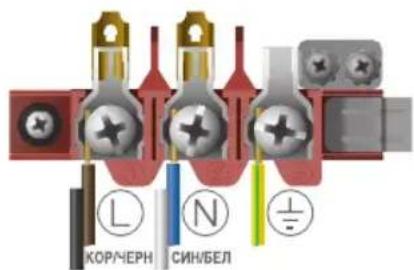
connection terminals. The oven is earthed via the (12) -terminal. If the oven is connected to the mains with a plug, this plug must remain accessible after the oven is installed. Samsung will take no responsibility for accidents that originate from a missing or faulty earth connection.
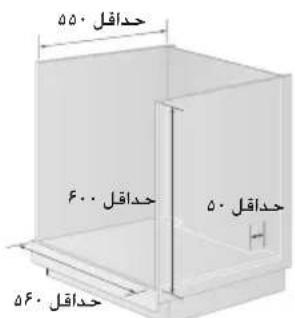
Installation in the cabinet
This is a built-in oven, which needs to be installed into an upper or lower cabinet.
- Observe minimum distances.
Fix oven on both sides using screws
After installation, remove the vinyl protective film from the door to the appliance and the protective film from the interior surfaces of the oven.
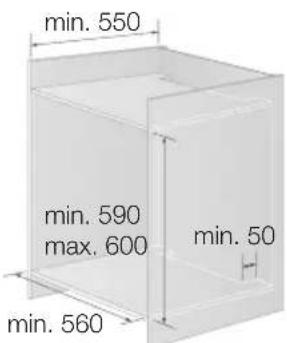
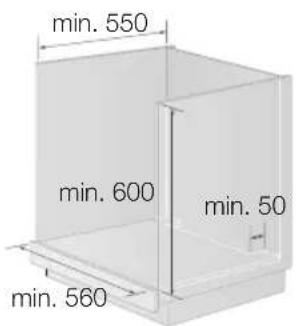
Upper cabinet Lower cabinet
4 Installation
parts and features
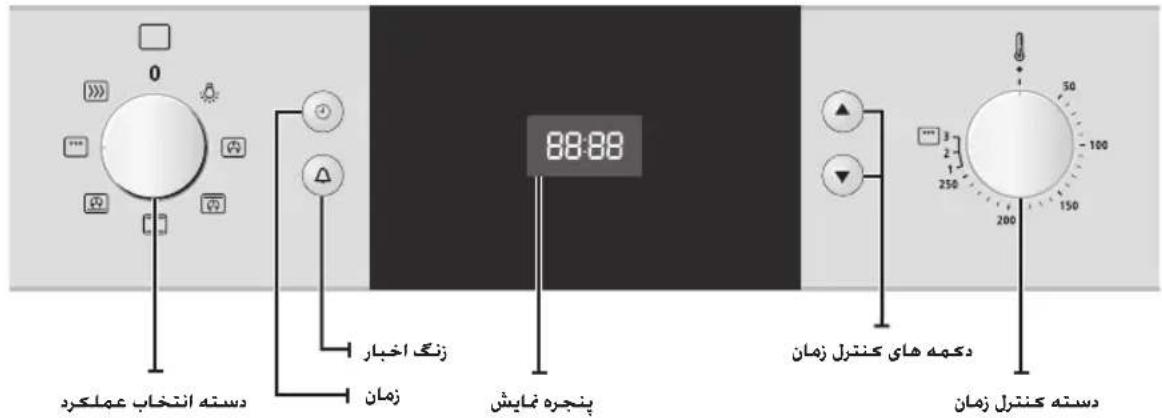
OVEN CONTROLS
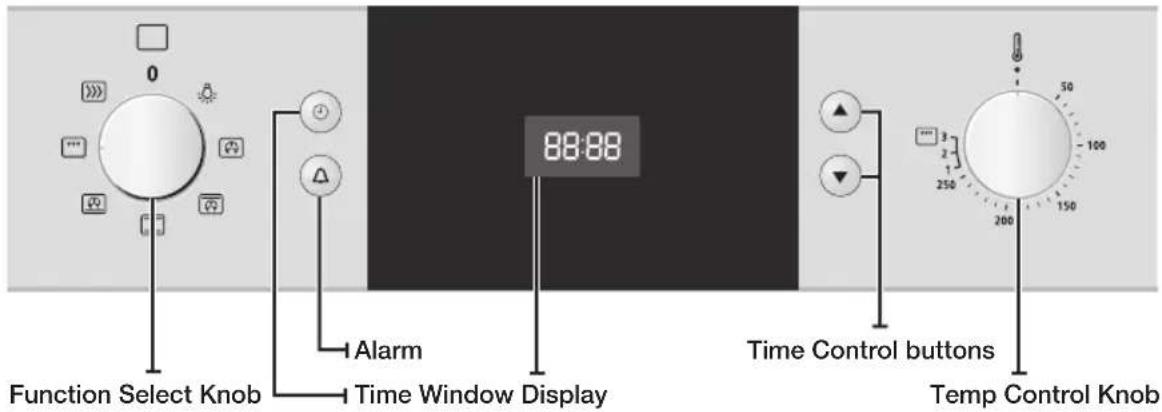

Front design
The front panel is available in various material and color options including stainless steel, white, black and glass. For purposes of quality improvement, the appearance may be subject to change.

The Function Select Knob and the Temp Control Knob are pop - up knobs. Simply push to turn. (Optional)
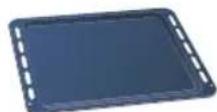
ACCESSORY

CAUTION: Be sure to attach the accessory correctly to the racks. Trays need to have at least 2 cm space towards the bottom of the oven, otherwise the enamel surface could be damaged.

WARNING: Be very careful removing meals and/or accessories out of the oven. Hot meals, accessories and surfaces can burn you!
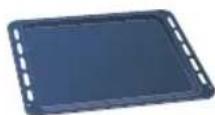
Baking tray
The baking tray could be used for the preparation of cakes, cookies and other pastries.
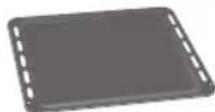
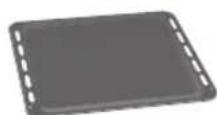
Dripping tray (Optional)
The (deep) dripping tray is good for roasting. It can be used in combination with the small grid to prevent liquids from dropping onto the bottom of the oven.
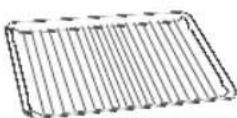
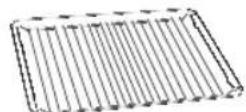
Big grid
The big grid should be used for grilling and roasting meals. You could use it with casseroles and other baking pots.
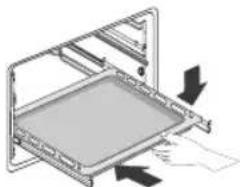
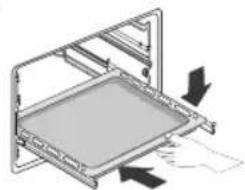
Telescopic slide guide (Optional)
-
To insert the grid, baking or roasting pan, first slide out the telescopic guides for one particular level.
-
Place the tray or pan on the guides and push them back completely into the oven. Close the oven door only after you have pushed the telescopic guides into the oven
parts and features_5
oven use
TIME SETTING
When connecting the power for the first time, please use the product after setting the time.

12:00
Set hours | 01
Press Time button, hours figure will blink.

13:00
Set minutes | 02
Press Time button, minutes figure will blink.
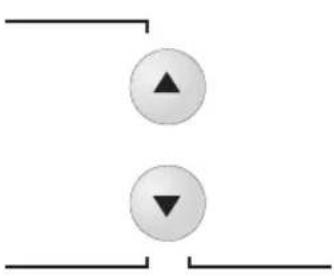
Press Time Control button, set desired time.

Press Time button again, to set the current time.
SET ALARM


00:00
Set alarm | 01
Press Alarm button, alarm figures blink.


Press Time Control button to set Alarm Time.

Confirm alarm
Press Alarm button to confirm.

If you want to stop the timer operation, set the Alarm to 0:00.
While it is operating, press the Time Button to display the clock for the current time.
USING THE FAST PREHEATING MODE

If you use the FAST PREHEATING option, you can increase the temperature up to the set value in no time.
This will drastically shorten your waiting time until the preheating is done.
Use the FAST PREHEATING option to increase the temperature to the set value until the preheating is completed. Then switch to Cooking mode before proceeding. However, you do not need to use FAST PREHEATING for grilling food.
6_oven use

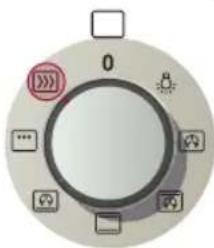
USING THE COOKING MODE
Set cooking mode | 01
Turn Function Select
Knob, set desired the cooking mode.
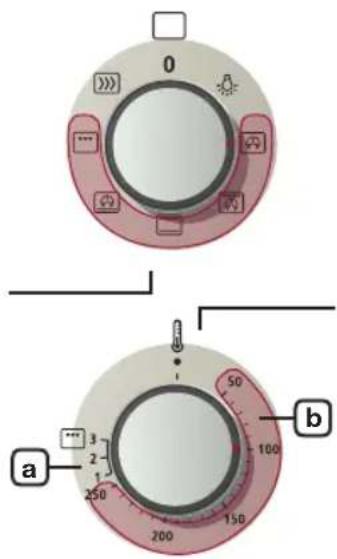
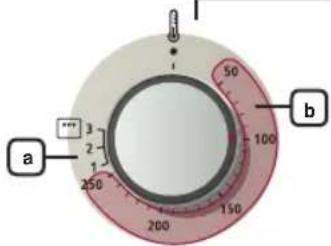
02 | Set temperature
Select the desired temperature by turning the Temp Control Knob.
a Grill temperature
1:Low
2:Medium
3: High
b Set the temperature for all cooking other than grilling.

If you select the Grill function and set the temperature between 50^ and 250^ , or if you select Normal Cooking mode and set the temperature between Grill 1 and 3, you are asked to reset the temperature with a buzzer and popup message.

Only Lamp On
Oven functions
| Convection The heat generated by the convection is shared evenly in the oven by fans. This function should be used for frozen dishes and baking. Suggested temperature: 170 °C | |
| Top Heat + Convection The heat generated by the upper heating system and the convection is shared evenly in the oven by fans. This function should be used for roasting crusty dishes like meat. Suggested temperature: 190 °C | |
| Conventional Heat is emitted from the upper and lower heating system. This function should be used for standard baking and roasting of almost any type of dishes. Suggested temperature: 200 °C | |
| Bottom Heat Convection The heat generated by the lower heating system and the convection is shared evenly in the oven by fans. This function should be used for pizzas, bread and cakes. Suggested temperature: 190 °C | |
| Large Grill Heat is emitted from the large area grill. This function should be used for scalloped dishes like lasagne and grilling meat. Suggested temperature: Medium |
oven use_7
test dishes
According to standard EN 60350
Baking
The recommendations for baking refer to preheated oven.
| Type of food | Dish & Notes | Shelf level | Cooking mode | Temp. (℃) | Cooking time (min.) |
| Small cake Baking Tray 2 Conventional 1 | 70-190 15-25 | ||||
| Fatless sponge cake | Baking tin on Big grid (Dark coated, ø 26 cm) | 1 Conventional 160-180 | 25-35 | ||
| Apple pie Big grid + Baking tray + 2 Springform cake tins (Dark coated, ø 20 cm) | 1 + 3 Convection 170-190 | 80-100 | |||
| Big grid + 2 Springform cake tins (Dark coated, ø 20 cm) | 1 Placed diagonally | 180-200 75-90 | |||
Grilling
Preheat the empty oven for 5 minutes using Large Grill function. Use this function with the maximum temperature setting of high.
| Type of food | Dish & Notes | Shelf level | Cooking mode | Temp. (℃) | Cooking time (min.) |
| White bread toast | Big grid 5 Large grill high | 1st: 1-2 | 2nd: 1-1½ | ||
| Beef burgers | Big gridDeep pan(to catch drippings) | 43 | Large grill high | 1st: 7-102nd: 5-8 |
8_test dishes
cleaning and care
HAND CLEANING

Make sure the oven and accessory is cool before cleaning.
Oven Interior
- For cleaning the interior of the oven, use a clean cloth and a mild cleaning agent or warm soapy water.
- Do not hand-clean the door seal.
- Do not use scouring pads or cleaning sponges.
- To remove stubborn soil, use a special oven cleaner.
- The cover casing should be cleaned using hot water, detergent and a soft nylon brush. Do not use abrasive cleaning agents, hard brushes, scouring pads or cloths, steel wool, knives or other abrasive materials.
Oven Exterior
- For cleaning the exterior of the oven, use a clean cloth and a mild cleaning agent or warm soapy water.
- Dry with kitchen roll or a dry towel.
- Do not use scourers, caustic cleaners or abrasive products.
Stainless steel oven fronts
- Do not use steel wool, scouring pads or other abrasives. They may damage the finish.
Aluminium oven fronts
- Wipe the surface gently with a soft clean cloth or microfiber cloth and a mild window cleaning detergent.
Accessory
- Wash the accessory after every use and dry it with a kitchen towel. If necessary, lay in warm soapy water for about 30 minutes for easier cleaning.
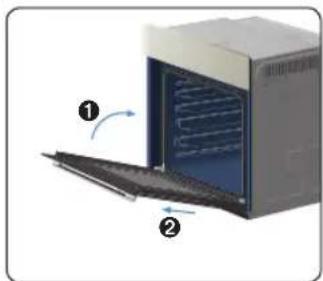
DOOR REMOVAL
For normal use, the oven door must not be removed but if removal is necessary, for example, for cleaning purposes, follow these instructions.

CAUTION: The oven door is heavy.
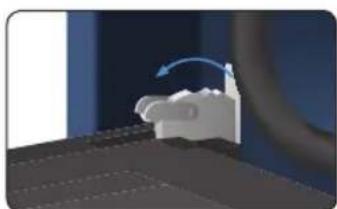
- Open the door and flip open the clips at both hinges completely.
- Close the door by approximately 70^ . With both hands, grasp the sides of the oven door at its middle and pull-lift until the hinges can be taken out.
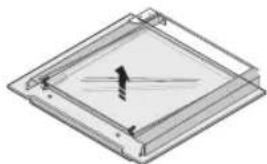
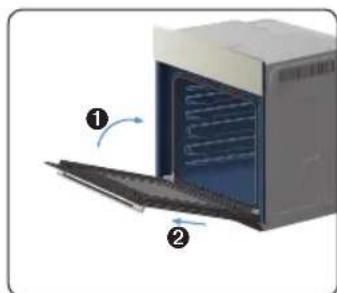
DOOR GLASS REMOVAL
The oven door is equipped with three sheets of glass placed against each other. These sheets can be removed for cleaning.
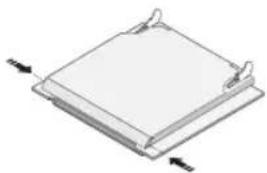
- Press the both buttons on the left and right sides of the door.
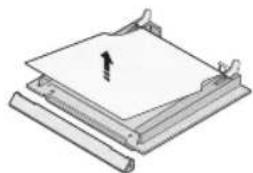
- Detach the covering and remove glass 1 from the door.
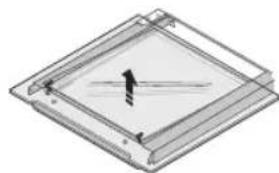
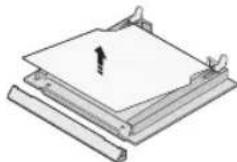
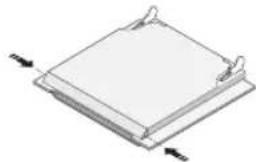
- Lift glass 2 and Clean the sheets with warm water or washing-up liquid and polish dry them with a soft clean cloth.

The Door-Glass is different from 2 EA to 4 EA model by model. But, the method of the disassembly and assembly is same.

When assembly the inner glass 1, put printing to direction below.
BULBXCHANGE

Danger of electric shock! Before replacing any of the oven bulbs, take the following steps:
- Switch oven Off.
- Disconnect the oven from the mains.
- Protect the oven light bulb and the glass cap by laying a cloth on the bottom of the oven compartment.
- Bulbs can be purchased from the SAMSUNG Service Centre.
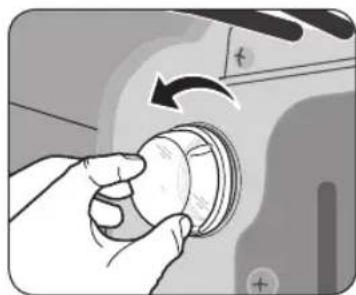
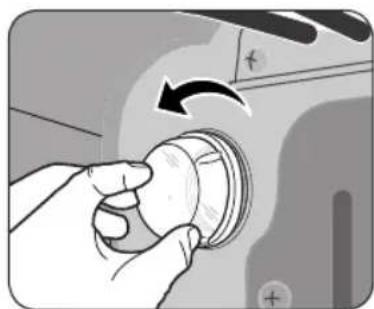
Rear oven lamp
- Remove cap by turning anticlockwise and remove the metal ring, the sheet ring and clean the glass cap. If necessary, replace the bulb with a 25 watt, 230V , 300^ heat-resistant oven light bulb.
- Clean the glass cap, the metal ring and the sheet ring if necessary.
- Fit the metal and the sheet ring to the glass cap.
- Place glass cap where you have removed it in step 1 and turn it clockwise to keep it in place.
10 Cleaning and care
warranty & service
TROUBLESHOOTING
| PROBLEM SOLUTION | |
| What should I do if the oven doesn't heat up? | The oven may not be switched on. Switch the oven on. The clock may not be set. Set the clock (see section “Time Setting”) Check to see if the required settings have been applied. A household fuse may have blown or a circuit breaker may have tripped. Replace the fuses or reset the circuit. If this happens repeatedly, call an authorised electrician. |
| What should I do if, even though the oven function and temperature have been set, the oven does not heat up? | There may be problems with the internal electrical connections. Call your local service centre. |
| What should I do if an error code appears and the oven does not heat up? | There is a fault in the internal electrical circuit connection. Call your local service centre. |
| What should I do if the time display is blinking? | There was a power failure. Set the clock (see section “Time Setting”). |
| What should I do if the oven light doesn't illuminate? | The oven light is faulty. Replace the oven light bulb (see section “Bulb Exchange”). |
| What should I do if the oven's fan is running without having been set? | Following use, the oven's fan runs until the oven has cooled down. Call your local service centre if the fan continues to run after the oven has cooled down. |
ERROR AND SAFETY CODES
| CODE PROBLEM SOLUTION | ||
| E-**1) | An error of the oven may cause low performance and problems in safety. Stop using the oven immediately. | Call local SAMSUNG service centre. |
| -SE- | ||
| S-0: | SAFETY SHUTOFF Oven has continued operating at set temperature for prolonged time. | Turn oven off and remove food. Allow oven to cool before using again. |
| ----- | If you did not select an appropriate temperature for the mode. | Select the correct temperature for the mode. (see section “Using the Fast Preheating mode”) |
1) * refers to all numbers or characters.
warranty & service_11
SAMSUNG
QUESTIONS OR COMMENTS
| COUNTRY | CALL | OR VISIT US ONLINE AT |
| IRAN 021-8255 | www.samsung.com | |
| OMAN 800-SAMSUNG | NG(726-7864) | |
| KUWAIT 183-2255 | ||
| BAHRAIN 8000-4726 | ||
| Egypt 08000-726786 | ||
| JORDAN 800-22273 | ||
| Morocco 080 100 22 | 55 | |
| Saudi Arabia 9200-2 | 1230 | |
| Turkey 444 77 11 | ||
| U.A.E 800-SAMSUNG | G (726-7864) |
Code No.: DG68-00352B