USER MANUAL DAE751 SAMSUNG
Wireless Audio with Dock user manual
imagine the possibilities
Thank you for purchasing this Samsung product.
To receive more a complete service,
please register your product at
www.samsung.com/register
features
AllShare Play
Play music saved on your devices (such as your PC, Smart phone, or NAS) through the Wireless Audio with Dock via a network connection.
AirPlay
Play music saved on your Apple devices on the Wireless Audio with Dock.
Dual Docking Audio Speaker System
Using the system's dual docking station, dock, charge, and then play either Samsung Galaxy devices or Apple devices through the system's built-in speakers.
USB Host support
Connect and play music files from external USB storage devices such as MP3 players, USB flash memory, etc. using the Wireless Audio with Dock's USB HOST function.
Bluetooth Function
Connect a Bluetooth device to the Wireless Audio with Dock and enjoy music from the device with high quality stereo sound, all without wires!
aptX®
aptX enables high quality Bluetooth stereo audio, delivering wired audio quality wirelessly.
License
AirPlay, AirPlay logo, iPhone, iPod, iPod classic, iPod nano, iPod shuffle, and iPod touch are trademarks of Apple Inc., registered in the U.S. and other countries. iPad is a trademark of Apple Inc.
safety Warnings
TO REDUCE THE RISK OF ELECTRIC SHOCK, DO NOT REMOVE THE COVER(OR BACK).
NO USER-SERVICEABLE PARTS ARE INSIDE. REFER SERVICING TO QUALIFIED SERVICE PERSONNEL.
This symbol indicates “dangerous voltage” inside the product that presents a risk of electric shock or personal injury.
This symbol indicates important instructions accompanying the product.
Warning : To reduce the risk of fire or electric shock, do not expose this appliance to rain or moisture.
caUtiOn : TO PREVENT ELECTRIC SHOCK, MATCH WIDE BLADE OF PLUG TO WIDE SLOT, FULLY INSERT.
This apparatus shall always be connected to a AC outlet with a protective grounding connection.
To disconnect the apparatus from the mains, the plug must be pulled out from the mains socket, therefore the mains plug shall be readily operable.
caUtiOn
Do not expose this apparatus to dripping or splashing. Do not put objects filled with liquids, such as vases on the apparatus.
To turn this apparatus off completely, you must pull the power plug out of the wall socket. Consequently, the power plug must be easily and readily accessible at all times.
Wiring the Main Power Supply Plug (UK Only)
iMPOrtant nOtice
The mains lead on this equipment is supplied with a moulded plug incorporating a fuse. The value of the fuse is indicated on the pin face of the plug and if it requires replacing, a fuse approved to BS1362 of the same rating must be used. Never use the plug with the fuse cover removed. If the cover is detachable and a replacement is required, it must be of the same colour as the fuse fitted in the plug. Replacement covers are available from your dealer.
If the fitted plug is not suitable for the power points in your house or the cable is not long enough to reach a power point, you should obtain a suitable safety approved extension lead or consult your dealer for assistance. However, if there is no alternative to cutting off the plug, remove the fuse and then safely dispose of the plug. Do not connect the plug to a mains socket as there is a risk of shock hazard from the bared flexible cord. Never attempt to insert bare wires directly into a mains socket. A plug and fuse must be used at all times.
iMPOrtant
The wires in the mains lead are coloured in accordance with the following code:– BLUE = NEUTRAL BROWN = LIVE
As these colours may not correspond to the coloured markings identifying the terminals in your plug, proceed as follows:–
The wire coloured BLUE must be connected to the terminal marked with the letter N or coloured BLUE or BLACK.
The wire coloured BROWN must be connected to the terminal marked with the letter L or coloured BROWN or RED.
Warning : DO nOt cOnnect eitHer Wire tO tHe earth terMinaL WHicH is MarKeD WitH tHe Letter e Or By tHe earth syMBOL , Or cOUoUreD green Or green anD yELLOW.
Hereby, Samsung Electronics, declares that this [Wireless Audio with Dock] is in compliance with the essential requirements and other relevant provisions of Directive 1999/5/EC.
The official Declaration of Conformity may be found at http://www.samsung.com, go to Support > Search Product Support and enter the model name.
This equipment may be operated in all EU countries.
In France, this equipment may only be used indoors.
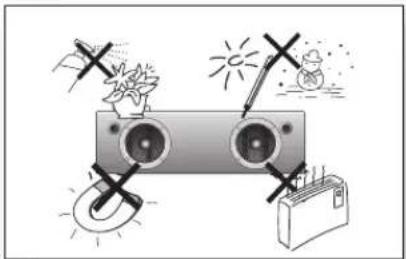
PrecaUtiOns
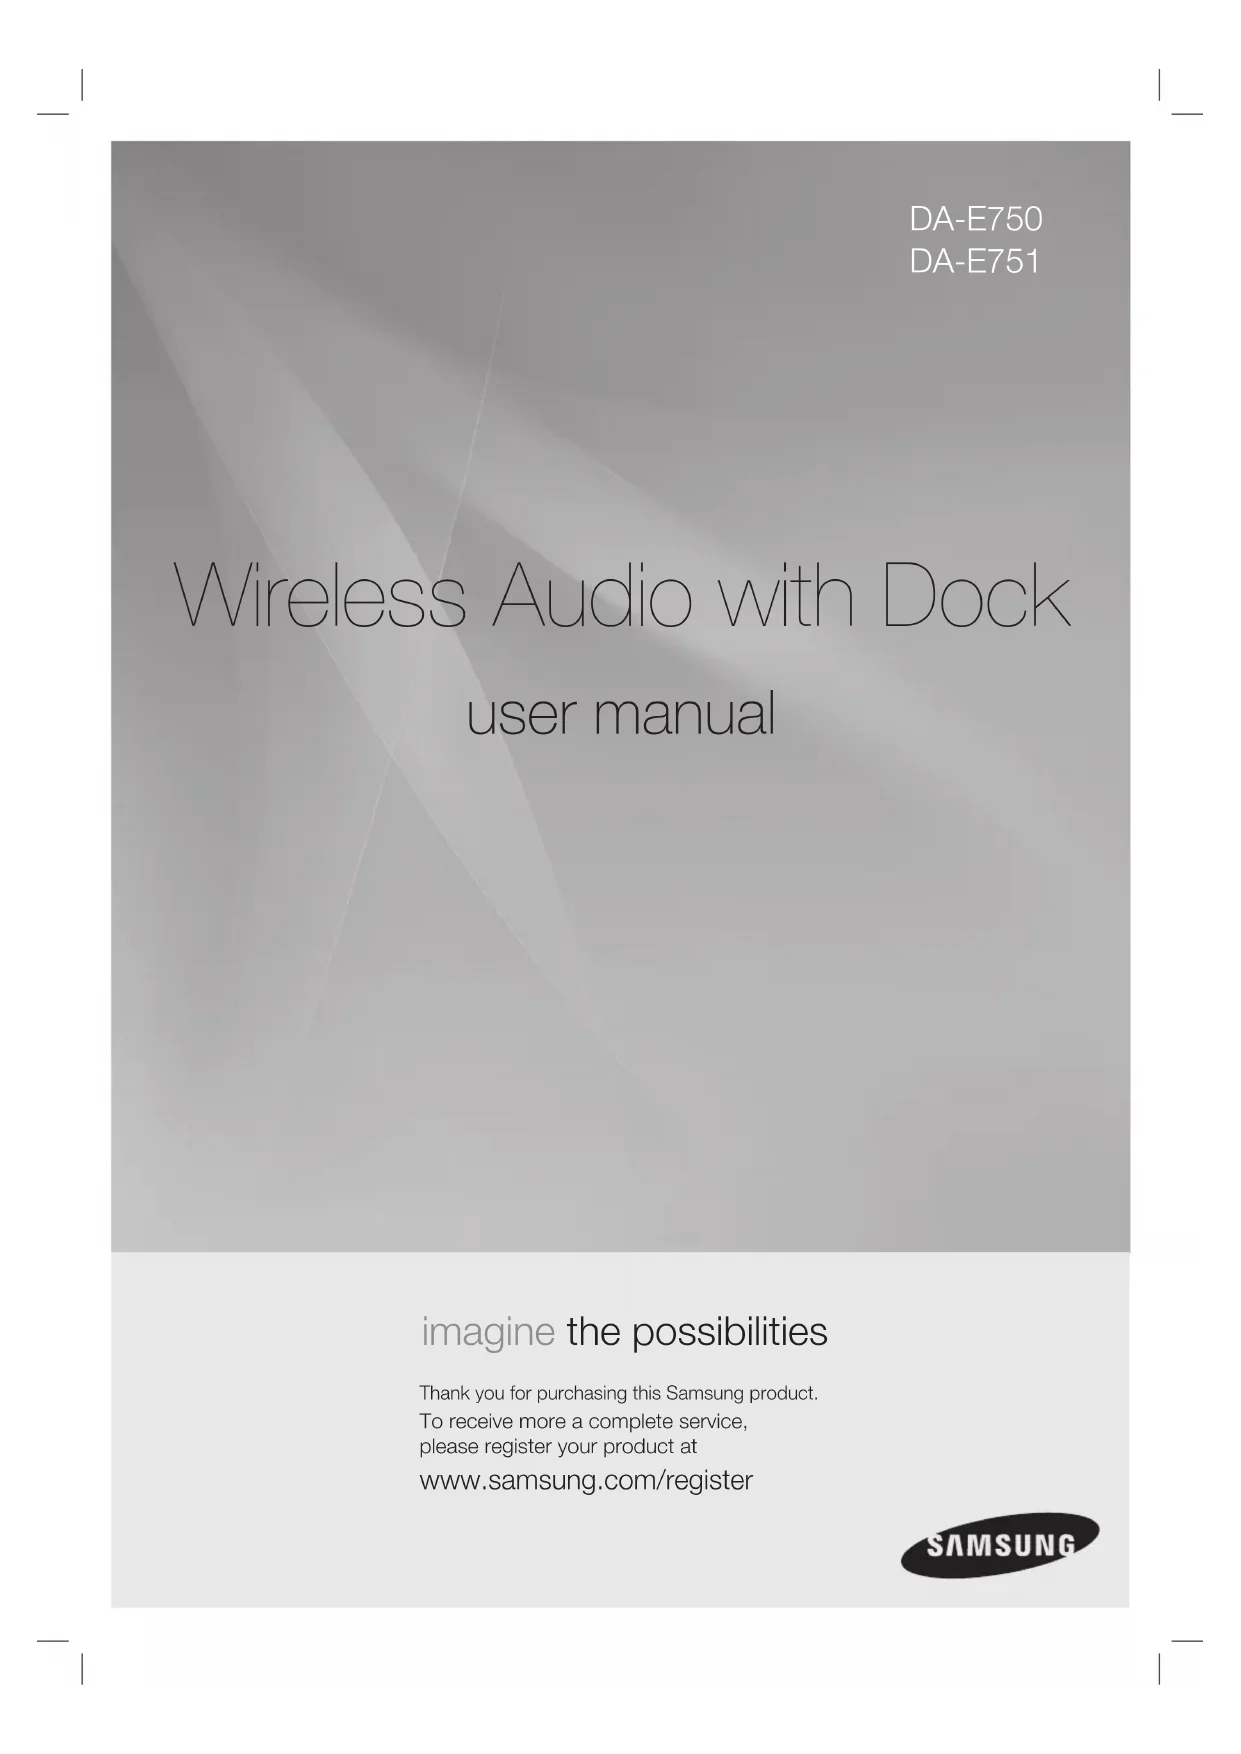
Ensure that the AC power supply in your house complies with the power requirements listed on the identification sticker located on the back of your product. Install your product horizontally, on a suitable base (furniture), with enough space around it for ventilation (70\~100 mm). Make sure the ventilation slots are not covered. Do not place the unit on amplifiers or other equipment which may become hot. This unit is designed for continuous use. To fully turn off the unit, disconnect the AC plug from the wall outlet. Unplug the unit if you intend to leave it unused for a long period of time.
natural_image
Illustration of a vintage-style speaker emitting sound waves near a window with a lightning bolt (no text or symbols)
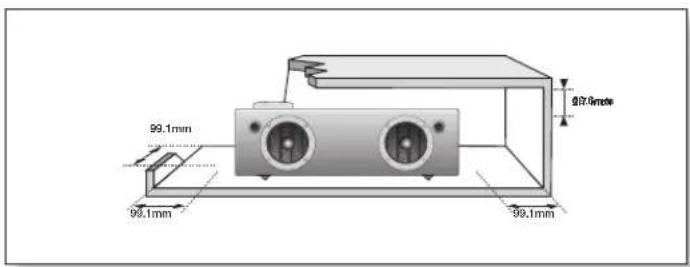
During thunderstorms, disconnect the AC plug from the wall outlet. Voltage peaks due to lightning could damage the unit.
natural_image
Simple line drawing of a room with a projector and a cross symbol, no text or labels present.
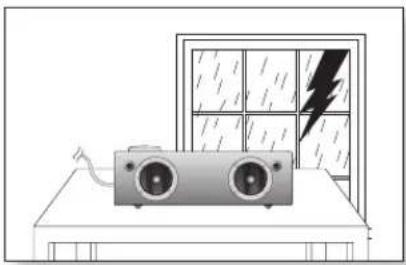
Do not expose the unit to direct sunlight or other heat sources. This could cause the unit to overheat and malfunction.
natural_image
Illustration of a dual-camera device with sun, wind, and battery symbols (no text or labels)
Protect the product from moisture (i.e. vases), and excess heat (e.g. fireplaces) or equipment creating strong magnetic or electric fields Disconnect the power cable from the AC supply if the unit malfunctions. Your product is not intended for industrial use. This product is for personal use only.
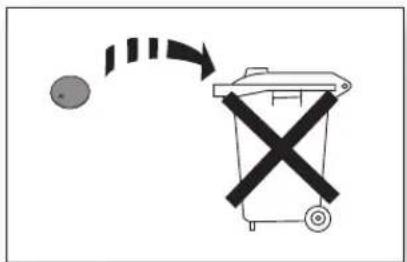
The batteries used with this product contain chemicals that are harmful to the environment.
Do not dispose of batteries in the general household trash.
Condensation may occur if your product has been stored in cold temperatures. If transporting the unit during the winter, wait approximately 2 hours until the unit has reached room temperature before using.
FeAtUreS
getting StArteD
DeScriPtiOnS
reMOte cOntrOI
POWer On AnD vOIUMe cOntrOI
cConnectiOnS
PIAying
FUnctiOnS
trOUBleSHOOting
APPenDiX
2 Features
2 License
3 Safety warnings
4 Precautions
6 Before reading the user's manual
6 What's included
7 Top/Front/Rear Panel
9 Tour of the remote control
10 Turning the Power on/off
10 Adjusting the volume
11 Installing the Toroidal Ferrite on the Power Cable
11 Installing the Ferrite Core on the LAN Cable
12 Using the Spacer Cover
13 Connecting a device to the Dual Dock
14 Connecting an audio device using AUX IN
15 Connecting to your Network
21 Connecting to Bluetooth devices
23 Using the TV mode (SoundShare)
23 Using the docking mode with Samsung Galaxy and Apple Devices
25 Using the Bluetooth mode
26 Using the USB mode
27 Using AirPlay and AllShare Play mode
28 Basic functions
29 Advanced functions
30 Software upgrade (only USB mode)
31 Troubleshooting
32 Specifications
getting started
BEFORE READING THE USER'S MANUAL
Note the following terms before reading the user manual.
Icons used in this manual
Icon Term Definition Caution Indicates a situation where a function does not operate or settings may be canceled. Note Indicates tips or instructions on the page that help a function operate.
Safety Instructions and Troubleshooting
1) Familiarise yourself with the Safety Instructions before using this product. (See page 3)
Copyright
©2012 Samsung Electronics Co., Ltd.
All rights reserved; no part or whole of this user's manual may be reproduced or copied without the prior written permission of Samsung Electronics Co., Ltd.
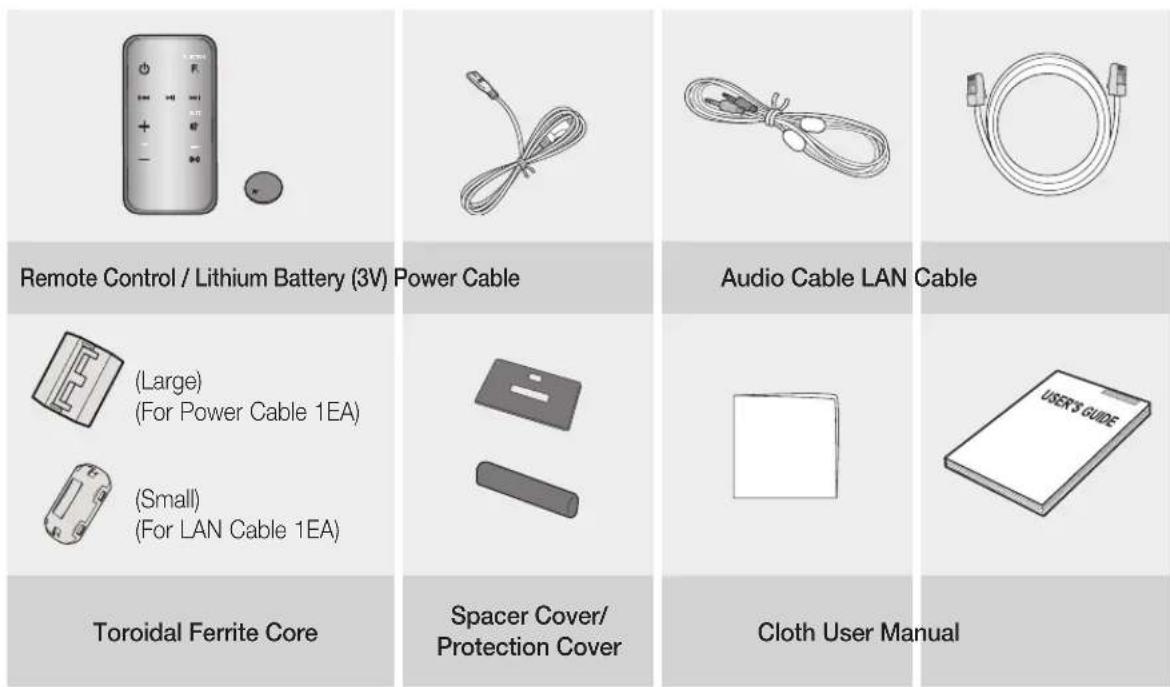
WHAT'S INCLUDED
Check for the supplied accessories shown below.
- The appearance of the accessories may differ slightly from the illustrations above.
descriptions
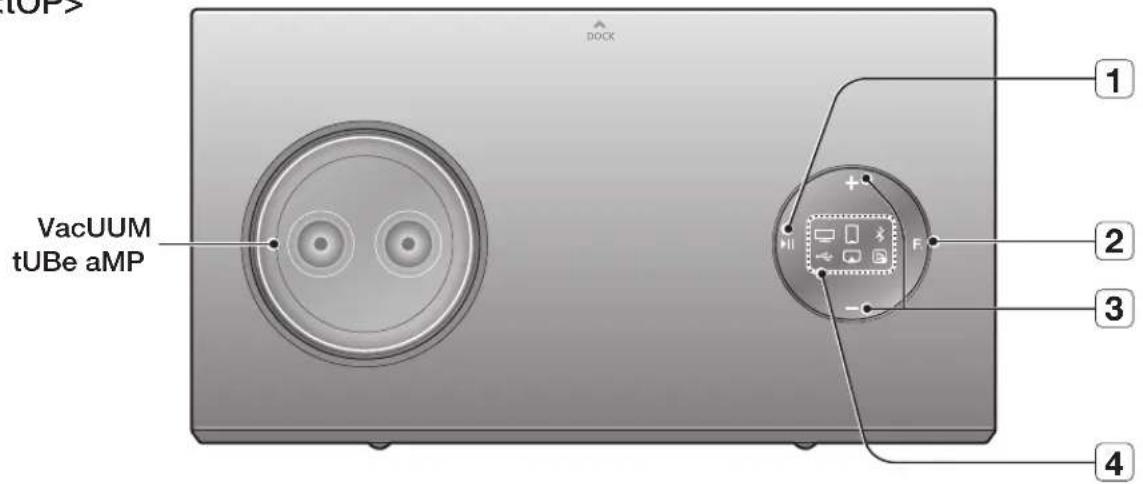
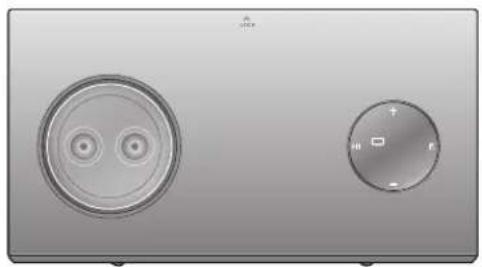
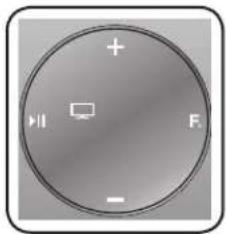
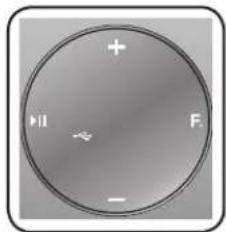
tOP/frOnt/rear PaneL
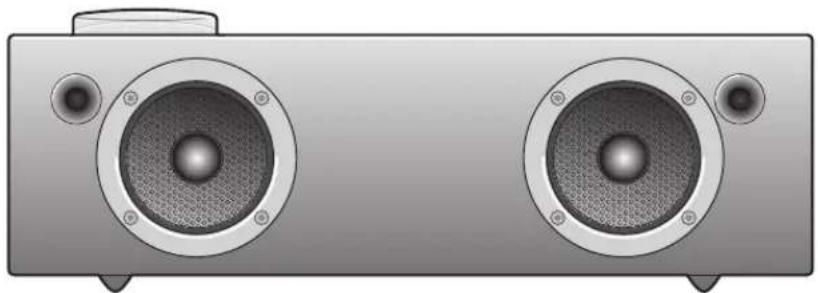
natural_image
Illustration of a two-tiered audio amplifier with two speakers and a top-mounted speaker (no text or symbols)
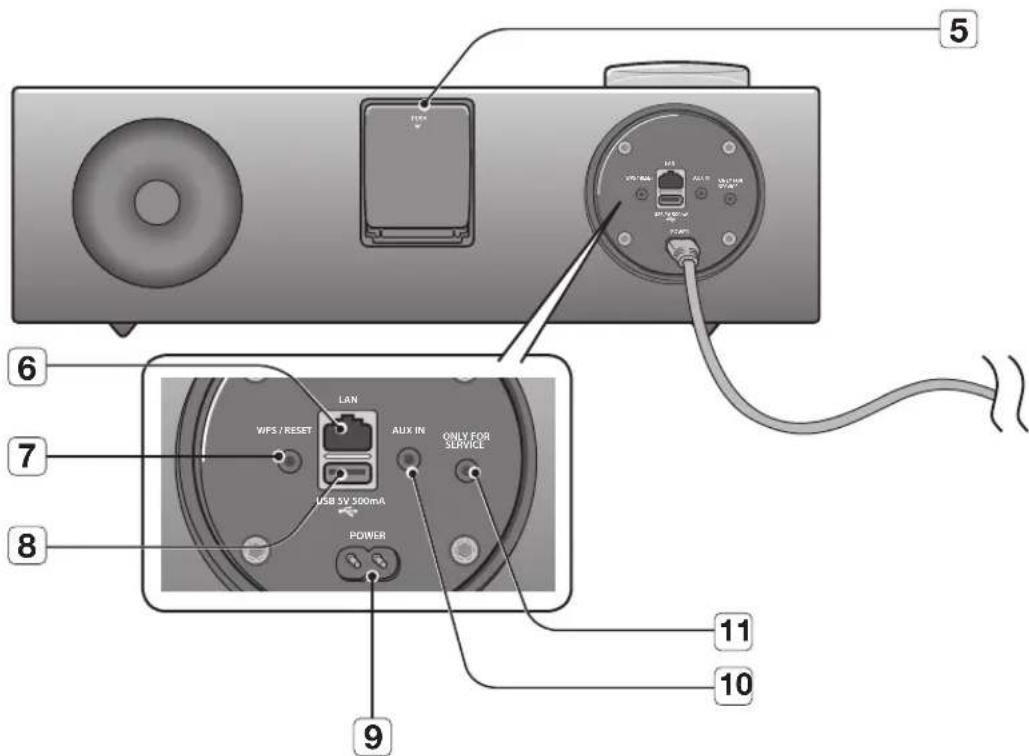
1 PLAY/PAUSE BUTTON Play or pause a music file. 2 FUNCTION BUTTON Switches the mode as follows : \& AUX (LED Off) 3 VOLUME +/- BUTTON Controls the volume level. 4 FUNCTION DISPLAY When you change the mode with the Function button, the icon of the selected mode is displayed in white on the Function Display.The LED blinks when you turn the power on and stops blinking when the unit is on and ready to play. 5 DUAL DOCK Provides a 5 pin dock for Samsung Galaxy devices and a 30 pin dock for Apple devices. 6 LAN TERMINAL Lets you connect to a network using a LAN cable. 7 WPS/RESET BUTTON Used in procedures for connecting the unit to wireless networks. 8 USB PORT Connect an external USB storage device such as an MP3 player here to play files located on the device. 9 POWER JACK Connect the power cord to this product. 10 AUX IN Connect to the Analog output of an external device. 11 ONLY FOR SERVICE This jack is for service only.
When you turn on this unit, it needs about 20 seconds to heat-up the Vacuum tube and produce stable sounds.
To update the product's software via USB port, it is required to use a USB memory device.
- When holding or moving the product, care must be taken as there is located the woofer speaker in the bottom of the product.
This unit can connect to mobile devices with high audio output levels. When you connect this unit to external devices with high output levels, it may lower the audio output to protect the amp and speakers.
When disconnecting the power cable from the wall outlet, hold the plug. Do not pull the cable.
If you put other electronic products on top of the product, audio from the product may be distorted.
Please make sure children do not touch the product's surface when the product is on. The surface will be hot.
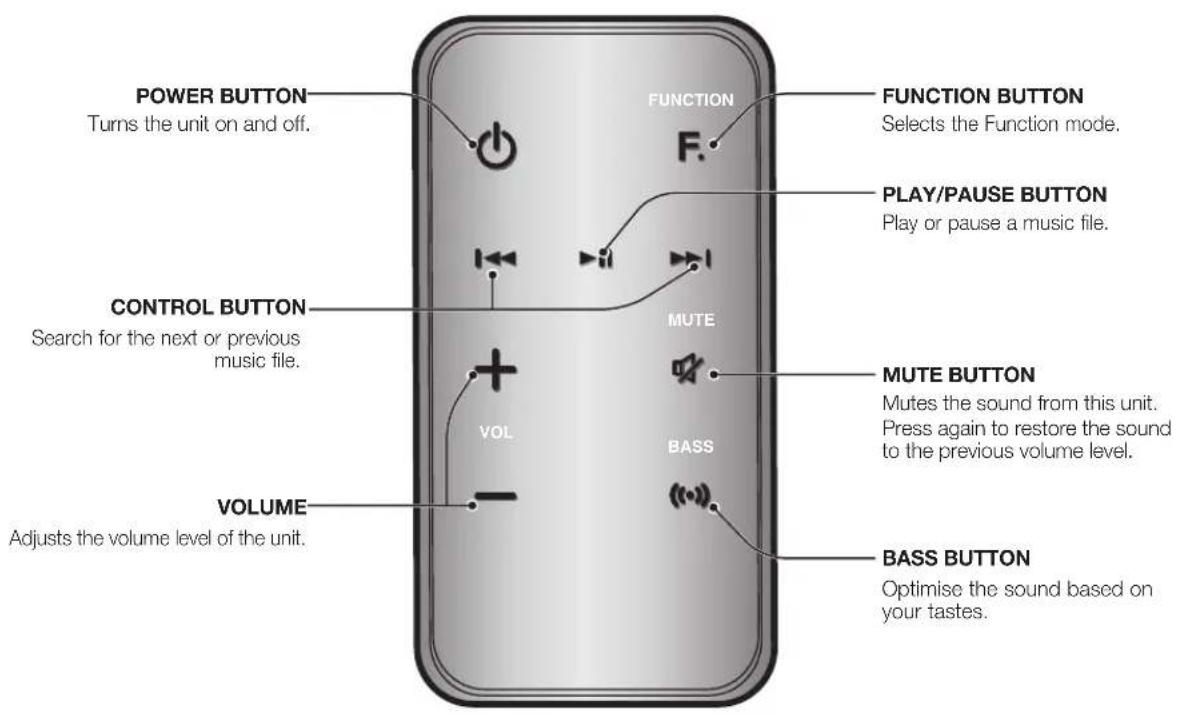
remote control
tOUr Of tHe reMOte cOntrOL
Installing battery in the Remote Control
flowchart
graph TD
    A["Device state"] --> B["Disassembly state"]
    B --> C["Final state with directional arrows indicating movement"]
Open the cover of the remote control by putting your fingernail into the gap between the cover and body of the remote control. Then, lift the cover and separate it completely.
Install a 3V Lithium battery.
Insert the battery into the battery compartment with the + side facing up.
Fit the remote control's cover to the remote control. Next, lower the cover so that it is flush with the body of the remote, and then press the cover into the body by pushing the edges down with your hand.
- Be careful not to catch your fingernail in the gap when you lift the cover. You can damage your fingernail.
Operation Range of the Remote Control
You can use the remote control up to 7 meters (23 feet) in a straight line from the unit. You can also operate the remote at a horizontal angle of up to 30^ from the remote control sensor.
power on and volume control
To turn on this unit, press any button on the unit's top panel when the unit is in Standby mode.
or,
Press POWER on the remote control.
To turn off this unit, press the ▶II button on the unit's top panel for more than 3 seconds.
or,
Press POWER on the remote control again.
- It will take about 20 seconds until the power of the unit turns on because of the preheating time of the amplifier.
ADJUSTING THE VOLUME
Use +,- buttons to adjust the volume. The function LEDs light from left to right when you turn the volume up and from right to left when you turn the volume down. The LEDs do not light if you try to increase the volume when it has already been set to maximum or try to decrease the volume when it has already been set to minimum.
Press the +/- button on the right side of the top panel.
or,
Press vOI +/- on the remote control.
- The volume level increases or decreases when you press VOL +/-
- You can also use the volume controls of devices connected using the Dual Dock or Bluetooth to control the volume. However, your ability to control the volume using the volume controls of devices connected using Bluetooth may be limited.
connections
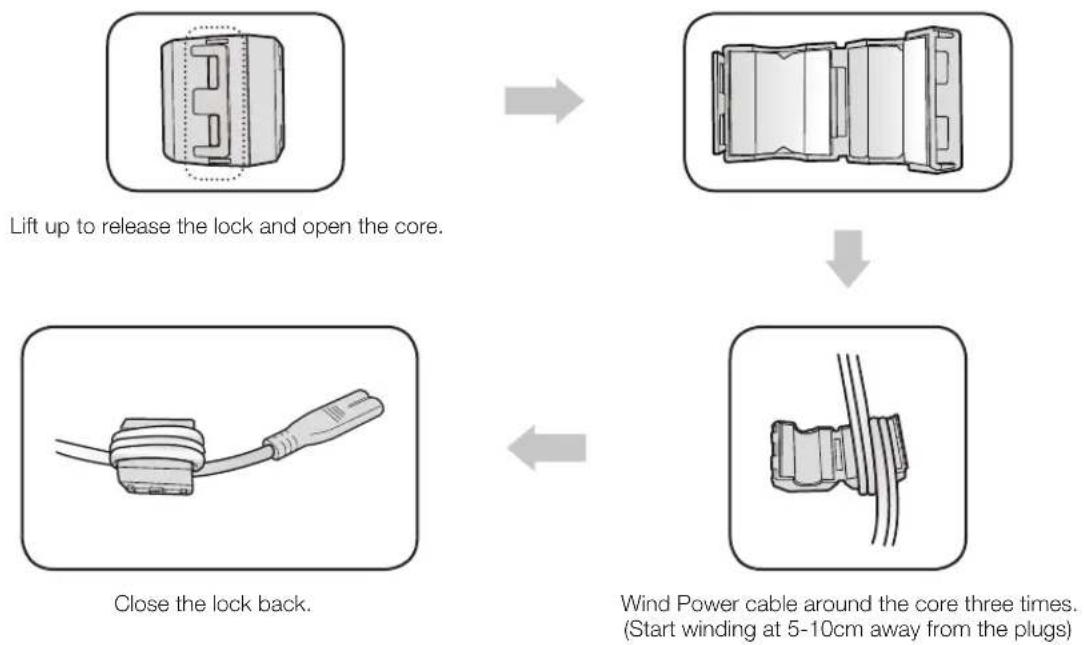
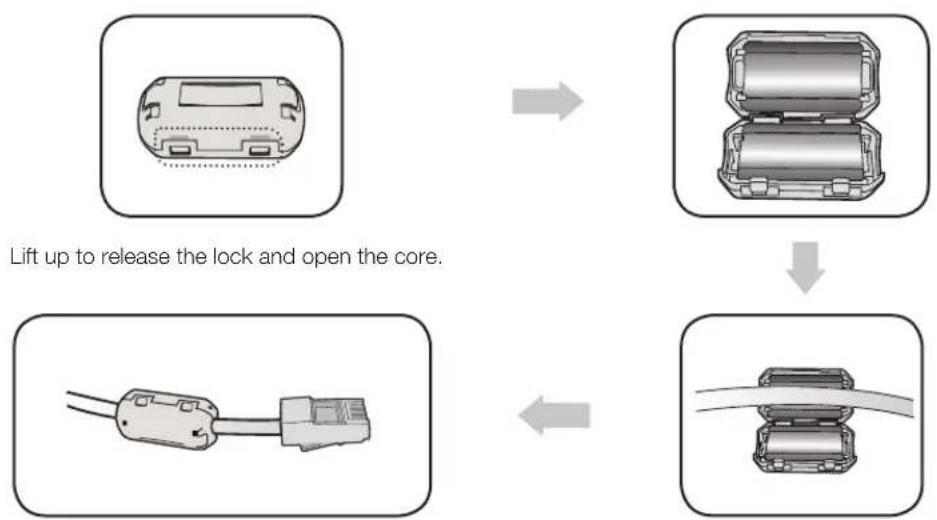
instaLLing tHe tOrOiDaL ferrite On tHe POWer caBLe
instaLLing tHe ferrite cOre On tHe Lan caBLe
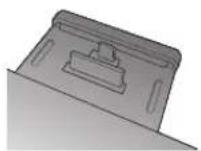
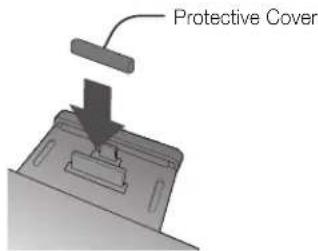
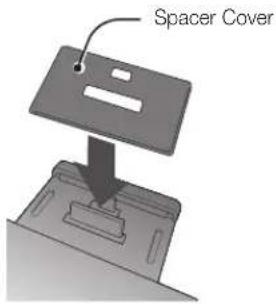
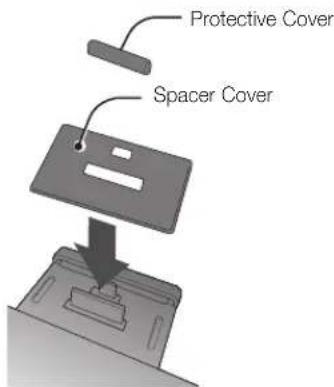
USING THE SPACER COVER
Attach the space cover if you want to dock a Samsung Galaxy or Apple device having no protective case onto the Dual Dock.
- Use it for stable installation of your device considering the shape of the device.
The Dual Dock also comes with a protective cover for the 30-pin Apple device connector. Use the protective cover for the 30-pin connector when you attach the 5-pin Samsung Galaxy device.
See the illustrations below for additional instructions.
When docking a device, use appropriate support considering the docking device's protective case or the device's shape for further stability.
Used for docking devices having no protective case on it.
- It is impossible to attach a device to the Dual Dock that has a case thicker than 1.5 mm or an unusual rounded bottom.
cConnecting a DeVice tO tHe DUaL DOcK
How to connect a device to the Dual Dock.
flowchart
graph TD
    A["Hand pressing down on camera"] --> B["Device being rotated to screen"]
    B --> C["Device holding a clip with scroll"]
    C --> D["Device being inserted into a device"]
    D --> E["Device being held in a device with scroll"]
    E --> F["Device being locked up"]
The DUAI DOcK is located on the back of the product. To open, push it in gently.
Press the F. button on the top panel of the Wireless Audio with Dock repeatedly until the ☐ icon appears in the display.
• Each time you press the button, the selection changes as follows :
□→□→*→←→□→□→aUX (LeD Off)
- The selected mode is displayed in white in the Function Display.
If you have a Samsung Galaxy device, connect the device to the 5 pin (smaller) connector to connect to the Dual Dock. If you have a Apple device, connect the device to the 30 pin (larger) connector on the Dual Dock.
Lift the device support up as shown to prevent the device from sliding or falling off the Dual Dock.
Turn on your Samsung Galaxy device before you attach it to the Dual Dock.
This unit doesn't support the simultaneous docking of Samsung Galaxy and Apple devices.
Connect your Samsung Galaxy or Apple device to the Dual Dock before starting Docking mode. (See page 23)
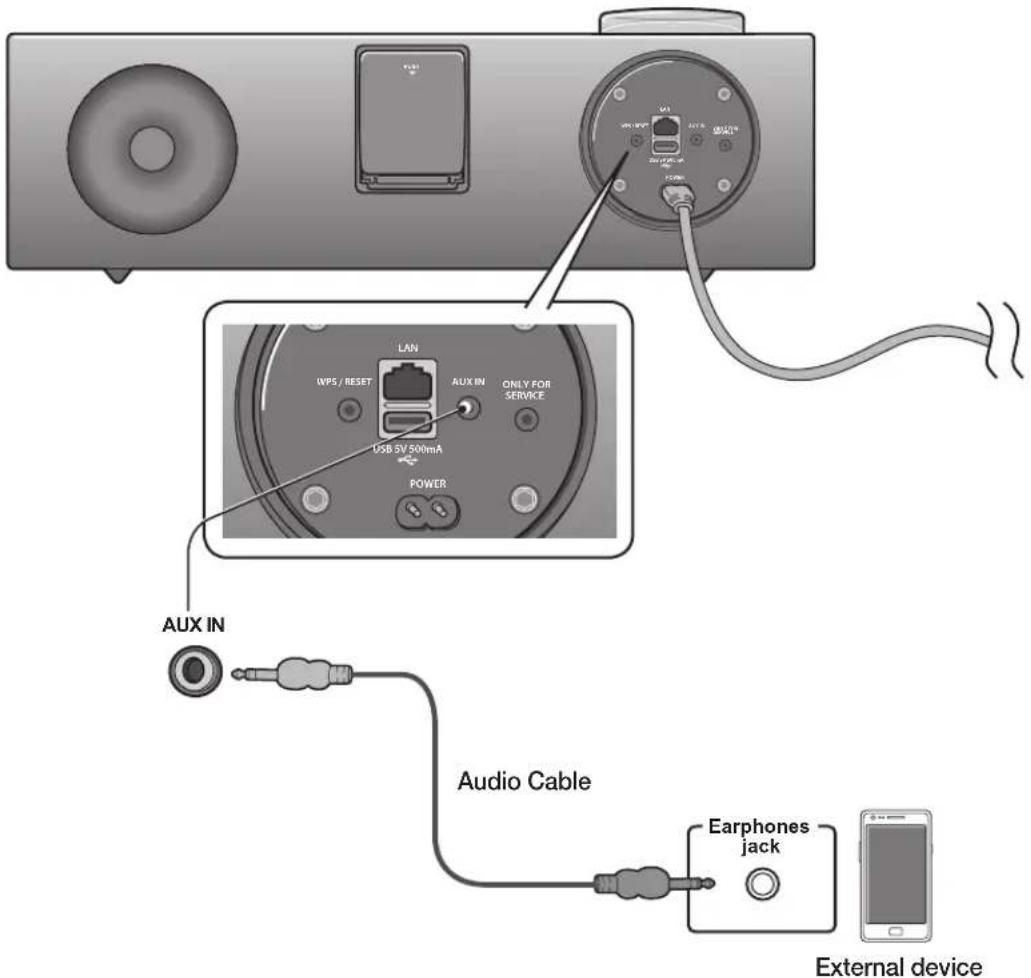
CONNECTING AN AUDIO DEVICE USING AUX IN
This section explains how to connect the unit to an audio device.
This unit is equipped with one audio analog jack for connecting an audio device.
AUX in
Connect AUX IN (Audio) on the back of the unit to the earphone jack of the external device or audio device.
Press the F. button repeatedly until the function LEDs are off.
- The AUX mode is active when no function LED is lit.
Before moving or installing this product, be sure to turn off the power and disconnect the power cord.
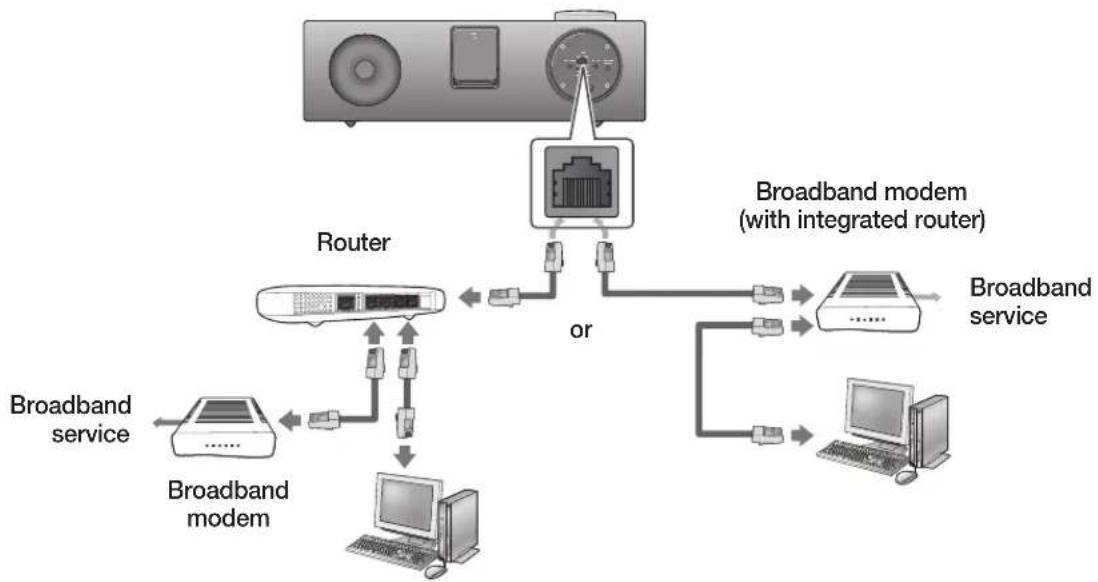
You can connect your Wireless Audio with Dock to your network router using one of the methods illustrated on the next few pages.
To connect the Wireless Audio with Dock to a Wired Network
flowchart
graph TD
    A["Router"] -->|or| B["Broadband modem (with integrated router)"]
    B --> C["Broadband service"]
    A --> D["Broadband modem"]
    D --> E["Broadband service"]
    A --> F["Broadband modem"]
    F --> G["Broadband service"]
    style A fill:#f9f,stroke:#333
    style B fill:#ccf,stroke:#333
    style C fill:#cfc,stroke:#333
    style D fill:#fcc,stroke:#333
    style E fill:#cff,stroke:#333
    style F fill:#ffc,stroke:#333
    style G fill:#cfc,stroke:#333
Please turn off the power of the Wireless Audio with Dock before you connect the LAN Cable.
Turn off the Wireless Audio with Dock.
Connect the Wireless Audio with Dock to the router using a LAN cable.
Turn on the Wireless Audio with Dock.
Press the F. button on the top panel of the Wireless Audio with Dock repeatedly until the icon appears in the display.
• Each time you press the button, the selection changes as follows :
The ▲ or □ indicator lights up in red, and changes to solid white once the Wireless Audio with Dock connects to the router.
If you connected the LAN cable when the product is on, turn the product off, then turn it on again.
If failed to connect to the network, unplug the LAN cable and connect it again, and restart the product.
xDSL user needs a router to make a network connection.
To connect the Wireless Audio with Dock to a Wireless Network
This section describes 4 methods of connecting the Wireless Audio with Dock to a wireless network.
Some of network related operations may be different than explained depending on performance and supported functions of used AP.
To configure the network connection to your router or modem, see the router or modem's user manual.
- WEP → Open
WPA-PSK → TKIP
WPA2-PSK → AES
- You can also connect the Wireless Audio with Dock to a network that does not have security and has no password.
- If your wireless router supports DHCP, this Wireless Audio with Dock can use a DHCP or static IP address to connect to the wireless network.
- Select a channel on the wireless router that is not currently being used, if the channel set for the wireless router is currently being used by another device nearby, it will result in interference and communication failure.
- If you select the Pure High-throughput (Greenfield) 802.11n mode and set the encryption type on your router to WEP or TKIP, then the Wireless Audio with Dock will not support a connection in compliance with new Wi-Fi certification specifications.
- Wireless LAN, by its nature, may cause interference, depending on the operating conditions (router performance, distance, obstacles, interference with other radio devices, etc)
- WPS(PBC) / WPS(PIN) does not operate when the security protocol is set to WEP.
- If you fail to set up the network, press and hold the WPS/RESET button on the rear panel until the ▲ or ▲ indicator blinks twice. Wait until the red light stops blinking, turn off and on the unit.
And try again.
To connect the Wireless Audio with Dock to your Apple device having iOS 5.0 or above (Info Sharing)
This network set-up method is for users of Apple devices that have iOS 5.0 or later.
Connect the Apple device to your network.
Select ☐ on the Wireless Audio with Dock, and then connect the iPod /iPhone /iPad device to the Dual Dock.
Press and hold the WPS/RESET button on the rear panel of the Wireless Audio with Dock with a pen tip or similar item for more than 1 second. The icon will blink once. Release the button.
Select in the pop-up menu on the display of the Apple device.
Change the mode to the 📁 and then the indicator will blink in red and changes to solid white. After the Wireless Audio with Dock connects, the indicator stops blinking in red, and glows in white.
To connect the Wireless Audio with Dock using WPS (PBC)
Press the F. button on the top panel of the Wireless Audio with Dock repeatedly until the ▲ or □on appears in the display.
• Each time you press the button, the selection changes as follows :
The indicator changes from white to red and blinks.
Press and hold the WPS/RESET button on the rear panel with a pen tip or similar item for more than 1 second. The indicator blinks once in white. After the indicator blinks, release the button.
• The indicator blinks in red.
Push the WPS/RESET button on your router or modem within 90 seconds.
After the Wireless Audio with Dock connects, the ▲ or ▶ indicator changes from blinking red to white.
• The network connection is complete.
To connect the Wireless Audio with Dock through a JBC (JukeBox Connect) Connection
Press the F. button on the top panel of the Wireless Audio with Dock repeatedly until the ▲ or □ icon appears in the display.
• Each time you press the button, the selection changes as follows :
The indicator changes from white to red and blinks.
Press and hold the WPS/RESET button on the back panel with a pen tip or similar item for more than 5 seconds. The indicator blinks in white once. Wait until the indicator blinks in white twice more, and then release the WPS/RESET button.
- The indicator blinks in red, and then stops blinking and glows in red when the unit accesses the Network Setting mode.
To connect the Wireless Audio with Dock to the network, search for "Samsung W_Audio E750 XXXXXXX" in the Wi-Fi Setting list of your WI-Fi device, and then select it.
ex) Samsung Galaxy Device
flowchart
graph LR
    A["Wi-Fi settings"] --> B["Wi-Fi"]
    B --> C["Network notification"]
    C --> D["Wi-Fi networks"]
    D --> E["Samsung W_Audio E750 XXXXXX"]

    subgraph Connection
        F["Connect to Samsung W_Audio E750 XXXXXX"]
        G["Connect"]
        H["Reset"]
        I["Cancel"]
    end

    subgraph Legend
        J["Wi-Fi"]
        K["Network notification"]
        L["Wi-Fi"]
        M["Wi-Fi"]
        N["Wi-Fi"]
        O["Wi-Fi"]
        P["Wi-Fi"]
        Q["Wi-Fi"]
    end
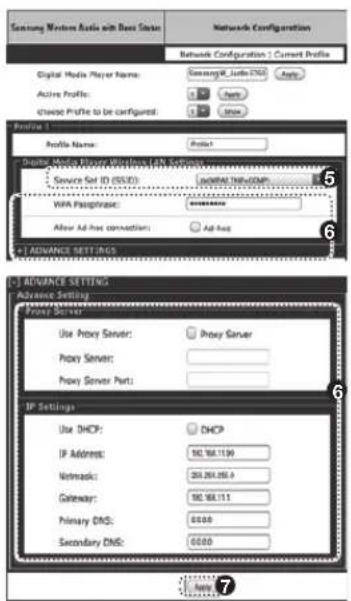
Open the web browser of the Wi-Fi device, and then type "http://192.168.1.1" into the address bar of the Internet browser to access the Wireless Audio with Dock's web page.
In the "Service Set ID (SSID)" field, select the AP device (router or modem) your Wi-Fi device is connected to.
Type the AP device's password into the WPA Passphrase" filed. If you want to set the static IP, press advanced settings. Fill in the desired static IP address.
Press .
If a warning appears on your Wi-Fi device, click OK.
When the connection between the Wireless Audio with Dock and AP you selected is completed, the indicator on the Wireless Audio with Dock changes to white.
• The Wireless Audio with Dock connection is complete.
The picture above is the screen which will appear on the display after completing the network connection successfully, so you can run AirPlay or DLNA normally.
To connect the Wireless Audio with Dock using a WPS PIN
Press the F. button on the top panel of the Wireless Audio with Dock repeatedly until the ▲ or □ icon appears in the display.
• Each time you press the button, the selection changes as follows :
→ → → → → → → aUX (LeD Off)
The indicator changes from white to red and blinks.
Press and hold the WPS/RESET button on the back panel with a pen tip or similar item for more than 5 seconds. The indicator blinks in white once. Wait until the indicator blinks in white twice more, and then release the WPS/RESET button.
- The icon blinks in red, and then stops blinking and glows in red when the unit accesses the Network Setting mode.
To connect the Wireless Audio with Dock to the network, search for "Samsung W_Audio E750 XXXXXXX" in the Wi-Fi Setting list of your WI-Fi device, and then select it.
ex) Samsung Galaxy Device
flowchart
graph LR
    A["WiFi settings"] --> B["WiFi"]
    B --> C["Network notification"]
    C --> D["WiFi Networks"]
    D --> E["Connect to Samsung W_Audio E750 XXXXXXXX"]
    E --> F["Connect. Forget Cancel"]
Open the web browser of the Wi-Fi device, and then type "http://192.168.1.1" into the address bar of the Internet browser.
Press or touch Samsung Wireless Audio with Dock Status.
The WPS PIN number appears on the bottom of the screen. Note or write down the number, and then turn the Wireless Audio with Dock unit off and then on.
Access the Wi-Fi set-up page of your AP (wireless router or modem) using your PC or other Internet ready device, and then set the Wi-Fi settings to the PIN method. Refer to the user's manual of your router or modem for instructions.
Type the Wireless Audio with Dock's WPS PIN number into the appropriate field of the Wi-Fi setup page.
Press and hold the WPS/RESET button on the back panel of the Wireless Audio with Dock with a pen tip or similar item for more than 10 seconds in the or ▶ mode. The indicator blinks once in white, and then twice. Wait until the indicator blinks three times, and then release the button.
- The icon blinks in red.
If the connection between the Wireless Audio with Dock and the AP is completed within 90 seconds, the indicator changes from red to white.
- The Wireless Audio with Dock connection is complete.
- The Wi-Fi Direct function is not supported by this product.
Direct connection may succeed in some cases, but it is not supported function by this product.
You can connect the Wireless Audio with Dock to Bluetooth devices and enjoy music with high quality stereo sound, all without wires!
What is Bluetooth?
Bluetooth technology lets Bluetooth-compliant devices interconnect easily with each other using a short wireless connection.
- A Bluetooth device may cause noise or malfunction, depending on usage, when:
A part of your body is in contact with the receiving/transmitting system of the Bluetooth device or the Wireless Audio with Dock.
It is subject to electrical variation from obstructions caused by a wall, corner, or by office partitioning.
It is exposed to electrical interference from same frequency-band devices including medical equipment, microwave ovens, and wireless LANs.
Keep the Wireless Audio with Dock and the Bluetooth device close together when pairing.
The further the distance between the Wireless Audio with Dock and Bluetooth device, the worse the quality. If the distance exceeds the Bluetooth operational range, the connection is lost.
In poor reception-sensitivity areas, the Bluetooth connection may not work properly.
The Bluetooth connection only works when the Bluetooth device is close to the set. The connection is automatically cut off if the Bluetooth device moves out of range. Even within range, the sound quality may be degraded by obstacles such as walls or doors.
This wireless device may cause electric interference during its operation.
- You may be required to enter a PIN code (password) when connecting the Bluetooth device to the Wireless Audio with Dock. If the PIN code input window appears, enter <0000>.
The Wireless Audio with Dock supports SBC data (44.1kHz, 48kHz).
Connect only to a Bluetooth device that supports the A2DP (AV) function.
You cannot connect to a Bluetooth device that supports only the HF (Hands Free) function.
■ Only one Bluetooth device can be paired at a time.
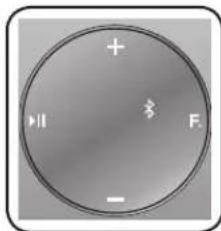
CONNECTING TO BLUETOOTH DEVICES
This section explains how to connect the Wireless Audio with Dock to Bluetooth compatible TVs and other Bluetooth devices.
To connect the Wireless Audio with Dock to a Bluetooth compatible 2012 Samsung TV (SoundShare)
natural_image
Front view of a gray electronic device with two circular buttons and a control knob (no text or symbols visible)
To produce TV sound on your Wireless Audio with Dock via Bluetooth connection, you need to pair your system to the Bluetooth compliant TV first. Once the pairing is established, the pairing information is recorded and kept and no further Bluetooth connection message will appear from the next time. Keep the Wireless Audio with Dock and the TV close together before pairing. (It is recommended to pair devices within 1 meter.)
Turn on the Samsung TV and Wireless Audio with Dock.
- Set "Add New Device" menu to "On" in the TV. (For more information, refer to the user's guide of TV) Menu → System → Device Manager → SoundShare Settings → Add New Device.
When you change the mode of Wireless Audio with Dock to ☐, a message asking whether to proceed with Bluetooth pairing appears. Select on the TV screen, then the pairing with the Wireless Audio with Dock will be completed.
• The □ indicator blinks, and stops blinking.
If you want to pair your Wireless Audio with Dock to a TV other than the connected TV, you should cancel the existing pairing in the Wireless Audio with Dock. It is possible to cancel the pairing in the way below.
The ☐ LED will blink once when you press the WPS/RESET button on the rear panel of the unit for 1 second in ☐. This unit will automatically pair to a TV once you cancel the existing pairing and the new TV is ready for connection.
If the TV cannot be connected, please try to reconnect it after pressing the WPS/RESET button on the rear panel of the set in the Bluetooth ☐ mode.
You should update TV software to the latest version to operate TV pairing (SoundShare) function.
Check the instructions for updating and applicable models from the support page on website (http://www.samsung.com) or contact the call centre.
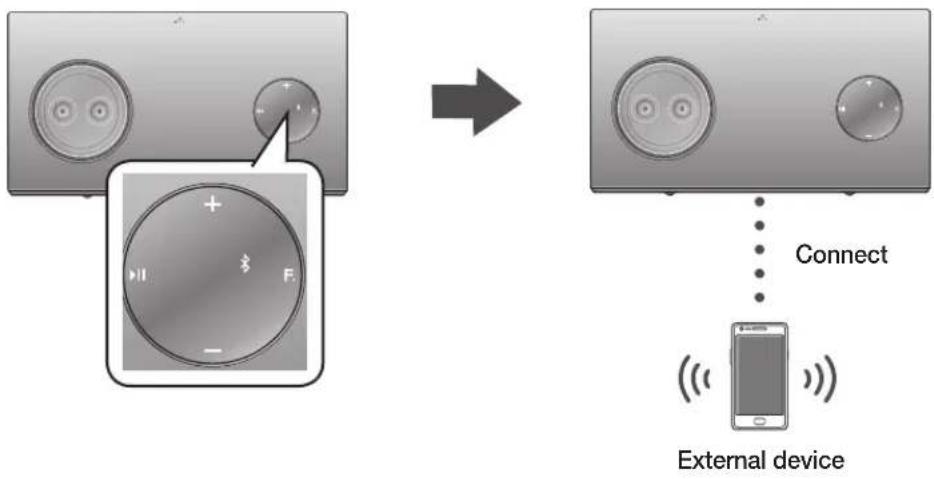
To connect the Wireless Audio with Dock to a Bluetooth device
Before you begin, confirm that your Bluetooth device supports the Bluetooth compliant stereo headset function.
flowchart
graph TD
    A["Device with +/− button"] --> B["External Device"]
    B --> C["Connect"]
    style A fill:#f9f,stroke:#333
    style B fill:#ccf,stroke:#333
    style C stroke-dasharray: 5 5
Press the F. button on the top panel of the Wireless Audio with Dock repeatedly until the ✗ icon appears in the display.
• Each time you press the button, the selection changes as follows :
- The selected mode is displayed in white in the Function Display.
Select the Bluetooth menu on your Bluetooth device.
(Refer to the Bluetooth device's user manual for instructions.)
Scan or search for All Devices or for Headsets.
- You will see a list of devices.
Select "[Samsung]W_Audio XXXXXX" from the searched list.
- If the Bluetooth device fails to pair with the Wireless Audio with Dock, delete the "[Samsung]W_Audio XXXXXX" found by the Bluetooth device, and search for the Wireless Audio with Dock again, and then repeat Steps 2, 3, and 4.
playing
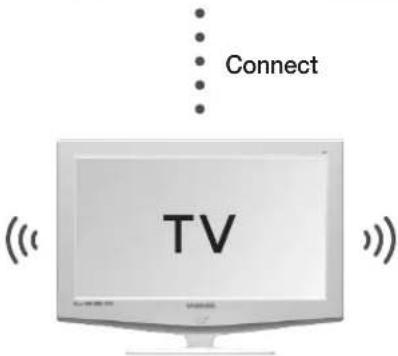
USING THE TV MODE (SoundShare)
Press the Fbutton to select the mode, and then connect the TV to the Wireless Audio with Dock. (See page 21)
• The unit will play the TV's audio when it is connected to the TV.
natural_image
Circular device control knob with plus, minus, and screen symbols (no readable text or labels)
- You can control the volume only with the Wireless Audio with Dock.
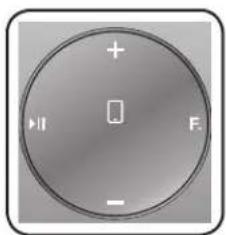
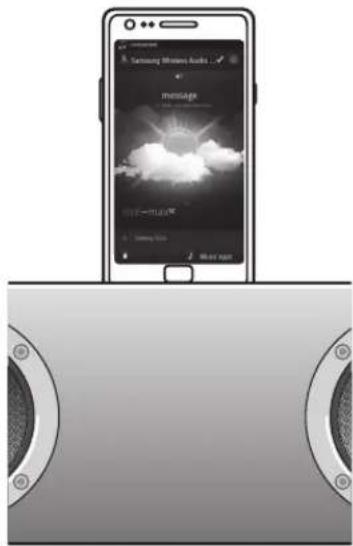
USING THE DOCKING MODE WITH SAMSUNG GALAXY AND APPLE DEVICES
Press the Fbutton to select the mode, and then connect the Samsung Galaxy or Apple device to the Dual Dock. (See page 13)
To use your Samsung Galaxy series device with the Dual Dock, you must download and install the Docking Mode application from the Android Market on the device. To download, follow these steps:
Tap the Play Store (Android Market) icon on the Samsung Galaxy device's main screen.
Tap the search icon on the screen to access the search bar.
In the search bar, type in the [Samsung Wireless Audio Dock], and then search.
In the search result list, find, and then tap [Samsung Wireless Audio Dock] to start downloading.
Tap [install].
To play music, follow these steps:
1-1. If you start the app when the Wireless Audio with Dock is the only device for the Bluetooth connection, selecting PLAY in your device automatically establishes the Bluetooth connection to the Wireless Audio with Dock and the unit plays music.
1) When you start the app, the list of the devices which you can connect to the Wireless Audio with Dock will appear.
- If there exists a Bluetooth device paired to the Wireless Audio with Dock before, it will not appear in the list and be connected automatically.
If you replace the Wireless Audio with Dock which you have paired to your mobile device, you should delete the remaining settings saved in your device before pairing to the new one.
• → [Clear data].
Once you started the application, running is not disturbed by charging your mobile device with an ordinary charger.
When you connect other device to the Wireless Audio with Dock after connecting Samsung Galaxy device in docking mode, you may have to turn off the Bluetooth mode of the Samsung Galaxy device.
If you have trouble connecting the Samsung Galaxy device to the Dual Dock, turn off the devices's Bluetooth mode.
Select the mode as described above, and then connect the Apple device to the Dual Dock as described in Connecting a Device to the Dual Dock (Page 13). You will hear a ringing sound.
Select the menu in the main screen of the Apple device.
Select and play the desired music.
- The music will play through the Wireless Audio with Dock's speakers.
- While playing a video with your device, Play/Pause/Next/Back operations may not be available. Use the button on your source device to operate it.
Compatibility list (Apple Device)
Docking mode compatible iPod/iPhone/iPad models
Update the software of your iPod/iPhone/iPad to the latest version before using it with this unit.
iPod touch (4th generation)
iPod touch (3rd generation)
iPod nano (6th generation)
iPod nano (5th generation)
iPhone 4S
iPhone 4
iPhone 3GS
iPad 2
iPad
- Depending on its version of iPod Software, your device may not be compatible or may operate abnormally.
※ If you connect an incompatible Apple device, the iPod Function LED will blink.
Using tHe BLUetOOtH MODE
Press the Fbutton to select the mode, and then connect the Bluetooth device to the Wireless Audio with Dock. (See page 22)
To connect your Bluetooth device when the Wireless Audio with Dock is in Bluetooth mode, search for the Wireless Audio with Dock on the device's Bluetooth list. Select the Wireless Audio with Dock, and then connect. Once the Wireless Audio with Dock has connected, select and play the desired music.
The music will play through the Wireless Audio with Dock's speakers.
If you want to change the device which is connected through Bluetooth mode to other device, disconnect the existing device and try to connect to the other device which you want to use.
While in Bluetooth communication, Play/Pause/Next/Back operations may not be available depending on used mobile device and application.
Operating Bluetooth device paired to the Wireless Audio with Dock may cause stuttering if operated while the Wireless Audio with Dock is playing back from AUX input.
To disconnect the Bluetooth device from the Wireless Audio With Dock
You can cancel Bluetooth pairing from the Wireless Audio with Dock. For instructions, see the Bluetooth device's user manual.
• The Wireless Audio with Dock will be disconnected.
To disconnect the Wireless Audio with Dock from the Bluetooth device
Press the F button on the top panel of the Wireless Audio with Dock to switch from ☐ another mode or press the Power button on the remote to turn the Wireless Audio with Dock off.
• The currently connected device will be disconnected.
The Bluetooth connection only works when the Bluetooth device is close to the set. The connection is automatically cut off if the Bluetooth device moves out of range. Even within range, the sound quality may be degraded by obstacles such as walls or doors.
If the Bluetooth device comes back into the effective range, you can restart to restore the pairing with the Bluetooth device.
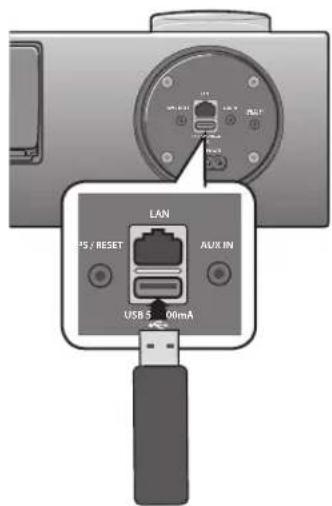
USING THE USB MODE
Connect the USB device to the USB port on the back of the unit.
Press the F. button on the top panel of the Wireless Audio with Dock repeatedly until the icon appears in the display.
• Each time you press the button, the selection changes as follows :
$$
\square \rightarrow \square \rightarrow \times \rightarrow \leftarrow \rightarrow \square \rightarrow \square \rightarrow A U X (L E D O f f)
$$
- The selected mode is displayed in white in the Function Display.
Before you connect a USB device
Read the list below to check compatibility.
This product may not be compatible with certain types of USB storage media.
The NTFS file system is not supported.
Connect a USB device directly to the USB port of the product. Otherwise, you may encounter a USB compatibility problem.
Do not connect multiple storage devices to the product via a multi-card reader. It may not operate properly.
Do not remove the USB device while it is being read.
DRM-protected music files (MP3, WMA) from a commercial web site can not be played.
Compatibility list
Format Music File name MP3 WMA File extension .MP3 .WMA Bit rate 80~320kbps 56~128kbps Version - V8 Sampling Frequency 44.1KHz 44.1KHz
※ Do not connect your mobile device to the USB port and the Docking station at the same time for recharging.
USING AIRPLAY AND ALLSHARE PLAY MODE
To use the ☐ function, the Wireless Audio with Dock and the device which you are trying to connect must be connected to the same AP.
1. Play the desired music in the menu on main screen of the Apple device.
2. Select "Samsung W\_Audio E750 XXXXXXX" by pressing the icon on the screen of the Apple device.
- The music will play through the Wireless Audio with Dock's speakers.


natural_image
Circular device control knob with plus, minus, and function buttons (no text or symbols beyond basic labels)
※ When you succeed the connection between iTunes and the Wireless Audio with Dock through same IP once, the mode will be switched automatically to AirPlay mode when you select the Wireless Audio with Dock and play musics in iTunes in a mode other than the AirPlay mode.

\- It takes 3\~5 seconds to respond for the set from your remote control operation.
1. Select the menu on the main screen of the Galaxy device.
2. After going into [Audio] in AllShare Play, select the desired music.
3. When the pop-up appears, select "Samsung W\_Audio E750 XXXXXXX".
\- The music will play through the Wireless Audio with Dock's speakers.


flowchart
graph LR
    A["My device"] --> B["Share multimedia contents with DNA compliant devices"]
    B --> C["Videos"]
    B --> D["Pictures"]
    B --> E["Audio"]

    F["Unknown 00:03:42"] --> G["Select device 24..."]
    G --> H["HTenkod (BAWMHEMANT..."]
    H --> I["Samsung W_Audio E750"]
    I --> J["Refresh Cancel"]

    K["Unknown 00:03:42"] --> L["Unknown 2 00:00:57"]
    L --> M["▶ Unknown 4 00:03:44"]
    M --> N["Unknown 4 00:03:46"]
    N --> O["Unknown 5 00:00:17"]
    O --> P["Unknown 4 3/25"]
    P --> Q["Audio"]

\- The control function may not be supported by your device depending on the functions of the application and the Audio Dock of your device.
functions
BASIC FUNCTIONS

natural_image
Diagram showing a camera with lens and control knob, no text or symbols present

You can select the following inputs: □→□→⊗→↔→□→□→AUX (LED Off).
Press an appropriate button on the remote control to select a desired mode, or press F. to select from: □→□→\*→←→□→□→AUX (LED Off).
Input mode Display TV mode Docking mode BLUETOOTH mode USB mode AirPlay mode AllShare Play mode AUX input LED Off

Play/Pause
During playback, press the ▶II button.
\- Press the ▶II button to stop playing the file temporarily. Press the ▶II button again to play the selected file.

This function may not operate in certain mode.

Skip Forward/Back
During playback, press the ◀◀,▶▶I button.
- When there is more than one file and you press the ▶▶I button, the next file is selected.
- When there is more than one file and you press the ◀◀ button, the previous file is selected.

This function may not operate in certain mode.

Muting the sound
This is useful when answering a doorbell or telephone call.
1. To mute sound of this unit, press the MUTE (☒) button of the remote control.
2. Press MUTE (✗) on the remote control again (or press VOLUME +/-) to restore the sound.

Using the BASS function
Lets you optimise the bass sound according to your tastes.
Press BASS on the remote control of this unit.
• Each time you press the button, the selection changes as follows: BASS ON → OFF
sOftWare UPgraDe (OnLy UsB MODE)
1. Visit www.samsung.com.
2. Click SUPPORT on the top right of the page.
3. Enter the product's model number into the search field, and then click Find Product.
4. Click Get downloads in the Center of the page below the Downloads header.
5. Click Firmware in the Center of the page.
6. Click ZIP file icon of the upgrade file.
7. Once popup window appears, click OK and continue to download and save upgrade file onto your PC.
8. Uncompress downloaded .zip file into a certain folder of your PC.
9. Copy all files in the folder to the USB flash drive's root directory.
\- Upgrading allows only one file set for upgrading at a time.
10. Press the F. button on the top panel of the Wireless Audio with Dock repeatedly until the icon appears in the display. Insert the USB drive into the USB port on the back panel of the unit.
11. The LED will blink during the Software update process. The product will turn off automatically after completing the firmware upgrade.
\- It may take longer depending on the functions to upgrade. (Maximum 10 minutes)
• Turn on the product again.

- Do not disconnect the power or remove the USB drive while an upgrade is being applied. The main unit will turn off automatically after completing the firmware upgrade.
- When software is upgraded, settings you have made will return to their default (factory) settings. We recommend you write down your settings so that you can easily reset them after the upgrade.
- If the firmware fails to upgrade, we recommend formatting the USB drive in the FAT16 format and then trying again.
- For upgrading purposes, do not format the USB drive in NTFS format. It is not a supported file system.
- Depending on the manufacturer, the USB may not be supported.
- Disconnect the Wireless Audio with Dock from the Internet and any external devices before you upgrade the software.
- You cannot charge other external devices through this USB port.
- Refer to the Upgrade Guide from the website.

troubleshooting
Before requesting service, please check the following.
Symptom Check Remedy The unit will not turn on. Is the power cord plugged into the outlet? Connect the power plug to the outlet. A function does not work when the button is pressed. Has the Wireless Audio with Dock or the remote been exposed to static electricity? Disconnect the power plug and connect it again. Sound is not produced. Is the unit properly connected to device?Is the Mute function on?Is the volume set to minimum? Connect it correctly.Press the Mute button to cancel the function.Adjust the volume. The remote control does not work. Are the batteries drained?Is the distance between remote control and main unit too far? Replace with new batteries.Operate closer to the main unit. Wi-Fi network connection failed Check if your Wi-Fi router is Wi-Fi certified. Make sure the Network Connection is set to Wireless (General).Make sure the Wireless Audio with Dock unit is connected to a wireless IP router or modem. The SoundShare (TV pairing) failed. Is your TV a supporting model?Is your TV firmware the latest version?Does an error occur in connection? Check whether your TV is a supporting model or not.(http://www.samsung.com)Update your TV with the latest firmware.Reset the unit.Press the WPS/RESET button in the TV mode.Contact the call centre.
SPECIFICATIONS
Model name DA-E750/ DA-E751 GENERAL Weight 9 kg Dimensions (W x D x H) 450 x 244,1 x 168,5 mm Operating temperature range +5°C~+35°C Operating humidity range 10 % to 75 % AMPLIFIER Rated output power Front L/R 20W/4OHM, THD = 1%, 1kHz Subwoofer 60W/8OHM, THD=1%, 70Hz Input sensitivity/Impedance 400mV/56Kohm (AUX) S/N ratio (analog input) 65 dB Separation(1kHz) 65 dB FREQUENCY RESPONSE Analog input 20Hz~20kHz(±3 dB) Digital input/48kHz PCM 20Hz~20kHz(±3 dB) DOCKING RATING iPad 5 V 2,0 A iPod 5 V 1,0 A Galaxy 5 V 1,0 A USB Type A USB 1.1 DC output 500mA NETWORK Ethernet 100BASE-TX Terminal Wireless LAN Built-in Security WEP (OPEN)WPA-PSK (TKIP)WPA2-PSK (AES) WPS(PBC/PIN) Supported
\* S/N ratio, distortion, separation, and usable sensitivity are based on measurement using AES (Audio Engineering Society) guidelines.
\* Nominal specification
- Samsung Electronics Co., Ltd reserves the right to change the specifications without notice.
- Weight and dimensions are approximate.
- Network speeds equal to or below 10Mbps are not supported.
- For the power supply and Power Consumption, refer to the label attached to the product.
Open Source Announcement
To send inquiries and requests for questions regarding open sources, contact Samsung via Email (oss.request@samsung.com).
\- This product uses some software programs which are distributed under the Independent JPEG Group.
FLAC decoder, Copyright (C) 2001,2002,2003,2004,2005,2006,2007 Josh Coalson
Redistribution and use in source and binary forms, with or without modification, are permitted provided that the following conditions are met:
- Redistributions of source code must retain the above copyright notice, this list of conditions and the following disclaimer.
- Redistributions in binary form must reproduce the above copyright notice, this list of conditions and the following disclaimer in the documentation and/or other materials provided with the distribution.
- Neither the name of the Xiph.org Foundation nor the names of its contributors may be used to endorse or promote products derived from this software without specific prior written permission.
THIS SOFTWARE IS PROVIDED BY THE COPYRIGHT HOLDERS AND CONTRIBUTORS "AS IS" AND ANY EXPRESS OR IMPLIED WARRANTIES, INCLUDING, BUT NOT LIMITED TO, THE IMPLIED WARRANTIES OF MERCHANTABILITY AND FITNESS FOR A PARTICULAR PURPOSE ARE DISCLAIMED. IN NO EVENT SHALL THE FOUNDATION OR CONTRIBUTORS BE LIABLE FOR ANY DIRECT, INDIRECT, INCIDENTAL, SPECIAL, EXEMPLARY, OR CONSEQUENTIAL DAMAGES (INCLUDING, BUT NOT LIMITED TO, PROCUREMENT OF SUBSTITUTE GOODS OR SERVICES; LOSS OF USE, DATA, OR PROFITS; OR BUSINESS INTERRUPTION) HOWEVER CAUSED AND ON ANY THEORY OF LIABILITY, WHETHER IN CONTRACT, STRICT LIABILITY, OR TORT (INCLUDING NEGLIGENCE OR OTHERWISE) ARISING IN ANY WAY OUT OF THE USE OF THIS SOFTWARE, EVEN IF ADVISED OF THE POSSIBILITY OF SUCH DAMAGE."
Ogg/Vorbis decoder, Copyright (c) 2002, Xiph.org Foundation
Redistribution and use in source and binary forms, with or without modification, are permitted provided that the following conditions are met:
- Redistributions of source code must retain the above copyright notice, this list of conditions and the following disclaimer.
- Redistributions in binary form must reproduce the above copyright notice, this list of conditions and the following disclaimer in the documentation and/or other materials provided with the distribution.
- Neither the name of the Xiph.org Foundation nor the names of its contributors may be used to endorse or promote products derived from this software without specific prior written permission.
THIS SOFTWARE IS PROVIDED BY THE COPYRIGHT HOLDERS AND CONTRIBUTORS "AS IS" AND ANY EXPRESS OR IMPLIED WARRANTIES, INCLUDING, BUT NOT LIMITED TO, THE IMPLIED WARRANTIES OF MERCHANTABILITY AND FITNESS FOR A PARTICULAR PURPOSE ARE DISCLAIMED. IN NO EVENT SHALL THE FOUNDATION OR CONTRIBUTORS BE LIABLE FOR ANY DIRECT, INDIRECT, INCIDENTAL, SPECIAL, EXEMPLARY, OR CONSEQUENTIAL DAMAGES (INCLUDING, BUT NOT LIMITED TO, PROCUREMENT OF SUBSTITUTE GOODS OR SERVICES; LOSS OF USE, DATA, OR PROFITS; OR BUSINESS INTERRUPTION) HOWEVER CAUSED AND ON ANY THEORY OF LIABILITY, WHETHER IN CONTRACT, STRICT LIABILITY, OR TORT (INCLUDING NEGLIGENCE OR OTHERWISE) ARISING IN ANY WAY OUT OF THE USE OF THIS SOFTWARE, EVEN IF ADVISED OF THE POSSIBILITY OF SUCH DAMAGE.
If you have any questions or comments relating to Samsung products, please contact the SAMSUNG customer care centre.
Area Contact Centre Web Site ALBANIA 42 27 5755 www.samsung.com AUSTRIA 0810 - SAMSUNG (7267864, € 0.07/min) www.samsung.com BELGIUM 02-20 1-24-18 www.samsung.com/be (Dutch)www.samsung.com/be_fr (French) BOSNIA 05 133 1999 www.samsung.com BULGARIA 0700 1 33 11 www.samsung.com CROATIA 062 SAMSUNG (062 726 7864) www.samsung.com CZECH 800 - SAMSUNG (800-726786) www.samsung.com DENMARK 70 70 19 70 www.samsung.com FINLAND 030 - 6227 515 www.samsung.com FRANCE 01 48 63 00 00 www.samsung.com GERMANY 01805 - SAMSUNG(726-7864 € 0,14/Min) www.samsung.com CYPRUS 8009 4000 only from landline www.samsung.com GREECE 80111-SAMSUNG (80111 726 7864) only from land line(+30) 210 6897691 from mobile and land line www.samsung.com HUNGARY 06-80-SAMSUNG(726-7864) www.samsung.com ITALIA 800-SAMSUNG(726-7864) www samsung.com KOSOVO +381 0113216899 www.samsung.com LUXEMBURG 261 03 710 www.samsung.com MACEDONIA 023 207 777 www.samsung.com MONTENEGRO 020 405 888 www.samsung.com
Area Contact Centre Web Site NETHERLANDS 0900-SAMSUNG (0900-7267864) (€ 0,10/Min) www.samsung.com NORWAY 815-56 480 www.samsung.com POLAND 0 801-1SAMSUNG(172-678)+48 22 607-93-33 www.samsung.com PORTUGAL 808 20-SAMSUNG (808 207267) www.samsung.com ROMANIA 08010 SAMSUNG (08010 7267864) only from landline(+40) 21 206 01 10 from mobileand land line www.samsung.com SERBIA 0700 Samsung (0700 7267864) www.samsung.com SLOVAKIA 0800 - SAMSUNG(0800-726786) www.samsung.com SPAIN 902 - 1 - SAMSUNG (902 172678) www.samsung.com SWEDEN 0771 726 7864 (SAMSUNG) www.samsung.com Switzerland 0848 - SAMSUNG(7267864,CHF 0.08/min) www.samsung.com/chwww.samsung.com/ch_fr(French) U.K 0330 SAMSUNG (7267864) www.samsung.com EIRE 0818 717100 www.samsung.com LITHUANIA 8-800-77777 www.samsung.com LATVIA 8000-7267 www.samsung.com ESTONIA 800-7267 www.samsung.com

Correct disposal of batteries in this product
(Applicable in the European Union and other European countries with separate battery return systems.)
This marking on the battery, manual or packaging indicates that the batteries in this product should not be disposed of with other household waste at the end of their working life. Where marked, the chemical symbols Hg, Cd or Pb indicate that the battery contains mercury, cadmium or lead above the reference levels in EC Directive 2006/66. If batteries are not properly disposed of, these substances can cause harm to human health or the environment.
To protect natural resources and to promote material reuse, please separate batteries from other types of waste and recycle them through your local, free battery return system.

Correct Disposal of This Product (Waste Electrical & Electronic Equipment)
(Applicable in the European Union and other European countries with separate collection systems)
This marking on the product, accessories or literature indicates that the product and its electronic accessories (e.g. charger, headset, USB cable) should not be disposed of with other household waste at the end of their working life. To prevent possible harm to the environment or human health from uncontrolled waste disposal, please separate these items from other types of waste and recycle them responsibly to promote the sustainable reuse of material resources.
Household users should contact either the retailer where they purchased this product, or their local government office, for details of where and how they can take these items for environmentally safe recycling.
Business users should contact their supplier and check the terms and conditions of the purchase contract. This product and its electronic accessories should not be mixed with other commercial wastes for disposal.
Wireless Audio with Dock (Lecteur audio sans fil avec station d'accueil) manuel d'utilisation
imaginez les possibilités
Merci d'avoir choisi cet appareil Samsung.
Pour obtenir une assistance plus complète,
veuillez enregistrer votre
www.samsung.com/register
caractéristiques
Lecture AllShare
Cette fonction permet d'écouter la musique enregistrée sur vos appareils (ex. : ordinateur, Smartphone ou serveur NAS) à l'aide du lecteur audio sans fil avec station d'accueil via une connexion réseau.
AirPlay
La technologie Airplay permet d'écouter la musique stockée sur vos appareils Apple à l'aide du lecteur audio sans fil avec station d'accueil.
Enceintes de la station d'accueil Dual Docking Audio
La station d'accueil dual docking pour appareils Samsung Galaxy ou Apple permet le chargement et la lecture de fichiers stockés sur ces appareils via ses enceintes intégrées.
Prise en charge de la fonction USB Host
Vous pouvez connecter des périphériques de stockage USB externes (lecteur MP3, mémoire flash USB, etc.) afin d'en lire les fichiers musicaux à l'aide de la fonction USB HOST du lecteur audio sans fil avec station d'accueil.
Fonction Bluetooth
Vous pouvez connecter un périphérique Bluetooth au lecteur audio sans fil avec station d'accueil pour écouter de la musique stockée sur le périphérique avec un son stéréo de grande qualité, le tout sans fil !
aptX®
aptX permet d'écouter un son stéréo Bluetooth de haute qualité, en délivrant une qualité audio câblée via une connexion sans fil.
Licence


AirPlay, le logo AirPlay, iPhone, iPod, iPod classic, iPod nano, iPod shuffle et iPod touch sont des marques de commerce d'Apple Inc., déposées aux États-Unis et dans d'autres pays. iPad est une marque commerciale d'Apple Inc.
consignes de sécurité
AVeRTiSSeMenTS ReLATiFS À LA SÉcURiTÉ
POUR LIMITER LES RISQUES DE DÉCHARGE ÉLECTRIQUE, NE RETIREZ JAMAIS LE CACHE (NI L'ARRIÈRE DE L'APPAREIL). LES PIÈCES QU'IL CONTIENT NE SONT PAS RÉPARABLES PAR L'UTILISATEUR. VEUILLEZ CONTACTER UN TECHNICIEN QUALIFIÉ POUR TOUTE RÉPARATION.


Ce symbole indique la présence d'une tension dangereuse dans l'appareil, présentant un risque de décharge électrique ou de blessure.

Ce symbole indique que des instructions importantes accompagnent le produit.
AVeRTiSSeMenT : Pour réduire les risques d'incendie ou de décharge électrique, veuillez ne pas exposer cet appareil à la pluie ou à l'humidité.
ATTenTiOn : POUR ÉVITER LES RISQUES DE DÉCHARGE ÉLECTRIQUE, VEILLEZ À FAIRE CORRESPONDRE LA BROCHE LA PLUS LARGE DE LA PRISE À L'EMPLACEMENT LE PLUS LARGE, EN L'INSÉRANT COMPLÈTEMENT.
- Cet appareil doit toujours être branché à une prise CA équipée d'une broche de mise à la terre.
- Pour débrancher l'appareil, il convient de retirer la fiche de la prise murale, laquelle doit donc être facilement accessible.
ATTenTiOn
- Évitez toute projection d'eau sur l'appareil. Ne posez jamais d'objets contenant un liquide (ex : un vase) sur l'appareil.
- Pour éteindre complètement l'appareil, vous devez retirer le cordon d'alimentation de la prise murale. Par conséquent, le cordon d'alimentation doit être facilement accessible à tout moment.
CE!
Par la présente, Samsung Electronics déclare que cette [Lecteur audio sans fil avec station d'accueil] est conforme aux exigences essentielles et autres dispositions relatives de la Directive 1999/5/CE.
La Déclaration de Conformité est disponible sur le site Web http://www.samsung.com.
Pour la consulter, accédez à la rubrique Support (Assistance) > Search Product Support (Rechercher l'assistance du produit), puis entrez le nom du modèle.
Cet équipement peut être utilisé dans tous les pays de l'Union européenne.
En France, cet équipement ne peut être utilisé qu'en intérieur.

Assurez-vous que l'alimentation CA de votre domicile est conforme aux instructions indiquées au dos de l'appareil. Posez votre appareil sur une surface horizontale appropriée (un meuble stable par exemple) en veillant à laisser un espace de 70 à 100 mm autour de ce dernier afin de permettre sa ventilation.
Veillez à ne pas obstruer les orifices de ventilation. Ne posez pas l'appareil sur un amplificateur ou un autre appareil susceptible de chauffer. Cet appareil est conçu pour une utilisation en continu. Pour éteindre complètement l'appareil, débranchez la fiche CA de la prise murale. Débranchez l'appareil si vous envisagez de ne pas l'utiliser durant une longue période.

natural_image
Illustration of a front-mounted speaker emitting sound waves, with a window and lightning bolt in the background (no text or symbols)
En cas d'orage, débranchez la fiche CA de la prise murale. Les crêtes de tension occasionnées par l'éclair risquent d'endommager l'appareil.

natural_image
Illustration of a dual-camera device with sun, wind, and battery components (no text or symbols)
Placez le produit à l'abri de la moisissure (ex. : vases), de toute chaleur excessive (ex. : cheminées) ou d'appareils susceptibles de générer des champs magnétiques ou électriques importants. Débranchez le câble d'alimentation de l'alimentation CA en cas de dysfonctionnement de l'appareil.
Ce produit n'est pas destiné à un usage industriel. Cet appareil est destiné exclusivement à un usage personnel.
De la condensation peut se former si votre produit est stocké dans un lieu où la température est basse.
Si l'appareil a été transporté pendant l'hiver, attendez environ 2 heures pour qu'il atteigne la température ambiante avant toute utilisation.

natural_image
Simple line drawing of a room with a projector and sun symbol (no text or labels)
N'exposez pas l'appareil au rayonnement direct du soleil ou à toute autre source de chaleur. Cela risquerait d'entraîner une surchauffe ou un dysfonctionnement de l'appareil.

Les batteries utilisées dans ce produit contiennent des produits chimiques néfastes pour l'environnement.
Ne jetez pas les batteries avec vos déchets ménagers.
table des matières
CARACTÉRISTIQUES

CONSIGNES DE SÉCURITÉ

MISE EN ROUTE

DESCRIPTION

TÉLÉCOMMANDE

MISE SOUS TENSION ET CONTRÔLE DU VOLUME

BRANCHEMENTS

LECTURE

FONCTIONS

DÉPANNAGE

ANNEXES

2 Caractéristiques
2 Licence
3 Avertissements relatifs à la sécurité
4 Consignes
6 Avant de lire le manuel d'utilisation
6 Contenu
7 Sommet/Façade/Panneau arrière
9 Boîtier de la télécommande
10 Mise sous et hors tension de l'appareil
10 Réglage du volume
11 Installation du tore de ferrite sur le câble d'alimentation
11 Installation d'un noyau en ferrite sur le cable lan
12 Utilisation de la protection intermédiaire
13 Branchement d'un appareil au Double Dock
14 Branchement d'un appareil audio au port AUX IN (ENTRÉE AUX.)
15 Connexion à votre réseau
21 Connexion aux peripheriques Bluetooth
23 Utilisation du mode TV (SoundShare)
23 Utilisation du mode d'accueil avec des appareils
Samsung Galaxy et Apple
25 Lecture en mode Bluetooth
26 Utilisation du mode USB
27 Lecture en mode AirPlay et AllShare
28 Fonctions de base
29 Fonctions avancées
30 Mise à niveau du logiciel (mode USB uniquement)
31 Dépannage
32 Caractéristiques techniques
mise en route
AVANT DE LIRE LE MANUEL D'UTILISATION
Prenez connaissance des termes suivants avant de lire le manuel d'utilisation.
Icônes utilisées dans ce manuel
Icône Terme Définition Attention Indique une situation dans laquelle une fonction est inopérante ou des paramètres peuvent être annulés. Remarque Indique des astuces ou des instructions sur la page qui aident à utiliser une fonction.
Consignes de sécurité et dépannage
1) Veillez à bien assimiler les instructions de sécurité avant d'utiliser ce produit. (Voir page 3)
2) En cas de problème, reportez-vous à la section Dépannage. (Voir page 31)
Copyright
©2012 Samsung Electronics Co., Ltd.
Tous droits réservés ; il est interdit de reproduire ou de copier tout ou partie de ce manuel d'utilisation sans l'accord préalable écrit de Samsung Electronics Co., Ltd.
CONTENU
Vérifiez que les accessoires présentés ci-dessous ont bien été fournis.


\- L'aspect des accessoires peut légèrement différer des illustrations ci-dessus.
description
SOMMeT/FAÇADE/PAnneAU ARRiÈRe


natural_image
Illustration of a two-tiered analog audio device with two speakers and a top-mounted speaker (no text or symbols)

1 BOUTON LECTURE/PAUSE Permet de lire ou de mettre en pause un fichier musical. 2 BOUTON F. (FONCTION) Permet de faire défiler les modes dans l'ordre suivant : AUX. (DEL Éteint) 3 BOUTON DE VOLUME +/- Permet de régler le volume. 4 ÉCRAN D'AFFICHAGE DES FONCTIONS Lorsque vous changez de mode à l'aide du bouton Function (Fonction), l'icône du mode sélectionné s'affiche en blanc sur l'écran d'affichage des fonctions.La DEL clignote lorsque l'appareil est mis sous tension et s'arrête de clignoter lorsque l'appareil est sous tension et prêt à fonctionner. 5 DOUBLE DOCK Fournit un dock 5 broches pour les appareils Samsung Galaxy ou un dock 30 broches pour les appareils Apple. 6 PRISE LAN Permet la connexion à un réseau à l'aide d'un câble LAN. 7 BOUTON WPS/ RESET (WPS/ RÉINITIALISATION) Utilisé dans les procédures de connexion de l'appareil aux réseaux sans fil. 8 PORT USB Connectez un périphérique de stockage externe USB tel qu'un lecteur MP3 pour lire les fichiers enregistrés sur le périphérique. 9 PRISE D'ALIMENTATION Connectez le cordon d'alimentation à l'appareil 10 AUX IN (ENTRÉE AUX.) Permet la connexion à la sortie analogique d'un périphérique externe. 11 UNIQUEMENT POUR LES RÉPARATIONS Cette prise est destinée uniquement aux réparations.

- Lors de la mise sous tension de l'appareil, environ 20 secondes sont nécessaires pour le chauffage du tube à vide et la production d'un son stable.
- Pour mettre à jour le logiciel du produit via le port USB, il est nécessaire d'utiliser un périphérique de mémoire USB.

- Prenez garde lorsque vous tenez ou déplacez le produit car l'enceinte du caisson de graves s'y trouve au fond.
- Cette unité peut être connectée aux périphériques mobiles avec des niveaux de puissance audio élevés. Lorsque vous connectez cette unité à des périphériques externes avec des niveaux de puissance élevés, la puissance audio peut être réduite pour protéger l'amplificateur et les enceintes.
- Tenez la fiche lorsque vous débranchez le câble d'alimentation de la prise murale. Ne tirez pas le câble.
- Le son émis est susceptible d'être déformé si vous placez d'autres appareils électroniques sur le produit.
- Tenez l'appareil hors de portée des enfants lorsqu'il fonctionne. afin d'éviter tout risque de brûlure.
télécommande
BOÎTieR De LA TÉLÉcOMMAnDe

Insertion de la pile dans la télécommande

flowchart
graph LR
    A["Opening Body"] --> B["Cut Outer Body"]
    B --> C["Close Outer Body"]
    C --> D["Final Close Body"]
    style A fill:#f9f,stroke:#333
    style B fill:#ccf,stroke:#333
    style C fill:#cfc,stroke:#333
    style D fill:#fcc,stroke:#333
1. Ouvrez le couvercle de la télécommande en insérant votre ongle dans le jeu entre le couvercle et le boîtier de la télécommande.
Puis, soulevez le couvercle et détachez-le complètement.
2. Insérez la pile au lithium 3V.
Insérez la pile dans le compartiment en orientant l'électrode + vers le haut.
3. Fixez le couvercle de la télécommande à la télécommande. Insérez d'abord le côté supérieur puis abaissez le couvercle de manière à l'encastrer dans le boîtier de la télécommande. Ensuite, avec votre main, poussez les bords du couvercle vers le boîtier de la télécommande.

\- Faites attention à ne pas coincer votre ongle dans le jeu lorsque vous soulevez le couvercle. Vous risqueriez d'abîmer votre ongle.
Portée de la télécommande
Vous pouvez utiliser la télécommande dans un rayon maximum de 7 mètres depuis l'appareil et dans un angle horizontal maximum de 30° à partir du capteur de la télécommande.
mise sous tension et contrôle du volume
MiSe SOUS eT HORS TenSiOn De L'APPAREiL

1. Pour allumer cette unité, appuyez sur n'importe quel bouton du panneau supérieur de l'unité lorsque cette dernière est en mode Veille.
ou
Appuyez sur le bouton POWER (MARCHE/ARRÊT) de la télécommande.
2. Pour éteindre cette unité, appuyez sur le bouton ▶II du panneau supérieur de l'unité pendant plus de 3 secondes.
ou
Appuyez à nouveau sur le bouton POWER (MARCHE/ARRÊT) de la télécommande.

\- En raison du temps de préchauffage de l'amplificateur, l'appareil se met en route au bout de 20 secondes.
RÉGLAGe DU VOLUME
Utilisez les boutons +, - pour régler le volume. Les DEL de fonction s'allument de gauche à droite lorsque vous augmentez le volume et de droite à gauche lorsque vous le baissez. La DEL s'éteint si vous augmentez le volume lorsqu'il est déjà réglé au maximum, ou lorsque vous baissez le volume s'il est déjà réglé au minimum.

Appuyez sur le bouton de +/- situé dans la partie droite du sommet de l'appareil.
ou
Appuyez sur le bouton VOL +/- de la télécommande.

\- Le volume augmente ou diminue lorsque vous appuyez sur VOL (VOLUME) +/-
\- Vous pouvez également utiliser les commandes de volume des appareils branchés à l'aide de la technologie Dual Dock ou Bluetooth pour régler le volume. Notez que les possibilités d'utiliser les commandes de volume des appareils connectés à l'aide de la technologie Bluetooth pour régler le volume peuvent être limitées.
branchements
inSTALLATiOn DU TORe De FeRRiTe SUR Le cÂBLe D'ALiMenTATiOn

natural_image
Simple line drawing of a 3D rectangular block with internal slot and dotted lines indicating hidden edges (no text or symbols)
Soulevez pour déverrouiller et ouvrir le tore de ferrite.


natural_image
Technical line drawing of a mechanical component or housing (no text or symbols)


natural_image
Simple line drawing of a cable connector with a terminal plug (no text or symbols)
Verrouillez à nouveau le tore.


natural_image
Simple line drawing of a mechanical component with two wires (no text or symbols)
Enroulez trois fois le câble d'alimentation autour du tore. (Commencez l'enroulement à 5-10 cm des prises)
inSTALLATiOn D'Un nOYAU en FeRRiTe SUR Le cABLe LAn

natural_image
Simple line drawing of a device casing with no text or symbols
Soulevez pour déverrouiller et ouvrir le tore de ferrite.


natural_image
Two stacked cylindrical electronic components with mounting brackets, shown in open and closed views (no text or symbols)


natural_image
Simple line drawing of a connector with two wires (no text or symbols)
Verrouillez à nouveau le tore.


natural_image
Diagram of a mechanical assembly with two stacked components and a curved line above (no text or symbols)
Placez le câble LAN sur le tore ouvert.
UTILISATION DE LA PROTECTION INTERMÉDIAIRE
Installez le cache de compensation si vous souhaitez connecter un appareil Samsung Galaxy ou Apple ne disposant pas de cache de protection sur le Dual Dock.
\- Utilisez-le pour une installation stable du périphérique compte tenu de sa forme.
Le double dock est également livré avec un cache protecteur pour le connecteur 30 broches des appareils Apple. Utilisez le cache protecteur du connecteur 30 broches lorsque vous fixez le périphérique Samsung Galaxy 5 broches.
Pour de plus amples informations, reportez-vous aux illustrations insérées ci-dessous.
Lorsque vous connectez un appareil, utilisez un support approprié en prenant en compte le cache de protection et la forme de l'appareil pour garantir la stabilité. Utilisation pour les appareils ne disposant pas de cache de protection.

\- Il n'est pas possible d'installer sur le double dock un appareil possédant un étui épais de plus de 1,5 mm ou possédant un fond arrondi inhabituel.
BRANCHEMENT D'UN APPAREIL AU DOUBLE DOCK
Comment brancher un appareil au double dock ?

flowchart
graph TD
    A["Hand pressing down on camera"] --> B["Adjusting touch panel with arrow"]
    B --> C["Assembly step with hand holding key"]
    C --> D["Adjusting touch panel with arrow and rotation indicator"]
1. Le compartiment du dock DUAL DOCK est situé au dos de l'appareil. Pour l'ouvrir, appuyez dessus en douceur.
2. Appuyez plusieurs fois sur le bouton F. situé sur la partie supérieure du lecteur audio sans fil avec station d'accueil jusqu'à ce que l'icône apparaisse à l'écran.
\- Chaque fois que vous appuyez sur ce bouton, les fonctions défilent dans l'ordre suivant :
→ ➕ ➔ ➔ ➔ ➔ ➔ ➔ ➔ ➔ ➔ ➔ ➔ ➔ ➔ ➔ ➔ ➔ ➔ ➔ ➔ ➔ ➔ ➔ ➔ ➔ ➔ ➔ ➔ ➔ ➔ ➔ ➔ ➔ ➔ ➔ ➔ ➔ ➔ ➔ ➔ ➔ ➔ ➔ ➔ ➔ ➔ ➔ ➔ ➔ ➔ ➔ ➄
\- Le mode sélectionné s'affiche en blanc sur l'écran d'affichage des fonctions.
3. Si vous disposez d'un appareil Samsung Galaxy, branchez le périphérique au connecteur à 5 broches (le plus petit) pour le brancher au double dock. Si vous disposez d'un appareil Apple, branchez l'appareil au connecteur à 30 broches (le plus grand) du double dock.
4. Soulevez le support de l'appareil comme indiqué pour l'empêcher de glisser ou de tomber du double dock.

- Allumez votre appareil Samsung Galaxy avant de le connecter au double dock.
- Cet appareil ne permet pas le branchement simultané d'appareils Samsung Galaxy et Apple.
- Branchez l'appareil Samsung Galaxy et l'appareil Apple à la station d'accueil audio avant de démarrer le mode d'accueil. (Voir page 23)
BRANCHEMENT D'UN APPAREIL AUDIO AU PORT AUX IN (ENTRÉE AUX.)
Cette section explique comment relier l'appareil à un périphérique audio.
Cet appareil est équipé d'une prise analogique audio pour le branchement à un périphérique audio.

ENTRÉE AUX.
1. Branchez la prise pour écouteurs du périphérique externe ou du périphérique audio à la source AUX IN (ENTRÉE AUX) (Audio) située à l'arrière de l'unité.
2. Appuyez plusieurs fois sur le bouton F. jusqu'à ce que les DEL de fonction s'éteignent.
\- Le mode AUX est actif lorsque aucune DEL de fonction n'est allumée.

\- Avant de déplacer ou d'installer l'appareil, mettez-le hors tension et débranchez le cordon d'alimentation.
CONNEXION À VOTRE RÉSEAU
Vous pouvez relier votre lecteur audio sans fil avec station d'accueil au routeur réseau en utilisant l'une des méthodes décrites aux pages suivantes.
Connexion du lecteur audio sans fil avec station d'accueil à un réseau câblé

flowchart
graph TD
    A["Router"] -->|ou| B["Modem large bande (avec routeur intégré)"]
    B --> C["Service large bande"]
    B --> D["Service large bande"]
    B --> E["Modem large bande"]
    E --> F["Computer"]
    B --> G["Service large bande"]
    G --> H["Modem large bande"]
    H --> I["Service large bande"]
Veillez à bien éteindre le lecteur audio sans fil avec station d'accueil avant de brancher le câble LAN.
1. Éteignez le lecteur audio sans fil avec station d'accueil.
2. Connectez le lecteur audio sans fil avec station d'accueil au routeur à l'aide d'un câble LAN.
3. Allumez le lecteur audio sans fil avec station d'accueil.
4. Appuyez plusieurs fois sur le bouton F. situé sur la partie supérieure du lecteur audio sans fil avec station d'accueil jusqu'à ce que l'icône ou apparaisse à l'écran.
\- Chaque fois que vous appuyez sur ce bouton, les fonctions défilent dans l'ordre suivant :

5. Le voyant ou callume en rouge puis devient fixe une fois le lecteur audio sans fil avec station d'accueil connecté au routeur.

- Si vous avez connecté le câble LAN lorsque l'appareil était allumé, éteignez l'appareil puis rallumez-le.
- Si la connexion au réseau n'a pas pu être établie, débranchez le câble LAN et rebranchez-le, puis redémarrez le produit.
- Les utilisateurs xDSL doivent passer par un routeur pour la connexion au réseau.
Connexion du lecteur audio sans fil avec station d'accueil à un réseau sans fil
Cette section décrit les 4 méthodes de connexion du lecteur audio sans fil avec station d'accueil à un réseau sans fil.

- Certaines opérations relatives au réseau peuvent être différentes des opérations expliquées en fonction des performances et des fonctions du PA utilisé prises en charge.
- Afin de configurer la connexion réseau au routeur ou au modem, reportez-vous au manuel d'utilisation du routeur ou du modem.
- Le lecteur audio sans fil avec station d'accueil prend en charge les protocoles de sécurité suivants :
- WEP → Open
\- WPA-PSK → TKIP
\- WPA2-PSK → AES
- Vous pouvez également connecter le lecteur audio sans fil avec station d'accueil à un réseau sans système de sécurité ni mot de passe.
- Si le routeur sans fil prend en charge le protocole DHCP, le lecteur audio sans fil avec station d'accueil pourra utiliser une adresse DHCP ou une adresse IP fixe pour la connexion au réseau sans fil.
- Sélectionnez un canal sur le routeur sans fil qui n'est pas en cours d'utilisation. Si le canal défini pour le routeur sans fil est actuellement en cours d'utilisation par un autre périphérique situé à proximité, il pourra en résulter des interférences et un échec de commutation.
- Lorsque le mode Pure High-throughput (Greenfield) 802.11n est sélectionné et le type de cryptage de votre routeur défini sur WEP ou TKIP, le lecteur audio sans fil avec station d'accueil ne prend pas en charge les connexions compatibles avec les nouvelles spécifications de certification Wi-Fi.
- Par nature, le réseau LAN peut provoquer des interférences, selon les conditions de fonctionnement (performance du routeur, distance, obstacles, interférences avec d'autres appareils radio, etc.).
- WPS(PBC) / WPS(PIN) ne fonctionne pas lorsque le protocole sécurité est réglé sur WEP.
- Si vous n'arrivez pas à configurer le réseau, appuyez sur le bouton WPS/RESET (WPS/RÉINITIALISATION) situé à l'arrière jusqu'à ce que le voyant ou clignote deux fois. Patientez jusqu'à ce que le voyant rouge cesse de clignoter, éteignez et rallumez l'appareil. Réessayez.
Cette méthode de configuration réseau est destinée aux utilisateurs d'appareils Apple qui disposent de la version iOS 5.0 ou d'une version ultérieure.
1. Connectez l'appareil Apple à votre réseau.
2. Sélect □ sur le lecteur audio sans fil avec station d'accueil, puis connectez votre appareil iPod/iPhone/iPad au double dock.
3. Maintenez enfoncé le bouton WPS/RESET (WPS/RÉINITIALISATION) situé à l'arrière du lecteur audio sans fil avec station d'accueil à l'aide de la pointe d'un stylo ou d'un objet similaire pendant plus d'une seconde. L'icône clignote une fois. Relâchez le bouton.
4. Sélectionnez dans le menu contextuel sur l'écran de l'appareil Apple.
5. Réglez le mode sur ▲ Le voyant clignote alors en rouge, puis passe au blanc fixe.
Une fois le lecteur audio sans fil avec station d'accueil connecté, le voyant arrête de clignoter en rouge et s'affiche en blanc.
• La connexion réseau est terminée.
Connexion du lecteur audio sans fil avec station d'accueil à l'aide d'un WPS (PBC)
1. Appuyez plusieurs fois sur le bouton F.situé sur la partie supérieure du lecteur audio sans fil avec station d'accueil jusqu'à ce que l'icône ou apparaisse à l'écran.
\- Chaque fois que vous appuyez sur ce bouton, les fonctions défilent dans l'ordre suivant :
$$
\square \rightarrow \square \rightarrow \times \rightarrow \leftarrow \rightarrow \square \rightarrow \square \rightarrow \text { AUX. (DEL Éteint) }
$$
Le voyant passe du blanc au rouge et clignote.
2. Maintenez enfoncé le bouton WPS/RESET (WPS/RÉINITIALISATION) situé à l'arrière de l'appareil à l'aide de la pointe d'un stylo ou d'un objet similaire pendant plus d'une seconde. Le voyant clignote une fois en blanc. Après que le voyant a clignoté, relâchez le bouton.
• Le voyant clignote en rouge.

3. Appuyez sur le bouton WPS/RESET (WPS/RÉINITIALISATION) de votre routeur ou de votre modem dans les 90 secondes.
4. Une fois le lecteur audio sans fil avec station d'accueil connecté, le voyant ou passe du rouge clignotant au blanc.
• La connexion réseau est terminée.
Connexion du lecteur audio sans fil avec station d'accueil via une connexion JBC (JukeBox Connect)
1. Appuyez plusieurs fois sur le bouton F. situé sur la partie supérieure du lecteur audio sans fil avec station d'accueil jusqu'à ce que l'icône ou apparaisse à l'écran.
\- Chaque fois que vous appuyez sur ce bouton, les fonctions défilent dans l'ordre suivant :

Le voyant passe du blanc au rouge et clignote.
2. Maintenez enfoncé le bouton WPS/RESET (WPS/RÉINITIALISATION) situé à l'arrière de l'appareil à l'aide de la pointe d'un stylo ou d'un objet similaire pendant plus de 5 secondes. Le voyant clignote une fois en blanc. Patientez jusqu'à ce que le voyant clignote deux fois de plus en blanc, puis relâchez le bouton WPS/RESET (WPS/RÉINITISALITION).
\- Le voyant clignote en rouge, puis cesse de clignoter et reste rouge lorsque l'appareil accède au mode de réglage du réseau.
3. Pour connecter le lecteur audio sans fil avec station d'accueil au réseau, recherchez "Samsung W\_Audio E750 XXXXXXX" dans la liste des paramètres Wi-Fi de votre périphérique Wi-Fi, puis sélectionnez-le.
Ex.) Appareil Samsung Galaxy

flowchart
graph LR
    A["Wi-Fi settings"] --> B["WPS button connection"]
    B --> C["Network notification"]
    C --> D["WPS button connection"]
    D --> E["Connect to Samsung W_Audio E750 XXXXXXX"]
    E --> F["Connect Forget Cancel"]
4. Ouvrez le navigateur Web du périphérique Wi-Fi, puis saisissez "http://192.168.1.1" dans la barre d'adresse du navigateur Internet pour accéder à la page Web du lecteur audio sans fil avec station d'accueil.
5. Dans le champ "Service Set ID (SSID) (Identifiant du réseau sans fil (SSID))", sélectionnez le point d'accès (routeur ou modem) auquel votre Wi-Fi est connecté.
6. Saisissez le mot de passe du point d'accès dans le champ "WPA Passphrase (Phrase secrète WPA)". Si vous souhaitez définir l'IP statique, sélectionnez les paramètres avancés. Saisissez l'adresse IP statique souhaitée.
7. Appuyez sur .
Si un avertissement s'affiche sur votre périphérique Wi-Fi, cliquez sur OK.
8. Une fois que la connexion entre le lecteur audio sans fil avec station d'accueil et le point d'accès sélectionné est établie, le voyant sur le lecteur audio sans fil avec station d'accueil devient blanc.
\- La connexion au lecteur audio sans fil avec station d'accueil est terminée.
L'image ci-dessus représente l'écran qui apparaît après avoir effectué la connexion réseau avec succès, ainsi vous pouvez lancer AirPlay ou DLNA normalement.


Connexion du lecteur audio sans fil avec station d'accueil à l'aide d'un WPS PIN
1. Appuyez plusieurs fois sur le bouton F. situé sur la partie supérieure du lecteur audio sans fil avec station d'accueil jusqu'à ce que l'icône ou apparaisse à l'écran.
\- Chaque fois que vous appuyez sur ce bouton, les fonctions défilent dans l'ordre suivant :
□ → □ → ✗ → ⇌ → △ → ▽ → AUX. (DEL Éteint)
Le voyant passe du blanc au rouge et clignote.
2. Maintenez enfoncé le bouton WPS/RESET (WPS/RÉINITIALISATION) situé à l'arrière de l'appareil à l'aide de la pointe d'un stylo ou d'un objet similaire pendant plus de 5 secondes. Le voyant clignote une fois en blanc. Patientez jusqu'à ce que le voyant clignote deux fois de plus en blanc, puis relâchez le bouton WPS/RESET (WPS/RÉINITISALITION).
\- Le voyant clignote en rouge, puis cesse de clignoter et reste rouge lorsque l'appareil accède au mode de réglage du réseau.
3. Pour connecter le lecteur audio sans fil avec station d'accueil au réseau, recherchez "Samsung W\_Audio E750 XXXXXXX" dans la liste des paramètres Wi-Fi de votre périphérique Wi-Fi, puis sélectionnez-le.
Ex.) Appareil Samsung Galaxy

flowchart
graph LR
    A["Wi-Fi settings"] --> B["WPS button connection\nConfiguration: Wi-Fi network configuration, automaticity"]
    B --> C["1A23E\n4B51D\n3E79A\nSamsung W_Audio E750 XXXXXXX"]
    C --> D["Network notification\nWiFi button connection\nConnect to Samsung W_Audio E750 XXXXXXX\nConnect\nForget\nCancel"]
    D --> E["WiFi settings"]
    E --> F["WiFi\nConnected to WiFi audio signal (8.7G, 27.1A, 10)"]
    F --> G["Network notification\nNotify any other network connections to WiFi"]
    G --> H["WPS button connection\nConnect to WiFi audio signal (8.7G, 27.1A, 10)"]
    H --> I["WiFi networks\nScenario\nSamsung W_Audio E750 XXXXXXX\nConnect to WiFi audio signal (8.7G, 27.1A, 10)"]
4. Ouvrez le navigateur Web du périphérique Wi-Fi que vous souhaitez connecter et saisissez "http://192.168.1.1" dans la barre d'adresse du navigateur Internet.
5. Appuyez sur ou touchez Samsung Wireless Audio with Dock Status.
6. Le numéro WPS PIN s'affiche au bas de l'écran. Notez le numéro puis éteignez le lecteur audio sans fil avec station d'accueil et rallumez-le.
7. Accédez à la page de configuration Wi-Fi de votre point d'accès (routeur ou modem sans fil) à l'aide de votre ordinateur ou d'un autre périphérique connecté à Internet, puis définissez les paramètres Wi-Fi sur la méthode PIN. Reportez-vous au manuel d'utilisation de votre routeur ou modem pour obtenir des instructions.
8. Saisissez le numéro WPS PIN du lecteur audio sans fil avec station d'accueil dans le champ approprié de la page de configuration Wi-Fi.
9. Maintenez enfoncé le bouton WPS/RESET (WPS/RÉINITIALISATION) situé à l'arrière du lecteur audio sans fil avec station d'accueil à l'aide de la pointe d'un stylo ou d'un objet similaire pendant plus de 10 secondes en mode □ ou ▶le voyant clignote une fois en blanc, puis deux fois. Patientez jusqu'à ce que le voyant clignote trois fois, puis relâchez le bouton.
• L'icône clignote en rouge.
10. Si la connexion entre le lecteur audio sans fil avec station d'accueil et le point d'accès est établie dans les 90 secondes, le voyant passe du rouge au blanc.
\- La connexion au lecteur audio sans fil avec station d'accueil est terminée.

\- Cet appareil ne prend pas en charge la fonction Wi-Fi Direct.
La connexion directe peut être établie dans certains cas, mais cet appareil ne prend pas en charge cette fonction.
Vous pouvez connecter le lecteur audio sans fil avec station d'accueil à un périphérique Bluetooth et écouter de la musique en son stéréo de haute qualité, le tout sans fil.
Qu'est-ce que Bluetooth?
La technologie Bluetooth permet aux appareils compatibles avec Bluetooth de s'interconnecter facilement en utilisant une courte connexion sans fil.
- Selon l'usage, un appareil Bluetooth peut entraîner des interférences ou des défaillances dans les cas suivants :
- Un membre de votre corps est en contact avec le système de réception/transmission du périphérique Bluetooth ou du lecteur audio avec station d'accueil.
- Des variations électriques peuvent se produire en raison de l'obstruction d'un mur, d'un coin ou d'une cloison de bureau;
- Il est exposé à des interférences électriques causées par des appareils fonctionnant sur la même bande de fréquence, notamment des équipements médicaux, des fours à micro-ondes ou des RL sans fil.
- Maintenez le lecteur audio sans fil avec station d'accueil et le périphérique Bluetooth à proximité lors de l'appariement.
- Plus la distance est grande entre le lecteur audio sans fil avec station d'accueil et le périphérique Bluetooth, plus la qualité de la transmission se dégrade. Si la distance dépasse la portée opérationnelle de Bluetooth, la connexion se perd.
- Dans les zones de faible réception, il est possible que la connexion Bluetooth ne fonctionne pas correctement.
- La connexion Bluetooth ne fonctionne que lorsque le périphérique Bluetooth est proche de la station d'accueil. La connexion est coupée automatiquement si le périphérique Bluetooth est déplacé hors de la portée. Même si la distance est respectée, il est possible que la qualité sonore soit détériorée par des obstacles (ex. : murs, portes).
- Cet appareil sans fil peut causer du brouillage électrique pendant son utilisation.

- Il peut vous être demandé de saisir un code PIN (mot de passe) lors de la connexion du périphérique Bluetooth au lecteur audio sans fil avec station d'accueil. Si la fenêtre d'entrée du code NIP s'affiche, entrez <0000>.
- Le lecteur audio sans fil avec station d'accueil prend en charge les données d'ordinateur monocarte (44,1 kHz, 48 kHz).
La fonction AVRCP n'est pas prise en charge.
- Connectez uniquement un appareil Bluetooth qui prend en charge la fonction A2DP (AV).
- Vous ne pouvez pas connecter un appareil Bluetooth qui ne prend en charge que la fonction ML (mains libres).
- Un seul appareil Bluetooth peut être jumelé à la fois.
- Une fois le lecteur audio sans fil avec station d'accueil éteint et le périphérique associé déconnecté, l'appariement n'est pas rétabli automatiquement. Pour les reconnecter, vous devez apparier les périphériques à nouveau.
- Le lecteur audio sans fil avec station d'accueil peut rencontrer des difficultés à effectuer des recherches ou des connexions dans les cas suivants :
\- Pprésence d'un champ électrique puissant autour du lecteur audio sans fil avec station d'accueil ;
\- Plusieurs périphériques Bluetooth sont connectés simultanément au lecteur audio sans fil avec station d'accueil.
\- L'appareil Bluetooth est éteint, défaillant ou il n'est pas en place.
\- Notez que des appareils tel qu'un four à micro-ondes, un adaptateur de RL sans fil, une lampe fluorescente ou une chaudière à gaz qui utilisent la même gamme de fréquences que l'appareil Bluetooth peuvent causer du brouillage électrique.
CONNEXION AUX PERIPHERIQUES BLUETOOTH
Cette section explique comment connecter le lecteur audio sans fil avec station d'accueil aux téléviseurs et autres périphériques Bluetooth compatibles.
Connexion d'un lecteur audio sans fil avec station d'accueil à un téléviseur Samsung 2012 compatible avec le Bluetooth (SoundShare)

natural_image
Front view of a gray electronic device with two circular buttons and a central display (no text or symbols visible)

sur l'écran du téléviseur. L'appariement avec le lecteur audio sans fil avec station d'accueil est alors terminé.
• Le témoin clignote et cesse de clignoter.
• L'appariement Bluetooth du lecteur audio sans fil avec station d'accueil est terminé.
Brancher le lecteur audio sans fil avec station d'accueil à un périphérique Bluetooth
Tout d'abord, vérifiez que votre appareil Bluetooth prend bien en charge la fonction écouteurs stéréo compatible Bluetooth.

1. Appuyez plusieurs fois sur le bouton F. situé sur la partie supérieure du lecteur audio sans fil avec station d'accueil jusqu'à ce que l'icône apparaisse à l'écran.
- Chaque fois que vous appuyez sur ce bouton, les fonctions défilent dans l'ordre suivant :
- Le mode sélectionné s'affiche en blanc sur l'écran d'affichage des fonctions.

2. Sélectionnez le menu Bluetooth sur votre périphérique Bluetooth.
(Reportez-vous au manuel d'utilisation du périphérique Bluetooth pour obtenir les instructions.)
3. Balayez ou recherchez tous les périphériques ou les écouteurs.
\- Une liste d'appareils s'affiche.
4. Sélectionnez "[Samsung]W\_Audio XXXXXX" dans la liste.
\- Si le périphérique Bluetooth ne réussit pas à s'apparier au lecteur audio sans fil avec station d'accueil, supprimez le lecteur « [Samsung]W\_Audio XXXXXX » trouvé par le périphérique Bluetooth, recherchez à nouveau le lecteur audio sans fils avec station d'accueil, puis répétez les étapes 2, 3 et 4.
UTILISATION DU MODE TV (SoundShare)
Appuyez sur le bouton Fpour sélectionner le mode ,puls connectez le téléviseur au lecteur audio sans fil avec station d'accueil. (Voir page 21)
• L'appareil lit le son du téléviseur lorsqu'il est connecté à celui-ci.
- Si vous modifiez la source d'entrée Bluetooth du lecteur audio sans fil avec station d'accueil ou si vous la désactivez, le son est à nouveau émis par le téléviseur.

natural_image
Circular icon with plus, minus, and square symbols inside, no readable text or numbers

\- Vous ne pouvez contrôler le volume qu'avec la télécommande du lecteur audio sans fil avec station d'accueil.
UTILISATION DU MODE D'ACCUEIL AVEC DES APPAREILS SAMSUNG GALAXY ET APPLE
Appuyez sur le bouton F. pour sélectionner le mode ☐, puis connectez l'appareil Samsung Galaxy ou Appel au dock audio. (Voir page 13)
natural_image
Circular device control knob with plus, minus, and function buttons (no text or symbols beyond basic labels)
1. Appuyez légèrement sur l'icône Play Store (Android Market) de l'écran principal de l'appareil Samsung Galaxy.
2. Appuyez sur l'icône de recherche affichée à l'écran pour accéder à la barre de recherche.
3. Dans la barre de recherche, saisissez [Samsung Wireless Audio Dock] puis recherchez.
4. Trouvez-le dans la liste des résultats de la recherche puis tapez [Samsung Wireless Audio Dock] pour lancer le téléchargement.
5. Appuyez sur [install (Installer)].
Pour lire de la musique, suivez ces étapes :
1-1. Si vous démarrez l'application alors que le lecteur audio sans fil avec station d'accueil est le seul périphérique disponible pour la connexion Bluetooth, la sélection de PLAY (LECTURE) sur votre périphérique établit automatiquement la connexion Bluetooth avec le lecteur audio sans fil avec station d'accueil et l'unité lit le morceau de musique.
1-2. S'il existe plusieurs périphériques pour la connexion Bluetooth comprenant le lecteur audio sans fil avec station d'accueil :
1) Lorsque vous démarrez l'application, la liste des périphériques pouvant être connectés au lecteur audio sans fil avec station d'accueil s'affiche.
2) Lisez la musique après avoir connecté le lecteur audio sans fil avec station d'accueil en le sélectionnant dans la liste des périphériques.
\- Si un périphérique Bluetooth était déjà associé au lecteur audio sans fil avec station d'accueil, il n'apparaît pas dans la liste et la connexion se fait automatiquement.

2. Si vous remplacez le lecteur audio sans fil avec station d'accueil que vous avez associé à votre téléphone portable, vous devez supprimer les réglages subsistants enregistrés dans votre téléphone avant d'en associer un nouveau.
• → [Clear data (Effacer les données)].

- Une fois l'application démarrée, le fonctionnement n'est pas perturbé par le chargement de votre téléphone portable à l'aide d'un chargeur ordinaire.
- Lorsque vous connectez un autre périphérique au lecteur audio sans fil avec station d'accueil après avoir connecté l'appareil Samsung Galaxy en mode dock, il se peut qu'il faille désactiver le mode Bluetooth de l'appareil Samsung Galaxy.
- Si vous n'arrivez pas à connecter l'appareil Samsung Galaxy au double dock, désactivez le mode Bluetooth de tous les autres périphériques.
à partir de l'écran principal de l'appareil Apple.
3. Sélectionnez et effectuez la lecture de la musique souhaitée.
\- La musique sera lue à travers les enceintes du lecteur audio sans fil avec station d'accueil.

\- Lors de la lecture d'une vidéo avec votre appareil, il est possible que les fonctions Play/Pause/Next/Back (Lecture/Pause/Suivant/Précédent) ne soient pas disponibles.
Utilisez le bouton de votre appareil source pour activer la fonction souhaitée.
Liste de compatibilités (Appareil Apple)
Modèles d'iPod/iPhone/iPad compatibles avec le mode dock
Mettez à jour le logiciel de votre iPod/iPhone/iPad sur la dernière version avant de l'utiliser avec cette unité.
- iPod touch (4ème génération)
- iPod touch (3ème génération)
- iPod nano (6ème génération)
- iPod nano (5ème génération)
- iPhone 4S
- iPhone 4
- iPhone 3GS
- iPad 2
- iPad
\- Selon la version du logiciel de votre iPod, votre appareil peut ne pas être compatible ou ne pas fonctionner correctement.
※ Si vous connectez un appareil Apple incompatible, la DEL de fonction iPod clignote.
LecTURe en MODE BLUeTOOTH
Appuyez sur le bouton F pour sélectionner le mode ,puis connectez le périphérique Bluetooth au lecteur audio sans fil avec station d'accueil. (Voir page 22)
Pour connecter votre périphérique Bluetooth lorsque le lecteur audio sans fil avec station d'accueil est en mode Bluetooth, recherchez le lecteur audio sans fil avec station d'accueil dans la liste Bluetooth du périphérique. Sélectionnez le lecteur audio sans fil avec station d'accueil et connectez-le. Une fois que le lecteur audio sans fil avec station d'accueil est connecté, sélectionnez et lisez la musique souhaitée.

La musique sera lue à travers les enceintes du lecteur audio sans fil avec station d'accueil.

- Si vous voulez changer le périphérique qui est connecté par Bluetooth à un autre périphérique, déconnectez le périphérique existant et essayez de connecter à l'autre périphérique que vous souhaitez utiliser.
- Durant la communication Bluetooth, les opérations Play/Pause/Next/Back (Lecture/Pause/Suivant/Précédent) peuvent ne pas être disponibles selon le téléphone portable et l'application utilisés.
- Le fonctionnement du périphérique Bluetooth associé au lecteur audio sans fil avec station d'accueil est susceptible de provoquer des discontinuités s'il est activé alors que le lecteur audio sans fil avec station d'accueil est en cours de lecture depuis l'entrée AUX.
Pour déconnecter le périphérique Bluetooth du lecteur audio sans fil avec station d'accueil
Vous pouvez annuler l'appariement Bluetooth du lecteur audio sans fil avec station d'accueil. Pour les instructions, reportez-vous au manuel d'utilisation de ce périphérique.
\- Le lecteur audio sans fil avec station d'accueil se déconnecte.
Pour déconnecter le lecteur audio sans fil avec station d'accueil du périphérique Bluetooth
Appuyez sur le bouton F. situé sur la partie supérieure du lecteur audio sans fil avec station d'accueil pour passer de ♂ à un autre mode ou appuyez sur le bouton Power (Marche/Arrêt) de la télécommande pour désactiver le lecteur audio sans fil avec station d'accueil.
\- Le périphérique actuellement connecté est alors déconnecté.

- La connexion Bluetooth ne fonctionne que lorsque le périphérique Bluetooth est proche de l'appareil. La connexion sera automatiquement coupée si la distance dépasse cette portée. Même si la distance est respectée, il est possible que la qualité sonore soit détériorée par des obstacles (ex. : murs, portes).
- Si le périphérique Bluetooth est replacé dans la portée conseillée, vous pouvez redémarrer pour rétablir la liaison avec ce périphérique.
UTILISATION DU MODE USB
1. Branchez le périphérique USB au port USB situé à l'arrière de l'appareil.
2. Appuyez plusieurs fois sur le bouton F. situé sur la partie supérieure du lecteur audio sans fil avec station d'accueil jusqu'à ce que l'icône apparaisse à l'écran.
\- Chaque fois que vous appuyez sur ce bouton, les fonctions défilent dans l'ordre suivant :

\- Le mode sélectionné s'affiche en blanc sur l'écran d'affichage des fonctions.

natural_image
Circular button with plus, minus, and anti symbols (no text or numbers)
Avant de connecter un périphérique USB
Consultez la liste ci-dessous pour vérifier la compatibilité.
- Ce produit peut ne pas être compatible avec certains types de support de stockage USB.
- Les systèmes de fichiers FAT16 et FAT32 sont pris en charge.
- Le système de fichiers NTFS n'est pas pris en charge.
- Connectez un périphérique USB directement au port USB du produit. Dans le cas contraire, vous pouvez rencontrer un problème de compatibilité USB.
- Ne connectez pas plusieurs périphériques de stockage au produit via un lecteur à cartes multiples. Il peut ne pas fonctionner correctement.
- Les protocoles PTP des caméras numériques ne sont pas pris en charge.
- Ne retirez pas le périphérique USB lorsqu'il est en cours de lecture.
- Les fichiers musicaux protégés par la technologie DRM (MP3, WMA) d'un site Web commercial ne seront pas lus.
- Les disques durs externes ne sont pas pris en charge.
- Liste de compatibilités
Format Musique Nom de fichier MP3 WMA Extension de fichier .MP3 .WMA Débit binaire 80 à 320 kbps 56 à 128 kbps Version - V8 Fréquence d'échantillonnage 44,1KHz 44,1KHz

※ Ne branchez pas simultanément votre périphérique mobile sur le port USB et sur la station d'accueil Docking pour recharger.
LECTURE EN MODE AIRPLAY ET ALLSHARE
Pour utiliser la fonction ou, le lecteur audio sans fil avec station d'accueil et l'appareil que vous essayez de relier doivent être connectés au même PA.
1. Lisez la musique de votre choix dans le menu de l'écran principal de l'appareil Apple.
2. Sélectionnez "Samsung W\_Audio E750 XXXXXXX" en appuyant sur l'icône située sur l'écran de l'appareil Apple.
- La musique sera lue à travers les enceintes du lecteur audio sans fil avec station d'accueil.


natural_image
Circular button with plus, minus, and icon buttons (no text or symbols)
※ Lorsque la connexion est établie entre iTunes et le lecteur audio sans fil avec station d'accueil à l'aide de la même adresse IP, le mode passe automatiquement au mode AirPlay lorsque vous sélectionnez le lecteur audio sans fil avec station d'accueil et lisez de la musique sur iTunes dans un mode autre que AirPlay.

\- L'appareil peut prendre de 3 à 5 secondes pour répondre à l'actionnement de la télécommande.
apparaît, sélectionnez "Samsung W\_Audio E750 XXXXXXX".
\- La musique sera lue à travers les enceintes du lecteur audio sans fil avec station d'accueil.

natural_image
Circular device with plus, minus, and function buttons (no readable text or symbols)

flowchart
graph LR
    A["My device"] --> B["Share multimedia contents with DLNA compliant devices"]
    B --> C["Videos"]
    B --> D["Pictures"]
    B --> E["Audio"]

    F["Audio"] --> G["Unknown 00:03:42"]
    F --> H["Unknown 2 00:00:57"]
    F --> I["Select device 24..."]
    F --> J["HTenkod (BAWMHEMANT... Samsung W_Audio E750"]
    F --> K["Refresh Cancel"]

    L["Audio"] --> M["Unknown 00:00:17"]
    L --> N["Unknown 2 00:00:44"]
    L --> O["Unknown 4 00:00:46"]
    L --> P["Unknown 5 00:00:44"]

\- La fonction de commande peut ne pas être prise en charge par votre périphérique selon les fonctions AudioDock de votre périphérique.
fonctions
FONCTIONS DE BASE

natural_image
Diagram showing a camera with two lenses and a circular dial labeled 'F' (no text or symbols beyond basic labels)

Utilisation du mode d'entrée
Vous pouvez sélectionner les entrées suivantes :
→ → → → → AUX. (DEL Éteint).
Appuyez sur le bouton de la télécommande correspondant au mode souhaité ou sur F. pour sélectionner l'un des modes suivants :
→ ➕ ➔ ➔ ➔ ➔ ➔ ➔ AUX. (DEL Éteint).
Mode d'entrée Affichage Mode TV Mode d'accueil Mode BLUETOOTH Mode USB Mode Airplay Mode de lecture Allshare Entrée AUX DEL Éteint

Lecture/Pause
Pendant la lecture, appuyez sur le bouton ▶II.
\- Appuyez sur le bouton ▶ II pour interrompre momentanément la lecture du fichier.
Appuyez à nouveau sur le bouton ▶ II pour lire le fichier sélectionné.

\- Cette fonction peut ne pas fonctionner dans certains modes.

Saut en avant/en Arrière
Pendant la lecture, appuyez sur le bouton ◀◀,▶◀.
- Lorsque vous appuyez sur le bouton ▶ pendant la lecture de plusieurs fichiers, le fichier suivant est sélectionné.
- Lorsque vous appuyez sur le bouton ◀ pendant la lecture de plusieurs fichiers, le fichier précédent est sélectionné.

\- Cette fonction peut ne pas fonctionner dans certains modes.

Désactivation du son
Cette fonction se révèle particulièrement utile lorsque vous devez ouvrir votre porte d'entrée ou répondre à un appel téléphonique.
1. Pour couper le son de cet appareil, appuyez sur le bouton MUTE (✗) de la télécommandel.
2. Appuyez à nouveau sur le bouton MUTE ( ) de la télécommande (ou appuyez sur VOLUME +/-) pour rétablir le son.

Fonction BASS (BASSES)
Cette fonction vous permet de régler le son des basses à votre goût.
Appuyez sur le bouton BASS de la télécommande de l'appareil.
\- Chaque fois que vous appuyez sur ce bouton, la sélection change dans l'ordre suivant :
BASS ON → OFF
MiSe À niVeAU DU LOGicieL (MODE USB UniQUeMenT)
1. Rendez-vous sur le site www.samsung.com.
2. Cliquez sur SUPPORT dans le coin supérieur droit de la page.
3. Saisissez le numéro de modèle de l'appareil dans le champ de recherche, puis cliquez sur Rechercher le produit.
4. Cliquez sur Obtenir des téléchargements au centre de la page sous l'en-tête Downloads (Téléchargements).
5. Cliquez sur Micrologiciel au centre de la page.
6. Cliquez sur l'icône ZiP du fichier de mise à niveau..
7. Quand la fenêtre contextuelle s'affiche, cliquez sur OK, continuez à télécharger et enregistrez le fichier de mise à niveau sur votre PC.
8. Décompressez le fichier .zip téléchargé dans un dossier spécifique sur votre PC.
9. Copiez tous les fichiers dans le dossier à la racine de la clé USB à mémoire flash.
• Lors de la mise à niveau, un seul groupe de fichiers peut être mis à jour à la fois.
10. Appuyez plusieurs fois sur le bouton F. situé sur la partie supérieure du lecteur audio sans fil avec station d'accueil jusqu'à ce que l'icône apparaisse à l'écran.
Insérez le périphérique USB dans le port USB situé à l'arrière de l'appareil.
11. La DEL clignote pendant la mise à jour du logiciel. Le produit s'éteint automatiquement une fois que la mise à niveau du micrologiciel est terminée.
- Cela peut prendre plus de temps en fonction de la mise à niveau. (10 minutes maximum)
• Allumez à nouveau l'appareil.

- Ne coupez pas l'alimentation et ne retirez pas le périphérique USB pendant la mise à niveau. L'unité principale s'éteint automatiquement une fois que la mise à niveau du micrologiciel est terminée.
- Une fois le logiciel mis à niveau, les paramètres que vous avez définis sont réinitialisés sur leur valeur par défaut.
Nous vous conseillons de noter vos paramètres par écrit afin de pouvoir facilement les redéfinir après la mise à niveau.
- En cas d'échec de la mise à niveau du micrologiciel, nous vous recommandons de formater la clé USB au format FAT16 et de réessayer la mise à niveau.
- Pour permettre la mise à niveau, ne formatez pas la clé USB au format NTFS. Ce système de fichiers n'est pas pris en charge.
- Selon le fabricant, la clé USB peut ne pas être prise en charge.
- Déconnectez le lecteur audio sans fil avec station d'accueil d'Internet et tous les autres périphériques avant de lancer la mise à niveau du logiciel.
- Vous ne pouvez pas charger d'autres périphériques externes via ce port USB.
- Reportez-vous au guide de mise à niveau disponible sur le site web.

dépannage
Avant de faire appel à l'assistante, vérifiez les points suivants.
Problème Vérification Solution L'appareil ne s'allume pas. Le cordon d'alimentation est-il branché sur la prise ? Branchez la prise d'alimentation sur la prise murale. Une fonction ne s'active pas lorsque le bouton correspondant est actionné. Le lecteur audio sans fil avec station d'accueil ou la télécommande sont-ils exposés à de l'électricité statique ? Débranchez la prise d'alimentation et rebranchez-la. Aucun son n'est produit. L'appareil est-il correctement relié au périphérique ?La fonction Mute (Muet) est-elle activée ?Le volume est-il réglé au minimum ? Branchez-le correctement.Appuyez sur le bouton Mute (Muet) pour désactiver la fonction.Réglez le volume. La télécommande ne fonctionne pas. Les piles sont-elles déchargées ?La télécommande est-elle suffisamment près de l'appareil ? Remplacez les piles.Rapprochez-vous de l'appareil. Échec de la connexion au réseau Wi-Fi Vérifiez que votre routeur Wi-Fi est certifié Wi-Fi. Assurez-vous que la connexion réseau est définie sur Wireless (Sans fil)(Général).Vérifiez que le lecteur audio sans fil avec station d'accueil est connecté à un routeur IP ou modem sans fil. La fonction de partage du son SoundShare (appariement du téléviseur) a échoué. Le modèle de votre téléviseur est-il pris en charge ?La version du micrologiciel du téléviseur est-elle la plus récente ?Une erreur s'est-elle produite lors de la connexion ? Vérifiez si la version de votre téléviseur est prise en charge.(http://www.samsung.com)Mettez votre téléviseur à jour avec la version du micrologiciel la plus récente.Réinitialisez l'appareil.Appuyez sur le bouton WPS/RESET (WPS/RÉINITIALISATION) en mode TV.Contactez l'assistance technique.
CARACTÉRISTIQUES TECHNIQUES
Nom du modèle DA-E750/ DA-E751 INFORMATIONSGÉNÉRALES Poids 9 kg Dimensions (l x P x H) 450 x 244,1 x 168,5 mm Plage de températures de fonctionnement +5°C~+35°C Plage de taux d'humidité 10 % à 75 % AMPLIFI-CATEUR Puissance de sortie nominale Avant G/D 20W/4OHM, THD = 1%, 1kHz Caisson de graves 60W/8OHM, THD=1%, 70Hz Sensibilité d'entrée/Impédance 400mV/56Kohm (AUX) Rapport signal/bruit(entrée analogique) 65 dB Séparation (1 kHz) 65 dB RÉPONSE EN FRÉQUENCE Entrée analogique 20 Hz~20 kHz(±3 dB) Entrée numérique/PCM 48 kHz 20 Hz~20 kHz(±3 dB) PUISSANCE DE CONNEXION iPad 5 V 2,0 A iPod 5 V 1,0 A Galaxy 5 V 1,0 A USB Type A USB 1,1 Sortie CC 500mA RÉSEAU Ethernet Borne 100BASE-TX LAN SANS FIL Intégré Sécurité WEP (OPEN)WPA-PSK (TKIP)WPA2-PSK (AES) WPS(PBC/PIN) Pris en charge
\* Le rapport signal/bruit, la distorsion, la séparation et la sensibilité utilisable sont basés sur des mesures effectuées à l'aide des directives AES (Audio Engineering Society).
\* Caractéristiques nominales
- Samsung Electronics Co., Ltd se réserve le droit de modifier les caractéristiques sans préavis.
- Le poids et les dimensions figurent à titre approximatif.
- Les vitesses de réseau égales ou inférieures à 10 Mbps ne sont pas prises en charge.
- Pour l'alimentation et la consommation d'énergie, reportez-vous à l'étiquette apposée sur le produit.
Open Source Announcement
Pour toute requête, demande et question sur les sources ouvertes, contactez Samsung via e-mail (oss.request@samsung.com).
\- Ce produit utilise certains programmes logiciels ayant été distribués par le Groupe JPEG Indépendant.
FLAC decoder, Copyright (C) 2001,2002,2003,2004,2005,2006,2007 Josh Coalson
Redistribution and use in source and binary forms, with or without modification, are permitted provided that the following conditions are met:
- Redistributions of source code must retain the above copyright notice, this list of conditions and the following disclaimer.
- Redistributions in binary form must reproduce the above copyright notice, this list of conditions and the following disclaimer in the documentation and/or other materials provided with the distribution.
- Neither the name of the Xiph.org Foundation nor the names of its contributors may be used to endorse or promote products derived from this software without specific prior written permission.
THIS SOFTWARE IS PROVIDED BY THE COPYRIGHT HOLDERS AND CONTRIBUTORS "AS IS" AND ANY EXPRESS OR IMPLIED WARRANTIES, INCLUDING, BUT NOT LIMITED TO, THE IMPLIED WARRANTIES OF MERCHANTABILITY AND FITNESS FOR A PARTICULAR PURPOSE ARE DISCLAIMED. IN NO EVENT SHALL THE FOUNDATION OR CONTRIBUTORS BE LIABLE FOR ANY DIRECT, INDIRECT, INCIDENTAL, SPECIAL, EXEMPLARY, OR CONSEQUENTIAL DAMAGES (INCLUDING, BUT NOT LIMITED TO, PROCUREMENT OF SUBSTITUTE GOODS OR SERVICES; LOSS OF USE, DATA, OR PROFITS; OR BUSINESS INTERRUPTION) HOWEVER CAUSED AND ON ANY THEORY OF LIABILITY, WHETHER IN CONTRACT, STRICT LIABILITY, OR TORT (INCLUDING NEGLIGENCE OR OTHERWISE) ARISING IN ANY WAY OUT OF THE USE OF THIS SOFTWARE, EVEN IF ADVISED OF THE POSSIBILITY OF SUCH DAMAGE."
Ogg/Vorbis decoder, Copyright (c) 2002, Xiph.org Foundation
Redistribution and use in source and binary forms, with or without modification, are permitted provided that the following conditions are met:
- Redistributions of source code must retain the above copyright notice, this list of conditions and the following disclaimer.
- Redistributions in binary form must reproduce the above copyright notice, this list of conditions and the following disclaimer in the documentation and/or other materials provided with the distribution.
- Neither the name of the Xiph.org Foundation nor the names of its contributors may be used to endorse or promote products derived from this software without specific prior written permission.
THIS SOFTWARE IS PROVIDED BY THE COPYRIGHT HOLDERS AND CONTRIBUTORS "AS IS" AND ANY EXPRESS OR IMPLIED WARRANTIES, INCLUDING, BUT NOT LIMITED TO, THE IMPLIED WARRANTIES OF MERCHANTABILITY AND FITNESS FOR A PARTICULAR PURPOSE ARE DISCLAIMED. IN NO EVENT SHALL THE FOUNDATION OR CONTRIBUTORS BE LIABLE FOR ANY DIRECT, INDIRECT, INCIDENTAL, SPECIAL, EXEMPLARY, OR CONSEQUENTIAL DAMAGES (INCLUDING, BUT NOT LIMITED TO, PROCUREMENT OF SUBSTITUTE GOODS OR SERVICES; LOSS OF USE, DATA, OR PROFITS; OR BUSINESS INTERRUPTION) HOWEVER CAUSED AND ON ANY THEORY OF LIABILITY, WHETHER IN CONTRACT, STRICT LIABILITY, OR TORT (INCLUDING NEGLIGENCE OR OTHERWISE) ARISING IN ANY WAY OUT OF THE USE OF THIS SOFTWARE, EVEN IF ADVISED OF THE POSSIBILITY OF SUCH DAMAGE.
Pour toutes questions ou observations concernant les produits Samsung, veuillez contacter le service clientèle de SAMSUNG.
Zone Centre de contact Site Internet ALBANIA 42 27 5755 www.samsung.com AUSTRIA 0810 - SAMSUNG (7267864, € 0.07/min) www.samsung.com BELGIUM 02-20 1-24-18 www.samsung.com/be (Dutch)www.samsung.com/be_fr (French) BOSNIA 05 133 1999 www.samsung.com BULGARIA 07001 33 11 www.samsung.com CROATIA 062 SAMSUNG (062 726 7864) www.samsung.com CZECH 800 - SAMSUNG (800-726786) www.samsung.com DENMARK 70 70 19 70 www.samsung.com FINLAND 030 - 6227 515 www.samsung.com FRANCE 01 48 63 00 00 www.samsung.com GERMANY 01805 - SAMSUNG(726-7864 € 0,14/Min) www.samsung.com CYPRUS 8009 4000 only from landline www.samsung.com GREECE 80111-SAMSUNG (80111 726 7864) only from land line(+30) 210 6897691 from mobile and land line www.samsung.com HUNGARY 06-80-SAMSUNG(726-7864) www.samsung.com ITALIA 800-SAMSUNG(726-7864) www.samsung.com KOSOVO +381 0113216899 www.samsung.com LUXEMBURG 261 03 710 www.samsung.com MACEDONIA 023 207 777 www.samsung.com MONTENEGRO 020 405 888 www.samsung.com
Zone Centre de contact Site Internet NETHERLANDS 0900-SAMSUNG (0900-7267864) (€ 0,10/Min) www.samsung.com NORWAY 815-56 480 www.samsung.com POLAND 0 801-1 SAMSUNG(172-678)+48 22 607-93-33 www.samsung.com PORTUGAL 808 20-SAMSUNG (808 20 7267) www.samsung.com ROMANIA 08010 SAMSUNG (08010 726 7864) only from landline(+40) 21 206 01 10 from mobile and land line www.samsung.com SERBIA 0700 Samsung (0700 726 7864) www.samsung.com SLOVAKIA 0800 - SAMSUNG(0800-726 786) www.samsung.com SPAIN 902 - 1 - SAMSUNG (902 172 678) www.samsung.com SWEDEN 0771 726 7864 (SAMSUNG) www.samsung.com Switzerland 0848 - SAMSUNG(7267864, CHF 0.08/min) www.samsung.com/chwww.samsung.com/ch_fr (French) U.K 0330 SAMSUNG (7267864) www.samsung.com EIRE 0818 717100 www.samsung.com LITHUANIA 8-800-77777 www.samsung.com LATVIA 8000-7267 www.samsung.com ESTONIA 800-7267 www.samsung.com

Elimination des batteries de ce produit
(Applicable aux pays de l'Union européenne et aux autres pays européens dans lesquels des systèmes de collecte sélective sont mis en place.)
Le symbole sur la batterie, le manuel ou l'emballage indique que les batteries de ce produit ne doivent pas être éliminées en fin de vie avec les autres déchets ménagers. L'indication éventuelle des symboles chimiques Hg, Cd ou Pb signifie que la batterie contient des quantités de mercure, de cadmium ou de plomb supérieures aux niveaux de référence stipulés dans la directive CE 2006/66. Si les batteries ne sont pas correctement éliminées, ces substances peuvent porter préjudice à la santé humaine ou à l'environnement.
Afin de protéger les ressources naturelles et d'encourager la réutilisation du matériel, veillez à séparer les batteries des autres types de déchets et à les recycler via votre système local de collecte gratuite des batteries.

Les bons gestes de mise au rebut de ce produit (Déchets d'équipements électriques et électroniques)
(Applicable dans les pays de l'Union Européenne et dans d'autres pays européens pratiquant le tri sélectif)
Ce symbole sur le produit, ses accessoires ou sa documentation indique que ni le produit, ni ses accessoires électroniques usagés (chargeur, casque audio, câble USB, etc.) ne peuvent être jetés avec les autres déchets ménagers. La mise au rebut incontrôlée des déchets présentant des risques environnementaux et de santé publique, veuillez séparer vos produits et accessoires usagés des autres déchets. Vous favoriserez ainsi le recyclage de la matière qui les compose dans le cadre d'un développement durable.
Les particuliers sont invités à contacter le magasin leur ayant vendu le produit ou à se renseigner auprès des autorités locales pour connaître les procédures et les points de collecte de ces produits en vue de leur recyclage.
Les entreprises et professionnels sont invités à contacter leurs fournisseurs et à consulter les conditions de leur contrat de vente. Ce produit et ses accessoires ne peuvent être jetés avec les autres déchets professionnels et commerciaux.
Wireless Audio with Dock (Kabelloses Audio System mit Docking Station)
Bedienungsanleitung
Unvorstellbare Möglichkeiten
Vielen Dank, dass Sie sich für dieses Produkt von Samsung entschieden haben.
Wenn Sie einen umfassenderen Service nutzen möchten, registrieren Sie bitte Ihr Produkt unter
www.samsung.com/register
funktionen
AllShare Play
Dient zur Wiedergabe von auf Geräten (wie PC, Smartphone, oder NAS) gespeicherten Musiktiteln über das Kabellose Audio System mit Docking Station mittels einer Netzwerkverbindung
AirPlay
Dient zur Wiedergabe von auf Ihren Apple Geräten gespeicherten Musiktiteln über das Kabellose Audio System mit Docking Station.
Dual Docking Audio Lautsprechersystem
Mit Hilfe der Dual Docking Station des Systems können Sie Ihr Samsung Galaxy oder Apple Gerät anschließen, aufladen und über die integrierten Lautsprecher abspielen.
Musikwiedergabe über USB-Anschluss
An den USB-Anschluss des Kabellosen Audio Systems mit Docking Station können externe USB-Speichergeräte, wie MP3-Player oder USB-Flash-Speicher angeschlossen und die darauf enthaltenen Dateien wiedergegeben werden.
Bluetooth Funktion
Nach dem Anschließen eines Bluetooth Geräts an das Kabellose Audio System mit Docking Station können Sie Musik von diesem Gerät in bester Stereo Klangqualität ganz ohne Kabel wiedergeben.
aptX®
aptX Liefert hochwertigen Stereoklang über eine kabellose Bluetooth Verbindung mit einer Klangqualität, wie bei herkömmlichen Kabelverbindungen.
Lizenz


AirPlay, das AirPlay Logo, iPhone, iPod, iPod classic, iPod nano, iPod shuffle und iPod touch sind in den USA und anderen Ländern eingetragene Marken der Apple Inc. iPad ist eine Marke der Apple Inc.
SICHERHEITSHINWEISE
ZUR VERMEIDUNG VON STROMSCHLÄGEN DARF DIESES GERÄT NICHT GEÖFFNET WERDEN.
ES ENTHÄLT KEINE BAUTEILE, DIE VOM BENUTZER GEWARTET WERDEN KÖNNEN. LASSEN SIE REPARATUREN NUR VON QUALIFIZIERTEM FACHPERSONAL DURCHFÜHREN.


Dieses Symbol weist auf eine „gefährliche Netzspannung“ im Inneren des Players hin. Es besteht die Gefahr von Stromschlägen und Körperverletzungen.

Dieses Symbol weist auf wichtige Anweisungen im Begleitmaterial zum Produkt hin.
WARNUNG : Schützen Sie das Gerät vor Regen und Feuchtigkeit, um die Gefahr von Bränden oder Stromschlägen zu verringern.
ACHTUNG : UM STROMSCHLÄGE ZU VERMEIDEN, STECKEN SIE DEN STECKER FEST UND VOLLSTÄNDIG IN DIE STECKDOSE EIN.
- Dieses Gerät muss stets an geerdete Steckdosen angeschlossen werden.
- Entfernen Sie den Stecker aus der Steckdose, um das Gerät vollständig abzuschalten. Aus diesem Grund sollte sich der Netzstecker in Reichweite befinden.
ACHTUNG
- Das Gerät keinem Spritz- oder Tropfwasser aussetzen. Keine mit Flüssigkeit gefüllten Behälter, wie Vasen auf das Gerät stellen.
- Um das Gerät vollständig auszuschalten, muss der Netzstecker aus der Steckdose gezogen werden. Somit muss der Netzstecker immer bequem erreichbar sein.

Samsung Electronics erklärt hiermit, dass dieses [Kabelloses Audio System mit Docking Station] mit den grundlegenden Anforderungen und anderen maßgeblichen Bestimmungen der Richtlinie 1999/5/EG übereinstimmt.
Die offizielle Übereinstimmungserklärung finden Sie auf der Webseite http://www.samsung.com. Öffnen Sie Support und geben Sie bei Produktsuche den Modellnamen ein.
Dieses Gerät darf in allen EG-Staaten betrieben werden.
In Frankreich darf das Gerät nur in Räumen verwendet werden.

Stellen Sie sicher, dass die Wechselstromnetzspannung den auf der Geräterückseite angegebenen Anforderungen entspricht. Stellen Sie Ihr Produkt horizontal auf einer geeigneten Unterlage (wie stabile Möbel) auf, sodass rundherum ausreichend Platz (70-100 mm) zur Belüftung bleibt. Achten Sie darauf, dass die Belüftungsöffnungen nicht abgedeckt sind. Stellen Sie das Gerät nicht auf Verstärker oder andere Geräte, die heiß werden können. Das Gerät ist für Dauerbetrieb eingerichtet. Um das Gerät vollständig auszuschalten, den Stecker aus der Steckdose ziehen. Ziehen Sie den Netzstecker des Geräts wenn Sie beabsichtigen, es für längere Zeit nicht zu nutzen.

natural_image
Illustration of a vintage-style speaker emitting sound waves, with a lightning bolt visible in the window (no text or symbols)
Ziehen Sie bei Gewittem das Stromkabel aus der Steckdose. Durch Blitze verursachte Spannungsspitzen können zur Beschädigung des Geräts führen.

natural_image
Illustration of a dual-camera device with light bulbs, sun rays, and a battery (no text or symbols)
Das Gerät vor Feuchtigkeit (z.B. keine Vasen auf das Gerät stellen) und starker Hitze (z.B. Feuerstellen) oder vor starke Magnet- bzw. elektrische Felder erzeugenden Geräten schützen.
Ihr Produkt ist nicht für den gewerblichen Einsatz vorgesehen. Dieses Produkt ist nur für den persönlichen Gebrauch bestimmt.
Wenn das Gerät bei kalten Temperaturen aufbewahrt wurde, kann Kondensation auftreten.
Wenn Sie das Gerät bei kalten Temperaturen transportiert haben, warten Sie mit der Inbetriebnahme circa 2 Stunden, bis das Gerät Raumtemperatur erreicht hat.

natural_image
Simple line drawing of a room with a projector and a cross symbol, no text or symbols present
Halten Sie das Gerät von direkter Sonneneinstrahlung oder anderen Wärmequellen fern. Dies kann zu einer Überhitzung und Fehlfunktion des Geräts führen.

Die in diesem Produkt verwendeten Batterien enthalten umweltschädliche Chemikalien.
Entsorgen Sie die Batterien nicht über den Hausmüll.
FUnktionen


eRSte SCHRitte

BeSCHReiBUnGen

FeRnBeDienUnG

einSCHALten UnD LAUtStÄRkeReGeLUnG

AnSCHLÜSSe

WieDeRGABe

FUnktionen

FeHLeRSUCHe

AnHAnG

2 Funktionen
2 Lizenz
3 Sicherheitshinweise
4 Vorsichtsmaßnahmen
6 Bevor Sie diese Bedienungsanleitung lesen
6 Lieferumfang
7 Ober-/Vorder-/Rückseite
9 Übersicht der Fernbedienung
10 Ein- und ausschalten des Geräts
10 Lautstärke einstellen
11 Anbringen des ferrit rinkerns am netzkabel
11 Anbringen des ferrit kerns am Ian kabel
12 Verwenden des abstandshalters
13 Anschliessen eines geräts an den Dual Dock
14 Ein audiogerät an den AUX IN eingang anschliessen
15 Anschliessen an ihr netzwerk
21 Anschliessen eines Bluetooth geräts
23 Verwenden des TV modus (SoundShare)
23 Verwenden des Docking Modus mit Samsung Galaxy und Apple Geräten
25 Verwenden des Bluetooth modus
26 Verwenden des USB modus
27 Verwenden des AirPlay und AllShare Play modus
28 Grundfunktionen
29 Erweiterte Funktionen
30 Software Aktualisierung (nur USB Modus)
31 Fehlersuche
32 Technische Daten
erste schritte
BEVOR SIE DIESE BEDIENUNGSANLEITUNG LESEN
Achten Sie beim Lesen der Bedienungsanleitung auf die folgenden Hinweise.
Symbole in diesem Benutzerhandbuch
Symbol Begriff Erklärung Achtung Zeigt eine Situation an, in der eine Funktion nicht funktioniert oder Einstellungen abgebrochen werden können. Hinweis Enthält Tipps oder Anweisungen zum Ausführen einer Funktion.
Sicherheitsanweisungen und Fehlersuche
1) Machen Sie sich mit den Sicherheitsanweisungen vertraut, bevor Sie dieses Gerät benutzen. (Siehe Seite 3)
2) Falls ein Problem auftritt, schlagen Sie im Kapitel zur Fehlerbehebung nach. (Siehe Seite 31)
Copyright
©2012 Samsung Electronics Co., Ltd.
Alle Rechte vorbehalten. Ohne vorherige schriftliche Genehmigung von Samsung Electronics Co., Ltd. ist das vollständige oder teilweise Reproduzieren oder Kopieren dieser Bedienungsanleitung nicht gestattet.
LIEFERUMFANG
Überprüfen Sie, ob das im Folgenden aufgeführte Zubehör mitgeliefert wurde.
Fernbedienung / Lithium-Batterie (3V) Netzkabel Audiokabel LAN-Kabel (Groß)(Für Netzkabel 1x) (klein)(Für LAN-Kabel 1x) Ferritringkern Abstandshalter/ Schutzabdeckung Tuch Benutzerhandbuch

\- Das Aussehen des Zubehörs kann leicht von den obigen Illustrationen abweichen.
beschreibungen
OBeR-/VORDeR-/RÜCKSeiTe


natural_image
Illustration of a two-tiered audio amplifier with two speakers and a top-mounted head (no text or symbols)

1 WieDeRGABe/ PAUSe TASTe Wiedergabe oder Unterbrechen eines Musiktitels. 2 FUnKTiOnSTASTe Der Modus wechselt folgendermaßen : AUX(LeD Aus) 3 LAUTSTÄRKe +/- TASTe Zum Einstellen der Lautstärke. 4 FUnKTiOn- SAnzeiGe Wenn Sie den Modus mit der Funktionstaste ändern, wird das Symbol des ausgewählten Modus in Weiß auf der Funktionsanzeige angezeigt.Die LED blinkt, wenn die Netzspannung eingeschaltet wird, und hört auf zu blinken, wenn das Gerät abspielbereit ist. 5 DUAL DOCK Stellt einen 5 Pin-Anschluss für Samsung Galaxy Geräte oder einen 30 Pin-Anschluss für Apple Geräte bereit. 6 neTzWeRKAnSCHLUSS Dient zum Anschluss an ein Netzwerk mit Hilfe eines LAN-Kabels. 7 WPS/ReSeT TASTe Wird bei der Verbindung des Geräts an WLAN Netzwerke verwendet. 8 USB-AnSCHLUSS Schließen Sie ein externes USB Speichergerät, wie einen MP3-Player an, um die sich auf dem Gerät befindenden Dateien abzuspielen. 9 AnSCHLUSS FÜR STROMVeRSORGUnG Schließen Sie das Netzkabel an das Gerät an. 10 AUX in Für den Anschluss an den Analogausgang eines externen Geräts. 11 nUR FÜR SeRViCe Dieser Anschluss dient nur zu Servicezwecken.

- Wenn Sie dieses Gerät einschalten, benötigt es ca. 20 Sekunden, um die Röhren aufzuheizen und eine stabile Tonwiedergabe zu erzeugen.
- Um die Software des Geräts über den USB-Anschluss zu aktualisieren, muss ein USB-Speichergerät verwendet werden.

- Beim Festhalten oder Bewegen des Geräts muss darauf geachtet werden, dass sich der Basslautsprecher auf der Unterseite des Geräts befindet.
- An dieses Gerät können mobile Geräte mit hohen Ausgangspegeln angeschlossen werden. Wenn Sie an dieses Gerät externe Geräte mit hohen Ausgangspegeln anschließen, kann der Audio Ausgangspegel gesenkt werden, um den Verstärker und die Lautsprecher zu schützen.
- Beim Ziehen des Netzsteckers aus der Steckdose nicht am Stecker ziehen. Ziehen Sie nicht am Kabel.
- Wenn Sie andere elektronische Geräte auf dieses Gerät stellen, kann die Klangwiedergabe dieses Geräts gestört werden.
- Achten Sie darauf, dass Kinder die Oberfläche des Geräts nicht berühren, wenn die Anlage in Betrieb ist. Das Gerät ist heiß.
fernbedienung
ÜBeRSiCHT DeR FeRnBeDienUnG

Batterien in die Fernbedienung einsetzen

flowchart
graph TD
    A["Shelf with lid"] --> B["Disassembly with internal components"]
    B --> C["Deformational change in battery plate"]
    C --> D["Final state with arrows indicating disassembly steps"]
1. Zum Öffnen der Fernbedienung den Fingernagel in den Spalt zwischen dem Verschluss und dem Gehäuse der Fernbedienung stecken. Die Abdeckung anheben und vollständig entfernen.
2. Legen Sie die 3V Lithium Batterien ein.
Legen Sie die Batterie in das
Batteriefach mit der +-Elektrode nach
oben zeigend ein.
3. Bringen Sie die Abdeckung der Fernbedienung an der Fernbedienung an. Zuerst das obere Ende einsetzen und den Verschluss so absenken dass er mit dem Gehäuse der Fernbedienung fluchtet und dann die Abdeckung an den Rändern mit der Hand nach unten drücken.

\- Geben Sie acht, dass Sie Ihren Fingernagel beim Anheben des Verschlusses nicht im Spalt einklemmen. Sie können dabei Ihren Fingernagel einreißen.
Reichweite der Fernbedienung
Die Fernbedienung hat eine Reichweite von 7 Metern in gerader Linie zum Gerät. Die Fernbedienung funktioniert in einem Winkel von bis zu 30° zum Fernbedienungssensor.
einschalten und lautstärkeregelung
EIN- UND AUSSCHALTEN DES GERÄTS

1. Wenn Sie das Gerät aus dem Standby-Modus einschalten möchten, eine beliebige Taste auf der Oberseite des Geräts drücken.
oder
Drücken Sie die POWER Taste auf der Fernbedienung.
2. Zum Abschalten des Geräts, die ▶II Taste auf der Oberseite des Geräts länger als 3 Sekunden gedrückt halten. oder
Drücken Sie erneut die POWER Taste auf der Fernbedienung.

\- Es dauert ca. 20 Sekunden, nach dem Einschalten bis das Gerät betriebsbereit ist, da sich der Verstärker aufwärmen muss.
LAUTSTÄRKE EINSTELLEN
Verwenden Sie die +,- Tasten zur Regelung der Lautstärke. Die Funktions-LED leuchtet von links nach rechts auf, wenn die Lautstärke erhöht wird und von rechts nach links, wenn die Lautstärke reduziert wird. Die LED leuchtet nicht, wenn Sie versuchen die Lautstärke zu erhöhen oder zu verringern und diese bereits auf ihr Maximum bzw. Minimum eingestellt ist.

Drücken Sie die +/- Taste rechts auf der Geräteoberseite.
oder
Drücken Sie die VOL +/- Taste auf der Fernbedienung.

\- Wenn Sie VOL +/- drücken, wird die Lautstärke erhöht oder erniedrigt.
\- Sie können ebenfalls die Lautstärkeregelungen der über den Dual Dock oder Bluetooth angeschlossenen Geräte zur Einstellung der Lautstärke verwenden. Beachten Sie, dass die Verwendung der Lautstärkeregelung von über Bluetooth angeschlossen Geräte eingeschränkt sein kann.
anschlüsse
AnBRinGen DeS FeRRiT RinKeRnS AM neTzKABeL

natural_image
Diagram of a 3D mechanical component with internal zigzag features, enclosed in a rounded square frame (no text or symbols)
Den Verschluss anheben und den Kern öffnen.

natural_image
Technical line drawing of a mechanical component with no visible text or symbols


natural_image
Simple line drawing of a cable connector with a plug (no text or symbols)
Schließen Sie den Verschluss wieder.


natural_image
Simple line drawing of a mechanical component with two wires (no text or symbols)
Wickeln Sie das Netzkabel drei Mal um den Kern. (Die Wicklung in einem Abstand von 5-10cm von den Steckern ausführen)
AnBRinGen DeS FeRRiT KeRnS AM LAn KABeL

natural_image
Simple line drawing of a device casing with no text or symbols
Den Verschluss anheben und den Kern öffnen.


natural_image
Two stacked cylindrical electronic components with mounting brackets, shown in 3D rendering (no text or symbols)


natural_image
Simple line drawing of a connector with two wires (no text or symbols)
Schließen Sie den Verschluss wieder.


natural_image
Diagram of a mechanical assembly with two stacked components and a curved line above (no text or symbols)
Das LAN-Kabel in den geöffneten Kern einlegen.
VERWENDEN DES ABSTANDSHALTERS
Bringen Sie den Abstandshalter an, wenn Sie ein Samsung Galaxy oder Apple Gerät ohne Schutzhülle an das Dual Dock andocken wollen.
\- Verwenden Sie den Abstandshalter, wenn aufgrund der Form des Geräts eine stabilere Installation erforderlich ist. Für das Dual Dock steht ebenfalls eine Schutzabdeckung für den 30 Pin-Anschluss der Apple Geräte zur Verfügung. Verwenden Sie die Schutzabdeckung für den 30-Pin-Anschluss, wenn Sie ein Samsung Galaxy Gerät mit 5 Pin-Anschluss anschließen.
Sie die folgenden Abbildungen für weitere Informationen.
flowchart
graph TD
    A["Hand pressing down on camera"] --> B["Device being turned out"]
    B --> C["Device moving to screen with rotation arrow"]
    C --> D["Device holding a clip or clip in front panel"]
    D --> E["Device adjusting the clip or clip using a device with rotation arrow"]
1. Das Fach mit dem DUAL DoCk Anschluss befindet sich auf der Rückseite des Geräts. Zum Öffnen vorsichtig drücken.
2. Drücken Sie mehrmals die F. Taste auf der Oberseite des Kabellosen Audio Systems mit Docking Station, bis das ☐ Symbol auf der Anzeige erscheint.
\- Durch wiederholtes Drücken der Taste ändert sich die Auswahl wie folgt:

\- Der ausgewählte Modus wird in Weiß auf der Funktionsanzeige angezeigt.
3. Wenn Sie über ein Samsung Galaxy Gerät verfügen, schließen Sie es an den (kleineren) 5 Pin-Anschluss des Dual Dock an. Wenn Sie über ein Apple Gerät verfügen, schließen Sie es an den (größeren) 30 Pin-Anschluss an.
4. Ziehen Sie die Stützvorrichtung wie auf der Abbildung dargestellt heraus, um ein Herausfallen des Geräts aus dem Dual Dock zu verhindern.

- Schalten Sie Ihr Samsung Galaxy Gerät ein, bevor Sie es an das Dual Dock System anschließen.
Samsung Galaxy und Apple Geräte können nicht gleichzeitig an das Gerät angeschlossen werden.
- Schließen sie das Samsung Galaxy oder Apple Gerät an erst an die Docking-Station an, nachdem der Docking Modus eingeschaltet wurde. (Siehe Seite 23)
EIN AUDIOGERÄT AN DEN AUX IN EINGANG ANSCHLIESSEN
In diesem Abschnitt wird erklärt, wie ein Audiogerät an diese Einheit angeschlossen werden kann.
Dieses Gerät verfügt über eine analoge Anschlussbuchse für den Anschluss eines Audiogeräts.

AUX in
1. Schließen Sie den Kopfhörerausgang des externen Geräts oder des Audiogeräts an die AUX IN (Audio) Buchse auf der Geräterückseite an.
2. Drücken Sie die F. Taste wiederholt, bis die Funktions-LEDs erlöschen.
\- Wenn keine Funktions-LED leuchtet, ist der AUX-Modus ist aktiv.

\- Bevor Sie dieses Gerät installieren oder an einer anderen Stelle aufstellen, müssen Sie es ausschalten und den Netzstecker ziehen.
ANSCHLIESSEN AN IHR NETZWERK
Sie können Ihr Kabelloses Audio System mit Docking Station mit einer der auf den folgenden Seiten beschriebenen Methoden an Ihren Netzwerk Router anschließen.
Das Kabellose Audio System mit Docking Station an ein Kabelnetzwerk anschließen

flowchart
graph TD
    A["Router"] -->|oder| B["Breitbandmodem (mit integriertem Router)"]
    B --> C["Breitband-Dienste"]
    B --> D["Breitband-Dienste"]
    B --> E["Computer"]
    F["Breitbandmodem"] -->|and| G["Router"]
    G --> H["Breitband-Dienste"]
    G --> I["Computer"]
    J["Breitband-Dienste"] --> K["Router"]
    K --> L["Breitband-Dienste"]
    K --> M["Computer"]
Schalten Sie bitte vor dem Anschließen des LAN-Kabels das Kabellose Audio System mit Docking Station aus.
1. Schalten Sie das Kabellose Audio System mit Docking Station aus.
2. Schließen Sie das Kabellose Audio System mit Docking Station über ein Netzwerkkabel an den Router an.
3. Schalten Sie das Kabellose Audio System mit Docking Station ein.
4. Drücken Sie mehrmals die F. Taste auf der Oberseite des Kabellosen Audio Systems mit Docking Station, bis das □ oder □ Symbol auf der Anzeige erscheint.
\- Durch wiederholtes Drücken der Taste ändert sich die Auswahl wie folgt :

5. Das ☐ oder Symbol leuchtet rot auf und leuchtet ständig weiß, wenn das Kabellose Audio System mit Docking Station mit dem Router verbunden ist.

- Wenn Sie das Netzwerkkabel bei eingeschaltetem Gerät angeschlossen haben, das Gerät aus- und wieder einschalten.
- Wenn die Verbindung zum Netzwerk fehlschlägt, ziehen Sie das Netzkabel heraus, schließen Sie es erneut an und starten Sie das Gerät neu.
- xDSL Benutzer benötigen einen Router, um eine Netzwerkverbindung herzustellen.
Das Kabellose Audio System mit Docking Station an ein WLAN-Netzwerk anschließen
In diesem Abschnitt werden 4 Methoden beschrieben, wie das Kabellose Audio System mit Docking Station an ein WLAN-Netzwerk angeschlossen werden kann.

- Die Bedienung einiger Netzwerkfunktionen kann von der Beschreibung je nach der Leistung und den unterstützten Funktionen des verwendeten Zugangspunkts abweichen
- Für die Konfiguration der Netzwerkverbindung zu Ihrem Router oder Modem, bitte in der Bedienungsanleitung des Routers oder Modems nachschlagen.
Das Kabellose Audio System mit Docking Station unterstützt die folgenden Sicherheitsprotokolle:
\- WEP → Open
\- WPA-PSK → TKIP
\- WPA2-PSK → AES
- Sie können das Kabellose Audio System mit Docking Station ebenfalls an ein nicht gesichertes Netzwerk und ohne Passwort anschließen.
- Wenn der WLAN-Router DHCP unterstützt, kann das Kabellose Audio System mit Docking Station eine DHCP oder statistische IP-Adresse für den Aufbau einer Netzwerkverbindung verwenden.
- Wählen Sie auf dem Router einen Kanal aus, der nicht verwendet wird. Wenn der für den WLAN-Router eingestellte Kanal von einem anderen Gerät in der Nähe genutzt wird, kommt es zu Interferenzen und Kommunikationsfehlern.
- Wenn Sie den 802.11n Modus auswählen und den Verschlüsselungsalgorithmus des Routers auf WEP oder TKIP einstellen, baut das Kabellose Audio System mit Docking Station gemäß den neuen Wi-Fi Zertifizierungsregeln keine Verbindung auf.
- In WLAN-Netzwerken kann es je nach Betriebsbedingungen (Leistung des Routers, Entfernung, Hindernisse, Störungen durch andere Funkgeräte, usw.), zu Interferenzen kommen.
- WPS (PBC) / WPS (PIN) funktioniert nicht, wenn das Sicherheitsprotokoll auf WEP eingestellt ist.
- Wenn die Konfigurierung des Netzwerks fehlschlägt, die WPS/RESET Taste auf der Rückseite des Geräts drücken und gedrückt halten, bis die 📄 oder 🚗 Anzeige zweimal blinkt.. Warten Sie, bis die rote Leuchte aufhört zu blinken, und schalten Sie anschließend das Gerät aus und wieder ein. Wiederholen Sie den Vorgang.
Das Kabellose Audio System mit Docking Station an ein Apple Gerät mit iOS 5.0 oder höher anschließen (Info Sharing)
Diese Methode zur Netzwerkeinrichtung ist für Benutzer von Apple Gerät mit dem iOS 5.0 oder später bestimmt.
1. Schließen Sie das Apple Gerät an Ihr Netzwerk an.
2. Wählen Sie am Kabellosen Audio System mit Docking Station und schließen Sie anschließend das iPod/iPhone/iPad Gerät an das Dual Dock an.
3. Die WPS/RESET Taste auf der Rückseite des Kabellosen Audio Systems mit Docking Station mit der Spitze eines Kugelschreibers oder Ähnlichem länger als 1 Sekunde drücken. Das ☐ Symbol blinkt einmal auf. Die Taste loslassen.
4. Wählen Sie im Popup-Menü auf dem Bildschirm des Apple Geräts.
5. Ändern Sie den Modus auf das Symbol blinkt rot und leuchtet anschließen ständig weiß.
Nachdem das Kabellose Audio System mit Docking Station die Verbindung hergestellt hat, hört das Symbol auf zu blinken und leuchtet ständig in Weiß.
• Die Netzwerkverbindung ist hergestellt.
Das Wireless Audio with Dock mit Hilfe von WPS (PBC) verbinden mit Hilfe von WPS (PBC) verbinden
1. Drücken Sie mehrmals die F.Taste auf der Oberseite des Kabellosen Audio Systems mit Docking Station, bis das 🚠 oder 🏠 Symbol auf der Anzeige erscheint.
\- Durch wiederholtes Drücken der Taste ändert sich die Auswahl wie folgt :

Das Symbol ändert seine Farbe von Weiß nach Rot und beginnt zu blinken.
2. Die WPS/RESET Taste auf der Rückseite mit der Spitze eines Kugelschreibers oder Ähnlichem länger als 1 Sekunde drücken. Das Symbol blinkt einmal weiß auf. Nachdem das Symbol aufgeblinkt hat, die Taste loslassen.
• Das Symbol blinkt rot.

3. Drücken Sie innerhalb von 90 Sekunden die WPS/RESET Taste an Ihrem Router oder Modem.
4. Nachdem das Kabellose Audio System mit Docking Station mit Hilfe von WPS (PBC) die Verbindung hergestellt hat, hört das ▲ oder □ symbol auf rot zu blinken und leuchtet weiß auf.
• Die Netzwerkverbindung ist hergestellt.
Das Kabellose Audio System mit Docking Station über eine JBC (JukeBox Connect) Verbindung anschließen
1. Drücken Sie mehrmals die F. Taste auf der Oberseite des Kabellosen Audio Systems mit Docking Station, bis das 📄 oder 📋 symbol auf der Anzeige erscheint.
\- Durch wiederholtes Drücken der Taste ändert sich die Auswahl wie folgt:
→ ➕ ➕ ➕ ➕ ➕ ➕ ➕ ➕ ➕ ➕ ➕ ➕ ➕ ➕ ➕ ➕ ➕ ➕ ➕ ➕ ➕ ➕ ➕ ➕ ➕ ➕ ➕ ➕ ➕ ➕ ➕ ➕ ➕ ➕ ➕ ➕ ➕ ➕ ➕ ➕ ➕ ➕ ➕ ➕ ➕ ➕ ➕ ➕ ➕ ➕ ➤
Das Symbol ändert seine Farbe von Weiß nach Rot und beginnt zu blinken.
2. Die WPS/RESET Taste auf der Rückseite mit der Spitze eines Kugelschreibers oder Ähnlichem länger als 5 Sekunden drücken. Das Symbol blinkt einmal auf Warten Sie, bis das Symbol noch zweimal weiß aufblinkt und lassen Sie anschließend die WPS/RESET Taste los.
\- Das Symbol blinkt rot, hört auf zu blinken und leuchtet rot, wenn das Gerät in den Modus für die Netzwerkkonfiguration übergeht.
3. Um das Kabellose Audio System mit Docking Station an das Netzwerk anzuschließen, in der Wi-Fi Einstellungen Liste Ihres Wi-Fi-Geräts nach "Samsung W\_Audio E750 XXXXXXX" suchen und auswählen.
Beispiel) Samsung Galaxy Gerät

flowchart
graph LR
    A["WPS button connection\nConnect to Samsung W_Audio E750 XXXXXX"] --> B["Network notification\nConnect to Samsung W_Audio E750 XXXXXX"]
    B --> C["WPS button connection\nConnect to Samsung W_Audio E750 XXXXXX"]
    C --> D["Receiving\nSamsung W_Audio E750 XXXXXX"]
4. Öffnen Sie den Webbrowser des Wi-Fi-Geräts und geben Sie "http://192.168.1.1" in die Adressleiste des Internetbrowsers ein, um die Webseite des Kabellosen Audio Systems mit Docking Station aufzurufen.
5. In dem Feld "Service Set ID (SSID)" den Zugangspunkt auswählen (Router oder Modem), an den Ihr Wi-Fi-Gerät angeschlossen ist.
6. Geben Sie das Passwort des Zugangspunkts in das Feld "WPA Passphrase (WPA Passwort)" ein. Wenn Sie eine statische IP-Adresse einstellen möchten, auf Erweiterte Einstellungen anklicken. Geben Sie die gewünschte IP-Adresse ein.
7. Klicken Sie auf .
Wenn eine Warnung auf Ihrem Wi-Fi-Gerät erscheint, auf OK klicken.
8. Wenn die Verbindung zwischen dem Kabellosen Audio System mit Docking Station und dem Zugangspunkt hergestellt wurde, ändert das Symbol am Kabellosen Audio System mit Docking Station die Farbe nach Weiß.
• Die Verbindung mit dem Kabellosen Audio System mit Docking Station ist hergestellt.
※ Die oben dargestellte Abbildung zeigt den Bildschirm, der auf dem Bildschirm erscheint, nachdem die Netzwerkverbindung erfolgreich hergestellt wurde und Sie AirPlay oder DLNA normal nutzen können.


Das Kabellose Audio System mit Docking Station mit Hilfe einer WPS PIN anschließen
1. Drücken Sie mehrmals die F. Taste auf der Oberseite des Kabellosen Audio Systems mit Docking Station, bis das ☐ oder ☐ Symbol auf der Anzeige erscheint.
\- Durch wiederholtes Drücken der Taste ändert sich die Auswahl wie folgt:
→ → → → → AUX(LeD Aus)
Das Symbol ändert seine Farbe von Weiß nach Rot und beginnt zu blinken.
2. Die WPS/RESET Taste auf der Rückseite mit der Spitze eines Kugelschreibers oder Ähnlichem länger als 5 Sekunden drücken. Das Symbol blinkt einmal auf Warten Sie, bis das Symbol noch zweimal weiß aufblinkt und lassen Sie anschließend die WPS/RESET Taste los.
\- Das Symbol blinkt rot, hört auf zu blinken und leuchtet rot, wenn das Gerät in den Modus für die Netzwerkkonfiguration übergeht.
3. Um das Kabellose Audio System mit Docking Station an das Netzwerk anzuschließen, in der Wi-Fi Einstellungen Liste Ihres Wi-Fi-Geräts nach "Samsung W\_Audio E750 XXXXXXX" suchen und auswählen.
Beispiel) Samsung Galaxy Gerät

flowchart
graph LR
    A["Wi-Fi settings"] --> B["WP5 button connection"]
    B --> C["4B51D"]
    C --> D["3E79A"]
    D --> E["Samsung W_Audio E750 XXXXXXXX"]

    B --> F["Network notification"]
    F --> G["WPS button connection"]
    G --> H["Connect to Samsung W_Audio E750 XXXXXXXX"]
    H --> I["Connect Forget Cancel"]

    G --> J["Network notification"]
    J --> K["WPS button connection"]
    K --> L["Connect to Samsung W_Audio E750 XXXXXXXX"]
4. Öffnen Sie den Webbrowser des Wi-Fi-Geräts und geben Sie "http://192.168.1.1" in die Adressleiste des Internetbrowsers ein.
5. Drücken oder tippen Sie auf Samsung Wireless Audio with Dock Status.
6. Die WPS PIN erscheint unten auf dem Bildschirm. Notieren Sie sich diese Nummer und schalten Sie anschließend das Kabellose Audio System mit Docking Station aus und wieder ein.
7. Öffnen Sie die Wi-Fi Setup Seite Ihres Zugangspunkts (Wi-Fi-Router oder Modem) mithilfe Ihres PCs oder internettauglichen Geräts und stellen Sie die Wi-Fi Einstellungen auf die PIN-Methode ein. Schlagen Sie in der Bedienungsanleitung Ihres Routers oder Modems für weitere Anweisungen nach.
8. Tragen Sie die WPS PIN Nummer des Kabellosen Audio Systems mit Docking Station in das entsprechende Feld auf der Wi-Fi-Setup Seite ein.
9. Die WPS/RESET Taste auf der Rückseite des Kabellosen Audio Systems mit Docking Station im oder Modus mit der Spitze eines Kugelschreibers oder Ähnlichem länger als 10 Sekunden drücken. Das Symbol blinkt einmal weiß und danach zweimal. Warten Sie, bis das Symbol dreimal blinkt, und lassen Sie anschließend die Taste los.
• Das Symbol blinkt rot.
10. Wenn die Verbindung zwischen dem Kabellosen Audio System mit Docking Station und dem Zugangspunkt innerhalb von 90 Sekunden aufgebaut wird, wechselt das Symbol seine Farbe von Rot nach Weiß.
• Die Verbindung mit dem Kabellosen Audio System mit Docking Station ist hergestellt.

\- Die Wi-Fi Direkt Funktion wird von diesem Gerät nicht unterstützt.
Eine Direktverbindung kann von Fall zu Fall möglich sein, wird von diesem Gerät jedoch nicht unterstützt.
Sie können an das Kabellose Audio System mit Docking Station ein Bluetooth Gerät anschließen und Musik in bester Stereo Klangqualität ganz ohne Kabel genießen!
Was ist Bluetooth?
Bluetooth ist eine Technologie, mit der Bluetooth Geräte innerhalb eines kurzen Abstandes eine Funkverbindung zueinander aufbauen können.
- Ein Bluetooth Gerät kann Störungen erzeugen oder falsch funktionieren, wenn:
- Das Empfangs-/Sendesystem des Bluetooth-Geräts oder des Kabellosen Audio Systems mit Docking Station von einem Körperteil berührt wird.
- Die Funkübertragung durch Wände, Ecken oder Bürotrennwände behindert wird.
- Interferenzen mit Geräten auftreten, welche dasselbe Frequenzband verwenden, wie medizinische Geräte, Mikrowellenherde oder Funknetzwerke.
- Beim Verbindungsaufbau müssen sich das Kabellose Audio System mit Docking Station und das Bluetooth Gerät nah beieinander befinden.
- Je größer der Abstand zwischen dem Kabellosen Audio System mit Docking Station und dem Bluetooth Gerät, desto schlechter die Qualität. Wenn die Distanz den Bluetooth-Betriebsbereich übersteigt, geht die Verbindung verloren.
- In Gebieten mit geringer Empfangssensibilität ist die Funktion der Bluetooth-Verbindung möglicherweise eingeschränkt.
- Die Bluetooth Verbindung funktioniert nur dann, wenn der Abstand zwischen den Geräten nicht zu groß ist. Die Verbindung wird automatisch abgebrochen, wenn sich das Bluetooth Gerät außerhalb der Reichweite befindet. Selbst innerhalb dieser Reichweite kann die Klangqualität durch Hindernisse wie Mauern oder Türen beeinträchtigt werden.
- Dieses Funkgerät kann Interferenzen während des Betriebs verursachen.

- Eventuell müssen Sie einen PIN-Code (Kennwort) eingeben, wenn die Verbindung zwischen dem Bluetooth Gerät und dem Kabellosen Audio System mit Docking Station hergestellt werden soll. Wenn Sie zur Eingabe des PIN-Codes aufgefordert werden, geben Sie <0000> ein.
Das Kabellose Audio System mit Docking Station unterstützt SBC Daten (44.1kHz, 48 kHz).
■ Die AVRCP Funktion wird nicht unterstützt.
\- Nur an ein Bluetooth-Gerät anschließen, das die A2DP (AV) Funktion unterstützt.
\- Sie können kein Bluetooth-Gerät verwenden, das nur die HF (Hands Free) Funktion unterstützt.
Es kann nur eine Verbindung zu einem Bluetooth-Gerät hergestellt werden.
\- Nachdem das Kabellose Audio System mit Docking Station ausgeschaltet und die Verbindung unterbrochen wurde, wird nach erneutem Einschalten die Verbindung nicht automatisch wieder hergestellt. Die Verbindung zwischen den Geräten muss erneut hergestellt werden.
\- In den folgenden Fällen kann das Kabellose Audio System mit Docking Station nicht richtig gefunden oder angeschlossen werden:
- Wenn um das Kabellose Audio System mit Docking Station ein starkes elektrisches Feld besteht.
- Wenn mehrere Bluetooth Geräte gleichzeitig mit dem Kabellosen Audio System mit Docking Station verbunden sind.
- Wenn das Bluetooth-Gerät ausgeschaltet oder nicht angeschlossen ist oder nicht richtig funktioniert.
- Beachten Sie, dass Geräte, wie Mikrowellenherde, WLAN-Geräte, Leuchtstoffröhren und Gasöfen denselben Frequenzbereich wie Bluetooth-Geräte verwenden, wodurch es zu Interferenzen kommen kann.
ANSCHLIESSEN EINES BLUETOOTH GERÄTS
In diesem Abschnitt wird erklärt, wie das Kabellose Audio System mit Docking Station mit einem kompatiblen Bluetooth Fernsehgerät und anderen Bluetooth Geräten verbunden werden kann.
Das Kabellose Audio System mit Docking Station mit einem Bluetooth kompatiblen 2012 Samsung Fernsehgerät verbinden (SoundShare)

aus und der Verbindungsaufbau mit dem Kabellosen Audio System mit Docking Station wird abgeschlossen.
• Die Anzeige blinkt und hört auf zu blinken.
• Die Bluetooth Verbindung mit dem Kabellosen Audio System mit Docking Station ist hergestellt.
Das Kabellose Audio System mit Docking Station an ein Bluetooth Gerät anschließen
Bevor Sie beginnen stellen Sie sicher, dass Ihr Bluetooth Gerät die Bluetooth Stereo Kopfhörer Funktion unterstützt.

flowchart
graph TD
    A["Device with circular ports"] --> B["Input: Display with 'F' icon"]
    B --> C["Output: External Device with 'Externes Gerät' signal"]
    C --> D["Verbindung: Display connected to external device"]
1. Drücken Sie mehrmals die F. Taste auf der Oberseite des Kabellosen Audio Systems mit Docking Station, bis das Symbol auf der Anzeige erscheint.
\- Durch wiederholtes Drücken der Taste ändert sich die Auswahl wie folgt:

\- Der ausgewählte Modus wird in Weiß auf der Funktionsanzeige angezeigt.
2. Wechseln Sie auf ihrem Bluetooth Gerät in das Bluetooth Menü.
(Weitere Informationen dazu finden Sie der Bedienungsanleitung des Bluetooth-Geräts.)
3. Scannen oder suchen Sie nach Allen Geräten oder nach Headsets.
\- Es wird eine Liste der Geräte angezeigt.
4. Wählen Sie "[Samsung]W\_Audio XXXXXX" aus der Liste aus.
\- Wenn der Verbindungsaufbau zwischen dem Bluetooth Gerät und dem Kabellosen Audio System mit Docking Station fehlschlägt, das vom Bluetooth Gerät gefundene "[Samsung]W\_Audio XXXXXX" löschen und erneut die Suche nach dem Kabellosen Audio System mit Docking Station durchführen und anschließend die Schritte 2, 3 und 4 wiederholen.
wiedergabe
VERWENDEN DES TV MODUS (SoundShare)
Drücken Sie die F.Taste, um den Modus auszuwählen und schließen sie das Fernsehgerät an das Kabellose Audio System mit Docking Station an. (Siehe Seite 21)
\- Der Ton des Fernsehgeräts wird über dieses Gerät wiedergegeben, wenn es an ein Fernsehgerät angeschlossen ist.
\- Wenn Sie die Bluetooth Eingangsquelle des Kabellosen Audio Systems mit Docking Station um- oder ausschalten, wird der Ton wieder über das Fernsehgerät wiedergegeben.

natural_image
Circular icon with plus, minus, and square symbols inside, no readable text or numbers

\- Sie können die Lautstärke nur mit dem Kabellosen Audio System mit Docking Station regeln.
VERWENDEN DES DOCKING MODUS MIT SAMSUNG GALAXY UND APPLE GERÄTEN
Drücken Sie die F. Taste, um den ☐ Modus wählen und schließen Sie das Samsung Galaxy oder Apple Gerät an das Docking Audio System an. (Siehe Seite 13)
natural_image
Circular button with plus, minus, and function labels (no readable text or symbols beyond basic design)
1. Tippen Sie auf das Play Store (Android Market) Symbol auf dem Hauptbildschirm des Samsung Galaxy Geräts.
2. Tippen Sie auf das Suchen Symbol, um zur Suchleiste zu wechseln.
3. Geben Sie in die Suchleiste [Samsung Wireless Audio Dock], ein und klicken Sie auf Suchen.
4. Suchen Sie in der Ergebnisliste nach [Samsung Wireless Audio Dock] und tippen Sie diese Position an, um den Download zu starten.
5. Tippen Sie auf [Installieren].
Um Musik wiederzugeben, folgen Sie bitte diesen Schritten:
1-1. Wenn Sie die Anwendung starten und das Kabellose Audio System mit Docking Station das einzige für die Bluetooth Verbindung konfigurierte Gerät ist, wird durch die Betätigung von PLAY (WIEDERGABE) auf Ihrem Gerät automatisch die Bluetooth Verbindung zum Kabellosen Audio System mit Docking Station hergestellt und der Musiktitel wird von diesem Gerät wiedergegeben.
1-2. Wenn mehrere für die Bluetooth Verbindung konfigurierte Geräte, einschließlich des Kabellosen Audio Systems mit Docking Station vorliegen,
1) Wenn Sie die Anwendung starten, wird eine Liste mit den Geräten angezeigt, die an das Kabellose Audio System mit Docking Station angeschlossen werden können.
2) Wird der Musiktitel wiedergegeben, nachdem die Verbindung durch Auswahl des Kabellosen Audio Systems mit Docking Station aus der Geräteliste hergestellt wurde.
\- Wenn ein Bluetooth Gerät vorhanden ist, das bereits zuvor mit dem Kabellosen Audio System mit Docking Station verbunden wurde, wird es in der Liste nicht aufgeführt und die Verbindung wird automatisch hergestellt.
2. Wenn Sie Ihr mobiles Gerät an ein anderes Kabelloses Audio System mit Docking Station anschließen möchten, sollten die auf Ihrem Gerät gespeicherten Einstellungen gelöscht werden, bevor Sie Ihr Gerät mit dem neuen Kabellosen Audio System mit Docking Station verbinden.
• → [Daten löschen].


- Nachdem die Anwendung gestartet wurde, wird die Anwendung nicht unterbrochen, wenn Sie Ihr mobiles Gerät mit einem normalen Ladegerät aufladen.
- Wenn Sie ein anderes Gerät an das Kabellose Audio System mit Docking Station anschließen, während ein Samsung Galaxy Gerät im Docking Modus angeschlossen ist, müssen Sie eventuell den Bluetooth Modus des Samsung Galaxy Geräts ausschalten.
- Wenn Sie Schwierigkeiten haben, das Samsung Galaxy Gerät an das Dual Dock System anzuschließen, schalten Sie bitte den Bluetooth Modus auf allen anderen Geräten aus.
Menü auf dem Bildschirm des Apple Geräts.
3. Wählen Sie den gewünschten Titel und spielen Sie ihn ab.
\- Der Musiktitel wird über die Lautsprecher des Kabellosen Audio Systems mit Docking Station wiedergegeben.

\- Bei der Wiedergabe eines Videos mit Ihrem Gerät stehen die Wiedergabe/Pause/Vor/Zurück Funktionen eventuell nicht zur Verfügung.
Benutzen Sie die Tasten auf dem Quellgerät für die Bedienung.
kompatibilitätsliste (Apple Gerät)
Mit dem Docking Modus kompatible iPod/iPhone/iPad Modelle
Aktualisieren Sie die Software Ihres iPod/iPhone /iPad Modells auf die neueste Version, bevor Sie es mit diesem Gerät verwenden.
- iPod touch (4. Generation)
- iPod touch (3. Generation)
- iPod nano (6. Generation)
- iPod nano (5. Generation)
- iPhone 4S
- iPhone 4
- iPhone 3GS
- iPad 2
- iPad
- Je nach Version der iPod Software kann Ihr Gerät nicht kompatibel sein oder fehlerhaft funktionieren.
※ Wenn Sie ein inkompatibles Apple Gerät anschließen, fängt die iPod Funktions-LED an zu blinken.
VeRWenDen DeS BLUeTOOTH MODUS
Drücken Sie die F. Taste, um den § Modus auszuwählen und schließen sie anschließend das Bluetooth Gerät an das Kabellose Audio System mit Docking Station an. (Siehe Seite 22) Um Ihr Bluetooth Gerät anzuschließen, wenn sich das Kabellose Audio System mit Docking Station im Bluetooth Modus befindet, suchen Sie nach dem Kabellosen Audio System mit Docking Station auf der Bluetooth Liste des Geräts. Wählen Sie das Kabellose Audio System mit Docking Station und stellen Sie die Verbindung her. Nachdem die Verbindung zu dem Kabellosen Audio System mit Docking Station hergestellt wurde, den gewünschten Musiktitel auswählen und wiedergeben.

Der Musiktitel wird über die Lautsprecher des Kabellosen Audio Systems mit Docking Station wiedergegeben.

- Wenn Sie im Bluetooth Modus auf ein anderes Bluetooth Gerät wechseln möchten, müssen Sie zuerst die Verbindung zu dem bereits angeschlossenen Gerät unterbrechen und versuchen, das andere Bluetooth Gerät anzuschließen.
- Bei einer Bluetooth Verbindung können je nach verwendetem mobilen Gerät und Anwendung die Funktionen Wiedergabe/Pause/Vor/Zurück nicht zur Verfügung stehen.
Der Betrieb eines an das Kabellose Audio System mit Docking Station angeschlossenen Bluetooth Geräts kann zu einer stotternden Wiedergabe führen, wenn über den AUX-Eingang des Kabellosen Audio Systems mit Docking Station gleichzeitig eine andere Wiedergabe erfolgt.
Das Bluetooth Gerät vom Kabellosen Audio System mit Docking Station abtrennen.
Die Bluetooth Verbindung zum Kabellosen Audio System mit Docking Station kann abgebrochen werden. Die Anleitung hierzu finden Sie in der Bedienungsanleitung des Bluetooth Geräts.
• Die Verbindung zum Kabellosen Audio System mit Docking Station wird abgebrochen.
Trennen des Kabellosen Audio Systems mit Docking Station vom Bluetooth Gerät
Drücken Sie die FTaste auf der Oberseite des Kabellosen Audio Systems mit Docking Station, um von § auf einen anderen Modus umzuschalten oder drücken Sie den Ein-/Ausschalter auf der Fernbedienung, um das Kabellose Audio System mit Docking Station auszuschalten.
• Die Verbindung mit dem aktuell verbundenen Gerät wird getrennt.

- Die Bluetooth Verbindung funktioniert nur dann, wenn der Abstand zwischen den Geräten nicht zu groß ist. Die Verbindung wird automatisch unterbrochen, wenn dieser Radius überschritten wird. Selbst innerhalb dieses Radius kann die Klangqualität durch Hindernisse wie Mauern oder Türen beeinträchtigt werden.
- Wenn sich das Bluetooth-Gerät wieder im effektiven Bereich befindet, können Sie das Gerät neu starten, um die Verbindung mit dem Bluetooth-Gerät wieder herzustellen.
VERWENDEN DES USB MODUS
1. Schließen Sie das USB-Gerät an der USB-Schnittstelle an, die sich auf der Rückseite des Geräts befindet.
2. Drücken Sie mehrmals die F. Taste auf der Oberseite des Kabellosen Audio Systems mit Docking Station, bis das Symbol auf der Anzeige erscheint.
\- Durch wiederholtes Drücken der Taste ändert sich die Auswahl wie folgt :

\- Der ausgewählte Modus wird in Weiß auf der Funktionsanzeige angezeigt.

Bevor Sie ein USB-Gerät anschließen
Prüfen Sie die folgende Kompatibilitätsliste.
- Dieses Gerät kann unter Umständen nicht mit allen USB-Speichergeräten kompatibel sein.
- Es werden die Dateisysteme FAT16 und FAT 32 unterstützt.
- Das NTFS-Dateisystem wird nicht unterstützt.
- Schließen Sie das USB-Gerät direkt an den USB-Anschluss des Geräts an. Anderenfalls können Kompatibilitätsprobleme mit dem USB-Gerät auftreten.
- Schließen Sie nicht mehrere Speichergeräte über einen Mehrfach-Kartenleser an das Gerät an. Dies kann zu Fehlfunktionen führen.
• Digital Kamera PTP Protokolle werden nicht unterstützt.
- Das USB-Gerät nicht während des Lesevorgangs abtrennen.
- DRM-geschützte Musikdateien (MP3, WMA) von kommerziellen Webseiten werden nicht wiedergegeben.
- Externe Festplatten werden nicht unterstützt.
- Kompatibilitätsliste
Format Musik Dateiname MP3 WMA Dateinamenerweiterung .MP3 .WMA Bitrate 80~320 kbit/s 56~128 kbps Version - V 8 Sampling-Frequenz 44.1KHz 44.1KHz

× Schließen Sie ihr mobiles Gerät nicht an den USB-Anschluss und die Docking-Station gleichzeitig an, um es aufzuladen.
VERWENDEN DES AIRPLAY UND ALLSHARE PLAY MODUS
Um die oder Funktion nutzen zu können, müssen das Kabellose Audio System mit Docking Station und das anzuschließende Gerät mit dem gleichen Zugangspunkt verbunden sein.
1. Geben Sie den gewünschten Musiktitel über das Menü auf dem Hauptbildschirm des Apple Geräts wieder.
2. Wählen Sie "Samsung W\_Audio E750 XXXXXXX" durch Drücken des Symbols auf dem Bildschirm des Apple Geräts aus.
\- Der Musiktitel wird über die Lautsprecher des Kabellosen Audio System mit Docking Station wiedergegeben.

natural_image
Circular icon with plus, minus, and play button symbols (no text or numbers)

※ Wenn die Verbindung zwischen iTunes und dem Kabellosen Audio System mit Docking Station einmal mit der gleichen IP-Adresse gelungen ist, wird der Modus automatisch in den AirPlay Modus umgeschaltet, wenn das Kabellose Audio System mit Docking Station ausgewählt und ein Musiktitel in iTunes in einem anderen Modus als den Airplay Modus wiedergegeben wird.

\- Die Antwort auf den Bedienungsbefehl Ihrer Fernbedienung dauert 3-5 Sekunden.
Pop-up erscheint, "Samsung W\_Audio E750 XXXXXXX" auswählen.

natural_image
Circular device with plus, minus, and function buttons (no readable text or symbols)
\- Der Musiktitel wird über die Lautsprecher des Kabellosen Audio System mit Docking Station wiedergegeben.

flowchart
graph LR
    A["My device"] --> B["Audio"]
    C["Share multimedia contents with DLNA compliant devices"] --> D["Videos"]
    E["Pictures"] --> F["Audio"]
    G["Select device"] --> H["Unknown 2"]
    H --> I["24..."]
    I --> J["HTenkod (BAWMHEMANT..."]
    J --> K["Samsung W_Audio E750"]
    K --> L["Refresh"]
    K --> M["Cancel"]
    N["Unknown 7"] --> O["Unknown 2"]
    O --> P["Unknown 4"]
    P --> Q["Unknown 4"]
    Q --> R["Unknown 5"]
    R --> S["Unknown 4 3/25"]
    S --> T["00:00:17"]
    S --> U["00:03:44"]

\- Die Steuerungsfunktion kann je nach den Funktionen der Anwendung und dem Audio Dock Ihres Geräts eventuell von Ihrem Gerät nicht unterstützt werden.
funktionen
GRUNDFUNKTIONEN

natural_image
Diagram showing a camera with two lenses and a dial, no text or symbols present

Einstellen des Eingangsmodus
Es kann zwischen den folgenden Eingängen gewählt werden:
→ → → → → AUX(LED Aus).
Drücken Sie die entsprechende Taste auf der Fernbedienung, um den gewünschten Modus auszuwählen oder drücken Sie F. ,um zwischen den folgenden Modi auszuwählen:
→ ➕ ➕ ➕ ➕ ➕ ➕ AUX(LED Aus).
Eingangsmodus Display TV Modus Docking Modus BLUETOOTH Modus USB-Modus AirPlay Modus AllShare Play Modus AUX-Eingang LED Aus

Wiedergabe/Pause
Drücken Sie während der Wiedergabe die ▶II Taste.
\- Drücken Sie die ▶II Taste, um die Wiedergabe des Titels vorübergehend zu unterbrechen.
Drücken Sie die ▶II Taste erneut, um die ausgewählte Datei abzuspielen.

\- Diese Funktion steht in bestimmten Modi nicht zur Verfügung.

Vorwärts/Rückwärts springen
Drücken Sie während der Wiedergabe die ◀◀,▶▶ Taste.
- Wenn mehrere Dateien vorhanden sind und Sie die ▶▶▶ Taste drücken, wird die nächste Datei ausgewählt.
- Wenn mehrere Dateien vorhanden sind und Sie die ◀◀ Taste drücken, wird die vorherige Datei ausgewählt.

\- Diese Funktion steht in bestimmten Modi nicht zur Verfügung.

Stummschaltung
Diese Funktion ist im Falle eines Telefonanrufs oder beim Ertönen einer Türglocke sehr hilfreich.
1. Um den Ton dieses Geräts stumm zu schalten, müssen Sie die MUTE (☒) Taste auf der Fernbedienung drücken.
2. Drücken Sie die MUTE (☒) (oder VOLUME +/-) Taste auf der Fernbedienung erneut, um den Ton wieder eizuschalten.

Verwendung der BASS Funktion
Mit dieser Funktion könne Sie den Bass an Ihren Geschmack anpassen. Drücken Sie die BASS Taste auf der Fernbedienung dieses Geräts.
\- Durch wiederholtes Drücken der Taste ändert sich die Auswahl wie folgt: BASS ON → OFF
SOFTWARE AKTUALiSieRUnG (nUR USB MODUS)
1. Besuchen Sie die Webseite www.samsung.com.
2. Klicken Sie am oberen Rand der Seite auf SUPPORT.
3. Geben Sie den Produktnamen oder die Artikelnummer in das Suchfeld ein und klicken Sie anschließend auf Alle Ergebnisse.
4. Klicken Sie im mittleren Teil der Seite auf den Tab Downloads.
5. Klicken Sie auf Firmware.
6. Klicken Sie auf das ZIP-Dateisymbol der Aktualisierungsdatei.
7. Wenn das Pop-up Fenster erscheint auf OK klicken, um die Aktualisierungsdatei herunterzuladen und auf Ihrem PC zu speichern.
8. Entpacken Sie die heruntergeladene .Zip-Datei in den gewünschten Ordner auf Ihrem PC.
9. Kopieren Sie alle Dateien aus dem Ordner in das Stammverzeichnis des USB-Flash-Laufwerks.
\- Bei der Aktualisierung kann nur ein Satz an Dateien gleichzeitig für die Aktualisierung verwendet werden.

10. Drücken Sie mehrmals die F. Taste auf der Oberseite des Kabellosen Audio Systems mit Docking Station, bis das Symbol auf der Anzeige erscheint. Schließen Sie das USB-Laufwerk an den USB-Anschluss auf der Rückseite des Geräts an.
11. Während der Software Aktualisierung blinkt die LED auf. Nach Abschluss der Firmware Aktualisierung schaltet sich das Gerät automatisch ab.
\- Der Vorgang kann je nach den zu aktualisierenden Funktionen länger dauern. (Maximal 10 Minuten)
• Schalten Sie das Gerät wieder ein.

- Während des Aktualisierungsvorgangs darf die Netzspannung nicht ausgeschaltet oder das USB-Laufwerk abgetrennt werden. Nach Abschluss der Firmware Aktualisierung schaltet sich das Gerät automatisch ab.
- Beim Aktualisieren der Software werden sämtliche Einstellungen auf die (werkseitigen) Voreinstellungen zurückgesetzt.
Sie sollten sich Ihre Einstellungen notieren, um sie nach der Aktualisierung wieder vornehmen zu können.
- Falls die Aktualisierung der Firmware fehlschlägt empfehlen wir, das USB-Laufwerk im FAT16 Format zu formatieren und die Aktualisierung erneut zu versuchen.
- Für die Aktualisierung das USB-Laufwerk nicht im NTFS Format formatieren. Dieses Dateisystem wird nicht unterstützt.
- Je nach Hersteller wird das USB-Laufwerk möglicherweise nicht unterstützt.
- Die Verbindung des Kabellosen Audio Systems mit Docking Station zum Internet und allen anderen externen Geräten trennen, bevor die Software Aktualisierung durchgeführt wird.
- Sie können keine anderen externen Geräte über diesen USB-Anschluss aufladen.
- Schlagen Sie bitte in der Aktualisierungsanleitung auf der Webseite nach.
fehlersuche
Bevor Sie sich an den Kundendienst wenden, überprüfen Sie bitte die folgenden Punkte.
Symptom Überprüfung Behebung Das Gerät lässt sich nicht einschalten. Ist der Netzstecker an eine Steckdose angeschlossen? Schließen Sie den Netzstecker an die Steckdose an. Das Gerät reagiert nicht auf das Drücken von Tasten. Wurden das Kabellose Audio System mit Docking Station oder die Fernbedienung einer elektrostatischen Ladung ausgesetzt? Ziehen Sie den Netzstecker, und schließen Sie ihn wieder an die Steckdose an. Kein Ton hörbar. Das System richtig mit dem Gerät verbunden?Ist die Mute Funktion eingeschaltet?Ist die Lautstärke auf minimal eingestellt? Schließen Sie das Gerät richtig an.Drücken Sie die Taste Mute, um die Funktion zu deaktivieren.Stellen Sie die Lautstärke ein. Die Fernbedienung funktioniert nicht. Überprüfen Sie, ob die Batterien leer sind.Ist die Entfernung zwischen Fernbedienung und Gerät zu groß? Legen Sie neue Batterien ein.Bedienen Sie das Gerät aus einer näheren Entfernung. Wi-Fi Netzwerkverbindung fehlgeschlagen Prüfen Sie, ob Ihr Wi-Fi Router zertifiziert ist. Stellen Sie sicher, dass die Netzwerkverbindung auf WLAN (Allgemein) eingestellt ist.Stellen Sie sicher, dass das Kabellose Audio System mit Docking Station mit einem WLAN-Router oder Modem verbunden ist. Das Ausführen der SoundShare Funktion (Verbindungsaufbau mit dem Fernsehgerät) ist fehlgeschlagen. Unterstützt Ihr Fernsehgerät diese Funktion?Verfügen Sie über die neueste Firmware Version?Tritt ein Fehler beim Verbindungsaufbau auf? Prüfen Sie, ob Ihr Fernsehgerät diese Funktion unterstützt. (http://www.samsung.com)Aktualisieren Sie die Firmware Ihres Fernsehgeräts auf die neueste Version.Setzen Sie das Gerät zurück. Drücken Sie die WPS/RESET Taste im TV Modus.Setzen Sie sich mit dem technischen Kundendienst in Verbindung
TECHNISCHE DATEN
Modellbezeichnung DA-E750/ DA-E751 ALLGEMEIN Gewicht 9 kg Abmessungen (B x T x H) 450 x 244,1 x 168,5 mm Betriebstemperaturbereich +5°C~+35°C Zulässiger Luftfeuchtigkeitsgehalt 10 % bis 75 % VERSTÄRKER Nennausgangsleistung Front L/R 20W/4OHM, THD = 1%, 1kHz Subwoofer 60W/8OHM, THD=1%, 70Hz Eingangsempfindlichkeit/Impedanz 400mV/56Kohm (AUX) Signal-Rausch Abstand(analoger Eingang) 65 dB Kanaltrennung (1 kHz) 65 dB FREQUENZGANG Analogeingang 20Hz - 20kHz (±3 dB) Digitaleingang/48kHz PCM 20Hz - 20kHz (±3 dB) DOCKING NENNKAPAZITÄT iPad 5 V 2,0 A iPod 5 V 1,0 A Galaxy 5 V 1,0 A USB Typ A USB 1.1 DC Ausgang 500mA NETZWERK Ethernet 100BASE-TX Anschluss WLAN Integriert Sicherheit WEP (OFFEN)WPA-PSK (TKIP)WPA2-PSK (AES) WPS(PBC/PIN) Unterstützt
\* Die Messung des Signal-Rausch Abstands, der Kanaltrennung und des übertragenen Frequenzbereichs Empfindlichkeit basieren auf den Richtlinien der AES (Audio Engineering Society).
\* Nominelle Spezifikation
- Samsung Electronics Co., Ltd behält sich das Recht auf unangekündigte Änderungen vor.
- Gewicht und Abmessungen können von den Angaben abweichen.
- Netzwerkgeschwindigkeiten von 10Mbps oder weniger werden nicht unterstützt.
- Informationen zur Stromversorgung und Stromverbrauch finden Sie im Aufkleber am Produkt.
Open Source Announcement
Senden Sie Fragen über Open Source haben, senden Sie diese über E-Mail an Samsung (oss.request@samsung.com).
\- Dieses Produkt verwendet Softwareprogramme, die unter der Independent JPEG Group vertrieben werden.
FLAC decoder, Copyright (C) 2001,2002,2003,2004,2005,2006,2007 Josh Coalson
Redistribution and use in source and binary forms, with or without modification, are permitted provided that the following conditions are met:
- Redistributions of source code must retain the above copyright notice, this list of conditions and the following disclaimer.
- Redistributions in binary form must reproduce the above copyright notice, this list of conditions and the following disclaimer in the documentation and/or other materials provided with the distribution.
- Neither the name of the Xiph.org Foundation nor the names of its contributors may be used to endorse or promote products derived from this software without specific prior written permission.
THIS SOFTWARE IS PROVIDED BY THE COPYRIGHT HOLDERS AND CONTRIBUTORS "AS IS" AND ANY EXPRESS OR IMPLIED WARRANTIES, INCLUDING, BUT NOT LIMITED TO, THE IMPLIED WARRANTIES OF MERCHANTABILITY AND FITNESS FOR A PARTICULAR PURPOSE ARE DISCLAIMED. IN NO EVENT SHALL THE FOUNDATION OR CONTRIBUTORS BE LIABLE FOR ANY DIRECT, INDIRECT, INCIDENTAL, SPECIAL, EXEMPLARY, OR CONSEQUENTIAL DAMAGES (INCLUDING, BUT NOT LIMITED TO, PROCUREMENT OF SUBSTITUTE GOODS OR SERVICES; LOSS OF USE, DATA, OR PROFITS; OR BUSINESS INTERRUPTION) HOWEVER CAUSED AND ON ANY THEORY OF LIABILITY, WHETHER IN CONTRACT, STRICT LIABILITY, OR TORT (INCLUDING NEGLIGENCE OR OTHERWISE) ARISING IN ANY WAY OUT OF THE USE OF THIS SOFTWARE, EVEN IF ADVISED OF THE POSSIBILITY OF SUCH DAMAGE."
Ogg/Vorbis decoder, Copyright (c) 2002, Xiph.org Foundation
Redistribution and use in source and binary forms, with or without modification, are permitted provided that the following conditions are met:
- Redistributions of source code must retain the above copyright notice, this list of conditions and the following disclaimer.
- Redistributions in binary form must reproduce the above copyright notice, this list of conditions and the following disclaimer in the documentation and/or other materials provided with the distribution.
- Neither the name of the Xiph.org Foundation nor the names of its contributors may be used to endorse or promote products derived from this software without specific prior written permission.
THIS SOFTWARE IS PROVIDED BY THE COPYRIGHT HOLDERS AND CONTRIBUTORS "AS IS" AND ANY EXPRESS OR IMPLIED WARRANTIES, INCLUDING, BUT NOT LIMITED TO, THE IMPLIED WARRANTIES OF MERCHANTABILITY AND FITNESS FOR A PARTICULAR PURPOSE ARE DISCLAIMED. IN NO EVENT SHALL THE FOUNDATION OR CONTRIBUTORS BE LIABLE FOR ANY DIRECT, INDIRECT, INCIDENTAL, SPECIAL, EXEMPLARY, OR CONSEQUENTIAL DAMAGES (INCLUDING, BUT NOT LIMITED TO, PROCUREMENT OF SUBSTITUTE GOODS OR SERVICES; LOSS OF USE, DATA, OR PROFITS; OR BUSINESS INTERRUPTION) HOWEVER CAUSED AND ON ANY THEORY OF LIABILITY, WHETHER IN CONTRACT, STRICT LIABILITY, OR TORT (INCLUDING NEGLIGENCE OR OTHERWISE) ARISING IN ANY WAY OUT OF THE USE OF THIS SOFTWARE, EVEN IF ADVISED OF THE POSSIBILITY OF SUCH DAMAGE.
Wenden Sie sich an SAMSUNG WORLD WIDE
Wenn Sie Fragen oder Anmerkungen zu Produkten von Samsung haben, wenden Sie sich an den Kundendienst von SAMSUNG.
Region Kontakt Zentrum Website ALBANIA 42 27 5755 www.samsung.com AUSTRIA 0810 - SAMSUNG (7267864, € 0.07/min) www.samsung.com BELGIUM 02-20 1-24-18 www.samsung.com/be (Dutch)www.samsung.com/be_fr (French) BOSNIA 05 133 1999 www.samsung.com BULGARIA 07001 33 11 www.samsung.com CROATIA 062 SAMSUNG (062 726 7864) www.samsung.com CZECH 800 - SAMSUNG (800-726786) www.samsung.com DENMARK 70 70 19 70 www.samsung.com FINLAND 030 - 6227 515 www.samsung.com FRANCE 01 48 63 00 00 www.samsung.com GERMANY 01805 - SAMSUNG(726-7864 € 0,14/Min) www.samsung.com CYPRUS 8009 4000 only from landline www.samsung.com GREECE 80111-SAMSUNG (80111 726 7864) only from land line (+30) 210 6897691 from mobile and land line www.samsung.com HUNGARY 06-80-SAMSUNG(726-7864) www.samsung.com ITALIA 800-SAMSUNG(726-7864) www.samsung.com KOSOVO +381 0113216899 www.samsung.com LUXEMBURG 261 03 710 www.samsung.com MACEDONIA 023 207 777 www.samsung.com MONTENEGRO 020 405 888 www.samsung.com
Region Kontakt Zentrum Website NETHERLANDS 0900-SAMSUNG (0900-7267864) (€ 0,10/Min) www.samsung.com NORWAY 815-56 480 www.samsung.com POLAND 0 801-1 SAMSUNG(172-678)+48 22 607-93-33 www.samsung.com PORTUGAL 808 20-SAMSUNG (808 207267) www.samsung.com ROMANIA 08010 SAMSUNG (08010 7267864) only from landline(+40) 21 206 01 10 from mobileand land line www.samsung.com SERBIA 0700 Samsung (0700 7267864) www.samsung.com SLOVAKIA 0800 - SAMSUNG(0800-726786) www.samsung.com SPAIN 902 - 1 - SAMSUNG (902 172678) www.samsung.com SWEDEN 0771 726 7864 (SAMSUNG) www.samsung.com Switzerland 0848 - SAMSUNG(7267864,CHF 0.08/min) www.samsung.com/chwww.samsung.com/ch_fr(French) U.K 0330 SAMSUNG (7267864) www.samsung.com EIRE 0818 717100 www.samsung.com LITHUANIA 8-800-77777 www.samsung.com LATVIA 8000-7267 www.samsung.com ESTONIA 800-7267 www.samsung.com

Korrekte E ntsorgung der Batterien dieses Produkts
(In den Ländern der Europäischen Union und anderen europäischen Ländern mit einem separaten Altbatterie-Rücknahmesystem)
Die Kennzeichnung auf der Batterie bzw. auf der dazugehörigen Dokumentation oder Verpackung gibt an, dass die Batterie zu diesem Produkt nach seiner Lebensdauer nicht zusammen mit dem normalen Haushaltsmüll entsorgt werden darf. Wenn die Batterie mit den chemischen Symbolen Hg, Cd oder Pb gekennzeichnet ist, liegt der Quecksilber-, Cadmium- oder Blei-Gehalt der Batterie über den in der EG-Richtlinie 2006/66 festgelegten Referenzwerten. Wenn Batterien nicht ordnungsgemäß entsorgt werden, können sie der menschlichen Gesundheit bzw. der Umwelt schaden.
Bitte helfen Sie, die natürlichen Ressourcen zu schützen und die nachhaltige Wiederverwertung von stofflichen Ressourcen zu fördern, indem Sie die Batterien von anderen Abfällen getrennt über Ihr örtliches kostenloses Altbatterie-Rücknahmesystem entsorgen.

Korrekte E ntsorgung von Altgeräten (Elektroschrott)
(In den Ländern der Europäischen Union und anderen europäischen Ländern mit einem separaten Sammelsystem)
Die Kennzeichnung auf dem Produkt, Zubehörteilen bzw. auf der dazugehörigen Dokumentation gibt an, dass das Produkt und Zubehörteile (z. B. Ladegerät, Kopfhörer, USB-Kabel) nach ihrer Lebensdauer nicht zusammen mit dem normalen Haushaltsmüll entsorgt werden dürfen. Entsorgen Sie dieses Gerät und Zubehörteile bitte getrennt von anderen Abfällen, um der Umwelt bzw. der menschlichen Gesundheit nicht durch unkontrollierte Müllbeseitigung zu schaden. Helfen Sie mit, das Altgerät und Zubehörteile fachgerecht zu entsorgen, um die nachhaltige Wiederverwertung von stofflichen Ressourcen zu fördern.
Private Nutzer wenden sich an den Händler, bei dem das Produkt gekauft wurde, oder kontaktieren die zuständigen Behörden, um in Erfahrung zu bringen, wo Sie das Altgerät bzw. Zubehörteile für eine umweltfreundliche Entsorgung abgeben können.
Gewerbliche Nutzer wenden sich an ihren Lieferanten und gehen nach den Bedingungen des Verkaufsvertrags vor. Dieses Produkt und elektronische Zubehörteile dürfen nicht zusammen mit anderem Gewerbemüll entsorgt werden.
Wireless Audio with Dock (Audio wireless con dock) manuale utente
immagina le possibilità
Grazie per avere acquistato questo prodotto Samsung.
Per ricevere un servizio più completo, registrare il
prodotto all'indirizzo
www.samsung.com/register
caratteristiche
AllShare Play
Per riprodurre sull'audio wireless con dock, attraverso una connessione di rete, la musica salvata sui dispositivi (come PC, smartphone o NAS).
AirPlay
Per riprodurre sull'audio wireless con dock la musica salvata sui dispositivi Apple.
Sistema di diffusori docking audio doppio
Utilizzando la docking station doppia del sistema, collegare, caricare e quindi riprodurre il dispositivo Galaxy o Apple Samsung attraverso i diffusori integrati.
Supporto host USB
Utilizzando la funzione host USB dell'audio wireless con dock è possibile collegare e riprodurre file musicali da dispositivi di memorizzazione USB esterni come lettori MP3, memorie flash USB ecc.
Funzione Bluetooth
È possibile collegare un dispositivo Bluetooth all'audio wireless con dock per ascoltare musica dal dispositivo con audio stereo di alta qualità, tutto senza fili!
aptX®
aptX assicura un audio stereo Bluetooth di alta qualità fornendo una qualità audio wireless come via cavo.
Licenza


AirPlay, il logo AirPlay, iPhone, iPod, iPod classic, iPod nano, iPod shuffle e iPod touch sono marchi di Apple Inc., registrati negli Stati Uniti e in altri Paesi. iPad è un marchio di Apple Inc.
aVVeRTenze PeR La SicUREzza
PER RIDURRE IL RISCHIO DI SCOSSE ELETTRICHE, NON RIMUOVERE IL COPERCHIO (O IL PANNELLO POSTERIORE). ALL'INTERNO NON VI SONO PARTI RIPARABILI DALL'UTENTE. PER LA MANUTENZIONE RIVOLGERSI AL PERSONALE DI ASSISTENZA QUALIFICATO.


Questo simbolo indica la presenza di "tensione pericolosa" all'interno del prodotto, che comporta il rischio di scosse elettriche o lesioni.

Questo simbolo indica istruzioni importanti che accompagnano il prodotto.
aVVeRTenza : Per ridurre il rischio di incendio o di scosse elettriche, non esporre questo apparecchio alla pioggia o all'umidità.
aTTenziOne : PER EVITARE SCOSSE ELETTRICHE, INSERIRE A FONDO LO SPINOTTO PIÙ LARGO DELLA SPINA NELLA RELATIVA PRESA.
- Questa apparecchiatura deve essere sempre collegata a una presa di rete con collegamento a terra.
- Per scollegare l'apparecchio dalla corrente è necessario estrarre la spina dalla presa; perciò la presa dovrà essere facilmente accessibile.
aTTenziOne
- Non schizzare o sgocciolare liquidi sull'apparecchio. Non sistemare oggetti pieni di liquidi, come dei vasi, sull'apparecchio.
- Per spegnere completamente l'apparecchio, estrarre la spina di alimentazione dalla presa di rete. Di conseguenza, la spina di alimentazione deve essere facilmente e prontamente accessibile in qualsiasi momento.
CE!
Samsung Electronics dichiara che il [Audio wireless con dock] è conforme ai requisiti essenziali e ad altre disposizioni rilevanti della direttiva 1999/5/CE.
La dichiarazione di conformità ufficiale è reperibile sul sito http://www.samsung.com, selezionando Support (Supporto) > Search Product Support (Richiesta di assistenza sul prodotto) e inserendo il nome del modello.
Questo apparecchio può essere utilizzato in tutti i Paesi dell'UE.
In Francia, questo apparecchio può essere utilizzato soltanto in luoghi chiusi.
PRecaUziOni

Verificare che le caratteristiche dell'alimentazione CA della casa corrispondano a quelle dell'etichetta di identificazione sul retro del prodotto. Installare il prodotto orizzontalmente, su un supporto adeguato (come un mobile), verificando che vi sia spazio sufficiente per una corretta ventilazione (70 - 100 mm). Assicurarsi che le aperture di ventilazione non siano ostruite. Non sistemare l'unità su amplificatori o altri dispositivi che potrebbero riscaldarsi. L'unità è progettata per un uso continuo. Per spegnere completamente l'unità, scollegare il connettore CA dalla presa di rete. Scollegare l'unità dalla presa se si intende lasciarla inutilizzata per un periodo prolungato.

natural_image
Illustration of a vintage-style speaker emitting sound waves, with a lightning bolt visible in the window (no text or symbols)
Durante i temporali, scollegare la spina di alimentazione dalla presa. I picchi di alta tensione provocati dai fulmini potrebbero danneggiare l'unità.

natural_image
Illustration of a smart nightlight system with sun, wind, and battery components (no text or symbols)
Tenere il prodotto lontano da fonti di umidità (ad es. vasi) e calore ecce sivo (ad es. fuoco) o da apparecchi che generano un forte campo ma netico o elettrico. In caso di malfunzionamento dell'unità, scollegare il cavo di alimentazione dalla presa di corrente.
Il prodotto non è destinato all'uso industriale. Il prodotto è destinato esclusivamente all'uso personale.
Se il prodotto viene conservato a basse temperature, potrebbe formarsi condensa. Se si trasporta l'unità in invemo, attendere circa 2 ore prima di utilizzarla, in modo che ritorni a temperatura ambiente.

natural_image
Simple line drawing of a room with a projector and sun symbol (no text or labels)
Non esporre l'unità alla luce diretta del sole o ad altre fonti di calore. Questo potrebbe provocare il surriscaldamento e il malfunzionamento dell'unità.

Le batterie utilizzate con il prodotto contengono sostanze chimiche nocive all'ambiente.
Non smaltirle insieme ai comuni rifiuti domestici.
CARATTERISTICHE


PER COMINCIARE

DESCRIZIONI

TELECOMANDO

ACCENSIONE E REGOLAZIONE DEL VOLUME

CONNESSIONI

RIPRODUZIONE

FUNZIONI

RISOLUZIONE DEI PROBLEMI

APPENDICE

2 Caratteristiche
2 Licenza
3 Avvertenze per la sicurezza
4 Precauzioni
6 Prima di leggere il manuale utente
6 Accessori forniti
7 Pannello Superiore/Anteriore/Posteriore
9 Descrizione del telecomando
10 Attivazione/disattivazione dell'alimentazione
10 Regolazione del volume
11 Installazione del nucleo toroidale in ferrite sul cavo di alimentazione
11 Installazione del nucleo in ferrite sul cavo lan
12 Utilizzo della copertura del distanziale
13 Collegamento di un dispositivo al Dual Docsk
14 Collegamento di un dispositivo audio attraverso l'ingresso AUX
15 Connessione alla rete
21 Collegamento ai dispositivi Bluetooth
23 Uso del modo TV (SoundShare)
23 Utilizzo del modo dock con dispositivi Samsung Galaxy e Apple
25 Uso del modo Bluetooth
26 Uso del modo USB
27 Utilizzo dei modi AirPlay e AllShare Play
28 Funzioni di base
29 Funzioni avanzate
30 Aggiornamento software (solo modo USB)
31 Risoluzione dei problemi
32 Specifiche
per cominciare
PRIMA DI LEGGERE IL MANUALE UTENTE
Prima di leggere il manuale utente, tenere presenti le seguenti indicazioni.
Icone utilizzate in questo manuale
Icona Indicazione Definizione Attenzione Indica una situazione in cui una funzione non è attiva o in cui è possibile che le impostazioni vengano cancellate. Nota Indica suggerimenti o istruzioni nella pagina che aiutano a comprendere il funzionamento dell'unità.
Istruzioni di sicurezza e risoluzione dei problemi
1) Familiarizzarsi con le istruzioni relative alla sicurezza prima di utilizzare il prodotto. (Vedere a pagina 3)
2) Se si verifica un problema, consultare la sezione relativa alla risoluzione dei problemi. (Vedere a pagina 31)
Copyright
©2012 Samsung Electronics Co., Ltd.
Tutti i diritti riservati; è vietata la riproduzione o la copia di una parte o dell'intero manuale utente senza previa autorizzazione scritta di Samsung Electronics Co., Ltd
ACCESSORI FORNITI
Controllare di seguito gli accessori forniti.


\- L'aspetto degli accessori può variare leggermente dalle illustrazioni riportate sopra.
descrizioni
PanneLLO SUPeRiORe/anTeRiORe/POSTeRiORe


natural_image
Illustration of a two-tiered audio amplifier with two speakers and a top-mounted speaker (no text or symbols)

1 TASTO RIPRODUZIONE / PAUSA Riproduce o mette in pausa un file musicale. 2 TASTO F. Per commutare i modi nella sequenza seguente : AUX (LED spento) 3 TASTO VOLUME +/- Regola il volume. 4 DISPLAY FUNZIONI Quando si cambia modo con il tasto Function, l'icona del modo selezionato viene visualizzata in bianco sul display Function (Funzione).Il LED lampeggia all'accensione e smette di lampeggiare quando l'unità è accesa e pronta per la riproduzione. 5 DUAL DOCK Fornisce un dock a 5 pin per dispositivi Galaxy Samsung o un dock a 30 pin per dispositivi Apple Samsung. 6 TERMINALE LAN Consente il collegamento ad una rete mediante un cavo LAN. 7 TASTO WPS/ RESET Utilizzarlo per collegare l'unità alle reti wireless. 8 PORTA USB Collegare un dispositivo di memorizzazione USB esterno come un lettore MP3 per riprodurre i file che si trovano sul dispositivo. 9 JACK DI ALIMENTAZIONE Collegare il cavo di alimentazione a questo prodotto. 10 AUX IN Per il collegamento di un dispositivo esterno all'uscita analogica. 11 ONLY FOR SERVICE Questo connettore è riservato all'assistenza.

- Quando l'unità viene accesa, sono richiesti circa 20 secondi per riscaldare l'amplificatore a valvole ed emettere un suono stabile.
- Per aggiornare il software del prodotto attraverso la porta USB, è richiesto l'utilizzo di un dispositivo di memoria USB.

- Quando si afferra o si sposta il prodotto, occorre fare attenzione all'altoparlante woofer posto sulla parte bassa del prodotto.
- L'unità può essere collegata a dispositivi mobili con livelli di emissione audio elevata. Quando l'unità viene collegata a dispositivi esterni con livelli di emissione elevata, è consigliabile ridurre l'emissione audio per proteggere l'amplificatore e i diffusori.
- Tenere la spina quando si scollega il cavo di alimentazione dalla presa di rete. Non tirare il cavo.
- Se si collocano altri prodotti elettronici sopra il prodotto, l'audio del prodotto può risultare disturbato.
- Assicurarsi che i bambini non tocchino la superficie del prodotto quando è in funzione. Il prodotto può riscaldarsi.
DeScRiziOne DeL TeLecOManDO

Installazione della batteria nel telecomando

flowchart
graph TD
    A["Rectangular Device"] --> B["Disassembly"]
    B --> C["Close-up of the Interior"]
    C --> D["Final Disassembly"]
1. Aprire il coperchio del telecomando infilando un'unghia tra il coperchio e il corpo del telecomando. Quindi sollevare il coperchio e staccarlo completamente.
2. Installare una batteria al litio da 3 V. Inserire la batteria nell'apposito vano con il polo + rivolto verso l'alto.
3. Montare il coperchio sul telecomando. Inserire innanzitutto il lato in alto e abbassare il coperchio verificando che sia a filo con il corpo del telecomando, quindi premere il coperchio sul corpo del telecomando spingendo i bordi verso il basso.

\- Fare attenzione che l'unghia non rimanga impigliata nel vano quando si solleva il coperchio. L'unghia può danneggiarsi.
Portata del telecomando
Il telecomando ha una portata di 7 metri in linea retta dall'unità. Il telecomando funziona anche con un angolo orizzontale fino a 30° rispetto al sensore.
Accensione e regolazione del volume
aTTiVaziOne/DiSaTTiVaziOne DeLL'aLiMenTaziOne

1. Per accendere l'unità, toccare un tasto qualsiasi del pannello anteriore quando l'unità è in modo standby.
oppure
Premere il tasto POWER del telecomando.
2. Per spegnere l'unità, toccare il tasto ▶II del pannello anteriore per più di 3 secondi.
oppure
Premere nuovamente il tasto POWER del telecomando.

\- A causa del tempo di preriscaldamento dell'amplificatore sono necessari circa 20 secondi per l'accensione dell'unità.
ReGOLaziOne DeL VOLUME
Utilizzare i tasti + e - per regolare il volume. I LED di funzione si accendono da sinistra verso destra quando si aumenta il volume e da destra verso sinistra quando si riduce il volume. Il LED si spegne se si alza il volume dopo averlo impostato sul massimo o se lo si abbassa dopo averlo impostato sul minimo.

Premere il tasto +/- sul lato destro del pannello superiore.
oppure
Premere il tasto VOL +/- del telecomando.

\- Quando si preme il tasto VOL +/-, il volume aumenta o diminuisce.
\- È anche possibile utilizzare i comandi del volume dei dispositivi collegati utilizzando il dual dock o il Bluetooth per regolare il volume. Tenere presente che l'uso dei comandi di regolazione volume nei dispositivi collegati mediante Bluetooth può essere limitato.
inSTaLLaziOne DeL nUcLeO TOROiDaLe in FeRRiTe SUL caVO Di aLiMenTaziOne

natural_image
Diagram of a 3D mechanical component with internal zigzag structure, enclosed in a rounded square frame (no text or symbols)
Sollevare i fermi per sbloccare il nucleo ed aprirlo.


natural_image
Technical line drawing of a mechanical component with no visible text or symbols


natural_image
Simple line drawing of a cable connector with a plug (no text or symbols)
Richiudere i fermi.


natural_image
Simple line drawing of a mechanical component with two wires (no text or symbols)
Eseguire tre avvolgimenti del cavo di alimentazione attorno al nucleo.
(Iniziare ad avvolgere i cavi a 5-10 cm di distanza dai connettori)
inSTaLLaziOne DeL nUcLeO in FeRRiTe SUL caVO Lan

natural_image
Simple line drawing of a device casing with no text or symbols
Sollevare i fermi per sbloccare il nucleo ed aprirlo.


natural_image
Two stacked cylindrical electronic components with mounting brackets, shown in 2D rendering (no text or symbols)


natural_image
Simple line drawing of a connector with two connectors (no text or symbols)
Richiudere i fermi.


natural_image
Diagram of a mechanical assembly with two cylindrical components and a curved band (no text or symbols)
Collocare il cavo LAN nel nucleo aperto.
UTILIZZO DELLA COPERTURA DEL DISTANZIALE
Applicare la copertura del distanziale per agganciare un dispositivo Galaxy o Apple Samsung senza custodia protettiva al dual dock.
Utilizzarla per installare il dispositivo in modo stabile, tenendo conto della forma di quest'ultimo.
Il dual dock viene fornito di cappuccio di protezione per il connettore a 30 pin dei dispositivi Apple. Proteggere il connettore a 30 pin con l'apposito cappuccio quando si collega il dispositivo Galaxy Samsung a 5 pin.
Per ulteriori informazioni, vedere le figure in basso.
COLLEGAMENTO DI UN DISPOSITIVO AL DUAL DOCK
Come collegare un dispositivo al dual dock.

flowchart
graph TD
    A["Hand pressing down on camera"] --> B["Adjusting touch panel with arrow"]
    B --> C["Assembly step with hand holding key"]
    C --> D["Adjusting touch panel with arrow and rotation indicator"]
1. Il vano di collegamento del DUAL DOCK si trova sul retro del prodotto. Premerlo delicatamente per aprirlo.
2. Premere ripetutamente il tasto F. sul pannello superiore dell'audio wireless con dock finché sul display appare l'icona □.
- Ogni volta che si preme il tasto, la selezione cambia con la sequenza indicata di seguito :
→ ➕ ➔ ➔ ➔ ➔ ➔ ➔ ➔ ➔ ➔ ➔ ➔ ➔ ➔ ➔ ➔ ➔ ➔ ➔ ➔ ➔ ➔ ➔ ➔ ➔ ➔ ➔ ➔ ➔ ➔ ➔ ➔ ➔ ➔ ➔ ➔ ➔ ➔ ➔ ➔ ➔ ➔ ➔ ➔ ➔ ➔ ➔ ➔ ➔ ➔ ➔ ➕
- Il modo selezionato viene visualizzato di colore bianco nel display funzione.
3. Se si dispone di un dispositivo Galaxy Samsung, collegarlo al connettore a 5 pin (più piccolo) per connetterlo al dual dock. Se si dispone di un dispositivo Apple, collegare il dispositivo al connettore (più grande) a 30 pin del dual dock.
4. Sollevare il supporto del dispositivo come indicato per impedire che il dispositivo scivoli o cada dal dual dock.

- Accendere il dispositivo Samsung Galaxy prima di collegarlo al Dual Dock.
- L'unità non supporta il docking simultaneo del dispositivo Samsung Galaxy e del dispositivo Apple.
- Collegare il dispositivo Samsung Galaxy e il dispositivo Apple al docking audio prima di avviare il modo dock.(Vedere a pagina 23)
COLLEGAMENTO DI UN DISPOSITIVO AUDIO ATTRAVERSO L'INGRESSO AUX
Questa sezione spiega come collegare l'unità a un dispositivo audio.
L'unità è provvista di un connettore analogico audio per collegare un dispositivo audio.

AUX IN
1. Collegare il jack auricolari del dispositivo esterno o del dispositivo audio al connettore AUX IN (audio) sul retro dell'unità.
2. Premere ripetutamente il tasto F. finché i LED funzione si spengono.
\- Il modo AUX è attivo se non vi sono LED funzione accesi.

\- Prima di spostare o installare il prodotto, spegnere l'apparecchio e staccare il cavo di alimentazione.
CONNESSIONE ALLA RETE
È possibile collegare l'audio wireless con dock al router di rete utilizzando uno dei metodi illustrati nelle pagine seguenti.
Per collegare l'audio wireless con dock a una rete via cavo

flowchart
graph TD
    A["Router"] -->|Servizio a banda larga| B["Modem a banda larga"]
    A -->|Servizio a banda larga| C["Modem a banda larga"]
    A -->|Servizio a banda larga| D["Modem a banda larga"]
    A -->|Servizio a banda larga| E["Modem a banda larga"]
    A -->|Servizio a banda larga| F["Modem a banda larga"]
    A -->|Servizio a banda larga| G["Modem a banda larga"]
    A -->|Servizio a banda larga| H["Modem a banda larga"]
    A -->|Servizio a banda larga| I["Modem a banda larga"]
    A -->|Servizio a banda larga| J["Modem a banda larga"]
    A -->|Servizio a banda larga| K["Modem a banda larga"]
    A -->|Servizio a banda larga| L["Modem a banda larga"]
    A -->|Servizio a banda larga| M["Modem a banda larga"]
    A -->|Servizio a banda larga| N["Modem a banda larga"]
    A -->|Servizio a banda larga| O["Modem a banda larga"]
    A -->|Servizio a banda larga| P["Modem a banda larga"]
    A -->|Servizio a banda larga| Q["Modem a banda larga"]
    A -->|Servizio a banda larga| R["Modem a banda larga"]
    A -->|Servizio a banda larga| S["Modem a banda larga"]
    A -->|Servizio a banda larga| T["Modem a banda larga"]
    A -->|Servizio a banda larga| U["Modem a banda larga"]
    A -->|Servizio a banda larga| V["Modem a banda larga"]
    A -->|Servizio a banda larga| W["Modem a banda larga"]
    A -->|Servizio a banda larga| X["Modem a banda larga"]
    A -->|Servizio a banda larga| Y["Modem a banda larga"]
    A -->|Servizio a banda larga| Z["Modem a banda larga"]
    A -->|Servizio a banda larga| AA["Modem a banda larga"]
    A -->|Servizio a banda larga| AB["Modem a banda larga"]
    A -->|Servizio a banda larga| AC["Modem a banda larga"]
    A -->|Servizio a banda larga| AD["Modem a banda larga"]
    A -->|Servizio a banda larga| AE["Modem a banda larga"]
    A -->|Servizio a banda larga| AF["Modem a banda larga"]
    A -->|Servizio a banda larga| AG["Modem a banda larga"]
    A -->|Servizio a banda larga| AH["Modem a banda larga"]
    A -->|Servizio a banda larga| AI["Modem a banda larga"]
    A -->|Servizio a banda larga| AJ["Modem a banda larga"]
    A -->|Servizio a banda larga| AK["Modem a banda larga"]
    A -->|Servizio a banda larga| AL["Modem a banda larga"]
    A -->|Servizio a banda larga| AM["Modem a banda larga"]
    A -->|Servizio a banda larga| AN["Modem a banda larga"]
    A -->|Servizio a banda larga| AO["Modem a banda larga"]
    A -->|Servizio a banda larga| AP["Modem a banda larga"]
    A -->|Servizio a banda larga| AQ["Modem a banda larga"]
    A -->|Servizio a banda larga| AR["Modem a banda larga"]
    A -->|Servizio a banda larga| AS["Modem a banda larga"]
    A -->|Servizio a banda larga| AT["Modem a banda larga"]
    A -->|Servizio a banda larga| AU["Modem a banda larga"]
    A -->|Servizio a banda larga| AV["Modem a banda larga"]
    A -->|Servizio a banda larga| AW["Modem a banda larga"]
    A -->|Servizio a banda larga| AX["Modem a banda larga"]
    A -->|Servizio a banda larga| AY["Modem a banda larga"]
    A -->|Servizio a banda larga| AZ["Modem a banda larga"]
    A -->|Servizio a banda larga| BA["Modem a banda larga"]
    A -->|Servizio a banda larga| BB["Modem a banda larga"]
    A -->|Servizio a banda larga| BC["Modem a banda larga"]
    A -->|Servizio a banda larga| BD["Modem a banda larga"]
    A -->|Servizio a banda larga| BE["Modem a banda larga"]
    A -->|Servizio a banda larga| BF["Modem a banda larga"]
    A -->|Servizio a banda larga| BG["Modem a banda larga"]
    A -->|Servizio a banda larga| BH["Modem a banda larga"]
    A -->|Servizio a banda larga| BI["Modem a banda larga"]
    A -->|Servizio a banda larga| BJ["Modem a banda larga"]
    A -->|Servizio a banda larga| BK["Modem a banda larga"]
    A -->|Servizio a banda larga| BL["Modem a banda larga"]
    A -->|Servizio a banda larga| BM["Modem a banda larga"]
    A -->|Servizio a banda larga| BN["Modem a banda larga"]
    A -->|Servizio a banda larga| BO["Modem a banda larga"]
    A -->|Servizio a banda larga| BP["Modem a banda larga"]
    A -->|Servizio a banda larga| BQ["Modem a banda larga"]
    A -->|Servizio a banda larga| BR["Modem a banda larga"]
    A -->|Servizio a banda larga| BS["Modem a banda larga"]
    A -->|Servizio a banda larga| BT["Modem a banda larga"]
    A -->|Servizio a banda larga| BU["Modem a banda larga"]
    A -->|Servizio a banda larga| BV["Modem a banda larga"]
    A -->|Servizio a banda larga| BW["Modem a banda larga"]
    A -->|Servizio a banda larga| BX["Modem a banda larga"]
    A -->|Servizio a banda larga| BY["Modem a banda larga"]
    A -->|Servizio a banda larga| BZ["Modem a banda larga"]
Scollegare l'alimentazione dell'audio wireless con dock prima di collegare il cavo LAN.
1. Spegnere l'audio wireless con dock.
2. Collegare l'audio wireless con dock al router utilizzando un cavo LAN.
3. Accendere l'audio wireless con dock.
4. Premere ripetutamente il tasto F. sul pannello superiore dell'audio wireless con dock finché sul display appare l'icona □ o 📄
- Ogni volta che si preme il tasto, la selezione cambia con la sequenza indicata di seguito:
5. La spia o tempeggia in rosso all'accensione, poi diventa stabilmente bianca quando l'audio wireless con dock si collega al router.


Se si collega il cavo LAN quando il prodotto è acceso, spegnere il prodotto e poi riaccenderlo.
Se il collegamento alla rete non riesce, scollegare il cavo LAN e ricollegarlo, quindi riavviare il prodotto.
- L'utente xDSL deve disporre di un router per collegarsi alla rete.
Questa sezione descrive 4 modi per collegare l'audio wireless con dock ad una rete wireless.

- Alcune operazioni legate alla rete possono differire da quanto spiegato a seconda delle prestazioni e delle funzioni supportate dall'AP utilizzato.
- Per configurare la connessione di rete al router o al modem, vedere il manuale utente del router o del modem.
- L'audio wireless con dock supporta i seguenti protocolli di sicurezza:
\- WEP → Aperto
- WPA-PSK → TKIP
- WPA2-PSK → AES
- È inoltre possibile collegare l'audio wireless con dock ad una rete senza protezione e senza password.
Se il router wireless supporta DHCP, questo audio wireless con dock può utilizzare un indirizzo IP statico o DHCP per collegarsi alla rete wireless..
- Selezionare un canale del router wireless che non sia al momento utilizzato. Se il canale impostato per il router wireless è attualmente utilizzato da un altro dispositivo vicino, ciò provocherà interferenze e problemi di comunicazione.
Se è selezionato il modo Pure High-throughput (Greenfield) 802.11n e il tipo di crittografia del router è impostato su WEP o TKIP, l'audio wireless con dock non supporta un collegamento conforme alle nuove specifiche di certificazione Wi-Fi.
- Per sua natura, una rete LAN wireless può provocare interferenze a seconda delle condizioni operative (prestazioni router, distanza, ostacoli, interferenze con altri dispositivi radio, ecc.)
■ WPS(PBC) / WPS(PIN) non funziona quando il protocollo di sicurezza è impostato su WEP.
Se la rete non è stata configurata, premere e tenere abbassato il tasto WPS/RESET sul pannello posteriore finché la spia ▲ o ▶ lampeggia due volte. Attendere finché la spia rossa smette di lampeggiare, quindi spegnere e poi riaccendere l'unità. Riprovare.
Questo metodo di configurazione della rete è rivolto agli utenti del dispositivo Apple con iOS 5.0 o superiore.
1. Collegare il dispositivo Apple alla rete.
2. Selezionare ☐ sull'audio wireless con dock, quindi collegare il dispositivo iPod /iPhone /iPad al dual dock.
3. Utilizzando la punta di una biro o uno strumento analogo, tenere premuto per più di 1 secondo il tasto WPS/RESET sul pannello posteriore dell'audio wireless con dock. L'icona □ lampeggia una volta. Rilasciare il tasto.
4. Selezionare nel menu di scelta rapida sul display del dispositivo Apple.
5. Quando si passa al modo ▲, la spia lampeggia in rosso, per poi diventare stabilmente bianca. Quando l'audio wireless con dock si collega, la spia smette di lampeggiare in rosso e diventa bianca.
• Il collegamento alla rete è completato.
1. Premere ripetutamente il tasto F. sul pannello superiore dell'audio wireless con dock finché sul display appare l'icona

\- Ogni volta che si preme il tasto, la selezione cambia con la sequenza indicata di seguito :
→ → → ← → → AUX (LED spento)
La spia passa dal bianco al rosso lampeggiant e.
2. Utilizzando la punta di una biro o uno strumento analogo, tenere premuto il tasto WPS/RESET sul pannello posteriore per più di 1 secondo. La spia lampeggia una volta in bianco. Dopo il lampeggio della spia, rilasciare il tasto.
• La spia lampeggia in rosso.
3. Premere il tasto WPS/RESET sul router o sul modem entro 90 secondi.
4. Quando l'audio wireless con dock si collega, la spia o passa dal rosso lampeggiante al bianco.
• Il collegamento alla rete è completato.

Per collegare l'audio wireless con dock attraverso una connessione JBC (connessione juke-box)
1. Premere ripetutamente il tasto F. sul pannello superiore dell'audio wireless con dock finché sul display appare l'icona ▲ o ▶
\- Ogni volta che si preme il tasto, la selezione cambia con la sequenza indicata di seguito:
□ → □ → ✕ → ⚙ → ▲ → 📁 → AUX (LED spento)
La spia passa dal bianco al rosso lampeggiante.
2. Utilizzando la punta di una biro o uno strumento analogo, tenere premuto il tasto WPS/RESET sul pannello posteriore per più di 5 secondi. La spia lampeggia una volta in bianco. Attendere che la spia lampeggi altre due volte in bianco, quindi rilasciare il tasto WPS/RESET.
\- La spia lampeggia in rosso, quindi smette di lampeggiare e diventa rossa quando l'unità accede al modo di impostazione di rete..
3. Per collegare l'audio wireless con dock alla rete, cercare "Samsung W\_Audio E750 XXXXXXX" nell'elenco delle impostazioni Wi-Fi del dispositivo WI-Fi, quindi selezionarlo.
es.) Dispositivo Galaxy Samsung

flowchart
graph LR
    A["Wi-Fi settings"] --> B["Wi-Fi"]
    B --> C["Network notification"]
    C --> D["Wi-Fi settings"]
    D --> E["Network notification"]
    E --> F["Wi-Fi settings"]
    style A fill:#f9f,stroke:#333
    style B fill:#ccf,stroke:#333
    style C fill:#cfc,stroke:#333
    style D fill:#fcc,stroke:#333
    style E fill:#cff,stroke:#333
    style F fill:#ffc,stroke:#333
4. Aprire il browser Web del dispositivo Wi-Fi, quindi digitare "http://192.168.1.1" nella barra degli indirizzi del browser Internet per accedere alla pagina Web dell'audio wireless con dock.
5. Nel campo "Service Set ID (SSID) (ID unità service (SSID))", selezionare il dispositivo AP (router o modem) a cui è collegato il dispositivo Wi-Fi.
6. Digitare la password del dispositivo AP nel campo "WPA Passphrase (Passphrase WPA)". Per impostare l'IP statico, premere le impostazioni avanzate. Inserire l'indirizzo IP statico desiderato.
7. Premere .
Se sul dispositivo Wi-Fi viene visualizzato un messaggio di avviso, fare clic su OK.
8. Una volta completata la connessione tra l'audio wireless con dock e l'AP selezionato, la spia sull'audio wireless con dock diventa bianca.
• La connessione dell'audio wireless con dock è completata.
L'immagine in alto indica la schermata che appare sul display dopo il completamento della connessione di rete; a questo punto si può eseguire normalmente AirPlay o DLNA.


Per collegare l'audio wireless con dock per mezzo di un PIN WPS
1. Premere ripetutamente il tasto F. sul pannello superiore dell'audio wireless con dock finché sul display appare l'icona o
\- Ogni volta che si preme il tasto, la selezione cambia con la sequenza indicata di seguito :
→ → → → → → AUX (LED spento)
La spia passa dal bianco al rosso lampeggiante.
2. Utilizzando la punta di una biro o uno strumento analogo, tenere premuto il tasto WPS/RESET sul pannello posteriore per più di 5 secondi. La spia lampeggia una volta in bianco. Attendere che la spia lampeggi altre due volte in bianco, quindi rilasciare il tasto WPS/RESET.
\- La spia lampeggia in rosso, quindi smette di lampeggiare e diventa rossa quando l'unità accede al modo di impostazione di rete.
3. Per collegare l'audio wireless con dock alla rete, cercare "Samsung W\_Audio E750 XXXXXXX" nell'elenco delle impostazioni Wi-Fi del dispositivo WI-Fi, quindi selezionarlo.
es.) Dispositivo Galaxy Samsung

flowchart
graph LR
    A["WiFi settings\nWPS button connection\nConfigure wireless network connections\nWiFi networks\n1A23E\n4B51D\n3E79A\nSamsung W_Audio E750 XXXXXXXX"] --> B["Network notification\nWiFi button connections\nConnect to Samsung W_Audio E750 XXXXXXXX\nConnect, Forget, Cancel"]
    B --> C["WiFi settings\nWi-Fi\nConnected to WiFi clock PUTC 27:16, WiFi\nNetwork notification\nNotify my phone on a single network to provide\nWiFi buttons\nWiFi Networks\n Siemens W_Audio E750 XXXXXXXX\n Siemens"]
4. Aprire il browser Web del dispositivo Wi-Fi, quindi digitare "http://192.168.1.1" nella barra degli indirizzi del browser Internet.
5. Premere o toccare lo Samsung Wireless Audio with Dock Status.
6. In fondo alla schermata viene visualizzato il numero WPS PIN (PIN WPS). Annotare o registrare il numero, quindi spegnere l'unità audio wireless con dock e riaccenderla.
7. Accedere alla pagina di impostazione Wi-Fi dell'AP (router o modem wireless) attraverso il PC o un altro dispositivo con connessione Internet, quindi effettuare le impostazioni Wi-Fi inserendo il codice PIN. Per le istruzioni, vedere il manuale utente del router o del modem.
8. Digitare il codice PIN WPS del docking audio doppio nel relativo campo della pagina di impostazione Wi-Fi.

9. Utilizzando la punta di una biro o uno strumento analogo, tenere premuto il tasto WPS/RESET sul pannello posteriore dell'audio wireless con dock per più di 10 secondi nel modo 📄 o 🍒a spia lampeggia una volta, poi altre due volte in bianco. Attendere che la spia lampeggi tre volte, quindi rilasciare il tasto.
• L'icona lampeggia in rosso.
10. Se la connessione tra l'audio wireless con dock e l'AP viene completata entro 90 secondi, la spia passa da rosso a bianco.
\- La connessione dell'audio wireless con dock è completata.

\- La funzione Wi-Fi Direct non è supportata da questo prodotto.
La connessione diretta può funzionare in alcuni casi, ma non è una funzione supportata da questo prodotto.
È possibile collegare l'audio wireless con dock ai dispositivi Bluetooth e ascoltare musica con elevata qualità del suono stereo, tutto senza fili!
Che cos'è il Bluetooth?
La tecnologia Bluetooth consente di collegare facilmente tra di loro i dispositivi compatibili Bluetooth attraverso una connessione wireless a breve distanza.
- Un dispositivo Bluetooth può dar luogo a disturbi o malfunzionamenti, a seconda delle condizioni di utilizzo, quando:
- Una parte del corpo è a contatto con il sistema di ricezione/di trasmissione del dispositivo Bluetooth o dell'audio wireless con dock.
- È soggetto a variazioni elettriche dovute a interferenze derivanti da riflessioni dei segnali su pareti, spigoli o tramezzature d'ufficio.
- È esposto a interferenze elettriche derivanti da dispositivi della stessa banda di frequenza, incluse apparecchiature mediche, forni a microonde e LAN wireless.
- Tenere vicini l'audio wireless con dock e il dispositivo Bluetooth durante la connessione.
- Maggiore è la distanza tra l'audio wireless con dock e il dispositivo Bluetooth, peggiore è la qualità. Se la distanza supera il raggio d'azione del Bluetooth, la connessione si interrompe.
- Nelle zone in cui la ricezione è debole, la connessione Bluetooth potrebbe non funzionare correttamente.
- La connessione Bluetooth funziona soltanto se il dispositivo Bluetooth è vicino all'unità. La connessione si interrompe automaticamente se il dispositivo Bluetooth viene allontanato. La qualità del suono si riduce in presenza di ostacoli quali pareti o porte, anche entro la distanza adeguata.
- Questo dispositivo wireless può provocare interferenze elettriche durante il funzionamento.

- Per collegare il dispositivo Bluetooth all'audio wireless con dock può essere richiesto di inserire un codice PIN (password). Se viene visualizzata la finestra di inserimento del codice PIN, inserire <0000>.
- L'audio wireless con dock supporta i dati SBC (44,1 kHz, 48 kHz).
La funzione AVRCP non è supportata.
\- Effettuare il collegamento esclusivamente a un dispositivo Bluetooth che supporti la funzione A2DP (AV).
\- Non è possibile effettuare il collegamento a un dispositivo Bluetooth che supporti soltanto la funzione HF (vivavoce).
\- È possibile collegare solo un dispositivo Bluetooth per volta.
\- Dopo aver disattivato l'audio wireless con dock e interrotto la connessione, questa non viene ripristinata automaticamente. Per ristabilire la connessione, accoppiare nuovamente i dispositivi.
\- L'audio wireless con dock potrebbe non effettuare la ricerca o collegarsi in modo corretto nei seguenti casi:
- In presenza di un forte campo elettrico intorno all'audio wireless con dock.
- Se vi sono più dispositivi Bluetooth collegati contemporaneamente all' audio wireless con dock.
\- Se il dispositivo Bluetooth è spento, non è in posizione o non funziona correttamente.
\- Tenere presente che tutti i dispositivi come fornì a microonde, adattatori LAN wireless, luci a fluorescenza e fornelli a gas utilizzano la stessa gamma di frequenza del dispositivo Bluetooth e possono causare interferenze elettriche.
COLLEGAMENTO AI DISPOSITIVI BLUETOOTH
Questa sezione spiega come collegare l'audio wireless con dock a televisori compatibili Bluetooth e ad altri dispositivi Bluetooth.
Per collegare l'audio wireless con dock a un televisore Samsung 2012 compatibile Bluetooth (SoundShare)

sulla schermata del televisore, la connessione all'audio wireless con dock viene completata.
• La spa lampeggia per breve tempo.
• La connessione Bluetooth dell'audio wireless con dock è completata.
Per collegare il sistema audio wireless con dock a un dispositivo Bluetooth
Prima di cominciare, verificare che il dispositivo Bluetooth supporti la funzione auricolari stereo compatibili Bluetooth.

1. Premere ripetutamente il tasto F. sul pannello superiore dell'audio wireless con dock finché sul display appare l'icona \$.
\- Ogni volta che si preme il tasto, la selezione cambia con la sequenza indicata di seguito :

\- Il modo selezionato viene visualizzato di colore bianco nel display funzione.
2. Selezionare il menu del dispositivo Bluetooth.
(Vedere il manuale utente del dispositivo Bluetooth per le istruzioni).
3. Scorrere o cercare tutti i dispositivi o gli auricolari.
\- Viene visualizzato un elenco di dispositivi.
4. Selezionare "[Samsung]W\_Audio XXXXXX" dall'elenco.
\- Se il dispositivo Bluetooth non riesce a stabilire la connessione con l'audio wireless con dock, eliminare la voce "[Samsung] W\_Audio XXXXXX" rilevata dal dispositivo Bluetooth e ripetere la ricerca dell'audio wireless con dock, quindi ripetere i passi 2, 3 e 4.
riproduzione
USO DEL MODO TV (SoundShare)
Premere il tasto F. per selezionare il modo □, quindi collegare il televisore all'audio wireless con dock. (Vedere a pagina 21)
• L'unità riproduce l'audio dal televisore quando è collegata al televisore.
- Se si cambia la sorgente di ingresso Bluetooth dell'audio wireless con dock o la si disattiva, l'audio torna a essere emesso dal televisore.

natural_image
Circular icon with plus, minus, and square symbols inside, no readable text or numbers

Il volume può essere regolato soltanto con il sistema audio wireless con dock.
UTILIZZO DEL MODO DOCK CON DISPOSITIVI SAMSUNG GALAXY E APPLE
Premere il tasto F. per selezionare il modo ☐ e collegare il dispositivo Samsung Galaxy o Apple Samsung al docking audio. (Vedere a pagina 13)
natural_image
Circular device control knob with plus, minus, and function buttons (no text or symbols beyond basic labels)

2. Se si sostituisce l'audio wireless con dock collegato al dispositivo mobile, eliminare le impostazioni rimanenti salvate sul dispositivo prima di effettuare la connessione con quello nuovo.
• → [Clear data (Cancella dati)].

- Dopo aver avviato l'applicazione, la si può eseguire anche durante il caricamento del dispositivo mobile con un comune caricabatteria.
- Se si collega un altro dispositivo all'audio wireless con dock dopo aver collegato il dispositivo Galaxy Samsung in modo dock, può essere necessario disattivare il modo Bluetooth del dispositivo Galaxy Samsung.
- In caso di problemi di connessione del dispositivo Galaxy Samsung al dual dock, disattivare il modo Bluetooth di tutti gli altri dispositivi.
nella schermata principale del dispositivo Apple.
3. Selezionare e riprodurre la musica desiderata.
- La musica viene riprodotta attraverso i diffusori dell'audio wireless con dock.

\- Durante la riproduzione di un video con il dispositivo, le funzioni di riproduzione/pausa/avanti/indietro potrebbero non essere disponibili.
Utilizzare il tasto sul dispositivo sorgente per attivarlo.
Elenco della compatibilità (Dispositivo Apple)
Modelli di iPod/iPhone/iPad compatibili con il modo dock
Aggiornare il software dell'iPod/iPhone/iPad all'ultima versione prima di utilizzarlo con l'unità.
- iPod touch (4 ^a generazione)
- iPod touch (3 ^a generazione)
- iPod nano (6 ^a generazione)
- iPod nano (5 ^a generazione)
- iPhone 4S
- iPhone 4
- iPhone 3GS
- iPad 2
- iPad
- A seconda della versione del software per iPod, il dispositivo può non essere compatibile o funzionare in modo anomalo.
※ Se si collega un dispositivo Apple non compatibile, il LED funzione dell'iPod lampeggia.
USO DeL MODO BLUeTOOTH
Premere il tasto F per selezionare il modo , quindi collegare il dispositivo Bluetooth all'audio wireless con dock. (Vedere a pagina 22)
Per collegare il dispositivo Bluetooth quando l'audio wireless con dock è in modo Bluetooth, cercare l'audio wireless con dock sull'elenco Bluetooth del dispositivo. Selezionare l'audio wireless con dock, quindi effettuare la connessione. Dopo aver collegato l'audio wireless con dock, selezionare e riprodurre la musica desiderata.
La musica viene riprodotta attraverso i diffusori dell'audio wireless con dock.


- Per cambiare il dispositivo collegato attraverso il modo Bluetooth con un altro dispositivo, scollegare il dispositivo attuale e tentare di collegarsi all'altro dispositivo da utilizzare.
- Durante la comunicazione Bluetooth, le operazioni di riproduzione/pausa/avanti/indietro potrebbero non essere disponibili a seconda del dispositivo mobile utilizzato e dell'applicazione.
- Il funzionamento del dispositivo Bluetooth collegato all'audio wireless con dock può procedere a scatti se avviene durante la riproduzione dell'audio wireless con dock dall'ingresso AUX.
Per scollegare il dispositivo Bluetooth dall'audio wireless con dock
È possibile annullare il collegamento Bluetooth dall'audio wireless con dock. Per istruzioni, vedere il manuale utente del dispositivo Bluetooth.
• L'audio wireless con dock viene scollegato.
Per scollegare l'audio wireless con dock dal dispositivo Bluetooth
Premere il tasto F. pannello anteriore dell'audio wireless con dock per passare da § ad un altro modo oppure premere il tasto Power del telecomando per disattivare l'audio wireless con dock.
\- Il dispositivo attualmente connesso si scollega.

- La connessione Bluetooth funziona soltanto se l'unità è vicina. Se la distanza è eccessiva, la connessione viene automaticamente interrotta. La qualità del suono si riduce in presenza di ostacoli quali pareti o porte, anche entro la distanza adeguata.
- Se il dispositivo Bluetooth viene riportato alla distanza adeguata, si può ripristinare la connessione con il dispositivo Bluetooth.
USO DEL MODO USB
1. Collegare il dispositivo USB alla porta USB sul retro dell'unità.
2. Premere ripetutamente il tasto F. sul pannello superiore dell'audio wireless con dock finché sul display appare l'icona ⇔.
\- Ogni volta che si preme il tasto, la selezione cambia con la sequenza indicata di seguito:
→ → → ← → → → AUX (LED spento)
\- Il modo selezionato viene visualizzato di colore bianco nel display funzione.

Prima di collegare un dispositivo USB
Leggere l'elenco seguente per verificare la compatibilità.
- Il prodotto potrebbe non essere compatibile con alcuni tipi di supporti USB.
- I file system FAT16 e FAT32 sono supportati.
- Il file system NTFS non è supportato.
- Collegare un dispositivo USB direttamente alla porta USB del prodotto. In caso contrario può verificarsi un problema di compatibilità USB.
- Non collegare più dispositivi di memorizzazione al prodotto attraverso un lettore multischede. Potrebbe non funzionare correttamente.
- I protocolli PTP per videocamere digitali non sono supportati.
• Non rimuovere il dispositivo USB mentre viene letto.
- I file musicali protetti da DRM (MP3, WMA) provenienti da un sito Web commerciale non vengono riprodotti.
• Gli HDD esterni non sono supportati.
- Elenco della compatibilità
Formato Musica Nome file MP3 WMA Estensione file .MP3 .WMA Bit rate 80~320 kbps 56~128 kbps Versione - V8 Frequenza di campionamento 44,1KHz 44,1KHz

※ Non collegare il dispositivo mobile contemporaneamente alla porta USB e alla docking station per ricaricarlo.
UTILIZZO DEI MODI AIRPLAY E ALLSHARE PLAY
Per utilizzare la funzione ☐, l'audio wireless con dock e il dispositivo che si tenta di collegare devono essere collegati allo stesso AP.
1. Riprodurre la musica desiderata nel menu della schermata principale del dispositivo Apple.
2. Selezionare "Samsung W\_Audio E750 XXXXXXX" premendo l'icona 📄 sulla schermata del dispositivo Apple.
\- La musica viene riprodotta attraverso i diffusori dell'audio wireless con dock.

natural_image
Circular button with plus, minus, and play symbols (no text or numbers)

Se una volta riesce la connessione tra iTunes e l'audio wireless con dock attraverso lo stesso IP, il modo passa automaticamente a AirPlay quando si seleziona l'audio wireless con dock e si riproduce la musica in iTunes in un modo diverso da AirPlay.

\- L'unità impiega da 3 a 5 secondi per rispondere alle operazioni attivate dal telecomando.
, selezionare "Samsung W\_Audio E750 XXXXXXX".
\- La musica viene riprodotta attraverso i diffusori dell'audio wireless con dock.

natural_image
Circular button with plus, minus, and function icons (no text or symbols)

flowchart
graph LR
    A["My device"] --> B["Share multimedia contents with DLNA compliant devices"]
    B --> C["Videos"]
    B --> D["Pictures"]
    B --> E["Audio"]

    F["Unknown 00:03:42"] --> G["Select device 24..."]
    H["Unknown 2 00:00:57"] --> I["▶ Unknown 4 00:03:44"]
    J["Unknown 4 00:03:46"] --> K["Unknown 5 00:00:17"]
    L["Unknown 7 00:03:31"] --> M["Refresh Cancel"]

    N["Unknown 7"] --> O["Audio"]

\- La funzione di controllo può non essere supportata dal dispositivo a seconda delle funzioni dell'applicazione e dock audio del dispositivo.
FUNZIONI DI BASE

natural_image
Two grayscale camera buttons with circular lenses and a dial, one showing a button labeled 'F' (no text or symbols on the buttons themselves)

Selezione del tipo di ingresso
È possibile selezionare i seguenti ingressi:
→ → → → → AUX (LED spento).
Premere il tasto appropriato del telecomando per selezionare il modo desiderato, oppure premere il tasto F. per selezionare uno dei seguenti modi: → → → ← → → → AUX (LED spento).
Modo di inserimento Visualizzazione Modo TV Modo dock Modo BLUETOOTH Modo USB Modo AirPlay Modo AllShare Play Ingresso AUX LED spento

Riproduzione/Pausa
Durante la riproduzione, premere il tasto ▶II.
\- Premere il tasto ▶ II per interrompere temporaneamente la riproduzione del file.
Premere di nuovo il tasto ▶ II per riprodurre il file selezionato.

\- Questa funzione potrebbe non operare in certi modi.

Riproduzione a salti Avanti/Indietro
Durante la riproduzione, premere il tasto ◀◀,▶◀.
- Se sono presenti più file, premendo il tasto ▶▶, viene selezionato il file successivo.
- Se sono presenti più file, premendo il tasto ◀◀, viene selezionato il file precedente.

\- Questa funzione potrebbe non operare in certi modi.

Disattivazione dell'audio
Questa funzione è utile se si deve rispondere al campanello o al telefono.
1. Per disattivare l'audio dell'unità, premere il tasto MUTE (✗) del telecomando.
2. Premere nuovamente il tasto MUTE ( ) del telecomando (oppure premere il tasto VOLUME +/-) per ripristinare l'audio.

Utilizzo della funzione BASS
Ottimizza l'audio dei bassi in base alle preferenze personali.
Premere il tasto BASS del telecomando dell'unità.
\- Ogni volta che si preme questo tasto, la selezione cambia con la sequenza indicata di seguito:
BASS ON → OFF
aGGiORnaMenTO SOFTWaRe (SOLO MODO USB)
1. Andare sul sito www.samsung.com.
2. Fare clic su SUPPORT (SUPPORTO) in alto a destra nella pagina.
3. Inserire il codice del modello del prodotto nel campo di ricerca, quindi fare clic su Trova il tuo prodotto.
4. Fare clic sulla scheda Manuali e download al centro della pagina, sotto l'intestazione del download.
5. Fare clic su Firmware al centro della pagina.
6. Fare clic sull'icona ZIP (ZIP) del file da aggiornare.
7. Quando viene visualizzata la finestra popup, fare clic su OK (OK) e continuare il download, quindi salvare il file da aggiornare sul PC.
8. Decomprimere il file .zip scaricato in una certa cartella del PC.
9. Copiare tutti i file della cartella nella directory principale dell'unità flash USB.
\- È possibile aggiornare soltanto un gruppo di file per volta.
10. Premere ripetutamente il tasto F. sul pannello superiore dell'audio wireless con dock finché sul display appare l'icona ←. Inserire la chiave USB nella porta USB sul pannello posteriore dell'unità.
11. Il LED lampeggia durante l'aggiornamento del software. Il prodotto si spegne automaticamente al termine dell'aggiornamento del firmware.
\- A seconda delle funzioni da aggiornare può richiedere tempi più lunghi. (Massimo 10 minuti)
• Riaccendere il prodotto.


- Non scollegare l'alimentazione o rimuovere la chiave USB mentre l'aggiornamento è in corso. L'unità principale si spegne automaticamente al termine dell'aggiornamento del firmware.
- Al termine dell'aggiornamento del software, vengono ripristinate le impostazioni predefinite.
Si consiglia di prendere nota delle impostazioni effettuate in modo da poterle reimpostare facilmente dopo l'aggiornamento.
- Se non si riesce ad effettuare l'aggiornamento del firmware, si raccomanda di formattare la chiave USB in formato FAT16 e quindi di riprovare.
- Ai fini dell'aggiornamento, non formattare la chiave USB in formato NTFS. Questo tipo di file system non è supportato.
- A seconda del costruttore, l'USB potrebbe non essere supportata.
- Scollegare da Internet l'audio wireless con dock ed eventuali dispositivi esterni prima di aggiornare il software.
- Non è possibile caricare altri dispositivi esterni attraverso questa porta USB.
- Vedere la guida all'aggiornamento sul sito Web.
risoluzione dei problemi
Prima di rivolgersi al servizio di assistenza, eseguire i controlli indicati di seguito.
Problema Verifica Rimedio L'unità non si accende. Il cavo di alimentazione è collegato alla presa? Collegare la spina alla presa. Una funzione non si attiva quando viene premuto il tasto. L'audio wireless con dock o il telecomando sono stati esposti a elettricità statica? Scollegare e ricollegare la spina. L'audio non viene riprodotto. L'unità è collegata in modo corretto al dispositivo?La funzione di disattivazione dell'audio è attivata?Il volume è regolato sul minimo? Collegarla correttamente.Premere il tasto di disattivazione dell'audio per ripristinarlo.Regolare il volume. Il telecomando non funziona. Le batterie sono scariche?Vi è eccessiva distanza tra il telecomando e l'unità principale? Sostituire le batterie.Avvicinare il telecomando all'unità principale. Errore connessione di rete Wi-Fi Verificare che il router Wi-Fi sia certificato Wi-Fi. Verificare che la connessione di rete sia impostata su Wireless(General)(Wireless(Generale)).Assicurarsi che l'unità audio wireless con dock sia collegata a un router o a un modem IP wireless. Il SoundShare (connessione TV) non è riuscito. Il televisore è un modello supportato?Il firmware del televisore è aggiornato?Si è verificato un errore di connessione? Verificare che il televisore sia un modello supportato.(http://www.samsung.com)Aggiornare il televisore all'ultimo firmware.Ripristinare l'unità.Premere il tasto WPS/RESET in modo TV.Contattare l'assistenza tecnica.
SPECIFICHE
Model name DA-E750/ DA-E751 GENERALITÀ Peso 9 kg Dimensioni (L x P x A) 450 x 244,1 x 168,5 mm Temperatura di esercizio +5°C~+35°C Umidità di esercizio Da 10% a 75% AMPLIFICATORE Potenza di uscita nominale FRONT. S./D. 20W/4OHM, THD = 1%, 1kHz Subwoofer 60W/8OHM, THD=1%, 70Hz Sensibilità di ingresso/ impedenza 400mV/56Kohm (AUX) Rapporto S/N(ingresso analogico) 65 dB Separazione (1kHz) 65 dB RISPOSTA IN FREQUENZA Ingresso analogico 20Hz~20kHz(±3 dB) Ingresso digitale/48 kHz PCM 20Hz~20kHz(±3 dB) POTENZA NOMINALE DEL DOCK iPad 5 V 2,0 A iPod 5 V 1,0 A Galaxy 5 V 1,0 A USB Tipo A USB 1,1 Uscita CC 500mA RETE Ethernet Terminale 100BASE-TX LAN wireless Integrata Sicurezza WEP (APERTA)WPA-PSK (TKIP)WPA2-PSK (AES) WPS(PBC/PIN) Supportato
\* I valori di rapporto S/N, distorsione, separazione e sensibilità utile si basano sulla misurazione secondo gli standard AES (Audio Engineering Society).
\* Specifica nominale
- Samsung Electronics Co., Ltd si riserva il diritto di modificare le specifiche senza preavviso.
- Peso e dimensioni sono approssimativi.
- Velocità di rete uguali o inferiori a 10 Mbps non sono supportate.
- Per l'alimentazione e il consumo di energia, vedere l'etichetta applicata al prodotto.
Open Source Announcement
Per inviare richieste e domande sulle sorgenti aperte, contattare Samsung tramite e-mail (oss.request@samsung.com).
\- Il prodotto utilizza alcuni programmi software distribuiti da Independent JPEG Group.
FLAC decoder, Copyright (C) 2001,2002,2003,2004,2005,2006,2007 Josh Coalson
Redistribution and use in source and binary forms, with or without modification, are permitted provided that the following conditions are met:
- Redistributions of source code must retain the above copyright notice, this list of conditions and the following disclaimer.
- Redistributions in binary form must reproduce the above copyright notice, this list of conditions and the following disclaimer in the documentation and/or other materials provided with the distribution.
- Neither the name of the Xiph.org Foundation nor the names of its contributors may be used to endorse or promote products derived from this software without specific prior written permission.
THIS SOFTWARE IS PROVIDED BY THE COPYRIGHT HOLDERS AND CONTRIBUTORS "AS IS" AND ANY EXPRESS OR IMPLIED WARRANTIES, INCLUDING, BUT NOT LIMITED TO, THE IMPLIED WARRANTIES OF MERCHANTABILITY AND FITNESS FOR A PARTICULAR PURPOSE ARE DISCLAIMED. IN NO EVENT SHALL THE FOUNDATION OR CONTRIBUTORS BE LIABLE FOR ANY DIRECT, INDIRECT, INCIDENTAL, SPECIAL, EXEMPLARY, OR CONSEQUENTIAL DAMAGES (INCLUDING, BUT NOT LIMITED TO, PROCUREMENT OF SUBSTITUTE GOODS OR SERVICES; LOSS OF USE, DATA, OR PROFITS; OR BUSINESS INTERRUPTION) HOWEVER CAUSED AND ON ANY THEORY OF LIABILITY, WHETHER IN CONTRACT, STRICT LIABILITY, OR TORT (INCLUDING NEGLIGENCE OR OTHERWISE) ARISING IN ANY WAY OUT OF THE USE OF THIS SOFTWARE, EVEN IF ADVISED OF THE POSSIBILITY OF SUCH DAMAGE."
Ogg/Vorbis decoder, Copyright (c) 2002, Xiph.org Foundation
Redistribution and use in source and binary forms, with or without modification, are permitted provided that the following conditions are met:
- Redistributions of source code must retain the above copyright notice, this list of conditions and the following disclaimer.
- Redistributions in binary form must reproduce the above copyright notice, this list of conditions and the following disclaimer in the documentation and/or other materials provided with the distribution.
- Neither the name of the Xiph.org Foundation nor the names of its contributors may be used to endorse or promote products derived from this software without specific prior written permission.
THIS SOFTWARE IS PROVIDED BY THE COPYRIGHT HOLDERS AND CONTRIBUTORS "AS IS" AND ANY EXPRESS OR IMPLIED WARRANTIES, INCLUDING, BUT NOT LIMITED TO, THE IMPLIED WARRANTIES OF MERCHANTABILITY AND FITNESS FOR A PARTICULAR PURPOSE ARE DISCLAIMED. IN NO EVENT SHALL THE FOUNDATION OR CONTRIBUTORS BE LIABLE FOR ANY DIRECT, INDIRECT, INCIDENTAL, SPECIAL, EXEMPLARY, OR CONSEQUENTIAL DAMAGES (INCLUDING, BUT NOT LIMITED TO, PROCUREMENT OF SUBSTITUTE GOODS OR SERVICES; LOSS OF USE, DATA, OR PROFITS; OR BUSINESS INTERRUPTION) HOWEVER CAUSED AND ON ANY THEORY OF LIABILITY, WHETHER IN CONTRACT, STRICT LIABILITY, OR TORT (INCLUDING NEGLIGENCE OR OTHERWISE) ARISING IN ANY WAY OUT OF THE USE OF THIS SOFTWARE, EVEN IF ADVISED OF THE POSSIBILITY OF SUCH DAMAGE.
Contatti SAMSUNG nel mondo
Per domande o commenti sui prodotti Samsung, contattare il Centro assistenza clienti SAMSUNG.
Area Centro di contatto Sito Web ALBANIA 42 27 5755 www.samsung.com AUSTRIA 0810 - SAMSUNG (7267864, € 0.07/min) www.samsung.com BELGIUM 02-201 -24-18 www.samsung.com/be (Dutch)www.samsung.com/be_fr (French) BOSNIA 05 133 1999 www.samsung.com BULGARIA 07001 33 11 www.samsung.com CROATIA 062 SAMSUNG (062 726 7864) www.samsung.com CZECH 800 - SAMSUNG (800-726786) www.samsung.com DENMARK 70 70 19 70 www.samsung.com FINLAND 030 - 6227 515 www.samsung.com FRANCE 01 48 63 00 00 www.samsung.com GERMANY 01805 - SAMSUNG(726-7864 € 0,14/Min) www.samsung.com CYPRUS 8009 4000 only from landline www.samsung.com GREECE 80111-SAMSUNG (80111 726 7864) only from land line(+30) 210 6897691 from mobile and land line www.samsung.com HUNGARY 06-80-SAMSUNG(726-7864) www.samsung.com ITALIA 800-SAMSUNG(726-7864) www samsung.com KOSOVO +381 0113216899 www.samsung.com LUXEMBURG 261 03 710 www.samsung.com MACEDONIA 023 207 777 www.samsung.com MONTENEGRO 020 405 888 www.samsung.com
Area Centro di contatto Sito Web NETHERLANDS 0900-SAMSUNG (0900-7267864) (€ 0,10/Min) www.samsung.com NORWAY 815-56 480 www.samsung.com POLAND 0 801-1 SAMSUNG(172-678)+48 22 607-93-33 www.samsung.com PORTUGAL 808 20-SAMSUNG (808 207267) www.samsung.com ROMANIA 08010 SAMSUNG (08010 7267864) only from landline(+40) 21 206 01 10 from mobileand land line www.samsung.com SERBIA 0700 Samsung (0700 7267864) www.samsung.com SLOVAKIA 0800 - SAMSUNG(0800-726786) www.samsung.com SPAIN 902 - 1 - SAMSUNG (902 172678) www.samsung.com SWEDEN 0771 726 7864 (SAMSUNG) www.samsung.com Switzerland 0848 - SAMSUNG(7267864,CHF 0.08/min) www.samsung.com/chwww.samsung.com/ch_Ir (French) U.K 0330 SAMSUNG (7267864) www.samsung.com EIRE 0818 717100 www.samsung.com LITHUANIA 8-800-77777 www.samsung.com LATVIA 8000-7267 www.samsung.com ESTONIA 800-7267 www.samsung.com

Corretto smaltimento delle batterie del prodotto
(Applicabile nei paesi dell'Unione Europea e in altri paesi europei con sistemi di conferimento differenziato delle batterie.)
Il marchio riportato sulla batteria o sulla sua documentazione o confezione indica che le batterie di questo prodotto non devono essere smaltite con altri rifiuti domestici al termine del ciclo di vita. Dove raffigurati, i simboli chimici Hg, Cd o Pb indicano che la batteria contiene mercurio, cadmio o piombo in quantità superiori ai livelli di riferimento della direttiva UE 2006/66. Se le batterie non vengono smaltite correttamente, queste sostanze possono causare danni alla salute umana o all'ambiente.
Per proteggere le risorse naturali e favorire il riutilizzo dei materiali, separare le batterie dagli altri tipi di rifiuti e riciclarle utilizzando il sistema di conferimento gratuito previsto nella propria area di residenza.

Corretto smaltimento del prodotto (rifiuti elettrici ed elettronici)
(Applicabile nell'Unione Europea e in altri paesi europei con sistema di raccolta differenziata)
Il marchio riportato sul prodotto, sugli accessori o sulla documentazione indica che il prodotto e i relativi accessori elettronici (quali caricabatterie, cuffia e cavo USB) non devono essere smaltiti con altri rifiuti domestici al termine del ciclo di vita. Per evitare eventuali danni all'ambiente o alla salute causati dall'inopportuno smaltimento dei rifiuti, si invita l'utente a separare il prodotto e i suddetti accessori da altri tipi di rifiuti e di riciclarli in maniera responsabile per favorire il riutilizzo sostenibile delle risorse materiali.
Gli utenti domestici sono invitati a contattare il rivenditore presso il quale è stato acquistato il prodotto o l'ufficio locale preposto per tutte le informazioni relative alla raccolta differenziata e al riciclaggio per questo tipo di materiali.
Gli utenti aziendali sono invitati a contattare il proprio fornitore e verificare i termini e le condizioni del contratto di acquisto. Questo prodotto e i relativi accessori elettronici non devono essere smaltiti unitamente ad altri rifiuti commerciali.