
RPS750 - Radio MPMAN - Free user manual and instructions
Find the device manual for free RPS750 MPMAN in PDF.
User questions about RPS750 MPMAN
0 question about this device. Answer the ones you know or ask your own.
Ask a new question about this device
Download the instructions for your Radio in PDF format for free! Find your manual RPS750 - MPMAN and take your electronic device back in hand. On this page are published all the documents necessary for the use of your device. RPS750 by MPMAN.
USER MANUAL RPS750 MPMAN
text_image
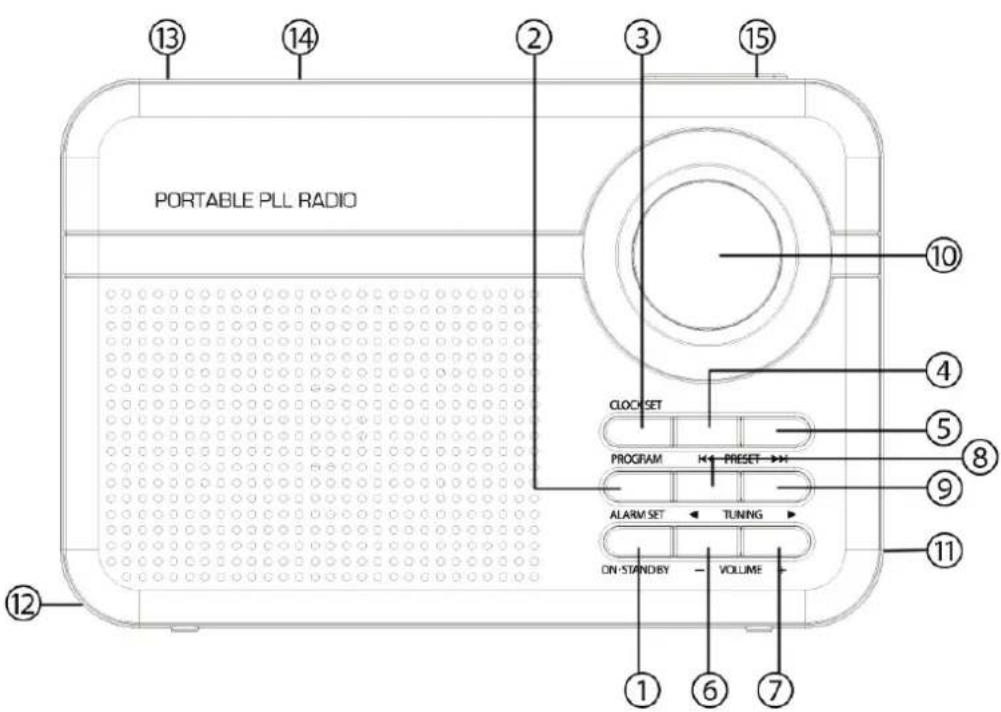
mp man PORTABLE PLL RADIO 104.6 FM CLOCK SET PROG PRESET ALARM SET TUNING ON STAND BY VOLUME +RPS750 INSTRUCTION MANUAL
text_image
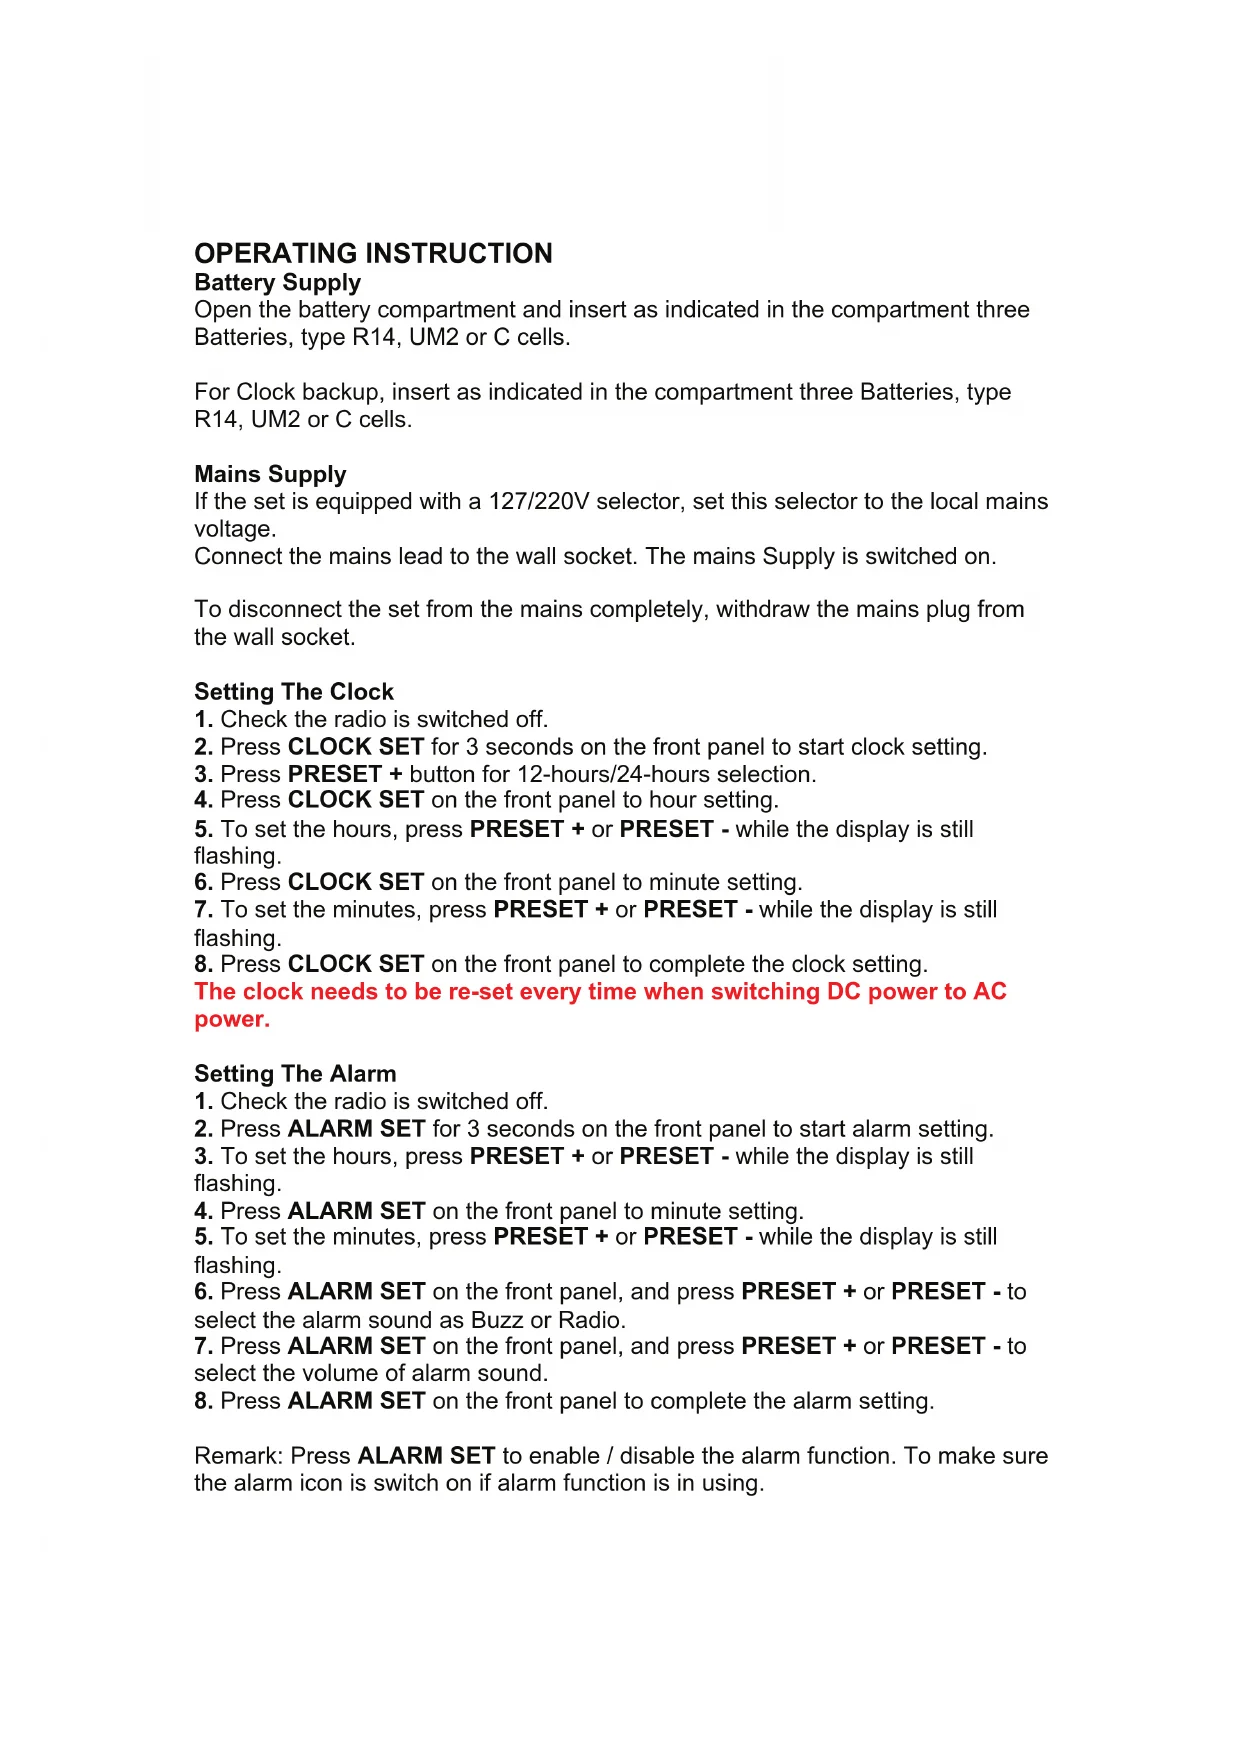
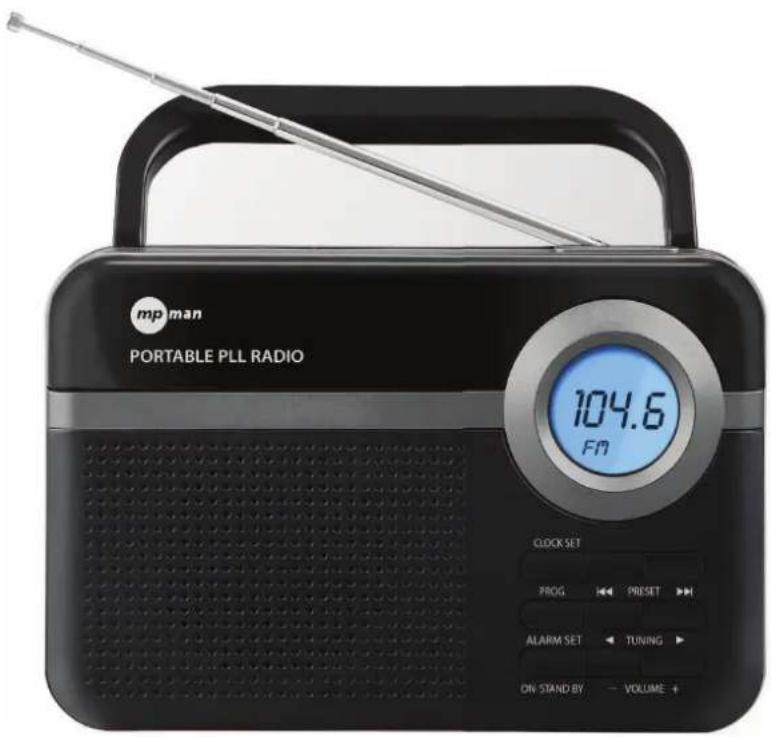
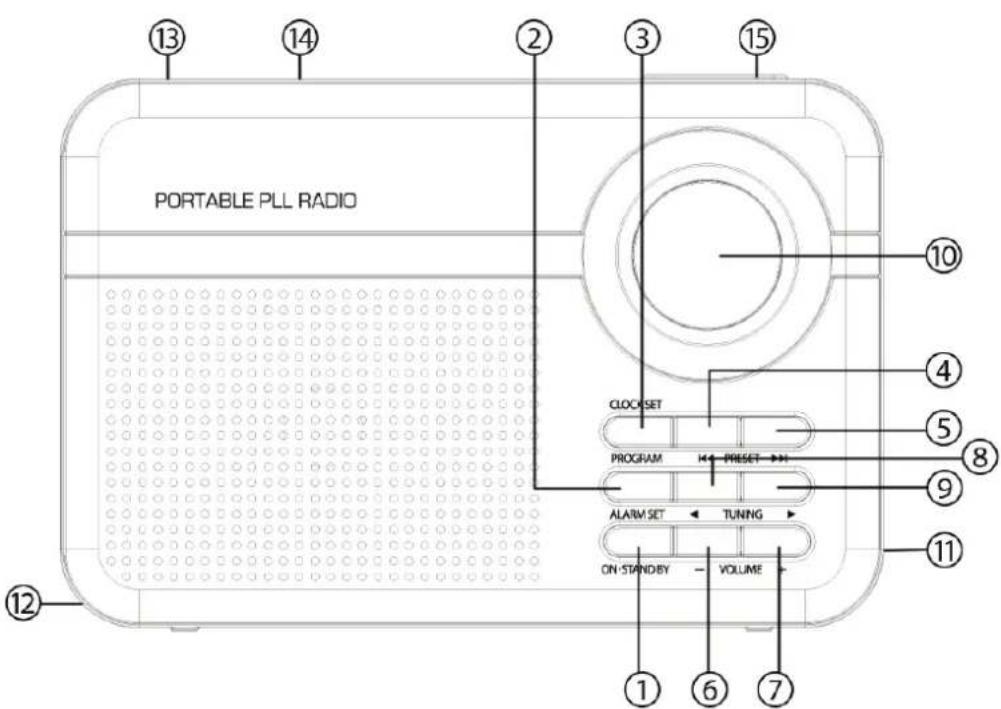
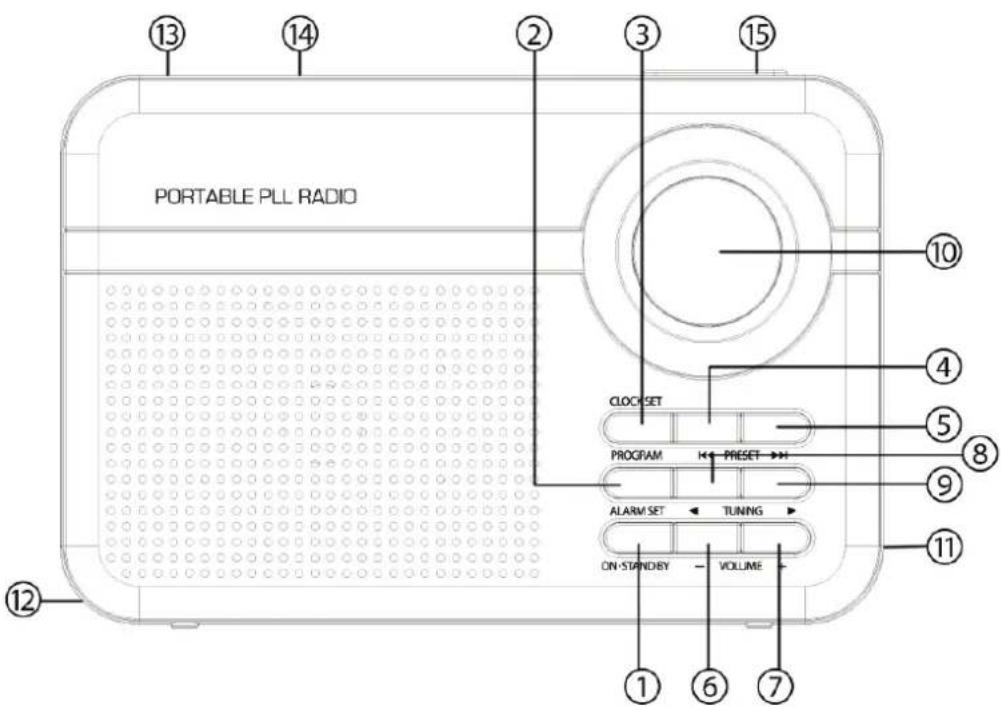
PORTABLE PLL RADIO 13 14 2 3 15 10 4 5 8 9 11 12 CLOCK SET PROGRAM PRESET → ALARM SET ← TUNING ON STANDBY VOLUME 1 6 7CONTROL LOCATION
- ON / STANDBY
- ALARM SET
- PROGRAM / CLOCK SET
- PRESET -
- PRESET +
- VOLUME -
- VOLUME +
- TUNING -
- TUNING +
- LCD DISPLAY
- HEADPHONE JACK
- BATTERY COMPARTMENT COVER
- ROD ANTENNA
- CARRYING HANDLE
- SLEEP / SNOOZE
Open the battery compartment and insert as indicated in the compartment three Batteries, type R14, UM2 or C cells.
For Clock backup, insert as indicated in the compartment three Batteries, type R14, UM2 or C cells.
Mains Supply
If the set is equipped with a 127/220V selector, set this selector to the local mains voltage.
Connect the mains lead to the wall socket. The mains Supply is switched on.
To disconnect the set from the mains completely, withdraw the mains plug from the wall socket.
Setting The Clock
- Check the radio is switched off.
- Press CLOCK SET for 3 seconds on the front panel to start clock setting.
- Press PRESET + button for 12-hours/24-hours selection.
- Press CLOCK SET on the front panel to hour setting.
- To set the hours, press PRESET + or PRESET - while the display is still flashing.
- Press CLOCK SET on the front panel to minute setting.
- To set the minutes, press PRESET + or PRESET - while the display is still flashing.
- Press CLOCK SET on the front panel to complete the clock setting.
The clock needs to be re-set every time when switching DC power to AC power.
Setting The Alarm
- Check the radio is switched off.
- Press ALARM SET for 3 seconds on the front panel to start alarm setting.
- To set the hours, press PRESET + or PRESET - while the display is still flashing.
- Press ALARM SET on the front panel to minute setting.
- To set the minutes, press PRESET + or PRESET - while the display is still flashing.
- Press ALARM SET on the front panel, and press PRESET + or PRESET - to select the alarm sound as Buzz or Radio.
- Press ALARM SET on the front panel, and press PRESET + or PRESET - to select the volume of alarm sound.
- Press ALARM SET on the front panel to complete the alarm setting.
Remark: Press ALARM SET to enable / disable the alarm function. To make sure the alarm icon is switch on if alarm function is in using.
Snooze Function
- When your alarm sounds, you can press the Snooze Button to turn off the alarm temporary for 9 minutes. The radio will then turn on again.
- Snooze can be repeated until the ALARM Button is pressed.
Sleep Function
- Press the SLEEP Button to select a time. For example, when the LED display shows 15 minutes. The radio turns on and then turns off automatically after 15 minutes.
- To select a longer playing time, press the SLEEP button to select 15 / 30 / 45 / 60 / 75 / 90 minutes.
- To turn off the radio at any time, press the ON / STAND BY Button.
Radio
- Press ON / STAND BY to switch on the radio.
- The display shows the radio station details throughout the radio mode.
- Select your station by using TUNING + or TUNING -
- Adjust the sound with VOLUME.
- To switch off the radio, press ON / STAND By once.
Tuning
Manual tuning
Press TUNING + or TUNING – briefly, once or more until the right frequency is found.
Automatic tuning
- Press and hold down TUNING + or TUNING – until the display frequency starts to run.
- When a station of sufficient strength has been found tuning stops, or you can stop automatic tuning by pressing TUNING + or TUNING – again.
Presets
You can store the frequencies of up to 50 radio stations in the memory. A stored frequency can be erased from the memory by storing another frequency in its place.
Automatic Preset
- Press and hold down PROGRAM until the display frequency starts to run.
Manual Preset
- Select your wave band and tune to your desired station (See TUNING).
- Press PROGRAM once to enter programming mode.
- Press PRESET + or PRESET – to select the desired memory location.
- Press PROGRAM once again to confirm the selected station.
- To listen to a preset station:
- select your waveband;
- press the PRESET + or PRESET – for selecting your desired station.
To improve reception:
- For FM, pull out the telescopic aerial. To improve FM Reception incline and turn the aerial, reduce its length if the FM-signal is too strong (very close to a transmitter).
Volume
Adjust the sound with the controls VOLUME + or VOLUME -
You may connect headphones with 3.5mm, plug to socket PHONES. The loudspeaker is then muted.
SPECIFICATIONS
Speaker: 3.5 inches, 8 ohm dynamic speaker
Power Output: 0.8W
Battery Operate: DC (3 x "R14 / UM-2 / C" 1.5V)
AC Operate: 220V \~ 50Hz
PRECAUTIONS:
- For AC operation, make sure the voltage is compatible. Always use the provided AC power cord; never use other AC power cord.
For DC operation, simply insert three "R14 / UM-2 / C" batteries for unit and clock operation. - Always disconnect the AC power cord from the AC power source when it is not in use or when DC power is operating.
- Do not leave the batteries in the compartment for a long time. Remove the batteries to avoid leakage and damage.
- Do not expose the unit to extreme temperature nor high humidity to ensure normal functioning for a long lifetime.
For instances, never place the unit in bathing areas nor around stoves and radiators.
- If you find the unit is not working properly, please take it to your nearest services centre. Do not attempt to repair by yourself.
WARNING :
To prevent fire or shock hazard, do not expose the unit to rain or moisture. To avoid electrical shock, do not open the cabinet, refer to service agent or qualified engineer only.


This is to certify that RPS750 is in conformity with: Council directive 89/336/EEC (EMC direction):
Applicable standards:
EN55013:2013
EN61000-3-2:2006+A1:2009+A2:2009
EN61000-3-3:2013
EN55020:2007+A11:2011
Made in PRC
For more information please visit our website www.mpmaneurope.com

text_image
mp mantext_image
mp man PORTABLE PLL RADIO 104.6 Fm CLOCK SET PROG PRESET ALARM SET TUNING ON- STAND BY VOLUME +RPS750
MANUEL D'INSTRUCTION

text_image
PORTABLE PLL RADIO 13 14 2 3 15 10 4 5 8 9 11 12 CLOCK SET PROGRAM PRESET → ALARM SET ← TUNING ON STANDBY VOLUME 1 6 7EMPLACEMENT DES COMMANDES
- MARCHE/VEILLE
- RÉGLAGE DE L'ALARME
- PROGRAMME / RÉGLAGE HORLOGE
- PRÉSÉLECTION -
- PRÉSÉLECTION +
- VOLUME -
- VOLUME+
- RÉGLAGE -
- REGLAGE +
- ÉCRAN LCD
- PRISE CASQUE
- COUVERCLE DE COMPARTIMENT DES PILES
- ANTENNE TIGE
- POIGNÉE DE TRANSPORT
- MISE EN VEILLE PROGRAMMÉE / REPORT D'ALARME
INSTRUCTIONS D'UTILISATION
text_image
Handwritten signature or scribble on white background, possibly a signature or artistic mark
text_image
mp manRADIO PORTATILE FM DIGITALE PLL
text_image
mp man PORTABLE PLL RADIO 104.6 FM CLOCK SET PROG PRESET ALARM SET TUNING ON STAND BY VOLUME +RPS750
text_image
mp.man PORTABLE PLL RADIO 104.6 FM CLOCK SET PROG PRESET ALARM SET TUNING ON STAND BY VOLUME +RPS750
HANDLEIDING
text_image
PORTABLE PLL RADIO 13 14 2 3 15 CLOCK SET PROGRAM PRESET ALARM SET TUNING ON-STAND BY VOLUME 1 6 7 10 4 5 8 9 11 12PLAATSING BEDIENINGSELEMENTEN
- ON / STANDBY
- ALARM SET
- PROGRAM / CLOCK SET
- PRESET -
- PRESET +
- VOLUME -
- VOLUME +
- TUNING -
- TUNING +
- LCD-DISPLAY
- HOOFDTELEFOONUITGANG
- DEKSEL BATTERIJVAK
- STAAFANTENNE
- DRAAGGREEP
- SLEEP / SNOOZE
GEBRUIKSAANWIJZING
text_image
mp man PORTABLE PLL RADIO 104.6 FM CLOCK SET PROG PRESET ALARM SET TUNING ON STAND BY VOLUME +RPS750
BEDIENUNGSANLEITUNG
text_image
PORTABLE PLL RADIO CLOCK SET PROGRAM ← PRESET → ALARM SET ← TUNING → ON STANDBY ← VOLUME → ① ⑥ ⑦ ⑫ ⑩ ⑪ ⑪BEDIENELEMENTE UND FUNKTIONEN
text_image
mp man PORTABLE PLL RADIO 104.6 FM CLOCK SET PROG PRESET ALARM SET TUNING ON STAND BY VOLUME +RPS750
MANUAL DE INSTRUÇÕES
text_image
PORTABLE PLL RADIO CLOCK SET PROGRAM ← PRESET → ALARM SET ← TUNING ON STANDLEY ← VOLUME ① ⑥ ⑦ ⑫ ⑩ ⑪ ⑪Directiva de concelho 89/336/EEC (direcção EMC):
Padrões aplicáveis:
EN55013:2013
EN61000-3-2:2006+A1:2009+A2:2009
EN61000-3-3:2013
EN55020:2007+A11:2011
Fabricado na RPC
