
RPS900 - Radio MPMAN - Free user manual and instructions
Find the device manual for free RPS900 MPMAN in PDF.


| Product Type | Portable USB/SD Radio Player |
| Brand | Mpman |
| Model | RPS900 |
| Power Source | 1 x 3.7V rechargeable lithium ion battery (BL-5C equivalent) |
| Battery Capacity | 1000 mAh |
| Charging Voltage | DC 5V |
| Charging Time | 4 hours |
| Max Play Time | 2.5 hours |
| Music Formats Supported | MP3, WMA |
| USB Support | USB 2.0, up to 16 GB |
| Memory Card Support | SD/MMC, up to 16 GB |
| FM Frequency Range | 87.5 - 108 MHz |
| Preset Stations | Up to 30 FM stations |
| Working Temperature | -5°C to +40°C |
| Working Humidity | 20% to 80% |
| Playback Modes | Radio, AUX-IN, USB, SD/MMC |
| Repeat Modes | Repeat All, Repeat-1, Repeat Folder |
| Antenna | FM telescopic antenna |
| Cleaning | Damp cloth; avoid solvents or detergents |
| Safety Features | Overload protection, lightning protection, battery leakage prevention |
| Certifications | CE (EN55013, EN55020, EN61000-3-2, EN61000-3-3) |
Frequently Asked Questions - RPS900 MPMAN
User questions about RPS900 MPMAN
0 question about this device. Answer the ones you know or ask your own.
Ask a new question about this device
Download the instructions for your Radio in PDF format for free! Find your manual RPS900 - MPMAN and take your electronic device back in hand. On this page are published all the documents necessary for the use of your device. RPS900 by MPMAN.
USER MANUAL RPS900 MPMAN

Portable USB/SD Radio Player

MODEL NO: RPS900
IMPORTANT SAFETY INSTRUCTIONS
When used in the directed manner, this unit has been designed and manufactured to ensure your personal safety.
However, improper use can result in potential electrical shock or fire hazards. Please read all safety and operating instructions carefully before installation and use, and keep these instructions handy for future reference. Take special note of all warnings listed in these instructions and on the unit.
Water and Moisture
The unit should not be used near water. For example: near a bathtub, washbowl, kitchen sink, laundry tub, swimming pool or in a set basement.
Ventilation
The unit should be situated so that its location or position does not interfere with its proper ventilation. For example, it should not be situated on a bed, sofa, rug or similar surface that may block the ventilation openings. Also, it should not be placed in a built-in installation, such as a bookcase or cabinet, which may impede the flow of air through the ventilation openings.
Heat
The unit should be situated away from heat sources such as radiators, heat registers, stoves or other appliances (including amplifiers) that produce heat.
Power Source
The unit should be connected to a power supply only of the type described in the operating instructions or as marked on the appliance.
Cleaning
The unit should be cleaned only as recommended. See the
section "Care and Maintenance" of this manual for cleaning instructions.
Object and Liquid Entry Care should be taken so that objects do not fall and liquids are not spilled into any openings or vents located on the product.
Lightning and Power Surge Protection
Unplug the unit from the wall outlet. This will prevent damage to the product due to lightning and power-line surges.
Overloading
Do not overload wall outlets, extension cords, or integral convenience receptacles as this can result in a risk of fire of electric shack.
Damage Requiring Service
This unit should be serviced by qualified service personnel when:
Objects have fallen into or liquid has been spilled into the enclosure.
The unit has been exposed to rain.
The unit has been dropped or the enclosure damaged.
The unit exhibits a marked change in performance or does not operate normally.
Periods of Nonuse
If the unit is to be left unused for an intended period of time, such as a week or longer, remove the battery to prevent damage or injury from possible battery leakage.
Servicing
The user should not attempt to service the unit beyond those methods described in the user's operating instructions.
Service methods not covered in the operating instructions should be referred to qualified service personnel.
LOCATIONS OF CONTROLS
FRONT VIEW
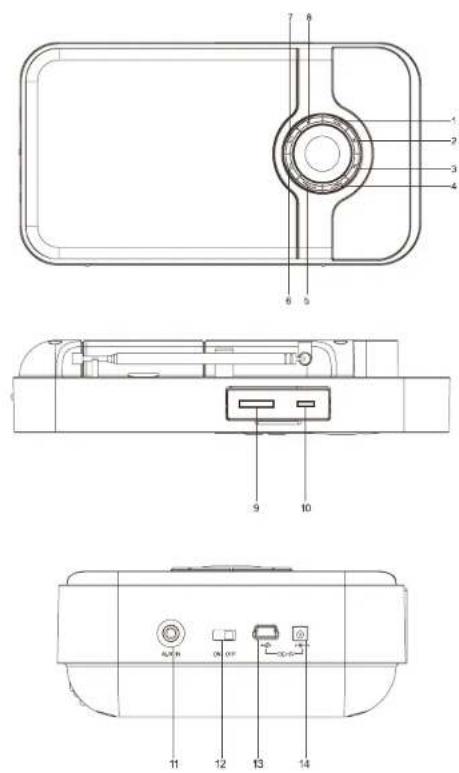
3
MODE button
-Press this button to select different play modes: RADIO/AUX-IN/USB/CARD
- Button
.In USB/CARD mode: to return to the beginning of current track or previous track
.In radio memory selecting mode: to select the channel number downward
- ▶▶| Button.
.In USB/CARD mode: to advance to the next track
.In radio memory selecting mode: to select the channel number upward
- PRESET Button
.In Radio mode: to enter the radio memory selecting mode.
- RPT(Repeat)/MEM Button
.In USB/CARD mode: to access to the Repeat-1, Repeat Folder, Repeat All mode.
In Radio mode: to save radio preset station
4
- Vol-Button
. To adjust volume level down
7. Vol+ Button
. To adjust volume level up
8. ▶|| Button
.In USB/CARD mode: to start of interrupt play
9. SD/MMC card slot
10. USB port
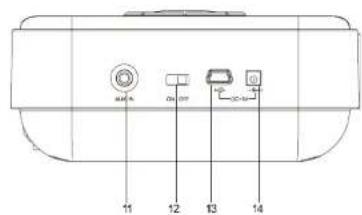
11. 3.5mm AUX-IN Jack
12. Power ON/OFF Switch
13. USB Charge port
14. DC 5V Jack (for charging only)
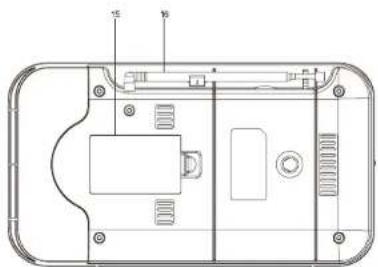
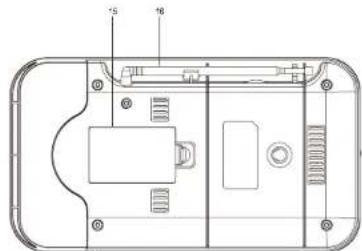
15. Battery compartment
16. FM Telescopic Antenna
POWER SOURCE
This unit is operated by 1pc 3.7V rechargeable lithium ion battery (included, which is exactly the same as the BL-5C battery from Nokia).
BATTERY INSTALLATION
To install the battery:
1.) Remove the battery compartment door.
2.) Follow the polarity to install the accompanied 3.7V lithium ion battery
3.) Replace the battery compartment door.
WARNING:
- Be sure that the battery is installed correctly.
-
Only batteries of the same or equivalent type as recommend are to be used.
-
If the unit is not to be used for an extended period of time, remove the battery to prevent damage or injury from possible battery leakage.
-Do not dispose of the battery in fire, the battery may explode or leak.
BATTERY CHARGING
The installed battery can be charged by using the accompanied charger that you plug into the wall socket and the other end into the DC5V charge port, the charging indicator on the charger will light up with Red color, once it is fully charged, the light turns to Blue.
It can also charge through the USB connector cable when attached to a computer.
GETTING STARTED
Before the first use, we recommend to charge up the accompanied battery for 4 hours to get the battery full.
Listening to FM Radio
Setting up the Antenna
Extend the telescopic antenna fully for best reception.
Tuning and Playing the Radio
- Slide the Power ON/OFF switch to ON position to turn on the unit.
- Press MODE button on the main unit until FM icon appears on the display to enter Radio mode.
- Press ▶▶/ |◀◀ button to fine tune the radio frequency.
- Press and hold ▶▶/◀◀ button for searching radio frequency automatically.
Notes:
-Manual tune to select weaker stations that might be by skipped during automatic tuning
-If the automatic tuning does not stop on the exact frequency of the station, for example, it stops on 100.8MHz instead of 100.6MHz, use the manual tuning method to fine tune to the exact frequency of the desired station.
-During FM Radio mode, if you plug USB or SD/MMC card into the unit, the play mode will automatically change to USB or SD playback mode.
Preset Stations
The unit allows you to store up to 30 FM stations for easy recall at any time.
-
Tune to the radio station you want to store in memory by using ▶▶ or ◀◀ button
-
Press RPT/MEM button, the memory channel number "P01" will show on the display, meanwhile, the Radio icon "FM" flashes simultaneously
-
Press ▶▶/ ◀◀ button to select the channel number you desire to set.
-
Press RPT/MEM button again to confirm the preset location.
-
Repeat steps 2-4 to store more stations if necessary.
Recalling Stored Preset Stations
-
Press PRESET button on the unit during Radio mode to enter the radio memory selecting mode.
-
Press ▶▶/◀◀ button to select the preset channel
USB/SD OPERATION
-
Slide the Power ON/OFF switch to ON position to turn on the unit.
-
Connect your USB device or SD/MMC card to the unit to access "USB" or "CARD" mode, the relevant "USB" or "CARD" icon appears on the display. The USB or SD/MMC card will start playing automatically once the contents scanning is finished.
-Press ▶ "PLAY/PAUSE" button to pause or resume playback. -Press "VOL+" or "VOL-" button to raise up/lower the volume level.
-Press "▶▶" button to skip to next track or press "◀◀" button to the previous track.
-Press and hold "▶▶" or '◀◀' button to search during the desired music.
-Press "RPT/MEM" button to change the Repeat mode in the following cyclical manner:
Repeat All (default repeat mode) → Repeat-1 → Repeat older

- To remove your USB device or SD/MMC card, simply stop the playback and gently unplug it from the connector.
If you are using an iPod or other MP3/digital audio player which can not plug in this unit directly, you can still play it on the unit via an audio connecting cable.
-
Plug one end of the 3.5mm audio cable (excluded) into the headphone or line out jack on your player, plug the other end of cable into the unit AUX-IN jack of the unit.
-
Turn on the external audio source and play your device.
- Slide the Power ON/OFF switch to ON position to turn on the unit.
- Press MODE button until "AUX" icon appears on the display.

- The volume level can now be controlled through the main unit. Operate all other functions on the external device as usual.
Notes:
1). If you're connected to the Line out Jack of your external device, then you only need to adjust the volume control of this unit. If you're connected to the Headphone Jack of your external device, then you may need to adjust both the volume control of your external device and the volume control of this unit to find the most desirable volume setting.
2) Slide the Power ON/OFF switch to OFF position to turn off the unit when you finish listening.
Don't forget to switch off the power of your external device as well.
3). During AUX mode, if you plug USB or SD/MMC card into the unit, the play mode will automatically change to USB or SD playback mode.
CARE AND MAINTENANCE
-Do not subject the unit to excessive force, shock, dust or extreme temperature.
-Do not tamper the internal components of the unit.
-Clean the unit with a damp (never wet) cloth except metal contact or speaker grille, Solvent or detergent should never be used.
-Avoid leaving your unit in hot, humid or dusty places.
-Keep your unit away from heating appliances and sources of electrical noise such as fluorescent lamps or motors.
-Always keep your finger dry and clear before touching all the buttons.
-Do not dispose of batteries in fire, batteries may explode or leak.
SPECIFICATIONS
| Battery capacity (included): | 1000 mAH |
| Charging Voltage: | DC5V |
| Charging Time: | 4 Hours |
| Max Play Time: | 2.5 Hours |
| Music Format supports: | MP3, WMA |
| USB Format supports: | 2.0 (up to 16GB) |
| Memory card type supports: | MMC & SD (up to 16GB) |
| FM Frequency: | 87.5-108 MHz |
| Working Temperature: | -5°C~+40°C |
| Working Humidity- | 20%~80% |
CE
This is to certify that RPS900 is in conformity with: Council directive 2004/108/EC(EMC direction):
Applicable standards:
EN55013:2001+A1+A2
EN55020: 2007
EN61000-3-2:2006+A1+A2
EN61000-3-3: 2008
For more information please visit our website www.mpmaneurope.com
MODÈLE N° : RPS900
INSTRUCTIONS DE SÉCURITÉ IMPORTANTES

MODELL NR: RPS900
MODELL Nr: RPS900
BELANGRIJKE VEILIGHEIDSINSTRUCTIES
MODELLO N°: RPS900
IMPORTANTI NORME DI SICUREZZA
1. Pulsante MODALITA'
Standard Applicabile:
EN55013:2001+A1+A2
EN55020: 2007
EN61000-3-2:2006+A1+A2
EN61000-3-3: 2008
MODELO N°: RPS900
INSTRUÇÕES DE SEGURANÇA IMPORTANTES
1. Botão MODO


- IMPORTANT SAFETY INSTRUCTIONS
- WATER AND MOISTURE
- VENTILATION
- HEAT
- POWER SOURCE
- CLEANING
- LIGHTNING AND POWER SURGE PROTECTION
- OVERLOADING
- DAMAGE REQUIRING SERVICE
- PERIODS OF NONUSE
- SERVICING
- LOCATIONS OF CONTROLS
- MODE BUTTON
- BATTERY INSTALLATION
- BATTERY CHARGING
- GETTING STARTED
- LISTENING TO FM RADIO
- TUNING AND PLAYING THE RADIO
- NOTES
- PRESET STATIONS
- RECALLING STORED PRESET STATIONS
- USB/SD OPERATION
- CARE AND MAINTENANCE
- INSTRUCTIONS DE SÉCURITÉ IMPORTANTES
- BELANGRIJKE VEILIGHEIDSINSTRUCTIES
- IMPORTANTI NORME DI SICUREZZA
- PULSANTE MODALITA
- INSTRUÇÕES DE SEGURANÇA IMPORTANTES
- BOTÃO MODO
Brand : MPMAN
Model : RPS900
Category : Radio