Blend & Go HR2875 - Blender PHILIPS - Free user manual and instructions
Find the device manual for free Blend & Go HR2875 PHILIPS in PDF.
User questions about Blend & Go HR2875 PHILIPS
0 question about this device. Answer the ones you know or ask your own.
Ask a new question about this device
Download the instructions for your Blender in PDF format for free! Find your manual Blend & Go HR2875 - PHILIPS and take your electronic device back in hand. On this page are published all the documents necessary for the use of your device. Blend & Go HR2875 by PHILIPS.
USER MANUAL Blend & Go HR2875 PHILIPS
- Keep pages 3 and 38 open when reading these operating instructions.
Français Page 6
- Read the instructions carefully in conjunction with the illustrations before using the appliance.
- Avoid damage. Before connecting please check if the voltage indicated on the appliance corresponds to the mains voltage in your home (110-127 V or 220-240 V).
- Do not use the appliance when the mains cord, the plug or other components are damaged. If the mains cord of this appliance is damaged, it must be replaced by the special cord. Apply to your Philips dealer or to the Philips organisation in your country.
- Keep the appliance away from children.
- Do not leave the appliance switched on unattended.
- Do not fill with ingredients hotter than 80^ (approx. 175^ ).
- Avoid spillage. Do not fill the jar higher than the highest level indication (i.e. 1.5 litre), especially when blending liquid. Always place the safety cap.
- Never put your hand or any objects into the blender jar while the appliance is switched on. If necessary, use a spatula to remove food from the sides of the jar after switching off the blender.
- Never remove the jar while the blender is operating.
- Make sure the blade unit is securely fitted to the base of the blender jar before you use the appliance.
- Never use any accessories or parts from other manufacturers or which have not specifically been advised by Philips. Your guarantee is void if such accessories or parts have been used.
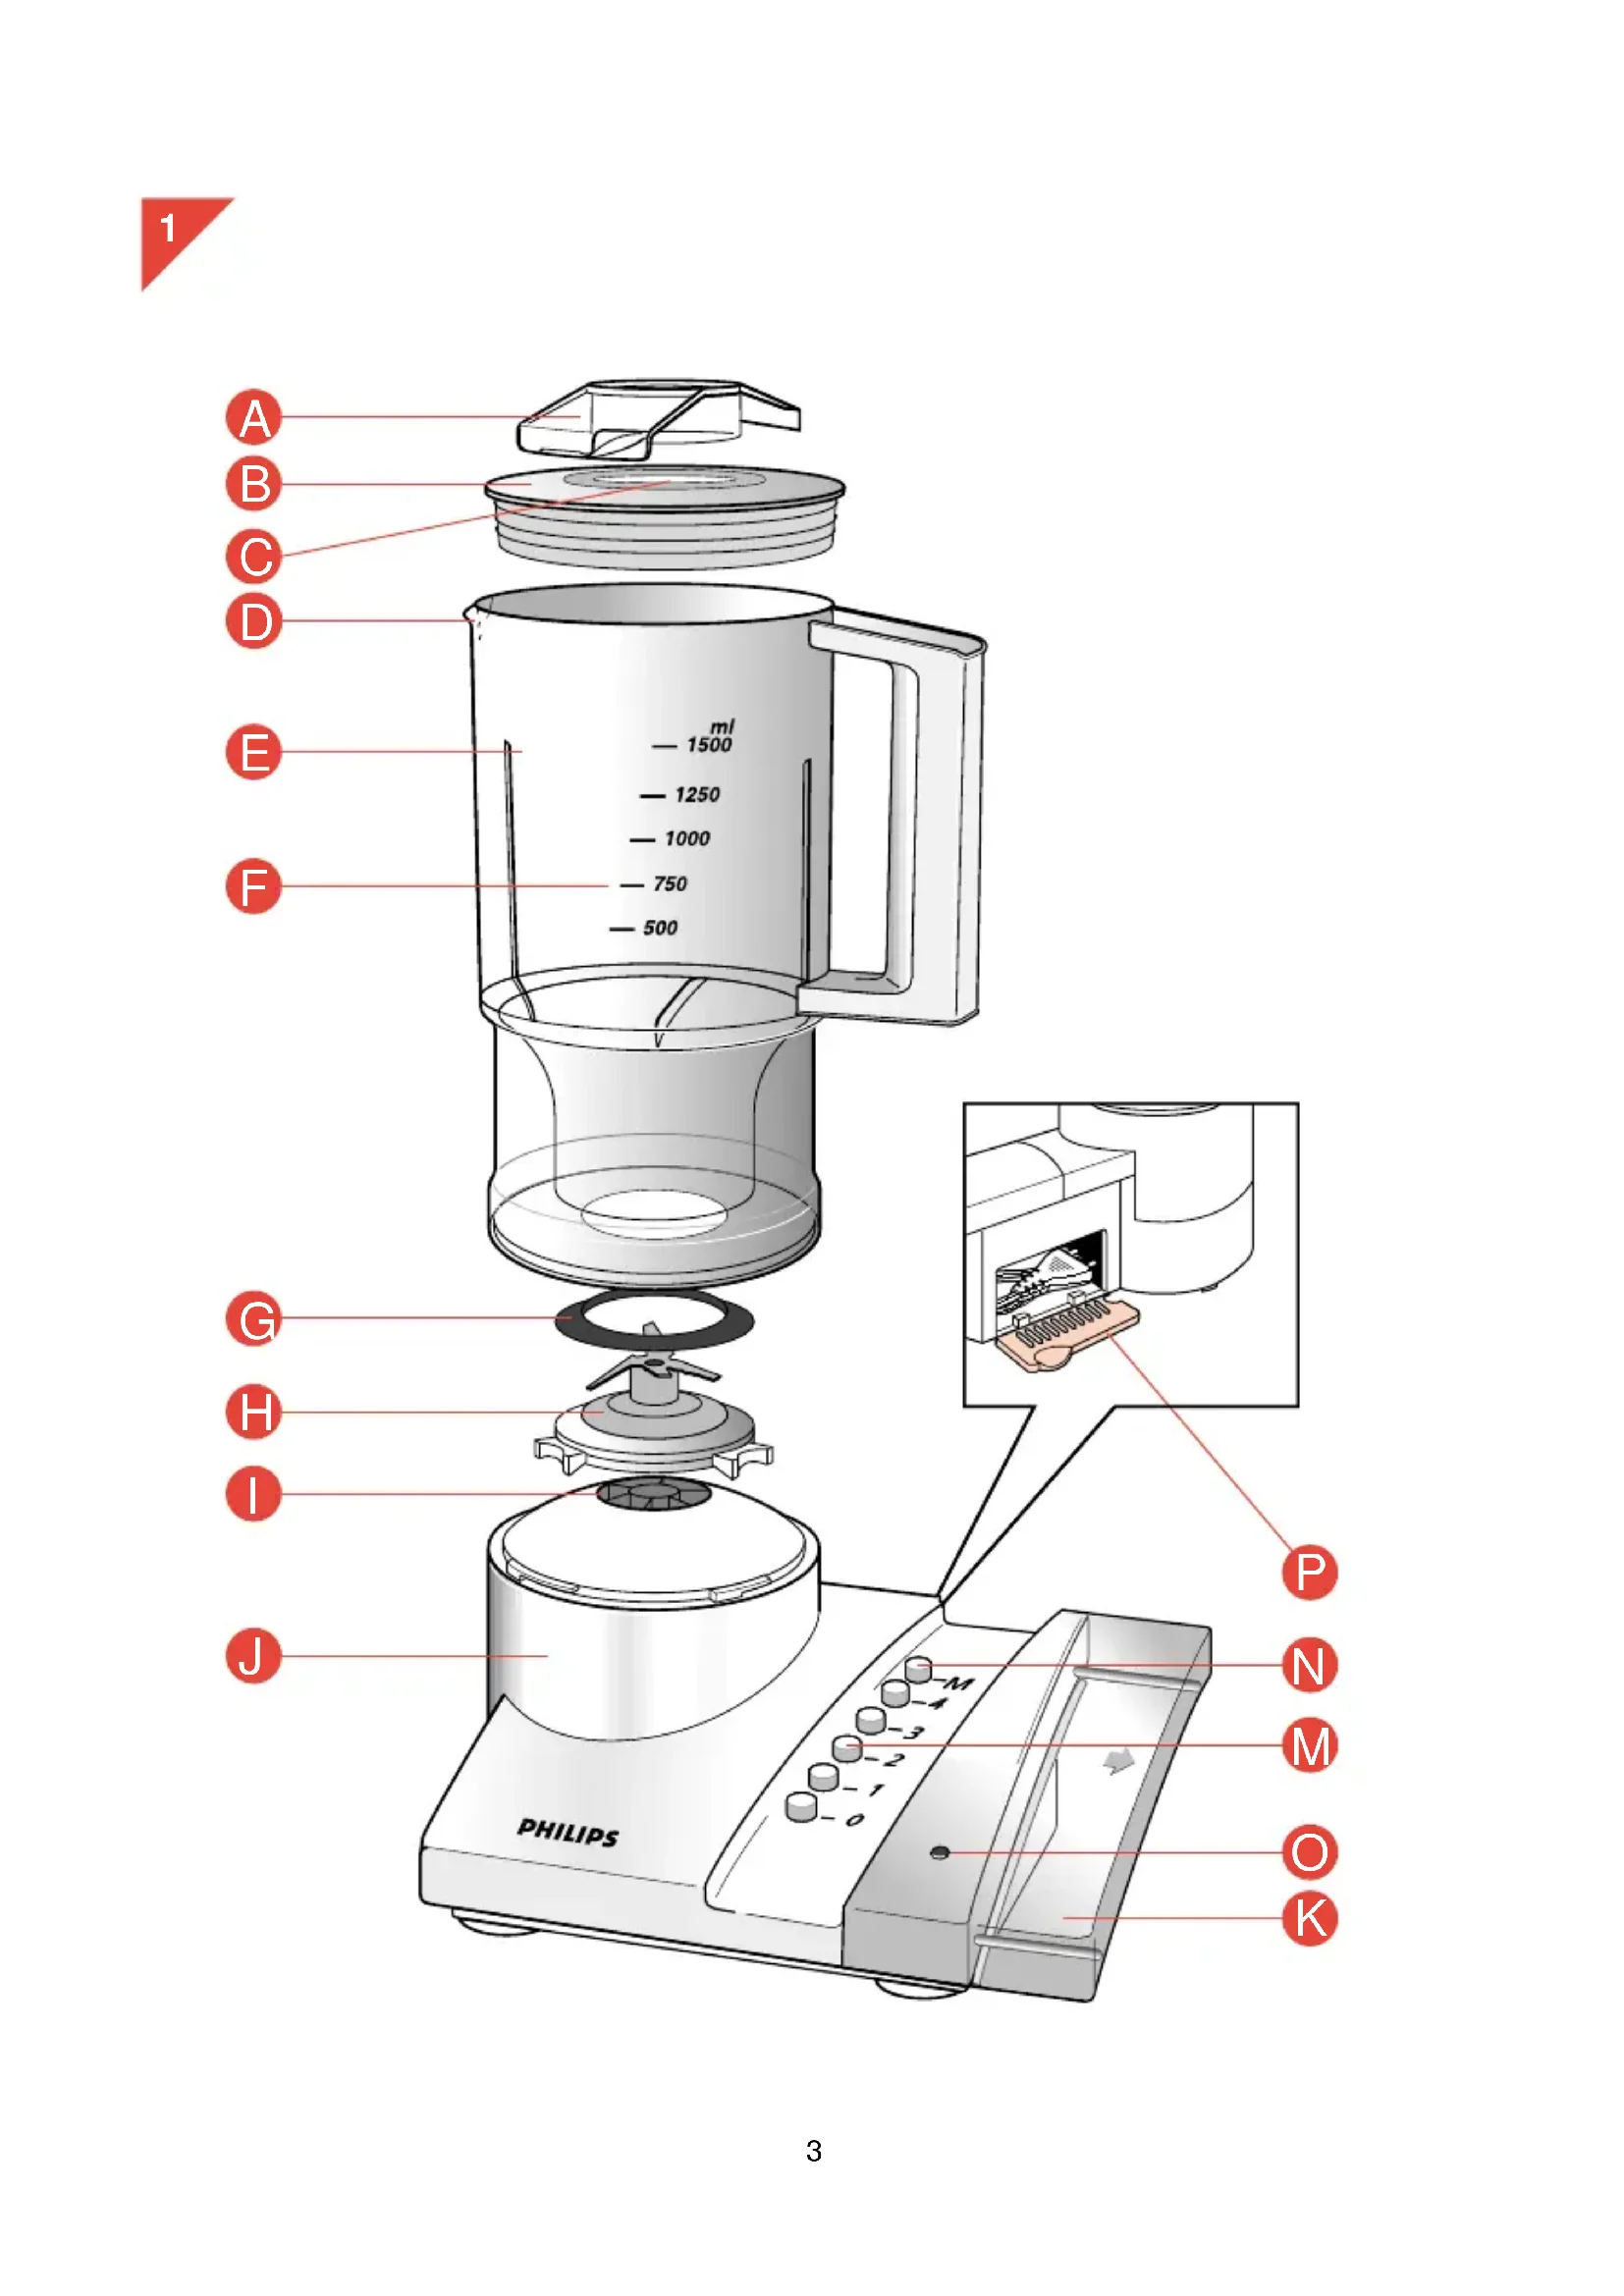
General description (fig 1)
Safety cap
B Lid
Opening in the lid
Spout
E Jar
Level indications
Rubber sealing ring
Blade unit
Drive axis
Motor unit
Slide cover
"Off" button
Speed buttons (1 = minimum speed; 4 = maximum speed)
Moment" button
Warning light
Cord storage compartment
Cord storage
You can store excess mains cord in the storage compartment at the back of the blender.
- Open the cord storage compartment (fig. 2).
- Pull out the required length of mains cord (fig. 3).
- Close the lid with the mains cord fitting into the slot of the lid (fig. 4).
Assembling
- First wash up all the removable parts. (Please refer to section "Cleaning".)
- Put the rubber sealing ring on the rim of the blade unit (fig. 5).
Fix the blade unit to the jar by rotating firmly in the direction of the arrow (fig. 6). - Place the mounted jar on to the motor unit and turn in the direction of the arrow until locked (fig. 7).
- After putting the ingredients into the jar, place the lid onto the jar by pressing downwards (fig. 8).
Fix the safety cap by pushing lightly downwards and turning in the direction of the arrow until locked (fig. 9).
For disassembling proceed in reverse.
Safety system
The appliance is provided with a safety system which disables the mechanism if the jar is not (or not properly) fitted.
If the red warning light is on, first press the "Off" button O to switch the appliance off. The warning light goes out. Then place the jar onto the motor unit and lock it properly. After this the appliance is ready for use.
Note: Do not use the jar to switch the appliance on and off.
Speed selection
- Before switching on, first ensure that the appliance is connected to the mains and that the jar is correctly fitted.
- Move the slide cover aside (fig. 10).
- Press the speed button corresponding to the ingredients you wish to process (fig. 11):
1, 2 for light applications with liquid ingredients, e.g. chocolate milk.
3 for thicker consistency, using liquid together with solid ingredients.
4 for heavier processes, using solid ingredients mainly.
- If you are not sure which speed to use, you can always use maximum speed (i.e. speed 4).
- For instant (repetitive) operation at the selected speed press and release the "Moment" button by turns (fig. 12).
- To stop the motor press button "Off" (fig. 13).
Tips
- Safety: When pouring ingredients into the jar, close the slide cover to prevent spillage over the buttons.
- Liquid ingredients (e.g. oil for the preparation of mayonnaise) can be poured through the small aperture in the safety cap whilst the motor is running (fig. 14).
- The opening in the lid can be used for adding ingredients whilst the motor is running (fig. 15).
- Do not blend longer than 3 minutes without interruption.
If longer blending is necessary, give the appliance a minute's rest before you continue.
- Cut meat or other solid food into pieces before putting them into the jar.
- For best blending with solid ingredients feed a series of small portions into the jar rather than putting one large quantity into it.
-
If the blending is not performed quickly, switch off the appliance and - switch to "Moment", or
-
stir the ingredients with a spatula (not while blending!), or
- reduce the contents of the jar.
- For crushed ice drop the ice cubes through the opening in the lid into the jar whilst the motor is running.
- When blending liquid and solid ingredients together, first pour the liquid(s) into the jar. While blending, add the solid ingredients.
Cleaning
- Pour lukewarm water with some washing-up agent into the jar. Place the lid and the safety cap. Place the jar onto the motor unit.
- Switch on for a few moments. Then switch off.
- Remove the mains plug from the wall socket.
- Remove the jar and rinse it with clean water.
- Remove the blade unit and rinse it. Be careful when handling the sharp blades.
- You can clean the motor unit with a humid cloth. Do not use abrasive cleaning materials, alcohol, polishers, etc.
- Do not clean in a dishwasher.
- Cleaning is easiest when done immediately after use.