Twist HR1700 - Blender PHILIPS - Free user manual and instructions
Find the device manual for free Twist HR1700 PHILIPS in PDF.
User questions about Twist HR1700 PHILIPS
0 question about this device. Answer the ones you know or ask your own.
Ask a new question about this device
Download the instructions for your Blender in PDF format for free! Find your manual Twist HR1700 - PHILIPS and take your electronic device back in hand. On this page are published all the documents necessary for the use of your device. Twist HR1700 by PHILIPS.
USER MANUAL Twist HR1700 PHILIPS
natural_image
Black-and-white illustration of a Philips blender with fresh strawberries and fruit in the background (no text or symbols)English Page 4
- Keep page 3 and 22 open when reading these operating instructions.
Français Page 7
natural_image
Technical line drawing of a mechanical component with labeled point A (no text or symbols beyond label)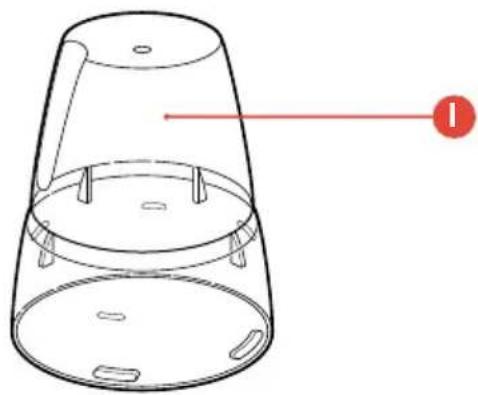
natural_image
Line drawing of a conical container with internal compartments and a red arrow pointing to a labeled point (no text or symbols present)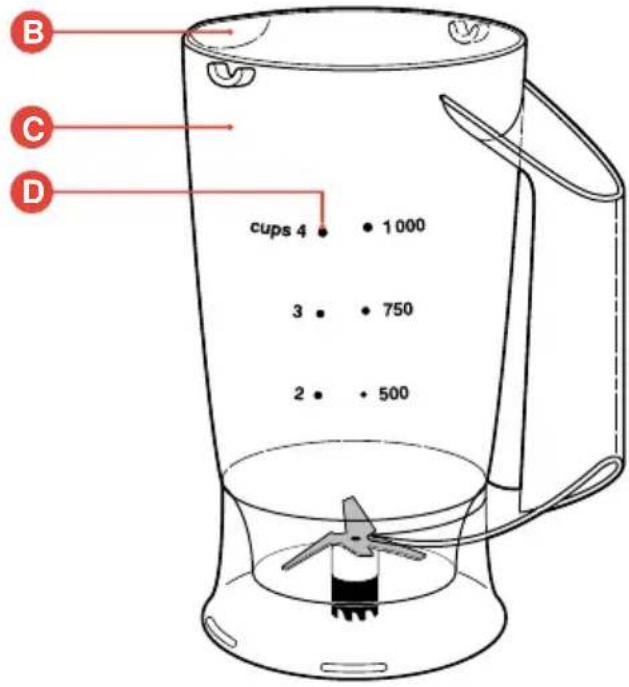
text_image
B C D cups 4 • 1000 3 • 750 2 • 500
text_image
J K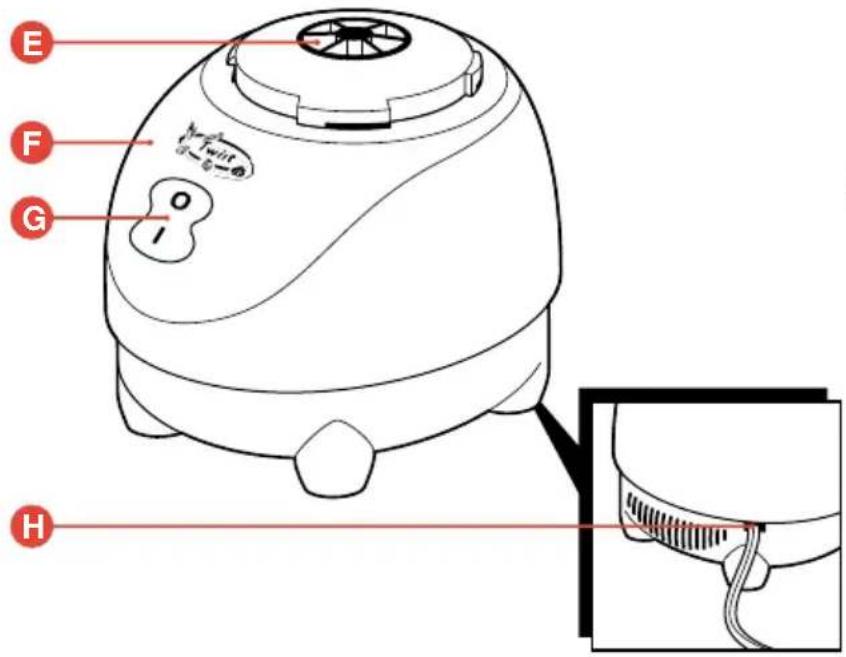
text_image
E F G H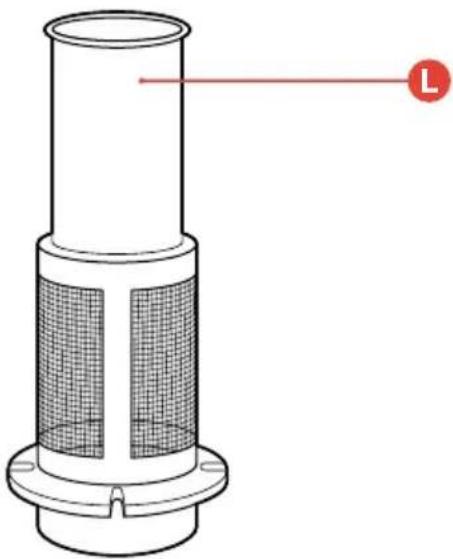
natural_image
Technical line drawing of a cylindrical mechanical component with internal mesh structure and a red indicator line labeled 'L' (no text or symbols on the component itself)English
Important
- Read the instructions carefully in conjunction with the illustrations before using the appliance.
- To avoid damage, check if the voltage indicated on the appliance corresponds to the mains voltage in your home (110-120V or 127V, or 220-230V) before you connect the appliance.
- Never use any accessories or parts from other manufacturers or which have not been specifically advised by Philips. Your guarantee will become invalid if such accessories or parts have been used.
- Keep the appliance away from children.
- Never let the appliance run unattended.
- Never immerse the motor unit in water or any other fluid, nor rinse it under the tap. For cleaning, only use a moist cloth.
- Never clean the accessories or the parts in a dishwasher.
- If the mains cord of this appliance is damaged, it must only be replaced by Philips or their service representative, as special tools and/or parts are required.
Blender
- Do not fill the blender jar with ingredients that are hotter than 80 °C.
- To avoid spillage, do not fill the jar above the maximum level indication (i.e. 1.0 litre). When you are blending liquid, do not fill the jar higher than 0.5 litre. Always place the lid.
- Never remove the jar while the blender is operating.
- Never put your hand or any other object in the blender jar while the appliance is switched on. If necessary, use a spatula to remove food from the wall of the jar after you have switched the blender off.
- Always make sure that the lid is in "closed position" when processing ingredients.
Mill (only types HR 1701 and HR 1707)
- The cutting edges of the blade unit are very sharp: avoid touching them!
- Never let the mill accessory run for more than 30 seconds without interruption.
- Always make sure that the blade unit has been correctly placed before you start using the appliance.
- Never put any liquid ingredients in the mill accessory.
- The mill accessory is not suitable for grinding very hard ingredients, such as nutmeg and ice cubes.
- Always process cloves, star anise and aniseed together with other ingredients. If they are processed separately, they may attack the plastic parts of the mill.
Filter (only types HR 1704 and HR 1707)
- Do not use the filter to process hot ingredients.
- Make sure the filter has been properly inserted and always place the lid before you switch the appliance on.
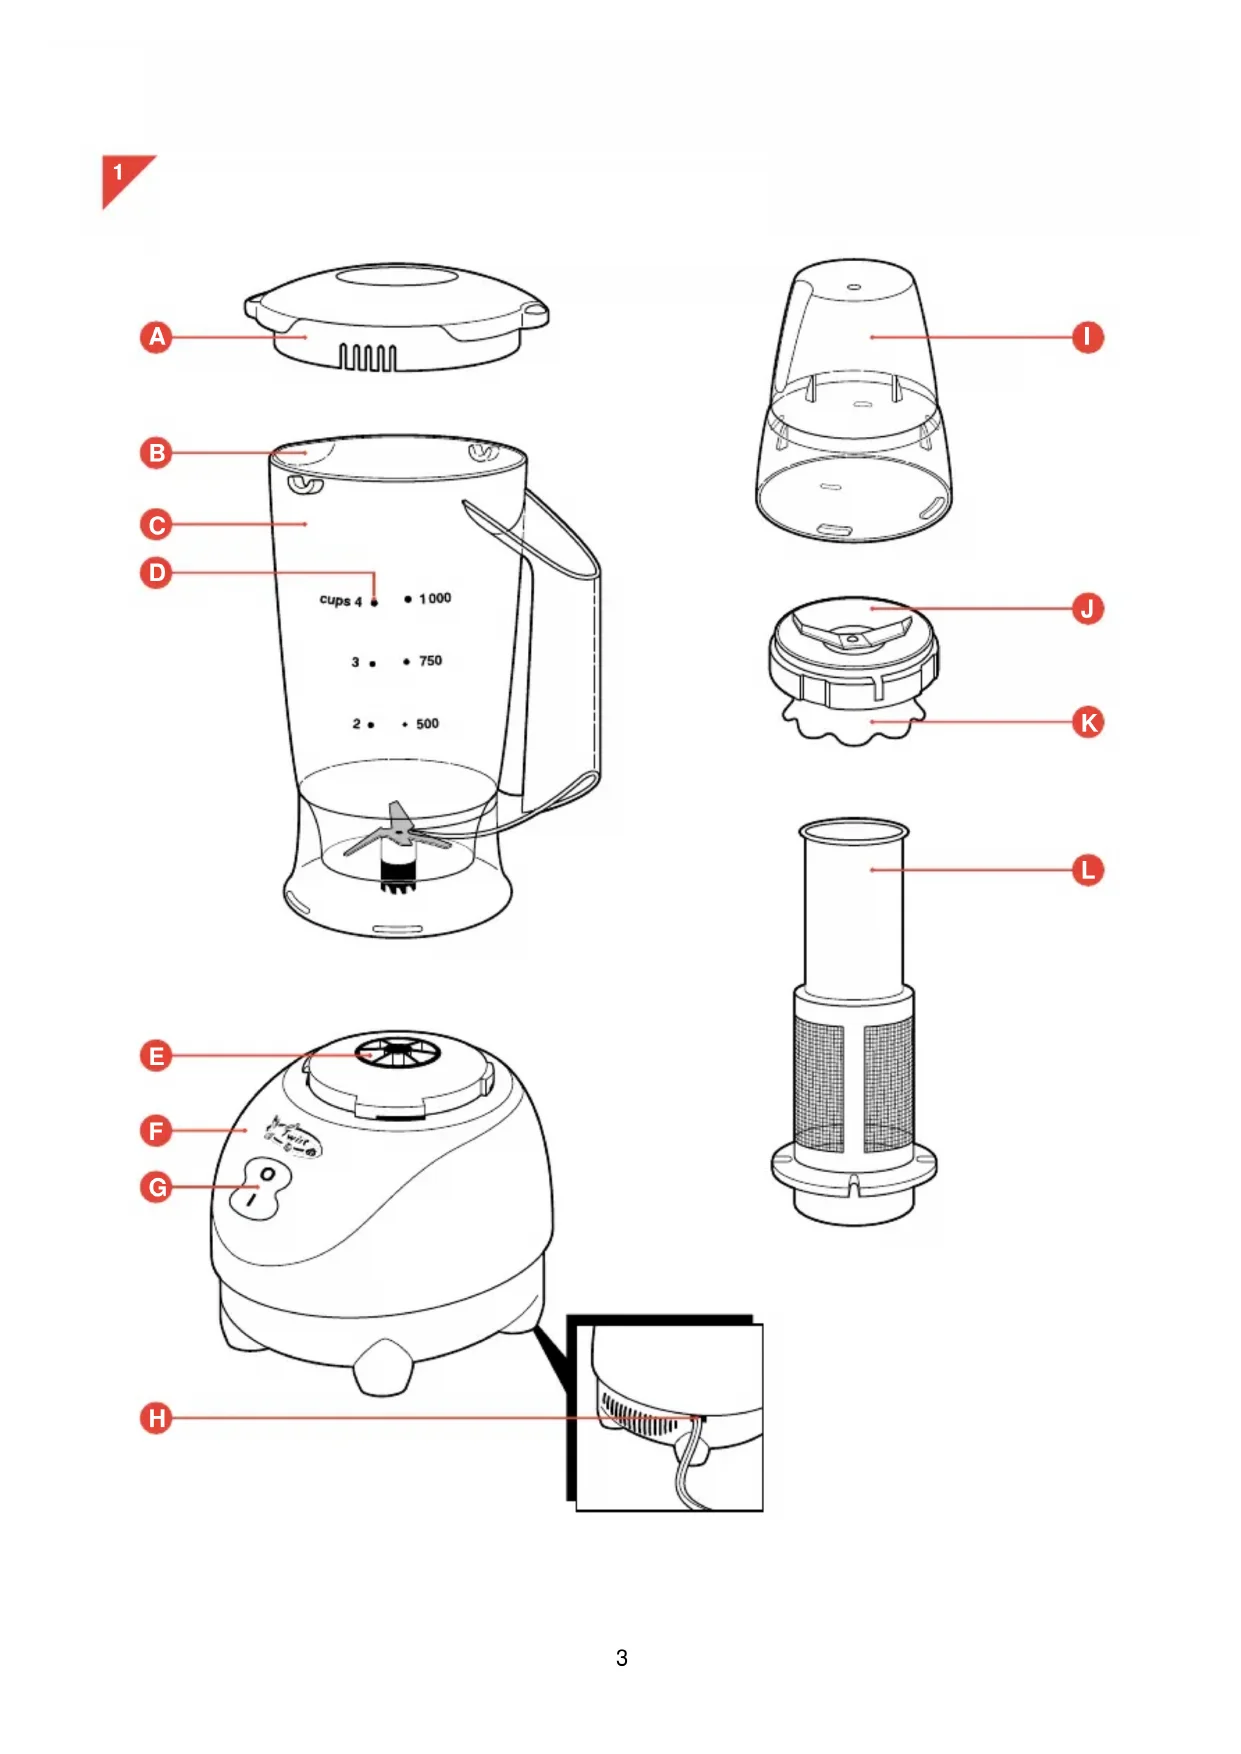
General description (fig. 1)
Blender
A Lid
BSpout
© Blender jar with blade unit
DLevel indication
EDrive axis
F Motor unit
G On/Off switch
H Cord storage compartment
Mill (only types HR 1701 and HR 1707)
1 Beaker
J Mill blade unit
K Safety ring
Filter (only types HR 1704 and HR 1707)
Filter
Cord storage
You can store excess mains cord by pushing it back into the cord storage compartment at the back of the appliance (fig. 2).
Blender
Preparing the blender for use
- First wash up all the removable parts (refer to section "Cleaning").
- Place the jar on to the motor housing and turn in the direction of the arrow until locked (fig. 3).
- After putting the ingredients into the jar, place the lid onto the jar and turn in the direction of the arrow until locked (fig. 4).
For disassembling proceed in reverse order and direction. - The lid has two positions: one when preparing recipes with filter accessory ("sieve position", fig. 5a) and one to prepare recipes without the filter accessory ("closed position", fig. 5b).
Do not force the handle of the jar!
Processing
- Set the selector to position I for operation (fig. 6).
- To stop the motor set the selector to position O (fig. 7).Tips
- Liquid ingredients (e.g. oil for the preparation of mayonnaise) can be poured through the small aperture in the lid whilst the motor is running (fig. 8).
- If blending is prolonged (max. 4 minutes) the results will generally be finer. Dry ingredients, however, should not be processed longer than 1 minute.
- Cut meat or other solid food into smaller pieces before putting them into the blender jar.
- For best blending with solid ingredients feed a series of small portions into the jar rather than putting one large quantity into it.
- If the blending is not performed quickly, switch off the appliance and
- switch the appliance on and off a few times, or
- stir the ingredients with a spatula (after you have switched off the motor), or - reduce the contents of the jar.
- For crushed ice drop the ice cubes into the jar whilst the motor is running. Keep the lid on the jar during processing.
- For tomato juice cut the tomatoes up quarters and one by one drop the pieces into the jar whilst the motor is running. Keep the lid on the jar during processing.
Mill (only types HR 1701 and HR 1707)
Preparing the mill for use
- Put the ingredients in the inverted beaker (fig. 9).
Process only dry ingredients. Do not fill the beaker beyond the "MAX" indication. - Pick up the blade unit by the safety ring (fig. 10).
- Place the blade unit in the beaker. Take care that all grooves fit the ribs inside the beaker. Press and turn clockwise until the blade unit is properly fixed (fig. 11).
-
Turn the assembled mill upside down and screw it onto the motor unit (fig. 12).
-
After processing, unscrew the mill from the motor housing by turning it anticlockwise.
- Place the mill upside down.
- Pull the safety ring out and turn it anti-clockwise.
- Remove the blade unit.
What to use the mill for?
The mill is suitable for grinding e.g.:
- pepper corns (25-50 g)
- sesame seed (25-50 g)
- rice, wheat (25-50 g)
- soya beans (25-50 g)
- dried peas (25-50 g)
- coconut flesh (25-50 g)
- hard (e.g. Parmesan) cheese (25-50 g)
- bread crumbs (one dried slice of bread)
- sugar cubes (50 g)
- nuts (shelled) (25-50 g)
- coffee beans (25-50 g)
The optimum quantities for processing are shown between brackets.
Filter (only types HR 1704 and HR 1707)
With this filter you will make delicious fresh fruit juices, cocktails or soy milk in next to no time. All pips and skins will remain behind in the filter.
Preparing the filter for use
- Assemble the blender jar.
- Put the filter in the assembled blender jar (fig. 13). Make sure that the grooves of the filter fit exactly onto the ribs inside the blender jar.
- Put the ingredients in the filter (fig. 14).
- Add water or another liquid (e.g. for cocktails).
- Place the lid in the sieve position (fig. 5a).
- Switch the appliance on. Let the appliance run for approx. 40 seconds.
- Switch the appliance off and remove the blender jar.
-
Pour out the drink through the spout of the blender jar (fig. 15).
-
For optimal results, put the jar with the remaining ingredients back onto the appliance and let it run for a few more seconds.
- Pour out the rest of the drink.
Tips
Particularly when you are processing large quantities, we advise you not to put all the ingredients in the filter at the same time. Start processing a small quantity, let the appliance run for a moment, switch it off and then add another small quantity. Always place the lid! Repeat this procedure until you have processed all the ingredients.
For soy milk
- Max. 50 g of dry soy beans can be processed with 500 ml water per batch at a time.
- Soak soy beans for 4 hours before processing them.
- Let the appliance run for maximum 40 seconds per batch at a time.
- Do not process more than two batches without interruption. If you wish to process more, let the appliance cool down to room temperature first and then continue the process.
For fruit juices and cocktails
- For the best results, add approximately 300 ml water (or other liquid for cocktails, etc.) to 150 g fruit.
Cleaning
- Cleaning of the appliance, its parts and the accessories is easiest immediately after use.
- Never clean the appliance, the accessories or the parts in the dishwasher.
- The motor unit can be cleaned with a moist cloth. Do not use abrasives, scourers, alcohol etc.
Blender
- Assemble the blender jar and pour lukewarm water and some washing-up liquid into the blender jar.
- Place the lid.
- Let the appliance run for a few moments.
- Unplug the appliance.
- Remove the blender jar and rinse it with clean water.
- Be careful with the sharp edges of the blade unit!
Mill (only types HR 1701 and HR 1707)
- Unplug the appliance
- Detach the mill from the motor unit
- Clean the beaker and the blade unit under a
running tap with lukewarm water and some washing-up liquid.
Be careful with the sharp edges of the blade unit!
- After washing up the parts, rinse them with clean water and dry them thoroughly.
Filter (only types HR 1704 and HR 1707)
- Take the filter out of the blender jar.
- Hold the filter over a waste bin and gently shake out the contents of the filter.
- Rinse the filter under the tap.
Cheese Cake
Put the following ingredients in separate bowls without mixing them:
- 3 eggs
- 350 ml of milk
- 40 g margarine
- 90 g Parmesan cheese
- 270 g sugar
Reserve into other separate bowls also without mixing, the following ingredients:
- 190 g corn meal
- 160 g wheat flour
- 15 g baking powder
Put all the ingredients of the first bowl into the blender jar in the sequence as mentioned. Turn the appliance on and let it run for 15 seconds. Keep the appliance running, add little by little using a spoon the corn meal during 20 seconds. Also add little by little, using a spoon, the wheat flour and baking powder during 30 seconds. Let the appliance run for 25 more seconds and then turn it off. The total time of processing is 90 seconds.
Preheat the oven to 200-210°C. Put the mixture in a baking tin that has been greased with oil or margarine and then floured. Place it in the oven and bake the cake for 35-40 minutes.
Remark: Do not process this recipe more than one time without interruption. If you wish to process more batches, let the appliance cool down to room temperature first and then continue the process.
Français
Important
الExtended Original Document in Egypt