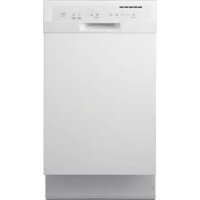
USER MANUAL WDF518SAAW WHIRLPOOL
Installation Instructions Undercounter Dishwasher
Table of Contents. 2
Table des matieres. 15
Table of Contents
Dishwasher Safety 2
Installation Requirements 3
Tools and parts 3
Location Requirements 3
Drain Requirements 5
Water Supply Requirements 5
Electrical Requirements 5
Installation Instructions. 6
Prepare cabinet opening
using existing utility hookups 6
Prepare cabinet opening
where there are no existing utility hookups. 7
Prepare dishwasher 9
Make electrical connection. 11
Connect to water supply 12
Connect to drain 13
Secure dishwasher in cabinet opening. 13
Dishwasher Safety
Your safety and the safety of others are very important.
We have provided many important safety messages in this manual and on your appliance. Always read and obey all safety messages.

This is the safety alert symbol.
This symbol alerts you to potential hazards that can kill or hurt you and others.
All safety messages will follow the safety alert symbol and either the word "DANGER" or "WARNING."
These words mean:
ADANGER
WARNING
You can be killed or seriously injured if you don't immediately follow instructions.
You can be killed or seriously injured if you don't follow instructions.
All safety messages will tell you what the potential hazard is, tell you how to reduce the chance of injury, and tell you what can happen if the instructions are not followed.
WARNING

Tip Over Hazard
Do not use dishwasher until completely installed.
Do not push down on open door.
Doing so can result in serious injury or cuts.
You need to:
- Slowly open dishwasher door while someone grasps the rear of the dishwasher. Remove shipping materials, drain hose and lower rack. Close dishwasher door until latched.
- Observe all governing codes and ordinances.
- Install this dishwasher as specified in these instructions.
- Installation should be performed by a qualified service technician. The dishwasher must be installed to meet all electrical and plumbing national and local codes and ordinances.
Installation Requirements
Gather the required tools and parts before starting installation.
All installations
- Phillips screwdriver
- Flat - blade screwdriver
- measuring tape or ruler
- 6" adjustable wrench
- small level
- flashlight
- shallow pan
- Level
Parts needed:
- 90^ elbow with 3/8" N.P.T. external threads on one end. (The other end must fit your water supply line.)
- thread seal tape
- 3 UL listed wire nuts
One 1 - 1 / 2^ - 2^ screw type clamp
In addition, for new installations
electric drill with 1 / 2^ 3 / 4'' and 1 - 1 / 2'' hole saw bits
- small tubing cutter
Parts needed:
- copper tubing (3/8" recommended)
- clamp connector (strain relief) to fit 7/8'' (22.2cm) diameter hole.
One 1 - 1 / 2^ - 2^ screw type clamp if connecting to waste-tee
Parts supplied
A. 2 - # 8 × 5 / 8 Phillips flat head wood screws
B. 4 - Phillips head, color matched toekick screws

A

B
Make sure these parts are included.
See separate parts list for accessories available for your dishwasher.
Location Requirements
Do not run drain lines, water lines or electrical wiring where they can interfere with or contact dishwasher motors or legs.
The location where the dishwasher will be installed must provide clearance between motors and flooring. Motors should not touch the floor.
Do not install dishwasher over carpeted flooring.
Protect dishwasher and water lines leading to dishwasher against freezing. Damage from freezing is not covered by the warranty.
Check location where dishwasher will be installed. The location must provide:
- easy access to water, electricity and drain.
- convenient access for loading and unloading dishes. Corner locations require a 2'' (5.1 cm) minimum clearance between the side of the dishwasher door and the wall or cabinet.
- there must be a minimum of 25 - 5 / 8'' (65.1 cm) in front of dishwasher to allow door to open fully.

- Fully enclosed on both sides, back, and top.
- square opening for proper operation and appearance.
- cabinet front perpendicular to floor.
- level floor. (If floor at front of opening is not level with floor at rear of opening, shims may be needed to level dishwasher.)
NOTE: To prevent shifting during dishwasher operation, shims must be securely attached to the floor.
If dishwasher will be left unused for a period of time or in a location where it may be subject to freezing, have it winterized by authorized service personnel.
Make sure pipes, wires and drain hose are within the shaded area shown in the "Cutout dimensions" section.
Helpful Tip: If the floor in the dishwasher opening is uneven (example: tile flooring only partway into opening) you will need to take special care in measuring dimensions and in leveling dishwasher.
Product dimensions

* to front of door frame
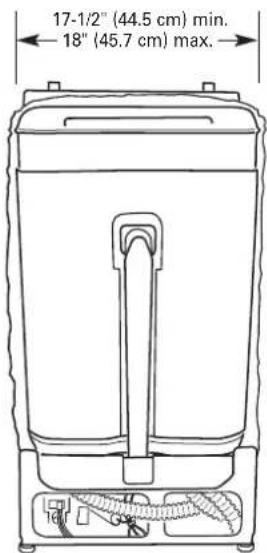
SIDE VIEW
REAR VIEW
Cutout dimensions

*Underside of countertop to floor.
Cut holes in shaded area of cabinet walls or floor for plumbing and electrical service.
Note: ADA installation, 32 - 1 / 2'' (82.5cm) beneath 34'' (86.4cm) high countertops may be accomplished by adjusting the toekick and leveling legs.
Drain Requirements
- Use the new drain hose supplied with your dishwasher. If this is not long enough, use a new drain hose with a maximum length of 10 feet (3.05 m) that meets all current AHAM/IAPMO test standards, is resistant to heat and detergent, use 5/8''(1.58cm) or 7/8''(2.2cm) inside diameter hose and a coupler to connect the two hose ends. Secure the connection with two clamps
- Connect drain hose to waste tee or dispenser inlet above drain trap in house plumbing and 32^ (81.3 cm) minimum above the floor. It is recommended that the drain hose either be looped up and securely fastened to the underside of the counter, or be connected to an air gap.
- Use an air gap if the drain hose is connected to house plumbing lower than 18^ (45.7 cm) above floor.

- Use 1/2 minimum I.D. drain line fittings.
- Do not connect drain lines from other devices to the dishwasher drain hose.
Water Supply Requirements
- A hot water line with 20-120 psi (138-862 kPa) water pressure.
120^ (49^) water at dishwasher.
- 3/8'' O.D. copper tubing with compression fitting or flexible stainless steel braided fill line (1/2" minimum plastic tubing is not recommended).
A 90^ elbow with 3/8'' N.P.T. external pipe threads on one end.
Do not solder within 6'' (15.2 cm) from water inlet valve.
Electrical Requirements
Contact a qualified electrician.
Assure that the electrical installation is adequate and in conformance with all national and local codes and ordinances.
You must have:
- 120 volt, 60 Hz, AC-only, 15 or 20 amp., fused electrical supply.
Wiring must be 2 wire with ground.
We recommend:
A time-delay fuse or circuit breaker.
- A separate circuit.
If direct wiring dishwasher:
- Use flexible, armored or non-metallic sheathed, copper wire with grounding wire that meets the wiring requirements for your home and local codes and ordinances.
If connecting dishwasher with a power supply cord:
Follow the kit instructions for installing the power supply cord.
- Power supply cord must plug into a mating three prong, grounded outlet, located in the cabinet next to the dishwasher opening. Outlet must meet all local codes and ordinances.
Installation Instructions
WARNING

Electrical Shock Hazard
Disconnect electrical power at the fuse box or circuit breaker box before installing dishwasher.
Failure to do so can result in death or electrical shock.
- Disconnect power.
- Turn off water supply.
Prepare cabinet opening using existing utility hookups
- Follow the steps in this section if you are installing the dishwasher in an existing cabinet opening with utility hookups.
-
If you are installing the dishwasher in a cabinet opening that does not have hookups, follow the steps under "Prepare cabinet opening where there are no existing utility hookups" section.
-
Check that the water line reaches to the front left of opening where the water connection will be made.
- Check that the direct wire reaches to the front right of opening where the electrical connection will be made
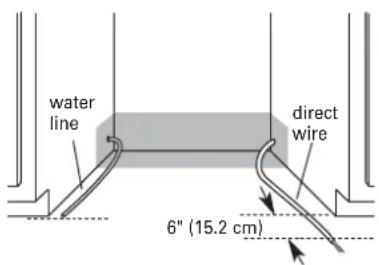
If the water line and the direct wire reach far enough into the opening, proceed to the next section "Install the drain hose." If they do not reach far enough, follow the steps under "Prepare cabinet opening where there are no existing utility hookups."
Install the drain hose
IMPORTANT: Always use a new drain hose even when installing a new replacement dishwasher.
- Drill a 1 - 1 / 2'' (3.8cm) diameter hole in cabinet wall or floor on the side of the opening closest to the sink.

-
Connect drain hose to waste tee or waste dispenser using one of the following methods:
-
Option 1, Waste disposer - with air gap
- Option 2, No waste dispenser - with air gap
- Option 3, Waste disposer - no air gap*
- Option 4, No waste dispenser - no air gap*
*an air gap is recommended
Helpful Tip:To reduce the vibration of the hose, keep the hose away from the floor and the edge of the hole where it passes through the cabinet.
Option 1, Waste disposal - with air gap:
- Remove the dispenser knockout plug. Cut end of drain hose if needed (do not cut ribbed section).
- Attach drain hose to air gap with large spring-type clamp. If the drain hose was cut, use a 1-1/2" to 2" (3.8 to 5 cm) screw-type clamp*.
- Use a rubber hose connector with spring or screw-type clamps to connect air gap to dispenser inlet. This connection must be before the drain trap and at least 20^ (50.8 cm) above the floor where dishwasher will be installed.

- Parts available from local plumbing supply store.
Option 2, No waste dispenser - with air gap:
- Cut end of drain hose if needed (do not cut ribbed section).
- Attach drain hose to air gap with large spring-type clamp. If the drain hose was cut, use a 1-1/2" to 2" (3.8 to 5 cm) screw-type clamp*.
- Use a rubber hose connector with spring or screw-type clamps to connect air gap to waste tee. This connection must be before the drain trap and at least 20" (50.8 cm) above the floor where dishwasher will be installed.

* Parts available from local plumbing supply store.
Option 3, Waste dispenser - no air gap:
- Remove the dispenser knockout plug. Do not cut end of drain hose.
- Attach drain hose to dispenser inlet with large spring-type clamp.
This connection must be before the drain trap and at least 20^ (50.8 cm) above the floor where dishwasher will be installed. It is recommended that the drain hose be looped up and securely fastened to the underside of the counter.

* Parts available from local plumbing supply store.
Option 4, No waste dispenser - no air gap:
- Cut end of drain hose if needed (do not cut ribbed section).
- Attach drain hose to waste tee with 1-1/2" to 2" (3.8 to 5 cm) screw-type clamp*.
This connection must be before the drain trap and at least 20^ (50.8 cm) above the floor where dishwasher will be installed. It is recommended that the drain hose be looped up and securely fastened to the underside of the counter.

Prepare cabinet opening where there are no existing utility hookups
Electrical connection
Option1, Direct wire method:
Helpful Tip: Wiring the dishwasher will be easier if you route wire into the cabinet opening from the right side.
1.Drill a 3 / 4'' (1.9 cm) hole in right-hand cabinet side, rear or floor. Preferred and optional locations are shown.

- Wood cabinet: Sand hole until smooth.
Metal cabinet: Cover hole with grommet, not provided.
- Route cable from power supply through cabinet hole ( cable must extend to the right front side of cabinet opening). Tape cable to the floor 6^ in front of unit. This will prohibit cable from moving when dishwasher is moved into cabinet opening.

Option 2, Power supply cord method:
NOTE: A mating, three prong, ground-type wall receptacle is required in a cabinet next to the dishwasher opening.
- Drill a 1-1/2"
(3.8 cm) hole in the cabinet rear or side. Preferred and optional locations are shown.

- Wood cabinet: Sand hole until smooth.
Metal cabinet: Cover hole with grommet (Part No. 302797) included with power supply cord kit.
Install the water line
Helpful Tip: Routing the water line through the left side of cabinet opening will make water connection easier.
-
Drill a minimum 1 / 2'' (1.3 cm) hole in the cabinet side, rear or floor. Preferred and optional locations are shown.
-
Measure overall length of copper tubing required.

- Attach copper tubing to the water line with a manual shutoff valve.
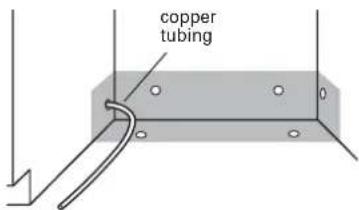
- Slowly feed copper tubing through hole in cabinet. Copper tubing will bend and kink easily, so be gentle.
The copper tubing should be far enough into the cabinet opening to connect it to dishwasher inlet on the front left of the dishwasher.
- Turn water shutoff valve to "ON" position. Flush water into a shallow pan to get rid of particles that may clog the inlet valve.
- Turn shutoff valve to "OFF" position.
Install the drain hose
IMPORTANT: Always use a new drain hose.
1.Drill a 1 - 1 / 2'' (3.8cm) diameter hole in cabinet wall or floor on the side of the opening closest to the sink.

-
Connect drain hose to waste tee or waste disposer using one of the following methods:
-
Option 1, Waste disposer - with air gap
- Option 2, No waste dispenser - with air gap
- Option 3, Waste disposer - no air gap*
- Option 4, No waste dispenser - no air gap*
*an air gap is recommended
Helpful Tip:To reduce the vibration of the hose, keep the hose away from the floor and the edge of the hole where it passes through the cabinet.
Option 1, Waste disposer - with air gap:
- Remove the dispenser knockout plug. Cut end of drain hose if needed (do not cut ribbed section).
- Attach drain hose to air gap with large spring-type clamp. If the drain hose was cut, use a 1-1/2" to 2" (3.8 to 5 cm) screw-type clamp.
- Use a rubber hose connector with spring or screw-type clamps to connect air gap to dispenser inlet. This connection must be before the drain trap and at least 20^ (50.8 cm) above the floor where dishwasher will be installed.

- Parts available from local plumbing supply store.
Option 2, No waste dispenser - with air gap:
- Cut end of drain hose if needed (do not cut ribbed section).
- Attach drain hose to air gap with large spring-type clamp. If the drain hose was cut, use a 1-1/2" to 2" (3.8 to 5 cm) screw-type clamp*.
- Use a rubber hose connector with spring or screw-type clamps to connect air gap to waste tee. This connection must be before the drain trap and at least 20^ (50.8 cm) above the floor where dishwasher will be installed.

* Parts available from local plumbing supply store.
Option 3, Waste disposer - no air gap:
- Remove the dispenser knockout plug. Do not cut end of drain hose.
- Attach drain hose to dispenser inlet with large spring-type clamp.
This connection must be before the drain trap and at least 20^ (50.8 cm) above the floor where dishwasher will be installed. It is recommended that the drain hose be looped up and securely fastened to the underside of the counter.

* Parts available from local plumbing supply store.
Option 4, No waste dispenser - no air gap:
- Cut end of drain hose if needed (do not cut ribbed section).
- Attach drain hose to waste tee with 1 - 1 / 2'' to 2^ (3.8 to 5cm ) screw-type clamp*.
This connection must be before the drain trap and at least 20^ (50.8 cm) above the floor where dishwasher will be installed. It is recommended that the drain hose be looped up and securely fastened to the underside of the counter.

* Parts available from local plumbing supply store.
Prepare dishwasher
WARNING

Tip Over Hazard
Do not use dishwasher until completely installed.
Do not push down on open door.
Doing so can result in serious injury or cuts.
WARNING
Excessive Weight Hazard
Use two or more people to move and install dishwasher.
Failure to do so can result in back or other injury.
-
Grasp sides of dishwasher door frame and put dishwasher on its back.
-
Remove four screws attaching toekick panel and lower panel to dishwasher using a Phillips screwdriver.
- Remove panels and set panels aside on a protective surface.

- Apply thread seal tape to 90^ elbow fitting and connect fitting to water inlet valve.
- Tighten elbow until snug, and be sure that it faces to the rear.
- Remove top screw and slide cover to the right to remove

- If you are direct wiring: install a U.L.-listed/CSA-certified clamp connector to the terminal box. If using conduit, use a U.L.-listed/CSA-certified conduit connector.
- If you are installing a power supply cord kit, do so now, following kit instructions. The power supply cord kit must be U.L.-listed and marked for use with dishwashers (i.e. Power Supply Cord Kit part no. 4317824).
Helpful Tip: Put cardboard under dishwasher until it is installed in cabinet opening. The cardboard will help protect floor covering during installation.
7.Measure height of cabinet opening from underside of countertop to floor where dishwasher will be installed (you need the lowest point).

- Extend leveling legs out from the dishwasher base, 1/4 less than opening height.
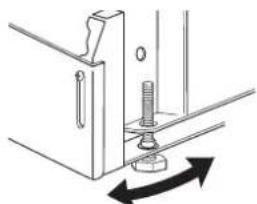
leveling leg
Check door spring tension
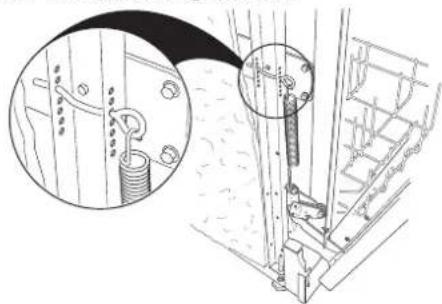
With another person holding the dishwasher to prevent it from tipping, open and close the door a few times. If the door closes too quickly or falls open under its own weight, the door tension will need to be adjusted.
- If the door closes too quickly, decrease the spring tension by pulling the spring adjustment pin out of its hole and reinsert it in the next lower hole toward the bottom of the dishwasher.
- If the door falls open, increase the spring tension by pulling the spring adjustment pin out of its hole and reinserting it in the next higher hole toward the top of the dishwasher.
- Spring adjustment pins should be in the same holes on both the left and right sides.
Move dishwasher into cabinet opening
- Using two or more people, stand the dishwasher up.
- Grasp the sides of the dishwasher at the edges of the door panel.
- Move dishwasher close to cabinet opening. Do not push on the front of the panel or on the console—they may dent.

- If dishwasher has a power supply cord, insert power supply cord into hole cut into cabinet.
If using direct wire, check that it is on the right front side of opening.
- Check that water line is on the left side of opening and insert the drain hose through the hole in cabinet.
- Slowly move dishwasher completely into cabinet opening so that the front corners of the dishwasher door are flush with the cabinet doors. Do not kink or pinch copper tubing, drain hose, power supply cord or direct wire between dishwasher and cabinet.
Helpful Tip: Once the dishwasher is in position, you may have to support the front of the dishwasher by raising, lowering or shimming front feet.
- Remove cardboard from under dishwasher.
NOTE: It is all right if dishwasher fits tightly into cabinet opening. Do not remove insulation blanket—the blanket reduces the sound level.
Level the dishwasher
- Align front of dishw asher door panel with cabinet doors. You may need to adjust alignment to be even with your cabinets.
Helpful Tip: Prop up one side of frame to hold dishwasher up off floor when adjusting front legs. With some installations, it may be easier to adjust the front leg using the 6^ adjustable wrench.

- Check that leveling legs are firmly against the floor.
- Close and latc h the door, and place level against the front panel. Check that dishwasher is plumb. If needed, adjust leveling leg or add shims until dishwasher is plumb.
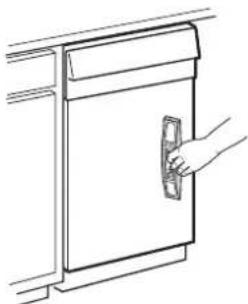
- Repeat for other side of dishw asher.
NOTE: Shims must be securely attached to floor to prevent their movement when the dishwasher is operated.
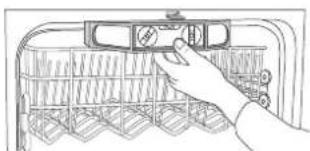
5. Place level ag ainst top front opening of tub. Check that dishwasher is level from side to side. If dishwasher is not level, adjust front legs up or down until dishwasher is level.
Make Electrical Connection
Check "Electrical requirements" section.
You need to:
have the correct electrical supply and recommended grounding method.
If you are:
- direct wiring, use Option 1
using a power supply cord, use Option 2
Option 1, Direct wire method


Electrical Shock Hazard
Electrically ground dishwasher.
Connect ground wire to green ground connector in terminal box.
Do not use an extension cord.
Failure to follow these instructions can result in death, fire, or electrical shock.
- Route direct wire so that it does not touch dishwasher motor or lower part of dishwasher tub.
2.Pull direct wire through hole in terminal box.

Helpful Tip:
- Select the proper size twist-on connectors to connect your household wiring to 16-gauge dishwasher wiring.
- Insert wire ends into twist-on connector. Do not pre-twist bare wire.
Twist connector.
Gently tug on wires to be sure both are secured.

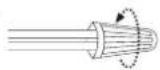

- Connect the wires as follows using twist-on connectors sized to connect direct wire to 16-gauge dishwasher wire:
Power supply wire: Terminal box wire:
white white
black black
ground wire ground connector

- Tighten clamp connector or conduit connector screws.
- Reinstall terminal box cover with wires inside terminal box.
The cover must be outside the box on the left side.

- Make sure no wires are pinched by cover.
Option 2, Power supply cord method
The power cord and connections must comply with the National Electrical Code, Section 422 and/or local codes and ordinances. Recommended power cord length is 54^ min. and 64^ max.
- Remove terminal box cover.
- Connect incoming power cord white (or ribbed) wire to dishwasher white wire, black (or smooth) wire to black wire and ground wire to dishwasher green wire. Use UL listed wire nuts of the appropriate size for connections.
- Replace terminal box cover. Make sure wires are not pinched under the cover.
- Plug power cord into a grounded 3 prong outlet.
- Check the power supply cord does not touch dishwasher motor or lower part of dishwasher tub.
Connect to water supply
Helpful Tip:
Compression fittings:
a. Slide nut onto copper tubing about 1" (2.5 cm).
b. Slide ferrule onto the tubing. Do not position ferrule on the end of the tubing.
c. Put the tubing into the elbow as far as it will go.
d. Slide the nut and ferrule forward and start the nut onto the elbow threads. Be gentle when handling and positioning the copper tubing, it bends and kinks easily.

- To prevent vibration during operation, route the water supply line so that it does not touch the dishwasher base, frame or motor.
- With copper tubing pushed into compression fitting as far as it will go, use a wrench and tighten compression fitting nut to elbow on water inlet valve. Do not use Teflon tape with compression fittings.

- Place paper towel under elbow. Turn on water supply and check for leaks.
Connect to drain
- To help minimize vibration, route drain hose to avoid contact with motor, door springs, water line, cabinet, flooring or the edge of the hole where it passes through the cabinet.
- Do not remove drain loop from side of dishwasher.
- Place pan under end of drain hose. Pan will collect any water in drain hose.

Remove towel from dishwasher.
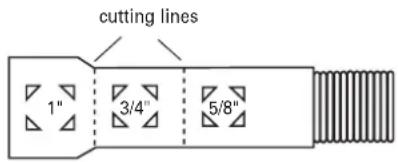
- The drain hose molded end will fit 5 / 8'' (16mm), 3 / 4'' (19mm) or 1'' (25.4mm) diameter connections on the air gap, waste tee or dispenser. Cut on the marked line as required for your installation.
IMPORTANT: Do not cut corrugated portion of hose.
If a longer drain hose is required, add up to 42''(1.07m) of length for a total of 10 ft (3.05m) to the factory installed hose.
- Use 5 / 8'' or 7 / 8'' inside diameter hose and a coupler to connect the two hose ends. Secure the connection with hose clamps.
Secure the drain hose to the air gap, waste tee or dispenser with clamps.
NOTE: Total drain hose length must not exceed 10 ft (3.05m), for proper drain operation.

hose clamp

coupler
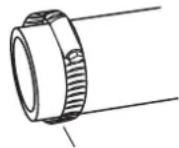
hose clamp
Securing dishwasher to countertop
WARNING
Excessive Weight Hazard
Use two or more people to move and install dishwasher.
Failure to do so can result in back or other injury.
Using two or more people, stand the dishwasher up.
The dishwasher must be secured to the countertop by the two brackets on top of the dishwasher.

brackets
Method 1
The dishwasher must be secured to wood countertop.
- Open the dishwasher door and remove the lower dish rack.
-
Place a towel over the pump assembly and spray arm of dishwasher to keep screws from falling into pump area during installation.
-
Check that the dishwasher is level and centered side to side in the opening.
- Check that the tub flange aligns with the front face of the cabinet frame.
- Attach the dishwasher to the countertop using the 2 brackets on top of the dishwasher.
NOTE: The dishwasher must be attached to the countertop to keep it from tipping when the door is opened.
- Insert 2# 8 × 5% Phillips flat-head screws through the brackets and into the countertop.

- Open the door about 3'' (7.6 cm) and check that the space between the inner door and tub is equal on both sides.
- If spacing is not equal, loosen the bracket screws and shift the tub. Retighten bracket screws.
- Check that the top of the door does not contact the screws, brackets or countertop. If it does, the dishwasher must be lowered and leveled again. See "Level The Dishwasher" in "Install Dishwasher."
- If spacing is not equal, loosen the bracket screws and shift the tub. Retighten bracket screws.
- Remove towel from dishwasher.
- Reinstall the lower dishrack.
Method 2
When countertops are granite or other materials that will not accept screws, secure dishwasher with sidemounting brackets.
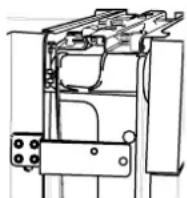
- Use a flat-blade screwdriver or prying tool to remove plug buttons (one on each side).
- Install screws through the dishwasher side mount bracket and into the adjacent cabinet on each side. Reinstall plug buttons.

When step is complete, close dishwasher door and verify that gap between countertop and top of dishwasher door is at least 1/2 .

Countertop
Complete installation
- Place the lower panel behind the toekic k panel.
- Place 2-piece tokek k against the legs of the dishwasher.
- Place the inner toekic k piece (with slots) against the toekick bracket. The slots should align with toekick bracket screw holes. Allow the bottom edge of the lower toekick to touch the floor.
- Place larger toekic k over the inner piece and install 4 toekick screws. Use additional 2 screws for installations over 33 - 1 / 2'' (85.09 cm) high. Use both toekick pieces for all installation heights.
- Reconnect power or plug in dishwasher.

2-piece toekick
Direct wire method:
WARNING

Electrical Shock Hazard
Electrically ground dishwasher.
Connect ground wire to green ground connector in terminal box.
Do not use an extension cord.
Failure to follow these instructions can result in death, fire, or electrical shock.
Power supply cord method:
WARNING

Electrical Shock Hazard
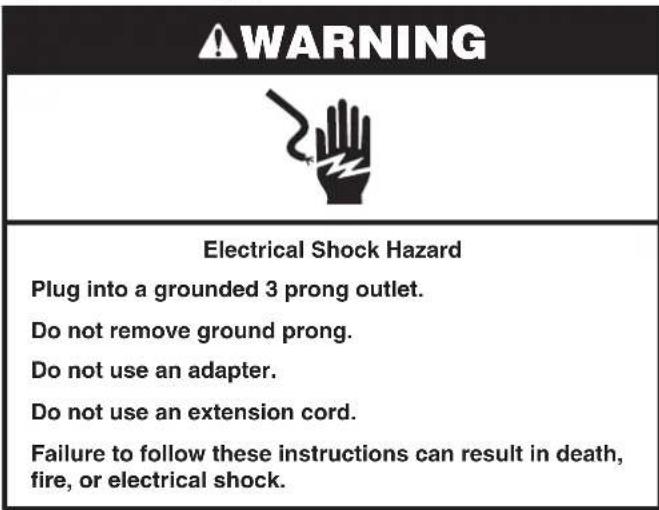
Plug into a grounded 3 prong outlet.
Do not remove ground prong.
Do not use an adapter.
Do not use an extension cord.
Failure to follow these instructions can result in death, fire, or electrical shock.
Check operation
- Read the Use and Care Guide that came with your dishwasher.
- Check that all parts have been installed and no steps were skipped.
- Check that you have all the tools you used.
- Start dishwasher and allow it to complete the shortest wash cycle. After the first two minutes, unlatch door, wait five seconds, then open door.
- Check to see that there is water in the bottom of the dishwasher tub. Check that dishwasher is working properly.
- If not, disconnect power or unplug dishwasher and see "If dishwasher does not operate" section.
If dishwasher does not operate
First try the solutions suggested here to possibly avoid the cost of a service call.
- Has the circuit breaker tripped or the house fuse blown?
Is the door closed tightly and latched?
- Has the cycle been set correctly to start the dishwasher?
Is the water turned on?
If none of these work, call 1-800-4MY-HOME.
Tabledesmatieres
Sécuritédulave-vaisse. 2Instruetioind'stallation
Configurationrequise pourI'installation 3
Outilsetpieces 3.
Configurationrequisepouri'emplacement
Configurationrequisepourlavidange
Disconnect electrical power at the fuse box or circuit breaker box before installing dishwasher.
Failure to do so can result in death or electrical shock.
Raccordsdecompression: