
Satinelle HP6503 - Epilator PHILIPS - Free user manual and instructions
Find the device manual for free Satinelle HP6503 PHILIPS in PDF.
| Product type | Epilator |
| Brand | Philips |
| Model | Satinelle HP6503 |
| Power supply | Rechargeable (NiMH batteries) and corded operation |
| Cordless autonomy | Approx. 20 minutes |
| Charging time | 16 hours (do not exceed 24 hours) |
| Number of speeds | 2 speeds (I and II) |
| Epilation head | Rotating discs capturing hairs as short as 0.5 mm |
| Cold applicator | Yes, two types: for legs (pivoting head) and for armpits/bikini line |
| Shaving head | Yes, interchangeable with the epilation head |
| Massage system | Yes, integrated into the epilation head |
| Included accessories | Cold applicator (2), shaving head, protective cover, massage system, cleaning brush, exfoliating sponge, stand |
| Maintenance and cleaning | Clean heads with brush or under running water (removable heads, device not waterproof) |
| Safety | Do not use on irritated or damaged skin; keep out of reach of children |
| Rechargeable batteries | Built-in NiMH, remove before disposal |
| Warranty | International Philips warranty |
Frequently Asked Questions - Satinelle HP6503 PHILIPS
User questions about Satinelle HP6503 PHILIPS
0 question about this device. Answer the ones you know or ask your own.
Ask a new question about this device
Download the instructions for your Epilator in PDF format for free! Find your manual Satinelle HP6503 - PHILIPS and take your electronic device back in hand. On this page are published all the documents necessary for the use of your device. Satinelle HP6503 by PHILIPS.
USER MANUAL Satinelle HP6503 PHILIPS
Satinelle Ice Premium
HP6503
PHILIPS
2

3
4


ENGLISH 6
FRANÇAIS 19
33
n 46
繁體中文 56
简体中文67
a 88
99
6503
ENGLISH6
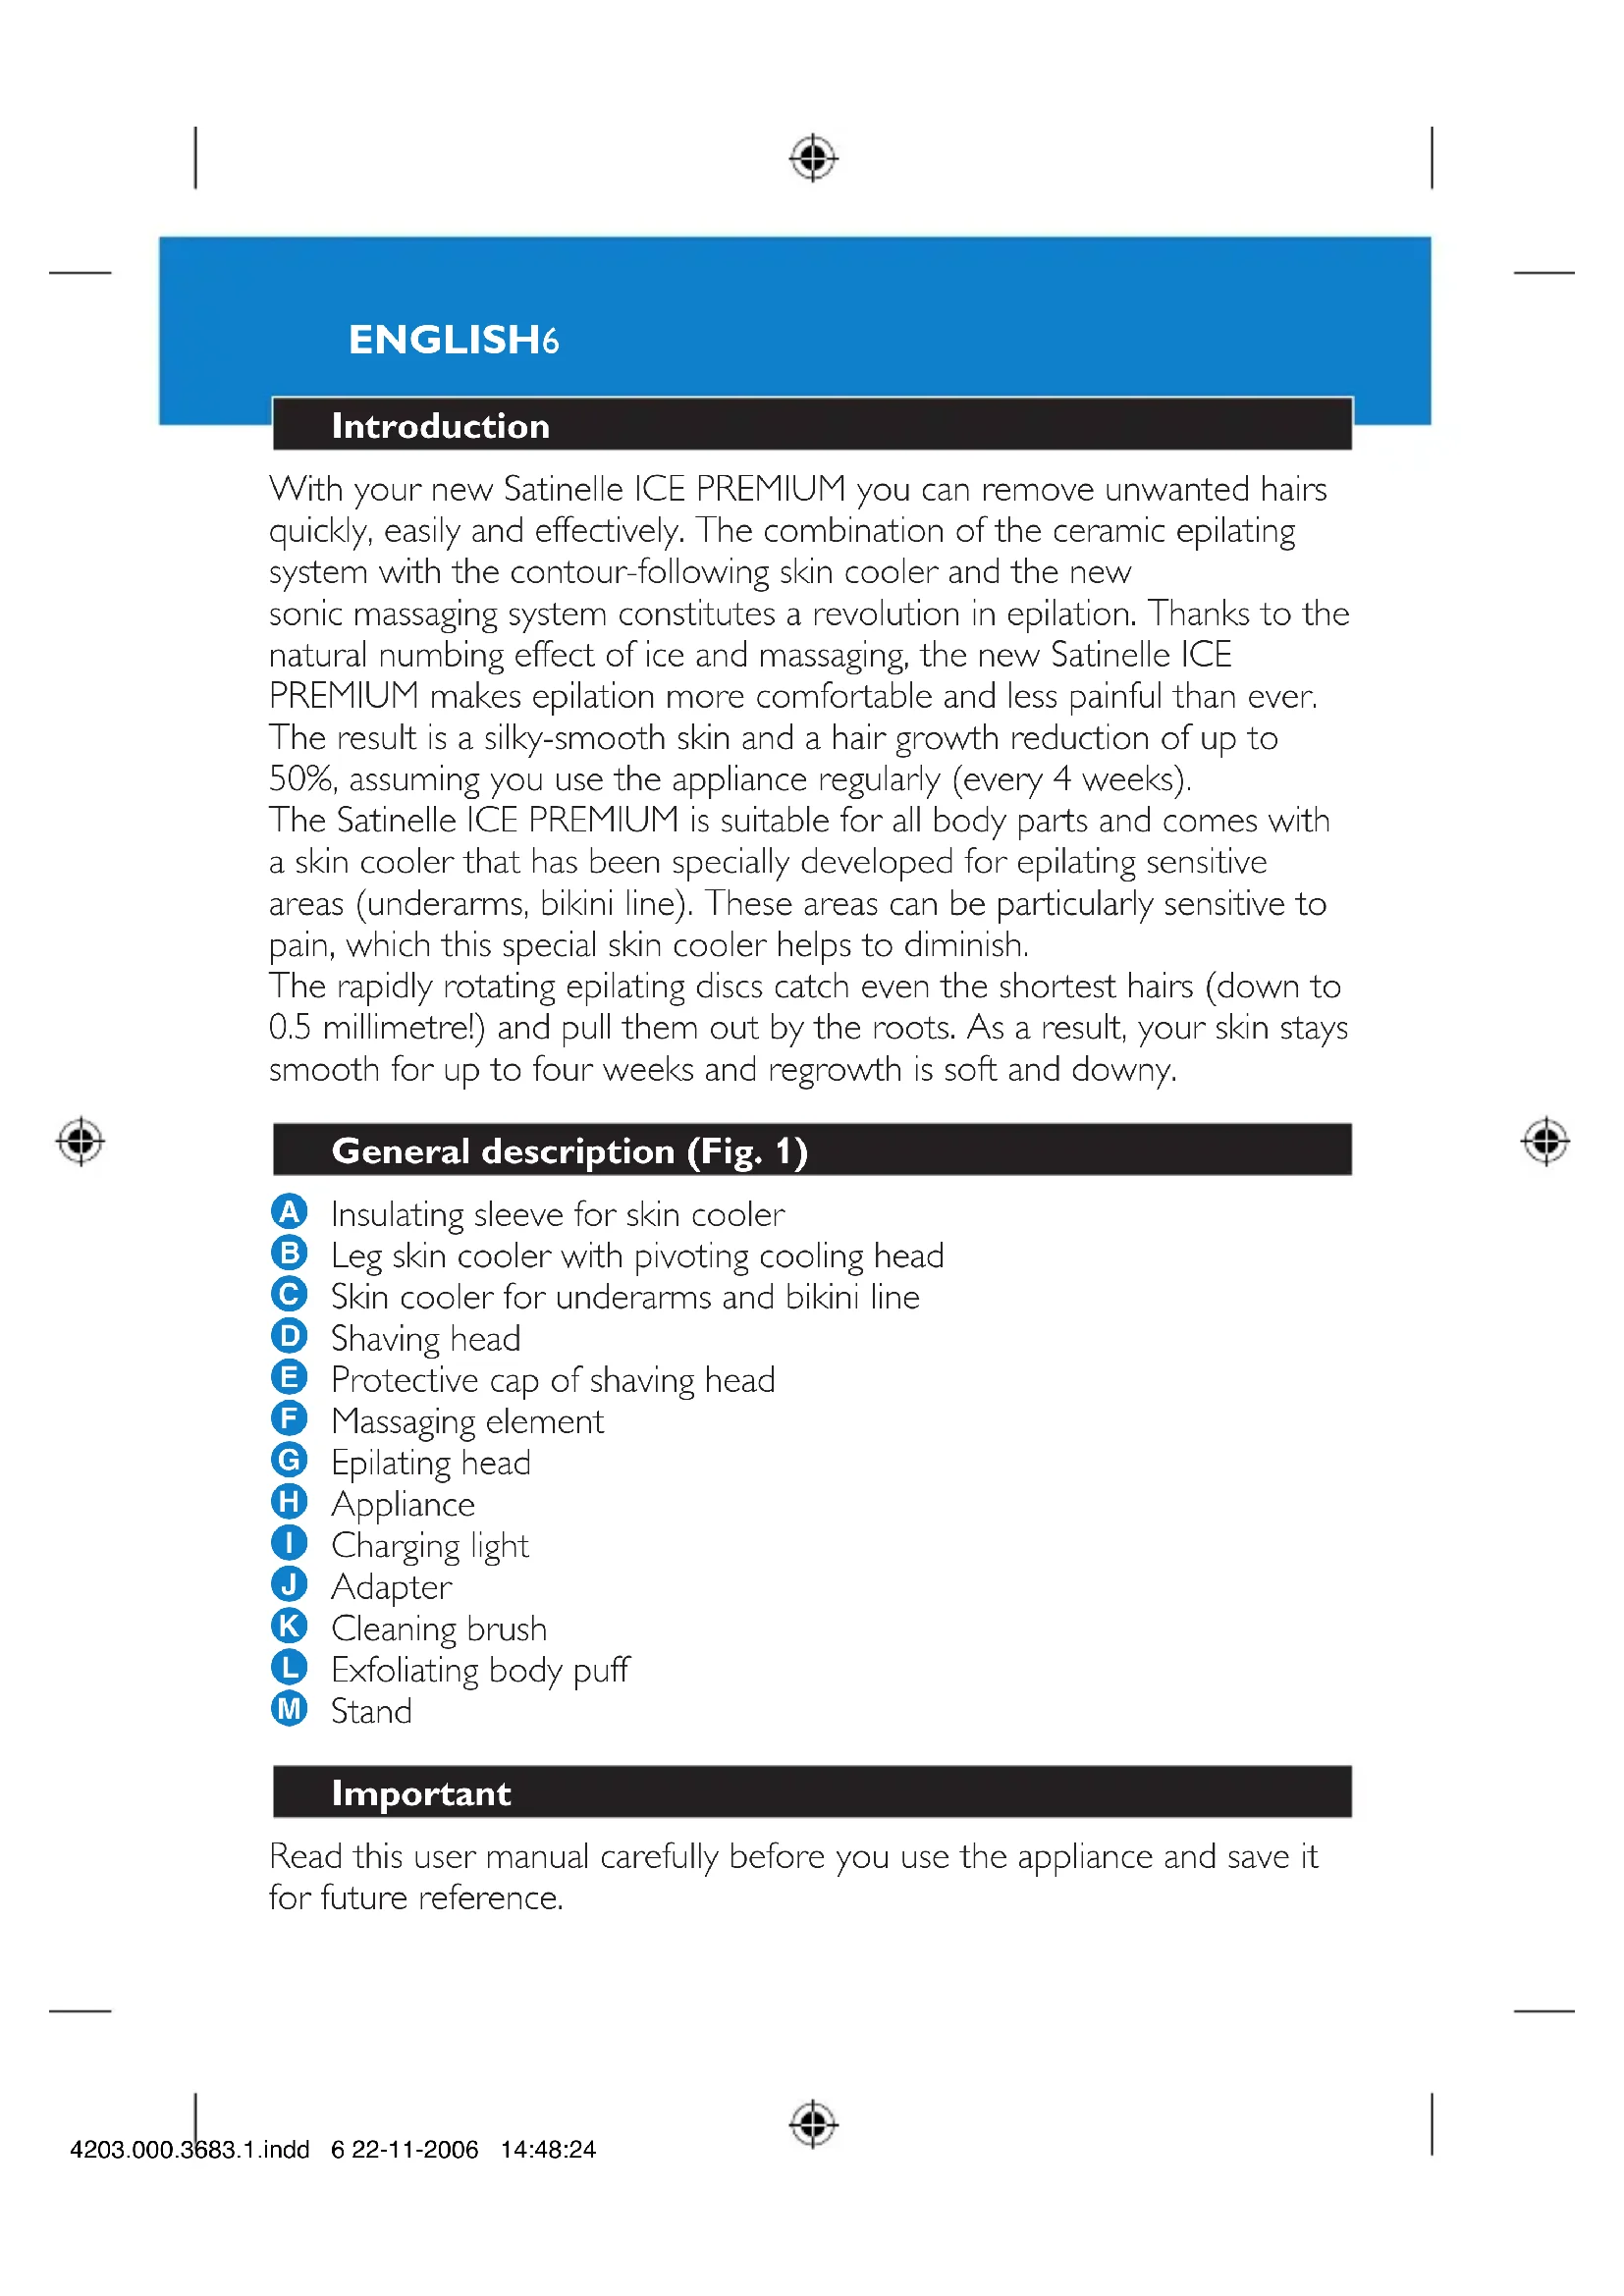
Introduction
With your new Satinelle ICE PREMIUM you can remove unwanted hairs quickly, easily and effectively. The combination of the ceramic epilating system with the contour-following skin cooler and the new sonic massaging system constitutes a revolution in epilation. Thanks to the natural numbing effect of ice and massaging, the new Satinelle ICE PREMIUM makes epilation more comfortable and less painful than ever. The result is a silky-smooth skin and a hair growth reduction of up to 50% , assuming you use the appliance regularly (every 4 weeks). The Satinelle ICE PREMIUM is suitable for all body parts and comes with a skin cooler that has been specially developed for epilating sensitive areas (underarms, bikini line). These areas can be particularly sensitive to pain, which this special skin cooler helps to diminish.
The rapidly rotating epilating discs catch even the shortest hairs (down to 0.5 millimetre!) and pull them out by the roots. As a result, your skin stays smooth for up to four weeks and regrowth is soft and downy.
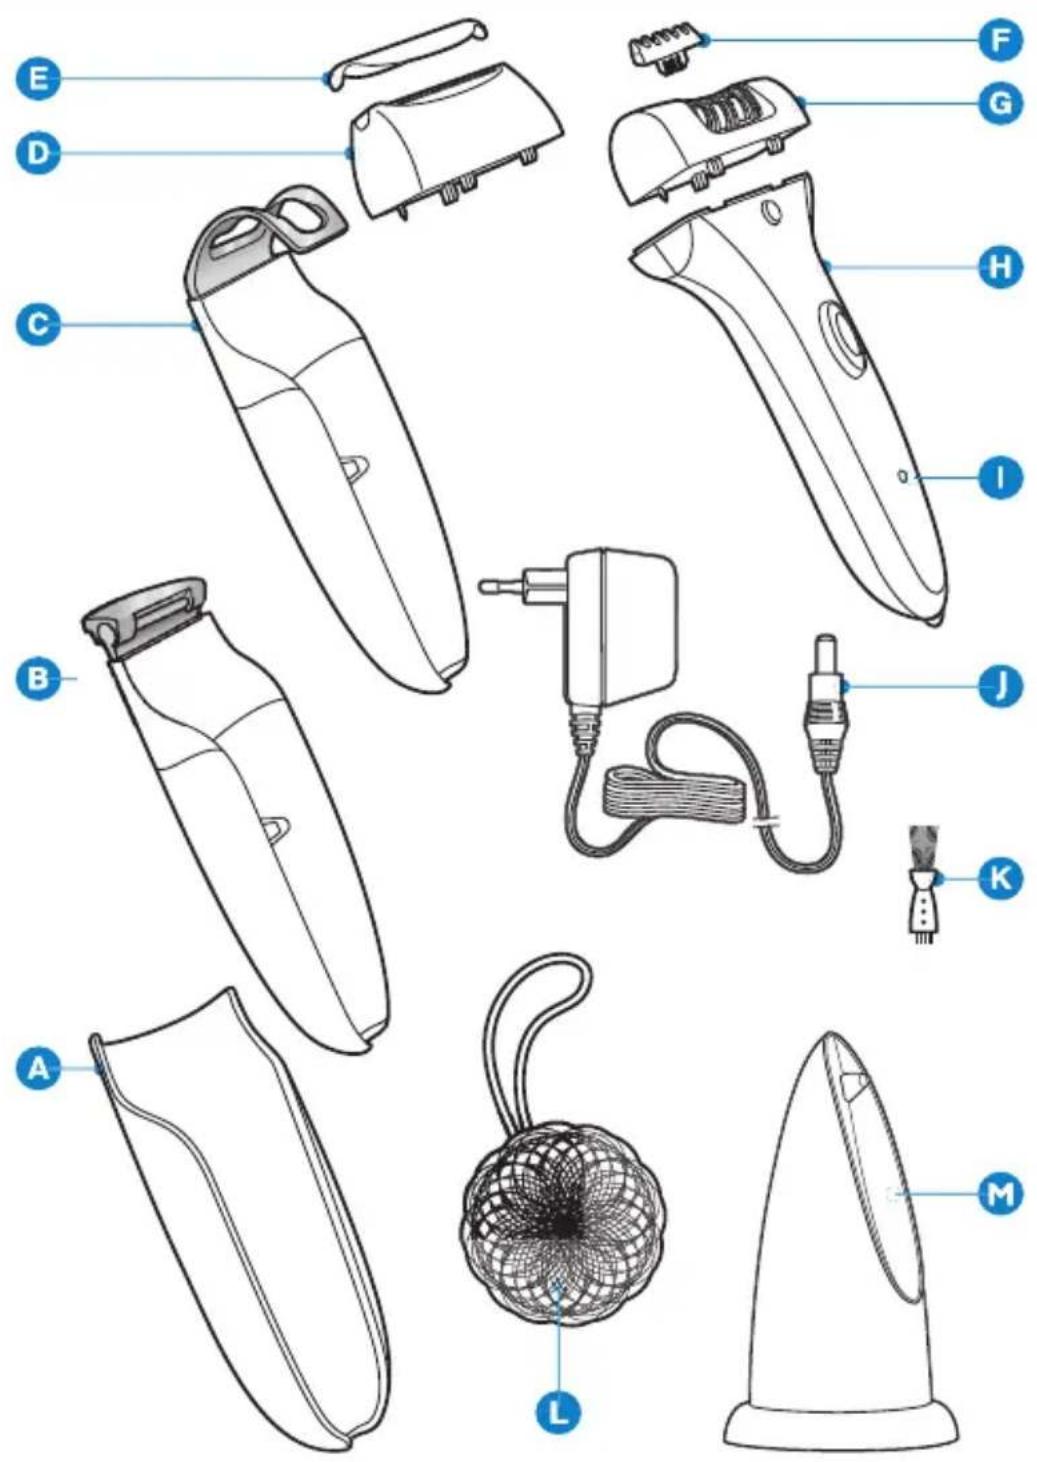
General description (Fig. 1)
Insulating sleeve for skin cooler
B Leg skin cooler with pivoting cooling head
Skin cooler for underarms and bikini line
D Shaving head
E Protective cap of shaving head
F Massaging element
Epilating head
H Appliance
Charging light
J Adapter
K Cleaning brush
Exfoliating body puff
M Stand
Important
Read this user manual carefully before you use the appliance and save it for future reference.
ENGLISH 7
- Check if the voltage indicated on the adapter corresponds to the local mains voltage before you connect the appliance.
- Only use the appliance in combination with the adapter supplied.
- Do not use the appliance if the adapter or the appliance itself is damaged.
If the adapter is damaged, always have it replaced with one of the original type in order to avoid a hazard. - The adapter contains a transformer. Do not cut off the adapter to replace it with another plug, as this causes a hazardous situation.
- Keep the appliance and the adapter dry.
- Keep the appliance out of the reach of children.
- Do not expose the appliance to temperatures lower than 5^ C or higher than 35^ C .
To prevent damage and injuries, keep the running appliance away from your scalp hair, eyebrows, eyelashes, clothes, threads, cords, brushes etc.
This appliance contains two NiMh rechargeable batteries that may harm the environment if not disposed of properly. - Do not use the appliance on irritated skin or skin with varicose veins, rashes, spots, moles (with hairs) or wounds without consulting your doctor first. People with a reduced immune response or people who suffer from diabetes mellitus, Raynaud's disease or immunodeficiency should contact their doctor first.
Electromagnetic fields
This Philips appliance complies with all standards regarding electromagnetic fields (EMF). If handled properly and according to the instructions in this user manual, the appliance is safe to use based on scientific evidence available today.
Charging
You can run the appliance directly from the mains or you can use it without the cord when the batteries have been charged.
Charge the batteries at least 16 hours before you use the appliance for a cordless operating time of up to 20 minutes.
Do not charge the appliance for more than 24 hours.


ENGLISH8
1 Make sure the appliance is switched off while charging.
2 Insert the appliance plug into the bottom of the appliance and put the adapter in the wall socket.
- The charging light goes on and stays on to indicate that the appliance is charging.
The charging light does not go out or change colour when the appliance is fully charged.
3 For more convenient charging, you can put the appliance in the stand ('click') (Fig. 2).
Optimising the lifetime of the batteries
- After you have charged the appliance for the first time, do not recharge it between epilating or shaving sessions. Continue to use it and only recharge it when the battery is (almost) empty.
- Discharge the batteries completely twice a year by letting the motor run until it stops.
- Do not keep the appliance plugged into a wall socket all the time.
- If the appliance has not been used for a long time, it must be recharged for 16 hours.
Preparing for use
Freezing the skin cooler
1 Put the skin cooler WITHOUT the insulating sleeve in the freezer or freezing compartment ( ) at least 4 hours before you start to epilate. When the fluid has turned completely blue, the skin cooler is ready for use.
Make sure the outside of the skin cooler is completely dry before you freeze it.
Tip: You can store the skin cooler in the freezer permanently.


Using the appliance
General information about epilation
Epilation is easier just after a bath or shower. Make sure your skin is completely dry when you start to epilate.
- When you use the appliance for the first time, we advise you to try it out on an area with only light hair growth. This helps you get accustomed to the epilation process.
For optimal epilating results, the hairs should not be longer than 10 millimetres (Fig. 3)
To epilate longer hairs: (Fig. 3)
- shorten the hairs to a maximum length of 10mm with a trimmer. In this case, you can start to epilate right away.
- shave the hairs completely. In this case you can start to epilate after a few days (the hairs must be at least 0.5mm long).
- Your skin may become a little red and irritated the first few times you use the epilator. This phenomenon is absolutely normal and quickly disappears. As you use the appliance more often, your skin gets used to epilation, skin irritation decreases and regrowth becomes thinner and softer. If the irritation has not disappeared within three days, we advise you to consult a doctor.
We advise you to epilate before you go to bed at night, as this allows any skin irritation that may develop to diminish overnight.
Cored use
Do not run the appliance from the mains when the battery is fully charged.
1 To run the appliance from the mains, switch off the appliance and connect it to the mains. Wait a few seconds before you switch on the appliance.
Epilating with the leg skin cooler
Make sure your skin is clean, entirely dry and free from grease. Do not use any cream before you start to epilate.
1 Slide the insulating sleeve onto the skin cooler. (Fig. 4)
ENGLISH10
The insulating sleeve prevents an unpleasant sensation of coldness in your hand while you use the appliance. It also keeps the skin cooler cold as long as possible.
Sometimes the pivoting cooling head freezes onto the skin cooler and does not move when you take the skin cooler from the freezer. The pivoting cooling head starts to pivot again after you have passed it over your leg a few times.
2 Snap the appliance onto the skin cooler (Fig. 5).
3 Insert the appliance plug into the bottom of the appliance and put the adapter in the wall socket.
4 Select the desired speed to switch on the appliance (Fig. 6).
Select speed I for areas with little hair growth and for areas where bones are located directly beneath the skin, such as knees and ankles.
Select speed II for larger areas with stronger hair growth.
5 Stretch your skin with your free hand to make the hairs stand upright.
6 Place the appliance perpendicularly onto the skin with the epilating head pointing forward. Move the appliance against the direction of hair growth at a moderate speed. (Fig. 7)
Make sure both the epilating discs and the skin cooler are in proper contact with the skin.
Press the appliance lightly onto the skin.
If you are not completely satisfied with the epilation result, try moving the epilator more slowly over your skin.
7 Use the tab on the bottom end of the appliance to remove the appliance from the skin cooler (Fig. 8).
Epilating with the skin cooler for underarms and bikini line
The special skin cooler for the underarms and the bikini line reduces the number of active epilating discs. Combined with the large cooling surface, this skin cooler makes epilating sensitive areas less painful. You get the best results when the hairs are not too long (max. 1cm).
1 Slide the insulating sleeve onto the skin cooler. (Fig. 9)
2 Snap the appliance onto the skin cooler (Fig. 10).
3 Switch on the appliance by selecting the desired speed. (Fig. 6) We advise you to use speed I.
4 To epilate the underarm area, place one arm behind your head to stretch the skin. Then place the appliance perpendicularly onto the skin with the hand of the other arm (Fig. 11).
5 To epilate the bikini line, stretch the skin with your free hand and place the appliance perpendicularly onto your skin. Do not exert any pressure (Fig. 12).
6 Move the appliance slowly across the skin against the direction of hair growth.
7 Use the tab on the bottom end of the appliance to remove the appliance from the skin cooler for underarms and bikini line (Fig. 13).
Epilating without skin cooler
If you do not want to use the skin cooler, for instance because you have grown accustomed to the sensation of epilation, you can also use the appliance without the skin cooler.
Make sure that you place the epilator perpendicularly onto your skin and that you move it against the direction of hair growth.
Using the exfoliating body puff
Use the exfoliating body puff in the shower. Regular massages with the puff may help to prevent ingrown hairs. Do not use the puff immediately before or after epilation.
Shaving
You can use the shaving head to shave sensitive body parts, such as your underarms and bikini line. With the shaving head, you obtain a smooth result in a comfortable and gentle way.
1 Make sure the appliance is switched off.
2 Remove the skin cooler (Fig. 8).


ENGLISH12
3 Remove the epilating head (Fig. 14).
Press the release button (1) and move the epilating head in the direction of the arrow (2).
4 Place the shaving head on the appliance and press it onto the appliance until it snaps home ('click') (Fig. 15).
5 Switch on the appliance by selecting speed II.
6 Place the shaving head onto your skin and move the appliance slowly and smoothly against the direction of hair growth. Press the appliance lightly (Fig. 16).
Cleaning and maintenance
Never rinse the adapter or the appliance itself with water.
Do not use any corrosive detergents, scouring pads or cloths, petrol, acetone etc. to clean the appliance.
1 Make sure the appliance is switched off and unplugged.
2 Remove the skin cooler from the appliance and slide the insulating sleeve off the skin cooler.
3 Clean the pivoting cooling head of the leg skin cooler with the brush supplied or with a moist cloth after each use.
Make sure the outside of the skin cooler is completely dry before you freeze it again.
Cleaning the epilating head
Clean the epilating head after every use.
1 Make sure the appliance is switched off and unplugged.
2 Remove the epilating head (Fig. 14).
Press the release button (1) and move the epilating head in the direction of the arrow (2).
3 Remove the massaging element (Fig. 17).
4 Clean all accessible parts, including the bottom of the epilating head and the epilating discs, with the brush (Fig. 18).
5 You can also rinse the epilating head (not the appliance!) under the tap to clean it more thoroughly (Fig. 19).
Never try to detach the epilating discs from the epilating head.
6 Reattach the massaging element to the epilating head. Then place the epilating head on the appliance and press it until it snaps home ('click') (Fig. 20).
The epilating head only fits onto the appliance in one way.
Cleaning the shaving head
Clean the shaving head after every use.
1 Make sure the appliance is switched off and unplugged.
2 Remove the shaving head.
3 Pull the cutter unit out of the shaving head. (Fig. 21)
Brush the hairs off the cutter unit and the shaving head. Make sure that you also brush away any hairs that have collected under the trimmers (Fig. 22).
5 You can also rinse the cutter unit and the rest of the shaving head (not the appliance!) under the tap (Fig. 23).
6 Put the cutter unit back into the shaving head and snap the shaving head back onto the appliance ('click') (Fig. 24).
Do not exert pressure on the shaving foil to avoid damage.
7 Rub a drop of sewing machine oil onto the trimmers and shaving foil of the shaving unit twice a year.
Storage
1 Put the protective cap on the shaving head ('click'). (Fig. 25)
2 Store the appliance and the accessories in the pouch.
3 You can also store the appliance in the stand (Fig. 2).
ENGLISH14
Replacement
If you use the shaving head several times a week, replace the cutter unit (type HP6193) after one or two years of use or if it is damaged.
Environment
- Do not throw away the appliance with the normal household waste at the end of its life, but hand it in at an official collection point for recycling. By doing this, you help to preserve the environment (Fig. 26).
- The built-in rechargeable batteries contain substances that may pollute the environment. Always remove the batteries before you discard and hand in the appliance at an official collection point. Dispose of the batteries at an official collection point for batteries. If you have trouble removing the batteries, you can also take the appliance to a Philips service centre. The staff of this centre will remove the batteries for you and will dispose of them in an environmentally safe way.
1 Remove the adapter from the wall socket and let the appliance run until the batteries are empty.
2 Remove the epilating head (Fig. 14).
3 Hold the appliance in your hand and open it with a screwdriver (Fig. 27).
4 Pull the two housings halves apart with you thumbs until the snap connections break (Fig. 28).
5 Remove all components (motor unit and the printed circuit board unit) from the housing halves.
6 Insert a screwdriver between the plastic battery holder and the batteries (Fig. 29).
7 Remove the batteries from the plastic battery holder and the printed circuit board (Fig. 30).
Do not try to reassemble the appliance in order to run it from the mains. This is dangerous (Fig. 3).


Guarantee & service
If you need information or if you have a problem, please visit the Philips website at www.philips.com or contact the Philips Customer Care Centre in your country (you find its phone number in the worldwide guarantee leaflet). If there is no Customer Care Centre in your country, go to your local Philips dealer or contact the Service Department of Philips Domestic Appliances and Personal Care BV.
Troubleshooting
Problem Possible cause Solution
Reduced You moved the epilating epilator in the performance. wrong direction.
Move the appliance against the direction of hair growth.
You placed the Make sure you place the appliance epilating head on perpendicularly onto the skin. the skin at the wrong angle.
The epilating head did not touch the skin.
Make sure both the epilating head and the skin cooler are in proper contact with your skin during epilation.
You moistened your skin with water or a cream or other skincare product prior to epilation.
Make sure your skin is entirely dry and free from grease. Do not put any cream, body milk or other skincare product on your skin before you start to epilate.


ENGLISH16
Problem Possible cause Solution
| The skin cooler for underarms and bikini line was on the appliance when you epilated your legs. | Only use the leg skin cooler to epilate your legs. | |
| Appliance have been moved too fast over the skin | Move the appliance at moderate speed over the skin | |
| The appliance does not work. | The batteries are empty. | Charge the batteries. |
| The socket to which the appliance is connected is not live. | Make sure the socket you use is live. If you use a socket in a bathroom cabinet, you may need to switch on the light to activate the socket. | |
| The appliance is not switched on. | Switch on the appliance. | |
| You did not attach the epilating head correctly. | Place the epilating head on the appliance and press it onto the appliance until it snaps home ('click'). | |
| Skin irritation occurs. | You used the epilator for the first time or after a long period of disuse. | Some skin irritation may occur the first few times you use the appliance. This is absolutely normal and usually disappears quickly. For tips to reduce skin irritation, see the first section of chapter 'Using the appliance'. Also make sure you keep the epilating head clean. |
Problem Possible cause Solution
| You have applied too much pressure to the appliance | Do not use any pressure when moving the appliance over skin | |
| The skin cooler is not cold enough. | You did not freeze the skin cooler long enough. | Put the skin cooler without the insulating sleeve in the freezer or freezing compartment (***) for at least 4 hours. When the colour of the fluid has changed from white to completely blue, the skin cooler is ready for use. |
| You did not put the skin cooler in the freezer or freezing compartment. | Put the skin cooler without the insulating sleeve in the freezer or freezing compartment (***) for at least 4 hours. Do not store the skin cooler in the refrigerator. | |
| The skin cooler did not touch the skin. | Make sure the skin cooler is always in proper contact with your skin during epilation. | |
| The pivoting cooling head of the leg skin cooler does not move. | The pivoting cooling head is frozen. | Pass the skin cooler over your leg a few times to make it pivot again. Always make sure the outside of the skin cooler is completely dry before you freeze it. |
| It is not possible to remove the epilating head. | You did not move the epilating head in the right direction. | Press the release button and move the epilating head in the direction of the arrow (fig. 14) to remove it. |
ENGLISH18
Problem Possible cause Solution
| It is not possible to remove the shaving head. | You did move the shaving head in the right direction. | Press the release button and move the shaving head in the direction of the arrow (fig. 14) to remove it. |
| Reduced shaving performance. | The shaving head is dirty. | Switch off the appliance, unplug it and remove the shaving head. Then clean the cutter unit and the shaving head with the cleaning brush supplied. Remove any hairs that are stuck under the trimmers. |
| The cutter unit is damaged or worn. | Replace the cutter unit. | |
| Stronger skin irritation than usual after | The cutter unit is damaged or worn. | Replace the cutter unit. |

Introduction
A
B
C
D
E
F
G
H
0
J
K
L
M
y
y
nauuunnnnnnnnnnnnnnnnnnnnnnnnnnnnnnnnnnnnnnnnnnnnnnnnnnnnnnnnnnnnnnnnnnnnnnnnnnnnnnnnnnnnnnnnnnnnnnn
y
yuaoluiuaiyueyueyueyueyueyueyueyueyueyueyueyueyueyueyueyueyueyueyueyueyueyueyueyueyueyueyueyueyueyueyueyueyueyueyueyueyueyueyue
nnaaannnnnnaanennnnnne nnnnnnnnnnnnnnnnnnnnnnnnnnnnnnnnnnnnnnnnnnnnnnnnnnnnnnnnnnnnnnnnnnnnnnnnnnnnnnnnnnnnnnnnnnnnnnn


n 47
nnaaannnnnnaanennnnnnnnnnnnnnnnnnnnnnnnnnnnnnnnnnnnnnnnnnnnnnnnnnnnnnnnnnnnnnnnnnnnnnnnnnnnnnnnnnnnnnnnnnnnnnnnnnnnnn
1
aannnnnnaananaananaananaananaananaananaananaananaananaananaananaananaananaananaananaananaananaananaananaananaananaananaananaananaananaananaananaananaananaananaananaananaananaananaananaananaananaananaananaananaananaananaananaananaananaananaananaananaananaananaanara
1
2
3 1
4 122
5 5
6 1
ywnnnaaunnnnnae nnnnnnne nn ne nnnnnnne nnnnnnne nnnnnnne
7 2


n52
nna
1 1
2
3 3
y
nnnnnnnnnnnnnnnnnnnnnnnnnnnnnnnnnnnnnnnnnnnnnnnnnnnnnnnnnnnnnnnnnnnnnnnnnnnnnnnnnnnnnnnnnnnnnnnnnnnnnnnnnnnnnnnnnnnnnnnnnnnnnnnnnnnnnnnnnnnnn
#
1 2
1
m = 311
s
(19 J5)
aall jall jll no gall aljll dil jalglai
j4 j 1
()()()
bii 1y jj j j j j j j j j
a
Jaaai J 8 ay yal w jbiy p
中
y
s
Y
()
Jlll 3y 2dawg j aillj
y
(1)
e laa Ls. j4j 15i i 10000000000000000000000000000000
aSaa jia Jgab aJy
d
dLw LgRyRgRgRgRgRgRgRgRgRgRgRgRgRgRgRgRgRgRgRgRgRgRgRgRgRgRgRgRgRgRgRgRgRgRgRgRgRgRgRgRgRg
1
()
1
()
a
a1 ≤ a2 ≤ a_3
1
1
)V jki) abwgi aegj yaiil gai oal lse jll
y
di jie ojai lii jil jil jie
g j 1
山
LjIb11 jae Jb!
y 1
()
-
L
aJgblal 1jgljy
aclw(1)jzssd jy.
1
a
1
jal j 1
1
daiy jaii jai iiaie ie aee eae
aaii! aieae galee
()j(1)
():
0
A
i1111111111111111111111
(j)
aJl jal daii 100
daii i 100
i j 1
yall 3jaiwuydai lii pi 2u jnne g qnn n nn
i 1
j 1
j4all j42ll jie g
JlJI Jglie jIjIy
aegn 10 no gai aegn 0 no jai jai jai y
m = 311
ICE PREMIUM JIJIJIJIJIJI
cuiy 10000000000000000000000000000000000000000000
j1jlll l. 2000
Lai jia jia jia jia jia jia jia jia jia jia jia jia jia jia jia jia jia jia jia jia jia jia jia jia jia jia jia jia jia jia jia jia jia jia jia jia jia jia jia jia jia jia jia jia jia jia jia jia jia jia j
()
CICE PREMIUM
5 = 120^
L 100 L 00000000000000000000000000000000000000

Guljgalis olSus as jy jiaaba
(A J) 12
(14)
S()c0xgjyjgssgssgss
a 10 J
1
g 1 1 1 1 1 1 1 1 1 1 1 1 1 1
gjus j
a
J 1
Lai jia jia jia jia yu yu yu yu yu yu yu yu yu yu yu yu yu yu yu yu yu yu yu yu yu yu yu yu yu yu yu yu yu
()
CICE PREMIUM J