
DOP30T840GS - Cooker Dacor - Free user manual and instructions
Find the device manual for free DOP30T840GS Dacor in PDF.
| Product Type | Gas range with electric oven |
| Brand | Dacor |
| Model | DOP30T840GS |
| Category | Professional gas range |
| Power Supply | Natural gas or LP gas; 120 V AC, 60 Hz, 20 A (dedicated circuit breaker) |
| Surface Burners | 4 burners: dual 20K BTU (right front), stacked 16K BTU (left front and right rear), stacked 9.5K BTU (left rear) |
| Oven - Cooking Modes | Bake, Convection Bake (Pure), Convection Roast (Pure), Broil, Air Fry, Stone Bake, Keep Warm, Special Functions (Proof, Air Sous Vide, Dehydrate) |
| Oven - Temperature Range | Bake/Convection: Lo to 550 °F; Air Fry: 350-500 °F; Stone Bake: 350-500 °F; Keep Warm: 175 °F |
| Temperature Probe | Yes, with range 100-200 °F, usable with Bake, Convection Bake, Convection Roast |
| Self-Cleaning | Yes, high-temperature cycle |
| Sabbath Function | Yes, disables audible tones and controls, maintains heat |
| Smart Connect | Yes, via oven interface |
| Child Safety | Lock controls and door |
| Included Accessories | Grills (2), flat grills (2), sliding grill (1), Air Fry tray, wok ring, temperature probe, convection filters, anti-tip bracket, front leg covers |
| Maintenance | Manual cleaning of burners and grills; self-cleaning cycle for oven; stainless steel surfaces with non-abrasive cleaner |
| Safety | Anti-tip device, automatic door lock during self-cleaning, automatic shut-off if door is left open for extended period |
| Warranty | 2 years full (USA, Canada); parts only after 5 years or non-residential use |
| Country of Manufacture | Not specified |
Frequently Asked Questions - DOP30T840GS Dacor
User questions about DOP30T840GS Dacor
0 question about this device. Answer the ones you know or ask your own.
Ask a new question about this device
Download the instructions for your Cooker in PDF format for free! Find your manual DOP30T840GS - Dacor and take your electronic device back in hand. On this page are published all the documents necessary for the use of your device. DOP30T840GS by Dacor.
USER MANUAL DOP30T840GS Dacor
Never Operate the Top Surface Cooking Section of this Appliance Unattended
- Failure to follow this warning statement could result in fire, explosion, or burn hazard that could cause property damage, personal injury, or death.
- If a fire should occur, keep away from the appliance and immediately call your fire department.
DO NOT ATTEMPT TO EXTINGUISH AN OIL / GREASE FIRE WITH WATER.
WARNING: If the information in this manual is not followed exactly, a fire or explosion may result causing property damage, personal injury or death.
-
DO NOT store or use gasoline or other flammable vapors and liquids in the vicinity of this or any other appliance.
WHAT TO DO IF YOU SMELL GAS -
DO NOT try to light any appliance.
- DO NOT touch any electrical switch.
- DO NOT use any phone in your building.
- Immediately call your gas supplier from a neighbor's phone.
Follow the gas supplier's instructions.
- If you cannot reach your gas supplier, call the fire department.
- Installation and service must be performed by a qualified installer, service agency or the gas supplier.
English2
ANTI-TIP DEVICE
WARNING
To reduce the risk of tipping the range, the range must be secured by a properly installed Anti-Tip device. AFTER THE RANGE HAS BEEN INSTALLED, CONFIRM THAT THE ANTI-TIP DEVICE HAS BEEN PROPERLY INSTALLED AND VERIFY THAT THE ANTI-TIP DEVICE IS PROPERLY ENGAGED. Refer to the installation manual for instructions.
a) If the anti-tip device is not installed, a child or adult can tip the range and be killed.
b) Verify the anti-tip device has been properly installed and engaged at the rear right (or rear left) of the range bottom.
c) If you move the range and then move it back into place, ensure the antitip device is re-engaged at the right or left rear of the range bottom.
d) Do not operate the range without the anti-tip device in place and engaged. Failure to do so can result in death or serious burns to children or adults.

WARNING
Do not step, lean, or sit on the oven door of the range. You can cause the range to tip, resulting in burns or serious injuries.
Confirm that the Anti-Tip device is installed properly. Then, to verify that the Anti-Tip device is engaged, grasp the top rear edge of the range and carefully attempt to tilt it forward. The Anti-Tip device should prevent the range from tilting forward more than a few inches.
If you pull the range out from the wall for any reason, make sure the anti-tip device is properly engaged when you push the range back against the wall. If it is not, there is a risk of the range tipping over and causing injury if you or a child stand, sit or lean on an open door.
Never completely remove the leveling legs. If you remove the leveling legs, the range will not be secured to the anti-tip device properly.
English 3
1. Radio Apparatus Notice
CAUTION
Any changes or modifications not expressly approved by the party responsible for compliance could void the user's authority to operate the equipment.
The remote enable equipment installed on this product complies with Part 15 of FCC Rules and Innovation, Science and Economic Development Canada's license-exempt RSS(s). Operation is Subject to following two conditions:
1) This equipment may not cause harmful interference, and
2) This equipment must accept any interference received including interference that cause undesired operation.
For products available in the US/Canadian markets, only channels 1 11 are available. You cannot select any other channels.
1. Radio Apparatus STATEMENT:
This equipment has been tested and found to comply within the limits for a Class B digital device, pursuant to part 15 of the FCC Rules and Canadian ICES-003. These limits are designed to provide reasonable protection against harmful interference in a residential installation.
This equipment generates, uses, and can radiate radio frequency energy and, if not installed and used in accordance with the instructions, may cause harmful interference to radio communications. However, there is no guarantee that interference will not occur in a particular installation. If this equipment does cause harmful interference to radio or television reception, which can be determined by turning the equipment off and on, the user is encouraged to try to correct the interference by one or more of the following measures:
English4
- Reorienting or relocating the receiving antenna
- Increasing the separation between the equipment and receiver
- Connecting the equipment to an outlet that is on a different circuit than the radio or TV
- Consulting the dealer or an experienced radio/TV technician for help.
RADIATION EXPOSURE STATEMENT:
This equipment complies with FCC and IC RSS-102 radiation exposure limits set forth for an uncontrolled environment. This equipment should be installed and operated so there is at least 8 inches (20 cm) between the radiator and your body. This device and its antenna(s) must not be co-located or operated in conjunction with any other antenna or transmitter.
dacor
To Our Valued Customer:
Congratulations on your purchase of the very latest in Dacor® products! Our unique combination of features, style and performance make us a great addition to your home.
In order to familiarize yourself with the controls, functions and full potential of your new Dacor Appliance, read this use and care manual thoroughly, beginning with the Before you begin section.
All Dacor appliances are designed and manufactured with quality and pride, while working within the framework of our company value. Should you ever experience a problem with your product, please first check the Troubleshooting section of this manual for guidance. It provides useful suggestions and remedies prior to calling for service.
Valuable customer input helps us to continuously improve our products and services, so please feel free to contact our Customer Service Team for assistance with any of your product support needs.
Dacor Customer Assurance
USA
Samsung Electronics America, Inc.
85 Challenger Road
Ridgefield Park, NJ 07660
Canada
Samsung Electronics Canada Inc.
2050 Derry Road West, Mississauga, Ontario L5N 0B9 Canada
Telephone: 833-353-5483(USA), 844-509-4659(Canada)
Hours of Operation: Mon - Fri, 8:00 a.m. to 8:00 p.m. Pacific Time
Website: www.dacor.com
Thank you for choosing Dacor for your home. We are a company built by families for families, and we are dedicated to serving yours. We are confident that your new Dacor product will deliver a high level of performance and enjoyment for many years to come.
Sincerely,
The Dacor Customer Assurance Team
English6
Contents
Before you begin 9
Important 9
About this manual 9
Important note to the installer 9
Important note to the consumer 10
Important note to the servicer 10
Energy saving tips 10
Oven vent/cooling vent 10
Important safety instructions 11
Read all instructions before using this appliance 11
Symbols used in this manual 11
California Proposition 65 Warning 12
Commonwealth of Massachusetts 12
General safety 12
Fire safety 13
Gas safety 14
Electrical and grounding safety 15
Location safety 16
Cooktop safety 17
Oven safety 19
Self-cleaning oven safety 20
Overview 21
Layout 21
Control panels and displays 21
Oven control panel 22
What's included 23
Using the cooktop 24
Burners 24
Ignition 25
Cookware 27
Grates 29
Griddle (Additional purchase Accessories) 30
Wok Ring 31
Using the oven 32
Basic settings - Clock, Time format 32
Kitchen timer 33
Timed cooking 34
English 7
Contents
Oven functions 35
Basic function instructions 38
Using the oven racks 40
Using the gliding rack 43
Air Fry mode 46
Stone bake mode 51
Using the special function feature 52
Using the Smart Control feature 66
To start the oven remotely 67
Child Lock 68
Settings 69
Using the hood control feature 72
Care and maintenance - Cooktop 74
Cleaning the cooktop surface 74
Stainless steel surfaces 75
Control knobs 76
Burner grates and components 77
78
78
79
Burner head and cap replacement 80
Care and maintenance - Oven 82
Care and cleaning of the oven 82
Ladder racks 87
Replacing the Ladder racks 88
Removing the oven doors 90
Reinstalling the oven doors 92
Oven light 94
Troubleshooting 95
Information codes 102
Warranty and Service 104
Warranty 104
Open-Source Announcement 107
English8
Important
- The overall design and/or accessories may differ with the model.
Installer
- To promote safety and minimize problems, read this manual thoroughly before starting the installation. Leave this manual with the user.
- Write the appliance's model/serial numbers in this manual for service/ maintenance reference.
User
- Keep this manual for personal reference and for that of inspectors, service personnel, etc.
Clean the oven thoroughly before using it for the first time. Then, remove the accessories, set the oven to Bake, and then run the oven at 425^ for 1 hour. There will be a distinctive odor. This is normal.
Ensure your kitchen is well ventilated during this conditioning period.
About this manual
READ THESE INSTRUCTIONS COMPLETELY AND CAREFULLY.
Important note to the installer
- Read all instructions contained in these installation instructions before installing the appliance.
- Remove all packing materials from the appliance compartments before connecting the electric and gas supply to the appliance.
- Observe all governing codes and ordinances.
- Be sure to leave these instructions with the consumer.
- Installation of this appliance requires basic mechanical skills.
- Proper installation is the responsibility of the installer.
- Product failure due to improper installation is not covered under the Warranty.
English 9
Before you begin
Important note to the consumer
Keep these instructions with your user manual for future reference.
- As when using any appliance generating heat, there are certain safety precautions you should follow.
- Be sure your appliance is installed and grounded properly by a qualified installer or service technician.
- Make sure the wall coverings around the range can withstand the heat generated by the appliance.
- Cabinet storage space above the range burners should be a minimum of 30 in (76.2 cm).
Important note to the servicer
The electrical diagram is attached inside the mini manual.
Energy saving tips
- During cooking, the oven door should remain closed except when you turn food over. Do not open the door frequently during cooking to maintain the oven temperature and to save energy.
- If cooking time is more than 30 minutes, you can switch the oven off 5-10 minutes before the end of the cooking time to save energy. The residual heat will complete the cooking process.
- To save energy and reduce the time needed for re-heating the oven, plan oven use to avoid turning the oven off between cooking one item and the next.
- Whenever possible, cook more than one item at a time.
Oven vent/cooling vent
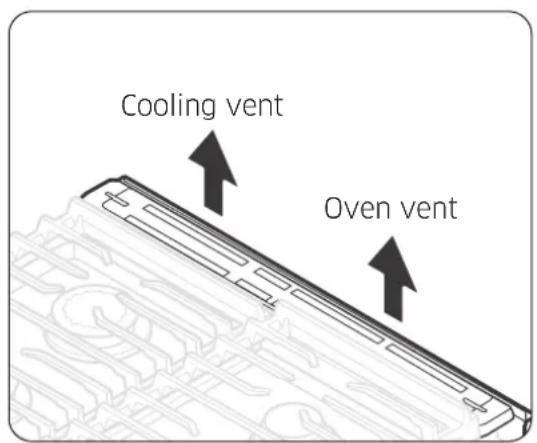
Both the oven vent and the cooling vent are located at the back of the oven range. Proper air circulation prevents combustion problems and ensures good performance.
- Do not block the vent or its surroundings with objects.
- Use caution when placing items near the vent. Hot steam can cause them to overheat or melt.
- Be careful when operating the oven whatever the mode it is. The oven lets very hot air out through the vent.
English10
Important safety instructions
Read all instructions before using this appliance
- All electrical and gas equipment with moving parts can be dangerous. Be sure to read the Important Safety Information in this manual. The instructions must be followed to minimize the risk of property damage, injury, or death.
- Keep this manual in a handy place so you can refer to it as needed.
Symbols used in this manual
WARNING
Hazards or unsafe practices that may result in severe personal injury or death.
CAUTION
Hazards or unsafe practices that may result in electric shock, personal injury, or property damage.
NOTE
Useful tips and instructions
These warning symbols are intended to prevent property damage and personal injury. Follow them explicitly.
Important safety instructions
California Proposition 65 Warning
WARNING
Cancer and Reproductive Harm - www.P65Warnings.ca.gov
Commonwealth of Massachusetts
This product must be installed by a licensed plumber or gas fitter qualified or licensed by the State of Massachusetts. When using ball-type gas shut-off valves, you must use the T-handle type. Multiple flexible gas lines must not be connected in series.
General safety
WARNING
To reduce the risk of fire, electric shock, personal injuries, and/or death, observe the following precautions.
- Do not touch any surface, component, or mechanism of the range during or immediately after cooking.
- Learn where and how to shut off the valve that feeds gas to the range.
- Make sure the anti-tip device is properly installed on the range. See the installation instructions for more information.
- Do not let children near the range. Do not let children go into the range or onto the range. Do not let children play with the range or any part(s) of the range. Do not leave children unattended in the kitchen when the range is in use. For children's safety, we recommend utilizing the control/door lockout feature.
- Remove all packaging before operating the range to keep this material from catching fire. Keep all packaging away from children. Properly dispose of packaging as soon as the range is unpacked.
- Do not keep objects of interest to children on or around the range.
- Do not operate the range if it is damaged in any way, if it malfunctions, or is missing parts.
- Do not use the range as a space heater. Use the range for cooking only.
- Do not use oven cleaners or oven liners in or around any part of the oven.
- Use only dry pot holders.
- Do not use the range to heat sealed food containers.
- Do not strike the oven glass.
English12
- When disposing of the range, cut off the power cord and remove the door to prevent children and animals from getting trapped.
- Unplug the range before service/maintenance.
- Make sure all meat and poultry is cooked thoroughly. Meat should always be cooked to an internal temperature of 160^ ( 71^ ). Poultry should always be cooked to an internal temperature of 180^ ( 82^ ).
- Do not make any attempt to operate the electric ignition range burners during an electrical power failure.
- Keep the appliance area clear of combustible materials, gasoline, and other flammable vapors and liquids.
- Teach children not to touch or play with the controls or any part of the range. We recommend you utilize the control / door lockout feature to reduce the risk of misuse by children.
- An air curtain or other overhead range hood, which operates by blowing a downward airflow onto a range, shall not be used in conjunction with a gas range unless the hood and range have been designed and tested in accordance with the Standard for Domestic Gas Ranges, ANSI Z21.1 - CSA1.1, and listed by an independent testing laboratory for combination use.
Fire safety
WARNING
To reduce the risk of fire, electric shock, personal injury, or death, observe these precautions:
- Do not store/place/use combustible materials (e.g., paper, plastic, pot holders, linens, gasoline, alcohol) near the range.
- Do not wear loose fitting or hanging garments while using the range.
- To avoid grease buildup, regularly clean the vents.
- Do not let pot holders or other flammable materials touch a heating element. Do not use a towel or other bulky cloth in place of a pot holder.
- Do not douse a grease fire with water. Instead, turn off the heat source, and smother the fire with a tight-fitting lid, or use a multi-purpose, dry-chemical or foam extinguisher.
- Do not heat unopened food containers. The buildup of pressure may cause the containers to burst and result in injury.
- Do not use the oven for storage. Paper and other flammable items stored in the oven can ignite.
- Do not put any combustible material or items around the range.
English 13
Important safety instructions
Gas safety
WARNING
To reduce the risk of fire, electric shock, personal injury, or death, observe these precautions:
If you smell gas:
- Close the valve and do not use the range.
- Do not light a match, candle, or cigarette.
- Do not turn on any gas or electric appliances.
- Do not touch any electrical switches or plug in a power cord.
- Do not use any phone in your building.
Evacuate everyone from the building. - Immediately call your gas supplier from a neighbor's phone. Follow the gas supplier's instructions.
- If you cannot reach your gas supplier, call the fire department.
Checking for gas leaks
Leak-testing the appliance must be done according to the manufacturer's instructions. Do not use a flame to check for gas leaks. Use a brush to spread a soap-and-water solution around the area you are checking. If there is a gas leak, small bubbles will appear in the solution. When not sure, call for professional help.
English14
Electrical and grounding safety
WARNING
To reduce the risk of fire, electric shock, personal injury, or death, observe these precautions:
- Plug the range into a grounded 3-prong outlet.
- Do not remove the grounding prong.
- Do not use an adapter or an extension cord.
- Do not use a damaged power plug, power cord, or loose power outlet.
- Do not modify the power plug, cord, or outlet.
- Do not put a fuse in a neutral or ground circuit.
- Use a dedicated 120 Vac, 60-Hz, 20-Amp breaker for this Range. A time-delay fuse or circuit breaker is recommended. Do not plug more than one appliance into this circuit.
- Do not connect the ground wire to plastic plumbing lines, gas lines, or hot water pipes.
- This range must be Earth grounded. If the range malfunctions or breaks down, grounding reduces the risk of electric shock by providing a safe path for the current. This range's power cord has a grounding plug, which must be firmly plugged into an outlet that is properly installed and grounded according to local regulations. If you are not sure your electrical outlet is properly grounded, have it checked by a licensed electrician.
- The range is supplied with a 4-pronged grounded plug. This cord must be plugged into a mating, grounded 4-prong outlet that meets all local codes and ordinances. If codes permit the use of a separate ground wire, we recommend that a qualified electrician determine the proper path for this ground wire.
- Electrical service to the range must conform to local codes. Barring local codes, it should meet the latest ANSI/NFPA No. 70 - Latest Revision (for the U.S.) or the Canadian Electrical Code CSA C22.1 - Latest Revisions.
- The range owner shall ensure that the proper electrical service is provided for the range.
English 15
Important safety instructions
Location safety
WARNING
To reduce the risk of fire, electric shock, personal injuries, and/or death, observe the following precautions.
- This range is for indoor, household use only. Do not install the range outdoors or anywhere that it will be exposed to weather/water or wind/strong drafts.
- Select a level, well-constructed floor that can support the range's weight. Synthetic flooring, such as linoleum, must withstand 180^ (82 °C) temperatures without shrinking, warping, or discoloring. Do not install the range directly over interior kitchen carpeting unless a sheet of ¼ inch plywood or a similar insulator is placed between the range and carpeting.
- For the range to ventilate properly, make sure the range's vents are not blocked or covered, and that there is enough clearance at the top, back, sides, and underneath the range. The vents allow the necessary exhaust for the range to operate properly with correct combustion and get the good cooking result. Blocking or covering the vents may cause incorrect combustion which could result in gas leaks and fire.
- Make sure the wall coverings around the range can withstand heat up to 200^ ( 93^ ) generated by the range.
- Cabinet storage above the surface of the range should be avoided. If cabinet storage above the range is necessary, allow a minimum clearance of 30 inches (76.2 cm) between the cooking surface and the bottom of the cabinets or install a range hood that projects horizontally a minimum of 5 inches (12.7 cm) beyond the bottom of the cabinets.
- Locate the range out of kitchen traffic paths and drafty locations to prevent poor air circulation.
- If the range is located near a window, NEVER hang long curtains or paper blinds on that window. They could blow over the surface burners and ignite, causing a fire hazard.
English16
Cooktop safety
WARNING
To reduce the risk of fire, electric shock, personal injury, or death, observe these precautions:
- Make sure all burners are off when not in use.
- Do not use aluminium foil to line the grates or any part of the cooktop. This can cause carbon monoxide poisoning. Aluminum foil linings may also trap heat, causing a fire hazard. Do not leave burners unattended on medium or high heat settings.
- Before igniting, make sure all burner caps are properly in place and all burners are level.
- Always use the Lite position when igniting the burners and make sure the burners have ignited. If ignition fails, turn the knob to Off and wait for the gas to dissipate before re-igniting the burner.
- When you set a burner to simmer, do not turn the knob quickly. Make sure the flame stays on.
- To heat food, you must have a ventilation hood. When you heat food, the hood must be on.
- Before removing or changing cookware, turn off the burners.
- Remove food and cookware immediately after cooking.
- Before removing any parts of the burner for cleaning, make sure the range is off and completely cool.
After cleaning the burner ring, make sure it is completely dry before re-assembling. - Make sure the spark mark on the dual burner ring is placed beside the electrode when it is assembled.
- To avoid carbon monoxide poisoning, do not pour water into the cooktop well while cleaning.
- Select cookware that is designed for cooktop cooking. Use recommended cookware no larger than the cooktop grates.
- To avoid cookware discoloration, deformity, and/or carbon monoxide poisoning, do not use cookware that is substantially larger than the grate.
- Make sure cookware handles are turned to the side or rear of the cooktop, but not over other surface burners or the front edge of the cooktop.
- Do not stand directly over a pot while frying food.
- Always heat frying oils slowly, and watch as they heat. If you are frying foods at high heat, carefully monitor the cooking process. If you are going to combine fats or oils when frying, mix them before heating.
- Use a deep-fry thermometer when possible so you do not heat the oil beyond its smoke point.
English
Important safety instructions
- Use a minimum amount of oil when shallow pan-frying or deep-frying. Do not fry frozen, icy, cold, or wet food.
- Before moving cookware full of fats or oils, make sure it has completely cooled.
-
To prevent delayed eruptive boiling, always allow heated liquids to stand at least 20 seconds after you have turned off the burner so that the temperature in the liquid can stabilize. In the event of scalding, follow these first-aid instructions:
-
Immerse the scalded area in cool water for at least 10 minutes.
-
Do not apply any creams, oils, or lotions.
Cover with a clean, dry cloth. -
Place pots in the center of the grate. Do not place a pot larger than 9" in diameter on the rear burners. If you place an oversized pot in the wrong position, it might disrupt necessary air circulation and make the flame on the burner sputter and burn inefficiently.
- Do not wear loose or hanging garments when using the range. They could ignite and burn you if they touch a surface burner.
- Never leave plastic items on the cooktop. Hot air from the vent can melt or ignite plastic items or cause build up of dangerous pressure in closed plastic containers. The melted plastic may clog the vents at the rear of the range. Clogged vents may cause incorrect combustion which could result in gas leaks and fire. You may get severe burns if you touch the surfaces near the vent while the oven is operating.
- Do not place portable appliances, or any other object other than cookware on the cooktop. Damage or fire could occur if the cooktop is hot.
- Always make sure the controls are Off and the grates are cool before you remove them to prevent any possibility of being burned.
- Do not put any combustible material or items around the range.
- Do not touch the burners when they are on. Turn off the burners when you change a pan or pot.
English18
Oven safety
WARNING
To reduce the risk of fire, electric shock, personal injuries, and/or death, observe the following precautions.
- Do not use the oven for non-cooking purposes such as drying clothes or storage. Use the oven for cooking only.
- Make sure the oven racks are placed on the same level on each side.
- Do not damage, remove, or clean the door gasket.
- Do not spray water on the oven glass while the oven is on or just after you have turned it off.
- Stand aside when opening the oven door.
- Keep the oven free from grease buildup.
- When repositioning the oven racks, make sure the oven is completely cool.
- Do not put plastic items inside the oven.
- To avoid damaging the burner control knobs or oven control, always bake and/or broil with the oven door closed.
- Do not place meat too close to the broil element. Trim excess fat before broiling.
- When using cooking or roasting bags in the oven, follow the manufacturer's directions.
- NEVER cover any slots, holes, or passages in the oven bottom or cover an entire rack with material such as aluminum foil. Doing so blocks air flow through the oven and may cause carbon monoxide poisoning. Aluminum foil linings may also trap heat, causing a fire hazard.
Important safety instructions
Self-cleaning oven safety
WARNING
To reduce the risk of fire, electric shock, personal injuries, and/or death, observe the following precautions.
- The self-cleaning feature operates the oven at temperatures high enough to burn away food soils in the oven. The range is extremely hot during a self-cleaning cycle. Do not touch any surfaces of the range during a self-cleaning cycle.
- Keep children away from the oven during a self-cleaning cycle.
- Before starting a self-cleaning cycle, remove all loose items from the oven, and wipe down all oven surfaces.
After a self-cleaning cycle, stand aside when opening the oven door. - If the self-cleaning cycle malfunctions, turn off the oven, turn off the power breaker, and contact a qualified service technician.
- Some birds are extremely sensitive to the fumes given off during the self-cleaning cycle of any oven. Move birds to another well-ventilated room.
English20
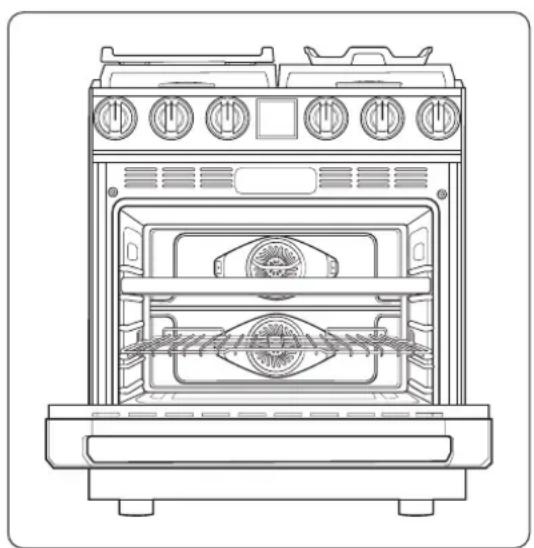
Layout
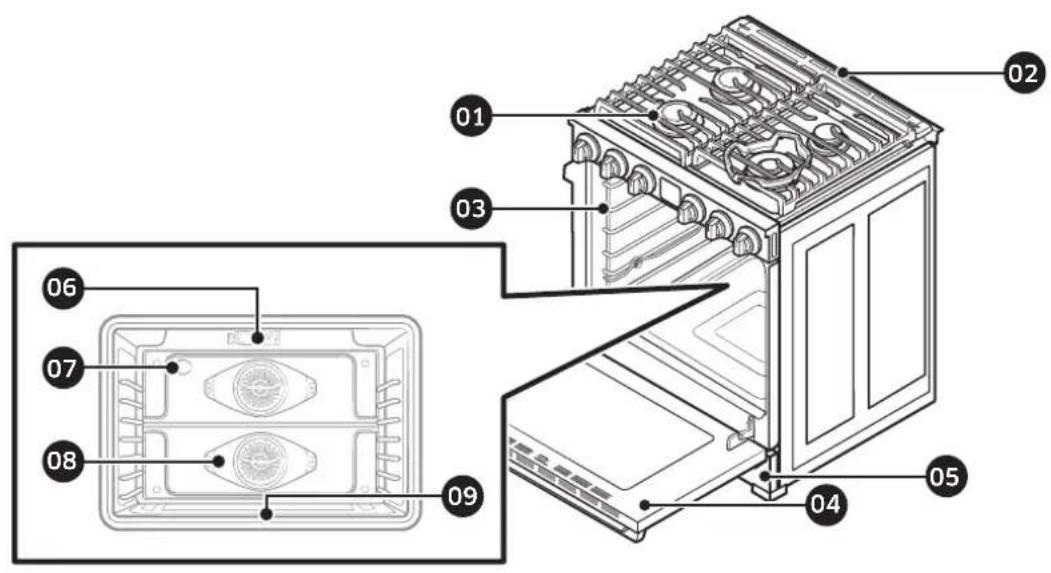
| 01 Surface burners | 02 Oven vent cover |
| 03 Ladder racks | 04 Removable oven door |
| 05 Storage Printer | 06 Broil oven burner |
| 07 Oven light (1 location) | 08 Convection fan |
| 09 Bake oven burner |
Control panels and displays
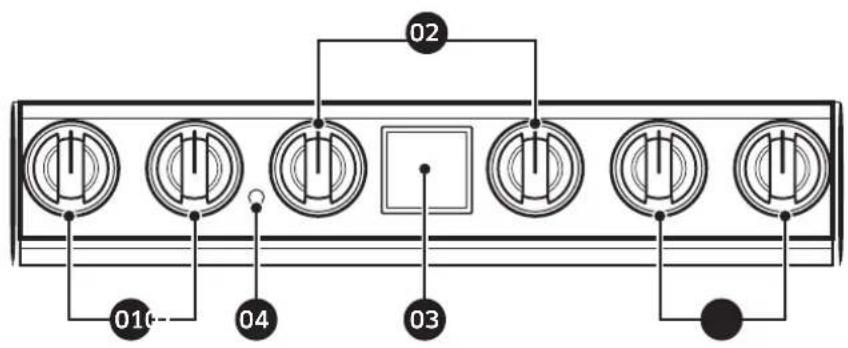
| 01 Surface burner knobs (4 pcs) | 02 Oven burner knobs (mode, temperature) (2 pcs) |
| 03 Oven control panel 04 Oven light button | |
English 21
Overview
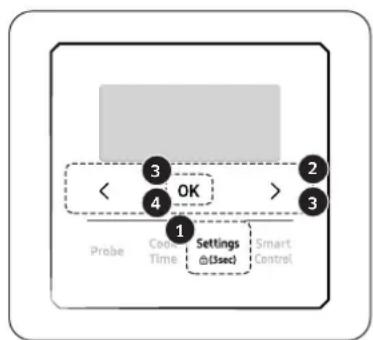
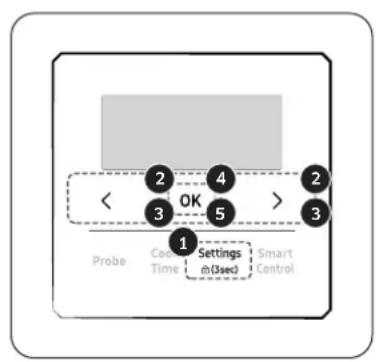
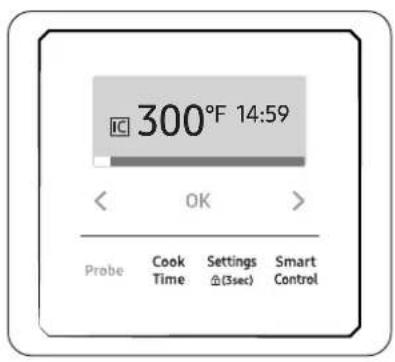
Oven control panel
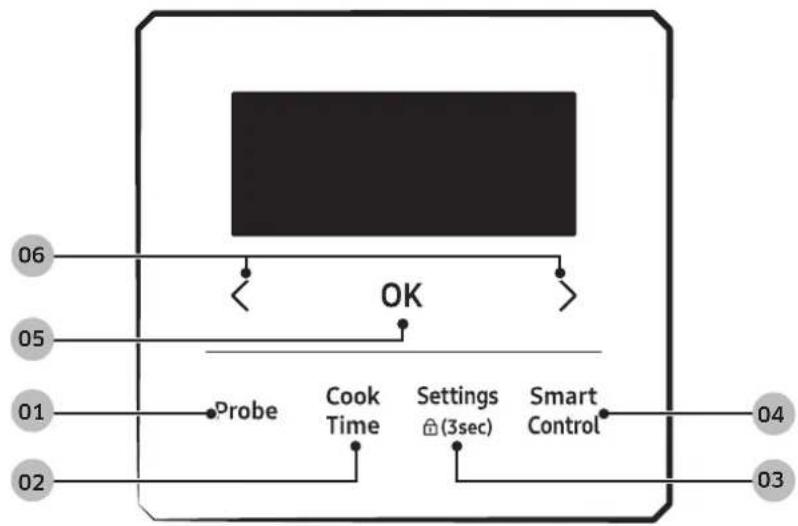
01 Probe : Activate the temperature probe mode.
02 Cook Time: Set the cooking time.
03 Settings : Display the user options available.
04 Smart control : Set Smart control function ON / OFF.
05 OK: Start a function or set the time.
06 <,> : Select a function or set time.
English22
What's included
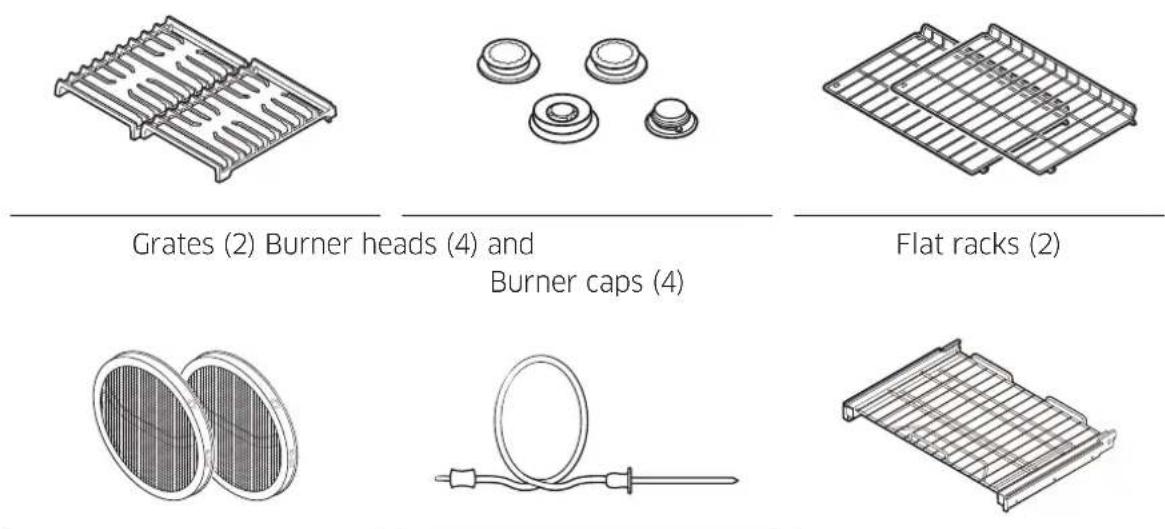
Convection filters (2) Temperature probe (1) Gliding rack (1)

Wok ring (1) Anti-tip bracket (1) Air Fry tray (1)
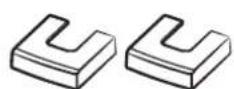
Front leg covers (2)
The range (some models) is supplied with two different types of burner caps (brass and porcelain) to suit the customer's preference. The brass discolors with use; the discoloration does not affect function.

NOTE
- You need to insert convection filters before using oven.
- Warranty does not cover discoloration of brass burner caps.
English 23
Using the cooktop
Burners
There are three different types of burners on your range. See the diagram below for heat output and location. Each burner generates a spark when the knob is rotated to the Lite spark position. (Do not use the cooktop if the spark is not activated). When the burner ignites, the spark stops automatically. The gaskets under the burners prevent spilled liquids from leaking into the range's internal parts.
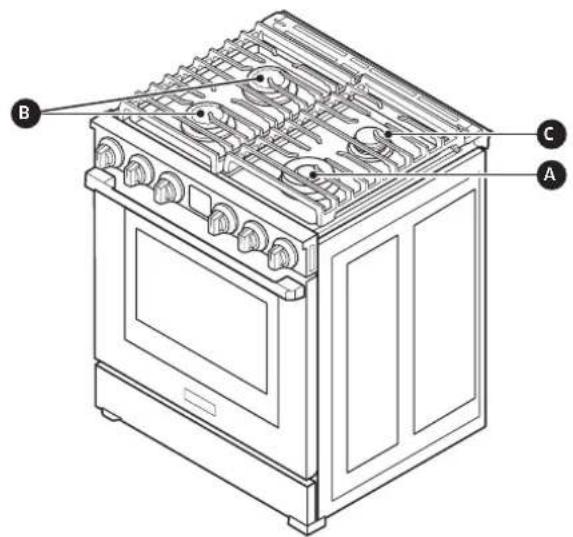
| A 20K BTU Dual burner |
| B 16K BTU Stack burner |
| C 9.5K BTU Stack burner |
Each burner is designed for a specific purpose, as detailed in this table:
| Burner Position Purp | |||
| Dual burner 20K BTU Right Front (RF) | Power heating / Low simmering | Boiling food Tomato sauce | |
| Stack burner 16K BTU | Left Front (LF) | Quick heating | General food, casseroles |
| Left Rear (LR) | |||
| Stack burner 9.5K BTU Right Rear (RR) Low simmering | Delicate food that requires low heat for a long time | ||
English24
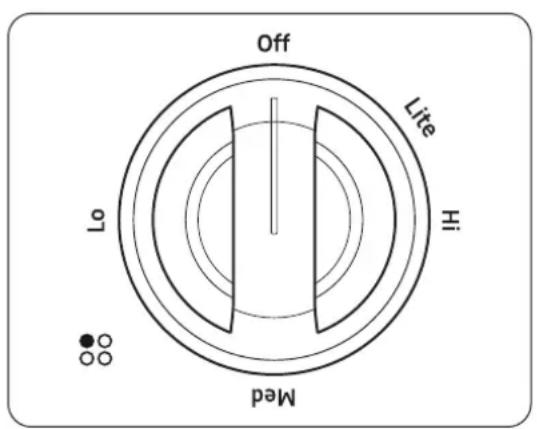
Ignition
NOTE
Each control knob has a corresponding burner. The location of corresponding burner is marked next to the knob.
To light a burner :
- Push in the knob and turn it counterclockwise to the Lite position. The igniter for the burner will spark repeatedly until it lights. The spark makes a "clicking" sound. The burner should light within four seconds. The flame should burn evenly around the burner, except underneath each grate support finger, where the flame height is reduced by Dacor's Smart Flame feature. A normal flame is steady and blue. Foreign material in the gas line, especially in new construction, may cause a temporary orange flame during initial operation. Small yellow tips on the flames are normal when using LP gas. If a burner does not ignite, the igniter continues to spark or if the flame is not spread evenly around the burner cap, see the Troubleshooting section on page 95.
- Place the cooking utensil on the grate.
- Adjust the flame to the cooking task.
NOTE
Turn off the burner if there is no spark, and verify that power is supplied to the range. Never manually light a burner during a power failure.
Using the cooktop
Tips
- Food cooks just as quickly at a gentle boil as it does at a vigorous, rolling boil. Boil foods gently to conserve energy, flavor, and nutrients.
- Use a low or medium flame when cooking with utensils that are poor heat conductors (glass, ceramics, cast iron). Adjust the flame to cover 1/3 of the cookware diameter to ensure even heating and reduce risk of burning/scorching the food.
Flame level
The flames on the burners should always stay under the cookware.
Before using burner knobs...
To prevent change in flame size, each burner knob only can be operated by push-turn method.
Also, the user will encounter stop points when turning the knob. At each stop point, push-turn the knob to continue. The knob can be turned only if the user intends to change flame size.
English26
Cookware
WARNING
Cookware with rough bottoms can permanently damage the grate surfaces.
- To avoid burns, always turn pan handles to a position where they cannot be easily hit. Handles should not extend over adjacent burners or the front edge of the cooktop. Always set cookware gently onto the grates and center them so that they are well-balanced.
- Do not drag cookware across the grates. Sliding may damage the finish. Lift cookware to reposition them.
- To avoid burns and fire hazards, ensure the burner flame stays under the cookware.
- When using glass cookware, make sure it is designed for cooktop cooking.
Make sure you hold the handle of a wok or a small one-handled pot while cooking.
For overall safety and best performance, select the correct cookware for the food being cooked. Improperly selected cookware will not cook evenly or efficiently.
Use cookware that:
- Has flat, smooth bottoms
- Has tight fitting lids to keep heat, odors and steam in
Well-balanced with the handle weighing less than the main portion of the pot or pan.

Recommended Not recommended Recommended Not recommended
English 27
Using the cooktop
Material characteristics
- Aluminum: An excellent heat conductor. Some types of food may cause the aluminum to darken. However, anodized aluminum cookware resists staining and pitting.
Copper: An excellent heat conductor but discolors easily. - Stainless steel: A slow heat conductor with uneven cooking performance but is durable, easy to clean, and resists staining.
Cast-Iron: A poor conductor but retains heat very well. - Enamelware: Heating characteristics depend on the base material.
Glass: A slow heat conductor. Use only glass cookware that is specified for cooktop cooking or oven use.
Size limitations

WARNING
Do not place a small pan or pot with a bottom diameter of about 6 inches or less on the large burner, this size pan may tip over and cause injury. Use the rear burners for this small sized cookware.
English28
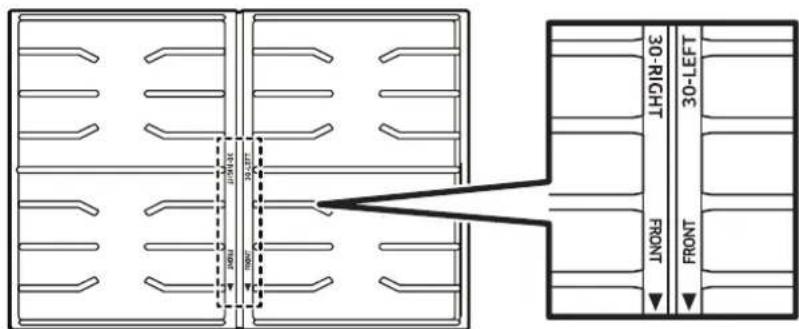
Grates
Gently set the grates on the top of the spill tray. Put the legs of each grate into the corresponding dimples.

NOTE
The grates are heavy. Be careful handling the grates.
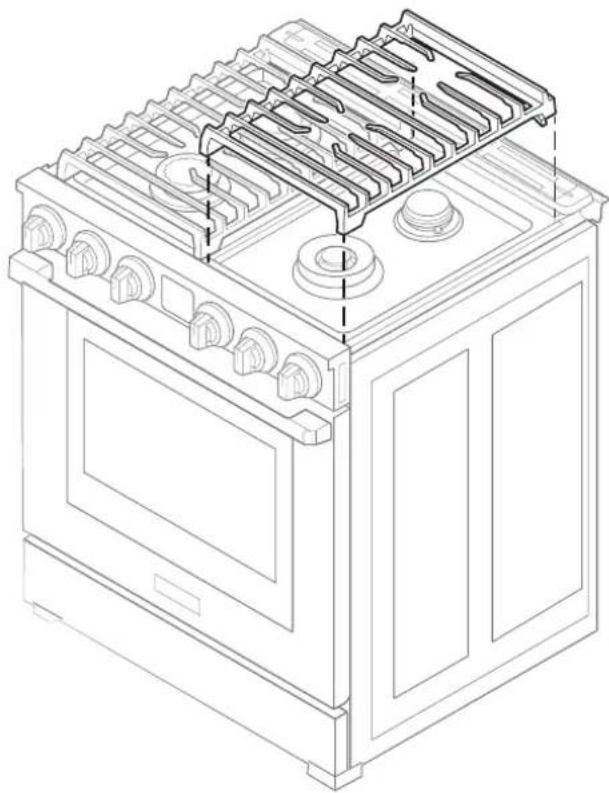

NOTE
Before installing grates, check the words under the grates. The words inform you where the front side is and the proper position of grate, right, center or left.
English 29
Using the cooktop
Griddle (Additional purchase Accessories)
- Before using the griddle for the first time, wash it in hot, soapy water, then rinse, and let it dry fully.
- For best results, preheat the griddle for 5 minutes.
- Orient the griddle's grease trap at the rear of the cooktop.
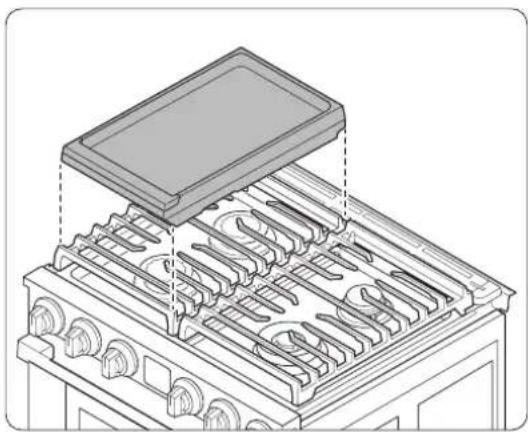
-
With all burners off and the range cool to the touch, place the griddle and grate in the left of cooktop.
-
The specified burners are the same size, which ensures even cooking front and rear.
-
Fit the tabs on the bottom of the feet into the inside corners of the grate. Slight rocking is normal.
-
push-turn the Left burners knob to the Ignite (flame) setting. The burner ignites.
CAUTION
Avoid using metal utensils on the surface because they can scratch the non-stick coating.
NOTE
Clean the griddle after each use.
The information for preheating is as below table.
| Type of Food Preheating time Preheat setting Cook setting | |
| Pancakes 3-5 min. Med-Lo Med-Lo | |
| Hamburgers 3-5 min. Med-Hi Med-Hi | |
| Fried Eggs 3-5 min. Med-Lo Med-Lo | |
| Bacon 3-5 min. Med Med | |
| Breakfast Sausages 3-5 min. Med Med |
English30
Wok Ring
Woks are often used for stir frying, pan frying, deep frying, and poaching. The provided wok Ring supports 12" to 14" woks.
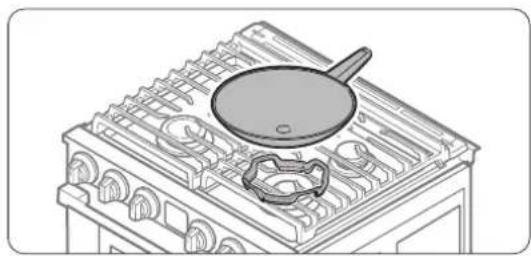
- Turn off all burners, and wait until the grates completely cool down.
- Place the wok Ring on the grate over the 20K BTU Dual burner.
- Put a wok on the wok Ring. Make sure the wok settles on the wok Ring.
- Turn on the burner, and adjust the flame level as appropriate.
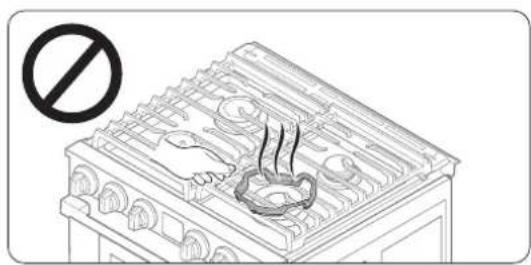
CAUTION
- Do not remove the wok Ring until the cooktop grates, surfaces, and wok Ring completely cool down.
- Do not use cookware with a flat bottom or with a diameter less than the wok ring diameter. The cookware may tip over.
- Do not use an oversized wok. The burner flames may spread out, causing damage nearby.
- Do not use the wok grate and the griddle at the same time.
Using the oven
Basic settings - Clock, Time format
Sleep
After 1 minutes of inactivity (or 1 minute when the oven is in standby mode), Settings, Smart control Light Off. After 5 minutes Clock light off and the control panel enters Sleep mode. In Sleep mode, the control panel stays inactive until it is reactivated by the user.
wake up
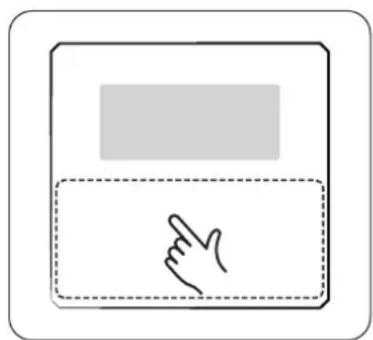
To activate the control panel, touch the lower area of the screen to wake it up. Touch the lower area once again, user preferences are available the settings and smart control.
Clock theme
- Press the Settings button.
- Press <,> to select Set Time.
- Tap OK. Press <,> to set the current time and tap OK. Display the AM/PM option, and then choose by pressing <,> .
- Tap OK to confirm the settings.
Time format

- Press the Settings button.
- Press <, > to select Time Format.
- Tap OK and then press <,> to select 24 hr / 12 hr format.
- Tap OK.
English32
Kitchen timer
The kitchen timer serves as an extra timer that will beep when the set time has elapsed. It does not start or stop cooking functions. You can use the kitchen timer with any of the other oven functions.
How to set the timer
- Press the Settings button.
- Press <, > to select timer and the Tap OK.
- Press <, > key to adjust 'hr' Timer. Press OK to move to 'min' setting. (Long press to increase or decrease time rapidly)
- Tap OK.
- When the set time elapses, the oven beeps and displays the 'Time is up' message. Tap the OK button to delete the message.
Using the oven
Timed cooking
In timed cooking mode, the oven turns on immediately and cooks for the length of time you select.
At the end of the cooking time, the oven turns off automatically.
- You can use the timed cooking feature only with another cooking operation. (Bake,
Convection Bake (Pure), Convection Roast (Pure), Air Fry, Proof, Stone Bake Mode, Air Sous Vide, Dehydrate).
NOTE
Available modes for each oven can be found on page 35.
How to set the oven for timed cooking
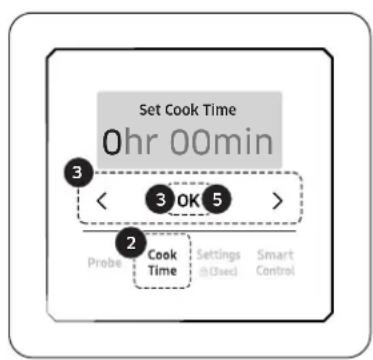
- Select the cooking mode you want.
- Press the Cook Time button.
- Press <, > key to adjust 'hr' cook time. Press OK to move to 'min' setting. (Long press to increase or decrease time rapidly)
- You can set the cooking time for any amount of time from 1 minute to 9 hours and 59 minutes.
(Only Air-Sous Vide mode available 99 hr 59 min)
- Press OK.
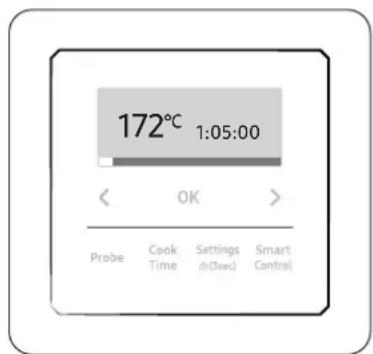
- The cooking time is displayed in the Cook Time area on the screen.
NOTE
You can cancel a cook time at any time by setting the Cook Time to 0 minutes.
CAUTION
Use caution with the timed cooking features. You can use these features to cook cured or frozen meats and most fruits and vegetables.
Food that can easily spoil (milk, eggs, and thawed or fresh fish, meat, or poultry) should be chilled in the refrigerator first.
Even when chilled, they should not stand in the oven for more than 1 hour before cooking begins, and should be removed promptly when cooking is completed.
Eating spoiled food can result in sickness from food poisoning.
English34
Oven functions
| Oven Oven | functions |
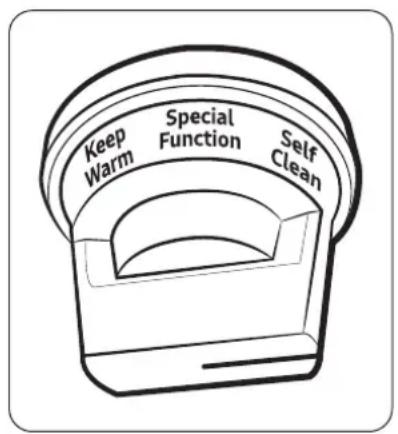
| Basic oven | Bake, Convection Bake (Pure), Convection Roast (Pure), Broil, Air Fry, Stone Bake Mode, Keep warm, Self clean, Special Function. |
Cooking mode
Select the cooking mode you want. Set the temperature you want.
See Basic function instructions on page 38.
| Mode Temperature range Temp Probe | |
| Bake Lo - 550 °F (285 °C) | ✓ |
| Convection Bake (Pure) Lo - 550 °F (285 °C) | ✓ |
| Convection Roast (Pure) Lo - 550 °F (285 °C) | ✓ |
| Broil Lo / Med / Hi | x |
| Air Fry 350 °F (175 °C) - 500 °F (260 °C) | x |
| Stone Bake Mode 350 °F (175 °C) - 500 °F (260 °C) | x |
| Keep warm 175 | °F (80 °C) |
= Available / = Not Available
Using the oven
| Mode Instruction | |
| Bake | · Bake mode is used for baking cakes, cookies, and casseroles. Always preheat the oven. ·Baking temperatures and times will vary depending on the ingredients and the size and shape of the baking pan used. ·Dark or nonstick coatings may cook faster with more browning. |
| Convection Bake (Pure) | ·Convection Bake (Pure) uses a fan to circulate the oven's heat evenly and continuously within the oven. ·This improved heat distribution allows for even cooking and excellent results while using multiple racks. ·Provides the best performance for cookies, biscuits, brownies, cupcakes, cream puffs, sweet rolls, angel food cake and bread. ·When convection baking with one rack, place the rack at Level 3 or 5. ·When convection baking with two racks, place them at Levels 3 and 5 for cake and cookies. ·The oven temperature must be manually reduced by 25 °F while using Convection Bake (Pure) mode. ·In this mode, 4-part pure convection is applied. |
| ConvectionRoast (Pure) | ·Convection Roast (Pure) is good for cooking large tender cuts of meat, uncovered. The convection fan circulates the heated air evenly over and around the food. ·Meat and poultry are browned on all sides as if they were cooked on a rotisserie. ·The heated air seals in juices quickly for moist and tender results while, creating a rich, golden-brown exterior. ·In this mode, 4-part pure convection is applied. |
| Broil | ·Broiling cooks tender cuts of meat by direct heat under the broil element of the oven. ·The high heat cooks quickly, creating a rich, golden-brown exterior. Broil mode is best for cuts of meat, fish, and poultry up to 1 inch in thickness. ·Always preheat the oven for 5 minutes before broiling. ·See the Broiling guide section starting on page 45. |
English36
| Mode Instruction | |
| Air Fry | ·Air Fry uses hot air for crispier and healthier frozen or fresh foods without or less oil than normal convection mode. ·For best results, use this mode in single oven mode and place the Air Fry tray in position 4. ·Preheating is not necessary for his mode. ·The temperature can be set between 350 °F - 500 °F. |
| Stone Bake Mode | ·Stone accessory required. ·Bake on a baking or pizza stone for pizza and bread. ·Always do preheat with a stone for the best results. Preheating will take about 20 - 30 mins. ·When the beep sounds, put pizza or bread on the rack position 2 or 3. |
| Keep Warm | ·The keep warm mode will keep cooked food warm for serving up to 3 hours after cooking has finished. ·You can use the keep warm mode without any other cooking operations or you can set it to activate after a timed or delay timed cooking operation. ·You should not use this mode to reheat cold food. |
Using the oven
Basic function instructions
- Select the cooking mode you want.
-
Set the temperature you want.
-
Broil mode can be set only Hi, Med or Lo.
- Keep Warm temperatures cannot be changed.
CAUTION
- Place food in the oven after preheating if the recipe calls for it. Preheating is very important for good results when baking cakes, cookies, pastry, and breads. After the oven has reached the desired temperature, the oven will beep.
- The convection oven fan shuts off when the oven door is opened.
- DO NOT leave the door open for long periods of time while using convection cooking or you may shorten the life of the convection heating element.
English38

NOTE
- If you leave the oven door open for more than 20 seconds when the oven is on, all heating elements will shut off automatically.
- When you have finished cooking, the cooling fan will continue to run until the oven has cooled down.
- If you are using an oven thermometer in the oven cavity, the temperature registered by the thermometer may differ from the actual set oven temperature.
- For performance reasons, the convection fan may turn on or off while the oven is cooking.
- This oven is designed for CLOSED DOOR broiling. The oven door must be closed during broiling.
Using the oven
Using the oven racks
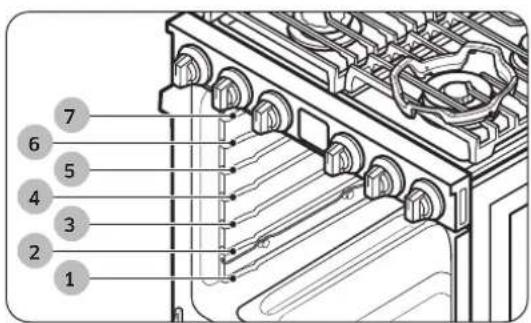
Recommended rack positions for cooking
| Type of food | Rack position |
| Broiling hamburgers 6 | |
| Broiling meats or small cuts of poultry, Fish | 4 -5 |
| Bundt cakes, Pound cakes, Frozen pies, Casseroles | 3 -4 |
| Fresh Pizza, Angel food cakes, Samll roasts | 2 |
| Turkey, Large roasts, Hams 1 |
This table is an example list for reference only.
CAUTION
- Do not cover an oven rack with aluminum foil. This will disturb the heat circulation, resulting in poor baking.
- Do not place aluminum foil on the oven bottom. The aluminum can melt and damage the oven.
- Arrange the oven racks only when the oven is cool.
- When placing an oven rack in the topmost rack position (position 7), make sure the rack is situated stably on the embossed stop.
English40
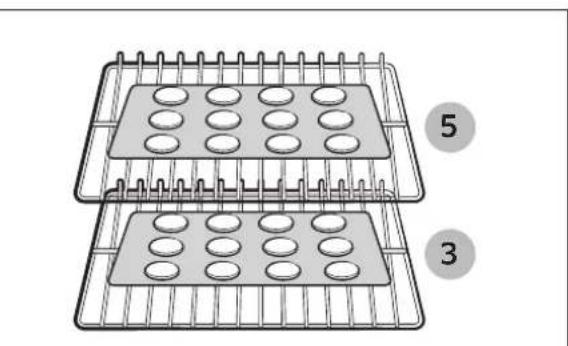
Multi-rack baking
Cakes pans position
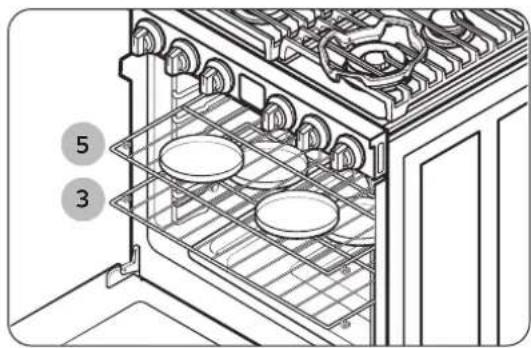
- For dual-rack baking of cakes or cookies, place the racks at Levels 3 and 5.
- For 4 baking pans on two racks: Place two pans in the front of the upper rack and the other two in the rear of the lower rack.
- When baking multiple items on one rack, maintain a 1" to 1.5" (2.5 cm to 3.8 cm) space between items.
- When using the gliding rack, place it below the flat rack.

Cookie sheets position
| Type of Baking Rack Position |
| Cakes 3 and 5 |
| Cookies 3 and 5 |
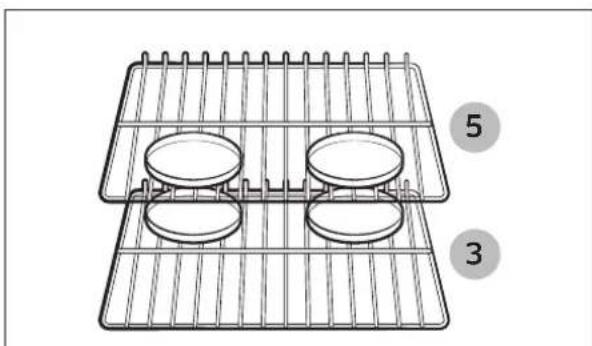
Cake Cookie
Using the oven
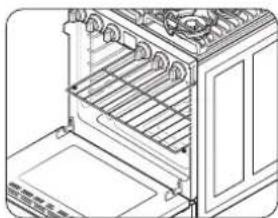
Before using the racks
Each rack has stops that need to be placed correctly on the supports. These stops will keep the rack from coming completely out.
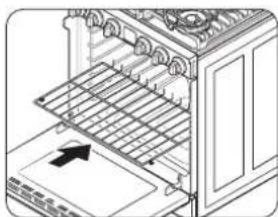
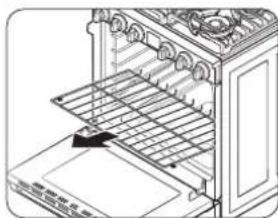
Removing the racks
- Pull the rack straight out until it stops.
- Lift the front of the rack, and then pull it out.
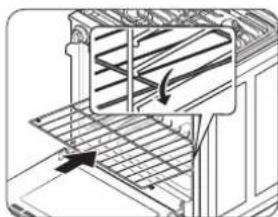
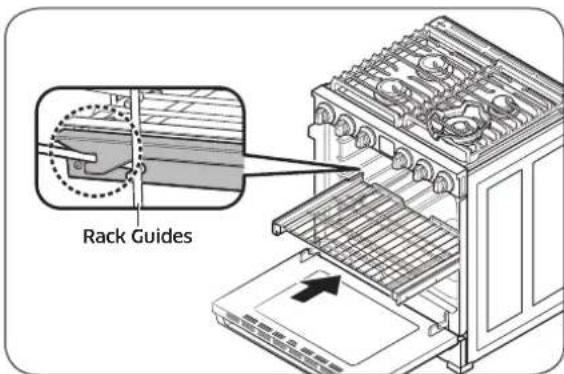
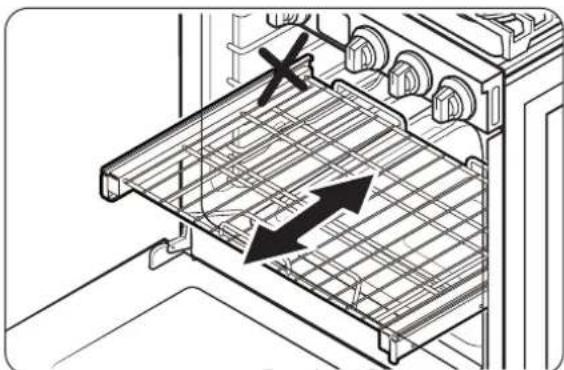
Replacing the racks
- Place the end of the rack on the support.
- Tilt the front end up and push the rack in.
CAUTION
- Do not cover a rack with aluminum foil or place aluminum foil on the oven bottom. This will hamper heat circulation, resulting in poor baking, and may damage the oven bottom.
- Arrange the oven racks only when the oven is cool.
English42
Using the gliding rack
The fully extendable gliding rack makes food preparation easier, especially when you are preparing heavier dishes. The gliding rack has 2 glide tracks that allow you to extend the rack well out of the oven without touching the sides of the oven walls.
Installing the gliding rack
- With the gliding rack in the closed position and the oven off, carefully insert the gliding rack between the guides until the rack reaches the back. See picture on the bottom left for closed position.
- Always grasp the gliding rack by its handle at the center-front of the rack. Pulling by the rack frame can cause the rack to come loose, resulting in spills and possible personal injury.
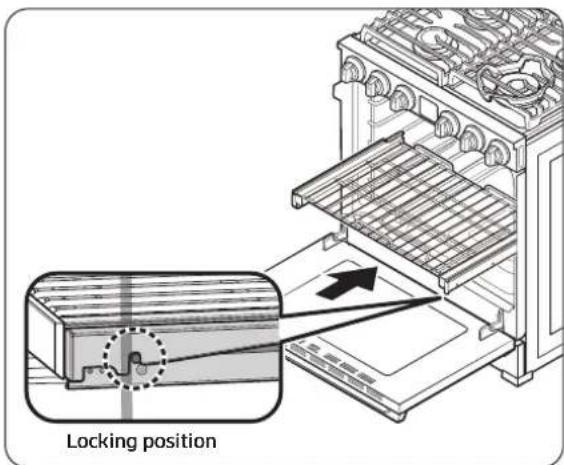
NOTE
Be sure to lock the gliding rack onto the rack support. Otherwise, the rack may come loose and cause personal injury.
Using the oven
Removing the gliding rack
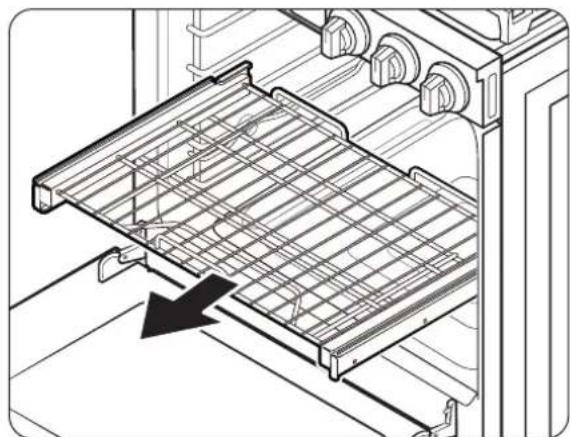
With the gliding rack in the closed position and the oven off and cool, grasp the rack and frame and pull both forward to remove.
CAUTION
- Do not attempt to place a gliding rack one level above a wire rack.
- You will not be able to install it properly and the rack could fall.
- Keep at least one open rack level between a glide rack and a flat rack.
NOTE
You may place a gliding rack at any but the lowest level (Level 1).
English44
Broiling guide

NOTE
This is for reference only.
- Preheating for 5 minutes before broiling is recommended.
- The size, weight, thickness, starting temperature, and your preference of how well done you like your food will affect broiling times.
- This guide is based on meats at refrigerator temperature.
| Food Doneness Size | Thickness | Broil setting | Rack position | Cooking time | ||
| 1st side 2nd side | ||||||
| Hamburgers | Medium 9 patties 1" Hi | 6 | 4'30"-5'30" | 3'30"-4'30" | ||
| Beef Steak | Medium 1 pc. | 1" Hi 5 | 8'00"-10'00" | 6'00"-8'00" | ||
| Pork Chops | Well done | 1-2 pcs. | 1/2"-3/4" | Lo | 4 | 12'00"-14'00" |
| Lamb Chops | Medium 4-6 | pcs. | 1" Hi 5 | 5'00"-6'00" | ||
| Chicken Pieces | Well done | 2-3 lbs. | 4"-1" | Lo | 4 | 18'00"-20'00" |
| Salmon Fillets | Well done | 3-4 pcs. | 1/2"-3/4" | Hi | 5 | 6'00"-7'00" |

CAUTION
Make sure to close the door after turning over the food.
English
Using the oven
Air Fry mode
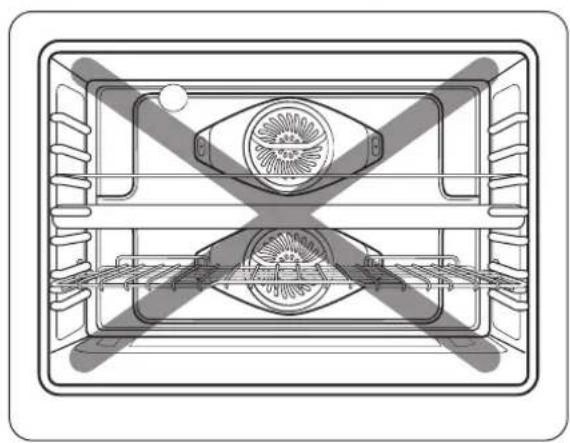
This feature uses hot air for crispier and healthier frozen or fresh foods without oil or less oil than normal convection modes. For best results, use this mode in single oven mode and place the Air Fry tray in position 4. The temperature can be set between 350^ and 500^ . Preheating is not necessary for this mode. This feature automatically increases the internal temperature by 40^ for optimal performance. Follow recipe or package directions for set temperature, time, or quantity.

- Place the Air Fry tray on rack position 4, and place a baking sheet or tray on rack position 2.
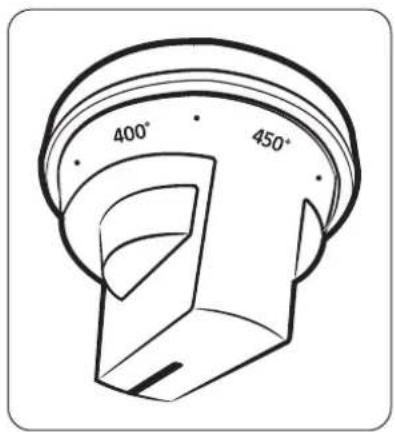
- Rotate the mode selector knob from Off to the Air Fry position, and then turn the temperature selector knob to set the baking temperature. You can set the temperature from 350^(175^) to 500^(260^)
- When baking is complete, turn both knobs to the Off position.

English46
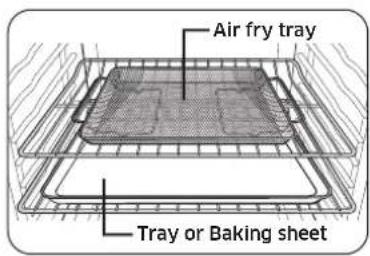
Air Fry Tray recommended placement
NOTE
-
Place a baking sheet or tray on the rack below the Air Fry tray for getting any drippings. This will help to reduce splatter and smoke for high fat foods, such as chicken wings.
Air Fry is designed for baking on a single oven rack. Place food on rack position 4 for best results. -
Before using a baking ware, check the maximum allowable temperature of baking sheet.
- Place the baking sheet under a few sheets of paper like parchment paper to absorb the fat for reducing splatter and smoke during the Air Fry.
- For cooking fresh or homemade foods, spreading the oil over a larger area more evenly, will crisp up the food more effectively.
- Wet or thick coating will not crisp or cook effectively with the Air Fry.
CAUTION
- Foods in high-in fat will smoke when using the Air Fry model, such as chicken wings, bacon, sausage and turkey legs.
Before you start Air Fry, turn on an exhaust hood at a high level fan setting. - Open a window in your kitchen if it is possible to make sure the kitchen is well ventilated.
- Once the oven has cooled, wipe down the interior of the oven before and after Air Fry cooking.
- Regularly, clean the grease filters of the exhaust hood to prevent smoking during cooking.
- Avoid opening the oven door, as it is difficult to maintain the oven temperature, prevent heat loss, and save energy.
Using the oven
Air Fry mode guide
NOTE
- Preheating is not necessary.
- Place the Air Fry Tray on the position 4.
It is recommended to use avocado oil. - Place a baking sheet or tray on the rack below the Air Fry Tray to catch any drippings. This will help to reduce splatter and smoke.
| Item Amount Temperature Time Tips | |||||
| Potatoes | |||||
| Frozen French Fries | 30-35 oz | 425 °F-450 °F 25 | -30 min - | ||
| Frozen French Fries, Seasoned | 25-30 oz | 425 °F-450 °F 18 | -23 min - | ||
| Frozen Tater Tots | 40-45 oz | 450 °F 20-25 min | - | ||
| Frozen Hash Brown | 25-30 oz | 450 °F 20-25 min | - | ||
| Frozen Potato Wedges | 30-35 oz | 425 °F-450 °F 20 | -25 min - | ||
| Homemade French Fries | 25-30 oz | 425 °F 23-28 min | Peel potatoes and cut into sticks with a thickness of 1/3 inch. Soak in cold water for 30 min. Brush with 3 tbsp of oil. Add salt and pepper to taste. | ||
| Homemade Potato Wedges | 25-30 oz | 450 °F 25-30 min | Cut them into wedges. Brush with 3 tbsp of oil. Add salt and pepper to taste. | ||
English48
| Item Amount Temperature Time Tips | |||||
| Frozen | |||||
| Frozen Chicken Nuggets | 24-28 oz | 400 °F-425 °F 18-23 min - | |||
| Frozen Chicken Wings | 30-35 oz | 425 °F 25-30 min - | |||
| Frozen Onion Rings | 20-25 oz | 425 °F 18-22 min - | |||
| Frozen Fish Fingers | 20-25 oz | 425 °F 18-22 min - | |||
| Frozen Chicken Strips | 25-30 oz | 425 °F-450 °F 25-30 min - | |||
| Frozen Churros | 20-25 oz | 425 °F 18-22 min - | |||
| Poultry | |||||
| Fresh Drumsticks | 35-45 oz | 425 °F-450 °F 27-32 min | Brush with 3 tbsp of oil. Add salt and pepper to taste. Air frying foods that are high in fat can create smoke. | ||
| Fresh Chicken Wings | 30-35 oz | 425 °F-450 °F 25-30 min | |||
| Chicken Breasts, Breaded | 30-35 oz | 400 °F-425 °F 30-35 min | Dip chicken breasts into the flour mixture. Whisk the egg and milk. Dip flour coated breasts into the egg mixture. Place them into breaded crumbs and toss until items are coated with crumbs. Add salt and pepper to taste. Brush with 3 tbsp of oil. | ||
Using the oven
| Item Amount Temperature Time Tips | ||||
| Vegetables | ||||
| Asparagus, Breaded | 15 - 20 oz | 425 °F | 20 - 25 min | Dip sliced vegetables into the flour mixture. Whisk the egg and milk. Dip flour coated vegetables into the egg mixture. Place them into breaded crumbs and toss until items are coated with crumbs. Add salt and pepper to taste. Brush with 3 tbsp of oil. |
| Egg Plants, Breaded | 20 - 25 oz | 425 °F | 20 - 25 min | |
| Mushroom, Breaded | 18 - 22 oz | 425 °F | 18 - 22 min | |
| Onions, Breaded | 18 - 22 oz | 425 °F | 20 - 25 min | |
| Cauliflower, Breaded | 30 - 35 oz | 400 °F - 425 °F | 20 - 25 min | |
| Vegetable Mix, Breaded | 30 - 35 oz | 400 °F - 425 °F | 20 - 25 min | |
English50
Stone bake mode
This feature bake on a baking or pizza stone for pizza and bread. So stone accessory required. Always preheat with a stone for the best results. Preheating will take about 20 - 30 mins. When the beep sounds, put pizza or bread on the rack position 2 or 3.
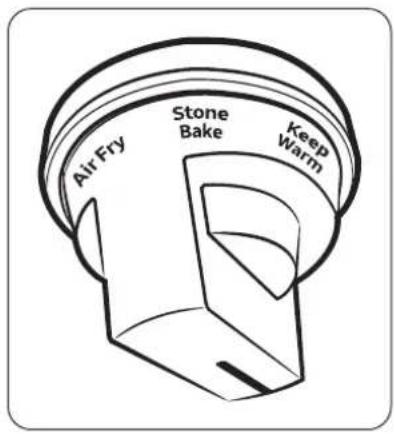
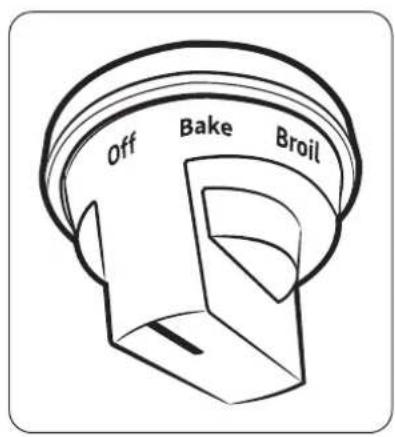
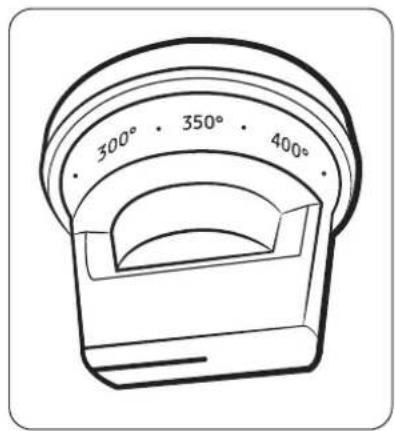
- Rotate the mode selector knob from Off to the Stone Bake mode position, and then turn the temperature selector knob from Off to set the temperature. You can set the temperature from 350^ (175°C) to 500^ (260°C).
- Let the oven preheat. The temperature display will start to change once the oventemperature reaches 150^ .
- When preheating is complete, only gas model needs 15 minutes more to heat stone.(* If stone is already heated, skip this process)
- place the food on the desired rack. Close the oven door.
- When cooking is complete, turn both knobs to the Off position.
NOTE
IC : Stone heating timer
English 51
Using the oven
Using the special function feature

- Set the temperature knob to the off position.
- Turn the mode selector knob from Off to the SPECIAL FUNCTION position.
- Find cooking menu you want through < or > keys and tap OK.
Special function provides 3 different specialized cooking options.
| Mode Temperature range | |
| Proof 95 °F (35 °C) | |
| Air Sous Vide 100 °F (40 °C) - 205 °F (95 °C) | |
| Dehydrate 150 °F (65 °C) | |
** A factory set temperature is applied for the best performance. You cannot adjust this temperature.

NOTE
You can Adjust 1^ unit by tapping or key of the Air sous vide mode. (Long press or key to decrease or increase rapidly at constant speed).
English52
| Mode Instruction | |
| Proof | · Proof provides an optimal temperature for the bread proofing process(95 °F). · For the best results, always start the Proof option with a cool oven. · Proof mode functions properly only if oven temperature is below 125 °F. · The proofing temperature is not hot enough to keep food warm. · Place the dough in a heat-safe container on rack position 2 or 3 and cover it with a cloth or with plastic wrap. You may need to anchor the plastic wrap underneath the container so that the oven fan does not blow the plastic wrap off the dough. · To avoid lowering the temperature and extending proofing time, do not open the oven door. |
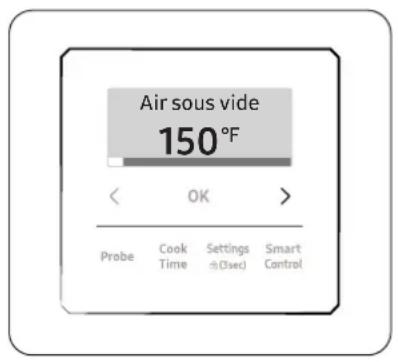
| Air Sous Vide | · Air Sous Vide mode uses low-temperature hot air to implement Sous Vide mode without steam or the water tank. · In this mode, the oven keeps constant low temperatures inside the cooking chamber, cooking food that can keep its original fragrance and nutrients while offering enriched flavor and soft texture. · You can Adjust 1°F unit by tapping < or > key of the Air sous vide mode. (Long press < or > key to decrease or increase rapidly at constant speed). |
| Dehydrate | · Dehydrate dries food or removes moisture from food via heat circulation. · After drying the food, keep it in a cool and dry place. · For fruit, adding lemon or pineapple juice or sprinkling sugar on the fruit helps the fruit retain sweetness. |
NOTE
Preheating is not necessary on special function feature.
Rack position chart for special cooking options
| Mode Rack position | |
| Proof 2 or 3 | |
| Air Sous Vide 4 | |
| Dehydrate 2 or 3 |
For some common features, refer to Using the oven page.
English 53
Using the oven
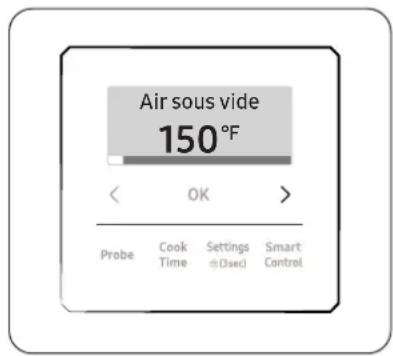
Air sous vide mode
Air sous vide mode uses low-temperature hot air to implement Sous Vide method without steam or the water tank. In this mode, the oven keeps constant low temperatures, cooking food that can keep its original fragrance and nutrients while offering enriched flavor and soft texture.
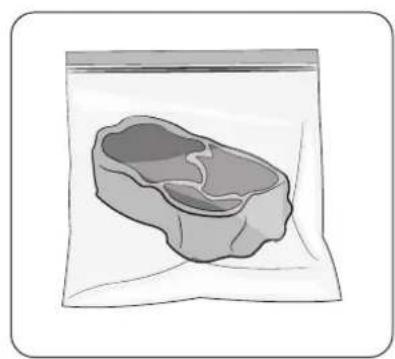
- Place the vacuum sealed bags of food on the rack in position 4, and then close the door.
- Set the temperature knob to the Off position.
- Turn the mode selector knob from Off to the SPECIAL FUNCTION position.
- Find Air sous vide menu through < or > keys and tap OK.
- Adjust 1^ unit by tapping or key and tap OK. (Long press or key to decrease or increase rapidly at constant speed.)
NOTE
- For cook time setting, see the Timed cooking section on page 34.
English54
NOTE
It is not necessary to preheat the oven when using Air Sous-Vide mode.
- Place the vacuum sealed bags of food on the rack 4 of the oven.
- Use it to cook meat, fish, seafood, poultry or vegetables.
- Use fresh and quality ingredients only. Trim them in clean conditions and store in the refrigerator.
- Use heat-resistant vacuum bags for moving and storing ingredients.
- Never reuse the heat-resistant vacuum bags.
- The cooking time depends on the thickness of food. Addition of salt or sugar may shorten the cooking time.
- Use Air Sous-Vide recommendation guide to find the recommended cooking time and temperature for the food.
- Only use temperatures below 140^ ( 60^ ) to cook foods that can safely be consumed raw.
Tips
To keep the original taste, we recommend you use less herbs and spices than in ordinary recipes.
- Meat and fish offer better flavors when seared and served.
- Sous vide dishes are best served immediately after cooking.
- If not served immediately after cooked, put the food in ice water and cool down completely.
Then, store them under 40^(5^) to keep the fragrance and texture of food.
- Chicken, especially, is recommended to eat immediately after cooked.
English
Air Sous-Vide recommendation guide
| Food Doneness | Temperature(°F) Time (hrs.) | ||
| Beef | |||
| Steak, 1.5" thick | Rare 130 °F | 2.5 - 4 | |
| Medium 140 °F | 2.5 - 4 | ||
| Well done 155 °F 3 - 5 | |||
| Roast | Medium 150 °F | 6 - 12 | |
| Well done 155 °F 6 - 12 | |||
| Pork | |||
| Chop, boneless | Tender 150 °F | 3 - 5 | |
| Firm 160 °F | 3 - 5 | ||
| Roast | Medium 150 °F | 4 - 6 | |
| Well done 160 °F 5 - 7 | |||
| Pulled pork Well done | 160 °F 15 - 48 | ||
| Poultry | |||
| Chicken, breast | Tender 145 °F | 3 - 4 | |
| Firm 160 °F | 3.5 - 4.5 | ||
| Duck, breast Tender | 145 °F 3 - 4 | ||
| Fish | |||
| Salmon steak | Tender 130 °F | 2 - 4 | |
| Well done 145 °F 2 - 4 | |||
| Cod fillet Tender | 130 °F 2 - 4 | ||
| Vegetables | |||
| Asparagus | - | 180 °F 0.5 - 2 | |
| Potato, sliced | - | 190 °F 2 - 4 | |
| Sweet potato, sliced | - | 190 °F 2 - 4 | |
| Carrot, sliced | - | 190 °F 2 - 4 | |
| Squash, cubes | - | 180 °F 2 - 3 | |
| Fruit | |||
| Apple, sliced | - | 180 °F 2 - 3 | |
| Pineapple, sliced | - | 180 °F 1 - 2 | |
| Pear, sliced | - | 180 °F 2 - 3 | |
English56
Temperature probe
For many meats, especially roasts and poultry, measuring the internal temperature is the best way to determine if the food is properly cooked. The temperature probe lets you cook meat to the exact internal temperature you want. This function can be used with Bake, Convection Bake (Pure), Convection Roast (Pure). After the internal temperature of the food reaches 100^ , the increasing internal temperature will be shown on the display.
How to use the temperature probe
- Push the probe into the meat, so that the tip is in the center of the meat.
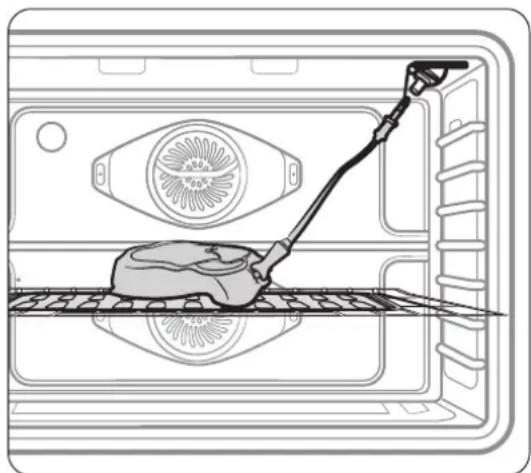
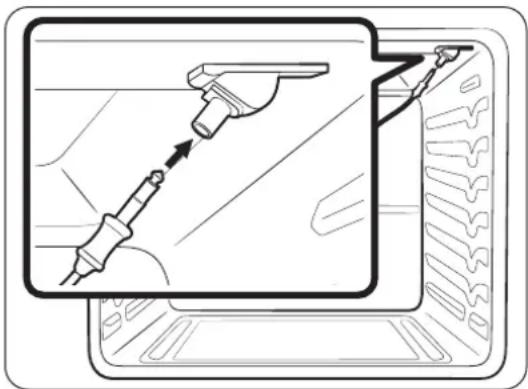
- Insert the probe completely into the meat as shown in the illustrations. It should not touch bone, fat, or gristle. If you do not fully insert the probe into the meat, the temperature probe function will not work correctly because the probe will sense the oven temperature, not the temperature of the meat.
- For bone-in meats, insert the probe into the center of the lowest and thickest portion of the piece.
- For whole poultry (turkey, large chickens, etc.), insert the probe into the thickest part of the inner thigh, parallel to the leg.
- If you activate the Keep Warm function to keep the meat warm after you have cooked it using the temperature probe function, the meat may be overcooked.
Using the oven
- Plug the temperature probe fully into the socket on the upper-side wall of the oven.
- Select the cooking operation (Bake, Convection Bake (Pure), Convection Roast (Pure)) you want. Select the cooking mode you want. Set the cooking temperature. (See page 38.)
- Tap Temp Probe to set the desired internal temperature.
Available temperatures 100^ to 200^
- Tap START. When the desired internal temperature is reached, the function automatically stops and an alarm sounds.
CAUTION
Do not let the probe tip protrude from the meat. Ensure the tip is in or near the thickest part of the meat.
- To avoid breaking the probe's tip, defrost your food completely.
- To avoid damaging the probe, do not leave it in the oven for any reason other than its intended use. Tongs can damage the probe.
- Use the temperature probe for Temp Probe function cooking only.
NOTE
- If you remove the temperature probe while the Temp Probe function is operating or insert the temperature probe while baking or cooking normally, cooking will stop after 1 minute.
- If you use the probe to cook frozen food, there are times when it cannot be detected. (The probe icon will not appear in the display.)
English58
Temperature table
| Type of food Internal temperature (°F) | |
| Beef / Lamb | Rare 140 - 150 |
| Medium 160 - 170 | |
| Well done 175 - 185 | |
| Pork 175 - 185 | |
| Poultry 185 - 195 | |
NOTE
If you cover the meat with aluminum foil and allow it to stand for 10 minutes after cooking, the Internal temperature will rise 5-10 degrees.
Removing the temperature probe
Unplug the temperature probe, then remove it from the meat. Store the meat probe in a separate place, do not leave it attached to the socket.
CAUTION
After cooking, the temperature probe is hot enough to cause burns. Let it cool sufficiently before attempting to remove it.
Using the oven
Clean feature
Self Clean
This self-cleaning oven uses high temperatures (well above cooking temperatures) to burn off leftover grease and residue completely or to reduce them to a finely powdered ash that you can wipe away with a damp cloth.
CAUTION
- Do not leave small children unattended near the oven during the self-cleaning cycle. The outside surfaces of the oven can get extremely hot.
- Some birds are extremely sensitive to fumes from a self-cleaning oven. Relocate birds to a well-ventilated room away from the oven.
- Do not line the oven, oven racks, or oven bottom with aluminum foil. Doing so will result in poor heat distribution, produce poor baking results, and cause permanent damage to the oven interior. The aluminum foil will melt onto and adhere to the interior oven surfaces.
- Do not force the oven door open during the self-cleaning cycle. This will damage the automatic door-locking system. The door automatically locks when the self-cleaning cycle is started and stays locked until the cycle is completed or cancelled and the oven temperature is below 400^ .
- Use caution when opening the oven door after the self-cleaning cycle. The Electric Oven will still be VERY HOT and hot air and steam might escape when the door is open.
- Wipe off any excess spillage before using the self-cleaning operation.
- Do not use oven cleaners. Commercial oven cleaners or oven liners should NEVER be used in or around any part of the oven. Residue from oven cleaners will damage the inside of the oven during a self-cleaning operation.
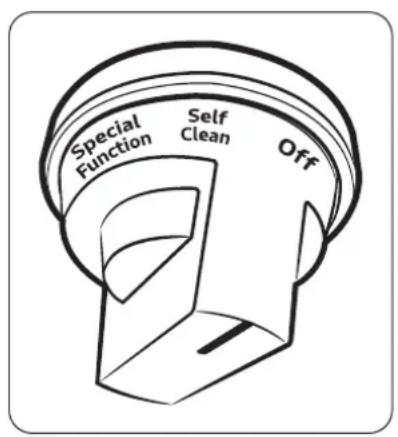
- Both knobs must be in the Off position initially before you set the mode selector knob to the Self Clean position.
English60
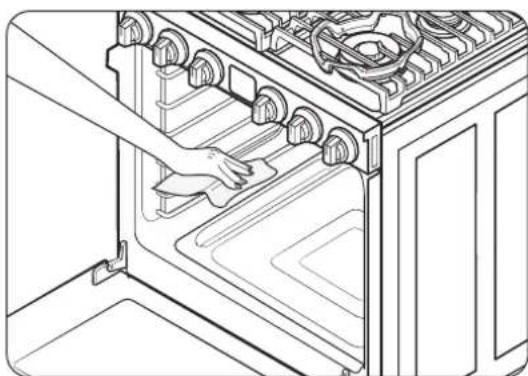
Fig. 1
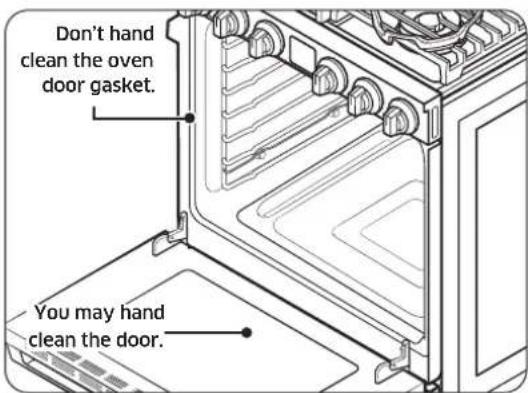
Fig. 2
- Keep the kitchen well ventilated during a self-cleaning cycle.
- Remove the racks, rack supports, and all foreign/loose items from the oven.
- Wipe up debris from the oven bottom. (Fig. 1)
- Clean the oven door and front frame around the gasket with hot water and soap-filled steel-wool pads or non-abrasive cleansers. Rinse with clean water and wipe dry.
- The oven-door gasket is fragile and cannot withstand hand-cleaning. Do not clean the gasket. If the gasket becomes worn or frayed, have it replaced.
Make sure the oven light cover is in place and the oven light is off.

NOTE
For details about removing the racks, see pages 42 and 44.
For details about removing the rack supports, see page 42.
English
How to run a self cleaning cycle
- Make sure the oven door is unlocked and closed completely.
- Turn the mode and temperature selector knobs to the Off position.
- Turn the mode selector knob from Off to the Self Clean position.
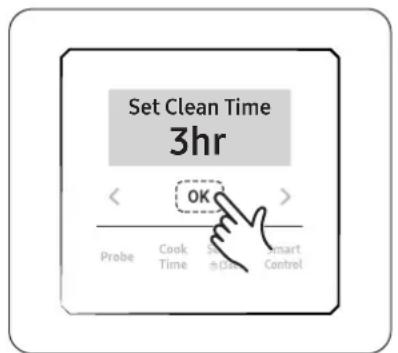
- Set the self cleaning time. 3 hr is the default. Press <,> to select another time set. Press OK to start Self Cleaning.
- The oven door is locked and the oven begins to heat up. When the cycle is complete, an alert beep sounds. The door will remain locked until the oven temperature falls below 400^ (205^) .
- When the Self-Cleaning cycle is complete, turn the mode selector knob to the Off position.

NOTE
- You will not be able to start a self-cleaning cycle if the control lockout feature is activated or if the oven's temperature is too hot.
- The oven doors lock automatically. The display will show the remaining cleaning time. You cannot open the oven doors until the temperature drops to a safe/cool temperature.
- You should not operate cooktop burners during self-cleaning mode.
English62
To cancel the self-cleaning cycle
You may find it necessary to stop or interrupt a self-cleaning cycle due to smoke in the oven. To turn off the self-cleaning cycle, turn the mode selector knobs to the Off position. The cycle turns off, but the door remains locked until the oven temperature falls below 400^ (205 °C).
After a self-cleaning cycle
- The door stays locked until the internal oven temperature falls below 400^ .
- When the oven has cooled down, wipe the oven surfaces with a cloth to remove ash residue.
- Stubborn stains can be removed using a steel-wool pad. Lime deposits can be removed using a vinegar-soaking cloth.
- If you are not satisfied with the cleaning results, repeat the self-cleaning cycle.
- The oven will not let you repeat a self cleaning cycle immediately. You must wait 2 hours before running self-cleaning again.
- Fine lines generated inside the cavity may occur during repeated cooling and heating of the product after long-term use. This phenomenon is normal, does not affect product performance, and is harmless to the human body.
CAUTION
Do not attempt to open the oven door immediately after the self-cleaning cycle is complete. The oven is still very hot when the door unlocks. Escaping hot air or steam could burn you.
Using the oven
Using the Sabbath feature
(For use on the Jewish Sabbath & Holidays)

For further assistance, guidelines for proper usage, and a complete list of models with the Sabbath feature, visit : http:\www.star-k.org.
You can use the Sabbath feature with baking only. The oven temperature may be set higher or lower after you set the Sabbath feature. (The oven temperature adjustment feature should be used only during Jewish holidays.) The display, however, will not change and tones will not sound when a change occurs. Once the oven is properly set for baking with the Sabbath feature active, the oven will remain on continuously until the Sabbath feature is cancelled. This will override the factory preset 12-hour energy-saving feature. If the oven light is needed during the Sabbath, press oven light button before activating the Sabbath feature. Once the oven light is turned on and the Sabbath feature is active, the oven interior light will remain on until the Sabbath feature is turned off. If the oven light needs to be off, be sure to turn the oven light off before activating the Sabbath feature.
How to use the Sabbath feature
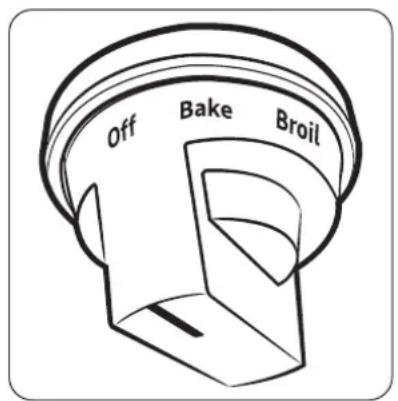
- Turn the mode selector knob from Off to Bake.
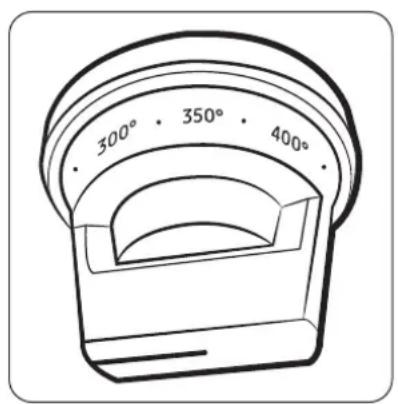
- Rotate the temperature selector knob from the Off position to set the temperature. You can set the oven to any temperature from Lo to 550^ .
English64
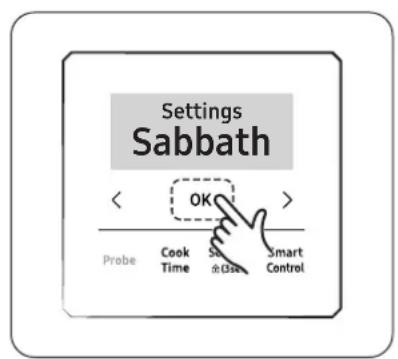
- Press the Settings button. and then press <,> to select Sabbath mode.
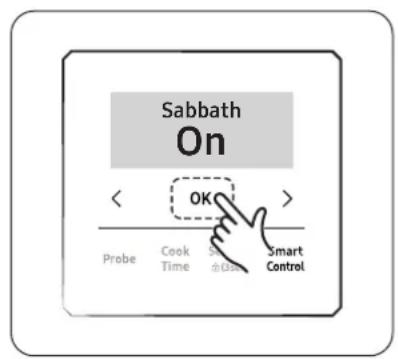
- Tap OK and then press <,> to select On / Off.
- Tap OK to sabbath mode on.
CAUTION
Do not to attempt to activate any other program feature except Bake while the Sabbath feature is active.
Do not open the oven door or change the oven temperature for about 30 minutes after you have started Sabbath mode to allow the oven to reach the set temperature. Note that for best performance, the oven fan operates only when the oven temperature is rising.
NOTE
- After you change the temperature while the unit is in Sabbath mode, there is a 15 second delay before the unit recognizes the change.
- You can set the Cook Time function before activating the Sabbath feature.
- Should the power fail, the oven shuts itself off. When power is restored, the oven does not turn itself on. Sabbath appears on the control panel, but the oven is not on. Food may be safely removed from the oven during Sabbath mode, but the oven is inoperable until after the Sabbath holidays, at which time you can tap-hold OK for 3 seconds to turn off Sabbath mode.
English
Using the oven
Using the Smart Control feature
To use the oven's Smart Control feature, you must download the SmartThings app to a mobile device. Functions that can be operated using the SmartThings app may not work smoothly if communication conditions are poor or the oven is installed in a place with a weak Wi-Fi signal.
A Wi-Fi Booster may be necessary. Wi-Fi Booster is not supplied by Dacor.
Refer to the following table for the main functions that can be operated from the app.
| When Smart Control on the oven is off. | Monitoring (Oven, Probe), Oven off |
| When Smart Control on the oven is on. | Monitoring (Oven, Probe), Oven off, Error check |
How to connect the oven
- Download and open the SmartThings app on your smart device.
- Follow the app's on-screen instructions to connect your oven.
- Press the Smart Control button for 3 seconds to connect your range. (The 'AP' will appear on the display).
- Once the process is complete, the oven displays 'Connection Complete'. The range is connected successfully.
- If the oven displays 'Can't Connect Try Again', follow the instruction in the app to reconnect.
English66
To start the oven remotely
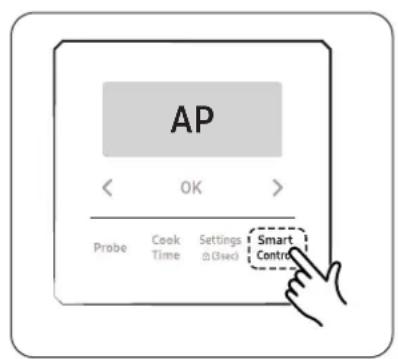
Press the Smart Control button for 3 seconds.
When Smart Control is on you can:
- Remotely change oven settings (mode, time, temperature) using your mobile device.
- Remotely turn on/off the oven.

NOTE
Important: Self Clean mode cannot be started remotely.
- Opening the oven door will deactivate Smart Control and prevent you from turning the oven on or controlling the oven remotely.
- If Smart Control is deactivated, you can still monitor the oven's status and turn the oven off.
- When oven cooking is finished or cancelled, Smart Control will be deactivated.
- The range continues operating even if the Wi-Fi connection is lost.
- The SmartThings Application will not work properly if the Wi-Fi Connection is unstable.
- See the SmartThings app manual for detailed information.
- For further instructions, refer to the SmartThings app web manual at www.dacor.com
Using the oven
Child Lock
This feature renders the touchpad inoperable and locks the oven door. You can only activate Child Lock when the oven is in standby mode.
How to activate the Child Lock feature
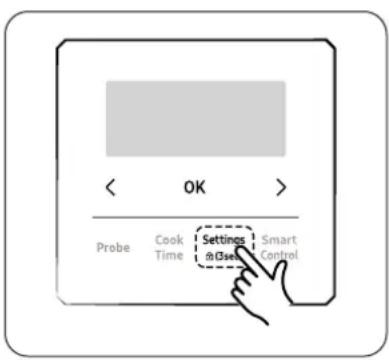
- Cancel or turn off all functions.
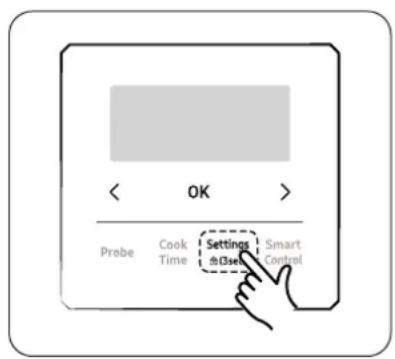
- Touch Settings for 3 seconds.
- The oven will display "Child Lock On" and the lock icon along with the current time.
NOTE
- Child Lock is available only when the oven temperature is under 400^ .
- All other functions must be canceled before you activate Child Lock.
How to unlock the controls
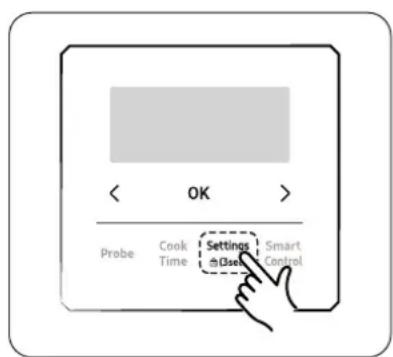
- Touch Settings for 3 seconds. 'Child Lock Off' and the lock icon will disappear from the display.
NOTE
It may take up to 10 seconds for the door to unlock.
English68
Settings
In Settings, you can change the default settings to your preference or diagnose problems with the network connection.
- Press the Settings button.
Wi-Fi
To enable a Wi-Fi connection
- Press the Settings button.
- Press <, > to select Wi-Fi.
- Tap OK and then press <,> to select On or Off then Tap OK.
NOTE
For details about the Wi-Fi connection and using the SmartThings app, see the SmartThings user manual.
Using the oven
Screen Timeout
You can adjust the screen timeout.
- Press the Settings button.
- Press <,> to select Screen Timeout.
- Tap OK and then press, <, > to change time. (Default is 20 min.)
- Tap OK.
Temp
Temp unit
You can program the oven control to display the temperature in Fahrenheit (default) or Celsius.
- Press the Settings button.
- Press <,> to select Temp. Unit.
- Tap OK and then press, <,> to select the temperature unit.
- Tap OK.
Temp adjust
The temperature in the oven has been calibrated at the factory. When first using the oven, be sure to follow recipe times and temperatures.
If you think the oven is too hot or too cool, you can correct the temperature in the oven. Before correcting, test a recipe by using a temperature setting that is higher or lower than the recommended temperature.
The baking results should help you to determine the proper adjustment. The oven temperature can be adjusted ± 35^ ( ± 19^ ).
- Press the Settings button.
- Press <,> to select Temp. Adjust.
- Tap OK and then press, <, > to select the adjustment you want to make.
- Tap OK.
NOTE
This adjustment will not affect the broiling or the self-cleaning temperatures. The adjustment will be retained in memory after a power failure.
English70
Sound
Using Sound setting, you can set the oven controls to operate silently.
- Press the Settings button.
- Press <, > to select Sound.
- Tap OK and then press, <, > to select Sound On / Alerts Only On / Sound Off.
- Tap OK.
12 hour energy saving
If you leave the oven on, this feature will automatically turn off the oven after 12 hours during baking functions or after 3 hours during a broil function.
- Press the Settings button.
- Press <,> to select 12hr Energy Saving.
- Tap OK and then press, <, > to select On or Off.
- Tap OK.
Demo Mode
This option is for use by retail establishments for display purposes only. (When Demo Mode is on, the heating elements are disabled and do not operate.)
- Press the Settings button.
- Press <,> to select Demo Mode.
- Tap OK and then press, <, > to select On or Off.
- Tap OK.
Using the oven
Using the hood control feature
NOTE
This product features a Bluetooth device that you can use to connect the range to Dacor hood control models. Through the Bluetooth connection, you can use the hood control function on the SmartThings app.
To connect to a hood control model and a hood:
- Download and run the SmartThings app on your smartphone. Then, complete the Smart Control procedure to connect to the range. See page 66.
- Follow the hood control model's Bluetooth instructions and activate the Bluetooth connection.
- Press the Bluetooth icon × on the hood's control panel. The Bluetooth icon LED blinks.
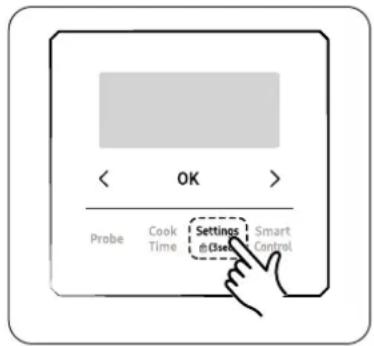
- Press the Settings button on the range display screen. Press <, > to select Hood Connection. Tap OK to connect to the hood.
- When Bluetooth pairing is finished, the Bluetooth icon LED stops blinking and glows steadily. Press the Settings button to exit.
- Follow the instructions in the user manual of the hood control model and the App guide to use the hood control.
English72
Bluetooth on/off
Press the Bluetooth icon 串 on the hood's control panel.
NOTE
- The Bluetooth icon LED on the hood is on when Bluetooth is enabled.
The Bluetooth icon LED on the hood is off when Bluetooth is not enabled. - If the Smart Control connection is not successful, you cannot use the SmartThings app to monitor and control the hood.
- Without a Smart Control connection to the range, you can use a Bluetooth connection to pair the range with the hood and sync them. To do this, follow the Bluetooth connection steps on page 72.
- Bluetooth will not work properly if the Bluetooth connection is unstable.
- See the SmartThings app manual for detailed information.
Care and maintenance - Cooktop
WARNING
Be sure electrical power is off and all surfaces are cool before cleaning any part of the cooktop. Wearing gloves is mandatory while cleaning. Some burners and cooktop parts have sharp edges. Be careful while cleaning.
Cleaning the cooktop surface
You should clean up spills as soon as possible.
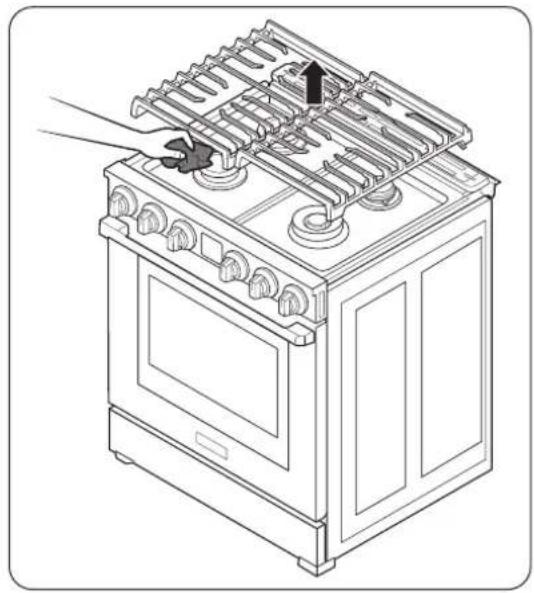
- Turn off all burners.
- When the grates have cooled sufficiently, remove them.
- Clean the cooktop surface with a soft cloth. If spills run into gaps in the burner components, remove the burner gaps and head, and wipe up the spills.
- When finished cleaning, reassemble the burners, and reposition the grates.
CAUTION
Do not wash burner grates in dishwasher.
English74
Stainless steel surfaces
- Remove any spills, spots, and grease stains using a soft, wet cloth.
- Apply an approved stainless steel cleaner to a cloth or paper towel.
- Clean one small area at a time, rubbing with the grain of the stainless steel if applicable.
- Dry the surface with a soft, dry cloth.
- Repeat Steps 2 - 4 as needed.
CAUTION
- Do not use items (e.g., steel-wool pad, sharp scraper, abrasive cleanser, caustic lye/sodium hydroxide), which can affect the appearance of the steel and damage components.
- Do not remove the spill tray to clean it. The gas lines leading to the burner manifolds can be damaged, possibly causing a fire or malfunction.
- Do not pour water into the cooktop. The water could drip into the gas and electrical systems, creating an electric shock hazard or high levels of carbon monoxide (CO) from corroded gas valves/ports.
- Do not spray any type of cleaner into the manifold holes. The ignition system inside them must remain dry.
Care and maintenance - Cooktop
Control knobs
Turn off all burner knobs.
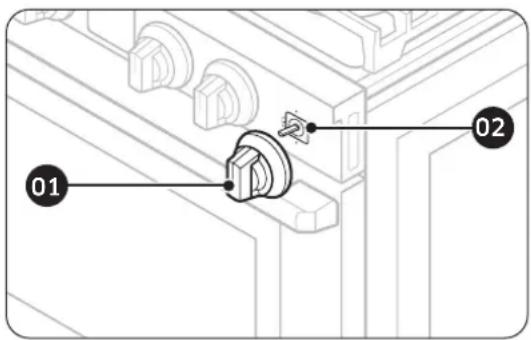
01 Grasp each knob and pull to remove.
02 Valve stem. Do not remove.
- Pull the knobs off their valve stems.
- Clean the knobs in warm, soapy water, then rinse and dry them thoroughly.
- Clean the stainless-steel surfaces using stainless-steel cleaner.
- Re-attach the knobs in the Off position to the control valve stems.
CAUTION
- Do not clean the control knobs in a dish washer.
- Do not spray cleaners directly onto the control panel. Moisture entering the electric circuits may cause electric shock or product damage.
English76
Burner grates and components
Turn off all surface burners and make sure they have all cooled down.
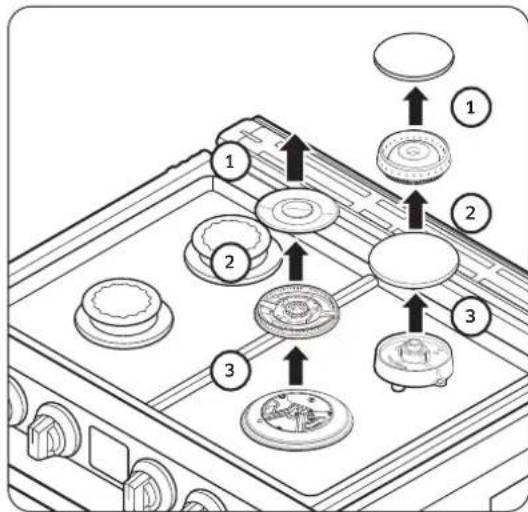
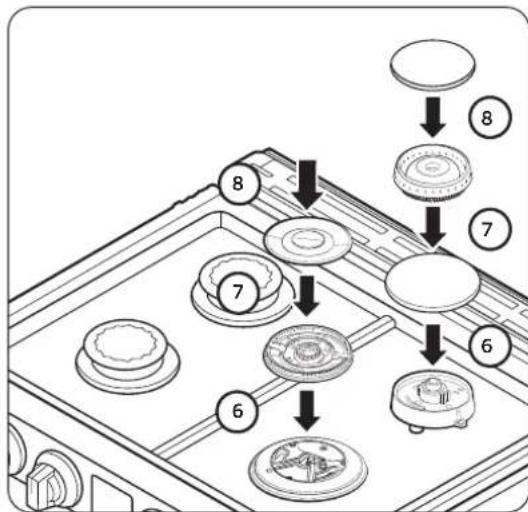
- Remove the burner grates.
- Remove the burner caps from the burner heads.
- Remove the burner heads from the valve manifolds to reveal the starter electrodes.
- Clean the grates and burner components in warm, soapy water. (Do not use steel-wool pads or abrasive cleaners.)
- Rinse and dry grates and burner components thoroughly. Ensure the burner ports are free of water.
- Reassemble the burner heads, making sure to insert a starter electrode through the hole in each head.
NOTE
See page 80 for details on how to reassemble the burner components.
- Reassemble the remaining burner components, making sure the caps lie flat on top of the heads.
- Re-install the burner grates in their respective positions.
- Turn on each burner to verify that it works properly, then turn off the burner.
CAUTION
- The starter electrodes are not removable. Do not attempt to remove them by force.
- Make sure all burner components (heads and caps) are reinstalled properly. When installed properly, they are stable and rest flat.
- To avoid chipping, do not bang grates and caps against each other or hard surfaces such as cast iron cookware.
- The burner ring can be blocked by food or dust. Clean the ring if it appears blocked. If you clean the spreader with water, assemble it only after it is completely dry. If the ring is wet, it might prevent the burners from igniting.
English
Care and maintenance - Cooktop
Burner caps and heads
NOTE
Before removing the burner caps and heads, remember their size and location. Replace them in the same location after cleaning.
Wash burner caps and burner heads in warm, soapy water and rinse with clean running water. You may scour with a plastic sponge or pad to remove burned-on food particles. Use a sewing needle or paper clip to unclog the small holes in the burner head, if required.
CAUTION
- Do not wash any burner parts in a dishwasher.
- Do not use steel wool or scouring powders to clean the burners.
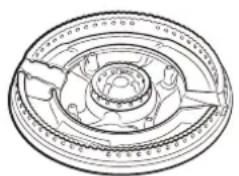
Brass burner head Brass burner cap
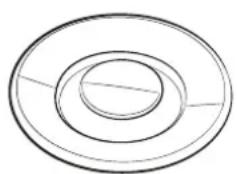
NOTE
- The brass parts of your burner will change color. However, this will not affect performance.
After cleaning, check that all burner ports are unclogged. - You may swap out the original burner caps for porcelain caps if desired.
- To remove burned-on grease, soak the brass burner cap in a solution of water and either 1 tablespoon of white vinegar or 1 tablespoon of lemon juice. Do not use a metallic brush while cleaning it. It can damage the brass parts.
Burner bases
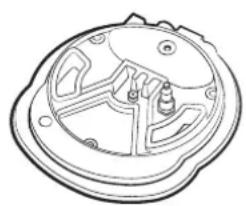
CAUTION
The burner bases are not removable; do not try to disassemble them.
Make sure that no water gets into the burner bases and the brass gas orifices.
Wipe them clean with a damp cloth, being careful not to mar or deform the bases.
Make sure the bases are completely dry before using the cooktop.
English78
Electrodes
WARNING
Do not turn on the valve while touching the electrode. Electric chock might occur.
CAUTION
Do not attempt to remove the electrode from the cooktop or burner bases.
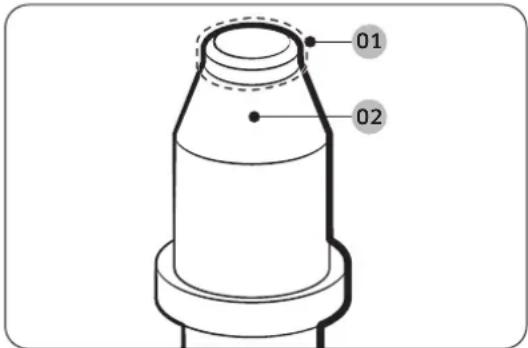
01 Metal part: Clean this metal part
02 White ceramic part: Do not clean this white ceramic part with an emery board
You should never be cooking while you're cleaning the cooktop.
Make sure the white ceramic electrodes are clean and dry. Clean the metal portion with a soft cloth. Do not clean the igniters with water.
Before reassembling the surface burners, push down gently on each of the white ceramic electrodes to make sure they are pressed against the burner bases.
Care and maintenance - Cooktop
Burner head and cap replacement
Dual Burner head / caps
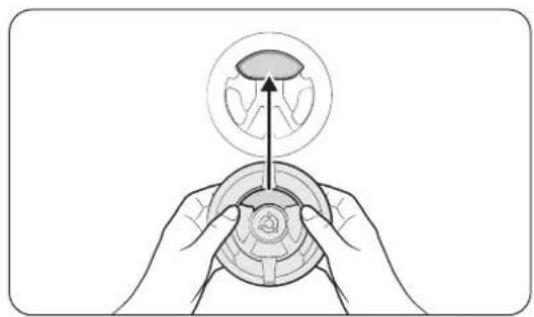
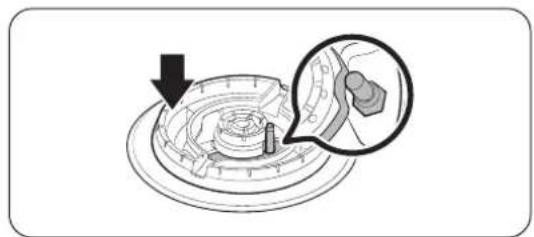
- Orient the burner head so the electrode opening aligns with the electrode itself.
- Install the burner head so the electrode passes through its opening in the head. Verify that the burner head lies flat on the cooktop.
- Match the burner caps to the burners by size, and then re-install the caps on the burner heads.
CAUTION
Each cap fits on a specific burner head. Verify that each cap is installed and lies flat on the correct head.
Round Burner head / caps
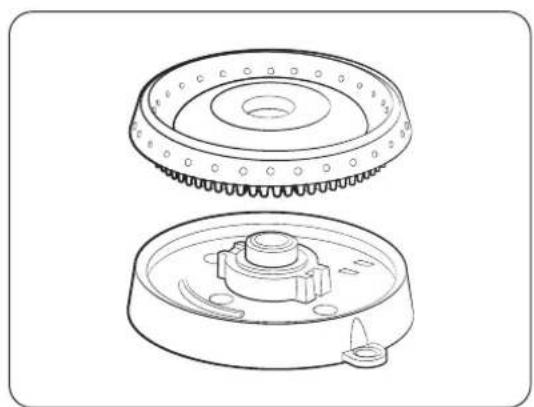
- Put the burner heads on the burner bases. The bottom of the head fits inside the top of the burner base.
- Turn the head until it drops in place, then wiggle it to ensure it is seated properly.
- Place the burner caps on the burner rings. The ridge on the bottom of each cap fits around the top of the ring.
CAUTION
Verify that all burner parts are properly seated.
English80
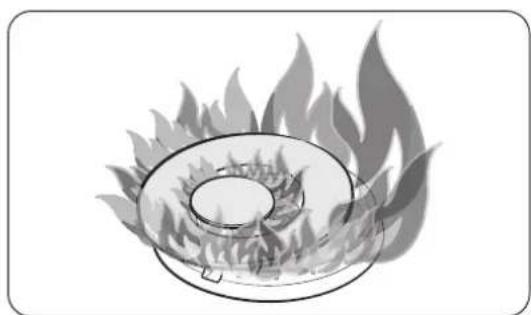
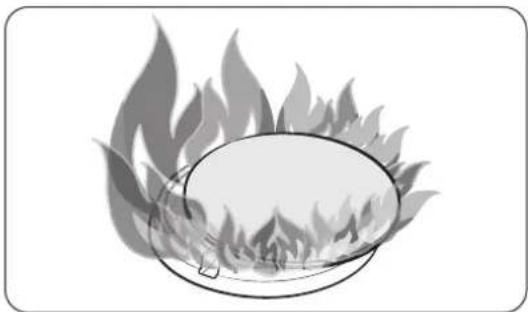
NOTE
After installing the burners, verify that they will work properly.
Improperly installed components will result in poor ignition or uneven flames as shown in the illustration at left. If the burner shows uneven flame and excessive yellow flame, shut off the burner immediately and let the burner cool down. Readjust the burner caps and try lighting the burner again. A good flame shows all blue and even flame around the burner.
Care and maintenance - Oven
Care and cleaning of the oven
WARNING
Be sure electrical power is off and all surfaces are cool before cleaning any part of the appliance.
Cleaning painted parts and decorative trim
- For general cleaning, use a cloth with hot, soapy water.
- For more difficult residue and built-up grease, apply a liquid detergent directly onto the area and leave for 30 to 60 minutes. Wipe with a damp cloth and dry. Do not use abrasive material or substances on any oven surfaces. They can be scratched.
Cleaning stainless steel surfaces
- Shake a bottle of stainless steel appliance cleaner or polish well.
- Place a small amount of stainless steel appliance cleaner or polish on a damp cloth or damp paper towel.
- Clean a small area, rubbing along the grain of the stainless steel if applicable.
- Dry and buff with a clean, dry paper towel or soft cloth.
NOTE
Some paper towels tend to scratch stainless steel, test on an inconspicuous location before using.
- Repeat as necessary.
NOTE
- Do not use a steel-wool pad. It will scratch the surface.
- If a mineral-oil-based stainless steel appliance cleaner has been used before to clean the appliance, wash the surface with dishwashing liquid and water prior to using the stainless steel appliance cleaner or polish.
Convection filter
The convection filters are located in the back of each oven chamber.
Clean them regularly. If you allow them to become clogged, the oven's convection cooking modes will not work properly.
NOTE
For your safety and proper oven performance, re-install the convection filters before cooking.
English82
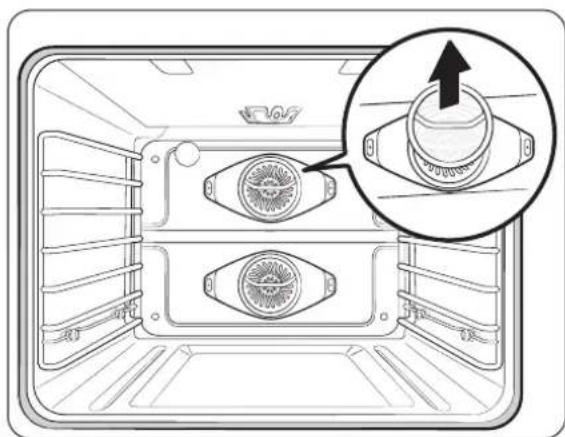
Removing your oven's convection filter
When the oven is cool, put your fingers around the edges of the filter and gently push up.
To clean the filter
Soak the filter in hot, soapy water, and rinse well. You may also place it in a dishwasher on the top rack. Dry the filter before re-installing it.

Installing your oven's convection filter
Carefully hook the metal clips on the back of the filter over the metal bar across the fan hole. Make sure it is centered over the hole. Be careful not to scratch the porcelain surfaces with the back of the filter
Air fry tray
To keep the Air fry tray clean, remove them from the cavity, and soak them in Lukewarm soapy water. Then, scour soil off of the Air fry tray using a plastic scouring pad.
NOTE
The air fry tray is dishwasher-safe.
CAUTION
Do not leave the air fry tray in the oven during the self-cleaning cycle. The extreme heat generated in this cycle can permanently peel off the air fry coating, their color will turn slightly blue and finish will be dull.
English
Care and maintenance - Oven
Oven racks
- It is recommended to remove racks but if the racks are left in the oven during a self-cleaning cycle, their color will turn slightly blue and the finish will be dull. After the self-cleaning cycle is complete and the oven has cooled, rub the sides of the racks with wax paper or a cloth containing a small amount of oil. This will help the racks glide more easily on their tracks.
- Gliding racks may be cleaned by hand with an abrasive cleaner or steel wool. During cleaning, be careful not to allow water or cleaner to enter the slides on the sides of rack.
NOTE
- Do not clean the oven racks in a dishwasher.
- If the rack becomes hard to remove or replace, lightly wipe the oven rack guides with cooking oil. Do not wipe cooking oil on the slides.
- If the rack becomes difficult to slide, the rack may need to be lubricated using a graphite lubricant.
- Graphite lubricant is available for retail purchase. Verify that the lubricant is FDA-approved.
CAUTION
- Do not leave racks in the oven during the self-cleaning cycle. The extreme heat generated in this cycle can permanently peel off the racks' coating and make it difficult to remove the racks.
- Do not spray cooking oil or lubricant directly onto the gliding rack.
English84
To lubricate the slides of the gliding rack
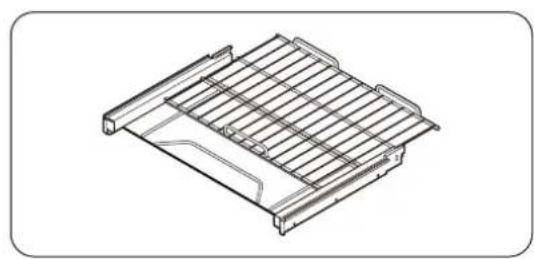
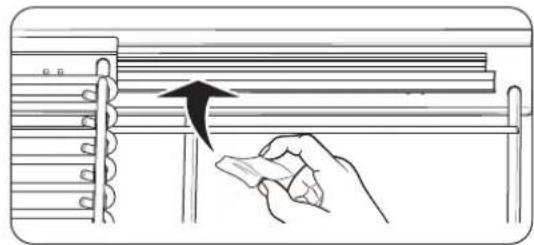
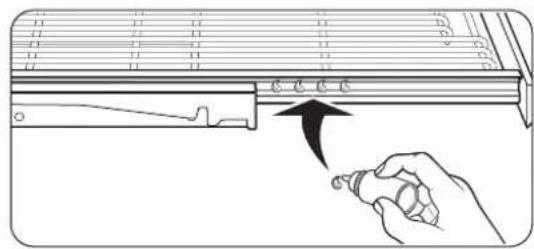

- Remove the rack from the oven. See removing the gliding rack in the Using the gliding rack section on page 43.
- Fully extend the rack on a table or countertop. Newspaper may be placed underneath the rack for easy cleanup.
- If there is debris in the slide tracks, wipe it away using a paper towel. (Any graphite lubricant wiped away must be replaced - See steps 4 through 7.)
- Shake the graphite lubricant before opening it. Starting with the left (front and back) slide mechanism of the rack, place four (4) small drops of lubricant on the two (2) bottom tracks of the slide close to the bearing carriers.
Care and maintenance - Oven
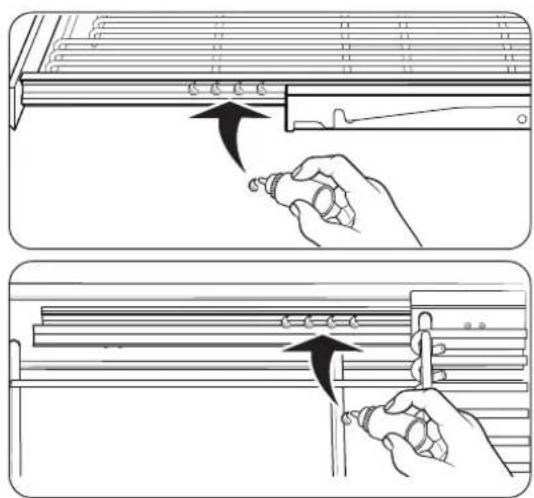
- Repeat for the right (front and back) slide mechanism of the rack.
- Open and close the rack several times to distribute the lubricant.
- Replace the cap on the lubricant and shake it again. Turn the rack over and repeat steps 3, 4, 5, and 6.
- Close the rack, turn the rack right-side-up, and then install it in the oven. See Installing the gliding rack on page 43.
NOTE
Do not spray the gliding rack with cooking spray or other lubricant sprays.
English86
Ladder racks
Ladder Racks can be removed for manual cleaning or to prevent discoloration during a Self-Cleaning cycle.
Removing the Ladder racks
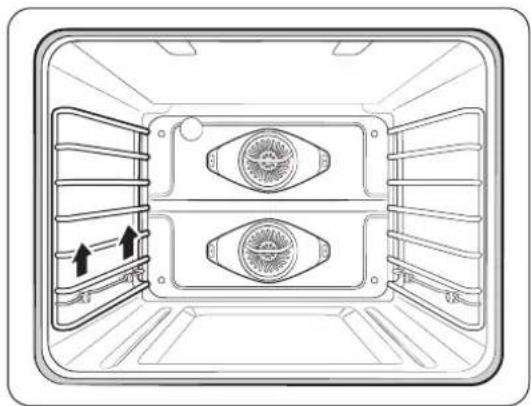
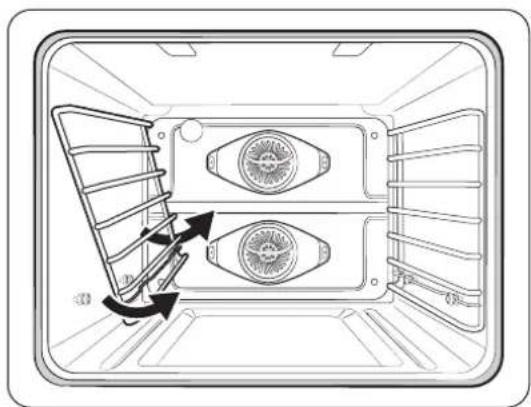
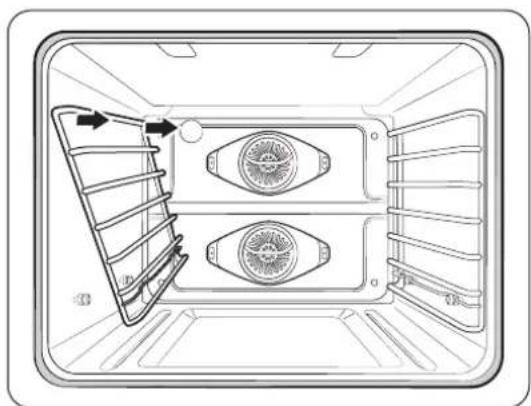
- Grasp the Position 2 rack guide, and then lift the Ladder Rack straight up. This frees the Ladder Rack from its two supports on the oven wall.
- Rotate the Ladder Rack by approximately 45^ .
- Pull the Rack away from the oven wall to remove it from the two support holes in the wall of the oven.
- Repeat this procedure with the Ladder Rack on the opposite wall.
Care and maintenance - Oven
Replacing the Ladder racks
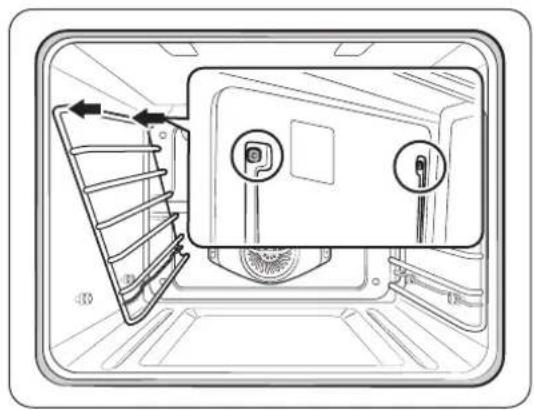
- Put the top of the Ladder Rack back into the two support holes in the oven wall.
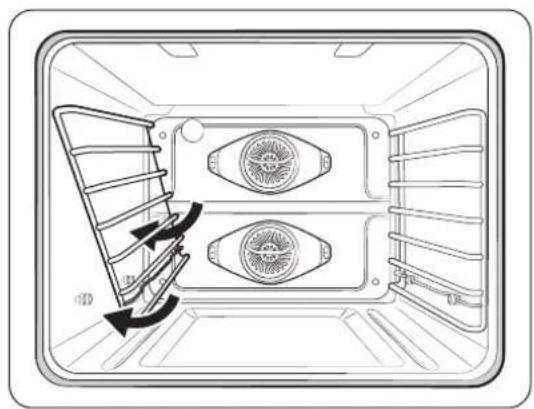
- Rotate the Ladder Rack towards the oven wall.
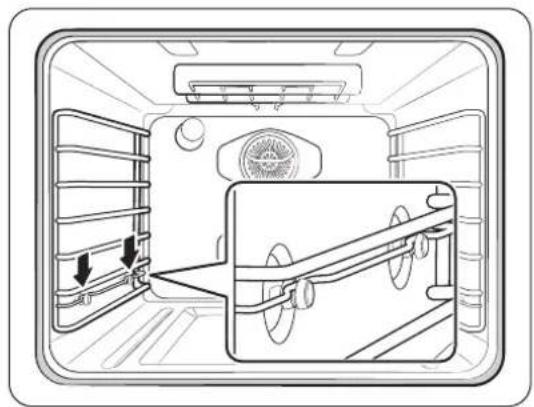
- Pull up on the Position 2 rack guide, and then press the Rack into the two supports on the oven wall.
- Repeat this procedure with the Ladder Rack on the opposite wall.
English88
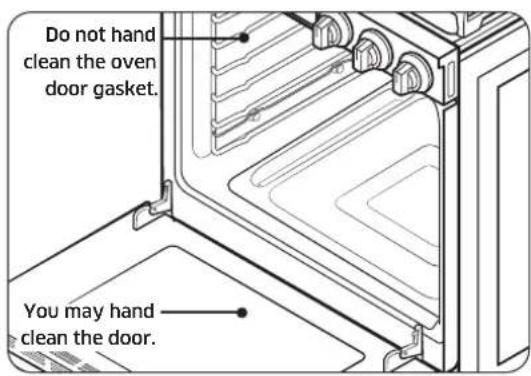
Oven door
- Use soap and water to thoroughly clean the top, sides, and front of the oven door. Rinse well. You may use a glass cleaner on the outside glass of the oven door. DO NOT immerse the door in water. DO NOT spray or allow water or the glass cleaner to enter the door vents. DO NOT use oven cleaners, cleaning powders, or any harsh abrasive cleaning materials on the outside of the oven door.
DO NOT clean the oven door gasket. The oven door gasket is made of a woven material which is essential for a good seal. Care should be taken not to rub, damage, or remove this gasket.
Care and maintenance - Oven
Removing the oven doors
CAUTION
- The door is very heavy. Be careful when removing and lifting the door.
- Do not lift the door by the handle.
Use two hands to remove an oven door.
- Take care when moving the oven door. Improper handling could result in physical injury.
- To prevent electric shock, make sure the oven is turned off before removing the oven door.
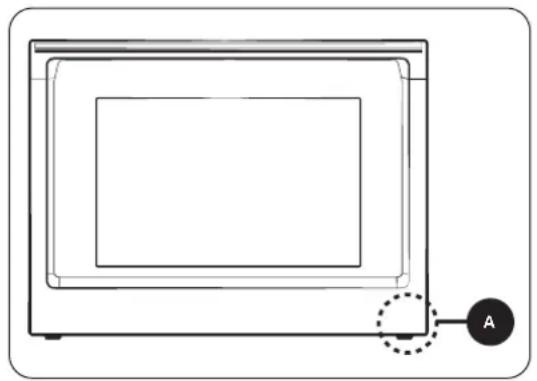
- Prior to removing the oven door, prepare a surface where you will place it. This surface should be flat and covered with a soft blanket. You can also use the corner posts from your packaging material.
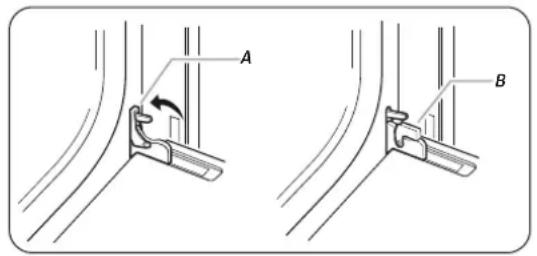
- Open the oven door.
- At the bottom corners of the door, flip the hinge locks fully out to unlock them; otherwise, the door cannot be removed.
A. Oven door hinge latch in locked position
B. Oven door hinge latch in unlocked position
English90
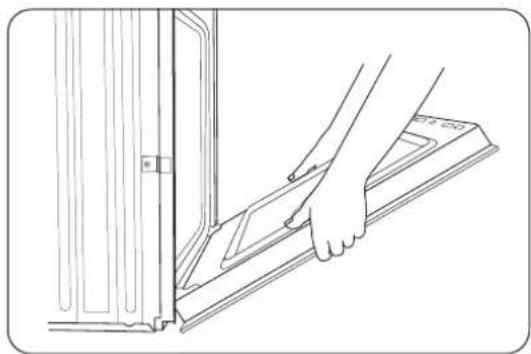
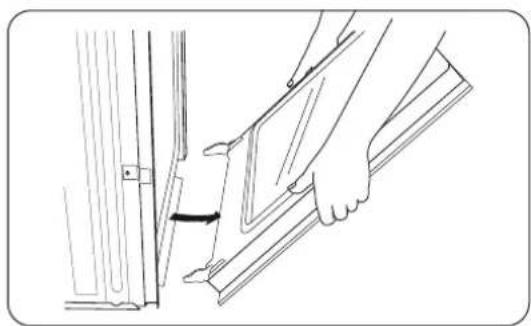
- Partially close the door to engage the door latch locks. The door will stop at this point.
- Grasp each side of the door below the handle, and lift the door slightly to expose the cabling at the base.
- Set the oven door aside on the prepared covered work surface with the oven door resting on its handle.
Care and maintenance - Oven
Reinstalling the oven doors
CAUTION
The door is very heavy. You may need help lifting the door high enough to slide it into the hinge slots. Do not lift the door by the handle.

A. Slot in the oven cavity for the door hinge lock
- Using two hands, grasp the side edges of the door at the midpoint. Face the oven cavity.
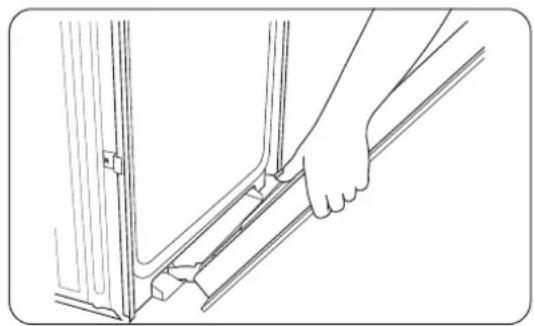
- Place the door near the product.
- Locate the slots on each side of the oven cavity for the door hinge locks.
- Hold the door at a 45^ angle, and then align the door hinges with the slots in the lower front of the oven cavity. Slowly insert the door, making sure you maintain the 45^ angle. You will know the door is engaged in the slot when you feel a slight drop.
English92

- Open the door fully. If the oven door does not open to a full 90^ , repeat steps 1 through 4.
- At the bottom corners of the door, flip the hinge locks forward to lock them. See Step 3 (illustration A) in the "Removing the oven doors" section for the proper locked position.
- Close the oven door.
NOTE
When the hinges are properly installed and the door is closed, there should be an even gap between the door and the control panel. If one side of the oven door is hanging lower than the other, the hinge on that side is not properly installed.
Care and maintenance - Oven
Oven light
The oven light is a standard 40-watt appliance bulb. It comes on when you open the oven door.
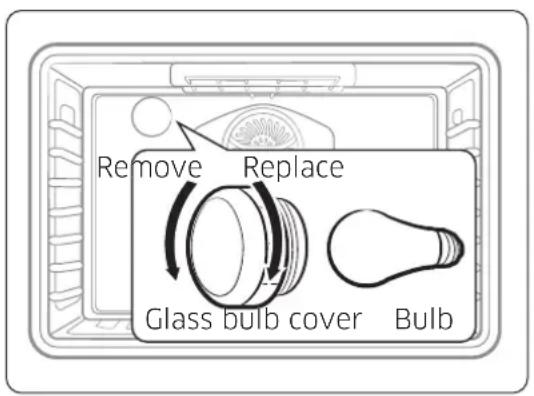
- Turn off the oven.
- Make sure the oven and oven light are cool.
- Open the door, and remove the glass cover by turning it counterclockwise.
- Remove the oven light from the socket by turning it counterclockwise.
- Insert a new 40-watt appliance bulb into the socket, and then turn it clockwise to tighten.
- Reinsert the glass cover, and then turn it clockwise to tighten.
CAUTION
To prevent electric shock, make sure the oven is turned off and cool before replacing the oven light.
NOTE
- The oven light does not operate during the self-cleaning cycle.
- Remove the racks if they prevent you from accessing the oven light.
English94
Troubleshooting
If you run into unexpected trouble, look first for a solution in the tables below. If you are still having trouble after trying the suggested solution, call 833-353-5483(USA), 844-509-4659(CANADA).
Gas safety
| Problem Possible cause Action | |
| You smell gas. The surface burner knob is not in the Off position and the burner is not lit. | Turn the burner knob to Off. |
| There is a gas leak. Clear the | room, building, or area of all occupants. Immediately call your gas supplier from a neighbor's phone. Do not call from your phone. It is electrical and could cause a spark that could ignite the gas. Follow the gas supplier's instructions. If you cannot reach your gas supplier, call the fire department. |
Surface burner
| Problem Possible causes Action | ||
| All burners do not light. | The power cord is not plugged into the electrical outlet. | Make sure the electrical plug is plugged into a live, properly grounded outlet. |
| A fuse in your home may be blown or the circuit breaker may have tripped. | Replace the fuse or reset the circuit breaker. | |
| The gas supply is not properly connected or turned on. | See the Installation Instructions that came with your range. | |
| Surface burners do not light. | The control knob is not set properly. | Push in the control knob and turn it to the Lite position. |
| The burner caps are not in place.The burner base is misaligned. | Clean the electrodes.Put the burner cap on the burner headAlign the burner base. | |
Troubleshooting
| Problem Possible causes Action | ||
| Surface burner clicks during operation. | The control knob has been left in the Lite position. | After the burner lights, turn the control knob to a desired setting. If the burner still clicks, contact a service technician. |
| The burners do not burn evenly. | Surface burner components and caps are not assembled correctly and level. | See page 77. |
| The surface burners are dirty. | Clean the surface burner components. (See page 74.) | |
| Very large or yellow surface burner flames. | The wrong burner orifice is installed. | Check the burner orifice size. Contact your installer if you have the wrong orifice (LP gas instead of natural gas or natural gas instead of LP gas). |
| Surface burners light but oven burners do not light. | The oven door lock is turned on. | The display will show the Lock icon. Hold the oven door open and Tap and hold Settings for 3 seconds. The oven will beep and the Lock icon will turn off. |
| The Gas Pressure Regulator shut off switch is in the off position. | Call a qualified service technician. | |
Control display
| Problem Possible cause Solution | |
| The display goes blank. | A fuse in your home may be blown or the circuit breaker tripped. |
| Touch controls do not respond when tapped | There is foreign matter caught between the buttons |
| There is moisture on the exterior | |
| The lock function is set Check whether the lock function is set. |
English96
Oven
| Problem Cause Action | ||
| The oven control beeps and displays an information code. | There may be an issue with your oven. See the Information codes chart on page 102. | Turn the burner knob to Off, and then restart the oven. If the problem persists, disconnect all power to the range for at least 30 seconds and then reconnect the power. If this does not solve the problem, call for service. |
| The oven will not turn on. | The oven is not completely plugged into the electrical outlet. | Make sure the electrical plug is fully inserted into a live, properly grounded outlet. |
| A fuse in your home may be blown or the circuit breaker may have tripped. | Replace the fuse or reset the circuit breaker. | |
| The oven temperature is too hot or cold. | The oven thermostat needs adjustment. | See page 70. |
| The oven burner will not shut off. | The oven door lock is turned on. | The display will show the Lock icon. Hold the oven door open and tap and hold Settings for 3 seconds. The oven will beep and the Lock icon will turn off. |
| The Sabbath function has been activated. | SAb and the time of day will show in the display. All other controls and signals will be deactivated. To turn off the oven only, turn knob to Off. To cancel the Sabbath function and reactivate the controls and signals, Tap and hold OK for 3 seconds. | |
Troubleshooting
| Problem Cause | Action | |
| Oven fan is making a noise, or won't turn off. * Slide-In oven model only. | The cooling fan is not visible, but you will hear it running whenever the electronics get hot and turn off when the electronics are cool. | This is normal operation to cool the oven, cooling fan automatically shuts down when the oven cools. |
| The oven light (lamp) will not turn on. | The oven door lock is turned on. The display will show the Lock icon. Hold the oven door open, and then tap and hold Settings for 3 seconds. The oven will beep and the Lock icon will turn off. | |
| The Sabbath function has been activated. | SAb and the time of day will show in the display. All other controls and signals will be deactivated. To cancel the Sabbath function and reactivate the light switch and other controls, tap and hold OK for 3 seconds. | |
| A loose or burned-out bulb. See page 94. | ||
| The switch operating the oven light needs to be replaced. | Call for a qualified service technician. | |
| The oven smokes excessively during broiling. | Meat or food was not properly prepared before broiling. | Cut away excess fat and/or fatty edges that may curl. |
| Improperly positioned top oven rack. | See the broiling guide on page 45. | |
| The controls are not being set properly. | See page 32. | |
| Greasy buildup on oven surfaces. | Regular cleaning is necessary when broiling frequently. | |
| Cooking is finished, but the cooling fan is still running. | The fan automatically runs for a certain amount of time to ventilate the inside of the oven. | This is not a product malfunction. The fan is designed to run automatically for a period of time to cool down the oven. |
English98
| Problem Cause Action | ||
| The oven will not self-clean. | The oven door lock is turned on. | The display will show the Lock icon. Hold the oven door open, and then tap Settings for 3 seconds. The oven will beep and the Lock icon will turn off. |
| The Smart Divider is installed in the oven. | Self-clean will not operate with the Smart Divider installed. Remove it from the oven. | |
| The oven is too hot. Let the oven | cool down, and then reset the controls. The self-clean cycle will not lock the oven door if the oven temperature is too hot. The door must lock before the self-clean cycle can start. | |
| The self-cleaning oven controls are not properly set. | Reset the self-cleaning oven controls. (See page 60.) | |
| A surface burner is on. Turn off the surface burner. Self-clean will not operate if a surface burner is on. | ||
| A crackling or popping sound. | This is normal. This is the sound of the metal heating and cooling during any cooking or cleaning function. | |
| Excessive smoking during a self-cleaning cycle. | This is the first time the oven has been cleaned. | This is normal. The oven will always smoke more the first time it is cleaned. Wipe up all excessive soil before starting the self-cleaning cycle. If smoke persists, turn the burner knob to Off. Open the windows to clear the smoke from the room. After the oven has cooled and unlocked, wipe up excessive soil, and then reset the oven for self-cleaning. |
| The oven door will not open after a self-cleaning cycle. | This is normal. The oven door will | stay locked until the oven temperature drops below 400 °F. |
Troubleshooting
| Problem Cause Action | |
| The oven is not clean after a self-cleaning cycle. | A fine dust or ash is normal. This can be wiped clean with a damp cloth. Set the self-cleaning cycle for a longer cleaning time. The cycle was not long enough to burn off the dirt buildup. Extremely dirty ovens require hand-cleaning of excessive spillovers and food buildup before you start a self-cleaning cycle. Multiple self-cleaning cycles may be necessary to completely clean the oven. |
| There is steam or smoke coming from under the control panel. | This is normal. The oven vent is located there. More steam is visible when you are using the convection functions or when baking or roasting multiple items at the same time. |
| A burning or oily odor coming from the vent. | This is normal for a new oven and will disappear within 1/2 hour of the first bake cycle. To speed the process, set a self-cleaning cycle for a minimum of 3 hours. (See page 60.) |
| Strong odor. This is temporary. The insulation around the inside of the oven emits an odor the first few times the oven is used. | |
| The oven racks are difficult to slide. | This is normal. Apply a small amount of vegetable oil to a paper towel, and then wipe the edges of the oven racks with the paper towel. Racks become dull and hard to slide if they are left in the oven during a self-clean cycle. |
| Fan noise. This is normal. The convection fan runs until the function is over or the door is opened. | |
| The convection fan is not working. | This is normal. The fan starts automatically when the oven reaches the preheat temperature. |
English100
Others
| Problem Cause Action | ||
| The product is not level. | The appliance has been installed improperly. The leveling leg(s) is (are) damaged or uneven. | Make sure the floor is level, strong, and stable. If the floor sags or slopes, contact a carpenter. Check and level the range. (See the Installation Instructions.) |
| The kitchen cabinets are not properly aligned and make the range appear to be not level. | Ensure that cabinets are square and provide sufficient room for installation. | |
| The display goes blank. | The electrical outlet Ground Fault Interruption (GFI or GFCI) has been tripped and needs to be reset. Your digital control has been damaged. | Replace fuse or reset circuit breaker. |
| Food does not bake or roast properly in the oven. | The wrong cooking mode is selected. | See page 35. |
| The oven racks have not been positioned properly for the foods being cooked. | See page 40. | |
| Incorrect cookware or cookware of improper size is being used. | See page 27. | |
| There is aluminum foil on racks or oven bottom. | Remove foil. | |
| The clock or timers are not set correctly. | See page 32. | |
| Food does not broil properly in the oven. | The oven controls are not set properly. | See page 32. |
| The oven door was not closed during broiling. | Close the oven door during broiling. | |
| The rack has not been properly positioned. | See the broiling guide on page 45. | |
English 101
Information codes
Oven
| Displayed code | Possible cause Solution | |
| C-d0 | This code occurs if the control key is short for 1 minute. | Clean the buttons and make sure there is no water on/around them. Turn off the oven and try again. If the problem continues, contact a local Dacor service center. |
| C-d1 | This code occurs if the door lock is mispositioned. | Turn the burner knob to Off, and then restart the oven. If the problem persists, disconnect all power to the oven for at least 30 seconds and then reconnect the power. If this does not solve the problem, call for service. |
| C-F0 | This code occurs if communication between the Main and Sub PBA is interrupted. | |
| C-F2 | This code occurs if communication between the Main and Touch is interrupted. | |
| C-20 | The oven sensor is open when the oven is operating. | |
| The oven sensor is short when the oven is operating. | ||
| C-21 | This code occurs if the internal temperature rises abnormally high. | Restart the appliance. |
| C-22 | The Sub PCB sensor is open when the oven is operating. | Turn both the mode and temperature selector knobs to Off, and then restart the oven. If the problem persists, disconnect all power to the oven for at least 30 seconds and then reconnect the power. If this does not solve the problem, call for service. |
| The Sub PCB sensor is short when the oven is operating. |
English102
| Displayed code | Possible cause Solution | |
| C-23 | The temperature probe sensor is short when the oven is operating. | Turn the burner knob to Off, and then restart the oven. If the problem persists, disconnect all power to the oven for at least 30 seconds and then reconnect the power. If this does not solve the problem, call for service. |
| C-30 | The PCB sensor is open when the oven is operating. | |
| The PCB sensor is short when the oven is operating. | ||
| C-31 | This code occurs if the PCB temperature rises abnormally high. | Call for service |
| C-A2 | The cooling motor is operating abnormally. | Call for service. |
| C-24 Oven | vent blocked | 1. To reset error, disconnect power or turn the burner knob to Off key after opening the oven door at least 60 sec. 2. Check whether any oven vent or air passage is blocked by aluminum foil or other material. 3. Remove aluminum foil or other material from any blocked oven vent or air passage. |
English 103
Warranty and Service
Warranty
What Is Covered
CERTIFICATE OF WARRANTY: DACOR RANGES
WITHIN THE FIFTY STATES OF THE U.S.A., THE DISTRICT OF COLUMBIA, AND CANADA:
FULL TWO-YEARS WARRANTY
The warranty applies only to the Dacor appliance sold to the first use purchaser, starting from the date of original retail purchase or closing date for new construction, whichever period is longer. Warranty is valid on products purchased brand new from a Dacor Authorized Dealer, or other seller authorized by Dacor.
If your Dacor product fails to function within one year of the original date of purchase, due to a defect in material or workmanship, Dacor will remedy it without charge to you.
All cosmetic damage (such as scratches on stainless steel, paint/porcelain blemishes, etc.) to the product or included accessories must be reported to Dacor within 60 days of the original purchase date to qualify for warranty coverage. Consumable parts such as filters and light bulbs are not covered and are the responsibility of the purchaser.
LIMITATIONS OF COVERAGE
Service will be provided by a Dacor designated service company during regular business hours. Please note service providers are independent entities and are not agents of Dacor.
Dealer display and model home display products with a production date greater than 5 years, products sold "As Is," and products installed for non-residential use, which include but are not limited to religious organizations, fire stations, bed & breakfast, and spas carry a one year parts warranty only. All delivery, installation, labor costs, and other service fees are the responsibility of the purchaser.
Warranty will be null and void on product that has altered, defaced, or missing serial numbers and tags.
The owner must provide proof of purchase or closing statement for new construction upon request. All Dacor products must be accessible for service.
Warranty is null and void if non-ETL or non-CUL approved product is transported from the U.S.A.
English104
OUTSIDE THE FIFTY STATES OF THE U.S.A., THE DISTRICT OF COLUMBIA, AND CANADA:
LIMITED TWO-YEARS WARRANTY
If your Dacor product fails to function within two years of the original date of purchase due to a defect in material or workmanship, Dacor will furnish a new part, F.O.B. factory to replace the defective part.
All delivery, installation, labor costs and other service fees are the responsibility of the purchaser.
What Is Not Covered
- Slight color variations may be noticed because of differences in painted parts, kitchen lighting, product placement and other factors; this warranty does not apply to color variation.
Service calls to educate the customer on proper use and care of the product. - Service fees for travel to islands and remote areas, which include but are not limited to, ferries, toll roads or other travel expenses.
- Consequential or incidental damage, including but not limited to food or medicine loss, time away from work or restaurant meals.
- Failure of the product when used for commercial, business, rental or any application other than for residential consumer use.
- Failure of the product caused by improper product installation.
- Replacement of house fuses, fuse boxes or resetting of circuit breakers.
- Damage to the product caused by accident, fire, flood, power interruption, power surges or other acts of God.
- Liability or responsibility for damage to surrounding property including cabinetry, floors, ceilings and other structures or objects around the product.
- Breakage, discoloration, or damage to glass, metal surfaces, plastic components, trim, paint or other cosmetic finish caused by improper usage, care, abuse or neglect.
Out of Warranty
Should you experience a service issue beyond the standard warranty period, please contact us. Dacor reviews each issue and customer concern to provide the best possible solution based on the circumstances.
English 105
Warranty and Service
THE REMEDIES PROVIDED IN THE ABOVE EXPRESS WARRANTY ARE THE SOLE AND EXCLUSIVE REMEDIES. THEREFORE, NO OTHER EXPRESS WARRANTY ARE MADE, AND OUTSIDE THE FIFTY STATES OF THE UNITED STATES, THE DISTRICT OF COLUMBIA AND CANADA, ALL IMPLIED WARRANTY, INCLUDING BUT NOT LIMITED TO, ANY IMPLIED WARRANTY OF MERCHANTABILITY OR FITNESS FOR A PARTICULAR USE OR PURPOSE, ARE LIMITED IN DURATION TO ONE YEAR FROM THE DATE OF ORIGINAL PURCHASE. IN NO EVENT SHALL DACOR BE LIABLE FOR INCIDENTAL EXPENSE OR CONSEQUENTIAL DAMAGES. IN THE EVENT DACOR PREVAILS IN ANY LAWSUIT, DACOR SHALL BE ENTITLED TO REIMBURSEMENT OF ALL COSTS AND EXPENSES, INCLUDING ATTORNEY'S FEES, FROM THE DACOR CUSTOMER. NO WARRANTY, EXPRESS OR IMPLIED, ARE MADE TO ANY BUYER FOR RESALE.
Some states do not allow limitations on how long an implied warranty lasts, or do not allow the exclusion or limitation of inconsequential damages, therefore the above limitations or exclusions may not apply to you. This warranty gives you specific legal rights, and you may also have other rights that vary from state to state.
English106
Open-Source Announcement
The software included in this product contains open source software. You may obtain the complete corresponding source code for a period of three years after the last shipment of this product by sending an email to mailto:oss.request@samsung.com.
It is also possible to obtain the complete corresponding source code in a physical medium such as a CD-ROM; a minimal charge will be required.
The following URL http://opensource.samsung.com/opensource/OVEN_HKM_TZ/seq/0 leads to the download page of the source code made available and open source license information as related to this product. This offer is valid to anyone in receipt of this information.


IMPORTANT:
Your warranty will not begin until you activate it online or return this form to Dacor. If you have purchased more than one Dacor product, please return all forms in one envelope, or activate the warranty for each product online.
Please rest assured that under no conditions will Dacor sell your name or any of the information on this form for mailing list purposes. We are very grateful that you have chosen Dacor products for your home and we do not consider the sale of such information to be a proper way of expressing our gratitude!
Owner's Name:
Last (Please Print or Type) First Middle
Street:
City: State:Zip
Purchase Date: Email: Telephone:
Dealer:
City:State:Zip
Your willingness to take a few seconds to fill in the section below will be sincerely appreciated. Thank you.
- How were you first exposed to Dacor products? (Please check one only.)
A.T.V.Cooking Show
B. Magazine
C. Appliance Dealer Showroom
D. Kitchen Dealer Showroom
E. Home Show
F Builder
G. Architect/Designer
H.AnotherDacorOwner
1. Model Home
J. Other
- Where did you buy your Dacor appliances?
A.Appliance Dealer
B.Kitchen Dealer
C. Builder Supplier
D. Builder
E. Other
- For what purpose was the product purchased?
A. Replacemobly
B. Part of a Remodel
C.NewHome
D. Other
- What is your household income?
A.Under $75,000
B. 75,000 -100,000
C. 100,000 -150,000
D. 150,000 -200,000
E. 200,000 -250,000
F.Over $250,000
- What are the brands of appliances that you have in your kitchen?
A. Cooktop
B.Oven
C. Dishwasher
D. Refrigerator
- Would you buy or recommend another Dacor product?
Yes
Comments:
No
Place Serial Number Label Here
Thank you very much for your assistance. The information you have provided will be extremely valuable in helping us plan for the future and giving you the support you deserve.
Website: www.dacor.com
Phone:833-353-5483(USA),844-509-4659(CANADA).
MEMO

NO POSTAGE NecesssARY IF MAILED IN THE UNITED STATES
BUSINESS REPLY MAIL
FIRST-CLASS MAIL PERMIT NO 1600 CITY OF INDUSTRY CA
POSTAGE WILL BE PAID BY ADDRESSEE
DACOR
ATTN: WARRANTY PROCESSING DEPT
POBOX90070
CITY OF INDUSTRY, CA 91715-9907
11.1111111111111111
fold here

DG68-01458A-00
dacor
Dacor • 14425 Clark Avenue, City of Industry, CA 91745 • Phone: 833-353-5483(USA), 844-509-4659(CANADA). • Fax: (626) 403-3130 • www.dacor.com
dacor
Manual del usuario
Estufa a gas pro
DOP30840*
ADVERTENCIA
Samsung Electronics America, Inc.
85 Challenger Road
Ridgefield Park, NJ 07660
- Canada
Samsung Electronics Canada Inc. 2050 Derry Road West, Mississauga, Ontario L5N 0B9 Canada
The Dacor Customer Assurance Team
Espanol6
Contidente
Antes de comenzar 9
Important 9
Parrillas verticals 87
FIRST-CLASS MAIL PERMIT NO 1600 CITY OF INDUSTRY CA
POSTAGE WILL BE PAID BY ADDRESSEE
DACOR
ATTN: WARRANTY PROCESSING DEPT
POBOX90070
CITY OF INDUSTRY, CA 91715-9907
11.11111111111111111
fold here

DG68-01458A-00
dacor
Dacor • 14425 Clark Avenue, City of Industry, CA 91745
Assurance client de Dacor
- États-Unis
Samsung Electronics America, Inc.
85 Challenger Road
Ridgefield Park, NJ 07660
Canada
Samsung Electronics Canada Inc.
2050 Derry Road West, Mississauga,
Ontario L5N 0B9 Canada
The Dacor Customer Assurance Team
Français6
Contenu
INFORMATIONS SUR LA GARANTIE

IMPORTANT :
FIRST-CLASS MAIL PERMIT NO 1600 CITY OF INDUSTRY CA
POSTAGE WILL BE PAID BY ADDRESSEE
DACOR
ATTN: WARRANTY PROCESSING DEPT
POBOX90070
CITY OF INDUSTRY, CA 91715-9907
11.11111111111111111
fold here

DC68-01458A-00
dacor
Dacor • 14425 Clark Avenue, City of Industry, CA 91745