HW18HN2DAA - Air Conditioning HOTPOINT - Free user manual and instructions
Find the device manual for free HW18HN2DAA HOTPOINT in PDF.
| Brand | Hotpoint |
| Model | HW18HN2DAA |
| Type | Reversible air conditioner (heat pump) |
| Operating modes | Cooling, Heating, Dehumidification, Fan |
| Refrigerant | R32 |
| Set temperature range | 16 °C to 30 °C |
| Power supply | 220-240 V ~ 50 Hz |
| Remote control | Wireless with LCD screen, range 7 meters |
| Remote control batteries | 2 AAA batteries (not included) |
| Fan speeds | Auto, Low, Medium, High |
| Special functions | Turbo, Quiet, 24h ON/OFF timer, Up/Down vent sweep, Key lock, Lighting |
| Air filter | Washable, clean regularly |
| Wi-Fi connectivity | Yes, via SmartHQ app |
| Emergency mode | Button on indoor unit (limited operation) |
| Safety | Key lock, short-circuit protection (fuse) |
| Warranty | Limited warranty (see installation manual) |
| Installation | Recommended by a qualified professional |
| Indoor unit (dimensions) | Not specified in the manual |
| Weight | Not specified |
Frequently Asked Questions - HW18HN2DAA HOTPOINT
User questions about HW18HN2DAA HOTPOINT
0 question about this device. Answer the ones you know or ask your own.
Ask a new question about this device
Download the instructions for your Air Conditioning in PDF format for free! Find your manual HW18HN2DAA - HOTPOINT and take your electronic device back in hand. On this page are published all the documents necessary for the use of your device. HW18HN2DAA by HOTPOINT.
USER MANUAL HW18HN2DAA HOTPOINT
REMOTE CONTROL FEATURES AND SETTINGS-Cool only .... 3
REMOTE CONTROL FEATURES AND SETTINGS-Heat Pump ... 5
MANUAL OPERATION AND MAINTENANCE .... 7
WI-FI PAIRING 8
TROUBLESHOOTING TIPS ...9
LIMITED WARRANTY ..... 10
IMPORTANT SAFETY INFORMATION READ ALL INSTRUCTIONS BEFORE USING THE SYSTEM
WARNING
WARNING For your safety, the information in this manual must be followed to minimize the risk of fire, electric shock or personal injury.
- Use this appliance only for its intended purpose as described in this Owner's Manual.
- This heat pump must be properly installed in accordance with the Installation Instructions before it is used.
- Turn the unit OFF before cleaning the air filter
-
GE Appliances, a Haier company does not support any servicing of the heat pump. We strongly recommend that you do not attempt to service the heat pump yourself.
-
For your safety...do not store or use combustible materials, gasoline or other flammable vapors or liquids in the vicinity of this or any other appliance. If you are getting rid of an old product with refrigerants, check with the company handling disposal about what to do.
- These R32 heat pump systems require contractors and technicians use tools, equipment and safety standards approved for use with this refrigerant. DO NOT use equipment certified for R22 or R410A refrigerant only.
⚠ WARNING
- This remote controller contains batteries. If a new or used battery is swallowed or enters the body, it can cause severe internal burns and can lead to death in as little as 2 hours. Always completely secure the battery compartment. If the battery compartment does not close securely, stop using the product, remove the batteries, and keep it away from children.
- If you think batteries might have been swallowed or placed inside any part of the body, seek immediate medical attention.
- The cells shall be disposed of properly, including keeping them away from children.
• Even used cells may cause injury.
WARNING
-
This product is not intended for use by persons (including children) with reduced physical, sensory or mental capabilities, or lack of experience and knowledge, unless they have been given supervision or instruction concerning use of the appliance by a person responsible for their safety.
-
Children should be supervised to ensure that they do not play with the product.
- Any damage of electrical supply must be replaced by the manufacturer, its service agent or similarly qualified persons in order to avoid a hazard.
READ AND SAVE THESE INSTRUCTIONS
Remote Control Features and Settings-Cooling Only
Applicable Model
| MODEL | |
| AC | HW12HN2CAA |
| HW18HN2CAA | |
| HW24HN2CAA |
Remote Control
flowchart
graph TD
    A["6"] --> B["TURBO"]
    C["8"] --> B
    D["2"] --> E["COOL DRY"]
    F["11"] --> G["TEMP"]
    H["5"] --> G
    I["3"] --> J["TIMER ON"]
    K["13"] --> J
    L["16"] --> M["LOCK LIGHT RESET"]
    N["12"] --> M
    O["14"] --> M
    P["17"] --> Q["CONFIRM CANCEL"]
    R["9"] --> S["ECO#F/QUIET"]
    T["15"] --> S
    U["18"] --> V["TIMER OFF"]
    W["10"] --> X["SWING"]
    Y["4"] --> Z["FAN"]
    AA["1"] --> AB["Power Circle"]
    AC["7"] --> AB
    AD["4"] --> AE["SWING"]
    AF["10"] --> AE
    AG["17"] --> AH["LOCK LIGHT RESET"]
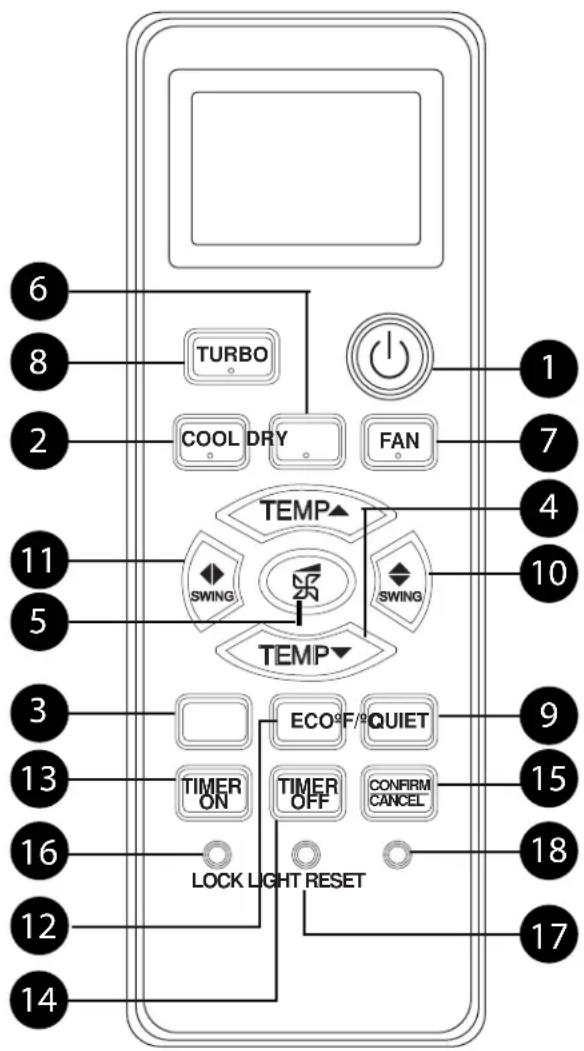
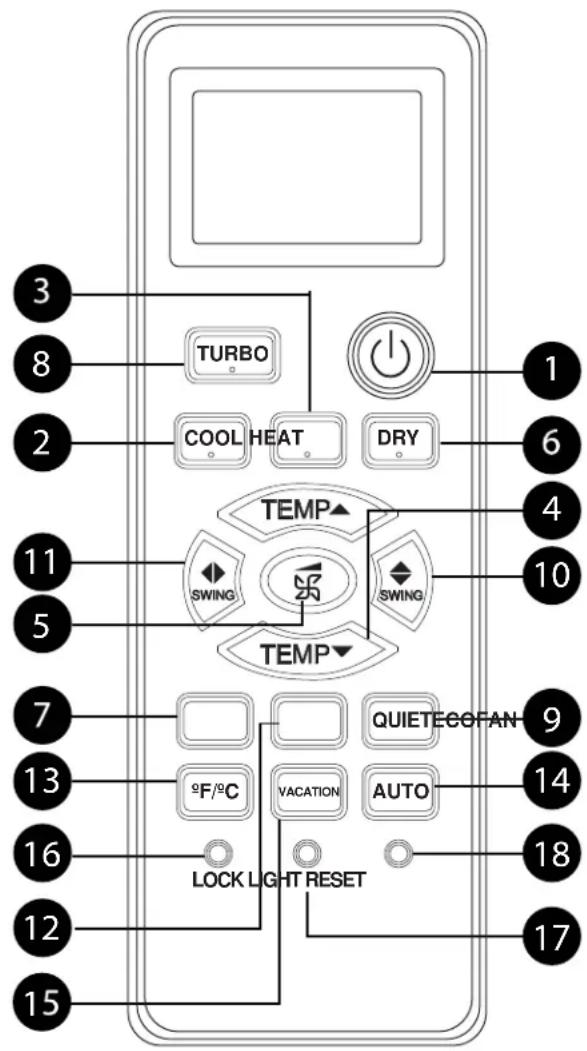
1. Power Button
Press the ON/OFF button on the remote control to start or stop the unit.
2. COOL Button
In COOL mode, the unit operates in cooling. When FAN is set to AUTO, the heat pump automatically adjusts the fan speed according to the room temperature. The *will be displayed during COOL mode.
3. Fahrenheit/Celsius Button
Press °F/°C to toggle remote and unit display temperature between Fahrenheit and Celsius.
4. Temperature +/- Buttons
Temp + : Every time the button is pressed, the temperature setting increases. Temp - : Every time the button is pressed, temperature setting decreases. The operating temperature range is 60°F-86°F (16°C-30°C).
5. FAN SPEED Button
FAN SPEED: For each press the fan speed changes as follows:
Remote control:

6. DRY Button
DRY mode is used to reduce humidity. In DRY mode, when room temperature becomes lower than temp. setting +2°F, unit will run intermittently at LOW speed regardless of FAN setting. The ⬆will be displayed during DRY mode.
7. FAN MODE Button
FAN mode circulates air only; there is no temperature adjustment available. Use the fan speed button (5) to adjust fan speed from low, medium to high. Auto, Turbo and Quiet are not available. The 25 will be displayed during FAN mode.
8. TURBO Button
The TURBO function is used for fastest air flow in Heating or Cooling modes. Control will display the TURBO icon - on the bottom right side of the remote display. Pressing the TURBO button again or the FAN SPEED button will turn TURBO off.
9. Quiet Button
The QUIET function switches the fan to the lowest speed. The control will display the QUIET icon on the bottom left side of the remote display. Pressing the QUIET button again or the FAN SPEED button will turn QUIET off.
Remote Control Features and Settings-Cooling Only
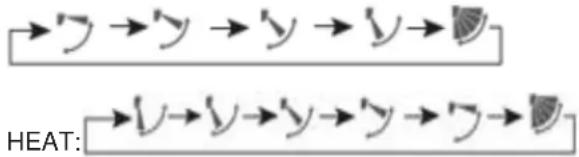
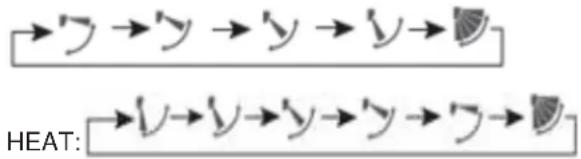
10. Louver UP/DOWN Button
Press the LOUVER UP/DOWN button to choose the position of the horizontal airflow louvers. Status display of air flow
COOL/DRY:
flowchart
graph LR
    A["→y →y →y →y"] --> B["HEAT:"]
    C["→v →v →y →y →y"] --> D["HEAT:"]
    style A fill:#f9f,stroke:#333
    style B fill:#ccf,stroke:#333
    style C fill:#cfc,stroke:#333
    style D fill:#fcc,stroke:#333
NOTE:
- It is advisable not to keep the vertical louver in the downward position for an extended period of time in COOL or DRY mode, otherwise condensate water may form on the louver.
- When turning the unit on, the remote control will automatically return the louver to the previous set swing position. When turning the unit off, the louver will rotate to the full open position prior to closing.
11. Louver SIDE/SIDE Button (select models)
Feature is not available
12. ECO Button
For 1H09HN2CAA, 1H12HN2CAA, 1H18HN2CAA and 1H24HN2CAA models:
Press ECO button repeatedly to select each step.
1st Press: Level 3 Eco - Reduces some energy consumption
- e L3 is displayed on the display screen.
2nd Press: Level 2 Eco - Additional reduction in energy consumption
- ♦ L2 is displayed on the display screen.
3rd Press: Level 1 Eco - Greatest reduction in energy consumption
- ☐ LI is displayed on the display screen.
Note: ECO modes will reduce the compressor operation frequency and increase the time needed to reach temperature set point. To exit ECO mode, press ECO Button a fourth time.
FOR ALL OTHER MODELS:
Feature is not available.
13. TIMER ON Button
Press the turned ON button, TEMP+/TEMP–button is pressed with the length of time increment/decrement in 0.5 hour between 0-12 hours, and 1 hour increment/ decrement between 12-24 hours 1. press the CONFIRM/CANCEL button, Timer being set. When the remote is set to ON, the system will turn off until the countdown timer ends. Then the indoor unit will turn on and operate in mode, temperature setting and fan speed that was displayed when timer was set.
14. TIMER OFF Button
Press the turned OFF button, TEMP+/TEMP- button is pressed with the length of time increment/ decrement in 0.5 hour between 0-12 hours,and 1 hour increment/decrement between 12-24 hours 1.press the CONFIRM/CANCEL button,Timer being set. When the remote is set to OFF,the system will remain ON until the countdown timer ends. Then the indoor unit will turn OFF.
15. CONFIRM/CANCEL Button
Confirm timing function.
16. LOCK Button
Used to lock buttons and LCD display, use a pen point or a similar object to depress this button.
17. LIGHT Button
The indoor display panel will show indoor set temperature by default. Press this button once, it will display the room temperature. Press this button twice within 3 seconds, it will turn off the indoor display panel. Press again to go back to display indoor set temperature.
18. RESET Button
If the remote control is not functioning properly, use a pen point or a similar object to depress this button to reset the remote.
NOTE FOR 1H12HN2CAB, 1H18HN2CAB AND 1H24HN2CAB MODELS:
To achieve most efficient operation, operate the indoor unit with fan speed in Auto mode. In Cooling mode, use a set temperature of 78^ F ( 25.5^ C) or higher.
Remote Control Features and Settings-Heat Pump
Applicable Model
| MODEL | |
| HP | HW09HN2DAA |
| HW12HN2DAA | |
| HW18HN2DAA | |
| HW24HN2DAA |
Remote Control
text_image
3 8 2 11 5 7 13 16 12 15 TURBO COOL HEAT DRY TEMP SWING SWING TEMP 9F/°C VACATION AUTO LOCK LIGHT RESET QUIETECOFAN AUTO 14 18 17 1 6 4 101. Power Button
Press the ON/OFF button on the remote control to start or stop the unit.
2. COOL Button
In COOL mode, the unit operates in cooling. When FAN is set to AUTO, the heat pump automatically adjusts the fan speed according to the room temperature. The will be displayed during COOL mode.
3. HEAT Button
In HEAT mode, warm air will blow out after a short period of the time due to cold-air prevention function. When FAN is set to AUTO, the heat pump automatically adjusts the fan speed according to room temperature. The ⚙ will be displayed during HEAT mode.
4. Temperature +/- Buttons
Temp + : Every time the button is pressed, the temperature setting increases. Temp - : Every time the button is pressed, temperature setting decreases. The operating temperature range is 60°F-86°F (16°C-30°C).
5. FAN SPEED Button
FAN SPEED: For each press the fan speed changes as follows:
Remote control:

6. DRY Button
DRY mode is used to reduce humidity. In DRY mode, when room temperature becomes lower than temp. setting +2°F, unit will run intermittently at LOW speed regardless of FAN setting. The ⬆will be displayed during DRY mode.
7. FAN MODE Button
FAN mode circulates air only; there is no temperature adjustment available. Use the fan speed button (5) to adjust fan speed from low, medium to high. Auto, Turbo and Quiet are not available. The 25 will be displayed during FAN mode.
8. TURBO Button
The TURBO function is used for fastest air flow in Heating or Cooling modes. Control will display the TURBO icon → on the bottom right side of the remote display. Pressing the TURBO button again or the FAN SPEED button will turn TURBO off.
9. Quiet Button
The QUIET function switches the fan to the lowest speed. The control will display the QUIET icon on the bottom left side of the remote display. Pressing the QUIET button again or the FAN SPEED button will turn QUIET off.
Remote Control Features and Settings-Heat Pump
10. Louver UP/DOWN Button
Press the LOUVER UP/DOWN button to choose the position of the horizontal airflow louvers. Status display of air flow COOL/DRY:
flowchart
graph LR
    A["→y →y →y →y →"] --> B["HEAT:"]
    C["→y →y →y →y →"] --> D["HEAT:"]
    style A fill:#f9f,stroke:#333
    style C fill:#f9f,stroke:#333
    style B fill:#ccf,stroke:#333
    style D fill:#ccf,stroke:#333
NOTE:
- It is advisable not to keep the vertical louver in the downward position for an extended period of time in COOL or DRY mode, otherwise condensate water may form on the louver.
- When turning the unit on, the remote control will automatically return the louver to the previous set swing position. When turning the unit off, the louver will rotate to the full open position prior to closing.
11. Louver SIDE/SIDE Button (select models)
Feature is not available
12. ECO Button
For 1H09HN2DAA1, 1H12HN2DAA1, 1H18HN2DAA1 and 1H24HN2DAA1 models: Press ECO button repeatedly to select each step.
1st Press: Level 3 Eco - Reduces some energy consumption
- L3 is displayed on the display screen.
2nd Press: Level 2 Eco - Additional reduction in energy consumption
- L2 is displayed on the display screen.
3rd Press: Level 1 Eco - Greatest reduction in energy consumption
- ☐ L1 is displayed on the display screen.
Note: ECO modes will reduce the compressor operation frequency and increase the time needed to reach temperature set point. To exit ECO mode, press ECO Button a fourth time.
FOR ALL OTHER MODELS:
Feature is not available.
13. Fahrenheit/Celsius Button
Press °F/°C to toggle remote and unit display temperature between Fahrenheit and Celsius.
14. AUTO Button
Press the AUTO button. Auto mode ☑ -The heat pump will automatically select Cool, Heat, or Fan operation according to set temperature. When FAN is set to AUTO the heat pump automatically adjusts the fan speed according to room temperature.
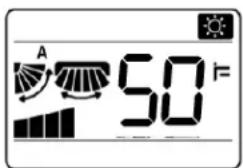
15. VACATION Button
50°F Heating sets the system to maintain 50°F. This is used to prevent freezing during long unoccupied periods of time.
text_image
A 50°F16. LOCK Button
Used to lock buttons and LCD display, use a pen point or a similar object to depress this button.
17. LIGHT Button
The indoor display panel will show indoor set temperature by default. Press this button once, it will display the room temperature. Press this button twice within 3 seconds, it will turn off the indoor display panel. Press again to go back to display indoor set temperature.
18. RESET Button
If the remote control is not functioning properly, use a pen point or a similar object to depress this button to reset the remote.
NOTE FOR 1H09HN2DAA, 1H12HN2DAA, 1H18HN2DAA AND 1H24HN2DAA MODELS:
To achieve optimal capacity and efficiency at 5^ F ( -15^ C) and below, it is recommended to operate indoor fan in Turbo Mode.
NOTE FOR ALL OTHER MODELS: To achieve most efficient operation, operate the indoor unit with fan speed in Auto mode. In Cooling mode, use a set temperature of 78^ F ( 25.5^ C) or higher. In Heating mode, use a set temperature of 73^ F ( 22.5^ C) or lower.
Manual Operation and Maintenance
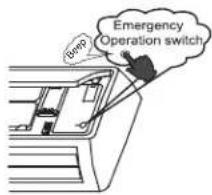
Manual Operation
- Use this operation only when the remote control is defective or lost.
- When the emergency operation switch is pressed, the unit beeps once, which indicates the start of this operation.
- The unit will run automatically in the following modes:
| Room Temperature | Designated Temperature | Timer Mode | Fan Speed | Operation Mode |
| Above 73°F 79°F NO AUTO | COOL | |||
| Below 73°F 78°F NO AUTO | HEAT* | |||
* Heat Pump models only
text_image
Enerp Emergency Operation switch- During emergency operation, it is not possible to change the temperature or fan speed. It is also not possible to operate in timer or dry modes.
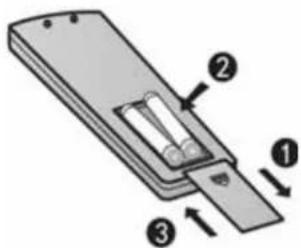
Inserting the Batteries
- Remove the battery cover
- Insert 2 AAA batteries as illustrated noting battery polarity
- Reinstall the battery cover
NOTE:
- The distance from the remote control to the receiver should be less than 23 feet with no obstructions.
- If the remote control display is weak or the operating distance has diminished, the batteries may need to be replaced.
- Remote control malfunctions can sometimes be corrected by removing the batteries from the remote for a few minutes and then reinstalling them.
- Remove the batteries from the remote control if the unit will not be in use for an extended period of time. If any segments of the display remain active after battery removal, press the reset button.
text_image
Diagram of a remote control panel with labeled components and directional arrows indicating movement or forceOptimizing Performance
Close doors and windows during operation
Do not block the air inlet or outlet
Wipe the cabinet using a soft and dry cloth. For serious stains, use a neutral detergent diluted with water. Wring the water out of the cloth before wiping down the unit. Then wipe off the detergent completely.

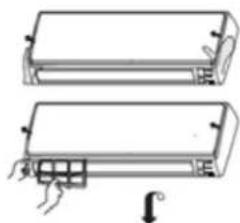
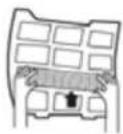
Cleaning the Front Cover
- Open the front cover by pulling it upward
- Remove the Filter: Gently push up on the filter's center tab until it is released from the stopper, and remove the filter in a downward motion.
- Clean the filter: Use a vacuum cleaner to remove dust, or wash the filter with water. After washing, dry the filter completely.
- Attach the filter: Attach the filter so that the "FRONT" label is facing outward. Make sure that the filter is securely attached behind the holding tabs. If the filter is not attached correctly the unit may not achieve maximum efficiency.
- Close the front cover.
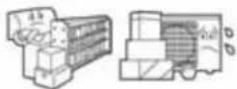
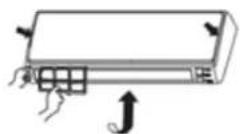
natural_image
Two schematic diagrams of rectangular electronic components with mounting holes and a downward arrow indicating rotation (no text or symbols)
Configuration Method
Download the App:
Download the SmartHQ app from
Google Play (Android) or the Apple app store (ios).

Maintenance
If you experience difficulty connecting to your WiFi network or have another technical issue with this module please contact 1-800-220-6899 for assistance.
After downloading the App:
- Please have wireless router information on hand (including password).
- Open the app.
- Select "Sign In".
- Sign into your account and register as new user.
- Turn your air conditioner on.
- Select the “+” icon to add a new device and follow the directions to add your air conditioner to your account.
- Follow the on-screen prompts.
KEEP THIS DOCUMENT FOR FUTURE REFERENCE
REGULATORY INFORMATION
FCC/IC Compliance Statement:
This device complies with Part 15 of the FCC Rules. Operation is subject to the following two conditions:
- This device may not cause harmful interference.
- This device must accept any interference received, including interference that may cause undesired operation.
This equipment has been tested and found to comply with the limits for a Class B digital device, pursuant to Part 15 of the FCC Rules. These limits are designed to provide reasonable protection against harmful interference in a residential installation. This equipment generates uses and can radiate radio frequency energy and, if not installed and used in accordance with the instructions, may cause harmful interference to radio communications. However, there is no guarantee that interference will not occur in a particular installation. If this equipment does cause harmful interference to radio or television reception, which can be determined by turning the equipment off and on, the user is encouraged to try to correct the interference by one or more of the following measures:
- Reorient or relocate the receiving antenna.
- Increase the separation between the equipment and receiver.
- Connect the equipment into an outlet on a circuit different from that to which the receiver is connected.
- Consult the dealer or an experienced radio/television technician for help.
Labelling: Changes or modifications to this unit not expressly approved by the manufacturer could void the user's authority to operate the equipment.
*Select Models Only
For additional troubleshooting tips, see the full installation manual at Hotpoint.com.
| Problem Cause and Solution | ||
| Normal Performance Inspection | The system does not restart immediately | When the unit is stopped, it will not restart again for 3 minutes to protect the system.When electricity is disconnected then reconnected, the protection circuit will be active for 3 minutes to protect the heat pump. |
| Noise is heard During unit operation or a sudden stop, a swishing or gurgling noise may be heard. The first 2-3 minutes after the unit has started is when the noise could be noticeable. This noise is generated by refrigerant flowing in the system.During unit operation, a cracking noise may be heard. This noise is sometimes generated by the casing expanding or shrinking due to temperature changes.If the airflow is creating a loud noise during unit operation, the air filter may be too dirty. | ||
| Odors The system circulates odors lingering in the airstream, such as the smell of furniture, paint, and/or cigarettes. | ||
| Mist or steam is blowing out | During COOL or DRY mode, the indoor unit may blow out mist or steam. This is due to the sudden cooling of the indoor air. | |
| In DRY mode, fan speed cannot be changed | In DRY mode, when the room temperature becomes lower than the set temperature by 2°F, the unit will run intermittently at LOW speed regardless of FAN setting. | |
| Items to look for The system is not running | • Is there a power failure?• Is the circuit breaker off?• Is the fuse blown? | |
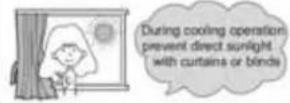
| Poor Cooling • Is the air filter dirty?• Is there anything blocking the inlet and/or outlet?• Is the temperature set correctly?• Are there any doors or windows open?• Is there any direct sunlight shining through the window during the cooling operation?• Are there too many heat sources or too many people in the room during cooling operation? | ||
Limited Warranty
For warranty detail please refer to installation manual.
Hotpoint®
SYSTÈME
SANS CONDUITS
MANUEL DU PROPRIÉTAIRE
FRANÇAIS
Hotpoint.