
DeskJet GT 5820 AllinOne - Printer HP - Free user manual and instructions
Find the device manual for free DeskJet GT 5820 AllinOne HP in PDF.
| Product type | Multifunction inkjet printer (print, copy, scan) |
| Brand | HP |
| Model | DeskJet GT 5820 All-in-One |
| Main functions | Print, copy, scan |
| Connectivity | USB, Wi-Fi, Wi-Fi Direct, HP ePrint |
| Display | Built-in LCD control panel |
| Printing software | HP Smart (123.hp.com/dj5820) or installation CD |
| Supported operating systems | Windows (XP to 10), Mac OS X (Yosemite, Mavericks, etc.) |
| Consumables | HP ink bottles (black and color) and replaceable printheads |
| Maintenance | Clean printheads, lock/unlock ink valve before moving |
| Safety | Use only HP power cord; keep ink out of reach of children |
| Warranty | 1 year or 15,000 pages (whichever comes first) |
| Repairability | User-replaceable printheads |
| Regulatory information | Declarations of conformity available at www.hp.eu/certificates |
| Environment | Indoor use, open environments (home) |
Frequently Asked Questions - DeskJet GT 5820 AllinOne HP
User questions about DeskJet GT 5820 AllinOne HP
0 question about this device. Answer the ones you know or ask your own.
Ask a new question about this device
Download the instructions for your Printer in PDF format for free! Find your manual DeskJet GT 5820 AllinOne - HP and take your electronic device back in hand. On this page are published all the documents necessary for the use of your device. DeskJet GT 5820 AllinOne by HP.
USER MANUAL DeskJet GT 5820 AllinOne HP
- Follow the Start here booklet to set up your printer.
- Insert the HP printer software CD into your computer or visit 123.hp.com/dj5820 to install the mobile app or HP printer software and connect the printer to your network.
Windows: If your computer is not connected to the Internet, insert the printer software CD into your computer. If the installation program does not start, browse to Computer, double-click the CD/DVD drive icon with the HP logo, and then double-click setup.exe.
Mac: HP printer software is only available at 123. hp.com/dj5820. The HP printer software CD will redirect you to the web.
Learn more
Electronic Help: Install the electronic Help by selecting it from the recommended software during software installation. Learn about product features, printing, troubleshooting, and support. Find notices, environmental, and regulatory information, including the European Union Regulatory Notice and compliance statements, in the Technical Information section.
- Windows® 8.1: Click the down arrow in lower left corner of the Start screen, select the printer name, click Help, and then select Search HP Help.
- Windows® 8: On the Start screen, right-click an empty area on the screen, click All Apps on the app bar, click the icon with the printer's name, and then click Help.
- Windows® 7, Windows Vista®, and Windows® XP: Click Start, select All Programs, select HP, and then select the printer name.
- OS X, Yosemite: Click Help > Mac Help. In the Help Viewer enter the printer name in the search field and press Enter.
- OS X, Mavericks: Click Help > Help Center. In the Help Viewer window, click Help for all your apps, and then click the Help for your printer.
Readme: Contains HP support information, operating system requirements, and recent printer updates.
- Windows: Insert the software CD in your computer, and then browse to the ReadMe.chm file. Double-click ReadMe.chm to open, and then select the ReadMe in your language.
- Mac: Open the Documents folder located at the top-level of the software installer. Double-click ReadMe, and then select the ReadMe in your language.
On the Web: Additional help and information: www.hp.com/go/support. Printer registration: www.registerer.hp.com. Declaration of Conformity: www.hp.eu/certificates. Ink usage: www.hp.com/go/inkusage.

M2Q28-90019
The information contained herein is subject to change without notice.
ENFR
PT
AR
Printed in [English]
Copyright 2017 HP Development Company, L.P.
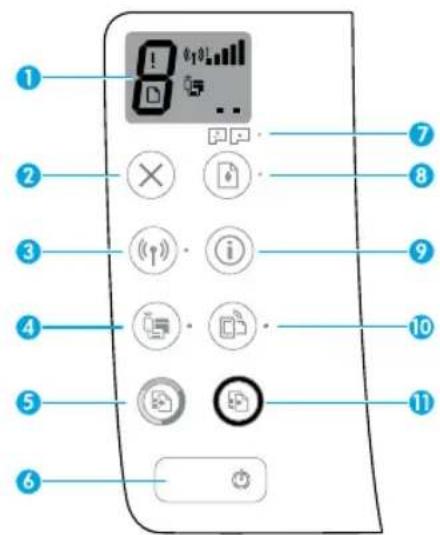
Control Panel
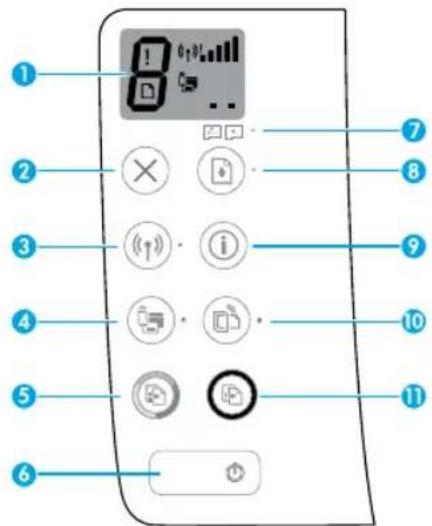
| 1 | Control panel display: Indicates number of copies, printhead priming state, media errors, wireless status and signal strength, Wi-Fi Direct status, and printhead problems. For more information about the icons, see the full User Guide at www.hp.com/go/support or the Electronic Help if you installed the recommended software on your computer. |
| 2 | Cancel button: Stops the current operation. |
| 3 | Wireless button: Turns wireless capabilities on or off. |
| Wireless light: Indicates whether the printer is connected to a wireless network or not. A blinking light indicates that wireless has not been setup or that the printer is attempting to connect. | |
| 4 | Wi-Fi Direct button: Turns Wi-Fi Direct on or off. |
| Wi-Fi Direct light: Indicates the on or off status of Wi-Fi Direct. A blinking light indicates that the printer is connecting to a mobile device in the Wi-Fi Protected Setup (WPS) push mode or there is a problem of the Wi-Fi Direct connection. | |
| 5 | Start Copy Color button: Starts a color copy job. To increase the number of color copies, press the button multiple times. The number of copies will be shown on the control panel display. Copying will start two seconds after the last button press. Note: You can generate a print quality diagnostics report by pressing and holding the Start Copy Color button for 3 seconds. |
| 6 | Power button: Turns the printer on or off. |
| 7 | Printhead Alert light: Indicates printhead problems. |
| 8 | Resume button: Resumes a job after a disruption (for example, after loading paper or clearing a paper jam). Resume light: Indicates the printer is in a warning or error state. |
| 9 | Information button: Press this button to print information about how to wirelessly connect your printer to your network or directly to your computer and mobile devices. |
| 10 | HP ePrint button: Turns HP ePrint on or off. HP ePrint light: Indicates the on or off status of HP ePrint. A blinking light indicates a problem with the connection to Web Services. |
| 11 | Start Copy Black button: Starts a black-and-white copy job. To increase the number of black-and-white copies, press the button multiple times. The number of copies will be shown on the control panel display. Copying will start two seconds after the last button press. |
Unable to Print
If you are unable to print, try the following:
- Make sure the power cord connections are secure and the printer is powered on. The Power button will be lit.
- If your computer is connected to the printer with a USB cable, make sure the USB connections are secure. If your computer is connected to the printer with a wireless connection, confirm that the wireless connection is working.
- Visit the HP Diagnostic Tools website at www.hp.com/go/tools to download free diagnostic utilities (tools) that you can use to fix common printer problems.
Make sure that the printer is set as your default printing device:
- Windows 8.1 and Windows 8: Point to or tap the upper-right corner of the screen to open the Charms bar, click the Settings icon, click or tap Control Panel, and then click or tap View devices and printers.
- Windows 7: From the Windows Start menu, click Devices and Printers.
- Windows Vista: On the Windows taskbar, click Start, click Control Panel, and then click Printer.
- Windows XP: On the Windows taskbar, click Start, click Control Panel, and then click Printers and Faxes.
Make sure that your printer has a check mark in the circle next to it. If your printer is not selected as the default printer, right-click the printer icon and choose Set as Default Printer from the menu.
If using a USB cable and you are still unable to print, or the software installation fails:
- Remove the CD from the CD/DVD drive, and then disconnect the USB cable from the computer.
- Restart the computer.
- Insert the printer software CD in the CD/DVD drive, and then follow the on-screen instructions to install the printer software. Do not connect the USB cable until you are told to do so.
- After the installation finishes, restart the computer.
If you are using wireless and you are still unable to print:
Go to the "Wireless Networking" section on the next page for more information.
MacWindows
Check your print queue:
- In System Preferences, click Printers & Scanners (Print & Scan in OS X v10.8 Mountain Lion).
- Click Open Print Queue.
- Click a print job to select it.
-
Use the following buttons to manage the print job:
-
Cancel icon: Cancel the selected print job.
-
Resume: Continue a paused print job.
-
If you made any changes, try to print again.
Restart and reset:
- Restart the computer.
- Reset the printer.
a. Turn off the printer and unplug the power cord.
b. Wait a minute, then plug the power cord back in and turn on the printer.
Reset the printing system:
- In System Preferences, click Printers & Scanners (Print & Scan in OS X v10.8 Mountain Lion).
- Press and hold the Control key as you click the list at the left, and then choose Reset printing system.
- Add the printer you want to use.
Uninstall the software:
- If the printer is connected to your computer through USB, disconnect the printer from your computer.
- Open the Applications/Hewlett-Packard folder.
- Double-click HP Uninstaller, and then follow the on-screen instructions.
Acknowledgements
Microsoft and Windows are either registered trademarks or trademarks of Microsoft Corporation in the United States and/or other countries.
Mac, OS X, and AirPrint are trademarks of Apple Inc., registered in the U.S. and other countries.
Wireless Networking
Need networking help?
Visit www. hp.com/go/wirelessprinting to learn how to prepare your wireless network, set up or reconfigure your printer, and troubleshoot networking problems.
Tip: Press the Information button (1) on the control panel to print print information about how to wirelessly connect your printer to your network or directly to your computer and mobile device.
If connecting your printer to the network was unsuccessful
- Confirm that wireless is enabled on your printer.
From the printer control panel, if the Wireless light is off, press the Wireless button (to turn on the printer wireless capabilities.
-
Confirm that your printer is connected to your network.
-
From your printer control panel, press the Wireless button (<<)) and the Information button (i) at the same time to print the wireless network test report and network configuration page.
-
Check the top of the wireless network test report to see if something failed during the test.
-
See the DIAGNOSTICS RESULTS section for all tests that were performed, to determine whether or not your printer passed.
- From the CURRENT CONFIGURATION section, find out the Network Name (SSID) to which your printer is currently connected. Make sure that the printer is connected to the same network as your computer.
- If the report indicates the printer is not connected to the network, press the Information button (i) for three seconds to print the wireless quick start guide, and then follow the instructions on it to connect your printer to the network.
Note: If your computer is connected to a Virtual Private Network (VPN), temporarily disconnect from the VPN before proceeding with the installation. After installation you will need to disconnect from the VPN to access your printer over your home network.
- Make sure security software is not blocking communication over your network.
Security software, such as firewalls, can block communication between your computer and printer when installing over a network. If your printer cannot be found, temporarily disable your firewall and check if the problem goes away. For more help and tips on security software, go to: www.hp.com/go/wpc-firewall
- Restart components of the wireless network.
Turn off the router and the printer, and then turn them back on in this order: router first and then printer. Sometimes, turning off devices and then turning them back on helps resolve network communication issues. If you still cannot connect, turn off the router, the printer, and the computer, and then turn them back on in this order: router first, then printer, and then computer.
If you still have problems, visit the HP Wireless Printing Center (www.hp.com/go/wirelessprinting). This website contains the most complete, up-to-date information about wireless printing, as well as information to help you prepare your wireless network; solve problems when connecting the printer to the wireless network; and resolve security software issues.
Note: If you are using a computer running Windows, you can use the Print and Scan Doctor tool, which can help solve many problems you might have with the printer. To download this tool, visit www.hp.com/go/tools.
If you want to share your printer with multiple computers on your network
First install your printer on your home network. After you have successfully connected your printer to your home network, you can share your printer with other computers on the same network. For each additional computer you only need to install the HP printer software. During the software installation, select Wireless from the Connection Options screen and then follow the on-screen instructions.
Wireless Networking (continued)
If you want to change from a USB connection to a wireless connection
First make sure that you have already successfully installed your printer software.
Windows
-
Double-click the printer icon on the desktop or do one of the following to open the printer software:
-
Windows 8.1: Click the down arrow in lower left corner of the Start screen, and then select the printer name.
- Windows 8: Right-click an empty area on the Start screen, click All Apps on the app bar, and then select the printer name.
-
Windows 7, Windows Vista, and Windows XP: From the computer desktop, click Start, select All Programs or Programs, click HP, click the folder for the printer, and then select the icon with the printer's name.
-
In the printer software, click Utilities.
- Select Printer Setup & Software.
- Select Convert a USB connected printer to wireless. Follow the on-screen instructions.
Mac
Use HP Utility in Applications/Hewlett-Packard to change the software connection to wireless for this printer.
If you want to use the printer wirelessly without a router
Use Wi-Fi Direct to print wirelessly without a router, from your computer, smartphone, or other wireless enabled device. To use Wi-Fi Direct from a computer, the printer software must be installed on the computer.
- If the Wi-Fi Direct light on the printer is off, press the Wi-Fi Direct button (☑) to turn on Wi-Fi Direct. The Wi-Fi Direct light is on when Wi-Fi Direct is turned on.
- Press the Wi-Fi Direct button (☑) and the Information button (i) together to print a Wi-Fi Direct guide.
- Follow the instruction on the Wi-Fi Direct guide to connect your computer or mobile device to the printer.
- Print as you normally do from your computer or mobile device.
Note: Wi-Fi Direct connection does not provide Internet access.
Visit the HP Wireless Printing Center at www.hp.com/go/wirelessprinting for more information about Wi-Fi Direct.
This product is designed for use in open environments (e.g., in homes and not connected to the public Internet) in which anyone may access and use the printer. As a result, the Wi-Fi Direct setting is in "Automatic" mode by default, without an administrator password; this allows anyone in wireless range to connect and access all functions and settings of the printer. If higher security levels are desired, HP recommends changing the Wi-Fi Direct Connection Method from "Automatic" to "Manual" and establishing an administrator password.
If you want to print from a mobile device
This printer is mobile printing-enabled. You can print wirelessly from your mobile devices. To use mobile printing, your printer and mobile device must be connected to the same wireless network.
-
For mobile device with built-in printing:
-
Select any item on your device.
- Touch the Share icon on an Apple device or the Menu icon on an Android device, and then touch Print from the menu list.
-
Select your printer, modify any print setting if necessary, and then touch Print.
-
For mobile device without built-in printing or if you are not sure, visit www.hp.com/go/mobileprinting to learn more.
Important Ink Information
To ensure that your printer functions properly, you will need to make sure that the ink valve is unlocked for printing and locked for moving. You should also maintain proper ink levels in the ink tanks when you are printing.

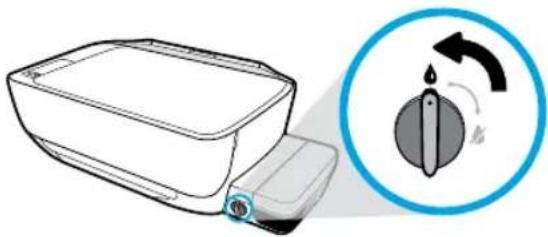
Lock and unlock ink valve to control ink flow
Lock and unlock the ink valve on the front of the ink tank to control the flow of ink to the printer.
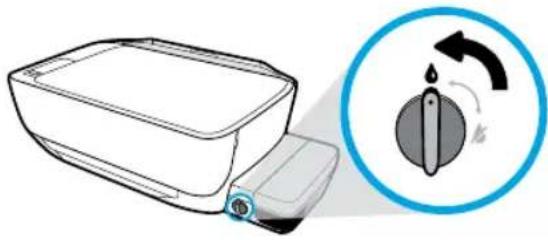
Unlock
Before you print, make sure the ink valve is unlocked. Turn valve left to vertical position to unlock.
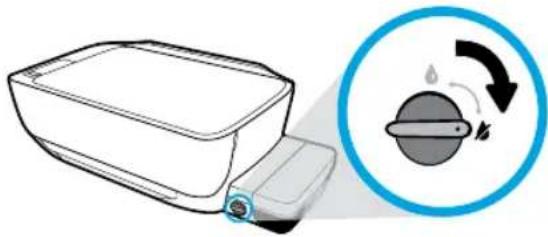
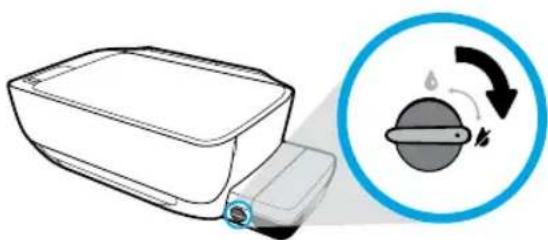
Lock
To prevent ink leakage, make sure the ink valve is locked before you attempt to move or tilt the printer. Turn valve right to horizontal position to lock.
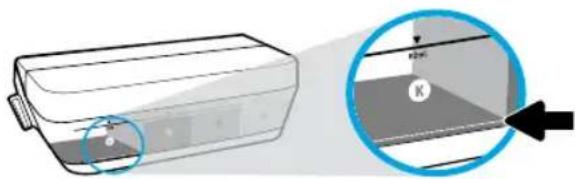
Maintain proper ink levels
Use the ink level lines on the ink tanks to determine when to fill the tanks and how much ink should be added. Never print when any of the ink tanks has less than the minimum amount of ink. Printing with too little ink or filling tanks with too much ink can damage the printer and affect print quality. Make sure you match the color of the ink to the color on the ink tank when you refill an ink tank. See the Start here booklet for instructions on how to fill the ink tanks.

Minimum ink level
Ink level should never go below the minimum line. Printing with ink level below the minimum line may cause damage to your printer.
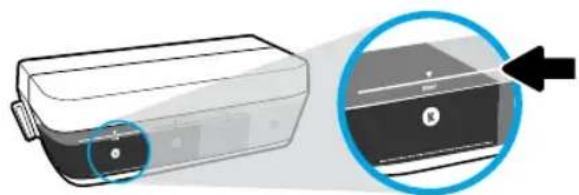
Maximum ink level
Do not fill ink above the maximum line. Any ink level above the maximum line may cause ink leakage. When you refill, some ink will be left over in the ink bottle. You can save the remaining ink by storing the ink bottle in a dry cool place for future refilling.
Note: Product service or repairs required as a result of filling the ink tanks improperly and/or using non-HP ink will not be covered under warranty.
Control Panel Display Errors
The printer control panel display indicates some errors by alternatively flashing the letter "E" and a number. The table below contains some common errors.
| Display Error | Solution |
| Printhead Carriage Stall | 1. Open the printhead access door on the front of the printer. 2. Make sure the carriage latch is completely closed and carriage can freely move. IMPORTANT! Do not open the carriage latch but check that it is pulled down firmly. Opening the latch could damage the printhead. 3. Close printhead access door, then front door. 4. Press Resume button to continue printing. |
| Paper Jam | 1. Press the Resume button to clear the paper jam. 2. If this does not clear the paper jam, refer to the full User Guide on www.hp.com/go/support or the Electronic Help if you installed the recommended software on your computer. Note: Make sure you have turned the ink valve right to the locked position before tilting or moving your printer to clear the paper jam. Turn the ink valve left to the unlocked position before you resume printing. |
| System Maintenance Required | Open the printhead access door completely, and then close it immediately. This process helps remove ink buildup and maintains the best print quality throughout the life of the printer. IMPORTANT! Do not open the carriage latch during this process; otherwise, the printer may require new printheads to function. |
| The error icon (!) and the paper error icon !blinking together indicates the printer is out of paper. | 1. Load paper in the input tray. 2. Press the Resume button to continue printing. Note: For information about how to load paper, see the full User Guide on www.hp.com/go/support or the Electronic Help if you installed the recommended software on your computer. |
| The error icon (!) and one or both printhead icons !blinking together indicates printhead problem. | The left printhead icon flashing shows an error related to the tri-color printhead, and the right icon flashing shows an error related to the black printhead. If you are setting up the printer for the first time, make sure that you have removed the tape from the printhead indicated by the flashing printhead icon. If you have been using your printer and are starting to see print quality problems, the printhead indicated needs to be replaced. Contact HP support at www.hp.com/go/support to get a replacement printhead. |
For more information about control panel display errors, visit www. hp.com/go/support to view or download the full User Guide. If you installed the recommended software on your computer, you will also find control panel display errors in the Electronic Help.
Safety information
Use only with the power cord and power adapter (if provided) supplied by HP.
Ink contains nitrates. Do not drink or place in mouth. Keep out of reach of children. Avoid contact with eyes. Safety Data Sheets, product safety, and environmental information are available at www.hp.com/go/ecodata.
HP printer limited warranty statement
| HP product | Duration of limited warranty |
| Software Media 3 months | |
| Printer | 1 year or 15,000 pages, whichever is earlier. |
| Ink bottles | Until the HP ink is depleted or the “end of warranty” date printed on the ink bottle has been reached, whichever occurs first. This warranty does not cover HP ink products that have been refilled, remanufactured, refurbished, misused, or tampered with. |
| Printheads | 1 year or 15,000 pages, whichever is earlier. |
| Accessories (excludes printheads) | 1 year unless otherwise stated |
A. Extent of limited warranty
- This HP Limited Warranty applies only to HP branded products sold or leased a) from HP Inc., its subsidiaries, affiliates.
authorized resellers, authorized distributors, or country distributors; b) with this HP Limited Warranty.
- HP Inc. (HP) warrants to the end-user customer that the HP products specified above will be free from defects in
materials and workmanship for the duration specified above, which duration begins on the date of purchase by the
c customer.
-
For software products, HP's limited warranty applies only to a failure to execute programming instructions. HP does not warrant that the operation of any product will be interrupted or error free.
-
HP's limited warranty covers only those defects that arise as a result of normal use of the product, and does not cover any other problems, including those that arise as a result of:
a. Improper maintenance or modification;
b. Software, media, parts, or supplies not provided or supported by HP;
c. Operation outside the product's specifications;
d. Unauthorized modification or misuse.
For HP printer products, the use of non-HP ink or printheads does not affect either the warranty to the customer of any HP support contact with the customer. However, if printer failure or damage is attributable to the use of a non-HP ink or printheads; or expired ink or printheads, HP will charge its standard time and materials charges to service the printer for the particular failure or damage.
- If HP receives, during the applicable warranty period, notice of a defect in any product which is covered by HP's
warranty, HP shall either repair or replace the product, at HP's option.
-
If HP is unable to repair or replace, as applicable, a defective product which is covered by HP's warranty, HP shall, within a reasonable time after being notified of the defect, refund the purchase price for the product.
-
HP shall have no obligation to repair replace, or refund until the customer returns the defective product to HP.
-
Any replacement product may be either new or like-new products of similar functionality as the product being replaced.
-
HP products may contain remanufactured parts, components, or materials equivalent to new in performance.
-
HP's Limited Warranty Statement is valid in any country where the covered HP product is distributed by HP. Contracts for additional warranty services, such as on-site service, may be available from any authorized HP service facility in countries where the product is distributed by HP or by an authorized importer.
B. Limitations of warranty
TO THE EXTENT AILOWED BY LOCAL LAW NEITHER HP NOR ITS THIRD PARTY SUPPLIERS MAKES ANY OTHER WARRANTY
OR CONDITION OF ANY VIND, WHEETED EVIDPECESS OR IMplied WARDANTIES OR CONDITIONS OF MERCHANTABILITY
SATISFACTORY QUALITY AND FITNESS FOR A PARTICULAR PURPOSE
C. Limitations of liability
- To the extent allowed by local law, the remedies provided in this Warranty Statement are the customer's sole and
exclusive remedies
- TO THE EXTENT ALLOWED BY LOCAL LAW, EXCEPT FOR THE OBLIGATIONS SPECIFICALLY SET FORTH IN THIS WARRANTY STATEMENT, IN NO EVENT SHALL HP OR ITS THIRD PARTY SUPPLIERS BE LIABLE FOR DIRECT, INDIRECT, SPECIAL,
INCIDENTAL OR CONSEQUENTIAL DAMAGES. WHETHER BASED ON CONTRACT, TORT, OR ANY OTHER LEGAL THEORY AND
WHE
D. Local law
-
This Warranty Statement gives the customer specific legal rights. The customer may also have other rights which vary from state to state in the United States, from province to province in Canada, and from country to country elsewhere in the world.
-
To the extent that this Warranty Statement is inconsistent with local law, this Warranty Statement shall be deemed modified to be consistent with such local law. Under such local law, certain disclaimers, exclusions and limitations of this Warranty Statement may not apply to the customer.
HP Limited Warranty
Visit www.support.hp.com to access warranty support including troubleshooting tips, diagnostics tools, software and drivers, product information, and how-to videos. Support options like chat and forums are also accessible from this website.
The HP limited Warranty is a commercial guarantee voluntarily provided by HP. The name and address of the HP entity responsible for the performance of the HP Limited Warranty in your country is as follows:
U.K: HP Inc UK Limited, Cain Road, Amen Corner, Bracknell, Berkshire, RG12 1HN
Ireland: Hewlett-Packard Ireland Limited, Liffey Park Technology Campus, Barnhall Road, Leixlip, Co.Kildare
Malta: Hewlett-Packard Europe B.V., Amsterdam, Meyrin Branch, Route du Nant-d'Avril 150, 1217 Meyrin, Switzerland
United Kingdom: The HP Limited Warranty benefits apply in addition to any legal rights to a guarantee from seller of nonconformity of goods with the contract of sale. These rights expire six years from delivery of goods for products purchased in England or Wales and five years from delivery of goods for products purchased in Scotland. However various factors may impact your eligibility to receive these rights. For further information, please consult the following link: Consumer Legal Guarantee or you may visit the European Consumer Centers website. Consumers have the right to choose whether to claim service under the HP Limited Warranty or against the seller under the legal guarantee.
Ireland: The HP Limited Warranty benefits apply in addition to any statutory rights from seller in relation to onconformity of goods with the contract of sale. However various factors may impact your eligibility to receive these rights. Consumer statutory rights are not limited or affected in any manner by HP Care Pack. For further information, please consult the following link: Consumer Legal Guarantee or you may visit the European Consumer Centers website Consumers have the right to choose whether to claim service under the HP Limited Warranty or against the seller under the legal guarantee.
Malta: The HP Limited Warranty benefits apply in addition to any legal rights to a two-year guarantee from seller of nonconformity of goods with the contract of sale; however various factors may impact your eligibility to receive these rights. Consumer statutory rights are not limited or affected in any manner by the HP Limited Warranty. For further information, please consult the following link: Consumer Legal Guarantee or you may visit the European Consumer Centers website.
Guarantee.
For further information, please consult the following link: Consumer Legal Guarantee (www.hp.com/go/eu-legal) or you may visit the European Consumer Centers website(http://ec.europa.eu/consumers/solvingsumer-disputes/non-judicial_redress/ecz-net).
Démarrage
www.hp.com/go/inkusage.
Impression impossible
www.hp.com/go/wpc-firewall
- hp.com/dj5820 123. hp.com/dj5820
A
J 1111111111111111111111111111111
. setup.exe 150
a 123. hp.com/dj5820 1c HP a 1b j 1
HP
jolal
aagaae aae
LgJgJg JgJgJg JgJg JgJg JgJg JgJg
C. “a"
jAeUwJg,6y'awLWnJGAAaIyAeLwAaIgJLgUgUuUuU:Windows 8.1
HPloalejG CJl JloalejSlc jol
Uulu> uI eJ aI I J aI aI aI aI aI aI aI aI aI aI aI aI aI aI aI aI aI aI aI aI aI aI aI aI aI aI aI aI aI aI aI aI aI aI aI aI aI aI aI aI aI aI aI aI aI aI aI aI aI aI aL
.
pHp,HPd,g,glj:WindowsXPgWindowsVista9Windows7
.aaJbJI
(oo)HelpViewer.(Macoo)MacHelp<(oo)Help:OSX,Yosemite
. Enter 15c b2eol p 1111 Jg a 1111 p w 111
(Le) Help Viewer 日 .(CJLJIeJ)Help Center< (CJLJIeJ)Help :OS X,Mavericks
aolalalalalalalalalalalalalalalalalalalalalalalalalalalalal
.
aHJU U JI HJU JI JI JI JI JI JI JI JI JI JI JI JI JI JI JI JI JI JI JI JI JI JI JI JI JI JI JI JI JI JI JI JI JI JI JI JI JI JI JI JI
doll lglgllnssw jysss sll yle ggy g bgsaalj
ReadMe ReadMe.chm .ReadMe.chm
Jrnnn nnnn nn nnnn nn nnnn nn nnnn nn nnnn nn nnnn nn nnnn nn nnnn nn nnnn nn nnnn nn nnnn nn nnnn nn nnnn nn nnnn nn nnnn nn nnnn nn nnnn nn nnnn nn nnnn nn nnnn nn nnnn nn nnnn nn nnnn nn nnnn nn nnnn nn nnnn nan
ReadMe 1 ReadMe
. www.registerHp.com :ddjss .www.hp.com/go/support :d2k2k2k2k2k2k2k2k2k2k2k2k2k2k2k2k2k2k2k2k2k2k2k2k2k2k2k2k2k2k2k2k2k2k2k2k2k2k2k2k2k2k2k2k2k2k2k
. www .hp . com /go/inkusage : jw . www .hp . eu /certificates :
aJg. bJLwgl sIg. aclpBGL wg jyj g Jg. g Jg. Jg. Jg. Jg. Jg. Jg. Jg. Jg. Jg. Jg. Jg. Jg. Jg. Jg. Jg. Jg. Jg. Jg. Jg. Jg. Jg. Jg. Jg. Jg. Jg. Jg. Jg. Jg. Jg. Jg. Jg. Jg. Jg. Jg. 1
.2
.3
.4
5
(aJgJUJJJJJJ) Printers & Scanners
pIj g (gJgJI JgJI aJI Print & Scan) .OSXv10.8 Mountain Lion
juljai aoi jg) Open Print Queue 2
.
lauiuiai aciab aigo sllj.3
:adllalaoo0jx aJlll jj1 1.4
aclbJl aogo sLjx:(yol)Cancel aigj
.
aagioaclabao go aolj:(oluiw)Resume
L
.5
:bllllddsc|gJzssllldsc|
.
.2
aIblllwwJaglg aIbll Jzwoggl .a
aIbJI UwJyogjclp,ddgaaa.
aJbJd
:clbI pbl bio osl
J (p) System Preferences .1
(aJU JcJUJI J) Printers & Scanners
pIbJ sG (sGJI JcwoJIg aclJI) Print & Scan)
.(OSXv10.8MountainLionJ
scljai gocontrolcuio uclggbbeoi .2
Reset jolwJg>goJl
((aclblpbi bwooslc) printing system
.3
:oljlll
JLb,USB jc gssKJy aiaaiaaaij k 1.1
jigssJlge>jc aolbll
Applications/Hewlett-Packard 2
JHP Uninstaller 3
.aaWwJlJcJrJbJI
aIbJI jgJgSj bIe aIbJI n no sI
:
a:Windows 8 g Windows 8.1
:ollllalalalalalalalal
/abg#oJyjoo bgyoJyj.1
.1JjLg> jc USB J≤ JpI ,DVD JpJI
.0gssJ 2
c0y 15c sgsx y jll bgsa aol jol jol .3
DVD 1pJJI/abg2ooJI oJg2I Jxoo
c
clio Udbj u> USB 1≤ jgjj aJd
.
.
jIJJg
:adcbjglc
aalg“aLw8akawolw"awlJaij
.ogloJlJnJyjJdA
J
LgSoslgl aalsslgl aakwllkwwww. hp.com/go/wirelessprinting j
Lg>Xp|g a<swjI pIwJyAeJxJU LKwJI yLswJwJg
Lslw8aBbJg> cloglal aclb JcI I (i) cloglaJI jIcI b
JgocooJIggeoJgogosKUg oA
J 1
.
JbIaJIbJIaIbJIaIbJIaIbJIaIbJIaIbJIaIbJIaIbJIaIbJIaIbJIaIbJIaIbJIaIbJIaIbJIaIbJIaIbJIaIbJIaIbJIaIbJIaIbJIaIbJIaIbJIaIbJIaIbJIaIbJIaIbJIa
aUdd<luU UK
.
aIbIgIgIaIbIy aIbIy I yIc (i) oIogIeJI jg ((q)) aSLxUJ jUc bI .1
aSsUSSgAeogAsLwUUsKsUJr
.2
a 11111111111111111111111111111111
AIOUJLJIIOJIOJIO
aIbI JI. IJI bI JI (SSID) aKJ IJ IJ IJ IJ IJ
.
Jd aclpJgT d (i) cloglall jyIc bip,akwll ayIaI JpaI pI yjrrj
.(aJJI J aclb) Print from the menu list
.(aclb) Print woll pJ oJ lI aclbll slc! Jy B aJ.3
aJy jy jy J 151 g aclbU nn oonn ng ygogoo Ijgeo
jol www. hp.com/go/mobileprinting
Jc
Ls. aIbll JJIaIbIg aIbll 1JrJl plw g cJn no sI IIL bIcIe iin jW Kw aIbll Joc IaJd .aIbll icer lljz+ g fawwiauill Jyugwu wleblkIe Ie
Jlll
a a a a a a a a a a a a a a a a a a a a a a a a a a a a a a
#
JUULpALLg.aaLLJIgRGLpOgoo
J
JgljI Jg jll plaol Jlal no JdU JL gag 11g 11la 11la 11la 11
aaiiie
J 1111111111111111111111111111111111111111111
J 1
J 1 J 1 J 1 J 1 J 1 J 1 J 1 J 1 J 1 J 1 J 1 J 1 J 1 J 1 J 1 J 1 J 1 J 1 J 1 J 1 J 1 J 1 J 1 J 1 J 1 J 1 J 1 J 1 J 1 J 1 J 1 J 1 J 1 J 1 J
J
Jg jg jg jg jg jg jg jg jg jg jg jg jg jg jg jg jg jg jg jg jg jg jg jg jg jg jg jg jg jg jg jg jg jg jg jg jg jg jg jg jg jg jg jg jg jg jg jg jg jg jg

g/9 100 KwJbI JI JI 100000000000000000000000000000000000000000000000000000000