
S3932 - Air Conditioning QLIMA - Free user manual and instructions
Find the device manual for free S3932 QLIMA in PDF.

| Product type | Wall-mounted air conditioner |
| Brand | Qlima |
| Model | S3932 |
| Indoor unit dimensions (W × H × D) | 777 × 250 × 205 mm |
| Outdoor unit dimensions (W × H × D) | 700 × 552 × 256 mm |
| Indoor unit weight | 8.5 kg |
| Outdoor unit weight | 26.0 kg |
| Power supply | 220-240 V ~ 50 Hz |
| Cooling capacity | 3300 W (1080 - 3770 W) |
| Heating capacity | 2800 W (1010 - 3940 W) |
| Cooling energy consumption | 1.00 kW |
| Heating energy consumption | 1.01 kW |
| Cooling energy class | A++ (SEER 6.1) |
| Heating energy class | A+ (SCOP 4.0) |
| Refrigerant type / charge | R32 / 600 g |
| Main functions | Cooling, Heating, Dehumidification, Ventilation, Feel Mode, ECO, Turbo, Silent, iFeel |
| Remote control | Yes (LR03 AAA batteries not included) |
| Air filter | Washable, clean every 2 weeks in dusty environment |
| Safety | Mandatory earth connection, child lock, automatic shutdown in case of malfunction |
| Warranty | Compressor 48 months, other parts 24 months |
| Maintenance | Clean front panel and filter, annual inspection by professional |
| Repairability | Spare parts available, repair by authorized technician |
Frequently Asked Questions - S3932 QLIMA
User questions about S3932 QLIMA
0 question about this device. Answer the ones you know or ask your own.
Ask a new question about this device
Download the instructions for your Air Conditioning in PDF format for free! Find your manual S3932 - QLIMA and take your electronic device back in hand. On this page are published all the documents necessary for the use of your device. S3932 by QLIMA.
USER MANUAL S3932 QLIMA
Mode Deshumidification (DRY)
CONDITIONS DE GARANTIE
m = 311
Congratulations on the purchase of your air conditioner. You have acquired a high quality
product that will provide you with many years of pleasure,
provided you use it responsibly. Therefore, read this manual first for a maximum lifetime
of you air conditioner.
On behalf of the manufacturer we offer you a 24 month warranty against all
material and manufacturing defects.
We wish you coolness and comfort with your air conditioner.
Yours sincerely,
PVG Holding B.V.
Customer service department
CONTENTS
A Safety regulations
B Components
C Before use
D Operation
E Maintenance
F Operating temperatures
G Troubleshooting
H Warranty conditions
Specifications
A SAFETY REGULATIONS
Install this device only when it complies with local/national legislation, regulation and standards. This product is intended to be used as an air conditioner in residential houses and is only suitable for use indoors in dry locations, in normal household conditions, like living rooms, kitchens, and garages. This device is suitable exclusively for earthed sockets, connection voltage 220-240 V~/ 50 Hz.

IMPORTANT
- The device MUST be grounded. If the power supply is not grounded, you may not connect the device. The plug must always be readily accessible if the device is connected. Read this instruction manual carefully and follow the instructions.
- The air conditioner contains a refrigerant and can be classified as equipment under pressure. Therefore always call a qualified technician for the installation and maintenance of the air conditioner. The air conditioner has to be checked and serviced yearly by an authorised technician, otherwise the warranty looses its validity.
Check before connecting the device if:
- The supply voltage matches the mains voltage specified on the name plate;
- Socket and power supply are suited for the electrical voltage specified on the name plate;
- The plug of the power cord can be plugged into the socket;
- The device is positioned on a firm foundation.
Have the electrical installation checked by a qualified professional if you are not sure everything is done properly.
- This device is constructed according to CE safety standards.
You have to be careful, like with any electrical device.
- Never cover the air inlet and exhaust.
- Never let the device come into contact with chemicals.
- Never let the device come into contact with water, never spray water on it or immerge it in water. Switch off the device and disconnect the power supply if there is water running into the unit.
- Don't put your hands, fingers or objects in the holes of the device.
- Never use the device with an extension cord. If there is no suited grounded socket available, have one installed by a qualified electrician.
- Repairs and/or maintenance should only be performed by an authorised technician or your regulated supplier. Follow the instructions for use and maintenance in this manual.
- Always disconnect from the mains if the device isn't being used.
- Never turn the air conditioner on or off by inserting the plug in the socket or pulling it out. Only use the designated buttons on the air conditioner or the remote control.
- Never move the air conditioner when in service. Disconnect from the mains before opening the device.
- Always pull the plug out of the socket or disconnect the mains for cleaning or servicing the air conditioner.
- Never position gas burners, ovens of cooking devices in the airflow.
- Never touch buttons or the air conditioner with wet hands.
- The outdoor unit produces noise when the device is in service. This can be a violation of local statutory regulations. The user is responsible to check if the equipment fully complies with the local statutory legislations.
- This device is not intended to be used by persons (including children) with reduced physical, sensory or mental capacities, or lack of experience and knowledge, unless they are supervised and have been given instructions con
cerning the use of the device by a person responsible for their safety.
- Children must be supervised to make sure they don't play with the device.
- Never stand directly in the airflow.
- Never drink the condensed water from the air conditioner
- Do not modify the product.
- If the power cord is damaged, it must be repaired by the manufacturer, its service agent or similarly qualified persons in order to avoid a hazard.
- This device can be used by children aged 8 and above and people with physical, sensory or intellectual disability and by people who don't have experience with of knowledge about the device if they are being supervised or received instructions concerning the safe use of the device and are aware of the risks.
- Make sure children don't play with the device.
- Cleaning and maintenance may not be performed by children without supervision.
- Do not use means to accelerate the defrosting process or to clean, other than those recommended by the manufacturer.
- Do not pierce or burn the appliance.
- The appliance shall be stored in a room without continuously operating sources (for example: open flames, an operating ignition gas appliance or an operating electric heater.)


ATTENTION!
- Never use the device if the power cord, plug, body or control panel is damaged.
- Failure to comply with the instructions could invalidate the warranty for this device.

PARTS
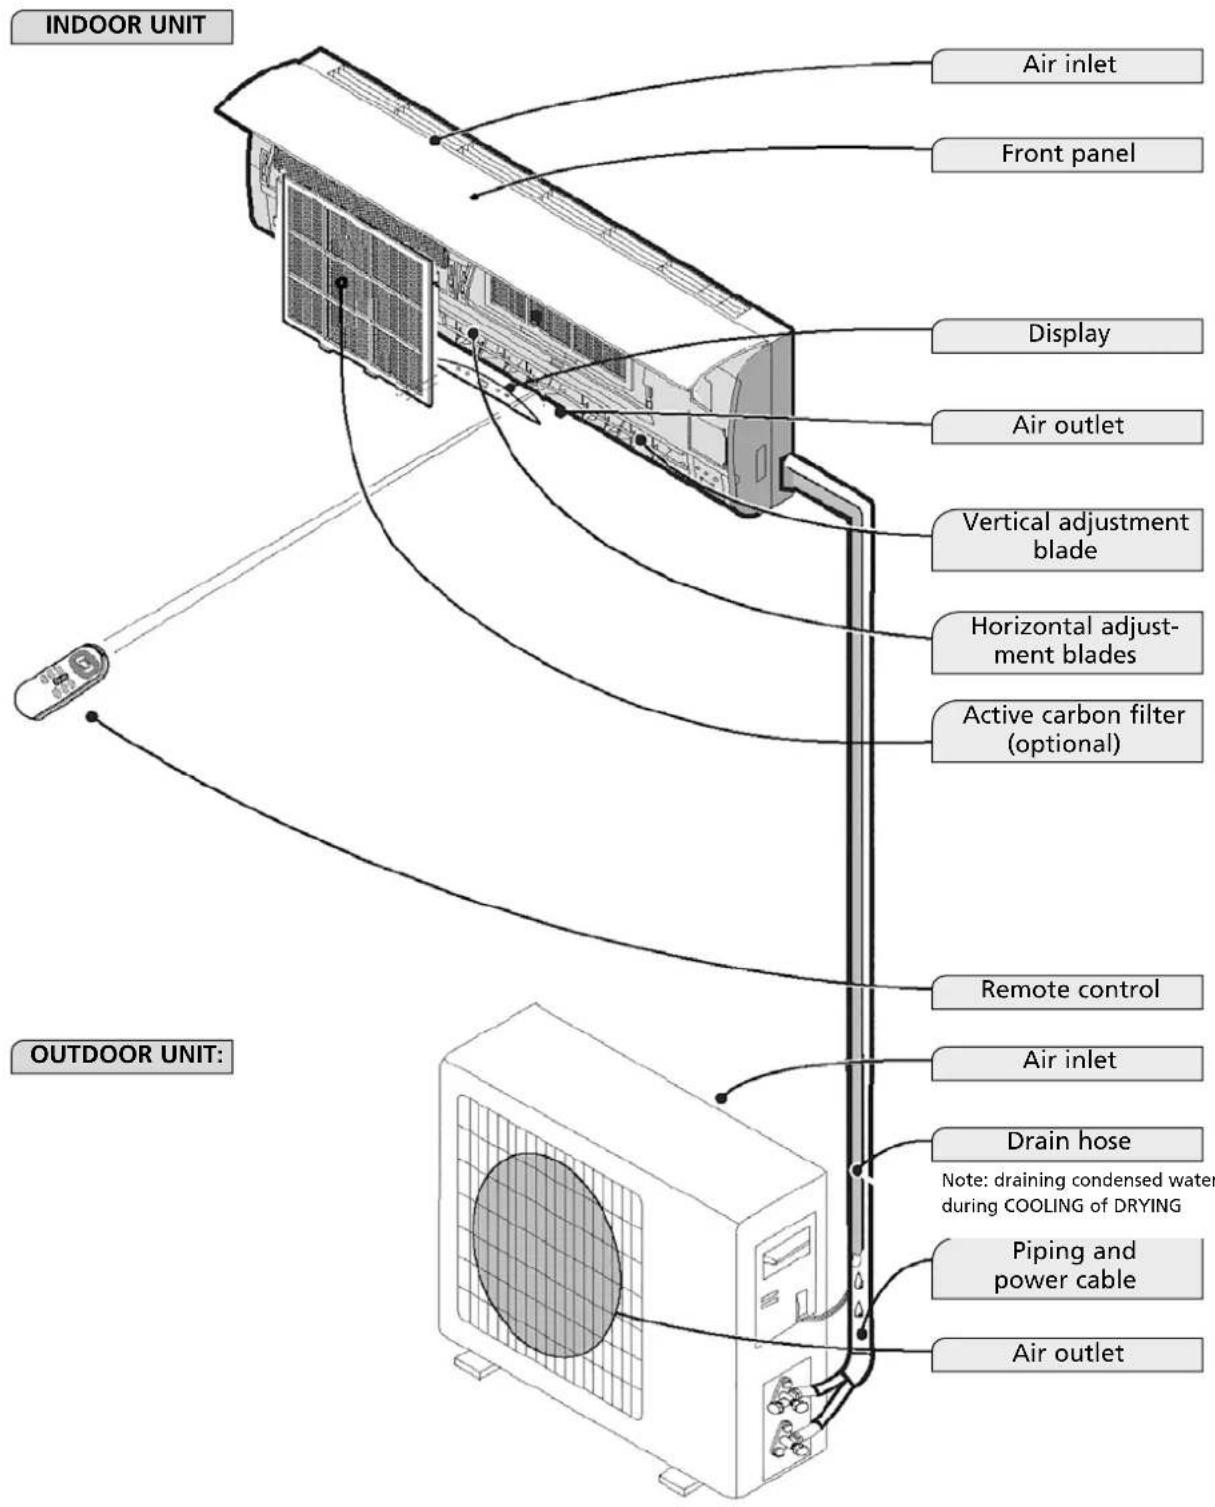
The illustrations in this manual are based on a standard model.
The air conditioner you bought might be another model.

BEFORE USE
Before using the air conditioner you must check and set the following.
Setting remote control
The remote control is NOT set by the manufacturer for the function only cooling or heating, you have to set these functions yourself.
Every time the batteries of the remote control are replaced, the arrow "Heat" or "Cool" on the display of the remote control will flash.
Depending on your type of air conditioner, you must set the remote control as follows:
Press any button if the arrow in front of "Heat" flashes, the heat pump is set.
Press any button if the arrow in front of "Cool" flashes, only cooling is set.
If you don't press a button within 10 seconds, the remote control will automatically be set on cooling.

OPERATION
Operation and display
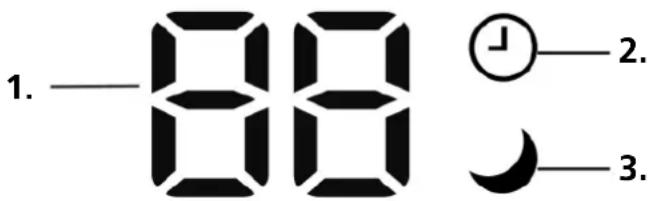
- Temperature indication LED
Shows the set temperature
- Indication LED Timer function
Shows the timer function is activated.
- Indication LED sleep function
Shows the sleep function is activated.
Remote control
The remote control sends signals to the system.
Note: Every mode and the relevant functions will be specified hereafter.
Placement of batteries
Remove the battery cover in the direction of the arrow.
Insert new batteries as shown (align the positive (+) and negative (-) symbols.
Slide the battery cover back in position.
Note: use 2 LR03 AAA(1.5volt) batteries. Do not use rechargeable batteries. Replace batteries with batteries of the same type (see above) if the display becomes more blurred.
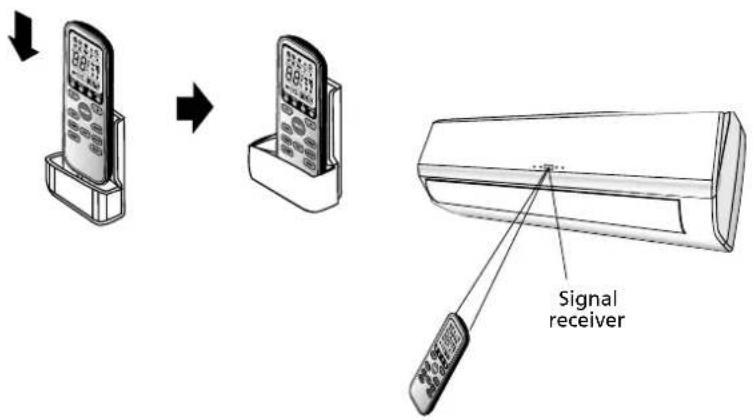
Storage of the remote control and tips for using
The remote control can be stored in a holder, mounted against the wall.
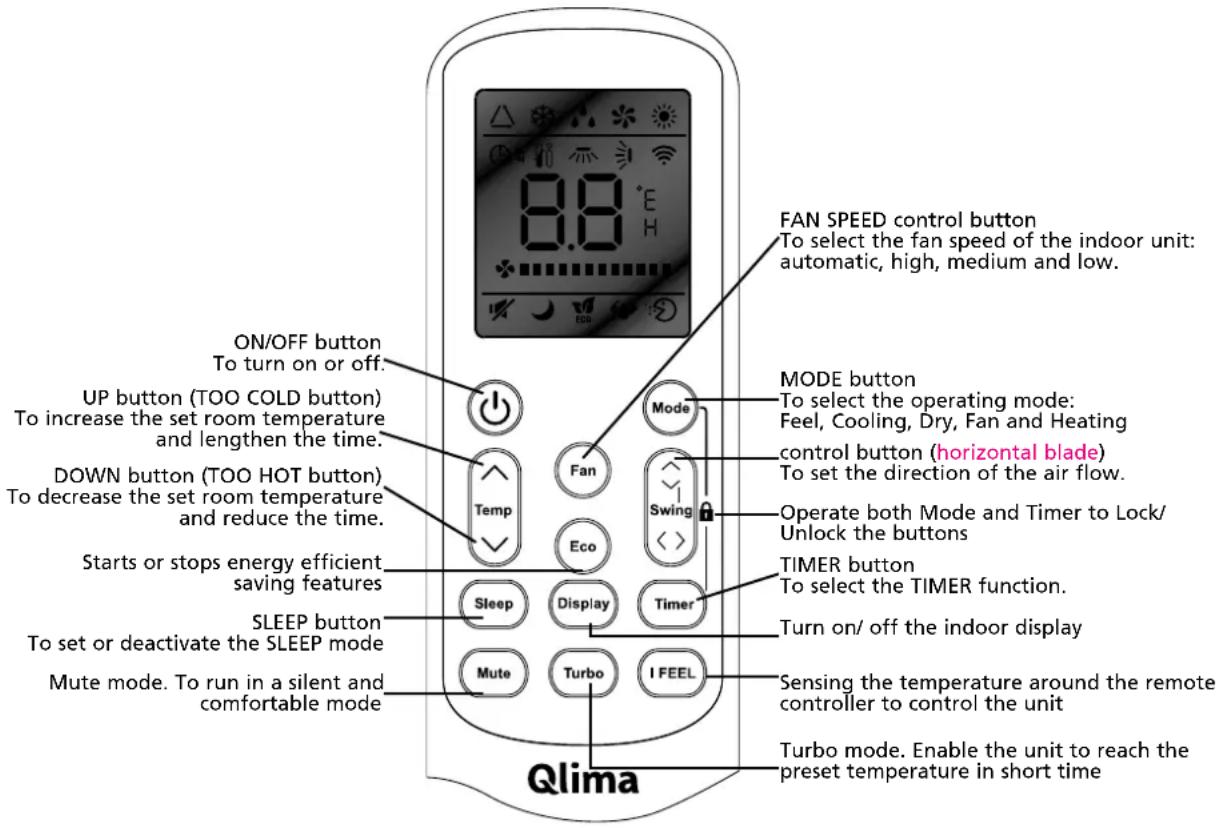
Using the remote control
Point the remote control towards the receiver on the indoor unit of the air conditioner. This way, the air conditioner can be operated from a distance up to 7 meter.
OPERATING INSTRUCTIONS
FEEL mode operating mode
The operating mode is selected automatically (HEATING, DRY, FAN, COOLING) depending on the room temperature at the time of selection.
With the remote control pointed towards the air conditioner.
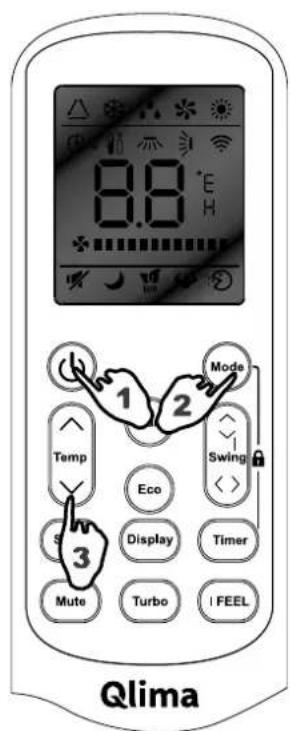
1. Turn on
Press the ON/OFF/RUN button. When the device receives a signal, the indication light RUNNING of the indoor unit lights up.
If the unit is not in the FEEL mode.
2 Select FEEL mode
Press the MODE button
Switching from MODE to FEEL
Operating mode and temperature will be set according the indoor temperature.
| Indoor temperature Operating mode Desired temperature | |
| Less than 20 °C | Heating for ‘heat pump’ type Fan for ‘cooling only’ type |
| 20 - 26°C DRY 18°C | |
| More than 26 °C COOLING | 23°C |
3. Set temperature
Press the button or the button.
By pressing the button, the set value of the set temperature will be increased by 1^ .
After the temperature is increased by 2^ , the indication light will remain unchanged.
By pressing the button, the set value of the set temperature will be decreased by 1^ .
GB
After the temperature is decreased by 2^ , the indication light will remain unchanged.
Note:
It might occur that there is no air flow with the unit in service.
When changing the mode the unit isn't always in service right away.
Cooling mode (COOL) heating (HEAT), condilate (FAN)
With the remote control pointed towards the air conditioner.
- Press the power button. When the device receives a signal, the indication light "running" of the indoor unit lights up.
- Press the MODE button to select the desired mode, cooling, ventilating or heating.
- In the heating and cooling mode it is possible to set the desired temperature with the and buttons and the desired fan speed, AUTO (FLASH), LOW of HOM with the FAN button on the remote control.
- In the mode ventilate it is not possible to set the room temperature. The speed of the fan can be set with the FAN button to LOW, MID or HIGH.
If the fan is set to AUTO, the fan will automatically activate the most favourable fan speed. When the room temperature comes closer to the set temperature, the speed of the fan will decrease.
Features of the HEATING mode
To heat
After the HEATING function is activated, the indoor unit will start blowing air after 2 - 5 minutes.
After heating
After the Heating function is stopped, the fan of the indoor unit will continue running for 2 - 5 minutes.
Defrost
During HEATING the device will defrost automatically for the best performance. This procedure normally takes 2 - 10 minutes. The fan will stop during defrosting. After defrosting the HEATING function will restart automatically.
Dehumidify mode
With the remote control pointed towards the air conditioner.
- Press the power button. When the device receives a signal, the indication light "running" of the indoor unit lights up.
- Press the mode button and select the DRY mode. The air conditioner will now dehumidify the room.
- When the room temperature reaches 18^ , the air conditioner will automatically stop dehumidifying. The air conditioner will restart automatically when the room temperature reaches 20^ .
When activating dehumidifying, the fan speed will be automatically set to AUTO.
The desired room temperature can not be changed in de dry mode. This is automatically set to 18^
TIMER mode
When you set the timer with the TIMER button when you leave, it will be comfortable when you return home. At night you can turn off the timer.
SET TIMER
The following procedure must be followed to turn on the air conditioner at the desired time (the remote control and the air conditioner are turned off):
- Press the Timer button.
- Choose the desired mode by pressing the Mode button.
- Choose the desired temperature by pressing the button (only possible if the 'cool' or 'heat' mode is selected).
- Choose the fan speed (low, medium or high) or the automatic mode (only possible if the Feel, Cool or Heat mode is selected) by pressing the Fan button
In the Dry mode the fan always runs on the Auto mode.
- Choose Swing or No swing by pressing the Swing button.
- Press the Timer button ('h' flashes).
- Use the button to select the period the air conditioner has to be turned on (between 0 and 10 you can set the time per half hour; between 10 and 24, you can set the time per hour).
- Press the Timer button ('h" will stop flashing) and the set time will appear on the display.
- Press on the Timer button again to delete de selected data from the memory.
Note: When no buttons have been pushed during setting the timer function, the remote control will automatically turn off after 10 seconds.
The following procedure must be followed to turn off the air conditioner at the desired time (the remote control and the air conditioner are turned off):
- Press the Timer button.
- Use the button to select the period the air conditioner has to be turned off (between 0 and 10 you can set the time per half hour; between 10 and 24, you can set the time per hour).
- Press the Timer button ('h" will stop flashing) and the set time will appear on the display.
- Press on the Timer button again to delete de selected data from the memory.
Note: When no buttons have been pushed during setting the timer function, the remote control will automatically turn off after 10 seconds.
Note: if 'h' is flashing and you press the ON/OFF/RUN button once, the set temperature will appear on the display. You can now change the temperature with the button. If you press the Timer button, the time will appear again and can be changed at this moment*. If you press the Timer button again, all data will be saved and the remaining time (the air conditioner will be turned on) will appear on the display.
- When you press the ON/OFF/RUN button in stead of the Timer button, the remote control will be turned off.
Press the Timer function to check the settings on the display.
SWING function
Carry out the operations below when the air conditioner is in service.
-
Press the SWING button to activate the swing function. The vertical blades will now move up and down to distribute the air to the room better in the vertical direction.
-
Press the SWING button again, the vertical blade will stop at the position during the moment the SWING button is pressed.
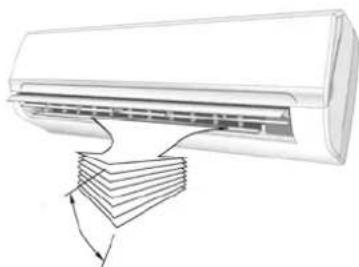
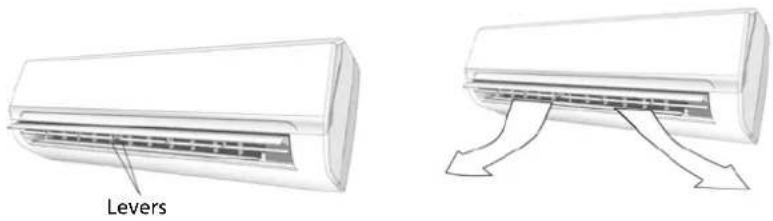
Horizontal air distribution
The horizontal air flow can be changed manually by adapting the horizontal blades with the levers, see picture.
SLEEP mode
Carry out the operations below when the air conditioner is in service.
- Press the SLEEP button to activate the sleep function.
- Press the SLEEP button or the MODE button to select another mode and turn off the SLEEP mode.
In SLEEP mode the air conditioner will control the room temperature as follows:
- In the cooling mode the set temperature will be increased automatically by 1^ after 1 hour. After two hours, the set temperature will be increased again by 1^ .
- In the heating mode the set temperature will be decreased automatically by 1^ after 1 hour. After two hours, the set temperature will be decreased again by 1^ .
- In the FEEL mode the air conditioner will set the temperature according point 1 or 2, depending on whether the air conditioner must cool or heat the room.
In the SLEEP mode, the air conditioner will be turned off automatically after 10 hours.
The SLEEP mode can only be used when the FEEL, cooling or heating modus is selected.
TURBO function
Press TURBO button to make the unit work extra hard. In COOL/HEAT/FAN mode, when you select TURBO feature, it will use the highest fan setting and use the preset temperature of 16^ in COOL mode and 31^ in HEAT mode. Press it again to inactivat the pre-setting status.
Mute mode
Press Mute button to activate mute mode, the unit will blow the lowest fan setting and the compressor works at lowest capacity. This may result in insufficient cooling and heating capacity. Press it again to cancel mute mode.
IFEELmode
Press I Feel button to enable the remote control to measure the temperature at its current location and send this signal to the air conditioner to enable the air conditioner to optimize the temperature around you and ensure maximum comfort. Press it again to cancel the I FEEL mode.
ECO mode
Press the ECO button to enable the unit to work in an economic situation like adjusting the compressor frequency and fan speed. Press it again to cancel the ECO mode.
Lock mode
Press Mode and Timer together to lock or unlock the keyboard, when locked, all buttons can't be operated until they are unlocked. The remote controller screen shows "LO".
E MAINTENANCE
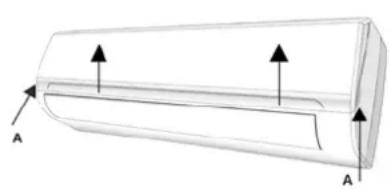
Cleaning the front panel
- Turn off the device and pull the plug out of the socket.
- Grab the front panel at position "a" and pull it towards you.
- Clean with a soft, dry cloth.
Use lukewarm water (max. 30^ ) to remove persistent dirt.
- Never use volatile substances like gasoline, or an abrasive to remove dirt.
- Never spray water on the indoor unit.
Danger! Electrical shock!
6. Replace the front panel and close it by pressing down position "b".
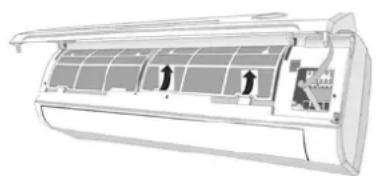
Cleaning the air filter
The air filter must be cleaned regularly.
Do this as follows:
-
Turn off the device completely.
-
Open the front panel.
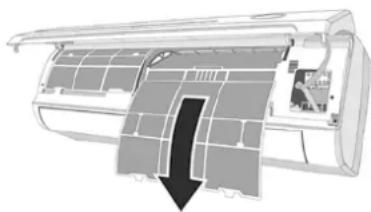
- Grab the lever and pull the filter out.
GB
- Clean the air filter and insert it again.
Clean a very dirty filter in lukewarm water with detergent. Let the filter completely dry at a spot without direct sunlight after cleaning.
- Close the front panel.
When the air conditioner is being used in a very dusty environment, it has to be cleaned every two weeks.
F OPERATING TEMPERATURES
Cooling, heating and / or dehumidifying is possible at the following inside or outside temperature.
| Mode | |||
| Refrigeration Heating | Dehumidify | ||
| Room temperature 16 | -48°C 16 – 31°C 16 – 48°C | ||
| Outdoor temperature 0 | -48°C -15 – +24°C 0 – 48°C | ||
G TROUBLESHOOTING
| Problem Cause / Solution | |
| Unit doesn't work. | The plug is not inserted correct in the socket. |
| The batteries of the remote control are empty. | |
| The safety switch is activated or the fuse is blown. | |
| Are the air inlets, outlets obstructed? | |
| No cooled or heated air. | Is the temperature set correctly? |
| Is the air filter clogged? | |
| No effective control. | Due to a malfunction (discharge of static electricity, power system failure) the device will not work properly. If this is the case, pull the plug out of the socket and insert it again after 2-3 seconds. |
| Do not start the unit immediately. | Changing mode when the unit is in service: 3 minute delay. |
| Unusual odour. | Odour might come from another source, furniture, cigarettes, etc. The unit blows the sucked in air out again. |
| Sound of running water. | Cause by the refrigerant in the air conditioner, this is not a malfunction. |
| Sound of defrosting in the heating mode. | |
| Cracking sound. | The sound can be caused by the expansion/contraction of the front panel due to changes in temperature. |
| A lot of vapour/mist is coming out the air out-let. | Vapour/mist is formed when the air temperature in the room drops strongly because cold air is being exhausted in the COOLING or DRY mode. |
| The red indicator light for the compressor flashes continuous and the fan of the indoor unit is not working anymore. | The unit switches from the heating mode to the defrost mode. The indication light turns off within 10 minutes, the unit returns to the heating mode. |

WARRANTY CONDITIONS
The air conditioner comes with a 48 month warranty for the compressor and a 24 month warranty for other parts, valid from the date of purchase. The following rules apply:
- We explicitly reject all further claims for damages, including consequential damage.
- Repairing or replacing parts during the warranty period does not extend the warranty period.
- The warranty is void when modifications have been made, non-original parts are used or when repairs have been made by third parties.
- Parts subject to normal wear, like the filter, are not covered by the warranty.
- The warranty is valid only when you present the original, dated purchase invoice and if no modifications have been made to it.
- The guarantee is invalid for damage caused by neglect or actions that deviate from those in the user manual.
- Shipping costs and the risks associated with shipping the air conditioner or parts of it will always be on account of the purchaser.
- Damage caused by not using the appropriate filters is not covered by the warranty.
- Loss of refrigerant and/or leakage as a result of unprofessional connecting / detaching of the units by unqualified personal is not covered by the warranty conditions applicable to this product. Damage to devices which were not installed, connected and / or detached according local rules and legislation and / or according this installation manual are not covered by the warranty conditions applicable to this product.
In case of repairs, refer to your dealer if these instructions don't offer a solution. Make sure that in the exceptional case of a forced detachment, this procedure always is carried out by a qualified and authorised professional, according local legislation and regulations.
SPECIFICATIONS
| Model S 3925 S 3932 S 3948 | ||||
| Air conditioner type | Wall model air conditioner | Wall model air conditioner | Wall model air conditioner | |
| Cooling capacity* W 2600 (960 - 3120) 3300 (1080 - 3770) 5100 (1250 - 5920) | ||||
| EE rating cooling* A++ A++ A++ | ||||
| SEER* 6.6 6.1 6.3 | ||||
| Heating capacity* W 2400 (950 - 3380) 2800 (1010 - 3940) 4500 (1350 - 6280) | ||||
| EE rating heating* | A+ | A+ | A+ | |
| SCOP* | 4.0 4.0 4.0 | |||
| Dehumidifying capacity** / *** | I / 24 h | 21.6 | 26.4 | 36.0 |
| Power consumption cooling | kW | 0.69 | 1.00 | 1.53 |
| Power consumption heating | kW | 0.67 | 1.01 | 1.55 |
| Yearly power consumption cooling / heating | kWh | 138/840 | 189/980 | 283/1575 |
| Power input | V / Hz / Ph | 220-240~ / 50 / 1 | 220-240~ / 50 / 1 | 220-240~ / 50 / 1 |
| Max. current | A | 6.4 | 7.1 | 12.0 |
| Air flow ** | m3/h | 550 | 550 | 800 |
| For rooms from - to ** | m3 | 60-85 | 80-100 | 140-185 |
| Suited for regions | W/A | W/A | W/A | |
| Compressor type | Rotary | Rotary | Rotary | |
| Fan speeds | 3 | 3 | 3 | |
| Thermostatic range | °C | 16 - 31 | 16 - 31 | 16 - 31 |
| Manual / mechanical / electronic control | Electronic remote control | Electronic remote control | Electronic remote control | |
| Remote control Yes / No | Yes | Yes | Yes | |
| Air filter type(s) | Mesh | Mesh | Mesh | |
| Refrigerant type / filling | C / g | R32 / 520 | R32 / 600 | R32 / 920 |
| Refrigerant GWP | 675 | 675 | 675 | |
| CO2equivalent | tonnes. | 0.351 | 0.405 | 0.621 |
| Diameter refrigerant piping Fluid - Gas | mm | 1/4" / 3/8" | 1/4" / 3/8" | 1/4" / 3/8" |
| Dimensions indoor unit (WxHxD) | mm | 777×250×205 | 777×250×205 | 910×292×205 |
| Dimensions outdoor unit (WxHxD) | mm | 700×552×256 | 700×552×256 | 780×602×347 |
| Net weight indoor unit | kg | 8.5 | 8.5 | 10.0 |
| Net weight outdoor unit | kg | 24.0 | 26.0 | 36.0 |
| Gross weight indoor unit | kg | 10.5 | 10.5 | 13.0 |
| Gross weight outdoor unit | kg | 27.0 | 29.0 | 40.0 |
| Sound level indoor unit**** | dB(A) | 50 | 50 | 53 |
| Sound level outdoor unit**** | dB(A) | 60 | 60 | 65 |
| Sound pressure level indoor unit (low)**** | dB | 19 | 19 | 27 |
| Protection indoor unit | IP | IPX0 | IPX0 | IPX0 |
| Protection outdoor unit | IP | IPX4 | IPX4 | IPX4 |
| Refrigerant R32 | Room area | Above 4㎡ | Above 4㎡ | Above 15㎡ |
- EN 14511/EN 14825
** Use indicative
*** Remove moisture at 27^ 60% RL
*** EN 12108
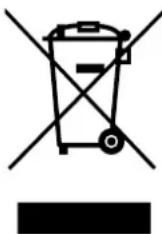
Don't dispose electrical devices with household waste; deliver it to a designated collection point. Contact the local authorities for information about places for disposal of electrical devices. When electrical devices are dumped at landfills or dumps, hazardous substances can leak into the groundwater and get into the food chain, with all consequences for the health of the local population. When replacing old devices it is the legal responsibility of the supplier to collect the old device for disposal. Don't throw batteries into fire. They can explode or leak hazardous fluids. When you replace or dispose the remote control, remove the batteries and
dispose them according the legislation applicable. They are harmful to the environment.
Environmental information: This device contains fluorinated greenhouse gases, as stated in the Kyoto protocol. The equipment may be repaired or dismantled only by professional, trained personal.
This device contains refrigerant R32, the amount is indicated in the table above. Don't let R32 escape into the atmosphere: R32 is a fluorinated greenhouse gas with greenhouse gas effect (GWP) = 675.
Internet:
In order to provide a better service, you can download the latest version of the user, installation, or service manual at www.qlima.com.
Egregio Signore, Gentile Signora,
Distributed in Europe by PVG Holding B.V.
Benotigen Sie weite Informationen oder treten Probleme auf, besuchen Sieitte unsere Website wwwqlima.com, oder setzen sie sich mit unserem Kundendienst in Verbindung (Telefonnummer auf www.qlima.com).
For alle yderligere oplysninger ell ve eventuelle problemer med apparatet henvises til www.qlima.com ell der lokale Kundecenter (telefonumre findes i www.qlima.com).
Si necesita informacion o si Tiene algo problema, visite nuestra pagina Web www.qlma.com, o pongase en contacto con el service客户提供 (hallar a numero de Telefono en www.qlma.com).
Si you souhaitez obtenir des informations supplémentaires ou si you rencontrez un probleme, rendez-vous sur notre site Web (www.qlma.com) ou contactez notre service client (vous trouverez l'adresse et numero de téléphone sur www.qlma.com).
Jo hau at huo to a, iattoja tai laiteen kansa tuee onglmia, tutustu verkkosivustoon ositteessw.qlima.com tai kysnuoa PVG kuluttajapalvelukeskuksesta (www.qlima.com).
If you need information or if you have a problem, please visit the our website (www.qlima.com) or contact our sales support (you find its phone number on www.qlima.com)
Per informazioni e in caso di problemi, visitate il site Web www.qlima.com oppure contattate il Centro Assistenza Clienti (per conoscere il numero di Telefono, consultate www.qlima.com).
Hvis du trenger informasjon, eller his du har et problem med produktet, kan du gà til nettsidene www.qlima.com. Alternativt kan du kontakte med PVG' forbrukertjeneste (telefonummeret i www.qlima.com).
Ns Alu inatme nig hebt of al u en probleme hbt, bezek dan de onze weibite (ww.qlima.com) of neem contact op met de afdeling sales support (adres en telefoon op www.qlima.com).
Se necessitar de informacoes ou se tiver problemas, visite o Web site www.qlima.com ou contacte o Centro de Assistencia (nromo de telephone o www.qlima.com)
W przypadiu problemów i w celu uzyskania szcęgólowych informaci odwiedź strone internetowa Qlima dostepnag pod adresem www.qlima.com lub skontaku z Centrum kontaków Qlima (www.qlima.com)
Om du behover service ell information ell har problem med apparaten kan du besoka www.qlma.com eller kontakta Qlma kundtjnst (du hittar Telefonumret pa www.qlma.com).
Czite datne informacie, obicite sptno mesto podjetna na naslovu www.qima.com ali poklicite na tefonsko (www.qima.com).
Daha fazla bilgiye ihtiaycduyarsaniz vya bir sorunla karsilasirsaniz, www.qlima.com adresindeki Qlma Internet sitesini ziyaret edin vya ulkenizde bulunan Qlma muster merkeziyle letisim kurun (telefon numarasini: www.qlima.com).

Read the user manual

Read the installation manual

Read the service manual