
Revitalize FK50100PC - Vacuum Cleaner Oreck - Free user manual and instructions
Find the device manual for free Revitalize FK50100PC Oreck in PDF.
| Technical Features | Oreck Revitalize FK50100PC is a cleaning device designed to revitalize carpets and rugs. |
|---|---|
| Device Type | Carpet and rug vacuum cleaner. |
| Weight | Lightweight, facilitating handling. |
| Usage | Ideal for deep cleaning of carpets, with easy and intuitive operation. |
| Maintenance | Regular cleaning of filters and brushes is recommended to maintain efficiency. |
| Safety | Equipped with safety devices to prevent overheating. |
| General Information | Product designed for domestic use, with a limited warranty. |
Frequently Asked Questions - Revitalize FK50100PC Oreck
User questions about Revitalize FK50100PC Oreck
0 question about this device. Answer the ones you know or ask your own.
Ask a new question about this device
Download the instructions for your Vacuum Cleaner in PDF format for free! Find your manual Revitalize FK50100PC - Oreck and take your electronic device back in hand. On this page are published all the documents necessary for the use of your device. Revitalize FK50100PC by Oreck.
USER MANUAL Revitalize FK50100PC Oreck
ORECK REVITALIZE carpet cleaner
ORECK
Important: Read carefully before assembly and use.
FK50100 Series #961151929 ID112145-RO
THANK YOU
for purchasing an Oreck® product
please register your product:
online at oreck.com or call 1.800.989.3535(U.S)
or 1.888.676.7325 (Canada) to register by phone
TABLE OF CONTENTS
1IMPORTANT SAFETY INSTRUCTIONS. 4
Solutions 7
2 FEATURES 8
3 OPERATION 10
Assembly 10
Before you Begin Cleaning. 11
Filling the Clean Water Tank. 12
Using your Machine 14
Emptying the Dirty Water Tank 16
Attaching Tools 18
Using your Tools 20
How to Clean Upholstery 22
4 MAINTENENCE 24
Cleaning the Dirty Water Tank 24
Cleaning the Nozzle 26
Cleaning the SpinBrush 360^TM 28
Removing the Flat Belt 29
5 TROUBLESHOOTING GUIDE 30
6 WARRANTY 32
7SPANISH 34
8 FRENCH. 56
IMPORTANT SAFETY INSTRUCTIONS
SAVE THESE INSTRUCTIONS
When using an electrical appliance, basic precautions should always be followed, including the following: READ ALL INSTRUCTIONS BEFORE USING THIS APPLIANCE.
WARNING: TO REDUCE THE RISK OF FIRE, ELECTRIC SHOCK OR INJURY:
This product is intended for household use only and NOT for commercial or industrial use. If used commercially warranty void.
- Fully assemble before operating.
- Operate cleaner only at voltage specified on data plate on lower back of cleaner.
- Do not leave appliance when plugged in. Unplug from outlet when not in use and before cleaning or servicing.
- Use indoors only.
- Do not immerse. Use only on carpet moistened by cleaning process.
- Use only ORECK cleaning solutions intended for use with this machine. (See the "Cleaning Solution Guide" section of this manual)
Do not allow to be used as a toy. Not intended for use by children age 12 and under. Close supervision is necessary when used near children. To avoid injury or damage, keep children away from product, and do not allow children to place fingers or other objects into any openings. -
Use only as described in this manual. Use only manufacturer's recommended attachments and products.
Do not use with damaged cord or plug. If appliance is not working as it should, has been dropped, damaged, left outdoors, or dropped into water, take it to a service center prior to continuing use. -
Do not pull or carry by cord, use cord as a handle, close a door on cord, or pull cord around sharp edges or corners. Do not place product on cord. Do not run appliance over cord. Keep cord away from heated surfaces.
- Do not unplug by pulling on cord. To unplug, grasp the plug, not the cord.
- Do not handle plug or appliance with wet hands.
- Do not put any object into openings. Do not use with any opening blocked; keep free of dust, lint, hair, and anything that may reduce air flow.
- Keep hair, loose clothing, fingers, and all parts of body away from openings and moving parts.
- Turn off all controls before unplugging.
- Use extra care when cleaning on stairs. To avoid personal injury or damage, and to prevent the cleaner from falling, always place cleaner at bottom of stairs or on floor. Do not place cleaner on stairs or furniture, as it may result in injury or damage.
- Do not use to pick up flammable or combustible liquids, such as gasoline, or fine wood sandings, or use in areas where they may be present.
- Connect to a properly grounded outlet only. See Grounding Instructions.
- Unplug before connecting SpinBrush 360 ^TM powered hand tool.
- Do not pick up anything that is burning or smoking, such as cigarettes, matches, or hot ashes.
- Do not use without filters and tanks in place.
- Do not clean over floor electrical outlets.
WARNING: This product contains chemicals known to the State of California to cause cancer, birth defects or reproductive harm. WASH HANDS AFTER HANDLING.
CAUTION: To reduce the risk of damage:
- Avoid picking up hard, sharp objects with this product, as they may cause damage.
- Store appropriately indoors in a dry place. Do not expose machine to freezing temperatures.
- Do not use sharp objects to clean out hose as they can cause damage.
- To assist in reducing drying time, be certain the area is well ventilated when using detergents and other cleaners with this machine.
- Do not store cleaner with solution in tanks.
- With brushes and brushroll on, do not allow cleaner to sit in one location for an extended period of time, as damage to floor can result.
- Do not use this cleaner on hard floors without squeegee. Using this machine on hard floors may scratch or damage your floor.
Water will drip from the brushes and underside of the product after use and may puddle. To avoid damage to wood and laminate flooring and to avoid potential slip hazard, after use (a) do not leave the product on wood and laminate surfaces and move to a hard surface and (b) place unit on absorbent material (such as a towel) to soak up drips.
To help prevent matting and resoiling, avoid contact with carpets until they are dry. Keep children and pets away from carpets until they are completely dry.
PLEASE KEEP INSTRUCTIONS FOR FURTHER USE.
IMPORTANT SAFETY INSTRUCTIONS
WARNING: Improper connection of the equipment-grounding conductor can result in the risk of electric shock. Check with a qualified electrician or service person if you are in doubt as to whether the outlet is properly grounded. Do not modify the plug provided with the appliance - if it will not fit the outlet, have a proper outlet installed by a qualified electrician. This appliance is for use on a nominal 120-volt circuit and has a grounding plug that looks like the plug (A) illustrated in Fig. 1. A temporary adapter (D) may be used to connect this plug to a 2-pole receptacle (E) if a properly grounded outlet is not available (Fig. 2). The temporary adapter should be used only until a properly grounded outlet (B) can be installed by a qualified electrician (Fig. 1). The green colored rigid ear, lug, or the like (F) extending from the adapter must be connected to a permanent ground (G) such as a properly grounded outlet box cover (Fig. 2). Whenever the adapter is used, it must be held in place by a metal screw. NOTE: In Canada, the use of
a temporary adapter is not permitted by the Canadian Electrical Code.
GROUNDING INSTRUCTIONS: This appliance must be grounded. If it should malfunction or breakdown, grounding provides a path of least resistance for electric current to reduce the risk of electric shock. This appliance is equipped with a cord having an equipment-grounding conductor (C) and grounding plug (A). The plug must be inserted into an appropriate outlet (B) that is properly installed and grounded in accordance with all local codes and ordinances.

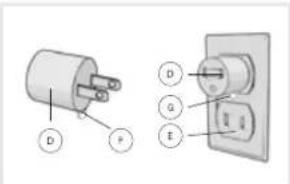
Fig.1 Fig.2
CLEANING SOLUTION GUIDE
| Product Name | Solution Name | Available Sizes |
| Oreck® Revitalize | Oreck® Elite Total Carpet Cleaning Solution | 64 oz. |
| Oreck® Elite Hard Floor Cleaning Solution* | 64 oz. |
*For use with squeegee only.
** Oreck hard surface attachment part # 440007236
For optimal performance use Oreck brand solutions found on oreck.com and Oreck stores nationwide.
!WARNING!!
TO REDUCE THE RISK OF FIRE AND ELECTRIC SHOCK DUE TO INTERNAL COMPONENT DAMAGE, USE ONLY ORECK CLEANING PRODUCTS INTENDED FOR USE WITH THE APPLIANCE AS NOTED ABOVE. WHEN CLEANING A HARD SURFACE THE ORECK HARD SURFACE ATTACHMENT MUST BE USED (OPTIONAL IF NOT INCLUDED).
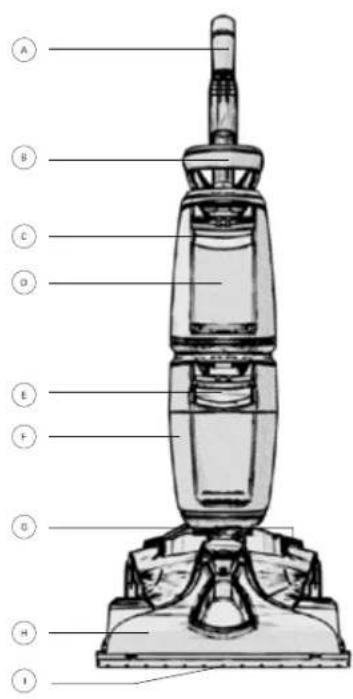
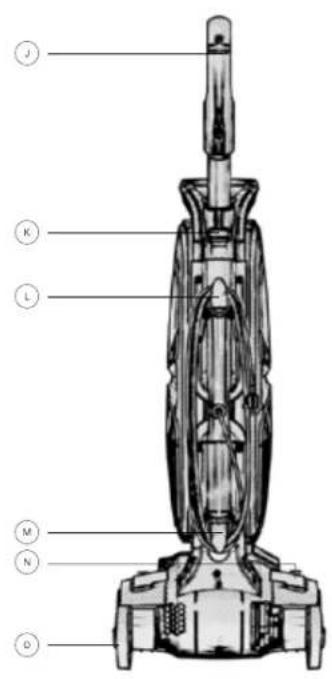
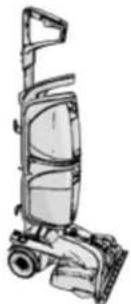
2. FEATURES
CARTON CONTENTS

Handle

On/Off Pedal

Lower Cord Hook

Carry Handle

Nozzle

Handle Release Pedal

Clean Water Tank Release Button

Squeegee (select models only)

Soft-Tread Wheels

Clean Water/ Solution Tank

Solution Trigger

Recovery Tank Release Button

Tool-Free Handle Lock

Recovery Tank

Quick Release Cord Hook
TECHNICAL SPECIFICATIONS | FK50100
| Name | Voltage | Wattage | Cord Length | Weight | Current |
| Revitalize™ | 120V | 900W | 26 ft. | 16 lbs. | 7.5 amps |
Subject to technical change without notice.
ALSO INCLUDES
16oz Oreck Elite Ultra Carpet Cleaning Solution (QUANTITIES VARY PER MODE)
Above Floor Hose (LENGTH VARYS BY MODEL)
Upholstery Tool
SpinBrush 360TM Powered Hand Tool (SELECT MODELS ONLY)
Hard Floor Squeeze (SELECT MODELS ONLY)
Accessory Bag
3.OPERATION
ASSEMBLY

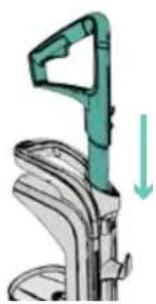
Cord Storage:
Insert the handle into the base. Push handle down to lock into position. Wrap cord around the cord hooks for convenient
storage. Attach the plug end to the cord.

CAUTION!
DO NOT USE THIS EXTRACTOR ON HARD FLOORS UNLESS YOU HAVE THE PROPER HARD FLOOR ATTACHMENT. USING THIS
MACHINE ON HARD FLOORS WITHOUT PROPER ATTACHMENT MAY SCRATCH OR DAMAGE YOUR FLOOR.
NOTE: To prevent staining, use plastic or aluminum foil to protect wood or metal surfaces from possible water spray. NOTE: To avoid damage to wood floors underneath area rugs or carpet, place waterproof material (e.g. plastic) underneath them before cleaning.
-
Vacuum carpet and upholstery thoroughly with an Oreck vacuum.
-
Test for colorfastness in a small, hidden area. Gently rub surface with a dampened white cloth. Wait ten minutes and check for color removal or bleed with a white paper towel.
-
Use your Oreck carpet cleaner only if upholstery fabric is marked with a "W" (for "wet" clean) or "S/W" (for "solvent/dry" or "wet" clean). Don't clean fabric marked "S" ("solvent/dry" clean only).
-
Move furniture out of area to be cleaned. Place aluminum foil or wax paper under legs of furniture too heavy to move to prevent wood finishes from staining carpet.
3.OPERATION
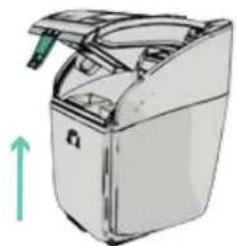
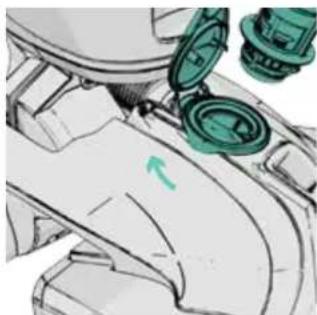
FILLING THE CLEAN WATER TANK
NOTE: Using more than the recommended amount of cleaning solution may cause excessive foaming.
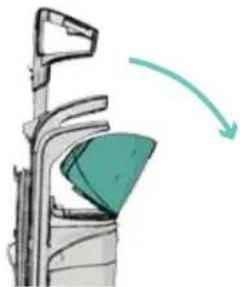
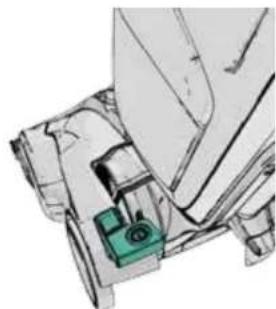
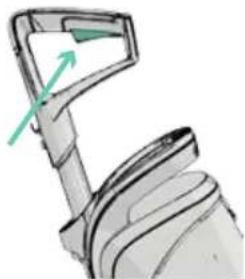
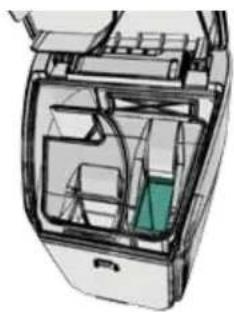
Press the Clean Water Tank latch on handle. Angle the Clean Water Tank out to remove.
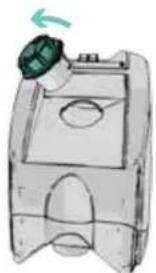
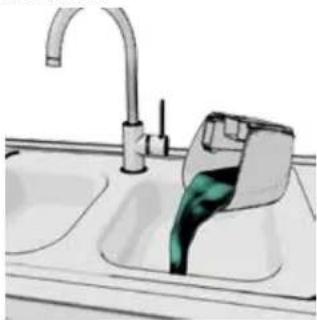
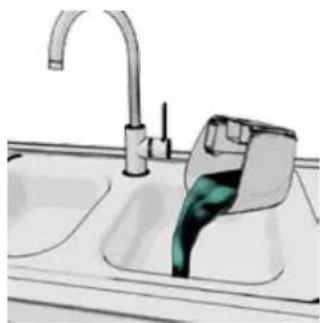
Turn water cap counter-clockwise to remove. Fill Clean Water Tank with hot tap water.
!WARNING!!
USE ONLY DREADK CLEANING PRODUCTS INTENDED FOR USE WITH THIS MACHINE. (SEE THE "CLEANINGPRODUCTS" SECTION IN THIS MANUAL FOR DETAILS.) THEY ARE SPECIALLY FORMULATED FOR USE WITH YOUR CLEANER. NON-DREADK CLEANING SOLUTIONS MAY HARM THE MACHINE AND VOID THE WARRANTY.
!CAUTION!!
DO NOT FILL WITH WATER ABOVE 140^ (60^)

Pour 2 caps of solution in Clean Water Tank. See solution label for accurate solution measurement based on a two quart tank. Replace cap.
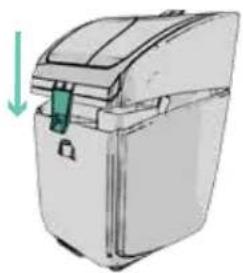
Angle the Clean Water Tank back onto the handle. It will click into place.

CAUTION!

DETERGENTS CONTAIN ANIONIC AND NONIONIC SURFACTANTS. AVOID CONTACT WITH EYES AND SKIN. IN CASE OF CONTACT WITH EYES, FLUSH WITH COLD WATER FOR 15 MINUTES. IN CASE OF CONTACT WITH SKIN, WASH WITH WATER. IF IRRITATION PERSISTS, CALL A PHYSICIAN.
3.OPERATION
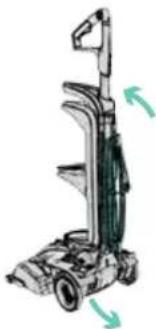
USING YOUR MACHINE
NOTE: For best results, use straight, parallel strokes. Overlap strokes by 1 in. to help prevent streaking.
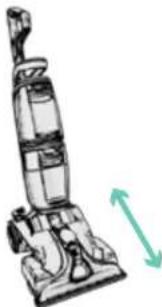
Plug in. Step on the handle release pedal to put unit in cleaning position.
Step on the power pedal to turn ON (I=ON). Press the power pedal again to turn OFF (0=OFF).
Squeeze trigger to apply cleaning solution. Slowly push forward then backwards while squeezing the trigger (wet stroke).

CAUTION!
DO NOT CLEAN OVER FLOOR ELECTRICAL OUTLETS. WATER WILL DRIP FROM THE BRUSHES AND UNDERSIDE OF THE PRODUCT AFTER USE AND MAY PUDDLE TO AWID DAMAGE TO WOOD AND LAMINATE FLOORING AND TO AWID POTENTIAL SLIP HAZARD, AFTER USE (A) DO NOT LEAVE THE PRODUCT ON WOOD AND LAMINATE SURFACES AND MOVE TO A HARD SURFACE AND (B) PLACE UNIT ON AN ABSORBANT MATERIAL (SUCH AS A TOWEL) TO SOAK UP DRIPS.
NOTE: Empty Dirty Water Tank when the motor sound becomes higher pitched and there is a loss in suction (see "Automatic shut-off"). NOTE: It is best to alternate wet and dry strokes as described below.
Release the trigger and slowly push forward over the sprayed area. Then slowly pull back toward you without squeezing trigger (dry stroke). Continue using dry strokes until little water is visible.
To rinse carpets, empty the Clean Water Tank and fill with water only before going over carpets again.
For best cleaning results, end with more dry strokes. (Continue using dry strokes until little water is visible passing through the nozzle.)
For best results, Oreck recommends rinsing carpet with water only. This removes residual carpet cleaning solution. Fill Clean Water tank with water only. For heavily soiled areas, repeat. Avoid saturating carpet.
3.OPERATION
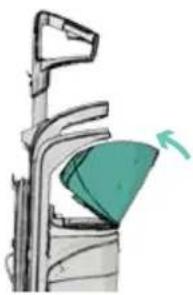
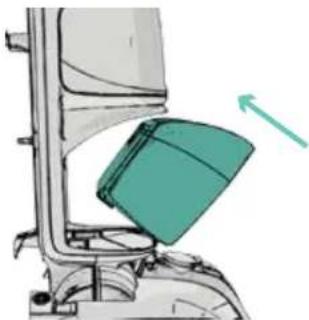
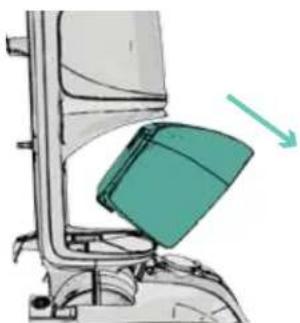
EMPTYING THE DIRTY WATER TANK

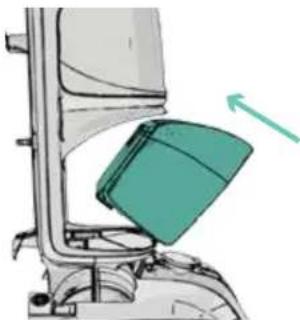
to release. Lift tank out at an angle like this.
Empty the Dirty Water Tank by pulling up on the latch at the back of the tank to open.
Hold lid open while emptying tank.Grasp Dirty Water Tank handle and

WARNING!

TO REDUCE THE RISK OF PERSONAL INJURY-UNPLUG BEFORE CLEANING OR SERVICING
Secure lid by pushing the latch down. It will snap when secured.
Insert Dirty Water Tank at an angle until it clicks into place.
Automatic Shutoff
Your carpet cleaner is equipped with a shut-off float. When the Dirty Water Tank becomes full, the float will rise, shutting off the air flow through the nozzle. A higher pitched sound will come from the motor.
When activated, empty the dirty water tank. If the dirty water tank does not appear full, turn off and wait for the float to reset. If the float repeatedly shuts off the suction, empty the dirty water tank.
For best results, use only Oreck brand cleaning solution. Other solutions may generate excessive foam which will cause the float to shut off the suction.
3.OPERATION
ATTACHING TOOLS
NOTE: Tools are located and stored in Mesh Stoge Bag.
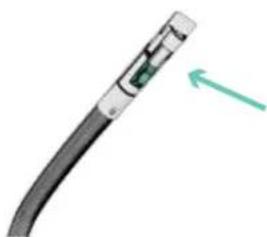
NOTE: Upholstery and SpinBrush 360 ^ Powered Hand Tool attach to the hose in the same manner.

Place unit in upright position. Slide the hose on the tool's connector until it locks. Push
forward with your thumb on the latch to remove.
!WARNING!WARNING!WARNING!
USE EXTRA CARE WHEN CLEANING ON STAIRS. TO AVOID PERSONAL INJURY OR DAMAGE, AND TO PREVENT THE CLEANER FROM FALLING, ALWAYS PLACE CLEANER AT BOTTOM OF STAIRS OR ON FLOOR. DO NOT PLACE CLEANER ON STAIRS OR FURNITURE, AS IT MAY RESULT IN INJURY OR DAMAGE. WHEN USING TOOLS, ALWAYS ENSURE HANDLE IS IN UPRIGHT POSITION.
! !
NOT TO BE USED FOR GROOMING A PET, TO REDUCE RISK OF INJURY FROM MOVING PARTS-UNPLUG BEFORE SERVICING.
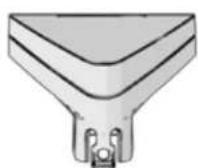
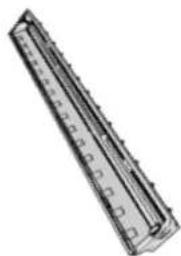
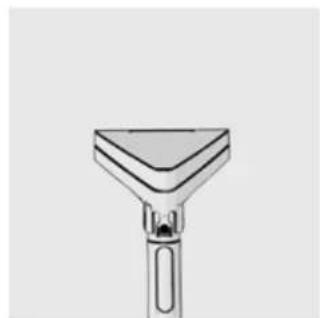
Upholstery Tool: Multi-Floor Squeeze
The Upholstery Tool's built-in brush provides scrubbing action.
*Select Models Only
The Multi-Floor Squeezegee extends cleaning from carpet to hard floors. Pivot squeezegee on front nozzle and snap back to secure squeezegee for hard floor use.
SpinBrush 360 ^※ Powered Hand Tool* Select Models Only
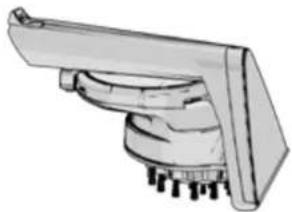
The SpinBrush 360 ^※ Powered Hand Tool's rotating brush provides extra scrubbing for spots and messes.
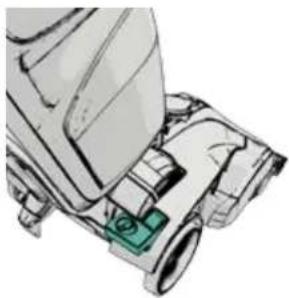
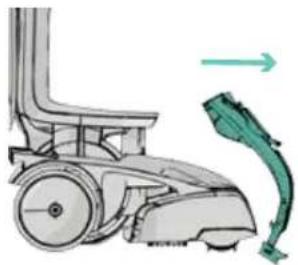
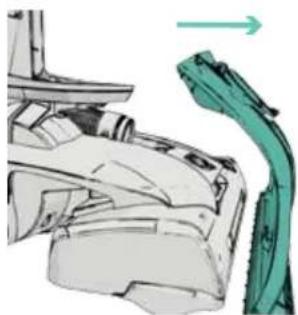
3.OPERATION
USING YOUR TOOLS.
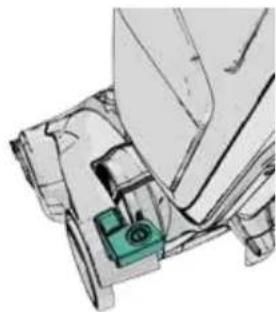
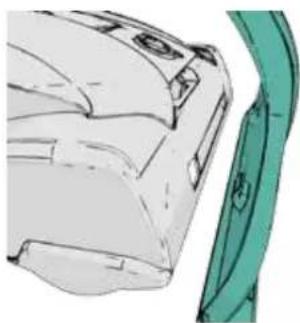
Pull up hose port on the nozzle. Insert hose end connector and twist clockwise to seal.
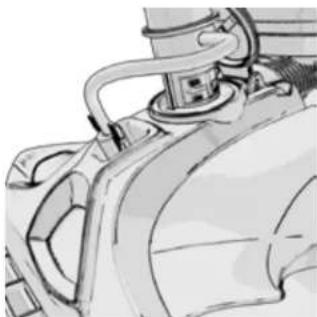
Connect cleaning fluid supply hose to the connector and twist clockwise to seal.
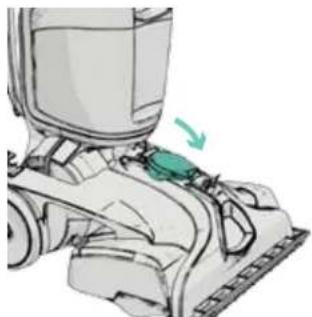
After use, remove hose and tube. Close hose port cover until it clicks in place.
After using tool:
Drain suction hose by turning cleaner ON and holding nozzle up for several minutes. Do not press the trigger.
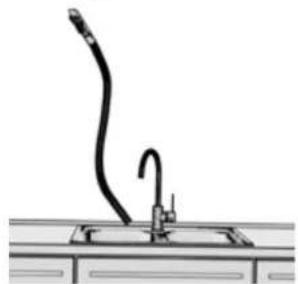
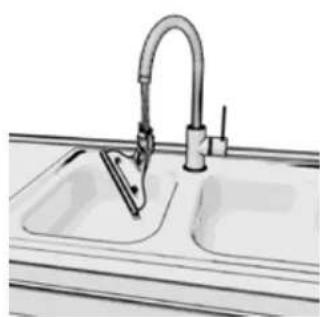
Disconnect hose and solution tube from cleaner. Drain solution tube by placing round end in sink and raising the trigger end at the hose nozzle above your head.
Press the trigger to release air and fluid. Replace Hose and tools in the Mesh Storage Bag.
3.OPERATION
HOW TO CLEAN UPHOLSTERY
Note: Read "Before You Begin Cleaning" instructions (pg. 11).
Be sure to check Oreck Cleaning Guide on page 7 and the cleaning code on your upholstery. Use your cleaner only on upholstery marked "W" or "W/S".

Attach hose to the unit. Follow steps "Using your Tools" on page 20.
Dry hands and plug into an outlet, then turn ON. Gently press the tool onto the fabric. Press the trigger and slowly pull the nozzle over the fabric.
Overlap strokes by 1/2 in. to prevent streaking. Make additional strokes without pressing the trigger. For heavily soiled areas, repeat the cleaning process.
If additional cleaning is necessary, wait until the upholstery is completely dry before using the tool again.
Empty Dirty Water Tank when the motor sound becomes higher pitched and there is a loss in suction (see "Automatic Shut-Off").
When finished cleaning, follow "After Cleaning" and "After Using Tool" instructions on page 14.
For best cleaning results, Oreck recommends to rinse the upholstery with water only. This removes residual cleaning solution.
4. MAINTENENCE
CLEANING THE DIRTY WATER TANK
Remove the Dirty Water Tank by squeezing latch and pulling the tank out at an angle.

Pull up on back latch to open Dirty Water Tank. Hold top open and rinse tank with clean water.
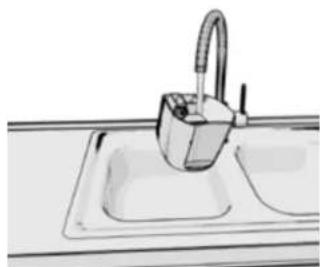
To clean Dirty Water Tank, place it under faucet and dispense high pressure clean water to backflush any loose debris.
!WARNING!!
TO REDUCE THE RISK OF PERSONAL INJURY-UNPLUG BEFORE CLEANING OR SERVICING.
LUBRICATION: THE MOTOR AND BRUSHROLL IS EQUIPPED WITH BEARINGS WHICH CONTAIN SUFFICIENT LUBRICATION FOR THEIR LIFETIME. THE ADDITION OF LUBRICANT COULD CAUSE DAMAGE. DO NOT ADD LUBRICANT TO MOTOR OR BRUSHROLL.
Be sure to clean the filter screen located in the top of the Dirty Water Tank.
Allow to air dry completely. Pull the lid down to insert latch. Replace Dirty Water Tank back onto unit until it snaps.
Familiarize yourself with these home maintenance tasks. Proper use and care of your cleaner will ensure continued cleaning effectiveness.
Any other servicing should be done by an authorized service representative. If appliance is not working as it should, has been dropped, damaged, left outdoors, or dropped into water, take it to a service center prior to continuing use.
During normal use, debris may accumulate inside of dirty water tank. In order to keep your unit functioning properly, rinse out your dirty water tank with fresh water after each use.
4. MAINTENENCE
CLEANING THE NOZZLE
To prevent leaking, remove Clean Water Tank and Dirty Water Tank. With unit in an upright position, tilt carpet cleaner back.
Remove two phillips head screws on the top of the nozzle.
Pull nozzle forward to remove. Disconnect nozzle from hose.
Note: Do not pull nozzle up when removing.

WARNING!

TO REDUCE THE RISK OF PERSONAL INJURY-UNPLUG BEFORE CLEANING OR SERVICING
Rinse debris from the nozzle. Attach nozzle to hose.
Pull nozzle down to
align the tabs with the notches on the base.
Insert Screws.
Note: Ensure the nozzle is flush with the foot.
STORAGE
Before storing:
- Empty Clean Water Tank and let air dry.
- Empty Dirty Water Tank, rinse tank and lid thoroughly with clean water and let air dry.
- Replace tanks on cleaner.
Allow brushes and underside of carpet cleaner to air dry thoroughly before storing cleaner on a carpeted or wood surface.
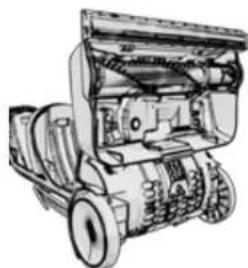
4. MAINTENENCE
CLEANING THE SPINBRUSHES 360^
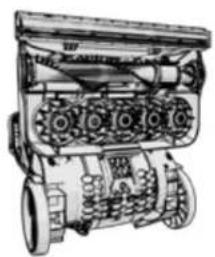
Flip cleaner on back. Grasp SpinBrush 360
Brushes and
pull out.
Rinse off debris. Replace SpinBrush 360Brushes by lining up tab and pushing back in.

WARNING!

TO REDUCE THE RISK OF PERSONAL INJURY-UNPLUG BEFORE CLEANING OR SERVICING
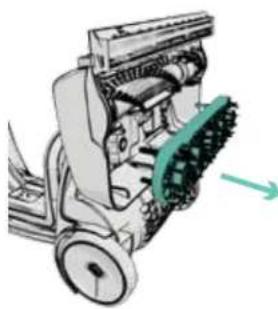
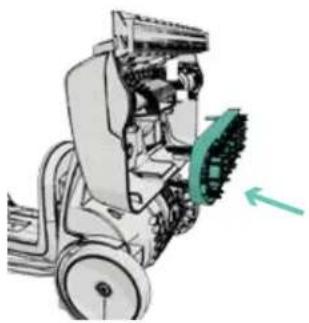
REMOVING THE FLAT BELT
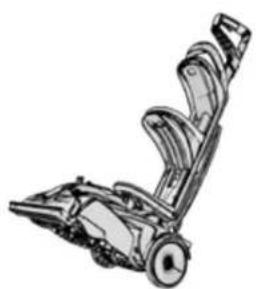
Flip cleaner on its back. Make sure SpinBrush 360™ Brushes are removed.
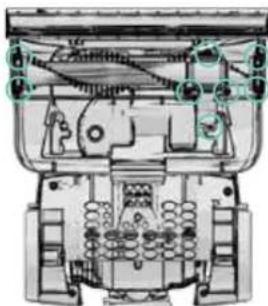
To access the belt, remove the 8 Philips screws and remove belt and brushroll cover. Circles show location of screws.
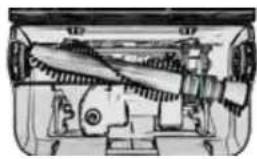
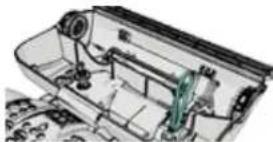
Using a screwdriver, remove the belt off the motor drive and replace with new belt. To reassemble, reverse steps.
What belt to buy: For replacement belts please order part number 440007241 for tooth/ timing belt. To locate a dealer nearest you, please call 1.800.989.3535 or visit our website at www.oreck.com. Note: Flat belt is smooth while timing belt has teeth.
5.TROUBLESHOOTING
If appliance is not working as it should, has been dropped, damaged, left outdoors or dropped into water, take it to a service center prior to continuing use. Any other servicing should be done by an authorized service representative.
| Problem | ResolutionCause | |
| Cleaner will not run | • Power cord not firmly plugged into outlet. • No voltage in wall plug. • Blown fuse or tripped breaker. | • Plug unit in firmly. • Check fuse or breaker in home. • Replace fuse/reset breaker in home |
| Cleaner won't pick up or has low suction | • Dirty Water Tank is not installed correctly. • Dirty Water Tank is full. • Dirty Water Tank is clogged. • Air path is clogged. | • Review Emptying your Dirty Water Tank (Pg. 14) • Empty Dirty Water Tank. • Clean Dirty Water Tank. • Unclog air path/nozzle. |
| Water escapes from Cleaner | • Dirty Water Tank is full. • Dirty Water tank is not installed correctly. • Clean Water Solution Tank not installed properly. | • Empty Dirty Water Tank. • Review Emptying your Dirty Water Tank (Pg. 14) • Review Clean Water Solution Tank Installation. |

WARNING!

TO REDUCE THE RISK OF PERSONAL INJURY-UNPLUG BEFORE CLEANING OR SERVICING
| Problem | ResolutionCause | |
| Cleaner will not dispense | • Clean Water Solution Tank is empty. • Clean Water Solution Tank not installed properly. • Needs service. | • Fill Clean Water Solution Tank. • Review Clean Water Solution Tank Installation. • Take to service center. To find nearest location, visit our website at www.queck.com or call 1.800.989.3535. |
| Hose nozzle will not spray after filling the Clean Water Tank or Detergent Container | • Air is trapped in the pump and hose. • The connection to the tool port is loose. | • Turn on the cleaner. If hose does not spray, prime the pump by lowering the hose down to the floor and hold the trigger for up to 1 minute. • Ensure that the Hose is securely connected to the hose connection. |
| Motor noise becomes high-pitched | • Dirty Water Tank is full. • Dirty Water Tank is clogged. • Air path is clogged. • The float in the Dirty Water Tank has been activated. | • Empty Dirty Water Tank. • Clean Dirty Water Tank. • Unclog air path. • Review Emptying & Cleaning the Dirty Water Tank. |
| Brushrolls are not spinning | • Belt needs to be changed. • Something is jammed in the brushroll. • Needs service. | • Refer to how to change belt. • Remove jammed item from cleaner with unit turned off and unplugged. |
5. WARRANTY
Techronic Floor Care Technology gives you the following limited warranty for this product only if it was originally purchased for residential use, not for resale, from Oreck® or an Oreck® Authorized Retail Dealer.
Orock will repair or replace, free of charge, to the original purchaser any part that is found to be defective in material or workmanship within four (4) years following the date of purchase for all residential models. NOTE: Warranty is void if used in a commercial setting. This limited warranty does not cover the replacement of expendable or consumable parts such as filters, cartridges, and other parts subject to normal wear unless they are defective in material or workmanship.
This limited warranty does not apply to any part subjected to accident, abuse, commercial use, alteration, misuse, damage caused by an act of God, the use of voltages other than on the data plate of this product or service of this product by other than Oreck or a participating Factory Authorized Service Center.
Oreck does not authorize any person or representative to assume or grant any other warranty obligation with the sale of this product.
Oreck's limited warranty is valid only if you retain proof of purchase from Oreck or an Oreck Authorized Retail Dealer for this product. If you purchase this product from any other source, your purchase is "AS IS," which means Oreck grants you no warranty, and that you, not Oreck, assume the entire risk of the quality and performance of this product, including the entire cost of any necessary servicing or repairs of any defects.
Oreck's liability for damages to you for any costs whatsoever arising out of this statement of limited warranty shall be limited to the amount paid for this product at the time of original purchase, and Oreck shall not be liable for any direct, indirect, consequential or incidental damages arising out of the use or inability to use this product. Some states do not allow the exclusion or limitation of incidental or consequential damages, so the above limitation or exclusion may not apply to you.
ALL EXPRESS AND IMPLIED WARRANTY OTHER THAN THE LIMITED WARRANTY SET FORTH ABOVE, FOR THIS PRODUCT, INCLUDING IMPLIED WARRANTY OF MERCHANTABILITY AND FITNESS FOR A PARTICULAR PURPOSE ARE EXPRESSLY DENIED.
This warranty gives you specific legal rights, and you may also have other rights which vary from state to state.


MANUAL DEL PROPIETARIO
360^ SpinBrush
*Sol on some modelos
! ADVERTENCIAL !
TENGASPECIAL CUIDADO AL LIMPIAR ESCALERAS. PARA EVITAR LESIONES FISicas O DANOS Y EVITAR QUE SE CAIGA LA ASIPRADORA, SIEMPRE COLOQUELA AL PIE DE LA ESCALERA O EN EL SUELO. NO LO COLOQUE SOBE ESCALERAS N IMUEBLES, YA QUE PUEDE OCASONAR LESIONES O DANOS. CUANDO UTILICE LAS HERRAMIENTAS ACCESORIAS, SIEMPRE ASEGURESE DE QUE EL MANGO SE ENCOUNTER EN POSICION VERTICAL.
! ADVERTENCIA!
NO UTILICE EL APARATO PARA ACICALAR A UN ANIMAL DE COMPANIA.
! ADVERTENCIA!
PARA REDUCIR EL RIESGO DE LESIONES OCASON ADAS POR PIEZAS EN MOVIMENTO-DESENCHUPE EL PRODUCTO ANTIES DE DARLE MANTENIMIENTO.
CÓMLO LIMPIAR LA BOQUILLA
1
IMPORTANT SAFETY INSTRUCTIONS
Techtronic Floor Care Technology Limited
Distributed by Royal Appliance Mfg. Co. Glenwillow, Oh 44139