
SBS440DAB - Fridge Infiniton - Free user manual and instructions
Find the device manual for free SBS440DAB Infiniton in PDF.
| Features | Details |
|---|---|
| Type of refrigerator | Combined refrigerator |
| Total capacity | 440 liters |
| Energy class | A+ |
| Dimensions (HxWxD) | 190 x 70 x 65 cm |
| Cooling system | Static cooling |
| Number of drawers | 3 drawers in the freezer |
| Additional features | Water dispenser, LED lighting |
| Adjustable temperature | Yes, adjustable thermostat |
| Maintenance | Manual defrost |
| Annual energy consumption | 350 kWh |
| Weight | 75 kg |
| Warranty | 2 years |
| Safety measures | Door locking system |
Frequently Asked Questions - SBS440DAB Infiniton
User questions about SBS440DAB Infiniton
0 question about this device. Answer the ones you know or ask your own.
Ask a new question about this device
Download the instructions for your Fridge in PDF format for free! Find your manual SBS440DAB - Infiniton and take your electronic device back in hand. On this page are published all the documents necessary for the use of your device. SBS440DAB by Infiniton.
USER MANUAL SBS440DAB Infiniton
In the interest of your safety and to ensure the correct use, before installing and first using the appliance, read this user manual carefully, including its hints and warnings. To avoid unnecessary mistakes and accidents, it is important to ensure that all people using the appliance are thoroughly familiar with its operation and safety features. Save these instructions and make sure that they remain with the appliance if it is moved or sold, so that everyone using it through its life will be properly informed on appliance use and safety.
For the safety of life and property keep the precautions of these user's instructions as the manufacturer is not responsible for damages caused by omission.
Children and vulnerable people safety
- This appliance can be used by children aged from 8 years and above and persons with reduced physical, sensory or mental capabilities or lack of experience and knowledge if they have been given super vision or instruction concerning use of the appliance in a safe way and understand the hazards involved.
- Children aged from 3 to 8 years are allowed to load and unload this appliance.
- Children should be supervised to ensure that they do not play with the appliance.
- Cleaning and user maintenance shall not be made by children unless they are aged from 8 years and above and supervised.
-
Keep all packaging well away from children. There is risk of suffocation.
-
If you are discarding the appliance pull the plug out of the socket, cut the connection cable (as close to the appliance as you can) and remove the door to prevent playing children to suffer electric shock or to close themselves into it.
- If this appliance featuring magnetic door seals is to replace an older appliance having a spring lock (latch) on the door or lid, be sure to make that spring lack unusable before you discard the old appliance. This will prevent it from becoming a death trap for a child.
General safety
WARNING! Keep ventilation openings, in the appliance enclosure or in the built-in structure, clear of obstruction.
WARNING! Do not use mechanical devices or other means to accelerate the defrosting process, other than those recommended by the manufacturer.
WARNING! Do not damage the refrigerant circuit.
WARNING! Do not use other electrical appliances (such as ice cream makers) inside of refrigerating appliances, unless they are approved for this purpose by the manufacture.
WARNING Do not touch the light bulb if it has been on for a long period of time because it could be very hot.
1) If there is a light in the compartment.
WARNING! When positioning the appliance, ensure the supply cord is not trapped or damaged.
WARNING! Do not locate multiple portable socket-outlets or portable power suppliers at the rear of the appliance.
- Do not store explosive substances such as aerosol cans with a flammable propellant in this appliance.
- The refrigerant isobutane (R-600a) is contained within the refrigerant circuit of the appliance, a natural gas with a high level of environmental compatibility, which is nevertheless flammable.
-
During transportation and installation of the appliance, be certain that none of the components of the refrigerant circuit become damaged.
-
avoid open flames and sources of ignition
-
thoroughly ventilate the room in which the appliance is situated
-
It is dangerous to alter the specifications or modify this product in any way. Any damage to the cord may cause a short circuit, fire and/or electric shock.
-
This appliance is intended to be used in household and similar applications such as
-
staff kitchen areas in shops, offices and other working environments;
-
farm houses and by clients in hotels, motels and other residential type environments;
-
bed and breakfast type environments;
- catering and similar non-retail applications.
WARNING! Any electrical components (plug, power cord, compressor and etc.) must be replaced by a certified service agent or qualified service personnel.
WARNING! The light bulb supplied with this appliance is a "special use lamp bulb" usable only with the appliance supplied. This "special use lamp" is not usable for domestic lighting.
- Power cord must not be lengthened.
- Make sure that the power plug is not squashed or damaged by the back of the appliance. A squashed or damaged power plug may overheat and cause a fire.
- Make sure that you can come to the mains plug of the appliance.
- Do not pull the mains cable.
- If the power plug socket is loose, do not insert the power plug. There is a risk of electric shock or fire.
- You must not operate the appliance without the lamp.
- This appliance is heavy. Care should be taken when moving it.
- Do not remove nor touch items from the freezer compartment if you hands are damp/wet, as this could cause skin abrasions or frost/freezer burns.
- Avoid prolonged exposure of the appliance to direct sunlight.
Daily use
- Do not put hot on the plastic parts in the appliance.
- Do not place food products directly against the rear wall.
1) If there is a light in the compartment.
- Frozen food must not be re-frozen once it has been thawed out. ^1)
- Store pre-packed frozen food in accordance with the frozen foodmanufacture8s instructions ^1 .
- Appliance's manufactures storage recommendations should be strictly adhered to. Refer to relevant instructions.
- Do not place carbonated of fizzy drinks in the freezer compartment as it creates pressure on the container, which may cause it to explode, resulting in damage to the appliance1).
- Ice lollies can cause frost burns if consumed straight from the appliance.
- To avoid contamination of food, please respect the following instructions
- Opening the door for long periods can cause a significant increase of the temperature in the compartments of the appliance.
- Clean regularly surfaces that can come in contact with food and accessible drainage systems.
- Clean water tanks if they have not been used for 48 ~h ; flush the water system connected to a water supply if water has not been drawn for 5 days.
- Store raw meat and fish in suitable containers in the refrigerator, so that it is not in contact with or drip onto other food.
-
Two-star frozen-food compartments (if they are presented in the appliance) are suitable for storing pre-frozen food, storing or making ice-cream and making ice cubes.
-
One-, two- and three -star compartments (if they are presented in the appliance) are not suitable for the freezing of fresh food.
- If the appliance is left empty for long periods, switch off, defrost, clean, dry and leave the door open to prevent mount developing within the appliance.
Care and cleaning
- Before maintenance, switch off the appliance and disconnect the mains plug from the mains - socket.
- Do not clean the appliance with metal objects.
- Do not use sharp objects to remove frost from the appliance. Use a plastic scraper. ^1)
- Regularly examine the drain in the refrigerator for defrosted water. If necessary, clean the drain.
If the drain is blocked, water will collect in te bottom of the appliance.
Installation
Important! For electrical connection carefully follow the instructions given in specific paragraphs.
-
Unpack the appliance and check if there are damages on it. Do not connect the appliance if it is damaged. Report possible damages immediately to the place you bought it. In that case retain packing.
-
It is advisable to wait at least four hours before connecting the appliance to allow the oil to flow back in the compressor.
- Adequate air circulation should be around the appliance, lacking this leads to overheating. To achieve sufficient ventilation follow the instructions relevant to installation.
- Wherever possible the spacers of the product should be against a wall to avoid touching or catching warm parts (compressor, condenser) to prevent possible burn.
- The appliance must not be located close to radiators or cookers.
- Make sure that the mains plug is accessible after the installation of the appliance.
Service
- Any electrical work required to do the servicing of the appliance should be carried out by a qualified electrician or competent person.
- This product must be serviced by an authorized Service Center, and only genuine spare parts must be used.
Energy saving
- Don't put hot food in the appliance;
- Don't pack food close together as this prevents air circulating;
-
Make sure food don't touch the back of the compartment(s);
-
If electricity goes off, don't open the door(s);
- Don't open the door(s) frequently;
- Don't keep the door(s) open for too long time;
- Don't set the thermostat on exceeding cold temperatures;
- Some accessories, such as drawers, can be removed to get larger storagevolume and lower energy consumption.
Environment Protection
This appliance does not contain gasses which could damage the ozone layer, in either its refrigerant circuit or insulation materials. The appliance shall not be discarded together with the urban refuse and rubbish. The insulation foam contains flammable gases: the appliance shall be disposed according to the appliance regulations to obtain from your local authorities. Avoid damaging the cooling unit, especially the heat exchanger.
The materials used on this appliancemarked by the symbol a re recyclable.
The symbol on the product or on its packaging indicates that this product may not be treated as household waste. Instead it should be taken to the appropriate collection point for the cling of electrical and electronic equipment. Ensuring this product is disposed of correctly, will help prevent potential negative equences for the environment and human health,
which could otherwise be caused by inappropriate waste handling of this product. For more detailed information about recycling of this product, please contact your local council, your household waste disposal service or the shop where you purchased the product.
Packaging materials
The materials with the symbol are recyclable. Dispose the packaging in a suitable collection containers to recycle it.
Disposal of the appliance
- Disconnect the mains plug from the mains socket.
- Cut off the mains cable and discard it.
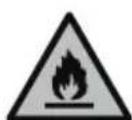
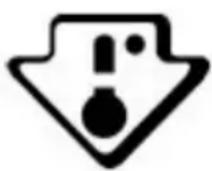
WARNING! During using, service and disposal the appliance, please pay attention to symbol similar as left side, which is located on rear of appliance (rear panel or compressor) and with yellow or orange color.
It's risk of fire warning symbol. There are flammable materials in refrigerant pipes and compressor.
Please be far away fire source during using, service and disposal.
SUMMARY
Important warnings and safety advice
I. Description of the device
II. Technical characteristics
III. Installation
IV. Before first use
V. Instructions to use
VI. Maintenance and cleaning
VII. Trouble shooting
VIII. Disposal
IX. Warranty
DESCRIPTION OF THE DEVICE
All the figures in this guide are schematic; some features and features may not fully match your refrigerator.
The appearance and specifications of the actual product may vary by model.
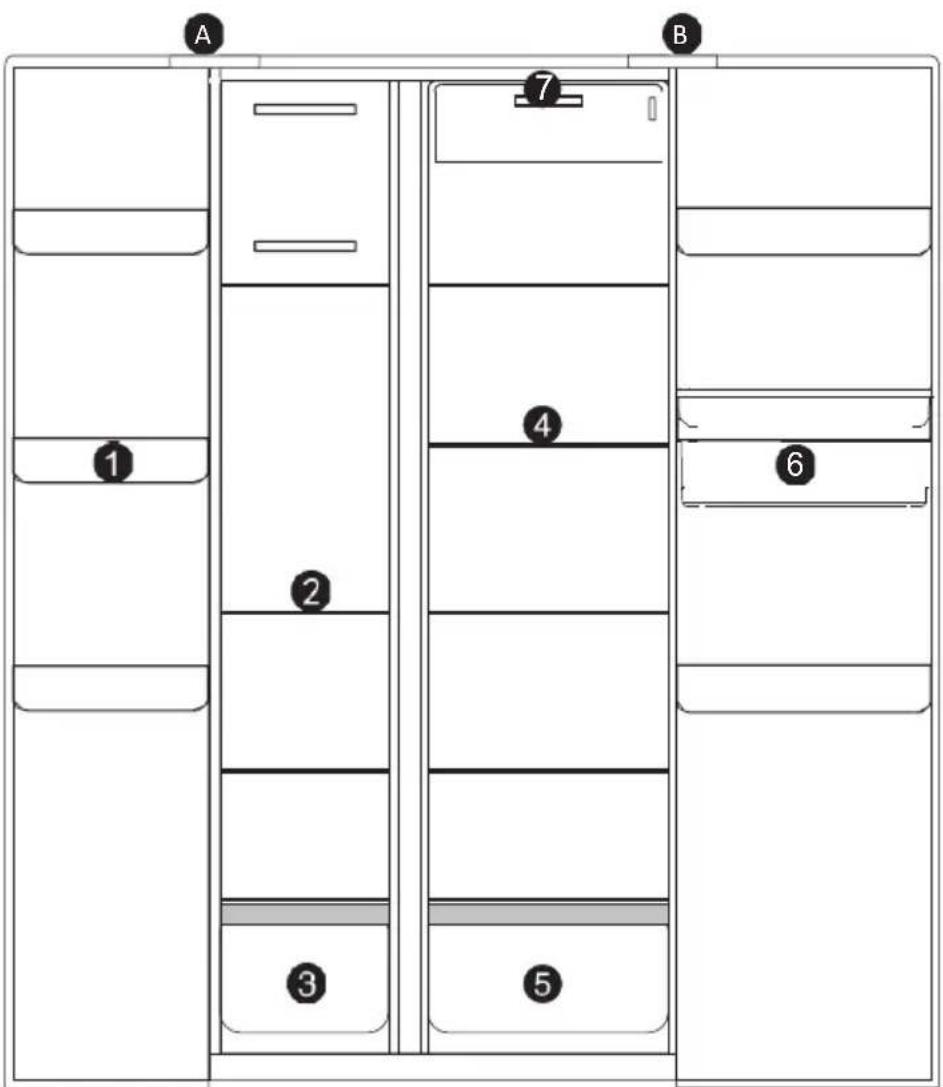
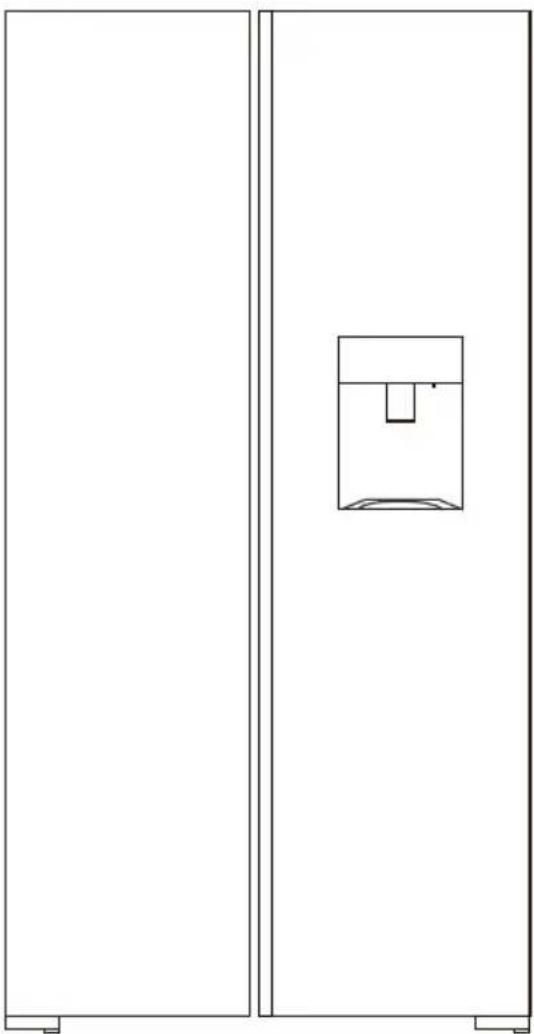
A - Freezer compartment B - Refrigerator compartment
- Freezer door tray
- Freezer glass shelves
-
Freezer drawer
-
Refrigerator glass shelves
- Refrigerator drawer
- Refrigerator drinking machine
- Control panel
II. TECHNICAL CHARACTERISTICS
TECHNICAL DATA:
| Mark Infiniton | |
| Reference | SBS-440DAB / SBS-442IXD |
| Power supply | 220-240V~ |
| Electric power | 50Hz |
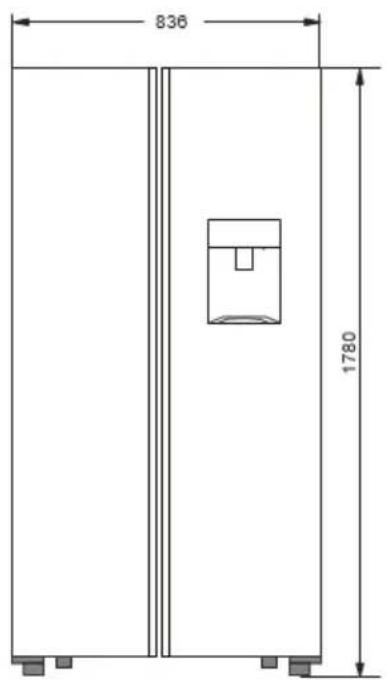
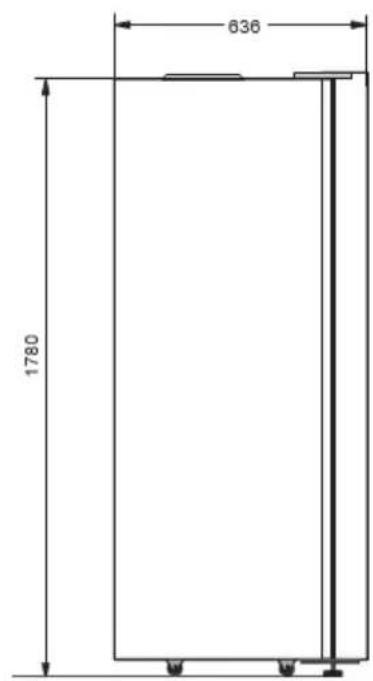
| Dimensions WxDxH | 836 x 1780 x 636 mm |
| Net weight 80 kg | |
| Type of installation | Freestanding |
| Refrigerant gas: R600a (75g) | |
| Insulating: Cyclopentane |
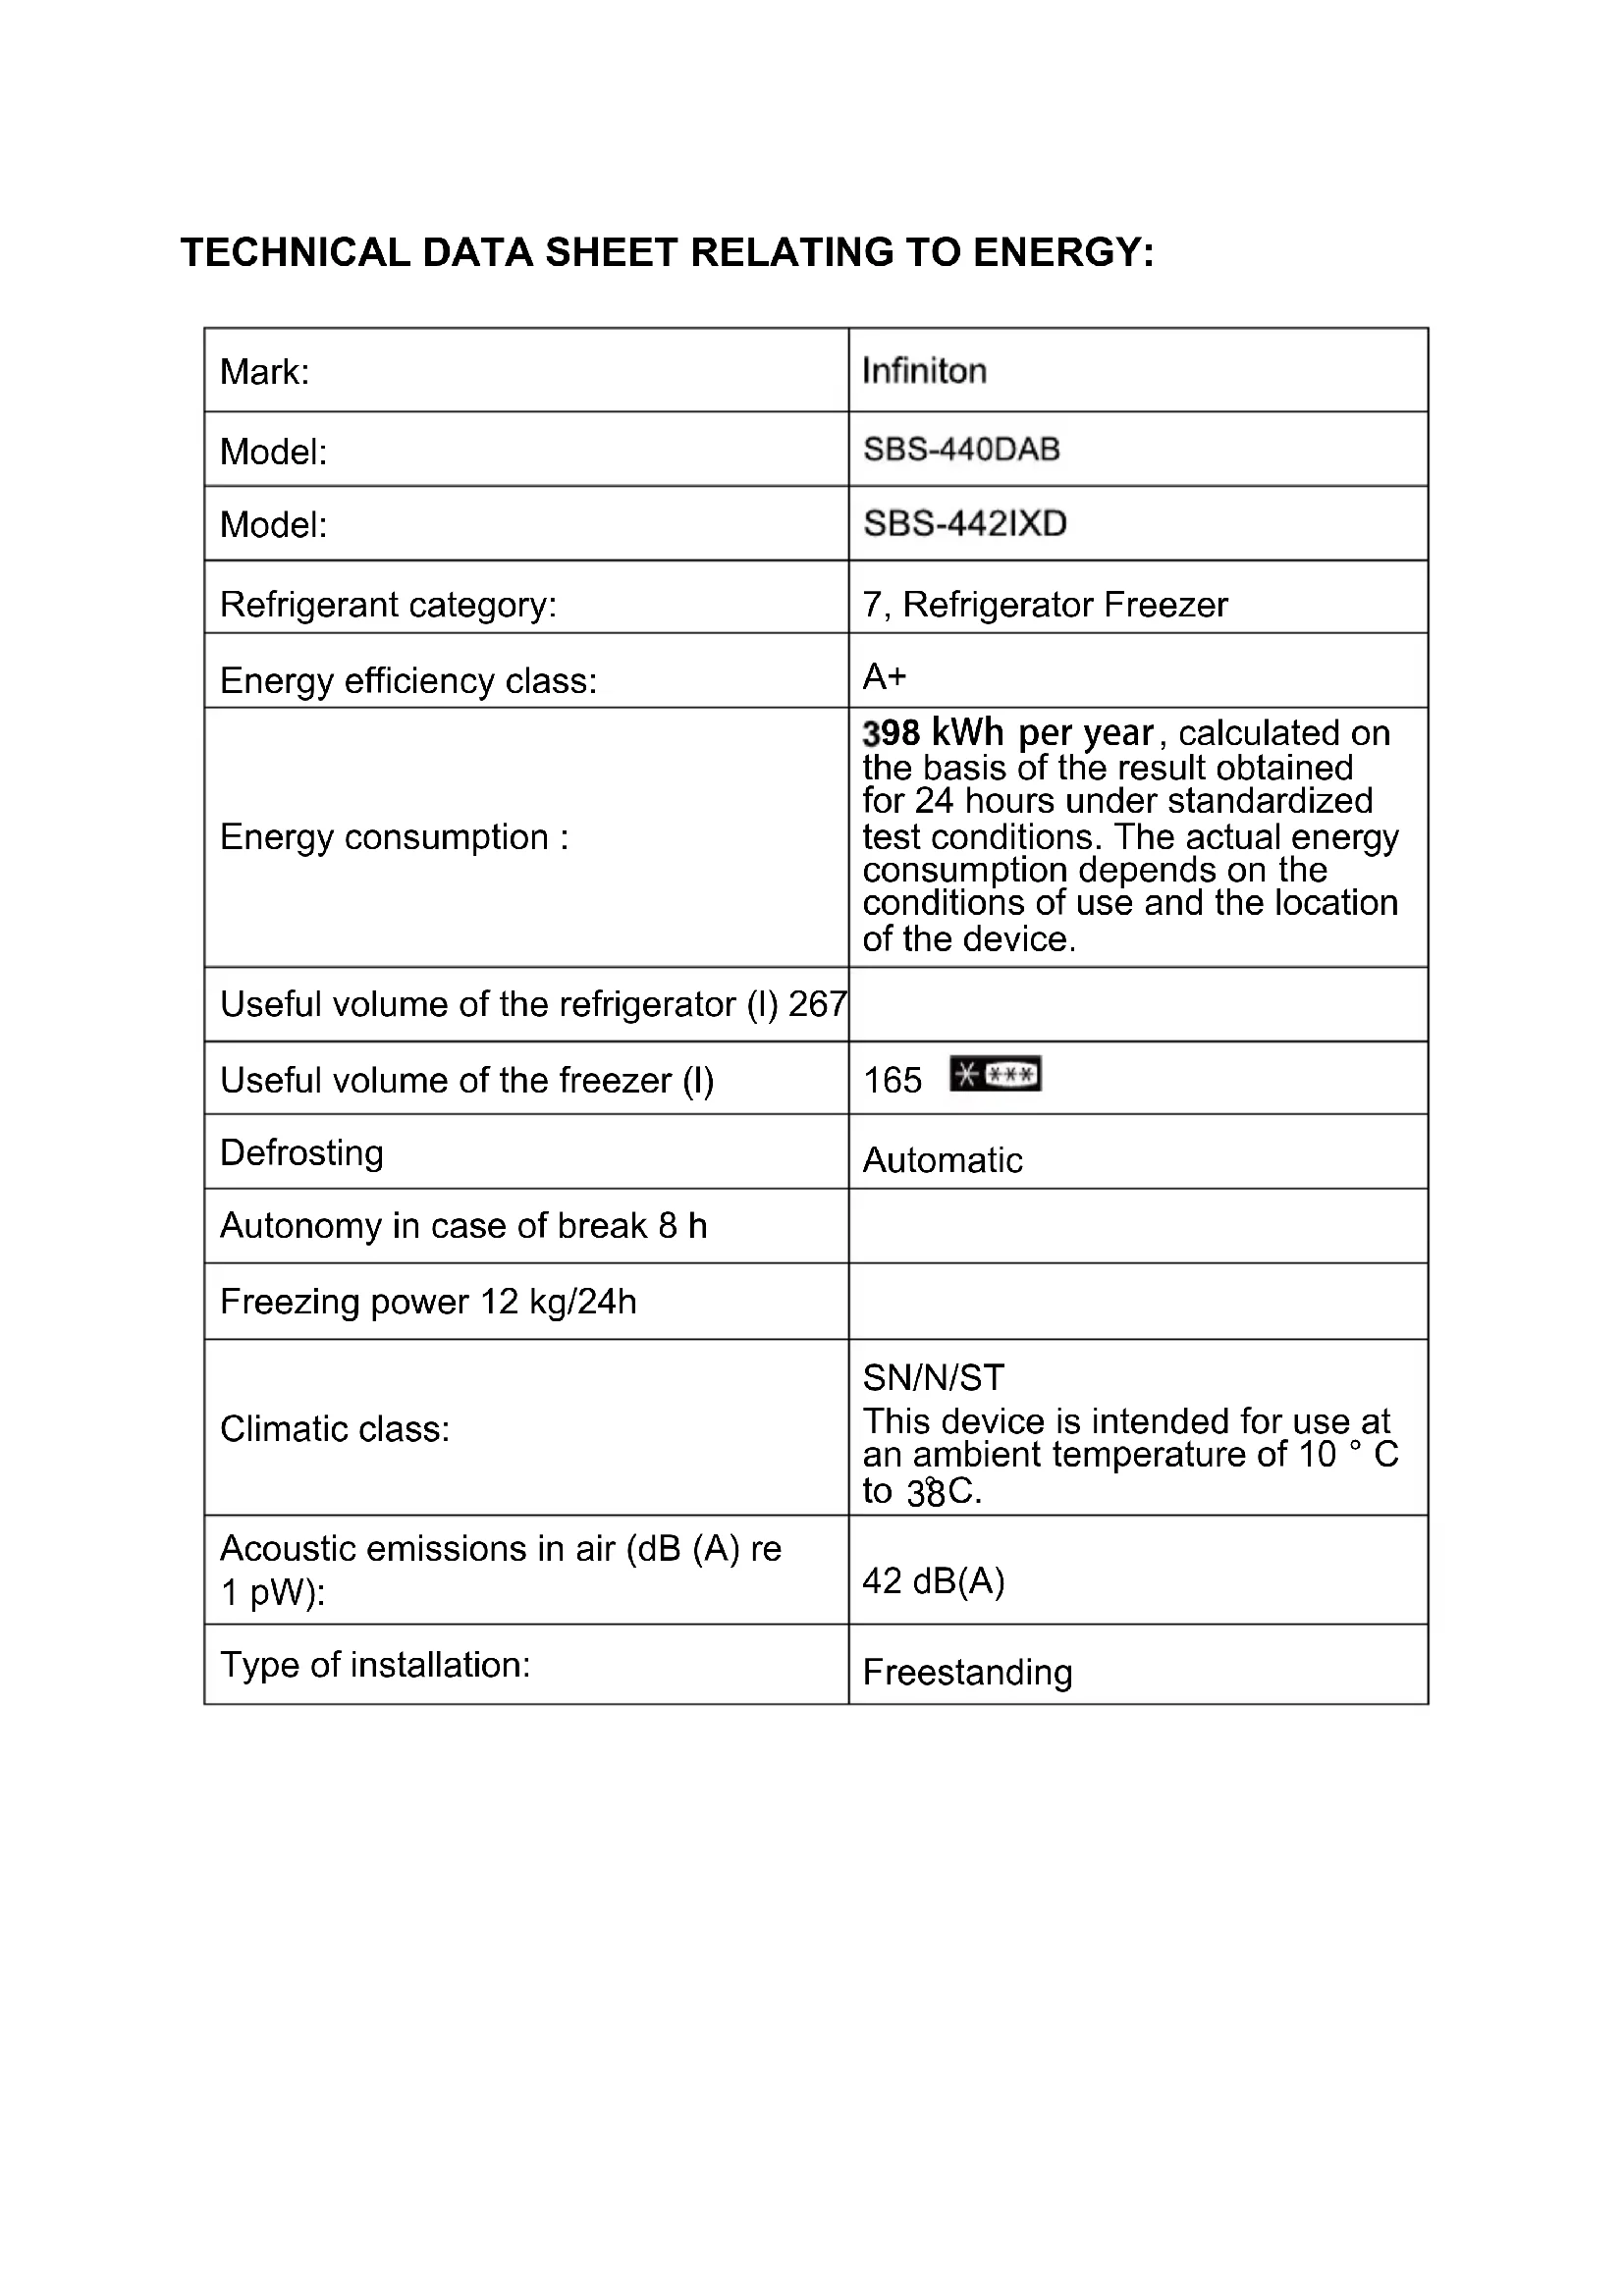
TECHNICAL DATA SHEET RELATING TO ENERGY:
| Mark: | Infiniton |
| Model: | SBS-440DAB |
| Model: | SBS-442IXD |
| Refrigerant category: | 7, Refrigerator Freezer |
| Energy efficiency class: | A+ |
| Energy consumption: | 398 kWh per year, calculated on the basis of the result obtained for 24 hours under standardized test conditions. The actual energy consumption depends on the conditions of use and the location of the device. |
| Useful volume of the refrigerator (l) 267 | |
| Useful volume of the freezer (l) | 165 |
| Defrosting | Automatic |
| Autonomy in case of break 8 h | |
| Freezing power 12 kg/24h | |
| Climatic class: | SN/N/STThis device is intended for use at an ambient temperature of 10 °C to 38C. |
| Acoustic emissions in air (dB (A) re 1 pW): | 42 dB(A) |
| Type of installation: | Freestanding |
III. INSTALLATION
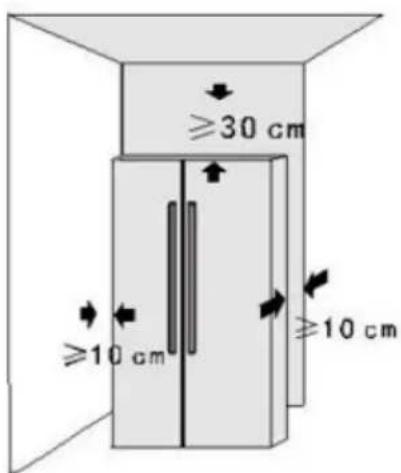
DIMENSIONS
Please keep enough space to ensure proper air circulation around the refrigerator. If you are installing the top panel or closet, please leave enough space to move it if necessary.
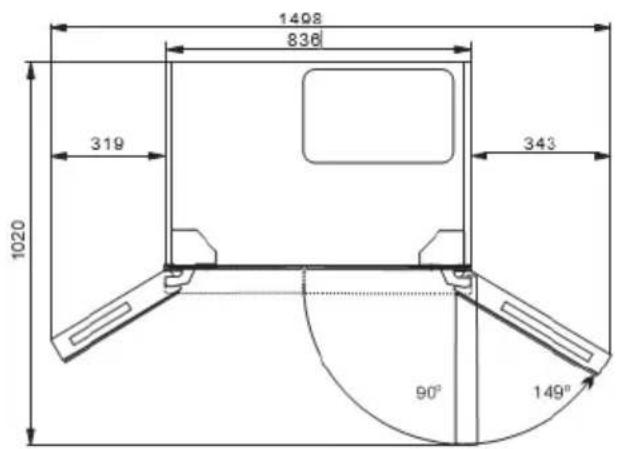
Note: The figure above is only a diagram of the installation. It does not represent the actual product.
TRANSPORT
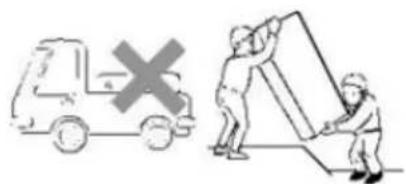
- Do not carry the refrigerator in a horizontal position or upside down.
- Do not carry the refrigerator while holding the door or handle; the refrigerator must be carried by lifting the lower part.
IMPORTANT: The installation of this unit requires the intervention of several people.
LOCATION
Choose a good location to place your device on a flat surface and in an easy-to-use place.
Avoid placing the device near heat sources, in direct sunlight, or in a damp place.
- The refrigerator should be placed on a hard and flat floor.
- The refrigerator should be away from damp places, water can be easily sprayed. Water and dust should be removed regularly with a soft cloth to prevent rusting.
- Place the refrigerator in a well-ventilated place. Keep a space of about 10cm around and behind the refrigerator. Do not cover or obstruct the air grille on the back plate of the refrigerator.
ADJUSTMENT OF PLASTIC FEET
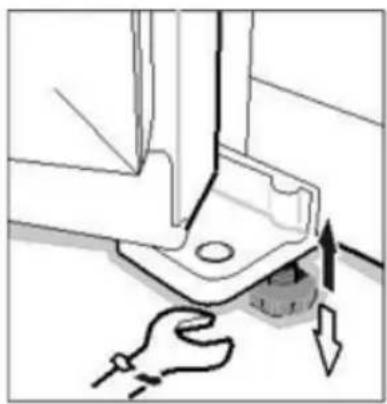
- When the refrigerator is in its packaging, the plastic feet are tight. After removing the refrigerator from its packaging for installation, be sure to adjust both front feet until the height is adequate; just adjust them with a wrench or by hand.
- Plastic feet and rear rollers should touch the floor to prevent the refrigerator from moving, vibrating, or making noise.
- When moving the refrigerator, adjust the plastic feet counterclockwise to remove them from the floor, and then gently push the refrigerator to move it.
When transporting this unit, take it by the base and gently tilt it up to 45^ . Do not lift the appliance by the door handle. Do not put the unit in a fully horizontal position or upside down. Push the refrigerator on the wheeled legs to move it.

Attention: After transporting the refrigerator, you must wait at
least 8 hours before putting it into service.
2. CLEANING THE APPLIANCE:
Clean all parts of the refrigerator with water and a mild detergent solution. Rinse it thoroughly and dry it with a soft cloth.
Note: The electrical parts of the device can be cleaned only with a dry cloth.
3. UNPACKING THE DEVICE AND DISPOSING OF THE PACKAGING ELEMENTS

- Remove all packing material around the appliance as well as the protective elements inside the appliance compartments.
-
Cartonboard and sheets of paper are recyclable. They are thrown in the collection bins provided for this purpose.
-
The materials bearing the symbol are recyclable::
PE <= polyethylene; > PS <= polystyrene; > PP <= polypropylene
This means that they can be recycled by depositing them in appropriate collection containers.
- Other packaging materials (adhesive, fasteners, etc.) should be disposed of with household waste.
To know more: www.quefairedemesdechets.fr
V. INSTRUCTIONS TO USE
BEFORE USE
- Remove all packaging, including the foam holder at the bottom of the refrigerator and the adhesive tapes that attach the accessories to the box.
- Place the refrigerator in the correct position and adjust the feet to the correct level.
It is best to clean the refrigerator before using it. - Remove the film: There is a layer of clear film on the panels of your product that can protect the products from scratches during manufacture and transportation. You can choose to keep or remove the film as needed.
- Place the refrigerator and adjust the level, clean it, let the refrigerator sit for 8 hours, then turn it on to check that the refrigerator is operating normally.
CONTROL PANEL
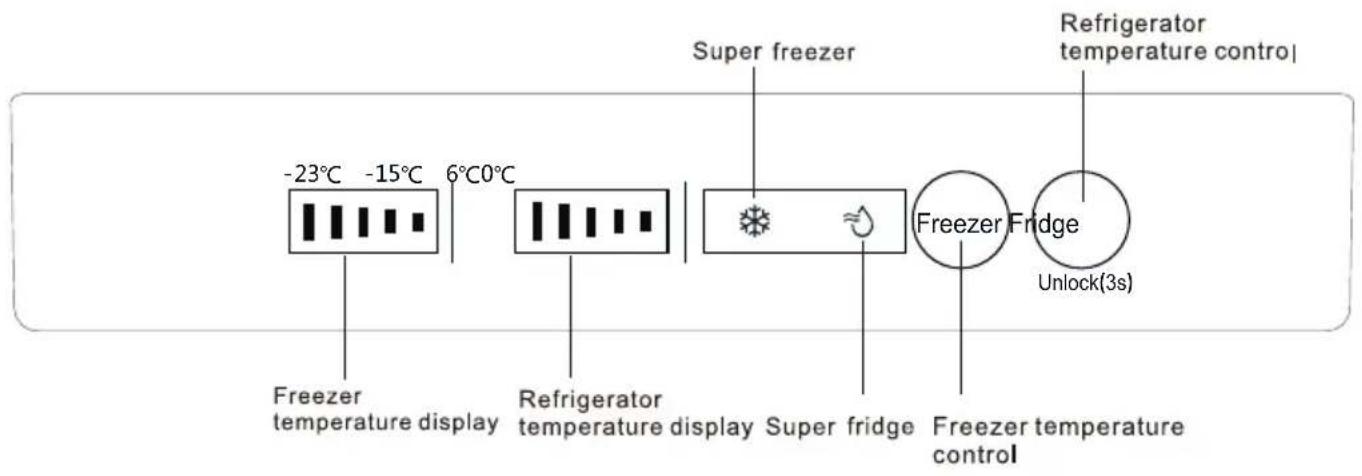
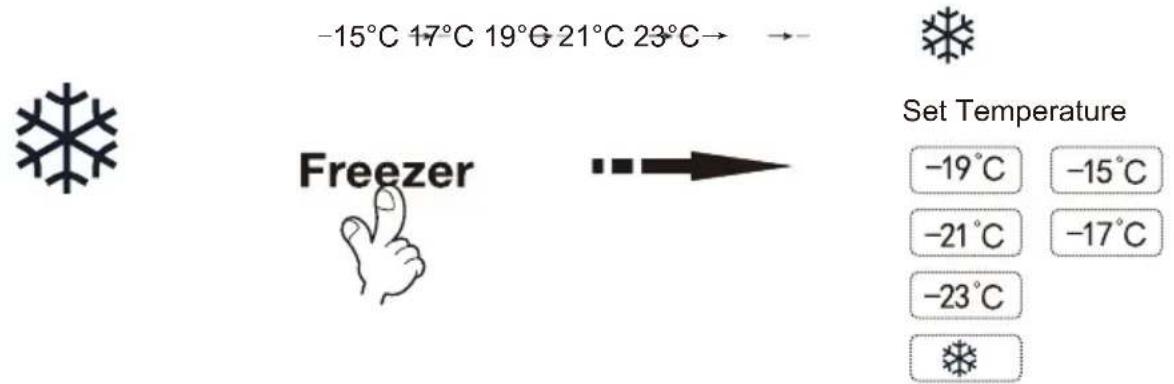
Freezer compartment settings
The default temperature of the freezer is -19^ . To change the temperature press the "Freezer" button to cycle through the set temperatures.

CAUTION: Do not place fresh foods directly on frozen foods.
Refrigerator compartment settings
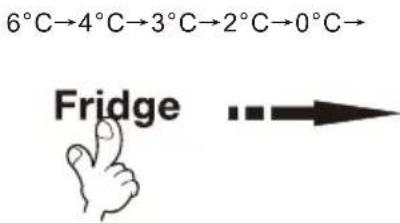
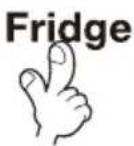
The default temperature of the refrigerator is 3^ . To change the temperature press the "Fridge" button to cycle through the set temperatures.

Set temperature
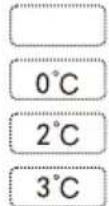
4°C
6^
Unlock(3s)
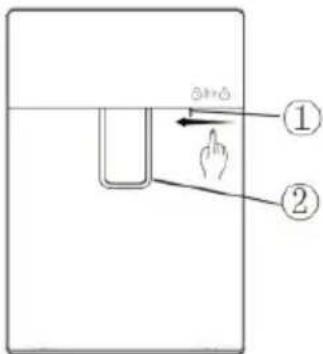
Under the locking state, long press“Fridge”button for 3 seconds to unlock. No operation within 20 seconds, the display will automatically go off.
DOOR OPENING ALARM
When the refrigerator door is open for more than 1 minute, an alarm sounds to remind users to close the door. After closing the door, the alarm stops automatically.
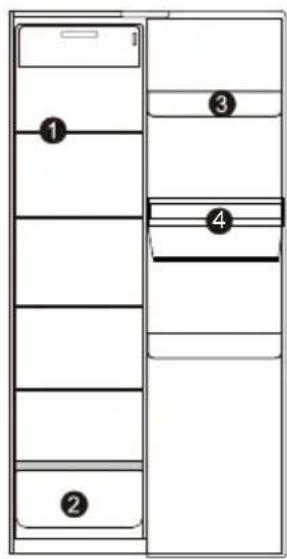
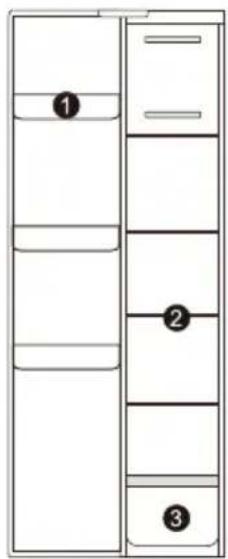
REFRIGERATOR COMPARTMENT
Suggested sections of refrigerator chamber for various foods and variety name:
① Glass shelve: wheaten foods, milk, etc.;
② 1rdrer:fruits,vegetables,etc.;
③ Top tray: dairy products, odorous foods, etc.;
④ Drinking machine: can store water and drink directly (the water in the water dispenser must be pure water).
The refrigerator compartment is mainly used to store food that is kept for a short time.
The refrigerator compartment is suitable for storing fruits, vegetables, drinks and other foods that will be consumed quickly. It is suggested to put food in closed containers and then put in the refrigerator.
Fruit and vegetable tray
The refrigeration compartment has a fruit and vegetable bin, which can hold moisture from fruits and vegetables and keep the bin wet.
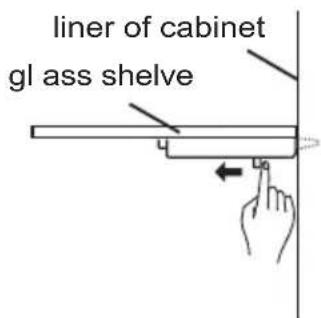
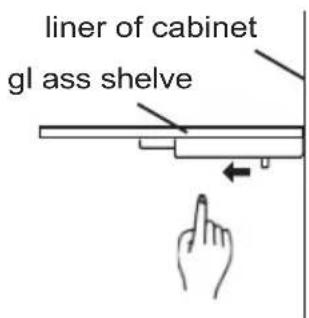
Glass shelves
When removing the glass shelf, please press the movable pin under the shelf with both hands and push inward at the same time. Then the glass shelf will be removed.
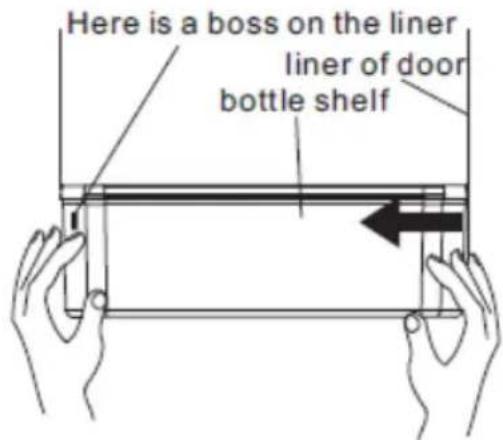
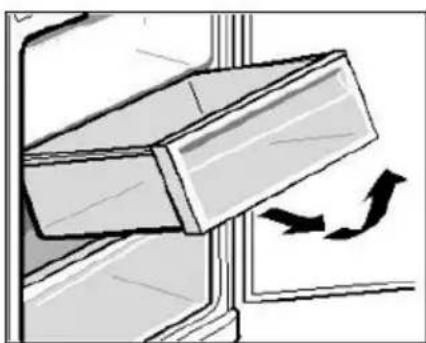
Bottle Shelf
Disassembly: Hold both sides of the bottle shelf with both hands. Push it from the side without the boss and push it inward as the direction of the arrow. When pushing hard, please note that the buckle on the edge of bottle shelf is separated from the groove of the liner. Then bottle shelf can be removed.
Installation: Hold both sides of the bottle shelf with both hands. Install the buckle of the boss side at first. Then push the other side inward slightly, the buckle can be fixed.
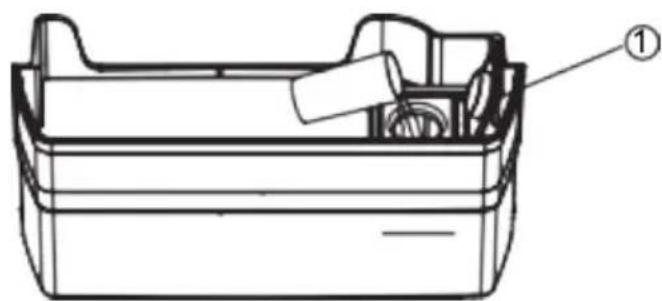
INSTRUCTIONS FOR CHILD LOCK LEVER
Press the child's lock lever with your thumb as the direction as below and the water lever will be locked to prevent children from taking any water.
Press in the opposite direction to unlock and take water
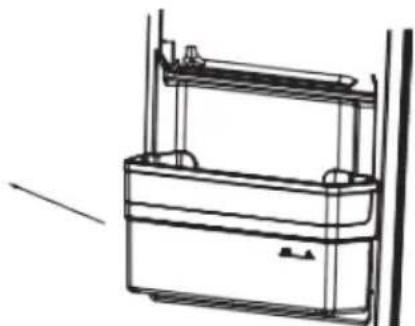
INSTRUCTIONS FOR WATER TANK ASSEMBLY
- Hold both sides of the tank with hands and pull the tank assembly off the door slightly in the direction indicated as below.
Notes: The transparent silicone parts of the sealed water valve could be brought out meantime when removing the water tank. If so, remove them, and re-install them according to the following steps.
i. Align the sealed part with the hole in the door and place it in it.
ii. The assembly is completed when the sealed portion is inserted into the hole.
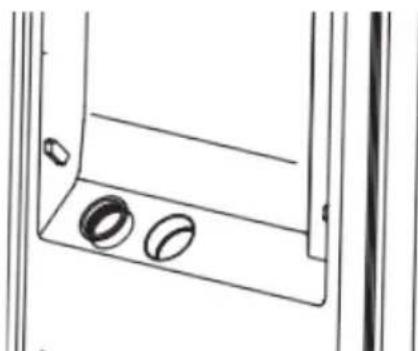
- Rotate counterclockwise to remove the water valve assembly from the water tank for cleaning.
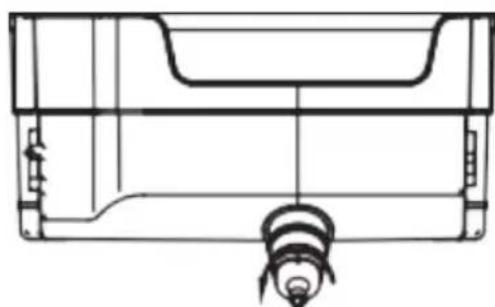
- Pinch the flange of the water tank cover slightly upwards, and the water tank cover can be separated from the water tank. Remove the other side with the same method. The tank and its cover can be cleaned after disassembly.
- Install the water valve by rotating it clockwise after cleaning. When installing the tank cover, install the one side at first (do not press it all the way), then install the other side. Press firmly on edges of the tank cover to fit the tank. Re-install the entire water tank assembly at 45^ to the door. Press the outer edge of the water tank slightly downwards to make it fit into the door.
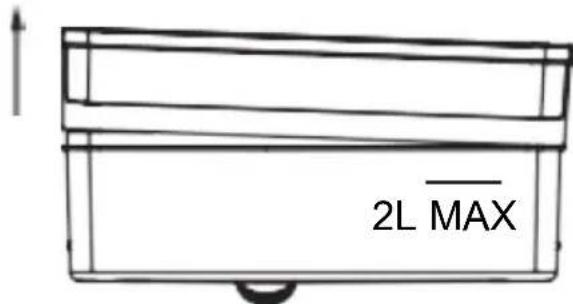
FILL THE TANK WITH PURE DRINK WATER
Open the inlet cover of water tank . Slowly fill the tank with pure drinking water up to the maximum fill line marked with "2L". Then close the inlet cover . To prevent any spills, please use a narrow-bore container to charge water.
FREEZER COMPARTMENT
Suggested sections of freezer compartment for various foods and variety name:
① Upper balcony: small frozen items;
② Glass shelve: frozen foods, such as fishes, meats and ice creams;
③ ② ③
Freezer compartment drawer
The top drawer of the freezer compartment can freeze and store large amounts of food and the bottom drawer is mainly used for storing frozen food.

WARNING
The food especially the oily food which stored in refrigerator, please avoid the direct contact with the liner. When the interior stained with oil or oily food soup stains, should be cleaned immediately to avoid the long contact with the liner which may lead to the liner corrosion and cracking.
FOOD STORAGE

WARNING
- When storing frozen food, place it inside the freezer compartment and not in the bottle rack.
- Do not place bottles or cans in the freezer compartment to avoid frost cracks.
- Before placing hot foods in the refrigerator, cool them to room temperature first; otherwise, they increase energy consumption.
- Indicate the freezing date on the freezer bag according to the different durations of food storage in order to avoid exceeding the expiry date.
- Divide foods into pieces and pack separately, those that are easy to freeze and those that do not congeal together.
- Packaging materials must be odorless, airtight, watertight and nonpolluting, so that packaged foods are not easily altered by other odors without reducing quality.
-
Do not put too much fresh food in the freezer compartment at one time. Preferably, do not exceed the freezing capacity of the refrigerator.
-
Thawed foods can not be re-frozen unless they have been turned into meals; otherwise, their quality of service will be affected.
- Glass bottles or containers should not be placed in the freezer compartment or near the air outlet of the refrigeration compartment duct; otherwise, they can explode.
- Food should not obstruct the air outlet; otherwise, there will be abnormal airflow.
ENERGY SAVING TIPS
- Be sure to keep the refrigerator away from sources of heat and direct sunlight.
- Before storing hot foods, cool them to room temperature and then put them in the refrigerator.
- Close the door, reduce the frequency and the opening time.
- When defrosting frozen foods, you can place them in the refrigeration compartment, which will help cool the compartment.
- Make sure the temperature sensor is not covered or blocked by food and maintain a correct distance between the food and the sensor.
INSTALLATION OF THE TEMPERATURE INDICATOR
Coldest zone:
- You will get a better preservation of your food if you place them in the cold zone best suited to their nature.
- The symbol below indicates the location of the coldest area of your refrigerator.
- This zone is delimited at the top by the low temperature compartment and at the bottom by the symbol or by the shelf positioned at the same height.
- In order to guarantee the temperatures in the coldest zone, take care not to modify the positioning of this shelf.
To help you adjust your refrigerator, it is equipped with a temperature indicator that will control the average temperature in the coldest area.
Warning:
This indicator is intended to work only with your refrigerator, be careful not to use it in another refrigerator (in fact, the colder zone is not the same), or for another use.
CHECKING THE TEMPERATURE IN THE COLDEST AREA
Once the temperature indicator has been installed, you can check regularly that the temperature of the coldest zone is correct, and, if necessary, adjust the thermostat accordingly as indicated above.
For proper storage of food in your refrigerator and particularly in the coldest area, make sure that the temperature indicator reads "OK". If "OK" does not appear, the average temperature of the zone is too high. Set the thermostat to a higher position.

Whenever you change the thermostat, wait for the temperature inside the device to stabilize before proceeding to a new setting if necessary. Do not change the position of
Thermostat gradually and wait at least 12 hours before proceeding to a new check and a possible modification.
NOTES:
After loading the appliance with fresh food or after repeated opening (or extended opening) of the door, it is normal that the word "OK" does not appear in the temperature indicator.
Wait at least 12 hours before readjusting the thermostat.
VI. MAINTENANCE AND CLEANING
ICING
This unit has an automatic defrost function, without manual operation.
CLEANING
- Before cleaning, unplug the appliance from the refrigerator.
- Remove all contents, remove accessories (shelves, drawers, beverage dispenser) and clean and wipe.
- Clean the inside and outside of the refrigerator with a mild detergent, then wipe with a clean, soft cloth.
- After cleaning, reconnect the refrigerator plug.
Precautions to take
- When cleaning the sealing strips of the door, always use clean water. Wipe with a clean, soft cloth. Moisten a soft cloth with warm water or a neutral detergent to wipe the refrigerator body except for the door sealing strips.
- Make sure there is no water entering the switch, control panel, door lamp and upper control box.
- It is forbidden to rinse the refrigerator directly with water, which would affect the electrical insulation properties, etc.
- Do not use metal sponges, dish brushes, abrasive detergents, strong alkaline detergents, or flammable or toxic cleaning fluids.
After cleaning, reconnect the refrigerator plug.
GENERAL INFORMATION
On holiday
When going on vacation, it is best to keep the refrigerator running continuously and leave food inside that can be stored for a short time. If you want to stop the refrigerator, remove all food, unplug the appliance, clean the inside of the refrigerator completely and open the door to prevent odors.
In case of power failure
- Generally, a short power outage does not have a dramatic effect on the refrigerator temperature. However, if the power outage lasts a long time, you must reduce the frequency of opening the refrigerator and you must not put fresh food in the refrigerator (avoids an acceleration of the increase of the temperature of the refrigerator).
- If you know that a power failure is going to occur, you can turn on the "Super Freezer" feature early to keep the fridge temperature low.
Stop
It is not usually recommended to stop a refrigerator. There may be an impact on the life of the refrigerator.
NORMAL PHENOMENA
Failure of touch
Please check the control panel to see if the refrigerator is in lock mode. When in lock mode, no keys will work.
Long to start
When the ambient temperature is too high, it takes longer to start the device.
Sidewalls are hot
The side walls are hot, outside, after a certain time of operation of the device, it is a normal phenomenon.
Drops of dew
When air from outside flows over the cold interior surfaces of the refrigerator, dew drops may form.
If the place where the unit is installed is very humid or during the wet season, dew drops may form on the outside surface of the refrigerator. This is a natural phenomenon that occurs when the weather is wet. Wipe the drops of water with a dry cloth.
Noise
When operating the refrigerator for the first time, it runs at high speed to cool down quickly and the sound may appear to be louder. When the internal temperature falls below a certain level, the noise fades.
If you have the impression that something is bumping into something else inside the refrigerator, this is normal.
This sound is due to the high speed operation of the compressor. These are normal noises.
Hot compressor
In operation, the external temperature of the compressor is above 80^ . Please do not touch the compressor as this can cause serious injury.
Compressor running for a long time
When the ambient temperature is too high or when too much fresh food has been placed in the refrigerator, it takes time to cool the refrigerator and for the appliance to operate at the desired temperature.
VII. TROUBLE SHOOTING
Before calling the after-sales service, consult this list.
| Problem | Possible cause | Solution |
| No display on the billboard. | The power plug of the device is not inserted correctly into the wall outlet. The fuse of the household power supply is not engaged. | Check if there is power; the fuse must be on. |
| Alarm | The door is slightly open or has not been closed for more than a minute. | Close the door completely. |
| The compressor does not work | It is in defrost mode. The power supply is not properly connected. | This is normal in case of defrosting. Check that the power supply is correctly connected. |
| The compressor runs for a long time | The refrigerator has been recently disconnected for a period of time; Too many fresh or hot foods have been introduced into the refrigerator; Doors are opened too frequently or for too long. | It takes a few hours in the refrigerator to cool completely; Hot foods will operate the refrigerator longer until the desired temperature is reached; A warm air intake in the refrigerator makes it work longer. Open the door less frequently. |
| Vibration noise | The soil is not regular or it is fragile; Objects placed on the refrigerator vibrate; The refrigerator touches the wall or closet. | Make sure that the floor is level and that it can support the refrigerator properly; Remove the objects; Move the refrigerator so that it does not touch the wall or cabinet. |
For any other problem occurring on your device: contact the After-Sales Service.
VIII. DISPOSAL
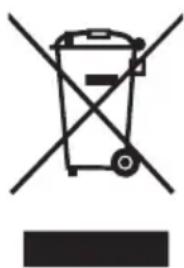
This logo affixed to the product means that it is a device whose treatment as waste falls within the framework of the directive 2012/19 / EU of July 4th, 2012, relative to the waste of electrical and electronic equipment (WEEE). This means that this product must be supported by a selective collection system in accordance with the European directive mentioned
above in order to be either recycled or dismantled in order to reduce any impact on the environment.
Hazardous substances in electrical and electronic equipment can have potentially harmful effects on the environment and human health.
Thus, at the end of the life of this appliance, it must not be disposed of with unsorted municipal waste. Recovery and collection systems are made available to you by local authorities (waste disposal centers) and distributors.
This device must not be thrown on public roads. You have the obligation to use the selective collection systems available to you.
INFINITON
SBS-440DAB / SBS-442IXD
Guide d'utilisation / Instruction manual / Manual de usuario / Manual de usuario
- FR (version originale)
- EN (translated from the original)