
AVHX5600BHS - DVD player PIONEER - Free user manual and instructions
Find the device manual for free AVHX5600BHS PIONEER in PDF.
| Product Type | DVD player / vehicle multimedia receiver |
| Brand | Pioneer |
| Model | AVH-X5600BHS |
| Chassis dimensions (W × H × D) | 178 mm × 100 mm × 165 mm |
| Front panel dimensions (W × H × D) | 171 mm × 97 mm × 18 mm |
| Power supply | 14.4 V DC (10.8 – 15.1 V), maximum current 10 A |
| Screen | 6.95-inch color touch screen, 16:9 |
| Compatible disc formats | DVD-Video, CD-Video, CD, CD-R/RW, DVD-R/RW |
| Compatible audio formats (USB/disc) | MP3, WMA, AAC, WAV (USB), DivX, MPEG-1/2/4 video |
| Radio functions | AM/FM, HD Radio™, SiriusXM™ (subscription required) |
| Bluetooth | Built-in, version 3.0, profiles HFP, A2DP, AVRCP, etc. |
| Connectivity | Front USB port, AUX input, AV input, rear video output, rear camera input |
| Audio output power | 50 W × 4 (max), 22 W × 4 RMS (4 Ω, 1% THD) |
| Equalizer | 8-band graphic, front/rear adjustment, high-pass filter |
| Additional functions | MIXTRAX, Pandora®, iTunes Tagging, AppRadio, MirrorLink™ |
| Maintenance and cleaning | Wipe with a soft, dry cloth; do not use chemicals |
| Safety instructions | Do not use while driving for video; parking brake lock; professional installation |
Frequently Asked Questions - AVHX5600BHS PIONEER
User questions about AVHX5600BHS PIONEER
0 question about this device. Answer the ones you know or ask your own.
Ask a new question about this device
Download the instructions for your DVD player in PDF format for free! Find your manual AVHX5600BHS - PIONEER and take your electronic device back in hand. On this page are published all the documents necessary for the use of your device. AVHX5600BHS by PIONEER.
USER MANUAL AVHX5600BHS PIONEER
Important (Serial number)
The serial number is located on the bottom of this unit. For your own security and convenience, be sure to record this number on the enclosed warranty card.

20 Settingupthevideoplayer
Settingthesubtitlelanguage37
Settingtheaudiolanguage37
Settingthemenulanguage37
Settingthemulti-angleDVDdisplay38
Settingtheaspectetric38
Settingtheslideshowinterval38
Settingparentallock38
SettingtheDivXsubtitlefile39
DisplayingtheDivX®VODregistration code39
Automatic playback of DVDs39
21 Systemsettings
Switchingtheauxiliarysetting40
SettingAVinput40
Settingthenavigationsystem40
SellingthePandoraconnectmode40
SelectingMirrorLinkMode40
Updating the firmware for the smartphone link adaptor 40
Displayingthesmartphonelinkadaptor
firmwareversion40
Updatingfirmware41
Displayingthefirmwareversion41
SettingMIXTRAXmode41
Changing the picture adjustment (Brightness, Contrast, Color, Hue, Dimmer and Temperature) 41
Selectingthesystemlanguage41
SettingSiriusXIVTuneStart™42
Swilchingsoundmuting/attenuation42
Settingtherearoutputandsubwoofer controller42
Usingthekeyboard42
Settingtheeverscroll42
SettingtheBluetoothaudio42
ClearingBluetoothmemory43
UpdatingBluetoothsoftware43
DisplayingtheBluetoothsoftware version43
Settingtherearviewcamera(backup
camera)43
AutoEQ(auto equalizing)43
Settingthevideosignal44
22 Favoritemenu
UsingtheFavoritemenu45
23 Bluetoothconnectionmenu
Bluetoothconnectionmenu
operations45
24 Thememenu
Selectingtheilluminationcolor46
SelectingtheOSD(on-screendisplay)
color46
Selectingthebackgrounddisplay46
25 Otherfunctions
Adjustingtheresponsepositionsofthe
touchpanels(TouchPanel
Calibration)47
UsinganAUXsource47
Resetlingthemicroprocessor48
Operatingthesoundmixer48
26 Connection
Connecting the power cord 50
When connecting to separately sold power amp51
When connecting the external video
componentandthedisplay51
When connecting with arearview
camera52
iPodwithlightningconnector52
iPodwith30-pinconnector53
OptionalSmartphonelinkadaptor(CD-
ML100)connection53
OptionalSiriusXMTunerconnection54
27 Installation
Installationusingthescrewholesonthe
sideoftheunit54
Installingthemicrophone55
Contents
Additionalinformation
Troubleshooting56
Errormessages57
UnderstandingautoEQerror
messages60
Understandingmessages61
Indicatorlist61
Handlingguidelines62
Audiocompatibility(USB)63
Compressedfilecompalibility(disc,
USB)64
iPodcompatibility64
Sequenceofaudiofiles65
Usingthedisplaycorrectly65
Bluetoothprofiles66
License,WarrantyDisclaimer&Limitationof
Liability66
LanguagecodechartforDVD68
Specifications69
Precautions
ThankyouforpurchasingthisPIONEER product.
Toensureproperuse, pleasereachrough this manual before using this product. It is especially important that you read and observe WARN-
ING sandCAUTION sin this manual. Please keep the manual in a safe and accessible place for further reference.
IMPORTANTSAFEGUARDS
Pleasereadallofthescinstructionsregarding yourdisplayandrelainthemforfuturereference.
Donotinstallthedisplaywhereitmay (i)obstructthedriver'svision,(ii)impair theperformanceofanyofthevehicle's operatingsystemsorsafetyfeatures,includingairbags,hazardlampbuttonson (iii)impairthedriver'sabilitytosafely operatethevehicle.
2 Donoteratethisdisplayifdoingsoin anywaywilldivertyourattentionfrom thesafeoperationofyourvehicle.Alwaysobservesafedrivingrulesandfollowalexistingtrafficregulations.Ifyou experienceddifficultyinoperatingthe systemorreadingthedisplay,parkyour vehicleinasafelocationandmakenecessaryadjustments.
3Pleaseremembertowearyourseatbelt atalltimeswhileoperatingyourvehicle. Ifyouareeverinanaccident,yourinjuriescanbeconsiderablymoresevereif yourseatbeltisnotproperlybuckled.
4 Neveruseheadphoneswhiledriving. 5 Topromotesafety, certainfunctions are disabled unless the parking brakeison, and the vehicle is not in motion.
6 Neversetthevolumeofyourdisplayso highthatyoucannothearoutsidetravfic andemergencyvehicles.

WARNING
- Donotattempttoinstallorservicethis productbyyourself.Installationorservicingofthisproductbypersonswithout trainingandexperienceelectronic equipmentandautomotiveaccessories maybedangerousandcouldexposeyou totheriskofelectricshock,injuryor otherhazards.
- Donotattempttcooperatetheunitwhiledriving.Makesuretopulofftheroadandpark yourvehicleinasafe locationbeforeattemptingtousethecontrolsonthedevice.
Toensuresafedriving

WARNING
• LIGHTGREENLEADATPOWERCONNECTORISDESIGNEDTODETECTPARKED STATUSANDMUSTBECONNECTEDTO THEPOWERSUPPLYSIDEOFTHEPARKINGBRAKESWITCH.IMPROPERCONNECTIONORUSEOFTHISLEADMAY VIOLATEAPPLICABLELAWANDMAYRESULTINSERIOUSINJURYORDAMAGE.
- To avoid the risk of damage and injury and the potential violation of applicable laws, this unit is not for use with videoscreen that is visible to the driver.
- To avoid the risk of accident and the potential violation of applicable laws, reviewing off front seat via should lever occur while the vehicle is being driven.
• Insome countries or states the viewing of mages on adisplay inside vehicle even by persons other than the driver may be illegal. Where such regulations apply, they must be obeyed and this unit's video features should not be used.
Precautions
When you attempt to watch video image while driving, the warning Viewing off front seat videos our whelled driving is strictly prohibited. will appear on the front display. Towatch video image on the front display, park your vehicle in a safe place and apply the parking brake.
Certain functions (videviewing and certain touch panel key to force by this unit could be dangerous and on unlawful if used with driving. To prevent such functions from being used while the vehicle is in motion, there is an inter-rock system that senses when the parking brake is set. If you attempt these functions described above while driving, they will become isolated until you stop the vehicle in a safe place, and (1) apply the parking brake, (2) release the parking brake and then (3) apply the parking brake again. Please keep the parking pedal pushed down before releasing the parking brake.
When using adisplay connected to ear monitor output
Therearmonitoroutputonthisunit(VOUT) is usedtoconnectarcardisplaythatallowspassengersinthercarseatstowatchvideos.

WARNING
NEVERinstallthereardisplayinallocation wherethedrivercanwatchvideoswhiledriving.
When using therearviewcamera
With an optional rearview camera, this unit can be used as an aid to keep paney contrailers, or when backing into a light parkingspot.

WARNING
• SCREENIMAGEMAYAPPEARRE- VERSED.
• USEINPUTONLYFORREVERSEOR MIRRORIMAGEREARVIEWCAMERA. OTHERUSEMAYRESULTININJURY ORDAMAGE.

CAUTION
- Therearviewcamerafunctionistobeused asanaidtokeepaneycontrailers,orwhile backingup.Donoluseforenertainment purposes.
- Picasenotethattheedgesoftherearview cameraimagesmaydifferslightlyaccording towhetherfullscreenimagesaredisplayed whenbackingup,andwhethertheimages areusedforcheckingtherearwhenthevehicleismovingforward.
Toavoidbatteryexhaustion
Keep the vehicle engine running when using this unit to avoid draining the battery power.
- When power supply is this unit, such as when the vehicle battery is being replaced, the microcomputer of this unit returns to its initial condition. Were recommend that you transcribe the audio adjustment data.

WARNING
Donotusewitvehiclesthatdonofteaurean ACCoosition.
Beforeyoustart
InformationtoUser
FCCID:AJDK071
MODELNO.:AVH-X5600BHS,AVH-X4600BT,AVH-X3600BHS,AVH-X2600BT
IC:775E-K071
This device complies with Part 15 of FCC
RulesandIndustryCanadalicence-exempt RSSstandard(s).Operationissubjecttothe followingtwoconditions:(1)thisdevicemay notcauseinterference,and(2)thisdevice mustacceptanyinterference,includinginterferencethatmaycauseundesireoperation ofthisdevice.
Thistransm ttermustnotbeco-locatedoroperatedinconjunctionwithanyotherantenna ortransmitter.
The Bluetoothantennacannotberemoved(or replaced)byuser.
Thisequipmentcomplieswith FCC/CradationexposurelimitssetforthoranuncontrolledenvironmentandmeettheFCCradiofrequency(RF)ExposureGuidelinesinSupplementCToCET65andRSS-102ofthelICradiofrequency(RF)Exposureureu.es. This equipmenthasverylowlevelsofR ^+ energy thatideemednotcolcomplywithoutmaxim-rn permissivesexposureevaluation(M.PF).Butil isdesirablethalitshouldbe installedandoperatedkeep ngtheraciatorat least20cmr moreawayfromperson'sbody(excludingextremities:hands, wrists,feetandankies).
MODELNO.:AVH-X1600DVD
This device complies with Part 15 of the FCC Rules. Operation is subject to the following two conditions:
(1) this device may not cause harmful interference, and (2) this device must accept any interference received, including interference that may cause undesired operation.
Alterationormodificationscarriedoutwith- outappropriateauthorizationmayinvalidate theuser'srightlooperaletheequipment.
Note
This equipment has been tested and found to comply with the limits for a Class-B digital device, pursuant to Part 1 of the FCC Rules. These limits are designed to provide reasonable protection against harmful interference in an residential installation. This equipment generates, uses and can radiate radio frequency energy, then installed in accordance with the instructions, may cause harmful interferenceloradiocommunication. However, there is no guarantee that interference will occur in particular installation if this equipment does cause harmful interferenceloradio television reception, which cannot be performed by turning the equipment of fondon, the user is encouraged to correctly correct the interference by one or more than following measures: -Reorientorelocatethereceiving antenna. -Increase these separation between the equipment and receiver.
-Connect the equipment into an outlet on a circuit different from that to which there receiver is connected.
-Consult the dealer or an experienced radio/TV technician for help.
Beforeyoustart
The Safety of Your Earsisin Your Hands
Get themostoutofyourequipmentbyplayingit atasafelevel—a evelthatletshesoundcome throughclearlywithoutannoyingblaringordis- tortionand,mostimportantly,withoutaffecting yoursensit vehearing.Soundcanbedecelving. Overtime,yourhearing“comfortlevel”adaptsto nighervolumesotsound,sownsat sounds“non- mal”canactuallybeloudandharmfulloyour nearing.Guaracagainstthisbysettingyour equipmentatasafelevelHEFFORfyourmearing adapls.
ESTABLISHASAFELEVEL:
- Selyourvolumecontrolatalowsetting.
- Slowlyincreasesounduntilyoucanhear itcomfortablyandclearly,withoutdistortion
- Once you have established comfortable sound level, set the daily leave there.
BESURETOOBSERVETHE FOLLOWINGGUIDELINES:
- Don't turn up the volumes of high that you can't hear what's around you.
• Use caution or temporarily discontinue use in potentially hazardous situations. - Donctuseheadphoneswhileoperatinga motorizedvehicle;theuseofheadphones maycreateatraffichazardandisillegalin manyareas.
Aboutthisunit
Thelunerfrequenciesonthisunilareallocated foruscinNorthAmerica.Uscinothorareas mayresultinpoorreception.

WARNING
Handling the concordenthisproductcordsassociatedwithaccessoriessoldwiththeproduct mayexposeyoutochemicalslistedonproposition65knowntotheStateofCaliforniaand othergovernmentalentiliestocausecancerand birthdefectorotherreproductveharm.Wash handsafterhandling.
CAUTION: USEOFCONTROLRADJUSTMENTOR PERFORMANCEOFPROCEDURES OTHERTHANTHOSESPECIFIEDHEREIN MAYRESULTINHAZARDOUSRADIATION EXPOSURE. CAUTION: THEUSEOFOPTICALINSTRUMENTS WITHTHISPRODUCTWILLINCREASE EYEAHAZARD.
CAUTION
Thisproductisaclass1laserproductclassifiedundertheSafetyoflaserproducts,IEC 60825-1:2007,andcontainsaclass1Mlaser module.Toensurecontinuedsafety,donotremoveanycoversoraltemptloginaccessio theinsideoftheproduct.Referallservicingo qualifiedpersonnel.
CLASS 1 LASER PRODUCT
CAUTION—CLASS 1M VISIBLE AND INVISIBLE LASER RADIATION WHEN OPEN. DO NOT VIEW DIRECTLY WITH OPTICAL INSTRUMENTS.
Beforeyoustart

CAUTION
- Donotallowthisunittocomeinfocontact with liquids. Electricalshockcouldresult. Also, damagethisunit, smoke, encoverheatingcouldresult from contact with liquids.
- Keep this manual handy for future reference.
- Always keep the volumelowenought near outsidesounds.
- Avoidexposuretomoisture.
- Ifthebatteryisdisconnectedordischarged, anypresetmemorywillbeerased.
- This unifteaturesanumocerotofophisticated functionslcensuresuperiorreception and operation. All the functions have been designed comfort cases estpossible, but many arenotself-explanatory. This operation manuelw ilhelyoubeneftfullyfrom thisun'ts potential and to maximize your listening enjoyment.
- This manual uses diagramsofactualscreens todescribeoperations. However, the screens onsomeunitsmay not match those shown in this manual depending on the model used.
After-salesservicefor Pioneerproducts
Please contact the dealer distributor from where you purchase this unifor after sales service (including warranty conditions) or any other information. In case the necessary information is not available, please contact the company listed below. Please contact your unit of the companies at the addresses listed below for repair without advance contact.
U.S.A.
PioneerElectronics(USA)Inc.
CUSTOMERSUPPORTDIVISION
P.O.Bcx1760
LongBeach,CA90801-1760
800-421-1404
CANADA
PioneerElectronicsofCanada,Inc.
CUSTOMERSATISFACTIONDEPARTMENT
340FemierStree.
Unit2
Markham,OnlanoL3R2Z5,Canada
1-877-283-5901
905-479-4411
ForwarrantyinformationpleaseeetheLimited Warrantysheetinc udedwith this unit.
Useandcareoftheremote control
Installingthebattery
Slide the ray on the back of the remote control out and insert the battery with the plus (+) and minus (-) poles aligned properly.
- When using for the first time, pull out the film protruding from the tray.
Beforeyoustart

WARNING
- Keep the battery out of these each of children. Should the battery be swallowed, consult a doctor immediately.
- Batteries(batterypackorbatteries installed) must not be exposed to excess vehicle heat such as sunshine, fire or the like.

CAUTION
- Removethebattery if theremote control is nctused for a month longer.
- Thereisadangerofexplosionifthebatteryis incorrectlyreplaced. Replaceonlywiththe samecrequivalenttype.
- Donothandlethebatterywithmetallictools.
- Donotstorethebatterywithmetallic objects.
- If the battery leaks, wipethere note control completely clean and install anew battery
- When disposing of used batteries, comply with governmental regulation on screen-mental public institutions' rules that apply in your country/area.
- "Perchlorate Material – special handling may apply. See www.dtsc.ca.gov/hazardouswaste/perchlorate.(ApplicabletoCalifornia.U.S.A.)"
Usingtheremotecontrol
Pointtheremotecontro inthed rectionofthe frontpaneltooperate.
• Theremote control may not function properly indirect sunlight.

Important
- Donotstoretheremotecontrolinhighttemperatureordirectsunlight.
- Donot etheremole control on the floor, where it may become jammed under the brake raccelerator pedal.
Demomode
The featured moaulmalically starts when you select Offortresource and continues while the ignition switch is shot to ACCorON. Tocancel the featured demo, press and hold MUTE. Press and hold MUTE againtest start. Operating the featured demo while the car engine is turned off with may drain the battery power.
Important
Theredlead(ACC)ofthisunitshouldbeconnectedtotheignitonyoffunction.Failuretocosomayresultincbatterydrain.
What'swhat
Headunit
①RESET
For details refer to Resetting the microprocess on page 48.
②SRC/OFF
③+/-(VOLUME/VOL)
④ MUTE
Presstomute.Pressagaintounmute.
⑤Homebutton
Displayingthehomedisplay. ThedisplayreturnstotheLauncherscreen whilea3rd-partyapplicationisbeingusedin
AppRadioMode.
Double-clickingtheiconontheLauncher screenreturnsthedisplaytothehomedisplay.
⑥MODE
WhenRGBinputisnotused
- PressMODEcolumnthedisplayoff.Press MODEagaintoturnthecisplayon. WhenRGBinputisused
- PressandholdMODElolumthedisplay off,PressMODEagainlolumthedisplay on.
- Whenthenavigationsystemisconnected, pressMODEloswitchlothenavigationdisplay.
- When sniPhone.halisrunninganapplicationthalsupportsAppRadioModels connected, pressMODEtoswitchtothe applicationd splay Youcanuselheapplicationbylouchingthed splay.
- WhenasmartphoneworkwiththeMirror-Linkfunctionisconnected,pressMODE loswitchtheapplicationdisplay.You can set the application by touching the display.
⑦◀/▶(TRK)
⑧▲(eject)
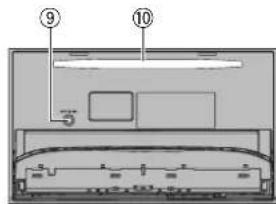
⑨AutoEQmicrophoneinputjack
UseloconnectanautoEQmicrophone.
⑩Discloadingslot
What'swhat
Notes
• Fordetail sonhowtooperateanavigation systemfromthisun t, refer to its operation manual.
• Fordetal sonhowtoconnectani Pood USB storage device this unit refer to Whenconnecting with optional CD-1U201V cable on page 53.
• Fordetal sonhowtoconnectasmartphone withltheMirrorLinkfunctionlothisunit refer loOptionalSmartphonelinkadaptor(CD-M1 100)connectionpage63.
Homedisplay
Homedisplay
Sourceoffdisplay
Sourceondisplay
①Sourceicon
Selectingafavoritesource. Whenthesourceiconisnotoisplayed.itcan bed splayedbypress ngthehomekeyor touching 🔒.
②Apps/MirrorLinkkey
SwitchingtoAppRadioMode/MirrorLink Mode.
③Rearviewkey
Displayingtherear viewimage. For details refer to Usingtherear view on page 10.
④Sourceoffkey
Turning the source off.
⑤Bluetoothkey
DisplayingtheBluetoothconnectionmenu.
⑥Themekey
DisplayingtheThememenu.
⑦Menuicon
Displayingthemenu.
Sourcekey
Displayingthesourcemenu.
Section
What'swhat
⑨Clockkey
Switchingtooclockadjustmentdisplay.
TurningthesourceON/OFF
(FunctionofAVH-X56003HS/AVH-X4600BT)
Tumingresourceonusingthebuttons
TPressSRC/OFF:otumthesourceon
Turningresourceoffusingthebuttons
T)PressancholdSRC/OFFuntilthesourceturns
off.
Selectingasource
Availablesourcemodes
•SiriusXM-SiriusXMTuner
(AVH-X5800B-S/AVH-X3800B-S)
• HDRadio HDRadiotuner
(AVH-X5800B-S/AVH-X3800B-S)
•Radio-Radctuner
(AVH-X4500B/TAVH-X2600B/TAVH-X1600DVD)
•Disc Built-nDVDandCDplayer
• USB, iPod, or USB MTP – USB/iPod/MTP
•Pandora-Pandora® nternetradio
- BluetoothAudio-Built-inBluetoothaudio
IANH-X5800B-S/AVH-X4800BT/AVH-
X3600BHS/AVH-X2600BT
•AUX-AUX
• AV-AVinput
Selectingasource
• Using SRC/OFF
(FunctionofAVI-HX600BHS/AVI-HX4600BT)
1PressSRC/OFF
• Using the touch panel key son then omedis-
day
1 Touch the source con and then touch the
desiredsourcename.
- When the source con snoldisplayed, it
canbedisplayedbytouchingscreen.
• Whileoperatingthemenu.youcannotse-
leclasourcebytouchingthesourcelcon.
Note
TheUSB/iPod conwillchangeasfollows:
- USB/iPod is displayed when node device is connected.
• USB sdisplayedowner aUSBstoragedeviceis connected to USB input.
- iPodisdisp ayedwhenan Pod sconnectecto USBinput.
- USBMTP is displayed when an MTP-compatible Android device running Android OS4.0 for higher connection by MIP connection using a USB cable.
What'swhat
Adjustingthevolume
- Press+/-(VOLUME/VOL)toadjustthe volume.
Remotecontrol
①+/-(VOLUME/VOL)
②MODE
Turning the nformal or displayoff.
①SRC/OFF
Presslocyclethroughalltheavalablesources.Pressandholdtolumthesourceoff.
④Thumbpad
UseloselectamenuontheDVDmenu.
⑤RETURN
PresslodisplaythePBC( playbackcontrol) menuduringPBC playback.
⑥▶/II
esstopauscorresumeplayback.
◀◀
Pressloperformfastreverse.
Presstochangetnefastreverspeed.
What'swhat
▶▶
Presstoperformfastforward.
Presstocnangethetastforwardspeed.
↓
Presstoreturntotheprevioustrack(chap-ter).
▶▶|
Presstogotothenexttrack(chapter).
■
Presstostopplayback.
If you resume playback, playback will start from the point where you stopped. Touch the key again to stop playback completely.
⑦FOLDER/P.CH
Presstoselectthenextorpreviousdiscor folder.
Prostoreca radiostationfrequenclesassignedtopresettuningkeys.
⑧MUTE
Presstomute.Pressagaintcunmute.
⑨MENU
PresstodisplaytheDVDmenuduringDVD playback.
TOPMENU
PresstoreturntotnetopmenuuringDVD playback.
10AUDIO
Presstochangetheaudiclanguageduring
DVDolayback
PresstoswitchaudicoutputforDivX/
MPEG-4
SUBTITLE
Presstochangethesubtitlelanguageduring
DVD/DivX/MPEG-4 playback.
ANGLE
Presstochangethev ewingangleduring DVD playback.
⑪BAND/ESC
Presstoselectthetunerbanownentuneris selectedasasource.Alsousedtocancelthe controlmodeoffunctions.
Presstoswitchbetweenmodeswherplay-ingthefollowingtypesofdata:
•Disc
Compressed audio and audiodata (CD-DA) such as with CD-EXTRA and MIXED MODECDS
- USBstoragedevice
Audicdata, videodata and photocata
Commonoperations
Commonoperationsfor menusettings/lists

(Functional/AVH-X5600BHS/AVH-X4600BT/AVH-X3600BHS/AVH-X2600BT)
Starting the Bluebot telephone menu.
Fordetails@referto@bluetooth/ticle phone on page 32.

Displaying the list menu. Starting these search function.

Displaying:heEQ(Aud of functionmenu).

Displaying the Favoritemenu.
Operatingthescrollicon andthescrubberbar
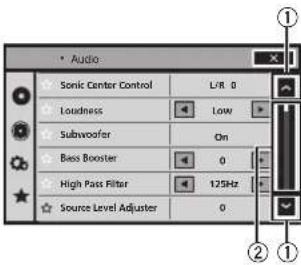
①Scrollicon
Appearswhenselectab eitemsarehioden. Touchthescrollicortoviewanyhidden items.
② Scrubberbar
Appearswhenitemscannotbedisplayedon asinglepageonly.
Dragthescrubberoartoviewanyhidden items.
Also, you can drag the list to view any hidden items.
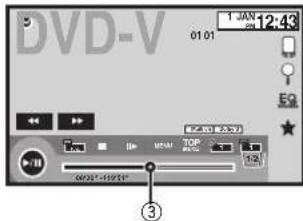
③Playbackpoint
Specifying the playback point
Dragtheplaybackpointontrescreen.
Commonoperations
Activatingthetouchpanelkeys
Touchpanelkeys
①Tabkey
Switching the touch panel keyson the display.
Usingtherearview
Areaviewcamerasoldseparatelyisrequired forusingtherearviewmode. Thebelowfunctionsareavailable.
- Rearviewcamera
This unit can be set up to display therear view images automatically when you move the shift left other REVERSE(R) position.
• Camerator rearview mode
There are ewcan belurned onlodisplayat all times.
There are evercameraedstobesettcaset- lingother than Offloturnonrearview mode.
For details about these settings, refer to Setting the rearview camera (backup camera) on page 43.
Usingtherearviewkeyto displaytherearview

Displaying hereviewimage by turning thereviewimage on. When thereviewimage is displayed, you can now I hold the audiovisual by touching the display. You can operate from the audiovisual temporarily at this time. If you can perform many formats on within at few seconds, the display will return thereenview image. Totumoff: noraviewimage, prosthome button to retu-mo the home display and then press this koyagain.
Usingtherearmonitor
Connecting are a monitor, sold separately, to this unit allows images and video to be viewed from the rear seats.
Notes
- You cannot usetouchpanelkeysandopera- Lonscreensfromthereammonitor.
- Imagesandvideowillcontinuelobedis- playedwhetherthevenicleisinmotionor stopped.
Usingsoundretriever

Automatica lyenhancescom- pressedaud candrestores rich sound.

Commonoperations
Notes
- This function is enabled for playback on the sources listed below.
— CD-DA
— MP3/WMA/AACI lesion USBMTPstorage devices
— MP3/WMA/AC/WAVfilesonUSBstorage devices
— MP3/WMA/AACI JasonCDmedia — Pod
— Pandora(IPodwith30-pinconnectoronly)
• These soundretrieversettingisturnedoff whentheMIXTRAXfunctionisusedinUSB sourcemode.
Changingthewide-screen mode

Selectingtheappropriatescreen ratiofortheplaybackvideo.
- Differentsettingscanbestoreofreach videosource.
- Whenavideois viewedinawidescreen model that does not match its original aspect ratio, it may appear different.
- Remember that using the wide mode feature of this system for commercial or public viewing purposes may constitute an infringement on the author's rights protected by the Copyright law.
- The video image will appear coarser when viewed in ZOOM mode.
- This function is an enabled for playback on the sources listed below.
— Disc: DVD-V, Video-CD, DivX, MPEG-1, MPEG-2, MPEG-4
— USB: DivX, MPEG-1, MPEG-2, MPEG-4, JPEG
— iPod:Video - AV:AVdata
- AUX:AVdata
1 Displaythescreenmode.
2 Touchthedesiredwidemodesetting.
FULL(fullscreen)
The4:3picture senlarged in the horizontal direction only granting viewers at 4:3TVpicture (normalpicture) without tanycmissions.
ZOOM(zoom)
The4:3picture senlargedinthesameproportionbothverticallyandhorizontally;ideaforecinemas zedopicture(wicescreenpicture).
NORMAL(normal)
The4:3picture is displayed as a granting viewersnosense of disparity and the proportions are the same as that often a normal picture.
Notes
- You cannot operate this function while driving.
Basicoperations
Adjusting the angle of the LCD panel and ejecting media

CAUTION
Keechandsandfingersclearoftheunitwhen opening, closing, or adjusting the LCD panel. Be especially cautious of children's handsandfingers.
AdjustingtheLCDpanelangle
(Function of AVH-X5600BHS/AVH-X4600BT)
1Press▲(eject)todisplaytheejecting menu.
2AdjusttheLCDpaneltoaneasilyviewableangle.

Layingthepaneldown.

■ Ast hese angle iissaved. The LCD panel will automatically read, usted clothesame position on the next time: the LCD panel is open.
Ejectingadisc
(Function of AVH-X5600BHS/AVH-X4600BT)
1Press▲(eject)todisplaytheejecting menu.
2Ejectadisc.

E.ectingad sc.
Ejectingadisc
(FunctionofAVH-X3600BHS/AVH-X2600BT/AVH-X1800DVD)
●Press▲toejectadisc.
Settingtheclock
1TouchtheClockkey.
TheClockAdjustmentscreenappears. RefertoClockkeyonpage8.
Indicates that the display is closed.
HDRadio™ tuner
AboutHDRadio™stations
(Function of AVH-X5600BHS/AVH-X3600BHS) HDRadio™ station offer high quality audio and dataservices. HDRadiolations are brought to your local FM/AM stations.
HDRadiostationsfeaturethefollowing:
• Highqualityaudio
• FM multicasting
- Dataservices

flowchart
graph TD
    A["FM band"] --> B["Analog FM"]
    A --> C["Analog FM — Digital FM"]
    A --> D["Analog FM"]
    D --> E["Digital FM-1ch"]
    D --> F["Digital FM-2ch"]
    D --> G["Digital FM-3ch"]
PSD)
ProgramServiceData:Contributesthatseaper on user experienceHIDRadio technology. Present songname, artist, stationLds, HD2/HD3ChannelGuide,and other relevant data streams.
HD2/HD3)
Adjacenttotractionama nstationisareextra ocalTV channels. These HD2/HD3Channel/sorvidenew original musicaswellasdeepcu.sir lotraditional genre.
Digital Sound
Digital CD qualitative sound I DRadiectinologonabics local radiostat, onatobroadcastacle and g talsignal. AM sounds like today's PMand FM sounds like CO.
iTunes Tagging
iTunes ^25 Tagging provides you the opportunity to discover wider range of content and theme as to tag that con- lentor alter review and purchase from the iTunes ^26 Store.
Artist Experience)
Visual information related to content being played on your ID Radio receiver, such as Album Art, historical
photographs, still from live broadcasts among other related content.
HDRadio™Technology
HDRadioTechnologymanufacturedunderlicensetromiSiquityDigitalCorporation.U.S. andForeignPatents.HDRadio®anotheHD,
HD Radio, and "Arc" logos are proprietary trademarksofiiBiquityDigitalCorp.
HDRadiotuneroperations
Touchpanelkeys
① Bandkey
Selectingaband(FMorAM)bytouchingthepenlocky.
Thetouchpanelkeyortheselectedbandis highlighted.
Section
HDRadio™tuner
Switching between FM1, FM2, and FM3 by touchingthebandkey.
When AMisselected, you cannot switch to another AMbandoytouchingthebandkey.
②Tagkey
Savingsonginformation(tag) from the broadcastingstat ontoyouriPod.
③Receptionmodekey
Switchingtotheanalogbroadcastofthe samefrequency.
④Seekmodekey
SwitchingbetweenDigitalbroadcastingsstationseekandnormalseek.
⑤Localkey
Settingtheolcalseek evel.
⑥Tuningkey
Turinguporccownmanually. Touchandholddownformorethaniwosecondskipislations Seektuningstartss soonasyourdisease. Touchagaintocancel seektuning. When an analogstation is received, tuning downoperation is conducted within the analogbroadcasting (8)→(2) if digital broadcast is only received, tuning upoperation tunesinthe next analogstation (2)→(6)

⑦Listkey
Displayingthepresetchannellist.
⑧ Presetchannelkey
Selectapresetchannel.
Basicoperations
| Switchingpresetchannelsus ngthebuttons 1 Press or (TRK). |
| Socktuningusingchobuttons 1 Press and no or (TRK). |
Note
TouchpanelkeysnotlistedunderHDRadio tuncoperationsmayappearonthedisplay. Refertoindicatoristonpage61.
Storingandrecallingstations
Youcaneasilystoreuptos xstationstoreach bandaspresets.
1Displaythepresetchannellistscreen.
RetertoHORadiotuneroperationsonpage 1. Thepreselchannelslappearsinthedisplay.
2Touchandholddownoneofthepreset tuningkeystostoretheselectedfrequency tothememory.
These selected radiostat on frequency has been stored in her memory.
3Touchtheappropriatepreset tuningkey to select the desired station.
Storingthestrongeststations
BSM(beststationsmemory)automatically stores the six strongest stations in the order of their signal strength.
StoringbroadcastfrequencieswithBSMmayreplaceobroadcastfrequenciesyouhaveseaved usingthepresettuningkeys.
HDRadio™tuner
1Displaythepresetchannellistscreen.
RefertoHDRadiotuneroperationsonpage11. Thepresetchannelstappearsinthedisplay.
2TouchBSMtoturnBSMon.
Thesixstrongestbroadcastfrequenc eswillbe storedunderpresettuningkeysinorderoftheir signalstrength.
■Tocancelthestorageprocess.touchCancel.
Tuningintostrongsignals
Localseekluningallowsyoulotune into only thoseadiostal or withsufficientlystrongsignalsforgoodreception.
FM:Off— ■ — ■ ■ ■ ■
......
AM:Off—
Themorethereareon.hescreen.thefewer thestationsthatcanbeselectoo.Onlystations withthostrongestsignalsinyourlocalaroacan beselected.
therearefewer —,th sunitwillbeabletore- ceivebroadcastsfromweakerstations.
UsingiTunestagging
Note
Formoredetail aboutiTunestagging,referto AboutiTunestaggingonpage65.
Storingthetaginformationto thisunit
1Tuneintothebroadcaststation.
2Storethetaginformationtothisunit.
RefertoHDRadiotuneroperationsonpage11. YoucanstoretheinformationiftheTagindicatorisdisplayedwhilethedesiredsongisbeing broadcast.
■Whilestoringthetagdataonthisunit,Tag flashes.
■ The tag information for upto50 song scan be stored on this unit.
■ Depending on the timing of when the lag information is stored, that lag information on for the song played before or after the currently playingsong may also be restored.
3Whencompleted, indicatorturns offand ♪ indicatorisdisplayed.
Storingthetaggedinformation toyouriPod
1ConnectyouriPod.
When your iPodis connected to this unit, your iPod starts storing the tagged information automatically.
2Whencompleted, ◎ indicatorturnsoff andthetaggedinformationisstoredon youriPod.
Switchingtheseekmode
There are two seek tuning settings one is HD (Digital broadcasting status seek) and the other ALL (normal seek).
ALL—HD
Switchingthereceptionmode
If thereceptionfor digital broadcast becomes poor, this unit automat cally switch the analog broadcast of the same frequency. If this function is set to D/A AUTO, theners switches between digital broadcast and analog broadcast automatically. If this function is set to ANALOG, theners will only receive analog broadcasts.
D/AAUTO—ANALOG
Tuner
Tuneroperations
(Function of AVH-X4600BT/AVH-X2600BT/AVH-X1600DVD)
Touchpanelkeys
①Bandkey
Selecting a band (FM1, FM2 or FM3) by touching the left icon. Switching the AM band by touching the right icon. The content these selected band is highlighted.
②Tagkey
Savingsonginformation(tag)fromthe broadcastingslationloyouriPod.
③Localkey
Settingthelocalseeklevel.
④Tuningkey
Tuningupordownmanually. Touchandholddownformorelthanlwosec- condstoskipstations.Socktuningstartsas soonasyourelease.Touchagainlocancel seektuning.
⑤Listkey
Displaying the preset channel list.
⑥ Presetchannelkey
Selectingapresetonannel.
Basicoperations
| Switchingpresetchannelsusingthebuttons | |
| 1 | Press ▲ or ▶ (TRK). |
| Socketuningusingthebuttons | |
| 1 | Press and hold ▲ or ▶ (TRK). |
Notes
- ListeningAMradiowhilecaniPodscharged from this unit may generate noise. In this case, disconnect the Pod from this unit.
- Touchpane keysnotlistedunderTuneroperationsmayappearonthed splay. Refertoindicatoristonpage61.
Storingandrecallingstations
You can easily store up to six stations to each band as presets.
1Displaythepresetscreen.
RetroTuneroperationsonpage13. Thepreselscreenaopearsinthedisplay.
2Touchandholldownoneofthepreset tuningkeystostoretheselectedfrequency tothememory.
The selected radiostation frequency has been stored in the memory.
3Touchtheappropriatepresettuningkey toselectthedesiredstation.
Storingthestrongeststations
BSM(beststationsmemory)automatically storestresixstrongeststationsintheorderof theirsignalstrength.
Tuner
StoringbroadcastfrequencieswithBSMmayreplacebroadcastfrequenciesyouhavesaved usingthepresettuningkeys.
1Displaythepresetscreen.
Refer to Tuneroperationsonpage 13. The presetscreenappearsinthedisplay:
2TouchBSMtoturnBSMon.
Thesisixstrongestbroadcastfrequencieswill be storedunderpresettuningkeysincorderoftheir signalstrength.
■ To cancel the storage process, touch Cancel
Tuning into strongsignals
Local seekuning allows you to be in only those radiostations with sufficient client strong signals for good reception.
FM:Off—
AM:Off - - -
The more —there are on the screen, the fewer the station that can be selected. On ystations with the strongest signals in your local area can be selected.
If there are fewer ■ this will be able to receive web broadcasts from weaker stations.
UsingiTunestagging
Note
FormoredetailsaboutiTunestagging,referto AboutiTunestaggingonpage65.
Storingthetaginformationto thisunit
1Tuneintothebroadcaststation.
2Storethetaginformationtothisunit.
RefertoTuneroperationsonpage13.
Youcanstoretheinformation/theTagindicatorisdisplaywhilethedesredsongs being broadcast.
■ While storing the tag data on this unit, Tag flashes.
- Thetaginformationforupto50songscanba storedonthisunit.
- Depending on the timing of when the tag information stored, the tag information forth as song played before a later the currently playingsong may also be restored.
3Whencompleted, indicatorturns offand indicatorisdisplayed.
Storingthetaggedinformation toyouriPod
1ConnectyouriPod.
When your iPod is connected both sunit, your iPod starts storing the lagged informal on automatically.
2Whencompleted, ◎ indicatorturnsoff andthetaggedinformationisstoredon youriPod.
Section
SiriusXMtuner
IntroducingSiriusXMtuner operations
(FunctionofAVH-X5800BHS/AVH-X3800BHS) YoucanusethsunitocontrolSiriusXMConnectVehicleTuner,whichissolcsdepartely. Formoreinformationshowtoinsta SiriusXM ConnectVehcleTuner,consulttheinstallation guideincludecowiththetuner. EverythingworthisteningtoisonSiriusXM. You’llfindchannelsandchannelsofprogramming,includingcommercial-freemusic,plus thebestsports.news,talkandexclusivocenter- lamtenLASiriusXMVehicleTunerandSub-scriptionsarerequired. Formore information, visitwww.siriusxm.com/intnelUSorwww.sir- iuxxm.cainCanada.
TosubscribetotheSiriusXM SatelliteRadioservice
1SelectSiriusXMasasource.
YoushouldbeabletotuneintoChannel1.If youcannolgetChannel1,makesurethalyour SiriusXMConnectVehicleTuncrisinstallodcor- rectlyasdescribedinthelunerinstallation guide.
2SwitchtoChannel0andchecktheRadio ID.
The SiriusXM/RadiolDcanbefoundbyturing toChannel0.Inaddition,theRadiolDislocated onlhebollomoftheSirusXMConnectVehicle Tuner. Please not that the SiriusXM/RadiolDdoesnot include:letters1,O,ScrF. You will need this numcertoactivate your subscription.
3ActivatetheSiriusXMserviceonlineor byphone.
For USS Subscriptions:
- Visitwww.siriusxm.com/activatenow - CallSiriusXMListororCarcat1 866 635 2349
For Canadian Subscriptions:
- Visitwww.xmradio.caencicikon"ACTIVATE
RADIO*inthetoprightcorner
• Call-877-438-9677
The SiriusXM satellite teswillsendanactivation message about a runner. When that run has received the message. SubscriptionUpdated is splayed. Press any key to clear the activation message. The activation process usually takes 10 minutes 16 minutes but may take up an hour in some cases. Don't run off the unit until you have heard what on message expressing any key.
Touchpanelkeys
① Listkey
Displayingthepresetchannellist.
② Informationkey
SwitchintheSiriusXMinformation.
Categoryname—Contentinformation
③ Bandkey
SelectingabandtromSXM1.SXM2or
SXM3
④ iTunes® songtaggingkey
SavingiTunes® songtaggingfromthebroad
castingstaticntoyouriPod.
SiriusXMtuner
⑤ Searchkey
Selectingachannelfromthelistscreen.
⑥ Parentalcontrolkey
TheParentalControlscreenappears,
⑦ Livekey
Useto return to the live broadcast while in InstantReplaymode.
⑧ Directkey
Anumerickeypadappears,allowingyouto enterSiriusXMchannelnumbersdirectly.
⑨ Pauseandplaykey
UsewhileInstantReplaymode.
10 Forward/Backwardkey
WhileinInstantReplaymode,usetoskipup,ordownorpressandholdofastforwardorfastrewind.
⑪ Tuningkey
Tuningupordownmanually. Touchancholddownformorethantwosco- ondsloskioslations.Seekturingslarisas soonasyourelease.Touchagainlocancel intuning.
⑫ Presetchannelkey
Recallingthepresetchannelsbytouching thekey.
Storingthecurrentstationinthepreset channellistbytouchingandholdingtnekey.
Basicoperations
Manualturing(stepoystep)usingthabuttons 1 Press ▶ or ▶ (TRK).
Seekt,uing,usingthebuttons
1 Press and hold ◀ or ▶ (TRK).
Note
Touchpanelkeysnotlistedunderintroducing SiriusXMtuneroperationsmayappearonthedis play.
Refer to Indicator listing page 61
Storingandrecallingchannels
Youcanasylstorceptosixchannelstoreach bandaspresels.
1Displaythepresetchannellistscreen.
Refer to introducing SinusXMtuneroperations on page 4.
Thepresetchannellistappearsinthedisplay.
2Touchandholddownoneofthepreset tuningkeystostoretheselectedchannelto thememory.
Theselectedchannelhasbeenstoredinthe memory.
3Touchtheappropriatepresetchannelkey toselectthedesiredstation.
Selectingachannelfromthe listscreen
Selectingachannelfromtheall channellist
You can select channel from any of the available channels.
1Touchthesearchkeytoopenthelist screen.
2Selecttheallchannels.
3Selectthedesiredchannel.
SiriusXMtuner
4Touchtheclosekeytoclosethelist screen.

Displayclosed.
Selectingachannelfromthe categorylist
You can select a channel from the available categories.
The types of categories available will depend on the types of channels available.
1Touchthesearchkeytoopenthelist screen.
2Selectacategoryfromthelist.
3Selectthedesiredchannel.
4Touchtheclosekeytoclosethelist screen.

Disp aylsclosed.
Switchingthelistdisplay
Youcanswitchbetweenlisttypeswhilealistis showing.
● TouchInfowhilealistisshowingto switchbetweenlisttypes.
Trolistd splayedwillswitchbetweenthebelow types in the order given.
Channel Name—Artist Name—Song Title—ContentInfo
SelectingaSiriusXM channeldirectly
YoucanselectaSiriusXMchannel directly by entering the des red channel number.
1Touchthedirectkeytoswitchtodirect inputdisplay.
2Touch0to9toinputthedesiredchannel number.
■Tocance the input lumbers touch C
3SelecttheSiriusXMchanneloftheenterednumber.
TheSinusXIVchannelofthecentersonumberis selected.

SelectingtheSiriusXMchannel of theenterednumber.
Replay™
You can pause, rewind and replay the current live channels as well as when you run before your channels stored on the current band of pre-sets.
- TouchPause/Playkeylopauseorplay.
- TouchForwardorBackwardkeystoskip throughcontent.PressancholdtheForward orBackwardskeystofaslscanthroughthe content.
- TouchLiveKeytoExitReplaymodeandgotothelivepointinthebroadcast.
UsingiTunestagging Note
Former details about Tunestagging, refer to AboutiTunestagging on page 65.
SiriusXMtuner
iTunestaggingofSiriusXMsongs
1Tuneintothebroadcaststation.
2TouchtheiTunes ^® songtaggingkey. Storethetaginformationtothisunit. You cansloretheinformationiftheTagindicatorsodisplayedwhilethedesiredsongisbeing broadcast.
■Willostoringthctagdataonthisunit,Tag flashes.
■Thetaginformationforupto50songscanbe storedonthisunit.
■ Depending on the incoming when the information is stored, that information for this song played for a fourth current playingsong may also be stored.
3Whencompleted,indicatorturns offand ♪ indicatorisdisplayed.
Storingthetaggedinformation toyouriPod
1ConnectyouriPod.
When your Pod sconnectedtothisunit, your iPodstartssloringthetaggedinformationautomatically.
2Whencompleted, ◎ indicatorturnsoff andthetaggedinformationisstoredon youriPod.
SettingParentalControl
The Parental Control feature allows you to limit access to any SiriusXM channels, including those with mature content.
When enabled, the Parenta Control feature requires you to enter a passcode to run the locked channels.
1Touchtheparentalcontrolkeytoopen thepasscodeconfirmationscreen.
2Usethenumerickeypadtoenterthe four-digitpasscodeandthentouchtheEnter key.

Touchoc confirmthepasscode.
Tnedefaultpasscodeis0000.
Itavalidpasscodeisentered,thechannelist appearsontheParentalControlscreentogether withalockorunlockicon.
3Thebelowoperationscanbecompleted fromtheParentalControlscreen.
Lockingchannels
Access to the current broadcast channel can be locked. You will need to input your password later on a list of locked channels.
●Tolockaspecificchannel,touchthe
nameofthedesiredchannelonthelist.
Alockedlock conwillappearnexttothename ofalockedchannel.
Touchrenameofalockedchannelasecond timetounlockthechannel.
ClearAll(clearingthelocks fromallchannels)
You can hear the lock from all lock channels at the same time.
●TouchClearAlltounlockalllockedchannelsatthesametime.
EditCode(changingthepasscode)
You can change your password.
1TouchEditCodetoswitchtothepass-codeeditscreen.
Section

Disc(CD/DVD)
Introducingmovieoperations
Youcanu se this unit to view DVD/DVD-R/DVD-RW/CD/CD-R/CD-RW movie files.
Touchpanelkeys

Whenplayingadisccontainingamixtureofvariousmediafiletypes
①Fastforwardkey/Reversekey
Fastforwardingorreversing
Touchtochangethefastforwardandreverse speed.
②Searchkey
Starting thesearchfunction.
③Switchsubtitlelanguagekey
WithDVDs/DivXf esfeaturingmulti-subtitle recordings,youcanswitchbetweensubtitle languagesduring playback.
④ Switchaudiolanguagekey
WithDVDs/Dvxt lesthatprovidesaudio playbackdifferentanguagesanddifferent audiosystems(Doby ^a Digital,DTS etc.), youanswitchbetweenlanguages/audio systemsduring playback. Dependingonthscstting.thevideomaynet beplaycobackwiththeaudiosystemusco torecord.heDVD.
⑤TOPMENUkey
Returninglo.helopmenuduringDVDplay-back.
⑥MENUkey
DisplayingtheDVDmeruduringDVDplay-back.
⑦Slow-motionplaybackkey
Mowing these selection header frame data time during playback. Touchandro downihekey form more than twosecond stos lowdownplayback speed. Touching the key increase the playback see cover for incremental settings during slow motion playback from DVD video/Video CD.
⑧Stopkey
Stopping playback. If you resume playback, playback will start from the point where you stopped. Touch the key again to stop playback completely.
Disc(CD/DVD)
⑨Screenmodekey
Changing the screen mode. Referto Changing the wide-screen mode on page 10.
Pauseandplaykey
Pausing playback. Returning to normal playback during paused, stopped, slow motion, or frame by frame playback.
11 Returnkey
Returningtothespecifiedscenetowhch theDVDcurrentlybeingplayechasbeenpre- programmedloreturn. Thisfunctioncannotbeuseditaspecif ed scerehasnotbeenpreprogrammedonthe DVDdisc.
⑫Bookmarkkey
During playback, touch the point at which you want to resume playback then next time the disc is loaded.
- YoucanselonebookmarkperDVDvideo. Youcansetuptofvebookmarkstotal.
- Too earthebookmarkonadisc,touch andholdthekeyduringplayback.
• Theoldestbookmarkisreplacedbythe newone.
⑬Arrowkey
DisplayingarrowkeystooperatetheDVD menu.
4Repeatkey
Selectingtherepeatrange
⑮Viewinganglekey
WithDVDsleaturingmulti-angle(scenes shotfrommultipleangles)recordings.you canswitchamongviewinganglesduring playback.
16Audiooutputkey
Switchingtheaudiocutput,whenplaying videodiscsrecordedwithLPCMaudio.
⑰Slowkey
Speedingdownthrep a yackspeedinfour steps, duringslowmot or playbackonVideo CD.
- There is no sound during slow motion playback.
- Imagesdurlingslow motion playbackmay beunclearforsomediscs.
- Reverses owmotionplaybackisnotavail able.
18Mediakey
Switching between mediaf elypestoplay on DVD/CD.
Basicoperations
Playingbackvideos
1 Insert the disc in other discloudingslot with the labelsideup.
Playback will automatically start.
- If you are playing a DVD or video CD, a menu may appear. Refer to Operating the DVD menu on page 18 and PBC playback on page 19.
- When the automatic playback function is on, then I will skip the DVD menu and automatic lystart playback from the first chord of the first title. Roten0Automatic playback of DVDsonpage39.
- Whenthesourceiconisnotdisplayed, itcan bedisplayedbytouch ngthescreen.
- If a message is displayed after loading basis containing DivXVODcontent, touch Play. RefertoPlayingDivX ^4 VODcontentonpage 20.
Fjeetingsdisc
• Refer to Ejecting ad is con page 1.
Disc(CD/DVD)
Selectingachapterusingthebuttons
1 Press ◀ or ▶ (TRK)
Fastforwardingreversingusingthebuttons 1) Press and hold ◀ or ▶ (TRK).
- Fastforward/fastreverse may not always be possible consomediscs, Insuchcases, normal playback will automat callyresume.
• The fastest forward/fast reverses speed depends on the length of the key press and holddown or (TRK). This function is not available for VideoCD.
Notes
- ThisDVDplayercanplaybacks.DivXfiere-cordacorCD-R/RW,DVD-R/RW,orMPEG-1/MPEG-2/MPEG-4.(Pleaseeseethefollowing sectionforfiles:hatcanbeplayedback.Roterto/DivAvidsofilesonpage63.)
• DonolinserlanythingotherthanaDVD-R/RWorCD-R/RWintothediscloadingslot. - Someoperationsmaynotbeavailablewhile watchingamedaduetotheprogramming ofthedsc.Insuchcases.the iconappearsonthescreen.
- There may betouch panel keys not listed under introducing movie operations on page 17 that apocaron't screen. Refertoindicatorist on page 61.
- With some DVDs, switching between languages/audiosystems may be possible using amonudisplay.
- You can also switch between languages/ audio systems using VideoSetupmenu. For details, refertoSettingtheaudiolanguageon page37.
- This unil will return nonormal playback if you changetheaud olanguagoduringfastforward/fastreverse.pauseorslowmotionplayback.
-
With some DVDs, switching between subtitle languages may only be possible using a menu display.
-
Youcanai soswitch between subtitlelanguages using VideoSetupmenu. For details, refer to Setting the subtitle language on page 37.
- This unit will return on normal playback, if you can get the subtitle language during fast forward/fast reverse, pause or slow when play back.
- During playbackofasceneshctfrommulti-pieangles,theangleiconisdisplayed.Use theVideoSetupmenutotumtheangle icondisplayonoroff.Fordetails.refertoSettingthemulti-angleDVDdisplayonpage38.
- You will return on normal playback if you change the viewing angled during fast forward/fast reverse, pause or slow off on play-back.
Soundplaybackoperations
YoucanusethisunittolistentoDVD-R/DVD-RW/CD/CD-R/CD-RWsoundfiles.
Touchpanelkeys
① Informationkey
Switchingthetext nformat ontodisplayon thisunitwhenplayingMP3/WMA/AACfiles.
Disc(CD/DVD)
② Searchkey
Displayingalistoftracktitles/filenamesto selectsongsonaCD.
Displaying the filename lists to select the files.
③ Mediakey
Switchingbetweenmed afiletypesona DVDoCD.
④ Soundretrieverkey
Refer to UsingsoundRetrieveron page 10.
⑤ Randomkey
Playingsongsinrandomorder
⑥ Repeatkey
Selectingtherepeatrange.
⑦ Previousfolderkey/Nextfolderkey
Selectingafolder.
⑧ Pauseandplaykey
Pausingandstarlingplayback.
Switchingthemediafiletype
When playing ad gitalmediacontainingamixture of various media file types, such as DivX, MPEG-1, MPEG-2, MPEG-4 and MP3, you can switch between media file type to play.
●TouchMediatoswitchmediafiletypes.
CD-DA(audiodata)—Music/ROM(compressed audio)—Video(DivX.MPEG-1,MPEG-2,MPEG-4 videofiles)
Note
Auciodata(CD-DA)filesonDVD-R/RW/ROM cannot be played back on this unit.
OperatingtheDVDmenu
(FunctionforDVDvideo)
SomeDVDsallowyoutomakeaselectionfrom thediscontentusingamenu.
Using the arrow keys
1 DisplayarrowkeystooperatetheDVD menu.
2 Selectthedesiredmenuitem.
| Selectingthedosirodmenultem. | |
| Enter | Startingplaybackfromthose-lectedmenultem. |
| Touch | OperatingtheDV Oman.by directlytouchingthemenuitem. |
| Backtoproviousdisplay. |
■WhenoperatingtheDVDmenuocirectlytouching,nereruilem,touchtheicontoperale.
| Key | ReturnngtothenormalDVDvneodisplay. |
| Displayingarrowkeys. |
Disc(CD/DVD)
■ Waystocisplaythemenuwildifferdepending
onthed sc.
- Depending on the contents of the DVD disc, this function may not work properly. In such cases, use the touch panel keys to operate the DVD menu.
Randomplay(shuffle)
●Touchtherandomkey.
- On -Playback fi es nrandomorder within therepeatrange, FolderandDisc
- Off Cancelrandomplay.
Repeating playback
●Touchtherepeatkey.
•Disc-Playthrough the current disc
• Chapter-Reposthocumantchapter
•Title—Repeat the current title
- Track-Repealt-recurrenttrack
- File—Repeatthecurrentf lo
• Folder—Repeatthecurrentfolder
• Disc/All – Repeat all files in the current disc
• All-Repectalfiles
Notes
- This function cannot be operated during VideoCD playback featuring PBC (playback control).
- If you perform chapter search, fast forward/ reverse, frame-by-framed playback controls, low motion playback, therepeat play will stop.
- When playing discswith-compressed audio and auclodata(CD-DA). playback is repeated within the type of data current by playing ingevent if Disc selected.
- If you select another folder during repeat play, therepeat play range change to Disc/All.
- If you perform track search or fast forward/reverse securing File, there repeat play range changes to Folder.
- ifyouperformtitle/chaptersearchorfastforward/reverseduringChapter,therepeatplayissettoofautomatically.
- If you perform track search or fast forward/ reversed during Track, the repeat play range changesto Disc.
- When Folder is selected, it is not possible to playback as subfolder of that folder.
Searchingforthepartyou wanttoplay
Youcanusethesearchfunctionofindthepart youwanttoplay. ForDVDvideos,youcanselectTitle(title).
Chapter(chapter)or10key(numerickeypad). For videoCDs, you can select Track(track) or
10key(numerickeypad).
- Chaptersearchisnotavailablewhendisc playbackisstopped.
- This function cannot be operated during some DVD videos or video CD playback featureing PBC (playback control).
1Startthesearchfunction.
Refertointrroducingmovieoperationsonpage 17.
2Touchthedesiredsearchoption(e.g., Chapter).
3Touch0to9toinputthedesirednumber.
■Tocance theentered numbers touchC
4Start playback from these selected part.

Registeringthenumbersand startingplayback.
Note
With discsfeaturingamenu,youcanalsouse theDVDmenutomakeyourselection.
Disc(CD/DVD)
Refer to introducing movie operations on page 17.
Selectingaudiooutput
When playing DVD video disc so recorded with LPCM audio, you can switch the audio output. When playing video CDs, you can switch between stereo and monaural audio output.
- This function is not available when discplay-backs stopped.
● Touch the audio output keytoswitch audio output types.
•L+R-Leftandright
• Left Left
-Right-Right
-Mix-Mixingleftandright
Note
You may not be able to select a user's function depending on the disc and try back location.
PBC playback
(FunctionforVideoCDs)
During playback of video CDs featuring PBC (playback control), PBCOn displayed.
1Startthesearchfunction.
Refer to introducing movie operations on page 17.
2Touch10keytodisplaythenumerickey-pad.
3Touch0to9correspondingtoamenu number.
4Start playback from these selected part.

Reg stringthenumbersand starting playback.
Notes
- You card display themerubylouching Return during PBC playback. Fordetails, refer to the instructions provided with the disc.
- PBC playbackkotaVideoCD cannot be can- ce ed.
- During p aybackoVdeocDsfeaturingPBC (playbackcontrol), you cannot select the repeat playrangeconusethesearchfunction.
Selectingtracksfromthe tracktitlelist
You can select track to play back using the track title list which is listed for the tracks recorded on adisc.
1Displaythetracktitlelist.
ReferloSound/playbackoperationsonpage18.
2Touchyourfavoritetracktitle.
Playbackbegins.
Selectingfilesfromthefile namelist
(Functionforcompressedaudio/DivX/MPEG-1/MPEG-2/MPEG-4)
Filenameistisalistoffi-enames(orfolder names)fromwhichyoucanselectafile(orfolder)top layback.
1Touchthesearchkeytodisplaythefile (orfolder)namelist.
2Touchyourfavoritefile(orfolder)name.
- When you have selected a folder, a list of the names of the files (orthofolders) not can be viewed. Repeath is operation to select the necessary file name. - If folder 1 (ROOT) contains no files, playback start from folder 2.
Note
Ifpartoff, therecordedinformationdoesnotdisplay,ascrollkeyappearsontherightsideoflist. Touchthescrollkeytscroll.
PlayingDivX ⊗ VODcontent
SomeDivXvicebondemand(VOD)contentmay onlybeplayaclatfixednumberoftimes.When youloadadisccontainingthislotypeofcontent, thenumberoftimesithasbeenplayedwillbe shownon-screen.Youcanthendedecidwhetherornotloplaythedisc.
- ForDivXVODcontentwithout.hisrestriction, youcanloadthediscintoyourplayerand playthecontentlasoflenasyoulike.withno messagedisplayed.
- You can confirm the number of times that the content can be played by checking the message. ThisDivXrental has used outofviews.
Important
• InordertoplayDivXVODcontentsonthis unit youfirstreedtoregislertheunitwith yourDivXVODcontentsourceProvider Fordela is onyourregistrationcode,refertoDisplaying theDivX® VODregistrationcodeonpage39.
- DivXVODcontent sprotectedbyaDRM (DigitalRightsManagement)system. This restrictsplaybackofcontenttospecific,registereddevices.
- Ifamessageisdisplayedafterloadinga discontainingDivXVODcontent,touch Play.
PlaybackoftheDivXVODcontentwillstart.
■Toskiptothernextfile,touchNextPlay.
■ If you donot want to play the DivXVODcontent, touchStop.
iPod
iPodcontrol
This manual app estothefollowing iPod models.
iPodwith30-pinconnector
—iPodtouch4thgeneration
—iPodtouch3rdgeneration
—iPodtouch2ndgeneration
—iPodtouch1stgeneration
-iPodclassic160GB-iPodclassic120GB
—iPodclassic
—iPodwithvdec
—iPodnanobthgeneration
—iPodnanosthgeneration
—iPodnano4thgeneration
—iPodnano3rdgeneration
—iPodnano2ndgeneration
—iPodnano ^st generation
—iPhone/S
—iPhone4
—iPhone3GS
—iPhone3G
—iPhone
iPodwithlightningconnector
—iPodtouchbthgeneration
—iPodnano/thgeneration
—iPhone5
Touchpanelkeys
iPodaudio(ControlAudio)
⑤④③②
iPodaudio(AppMode)
① Songtitle
DisplayingtheSongs list the iPod. The application name is displayed when you listen to music other than iPod music. (Except for Pandora)
② Artistname
DisplayingtheArtistslistontheiPod. ThesongtitleisdisplayedwhenyoulistentomusicotherthaniPodmusic. (ExceptforPandora)
③ MIXTRAXEZkey
Starting MIXTRAXEZ. Retroto MIXTRAXE/operationonpage29.
④ Artwork
Starting linksearchonyouriPodwhenyou touch.thearlworkdisplay.
iPod
⑤Searchkey
DisplayingiPodmenus.
©Soundretrieverkey
Refer to Usingsoundretrieveronpage10.
⑦iPodcontrolmodekey
Conducting operation from your Podand listening to it using your car's speakers.
⑧Shufflekey
Playingsongsonthe Podnrandomorder.
⑨Repeatkey
Selectingtherepeatrange.
⑩Changespeedkey
Changingthespeedotaudiobook playback entheiPod.
⑪Genre
DisplayingtheGenreslistonthaiPod. Thealbumtileisdisplayedwhenyoullisten lomusicotherthanilPodmusic. (ExceptorPandora)
⑫Albumtitle
DisplayingtrcAlbumslistontreiPod. Thearlistnameisdisplayedwhenyoulisten lomusicotherlthaniPodmusic. (ExceptforPandora)
⑬Pauseandplaykey
Pausing and starting playback.
⑭Unitoperationkey
Performing operations from this unit and listening to the music on your Podusing your car's speakers.
⑮Screenmodekey
Changingthescreenmode.
Soundplaybackoperationsfor Bluetooth
(FunctionofAVH-X5600BHS/AVH-X4600BT/AVH-X3600BHS/AVH-X2600BT)
When all of the following settings are made.
audiocanbeenjoyedonthisunilusinga
Bluetoothconnection.
1SetDeviceconnection.
Deviceconnectioncanbesetwhenallofthe
followingconditionsaremet.
—The phone is not connected.
—NoBuelootConnection.
—Thesourceisturnedoff.
1 Turntheseurosoft.
RefertoSourceoffkeyonpage/.
2 Press the home button switch to the home display.
3 Touch the system key to open the system
menu
4 TouchDeviceconnectiononthesystem
menu
5 TouchiPhoneviaBluetoothloselect.
2ConnecttheiPhoneandthisunitvia
Bluetoothconnection.
RefertoBluetoothconnectionmenpage45.
Note
Artworkwillnotbedisplayedwhensoundplay-backoperationsareperformedusinga
Bluetoothconnection.
Movingimagesoperations
ForiPodwith30-pinconnectorusers
YoucanusethneunittoviewiPodmovictiles.
• Depending on your iPod, there may not be any output unless you use CD-IU201S/CD-IU201V (sold separately). Bosurhouse CD-IU201S/CD-IU201V to connect your iPod.
ForiPodwithlightningconnectorusers
iPod
- ToplaymoviefilesiniPodwithth sunit,connectaCD-V203(soIdseparately)andLightningDigitalAVAdacte(AppleInc,Tproducts) (soIdseparately)andinstaltheCarMediaPlayeracponyourPool.RefertotheCarMediaPlayermanualformoreinformation. RefertoAppRadioModeoperationonpage 23.
Touchpanelkeys
①Fastforwardkey/Reversekey
Fastforwardingorreversing Touchtochangethetastforwardandreverse speed.
②Searchkey
Displaying Podmenus.
③iPodcontrolmodekey
ConductingoperationfromyouriPodandlisteningtoitusingyourcar'sspeakers.
④Shufflekey
PlayingthevideonyouriPodinarandom order.
⑤Repeatkey
Selectingtherepeatrange.
Screenmodekey
Changingthescreenmode. RefertoChangingthewide-screenmodeon page10.
⑦Pauseandplaykey
Pausing playback. Returningtonormalplayback during paused,slowmot on.orframe by frameplay back.
Basicoperations
Playingbackvideos
① Touch the search key to pull up the Pod menus.
2 Se eclam ovetoplay.
Refer to Playing videos from your Podon page 22.
- When the source icon is not displayed, it
can bed splaved by touching the screen. - Disconnectheadphonesfromtheil?odbeforeconnectingilltothisunit.
- Depending on the Pod model and the amount to restore the Pod, t may takes sometime for playback to begin.
- Uselhelouchpane keysloselect neiPod afterconnecting both sun t.
- NoDevice is displayed when disconnecting the Pod.
Fastforwardingomeversingusingthebuttons
1 Press and hold ◀ or ▶ (TRK).
Notes
• To ensure proper operation, connect the dock connectorable from the Pod directly to this unit.
- Whilst neiPodisconnectedtothisunit,the iPodcannolbelumedonoroff.
- TouchpanelkeysnotlistledunderMovingimagesoperationsmayappearonthodisplay. Refer to Indication on page 61.
Section
10
iPod
Usingthisunit'siPod functionfromyouriPod
You can listentosound from application on your iPod using the car's speakers when
AppModeisselected.
This function is not compatible with the following iPodmodels.
• iPodnano1stgeneration
- iPodwithvideo
Notes
• Video-related functions are not available to iPod with lightning connectors users.
- While this function is in use, the iPod will not turn off even if the ignition key is turned off. Operale the iPod turns off the power.
1TouchtheiPodcontrolmodekeyto switchtoAppMode.
2OperatetheconnectediPodtoselecta video/songandplay.
Notes
- The following functions are still accessible from the unileven if the control mode is set to AppMode. However, the operation will depend on your applications. - Playing/nausing - Fastforwarding/reversing - Tracking/up/down - Moving/boachapter/up/down
- AppMode is compatible with the following iPodmodels.
—iPostouch4thgeneration
—ilPoctouchördgeneration
—iPoctoucn2ndgeneration
—iPocket'slgeneration
—iPodclassic160GB
—iPodclassic120GB
—iPodClassic
—iPochnanc6thgeneration
— Podnanobihgeneration
—Podnano/ generation
—Podnano3regeneration
— Podnano2ndgeneration
—Phone43
—Phone4
— Phone3GS
—Phone3G
—Phone
Shuffleplay
●Touchtheshufflekey.
- Songs—Playback/videos/songs in these- ected istinrandomorder.
•Albums -Playbackvideos/songstromarandomlyselect:letalbum norder.
-Off-Turnaffshuffleplay.
Repeating playback
●Touchtherepeatkey.
•One-Repeat just the current video/song
- All – Repeat all videos/songs in the selected islontheiPod
PlayingvideosfromyouriPod
VideoscanbeplayedonlhisunitifaniPodwith videocapabilitiesisconnected.
- This unit can play back "Movies", "Music videos", "TV show", "Video Podcast" and "Rented Movies" which are downloaded from the iTunesstore.
Note
Th sfunctionisnotavailabletoiPodwithlightningconnectorusers.
1TouchSearchtodisplayiPodmenus.
■ If you want to switch to Podvide made, touch the icon.

■ If you want to pod music mode, touch the icon.

SwitchinglePodmusicmode.
Browsingforavideo/music ontheiPod
Tomakeoperatinganosearchingeasy,operationstocontrolaniPodwiththisunitaredesignetobeassimilarotheiPodaspossible.
Note
Video-related functions are not available to iPod with lightningconnector users.
Searchingforavideo/musicby category
1TouchthesearchkeytopulluptheiPod menus.
Refer to Search key on page 21.
2Touchoneofthecategoriesinwhichyou wanttosearchforavideo/music.
Category sls(forvideo)
• VideoPlaylists(videoplaylists)
• Movies(movies)
• MusicVideos(music videos)
•TVShows:TVshows
• VideoPodcasts (videopodcasts)
•RentedMovies(rentedmovies)
• VideoiTunesU(vinoolTunesL)
Category sts(formusic)
• Playlists( play ists)
• Artists(artists)
• Albums(albums)
•Songs(songs)
- Podcasts(nodcasts)
-Genres(genres)
• Composers(composers)
• Audiobooks(audiobooks)
3Touchthetitleofthelistthatyouwant toplay.
Repeatthisoperationuntilycufindthedesired video/music.
Notes
- Depending the generation conversion of the Pod, some functions may not be available.
- You can play playlists created with the computer application (MusicSphere). The application will be available online website.
22
En
iPod
- Playlists that you create with the computer application (MusicSphere) are displayed in abbreviated form.
Searchingthelistbyalphabet
1Selectacategory. ReferloSearching/foravideo/musicbycategory onpage22.
2Switchtoalphabetsearchmode.

Switchingtoalphabetsearch mode.
Alphabetsearchmode is displayed.
3Touchthefirstletterofthetitleofthe video/songyouarelookingfor.
While searching touchpanel keyoperationis not available.
■Torefiret researchwithad fferentletter,ouch
Cancel.
4Touchthetitleofthelistthatyouwant toplay.
Repeat this operation until you find the desired song/video.
Changingaudiobookspeed
● Touchthechangespeedkeytochange thespeed.

Playbackataspeedfastertnan normal

Playbackatnormal speed

Playbackaspeedslowertnan normal
Displayinglistsrelatedto thesongcurrentlyplaying (linksearch)
Touchtheartworktoopena stofthenamesof songsonthealbumcurrentlyplaying. Touchthe nameofthesongyouwanttoplaytosstartplay-ingthatsong.
Note
If part of the recorded information does not display, ascrollkey appears on other rights side of. Touch the scroll key to scroll.
AppRadioMode
AppRadioModeoperation
ThissystemcanswitchtotheAppRadioMode, which you can display and operate the application for iPhone orthesthescreen.
InAppRadioMode, you can operate applications with fingeringesturessuchaslaoping, dragging, scrollingorflickingonthescreenofthe system.
Instal theAppRadioapponyouriPhone.
WARNING
CertainusesofaniPhoneorsmartphone maynotbelegalwhiledrivinginyourjurisdiction,soyoumustbeawareofandobey anysuchrestrictions.
Ifindoubtastoaparticularfunction,only performitwhilethecarisparked.
Nofeaturesouldbeusedunlessitissafe todosounderthedrivingconditionsyou areexperiencing.
CAUTION
While driving, you cannot enter text on your iPod.
- Pioneerisnclliableforanyissuesthat mayarisofromincorrectorflawocapp-basedcontent.
• The content and functionality of the supported applications are theresponsibility of the Appproviders. - InAppRadioMode functionality through the product is limited while driving with available functions determined by the App providers.
• Availability of AppRadio Mode functionality is determined by the Appprovider and no determined by Pioneer. - AppRadioModeallowsaccesstoapplicationsotherthanthoselisted(subjectto limitationswhiledriving),buttheextentto whichcontentcanbeusedisdetermined bytheApproviders.
Important
- When listening to music and sounds from applications simultaneously, see the following section. Refer to Operating the sound mixer page 48.
Notes
- ApplicationsoperablebyswitchingthissystemtoAppRadioModeareonlythoseavailableforAppRadioMode.
- Pleasecheck Phoneapplicationsupported AppRadioModeat http://www.pioneerelectronics.com/ AppRadioMode
http://www.pioneerelectronics.ca/AppRadioMode
iPhonecompatibility
AppRadioMode is compatible with the following iPod models.
- iPodtouch5thgeneration (onlywithAVH-X5600BHS/AVH-X4600BT/AVH-X3600BHS/AVH-X2600BT)
AppRadioMode
- iPodtouch4thgeneration
- iPhone5(onlywithAVH-X5600BHS/AVH-X4600BT/AVH-X3600BHS/AVH-X2600BT)
- iPhone4S
- iPhone4
Startingprocedure
1InstalltheAppRadioapponyouriPhone.
2SetDeviceconnection.
Deviceconnectioncanbesetwhenallofthe
followingconditionsaremet
—The iPhone is not connected.
—NoBluetooth connection.
—Thesourceisturnedoff.
1Turnresourceoff.
RefertoSourceoffkeyonpage7.
2 Pressthehomebuttontoswitchtothehome display.
3 Touch the system key to open the system menu.
4 TouchDeviceconnectiononthesystem menu.
5 Touchthedesiredsetting.
-iPhoneviaBluetooth(foriPodwithlight- ningconnectorusers)
—iPhoneviaUSB(foriPodwith30-pincon- nectorusers)
3AfterconfiguringDeviceconnection,connecttheiPhonetothisunit.
■ForiPodwithlightningconnectorusers
(Function of AVH-X5600BHS/AVH-X4600BT/AVH-X3600BHS/AVH-X2600BT)
—ABluetoothconnectionisrequ redforiPod withlightngconnector.ReferloBluetooth connectionmenuonpapa45.
—UsetheCD-IV203(soldseparately)andLightningtoVGAadapter(Applainc.products)(soldseparately)whenyouusethisfunction.
—RefertoWhenconnectingwithoptionalCD-N203cableonpage52.
■ForiPodwith30-pinconnectorusers
—Use the CD-1U201S(sold separately) when you do this function.
—RefertoWhenconnectingwithoptionalCD-IU201Scableonpage53.
4Startanapplicationavailablefor AppRadioModefromtheiPhone.
Animageoftheapplicationisdisplayedonthe screenofthissystem.
- You can start an application available for AppRadioMode also from a launcher application.
5PressMODE.
■Presstnehomebuttontoswitchtothenomecis-playandchentouchtheAppskeytostartthelauncherapplication.
6Operatetheapplication.
SettingtheKeyboard
CAUTION
Foryoursafely, the keyboard functionality is only available when the vehicle is stopped and the parking brake is engaged.
Depending on the application, you can input text to display in order to input text correctly using keyboard which appears this unit, you need to set the language setting in this function. When the AppRadioMode is used, the language setting for the keyboards set the function and the language setting for the Phone keyboard need to do this same.
• KeyboardisavailableonlyinAppRadio
Mode
When you put a latex input area of an application for iPhone, a keyboard will be displayed on screen. You can input the desired text directly from this system.
AppRadioMode
- The language preference for the keyboard of this system should be same as the setting on your iPhone. If these settings for this product and the iPhone are different, you may not be able to enter characters properly.
1Pressthehomebuttontwicetoswitch fromtheAppRadioModedisplaytothe homedisplay.
2Touchthesystemkeytoopenthesystem menu.
3TouchKeyboardontheSystemmenuto selectdesiredlanguage.
4Touchthedesiredlanguage.
French (French)—German (German)—Greek (Greek)—Russian (Russian)—English (US English)—English (UK) (UK English)—Dutch (Dutch)—Italian (Italian)—Norwegian (Norwegian)—Swedish (Swedish)—Finnish (Finnish)
— Spanish (Spanish)—Portuguese (Portuguese)—Chinese(Simplified)(SimplifiedChinese)—Chinese(Traditional):Traditional Chinese)—Arabic (Arabic)—Hebrew (Hebrew)—Thai(Thai)
5Tapthetextinputareaontheapplication screenoftheiPhone.
Touch ↓ tohidethekeyboard.
Smartphonelinkadaptor operations
You can operate your smartphone on the unit's display by using this function. Only compatible smartphones work with the Mirror Link function.
—Fordetailsonhowtoconnectwithsmartphonelinkadaptor(CD-ML100)(soldseparately), referloOptionalSmartphonelinkadaptor(CD-ML100)connectionpage53.
—For details about Mirror inksetting, refer to Selecting Mirror inkMode on page 10.
—For details about tresoundmixer, refer to Operatingthesoundmixer on page 48.
Startingprocedure
1Connectyoursmartphonetothesmart-phonelinkadaptor(CD-ML100)(soldseparately)withtheRGBinput.
2PressMODE.
■PressthehomebuttontoswitentothehomedisplayandthentouchtheMirrorLinkkeytostartthelauncherapplication.
- The smartphone's screen appears on the unit's display when you select MirrorLink and you can then operate your smartphone connected display.
3Operatetheapplication.
Presshomebutton:Displaystehome screenforMirrorLink.
—Prosshomebuttentwice: Displaysthomo screenfortheunit.
—Press▶(TRK):Displays the meruscreen for MirrorLink.
—Press◀(TRK):Displaysthepreviousscreen forMirrorLink.
Fordetails, refer to Headunion page 7.
■Youcanope atethead applications on the touch panelscreen as well as on your smartphone screen.

CAUTION
- Donotoperate your smartphone awhile arriving. Obeya relevant laws in your area.
- You must agree to obey the above rule on the caution screen. Besureto follow the on-screen instructions.
USB
This unit is compliant with USBMSC (Mass StorageClass) and USBMTP (MediaTransfer Protocol). You can also use USBMTP (connecting to MTP-compatible Android devices using a USB cable); however, some functions are not supported for MTP connection.
| USBMSCUSBMTP | |
| MP3✓ | ✓ |
| WMA✓ | ✓ |
| WAV✓— | |
| AAC✓ | ✓ |
| DiX✓— | |
| MPTG-1✓— | |
| MPEG-2✓— | |
| MPTG-4✓— | |
| JPEG | ✓— |
| Musicbrowsernode | ✓— |
| MIXTRAXEZ | ✓— |
Movingimagesoperations
(FunctionofUSBMSC)
You can us this unit to view USB storage device files.
Touch panel keys
① Fastforwardkey/Reversekey
Fastforwardingorreversing
Touchtochangethefastforwardandreverse speed.
② Searchkey
Displaying the filename list to select the files.
③ Switchsubtitlelanguagekey
WithDivXfilesfeaturingmulti-sublittlere-cordings,youcanswitchbetweensubtitle languagesduringplayback.
④ Mediakey
Switchingbetweenmediaf etypestoplay onMusic/Video/Photo.
⑤ Switchaudiolanguagekey
WithDivXfilestratprovidesaudioplayback indifferentlanguagesanddifferentaudiosystems(DolloyDigital, DTS, etc.), youcan switchoetweenlanguages/audiosystems duringplayback.
⑥ Repeatkey
Selectingtherepeatrange.
Section
12
13
English
USB
RefertoRepeatingplaybackonpage27.
⑦Slow-motion playbackkey
(FunctionforDivXfile/MPEG-1/MPEG-2/
MPEG-4)
Movingtheselectionaneadoneframeata
timeduring playback.
Touchandholddownthekeyformorethan
twosecondstoslowdownplaybackspeed,
⑧Stopkey
Stopping playback.
Ityouresume playback, playback will start
from the point where you stopped. Touch the
keyagain to stop playback completely.
⑨Screenmodekey
Changingt*escreenmode.
RatertoChangingthewide-screenmodeon
page10.
Pauseandplaykey
Pausing playback.
Returningonormalplaybackduring
paused.slowmotion.orframe-by-frameplay-
back.
Basicoperations
Playingbackvideos
ConnecttheUSBdevice.
Playbackwillautomaticalystart.
When the source is not sold, it can
bed splayedbytouchingthescreen
Fastforwarding or reversing using the buttons
Press and noin ◀ or ▶ (TRK).
Notes
- Touchpanelkeysnollis, eunder Movingimagesoperationsmayappearonthedisplay, Rotertolindicatoristonpage61.
- Youcanai soswitchbetweenlanguages/ audiosystemsusingVideoSetupmenu.For details,refertoSettingtheaudiclanguageon page37.
- This unit will return on normal playback, if you change the audio language during fast forward/fast reverse, pause or slow off playback.
- Youcana soswitch between subtitle languages using VideoSetupmenu. For details, refer to Setting the subtitle language on page 37.
- This unit will return on normal playback if you change the subunit language during fast forward/fast reverse, pause or slow not on playback.
Soundplaybackoperations
YoucanuselhisunillolistentoUSBaudiofiles.
MTPconnection
USBMTP(connectingtoVMP-compatible AndroiddevicesusingaUSBcable)issup- portedonlyforMP3/WMA/AACi esinthisfunc- tion.
Notes
• The playdimemaynotoisolaycorrectly.
- When playing backfilesrecordedasVBR (variablebitrate)files.theplayt mewill not becorrectlydisplaydiffastforwardcorre verseoperationsareused.
• To ensure proper operation connect the dock connector cable from the Poddirectly to this unit.
- While the iPod is connected to this unit, the iPod cannot be turned on or off.
- If the characters recorded on the USB storage device are not compatible with this unit, those characters will not be displayed.
USB
- Textinformationmaynotbecorrectlydis-
playeddependingontherecordedenvironment.
• D sconnecttheUSBportableaudiop ayer/ USBmemorywhenyouaredoneusing it. - When you select Speanaon Selecting the background display on page 46, the artwork is not displayed.
Touchpanelkeys
①MIXTRAXEZkey
StarlingMIXTRAXEZ
(ExceptforUSBMTP)
②Informationkey
Switchingthetextinformationdisplayon thisunitwhenplayingMP3/WMA/AAC/WAV files.
③Searchkey
Displaying the filename lists to select the files.
④Mediakey
Switchingbetweenmed afiletypestoplay onUSB.
⑤Soundretrieverkey
RefertoUsingsoundretrievercnpage10.
Randomkey
Playingsongsinrandomorder.
⑦Repeatkey
Selectingtherepeat/range.
DBkey
Creating gadatabasethalensablessearches
byart st name, genre, and other options.
Referto/Musicbrowsepage26.
⑨Previousfolderkey/Nextfolderkey
Selectingatolder.
⑩Pauseandplaykey
Pausingandstartingpayack.
Basicoperations
Playingbacktracks
①Connect⑤USBdev④
Playback w lautomatically start.
Whenthesourceiconisnotd splayed.itcan
bedisplayedbytouchingthescreen.
Fastforwardingorreversingusingthebuttons
1 Press and hole ◀ or ▶ (TRK).
Musicbrowsemode
(FunctionforUSBMSC)
Thisunitcreatesanindexinorcertctacilitate
browsingforasong.Youcansearchbythecale-
goniessuchasalbumsandartists.

CAUTION
• This function is not available when the USB
storagedeviceislocked.
USB
- This function isn't available when the free space of USB storage device is less than 5MB.
- While this unit creates an index, donotum the unit off. It may cause loss of data on your USB storage device.
- If you switch to video or JPEG imaged display while a database is being created, or when a database could not be created, a message appears and database secretion steps.
1TouchDBtocreateadatabaseinMusic browsemode.
ReferloSoundplaybackoperationsonpage26.
2When"SavetheDatabasetomemory?" isdisplayed,touch"Yes".
Saving the database is completed. If you do not save it touch "No".
When resaving is completed, "Completed savingDatabase tomemory." appears. Musicbrowsemodew start.
3Displayalistandtouchthetagkey.
4Selectafile.
Stillimageplaybackoperations
(FunctionforUSBMSC)
Youcanu set this unit to view still images saved on a USB storage device.
Touchpanelkeys
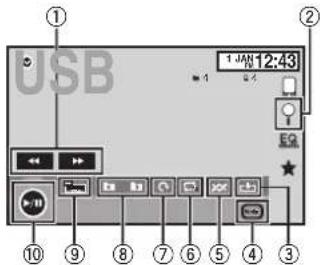
① Fastforwardkey/Reversekey Selectingapicture.
② Searchkey
Displaying the filename is t to select the files.
③ Capturekey
Capturingan magcinJPEGfiles.
④ Mediakey
Switching between media file types when there is more than one media file types saved to the USB device. This key does not appear if there is only one media file types saved to the USB device.
⑤ Randomkey
Playingfilesinarandomorder.
⑥ Repeatkey Selecting the repeatrange.
⑦ Rotatekey
Rotating the displayed picture 90° clockwise.
USB
⑧ Previousfolderkey/Nextfolderkey Selectingafolder.
⑨ Screenmodekey
Changingthescreenmode.
RefertoChangingthewide-screenmodeon
page10.
30 Pauseandplaykey
Startingorpausingtheslideshow.
Basicoperations
Playing still images
① Connect the USB device.
Playback will automatically start.
- When the source icon is not displayed, it can be displayed by touching the screen.
Selecting a file using the buttons
1) Press ◀ or ▶ (TRK).
Fast file searching
1 Press and hold ◀ or ▶ (TRK).
- You can search 10 JPEG files at a time.
If there are fewer than 10 files, the search will cover the first or last file.
Notes
- Files are played back inflenum order and folders are skipped if they contain no files. (If folder 1 (ROOT) contains no files, playback commences with folder 2.)
- Touchpanel keysnotlistedunderStillImage playbackoperationsmayacpearonthedisplay. Referloindicatoristonpage61.
Switchingthemediafiletype
- TouchMediatoswitchbetweenmedia filetypes.
Randomplay(shuffle)
●Touchtherandomkey.
- On - Play back files in random order within the repeat range, Folder and Media.
- Off-Cancel random play.
Repeating playback
●Touchtherepeatkey.
- Folder – Repeat the current folder
• All - Repeat all files - When Folder is selected, it is not possible to play back a subfolder of that folder.
- If you select USB source, the repeat play range changes to All.
Selectingfilesfromthefile namelist
(Functionforcompressedaudio/DivX/MPEG-1/MPEG-2/MPEG-4)
OperationisthesameasthalforDisc. RefertoSelectingfilesfromthefilenameliston page19.
Displayinglistsrelatedto thesongcurrentlyplaying (linksearch)
Touch the artworklopenalist of the names of songs on the album currently playing. Touch the name of the song you want to play to start playing thalsong.
Notes
- It part of the recorded information does not display, ascroll key appears on her right side of list. Touch the scroll key to scroll.
- This function is available for USB devices in Musicbrowserode.
PlayingDivX \* VODcontent
OperationisthesameasthatforDisc. ReferloPlayingDivX ^® VODcontentpage20.
CaptureanimationJPEGfiles
Youcan capture imagedalaanduseitaswall-paper. Imagescanbestorecandreca iedeasily in this unit.
- Only one image can be restored on this unit. Old image is overwritten with the new one.
1Touch▶/IItopausetheslideshowwhen thedesiredimageisdisplayed.
2TouchCapturetocapturethedesired image.
3When "Doyousavethisimage?" is displayed, touch Yes.
While storing the image this unit, "Saving the image. During the save, pleased on't turn off the engine." is displayed. When the process finished, "Images saved. Is displayed.
■Tocancel the storage process, touch No.
BluetoothAudio
Soundplaybackoperations
(FunctionofAVH-X5600BHS/AVH-X4600BT/AVH-X3800BHS/AVH-X2600BT) YoucanusethisunittolistentoBluetoothaudio files.
Notes
- Depending on the Bluetooth audio player connected to this unit, the available operators will be limited to the following two levels:
—A2DProfile(AdvancedAudioDistribution Profile):Youcanon yplaybacksongsonyour audition ayer.
—AVRCP profile (Audio/Video Remote Control Profile): You can perform playback, pause playback, select songs, etc.
- AsthereisawidevarietyofBluetoothaudio playersavailableontnemarket. Operations availablewithspecficmode smayvaryextensively.Whenattemptingtoruna Bluetoothaudioplayerusingthisunit,refer lotheinstructionmanualthatcamewiththe playeraswellastothismanualforassistance.
• Asthesignalfromyourcularpronemay causenoise, avoidusingitwhenyouarelisteningtosongsonyourBluetoothaudio player.
• ThesoundfromaBluetoothaudioplayer connectedtothisunitwillbemutedwhile callisinprogressonacellularphoneconnectedtothisunitviaBluetoothwireless technology.
- The playtime may not display correctly. - Depending on the type of Bluetooth audio player you have connected this unit operation and information display may not be available for some functions.
Touchpanelkeys
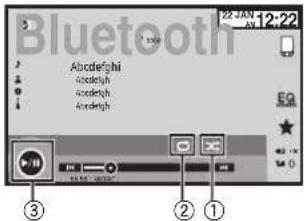
①Randomkey
Playingsongsinrandomorder.
②Repeatkey
Selectingtherepeatrange.
③Pauseandplaykey
Pausing and starting playback.
SettingupforBluetoothaudio
Before you can use the Bluetooth audio function you must establish a Bluetooth wireless connection between the unit and your Bluetooth audio player.
1Connection
First.youneectoconnectaBluetoothaudictothsunt.
For detailed instructions on connecting your Bluetooth audict this unit via Bluetooth wireless technology, refer to Bluetooth connection menu or page 45.
BluetoothAudio
Notes
- When playing back files recorded as VBR (variable bit rate) files, the playtime will not be correctly displayed if fast forward or reverse operations are used.
• To ensure proper operation, connect the dock connectorable from the Food directly to this unit. - Whilst neiPodisconnectedtothisunit,the iPodcannolbelumedonoroff.
- If the characters recorded on your Bluetooth audioplayer are not compatible with this unit, these characters will not be displayed.
- Texinformationmaynolbecorrectlydisplayddependingontherecordocenvironment.
Randomplay(shuffle)
●Touchtherandomkey.
• On-Playback files nrandomoroor.
- Off-Cancelrandomplay.
Repeating playback
●Touchtherepeatkey.
•One-Repealtherec.urentsongonly
• All Repeatalsorgs
UsingMIXTRAX
MIXTRAXoperation
MIXTRAXisoriginaltechnologyforcreating non-stopmixesofselectionsfromycuraudioliorary.compleewithDJeffectsIthatmakethem soundasifaDJisrighttherewithyouplaying themusic.
MIXTRAXEZoperation
You can uset this unittoplayiPod/USBaudio files.
MIXTRAXF/isusedtoaddavarietyofsound effects between songs for arranging the pauses between songs. It allows you to enjoy listening to music on stop.
- This function is only available when a file on a USB storage device or a long file is being played.
- This function is not available when the control mode is setloAppMode.
- Dependingonthof ie/song,soundeffects may not be available.
- Depending on the file/song, non-slopplay-back may not be available.
Note
You cannot use this function with USBMTP.
StartingMIXTRAXEZoperation
●TouchMIXTRAXEZ.
Refer to MIXTRAXEZkeyonpage20 and 26.
SettingMIXTRAXmode
Turnor this function to playback audiofiles using MIXTRAX.
1Pressthehomebuttontoswitchtothe homedisplay.
2Touchthesystemkeytoopenthesystem menu.
3TouchMIXTRAXSetuponthesystem menu.
MIXTRAXsettingitemsaredisplayed.
- ShortPlaybackMode—When turned on, select a audio track playback length.
60s (60 sec.)—90s (30 sec.)—120s (120 sec.)
—150s (150 sec.) —180s (180 sec.) —Random (random)—Off(off)
WhenRandomisselected, the playbacktime varies between 80s, 90s, 120s, 150s, and 160s selected at random when the playback song changes.
- Display Effect – When Display Effect is set toon, theartwork display can be removed according to the music type.
- Cut-In Effect – When Cut-In Effect is set to on, soundeffectswill playbetweentracks.
- Effect Setting – Use Effect Setting to set up the sound effect you want to insert between tracks.
Settingtheeffect
You can change the settings for fixed sounds and sound effects.
There are six different fixed sounds available that can be inserted for playback between tracks.
Tresoundeflectsareusedaseffectstosignal treendofasorgbeingplayedandthebeginningofthenextsonginseries.
Tref xedsoundsandscoundeffectsaresetas combinationsasMIXTRAXsounds.
Fixedsounds
- Phaser – A fixed sound that sounds like surging waves.
-
Roll – A fixed sound that repeats playback of acerlainsound.
-
Turntable-AfixedsoundthatmimicsDJ scratching.
- Flanger2-Arushingsoundthatmimics thatrisingandfallingsoundscfajetengine.
- Reverb – A fixed sound effect that creates a reverberation effect.
- Echo2 – A fixed sound effect that creates an echoing effect.
Soundeffects
•CrossFade—Asoundeffectthatcreatesa fadeinandfadeouteffectbetweenensongs.
- Flanger1 - Arushingsoundlhatmimics - Halrisingandfallingsoundsofajelengine.
- Echo1 – A sound effect that creates an echo-ing effect.
- Loop Asoundeffectthatrepealsp ayback ofonosectionofasongtrack.
Note
CrossFade cannot be selected for Podaudio files.
Settingsoundsandsoundeffects aspresetsusingthepresetkey
TheStandardandSimplesoundeffectsareset alreadyasdefaultpresets.
- TouchStandardorSimpletocheckthe settings.
Theregisteredpresetsoundeffectorthekey thalwastouchedisselasapresel.
Registeringsoundsandsound effectsaspresets
Registersdesiredcombinationofsoundsand soundeffectstoCustom.
TouchCustomtoeasilysetthedesireosoundorsoundeffect.
1TouchCustom.
2Addacheckmarktothedesiredsound effectbytouchingtheoption.
ThemarkedsoundeffectisregisteredasapresetinCustom.
Notes
- Ifasoundeffectistouchedintheselection screenforStandardorSimple,theCustom screenisautomaticallydisplayandothe soundefect sregisteredtoCustom.
- You can list to fixed soundstofheare examples by touching the speakericon.
StreamingPandora
Pandoraoperations
ForiPhoneusers
ConnectandPcttoUSBinput
SelPandoraConnectionloiPhone.
(Function of AVL-X5600BHS/AVL-X4600RT/
AVH-X3600BHS/AVH-X2600BD
(This setting is not required for AVH-X 600DVD.)
Forsmartphoneusers
(FunctionofAVH-X5600BHS/AVH-X4600BT/AVH-X3600BHS/AVH-X2600BT)
—SetPandoraConnectiontoAndroid
—ABluetoothconnectionisrequiredfor Androiddevices.RefertoBluetoothconnectionmenupage45.
Important
RequirementstoaccessPanderausingthe Pioneercaraudio/videproducts:
ConnectaniPodloUSBinputoranAndroicdeviceusingBluetoothtoplayPandoraontnis unit.
- Pleaseupdate the firmware of the Panama application to the latest version before use.
- The latest version of the Pandora application can be downloaded on TunesAppStore and Google Play
- Createfreerapaidaccountonline.You can createtheaccountinthePandoraapplication fromyouriPhoneoronthewebsite.TheURIn the following:
http://www.pandora.com/register - If the Data Plan for your iPhone does not provide toru limited data usage, additional charges from your carrier may apply for accessing the Pandora service via 3Gand/or EDGE networks
- Youneedtoconnecttotheinternetvia3G,EDGE orWi-FietworkcousetheservicetromPandora.
Limitations:
- Depending on the availability to the Internet, you may not be able to receive Pandora service.
• Pandoraservices subject to charge without notice. This service could be affected by any other following firmware versions of iPhone, firmware versions of Pandora application, changes the Pandora music service.
- Contain functions of the Panecaser vicoaron of available non-accessing the service through the Pioneercaraudio/ deoproducts. They include burnout limited to following a cost of new stations, deleting stations sending information about currentizations, buy ngtracks from iTunes, viewing additional font information, logging into Pandora, adjusting Cell Network Audio Quality.
Pandorainternetradioisamusicserv cenolaffiliatedwithPioneer.Moreinformationisavailablea:http://www.pandora.com.
The Pandoramob application available for mostiPhoneanosmartphone, please visit www.pandora.com/everywhere/mobilefor.he laleslcompatibilityinformation.
SettingthePandoraconnectmode
(FunctionofAVH-X5600BHS/AVH-X4600BT/AVH-X3600BHS/AVH-X2600BT)
Note
Thisfunction is not available when
Deviceconnection assetdoiPhoneviaBluetooth.
1Pressthehomebuttontoswitchtothe homedisplay.
2Touchthesystemkeytoopenthesystem menu.
3TouchPandoraConnectionrepeatedly untilthedesiredsettingappearsonthe screen.
iPhone: An iPhone is connected using an actual cable.
Streaming Pandora®
Android AnAndroid device is connected using Bluetooth.
Touchpanelkeys
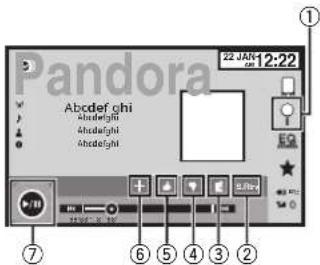
①Searchkey
Displaystheshuffie/stationlist.Selectthe desireostationorshufflemode.
②Soundretrieverkey
(OnlyavailableconiPod) ReferloUsingsoundrcinioveronpage10.
③Bookmarkkey
Storestrackinformation(Bookmark). Bookmarksareviewableinyourprofile.
④Thumbs-downkey
Givinga"thumbs-down" tells Pandorayoudo not likethecurrenttrack. Pandorawillskipto thenextrack, and will not play that track on thestationagain.
⑤Thumbs-upkey
Givinga"thumbs-up"tellsPandorathatyou likethecurrenttrack.Pandorawili continue toplaythattrackandtrackslikeitonthestation.
⑥Addstationkey
Anewstationiscreated
Streaming Pandora®
⑦Pauseandplaykey
Pausingandstartingplayback.
Basicoperations
Playing tracks
1 Connect an iPhone to USB input.
For an Android device, a Bluetooth connection is required as well.
Refer to Pandora operations on page 30.
2 Switch the source to Pandora.
Skipping tracks
1 Press ▶ (TRK).
Add station
A new station will be created from the information for the artist or track of the station currently being played.
T1 Touch the Add station key
2 Touch Track (from track) or Artist (from artist). A new station is created.
• To cancel the Add station, touch Cancel
Deleting stations
1) Display the shuffle/station list
2 Touch the Delete station key
3 Touch Yes
The station will be deleted.
• To cancel, touch No
Notes
- Touch panel keys not listed under Pandora operations may appear then display. Refer to indicator lists page 61.
- Pandoralimitsthenumberotskiipallowed on theirservce.Ifyouattempttaskctracks beyondthelimil."Skiplimitreached."isdisplayed.Ifyouhaveerachthedtheskiplimitand yougvea"thumbs-down",thecurrenttrack willcontinuetoplay,butyourfeedbackwill beregistered.
- WhentheConnectkeyisdisplayed, manuallyconnectaregisteredBluetoothdevice.
Selecting and playing Pandora® stations/shuffle
Touch relist for your Pandorastation to set one of them to play.
1 Displaytheshuffle/stationlist.
ReferloSearchkeyonpage31.
2 Changethesortorder.

You can sort the items in the list alphabet cally.

You can sort the items in the list in order of the dates on which the items were created.

You can scroll the titles in the list while you touch and hold down the scroll icon.
3 Selectshuffleorthedesiredstation.

Shuffle mode will play tracks from your selected stations. You can edit shuffle preferences or your mobile device.
Addingastationfromthe stationlist
1 TouchGenreinthestationlist.
2 Touchthestationinthegenrelistthat youwishtoadd.
3 Anewstationiscreated.
Note
Stations indicated by a sharesharedstations.
Bluetoothtelephone
Bluetoothtelephone
Bluetoothhtelephone operations
(FunctionofAVH-X5600BHS/AVH-X1600BT/AVH-X3600BHS/AVH-X2600BT) YoucaruseBluetoothtelephone.
Important
• Leaving the uniton standcytoconnect to your phone via Bluetooth while the engine is not running candidate rebattery.
- Advanced operation that require attention such as dialing number on the monitor, using the phonebook, etc., are prohibited while driving. Besuretopark your vehicle in asafoplace and apply the parking brake before proceeding.
- Bluetooth connection menu cannot be selected while driving.
• Operations available may belimited depending on the cellular phones connected to this unit.
- If you are unable to complete, he connects or using this unit, use the device to connect to the unit.
- If you connect more than one device at a time, connected device may not operate properly. Connecting one device at time is recommended.
Touchpanelkeys
Telephonestandbydisplay
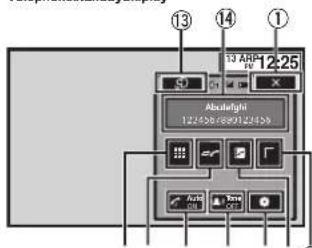
②③④⑤⑥on7hokkey
Whenswitchingtotheenteringphonenumber mode
①Closekey
Displayisocosed.
②Presetdialkey
Displaying the preset a screen.
③Phonebook key
Switchingtothepronebookmode.
④Settingkey
Displayingthe Bluetoothconnectionmenu.
⑤Tonekey
Turningtheringtoneforincomingcallson profit.
⑥Auto-answerkey
Turningautomaticansweringdonoroff.
⑦Historykey
Switchingtothemssed,receivedand dialed calllists.
⑧Keypadkey
Switchingthemadetoenterthephone num berdirectly.
Endingacall.
Rejecting an incoming call. Canceling call waiting.
⑩Volumekey
Adjusting the other party's listening volume.
⑪Privatemodekey
Turningprovatemodeonoreff.
12Off-hookkey
Accepting an incoming call. Making phone call, where selecting a phonenumber. Switching between callers on void.
⑬Voicecontrolkey
Notes
- Privatemodecanonlybecoperatedwhileyou aretalkingonthephone.
• To end the call, both you and the other caller must hanguypourphones. - Touch panel keys not listed under Bluetooth telephoneoperationsmayappearonthedis-pay.
Referlo/indicatoristonpage61.
Text information
⑭Incomingcallnotice
Indicates that an incoming call has been received and has not been checked yet.
- Notdisplayedforcallsmadewhenyour cellularphone is disconnected from this unit.
Setting up forhands-freephoning
T Correction
First, you need to connect a Bluetooth telephone to this unit.
For detailed instructions on connecting your phone to this unit via Bluetooth wireless technology, refer to Pairing from this unit on page 45.
2 Volume adjustment
Adjust the earpiece volume of your cellular phone to your preference. The unit will record the adjusted volume level as the default setting.
Notes
• The volume of the caller's voice and ring tonemay vary depending on the type of cellular phone.
- If there is a large volume difference between the right one and caller's voice, the overall volume level may become unstable.
• Makesuretoadjustthevolumetaproper levelbeforedisconnectingthecellularphone from the unit. If the volume is muted (zero level) on your cellular phone, the volume level of your cellular phoneremains muted even after the cellular phone is disconnected.
Bluetoothhtelephone
Callinganumberinthe phonebook
Thecontactsonyourphonewillnormallybe transferredautomaticallywhenthephones connected. litisnot,useyourphonemenuto transferthecontacts. Thevisibilityofthisunit shouldbeonwhenyousethephonemenu. RefertoSwitchingvisibleunitonpage46. After findingthenumberyouwanttocalinthe phonebook youcanse ecltheentryandmake thecall.
1Touch the phonebook keytoswitch to the phonebook mode.
2Selectthephonenumberlist. The detailedophonenumberlist of these selected entry is displayed.
3Selectthephonenumber. ■Ifyouwanttostorethephonenumber.touchand holdthelist.
4Touchtheoff-hookkeytomakethecall.
5Touchtheon-hookkeytoendthecall.
Note
Trecontactsonyourphonewillnormallybe transferredautomaticallywhenthephoneis connected.lftisnot,useyourphonomenuto transferthecontacts.Thevisibilityofthisunit shouldbeonwheryouselhephonemenu. RotortoSwitchingvisibleunitonpage46.
Selectinganumberby alphabetsearchmode
Ifalctofnumbersareregisteredinthephone book,youcansearchforthephonenumberby alphabetsearchmode.
1Touch the phonebook keytoswitch to the phonebook mode.
2TouchABCtoswitchtoalphabetsearch mode.
3Touchthefirstletteroftheentryyouare lookingfor.
The Phone Book entries starting with that letter (e.g. "Ben", "Brian" and "Burt" when "B" is selected) will be displayed.
■The order of the first name and last name may be different from that of the cellular phone.
4Touchthelisttodisplaythephonenum- berlistoftheselectedentry.
■ If several phonenumbers are included in an entry, select one by touching the list. ■ If you want to switch the call history list, touch the icon.

Switchingtothecallhistorylist.
5Touchtheoff-hookkeytomakethecall.
6Touchtheon-hookkeytoendthecall.
Invertingnamesinphonebook
When your cellular phone is connected to this unit, the first and last names of your contacts may be registered to the phone book in reverse order. You can use this function to change the order back.
(Invertingthenamesinthephonebook)
1Touch the phonebook keytoswitch to the phonebook mode.
Bluetoothhtelephone
2Invertnamesinphonebooks.

Invertingnames in phonebooks.
3"Wouldyouliketoinvertallnames?"appears.TouchYestocontinue.
While then names are inverted, is displayed. ■ If the invers on fails, 'Invert Name Error' appears. Insuch cases, try again from the beginning.
Note
Inverlingthenamesofyourcontactsfromthis unitdoesnotaffcctthedataonyourBluetooth device.
Using themissed, received and dialedcalllists
The80mostrecentcallsdialed,received,and missedarestoredinthememory.Youcan browsethemandcallnumbersfromtheselists.
1Touchthehistorykeytodisplaythecall historylist.
2SelectMissedCalls,DialedCallsor ReceivedCalls.

Displaying:thereceivedcall list.

Displayingthedialedcall st.

Displaying them missed call list.
3Touchthelistnumbertoselectaphone number.
Nameandphonenumberaredisplayedinthe detailedclist.
■If you want to store the phone number, touch and hold the list.
4Touchtheoff-hookkeytomakethecall.
5Touchtheon-hookkeytoendthecall.
Settingautomaticanswering
If this function is on, this unit automatically answers all incoming calls.
●Touchtheauto-answerkeytoturnautomaticansweringonoroff.
Adjustingtheotherparty's listeningvolume
To maintain the good sound quality, this unit can adjust the other party's listening volume. If the volume is not loud enough for the other party, use this function.
● Touchthevolumekeytoselect Far-EndVOL.
1—2—3
■This function can be performed even while talking on the phone.
■ Settingscanbestoredforeachdevice.
Switchingtheringtone
You can select whether omottouset this unit's ringtone. If this function is set toon, thereing tone for this unit will sound.
1Connectyourcellularphonetothisunit.
Section
Bluetoothtelephone
2Touchthetonekeytoturntheringtone onoroff.
Usingthepresetdiallists
You can easily store up to six phones numbers as presels.
1Touchthepresetdialkeytodisplaythe presetscreen.
2Touchoneofthephonenumberstose-lect.
■If you want to delete apreset phonenumber, touch a chold the phonenumber you wish to delete.
3Touchtheoff-hookkeytomakethecall.
4Touchtheon-hookkeytoendthecall.
Makingacallbyentering phonenumber
EnteringphonenumbermodecannotbeoperateunlessaB uetochtelephoneisconnected lothisunil.
Settingtheprivatemode
During a conversation, you can switch to private mode (talk directly on your cellular phone).
●Touchtheprivatemodekeytoturnprivatemodeonoroff.
Voicecontrol
I your cellular phone is equipped with the voice control feature, you can use voice commands to make calls, for example.
• Operation varies depending on the type of cellular phone. Referto the instruction manual that camewith your cellular phone for detailed instructions.
- WhenaniPhoneRunningiOS8,1orlatens used. SiriFyesFreeModeisavailablewiththis product.
1Touchthevoicecontrolkey.
Thedisplayswitchestothevoicecontrolscreen. Youcanalsoswilchtolthevoicecontrolscreen bypressingandholdingdownthehomebutton whileresourceison.
Bluetoothtelephone
25startvoicecontrol.

indicatestratcont nuouscalls canbemadeuninterrupted.

Indicate that the display is closed.
Notes
• In order to your voice command, to be recognized and interpreted correctly, ensure that conditions are suitable for recognition.
- Pleasenotethatwinoblowingthroughthe vehiclewindowsandnoisecomingfromoutsidethevehiclecleaninterferewithvoicecommandoperation.
- Foroptimumpick-up.themicrophones should beplacedirectlyinfrontofthedriverata suitable distance.
- Speaking to coscon after the start of the recom-
mand may cause voice recognition to fail.
• Speakslowly, deliberately, and clearly.
Settings
Menuoperations
Touchpanelkeys

①Videosetupkey
Refer to Selling up the video player on page 37.
②Audiofunctionkey
Refer to Audioadjustments on page 35.
③Closekey
Returning to non-current sourced display.
④Systemkey
Refer to System settings page 40.
⑤Favoritekey
You can choose menus with line a ch menu (Audiofunct on menu, etc.) and register them to this favor i temenu. Refer to favor i temenu on page 45.
Notes
- You can display the Video Setup menu when a Discor USB source is selected.
- If you start the VideoSetupmenu, playback is stopped.
- You cannot display the audio function menu when the mutefunction is onoraJPCGfile is playing.
1Pressthehomebuttontoswitchtothe homedisplay.
2Touchanyofthefollowingtouchpanel keystoselectthemenutobeadjusted.

Audioadjustments
Usingfader/balanceadjustment
Fader/BalancedisplayswhenRearSpeakerris seltoFullontheSystemMenu. You can change the fader/balancesellinglopro- videoanideallisteningenvironmentforallofthe occupiedseats.
1Pressthehomebuttontoswitchtothe homedisplay.
2Touchtheaudiofunctionkeytoopenthe "audiomenu.
3TouchFader/Balanceontheaudiofunctionmenu.
4Touch ▲ ortə'adjustthefront/rear speakerbalance. Range: F15L/R0 to R15L/R0
- Select F/R 0 L/R 0 when only using two speakers
5Touch or toadjusttheleft/right speakerbalance. Range: F/ROL15toF/ROR15
Note
You can also set the latter balance by dragging the dot on the displayed table.
Usingbalanceadjustment
BalancedisplayswhenRearSpeakerissello SubwooferontnoSystemMenu.Thissetting willallowyouloadjust.thebalancebetween right/leftsoundoutout.
1Pressthehomebuttontoswitchtothe homedisplay.
2Touchtheaudiofunctionkeytoopenthe audiomenu.
3TouchBalanceontheaudiofunction menu.
4Touch
Note
Youcana sosetthebalancebydraggingthedot onthedisplayedtable.
Usingtheequalizer
You can adjust the equalization to match the car's inferior acoustic characteristics desired.
Recallingequalizercurves
There are seven store equalizer curves which you can easily recall all any time. Here is also of the equalizer curves.
| Display | Equalizer curve |
| S.Bass | Super bass |
| Powerful | Powerful |
| Natural | Natural |
| Vocal | Voca |
| Flat | Flat |
| Custom1 | Custom 1 |
| Custom2 | Custom 2 |
• The equalizer curves for Custom1 and Custom2 can be adjusted.
- You can not select Custom1 and Custom2 when using the auto-equalizer.
- When Flat, no changes are made to the sound. You can check the effect so that equalizer curves by switching alternatively between Flat and another equalizer curve.
Audioadjustments
1Pressthehomebuttontoswitchtothe homedisplay.
2Touchtheaudiofunctionkeytoopenthe audiomenu.
3TouchGraphicEQontheaudiofunction menu.
■You cannot selector adjust the equalizer curves of Custom1 and Custom2 when using the auto-equalizer.
4Touchthedesiredsetting. S.Bass—Powerful—Natural—Vocal—Flat—Custom1—Custom2
Adjustingthe8-bandgraphic equalizer
You can adjust the level of each band for the equalizer curves.
- AseparateCustom1curvecanbecreated foreachsource.Ifyoumakeadjustments whenacurveetherthanCustom2isselected,theequalizercurvesettingswillbe storedinCustom1.
- ACustom2curvethat scommonforall sourcescanbecreated.IfyourmakeadjustmentswhentheCustom2curveisselected, theCustom2curvewillbeupdated.
1Pressthehomebuttontoswitchtothe homedisplay.
2Touchtheaudiofunctionkeytoopenthe audiomenu.
3TouchGraphicEQontheaudiofunction menu.
4Touchthedesiredsetting. S.Bass Powerful Natural Vocal Flat Custom1—Custom2
5Touchthetabletoadjustthelevelofthe equalizerband. Range:+12dBto-12dB
Usingtheauto-equalizer
Theauto-equalizerisanequalizercurvecreated byautoEQ(referloAutoEQ(auto-equalizing)on page43).
Youcanlurntheauto-equalizeronoroff. Iyouconneclanocialmicrophonelolthis unit,youcanusethistfunction.
1Pressthehomebuttontoswitchtothe homedisplay.
2Touchtheaudiofunctionkeytoopenthe audiomenu.
3TouchAutoEQtoturntheauto-equalizer onoroff.
- You cannot us this function if autoEQ has not been carried out.
Usingsoniccentercontrol
Soundthatissuitedforthelisteningposition caneasilybecreatedwiththisfunction.
1Pressthehomebuttontoswitchtothe homedisplay.
2Touchtheaudiofunctionkeytoopenthe audiomenu.
3TouchSonicCenterControlontheaudio functionmenu.
4Touch <ortoselectalistestingposition. Range:Left7toRight7
Audioadjustments
Adjustingloudness
Loudnesscompensatesfordeficienciesinthe low-frequencyandhigh-frequencyrangesatlow volume.
1Pressthehomebuttontoswitchtothe homedisplay.
2Touchtheaudiofunctionkeytoopenthe audiomenu.
3Touch◀or▶toselectadesiredlevelfor loudness.
Off (off)—Low (low)—Mid (mid)—High (high)
Usingsubwooferoutput
This unit is equipped with asubwoofer output which can be turned on or off.
- Thecul-off frequency and culpul level can be adjusted when the subwoofer output is on.
1Pressthehomebuttontoswitchtothe homedisplay.
2Touchtheaudiofunctionkeytoopenthe audiomenu.
3TouchSubwooferontheaudiofunction menu.
4TouchOnorOffnexttoSubwoofer to turnthesubwooferoutputonoroff.
5TouchNormalorReversenexttoPhase toselectthephaseofsubwooferoutput.
6Touch◄or►nexttoLeveltoadjustthe outputlevelofthesubwoofer. Range:+6to-24
7Touch◄or►nexttoFrequencytoselect thecut-offfrequency.
50Hz 63Hz 80Hz 100Hz 125Hz
Only frequencies lower than those in these selected range are outputted from the subwoofer.
Boostingthebass
You can boost the bass level.
1Pressthehomebuttontoswitchtothe homedisplay.
2Touchtheaudiofunctionkeytoopenthe audiomenu.
3Touch◀or▶ toselectadesiredlevel. Range:0to+6
Usingthehighpassfilter
Use this function when wanting to listen only to high-frequency sounds. Only frequency exceeds than the high-pass filter (HPF) cutoff are output from the speakers.
1Pressthehomebuttontoswitchtothe homedisplay.
2Touchtheaudiofunctionkeytoopenthe audiomenu.
3Touch◄or►nexttoHighPassFilterto selectcut-offfrequency. Off (off)—50Hz—63Hz—80Hz—100Hz—125Hz
Only frequencies higher than those in these selected range are output from the front to rear speakers.
Audioadjustments
Adjustingsourcelevels
With SLA(sourceleveladjustment), the volume level so each source can be adjusted to prevent significant differences between sources.
- SettingsarebasedontheFMvolumelevel, whichremainsunchanged.
1Pressthehomebuttontoswitchtothe homedisplay.
2Touchtheaudiofunctionkeytoopenthe audiomenu.
3ComparetheFMvolumelevelwiththe levelofthesourceyouwishtoadjust.
4TouchSourceLevelAdjusterontheaudio functionmenu.
5Touch ^ ortoadjustthesourcevol-
ume.
Range:+4to-4
Notes
- SourceLevelAdjusterisnotavailablewhen FMisselectedasthesource.
• The AM volume level can also be adjusted with this function.
• VideoCD, CD, compressedaudio, DivX, MPEG-1, MPEG-2 and MPEG-4 are automatically settothes a source level adjustment volume.
Settingupthevideoplayer
Settingthesubtitlelanguage
You can set a desired subclass language. When available, the subclass will be displayed in the selected language.
1Pressthehomebuttontoswitchtothe homedisplay.
2Touchthevideosetupkeytoopenthe videosetupmenu.
3TouchSubtitleLanguageonthe VideoSetupmenu.
Asubtllelanguagemenuisodisplayed.
4Touchthedesiredlanguage. Thesubtitlelanguageisset.
■ If you have selected Others refer to When you selectOthersonpage37.
Notes
- If these selected language is not available, the languages specified on the disc is displayed.
- You can also switch the subtitle language by touching the switch subtitle languages key during playback.
- Thesettingmadeherewillnctbeaffected evenifthesubtitlelanguageaisswitchcheduringplaybackusingtheswitchsubtitlelanguageskey.
WhenyouselectOthers
Alanguagecodeinpuldisplayisshownwhen Othersisselocted.Refertolanguagecodechart forDVDonpage68.
●Touch0to9toinputthelanguagecode.
- Tocance theenteredrumbers,touchC. - Toreg slerthecode,touchthefollowingtouch panel key.

Registeringthecode.
Settingtheaudiolanguage
Youcansetthepreferredaudiolanguage.
1Pressthehomebuttontoswitchtothe homedisplay.
2Touchthevideosetupkeytoopenthe videosetupmenu.
3TouchAudioLanguageontheVideo Setupmenu.
Anaudiolanguagemenuisdisplayed
4Touchthedesiredlanguage.
Theaudiolanguageisset.
■ If you have selected Others, refer to When you selectOthers on page37.
Notes
- If these selected language is not available, the languages specified on the discisused.
- Youcanalsoswitchthcaudiolanguageby touchingtheswitchaudiolanguageskey during playback.
- The selling made her will not be affected even if the audiolanguage is switched during playback using the whichaudiolanguages key.
Settingthemenulanguage
Youcansetthepreferredlanguageinwhichthe menusrecordedonadiscaredisplayed.
1Pressthehomebuttontoswitchtothe homedisplay.
Section
20
Settingupthevideoplayer
2Touchthevideosetupkeytoopenthe videosetupmenu.
3TouchMenuLanguageonthe VideoSetupmenu.
Amenulanguagemenuisdisplayed.
4Touchthedesiredlanguage.
Themenulanguageisset.
■ If you have selected Others, refer to When you selectOthersonpage37.
Note
If these selected language is not available, the language specified on the disc is displayed.
Settingthemulti-angleDVD display
Theangleiconcanbeselsoitappearson sceneswheretheanglecanbeswitched.
1Pressthehomebuttontoswitchtothe homedisplay.
2Touchthevideosetupkeytoopenthe videosetupmenu.
3TouchMultiAngleontheVideoSetup menutoturnangleicondisplayonoroff.
Settingtheaspectratio
There are two kinds of display: awidescreen display that has a width-to-height ratio (TV aspect ratio) of 16.9 and regular display that has a aspect of 4.3. Besuretoselect the correct TV aspect for the display connected to VOUT.
- When using regular display, select either LetterBoxorPanScan. Selecting 16:9 may result in an unnatural picture.
- If you select the Vaspect ratio, the unit's display will change to these names setting.
1Pressthehomebuttontoswitchtothe homedisplay.
2Touchthevideosetupkeytoopenthe videosetupmenu.
3TouchTVAspectontheVideoSetup menutoselecttheTVaspectratio.
TouchTVAspectrepeatedlyuntilthedesirecaspectratioappears.
- 16:9 – Wide screen picture (16:9) is displayed asis(initialsetting)
- Letter Box – The picture is the shape of a letterbox with black bands on the top and bottom of the screen
•PanScan—Thepictureiscutshortonthe rightandleftsidesofthescreen
Notes
- When playing discsthatonotspecify PanScan, the discisplayedback in LetterBox display even if you select the PanScansetting. Confirm whether the disc package be a star the 16:9 LB mark.
- The TVaspect ratio cannot be changed for somediscs. Fordetails, refertothedisc's instructions.
Settingtheslideshowinterval
JPEGfilescanbeviewedasal deshoworthis unit. In this setting, the interval between each image can be set.
1Pressthehomebuttontoswitchtothe homedisplay.
2Touchthevideosetupkeytoopenthe videosetupmenu.
Settingupthevideoplayer
3TouchTimePerPhotoSlideonthe VideoSetupmenutoselecttheslideshowin- terval.
TouchTimePerPhotoSliderrepeatedlyuntilthe desiredsettingappears.
- 5sec-JPEGimagasswitchatintervalsof5 seconds
- 10sec – JPEG images switch at intervals of 10 seconds
• 15sec – JPEG images switch at intervals of 15 seconds - Manual-JPEGimagescanbeswitched manually
Settingparentallock
SomeDVDvideodiscslelyouuseparentallock torostrictchildrenfromviewingviolentand adult-orientedsconos.Youcansetparentallock tothedesireolevel.
- When you have aparentallock level set and play discrete caturing parentallock code number input indications may be displayed. Insuch cases, playback will begin when the correct codenum or is centered.
Settingthecodenumberandlevel
Acodenum must be registered incerto playback disc with parental lock.
1Pressthehomebuttontoswitchtothe homedisplay.
2Touchthevideosetupkeytoopenthe videosetupmenu.
3TouchParentalontheVideoSetupmenu.
4Touch0to9toinputafourdigitcode number.
■Tocanceltheenterednumbers,touchC.
- Toregisterthecoce,touchthefollowingtouch panelkey.

Registeringthecode.
The codenumberisset, and the level can now be set.
5Touch1to8toselectthedesiredlevel.
6TouchEnter.
Theparentallocklevelisset.
• 8 – Playback of the entire disc is possible (ini-
tial setting)
• 7 to 2 – Playback of discs for children and
non-adult-orienteddiscsispossible
• 1 – Playback of discs for children only is possible
Notes
• Were recommend to keep a record of your codenumber incasc you forget it.
• The parental lock level is stored on the disc. Look for the level indication written on the disc package, included lateralure on the disc itself. Parental lock of this unit is not possible if a parental lock level is not stored on the disc.
- Withsomediscs, theparentallockmaybe activeonlyforcertainlevelsofscenes. The playbackofthosesceneswillbeskipped. For details, refertotheinstructionmanualthat camewiththedisc.
Changingthelevel
Youcanchangethesetparentallocklevel.
1Pressthehomebuttontoswitchtothe homedisplay.
2Touchthevideosetupkeytoopenthe videosetupmenu.
3TouchParentalontheVideoSetupmenu.
38
En
Settingupthevideoplayer
4Touch0to9toinputtheregisteredcode number.
5Registeringthecode.

Registeringthecoce
Thissetsthecodumberandthelevelcan nowbechanged.
■ If you enter an incorrect code number the icon is displayed. Touch Candenter, he correct code number.
■ If you forget your code number, refer to if you forget your code number or page 39.
6Touch1to8toselectthedesiredlevel.
7TouchEnter.
Thenewparentallocklevelissel.
If you forget your codenumber - PressRESET.
SettingtheDivXsubtitlefile
You can select whether or not to display DivXexternal subities.
- TheDivXsubtit eswillbodisp ayedeven when Custom sselectedditnoDivXexternal sublittlef i sexisl.
1Pressthehomebuttontoswitchtothe homedisplay.
2Touchthevideosetupkeytoopenthe videosetupmenu.
3TouchDivX®SubtitleontheVideoSetup menutoselectthedesiredsubtitlesetting.
• Original-DisplaytheDivXsublities
- Custom – Display the DivX external subtitles
Notes
• Uoto42 characterscanbedisplayedonone line.itmoretnan42charactersareset.the linebreaksandthecharactersaredisplayed onthenexline.
- Upto126characterscanbedisplayedon onescreen.lfmorethan126charactersare set,theexcesscharacterswillrolbedis-played.
DisplayingtheDivX® VOD registrationcode
InordertoplayDivXVOD(videoondemand) contentsonthisunit,theunitmustfirst:bergisteredwithaDivXVODcontentsprovider.For registration,generateaDivXVODregistration codesandsubmit theyourprovider.
- Keeparecordofthecoceasyouwillneedit whenyouregistryyourunittotheDivXVOD provider.
1Pressthehomebuttontoswitchtothe homedisplay.
2Touchthevideosetupkeytoopenthe videosetupmenu.
3TouchDivX®VODontheVideoSetup menu.
RegistrationCode and DeregistrationCode appear.
4TouchRegistrationCode.
Yourregistrationcode is displayed.
Displayingthederegistrationcode
If your device is already registered, deregisent by entering the deregistration code.
1Pressthehomebuttontoswitchtothe homedisplay.
Settingupthevideoplayer
2Touchthevideosetupkeytoopenthe videosetupmenu.
3TouchDivX®VODontheVideoSetup menu.
4TouchDeregistrationCode.
■Tocance de-registration.touchCancel.
5TouchOK.
Thederegistrationiscomplete.
AutomaticplaybackofDVDs
WhonaDVDdiscwithaDVDmenuisinserted, thisunitwillcancelthemenuautomaticallyand startplaybackfromthefirstchapterofthefirst title.
- SomeDVDsmaynotoperateproperly. If this function is not fully operable, turn this function off and start playback.
1Pressthehomebuttontoswitchtothe homedisplay.
2Touchthevideosetupkeytoopenthe videosetupmenu.
3TouchDVDAutoPlaytoturnautomatic playbackon.
■ lotumautomat op aybackoff.touch
DVDAutoPlayagain
Section
Systemsettings
Switchingtheauxiliarysetting
Activate this setting when using an auxiliary device connected to this unit.
1Pressthehomebuttontoswitchtothe homedisplay.
2Touchthesystemkeytoopenthesystem menu.
3TouchAUXInputonthesystemmenuto turnAUXInputonoroff.
SettingAVinput
Activate this setting when using an external videocomponent connected to this unit.
1Pressthehomebuttontoswitchtothe homedisplay.
2Touchthesystemkeytoopenthesystem menu.
3TouchAVInputonthesystemmenuto turnAVInputonoroff.
Settingthenavigationsystem
Activate this setting when connecting Pioneer Add-on Navigationsystem (sold separately).
Deviceconnectioncanbeselwhenallofthefollowingconditionsaremet.
—The iPhone is not connected.
—NoBluetoothconnection.
—Thesourceistumedoff.
1Turnthesourceoff.
RefertoSourceoffkeyonpage7.
2Pressthehomebuttontoswitchtothe homedisplay.
3Touchthesystemkeytoopenthesystem menu.
4TouchDeviceconnectiononthesystem menu.
5TouchNAVItoselect.
SettingthePandoraconnect mode
ReferetoSettingthePandoraconnectmodeon page30.
SelectingMirrorLinkMode
You can select the mirror link modesetting whether you use third party applications in your smartphone or not.
1Pressthehomebuttontoswitchtothe homedisplay.
2Touchthesystemkeytoopenthesystem menu.
3Touchthedesiredsettingnextto CD-ML100Setting.
- CarMode—Youcanusethalauncherapplicationsiryoursmartphoneortheunit's screen.
- AppListMode—Youcanusethethirdparty applicationsinyoursmartphoneontheunit's screen.
Updating the firmware for thesmartphonelinkadaptor
This function is used to update the smartphone link adaptor firmware with the latest firmware.
Systemsettings
Foraboutsmartphonelinkadaptorfirmware andupoating, refertocurwebsite. You can update only when smartphonelink adaptoris available.
Important
- The USBstoragedeviceforupdatingmust contain nonlythecorrectupdatefile.If the USBstoragedevicecontainsmultiplicfiles, theupdatewillfail.
- Neverturn the unilof and never disconnect the USB storage device while the firmware is being updated.
- Youcanonlystartthefirmwareupdatewhen thevchicleisstoppedandtheparkingbrake isengaged.
1 Downloading the firmware update files.
2Connectablank(formatted)USBstorage deviceyourcomputer,andthenlocate andcopythecorrectupdatefileontothe USBstoragedevice.
3Turnthesourceoff.
RefertoTurningthesourceON/OFForpage8.
4Pressthehomebuttontoswitchtothe homedisplay.
5Touchthesystemkeytoopenthesystem menu.
6TouchCD-ML100Updateonthesystem menu.
7ConnecttheUSBstoragedevicetothe smartphonelinkadaptor.
RefertoConnectionforupdatingSmartphone linkadaptorfirmwareonpage53.
8TouchContinuetodisplaytheupdate mode.
Followtheon-screen instructionstofinishup datingthesmartphonelinkadaptor.
9RemovetheUSBstoragedevicefromthe smartphonelinkadaptor.
10TurntheignitionswitchOFFandthento ACCorON.
Notes
- Ifupdatefailed, pleaseconsult yourdealer or thenearestauthorizedPIONEERServiceStation.
- You cannot update while connected to Bluetooth.
Displayingthesmartphone linkadaptorfirmwareversion
If smartphonelink adaptor failstooperate properly, you may need to consult your dealer for repair. Ins such cases, you maybe asked to specify the firmware version. Perform the following procedure to check the version on smartphone link adaptor.
1Turnthesourceoff.
ReferloTurningthesourceON/OFFonpage8.
2Pressthehomebuttontoswitchtothe homedisplay.
3Touchthesystemkeytoopenthesystem menu.
4TouchCD-ML100FirmwareInfotodisplay totheversionofthefirmwareofsmart-phonelinkadaptor.
Systemsettings
Updatingfirmware
Teisfunctionisusedtoupdatethisunitwiththe latestfirmware. Foraboulfirmwareandupdaling,referloour website.
Important
- The USB storage device for updating must contain only the correct update file. If the USB storage device contains multiple plefiles, the update will fail.
- Nevertumtheun toffandneverdisconnect theUSBstoragedevicewhilethefirmwareis beingupdated.
- You can only start the firmware update when the vehicle is sooped and the parking brake is engaged.
1Downloadingthefirmwareupdatefiles.
2Connectablank(formatted)USBstorage device to your computer, and then locate and copy the correct update file onto the USB storage device.
3Turnthesourceoff.
ReferloTurningthesourceON/OFFonpage8.
4Pressthehomebuttontoswitchtothe homedisplay.
5Touchthesystemkeytoopenthesystem menu.
You can check the current version of your unit's firmware. Touch Firmware Information on the system men to open the Firmware Information screen.
6TouchFirmwareUpdateonthesystem menu.
The confirmationscreenappearsonthedisplay.
7ConnecttheUSBstoragedeviceaccord- ingtotheon-screenmessages.
8TouchContinuetodisplaythereadfile mode.
Check an my messages if warnings screens appear on the display.
9TouchStarttodisplaythedatatransfer mode.
■ Follow-theon-screen instructions to finish updating the firmware.
This unit will resetautomatically after the firmware update is completed if the possible successful.
Note
If UpdateFailed! appears on the screen turn the ignition switch to OFF, then turn the ignition switch to the ACC position to proceed and start therecovery sequence.
Displayingthefirmware version
If this unifails to operate properly, you may need to consult your dealer for repair. In such cases you may be asked to specify the firmware version. Perform the following procedure to check the version on this unit.
1Turnthesourceoff.
RefertoTurningtheSourceON/OFFonpage8.
2Pressthehomebuttontoswitchtothe homedisplay.
3Touchthesystemkeytoopenthesystem menu.
4TouchFirmwareInformationtodisplayto theversionofthefirmwareofthisunit.
Systemsettings
SettingMIXTRAXmode
Refer-toSettingMIXTRAXmodeonpage29.
Changing the picture adjustment (Brightness, Contrast, Color, Hue, Dimmerand Temperature)
You can adjust the Brightness (brightness), Contrast (contrast), Color (color), Hue (hue), Dimmer (dimmer) and Temperature (temperature) for each source and view camera.
- You cannot adjust Color and Hue for the audio source.
- You cannot adjust Color and Hue for NAVI AppsandMirrorLink.
1Pressthehomebuttontoswitchtothe homedisplay.
2Touchthesystemkeytoopenthesystem menu.
3Ifyouareadjustingthe PictureAdjustment,selecttheunit.
NAVI
CompletingPictureAdjustmentfortheNavigationsystem whenDeviceconnection asset toNAVI.
Apps
Complet ngPictureAdjustmentfortheAppRadioMode whenDeviceconnection assetioiPhoneviaUSBoriPhone viaBluetooth.
MirrorLink
CompletingPictureAdjustmentfortheMirrorLink Mode
Rear View
Adjusting the Picture Adjustment for other view camera.
Source
AdjustingthePictureAdjustmentforresource.
4Touchanyofthefollowingtouchpanel keystoselectthefunctiontobeadjusted.
PictureAdjustmentilernsaredisplayed • Brightness—Adjuststhablackintensity
• Contrast-Adjuststhecontrast
•Color-Adjuststhecolorsaturation
- Hue – Adjusts the tone of color (red or green isemphasized)
- Dimmer-Adjuststhebrightnessofthedisplay
• Temperature Adjusted color temperature, resulting in a better white balance
■YoucanadjustHueonlywhanthecolorsystem issettoNTSC.
- With some rearview cameras, picture adjustment may not be possible.
5Touch◄or►toadjusttheselecteditem.
Each time you touch ▶or▶, the level of these selected item increases or decreases.
- Brightness, Contrast Color and Hue can be ad justed from +24 to -24
- Dimmer can be adjusted from +1 to +48.
■ Temperature can be adjusted from +3 to -3.
Notes
- You cannot operate this function while driving.
- Different Brightness/Contrast/Dimmer settingscanoesetforwhentheillumination switchisonandwhenitisoff.
Selectingthesystemlanguage
Tresystem language can be selected.
Section
21
Systemsettings
Iftextinformationsuchasthetitlename,artist namecracomment sembeddedinaEuropean language,theycanalasobedisplayedonthis unit.
• The language can be changed for the following:
—Audiomenu
—Systemmenu
—VideoSetupmenu
—Bluetoothmenu
—Languageforcautions
Some operations on this unit are prohibited from use while driving or require careful attention when operated. In such cases, a caution will appear on the display. You can change the language for caution messages with this setting.
- If the embedded language can be selected, languages setting a row of the same text information may not display properly.
- Somecharactersmaynolbedisplayed properly.
1Pressthehomebuttontoswitchtothe homedisplay.
2Touchthesystemkeytoopenthesystem menu.
3TouchSystemLanguageonthesystem menutoselectthedesiredlanguage.
4Touchthedesiredlanguage. English (English)—Français (French)—Español (Spanish)—Português (Portuguese)—中文 (SimplifiedChinese)
SettingSiriusXMTuneStart™
Refer to Setting SiriusXM TuneStart™ on page 16.
Resettingtodefault
Refer to Resetting default page 16.
SettingDemoMode
OnceDemoModeisturnedon,theDemo screenappears. RefertoDemomodeonpage6.
1Pressthehomebuttontoswitchtothe homedisplay.
2Touchthesystemkeytoopenthesystem menu.
3TouchDemoModeonthesystemmenu toturnDemoModeonoroff.
- On-The Demoscreenappears. - Off-The Demoscreendoesnotappear.
Switchingsoundmuting/attenuation
Inordetousethisfunction,theunit'syellow blackleadmustbeconnectedtoequipment withamutefunction.
RefertoConnectingthepowercordonpage50. Soundfromthissystemisautomaticallymuted orattenuatedwhenasignalfromequipment withamutefunctionisreceived.
• Soundfromthissystemreturnstonormal whenthemutingorattenuationisfty.
1Pressthehomebuttontoswitchtothe homedisplay.
2Touchthesystemkeytoopenthesystem menu.
Systemsettings
3TouchMute/ATTuntilthedesiredsetting appears.
TouchMute/ATTuntilthedesiredsettingappearsinthedisplay.
•Mute-Muting
- ATT -20dB – Attenuation (ATT -20dB has a strongereffect than ATT-10dB)
• ATT-10dB - Attenuation - Off – Turns the sound muting/attenuation off
Notes
- When Mute is displayed, the soundistumed off and no audio adjustments can be made.
- When ATT is displayed, the soundisattenuated and only the volume can be adjusted. (No other audio adjustments can be made.)
• Operation returnstonormalwhenthephone connectionisended.
Settingtherearoutputand subwoofercontroller
This runit'srearoutput(rearspeakerleadsoutputandRCArearoutput)canbeusedforfull-rangespeaker(Full)orsubwoofer(Subwoofer)connection.Ifyouswitchtherearoutputsetting
toSubwoofer, you can connect are speakers lead directly to as subwoofer without using an auxiliary amp.
Initially, the unit is set for are full-ranges speaker connection (Full).
1Turnthesourceoff.
RefertoTurningthesourceON/OFFonpage5.
2Pressthehomebuttontoswitchtothe homedisplay.
3Touchthesystemkeytoopenthesystem menu.
4TouchRearSpeakeronthesystemmenu toswitchthesubwooferoutputorfull-range speaker.
■Whennosubwooferisconnectedtotherearoutput,selectFull(full-rangespeaker).
■Whenasubwooferisconnectedtotherearoutput,selectSubwoofer(subwoofer).
Notes
- Evenifyouchangethissetting,therewillbenooutputunlessycuturnthesubwooferoutput(refertoUsingsubwooferoutputonpage36).
- BothrearspeakerleadoutputsandRCArea outputareswitchedsimultaneouslyinthis setting.
Usingthekeyboard
KeyboardisavailableonlyinAppRadioMode. ReferloSellingtheKeyboardonpage24.
Settingtheeverscroll
WheneverscrollissettoOn, recordedtextinformationscrollscontinuously nthedisplay.Setto Offifyouprefertheinformationloscrolljust once.
1Pressthehomebuttontoswitchtothe homedisplay.
2Touchthesystemkeytoopenthesystem menu.
3TouchEverScrollonthesystemmenuto turneverscrollonoroff.
SettingtheBluetoothaudio
(Function of AVH-X5600BHS/AVH-X4600BT/AVH-X3600BHS/AVH-X2600BT)
Systemsettings
YouneedtoactivatetheBluetoothAudio sourceinordertouseaBluetoothaudioplayer.
1Pressthehomebuttontoswitchtothe homedisplay.
2Touchthesystemkeytoopenthesystem menu.
3TouchBluetoothAudioonthesystem menutoturnBluetoothaudioonoroff.
ClearingBluetoothmemory
Important
NevertumtheunitoffwhiletheBluetoothmemoryisbeingcleared.
1Turnthesourceoff.
ReferloTurningthesourceON/OFFonpage8.
2Pressthehomebuttontoswitchtothe homedisplay.
3Touchthesystemkeytoopenthesystem menu.
4TouchBluetoothMemoryClearonthe systemmenu.
5TouchClear.
Afterselectingadesireditem,aconfirmation displayappears.TouchOKtodeletethememory.
■ If you donot want to clear the memory, touch Cancel.
UpdatingBluetoothsoftware
This function is used to update this unit with the latest Bluetooth software. For about Bluetooth software and updating, refer to our website.
Important
Neverturntheunitoffandneverdisconnectthe phonewhilethesoftwareisbeingupdated.
1Turnthesourceoff.
RefertoTumingthesourceON/OFFonpage8.
2Pressthehomebuttontoswitchtothe homedisplay.
3Touchthesystemkeytoopenthesystem menu.
4TouchBTSoftwareUpdate.
5TouchStarttodisplaythedatatransfer mode.
■ Followtheon-screen instruction to finish updating the Bluetooth software.
DisplayingtheBluetooth softwareversion
If this unit fail to operate properly, you may need to consult your dealer for repair. In such cases, you may be asked to specify the software version. Perform the following procedure to check the version on this unit.
1Turnthesourceoff.
Refer to Turning the source ON/OFF on page 8.
2Pressthehomebuttontoswitchtothe homedisplay.
3Touchthesystemkeytoopenthesystem menu.
4TouchBluetoothVersionInformationto displaytotheversionoftheBluetoothmoduleofthisunit.
Systemsettings
Settingtherearview camera(backupcamera)
CAUTION
Pioneerrecommendstheuseofacamera whichoutputsmirror-reversedimages. Otherwise, thescreenimagewillappearreversed.
This unit features a function that is automatically switches the rearview camera video (R.CIN) when rearview camera installed on your car and the shift lever is moved to the REVERSE
(R) position.(Formoredetails,consullyour dealer.)
You can also switch therearviewimage by pressing the touch panel key. Ford details refer to Using therearview on page 10.
- After you setup there are view cameras setting move the shift ever to REVERSE(R) and confirm that the rear view camera videos is shown on the display.
- Changethissettingifthedisplayswitchesto therearviewcameravideobyerrorwhileyou aredrivingforward.
- Toslopwatchingtherearviewcameravideo andreturntotnesourcedisplay,pressand holdMUTE.
- Touch the RearViewsource icon display therearviewcamera image while driving. Touch the source icon again to turn therear view camera off. Fordalls, refer to Selecting as source page 8.
1Pressthehomebuttontoswitchtothe homedisplay.
2Touchthesystemkeytoopenthesystem menu.
3TouchCameraPolarityonthesystem
menutoselecttheappropriatesetting.
- Battery – When the polarity of the connected leadispositivewhiletheshiftleveris nRE-VERSE(R)position
- Ground–Whonthepolarityofthecorriected leadisnegativewhilethesniftleversinRE-VERSE(R)position
- Off-When area view camera is not connected to this unit
- Therearviewkeysettingalsolumsofonthe homedisplayscreer.
The auto-equalizer automatically measure the car's inferior acoustic characteristics, and then creates an auto-equalizer curve based on that information.
• Topoformthisfunction, dedicated microphone (e.g. CD-MC20) is required.
WARNING
Asaloudtone(noise)maybeemittedfromthe speakerswhenmeasuringthecar'sinterior acousticcharacteristics,neverperformautoEQ whilecriving.
CAUTION
- ThoroughlychecktheconditionsbeforeperformingautoEQasthospeakersmaybedamagedifthosofunctionsareperformed when:
—Thespeakers are incorrectly connected. (For example, when a earspeaker is connected as as subwoofer output.)
—Aspeakerisconnectedtoapowerampdeliveringoutput gherthanthespeaker'smaxmuminputpowercapability.
Section
Systemsettings
- Ifthemicrophoneisplacedinanunsuitable positionthemeasurementtonemaybecome loudandmeasurementmaytakealong time,resultinginbatterydrainage.Besure toplacethemicrophoneinthespecif edlocation.
BeforeoperatingtheautoEQ function
- CarryautoEQ nasquielasplaceaspossible, with hecarengine and a conditioningswitchedoft. Also outpowertor phonesorportable telephonesinthecar, or remove them from thecar before carrying outautoEQ Sounds other than theremeasurement on surroundings sounds, engine sound, telephones ringing etc.) may prevent correct measurement of the car interior acousto characteristics.
- Besuretocamyoutauto=Qusingtheop tionalmicrophone.Usinganothermicro- phenemayoreventmeasurement,omesut inincorrectmeasurementofthecarnterior acousticcharacteristics.
- InordertoperformautoEQ, thefrontspeak-ermustbecorrection.
- When this unit is connected to a power ramp within input level control, autoEQ may not be possible if the power ramp's input level is set below the standard level.
- When this unit is connected to a power ramp with an LPF, turn this LPF off before performing autoEQ. Also set the cut-off frequency for the built-in LPF of an actives subwoofer to the highest frequency.
- The distance has been calculated by computer label, heolium mume de aylogive accurate results for the circumstances. So please continue us this value.
- Therefected sound within the car is strong and delays occur.
- The LPForactive water sources external amps deciahy the lower sounds.
• AutoEQchangesheadiosettingsasfollows:
—Thefader/balancesettingsreturntothe centerposition.(RefertoUsingfader/balanceadjustmentonpage35.)
—TheequalizercurveswitchestoFlat. (ReferloRecallingequalizercurvson page35.)
—Thefront, centerandrearspeakerswill automaticallybeadjustedtohighpass filtersetting.
- PrevioussettingsforautoEQwillbeoverwritten.
• If using an AVH-X3600BHS, AVH-X2600BT, or AVH-X1600DVD, connectamicrophoneext lens on cable (solo separately) to the AUX input in advance.
PerformingautoEQ
1Stopthecarinaplacethatisquiet, close allthedoors, windowsandsunroof, and thenturntheengineoff.
If the engine is left running, enginoisern may prevent correct auto EQ.
2Fixtheoptionalmicrophoneinthecenter oftheheadrestofthedriver'sseat, facing forward.
TheautoEQmaydifferdependingonwhereyou placethemicrophone.lfdesireo.placethemicrophoneonthefrontpassengerseattocany outautoEQ.

natural_image
Line drawing of a car interior with steering wheel, dashboard, and cable (no text or symbols)3TurntheignitionswitchtoONorACC.
Ifthecar'sa rconditionerorheateristurnedon, tumitoff. NoisefromthefanintheairconditionerorheatermaypreventcorrectautoEQ.
Systemsettings
4Pressthehomebuttontoswitchtothe homedisplay.
5Touchthesystemkeytoopenthesystem menu.
6TouchAutoEQMeasurementtoenter autoEQmeasurementmode.
7Plugthemicrophoneintothemicrophoneinputjackonthisunit.
AVH-X5600BHSandAVH-X4600BT

natural_image
Simple line drawing of a device with a bulb, plug, and screen (no text or symbols)AVH-X3600BHS, AVH-X2600BT and AVH-X1600DVD
8TouchStarttostartautoEQ.
9Whenthe10-secondcountdownstarts, getoutofthecarandclosethedoorwithin 10seconds.
Amasurementtone(noise)isemittedfromthe speakers.andautoEQmeasurementbegins.
WhenautoEQiscompleted. Themeasurement hasfinished. PleasedisconnectthemicrophoneandthenpushHOMEkey. Is displayed. When the car's mteroracoust characteristic cannot be measuredcorrect y.anerromessage will be displayed. (Referto Understanding auto EQonormessages on page 60.)
■ It takes a multi-ner rules for autoEQ measurement to be completed when all speakers are connected.
■TuslaautoEQ,touchStop
10Storethemicrophonecarefullyinthe glovecompartmentoranothersafeplace. If themicrophone ssubjectedirectsunlight foranextendedperiod, hightemperaturesmay caused stortion, colorchangcormaltfunction.
Settingthevideosignal
When you connect this unit to can AVEquipment to this unit, select the suitable video signal setting.
- Asthistfunction is initially settoAuto, the unit will automatically adjust the video signal setting.
- You can operate this function only for the v-desigma input into the AVInput.
1Pressthehomebuttontoswitchtothe homedisplay.
2Touchthesystemkeytoopenthesystem menu.
3TouchVideoSignalSettingonthesystem menu.
VideoSignalSettingilemsared displayed.
- AV-AdjuststneAVvideosignal
• AUX-AdjuststheALXvideosignal - Camera Adjuststhereariewcamerevideo signal
4Touch◄or► toselectthedesiredvideo
signalappears.
Auto—PAL—NTSC—PAL-M—PAL-N—SECAM
Favoritemenu
UsingtheFavoritemenu
1Displaymenucolumnstoregister.
Refer to Menu operations on page 35
■YoucancustomizemenusexceedVideoSetup menu.
2Touchthestariconinthemenucolumn
forthedesiredmenutoregisterthemenu.
Trestariconfortheselectedmenuisfilledin.
■ To cancel the registration, touch the scalar criterion them an ucolumn again.
3Displaythefavoritemenuandchoosea
registeredmenu.
RetertoMenuoperationsonpage3b.
Note
Youcanregisterupto12columns.
Bluetoothconnectionmenu
Bluetoothconnectionmenu operations
(FunctionofAVH-X5600BHS/AVH-X1600BT/AVH-X3600BHS/AVH-X2600BT)
Note
If you are using a cellular phonethatcan be connected via Bluetooth wire estechnology, we recommend that you use your phone search for this unit and establish a connection between it and your phone. The Pincode setto 0000 as default. The product name of this unit will display your phone ahead of device name. For details, refer to Entering Pincode for Bluetooth wireless connection on page 46. For further details concerning the procedures forestablisning. Bluetooth wireless connections, refer to instructions manual for the phone.
Pairingfromthisunit
1Pressthehomebuttontoswitchtothe homedisplay.
2TouchtheBluetoothkeytoopenthe Bluetoothconnectionmenu.
3TouchConnectiontoselectadevice.
4Starttosearch.

Startinglosearch.
Whilesearching, is displayed and when available devices are found, the device names or Bluetooth device addresses (if names cannot be obtained) are displayed.
■If you want to switch between the device names and Bluetooth device addresses, touch the icon.

Switchingbetweenthe device namesandBluetoothdeviceaddresses.
■ Iocancelsesearching,touchStop.
- 11th redevicosarea readpaired MemoryFull isd splayedandpair ringcanmolbeperformed.In suchcases.deletcapaircddevicestfirst.Reforto page45.
■Ifnodevicecanbefound,NotFounddisdisplayet,Insuchcases,checkthestatusctheBluetoothdeviceandscarchagain.
5Touchadevicenametoselectthedevice youwanttoconnectto.
While connecting, Pairing is displayed. If the connection is established, Paired is displayed.
■If you devices support SSP (Secure Simple Pairing), six-digit number appears on the display of this unit. Once he connection is established, this number disappears.
■If the connection fails, Error so displayed. In such cases, try again from the beginning.
- The PINcodeisatta0000asthedefault, but can be changed. RefertoEnteringPINcodeforBluetoothwirelessconnectiononpage46.
- Once the connection sestablished, the device names displayed.
Touchthedevicenametodisconnect.
■If you want to operate repaired Bluetooth telephone, display DeleteOK? Touch Yes to delete the device.

Deletingacaireddevice.
■ NeverturntheunitoffwhilenepairedBluetooth telechoneisbeingdeleted.
Section
22
23
English
ConnectingtoaBluetooth deviceautomatically
If this function is set to on, a connection between your Bluetooth device and this unit will take place automatically as soon as network devices are less than a few meters apart. Initially, this function is set to on.
1Pressthehomebuttontoswitchtothe homedisplay.
2TouchtheBluetoothkeytoopenthe Bluetoothconnectionmenu.
3TouchAutoConnecttoturnautomatic connectionon. IfyourBluetoothdeviceisreadyforaBluetooth wirelessconnect on aconnectionthisunit will automaticallybeestablished. ■Telurnautomatconnectionoff,ouch AutoConnectagain. IConnectionfails,"Autoconnectionfailed. Retry?"appears.TouchYesoreconnect.
4Onceyouturnyourvehicle'sACCswitch onagain,aconnectionisestablishautomatically.
Switchingvisibleunit
Thisfunctionsetswhetheromettomakethis unitvisibletotheotherdevice. Initially, thisfunctionissetloon.
1Pressthehomebuttontoswitchtothe homedisplay.
2TouchtheBluetoothkeytoopenthe Bluetoothconnectionmenu.
3TouchVisibilitytoselectvisibilityoff. ■ Toturnvisibilityon,touchVisibilityagain.
EnteringPINcodeforBluetooth wirelessconnection
ToconnectyourBluetoothdevicetothisunitvia Bluetoothwirelesstechnology,youneedloenter aPINcodeonyourBluetoothdevicetovrifythe connection.Thedefaultcodeis0000,butyou canchangeitwiththisfunction.
1Pressthehomebuttontoswitchtothe homedisplay.
2TouchtheBluetoothkeytoopenthe Bluetoothconnectionmenu.
3TouchPINCodeInputtoselect PINCodeInput.
4Touch0to9toinputpincode.
5AfterinputtingPINcode(upto8digits), storeinthisunit.

StoringthePINcodeinthisunit
DisplayingBluetoothDevice address
This unit displays its Bluetooth device address.
1Pressthehomebuttontoswitchtothe homedisplay.
2TouchtheBluetoothkeytoopenthe Bluetoothconnectionmenu.
3TouchDeviceInformationtodisplaydeviceinformation.
TheBluetoothdeviceaddressisdisplayed.
Thememenu
Selectingtheilluminationcolor
This unit is equipped with multiple-color illumination.
Directselectionfrompreset illuminationcolors
You can select an illumination color from the color list.
1Pressthehomebuttontoswitchtothe homedisplay.
2Touchthethemekeytoopenthetheme settings.
3Touchilluminationandthentouchacolor onthelist.
Red—Amber—Green—Blue—White—Custom—Rainbow
■When Rainbow is selected, the illumination color automaticly changes.
Customizingtheilluminationcolor
1Pressthehomebuttontoswitchtothe homedisplay.
2Touchthethemekeytoopenthetheme settings.
3TouchIlluminationandthentouch Custom.
4Displaythecustomizingmenu.

Displaying the customizing menu.
5Touchthecolorbartocustomizethe color.
6Touch◄or► tofine-tunethecolor.
7Touchandholdtheicontostorethecustomizedcolorinthememory.
Memo
Storing the customized color in the memory.
Thecustomizedcolorhasbeenstoredinthe memory.
The setcolorwillberecalledfromthememory thenexttimeyoutouchthesameicon.
SelectingtheOSD(on-screen display)color
TheOSDcolorcanbechanged.
1Pressthehomebuttontoswitchtothe homedisplay.
2Touchthethemekeytoopenthetheme settings.
3TouchScreen.
4Touchoneofthecolorsonthelist.
Selectingthebackground display
Youcanswitchthebackgroundthatisdisplayed whenlisteningtoasource.
1Pressthehomebuttontoswitchtothe homedisplay.
2Touchthethemekeytoopenthetheme settings.
3TouchBackground.
Thememenu
4Touchthedesiredsetting.
■Youcanviewthenideansettingsbyflickingthe display.
■IfnoJPEGimagesarestoredirthisunit,you
cannolselectphoto.Tos:orecJPEGimagelothis
unit,refartoCaptureanimageinJPEGfilesonpage
28.
■ If you want to date the capture JPEG image, touch and hold the key of the JPEG image.
Otherfunctions
Adjustingtheresponse positionsofthetouchpanels (TouchPanelCalibration)
ltyoutelcaththetouchpanelkeysonthe screndeviatefromtheactualpositionsthatres- spondloycurlouch,adjusttheresponseposi- tionsofthelouchpanel.Therearetwo adjustmentmethodsfour-pointadjustment,in whychyoutouchfourcornersofhescreen and 16-pointadjustment,inwhichyourmakefine-ad- justmentsonthsentiroscreen.
• Parkyourcarinasateplaceandusethis function. Denotoperaleitwhiledriving.
- Touch the screengently for adjustment. For carefully pressing the touch panel may damage the touch panel. Do not use a sharp pointed tools such as ballpoint penormechanical pen. Doings may damage the screen.
- If the touch panel cannot be adjusted properly, consult your local Pioneer dealer.
1Turnthesourceoff.
Refer to Turning the source ON/OFF on page 8.
2Pressandholdthehomebuttontostart TouchPanelCalibration.
The four-point touch panel adjustments screen appears. Whentwo-point appears at once, louchboth.
3Toucheachofthearrowsonthefourcornersofthescreen.
■Tocance the adjustment pressandholdthe homebutton.
4Pressthehomebuttontontocompletefour-pointadjustment.
Datafortheadadjustedpositionissaved. ■Donotturnofftheengnewhilethedataisbeing saved.
5Pressthehomebuttontoproceedto16-pointadjustment.
The16-pointtouchpaneladjustmentscreenappears.
■Tocancellheadjustment, pressandhold the homebutton.
6Gentlytouchthecenterofthe+markdis-playedonthescreen.
Afteryoutouchallthemarks, the data for the adjusted position is saved.
■Donotturnofftheenginewhilethedataisbeing saved.
7Pressandholdthehomebuttontocompletetheadjustment.
UsinganAUXsource
Anauxiliarydeviceorportabledevicesoldseparatelycanbeconnectedtothisunit.
AboutAUXconnectionmethods
Youcanconnectauxiliarydeviceslothisunit.
Minipinplugcable(AUX)
When connecting an auxiliary device using a miniplugcable
iPodsandportableaudio/videoplayerscanbe connectedtothisunitviaminiplugcable.
- IfaniPodwithv deccapabilities is connectedtothisunitvia3.5mmplug(four pole)cable(suchastheCD-V150M),youcan enjoythev decontentsof theconnected iPod.
- Aportableaudio/videolayercanoconnectedbyusinga3.5mmplug(fourpole) withanRCable(soldseparately). However, depending on the cable areverse connection between thered(rightsideaudic) cable and yellow(video) cab emayberequirodinorderforthscundandvideo imagetobereproducedcorrectly.
- InsertthestereominiplugintotheAUX inputjackonthisunit.
RefertoConnectingthepowercordonpage50.
Resettingthemicroprocessor
Bypressing RESET, you can reset themicroprocesscloitsinitialsettingswithoutchangingthe bookmarkinformation.
The microprocessormust bereset in the following situations:
- Before using this unit for the first time after installation
• If the unifai sloperate properly
- When strange or incorrect messages appear orthodisplay
1TurntheignitionswitchOFF.
2PressRESETwithapentiporother pointedinstrument.
Refer to What's what on page 7.
Note
SwitchyourengineONorsettheignitionswitch loACCONbeforepressingRESETnthefollowingsituations:
•Aftercompletingconnections
•Whenerasingalstoredsettings
- When resettirgtheunittoltsinitial(factory)set- tings
Operatingthesoundmixer
Youcanlistenloaudiofrom.theunilandyour iPhoneorsmartphonesimullaneously.The mainsoundistromtheunit.Thesubsoundis fromtheiPhoneorsmartphone.You cancontrol thevolumeof.thesubsoundonthescreen.
1ConnectyouriPhoneorsmartphoneto theunitwiththeRGBinput.
RefertoWhenconnectingwithoptional/CD-IV203 cableonpage52. RefertoWhenconnectingwithoptional/CD-IU201Scableonpage53.
RefertoOptionalSmartphonslinkadaptor(CD-ML100)connectionpage53.
2Press+/-(VOLUME/VOL)todisplaythe soundmixercontrolbar.
Thesoundmixerscreenappears.

① Source sound – Press +/- (VOLUME/VOL) to adjust the volume of domainsound. The mainsound/volume level is displayed on the Sourcespoundsmeer.
② Mix – touch ON or OFF to switch the sound mixeronoff. The subsound smile when Mix is OFF.
SettoONwhenyouw/shtooutputsoundfor AppRadioMode, such asthenavigation sound, from the unit.
SeltoOFFwhenyouw shtoutputsoundfor AppRadioMode, suchasmusic,astne mainsound.
③ App Sound – Touch + or – on the screen to adjust the subsound volume. The subsound volume level is said, displayed for the AppSound screen.
Notes
- You cannot adjust the volume of them in sound on the screen.
- Thesoundmixercontrol barisdisplayed for four seconds. If the screen disappears, press +/- (VOLUME/VOL) again. Thescreenappears.
Connection

WARNING
In some countries or states the viewing of images on display inside vehicle even hyperson other than the river maybe legal. Where such regulations apply, they must be occasioned and this unit's DVD features should not be used.

CAUTION
- Donotdrila and eintotheenginecompartmenttoconnecttheyellowcableofthedisprayunittothevehiclebattery. Engine vibrationmayeventuallycausethelinsulation tofallatthepointwherethewirecasses fromthepassengercompartmentintothe enginecompartment.Takeextracareinsecuringthewireathispoint.
- Makesurethatcableswillnotinterferewith movingpartsofthevenicle,suchastheshift lever,parkingbrakeorseatslidingmechanism.

speakersover50W(outputvalue)and between4Ωto5Ω(impedancevalue).Do cluse'Ωto3Ωspeakersforth sunit.
- The black cable is ground, When installing this sun tor power amp (solesepartely), makes sure to connect the ground wire first. Makes sure that the ground cable is properly connected to metal parts of the car body using gaspacte terminal sold commercially. The ground wire of the power amp and the one of this unit or any other device must be connected to the cars separately with different screws if the screw for the ground wire lossens for falls out, it could result in fire, generation of smoke or malfunction.

Other devices (Another electronic device in the car) Metal parts of car's body
*1 Non supplied for this unit

Important
- This unit cannot be installed in vehicle without ACC (accessory) position on the ignition switch.


ACCpositionNoACCposition
- Use this unit with a 12-volt battery and negative grounding only. Failure to dosomay result in a fireormal function.
- Topreventashort-circuit,overheatingnormal-function,besuretofollowtheirectors below.
— Disconnect the negative terminal of the battery before installation.
Connection
—Securethewirngwithcableclampsoradhesivelape.Wrapadhesivelapearounddwiring thatcomosintocontactwithmetalpartstoproteclthewirng.
—Placeal cablesaway from moving parts, such as thoshift over and scatrails.
—Placeal cablesaway from hot places, such as near the heater outlet.
—Donal connected they yellow cable to the battery bypassing through the holetto the engine compartment.
—Coverany disconnected cable connectors with insulating tape.
—Denotsnorter anycables.
—Nevercutthe insu ationof thepowercable of thisunit nordertosharethepowerwith otherdevices.Thecurrentcapacityofthe cableislimited.
—Useafuseoftheratingprescribed.
—Neverwirethenegativespeakercabledirectly toground.
—Never band together negative cables of multi- plespeakers.
- When this unit is on, controls signals are sent through the blue/white cable. Connect this cable to the system remote control of an external power ramp or the vehicle's auto-antenna relay controller (max. 300mA 12VDC). If the vehicle is equipped with a glass antenna, connect the antenna booster powers supply terminal.
- Neverconnecttheblue/whitecabletothe powerterminalofanexternalpoweramp. Also,neverconnectittothepowerterminal oftheautcantenna.Doingsomayresult in batterydrainoramalfunction.
Connection
Section
Connection
Connection
Connectingthepowercord
flowchart
graph TD
    A["Pioneer Add-on Navigation system (sold separately)"] --> B["20-pin cable (Supplies with navigation unit)"]
    B --> C["Input the 76-pin cable in the direction indicated in the figure."]
    C --> D["RGB input"]
    D --> E["Microphone (Function of AVH-X500BHS/AVH-X400BT/AVH-X300B-HS/AVH-X200BT)"]
    D --> F["Microsphere Input (Function of AVH-X500BHS/AVH-X400BT/AVH-X300B-HS/AVH-X200BT)"]
    D --> G["Wired remote input (Hand-wired remote control adapter can be connected viad separately)."]
    G --> H["Violet-white Of the two lead wires connected to the back lamp, connect the one which the voltage changes when the gear shift is in the I-IV/RSE DC position. This connection enables as the unit to sense whether the can's moving forwards or backwards."]
    H --> I["Yellow/white Too Connect to terminal controls by ignition switch (12 V DC)."]
    I --> J["Yellow/black If you use an equipment with Mute function, wire this lead to the Audio Mute lead on that equipment. It not, keep the Audio Mute lead free of any connections."]
    J --> K["Black Schassis Ground"]
    K --> L["Connect to a clean, paint-free metal location."]
    L --> M["Front speaker I to I, Speaker"]
    M --> N["LefiRight"]
    N --> O["Green/Black Violed/Black"]
    O --> P["Hear speaker or Subwoofer (4Ω)"]
    P --> Q["Blue/white Connect to system control terminal of the power amp or out-of-ammon relay control terminal (max 300 mA⁻² V DC)."]
    Q --> R["Power supply side"]
    R --> S["Ground side"]
    S --> T["Parking brake switch"]
    T --> U["With a 2 speaker system, no connection anything to the speaker leads but are not connecting to speakers."]
    U --> V["Blue/white Connect to system control terminal of the power amp or out-of-ammon relay control terminal (max 300 mA⁻² V DC)."]
    V --> W["When using a subwoofer of 70 W (2Ω), be sure to connect with Violed and Violed/Black loads of this unit. Do not connect anything to Green and Green/black leads."]
    W --> X["Not used"]
    X --> Y["Green/block"]
    Y --> Z["Violet/block"]
    Z --> AA["Subwoofer (Ω × 2)"]
    AA --> AB["Note: Change the initial setting of this unit, the subwoofer output of this unit is monoual"]
Connection
Whenconnectingtoseparatelysoldpoweramp
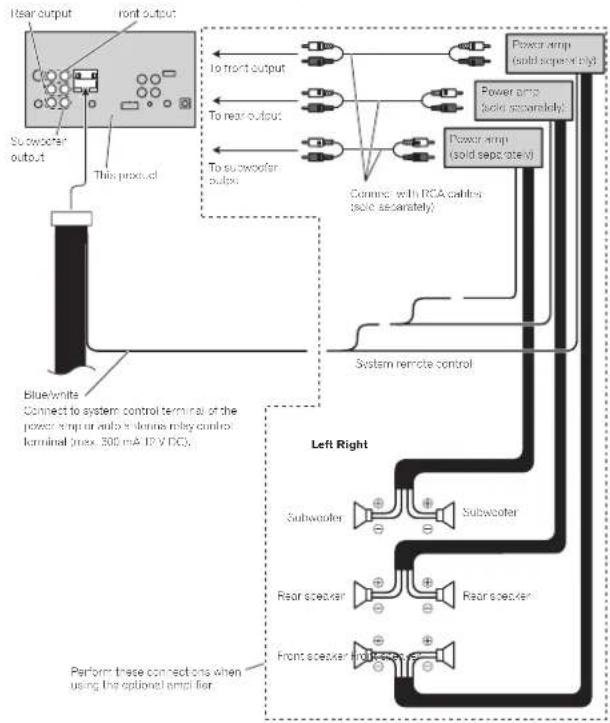
flowchart
graph TD
    A["rear output"] --> B["Front output"]
    B --> C["To front output"]
    C --> D["Power pump (solid separately)"]
    D --> E["Power pump (solid separately)"]
    E --> F["Power pump (solid separately)"]
    F --> G["Power pump (solid separately)"]
    G --> H["Power pump (solid separately)"]
    H --> I["Power pump (solid separately)"]
    I --> J["Power pump (solid separately)"]
    J --> K["Power pump (solid separately)"]
    K --> L["Power pump (solid separately)"]
    L --> M["Power pump (solid separately)"]
    M --> N["Power pump (solid separately)"]
    N --> O["Power pump (solid separately)"]
    O --> P["Power pump (solid separately)"]
    P --> Q["Power pump (solid separately)"]
    Q --> R["Power pump (solid separately)"]
    R --> S["Power pump (solid separately)"]
    S --> T["Power pump (solid separately)"]
    T --> U["Power pump (solid separately)"]
    U --> V["Power pump (solid separately)"]
    V --> W["Power pump (solid separately)"]
    W --> X["Power pump (solid separately)"]
    X --> Y["Power pump (solid separately)"]
    Y --> Z["Power pump (solid separately)"]
    Z --> AA["Power pump (solid separately)"]
    AA --> AB["Power pump (solid separately)"]
    AB --> AC["Power pump (solid separately)"]
    AC --> AD["Power pump (solid separately)"]
    AD --> AE["Power pump (solid separately)"]
    AE --> AF["Power pump (solid separately)"]
    AF --> AG["Power pump (solid separately)"]
    AG --> AH["Power pump (solid separately)"]
    AH --> AI["Power pump (solid separately)"]
    AI --> AJ["Power pump (solid separately)"]
    AJ --> AK["Power pump (solid separately)"]
    AK --> AL["Power pump (solid separately)"]
    AL --> AM["Power pump (solid separately)"]
    AM --> AN["Power pump (solid separately)"]
    AN --> AO["Power pump (solid separately)"]
    AO --> AP["Power pump (solid separately)"]
    AP --> AQ["Power pump (solid separately)"]
    AQ --> AR["Power pump (solid separately)"]
    AR --> AS["Power pump (solid separately)"]
    AS --> AT["Power pump (solid separately)"]
    AT --> AU["Power pump (solid separately)"]
    AU --> AV["Power pump (solid separately)"]
    AV --> AW["Power pump (solid separately)"]
    AW --> AX["Power pump (solid separately)"]
    AX --> AY["Power pump (solid separately)"]
    AY --> AZ["Power pump (solid separately)"]
    AZ --> BA["Power pump (solid separately)"]
    BA --> BB["Power pump (solid separately)"]
    BB --> BC["Power pump (solid separately)"]
    BC --> BD["Power pump (solid separately)"]
    BD --> BE["Power pump (solid separately)"]
    BE --> BF["Power pump (solid separately)"]
    BF --> BG["Power pump (solid separately)"]
    BG --> BH["Power pump (solid separately)"]
    BH --> BI["Power pump (solid separately)"]
    BI --> BJ["Power pump (solid separately)"]
    BJ --> BK["Power pump (solid separately)"]
    BK --> BL["Power pump (solid separately)"]
    BL --> BM["Power pump (solid separately)"]
    BM --> BN["Power pump (solid separately)"]
    BN --> BO["Power pump (solid separately)"]
    BO --> BP["Power pump (solid separately)"]
    BP --> BQ["Power pump (solid separately)"]
    BQ --> BR["Power pump (solid separately)"]
    BR --> BS["Power pump (solid separately)"]
    BS --> BT["Power pump (solid separately)"]
    BT --> BU["Power pump (solid separately)"]
    BU --> BV["Power pump (solid separately)"]
    BV --> BW["Power pump (solid separately)"]
    BW --> BX["Power pump (solid separately)"]
    BX --> BY["Power pump (solid separately)"]
    BY --> BZ["Power pump (solid separately)"]
    BZ --> CA["Power pump (solid separately)"]
    CA --> CB["Power pump (solid separately)"]
    CB --> CC["Power pump (solid separately)"]
    CC --> CD["Power pump (solid separately)"]
    CD --> CE["Power pump (solid separately)"]
    CE --> CF["Power pump (solid separately)"]
    CF --> CG["Power pump (solid separately)"]
    CG --> CH["Power pump (solid separately)"]
    CH --> CI["Power pump (solid separately)"]
    CI --> CJ["Power pump (solid separately)"]
    CJ --> CK["Power pump (solid separately)"]
    CK --> CL["Power pump (solid separately)"]
    CL --> CM["Power pump (solid separately)"]
    CM --> CN["Power pump (solid separately)"]
    CN --> CO["Power pump (solid separately)"]
    CO --> CP["Power pump (solid separately)"]
    CP --> CQ["Power pump (solid separately)"]
    CQ --> CR["Power pump (solid separately)"]
    CR --> CS["Power pump (solid separately)"]
    CS --> CT["Power pump (solid separately)"]
    CT --> CU["Power pump (solid separately)"]
    CU --> CV["Power pump (solid separately)"]
    CV --> CW["Power pump (solid separately)"]
    CW --> CX["Power pump (solid separately)"]
    CX --> CY["Power pump (solid separately)"]
    CY --> CZ["Power pump (solid separately)"]
    CZ --> DA["Power pump (solid separately)"]
    DA --> DB["Power pump (solid separately)"]
    DB --> DC["Power pump (solid separately)"]
    DC --> DD["Power pump (solid separately)"]
    DD --> DE["Power pump (solid separately)"]
    DE --> DF["Power pump (solid separately)"]
    DF --> DG["Power pump (solid separately)"]
    DG --> DH["Power pump (solid separately)"]
    DH --> DI["Power pump (solid separately)"]
    DI --> DJ["Power pump (solid separately)"]
    DJ --> DK["Power pump (solid separately)"]
Connection
Whenconnectingtheexternalvideocomponentandthedisplay
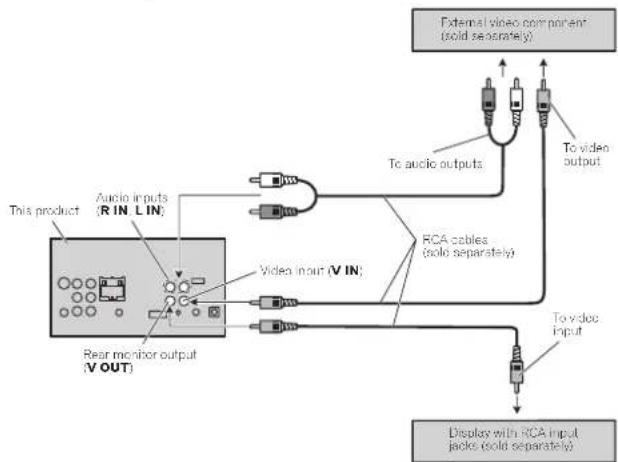
flowchart
graph TD
    A["External video component (solid separately)"] --> B["To audio outputs"]
    A --> C["To video output"]
    D["This product"] --> E["Audio inputs (R IN, L IN)"]
    E --> F["Video input (V IN)"]
    F --> G["Video monitor output (V OUT)"]
    G --> H["Display with RCA input packs (solid separately)"]
    I["To video input"] --> H
    J["RCA cables (solid separately)"] --> H
- It is necessary to change AVInput the system menu when connecting the external videocomponent. RefertoSettingAVinputpage40.
This product sreaivicleoutputisforconnectionofacisplaytoenablepassengers intherear seatstowatchtheDVD.etc.
WARNING
Neverinstallareardisplayinalocationthatis visib elothedrverwhiletnevehiclesinmo-tion.
Connection
Whenconnectingwitharear viewcamera
If you switch these shift lever to REVERSE(R), the display on this unit will automatically switch to there are view image. You need to set the
CameraPolarityproperlyinthesystemunitto use.Fordetailsonsettings, refer to Settingthe rearviewcamera(backupcamera)onpage43. You can also switch to the rearviewimage by pressing the couch pane key. For details, refer to Using therearviewonpage 10.

WARNING
USEINPUTONLYFORREVERSEORMIRRORIMAGEREARVIEWCAMERA.OTHER USEMAYRESULTININJURYORDAMAGE.

CAUTION
- Youmustuseacamerawhichoutputs mirrorreversedimages.
• The screen image may appear reversed.
• Therearviewcamerafunctionistobeused asanaictokeepaneyeontrailers,orwhile backingup.Donotuseforentertainment purposes.
- Objectsintherearviewmayappearcloseror moredistantthantheyactuallyare.
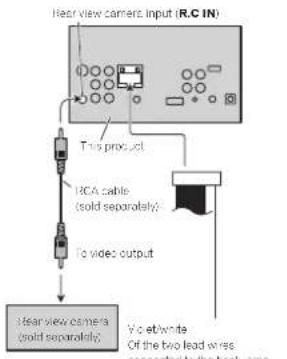
Connection
iPodwithlightningconnector
Whenconnectingwithoptional
CD-IU52cable
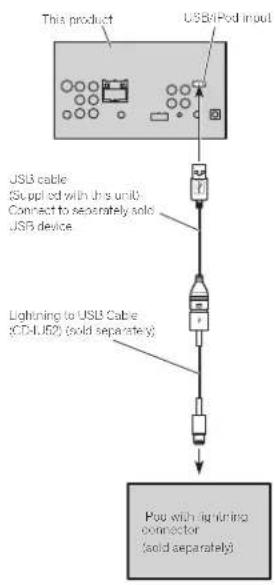
flowchart
graph TD
    A["This product"] --> B["USB/Port Input"]
    B --> C["USB cable (Supplied with this unit)<br>Connect to separately sold USB device"]
    C --> D["Lightning to USB Cable (CDL/LED) (solid separately)"]
    D --> E["Pou with lightning connector<br>(solid separately)"]
Whenconnectingwithoptional CD-IV203cable
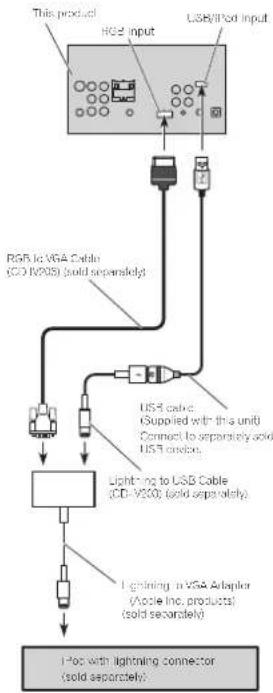
flowchart
graph TD
    A["This product"] --> B["RGB input"]
    B --> C["USB/USB cable input"]
    C --> D["USB cable (Supplied with this unit)"]
    D --> E["Lighting to USB Cable (CD-V200) (solid separately)"]
    E --> F["Lighting in VSA Adapter (Vccle Inc. products) (solid separately)"]
    F --> G["LED with lightning connector (solid separately)"]
Connection
iPodwith30-pinconnector
Whenconnectingwithoptional
CD-IU201Vcable
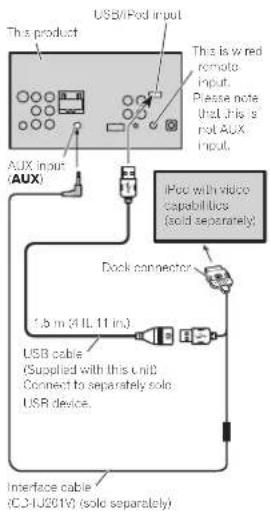
flowchart
graph TD
    A["This product"] --> B["USB/iPod input"]
    B --> C["Aux input (AUX)"]
    C --> D["AUX input (AUX)"]
    D --> E["Dock connector"]
    E --> F["USB cable (Supplied with this unit) Connect to separately solo USB device."]
    F --> G["Interface cable (CJ-U201V) (solo separately)."]
    H["This is wired remote input. Please note that this is not Aux input."] --> I["iPod with video capabilities (solid separately)."]
Whenconnectingwithoptional CD-IU201Scable
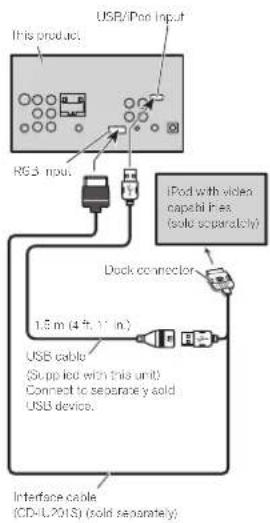
Connection
OptionalSmartphonelinkadaptor(CD-ML100)connection
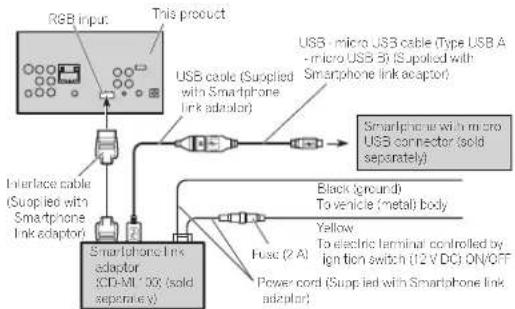
flowchart
graph TD
    A["RGB input"] --> B["This product"]
    B --> C["USB cable (Suplied with Smartphone link adaptor)"]
    C --> D["Smartphone with micro USB connector (solid separately)"]
    D --> E["Black ground To vehicle (metal) body"]
    D --> F["Yellow To electric terminal controlled by ignition switch (12 V DC) ON/OFF"]
    D --> G["Power cord (Suplied with Smartphone link adaptor)"]
    B --> H["Interface cable (Suplied with Smartphone Link adaptor)"]
    H --> I["Smartphone Link adaptor (CD-A1* 00, solid separately)"]
ConnectionforupdatingSmartphonelinkadaptorfirmware

flowchart
graph TD
    A["RSB input"] --> B["USB cable (Supplied with Smartphone link adapter)"]
    B --> C["USB storage device (sold separately)"]
    D["Smartphone Link adaptor (CD-VI 10X) (sold separately)"] --> E["Fuse (2 A)"]
    E --> F["Black (ground)<br>To vehicle (metal) body"]
    E --> G["Yellow<br>To electric terminal controlled by ignition switch (12 V DC) ON/OFF"]
    E --> H["Power cord (Supplied with Smartphone Link adaptor)"]
    I["Interface cable (Supplied with Smartphone Link adaptor)"] --> J["USB cable (Supplied with Smartphone link adapter)"]
    J --> B
OptionalSiriusXMTuner connection
(FunctionofAVH-X5600BHS/AVH-X3600BHS)
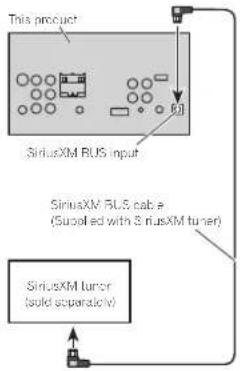
flowchart
graph TD
    A["This product"] --> B["SyrusXM BUS input"]
    B --> C["SyrusXM BUS cable (Supplied with 3 riusXM tuner)"]
    C --> D["SyrusXM tumor (solid separately)"]
    D --> E["Output"]
• A maximum of 500 mA car besupplied from the unit to the Sirius XMtuner.
Installation
Notes
- Checkallconnectionsandsystemsbefore finalinstallation.
- Donotuseunauthorizedpartsasthismay cause malfunctions.
- Consult your dealer installation requires drilling of the solar thermal modification to the vehicle.
- Donotinstallthisunitwhere:
— itmayinterferewithoperationofthevehicle.
— itmaycausein,urytoepassengarasaresuft
ofasuppansstop.
• These semiconductor laser will be damaged if overheals. Install this unilaway from not places such as heartacheaterout et.
• Optimum performance is obtained when the unit is installed at an angle of less than 30°.
- Wheninstalling,toenscreproperheatdispersalwhenusingthisunit,makesureyou leaveamplespacebehindtherearpaneland wrapanylicosecablessotheyarenotblock ingthevents.
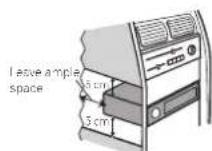
• Tosometypesofvehicles, this sunit cannot be properly installed. Insucncase, usetheoptonal installation kit (ADT-VA133).
Installationusingthescrew holesonthesideoftheunit
● Fasteningtheunittothefactoryradio-mountingbracket.
Position the units that its screwholes are aligned with the screw holes of the bracket, and lighten the screws all re locations on each side.
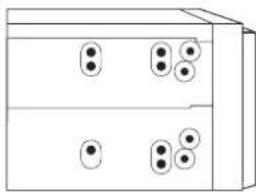
natural_image
Simple line drawing of a two-tiered rectangular box with circular holes on the top and bottom (no text or symbols)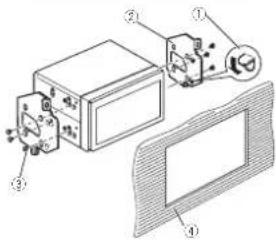
①ftnepawlgetsintheway,benditdown.
②Factoryradiomountingbracket
③Use either truss(5mm×8mm) or flush surface(5mm×9mm) screws, depending on the kind of screws that the mounting bracket screwholes will be accepted.
④ Dashboardorconsole
Installation
Installingthemicrophone
(Function of AVH-X5600BHS/AVH-X4600BT/AVH-X3600BHS/AVH-X2600BT)

CAUTION
It is extreme ydangerous call with the micro-phonolactobecome wound around restoring columnor shifttlover. Besureto install the unit insuchaway hall will not obstruct driving.
Notes
- Install the microphone in a position and orientation that will enable it to pickup the voice of the person operating the system.
- Useseparatelysoldclampslosecurethe leadwhoroneccessaryinsidethevehicle.
Wheninstallingthemicrophone onthesunvisor
1Fithemicrophoneleadintothegroove.
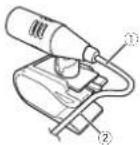
①Microphonelead ②Grove
2Installthemicrophonecliponthesun visor.
With the sunvisor up, install them a microphone clip. (Lowering the sunvisor reduces the voice recognition rate.)

natural_image
Technical line drawing of a vehicle's front wheel and dashboard assembly (no text or symbols)①Microphoned ip
Wheninstallingthemicrophone onthesteeringcolumn
1 Detachthemicrophonebasefromthemicrophoneclip.
Todetachthemicrophonebasefromthemicrophoneclip, slidethem crophonebase.
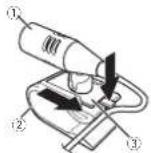
①Microphone
②Microphoned ip ③Microphonebase
Installation
2Installthemicrophoneonthesteering column.
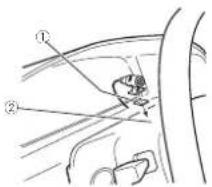
①Double-sidedtape
② Install hemi crophone on the rear side of the steering column.
Adjustingthemicrophoneangle
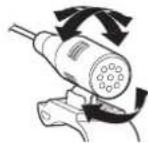
Section
Appendix
Additionalinformation
Troubleshooting
Symptoms are written in bold and causes in regular, non-identified text. Regular, indented text is used to indicate actions to be taken.
Common
Thepowerwillnotturnon.
Theunitwillnotoperate.
Leadsandconnectorsareincorrect yconnected. Confirmance more that all connections are correct.
The fuse is still own. Rectify the cause and then replace the fuse. Be sure to install fuse with the same rating.
Noiseand/crotherfactorsarecausingtheoult-in microprocessortooperateincorrectly. PressRESET.(Page48)
Operationwiththeremotecontrolisnotpossible.
Theunitdoesnotoperatecorrectlyevenwhen theappropriateremotecontrolbuttonsare pressed.
Batterypowerslow. Loadanewbattery.
Some operations are proh bited with certain discs. Tryoperating with other disc:
Playbackisnotpossible.
The discisards.
Cleanthedisc.
The type of isocaded cannot be played on this unit.
Checknedisctype.
The isolated snotcompatiblewiththisviceosystem.
Changetnedisctoonethatiscompatiblewith yourvideosystem.
Thereisnosound.
Thevolumelevelwillnotrise.
Cablesarenotconnectedcorrectly. Connectthecablescorrectly.
The unitisperformingstill.slowmotionoframe-by-
frame playback. There is nose and dark enough, slow motion or frame-by-frame playback.
Thereisnoimagedisplayed.
The parkingbrakocab a snotconnected. Connect the parkingbrakocab, and apply the parkingbrake.
The parking brake is not applied. Connect the parking brakeable, and apply the parking brake.
The Ⓧ iconisdisplayed, andoperationisnot possible.
The operation is prohibited for the disc. This operation is not possible.
The operation is not compatible with the configuration on the basis.
This operation is not possible.
Theimagedisplayedstops(pauses)andtheunit cannotbeoperated.
The data could be longer/bereaduring playback. Stop playback once and start playback again
Thereisnosound.
Thevolumelevelislow.
The volume level is slow. Adjust the volume level.
Theattenuatorison. Turntheattenuatoroff.
Thesoundandvideoskip.
The unit is not firmly secured. Firmly secure the unit.
Additionalinformation
Filesize and transmission rate are above recommended.
CreatoaDivXfilectnatiswithinthe recommendedsizeandtransmissionrate
Theaspectratioisincorrectandtheimageis stretched.
Theaspectratlosettingis incorrectforthedisplay. Selecttheacpropriatesettingforyourd splay. (Page38)
Themotorsoundswhentheignitionswitchis turnedON(oristurnedtoACC).
Theurilisconfirmingwheromolatiscis
loaded. This is an normal operation.
Nothingisdisplayed.
Thetouchpanelkeyscannotbeused.
Therearviewcamerals of connected. Connect nearviewcamera.
CameraPolarity satincorrectsetting. Press the home button on return to a resource display and then select the correct setting for CameraPolarity. (Page 43)
Noxxxxappearswhenadisplayischanged (NoTitle, forexample).
There is no embedded text information. Switch the display or play another track file.
Subfolderscannotbeplayedback.
Folderrepeatplayhas been selected. Select therepeatrangeagain.
Therepeatrangechangesautomatically.
Anotherfoldenwasse ectedduringrepeatplay. Selecttherepeatrangeagain.
Tracksearchorfastforward/reversowasperformed duringfierepeatclay. Selecttherepeatrangeagain.
DVD
Playbackisnotpossible.
The loaded dischasadifierer region number from this unit. Replaced disc with or featuring these same region number as this unit.
Aparentallockmessageisdisplayedandplay-backisnotpossible.
Parentallock is activated. Turnparentallock of recharge level. (Page 38)
Parentallockcannotbecanceled.
Thecodenumberisincorrect. Enterthecorrectcodenumber.(Page39)
You have forgotten your codenum or Press RESET. (Page 49)
Dialoglanguage(andsubtitlelanguage) cannot beswitched.
TheDVDbeingplayeddoes:notfeatu,remultiplelanguage:recordings.
The language cannot be switched if they aren't recorded on the disc.
You can only switch between items indicated in the disc menu.
Switch the language using the screenshot.
Nosubtitlesaredisplayed.
TheDVDbeingplayeddoesnotfeatureresubtitles. Subtitlesare notdisplayediftheyarenotrecordonthecisc.
You can only switch between items and caled in the disc menu.
Switch the language using the dismenu
Additionalinformation
Playbackisnotperformedwiththeaudio languageandsubtitlelanguagesettingsselected inVideoSetupmenu.
The DVD being played does not feature a logo or subtitles in the selected language.
The language cannot be switched if these selected languages are not recorded on the disc.
Theviewinganglecannotbeswitched.
The DVD being played does not feature scenes that from multiple angles.
The viewing angle cannot be switched to the DVD does not feature rescenes recorded from multiple angles.
You are trying to switch to the angloviewing fora
scenet nal was not recorded from multiple angles. Switch between multiple angles when watching scenes recorded from multiple angles.
The image is extremely unclear/distorted and dark during playback.
Somediscsfeatureasignaltoprohibitcopying. Sincethisunitiscompatibewiththeanalog copygenerationmanagementsystemwhen applyingadiscathasasignalprohibiting copying, horizontalstripesoratherimperfections mayacpearwhenviewedonsomedisplays. This isnotamalfunction.
VideoCD
ThePBC( playbackcontrol)menucannotbe calledup.
The VideoCD being played does not feature PBC. This operation is not available for VideoCD that do not feature PBC.
Repeatplayandtrack/timesearcharenot possible.
TheVideoCDbeingplayedfeaturesPBC. ThisoperationisnotavailableforVideoCDsthat featurePBC.
iPod
TheiPoddoesnotoperatecorrectly.
The cables are incorrectly connected. Disconnect the cable from the iPod. Once the iPod's main menu is displayed, reconnect the iPod and resell.
TheiPodversionisol.
Update the Podversion
SoundfromtheiPodcannotbeheard.
The audio output direction may switch automatically when the Bluetooth and USB connections are caused at the same time.
UsetheiPodtochargetneaudiocutput direction.
Bluetoothaudio/telephone
ThesoundfromtheBluetoothaudiosourceis notplayedback.
Thereisacall inprogressionalB uctootnconnected cellularpnone.
The sound will be played back when the call is terminated.
ABluetoothconnectedcellularphoneiscurrently beingoperated.
Donotusethecel l larphoneath st me.
AcaIwasmadewithaBluetoothconnectedcellular phoneandthenimmediate yterminated.Asasult, communicationbetweenthisunitandthecellular phonewasrotterminatedproperly.
Reconnect the Bluetooth connector between the sun and the cellular phone.
Additionalinformation
Errormessages
When you contact your dealer or your nearest Pioneer Service Center, besuretonotel error message. Error messages are written into land causes irregular, non-indented text. Regular, indented text is used to indicate action to accept taken.
Common
AMPError
Thisun failstooperateorthespeakerconnection is ncorrect;theprotectivecircuitisactivated. Checkthespeakerconnection.lithomessage fallstocisappearevenafterheeng neis switchedoff/oncontactyourceleroran authorizedPioneerServiceStat onfor assistance.
Tuner
NoDataProvided
This un te cannot receive artist name/song title information.
Movelothedesirablelocal onwithgood reception.
NoData
This can not receive program service information.
Movetothedesirablelocat onwithgood reception.
SiriusXMSatelliteRadio
CheckAntenna
Theantennacconnection incorrect. Check the antennacconnection lifetime message failstod sappoarcvona@orthconghols switchedoff/on,contactyourdealeroran authorized Pioneer Service Station for assistance.
CheckTuner
TheSiriusXMConnectVehicleTunerconnection s incorrectthepowerfailed.
Check that unerconnection and battery voltage, if the message fail is disappeared, even after the engine switched off/on contact your dealer or unauthorized Pioneer Service Station for assistance.
NoSignal
TheSiriusXMConnectVehicleTuner shavingdiffi cultyreceivingtheSiriusXMsatellites gnal.
- Verify that your vehicle is outdoors with clear view of those southern sky.
- VerifythatthoSiriusXMmagneticmount anterraismountedonametalsurfaceonthe ousidelthevehicle.
• MovethoSirlusXMantennaawayfromany obstructions.
SubscriptionUpdated
This unith as detected a change in your SiriusXM subscription status.
Pressarykeytoclearthemessage.
NotAvailable
The channel that you favor a quested is not valid. SinusXMchannel.
ChecktheSiriusXMcharnellneup.
Appendix
Appendix
Additionalinformation
ChannelNotSubscribed.CallSiriusXMto
Subscribe.
The channel that you have requested is not included
inyourSir usXM subscriptionpackage.
Check the content of your SiriusXM subscription package.
ChannelLocked
Locked by theraciol Parenta ControFeature.
Releasethechannellock,
DVD
DifferentRegionDisc
The disc does not have the same region numbers
thisunit.
Replace the DVD with one bearing the correct
regicarrumber
Error-02-XX/FF-FF
The disciscity.
Cleanthedisc.
The discisscratched.
Replacelhed sc.
The disc is loaded up/sidedown.
Check that the disc is too and correctly.
There is an electr calo mechanical error.
PressRESET.(Page48)
UnplayableDisc
Thistype could se cannot be played on this unit.
Replacehold scwithorctnatcanbeplayodon
Unisunit.
Their sorted discdoes not contain any playable ones.
Replacethed sc.
Protect
Al thefilesontheinserteddscareembeddedwith
DRM
Replacethed sc.
Skipped
The inserted discontains DRM protected files.
Player audiofilenotemeddecwithWindows
Media™DRM9/10.
TEMP
The temperature of the unit is outside the normal op-
ealingrange
Waitun: the unit return stoatemperature
with nthenormaloperatnglimits.
ThisDivXrentalhasexpired.
The inserted disc contain insexpired DivXVODcon-
tent.
Selectafilethatcarbeplayed
Videoresolutionnotsupported
The insertedciscontainsahighdefinitionDivX
FG-1/MPFG-2/MPFG-4
Selectafilethatcarbeplayed
Itisnotpossibletowriteitintheflash.
This unit's flash memory used last not temporary
agearcaisfull
Selectafilethalcarbeplayed
YourdeviceisnotauthorizedtoplaythisDivX
protectedvideo
This unit's D vX registrationcodehesrotbeenau
thorizedbytheDivXVOcontentsprovider.
Register this sun to the DivXVODcontents
provider.
UnplayableFile
This type off file cannot be played on this unit.
Selectafilethatcarbeplayed
Additionalinformation
FormatRead
Sometimes there is a delay between the start of play
ckar downenyoustart to hear any sound.
Wait until the messaged is aopears and you hear
sound.
Videoframeratenotsupported
DivXfile'sframeraleismorethan30fps.
Selectafilethatcanbeplayed
AudioFormatnotsupported
Th stypeoffileisnotsupportedonthisunit.
Selectafilethatscanbeplayed.
Externalstoragedevice(USB)
UnplayableFile
Th stypeoffilecannotbeplayedontnisunit.
Selectafilethat:canbeplayed
therearenosongs.
Transfer,heaudiofilestotheUSBportableaudio
player/USBmemoryandcorrect.
SecurityfortheconnectedUSBmemoryisenabad
Follow the USB memory instructions disabled
security
FormatRead
Sometimes there is a delay between the start of play
backer owner you start to hear any sound
Wait until them messaged in aopears and you hear
sound.
Skipped
The corrected USB portable audio player/USB
memorycontainsWM Afilesthatareprotectedby
ndowsMedia™DRM8/10.
Player audiofilenetembededwithWindows
Med a ^18 DRM9/10.
Protect
Al the files on the connected USB port ab audio
player/USBmemoryareprotectedbyWindows
MediaDRM970
Transferaud of files not protected by Windows
MediaDRM9/10totheUSBportableaudio
player/USBmemoryandconnect.
IncompatibleUSB
The connected USB device is not supported by this
unit.
ConnectaUSBportableaudioplayerofUSB
memorythat is USBMassStorageClass
compliant.
TheUSBdeviceisnotformattedwithFAT12.FAT16
orFAT32.
The connected USB device should be formatted
with FAT12,FAT16c,FAT37
CheckUSB
TheUSBconnectororUSBcablehasshort-
circuited.
Check that the USB connector or USB cable is
notcaughtinsomethingordamaged.
The connected USB storage device consumes more
than maximum allowable current.
DisconnecttheUSBportabloaudioplayer/USB
memoryanddonotuseit.Turntheignition
switch to OFF, then to ACCorON and then
connectacompliantUSBportablecaucioplayer/
USB memory
Error-02-9X/-DX
Communicationfailec.
Performoneofthefolowingoperations.
-TurntheignitionswitchOFTandbackON.
DisconnecttheUSBportaleaucioplayer/USB
memory.
-Changetcadifferentsource.
Then, return to the USB portable audio player/
LSB memory
Additionalinformation
ThisDivXrentalhasexpired.
The inserted external storage device contains insexpired D vXVODcontent.
Selectafi ethatcanbeplayed.
Videoresolutionnotsupported
The nserectealternslo-agedevicetcairnsahigh definitionDivX/MPFG-1/MPFG-2/MPFG-4file. Selectafi ethatcanbeplayed.
Itisnotpossibletowriteitintheflash.
This unit's flashmemoryusedesthetemporary storage ageareaisfull.
Selectafi ethatcanbeplayed.
YourdeviceisnotauthorizedtoplaythisDivX protectedvideo.
This unit's DivX registration code has not been authorized by the DivXVODcontents provider.
RegisterthisunittotheDivXVODcontents provider.
FormatRead
Sometimes there is a delay between host start of play back and when you start to hear any sound.
Wait until the message is appears and you hear sound.
Videoframeratenotsupported
D vXfile'sframerate smorethan30fps. Selectafi ethacanbeplayed.
AudioFormatnotsupported
This type of is not supported on the Sun I. Select a that can be played.
CreatingtheDatabasehasfailed.
ThamodewasswitchadrovidecorJPEGImagedis-playwh lethedatabasewasbe ngcreated. Createthedatabaseagain (Page26)
iPod
FormatRead
Sometimes there sadelay between the start of play-back and when you start to near any sound. Wa tunti nomssaged sappears and you hear sound.
Error-02-6X/-9X/-DX
Communicationfailed. Disconnect the edge from the iPod. Once the iPod's main menu is displayed, reconnect the iPod and reset it.
Podfailure. DisconnectthecaoiefromtheiPod.Oncethe iPod'smainmenuisdisplayed,reconnectthe iPodandresell.
Error-02-67
TheiPodfirmwareversionisold. UpdateethaPodversion.
Stop
There are nosongs. TransfersongstotheiPod.
There are nosongs in the current list. Selectalist that contains songs.
NotFound
Nonrelated songs. Transfersongs:otheriPoc.
iTunestagging
iPodfull.Tagsnottransferred.
MemoryusedfortaginformationontheiPodistul. SyntheiPodwithiTuresards:cleanupthe tagsepaylist.
Additionalinformation
Memoryfull.Tagsnotstored.ConnectiPod.
This unit's memory used at temporary storage area is useful.
The tag information on the unit transferred to the Podautomatically whananiPodis connected.
Tagtransferfailed.ReconnectyouriPod.
This unit's staginformation cannot transfer to the Pod.
ChecktheiPoziandtryagain.
Tagstorefailed.
Tapinformation cannot bestored in this sun t. Try again.
Error-8D
Built-in FLASHROMencounteredan error. Turn the ignition OFFForON.
Alreadystored
This taginformationisalreadystoredinmemory, Taginformationcanonybosavedoncoforany givensong.Taginformation cannotbesavedfor thesameongimoretharance.
Bluetooth
Error-10
The power failed for the Bluetooth module of this unit.
Turn the ignition switch OFF and then to ACC or ON.
If the error message is still displayed after performing the above action, please contact your dealer or unauthorized Pioneer Service Station.
[EMPTY]
Pandora
Error-19
Communicationfailed. Discorrect hecable from the Pod. Once the Pod's main menu is displayed, reconnect the Podandresetil.
StartupthePandoraApplicationfromyourDevice.
The Pandora application has not started running yet. Startup the Pandora application from your iPhone.
Unabletosavethumbrating.Tryagainlater.
Unabletosavethumbrating Tryaginolaler.
UnabletosaveBookmark.Tryagainlater.
UnabletosaveBookmark.
Tryagainlater.
Pandorasystemmaintenance.Tryagainlater.
Panderasystemisundergoing maintenance. Tryagainlater.
Skiplimitreached.
Skiplimitreached, Dorotexceedtheskiplimit.
ThisversionofthePandoraApplicationisnot supported.
This version of the Pandora application shotsupported.
ConnectaniPhonethalhasacompable versionofthaPandoraapplicationinstalled
CheckDevice
DevicecorrormessagedisplayedinthePancoraapplication.
Please check your iPhone.
Appendix
Appendix
Additionalinformation
Pandoraisunabletoplaymusic.Pleaseeseeyour Device.
Unabletoplaymusicfrom Pandora. PleasecheckyouriPhone.
Pleasecreatestation.ApplicationonDevice.
Nostationfound. CreateestationinthePandoraapplicationon yourPhone.
NoActiveStation
Nostationsselected. Selectasiaton.
Communicationerroroccured.Pleasereconnect yourdevice.
If there is no ACK after 1 c attempted retries at 750 mrs, the accessory should assume that communication is interrupted and disconnect from Pardoral ink. Pleasereconnect your phone and try again.
Devicehasnotbeenregistered.Goto"Bluetooth ConnectionMenu"toregister.
NoBlueclothdevcefound. Followtheinstructionsthatappearonthe screen.
Connectionfailed.Press"Connect"toretry.
Bluetooth connection failed. Follow the instruction that appears on the screen.
Disconnected.Press"Connect"toreconnectthe device.
Bluetooth connection lost. Follow the instructions that appear on the screen.
MirrorLink
Theapplicationlistcouldnotbereadout.
Failed to load the application list. • Disconnect the candidate from the smartphone, and nonconnect this smartphone can gain a few seconds. • Turn the digit on switch OFF and then to ACC or ON. If the cornomossagalisis it disp ayodator performing the adovection, reset the smartphone. If the cornomossagalisis it disp ayodator performing the adovection, please contact your doctor or unauthorized Pioneer Service Station.
ThereisnosupportedapplicationonyourMirror-Linkdevice.
Nosupportedapplicatorscanbefound. • Disconnectthecablefromthesmartphone, and henceconnectthesmartphoneaganathera fewseconds. • Turntheight onswitch OFFanothertoACC o-ON. Ifth ecorrormassageisstilldisp ayedafter performingtheaoveaction, resetthe smartphone. Ifth ecorrormassageisstilldisp ayedafter performingtheaoveaction, pleasecontactyour dealeroranzulhorizedPioneerServiceStation.
Communicationerroroccurred.
There was a common call error. • Disconnect the basic from the smartphone, and then connect the smartphone again after a few seconds.
Additionalinformation
•Turntheignitor switchOFFandthentoACC orON. Ithi corrormossegoisstill displayadafter performing the aboveaction, reset the smartphone. Ithi corrormossegoisstill displayadafter performing the aboveaction, pleasecontactyo dealeroranauthorizedPioneerServiceStation
Launchingtheapplicationfailed.
Failed to launch the application. • Disconnect the cable from the smartphone, and hence connect the smartphone again after a few seconds. • Turn the ignition or switch OFF and then to ACC or ON. If the error message still displayed after performing heatwave action, reset the smartphone. If the error message still displayed after performing heatwave action, please contact your dealer or unauthorized Pioneer Service Station.
USBconnectionwastemporarilydisabledfordeviceprotection.DonotconnectthisUSBdevice totheunit.TorestartUSB,restarttheunit.
There is an overcurrent error Donotuseth's USB storage device. Turn the ignition switch OFF and the ACC or ON. With more massage still displayed after performing the above action, please contact your dealer or authorized Pioneer Service Station.
UnderstandingautoEQerror messages
When correct measurement to be a cather sinterior acoustic characteristics is not possible using auto-Q an error message may appear in the display. Insuch cases, refer to the ab ebelc wto see what the problem misand how it may be corrected. After checking, try again. For messages are written in bold and causes irregular, non-identified text. Regular, incented text is used to indicate onstobataken.
Pleaseconnectthemicrophonefor measurement. Whenfinished,pleasepush HOMEkey.
Thermicrophonesnotconnected. Plugtheoptional microphonesecurely not the jack.
Error.Pleasecheckxxxxspeaker.
Thermicrophone can not keep the measuring tone of aspaoker. - Confirm that the speakers are connected correctly. - Correct the input level setting of the power am connected to this speaker. - Plug themicrophones are already into the jack.
Error.Pleasechecknoise.
Thesurroundingnoiselevelistcoh gh. - Stopyourcarinaplacelhatisquiet, and switchofftheengine, airconditionerandheater. - Setthem crophonecorrectly.
Error.Pleasecheckbattery.
Power is not being supplied from the battery to its unit. - Conincothebattery correctly. - Check the battery voltage.
Additionalinformation
Understandingmessages
MessagesTranslation
| Screenimagemay appearreversed. | Pioneerrecommends theuseofacamera whichoutputsmirror-reversedimages. Otherwise,thescreen imagewillappearreversed. |
Indicatorlist
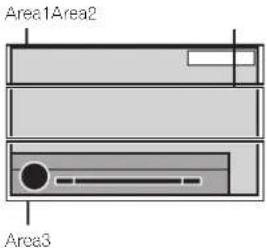
Area1
| MUTE | Ind catesthatthemutefunctionson. |
| ATT | Ind catesthatthesoundsatle-nuated. |
Area2
| Showswendownloadsbiesong information/tagitromaradiostationis received. Disabledwhilesonginformation /tagitromani-HDRadiostationis beingsavectoth sunit. | |
| Dolby D | Ind cateathathedigitalformatis DolbyDigital |
| MPEG-A | Ind cateathathedigitalformatis MPEGAudio. |
Additionalinformation

Indicates that the digital formatis LinearPCM.

Ind catesthesampling frequency.

Indicates that the digital formatis DTS.

Ind catestheaudiocharne.

Ind catestheaudiocharne.

(No text)

[Non-Text]

Ind catesthatad scwith PBCOn isbeingplayed.

• Indicate stethatocellular phone is connected.
- Indicatosthatar incoming call has been received and has not been checked yet.

Ind catesthe battery strength of the cellular phone.
• The eve shown nonthe indicator may differ from the actual battery strength.
- If the battery strength is not available, nothing is displayed in the battery strength indicator area.

Ind catesthattheconnected Bluetooth deviceonly supports Bluetooth telephone.

Indicate that the connected Bluetooth device only supports
Bluetoothaudio.

Showthealbumin lewherreceivingthctaginformation. Showsthealbumin eoitnesong currently being played for MP3/WMA/AAC/NAVfiles.

Showsthesongtitlewhenreceivingthelaginformation. Showsthesongtitleofthesong currentlybeingplayedforMP3/WMA/AAC/NAVfiles.

Showsthecommentcurrently beingplayed.

Showthestationnamecurrently tuned into.

Showstcartistnamewhonre- ceivingthelaginformation. Showstcartistnamecofthear- tistcurrentlybeingplayedfor MP3/WMA/AAOMAVfiles.

Showscellularphone information.

Showsgeneralphoneinformation.

Showshomephoneinformation

Showsofficephone information.

Appendix

Appendix
Additionalinformation

Showstecom posename.
Showsthecategoryname.
Show the folder name of the folder containing the MP3/WMA/ AAC file currently being played.
ShowsthefilenameoftheMP3/WMA/AAChilocurrentlybeing played.
Show the preset number of the station currently being turned into.
Showsthechannelcurrently beingtunedinto.
ShowsSiriusXMinformation.
Showsthaticlenumbercurrently beingplayed.
Showstachapternumocurrentybeingplayed.
Showstherelayt mecurrently beingplayed.
Showswhenthegamea erfuncticnisonwhilereceiving SiriusXMstations.
Showstegenreofthetracy/songcurrentlybeingplayed.
Area3
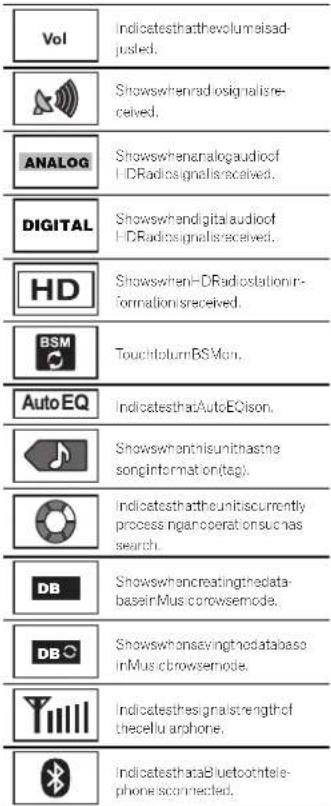
Additionalinformation
Handlingguidelines
Discsandplayer
Used discsfeaturinganyofthefollowinglogos.


Use12-cmdiscs
Theo lowingtypes of discscannotbeused with th sunit.
■DualDiscs
- 6-cmdiscs:Attemptstousesuchdiscswith
anadaptermaycausetheunitoma function.
- Oddlyshapedelises

- Damaged discs, includ ngclicesthatare cracked chippedorwarped
• CD-R/RWandDVD-R/RWDiscsthathaveno. beenfinalized
• DVD-RAM
Donotouchtherecordedsurfaceofthediscs.
Stored ses in the cases when not in use.
Donotattachlabels, write on crapply chemicals to the surface of the discs.
Tocleanad sc.wipethediscwithasoftclothoutwardfromthecenter.
Condensat or may temporarily impair the player's performance. Let trastforaboutonehourcoajusttawarmertemperature.Also.w peany dampdiscsoffwithasoftcloth.
Playbackofdiscsmaynotocpossibleboccausootdsccharacteristics,dscformal,recordedapplication.playbackenvironment,storagecondtions,andsoon.
Roadshocksmayinterruptdiscplayback.
Certain functions may not be available for some DVD video classes.
It may not be possible to pay back some DVD video discs.
This unit is not compatible with disc recorded in AVCHD(AdvancedVideoCodecl highDefinition) format. Donotin sort AVCHD disc as you may not be able to reject the disc.
When using discsthatcan be print today bol sur faces, check their instructions and how warnings of the discs. Depending without scs, nserling and ejecting may not be possible. Using such discs may result in damage to this equipment.
Dorctattachcommerciallyavailableanelorsor othermaterialstothed scs.
• Trediscs may warp making: neciscound ayable.
- Thelabels may come off during playback and preventejection of the scs, which may result in damage to the equipment.
USBstoragedevice
Depending on the external storage device (USB), the following problem may occur.
• Operations may vary.
• Thasoragedevicemayno:berecognized.
- Filesmaynotbeplayedbackproperly.
Connectors via USBhubarenolsupports.
Additionalinformation
DonotconnectanythingotherthaneUSBstoragedevice.
FirmlysecuretheUSBstoragedevicewrendriving. Don't lettheUSBstoragedevicefalltothe floor, where tmaybecomejammodundro the brakeoracceleratorpedal.
Depending on the USB storage device, the device may cause noisetoccurintheradio.
Copyright-protected file stararestorec in the USBbovicas cannot be played back.
You cannot connect a USB portao eaudiop layer/USB memory to this unit via USB hub
PartitionedUSBmemoryis not compatible with this unit.
Dependingonthrak ndofUSBportableaudio player/USBmemoryyouuse.thedevicemaynot berecognizedoraudio/filesmayno beplayed backproperty
DonotleavetheUSBportableaudioplayer/USB memoryindirectsunlightforexencedamounts of time. Doirgsomaycausethadevicetomal function from theextremeriseintemperature.
iPod
To ensure proper operation connected to a connectorable from the Postdirectly this unit.
FirmlysecuretheiPodwhendriving.Donolletthe iPodfallonlalheoor,whereilmaybecome jammeduncorthebrakcoracceleratorpoca.
AboutiPodsettings
- When an iPod disconnected, this unif changes the EQ (equal zer) setting of the iPod off in order to opt minimize the acoustics. When you can connect the iPod, the EQ return to the original setting.
- You cannot set Repeattooff on the Pod when using this unit. Repeat is automatically changed to All when the Pod disconnected to this unit.
incompatible text saved on the Podwill not bed a played by the unit.
DVD-R/RWdiscs
UnfinaizedDVD-R/RWdiscswhichhavebeenre- comed intheVidecformat(videomode)cannot be played back.
Playback:ifDVD-R/RW/discsmaynotbeposs ble, ducted is characteristics,scratches or it on the disc, oreir, condensation etc. ent elcnsof this unit.
Depending on the applications settings and environment, layback of disc recorded ones computer may not be possible. (For details, contact the manufacturer of the application.)
CD-R/RWdiscs
When CD-R/RWolscsareused playbackispossibleonlyfordiscswnich have been finalized. Playback:CD-R/RWolscsrecordedonamusic CDrecorderoracomputermayrctbepossiole duetodisccharacteristics,scratchesorditon thepisc,ordir,condensation,etc.,onthelensof thisunit.
Depending on the application settings and the environment, play back of discussion recorded on computer may not be possible. (For details, contact the manufacturer or the application.)
Additionalinformation
PlaybackofCD-R/RWdiscsmaybecomeimpossible caseofdirectexposuretoaunl ght.high temperatures,orthestoragecondit onsinthevehicle.
Titles and other text information recorded on CD-R/RWdisc may not be displayed by this unit (in the case of audodata(CD-DA)).
JPEGpicturefiles
JPEGlsshortfordclintPhotograph cExperts Groupand referstoastillImagecompression technologystandard.
Fl esarecompatible with BaselineJPEG and EXI 2.1 still images upto resolution of 8192×7680 (EXIF format sused in most commonly with digital still cameras.)
PlaybackofEXIFormatfilesthatwereprocessed byacomputermaynotbepossible.
There is no progressive PEG compatibility.
DivXvideofiles
Depending on the composition of the file information, such as the number of audio streams or file size, there may be a light delay when playing backdiscs.
Somespacialoperationsmaybeprehle teddueto thecompositionoftheDivXfiles.
Only DivX files down loaded from a DivX partner site care guarantee for proper operation. Unauthorized DivX files may not properly
DRMrentafiles cannot be operated until playback started.
Recommenderfilesize:2GBorlesswithatransmissionratcof2Mbpscross.
ThalDcodecftth sunitmustberegisstedtoea DivXVODprovider nordertoplaybackDivXVOD files.Forinformation onlCodes,refertoDisplay-ingtheDivX ^08 VODregistrationcodeonpage38.
Formorodetailsabout:DivX,visitthofollowing site; http://www.divx.com/
MPEG-1/MPEG-2/MPEG-4videofiles
Elapsed by back time may not be displayed correctly.
Important
- WhennamingaJPEGimagefile addthe corresponding filenameextens on(.jpg, .jpegor, pe).
Thisunitplaysbackfileswiththesefilename extensions(.jpg, .joegor, jpe)asaJPEG imagefile. Topreventmafunctions, donot usetheseextensionsforfilesotherthan JPEGimagefiles.
Audiocompatibility(USB)
WAV
Fileextension:wav
Quantizationbits:8and16(LPCM),4(MSADPCM)
Sampling frequency: 6kHz to 48kHz (LPCM), 22.05kHz to 44.1kHz (MSADPCM)
Appendix
Additionalinformation
Compressedfile compatibility(disc,USB)
WMA
Fileextens on: wma
BI, rate:48kbpslo320kbps(CBR), VBR
Samplingfrequency:32kHz to 48kHz
Windows Media™/AudioProfessional.Lossless, Voice/DRMStream/Streamwithv.doc:Notcompatible
MP3
Fileextension:mc3
Bitrate:8kbpsto320kbps(CBR) VBR
Sampling frequency: 8kHz to 48kHz (32kHz, 44.1kHz, 48kHz for emphasis)
CompatibleID3tagversion:1.0,1.1,2.2,2.3,2.4 (ID3tagVersion on 2.xisgivenpriorityoverVersion 1.x.)
M3uplaylist: Notcompatible
MP3i(MPSinteractive).mp3PRO:Notcompatible
AAC
Compatible format: AAC encoding by Tunes
Fileextons on: m4a
Samplingfrequency:11.025kHzto48kHz
Bitrate:16kbpsto320kbps
Aco eLossless Notcompatible
AACfi aboughtfromtheiTunesStore(.m4pfile extension):Notcompatible
DivXcompatibility
Compatible format: DivXvideoformat implemented in relation to DivXstandards
Fileextensions.aviory.divx
DivXU traformat: Notcompatible
D-vXHD format: No compatible
DivXfileswithoutvideodata:Notcompatible
DivXplus:Notcompatible
Compatibleaudiocode:MP2,MP3,DolbyDigital
LPCM:Compatible
Bitrace:8kbpsto320kbps(CBR),VBR
Samplingfrequency:8kHz<48kHz
Compatible external subtitle leextension.srt
MPEG-1/MPEG-2/MPEG-4video
Fileextensions.mpgor.mpeg(MPEG-1/MPFG-2), .avi(MPEG-4)
Compatible audiocode: MP2(MPEG-1/MPEG-2), MP2.MP3.Do byDigital(MPEG-4)
H.264(MPEG-4AVC):Notcompatible
LPCM:Not comparable
Bitrate:8kbpsto320kbps(CBR),VBR
Samplingfrequency:8kHz to 48kHz
Additionalinformation
Supplementalinformation
Somecharactersina@lonoame(includingthat lo extension)orafo@ernamemaynolbedisplayed.
This unit may not work properly depending on the application used to encode WMA files.
There may be a light delay at the start of playback of audio files embedded with images and audio files stored on USB storage device that has numerous folder hierarch as.
Disc(CD/DVD)
Playablefolders:upto99forCD-R/RW
Playable folders: up to 700 for DVD-R/RW
Playablefiles:upte999forCD-R/RW
Playablefiles:uptc3500forDVD-R/RW
F l esystem: ISO9660Level1 and 2 Romeo, Jollet. UDF1.02(DVD-R/RW)
Multi-session playback: Compatible
PacketwritedatastransferNotcompatible
Regardless the length of blank sections between the songs from the original recording.com pressed audio disc play with short pause between songs.
Externalstoragedevice(USB)
Playablefolders:upto1500(upto700forDivX/MPEG-1/MPEG-2/MPEG-4)
Playablefiles:upto15000
Playback of copyright-protected files: Not compatible
Partitionedexternalstoragedevice(LSB):Onlythat firstplayab epartitioncanbeplayed.
There is no compatibility for MultiMediaCards (MMC).

CAUTION
- Pioneeracceptsncresponsibilityfordata loslontheUSBmemory/USBoptableaudo playerevenifthaldata sloslwhileusing thisunit.
- Pioneer cannot guarantee compal billy with all USB mass storage devices and assumes nonrespons bility for any loss of data on mediaplayers, smartphones, or other devices while using this product.
- Donot eavethediscs/externalstoragedev-ce(USB)oriPodinplaceswithhightem-peralures.
iPodcompatibility
This units supports only the following iPod models.
Madefor
- iPodtouch(5t generation)
- iPodtouch(4th generation)
• iPodtouch(3rdgeneration)
- iPodtouch(2nogeneration)
- iPodtouch(1stgeneration)
- iPodclass c
- iPodwithvideo
• iPodnano(7thgeneration)
• iPodnano(ethgenerat on)
- iPodnano(5lhgeneral on)
- iPodnano(4thgeneration)
• iPodnano(3rdgeneration)
- iPodnano(2ndgeneration)
• iPodnano(1stgeneration)
- iPhoneb
• iPhone4S
- iPhone4
Additionalinformation
- iPhone3GS
- iPhone3G
• iPhone
Depending on the regeneration inversion of the
iPod, some functions may not be available.
Operations may vary depending on the software version of iPod.
About the file format compatibility, refer to the iPodmanua s.
Audiobook, Podcast: Compatible

CAUTION
Pioneeracceptsnoresponsibilityfordatalost ontheiPod, even if that data is lost while this unit is used.
AboutiTunestagging
This function can be performed with the following iPodmodels.
— iPodlouch4thgeneration
—iPodtouch3rdgeneration
— iPodtouch2ndgeneration
— iPodlouch!stgeneration
—iPodclassic160GB
—Podclassic120GB
— iPodclassic
—iPodwithvideo
—iPodnano6thgeneration
— iPodanos6thgeneration
—iPodnano4thgeneration
—iPodnano3rdgeneration
—iPhone5
—iPhone4S
—iPhone4
—iPhone3GS
—iPhone3G
—iPhone
Thesonginformaton(lag)canbesavedfrom
thebroadcastingstationoyouriPod.Thesongs
willshowupinaplaylistcalled"Taggedplaylist"
iniTunesthenextimeyousyncyouriPod.Then
youcandirectlybuythesongsyouwantfrom
theiTunesStore.
The tagged songs and the song that you can buy from their Tunes Store may be different. Make sure to confirm the song before you make the purchase.
If you cannot use this function normally, update your Poolfirmware.
Sequenceofaudiofiles
Theuser cannot assign to dernumbers and specify playback sequences with this unit.
Exampleofahierarchy

Level 1 Level 2 Level 3 Level 4
Folder Compressed audiofile 01to05:Folder number ToPlayback sequence
Disc
Folderselect orsequenceorotheroperation may differ depending on the encoding or writing software.
Externalstoragedevice(USB)
The playback sequence of the same astherocorded sequence in the external storage device (USB).
Tospecifytheplaybacksequence,thefollowing methodisrecommended.
Additionalinformation
①Createafilennamethatincludesnumbers thatspecifytheplaybacksequence(e.g. 001xxx.mp3and099yyy.mp3).
2 Putthosefiles ntoafolder.
3 Save the folder that contains the file to the external storage device (USB).
However, depending on the system environment, your may not be able to specify the playback sequence.
For USB portable audioplayers, thesequence is different land depends on the player.
Usingthedisplaycorrectly

CAUTION
- Illiquidorforeignmallershouldgelinside thisunit, turnoff the power immediately and consult your deal or then care authorized PICNEERSService Station. Donolusethe un linlhiscondition because doing so may result in fire, electric shock or other failure.
- If you notice smoke, astrange noise smell, or any other abnormalities from tired spray, turnout the power immediately and consult your deal eror there are a authorized PIONEER Service Station. Using this unilin this condition may result in permanent damage to the system.
- Doncldisassembleormodifythisunit, as therearchigh-voltagecomponentsins de whichmaycauselectricshock.Bosuroto consullyourdealerorthenearestauthorized PIONEERServiceStationforinternalinspection.adjustments.omepairs.
Handlingthedisplay
- Nevertouchthescreenwithanythingbesidesyourfingerwhenoperalingthelouchpanelfunction.Thescreencanscratcheasily.
- When the display is subjected to direct sunlight for a long period of time, it will become very hot resulting in possible damage to the LCD screen. You should avoid exposing the display on direct sunlight as much as possible.
- The display should be used within the temperature range of 14°F to 140°F. At temperature higher or lower than this operating temperature range, the display may not operate themally.
• The CD screen is exposed in order to increase its visibility within the vehicle. Donot pressils strongly on its this may damage it. - DonotpushtheLCDscreenforcefullyas thismayscratchit.
Liquidcrystaldisplay(LCD)screen
- HeatfromtheheatermaydamagetheLCD screen andcoolairfromthecoo ermay causomosturetoforminsidethodisplayro-sultinginpossiledamage.
- Smallblackdotsorwhiledots(brightdots) mayappearontheLCDscreen. These are ductothecharacteristicsotheLCDscreen and/ornotindicateamalfunction.
- When using acellular phone, keep the antenna away from the display to prevent disruption of the video image by the appearance of spots, colored stripes etc.
LED(light-emittingdiode)backlight
- Allow temperatures, using the LED backlight may increase image lag and degrade the image quality to the characteristics of the LCD screen. Image quality will improve with an increase in temperature.
- Toprotectthel FIDbacklight, the display will darken in the following environments: — In directed sunlight — Near the weather event
Appendix

Appendix
Additionalinformation
• The product lifetime of the LED backlight is more than 10000 hours. However, it may decrease if used in high temperatures.
- If the LED backlight reaches the endofits product life, the screen will become dark and the image will longer be projected. In such cases, please consult your dealer or the nearest authorized PIONEER Service Station.
Keepingthedisplayingood condition
- When removing dust from the screener cleaning the display, first turn the system power off, then wipewith as of dry cloth.
- When wiping the screen, take care not to scratch the surface. Donot use harshor abrasive chemical cleaners.
Bluetoothprofiles
IncertouseBluetoothwirelesstechnology, devicesmustbeabletointerpretcertainprofiles.Thisunitiscompatiblewiththefollowing profiles.
•GAP(GenericAccessProfile)
• SDP(ServiceDiscoveryProtocol)
• OPP(ObjectPushProfile)
• HFP(HandsFreeProfile)
• HSP(HeadSelProfile)
• PBAP(PhoneBookAccessProfile)
• A2DP(AdvancedAudio Distribution Profile)
•AVRCP(Audio/VideoRemoteControlProfile)
1.3
•SPP(SerialPortProfile)1.1
License, WarrantyDisclaimer & Limitation of Liability SAFETY PROVISIONS
Disclaimer
THEWARRANTIFSSFIFORTHINPIONEER THELDWARENTYARRETHONLYWARRANT TIESMADBPIONEFORANYOFITISHEN- SORS,ASAPPLICABLE,PIONEFRANDITS LICENSORSEXPRESSLYDISCLAIMALLOTHER WARRANTIFS,EXPRESSORMIPED,INCLUDING WITHOUT IMITATION,WARRANTIFSOF MERCHANTABILITYANDFITNESSFORAPAR- TICULARPURPOSE.
LimitationofLiability
TOTHEMAIX: VUMEXTENTPERMISSIBLE UNDERAPPLICABLELAW.NEITHERPIONEER NORITS LICENSORS WILL BE LIABLE TO YOU OR TO ANY OTHER PARTY FOR ANY INDIRECT, CONSEQUENTIAL, INCIDENTAL, PUNITIVE, OR SPECIAL DAMAGES, REGARDLESS OF THE FORMO ACTION, WHETHER INCONTRACT OR NTORT, INCLUDING NEGLIGENCE, EVENIF SUCH PARTIES HAVE BEEN ADVISED OF THE POSSIBILITY OF SUCH DAMAGES.
TOTHEMAIX: VUMEXTENTPERMISSIBLE UNDERAPPLICABLELAW. PIONEER S. OR ITS LICENSORS: TOTAL LIABILITY OF ANY KIND ARISING OUTFOR RELATED TO YOUR USE OF THE PRODUCTS, INCLUDING BUT NOT LIMITED TO ANY WARRANTY CLAIMS. OR ANY CLAIMS FOR PROPERTY DAMAGE, DEATHOR DISABILITY, REGARDLESS OF THE FORUM AND REGARDLESS OF WHETHER ANY ACTION OR CLAIMS BASED ON CONTRACT, TORT, (INCLUDING NEGLIGENCE), STRICT PRODUCT LIABILITY, OR ANY OTHER LEGAL THEORY WILL NOT EXCEEDENETIOUS AND DOLLARS (USD \$1000).
Additionalinformation
SOMEJURISDICTIONSDONOTALLOWTHE EXCLUSIONOFDAWAGESORLIMITATIONOF LIABILITY,SOTHFABOVFXCLUSIONSOR LIMITATIONS,TOTHEEXTENTPROHIBITEDBY APPLICABLELAW,MAYNOTAPPLYTOYOU, YOURSPECIFICRIGHTSMAYARYTROMJURISDICTIONTOJURISDICTION.
libpng
Pleasebeaware inadvancethalPioneerwillnot respondloquestionsconcerningthecontents ofthesourcecode.
This licence was originally written in English and translated here only to help thereader understand its content. Therefore, please note that translated licence is NOT legally identified with the original English text.
This copy of the libpong notices is provided for your convenience. Incaseofanydiscrepancy between this copy and her notices in the file png, hthat is included in the libpng distribution, the lattershallprovail.
COPYRIGHTNOTICE, DISCLAIMER, and LICENSE:
Iyoumod fyllopingyoumayinsortadditional noticesimmed aley following thisissentence. Thiscode released uncertelibonglicense.libongversions1.2.6.August 15.2004,through 1.5.0. January 6.2011,areCopyright(c)2004, 2008-2010GlennRanders-Penron,andaredistributedaccordngtothesamedisclaimerandlicenseslibpng-1.2.Swiththefollowing individual addedlothelistofContributingAuthors
CosminTruta
libongversions1.0.7.July1,2000.through1.2.5-October3,2002,areCopyrightic2000-2002 GlennRanders-Pehrson,andaredistributedac-cordingtothesamedisclaimerandlicenseas libong-1.0.6withthefollowingindividualsadded tothelistofContributingAuthors
Simon-PierreCadieux
EricS.Raymond
GillesVollant
andwiththefollowingadditionstothedisclaimer:
Thereisnowarrantyagainstinterferencewith youenjoymentofthelibraryoragaintinfringement.Thereisnowarrantythatcourefortorsor thelibrarywilltufillanyofyourparticularpurposesomeeds.Thislibraryisprovidedwith all faults,andtheentlerisko/satisfactoryquality, performance,accuracy,ancefortiswththe user.
libpngversions0.97,January1998,through 1.0.6,March20,2000,areCopyright(c)1998,1999GlennRanders-Pehrson,andarodistribu-ledaccordinglcIresamedisclamerandl- censcaslibpng-0.96,withthofollowing individualsaddedtothelstofContributingAu- thors:
TomLane
GlennRanders-Pehrson
WillemvanSchaik
libprgversions0.89,June1996,through0.96, May1997.areCopyright(c)1996.1997Andreas DilgerDistributedaccordinglothesamedis- claimerandlicenseaslibong-0.88,withthefol- lowingindividualsaddoctothelistof
ContributingAuthors:
JohnBowler
KevinBracev
SamBushel
MagnusHolmgren
GregRoelofs
TomTanner
liboprgversions0.5, May 1995, through 0.88, January 1996, are Copyright(c) 1995, 1996 Guy Eric Schainat, Group42, Inc.
For the purposes of this copyright and license, "Contributing Authors" is defined as the following set of individuals:
Additionalinformation
AndreasDilger
DaveMartindale
GuyEricSchalnat
PaulSchmiot
Tim Wegner
ThePNG Reference Library is supplied "ASIS".
The Contributing Authors and Group 42, Inc. disclaim all warranties, expressed or implied including, without limitation, the warranties of
merchantability and fitness for any purpose.
The Contributing Authors and Group 42, Inc. assumes nonoliability to direct indirect, incidental, special, exemplary, or consequential damages, which may result from the use of the PNG Reference Library, even if advised of the possibility of such damage.
Permission is hereby granted, use, copy, modify and distribute this source code, or portions hereof, for any purpose, without use, subject to the following restrictions:
-
The origino this source codem must not be misrepresented.
-
Altered versions must be plainly marked as such and must not be represented as being the original source.
3.ThisCopyrightnoticemaynolberemovedor alteredfromanysourceoralteredsourcedistribution.
The Contributing Authors and Group 42, Inc. specifically per m.t., without fee, and encourage the use of this source code as a component to supporting the PNG file format in commercial products. If you use this source code in product, acknowledgment is not required but would be appreciated.
A'png_get_copyright'functionisavailable.for convenientusein'about'boxesandthelike:
printf("%s",ong_get_copyright(NULL); Also.thePNGlogo(inPNGformat_ofcourse)is suppliedinthefiles'pngbar.png'and
'pngbar.jpg(88x31)and'pngrow.png'(98x31), LibprgisOSICertifiedOpenSourceSoftware, OSICertifiedOpenSource Certification markoftheOpenSourceInitiat ve.
GlennRanders-Pehrson
glennrpatusers.sourceforge.net
January6.2011
Copyrightandtrademarknotice
ThisitemincorporatescopyprotectiontechnologyhalisprotectedbyU.S.patentisandotherintellectualpropertyrightsofRovCorporation.Roverscengincoringandoisassemblyareprohibited.
Bluetooth
TheBluetooth® wordmarkandlogosareregisteredtrademarksownedbyBluetoothSIG, Inc., andanyuseofsuchmarksbyPIONEER CORPORATION sunderlicense. Other trademarksandtradenamesarethoseoftheirrespectiveowners.
DVDvideo
DVD isatrademarkofDVDFormet/Logo
LicensingCorporation.
iTunes
Apple and iTunes are trademarks of Apple Inc., registered in the U.S. and other countries.
MP3
Supply of this production youveys a license for private non-commercial use and does not convey a consensor imply a rightouse this product in any commercial (i.e. revenue-generating) real-time broadcasting (terrestrial, satellite, caoloand/oranyothormodia), broadcasting/streaming via internet, intraneis and/or other networks or other electronic content distributions systems, such as pay-audio audio on-demand applications. An independent license for such use is required. For details, please visit http://www.mp3licensing.com.
Additionalinformation
WMA
WindowsMediaiseitherareg steredtrademark ortrademarkofMicrosoftCorporationinthe UnitedScalesand/orthercountries.
This product includes technology owned by Microsoft Corporation and cannot be used for distributed without a license from Microsoft Licensing, Inc.
iPod&iPhone
iPhone,iPod,iPodclassic,iPodnano.andiPod toucharctredemarksofAppleInc...registered in the U.S. and other countries.
Lightningisstrademarko@AppleInc. "Made for iPod" and "Made for iPhone" mean that are electronicaccessoryhasbeen designed toconnectspecificallyto!PodoriPhone, respectively, and hasboencortifiedbythodeveloperto meet. Appleperformancestandards. Apple is no responsible for the operation of this device or its compliance with safety and regulatory standards. Please note that the successful accessory withiPodoriPhnomemayaflectwire ess performance.
Android™&GooglePlay
Android and Google Play are trademarks of Google Inc.
DolbyDigital
ManufacturedunderlicensetromDolby Laboratories.Dolbyanothedouble Dsymbol aretrademarksofDolbyLaboratories.
DivX
DivX ^00 , DivXCerified ^16 and associated logos are trademarks of Rovi Corporation or tssubsidiaries and are used under license.
ABOUTDIVXVIDEO:DivX® is digital video format created by DivX, LLC.asubs diary of Rovi Corporation. This sanctified DivACertified device that plays DivXvideo. Visitdivx.com for more information and software tool to convert your files into DivXvideos.
ABOUTDIVXVIDEO-ON-DEMAND This DivXCertified device must be registered order to top purchase DivXVideo on Demand (VOD) movies. To obtain your registration code, locate the DivXVOD section -Displaying the DivX VOD registration code. Gotovod.divx.com tomorrow information now to complete your registration.
SiriusXMSatelliteRadio
((SiriusXM)) READY
Sirius,XMandallrelatedmarksandlogosare trademarksofSiriusXMRadio,Inc.Allrightsreserved.
Pandora® internetradio
PANDORA, the PANDORALogo, and the Pandoratradecressaretrademarksorregisteredtrademarksof PancoraMedia, Inc. Used with permission.
MIXTRAX
MIXTRAXisatrademarkofthePIONEER CORPORATION.
MirrorLink
MirrorLinkCertif ed™, the Design Only™ Certification Logo, Mirror Link™ and the Mirror Link™ Logo are certification marks and trademarks of the Car Connectivity Consortium LLC. Unauthorized use is strictly prohibited.
Appendix
Additionalinformation
LanguagecodechartforDVD
| Language(code),inputcode | ||||
| Japanese (aj), 1001 | Dzongkha (dz), 0426 | Kurdish (ku), 1121 | Kinyanwanda (rw), 1823 | |
| English (en), 0514 | Ewe (ac), 0505 | Koml (kv), 1122 | Sanskrit (sa), 1901 | |
| French (fr), 0618 | Esperanto (eo), 0515 | Cornish (kw), 1123 | Sardinian (sc), 1903 | |
| Spanish(es),0519 | Estonian(ei), 0520 | Kirginiz,Kyrgyzky), 1125 | Sindhi(sd),1904 | |
| German (de), 0405 | Basque (eu), 0521 | Latin (a), 1201 | NorthernSami(se), 1905 | |
| Italian(t),0920 | Persian(ta), 0601 | Luxembourgish(lb), 1202 | Sangno(sq), 1907 | |
| Chinese (zh), 2608 | Fulah (fl), 0606 | Ganda (lg), 1207 | Sirhala (s), 1909 | |
| Dutch,Flemish(nl), 1412 | Finnish (fl), 0609 | Limburgan (ll), 1209 | Slovak (sk), 1911 | |
| Portuguese (pl), 1620 | Fij ar (f), 0610 | Lingala (lr), 1214 | Slovenian (sl), 1912 | |
| Swedish (sv), 1922 | Farcese (fc), 0615 | Lao (lc), 1215 | Samoaan (sm), 1913 | |
| Russian(r), 1821 | WesternHris an(hy), 0625 | L thuan an(lt),1220 | Shona(sn),1914 | |
| Korean (ko), 1115 | Irish (ga), 0701 | Luba-Kalarga (u), 1221 | Somali (sc), 1915 | |
| Greek (ef), 0512 | Gas le (gö), 0704 | Latvian (v), 1222 | Albanlan (sq), 1917 | |
| Afara (sa), 0101 | Galician (gl), 0712 | Malagasy (mg), 1307 | Serbian (sr), 1918 | |
| Axhazlan (ab) 0102 | Guaranl (gn), 0714 | Marshallese (mn), 1308 | Swafi (ss), 1919 | |
| Avastan (ac), 0105 | Gujarati (gu), 0721 | Maori (mi), 1309 | Sothe,Southamist, 1920 | |
| Afrikaans (af), 0106 | Manx (gv), 0722 | Macedonian (mi), 1311 | Sundamese (su), 1921 | |
| Akan (ak), 0111 | Hausa (ha), 0801 | Ma ayalam (mi), 1312 | Swahili (sw), 1923 | |
| Amharic (am), 0113 | Hebrew (he), 0805 | Morgolan (mn), 1314 | Tamil (ta), 2001 | |
| Aragonese (an), 0114 | Himai (hi), 0809 | Marathi (mri), 1318 | Telugu (le), 2005 | |
| Arabic (ar), 0118 | Hini Molu (ho), 0815 | Malay (ms), 1319 | Tajik (lg), 2007 | |
| Assamese (as), 0119 | Croatian (hr), 0818 | Maltaso (mt), 1320 | Thai (th), 2008 | |
| Avanz (av), 0122 | Haitian (hi), 0820 | Burmese (my), 1325 | Tigniya (l), 2009 | |
| Aymara (ay), 0125 | Hungarian (hu), 0821 | Nauru (na), 1401 | Turkonom (tk), 2011 | |
| Azerbaijan (az), 0126 | Armonian (hy), 0825 | Bokmal (nb), 1402 | Tagalog (tl), 2012 | |
| Baskiriba),0201 | Herero(hr),0826 | Ndebe e North(no), 1404 | Tswana(in), 2014 | |
| Belarusian (bei), 0205 | Interlingua (ia), 0901 | Nepali (ne), 1405 | Tonga (to), 2015 | |
| Bulgarian (bg), 0207 | Indonesian (id), 0904 | Ndonga (rg), 1407 | Turkish (t), 2018 | |
| Bihari (bh), 0208 | Interlingue (es), 0905 | Nynorsk (an), 1414 | Tsonga (ts), 2019 | |
| Bis ama (bi), 0209 | Igoo (ig), 0907 | Norwegian (no), 1415 | Tatar (tt), 2020 | |
| Bambara(bm),0213 | SichuanY(ii),0909 | Ndebe e South(nr), 1418 | Twix(w),2023 | |
Additionalinformation
| Language(code),inputcode | ||||
| Bonga'i(br).0214 | Inupiaq(k).0911 | Navajo,Navano(nv), 1422 | Iahitian(cy).2025 | |
| Tibetan (jo).0215 | Ido (o).0915 | Cruchewa (ny), 1425 | Ughur,Iygnur(ug), 2107 | |
| Breton (br).0218 | Icelandic (is).0919 | Occitan (oc), 1503 | Ukrainan (uk), 2111 | |
| Bosnian (bs).0219 | Inuktitut (ju).0921 | Ojiowa (oj), 1510 | Urdu (ur), 2118 | |
| Cataran (ca).0301 | Javanese (vj), 1022 | Oromo (om), 1513 | Uzbek (uz), 2126 | |
| Chechon (ce).0305 | Georgian (ke), 1101 | Orya (or), 1518 | Venda (ve), 2205 | |
| Charromo (ch).0308 | Kongo (kg), 1107 | Osselian (cs), 1519 | Vietnamese (vi), 2209 | |
| Cors pan (cs).0315 | Kikuyu,Gikuyu(kl),1109 | Panjati,Pumjabil(pai), 1601 | Volapiki(vo),2215 | |
| Cree (cr).0318 | Kuanyama (kj), 1110 | Pari (pl), 1609 | Waloon (wa), 2301 | |
| Czech (cs).0319 | Kazakh (kk).1111 | Polish (pl), 1612 | Wolof (wo), 2315 | |
| Churon Slavic (cu).0321 | Kalaallisut (kl), 1112 | Pashto,Pushto(ps), 1619 | Xhosa(xn),2408 | |
| Chuvash (cv).0322 | Centraikhmer(km). 1113 | Quechua(qui),1721 | Yiddish(yi),2509 | |
| Welsh (cy).0325 | Kannsda (kn).1114 | Romansh (rn), 1813 | Yoruba (yo), 2515 | |
| Dan sh (da).0401 | Kanuri (kr).1118 | Runci (rn), 1814 | Zhuang,Chuang(za), 2601 | |
| Divehi (dv).0422 | Kashmiri (ks), 1119 | Romanian (ro), 1815 | Zuu (zu), 2621 | |
Additionalinformation
Specifications
General
Powersource....14.4VDC;10.8Vto15.1Val
(owable)
Groundingsystem......Negativetype
Maximum current consumption
10.0%
Dimensions(W×H×D):
13
Chassis....78mm×00mm×165mm
7in.×3-7/8in.×6-1/2in.)
(AVI X3600BI IS/AVI I X2600BT/AVI I X1600DVD)
Display
Screensize/aspectratio..6.95 inch wide/16:9
(effective display area:
156.6mm×8:6mm
(AVI X5600BI IS/AVI X460CBT)
Screensize/aspect ratio..B.1 nchwide/16:9
(effective displays)
136.2mm×72.0mm
(AVH X3600BHS/AVH X2800B1/AVH X1600DV_3)
Pixels....157000(240)×480;
Displaymethod.....TFTactivematrix,drivingtype
Colorsystem.... NISOPAL/PAL M/PAL N
SECAMcompatible
Durzoletemperaturerange(poweroff)
-4°F+10-176°F
Audio
Maximum power output..50W×4
70W×' /2Ω(forsuowooler)
Continuouspoweroutput
22W×4(50Hz)c15000Hz
b&IHD,4Ωoad boinchan-
nelsdr von)
Load impedance .... 4Ω (4Ω to 8Ω (2Ω for 1c))
allowable
Precout maximum output level
AO = AV
(AYI)X5600B IS/AYI)X4600B
Preoutmaximumoutputlevel
20V
(AVH X3600BHS/AVH X2600B /AVH X1600DVD)
Equalizer® BandGraphic Equalizer:
Frequency....40Hz/80Hz/200Hz/400Hz/
1kHz/2.5kHz/8kHz/10kHz
Gain....⊥12cB
|P
Frequency.....501 12/631 12/801 27/1001 12/
125Hz
Slone -12:43/oc
Subwoofer(mono)
Frequency 50Hz/63Hz/80Hz/100Hz
125Hz
Slow-18dB/oct
Gain +6dB to -24dB
Phase Normal:Reverse
Basscoast:
Gain....+12dBtcc0dB
DVDPlayer
System......DVVideo,VideoCD,CD
WMA MP3 AAC DivX
MPEGplayer
Usablediscs.....DVVideo,VideoCD,CD,CD
R/RW DVD-R/RW/RD
Regionumber......
Frequency response.....bHz to 44000Hz (with DVD,
alsamplingfrequency96kl Hz
Signa 3c noiseratio.....96cB(1k|12)(II IF Anecwork)
(RCAlevel)
(AVH-X5600BHS;AVH-X4600
Signa -co-noiseratio.....91dB(13Hz)(IIF-Anetwork)
(RCAlevel)
(AVH-X3600BHS/AVH-X2600BT/AVH-X1600DVD)
Oc Inu level
Video 1.0 Vc p/75 Ω (-0.2 V)
Number of passages 2(stereci)
MP3decodingformat....VPEG-1&2Aud player3
WMAdeccingofarmst...Var.7.7.1.8.9.10.11.12/2ch
aucio
(WindowsMediaPlayer)
AACcecedinglerma.....M-EG-1AACII unescoded
on (i) [14]
Ver. 10 Handeardier
Additionalinformation
DivXdecodingformat.....HomeTheater/Ver.3,4,5,7,0
(ExceptultraandHO)(avi.
.01ex)
MPEGvice decoding format
MPFG1.MPFG2.MPFG4
(fear12.MS-NPEG4(ver.3)
USB
USL standards specification
...USB1.1,USB2.0furlspeed
(For identifying)
USB2.0highspeed;For
aucicliles)
Maximum current supply
1.0A
USPClass....MSC(MassStorageClass)
M P/Med a transferProtocol
Filesystem....FAT16.FAT32
MP3decod neformat.....MPFG-132Aud ol syer3
WMAdeccinglernal...Ver.7.7.1.8.9.10.*1.1202ch
aucic)
WindowsMediaPlayer
AACdecodingformat.....MPFG-4AACOiTunesencoded
QH
(Ver 10.6andearlier)
WAV(MSCModeonly)
WAVsignalformat.....LinearPCM,VSADPCM
(.wav)
Sampling Frequency.....LinearPCV:16kHz,22.05kHz,
24kHz 32kHz 44.1kHz
48kHz
MSADPCM:22.064 Hz
44'k
JPEG(MSCModeonly)
JPEGdeccdingfamral...pen, no, ne
PixelSample 422420
DecodeSize MAX:81921Hx76800M
MIN:32(H)×320W
Divocodinlorma (MSCMeccony)
Uranllbasloiter 34526
(ExceptultraandHDv.avi.
civxt
MPEGvice decoded information(MSCModeonly)
МРГС1 МРГС2 МРГС4
(part2) MS-VPEG4iver 3
- 公司及本公司的股东、实际控制人及其关系
FMtuner
Frecuer syrange....87.9MHz to 107.9MHz
Usable sensitivity 9dBf (0.8μV/75Ω, mono. S/N:
30d3
Signal to inciseratio.....80dB(digitalbroadcasting)
(II) F-Anetworq
(AVH-X5600BHS/AVH-X3600BHS)
Signal-to-noise ratio.....72dB (analog broadcasting)
(IHT Anetworks)
AMtuner
Frequency range.....530k lzto1210k lz(104Hz)
Usablesensitivity.....25μV(S/N:20dB)
Signal-to-noiseratio.....80dB(dial tollbroadcasting)
(1+ Anelwor)
(AYI X5600BISAVI X3600BIS)
Signal-to-noiseratio.....62oR (analogbroadcasting)
(1HF-Anetwork)
Bluetooth
(AVH-X5000BHS/AVH-X4500BT/AVH-X3600BHS/AVH-
X2600B
Version......Bluetooth3.0certified
Outputpower....+4dBmMaximum
(Power class2)
CEA2006Specifications

Poweroutput.....14W RMS×4Channels(40)
and≤%H2(N)
S/Nratio....91 dBA (reference: 1W nle
4Ω
Note
Specif cationsandthedes gnaresubjectto
modificationswithoutnotice.
Tabledesmatières
01 Précautions
RÈGLESDEPROTECTION
IMPORTANTES72
appareiisurvctreiPoo92
Lecturealéatoire93
Accentuation desgraves108
Miseajourdufirmwareel'adaptateurde
liaisondesmartphone112
Affichagede aversiondufirmwarede
Installationdum microphone128
AVH-X3600BHS, AVH-X2600BTetAVH-X1600DVD
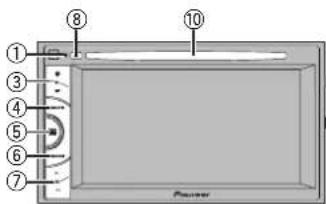
Aff chagedumenusource.
⑨Clocktouche

①Icônededéfilement
Spécificationcupointdelecture
Faitesglisserlepointdelectureal'écran.
Opérationscommunes
⑤ Touchedestationlocale
Réglagedel'accordautomatiquesurune stationlocale.
③Touchedestationlocale
■Sivou svou czbasculorsurler odevidécode l'Pod, ouchezlicône.

Commutationverslemocevidés del iPod.
iPod
■Sivousyoulezafficherlemodernosiquee 'iPod,touchzahl'cone.

Commutationverslemodemusiquedel' iPod.
http://www.pioneerelectronics.com/AppRadioMode auCanada
http://www.pioneerelectronics.ca/AppRadioMode
AppRadioMode
CompatibilitéiPhone
①ToucheAléatoire
Suppress on de stations
| S.BassAccentuationdesgraves |
Accentuationdesgraves
3Mettezlasourcehorsservice.
natural_image
Line drawing of a car interior showing steering wheel, dashboard, and cable (no text or symbols)3Placezlecontactd'allumagesurONou ACC.
Silaclimatisationoulechzuffagedelavoiture sonlenservice,coupez-les.Lebruillduventiataundelaclimatisationouduchauffagepout empôcherunocexecutioncorrecteuróglageEQ auto.
natural_image
Simple line drawing of a two-tiered container with circular holes on top and bottom (no text or symbols)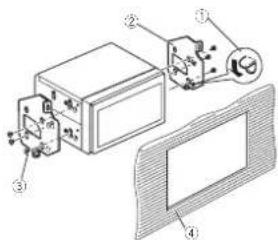
①Courbezlalanguelleverslebassiellegène ②Supportdemontageradiad'usine
Section
26
27
Français
Installation
Installationdumicrophone
(Fonctiende AVH-X5600BHS/AVH-X4600BT/AVH-X3600BHS/AVH-X2600BT)

PRÉCAUTION
①Fidum crophone
② Rainure
2Installezleclipmicrophonesurlepare- soleil.
natural_image
Technical line drawing of a vehicle's front wheel and dashboard assembly (no text or symbols)①Cl microphone
Sivousinstallezlemicrophone surlacolonnededirection
1Détachezlabasepourmicrophonedu clipmicrophone.
①Bandedoubleface
②Installezlemicrophonesurlafaccarrierede acolonnecodirection.
Réglagedel'angledumicrophone
Changazlalanguconutiisantlemcnudu disque.
Pannedecommunication.
Communicationerroroccurred.
Launchingtheapplicationfailed.
natural_image
Diagram of a device with three horizontal panels and a central circular element, labeled 'Zone3' at the bottom (no text or symbols within the diagram itself)Zone1

Indiquequelaforctions lencieux estactive.

Ind cue letempsderelectureen coursdelecture.

MP3i(MPSinteractif),mp3PRO:incompatible
AAC
Formatcompatible AACencodépariTunes
AppleLossless: incompatible
Fich or AACachetósurleiTunesStore(extension defich er.m4p): incompatible
CompatibilitéDivX
Extension of which is described in the external compatible source
Annexe
Lecture multi-session: compatible
- If outside (scnegeneration, iPortevan's stress/rotation)
- Podtouch (zemegeneration)
•Podtouch (regeneration)
- iPodclassic
•iPodavocuido
• iPodnanei7drogónération
(7) Condonal, embe generation
•IPoonanc(bemegeneration)
—Podnanoc4emegeneration
Ter's and'alimentation ... 14.4/CC10.3/315.1Vac
ceptable)
(AVI | X2600BI IS/AVI | X2600BT/AVI | X1600DV)
Poids 2.0kg
(AVH-X32003HS/AVH-X480031)
Poids....1.7kg
(AVH X3600BHS/AVH X2600BT/AVH X1600DV_2)
Affichage
la l'odel'ocran/ralicd'aspect
(surface affichage effective)
156,6mm×8",6mm;
(AYI-X5600SI S/AVI-X490CBT)
Phase......Non-male/Inverse
Accentuation desgraves:
Gain....+12dB@0dB
LecteurDVD
MPFG+, MPFG2, MPFG4(per-
tie2,MS-ME[64version3)
USB
SpecificationStandardUSB
USB1.1,USB2.0pleinevi
AVH-X3600BHS, AVH-X2600BTyAVH-X1600DVD
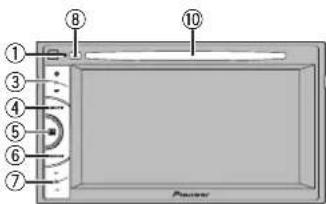
(AVH-X5800B S/AVH-X3800B S)

①Tecladebandas
—iPhone45
—iPhone4
—iPhone3GS
—iPhone3G
—iPhone
■Taqueeliconosiquerecambiaralmocade videodeliPod.

Camolcalmocoviceodellipoc.
3ReproduzcaelvideoeneliPod.
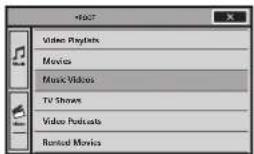
■ loquee iconosiqu erecambiaral mocodemusicadel Pod.

CamboalmodomúsicalediPod.
•TVShows(program asdeTV)
•VideoPodcasts(podcastsdevideo)
http://www.pioneerelectronics.ca/AppRadioMode
AppRadioMode
Consu teTeclaSourceofferlapágina149.
natural_image
Line drawing of a car interior with steering wheel, dashboard, and cable (no text or symbols)3Coloquelallavedeencendidodelauto- móvilenONoACC.
natural_image
Simple line drawing of a device with a bulb, tubing, and a hanging handle (no text or symbols)AVH-X3600BHS, AVH-X2600BTyAVH-X1600DVD
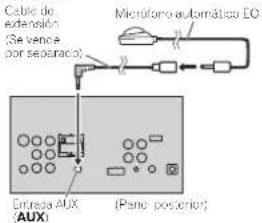
natural_image
Simple line drawing of a two-tiered container with circular holes on top and bottom (no text or symbols)
①:Pinza
Communicationerroroccurred.
Launchingtheapplicationfailed.
Windows Media™ AudioProfessional, Lossoss.
Voice/DRMStream/Streamconvideo: incompatible
MP3
H.264(MPEG-4AVC):incompatible
LPCM:noncompatible
Veloc iaddegrabación de8kbpsa320kbps (CBR), VBR
(AM) X56081S(AM)X4608T
120.5 m/s = 70.0 m/s
(AVF-X3600BHS/AVH-X2500BT/AVH-X1000DVD)
Pryales 1:52.003 (2450 × 480)
- wav, daw, abwawcimvani
14.872 double, 60% cosmetic 10%.
D: 1,694,097; 1,460;
30+120
7542
Pendente....-1
Garancia ....+5dB a -24 dB
Fase Normal/Insera
96c8(12d)iree ⅡE4taiye
BCA
VH-X6001H54VH-X46001
(exceptou(trayHD)C.avi
di-
(Windows/Media Player)
MAX:8192(Alx7650(An).
MIN:32(A|x)32(An)
Formalededecci icac on DivX(sc ormoduMSC)
HomeTheaterVer3.4.5.2.6
(exceptoultrayHD)(avi,
divx:
Formatodecodif caciondev/decVPFG(isolomode
MSCI MPEG1 VPEG2 MPEG4
(parc2),MS-MPEG4(ter.3)
SintonizadordeFM
natural_image
Two identical rounded rectangular shapes with no text, numbers, or symbols
Español
219Es
Visit our website / Visitez notre site Web / Visite nuestro sitio Web
Register your product at
http://www.pioneerelectronics.com
in Canada
au Canada http://www.pioneerelectronics.ca
en Canada
- Register your product. We will keep the details of your purchase on file to help you refer to this information in the event of an insurance claim such as loss or theft.
2 Receive updates on the latest products and technologies.
3 Download owner's manuals, order product catalogues, research new products, and much more.
4 Your feedback is important in our continual effort to design and build the most advanced, consumer-focused product in the industry.
©2013PIONEERCORPORATION.Allrightsreserved.
©2013PIONEERCORPORATION.Tousdroitsdereproductionetdetraductionréservés.

- Settingupthevideoplayer
- Systemsettings
- Favoritemenu
- Bluetoothconnectionmenu
- Thememenu
- Otherfunctions
- Connection
- Installation
- Contents
- Additionalinformation
- Precautions
- IMPORTANTSAFEGUARDS
- WARNING
- Toensuresafedriving
- When using adisplay connected to ear monitor output
- When using therearviewcamera
- CAUTION
- Toavoidbatteryexhaustion
- Beforeyoustart
- InformationtoUser
- FCCID:AJDK071
- MODELNO.:AVH-X1600DVD
- Note
- The Safety of Your Earsisin Your Hands
- ESTABLISHASAFELEVEL:
- BESURETOOBSERVETHE FOLLOWINGGUIDELINES:
- Aboutthisunit
- After-salesservicefor Pioneerproducts
- U.S.A.
- CANADA
- Useandcareoftheremote control
- Installingthebattery
- Usingtheremotecontrol
- Important
- Demomode
- What'swhat
- ③+/-(VOLUME/VOL)
- ④ MUTE
- ⑤Homebutton
- AppRadioMode.
- ⑥MODE
- WhenRGBinputisnotused
- ⑦◀/▶(TRK)
- ⑧▲(eject)
- ⑨AutoEQmicrophoneinputjack
- ⑩Discloadingslot
- Notes
- ①Sourceicon
- ②Apps/MirrorLinkkey
- ③Rearviewkey
- ④Sourceoffkey
- ⑤Bluetoothkey
- ⑥Themekey
- ⑦Menuicon
- Sourcekey
- ⑨Clockkey
- TurningthesourceON/OFF
- Selectingasource
- Adjustingthevolume
- ②MODE
- ①SRC/OFF
- ④Thumbpad
- ⑤RETURN
- ⑥▶/II
- ▶▶
- ↓
- ▶▶|
- ■
- ⑦FOLDER/P.CH
- ⑧MUTE
- ⑨MENU
- TOPMENU
- 10AUDIO
- SUBTITLE
- ANGLE
- ⑪BAND/ESC
- •Disc
- - USBstoragedevice
- Commonoperations
- Commonoperationsfor menusettings/lists
- Operatingthescrollicon andthescrubberbar
- ①Scrollicon
- ② Scrubberbar
- ③Playbackpoint
- Usingtherearview
- Usingtherearviewkeyto displaytherearview
- Usingtherearmonitor
- Usingsoundretriever
- Changingthewide-screen mode
- Displaythescreenmode.
- Touchthedesiredwidemodesetting.
- FULL(fullscreen)
- ZOOM(zoom)
- NORMAL(normal)
- Basicoperations
- Adjusting the angle of the LCD panel and ejecting media
- AdjustingtheLCDpanelangle
- Ejectingadisc
- Settingtheclock
- HDRadio™ tuner
- AboutHDRadio™stations
- PSD)
- HD2/HD3)
- Digital Sound
- iTunes Tagging
- Artist Experience)
- HDRadio™Technology
- HDRadiotuneroperations
- ① Bandkey
- HDRadio™tuner
- ②Tagkey
- ③Receptionmodekey
- ④Seekmodekey
- ⑤Localkey
- ⑥Tuningkey
- ⑦Listkey
- ⑧ Presetchannelkey
- Storingandrecallingstations
- 1Displaythepresetchannellistscreen.
- 2Touchandholddownoneofthepreset tuningkeystostoretheselectedfrequency tothememory.
- 3Touchtheappropriatepreset tuningkey to select the desired station.
- Storingthestrongeststations
- 2TouchBSMtoturnBSMon.
- Tuningintostrongsignals
- UsingiTunestagging
- Storingthetaginformationto thisunit
- 1Tuneintothebroadcaststation.
- 2Storethetaginformationtothisunit.
- 3Whencompleted, indicatorturns offand ♪ indicatorisdisplayed.
- Storingthetaggedinformation toyouriPod
- 1ConnectyouriPod.
- 2Whencompleted, ◎ indicatorturnsoff andthetaggedinformationisstoredon youriPod.
- Switchingtheseekmode
- ALL—HD
- Switchingthereceptionmode
- D/AAUTO—ANALOG
- Tuner
- Tuneroperations
- ①Bandkey
- ③Localkey
- ④Tuningkey
- ⑤Listkey
- ⑥ Presetchannelkey
- 1Displaythepresetscreen.
- 2Touchandholldownoneofthepreset tuningkeystostoretheselectedfrequency tothememory.
- 3Touchtheappropriatepresettuningkey toselectthedesiredstation.
- Tuning into strongsignals
- SiriusXMtuner
- IntroducingSiriusXMtuner operations
- TosubscribetotheSiriusXM SatelliteRadioservice
- 1SelectSiriusXMasasource.
- 2SwitchtoChannel0andchecktheRadio ID.
- 3ActivatetheSiriusXMserviceonlineor byphone.
- Storingandrecallingchannels
- 2Touchandholddownoneofthepreset tuningkeystostoretheselectedchannelto thememory.
- Selectingachannelfromthe listscreen
- Selectingachannelfromtheall channellist
- Selectingachannelfromthe categorylist
- Switchingthelistdisplay
- SelectingaSiriusXM channeldirectly
- Replay™
- UsingiTunestagging Note
- iTunestaggingofSiriusXMsongs
- SettingParentalControl
- Lockingchannels
- ClearAll(clearingthelocks fromallchannels)
- EditCode(changingthepasscode)
- Disc(CD/DVD)
- Introducingmovieoperations
- ②Searchkey
- ③Switchsubtitlelanguagekey
- ④ Switchaudiolanguagekey
- ⑤TOPMENUkey
- ⑥MENUkey
- ⑦Slow-motionplaybackkey
- ⑧Stopkey
- ⑨Screenmodekey
- Pauseandplaykey
- Returnkey
- ⑫Bookmarkkey
- ⑬Arrowkey
- 4Repeatkey
- ⑮Viewinganglekey
- 16Audiooutputkey
- ⑰Slowkey
- 18Mediakey
- Playingbackvideos
- Soundplaybackoperations
- ② Searchkey
- ③ Mediakey
- ④ Soundretrieverkey
- ⑤ Randomkey
- ⑥ Repeatkey
- ⑦ Previousfolderkey/Nextfolderkey
- ⑧ Pauseandplaykey
- Switchingthemediafiletype
- ●TouchMediatoswitchmediafiletypes.
- OperatingtheDVDmenu
- Using the arrow keys
- Randomplay(shuffle)
- ●Touchtherandomkey.
- Repeating playback
- ●Touchtherepeatkey.
- Searchingforthepartyou wanttoplay
- 1Startthesearchfunction.
- 2Touchthedesiredsearchoption(e.g., Chapter).
- 3Touch0to9toinputthedesirednumber.
- 4Start playback from these selected part.
- Selectingaudiooutput
- ● Touch the audio output keytoswitch audio output types.
- PBC playback
- 2Touch10keytodisplaythenumerickey-pad.
- 3Touch0to9correspondingtoamenu number.
- Selectingtracksfromthe tracktitlelist
- 1Displaythetracktitlelist.
- 2Touchyourfavoritetracktitle.
- Selectingfilesfromthefile namelist
- 1Touchthesearchkeytodisplaythefile (orfolder)namelist.
- 2Touchyourfavoritefile(orfolder)name.
- PlayingDivX ⊗ VODcontent
- - Ifamessageisdisplayedafterloadinga discontainingDivXVODcontent,touch Play.
- iPod
- iPodcontrol
- iPodwith30-pinconnector
- iPodwithlightningconnector
- Touchpanelkeys
- ① Songtitle
- ② Artistname
- ③ MIXTRAXEZkey
- ④ Artwork
- ⑤Searchkey
- ©Soundretrieverkey
- ⑦iPodcontrolmodekey
- ⑧Shufflekey
- ⑨Repeatkey
- ⑩Changespeedkey
- ⑪Genre
- ⑫Albumtitle
- ⑬Pauseandplaykey
- ⑭Unitoperationkey
- ⑮Screenmodekey
- Soundplaybackoperationsfor Bluetooth
- 1SetDeviceconnection.
- 2ConnecttheiPhoneandthisunitvia
- Bluetoothconnection.
- Movingimagesoperations
- ForiPodwith30-pinconnectorusers
- ForiPodwithlightningconnectorusers
- ①Fastforwardkey/Reversekey
- ③iPodcontrolmodekey
- ④Shufflekey
- ⑤Repeatkey
- Screenmodekey
- ⑦Pauseandplaykey
- Se eclam ovetoplay.
- Usingthisunit'siPod functionfromyouriPod
- 1TouchtheiPodcontrolmodekeyto switchtoAppMode.
- 2OperatetheconnectediPodtoselecta video/songandplay.
- Shuffleplay
- ●Touchtheshufflekey.
- PlayingvideosfromyouriPod
- 1TouchSearchtodisplayiPodmenus.
- Browsingforavideo/music ontheiPod
- Searchingforavideo/musicby category
- 3Touchthetitleofthelistthatyouwant toplay.
- Searchingthelistbyalphabet
- 3Touchthefirstletterofthetitleofthe video/songyouarelookingfor.
- 4Touchthetitleofthelistthatyouwant toplay.
- Changingaudiobookspeed
- Displayinglistsrelatedto thesongcurrentlyplaying (linksearch)
- AppRadioMode
- AppRadioModeoperation
- iPhonecompatibility
- Startingprocedure
- 2SetDeviceconnection.
- 3AfterconfiguringDeviceconnection,connecttheiPhonetothisunit.
- ■ForiPodwithlightningconnectorusers
- ■ForiPodwith30-pinconnectorusers
- 4Startanapplicationavailablefor AppRadioModefromtheiPhone.
- 5PressMODE.
- 6Operatetheapplication.
- SettingtheKeyboard
- • KeyboardisavailableonlyinAppRadio
- Mode
- 1Pressthehomebuttontwicetoswitch fromtheAppRadioModedisplaytothe homedisplay.
- 3TouchKeyboardontheSystemmenuto selectdesiredlanguage.
- 4Touchthedesiredlanguage.
- 5Tapthetextinputareaontheapplication screenoftheiPhone.
- Smartphonelinkadaptor operations
- 2PressMODE.
- 3Operatetheapplication.
- USB
- ⑦Slow-motion playbackkey
- MTPconnection
- ①MIXTRAXEZkey
- ②Informationkey
- ③Searchkey
- ④Mediakey
- ⑤Soundretrieverkey
- Randomkey
- ⑦Repeatkey
- DBkey
- ⑨Previousfolderkey/Nextfolderkey
- ⑩Pauseandplaykey
- Musicbrowsemode
- 1TouchDBtocreateadatabaseinMusic browsemode.
- 2When"SavetheDatabasetomemory?" isdisplayed,touch"Yes".
- 3Displayalistandtouchthetagkey.
- 4Selectafile.
- Stillimageplaybackoperations
- - TouchMediatoswitchbetweenmedia filetypes.
- PlayingDivX \* VODcontent
- CaptureanimationJPEGfiles
- 1Touch▶/IItopausetheslideshowwhen thedesiredimageisdisplayed.
- BluetoothAudio
- ①Randomkey
- ②Repeatkey
- ③Pauseandplaykey
- SettingupforBluetoothaudio
- 1Connection
- UsingMIXTRAX
- MIXTRAXoperation
- MIXTRAXEZoperation
- StartingMIXTRAXEZoperation
- ●TouchMIXTRAXEZ.
- SettingMIXTRAXmode
- 2Touchthesystemkeytoopenthesystem menu.
- 3TouchMIXTRAXSetuponthesystem menu.
- Settingtheeffect
- Fixedsounds
- Soundeffects
- Settingsoundsandsoundeffects aspresetsusingthepresetkey
- - TouchStandardorSimpletocheckthe settings.
- Registeringsoundsandsound effectsaspresets
- 2Addacheckmarktothedesiredsound effectbytouchingtheoption.
- StreamingPandora
- Pandoraoperations
- ForiPhoneusers
- Forsmartphoneusers
- —SetPandoraConnectiontoAndroid
- Limitations:
- SettingthePandoraconnectmode
- 1Pressthehomebuttontoswitchtothe homedisplay.
- 3TouchPandoraConnectionrepeatedly untilthedesiredsettingappearsonthe screen.
- Streaming Pandora®
- ①Searchkey
- ②Soundretrieverkey
- ③Bookmarkkey
- ④Thumbs-downkey
- ⑤Thumbs-upkey
- ⑥Addstationkey
- Playing tracks
- Skipping tracks
- Press ▶ (TRK).
- Add station
- Deleting stations
- Touch Yes
- Selecting and playing Pandora® stations/shuffle
- Displaytheshuffle/stationlist.
- Changethesortorder.
- Selectshuffleorthedesiredstation.
- Addingastationfromthe stationlist
- Bluetoothtelephone
- Bluetoothhtelephone operations
- ②③④⑤⑥on7hokkey
- ①Closekey
- ②Presetdialkey
- ③Phonebook key
- ④Settingkey
- ⑤Tonekey
- ⑥Auto-answerkey
- ⑦Historykey
- ⑧Keypadkey
- Endingacall.
- ⑩Volumekey
- ⑪Privatemodekey
- 12Off-hookkey
- ⑬Voicecontrolkey
- Text information
- ⑭Incomingcallnotice
- Setting up forhands-freephoning
- T Correction
- Volume adjustment
- Bluetoothhtelephone
- Callinganumberinthe phonebook
- 1Touch the phonebook keytoswitch to the phonebook mode.
- 4Touchtheoff-hookkeytomakethecall.
- 5Touchtheon-hookkeytoendthecall.
- Selectinganumberby alphabetsearchmode
- 3Touchthefirstletteroftheentryyouare lookingfor.
- 4Touchthelisttodisplaythephonenum- berlistoftheselectedentry.
- 5Touchtheoff-hookkeytomakethecall.
- Invertingnamesinphonebook
- 3"Wouldyouliketoinvertallnames?"appears.TouchYestocontinue.
- Using themissed, received and dialedcalllists
- 1Touchthehistorykeytodisplaythecall historylist.
- 3Touchthelistnumbertoselectaphone number.
- Settingautomaticanswering
- Adjustingtheotherparty's listeningvolume
- ● Touchthevolumekeytoselect Far-EndVOL.
- 1—2—3
- Switchingtheringtone
- Usingthepresetdiallists
- Makingacallbyentering phonenumber
- Settingtheprivatemode
- Voicecontrol
- 1Touchthevoicecontrolkey.
- Settings
- Menuoperations
- Audioadjustments
- Usingfader/balanceadjustment
- Usingbalanceadjustment
- Usingtheequalizer
- Recallingequalizercurves
- Adjustingthe8-bandgraphic equalizer
- Usingtheauto-equalizer
- Usingsoniccentercontrol
- Adjustingloudness
- Usingsubwooferoutput
- Boostingthebass
- Usingthehighpassfilter
- Adjustingsourcelevels
- Settingupthevideoplayer
- Settingthesubtitlelanguage
- WhenyouselectOthers
- Settingtheaudiolanguage
- Settingthemenulanguage
- 2Touchthevideosetupkeytoopenthe videosetupmenu.
- 3TouchMenuLanguageonthe VideoSetupmenu.
- Settingthemulti-angleDVD display
- 3TouchMultiAngleontheVideoSetup menutoturnangleicondisplayonoroff.
- Settingtheaspectratio
- 3TouchTVAspectontheVideoSetup menutoselecttheTVaspectratio.
- Settingtheslideshowinterval
- 3TouchTimePerPhotoSlideonthe VideoSetupmenutoselecttheslideshowin- terval.
- Settingparentallock
- Settingthecodenumberandlevel
- 3TouchParentalontheVideoSetupmenu.
- 4Touch0to9toinputafourdigitcode number.
- 5Touch1to8toselectthedesiredlevel.
- 6TouchEnter.
- Changingthelevel
- DisplayingtheDivX® VOD registrationcode
- Systemsettings
- Switchingtheauxiliarysetting
- SettingAVinput
- Settingthenavigationsystem
- SettingthePandoraconnect mode
- SelectingMirrorLinkMode
- Updating the firmware for thesmartphonelinkadaptor
- Displayingthesmartphone linkadaptorfirmwareversion
- Updatingfirmware
- 1Downloadingthefirmwareupdatefiles.
- 2Connectablank(formatted)USBstorage device to your computer, and then locate and copy the correct update file onto the USB storage device.
- 3Turnthesourceoff.
- 4Pressthehomebuttontoswitchtothe homedisplay.
- 5Touchthesystemkeytoopenthesystem menu.
- 6TouchFirmwareUpdateonthesystem menu.
- 7ConnecttheUSBstoragedeviceaccord- ingtotheon-screenmessages.
- 8TouchContinuetodisplaythereadfile mode.
- 9TouchStarttodisplaythedatatransfer mode.
- Displayingthefirmware version
- 1Turnthesourceoff.
- 2Pressthehomebuttontoswitchtothe homedisplay.
- 3Touchthesystemkeytoopenthesystem menu.
- Changing the picture adjustment (Brightness, Contrast, Color, Hue, Dimmerand Temperature)
- 3Ifyouareadjustingthe PictureAdjustment,selecttheunit.
- 4Touchanyofthefollowingtouchpanel keystoselectthefunctiontobeadjusted.
- 5Touch◄or►toadjusttheselecteditem.
- Selectingthesystemlanguage
- Resettingtodefault
- SettingDemoMode
- Switchingsoundmuting/attenuation
- Settingtherearoutputand subwoofercontroller
- Usingthekeyboard
- Settingtheeverscroll
- SettingtheBluetoothaudio
- ClearingBluetoothmemory
- 4TouchBluetoothMemoryClearonthe systemmenu.
- 5TouchClear.
- UpdatingBluetoothsoftware
- 4TouchBTSoftwareUpdate.
- 5TouchStarttodisplaythedatatransfer mode.
- DisplayingtheBluetooth softwareversion
- Settingtherearview camera(backupcamera)
- 3TouchCameraPolarityonthesystem
- BeforeoperatingtheautoEQ function
- PerformingautoEQ
- 1Stopthecarinaplacethatisquiet, close allthedoors, windowsandsunroof, and thenturntheengineoff.
- 2Fixtheoptionalmicrophoneinthecenter oftheheadrestofthedriver'sseat, facing forward.
- 3TurntheignitionswitchtoONorACC.
- 6TouchAutoEQMeasurementtoenter autoEQmeasurementmode.
- 7Plugthemicrophoneintothemicrophoneinputjackonthisunit.
- 8TouchStarttostartautoEQ.
- 9Whenthe10-secondcountdownstarts, getoutofthecarandclosethedoorwithin 10seconds.
- Settingthevideosignal
- 3TouchVideoSignalSettingonthesystem menu.
- 4Touch◄or► toselectthedesiredvideo
- signalappears.
- Favoritemenu
- UsingtheFavoritemenu
- Bluetoothconnectionmenu
- Bluetoothconnectionmenu operations
- Pairingfromthisunit
- 5Touchadevicenametoselectthedevice youwanttoconnectto.
- ConnectingtoaBluetooth deviceautomatically
- Switchingvisibleunit
- EnteringPINcodeforBluetooth wirelessconnection
- DisplayingBluetoothDevice address
- Thememenu
- Selectingtheilluminationcolor
- Directselectionfrompreset illuminationcolors
- Customizingtheilluminationcolor
- Memo
- SelectingtheOSD(on-screen display)color
- Selectingthebackground display
- 4Touchthedesiredsetting.
- Otherfunctions
- Adjustingtheresponse positionsofthetouchpanels (TouchPanelCalibration)
- 2Pressandholdthehomebuttontostart TouchPanelCalibration.
- 3Toucheachofthearrowsonthefourcornersofthescreen.
- 4Pressthehomebuttontontocompletefour-pointadjustment.
- 5Pressthehomebuttontoproceedto16-pointadjustment.
- 6Gentlytouchthecenterofthe+markdis-playedonthescreen.
- 7Pressandholdthehomebuttontocompletetheadjustment.
- UsinganAUXsource
- AboutAUXconnectionmethods
- Minipinplugcable(AUX)
- - InsertthestereominiplugintotheAUX inputjackonthisunit.
- Resettingthemicroprocessor
- 1TurntheignitionswitchOFF.
- 2PressRESETwithapentiporother pointedinstrument.
- Operatingthesoundmixer
- 1ConnectyouriPhoneorsmartphoneto theunitwiththeRGBinput.
- 2Press+/-(VOLUME/VOL)todisplaythe soundmixercontrolbar.
- Connection
- Whenconnectingwitharear viewcamera
- USEINPUTONLYFORREVERSEORMIRRORIMAGEREARVIEWCAMERA.OTHER USEMAYRESULTININJURYORDAMAGE.
- OptionalSiriusXMTuner connection
- Installation
- Installationusingthescrew holesonthesideoftheunit
- ● Fasteningtheunittothefactoryradio-mountingbracket.
- Installingthemicrophone
- Wheninstallingthemicrophone onthesunvisor
- 2Installthemicrophonecliponthesun visor.
- Wheninstallingthemicrophone onthesteeringcolumn
- Adjustingthemicrophoneangle
- Troubleshooting
- Common
- Thepowerwillnotturnon.
- Operationwiththeremotecontrolisnotpossible.
- Theunitdoesnotoperatecorrectlyevenwhen theappropriateremotecontrolbuttonsare pressed.
- Playbackisnotpossible.
- Thereisnosound.
- Thevolumelevelwillnotrise.
- Thereisnoimagedisplayed.
- The Ⓧ iconisdisplayed, andoperationisnot possible.
- Theimagedisplayedstops(pauses)andtheunit cannotbeoperated.
- Thevolumelevelislow.
- Thesoundandvideoskip.
- Theaspectratioisincorrectandtheimageis stretched.
- Themotorsoundswhentheignitionswitchis turnedON(oristurnedtoACC).
- Nothingisdisplayed.
- Thetouchpanelkeyscannotbeused.
- Noxxxxappearswhenadisplayischanged (NoTitle, forexample).
- Subfolderscannotbeplayedback.
- Therepeatrangechangesautomatically.
- DVD
- Aparentallockmessageisdisplayedandplay-backisnotpossible.
- Parentallockcannotbecanceled.
- Dialoglanguage(andsubtitlelanguage) cannot beswitched.
- Nosubtitlesaredisplayed.
- Playbackisnotperformedwiththeaudio languageandsubtitlelanguagesettingsselected inVideoSetupmenu.
- Theviewinganglecannotbeswitched.
- The image is extremely unclear/distorted and dark during playback.
- VideoCD
- ThePBC( playbackcontrol)menucannotbe calledup.
- Repeatplayandtrack/timesearcharenot possible.
- TheiPoddoesnotoperatecorrectly.
- SoundfromtheiPodcannotbeheard.
- Bluetoothaudio/telephone
- ThesoundfromtheBluetoothaudiosourceis notplayedback.
- Errormessages
- AMPError
- NoDataProvided
- NoData
- SiriusXMSatelliteRadio
- CheckAntenna
- CheckTuner
- NoSignal
- SubscriptionUpdated
- NotAvailable
- ChannelNotSubscribed.CallSiriusXMto
- Subscribe.
- ChannelLocked
- DifferentRegionDisc
- Error-02-XX/FF-FF
- UnplayableDisc
- Protect
- Skipped
- TEMP
- ThisDivXrentalhasexpired.
- Videoresolutionnotsupported
- Itisnotpossibletowriteitintheflash.
- YourdeviceisnotauthorizedtoplaythisDivX
- protectedvideo
- UnplayableFile
- FormatRead
- Videoframeratenotsupported
- AudioFormatnotsupported
- Externalstoragedevice(USB)
- IncompatibleUSB
- CheckUSB
- Error-02-9X/-DX
- YourdeviceisnotauthorizedtoplaythisDivX protectedvideo.
- CreatingtheDatabasehasfailed.
- Error-02-6X/-9X/-DX
- Error-02-67
- Stop
- NotFound
- iTunestagging
- iPodfull.Tagsnottransferred.
- Memoryfull.Tagsnotstored.ConnectiPod.
- Tagtransferfailed.ReconnectyouriPod.
- Tagstorefailed.
- Error-8D
- Alreadystored
- Bluetooth
- Error-10
- Pandora
- Error-19
- StartupthePandoraApplicationfromyourDevice.
- Unabletosavethumbrating.Tryagainlater.
- UnabletosaveBookmark.Tryagainlater.
- Pandorasystemmaintenance.Tryagainlater.
- Skiplimitreached.
- ThisversionofthePandoraApplicationisnot supported.
- CheckDevice
- Pandoraisunabletoplaymusic.Pleaseeseeyour Device.
- Pleasecreatestation.ApplicationonDevice.
- NoActiveStation
- Communicationerroroccured.Pleasereconnect yourdevice.
- Devicehasnotbeenregistered.Goto"Bluetooth ConnectionMenu"toregister.
- Connectionfailed.Press"Connect"toretry.
- Disconnected.Press"Connect"toreconnectthe device.
- MirrorLink
- Theapplicationlistcouldnotbereadout.
- ThereisnosupportedapplicationonyourMirror-Linkdevice.
- Communicationerroroccurred.
- Launchingtheapplicationfailed.
- USBconnectionwastemporarilydisabledfordeviceprotection.DonotconnectthisUSBdevice totheunit.TorestartUSB,restarttheunit.
- UnderstandingautoEQerror messages
- Pleaseconnectthemicrophonefor measurement. Whenfinished,pleasepush HOMEkey.
- Error.Pleasecheckxxxxspeaker.
- Error.Pleasechecknoise.
- Error.Pleasecheckbattery.
- Area3
- Handlingguidelines
- Discsandplayer
- USBstoragedevice
- DVD-R/RWdiscs
- CD-R/RWdiscs
- JPEGpicturefiles
- DivXvideofiles
- MPEG-1/MPEG-2/MPEG-4videofiles
- Audiocompatibility(USB)
- WAV
- Compressedfile compatibility(disc,USB)
- WMA
- MP3
- AAC
- DivXcompatibility
- MPEG-1/MPEG-2/MPEG-4video
- Supplementalinformation
- iPodcompatibility
- AboutiTunestagging
- Sequenceofaudiofiles
- Disc
- Usingthedisplaycorrectly
- Handlingthedisplay
- Liquidcrystaldisplay(LCD)screen
- LED(light-emittingdiode)backlight
- Keepingthedisplayingood condition
- Bluetoothprofiles
- License, WarrantyDisclaimer & Limitation of Liability SAFETY PROVISIONS
- Disclaimer
- LimitationofLiability
- libpng
- Copyrightandtrademarknotice
- DVDvideo
- iTunes
- iPod&iPhone
- Android™&GooglePlay
- DolbyDigital
- DivX
- ((SiriusXM)) READY
- Pandora® internetradio
- MIXTRAX
- Specifications
- General
- Display
- Audio
- DVDPlayer
- FMtuner
- AMtuner
- CEA2006Specifications
- Tabledesmatières
- Précautions
- ⑨Clocktouche
- ①Icônededéfilement
- Opérationscommunes
- ⑤ Touchedestationlocale
- ③Touchedestationlocale
- CompatibilitéiPhone
- ①ToucheAléatoire
- Accentuationdesgraves
- 3Mettezlasourcehorsservice.
- 3Placezlecontactd'allumagesurONou ACC.
- Installationdumicrophone
- PRÉCAUTION
- 2Installezleclipmicrophonesurlepare- soleil.
- Sivousinstallezlemicrophone surlacolonnededirection
- Réglagedel'angledumicrophone
- Zone1
- CompatibilitéDivX
- Affichage
- LecteurDVD
- 3Coloquelallavedeencendidodelauto- móvilenONoACC.
- SintonizadordeFM
- Visit our website / Visitez notre site Web / Visite nuestro sitio Web
- http://www.pioneerelectronics.com
- au Canada http://www.pioneerelectronics.ca
Brand : PIONEER
Model : AVHX5600BHS
Category : DVD player