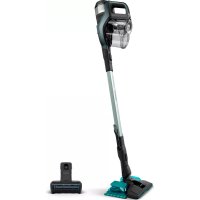
SmartPro Easy FC8795 - Vacuum Cleaner PHILIPS - Free user manual and instructions
Find the device manual for free SmartPro Easy FC8795 PHILIPS in PDF.
Download the instructions for your Vacuum Cleaner in PDF format for free! Find your manual SmartPro Easy FC8795 - PHILIPS and take your electronic device back in hand. On this page are published all the documents necessary for the use of your device. SmartPro Easy FC8795 by PHILIPS.
USER MANUAL SmartPro Easy FC8795 PHILIPS
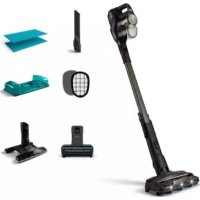
1English 6 Deutsch 15 Español 25 Français 35 Italiano 45 Nederlands 55 Português 65 Svenska 75 Türkçe 84English Introduction Congratulations on your purchase and welcome to Philips! To fully benefit from the support that Philips offers, register your product at www.philips.com/welcome. General description 1 Handle of dust container lid 2 Dust container lid 3 Filter unit 4 Extra filter unit (FC8796, FC8795, FC8794) 5 Dust container 6 Edge of top cover 7 Docking station sensor 8 Suction opening 9 Start/stop button 10 Side brushes 11 Extra set side brushes (FC8796 only) 12 Shafts for mounting the side brushes 13 Front wheel 14 Suction opening 15 Side wheels 16 Drop-off sensors 17 Cover of the battery compartment 18 Mopping attachment (FC8796, FC8795, FC8794) 19 Mopping pad (FC8796, FC8795, FC8794) 20 Small plug 21 Adapter 22 Cleaning brush 23 Remote control 24 AAA batteries for remote control 25 Docking station Remote control You can operate the robot with the remote control (Fig. 2). It has the following buttons: 1 Start/stop button 2 Navigation buttons 3 Cleaning mode buttons 4 Docking button 5 24-hour scheduler How your robot works What your robot cleans This robot is equipped with features that make it a suitable cleaner to help you clean the floors in your home. The robot is especially suitable for cleaning hard floors, such as wooden, tiled or linoleum floors. It may experience problems cleaning soft floors, such as carpet or rugs. If you use the robot on a carpet or rug, please stay close by the first time to see if the robot can deal with this type of floor.
EnglishBecause the robot uses infrared sensors to navigate, it may run into difficulties on very dark and shinyfloors. If you use the robot on such surfaces, please stay close by the first time to see if the robot candeal with such a dark and shiny floor. How your robot cleans Cleaning system The robot has a 3-stage cleaning system to clean your floors efficiently. The two side brushes help the robot clean in corners and along walls. They also help to remove dirtfrom the floor and move it towards the suction opening (Fig. 3). The suction power of the robot picks up loose dirt and transports it through the suction openinginto the dust container (Fig. 4). Models FC8796, FC8795 and FC8794 come with a mopping attachment that can be attached to therobot to mop your hard floor. Cleaning patterns In its auto cleaning mode, the robot uses an automatic sequence of bounce and wall-followingpatterns to clean each area of the room optimally. It continues to clean until its battery runs low oruntil it is switched off.You can also select one of the three individual cleaning modes by pressing the appropriate button onthe remote control (see 'Cleaning mode selection'). The robot continues cleaning in the selectedcleaning mode for a few minutes and then returns to auto cleaning mode.1 Bounce mode (Fig. 5) 2 Wall-following mode (Fig. 6) 3 Spiral mode (Fig. 7) How your robot avoids height differences The robot has five drop-off sensors in its bottom. It uses these drop-off sensors to detect and avoidheight differences such as staircases.Note: It is normal for the robot to move slightly over the edge of a height difference, as its front drop-off sensor is located behind the bumper.Caution: In some cases, the drop-off sensors may not detect a staircase or other height differencein time. Therefore monitor the robot carefully the first few times you use it, and when you operate itnear a staircase or another height difference. It is important that you clean the drop-off sensorsregularly to ensure the robot continues to detect height differences properly. Before first use Mounting the side brushes 1 Unpack the side brushes and place the robot upside down on a table or on the floor.2 Push the side brushes onto the shafts on the bottom of the robot (Fig. 8).Note: Make sure you attach the side brushes properly. Press them onto the shaft until you hearthem lock into position with a click. Placing the batteries in the remote control The remote control works on two AAA batteries.
English1 Push the tab (1) to unlock the battery compartment lid (2) and remove the battery compartment lid (Fig. 9). 2 Insert two AAA batteries (Fig. 10). Note: Make sure the + and - poles point in the right direction. 3 To reattach the battery compartment lid, first insert the lug into the opening in the rim of the compartment (1) and then push down the lid (2) until it locks with a click (Fig. 11). Now the remote control is ready for use. Preparing for use Installing the docking station 1 Insert the small plug of the adapter into the socket on the docking station (1) and insert the adapter into the wall socket (2) (Fig. 12). 2 Place the docking station on a horizontal, level floor against a wall. Note: Make sure that there are no obstacles or height differences 150 cm in front, 30 cm to the right and 100 cm to the left of the docking station (Fig. 13). Charging 1 Place the robot on the plugged-in docking station (Fig. 14). 2 The start/stop button starts flashing (Fig. 15). 3 When the rechargeable battery is fully charged, the start/stop button lights up continuously (Fig. 16). Note: After charging, model FC8796 has a run time of around 115 minutes. After charging, models FC8794 and FC8795 have a run time of around 105 minutes. Preparing the room for a cleaning run
Before you start the robot on its cleaning run, make sure that you remove all loose and fragile objects from the floor (Fig. 17).
Remove all cables, wires and cords from the floor to prevent the robot from getting entangled in them.
If there is a rug with tassels in the room you want the robot to clean, fold the tassels under the rug to prevent the robot from getting stuck on the tassels and to prevent the rug from getting damaged (Fig. 18). Using your robot Using the remote control 1 Place the robot on the docking station or press the start/stop button on the robot (Fig. 19) to activate the robot.
Now you can use the remote control to operate the robot. Starting and stopping 1 Press the start/stop button on the remote control (Fig. 20).
English2 The start/stop button on the robot lights up continuously and the robot starts cleaning (Fig. 21). 3 The robot cleans in auto-cleaning mode until its battery runs low. In auto cleaning mode, it follows repeated sequences of random, wall-following and spiral movements. 4 When the battery runs low, the start/stop button starts flashing quickly and the robot starts searching for the docking station to charge (Fig. 22). 5 You can also press the start/stop button to interrupt or stop the cleaning run. If you press the start/stop button again and there is still enough energy in the rechargeable battery, the robot continues cleaning in the auto cleaning mode. 6 To make the robot return to the docking station before the rechargeable battery runs low, press the docking button on the remote control (Fig. 23). 7 The start/stop button starts flashing and the robot returns to the docking station. Cleaning mode selection This robot has four cleaning modes. Its standard cleaning mode is the auto cleaning mode, which is an automatic sequence of bounce and wall-following patterns (Fig. 24). Next to this auto cleaning mode, the robot has three individual cleaning modes that can each be activated by pressing the appropriate button on the remote control. Bounce mode In this mode, the robot cleans the room in a mixed pattern of straight and crisscross movements (Fig. 25). Wall-following mode In this mode, the robot follows the walls of the room to give the area alongside the walls an extra clean (Fig. 26). Spiral mode In this mode, the robot moves in an expanding spiral from a central point to clean the area thoroughly (Fig. 27). Note: The manually selected modes are only active for a couple of minutes. After that, the robot switches to auto-cleaning mode. Manual driving You can drive the robot manually with buttons on the remote control. 1 Use the arrow buttons above and below and to the left and right of the start/stop button on the remote control to navigate the robot through the room (Fig. 28). Note: Be careful when you drive the robot manually close to height differences and staircases. Using the 24-hour scheduler The 24-hour scheduler can be activated with the remote control. Make sure the robot is in standby mode and is placed on the docking station. 1 Press the 24-hour scheduler button (Fig. 29) on the remote control to activate the 24-hour scheduler.
When you activate the 24-hour scheduler, you hear a sound and the display starts to flash briefly every few seconds.
English- The robot will start a cleaning run 24 hours after you activated the 24-hour scheduler. It will continue to start a cleaning run at the same time every 24 hours until you deactivate the 24-hour scheduler. 2 To deactivate the 24-hour scheduler, press the 24-hour scheduler button. You will hear a sound and the display will light up continuously to show the robot is in standby mode and the 24-hour scheduler is no longer active. Mopping with the robot Models FC8796,FC8795 and FC8794 come with a mopping attachment and a mopping pad for wet cleaning of hard floors. Attaching the mopping pad 1 Soak the mopping pad in water or wet the mopping pad under the tap. You can add a few drops of a readily available floor cleaner that is suitable for your floor. 2 Squeeze the mopping pad thoroughly to ensure it is only damp instead of wet. 3 Attach the damp mopping pad to the mopping attachment by pushing the Velcro fasteners of the mopping pad onto Velcro fasteners of the mopping attachment (Fig. 30). 4 Insert the attachment lugs of the mopping attachment into the two attachment holes located just behind the wheels. Then press down until you hear a click (Fig. 31). Cleaning floors with the mopping attachment Note: To clean hard floors with the mopping attachment, you have to start the robot from a point in the room you wish to clean. You cannot start the robot from its docking station with the mopping pad attached. 1 Just press the start/stop button on the remote control to start the robot.
The robot continues mopping until its battery runs low and the robot stops. Note: Detach the mopping pad and the mopping attachment before you send the robot to the docking station with the docking button on the remote control or before you place the robot on the docking station manually. Detaching the mopping attachment 1 To detach the mopping attachment, press the tab (1) and pull up the mopping attachment to remove it (2) (Fig. 32). 2 Pull the mopping pad off the mopping attachment. 3 To clean the mopping pad, wash it in the washing machine on a gentle cycle at a temperature of 60°C max. Alarm signal If the robot gets into trouble while cleaning (e.g., because a wheel jams or is no longer in contact with the floor, or because a sensor can no longer detect the floor), you will hear a sound and the robot stops. Press the start/stop button to switch the robot to standby mode and solve the problem that causes the alarm signal, for instance by removing the obstacle that blocks the wheel, cleaning the sensors, or picking up the robot and putting it down in a different place.
EnglishCleaning and maintenance Emptying and cleaning the dust container Empty and clean the dust container when the dust container is full. 1 Pull up the handle of the dust container lid and lift the dust container out of the dust container compartment (Fig. 33). 2 Pull the tab on the side of the dust container to open the lid (Fig. 34). 3 Remove the filter unit from the dust container (Fig. 35). 4 Shake the dust container over a dustbin to empty it (Fig. 36). 5 You can clean the dust container under a lukewarm tap. Caution: Do not clean the dust container in the dishwasher. 6 To clean the filters thoroughly, take the filter unit apart by pressing the tabs located on both sides of the filter unit and taking the dust filter off the EPA filter. Then clean the EPA filter with the cleaning brush supplied (Fig. 37). 7 Reassemble the filter unit, snap the EPA filter into the dust filter. Then place the filter unit back into the dust container (Fig. 38). Note: If you cleaned the dust container under the tap, please make sure it is dry before you reinsert the filter unit. 8 Put the lid on the dust container and make sure it locks into place with a click (Fig. 39). 9 Put the dust container back into the dust container compartment and fold down the dust container handle (Fig. 40). Caution: Always make sure the filter unit is present inside the dust container. If you use the robot without the filter unit inside the dust container, the motor will be damaged. Cleaning the robot To maintain good cleaning performance, you have to clean the drop-off sensors, the wheels, the side brushes, the suction opening and the contact points of the robot and docking station from time to time. 1 Place the robot upside down on a flat surface. 2 To clean the side brushes, grab them by the bristles and pull them off their shafts (Fig. 41). 3 Clean the side brushes and the shafts of the side brushes with the cleaning brush supplied (Fig. 42). 4 Remove dust or fluff from the front wheel and side wheels with the cleaning brush supplied (Fig. 43). 5 If hair or fluff has become entangled around the front wheel, remove the front wheel with a screwdriver (Fig. 44). 6 After cleaning the front wheel with the cleaning brush (Fig. 45), push the front wheel back into the robot with your thumb (Fig. 46). 7 Remove dust or fluff from the dust or fluff from the drop-off sensors with the cleaning brush supplied (Fig. 47). Note: It is important that you clean the drop-off sensors regularly. If the drop-off sensors are dirty, the robot may fail to detect height differences or staircases. 8 Use the cleaning brush supplied to clean the suction opening (Fig. 48). 9 Check the side brushes and the bottom of the robot for any sharp objects that could damage your floor. 10 Use a dry cloth or a cotton bud to clean the contact points of the docking station (Fig. 49).
English11 Use a dry cloth or a cotton bud to clean the contact points on the bottom of the robot (Fig. 50). Ordering accessories To buy accessories or spare parts, visit www.philips.com/parts-and-accessories or go to your Philips dealer. You can also contact the Philips Consumer Care Center in your country (see the international warranty leaflet for contact details). Replacement Replacing the filter Replace the EPA filter if it is very dirty or damaged (see 'Emptying and cleaning the dust container'). To obtain a new EPA filter, go to www.philips.com/parts-and-accessories. Replacing the rechargeable battery The rechargeable battery of the robot may only be replaced by qualified service engineers. Take the robot to an authorized Philips service center to have the battery replaced when you can no longer recharge it or when it runs out of power quickly. You can find the contact details of the Philips Consumer Care Center in your country in the international warranty leaflet or on the website at www.philips.com/support. Replacing the side brushes Replace the side brushes after some time to ensure proper cleaning results. Note: Always replace the side brushes when you notice signs of wear or damage. We also recommend that you replace both side brushes at the same time. To obtain new side brushes, go to www.philips.com/parts-and-accessories. 1 To replace the side brushes, grab the old side brushes by the bristles and pull them off their shafts. 2 Push the new side brushes onto the shafts. Replacing the batteries of the remote control 1 Push the tab (1) to unlock the battery compartment lid (2) and remove the battery compartment lid (Fig. 9). 2 Remove the empty AAA batteries from the battery compartment. 3 Insert two new AAA batteries (Fig. 10). Note: Make sure the + and - poles point in the right direction. 4 To reattach the battery compartment lid, first insert the lug into the opening in the rim of the compartment (1) and then push down the lid (2) until it locks with a click (Fig. 11). Now the remote control is ready for use. Note: Dispose of empty disposable batteries according to the local rules in your country. Recycling
This symbol means that this product shall not be disposed of with normal household waste (2012/19/EU) (Fig. 51).
English- This symbol means that this product contains a built-in rechargeable battery which shall not be disposed of with normal household waste (Fig. 52) (2006/66/EC). Please take your product to an official collection point or a Philips service center to have a professional remove the rechargeable battery.
Follow your country’s rules for the separate collection of electrical and electronic products and rechargeable batteries. Correct disposal helps prevent negative consequences for the environment and human health. Removing the rechargeable battery Only remove the rechargeable battery when you discard the product. Before you remove the battery, make sure that the product is disconnected from the wall socket and that the battery is completely empty. Take any necessary safety precautions when you handle tools to open the product and when you dispose of the rechargeable battery. Removing the rechargeable battery
Warning: Only remove the rechargeable battery when you discard the appliance. Make
sure the battery is completely empty when you remove it. To remove the rechargeable battery, follow the instructions below. You can also take the robot to a Philips service center to have the rechargeable battery removed. Contact the Philips Consumer Care Center in your country for the address of a service center near you. 1 Let the robot run until the rechargeable battery is empty to make sure that the rechargeable battery is completely discharged before you remove it and dispose of it. 2 Undo the screws of the battery compartment lid and remove the lid (Fig. 53). 3 Lift out the rechargeable battery and disconnect it (Fig. 54). 4 Take the robot and the rechargeable battery to a collection point for electrical and electronic waste. Troubleshooting This chapter summarizes the most common problems you could encounter with the appliance. If you are unable to solve the problem with the information below, visit www.philips.com/support for a list of frequently asked questions or contact the Consumer Care Center in your country. Problem Possible cause Solution The robot does not start cleaning when I press the start/stop button. The rechargeable battery is empty. Charge the rechargeable battery (see 'Preparing for use'). The robot does not respond when I press one of the buttons. The robot could not find the docking station and the battery ran out. Place the robot on the plugged-in docking station. After a few seconds, the robot beeps and the display lights up. The robot beeped and stopped. One or both wheels are stuck. Press the start/stop button. Remove the fluff, hair, thread or wire that is caught around the wheel suspension.
EnglishProblem Possible cause Solution One or both side brushes are stuck. Clean the side brushes. The robot was lifted while it was cleaning. Press the start/stop button. Place the robot on the floor. Then press the start/stop button to make the robot resume cleaning. The robot does not clean properly. The bristles of one or both side brushes are crooked or bent. Soak the brush or brushes in warm water for a while. If this does not restore the bristles to their proper shape, replace the side brushes (see 'Replacing the side brushes'). The filter in the dust container is dirty. Disassemble the filter unit. Clean the dust filer and the EPA filter with a toothbrush with soft bristles. You can also rinse the dust filter under a tap. If cleaning the EPA filter does not help anymore, replace the filter with a new one. We advise you to replace the EPA filter at least once a year. The suction opening in the bottom of the dust container is clogged. Clean the suction opening. The front wheel is jammed with hair or other dirt. Clean the front wheel (see 'Cleaning the robot'). The robot is cleaning a very dark or shiny surface, which triggers the drop-off sensors. This causes the robot to move in an unusual pattern. Press the start/stop button and then move the robot to a lighter colored piece of the floor. If the problem continues to occur on lighter colored floors, please go to www.philips.com/support or contact the Consumer Care Center in your country. The robot is cleaning a floor that reflects sunlight quite strongly. This triggers the drop- off sensors and causes the robot to move in an unusual pattern. Close the curtains to block sunlight from entering the room. You can also start cleaning when the sunlight is less bright. The rechargeable battery can no longer be charged or runs empty very fast. The rechargeable battery has reached the end of its life. Have the rechargeable battery replaced by a Philips service center (see 'Replacing the rechargeable battery'). The robot cannot find the docking station. There is not enough room for the robot to navigate towards the docking station. Try to find another place for the docking station (see 'Installing the docking station'). The robot is still actively searching. Give the robot around 20 minutes to return to the docking station.
54Page appears only if there are more than 24 figuresPage appears only if there are more than 48 figures© 2019 Koninklijke Philips N.V. All rights reserved 4222.003.4307.6 (24/10/2019) >75 % recycled paper >75 % papier recyclé