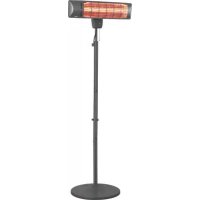
Qtime Golden 1800S - Heating Eurom - Free user manual and instructions
Find the device manual for free Qtime Golden 1800S Eurom in PDF.


| Product type | Infrared radiant heater for terrace |
| Brand | Eurom |
| Model | Qtime Golden 1800S |
| Power | 900 W (half power) / 1800 W (full power) |
| Voltage and frequency | 220-240 V ~ 50/60 Hz |
| Protection class | IP65 (dust-tight and protected against water jets) |
| Lamp type | Halogen « Golden tube » – estimated lifespan 8,000 hours |
| Maximum heating area | 16 m² |
| Mounting | On stand (model S) or wall |
| Adjustable height | Yes (adjustable part of the base) |
| Orientation | Vertical pivot ±30°, horizontal rotation 360° |
| Head dimensions | 54 x 14 x 15 cm |
| Total dimensions (with stand) | Approx. 54 x 14 x 200 cm |
| Weight | 9.0 kg |
| Housing material | Metal |
| Control | Pull-cord switch (positions 0, 900 W, 1800 W) |
| Tilt protection | Yes (automatic shut-off if tilted) |
| Minimum safety distances | Floor: 180 cm, ceiling: 30 cm, sides: 50 cm, front: 100 cm |
| Cleaning | With a damp cloth and mild detergent; use a soft brush and vacuum for the grille |
| Repairability | Lamp replacement possible; all repairs must be carried out by a qualified professional |
| General information | Outdoor use or in a large open space; do not cover; do not use for drying laundry |
Frequently Asked Questions - Qtime Golden 1800S Eurom
User questions about Qtime Golden 1800S Eurom
0 question about this device. Answer the ones you know or ask your own.
Ask a new question about this device
Download the instructions for your Heating in PDF format for free! Find your manual Qtime Golden 1800S - Eurom and take your electronic device back in hand. On this page are published all the documents necessary for the use of your device. Qtime Golden 1800S by Eurom.
USER MANUAL Qtime Golden 1800S Eurom
Q-time Golden 1800 / 1800S
Art.nr. 334159
Art.nr.334166
Dank
Thank you very much for choosing for a Eurom device. You have made a good choice! We hope you will be satisfied about its functioning.
To get maximum profit from your panel, it is important to read this manual attentive and totally before use, and to understand what is written. Read especially the safety instructions: they are there to protect you and your environment.
Keep the manual in a safe place for future reference. Store also the package: that is the best protection for your heater in times of no-use. And if you at any time pass the appliance on, pass on the manual and package too.
We wish you a lot of fun with the Q-Time Golden!
Eurom
Kokosstraat 20
8281 JC Genemuiden (NL)
info@eurom.nl
www.eurom.nl
This manual has been complied with the utmost care. Nevertheless, we reserve the right to optimize this manual at any time and to adjust it technically. The images used may differ.
Symbol statement
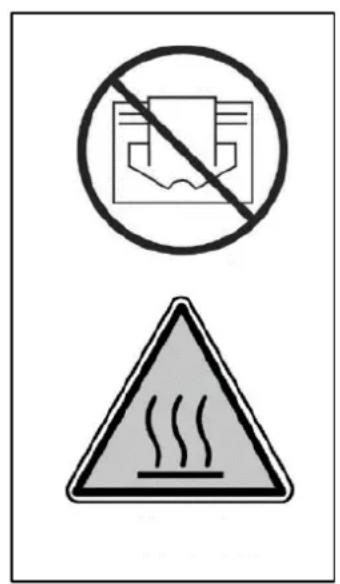
Do not cover your device!
Be careful: hot surface!
Product description
Your Eurom Q-time Golden 1800(S) infrared heater warms up not primarily the air in the room, but all objects before the heater. By means of that your infra-red heater is effective and very qualified to be used in the open air as well.
The Eurom Q-time Golden 1800(S) has some serious pré's:
- high degree of water tightness (totally dust- and watertight, IP65)
- the special 'Golden tube' lamp: a superior lamp with an expected lifetime of 8000 working hours. Under normal circumstances it will not be necessary to change the lamp.
Use the infrared heater for the objective for which it is made: to heat (the object in/on) a room or terrace. Don't hang p.e. wet textile over the lamp to dry, but always notice the minimum distances to the equipment.
Technical details
| Q-time Golden 1800 | Q-time Golden 1800S | |
| Heat output | 1800 W | 900 - 1800 W |
| Voltage | 220-240V~50/60Hz | 220-240V~50/60Hz |
| Protection class | IP65 | IP65 |
| Lamp | Golden halogen | Golden halogen |
| Reach | Max 16 m² | Max 16 m² |
| Model | Hanging at te wall | Standing on a standard |
| Oscillatable | ±30° ↑ | 360° ↔ ±30°↑ |
| House | metal | metal |
| Dimensions | 54 x 14 x 15 cm | 54 x 14 x 200 cm |
| Weight | 2,3 kg | 9,0 kg |
Warnings regarding electrical terrace heaters
General safety warnings
- Use the terrace heater only for the purpose for which it is designed: heating a terrace, garden or other outdoor domestic spaces and NOT for heating indoor spaces, outdoor non-domestic spaces or for drying textile and/or other materials.
- Carefully read this entire manual before using and/or installing this appliance. Keep the manual in order to be able to consult it in the future and possibly to pass it on to other people.
-
Check this new appliance before you use it (including cable and plug) for any visible damage. Do NOT use a damaged appliance, but bring it to your supplier for replacement.
-
Improper use and/or installation entail risks of electric shocks and/or fire.
Warnings for installation and positioning
- Use the terrace heater only outdoors or in a very large open space. Keep all flammable objects, such as tent cloths, parasols, branches, furniture/garden furniture, curtains, paper, etc. away from the appliance (minimum 1 metre, also when they are windblown!). Always take care of good ventilation!
- Observe the following minimum distances when installing the appliance: Minimum distance from the ceiling /roof: 30 cm Minimum free distance at the front side: 100 cm Minimum distance to the sidewalls: 50 cm Minimum distance to the floor: 180 cm
- The ceiling and wall that are used for mounting the appliance must be made from non-combustible or hardly combustible material. In any case, they should withstand a temperature of minimum 150^ without starting to singe, melt, deform or ignite. Check regularly whether the wall and ceiling do not become overheated, because this poses risks!
- Some parts of the appliance become extremely hot or the protective grids do not provide sufficient protection. For safety reasons, the lowest point of the appliance must always be at a distance of 180~cm from the ground.
- The air around the appliance should be able to circulate freely. Therefore, do NOT place it too closely to large objects. The minimum distances between large objects and the top, sides and bottom of the appliance are equal to the aforementioned distances to ceiling/roof, front side, sidewalls and floor.
- The terrace heater is intended only for domestic use. Therefore, do NOT use it on construction sites, in greenhouses, sheds, stables, etc., even if these are largely open spaces. Usually, these spaces contain too many flammable substances.
- Do NOT use this terrace heater for sauna heating, room heating, and heating of a kennel or another location in which there are animals.
-
If you use the appliance outdoors, it should be connected to a suitable, waterproof and earthed socket. All electrical connections must stay dry under all circumstances. The manufacturer, importer and supplier are not liable for incorrect connections!
-
Do NOT use this appliance before it is completely installed as described in the manual. NEVER use the appliance when it lays down, leans or similar. Do NOT insert the plug into the wall socket before the appliance is correctly installed in its final place.
- Do NOT place the appliance above a faucet, another source of water, etc. or within a distance of 1 metre from these objects. Do NOT install it in a humid environment, such as bathrooms, laundry rooms or similar indoor places. Be careful with water regardless of the fact that the appliance is splash-proof. Make sure that the appliance cannot fall into water and do NOT expose it to hard or brutal waterjets. Do NOT operate or touch it with wet hands. Install the appliance in such a manner that nobody can operate or touch it from a bathtub, shower or swimming pool.
- Use the appliance only when it is firmly mounted. Make sure that you always use fasteners suitable for the substrate and if necessary, consult an expert.
- If this appliance will be connected directly to the cabling of your electricity installation, an authorised specialist should install it while taking into account the applicable legislation, regulations and instructions.
- Always place the appliance on a firm, flat and horizontal substrate. The entire surface of the base should touch the substrate.
- Do NOT place the appliance near, under or pointing towards a socket and do NOT place it near open fire or heat sources.
- Do NOT use the appliance near or pointing towards furniture/garden furniture, parasols, tent cloths, branches, flags, paper, clothing and other flammable objects. Maintain at least 1 metre distance between these objects and the appliance!
- The inside of the appliance contains hot and/or glowing and sparking parts. Therefore, do NOT use the appliance in spaces for storing combustible liquids and/or gases such as fuels and paint. Do NOT use the appliance in locations where there is a risk of fire, such as near gas tanks, gas pipes or spray cans. That entails the risk of explosion or fire!
- When selecting a place for the appliance, take into account that this place cannot be reached / accessed by children.
Warnings regarding use
-
Do NOT use additions/accessories in/on the appliance that are not recommended or supplied by the manufacturer.
-
Use the appliance only for the purpose for which it is designed and only in a manner as described in the user manual.
-
Some parts of this appliance become extremely hot and can cause burns. Special attention is needed when children, vulnerable persons or pets are near the appliance. NEVER leave them alone if the appliance is operating!
-
Make sure that the infrared heater is always pointing down and NEVER towards the ceiling to prevent overheating the ceiling!
-
NEVER cover or block the appliance, which causes overheating and entails the risk of fire. NEVER hang or put objects such as clothing, blankets, pillows, etc. on the appliance. Always observe a minimum distance of 1 metre between the appliance and flammable materials. To prevent fire, ventilation openings must not be blocked. NEVER use the appliance for drying clothing and NEVER put something on it. Nothing may lean against the appliance!
-
Warning! NEVER leave an operating appliance without supervision. Do NOT put the appliance automatically into operation by means of a timer or any other device that switched on the appliance automatically. Always check that the appliance stands in safe conditions before using it! Do NOT use the appliance by means of a voltage regulator such as a dimmer or something similar; that is also dangerous!
-
Connection voltage and frequency stated on the appliance should correspond with the voltage and frequency of the wall socket that you are using. The wall socket must have an earth connection and the electrical installation should be protected using a 30mA residual-current circuit breaker. At all times, the wall socket used should be easily accessible in order to be able to remove the plug from the socket in case of an emergency.
-
To prevent overloading and blown fuses, other devices may not be connected to the same wall socket as the socket to which the appliance is connected.
-
Completely unwind the electric cable of the appliance before inserting the plug into the wall socket and ensure that the cable does not touch the hot parts of the appliance anywhere or can become hot in another manner. Do not put the electric cable under carpets, mats, runners, etc. and keep the cable out of the walkway. Make sure that no one steps on it and that garden furniture/furniture is not put onto it. Do not lead the cable around sharp corners and do not wind it too tightly after using it! Prevent
the cable from making contact with oil, solvents and sharp objects. Regularly check the cable for damage. Do not twist or bend the electric cable or wind it around the appliance; these things can damage the insulation!
- It is recommended not to use an extension cable, because that can cause overheating and fire. If using an extension cable is unavoidable, ensure that you use an undamaged and approved earthed extension cable with a minimum diameter of 3 × 2.5mm^2 and a minimally allowed power of 2300 Watt. Always unwind the extension cable completely to prevent overheating.
- Connect the appliance only to a fixed wall socket. Do NOT use a junction box, power strip, etc.
- The plug can feel lukewarm while the appliance is operating. This is normal, but if the plug gets very hot, then there is something wrong with the wall socket. Please contact your electrician.
- Always switch off the appliance initially using the main switch and subsequently, remove the plug from the wall socket. NEVER switch off the appliance by removing the plug!
- NEVER pull the electric cable to remove the plug from the wall socket or to move the appliance.
- Prevent any strange objects from penetrating the radiation/ventilation openings. This can cause an electric shock, fire or damage.
- NEVER stick fingers into the appliance through an opening.
- NEVER leave an operating appliance without supervision; first, switch off the appliance and subsequently, remove the plug from the wall socket.
- Always remove the plug from the wall socket, when the appliance is not operated. For this purpose, grasp the plug; NEVER pull the electric cable!
- The housing and the front side of the appliance become extremely hot during its operation. Therefore, do NOT touch the appliance during or shortly after its operation: that causes burns! Pay attention that wind or other environmental factors do not bring flammable materials, such as branches, parasols, tent cloths, flags, plastic foils, etc., in the vicinity of the appliance. This can cause damage/singe damage or fire. Pay attention that these objects/materials do not cover or block the appliance.
- Warning! This appliance is not equipped with a device to regulate room temperature. Do NOT use this appliance in small rooms, when
these are used by persons that are not able to leave these rooms independently, unless there is continuous supervision.
- NEVER operate the appliance with wet hands.
- Warning! Some parts of this appliance become extremely hot and can cause burns. Special attention is needed when children, vulnerable persons or pets are near the appliance. NEVER leave them alone in case the appliance is operating!
Who is allowed to use the appliance?
- Children, who are younger than 3 years old, should be kept away of the appliance, unless there is supervision.
- Children between the ages of 3 and 8 are only allowed to switch the appliance on or off, if it is placed or installed in its normal workplace and if there is supervision or if they have received instructions for using the appliance safely and understand which risks are related to using it. Children between the ages of 3 and 8 are NOT allowed to insert the plug into the wall socket, regulate or clean the appliance and carry out maintenance.
- This appliance can be used by children, who are over the age of 8, and by persons with reduced physical, sensory or mental skills or lack experience and knowledge, if there is supervision or if they have received instructions for using the appliance safely and understand which risks are related to using it.
- Children are not allowed to clean and maintain the appliance without supervision.
- Children are not allowed to play with the appliance.
Warnings regarding maintenance
- NEVER change anything in the appliance, electric cable or plug.
- Keep the appliance clean, because dust, dirt and/or sediment is often the reason for overheating. Make sure that such sediment is removed regularly.
- NEVER submerge the appliance in water to clean it.
-
Always switch off the appliance, remove the plug from the wall socket and let the appliance cool down, when you:
-
Want to clean the appliance.
- Want to carry out maintenance.
-
Want to touch or move the appliance.
-
Do NOT put the appliance into operation, if you observe damage to the appliance, electric cable or plug, or if it operates poorly, makes unusual noise, has fallen or if you smell something, see smoke or observe some other fault. Remove the plug from the wall socket
immediately. Return the entire appliance to your supplier or a qualified electrician for a check and/or repair. Always demand original spare parts.
- Only authorised and qualified persons are allowed to open and/or repair the appliance. Do not repair the appliance yourself; that can be dangerous! Repairs by unauthorised persons or changes to the appliance breach the water and dust tightness of the appliance and cause the warranty and liability of the manufacturer to be cancelled.
- If the electric cable is damaged, it should be replaced by the manufacturer or its service employee or persons with similar qualifications to prevent risks.
Deviations of points < 5> , < 6> , and/or < 7> can cause damage, fire and/or personal injury. This cancels the warranty and the manufacturer, importer and/or supplier do not accept any liability for the consequences.
Description
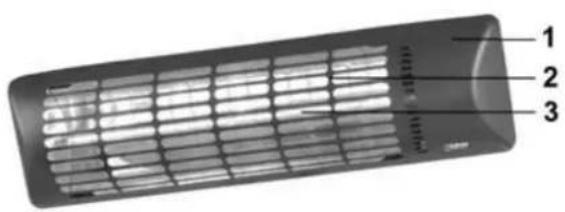
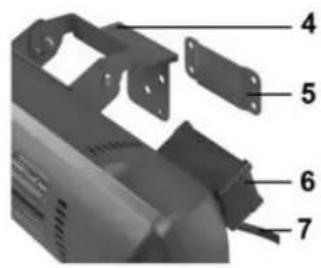
Golden 1800 & 1800S
- Heater housing
2.Grille - Lamp
Golden 1800
- Suspension bracket
- Wall bracket
- Junction box
- Electrical cable with plug
Golden 1800S
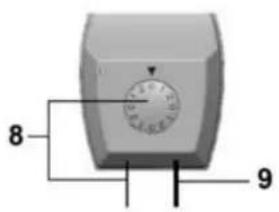
- Pull cord and position indicator
- Electrical cable with plug
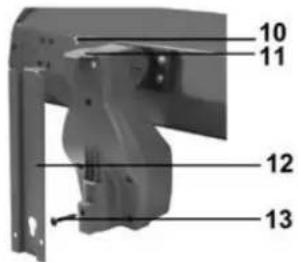
- Bolt
- Bracket (for hanging the patioheater)
- Wall bracket
- Hanging screw
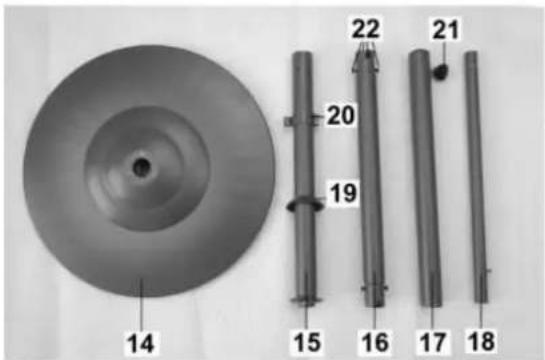
- Base
- Stand, bottom section
- Stand, middle section
- Stand, top section
- Stand, adjustable section
- Protective cover
- Cable guide
- Black locking screw
- Fixing screws for stand
Installing the heater
Remove all package material (including the shock absorbing material around the bulb) before installing the heater and check the appliance, supply cord and the plug for signs of damage. Carefully choose the right place to install your heater.
Before fastening, check that the minimum safe distances between the surroundings and the chosen location are respected:
Minimum distance lowest point of heater - floor: 1,8 metres
Minimum distance heater - heated object: 1 metre
Minimum distance top heater - fire-resistant ceiling: 0.3 metres
Minimum distance top heater - tent tarpaulin, parasol etc.: 0.3 metres
Minimum distance side heater - walls, obstacles, objects: 0.5 metres
If you suspend the device outside, ensure that it is protected from the wind.
Wall mounting
-
The housing of the heater (1) must be at least 30~cm from the ceiling, 50~cm from side-walls and 1.80~m above the floor.
-
The patio heater must be affixed to a sturdy wall made of stone or cement. Never attach to walls made of wood or other flammable material! Attach using the bracket supplied; do not use any other supports or attachments!
Wall mounting Golden 1800
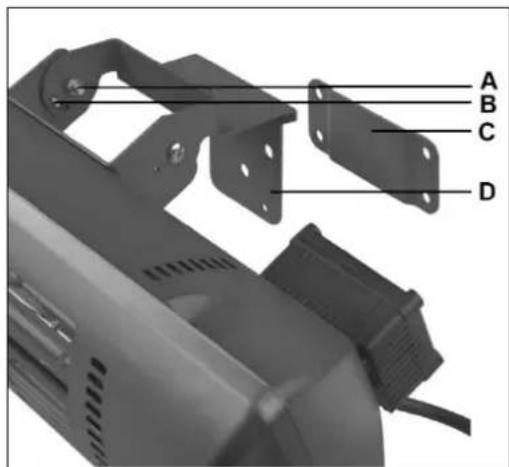
- Mount the suspension bracket (D) with the 2 nuts and bolts (A) firmly to the terrace radiator as shown in the illustration.
-
Drill four holes in the correct places for the plugs and attach the wall bracket (C) to the wall using the screws. The wall bracket must be horizontal.
-
Hook the radiator into the wall support and check that everything is firm and is suspended fully horizontally.
- Secure it by tightening the screw supplied through the bottom hole of the bracket up against the wall.
- Determine the direction of radiation. Your terrace radiator has 4 positions: from straight ahead to ± 30^ downwards. Fix the device in the required position using the 2 small screws (B).
Wall mounting Golden 1800S
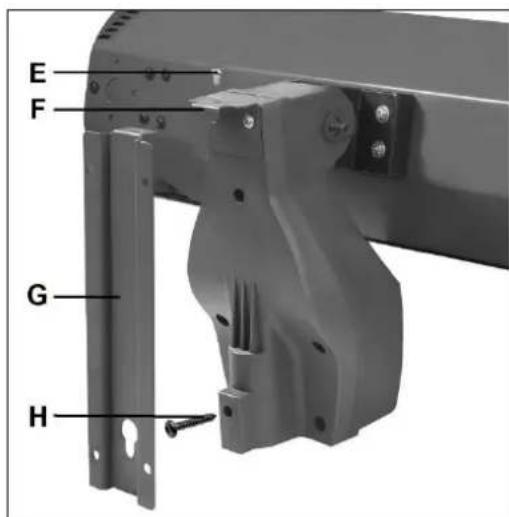
- Drill four holes in the correct places for the plugs and attach the wall bracket (G) to the wall using the screws. The curved part of the plate must be uppermost and the 'keyhole' must be located at the bottom of the support. The wall bracket must be perfectly vertical.
- Attach the bracket (F) using the two small screws on the patio heater, as shown.
- Turn the hanging screw (H) into the corresponding hole on the side of the patio heater, until it protrudes a maximum of 5mm (see diagram).
- Hang the heater onto the wall support. The bracket at the back of the heater unit must fall into the curved part of the wall support; the hanging screw (H) must be placed into the round part of the 'keyhole' on the wall support and then pushed gently downwards until the patio heater is firmly affixed. Secure this with a bolt (E) through both brackets (see diagram).
- Check that the patio heater is attached firmly and fully horizontally before use.
Assembling the stand (Golden 1800S)
-
Place the bottom section of the stand (15, with the fastening plate) on the base (14), in such a way that the screw holes are aligned. Turn the foot over and screw the lower section of the stand from below with the plate and the locking nut (see picture). Turn the base the right way up. Place the protective cover over the screw connection.
-
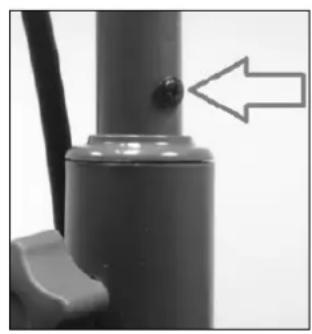
Slide the adjustable, narrow section of the stand (18) from below through the top section of the stand (17), until it comes out again at the top (widening at the base). Secure the adjustable section using
the black locking screw (21) that is located at the top of the top section of the stand.
- Push the centre section of the stand (16) into the lower section (15), screw-hole to screw-hole. Secure with four fixing screws. In the same way, secure the upper section of the stand (17, with the adjustable part inside) over the central section.
- Screw the extra black coloured screw (supplied) into the adjustable section of the stand so that it cannot, so that it cannot slide into the upper section (to secure the movable pipe).
- Then undo the locking screw (21) almost entirely. Place the top of the patio heater over the top of the adjustable stand section so that the locking screw falls precisely into the recess on the stand. Now tighten the locking screw firmly. The electrical cable can be secured in the cable holders on the stand.
- Check that all connections are completely secure and that the terrace heater is securely positioned before using it. The terrace heater must be placed firmly on an even and completely horizontal surface. The top of the patio heater can tilt to around 30^ ; set it to the position you prefer.
Stand Golden 1800S
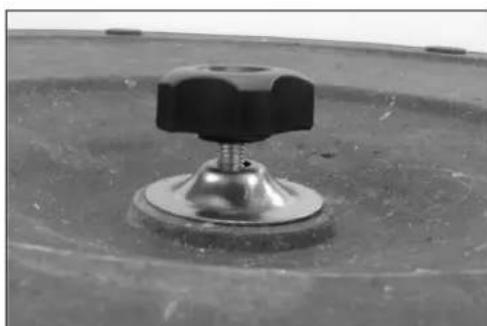
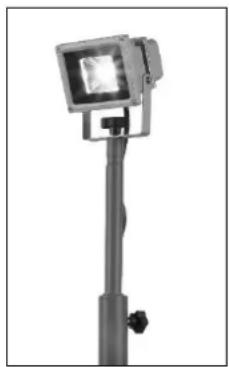
The stand that is supplied with the Golden 1800S is multifunctional. In the top of the narrow stand section, there is a threaded section; a suitable screw with a black top is also supplied. You can, therefore, also mount a lamp on the stand (see picture).
Patio heater functions
Golden 1800
- Check that all of the safety requirements have been fulfilled.
- Now insert the plug into the socket (220-240V~50/60Hz). The device will start to radiate. You can stop it from operating by removing the plug from the socket.
Golden 1800S
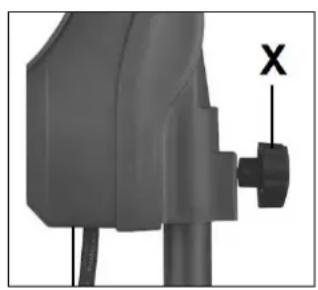
The height of the heater top can be adjusted with the S-system. The black locking screw (21) on the upper stand section must be undone and the adjustable stand section can be pushed in/out of the upper section. Then tighten the screw up firmly. The heater head must always be kept at least 180 cm above the floor.
- Check that all of the safety requirements have been fulfilled.
- Ensure that the position switch (Y) is set to 0.
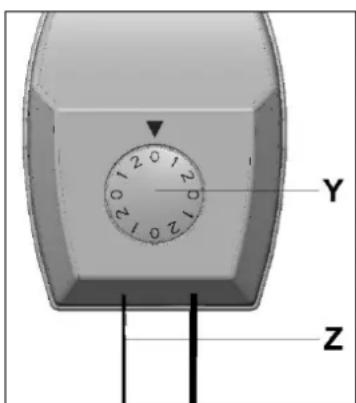
- Now insert the plug into the socket (220-240V~50/60Hz).
- Pulling the pull cord (Z) once will switch the device to position 1 and it will start operating at half power (900W). Pulling it again will switch to position 2 (full power, 1800 Watts). Pulling again will switch the device off again.
- By pressing one of the two operating switches (I pressed), you can set the patio heater to half power (1000W). By pressing the other switch in too, you can also switch the second light on and the device works at full power (2000W). Switch off the lamps by pressing the switches again (O pressed).
- Remove the plug from the socket when the patio heater is not in use.
The patio heater does not have a thermostat and continues to give out heat until it is switched off. Always keep a close eye on the patio heater when it is switched on!
Fall protection
The Golden 1800S is equipped a fall safeguard. It will automatically switch off if, despite the precautionary measures you have taken, the device falls over. In this event, unplug the device immediately. Always check the patio heater carefully for damage, then put it upright again. Never use a damaged device but take it to your dealer or a recognised service point to be checked and/or repaired. If you cannot find any damage, switch the patio heater off, insert the plug into the socket and put the device on again. Monitor the patio heater closely for the first fifteen minutes; if any defects occur, unplug immediately and take it to your dealer/service point to be repaired.
Cleaning
Always switch the patio heater off, allow the patio heater to cool down and unplug before cleaning. Clean using a damp cloth and, if necessary, a little cleaning fluid. Never use corrosive or abrasive cleaning agents! After a while, dust and debris may gather behind the grille (2). You can try to remove this carefully using a thin, soft brush and a vacuum cleaner. Never use a compressor as this could damage the lamps or the reflector. Avoid touching the lamps.
Removal
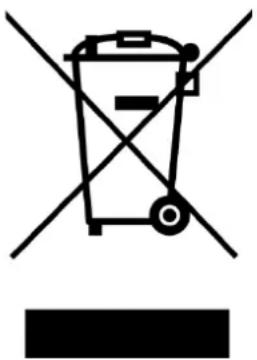
In the EU this symbol indicates that this product may not be disposed of as ordinary household waste. Old equipment contains valuable materials, suitable for recycling. These materials should be made suitable for reuse in order to prevent any adverse effects to health and the environment caused by unregulated waste collection. Therefore, please make sure that you bring old equipment to a designated collection point. Alternatively, contact the original supplier, who can make sure that as many of the components as possible can be recycled.
CE-declaration
See page 119.
Dank
Installation of apparatus
declares the following device in sole responsibility:
Product: Infrared Terrace heater
Brand name: EUROM
Model: Q-time Golden 1800 / Q-time Golden 1800S
Item number: 334159 / 334166
Complies with the following harmonization rules:
Low Voltage Directive: LVD 2014/35/EU
Electromagnetic compatibility Directive: EMC 2014/30/EU
Restriction of Hazardous Substances RoHS Directive:2011/65/EU&(EU)2015/863
Applied harmonized standards:
EN 60335-2-30:2009+A11:2012
EN 60335-1:2012+A11:2014+A13:2017
EN 62233:2008
EN 55014-1:2017
EN 55014-2:2015
EN 61000-3-2:2014
EN 61000-3-3:2013
Genemuiden, 16-12-2020
W.J. Bakker, alg. Dir.
Eurom
Kokosstraat 20
8281 JC Genemuiden
The Netherlands
info@eurom.nl
www.eurom.nl

- Q-time Golden 1800 / 1800S
- Dank
- Symbol statement
- Product description
- Technical details
- Warnings regarding electrical terrace heaters
- General safety warnings
- Warnings for installation and positioning
- Warnings regarding use
- Who is allowed to use the appliance?
- Warnings regarding maintenance
- Description
- Golden 1800 & 1800S
- Golden 1800
- Golden 1800S
- Installing the heater
- Wall mounting
- Wall mounting Golden 1800
- Wall mounting Golden 1800S
- Assembling the stand (Golden 1800S)
- Stand Golden 1800S
- Patio heater functions
- The patio heater does not have a thermostat and continues to give out heat until it is switched off. Always keep a close eye on the patio heater when it is switched on!
- Fall protection
- Cleaning
- Removal
- CE-declaration
- Installation of apparatus
- Eurom
Brand : Eurom
Model : Qtime Golden 1800S
Category : Heating