
MC7000 - DJ Equipment DENON - Free user manual and instructions
Find the device manual for free MC7000 DENON in PDF.
| Brand | Denon |
| Model | MC7000 |
| Product type | DJ controller / 4-channel USB audio interface |
| Power supply | 5V DC, 4A power adapter, center positive (included) |
| USB ports | 2 USB ports for connection to two computers (DJ transition) |
| Audio inputs | 2 line inputs (RCA), 2 line/phono inputs (RCA), 2 microphone inputs (XLR and 6.35mm) |
| Audio outputs | XLR and RCA main outputs, XLR booth outputs, 6.35mm and 3.5mm headphone outputs |
| Equalizer | 3-band per channel (high, mid, low) with high-pass/low-pass filter |
| Effects | 2 effects processors with per-channel assignment, level and tempo control |
| Pads | 8 backlit pads with modes: Cue, Cue Loop, Roll, Saved Loop, Slicer, Slicer Loop, Sampler, Velocity Sampler, Flip |
| Crossfader | Crossfader with channel assignment (L/R/Thru) and curve adjustment (Contour) |
| Compatible software | Serato DJ (download included) |
| Microphone functions | Microphone volume, equalizer (Mic 1: HI/LOW, Mic 2: Tone), Echo, Talkover, Post (send to booth) |
| Loop functions | Auto-Loop, Reloop, half/double loop, in/out points |
| Advanced functions | Key Lock, Key Sync, Pitch Bend, Slip Mode, Censor, Beat Grid (slip adjustment) |
| Warranty | Visit denondj.com for warranty details |
| User manual | Quick start guide included in French, full manual downloadable at denondj.com |
Frequently Asked Questions - MC7000 DENON
User questions about MC7000 DENON
0 question about this device. Answer the ones you know or ask your own.
Ask a new question about this device
Download the instructions for your DJ Equipment in PDF format for free! Find your manual MC7000 - DENON and take your electronic device back in hand. On this page are published all the documents necessary for the use of your device. MC7000 by DENON.
USER MANUAL MC7000 DENON
Power Adapter (5 VDC, 4 A, center-positive)
Software Download Card
Quickstart Guide
Safety & Warranty Manual
Important: Download the complete MC7000 user guide from denondj.com.
Support
For the latest information about this product (documentation, technical specifications, system requirements, compatibility information, etc.) and product registration, visit denondj.com.
For additional product support, visit denondj.com/support.
Setup
Important: Occasionally, we may update MC7000's firmware to improve its performance. Visit denondj.com to check for available firmware updates, especially after you update your software (firmware updates may address new software features).
Note: Items not listed under the Introduction > Box Contents are sold separately.
Single-DJ Performance
- Visit denondj.com and log into your account. (Create an account if this is your first Denon DJ product.)
- In your account, download and install the latest version of Serato DJ.
- Windows users only: In your account, download and install the latest Windows driver.
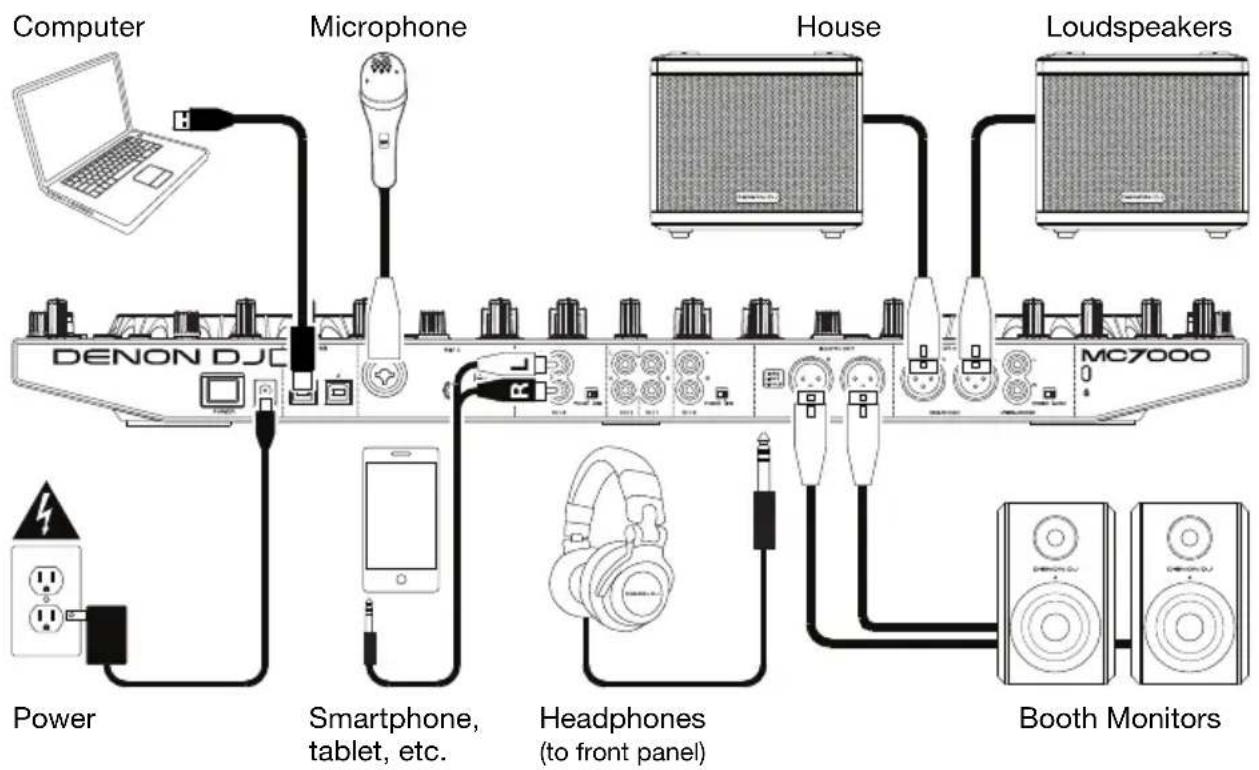
- Connect input sources (microphones, CD players, etc.) to MC7000.
- Connect output devices (headphones, power amplifiers, loudspeakers, etc.) to MC7000.
-
Plug all devices into power sources, and turn on devices in proper order:
-
When starting a session, turn on (1) input sources, (2) MC7000, (3) output devices.
-
When ending a session, turn off (1) output devices, (2) MC7000, (3) input sources.
-
Using a standard USB cable (included), connect the USB port on MC7000 to your computer. Open Serato DJ and go! For more information on how to use Serato DJ with MC7000, visit serato.com/dj/support and select Denon DJ MC7000.
flowchart
graph TD
    A["Computer"] --> B["Microphone"]
    B --> C["House"]
    C --> D["Loudspeakers"]
    D --> E["Booth Monitors"]
    E --> F["Headphones (to front panel)"]
    F --> G["Smartphone, tablet, etc."]
    G --> H["Power"]
    H --> I["DENON DJC"]
    I --> J["MC7000"]
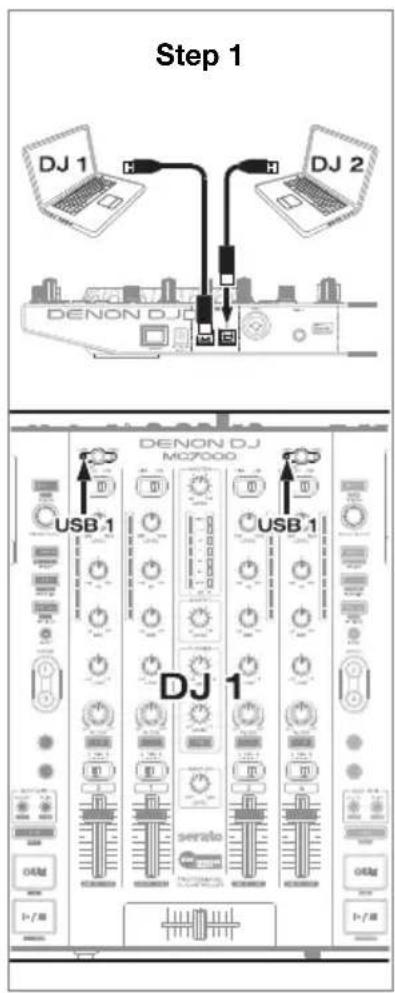
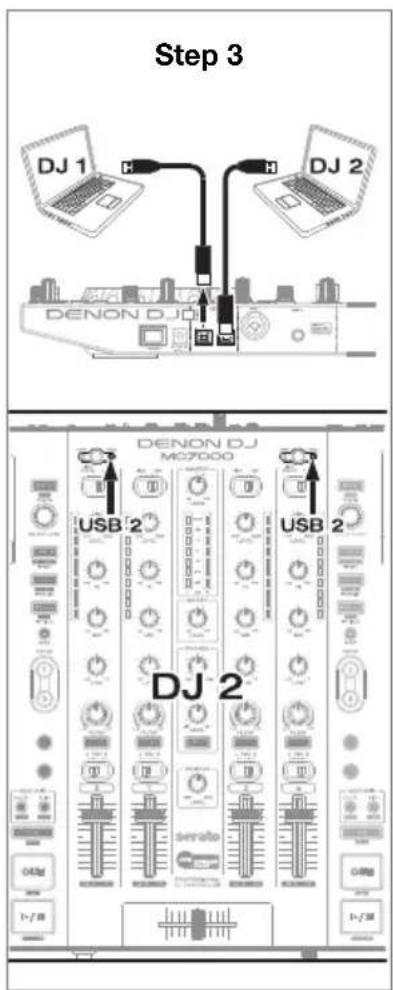
Transitioning Between DJs
MC7000 has two USB ports, allowing you to control audio from two computers at the same time, which allows for seamless transitions while switching from one DJ to another.
To transition between DJs:
-
While DJ 1 uses MC7000 normally, use a standard USB cable to connect DJ 2's computer to the other USB port (1 or 2) on MC7000's rear panel.
-
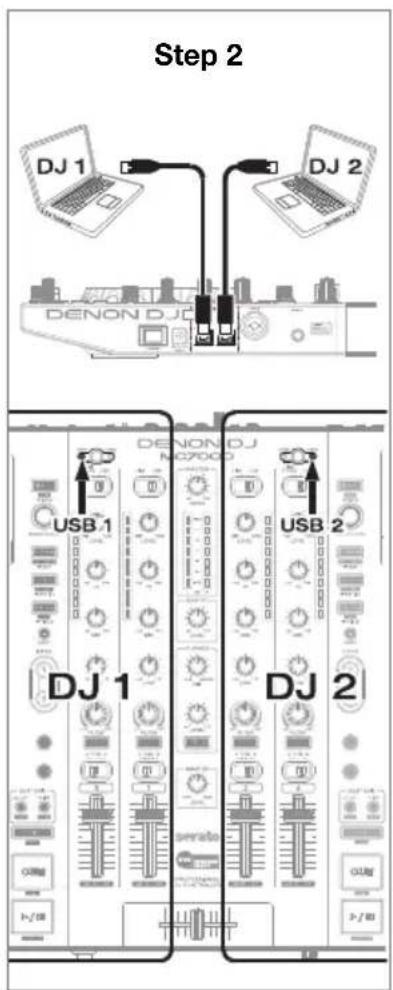
While the master mix is playing audio from the left deck, set the right deck's USB selector to DJ 2's USB port (1 or 2). (You can do this step with the master mix playing on the right deck instead—just remember to swap "left" and "right" for the rest of this process.)
Now, while DJ 1 uses the left deck (and the mixer controls for Channels 1 & 3) to control their computer, DJ 2 can also use the right deck (and the mixer controls for Channels 2 & 4) to control their computer.
Important: During this time, the Sampler Volume knob controls the volume level of the sampler on both computers.
- While the master mix is playing audio from the right deck (and after DJ 1 has played their last track), set the left deck's USB selector to DJ 2's USB port (1 or 2).
Now, DJ 2 is using both left and right decks to control their computer.
Features
Top Panel
- Input Selector: Set this switch to the desired audio source from this channel: USB (a track playing on that layer in the software), Line (a device connected to the line input on the rear panel), or Line/Phono (a device connected to the line/phono input on the rear panel). Please note that the Line/Phono selector switches on the rear panel must also be set properly. Also, a channel's controls will only send MIDI information when its input selector is set to USB.
- USB Selector: Press this button to select whether the deck is controlling the computer connected to USB Port 1 or USB Port 2. Remember to set the channel's input selector to USB if you want it to play the audio from that layer in the software.
- Channel Level: Turn this knob to adjust the level of the pre-fader, pre-EQ audio signal for the channel.
- Channel Level Meters: These LEDs display the audio signal level of the channel.
- Channel EQ: Turn these knobs to boost or cut the high, mid-range, and low frequencies for the channel.
- Channel Filter: Turn this knob to adjust the filter applied to the channel. Turn the knob counterclockwise to apply a low-pass filter. Turn the knob clockwise to apply a high-pass filter.
-
Channel Cue: Press this button to send the channel's pre-fader signal to the headphones' cue channel.
-
Channel Fader: Use this fader to adjust the channel's volume level.
- Crossfader Assign: Routes the audio playing on the corresponding channel to either side of the crossfader (L or R), or bypasses the crossfader and sends the audio directly to the program mix (center, Thru).
- Crossfader: Use this crossfader to mix between the left and right decks.
- Channel FX: Use these buttons to apply Effect A and/or B to the corresponding channel.
- Sampler Volume: Turn this knob to adjust the volume level of the software's sampler.
- Master Level Meters: These LEDs display the audio signal level of the master mix (sent out of the master outputs).
- Master Level: Turn this knob to adjust the volume level of the master outputs.
- Booth Level: Turn this knob to adjust the volume level of the booth outputs.
- Mic On/Off: Press this button to activate/deactivate the microphones.
- Mic Level: Turn these knobs to adjust the volume levels of the corresponding microphone inputs. The Peak light next to each knob indicates the current signal level by its color: green (low), amber (normal/optimal), or red (maximum/peak).
Important: The audio signals from the microphones are routed directly to the master outputs.
- Left Deck:
- Mic EQ: Turn these knobs to boost or cut the high and low frequencies for Mic 1.
Right Deck:
- Tone: Turn this knob to adjust the tone of the Mic 2 audio signal.
-
Mic Echo Level: Turn this knob to adjust the amount of the reverb effect on the microphones' audio signal.
-
Left Deck:
- Talkover/Post: Press this button to use the “talkover” feature, which automatically reduces the volume level of the master mix when you speak into the microphones. Press and hold Shift and then press this button to activate/deactivate the “post” feature. When on, the microphones’ signal will be sent to the Booth Outputs. When off, the microphones’ signal will not be routed to the Booth Outputs.
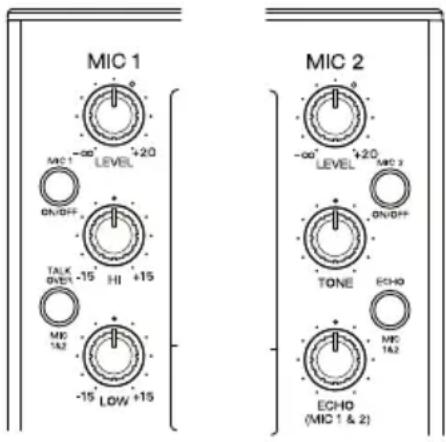
Right Deck:
- Echo On/Off: Press this button to activate or deactivate the reverb effect on the microphones' audio signal.
- Phones Level: Adjusts the volume of the headphones.
- Phones Mix: Adjusts the software's audio output to the headphones, mixing between the cue output and the master mix output.
- Split Cue: When this switch is in the On position, the headphone audio will be “split” such that all channels sent to cue channel are summed to mono and sent to the left headphone channel and the master mix is summed to mono and sent to the right channel. When the switch is in the Off position, the cue channel and master mix will be “blended” together.
-
Deck: Selects which deck in the software is controlled by that hardware deck. The left deck can control Deck 1 or 3; the right deck can control Deck 2 or 4.
-
Shift: Press and hold this button to access secondary functions of other controls.
-
Sync / Sync Off: When using Serato DJ, press this button to automatically match the corresponding deck's tempo with the tempo and phase of the opposite deck.
Press and hold Shift and press this button to deactivate Sync.
- Cue / Track Start: During playback, press this button to return the track to a temporary cue point. If you have not set a temporary cue point, then press this button to return to the start of the track. (To set a temporary cue point, make sure the track is paused, move the platter to place the audio playhead at the desired location, and then press this button.)
If the deck is paused, press and hold this button to play the track from the temporary cue point. Release the button to return the track to the temporary cue point and pause it. To continue playback without returning to the temporary cue point, press and hold this button and then press and hold the Play button, and then release both buttons.
Press and hold Shift and then press this button to return to the start of the track.
- Play/Pause / Stutter: This button pauses or resumes playback.
Press and hold Shift and then press this button to "stutter-play" the track from the last set cue point.
- Platter: This capacitive, touch-sensitive platter controls the audio playhead when the wheel is touched and moved. When the Vinyl button is on, move the platter to "scratch" the track as you would with a vinyl record. When the Vinyl button is off (or if you are touching only the side of the platter), move the platter to temporarily adjust the track's speed.
While editing a loop, move the platter to adjust the Loop In or Loop Out point.
Press and hold Shift and then move the platter to move quickly through the track.
-
Stop Time: Controls the rate at which the track slows to a complete stop ("brake time").
-
Vinyl: Press this button to activate/deactivate a "vinyl mode" for the platter. When activated, you can use the platter to "scratch" the track as you would with a vinyl record.
-
Pitch Fader: Move this fader to adjust the speed (pitch) of the track. You can adjust its total range with the Pitch Bend buttons.
-
Pitch Bend -/+: Press and hold one of these buttons to momentarily reduce or increase (respectively) the speed of the track.
Press and hold Shift and then press one of these buttons to set the range of the pitch fader.
- Key Lock / Key Sync: Press this button to activate/deactivate Key Lock. When Key Lock is activated, the track's key will remain the same even if you adjust its speed.
While using Serato DJ, press and hold Shift, and then press this button to automatically match the corresponding deck's key with the key of the opposite deck. You can use this if you have installed the Pitch 'n Time DJ plugin from Serato.
-
Key Select/Reset: Turn this knob to raise or lower the key of the track in semitone increments. Press this knob to reset the track's key to its original key. You can use this if you have installed the Pitch 'n Time DJ plugin from Serato.
-
Pads: These pads have different functions on each deck depending on the current Pad Mode.
-
Cue / Cue Loop / Flip: This Pad Mode button puts the pads in two modes: Cue Mode, Cue Loop Mode. Press and hold Shift and press this button to put the pads in Flip Mode. When the button is unlit, the first press will always select Cue Mode. See the complete user guide for more information.
-
Roll / Saved Loop: This Pad Mode button puts the pads in two modes: Roll Mode and Saved Loop Mode. When the button is unlit, the first press will always select Roll Mode. See the complete user guide for more information.
-
Slicer / Slicer Loop: This Pad Mode button switches the pads between two modes: Slicer Mode and Slicer Loop Mode. When the button is unlit, the first press will always select Slicer Mode. See the complete user guide for more information.
Important: While using Serato DJ, your track must have a set Beat Grid for Slicer Mode or Slicer Loop Mode to work. - Sampler / Velocity Samp.: This Pad Mode button switches the pads between two modes: Sampler Mode and Velocity Sampler Mode. Sampler Mode is available in Serato DJ only. When the button is unlit, the first press will always select Sampler Mode. See the complete user guide for more information.
- Auto-Loop/Reloop: Press this button to create an auto-loop with the length that is set in the software. Press and hold Shift and then press this button to skip to the last-played loop and activate it immediately.
- X 1/2 Loop / Loop In: Press this button to halve the length of the current loop.
Press and hold Shift and then press this button to create a Loop In point at the current location.
- X 2 Loop / Loop Out: Press this button to double the length of the current loop.
Press and hold Shift and then press this button to create a Loop Out point at the current location.
- ◀/► / Param 1/2: Use these buttons for various functions in each Pad Mode.
Press and hold Shift and use these buttons to access secondary parameters.
-
Slip: Press this button to enable or disable Slip Mode. In Slip Mode, you can jump to cue points, trigger loop rolls, or use the platters, while the track's timeline continues. In other words, when you stop the action, the track will resume normal playback from where it would have been if you had never done anything (i.e., as if the track had been playing forward the whole time).
-
Censor / Rev: Press this button to activate/deactivate the Censor feature: the playback of the track will be reversed, but when you release the button, normal playback will resume from where it would have been if you had never engaged the Censor feature (i.e., as if the track had been playing forward the whole time).
Press and hold Shift and then press this button to reverse the playback of the track normally.
- Adjust/Set: Press and hold this button and move the platter to "warp" the entire Beat Grid.
Press and hold Shift and then press this button to set a Beat Marker at the Audio Playhead's current location.
Important: Your track must have a set Beat Grid for the Adjust feature to work. Also, using the Adjust feature will change the track's BPM.
- Slide/Clr: When using the software's Beat Grid, press and hold this button and move the platter to "slide" the entire Beat Grid to the left or right.
Press and hold Shift and then press this button to clear the entire Beat Grid.
Important: Your track must have a set Beat Grid for the Slide/Clr button to work.
- Select/Load Knob: Turn this knob to navigate through lists. Press this button to switch between the library view and crates view (and any other open panels).
Press and hold Shift and then turn this knob to browse quickly through the tracks in your library.
Tip: Press it quickly twice to load the same track to both decks ("instant doubles").
- Sort: Press and hold this button to access tertiary sort (▼) functions of the navigation controls.
- Back/Fwd/Sort BPM: Press this button to move to the previous window.
Press and hold Shift and then press this button to move to the next window.
Press and hold Sort and then press this button to sort the tracks by BPM.
- Load Prep/Open Prep/Sort Key: Press this button to load the currently selected track to the Prepare Crate.
Press and hold Shift and then press this button to jump to the Prepare Crate in the software.
Press and hold Sort and then press this button to sort the tracks by key.
- Files/History/Sort Artist: Press this to jump to the Files panel.
Press and hold Shift and then press this button to jump to the History panel.
Press and hold Sort and then press this button to sort the tracks by artist.
- Panel/View/Sort Title: Press this to cycle through the different panels.
Press and hold Shift and then press this button to change the view layout.
Press and hold Sort and then press this button to sort the tracks by title.
- Needle Drop Strip: The length of this strip represents the length of the entire track. Place your finger on a point along this sensor to jump to that point in the track.
- FX On / Select: Press this button to turn the corresponding effect on or off. Press and hold Shift and then press this button to select an effect in Serato DJ.
- FX Level: Turn this knob to adjust the level of the corresponding effect. The FX On button under the knob must be lit for this knob to function.
While using Serato DJ, press and hold Shift and then turn this knob to scroll through the list of effects.
- FX Beats: Turn this knob to adjust the rate of time-based effects on that deck. Press this knob to reset the rate to 1 beat.
- FX Tap: Tap this button repeatedly at the desired tempo to set the rate of the effects' low-frequency oscillators (LFOs). Press and hold this button to reset Beat Multiplier to the Deck's BPM.
Press and hold Shift and then press this button to switch between Single-FX Mode and Multi-FX Mode.
Front Panel

- Phones Outputs (1/4" or 1/8" / 6.35 mm or 3.5 mm): Connect headphones to these 1/4" (6.35 mm) and 1/8" (3.5 mm) jacks for monitoring the signal. The headphone volume is controlled using the Monitor Level knob.
- Crossfader Contour: Adjusts the slope of the crossfader curve. Turn the knob to the left for a smooth fade (mixing) or to the right for a sharp cut (scratching). The center position is a typical setting for club performances.
Rear Panel

- Power Input: Use the included power adapter (5 VDC, 4 A, center-positive) to connect this input to your power source.
- Power Button: Press this button to power MC7000 on or off. Power on MC7000 only after you have connected all of your input devices and before you power on your amplifiers and loudspeakers. Power off your amplifiers and loudspeakers before powering off MC7000.
- Cable Restraint: You can secure the power cable to this restraint to help prevent disconnecting it accidentally.
- USB Port 1/2: Use a standard USB cable (included) to connect each USB port to an available USB port on a computer. These 2 ports allow you to control audio from 2 computers at the same time, which allows for seamless transitions while switching from one DJ to another.
To set a channel to control your computer, set its input selector to USB, and set its USB selector to the desired port (USB1 or USB2). - Master Outputs (XLR, balanced): Use standard XLR cables to connect these outputs to loudspeakers or an amplifier system. Use the Master knob on the top panel to control the volume level.
- Master Outputs (RCA, unbalanced): Use standard RCA cables to connect these outputs to loudspeakers or an amplifier system. Use the Master knob on the top panel to control the volume level.
- Stereo/Mono: Use this switch to set the channel configuration of the master outputs: Stereo (binaural audio using separate left and right channels) or Mono (summed monaural audio through both left and right channels).
- Booth Outputs (XLR, balanced): Use standard XLR cables to connect these outputs to booth monitors or a booth amplifier system. Use the Booth knob on the top panel to control the volume level.
- Line Inputs (RCA, unbalanced): Use standard RCA cables to connect these line-level inputs to an external audio source.
- Line/Phono Inputs (RCA, unbalanced): Use standard RCA cables to connect these line-level or phono-level inputs to an external audio source.
- Phono/Line Switch: Flip this switch to the appropriate position, depending on the device connected to the Line/Phono Inputs. If you are using phono-level turntables, set this switch to Phono to provide the additional amplification needed for phono-level signals. If using a line-level device, such as a CD player or sampler, set this switch to Line.
- Mic 1 Input (XLR or 1/4" / 6.35 mm): Use a standard XLR or 1/4" (6.35 mm) cable (not included) to connect a standard dynamic microphone to this input. Use the Mic 1 Level knob on the top panel to control the volume level.
- Mic 2 Input (1/4" / 6.35 mm): Use a standard 1/4" (6.35 mm) cable (not included) to connect a standard dynamic microphone to this input. Use the Mic 2 Level knob on the top panel to control the volume level.
- Kensington ^® Lock: Use this slot to secure MC7000 to a table or other surface.
Single-DJ Performance
Technical Specifications
| Analog Output Master | +24 dBu (balanced, maximum), +4 dBu (balanced, unity) | |
| +20 dBu (unbalanced, maximum), 0 dBu (unbalanced, unity) | ||
| Booth +24 dBu (balanced, maximum), +4 dBu (balanced, unity) | ||
| Headphones >150 m W @ 40 Ω | ||
| Analog Input Microphone | -40 dBu (unity), -60 dBu (minimum) | |
| Line +18 dBV (maximum), 0 dBV (unity) | ||
| Microphone | EIN | <-119 dBu (Rs = 150 Ω, DIN) |
| CMRR | >80 dB | |
| Channel Separation | <-105 dB | |
| THD+N | Line/Phono | <0.01% |
| Microphone | <0.02% | |
| Frequency Response | 20–20000 KHz (±1 dB) | |
| Dynamic Range | >108 dB (A-weighted) | |
| Signal-to-Noise Ratio | >108 dB (A-weighted) | |
| USB Audio / MIDI Interface | Sampling Rate | 44.1 kHz |
| Bit Depth | 24-bit | |
| Connections | Audio | (2) USB outputs (master left/right, balanced)(1) RCA output pair (master left/right, unbalanced)(2) XLR outputs (booth left/right, balanced)(1) 1/4" (6.35 mm) stereo output (headphones)(1) 1/8" (3.5 mm) stereo output (headphones) |
| Audio Inputs | (2) RCA input pairs (line-level, unbalanced)(2) RCA input pairs (line- or phono-level, unbalanced)(1) XLR+1/4" (6.35 mm) input (Microphone 1)(1) 1/4" (6.35 mm) input (Microphone 2) | |
| Other | (2) USB ports (to computers)(1) power adapter input | |
| Power | Power Adapter | 5 VDC, 4 A, center-positive (included) |
| Input Voltage | 100–240 VAC, 50/60 Hz | |
| Consumption | 15 W (maximum) | |
| Dimensions(width x depth x height) | 26.1" x 14.9" x 2.7" / 664 x 378 x 68 mm | |
| Weight | 15.4 lbs. / 7.00 kg | |
Specifications are subject to change without notice.
Trademarks & Licenses
Denon is a trademark of D&M Holdings Inc., registered in the U.S. and other countries. Denon DJ products are produced by inMusic Brands, Inc., Cumberland, RI 02864, USA. Serato, Serato DJ, and the Serato logo are registered trademarks of Serato Audio Research. Kensington and the K & Lock logo are registered trademarks of ACCO Brands. All other product names, company names, trademarks, or trade names are those of their respective owners.
denondj.com

Brand : DENON
Model : MC7000
Category : DJ Equipment