
MP373N - Lawn mower JATA - Free user manual and instructions
Find the device manual for free MP373N JATA in PDF.
| Product type | Hair and beard clipper |
| Brand | JATA |
| Model | MP373N |
| Power supply | Rechargeable Ni-MH battery, mains adapter included |
| Initial charging time | 16 hours |
| Cutting lengths | Precision guide: 0.5 to 2.5 mm (continuously adjustable); Medium guide: 3 to 18 mm; Long guide: 21 to 36 mm |
| Included cutting guides | 3 guides: precision, 3-18 mm, 21-36 mm |
| Integrated variable comb | Yes, for graduated or uneven cut |
| Functions | Hair, beard, moustache cutting, finish without guide |
| Blades | Removable steel blade for cleaning |
| Lubrication | Oil provided, to apply before each use |
| Cleaning | Brush included, damp cloth for exterior |
| Safety | Use only with supplied adapter; do not immerse; unplug before cleaning |
| Environmental protection | Ni-MH batteries recyclable; do not dispose of in household waste |
| Included accessories | Adapter, charging base, brush, scissors, oil |
| Use | Household use only |
Frequently Asked Questions - MP373N JATA
User questions about MP373N JATA
0 question about this device. Answer the ones you know or ask your own.
Ask a new question about this device
Download the instructions for your Lawn mower in PDF format for free! Find your manual MP373N - JATA and take your electronic device back in hand. On this page are published all the documents necessary for the use of your device. MP373N by JATA.
USER MANUAL MP373N JATA
- Variable comb button.
8.Length cutting regulator. - On switch.
- Charge indicator.
- Button to fix the cutting guide.
12.Base.
13.Adapter.
14.Comb.
15.Brush.
16.Lubricating oil.
PRINCIPAUX COMPOSANTS
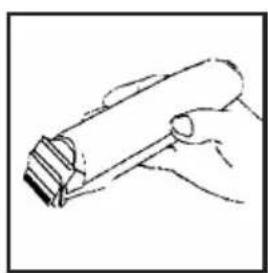
Fig CFig BFig AFoto 1
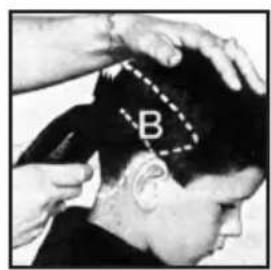
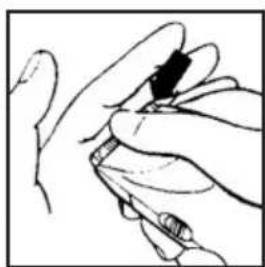
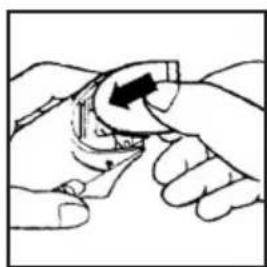
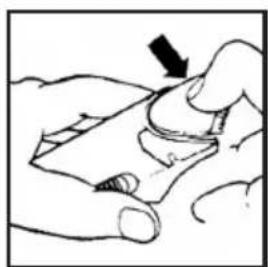
Fig GFig FFig EFig DFoto
INSTRUCCIONES DE USO
- Carefully read these instructions before using the appliance for the first time and keep the for future enquiries.
- This appliance is not intended for use by persons (including children) with reduced physical, sensory or mental capabilities, or lack of experience and knowledge, unless they have been given supervision or instruction concerning use of the appliances by a person responsible for their safety.
-
Keep all plastic bags and packaging components out of the reach of children. They are potentially dangerous.
-
Do not connect the appliance to the mains without checking that the voltage of the adapter (230 V.) and that of your household are the same.
- Do not use nor recharge near the water contained in bathtubs, wash basins or other containers.
- Don't allow children play with the appliance.
- Keep away from any sources of heat.
- Do not use if the cutting guide has cracks or the blade does not have all the teeth in perfect condition. They could be the cause of serious injuries.
- Do not leave on clothes or any other object while in use, in order to avoid possible blockage. It must not be left connected on flat surfaces such as tables or counter tops, as the vibration of the appliance may cause it to slide off and break.
- Do not use on injured skin or if you have any skin diseases.
- To recharge the battery always use the adapter provided. Do not use any other type of adapter.
- This appliance has been designed for domestic use only.
- VERY IMPORTANT: The hair clippers, the adapter and the base must never be immersed in water or any other liquid.
- If you are using it in a bathroom, it is advisable to install in the electrical circuit of the bathroom a residual differential current device (DDR) of differential current of assigned capacity that does not exceed 30mA . Ask your supplier for advice.
- The adapter must always be used indoors. Do not use in the open air.
- If the cable were to deteriorate it must be changed by an Authorised Service Centre.
INSTRUCTIONS OF USE
Charging the battery.
- Before using for the first time it is necessary to charge the battery.
- To do so keep the switch (9) on the "0" position, connect the adapter in the back side (12) and the adapter to the mains.
- Place the appliance in vertical position over the base. The pilot light (10) will go on.
-
The charging of the battery may also be carried out without the base (12). It is enough to put the adapter plug (13) into the base of the hair clippers and plug the adapter into the mains.
The first charge of the battery will take 16 hours. For the later charges it will be enough to keep it charging during the night. -
In order to optimise the durability of the battery bear in mind the following pieces of advice:
- Never exceed the indicated loading times for the battery.
-It is important to discharge the battery before it is recharged, leave it on until it stops or the power decreases clearly.
The battery must be recharged every 6 months if it has not been used for said period of time.
-Also recharge if it has not been used for more then a month.
LUBRIFICATION
- For the hair clippers to work correctly it is absolutely necessary to lubricate the blades with oil before each use.
- Carefully pour a few drops of oil, which is provided, between the teeth of the blade, or if you have run out, with another high quality, acid free oil.
- Turn the hair clippers on for a few seconds and clean the excess oil off with a cloth.
CUTTING GUIDE POSITIONS
- The unit is equipped with three practical cutting guides, which allow a precise adjustment of the desired length.
1.Precision cutting guide:
This guide allows a cutting height between 0,5 and 2.5mm . Once inserted the guide slide the regulator (2) placed in the lower part to leave it in the desired position. The different positions are showed under the comb.
Position with the closed comb. Cutting height of 0.5mm
Position 1. Cutting height of 1mm
Position 2. Cutting height of 1.5mm
Position 3. Cutting height of 2mm
Position 4. Cutting height of 2.5mm
2.Cutting guide 3-18 mm. To cut between 3 and 18mm The guide has this indications in both sides.
3.Cutting guide 21-36 mm. To cut between 21 and 36mm The guide has this indications in both sides.
To assemble the chosen guide place it in the blade and press the bottom flange of the guide to be inserted. (fig. A)
- To insert the guides of 3-18 and 21 - 36mm in the desired position, place the fixing button (11) in the position () Next turn forwards the regulator (8) to leave it in the desired position. The indications of the cutting guide of 3 - 18mm are placed in the left side of the unit. The indications of the cutting guide of 21 - 36mm are in the right side of the unit.
- Next and before starting, place the fixation button in the ( ) position to leave it fixed.
BEGINNING THE CUT
Relax and work slowly. Make short cuts. Do not go on to the final cut of one side or the back straight away. Work gradually and all over the head.
It is better to cut a little each time to be able to cut some more later on.
While you are working and before you begin, comb the hair frequently to the chosen style.
It is preferable to cut the hair when it is dry, not wet. It is easier to see and control the amount of hair you are cutting.
- The first time you use the appliance it is advisable to cut a small portion of hair until you get used to the lengths of the different positions of the guide. At the beginning use the guides with the longest cutting length. With a little practice you will soon choose the most adequate position for the length you wish to have.
- After combing your hair following its natural direction, proceed as follows to obtain a perfect hair cut.
First step: NAPE
- Place the guide in around 4mm cutting position. Start cutting at the centre of the nape and at the bottom of the neck. Hold the hair clippers softly against the head with the teeth of the guide pointing upwards.
- Go up gradually, working your way upwards and outwards, just cutting a little hair at a time. When cutting raise the head of the clippers towards you little by little. Continue cutting at the back of the head from the base of nape to the area just above the ears (Zone "A", photo 1).
Second step: THE BACK OF THE HEAD
Set the guide in approximately 8 - 10mm and cut the area at the back of the head, identified as zone "B" on photo 2.
Third step: SIDES
- With the guide set in around 4 - 7mm cutting position, start cutting the side burns and the area close to the ears. Next, set the guide to a higher position to go on cutting the hair at the top of the head.
Fourth step: THE TOP OF THE HEAD
- Set the guide to long cutting length and start cutting from the crown forwards against the growth of the hair. In some cases you will have to cut from the front backwards.
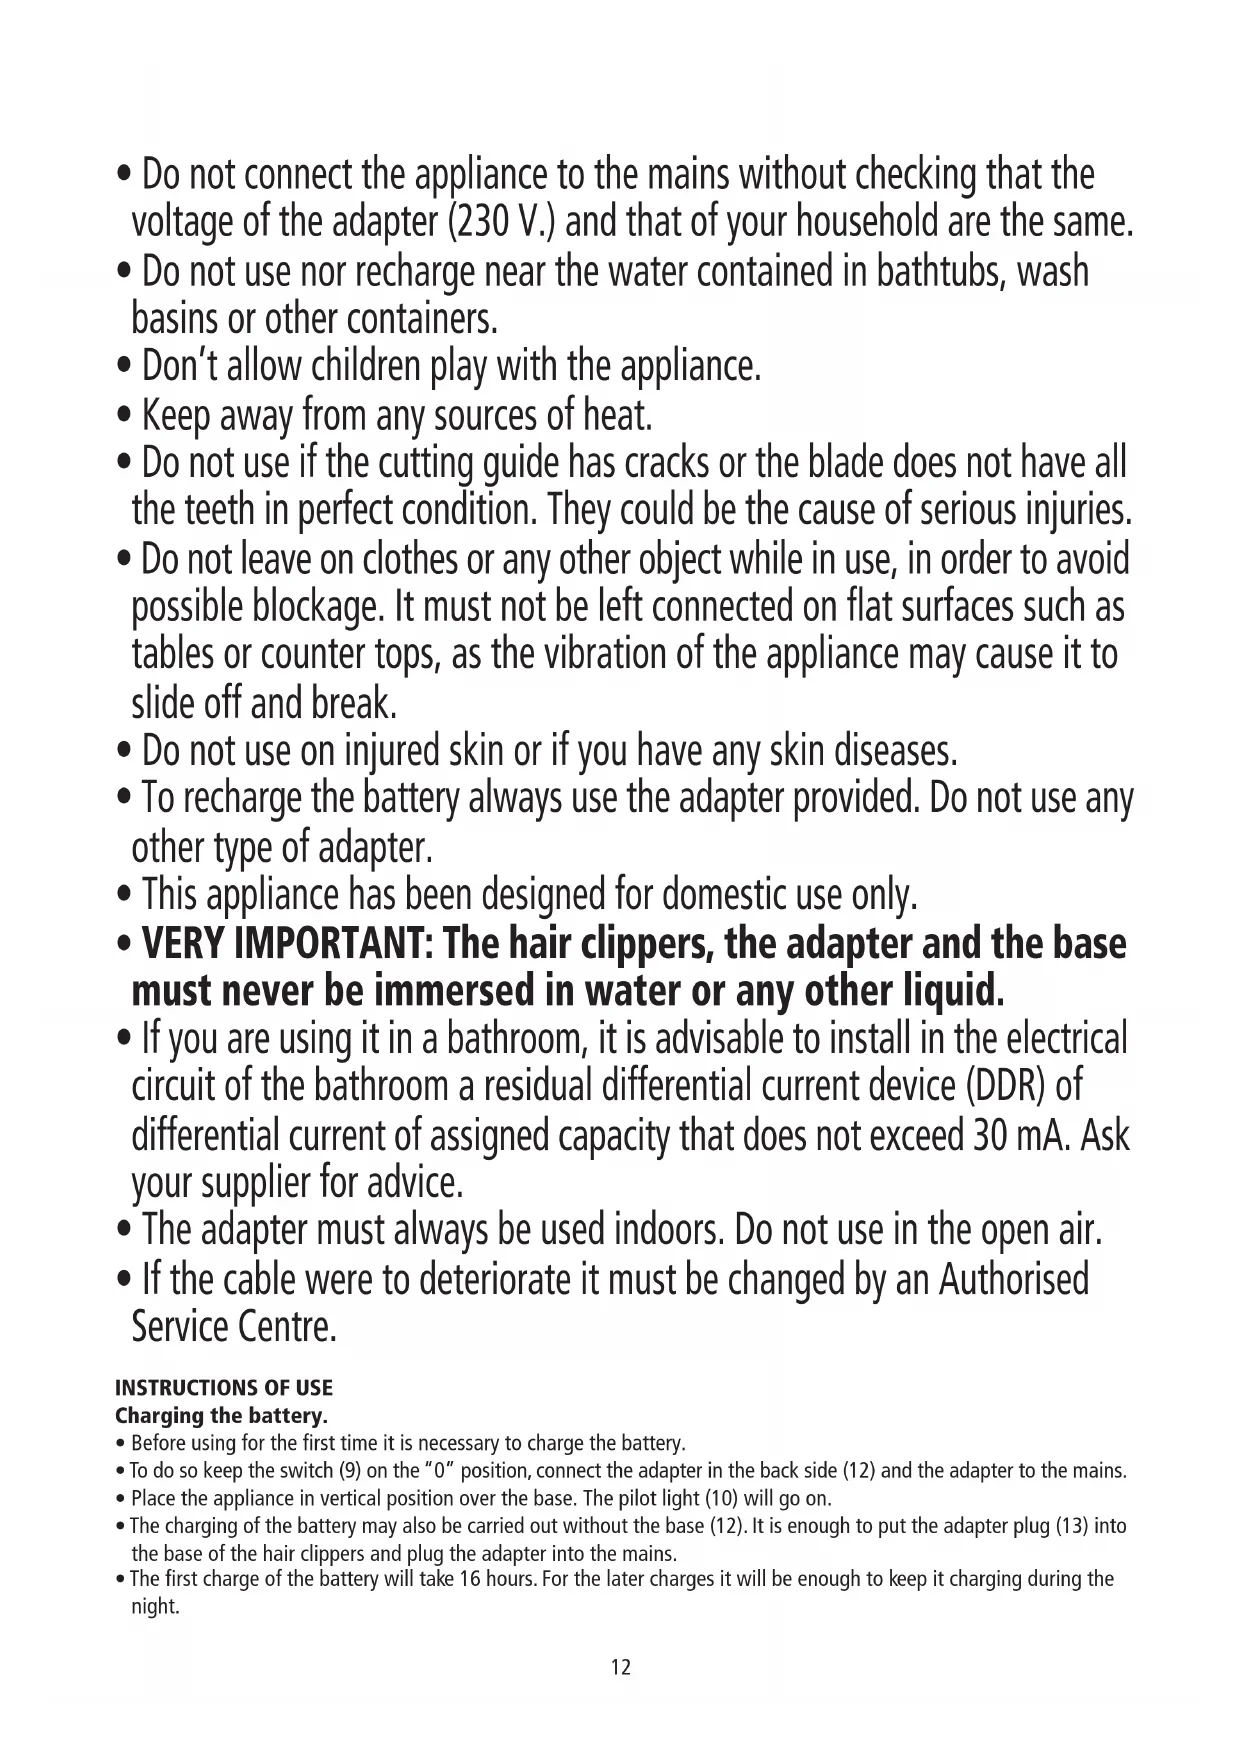
- To leave your hair longer use a comb to lift the hair at the back of the head and cut above the comb; or else hold the lock of hair between your fingers and cut off the to the desired length. (fig. B).
- Always working your way from the back of the head, gradually cut the hair, shorter each time by reducing the space between the comb, or between your fingers, to the hair. Frequently comb your hair to check for any differences in its length and to eliminate the hair, which has already been cut.
Fifth step: THE FINAL TOUCHES
- Do not use any guides for the final touches.
To get an exact hair cut, and the side burns, nape and the area around the ears with straight lines, turn the hair clippers round and place them at a straight angle with your head so the blade is in slight contact with the skin, and shave downwards. This way you will get a perfect finish, as if shaving.
VARIABLE THIN OUT FUNCTION
- The clippers come with a practical comb (6) whose function is to cut the hair unevenly.
- Without none cutting guide, slide forwards the variable comb button (7).
- Raise the hair with your fingers or with the comb (14) and turn the hair clippers round (Fig. C). Proceed to cut as shown in figure D. Part of the hair will go in between the teeth of the comb and will be cut, while the rest of the hair will not be affected by the cut.
BEARD
- Always remember you must begin with the cutting guides set to the longest cutting position before setting it to a lower position.
- Start by cutting from the down side of the chin and moving the clipper with soft movements upwards and outwards.
- For the final touches and the edges always use the hair clipper without any guide.
MOUSTACHE
- Comb the moustache downwards.
- Start with the higher cutting guide. Later you may use the shorter cutting guides.
MAINTENANCE AND CLEANING
- Before doing anything, make sure the hair clipper is unplugged from the mains.
- For a correct cleaning it is advisable to remove the block of the blade. To do so press on the blade with your thumb (Fig. E). The block will become loose. Clean with the brush (15) the blade and the inside of the hair clippers
To replace the block of the blade slot it in by the bottom (Fig. F), and press on the top until it clicks into place (Fig. G). - Use a slightly damp cloth to clean the outside of the appliance.
- Do not use to clean chemical products or abrasives, metallic scourers and similar, which may deteriorate the surfaces.
ENVIRONMENT PROTECTION
- This appliance is equipped with two Ni-Mh batteries.
- To remove the batteries, follow the next steps:
- Remove the rating label of the appliance and release with a small screwdriver the screw placed below.
- Slide totally forwards the cutting length regulator (8) and release the two screws placed in the lower part of the appliance.
connexion. - Dispose the appliance according to the local garbage regulations.
- Dispose the batteries according to the local garbage regulations.
- Never throw away the appliance or the batteries to the rubbish. So you will help to the improvement of the environment.
- The batteries must not be mixed with other domestic residues

ATTENTION
GARANTIA GERAL (2 ANOS) - GARANTIA TOTAL
In the rest of countries, the holder of the guarantee will enjoy all the rights that his legislation in force concedes.
FRANÇAIS:

- PRINCIPAUX COMPOSANTS
- INSTRUCCIONES DE USO
- INSTRUCTIONS OF USE
- Charging the battery.
- LUBRIFICATION
- CUTTING GUIDE POSITIONS
- 1.Precision cutting guide:
- BEGINNING THE CUT
- First step: NAPE
- Second step: THE BACK OF THE HEAD
- Third step: SIDES
- Fourth step: THE TOP OF THE HEAD
- Fifth step: THE FINAL TOUCHES
- VARIABLE THIN OUT FUNCTION
- BEARD
- MOUSTACHE
- MAINTENANCE AND CLEANING
- ENVIRONMENT PROTECTION
- ATTENTION
- GARANTIA GERAL (2 ANOS) - GARANTIA TOTAL
- FRANÇAIS:
Brand : JATA
Model : MP373N
Category : Lawn mower