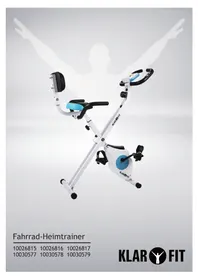
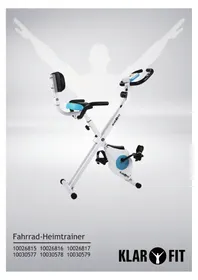
Azura 10030577 - Exercise bike Klarfit - Free user manual and instructions
Find the device manual for free Azura 10030577 Klarfit in PDF.
| Product type | Exercise bike |
| Brand | Klarfit |
| Model | Azura 10030577 |
| Article numbers | 10026815, 1002686, 1002687, 10030577, 10030578, 10030579 |
| Console power supply | 2 AAA batteries (included) |
| Safety standard | EN957 class H.C. - domestic use |
| Maximum user weight | 100 kg |
| Braking | Speed-independent |
| Resistance type | Magnetic |
| Flywheel | Disc Ø190 mm - 1.1 kg |
| Console functions | Time, Speed, Distance, Calories, Odometer, Heart rate |
| Display | LCD with automatic SCAN mode |
| Adjustments | Height-adjustable seat, adjustable backrest |
| Pedals | Left and right, reverse threading for left |
| Support handles | Coated, with heart rate sensors |
| Transport | Built-in transport wheels |
| Maintenance | Regular lubrication of moving parts, sponge cleaning, dry storage |
| Safety | Check fastenings before each use, do not use if abnormalities |
| Spare parts | Complete numbered list in the manual (78 pieces) |
| Recycling | Compliant with WEEE (2012/19/EU) and battery directive (2006/66/EC) |
Frequently Asked Questions - Azura 10030577 Klarfit
User questions about Azura 10030577 Klarfit
0 question about this device. Answer the ones you know or ask your own.
Ask a new question about this device
Download the instructions for your Exercise bike in PDF format for free! Find your manual Azura 10030577 - Klarfit and take your electronic device back in hand. On this page are published all the documents necessary for the use of your device. Azura 10030577 by Klarfit.
USER MANUAL Azura 10030577 Klarfit
Congratulations on purchasing this equipment. Please read this manual carefully and take care of the following hints to avoid damages. Any failure caused by ignoring the mentioned items and cautions mentioned in the instruction manual are not covered by our warranty and any liability.
Technical Data
Item number 10026815, 1002686, 10026817
10030577, 10030578, 10030579
Power supply (computer) 2 × AAA batteries (included)
Safety Instructions
To reduce the risk of fire, electric shock and damage:
- Do not expose this device to rain.
- Do not playe objects on the unit filled with liquids, such as vases.
- Use recommended accessories only.
- Do not repair this device yourself. Refer repairs to qualified service personnel.
- Do not drop any metal objects into this unit.
- Do not place heavy objects on top of this unit.
Small objects / Packaging Parts
Store small objects (eg screws and other mounting hardware, memory cards) and packaging parts out of the reach of children. Do not let you play with the film. Risk of suffocation!
Location
- Do not place naked flame sources, such as burning candles, on the unit.
- Set the appliance on a dry, flat and water-resistant surface
- Place the unit in a location away from children.
Intended Use
- This device is used for training. It is exclusively meant for this purpose and must only be used for this purpose. It may only be used in the manner as described in this manual. This product is not designed for use by persons (including children) who have reduced physical, sensory or mental capacities or persons with no experience or knowledge, unless they are instructed and supervised in the use of the appliance by a person responsible for their safety.
Transport
Please keep the original packaging. To an adequate protection during transport of the device, pack the unit in its original packaging.
Cleaning
Do not use volatile liquids, such as insecticide spray. Dont clean the surface with strong pressure otherwise it could get damaged. Rubber or plastic should not be in in contact with the devive over a longer period. Clean the appliance using a soft cloth and warm water.
First Use
- Remove the exterior and interior packaging.
- It is important to read this entire manual before assembling and using the equipment. Safe and efficient use can only be achieved if the equipment is assembled, maintained and used properly. It is your responsibility to ensure that all users of the equipment are informed of all warnings and precautions.
- Before starting any exercise program you should consult your doctor to determine if you have any physical or health conditions that could create a risk to your health and safety, or prevent you from using the equipment properly. Your doctor's advice is essential if you are taking medication that affects your heart rate, blood pressure or cholesterol level.
- Be aware of your body's signals. Incorrect or excessive exercise can damage your health. Stop exercising if you experience any of the following symptoms: Pain, tightness in your chest, irregular heartbeat, extreme shortness of breath, feeling light headed, dizzy or nauseous. If you do experience any of these conditions you should consult your doctor before continuing with your exercise program.
- Keep children and pets away from the equipment. The equipment is designed for adult use only.
- Use the equipment on a solid, flat level surface with a protective cover for your floor or carpet. For safety space, the equipment should have at least 0.5 meter of free space all around it.
- Before using the equipment, check the handlebar, seat, pedals, and the nuts and bolts are securely tightened.
- The safety level of the equipment can only be maintained if it is regularly examined for damage and/or wear and tear. (E.g. handle bar, pedals, and seat....)
- Always use the equipment as indicated. If you find any defective components while assembling or checking the equipment, or if you hear any unusual noises coming from the equipment during use, stop immediately. Do not use the equipment until the problem has been rectified.
- Wear suitable clothing while using the equipment. Avoid wearing loose clothing that may get caught in the equipment or that may restrict or prevent movement.
- The equipment has been tested and certified to EN957 under class H.C, suitable for domestic, home use only. Maximum weight of user: 100kg. Braking is speed independent.
- The equipment is not suitable for therapeutic use.
- Care must be taken when lifting or moving the equipment so as not to injure your back. Always use proper lifting techniques and/or seek assistance if necessary.
- All moveable accessories (eg. pedal, handlebar, saddle...etc.) require weekly maintenance. Check them before use every time. If anything broken or loose, please fix them immediately. You may continue using bike after they return to good conditions
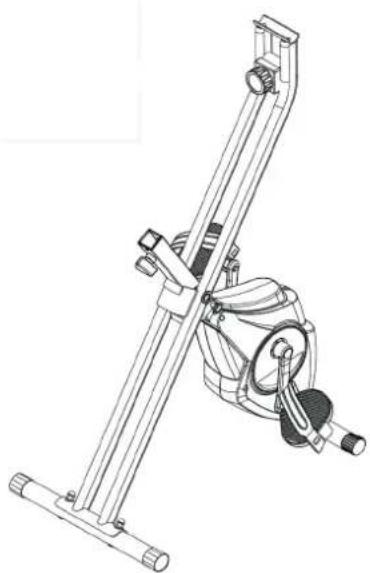
Product Description
Part List
| No. | Description Qty No. Description Qty | |||||
| 1 | Main frame 1 40 Nylon nut M8 5 | |||||
| 2 | Support rack 1 41 Pipe shroud 1 | |||||
| 3 | Seat-adjusting metal 1 42 Cap nut M8 5 | |||||
| 4 | Handle bar | 1 | 43 | External pliers Ø17 | 7 | |
| 5 | Front Stabilizer | 1 | 44 | Axis pipe | 1 | |
| 6 | Backrest elbow pipe | 1 | 45 | Bearing end cover reinforcement | 2 | |
| 7 | Backrest fixed pipe | 1 | 46 | Bolt M6 | 2 | |
| 8 | Rear stabilizer | 1 | 47 | Pressure sping | 1 | |
| 9 | Magnetic board 1 48 Bearing 6003 4 | |||||
| 10 | Line of sensor 1 49 Bearing 6000 2 | |||||
| 11 | Computer | 1 | 50 | Left crank | 1 | |
| 12 | Alum idle wheel | 1 | 51 | Right crank | 1 | |
| 13 | Idle bearing | 1 | 52 | Pulse sensor | 2 | |
| 14 | Bearing cover | 2 | 53 | Alum belt plate | 1 | |
| 15 | Screw Ø4.2*15 | 2 | 54 | Bearing seat | 2 | |
| 16 | Nut M10*P1.25 | 2 | 55 | Move bush | 6 | |
| 17 | Bolt M8*48 | 2 | 56 | Tube plug 15*30 | 4 | |
| 18 | Armrest foam | 2 | 57 | Tube plug 30*30 | 1 | |
| 19 | Screw M8*45 | 4 | 58 | Rear stabilizer bush | 2 | |
| 20 | Screw M8*76 | 1 | 59 | Square head plug | 4 | |
| 21 | Screw M8*15 | 2 | 60 | Pipe bush | 1 | |
| 22 | Screw M8*15 | 2 | 61 | Wave washer Ø10*14*0.03 | 2 | |
| 23 | Screw M5*20 | 1 | 62 | Nylon washer Ø9*Ø20*2 | 2 | |
| 24 | Spring washer Ø8.2*10*1.5 | 6 | 63 | Front wheel cover | 2 | |
| 25 | Screw M6*12 | 7 | 64 | Convenient plug | 3 | |
| 26 | Spacer Ø8.2*Ø20*1.5 R25 | 6 | 65 | Knob M12 | 1 | |
| 27 | Screw M4*10 | 1 | 66 | Crank cover | 2 | |
| 28 | Screw M8*40 | 2 | 67 | Left cover | 1 | |
| 29 | Screw ST4.2*19 | 4 | 68 | Right cover | 1 | |
| 30 | Screw ST4.2*20 | 4 | 69 | Front cover | 1 | |
| 31 | Washer Ø8.2*Ø20*1.6 | 10 | 70 | Small black cover | 1 | |
| 32 | Seat | 5 | 71 | Pedal L/R | 2 | |
| 33 | Main belt wheel | 4 | 72 | Belt 240P | 1 | |
| 34 | Axis of rotation | 1 | 73 | Belt 230P | 1 | |
| 35 | EV mat | 4 | 74 | Speed connecting line | 1 | |
| 36 | Flywheel Ø190*1.1kg | 1 | 75 | Pulse connecting line | 1 | |
| 37 | Backrest | 1 | 76 | Rear handlebar set | 1 | |
| 38 | M10*P1.25nut | 2 | 77 | Rear handlebar foam | 2 | |
| 39 | Eight period adjusting knob | 1 | 78 | Lock Pin | 1 |
Hardware Packing List
| #28 Screw M8*40 #24 Spring washer Ø8.2*10*1.5 #26 Spacer Ø8.2*Ø20*1.5 R25 | #19 Screw M8*45 #24 Spring washer Ø8.2*10*1.5 |
| #17 Bolt M8*48 #31 Washer Ø8.2*Ø20*1.6 #40 Nylon nut M8 | #26 Spacer Ø8.2*Ø20*1.5 R25 #40 Nylon nut M8 |
| Tightener Hex wrench |
Assembly Instructions
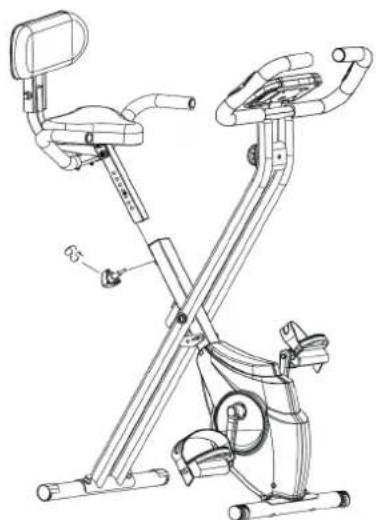
Step 1: Install the lock pin
Pull out the Lock Pin(78) from the folding bike, and extend the bike and fix the Lock Pin.
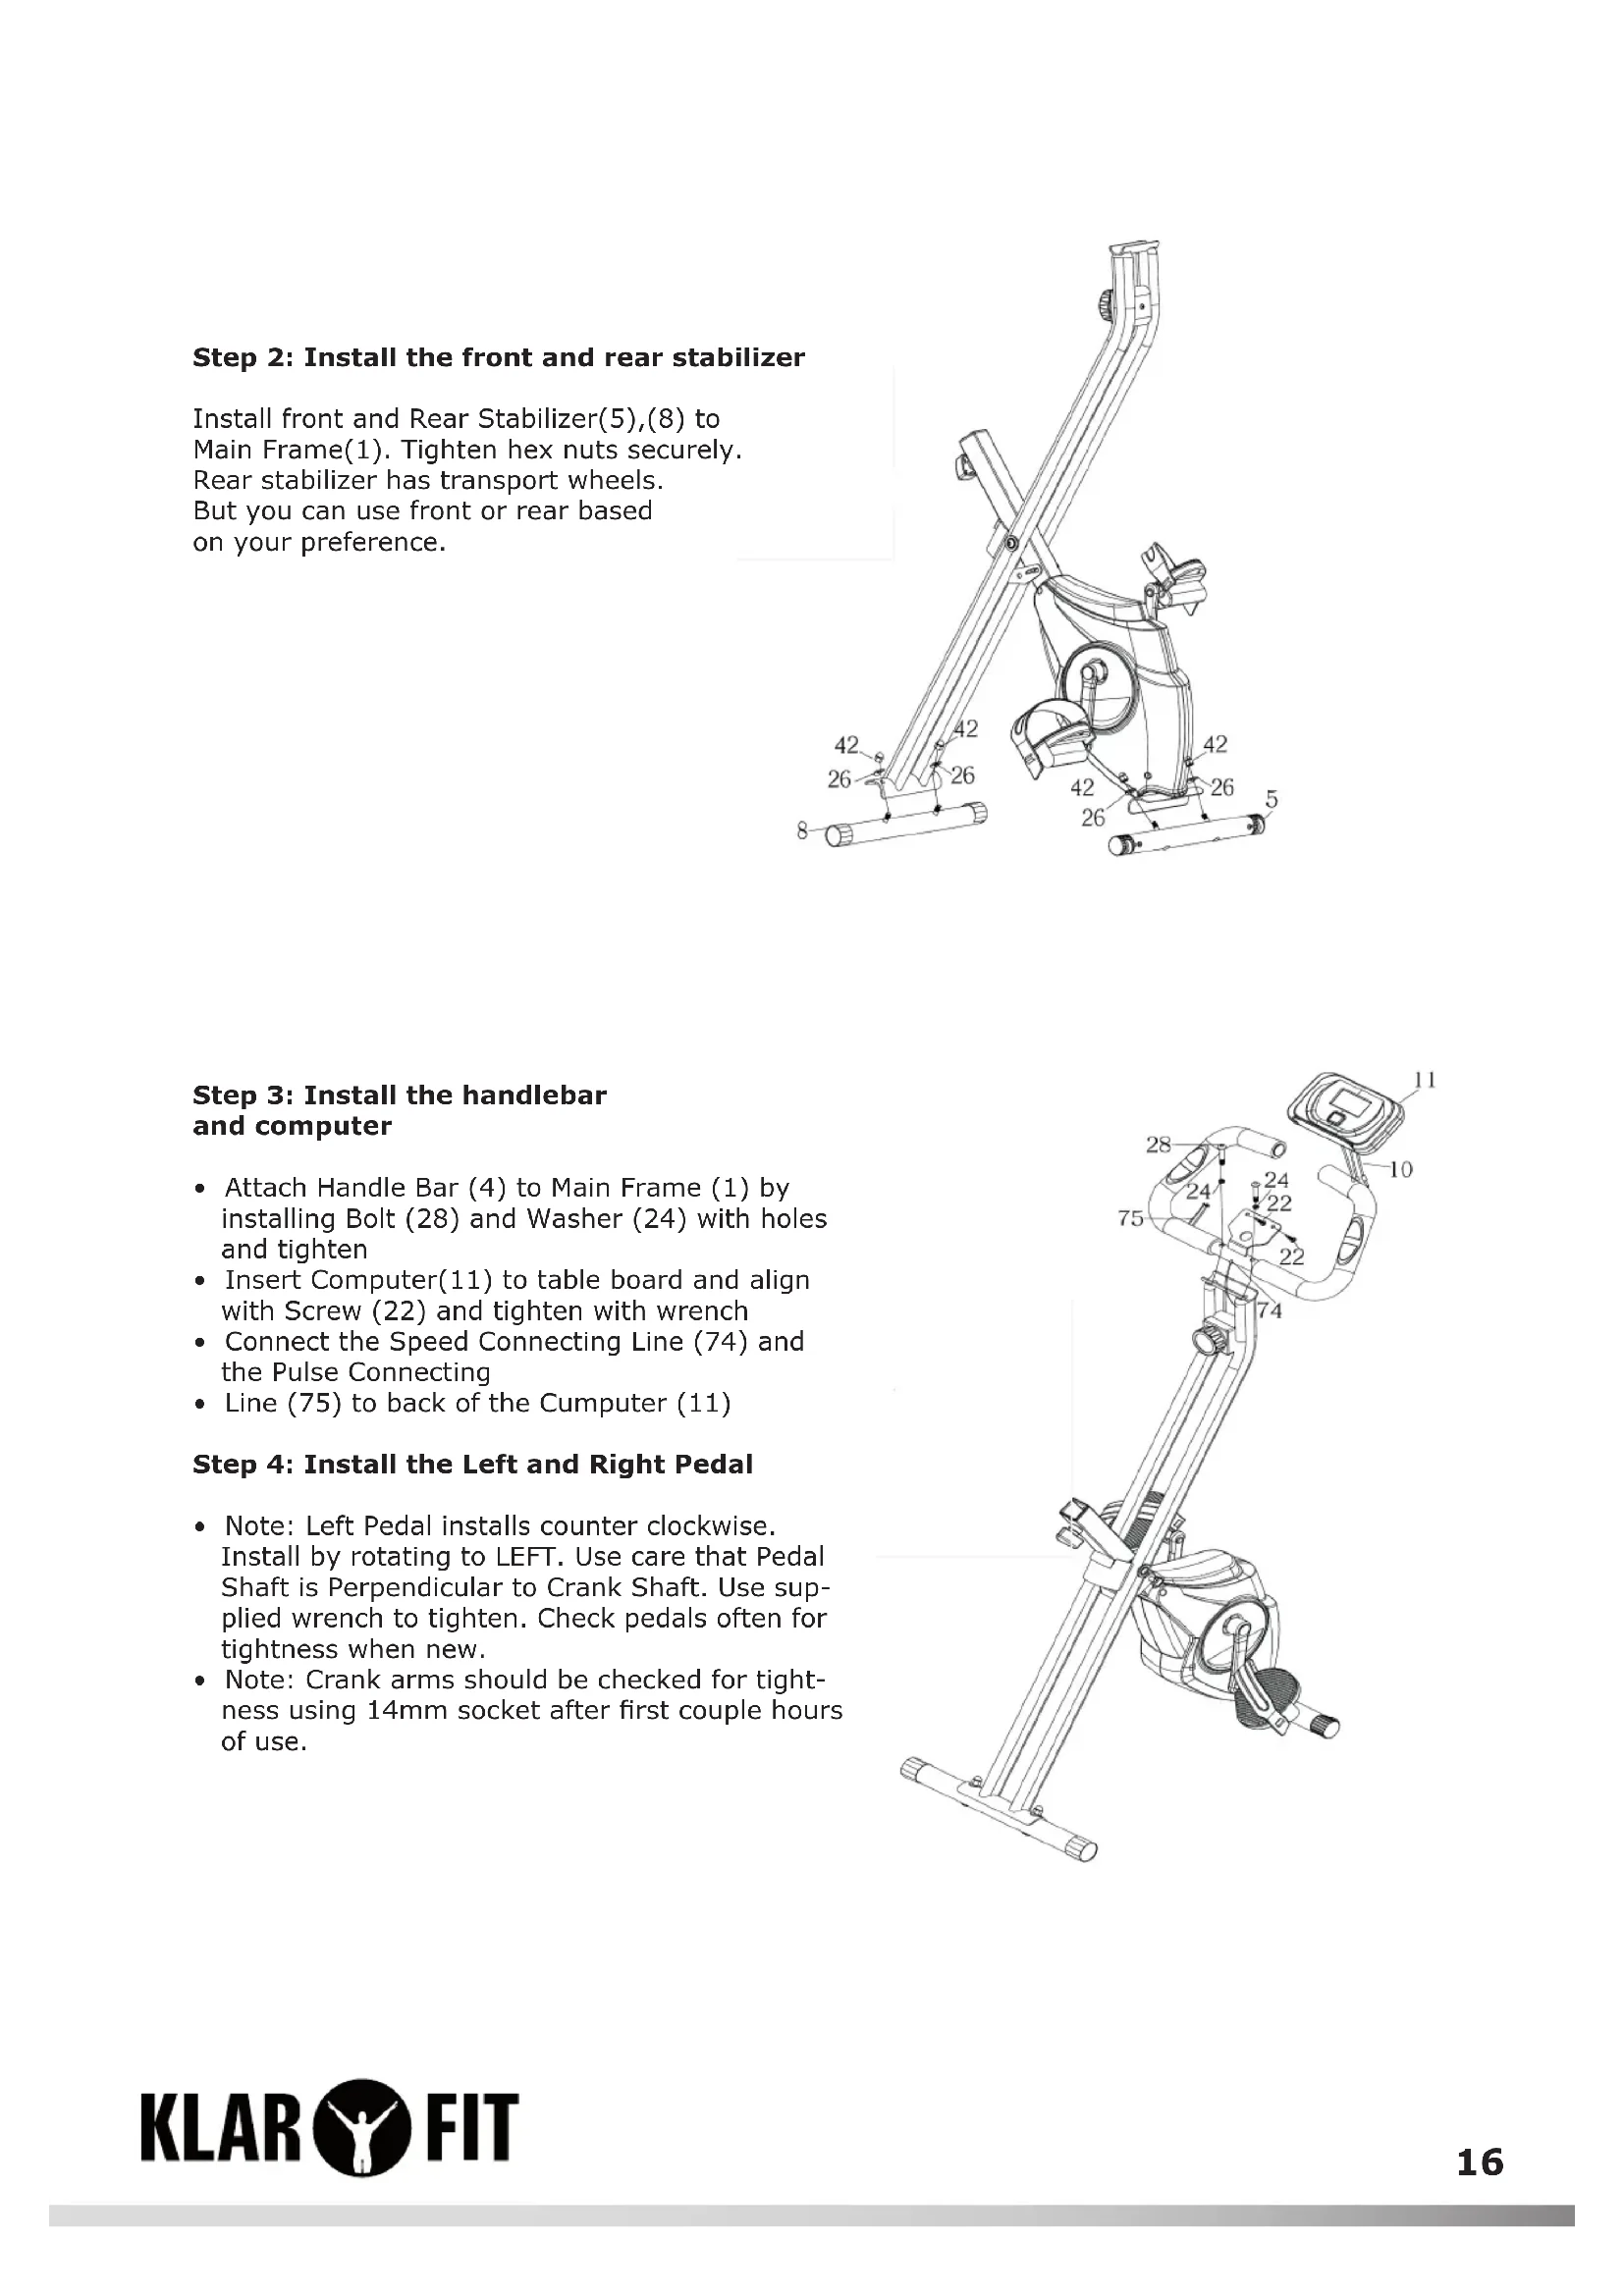
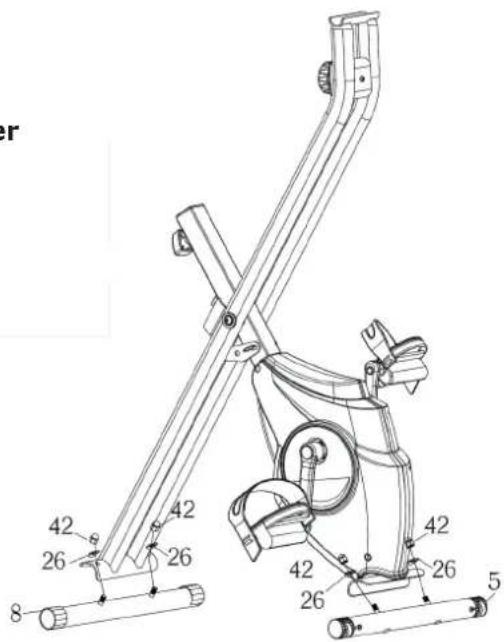
Step 2: Install the front and rear stabilizer
Install front and Rear Stabilizer(5),(8) to Main Frame(1). Tighten hex nuts securely. Rear stabilizer has transport wheels. But you can use front or rear based on your preference.
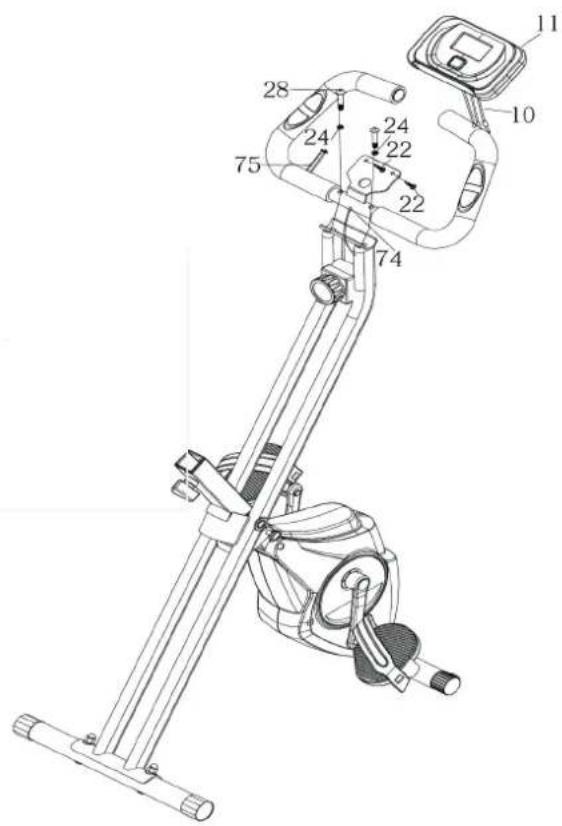
Step 3: Install the handlebar and computer
- Attach Handle Bar (4) to Main Frame (1) by installing Bolt (28) and Washer (24) with holes and tighten
- Insert Computer(11) to table board and align with Screw (22) and tighten with wrench
- Connect the Speed Connecting Line (74) and the Pulse Connecting
Line (75) to back of the Cumputer (11)
Step 4: Install the Left and Right Pedal
- Note: Left Pedal installs counter clockwise. Install by rotating to LEFT. Use care that Pedal Shaft is Perpendicular to Crank Shaft. Use supplied wrench to tighten. Check pedals often for tightness when new.
Note: Crank arms should be checked for tightness using 14mm socket after first couple hours of use.
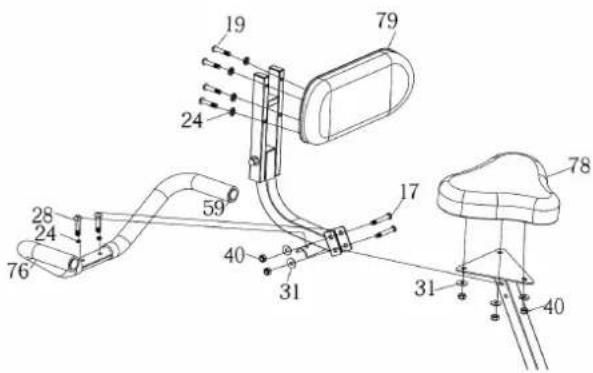
Step 5: Install the Saddle, Seat Back Cushion and the Back Handlebar
- Saddle (78) is mounted to Seat adjusting Metal (3) using Nylon nut M8 (40) and Washer (31).
- Align Bolt (28) with hole of Rear Handlebar Set (76), through Washer (24) and tighten securely.
- Align Bolt (19) with the hole of assembled seat back cushion(79), through Washer
(24) and Nylon Nut (40) and tighten securely. - Back rest is connected with the seat tightly through Nylon Nut (40), Washer (31) and Bolt (17)
Step 6: Install the Seat Post to the Main frame
- Attach the seat post to the main frame, choose a suitable height, and then fasten the seat adjusting knob(65)
- Note: When adjusting the height of seat post, the maximum insert depth of mark line cannot be higher than the edge of bushing.
Operation
| Time (TIME) 00:00 - 99:59 | |
| Speed (SPD) 0 - 99.9 km/h (mph) | |
| Distance (DIST) 0 - 999.9 km (mi) | |
| Calorie (CAL) 0 - 9999 kcal | |
| Odometer (ODO) 0 - 999.9 km (mi) | |
| Pulse (PUL) 40 - 240 BPM |
Key Functions
| MODE/SELECT/RESET This key lets you to select and lock on to a particular function you want. | |
| SET Can to proceed the data establish for "TIME" "DISTANCE" "CALORIES". | |
| RESET | The key to reset the value to zero by pressing the key. |
Operation Procedures
1. AUTO ON/OFF
The system turns on when any key is pressed or when it sensor an input from the speed sensor.
The system turns off automatically when the speed has no signal input or on key are pressed for approximately 4 minutes.
2. RESET
The unit can be reset by either changing battery or pressing the MODE key for 3 seconds.
3. MODE
To choose the SCAN or LOCK if you do not want the scan mode, press the MODE key when the pointer on the function you want which begins blinking.
Functions:
TIME:
Press the MODE key until pointer lock on to TIME. The total working me will be shown when starting exercise.
SPEED:
Press the MODE key until the pointer advanced to SPEED. The current speed will be shown.
DISTANCE:
Press the MODE key until the pointer advanced to DISTANCE. The distance of each workout will be displayed.
CALORIE:
Press the MODE key until pointer lock on to CALORIE. The calorie burned will be displayed when displayed will be shown.
ODOMETER (IF HAVE):
Press the MODE key until the pointer advanced to ODEMETER. The total accumulated distance will be shown.
PULSE (IF HAVE):
Press the MODE key until the pointer advance to PULSE, User's current heart rate will be displayed in beats per minute. Place the palms of your hands on both of the contact parts (or put ear-clip to ear), and wait for 30 seconds for the most accurate reading.
SCAN:
Automatically display changes every 4 seconds.
BATTERY:
If improper display on monitor, please reinstall the batteries to have a good result.
Care and Maintenance
- Regularly check whether all elements with screws and nuts are properly tightened.
Grease II movable elements regularly. - Avoid contact of sweat with all glazed or chromed parts of the appliance, in particular the computer. Wipe off the machine immediately after each use and dry off. All glazed parts can be cleaned by using a sponge. Do not use aggressive agents.
- Keep the device in a clean, dry place away from children.
Hints on Disposal

According to the European waste regulation 2012/19/EU this symbol on the product or on its packaging indicates that this product may not be treated as household waste. Instead it should be taken to the appropriate collection point for the recycling of electrical and electronic equipment. By ensuring this product is disposed of correctly, you will help prevent potential negative consequences for the environment and human health, which could otherwise be caused by inappropriate waste handling of this product. For more detailed information about recycling of this product, please contact your local council or your household waste disposal service.
Your product contains batteries covered by the European Directive. 2006/66/EG, which cannot be disposed of with normal household waste. Please check local rules on separate collection of batteries. The correct disposal of batteries helps prevent potentially negative consequences on the environment and human health.
Declaration of Conformity

Producer: Chal-Tec GmbH, Wallstraße 16, 10179 Berlin, Germany.
This product is conform to the following European Directives:
2014/30/EU (EMC)
2011/65/EU (RoHS)