
ES8044 - Shaver PANASONIC - Free user manual and instructions
Find the device manual for free ES8044 PANASONIC in PDF.
| Product Type | Electric Shaver |
| Brand | Panasonic |
| Model | ES8044 |
| Power Supply | Rechargeable Lithium-ion battery, charger RE7-27 (100-240 V AC) |
| Charging Time | 1 hour for full charge |
| Battery Life | Approximately 14 shaves (3 minutes per shave) |
| Shaving Types | Dry and wet (with water and foam) |
| Main Features | Wet/Dry shaving, built-in trimmer, pivoting head (soft/lock), sonic vibration turbo mode for cleaning |
| Display | LED: battery capacity monitor (full/medium/low), charging indicator |
| Water Resistance | Usable in the shower, washable under running water |
| Cleaning | With water and liquid soap, with cleaning brush |
| Maintenance | Replace outer foil (every year) and inner blades (every 2 years) |
| Spare Parts | System outer foil, inner blades, charger |
| Safety | Do not use if foil damaged, unplug before water cleaning |
| Noise Level | 64 dB(A) |
| Included Accessories | Charger, charging stand, cleaning brush, storage case |
| Usage | Household use only |
Frequently Asked Questions - ES8044 PANASONIC
User questions about ES8044 PANASONIC
0 question about this device. Answer the ones you know or ask your own.
Ask a new question about this device
Download the instructions for your Shaver in PDF format for free! Find your manual ES8044 - PANASONIC and take your electronic device back in hand. On this page are published all the documents necessary for the use of your device. ES8044 by PANASONIC.
USER MANUAL ES8044 PANASONIC
Wet/Dry/Rechargeable Shaver
Operating Instructions
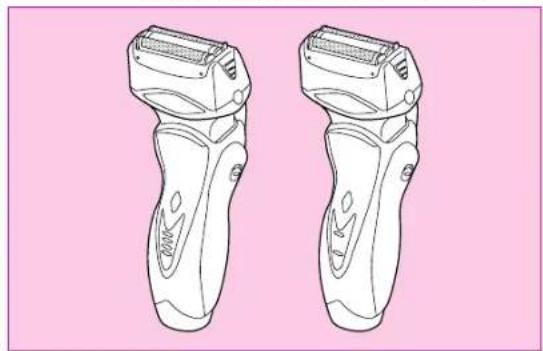
Model No. ES8044/ES8043
Matsushita Electric Works Wanbao (Guangzhou) Ltd.
Wanbao Base, Zhong Cun Pan Yu, GuangDong 511495, China
Before operating this unit, please read these instructions completely.
P000-005_ES8044_43_EU
05.2.21
11:15
2
1
2
2
6
7
8
9
3
1011
(A) (B)
12
Index
ENGLISH Page 5
SVENSKA
Sid 58
DEUTSCHSeite 11
SUOMI
Sivu 63
FRANCAIS Page
POLSKI
Strona 68
ITALIANO
Pagina 23
CESKY
Strona 75
ESPANOL
Pgina 35
BOMANA
87
DANSK
Side 41
PYCKM
CtpaHua 93
PORTUGES
Pagina 47
TURKQE Say
100
NORSK
Side 53
YKpaIHcBKn
CTopihka 106
Before use
This Wet/Dry shaver can be used for wet shaving with shaving lather or for dry shaving. You can use this watertight shaver in the shower and clean it in water. Treat yourself to wet lather shaves for at least three weeks and notice the difference. Your Panasonic Wet/Dry shaver requires a little time to get used to because your skin and beard need about a month to adjust to any new shaving method.
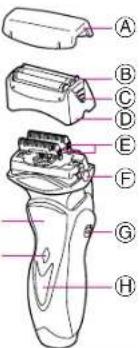
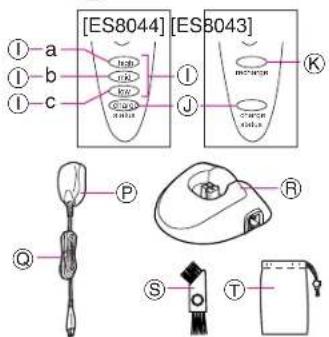
Parts identification
(see fig. 1)
Protective cap
System outer foil
System outer foil release buttons
Foll frame
EInner blades
Foll frame release buttons
⑥ Pivot action selector
LED display
① Battery capacity monitor
① -ahigh
①-b mid
① -c low
①Charge status lamp
Low battery indicator
On/Off switch
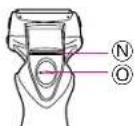
Mfinger rest
NTrimmer
Trimmer handle
Adaptor
@Power cord
Charging stand
⑤ Cleaning brush
①Soft case
READ ALL INSTRUCTIONS BEFORE USE.
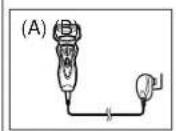
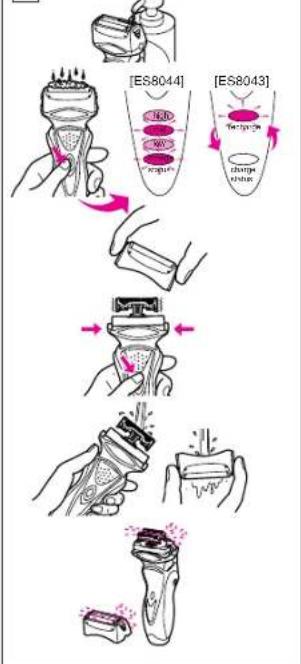
Charging
Connect the power cord to the shaver, and plug the adaptor to an AC outlet. (see fig. 1 (A))
The shaver will be adjusted automatically to voltages between 100-240V AC.
In some areas, a special plug adaptor may be required.
- When charging the shaver for the first time or when it has not been in use for more than 6 months, the charge status lamp may not illuminate for a few minutes after operation. It will eventually illuminate if kept connected.
Adequate ambient temperature for charging is between 15 to 35^
- If it is far below or over the appropriate temperature, the charging time may extend, or the adaptor may not function.
In particular, low temperature may shorten the life span of the rechargeable battery. In this case, the charge status lamp blinks twice in 1 second.
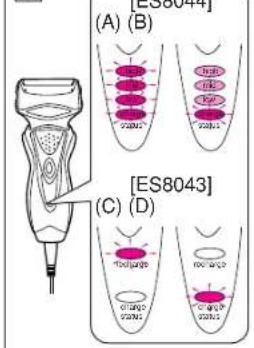
[for ES8044]
The charge status lamp will glow when the shaver is being charged.
The battery capacity monitor will all illuminate and the charge status lamp will blink after charging is completed (see fig. 2 (A)).
10 minutes after charging is completed, the battery capacity monitor will extinguish and the charge status lamp will continue to blink (see fig. 2 (B)).
You can fully charge the shaver in 1 hour if the LED display shows "low" (low).
The battery capacity monitor indicates the charge remaining in the battery in 3 levels (high/mid/low). The unit can be used once or twice more after the "low" (low) starts to blink. (Differs depending on the use situation.)
[for ES8043]
The charge status lamp will glow when the shaver is being charged. It will blink when the charging is completed (see fig. 2 (D)).
You can fully charge the shaver in 1 hour if the low battery indicator blinks (see fig.2C).
The unit can be used once or twice more after the low battery indicator starts to blink.
A full charge will supply enough power for approx. 14 shaves (3 minutes per shave for a normal beard). Before travelling, charge it fully for 1 hour if you will not be taking the adaptor with you.
In case your shaver is without charge, you may quick charge it for 1 shave in about 5 minutes.
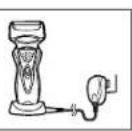
Charge with charging stand
(see fig. 1 (B))
To charge with the charging stand, connect the power cord to the charging stand. Place the shaver into the stand, and plug the adaptor to the AC outlet.
You can always store your shaver in the charging stand to maintain full battery capacity. This shaver cannot be overcharged.
Using your shaver
Caution - The system outer foil is very thin and can be damaged if handled improperly. Before each use, always check the foil for damage. To avoid personal injury, do not use if the foil or other parts of the shaving head is damaged.
Disconnect the power cord from the shaver, and push the On/Off switch to turn the shaver on.
If you push and hold the On/Off switch for more than 2 seconds, it will activate the turbo mode for "sonic" vibration cleaning. (see "Cleaning your shaver") Caution: Shaving with "sonic" vibration may damage your skin. Please turn it off and on again to deactivate the turbo mode.
Do not place fingers on the On/Off switch during use.
This may cause the shaver to stop during use or change it to the "sonic" vibration cleaning mode. Place your finger on the finger rest during use.
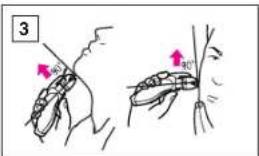
Hold the shaver at a right angle (90^) to your skin (see fig. 3). Start out shaving by applying gentle pressure to your face. Stretch your skin with your free hand and move the shaver back and forth in the direction of your beard. You may gently increase the amount of pressure as your skin becomes accustomed to this shaver. Applying excessive pressure does not provide a closer shave.
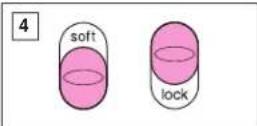
Pivot action selector
(see fig. 4)
Use the pivot action selector to choose the shaving mode, "soft" (soft) and "lock" (lock) based on your shaving preference.
The pivot action can be changed whether the switch is turned on or off.
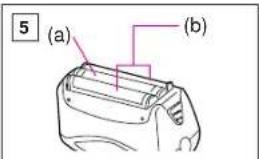
System outer foil
(see fig. 5)
System outer foil has a slit blade (a) between 2 foils (b). They move up and down independently to follow the contours of your face.
The slit blade catches and cuts longer and lying hairs easily.
For wet shaving
Put a thin layer of shaving foam on your face which works as a lubricator. Shaving foam is the most suitable among many other shaving aids
(gel, soap, cream, etc.). Do not put a thick layer of shaving foam as it may affect shaver's performance. If the shaving head is clogged with foam, simply rinse it under running water.
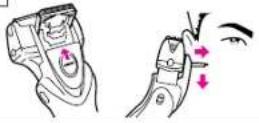
Using the trimmer
(see fig. 6)
Slide the trimmer handle up to open the trimmer.
Place the trimmer at a right angle to your skin and move it downward to trim sideburns.
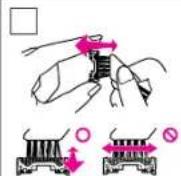
Cleaning your shaver
(see fig. 7)
Warning - To prevent electric shock or personal injury, disconnect the power cord from the shaver before cleaning with water.
For cleanliness and convenience, we recommend that you clean your shaver with water and a liquid hand soap. Regular cleaning will keep your shaver in good condition while preventing odors or bacteria from developing, and maintain the cutting performance.
With the system outer foil in place, apply some hand soap onto the outer foil.
Push and hold the On/Off switch more than 2 seconds to activate the turbo mode for "sonic" vibration cleaning.
At the same time, the lamps of the Battery capacity monitor (ES8044) or Low battery indicator/Charge status lamp (ES8043) will flash around randomly.
Pour some water over the outer foil. After about 20 seconds, it will be automatically turned off, or you can turn it off by pushing the On/Off switch.
Remove the foil frame and push the On/Off switch more than 2 seconds to activate the turbo mode for "sonic vibration cleaning and clean it with running water.
Wipe off any moisture from the shaver with a dry cloth and dry it without the foil frame.
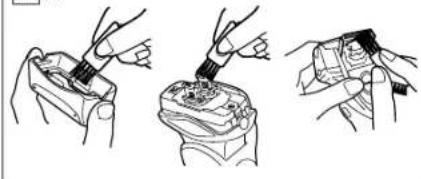
Brush cleaning
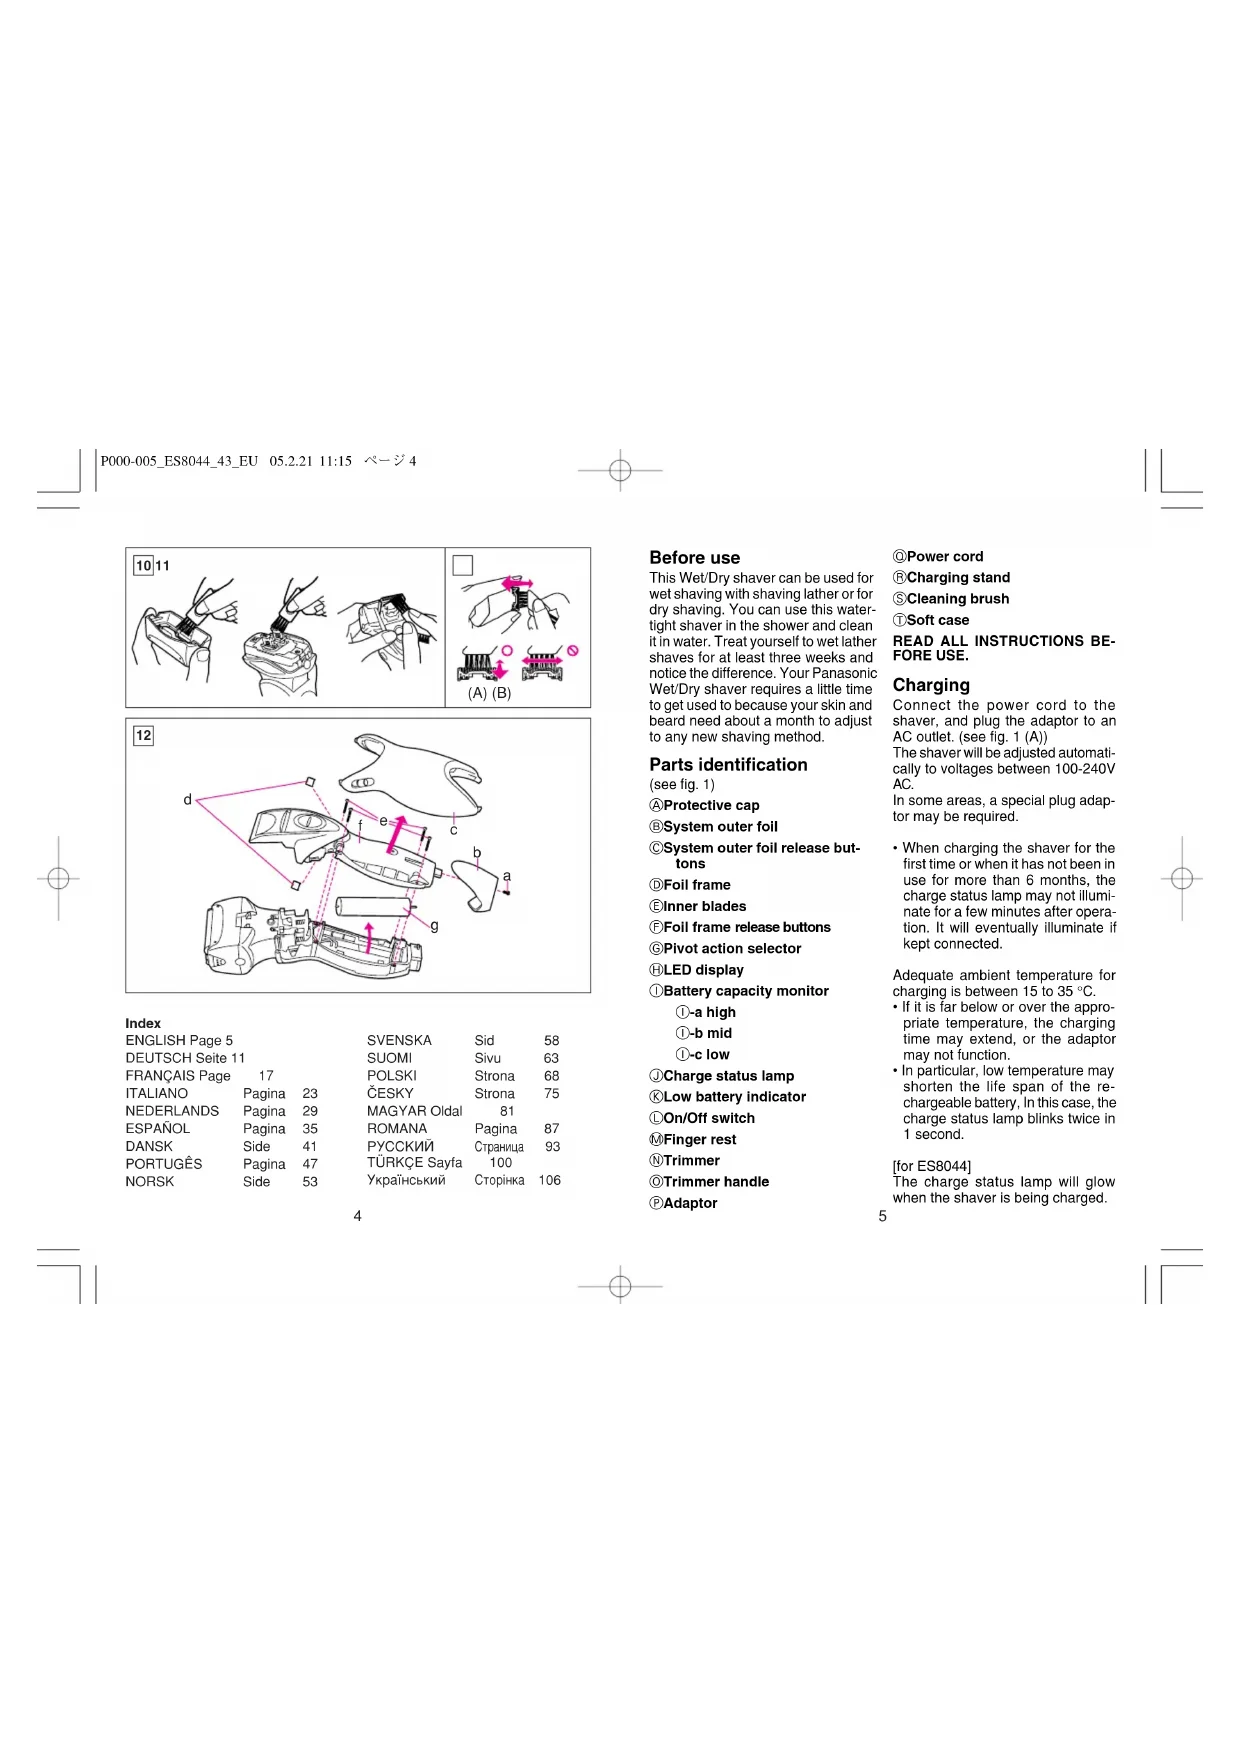
Squeeze the foil frame release buttons and lift the foil frame upward to remove it (see fig. 9). Remove the inner blades one at a time by grasping it firmly at both ends and pulling it straight away from the shaver. Clean the outer foils, the shaver body and the trimmer with the long brush (see fig. 10). Clean the inner blades with the short brush by moving it in the direction in fig. 11 (A). Do not move the brush in the direction in fig. 11 (B), as it will damage the inner blade, and its cutting performance. Do not use the short brush to clean the outer foils.
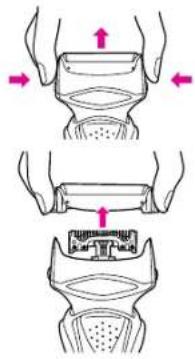
Replacing shaving head components
It is recommended that you replace the system outer foil at least once a year and the inner blade at least once every 2 years to maintain your shaver's cutting performance.
Replacing the system outer foil (see fig.8)
Squeeze the system outer foil release buttons and lift the system outer foil upward to remove it. To insert the new system outer foil, press down until it snaps into place.
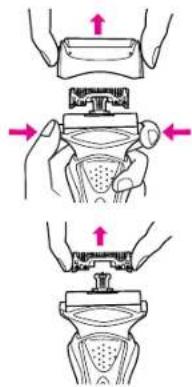
Replacing the inner blades (see fig.9)
Squeeze the foil frame release buttons and lift the foil frame upward to remove it. Remove the inner blade one at a time by grasping it firmly at both ends and pulling straight away from the shaver.
Do not touch the metal parts of inner blades.
To insert the new inner blade, hold the blade one at a time at both ends and press downward until it snaps into the shaver.
For environmental protection and recycling of materials
This shaver contains a Lithium-ion battery.
Please make sure that the battery is disposed of at an officially assigned location, if there is one in your country.
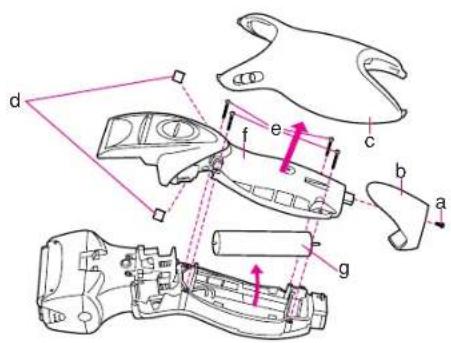
How to remove the built-in rechargeable battery before disposal of the shaver (see fig. 12)
WARNING: Do not attempt to replace the battery for the purpose of reusing the shaver. This could result in the risk of fire or electric shock.
The battery in this shaver is not intended to be replaced by consumers. However, the battery may be replaced at an authorized service center. The procedure described below is intended only for removal of the rechargeable battery for the purpose of proper disposal.
- Disconnect the power cord from the shaver when removing the battery.
- Remove the bottom cover screw (a).
- Remove the bottom cover (b).
- Slide the back panel (c) and remove it.
- Remove the housing clips (d).
- Remove the four housing screws (e).
- Remove the housing B (f).
- Lift the battery (g) and remove it.
Caution
- Do not charge the shaver, where it will be exposed to direct sunlight or a heat source, or where there is a lot of moisture.
- Use only the included adaptor RE7-27 to charge the ES8044/ES8043 shaver.
- Dry the shaver completely before charging it.
- The shaver and adaptor will become slightly hot during use or charging, however this is not a malfunction.
- Keep the adaptor away from water and handle it only with dry hands.
-
Grip the adaptor when disconnecting it from an AC outlet; tugging on the power cord may damage it.
-
Store the adaptor in a dry area where it will be protected from damage.
- Do not pull, twist, or severely bend the power cord.
- Do not wrap the power cord tightly around the appliance.
- If the power cord gets damaged, it alone can not be replaced. Contact an authorized service center.
- In cases where static noise is emitted from the television during use or recharging, connect the adaptor to a different outlet.
- Do not touch the edge (metal part) of the inner blade.
Failure to observe this may lead to hand injuries. - Wash the shaver in tap water. Do not use salt water or boiling water. Also, do not use cleaning products that are designed for toilets, bathrooms or kitchen appliances. Do not submerge the shaver for a long time.
- Do not wipe any part of the shaver with thinner, benzine or alcohol. Clean it by using a cloth dampened with soapy water.
- Do not take the housing apart as this can affect the watertight construction.
- Do not clean with water when the shaver is connected to the power cord.
- When cleaning the shaver with water, do so with both the inner blades attached. (Doing so with only one of the inner blades attached makes an abnormal noise and may damage the shaver.)
P006-039_ES8044_43_EU
05.2.21
11:15
10
- Keep the unit away from children.
- Keep instructions in a safe place.
This product is intended for household use only.
Airborne Acoustical
Noise: 64 (dB(A) re 1pW)
VordemGebrauch
OCTOPOXKHO: He NtaiTeCb 3aMeHnTb 6bataeIO JnI NOBTOpHOro IcNoJIb30BaHNi 6pNTbbl.3To MOxET npINBeCTN K NoXApY IInn nopaxhenIO 3NeKtpnueckm TOKOM.
Batape B daHHoB 6pntBe He npDnHa3HauHe Da nra 3aMeHbI nNoIb3OBaTeEN. Ondako batapeo MORYT 3aMeHTb B yNOnHOMOeHHOM cepBnc-CEHTpe. IoprdoK DeiCTBn, ONscAHbH HxKe, npDnHa3HauEH ToIbKO nDr CHATNA 3apAHOB batape C celbIO HAnNeXauey UytINu3aun.
1.OTKJIIOHHTe WHyp nTuHnO T 6pNTBbI npn CHaTm 6aTapeu.
2. Otkpytute BnHT HnKHei KpbIuKN (a).
3. CHIMMTE HIXKHOIO KpbIiKy (b).
4.CBmHbTe 3aHHIO nAHeJIb (c) NCHMITE ee.
5. CHIMNE Te 3axnmbi Kopnyca (d).
6. Otkpytute cheblpe BnHTa Kopnyca (e).
P074-112_ES8044_43_EU
05.2.21
11:15
一98
- CHINMTe Koprnyc B (f).
- IIOHNMITE 6aTaapeo (g) n CHIMMTe ee.
OctopoxkHO
He npo3BOJnTe 3apAky 6pNTBbI B MecTAX BO3JeNCTBn I PnMbIX COJIeHbIX Nyey Nm NcTOCHNkA TeNna,NNB NOMeueHNx C BoJbwo BNaxHOCTbO.
Пользунець толбк BOXДИМВ KOMЛКТ 3арднblу yctpoиCTBOM RE7-27 ДЯЗAPДКBN 6рIMTbI ES8044/ES8043.
-ПОЛНOCью npocuWbAte 6pntBy nepeD 3apRkoJ.
PnncnoB30BaHm nI 3apAke, 6pntBa n 3apAHOe yCTPOvCTBO MORYT HEMHOr HarpTeCB, HO 3TO HE ABNReTCA HENCPaBHOCTbO.
XpaHnTe 3apAnDho yCTpoNCTBO NOaIbIe OT BObl, IN DToParInBaIteB do Hero ToJIbKO cyxIMn pyKAMn.
- Pn OTcoeHHeHH 3apHOrO yctpoCTBa oT03KtN tnaHAR npeMeHoro TOKa 6epNTecb 3a cAmo 3apHoe YcTPOCTBO; eCIN bbl 6yDEte TAnYb HEnOpCECTBENHO 3a WHP NtAHNR, Bbl MoKeTe NOpeDJIbEro.
XpAHNTe3aHPdHOeYcTPOCTBO CyXOM MecTe, 0e OHO 6yDeT 3auuHHeO NTOBpeKdHn
He TAnHTe 3a Wnyp NITAHIN, He CkpyuHbAte Hne crn6aBte erO CInLbHO.
He hamaTbIaBte uHyp nTuTaHnHa nIe6Dp.
EcnnB hUnype nHTAHn6buyT nobpekdenH,ero HeIb3y bdyet 3aMeHInbOTdEhBO.
CBXKNTecb C yNOJHOMOeHHbIM cepBNC-ueHTpOM.
B Tex cnyaHx, KOrHa npn cnonb3oBAHH nnn 3apnKne 6pnTbbl TeLEBN3Op ABnReTCn HCTOCHNKOM CTaTHueCckNX NOMEX, NOKnIOUHTe 3apnHOe yctpoCTBO Kpyro po3Te.
- He npkaacntecb K kpa0 (metanuecka qactb) BHTPENHERO HOKA.
HecobnoeHne daHHoro TpeboaMROKETPnBecTN K TpaMm PYK.
PpombBaiTe 6pntby npkpaHOM. He MoTte 6pntby B cOJeHoi nn KnnaeHoi BOe.Takke 3anpeaetcN cNoIb3oBaTb cnCTaune CpeDCTBA, npedHa3NaHeHHbe DnN YcNCTKn TYaNETOB, BAHN NKN KYXOHHO O6OpydoBaan. He norgpykaJTe 6pntby B bOdy Ha dNInTeNbHoe BPemr.
3aIrpseaaetc npotnpatb IIObIe
detanin 6pnttby pa3abnTeNEM,
6EH3HOM NIN CNPtOM.
1PpOtnpaTne HTKaHTBO,
CMOeHHoB MBInhOB BOe.
He pa3bpauite KOpNc 6pnttby,
NOCKoNBky 3TO MOeJ HApuyuNTb,
ee BOHOENPOHnuaEMOCtB.
He npombaaTe 6pntby BDOi,
ecnn 6pntBa NOKnLIOUeHa K
THyPy nITAHNA.
PnOuHCTKe 6pNTBbI BDOJ O6a BHytpeHHX Hoa DOJIHb6blbTb PnIKpeHNHeI. (Ecnn OcyueCTBtB TaKyo OHCTKY ToJIbKO c ODHm PNkPeHNHeHbIM HOxOM, NOBHTCr HEObHI NwM, INTO MOKeT pNBEcTN KOBpeKeDeHIO 6pNTBb.)
-ДеркпгпнбогВ HeIoCTyHOMДЯDETeMecTe.
XpaHnTe HnCTpyKuIO B HADEXHOM MeCTe.
DHaHHe OyTpOCTB O npEHa-3HaHEno TOnbKO DnA CnONB-3OBAHnB BOMaHHx YcN0BnX.
YcTaHOBnEHnI npOn3BODntEm B
nopRke n.2 cT5 ΦepebnHoro
3aKoHa PΦ O aatne npab
notpe6nTeen" cpoK cnjx6bln
daHOrHO n3dennpaBEN 7rOam C
DaTb npOn3B0CTBa npy cynOBn,
yTO n3dennncnONb3yeTCB
CTporOM COOTBeTCTBN C
hactoer mHcTpykcnE NO
3KcNlnyataunnpmHeHMblm
TexHHeCKMm CTAnDapTAMn

BZ02
CdeNaHO B Kntae
TOTn pO6 nppeHa3aHcHbTOnbKbDnI DOMAHIgero nCnloBcBOHain.
MaUyunTa 3JneKtpnBopKc,JIa.
Bo3dyuHbAkyCTnueckmIyM 64 (B) npn 1 nBt
Kullanmadan once
PcIra TOrO,AK 3aMrrae IHmkaTOp Hm3bKOro pIBH 3apAry,6pntBOO MOxHa CKOpCTaTnCA ue pa3 W DBHI.
NobHCTIO 3apJxKeHOrO akyMnyTopa BuCTaHa e y cepeHbomy Ha 14 roiHb (3 xBnHHn Ha roiHHa 3BnuAHOI 6o0Dn).
Bupyuaouy noDopoxk 6e3 3apnHO raoanTepe, noBHcTIO 3apnIb akymyntop 6pntBn BnpOdo1 rOuHH.
KJko akymylatop 6pntbN pO3prdkeho,3iHCHtB 3apRky akymylatopa 6pbnBn BPODobX 5 xBnHnBpa3i Qoro Bam BuCTaunb enektpoehepiH h 1 ceacr tonHH.
3aMiHa BHyTpiuHix Ne3 (MIB.MaJ.9)
HaTnCHiB KHONK BN3BOJENH RA CHaIOnEBoI pAMKn Ta NiDHImtb CTaHIOEnBy pAMky BROP, 0o6 3Hrnt II. 3HiMItb BHyTpHi Ne3a, MiHO 3dABuWmix 3a 06nDa KIHJI i NOTARHyBuWn Ha Ce6e.
He TopkaTecn MetaneBoi Nobepxhi BHTpiuHix ne3. No cep3i BCTaHOBt HOBi BHTpuiHni ne3a, ytpmuyoH ix 3a 06nDa KInci, i 3akpinb ix y 6pnTbi, HAITcKaOuH Ha ne3a, DOKn He noHyTe KnaaHaH.
3axo0n 3 oxopoHn HABKOINHbOro cepeOBuua n ytni3auii matepianib
YKOMNNEKT 6PNTBn BXOANTb NITIOHNHn akymyIATOp.3a6e3neUte yTNIi3auHIOAKymyIATop y ophiuHOnpnsnaHcHOMy MiCi, RkUoTake IChye B Baui KpaIH.
BnlaenHb6ydoBaHOI akymnTOpHOi BaTapei nepei ytni3aicO 6pntbn (DMB.MAN.12)
3ACTEPEXHEHH: He Hamaratec 3aminHn AkyMnTPOHy B6atapeo 3 MetHO noaIbWoBnKOpncTaHHB 6pTbn. Bu pNkNkKaTn noxKey a60 ypaHex Hn ENEKTPuHHM CTpyMOM
AkymnyrTopha 6atapera, BCTaHOBnEHa B 6iipntBi, He niDnrae 3amHcnoXnbauAMn. OAnk 3amHy 6bataepoMxHa 3diuCHNTB OFiHOMy cepbiHOMY CEHTPI. KopriCyTneCe r HabeDeHHMn HNKe YHCTpyKUJIIMn DnBaDaneHH AkymnyrTopHnx 6bataep 3 metoIO IXhOBI HanExHoI ytni3aui. Ipeep BuDaneHHM AkymnyrTopHnx 6bataep 6pntBa Ma 6byt BiKDIOHea Bid MepeXI KNUBHeHH!
- Ppei BmDaneHHM 6aTaapei BiE dHaIte BiD 6pTbN uHyp XMBeEHHa.
-
BURBUNHTITb RBHHT (a) HIXHB0I KPNJKN.
-
3HIMITb HmXKHO KpnUky (b).
3.Cyhbe TunbHy naneBcTa 3HIMtB II. - P03φikcyuTe φikcatopu 6bataeHoro Biciky (d).
- BiDrBnHTiTb TOTnpi rBnHTa (e).
- 3HIMITb6atapeHHnBicik B(f).
8.ПиHIMITb 6aTapeo (g) TaBnAnITy II.
3anobixhi 3axo
3a6b0pHReTbc 3diiChIOBATn 3apNky akymyTAToPA 6pNTBn NII pRMM BINBOM COHHTORO CBTna, 6iIN dKepena TENNOBOI eHepri, IN B yMOBX nIDBuNEHOI BONROCTI.
3apnKatn akymyIaTOp 6pntBn ES8044/ES8043 donyckaTeBcN Iiue 3a DonomoroIO 3apnHoro aanTepe RE7-27,io BxoDHTb y KOMNIeKT biNNOBIDHO6pNTBn.
- Pered 34nKdoO 6pntby NOBHCTU BVCYWNTb.
-Пд ус ровот abo Зардк
6рнтba та щанТер Дeo
HarpiBaIOTbC, OДнak Уе He e
HecnpaBicTHO.
He donnyckaTe KOHTAKy aanTepa 3 BOIO i 6epiTbCn 3a HbOro InuIe CYMMN pyKAMn.
Bnmao3apdHn aanTep 3 po3eTK nepeMHOrO cTpyM, 6epItcna Hsne 3a HbOrO; He TnHtB 3a Whyp XNBUEHHA, TOMy 10 Tak Noro MoKHa NOWKODNTN.
36epirae zapn anpntep y cyxomy Mciu, de Bin bye 3axnueHm BID nowkdoxehn.
He pO3aTyrnTe, He cKpyHyTe Ta He 3aargHnAte Whyp KJbNeHnH nIiD roCTpIM KYtOM.
P074-112_ES8044_43_EU
05.2.21
11:15
一112
He 60mToyTe uHpy KINBneHHn HABKONO 6pNTBn 3aHaTTO Tyro.
Bpa3i NowKOdKeHHaHEMOKJINBO 3amHHTN NIwe SHypXKNBHeHH. YcMbY BUNaKy 3eptaTReCbdo OphiunHoro cepbichoro ceHTpy.
Bpa3i noBn niaac po6oTn a60 3apKn cTaTHHnx nepeKoD TepeBisiHOMy npHOMy BCTpOMtB aanTepe y iHwy po3kTy.
He TopkaTecb KpaKn (MeTaneBoi HcCTHnB) BHTpiHbOro ne3a. HeOpTpMaHaH Haie BmOrMoKe np3BeCTn Do nop3ib.
- PpomBaIte 6pITby BOJOnPBoIHOIO BOIOIO. He BnKOpNCTOByTe MInhepaIizOBAHy NIKN'UeHbY BoYd. He BnKOpNCTOByTe MNoui 3a06b, np3HaHeH dJa o6p06Kn TYanetIB, BaHHx Nc KxyoHHnx npnAad. He aHpyioTe 6pBTby yBOy H TaPbnBnn Yac.
He npotnpaTe KOMnoHEnTH 6pntbn po3HHNKOM, 6e3nHOM cnCnPTOM. IIN HUeHHb BpNTB BUKOPUCTOBYte TKAHNHy, 3MOeHBY MmNBHI BODI.
He po3bpaTRe KOpNc 6pHTBn, uo6 yHKnHyTN moro po3repmTeaui.
3a60pHaetbC BONORE 甲HENHb6PHTBn,AkoBOHA 3'EDHnA 3 HYPDM XINBHeHn.
PnBONORmy HUeHHHe 3HIMaTe BHYTpIWHX ne3.(HKuO 3HTN ONE 3 BHYTpIWHX ne3, 3'ABTNcHEHOHPMaBHN Wym, i 6pNTBa MOKe NOoKOANTCA).
36epiraitne npctpr y HEDOCXHOMY DITeI Mici.
36epiraTe ihctpykuio y 6e3neHOMy mi ci.
BctahOBJIeHNI BnO6HNIKOM TepMH Cny6M (npNDAthOCTi) cIb0r BnO6y dopIBHO7 POKAM 3 daTn BnROTOBNEH3a YM0BN, uO BnPi6 BnKOpNCTOBYETCBc y cyBOPi BIDNOBIHDOTIO dINCHOHCTpyKlU 3 ECKNPyatauII Ta TEXHIHNX CTAndapti, 8o 3AcTOCOBYOTCBc Do cIb0r BnO6y.
Daty BnroTOBneHHa3HaueHO Ha Bnpo6i.
AkyctnHm ym:64 (d5(A) biin. 1pW)

- Wet/Dry/Rechargeable Shaver
- Operating Instructions
- Index
- Before use
- Parts identification
- Charging
- [for ES8043]
- Charge with charging stand
- Using your shaver
- Pivot action selector
- System outer foil
- For wet shaving
- Using the trimmer
- Cleaning your shaver
- Brush cleaning
- Replacing shaving head components
- Replacing the inner blades (see fig.9)
- For environmental protection and recycling of materials
- Caution
- VordemGebrauch
- OctopoxkHO
- Kullanmadan once
- 3aMiHa BHyTpiuHix Ne3 (MIB.MaJ.9)
- 3axo0n 3 oxopoHn HABKOINHbOro cepeOBuua n ytni3auii matepianib
- BnlaenHb6ydoBaHOI akymnTOpHOi BaTapei nepei ytni3aicO 6pntbn (DMB.MAN.12)
- 3anobixhi 3axo
Brand : PANASONIC
Model : ES8044
Category : Shaver