
ES8162 - Shaver PANASONIC - Free user manual and instructions
Find the device manual for free ES8162 PANASONIC in PDF.
| Product type | Electric shaver |
| Brand | Panasonic |
| Model | ES8162 |
| Usage | Dry or wet shaving (Wet/Dry) |
| Water resistance | Can be used in the shower, washable under running water |
| Power source | Rechargeable Lithium-ion battery |
| Charger | RE7-25, 100-240 V AC (automatic voltage adaptation) |
| Full charge time | 1 hour |
| Quick charge (5 min) | For 1 shave |
| Battery life | Approximately 14 shaves (3 min per shave) |
| Display | LED: battery capacity monitor and charge status indicator |
| Shaving head | Outer foil with central blade, pivoting (Soft/Lock mode) |
| Integrated trimmer | Yes, sliding |
| Turbo cleaning mode | Sonic vibrations (hold On/Off for 2s) |
| Cleaning | With water and liquid hand soap, or with a brush |
| Outer foil replacement | Every year (recommended) |
| Inner blades replacement | Every 2 years (recommended) |
| Noise level | 67 dB(A) |
| Safety | Automatic stop of turbo mode after 20s; do not use if foil is damaged |
| Included accessories | Charger, charging stand, cleaning brush, storage case |
Frequently Asked Questions - ES8162 PANASONIC
User questions about ES8162 PANASONIC
0 question about this device. Answer the ones you know or ask your own.
Ask a new question about this device
Download the instructions for your Shaver in PDF format for free! Find your manual ES8162 - PANASONIC and take your electronic device back in hand. On this page are published all the documents necessary for the use of your device. ES8162 by PANASONIC.
USER MANUAL ES8162 PANASONIC
Wet/Dry Rechargeable Shaver Operating Instructions
Model No. ES8163/ES8162/ES8161
Matsushita Electric Works, Ltd.
1048, Kadoma, Osaka 571-8686, Japan
No.1 EN, GR, FR, IT, NE, SP, DN, PO, NR, SW, FN, Po, Cz, Hu, Ru, Russi, TU, Uk (欧州) Printed in Japan
- Before operating this unit, please read these instructions completely.
P000-005_ES8163_62_61_EU 05.2.21 11:17 -2
2
3
P000-005_ES8163_62_61_EU 05.2.21 11:17 -4
| Index | |||
| ENGLISH Page 6 | SVENSKA | Sid | 60 |
| DEUTSCH Seite 12 | SUOMI Sivu | 66 | |
| FRANÇAIS Page 18 | POLSKI | Strona | 72 |
| ITALIANO Pagina 24 | ČESKY | Strona | 79 |
| NEDERLANDS Pagina 30 | MAGYAR Oldal | 85 | |
| ESPÁÑOL Pagina 36 | ROMANA | Pagina | 92 |
| DANSK Side 42 | PYCCKM | стараца | 98 |
| PORTUGÉS Pagina 48 | ТURKCE Sayfa | 105 | |
| NORSK Side 54 | Украïnhсыкий | сторika | 111 |
Before use
This Wet/Dry shaver can be used for wet shaving with shaving lather or for dry shaving. You can use this watertight shaver in the shower and clean it in water. Treat yourself to wet lather shaves for at least three weeks and notice the difference. Your Panasonic Wet/Dry shaver requires a little time to get used to because your skin and beard need about a month to adjust to any new shaving method.
Parts identification
(see fig.1)
Protective cap
System outer foil
Inner blades
System outer foil release buttons
E)Pivot action selector
LCD display [ES8163] LED display [ES8162] [ES8161]
Battery capacity monitor
Charge status lamp
①Low battery indicator
On/Off switch
Finger rest
① Trimmer
Trimmer handle
Adaptor
Power cord
Charging stand
Cleaning brush
Soft case
READ ALL INSTRUCTIONS BEFORE USE.
Charging
Connect the power cord to the shaver, and plug the adaptor to an AC outlet. (see fig. 1 (A))
The shaver will be adjusted automatically to voltages between 100-240V AC.
In some areas, a special plug adaptor may be required.
- When charging the shaver for the first time or when it has not been in use for more than 6 months, the plug symbol and backlight of LCD display (ES8163) or charge status lamp (ES8162, ES8161) may not illuminate for a few minutes after operation. These lights will eventually illuminate if kept connected.
Adequate ambient temperature for charging is between 15 to 35^
- If it is far below or over the appropriate temperature, the charging time may extend, or the adaptor may not function.
In particular, low temperature may shorten the life span of the rechargeable battery. In this case, the backlight of LCD display (ES8163) or charge status lamp (ES8162; ES8161) blinks twice in 1 second.
[for ES8163]
When the shaver is being charged, the backlight of LCD display turns on, and the plug symbol appears (see fig. 2(A)).
It shows the remaining battery capacity from 0% to 100% , in 10% increments.
When the charging is completed, it will indicate 100% and the backlight of LCD display will flash once in about 1 second. It will flash once in about 2 seconds for 10 minutes after charging is completed (see fig. 2 (B)).
You can fully charge the shaver in 1 hour if the LCD display shows 10% and lower.
The plug symbol blinks in the LCD display when the remaining battery capacity is 10% and less.
The unit can be used once or twice more after the LCD display starts to show 10% . (Differs depending on the use situation.)
[for ES8162]
The charge status lamp will glow when the shaver is being charged. 100 to 20 of the battery capacity monitor will all illuminate and the charge status lamp will blink after charging is completed (see fig. 2(C)). 10 minutes after charging is completed, the battery capacity monitor will extinguish and the charge status lamp will continue to blink (see fig. 2(D)).
You can fully charge the shaver in 1 hour if the LED display shows 20% . The battery capacity monitor indicates the charge remaining in the battery. The unit can be used once or twice more after the "20" starts to blink. (Differs depending on the use situation.)
[for ES8161]
The charge status lamp will glow when the shaver is being charged. It will blink when the charging is completed (see fig. 2(F)).
You can fully charge the shaver in 1 hour if the low battery indicator blinks (see fig.2 E).
The unit can be used once or twice more after the low battery indicator starts to blink.
A full charge will supply enough power for approx. 14 shaves (3 minutes per shave for a normal beard). Before travelling, charge it fully for 1 hour if you will not be taking the adaptor with you.
In case your shaver is without charge, you may quick charge it for 1 shave in about 5 minutes.
Charge with charging
stand
(see fig. 1 (B))
To charge with the charging stand, connect the power cord to the charging stand. Place the shaver into the stand, and plug the adaptor to the AC outlet.
You can always store your shaver in the charging stand to maintain full battery capacity. This shaver cannot be overcharged.
Using your shaver
Caution - The system outer foil is very thin and can be damaged if handled improperly. Before each use, always check the foil for damage. To avoid personal injury, do not use if the foil or other parts of the shaving head is damaged.
Disconnect the power cord from the shaver, and push the On/Off switch to turn the shaver on.
If you push and hold the On/Off switch for more than 2 seconds, it will activate the turbo mode for "sonic" vibration cleaning. (see "Cleaning your shaver") Caution:
Shaving with "sonic" vibration may damage your skin. Please turn it off and on again to deactivate the turbo mode.
Do not place fingers on the On/Off switch during use.
This may cause the shaver to stop during use or change it to the "sonic" vibration cleaning mode. Place your finger on the finger rest during use.
Hold the shaver at a right angle (90^) to your skin (see fig. 3). Start out shaving by applying gentle pressure to your face. Stretch your skin with your free hand and move the shaver back and forth in the direction of your beard. You may gently increase the amount of pressure as your skin becomes accustomed to this shaver.
Applying excessive pressure does not provide a closer shave.
Pivot action selector (see fig.4)
Use the pivot action selector to choose the shaving mode, "soft" (soft) and "lock" (lock) based on your shaving preference.
The pivot action can be changed whether the switch is turned on or off.
System outer foil (see fig.5)
System outer foil has a slit blade (a) between 2 foils (b). They move up and down independently to follow the contours of your face.
The slit blade catches and cuts longer and lying hairs easily.
For wet shaving
Put a thin layer of shaving foam on your face which works as a lubricator. Shaving foam is the most suitable among many other shaving aids (gel, soap, cream, etc.). Do not put a thick layer of shaving foam as it may affect shaver's performance. If the shaving head is clogged with foam, simply rinse it under running water.
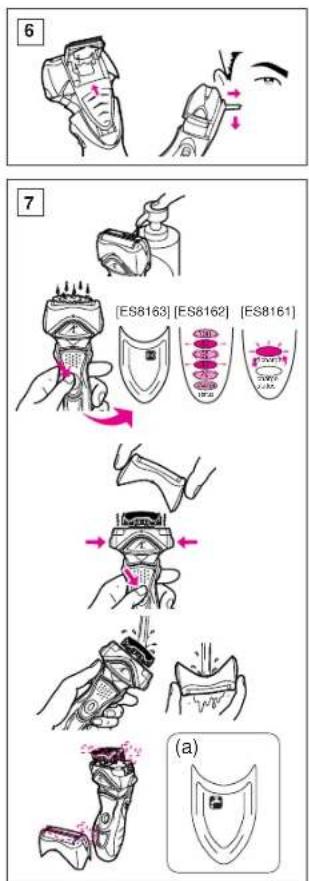
Using the trimmer
(see fig. 6)
Slide the trimmer handle up to open the trimmer.
Place the trimmer at a right angle to your skin and move it downward to trim sideburns.
Cleaning your shaver (see fig. 7)
Warning - To prevent electric shock or personal injury, disconnect the power cord from the shaver before cleaning with water.
For cleanliness and convenience, we recommend that you clean your shaver with water and a liquid hand soap. Regular cleaning will keep your shaver in good condition while preventing odors or bacteria from developing, and maintain the cutting performance.
With the system outer foil in place, apply some hand soap onto the outer foil.
Push and hold the On/Off switch more than 2 seconds to activate the turbo mode for "sonic" vibration cleaning.
At the same time, the "sonic" cleaning symbol appears in the LCD display (ES8163), or the lamps of the Battery capacity monitor (ES8162), or Low battery indicator/Charge status lamp (ES8161) will flash around randomly.
Pour some water over the outer foil. After about 20 seconds, it will be automatically turned off, or you can turn it off by pushing the On/Off switch.
Remove the system outer foil and push the On/Off switch more than 2 seconds to activate the turbo mode for "sonic" vibration cleaning and clean it with running water.
Wipe off any moisture from the shaver with a dry cloth and dry it with-
out the system outer foil.
It is recommended to clean your shaver with the "sonic" vibration cleaning when the tap symbol (a) appears in LCD (ES8163).
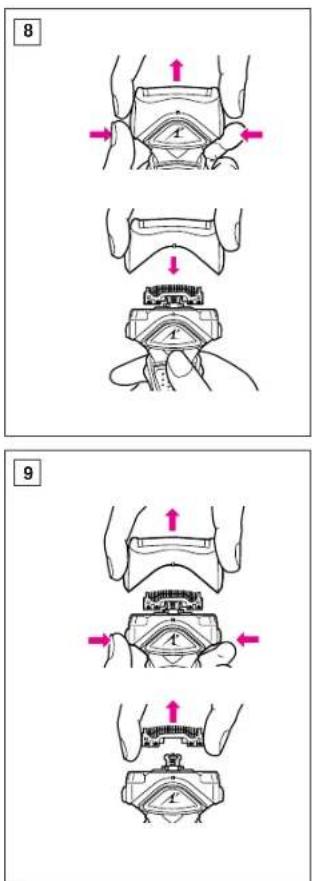
Brush cleaning
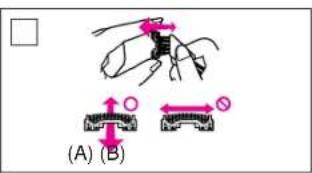
Squeeze the foil frame release buttons and lift the foil frame upward to remove it (see fig. 9). Remove the inner blades one at a time by grasping it firmly at both ends and pulling it straight away from the shaver. Clean the outer foils, the shaver body and the trimmer with the long brush (see fig. 10). Clean the inner blades with the short brush by moving it in the direction in fig. 11 (A). Do not move the brush in the direction in fig. 11 (B), as it will damage the inner blade, and its cutting performance. Do not use the short brush to clean the outer foils.
Replacing shaving head components
It is recommended that you replace the system outer foil at least once a year and the inner blade at least once every 2 years to maintain your shaver's cutting performance.
Replacing the system outer foil (see fig. 8)
Squeeze the system outer foil release buttons and lift the system outer foil upward to remove it. To insert the new system outer foil, press down until it snaps into place.
P006-041_ES8163_62_61_EU
05.2.21
11:17

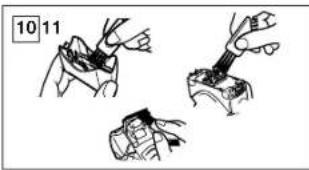
Replacing the inner blades (see fig.9)
Squeeze the system outer foil release buttons and lift the system outer foil upward to remove it. Remove the inner blade one at a time by grasping it firmly at both ends and pulling straight away from the shaver. Do not touch the metal parts of inner blades.
To insert the new inner blade, hold the blade one at a time at both ends and press downward until it snaps into the shaver.
For environmental protection and recycling of materials
This shaver contains a Lithium-ion battery.
Please make sure that the battery is disposed of at an officially assigned location, if there is one in your country.
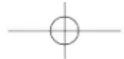
How to remove the built-in rechargeable battery before disposal of the shaver (see fig. 12)
WARNING:
Do not attempt to replace the battery for the purpose of reusing the shaver. This could result in the risk of fire or electric shock.
The battery in this shaver is not intended to be replaced by consumers. However, the battery may be replaced at an authorized service center. The procedure described below is intended only for removal of the rechargeable battery for the pur
pose of proper disposal.
1. Disconnect the power cord from the shaver when removing the battery.
2. Remove the bottom cover screw (a).
3. Remove the bottom cover (b).
4. Slide the back panel (c) and remove it.
5. Remove the housing clip (d).
6. Remove the four housing screws (e).
7. Remove the housing B (f).
8. Lift the battery (g) and remove it.
Caution
- Do not charge the shaver, where it will be exposed to direct sunlight or a heat source, or where there is a lot of moisture.
- Use only the included adaptor RE7-25 to charge the [ES8163] [ES8162] [ES8161] shaver.
- Dry the shaver completely before charging it.
- The shaver and adaptor will become slightly hot during use or charging, however this is not a malfunction.
- Keep the adaptor away from water and handle it only with dry hands.
- Grip the adaptor when disconnecting it from an AC outlet; tugging on the power cord may damage it.
- Store the adaptor in a dry area where it will be protected from damage.
- Do not pull, twist, or severely bend the power cord.
-
Do not wrap the power cord tightly around the appliance.
-
If the power cord gets damaged, it alone can not be replaced.
Contact an authorized service center. - In cases where static noise is emitted from the television during use or recharging, connect the adaptor to a different outlet.
- Do not touch the edge (metal part) of the inner blade.
Failure to observe this may lead to hand injuries.
- Wash the shaver in tap water. Do not use salt water or boiling water. Also, do not use cleaning products that are designed for toilets, bathrooms or kitchen appliances. Do not submerge the shaver for a long time.
- Do not wipe any part of the shaver with thinner, benzine or alcohol. Clean it by using a cloth dampened with soapy water.
- Do not take the housing apart as this can affect the watertight construction.
- Do not clean with water when the shaver is connected to the power cord.
- When cleaning the shaver with water, do so with both the inner blades attached. (Doing so with only one of the inner blades attached makes an abnormal noise and may damage the shaver.)
- Keep the unit away from children.
- Keep instructions in a safe place.
This product is intended for household use only.
Airborne Acoustical
Noise: 67 (dB(A) re 1pW)
Vor dem Gebrauch
BbMoKTeNoHnOCTbU 3aprAHTb 6pTBy T BteHeMeI HcAe,ECnHa NK-cknIee oTo6paKaetc10% nnn MeHbWe.
3Haoyok BnKm Mnaer HaKK-NCnJee,ecnn octabwacr EMKoCTb 6atapen coCTaBnT 10% mN MeHbIe.
Pnoe Toro, ka Ha KK-dncnnee HauHET OTO6paxaTbCn 10%, Bb CMOXeBOCNNoB3OBAcBc annapaTOM OINH INN Dba paa. (3aBNCNT oCtTuaynnnncnONN3OBAHn.)
[EN8ES8162]
CBETOBU INHDAKATOP COCTOHN 3apRkN6byTe TpeTb npn 3apRkDe 6pIMTBbl.
Ha DnCnIe 3apJa 6aTape 3arOpTcA DeJeHn100-20, aCBTOBOn IHnKAtOP COCTORHNJ.
3apAKn 6ydt MntaB no OKOHuaHn 3apAKn (cm. pmc.2(C)). CnCTy 10MHyt no 3abepeuHn 3apAKn, dnncn 3apda 6batae NORachet, a CBTOBOHN HNkAtop COCToHnA 3apAKn 6ydt npDoNtB MNTaB (cm. pmc.2(D)). BBy MoXeTe NnHOCTb O3apdntb 6pTBy B TeueHne I yaca, ecnn Ha CBToDnOHN DcNnnee OTObpaKaETC 20%.
Icnne 3apna 6atapen OTObpaKaet octabunnc 3apnd 6batepn. Nocne toro, kak hauhet MrraTb uippa"20", Bbl cmoxete BOCNlb3ObaTcB annapatom oDHH ININ Dpa paa. (3aBNCNT OT CNYAUNN NCONB3OBAHNN.)
[DAE ES8161]
CBeTOBOHnIHkATOp COCTOHNH 3apRKn6bETeTpeTp npn3apRKe 6bpHTbI. No 3aBepueHn 3apRKn OH 6bETMnRaTb (CM. pnc.2(F)).
BbMOKeTe NOHOCbIO 3aprAHTb 6pNTBy B TeueHne I yaca,ecnn HnDKaTOp pa3prda 6atapen MnaET (cm.pmc.2(E)).
Nocne TOrO, KaK HaHcET Mrratb HnMkaTOp pa3Pda6Batape,Bbl CMOxETe BOCNOB30BaTBcR annapatom OINH ININ Dpa3a.
PnHn3 3apnKa o6ceuHT OoCTaOCHyIO 3eHrIO pnp6n3ntBnHO 14 2ceAcoB 6pTb3 (3 MNHybHa 6pTbe npn HOpMaHbHom BOONcHOM NOKPOBE). ECnn Bblye3xaeIe N He6peC c0oB 3aepnOyeCTBO, PNNHO3b3 aapnDte 6pTbY B TeEHNE 1ca4.
B Cnyae ecnn 6pnTba He 3apXeHa, Bbl MoXeTe 6blcTpo ee 3apAnlt, pnpMepHO 3a 5 MMHy Ta 1ceah 6pnTb.
P078-118_ES8163_62_61_EU
05.2.21 11:18 100
3apKa c NOMOsbIO 3apHNO CTOnKu
(CM.PMC.1B)
IIN3apKnC NMOOsbHO 3apHNOH
CTOKNIOKNIOHTe HHPNTAHN
K3APADHO CTOKKE.BCTABTe 6pNTBY
BCTOKKY INCTABTe BNIky B pO3eTKY
NEPEMeHNOR TOKA.
IIN6EoNCHeHn NOCTOaHHo
3apJKn 6bTApEN peKOMeHNyEM
BCERdA OCTABTNb 6pNTBy T2APHO
CTOKKE.3Ta MoDEnb 6pNTBbl
3aUmEHaOT N3bIoTHoHH 3apKn
IcnoJb3OBAHHe 6pntBbl
Ppeoctepexehne-BheHnAeTKeaCnCTEmbOyeHbTOHka,N npn HeBepHom obaueHHn ee NERko nobpeHt. PpekKaKdbmNCNpNb30BaHaEM BCerda npOBepHTe CETky HoTCyTCTBme NOBpeJHn.Bo n36ExKaHHeJHou TpaBmHe NCNoB3yHe 6PntBy,ecn CETka nnDpyrNe detann 6PntBHeHn ROnOBKn NOBpeXeHb.
OTcoeHNHtme WHPNNTAHNAOT O BmTbbln HAKMNTe BbkIOHcATEbB BkN/BbkN, Tc0bBbkIOHcMbTbY.
Ecnn Bbl HaxMeTe 3aDpeXnTe
BbIKNoHTeBbK./BbIKn.
60bnBe Ym Ha Dbe cekYbI,3To
AKTNbpyET tybo peKYM nCTKn
BbIPauey" "sonic"
CM."NCTKa bPHTBbl)
PiepoctepeKeHne:
Bpntte B pexkme Bn6paun
"sonic" MoKet NobpeNTb BAuy
koxy. IoxkanyuCTa, BblNKNoHTe
6pnTBy N BkNoHTe ee CHOBA,
t06bl de3akTbnpoBaTb tybo
peXmm.
Pn nCnOJb3OBaHm 6pntBbl He KnaIaTe naIbIc H a nepeKJIouyateIb "BKn./BbIKn." 3To moKet npINBEcTn K otKIOUeHHIO 6pntBbl pn nCnOJb3OBaHm nn nepExoY B pexHM NCTKn Bn6paueH e "sonic: Pn nCnOJb3OBaHm 6pntBbl KnaIaTe Naeue Ha noDctABky dnnanba.
ДерхиTe 6pntBy NOДnpRbIM YrIOM K KOKe (90°) (cm. pnc. 3). ПпстУпаNTe KбрТьHO, OCTopoXHo рnxнмбрNTy K nIvy. HATrNBaTE KOKY CBO6OHDH pyKoN epemeuaite 6pntBy B3aI N BpepeNo HAnpaBNeHIO BOONcHOrO NOKPOBa. No Mepe TOrO, KAK BaAka KOKa BydET nPpBbKaTb K 6pNTbe, Bbl MokTe octopoXHo yCnITb Haxm Ha KOKy. N3bToCHbHaxmHa KOKy He Tpebyetc, TAK KAc 3TO He DaET ynyuWeHn KaueCTBa 6pNTbЯ.
IpeeklouateIb pa6oynx pekmoB
(cm.pmc.4)
IcnoIb3yIte nepeKIOUaTeIb
paOoHnPEXKIMOB, YTO6bI Bb6PbATpeXMM 6pNTBra "soft"(MARKIN)N"lock"(6NOKIOPOBA)B3ABNCMOCTNt OPNEOHTeHn Pn6 p6TBe.
Pa6OCh peXMM MoKeT 6bITb
m3MeHEN He3A8NCIMO TO TOrO,
HaxoNDTCn BLbIKNOaTeHn B
NoJooKHeHn BKn.Iu N"BbKn.
TpoHn 6pntBehnna CnCTema
(CM.PNC.5) TpoHHaB 6pHTBeHHaR CnCTema (a),
3aKpeHnHHI TpMMep Mekdy 2 cetkam (b).OnnBraAOTCB BepxBHN3 He3ABNCMO Dpyr OT Dpyra, Cneydu OeHTpanhM BaWero Nlaica. LHeTpalnbHpeKyuSbnok Nerko 3aXbaTbBaet N obpe3aet 60nee dHHbI, pInneraIOuNE K NnuY BONcbl.
MOKP06pntb
HaHecnTe TOhKn CnoN neHbI dna 6pTbHa Nla:3Ta nHea 6byet BbIOnnHrTa Cma3bIbAoUyO CyHKnIO. Nha DnA 6pTbHa Lyuwee CpEcTBO CpaBHeHm C MHOHNpyDmYm (Rbn, MbIIO, Kpem I T.D.) He HauocnTe neHy Ha NlIoTOCTbIM CNOEM, TAK KAK 3TO MOKeT OTPnuaTeNb HO CKa3aTbCn HA 3ΦΦKTHNBOCT paBoTb 6pTbBa Ecnn 6pTbHeHHa rONBka 6byet 3aBnTa NeHOn To DCtatoH0 npononckatbe eoN kpaHOM
McNoJIb3OBAHne TpMMepa (CM.pnc.6)
PpOdBnBtepyKyTpMMepa BBePx,TOb6IOTKpbITbTpMMeP. PomeCTTE TpMMeP NO pRpaBM yJrOM K KOJE NPODBuRgAte 6pNTBy BHN3,TOb6I NOpOBHrTb BVCKN/ 6aKeH6apDbI.
甲CTka6pntTbbl
(cm.pnc.7)
Octopokho - Bo n36eKaHne nopaxehnnaektpueckm TOKOM INN NOLYeHnINMHybX TpabM,OTc0eDnHnTe UHP nITahnO T6pNTBbI npn OChTKe 6pNTBbI BOoN.
B cenrnnn H n oecneeyehna yodcbta nnonb0aHnpeKoMeHHyETcHcHTNTb 6PNTBY BODOn JxNkIMM MBJON. PerynpHaN cTcA NOMOeT noDepExNBATb 6PNTBy B xopoWem coCToHHn, npedotBpaaan noBJIHHe HnPNTHbX 3anaXOB nn bakTeprn, a TAKKe oecneuHt BbICOKY OePfKTbHbOCTb 6PNTb. He Chmam BHEuHIO cETky, HambIbTe ee MbJOM.
Haxmte u depxnbate BbIKnOyateB"BKn./BbIK." He Mehee DBye CkyHd, YTO6bl aKTHINPOBaTb Typ6OpexM NCTKN Bbopaun "sonic".
OndHOBpemEnHaKK-dncnnee noBHTC3HauOKuCTKn"sonic" (ES8163),nnCBETObIe uHdkaTOpbl dNcPnE 3apJa 6atapEn(ES8162),nn HdkaTOp pa3paJa 6atapEn/CbTeBOJ uHdkaTOp ccoTOnn 3apJKn (ES8161)6dyT Mrrb B CnyHAnOH nocneDobateNBHOCTM.
06JeTe BHeHIO cETKy Heoblbmm KONHECTBOM BObl.
IpnbIbn3nteBhoYepe32CeKHyD 6pTnBa ABOTMaTHueCKN BbIKHOHTCRA,nn Bbl MoKTe BbIKIOuHTbe ee, Haxab BbIKIOaHTe "BKn./BbKn." CHMNTe BHeHIOc cETky CnCTEmbl uyePbXuBaIte BkIKIOuTeAeB "BKn./BbKn." He Meene 2 CeKHyD TTObl BKIOUHTb Typ6Opexm YnCTKn Bu6paunen "sonic", n npomoe BpTBy B npotoHOn BOe.
P078-118_ES8163_62_61_EU
05.2.21
11:18
一102
Bbtpnte Bnary C 6pntBblc nOMOuBIO CYXON TKAHN N pOPOUYmTe ee 63 BHeWneI CETKN CNTEmbl. PekomeHdyeTcO OcyueCTBnRb ONUCTky 6pntBblc NOMOuBIO BnopaMn "Sonic" npN NOBNEHM Ha KK-dncnnee 3NaUka KpaHa (a) (ES8163).
UncTka uetKoI
CoxMITE qnKCaTopb BheHne CETKNoDnHMTE BHeuHIO CetTKBbePx n CHmMITE ee (cm. pnc.9).I0 ONDHY CHmMTE BByTPeHNHe HOxN, HadeJHO 3a8BaTbBAH IN C DByX CTOpOH N BBTARINB HA IN 6pNTBbI. IpoNuCTHE BHeuHne CETKo KOPNc 6pNTBbI N HOXNcblc NOMOsbIO dnnHOJ UETKn (cm. pnc. 10).PiOpCTHE BHTyPeHNHe HOXn c NOMOsbIO KOpOTKO JETKn, nepeDbIRrae E B HapnbAneHHU yka3AHOM Ha pnc. 11 (A). He Dbrarnte QETky B HapnbAneHHU yka3AHOM Ha pnc. 11 (B)-3TO npNBedet K NOPBExdHIO BHTyHrero HOXA n Chn3nt erO peKyuO cNoC6HoCTb. He NCOnOB3yIe KOpOTky UETky dna CYCTKN BHeuHne CETKn.
3aMeHa 3JIeMeHTOB roJIOBKn 6pNTBbl
Дл coхангь Bblcokoi 3ффektnbHoctn 6pnTbЯ peKOMHyETer pOn3BOJNTb 3amEny BHeHne CETKn CNTEmbl. no KpaHne Mepe, exeroDHO, a BHTpeHHnx HoxKe - no KpaHne Mepe, oMHn aB 2 roda.
3aMeHa CnCTembl BHeWHei CETK
(cm.pnc.8)
Hakab Ha KcTobI RoOBKn 6PbTBbl,NotAHNHe eBBeP,4TOb6 ChrB. 10 ODHOMY ydaNtE BHTpeHNHE HOXn, TBepDO 3aXBbIBaH N C 06eNX CTOpOH N NotAHyB IN BBePOT 6PbTbbl 4TO6bl BCTABMb HOBIE BHTpeHNHE HOXn, BCTAByNE IN NO OHOMY 3aXBaTbK KaJbbl HOX C DByX CTOpOH, H HaxIMAR BHIN, 4TO6bl OHNIOTHO BCTaII HA CBON MecTA B6pITBE.
3aMeHa BHyTppeHHHX HOKei (CM.pmc.9)
CoKmnte fNkcatopbI rONOBKn 6pTbBn CHMnTE rONOBky 6pNTbBn, NOHRe ee Bepx. No OHMy YAanTe BNYtpeHNHe HOKN, TBepDo 3aXBaTbIBaHN X C OeHN CTOpOH NOTAHy IN BBePx OT bPNTbBn. He npHKaainTeCb K MetanHHueckm YactrM BHyTpEHHN HOKe.
TObb BCTaBnTB HOBb BHyTeHHN HOK,3XBAATNTBE BHYTpEHHN HOK C 0eBX CTOpOH HaDaBtE Ha Hero BHIN, TObb OH CO ΜεηκOM 3αρκCπρOBANCB δρntBE.
3aunTa okpykaoucei cpebln ytnu3aun HcnoJb3ObaHHbIX MaTePnaOB
3Ta 6BnTBA coOpEgNITIINHNOHHVbatapeO.
Noxanyucta, yTuInn3npyTe 6bataeio B OounnaIbHO
YTBepXDeHHOM MECTe,ecnn TaKaB cnlyk6a npedymTopeha Bwaew CTpaHe.
CHATNE BCTPOEHHO8batape 10 yTHN3aun6pNTBbl (cm.pnc.12)
OCTOPOXHO:
He nbitaTaebc 3aMeHntb 6atapeoIJa NOBtOpHo IcNoNob3ObaHNb 6pNTbI.3To MoKet npBeCTn K NoXApy IIn NopaxKeHHIO 3NeKTPuYeCKM TOKOM.
BaTapeB DAnHNo BpntBe He npDnHa3HaCyHe Na 3aMeHb nIb3oBatelem. Ondako BaTapeO MOryt 3aMeHHTb B yOnNHOOMOeHHOM cepBnc-zeHtpe. IopRdok DeCTbn, ONcaHbI Hxke, npDnHa3Haey ToIbKO dNr CHrtna 3apHdH oBaTapeC cIeBIO HaNeJkauey TynNtAaznn.
- OTKJIIOUYIte 7HUPnTATAHN OTOBSPBtBu NPH CHTMn 6aTApEn.
- Otkpytnte BnHT NHHKHe KpbiluKn (a).
- CHIMMTE HIXKHO KpbIUKy (b).
4.CDINHIE3aHHIOIaHEnb(c)CHIMITE ee. - CHHMMTe 3aXkIM KOpnyca (d).
- OTKpyTne YeTbpe BnHTa Kopnyca (e).
- CHMMTe Kopnyc B (f).
8.ПОДИМITE 6БАТЕЦ(g)CHIMITE ee.
OctopoXHo
He npov3BOJnTe 3apAky 6pNTbbl B MCTAX BO3DeIeCTBNI PnRMbIX COJIHeuHbIX Iyue NmNtOCHNkA TeNa, INN B NOMEueHnx C BoJIbWo BNJxKHOCTbIO.
-ПоньунТсьТольКВхODДИМВ
КOMПЛЕКТ 3арДнБIM
yctpoiCTBOM RE7-25 ДЯ
Зрдк6рNTы [ES8163]
[ES8162][ES8161].
PoiHocTbO npocuWBAHTe 6BPITBYpeD3apKdOKI.
PnHNCNb30BaHN HIN 3apAKe, 6pHTBA H3apHNoe YcTpoIcTBO MORYHEMHOHarpTeBcH,HO3TO HE ABNECTCAHECNpAbHOCTbHO.
XpaHnTe 3aprHnOe yCTpOCTBO NOaIbIe OT BObl, IN DToParNbaTecb Do Hero TOnBko CxykMny pKaMn.
PnOTcOeHHeHH 3apJHOro yctpoCTBa OT po3eTK NITAHN NEpeMeHHoro TOKA bepntec 3a cAmO 3apJHoe YcTPOCTBO; ECIN Bbl 0dyTe TReyTB HENOCPECTBEHHO 3a UHP NITAHN, Bbl MoKeTe NOpeBbIbEro.
XpaHnTe 3apHnOe yctpOCTBO cyxom MeCe, Tpe OHO bET 3auuueHO OT NOBpeKdHeNIA.
He TaHnTe 3a shyP nTaNHn, He CkpyuMaIte n He crM6aIte erO cnBHo.
He Hamatbai Te Huyp nItaHnHa np6Op.
- EcnB shHype nHTaHH 6dyT NOBpeXdHn,ero HHe3y 6yDet 3aMeHNTb OTdJIbHO. CBKNTecb c yONHOMOeHHbIM cepBNC-CEHTpOM.
P078-118_ES8163_62_61_EU
05.2.21
11:18
一104
B Tex Cnyaex, Korga npn
NcNoIb3ObaHnn Nn 3apAKe
6PnTbbl TeneBn3Op RnBHeTCN
NCTOHNKOM CTaNHEeKn NmEx,
NODKNIOHTe 3apAnhoe yCtpoiC-
TBO KpyroN PO3EKe.
He npkaacTecb K kpaio (MeaJInuueckar qacTb) BHTpeH Hero Hoxa. HecobJIOdHne DaHHoro Tpe6oBaHn MOKET npBcCTN K TpAmM pyk.
- PpOMbIaBte 6pntby NOKpaHOM. He MoIte 6pNTby B COJIeHIO INN KINPAHcHOBe BoJe. TaKKe 3anPeuaeTcNcNOb3ObaTb UcCTRnue CpeDCTBa, npEHa3hauHHeBd IINu NcTKn TYaNETOB, BaHH INN KYXOHHO O6OpDobAHn. He NorpykaJyO 6pNTby BOYd Ha DInTeNbHoe BpEMr.
-3anpeaaetcnpnpatbIIObble detanl6pntbpa36abentem, 6eHNOM nN CNPOTom. Ipontpantnx TKAhbo, CMOCHHNO BMbIbHOBDE
- Ha p3aipaaTe KOpNc 6pNTbI, NocKoJIbKy 3TO MOKeT HApUWITb ee BOHOHPOHNUaEAMOCTb.
He npmbbaine 6pntby BOdo, ecnn 6pntba NOdkJIOUeHa K shpyuNTAHn.
- PnO OHCTKe 6pNTBbI BOoO 6Ba BYHTpeHHHX HOXA DOJXHbI 6BtB pNkKpenHneB. (EcnOcUyCteBnTb TaKYIO OChCTky TOBko COnHM pNkpenHeHbIM HOXOM, NOBnTC HeO6bHbI Wym, N 3TO MOxET pNBeCTN K NOBpeXeHNHO pNTBbl.)
-ДеркпгпнбогВ HeIoCTyHOMДЯDETeMecTe.
XpaHNTe INCTpyKuIN B HAeXHOM MceTe.
DaHnOe yctPonTbO npEHa-3HaYeHO TOnbKO dIra IcNOpJb3oBAHNBA DOMaOHNX YcONBHX.
YctahOBJIeHHb npOn3BODHTenEM B nopJKe n.2.CT5ΦepeapbHOrO 3aKoHa PΦ O 3aunTe npab nopTe6HtenePcOK CnyKbI JnA daHOrO m3dJIINpaBeH 7 rOamC daTbI npOn3BOCTBa npu ycNobIM, yTO H3dJIeM INcNoJIb3yETCB CTporOM COOTBETCTBn C hactoruein HnCTpyKUnei NO 3KnJyataunnpmImHMbIM TExHueCKMm CTAnDpTaMM.

BZ02
CdeHaNoB AnoHm
3TOT pnp6op npedha3aHcHen TolbKO DnA DomawHero NcNoB3ObaHnA.
MauywnTa 3neKtpnBopKc, TtA.
YpOBeHb yMa: 67 (D5(B) npn 1 nBt)
Kullanmadan once
(ДИВ.MAN.6)
UO6 BucHyTN HIX DnI niDpIBHOBAnH, nepeCyHbTe NOB3YHOK Haropy.
BnCTaBte HIX nID npAMM KYtOM Do dIINHK Nkipn Ha ckpoH, 10 6bO6bIOeTbcra, Ta nepeMiuaTe HIX DOHN3y.
HnueHH6pntBn (DVB.Ma7)
PonepeJxehnH- 363anobirtn ypaexHH eKETpMHc mTpyMOM a6o TpaBMn, nepeBONORN MUIeHHN BIDcDHaHTe BiD 6pnTBN WHyP XINBHeHH.
Длгзунocti i 3 MeToIO DCORHHeHH MaKcMnAbHOrO eФкт npuNueHHi bPntBn, peKoMeHdYcMo BkOpNCTOByBAtn piKe MInO dIg pyi BoY.
Perynphe yueneHH CnpnE
ytpmByaHHo 6pnBn B HopmAbHOMy poOCHOMy CTahi, 3ano5irae
ytBOpEHNO 3anaxy i p03MHOKeHH 6aKTePi, aTAKX 3a6e3neYc
ONTMMANHy RkICb rONIHHR.
Hahecihtb Hebenky KInbKictb pIKORO mna dny pyk Ha 3OBHIuHc nIIBKOBE NOKPITRA He 3HimaOnu Horo 3 EpnTBN.
ДаakTbaui WbNdkicHoropexnMy DnWbNdkhoricBipaaHORO YmueHnHaTncHtTa npurmae KhoNKy BKn./BKn.6bn2cekynd.
ONoHAcHO 3nM Ha PK-dncnei (ES8163) 3'ABNTbCnBMON WbNdkIchoro YnueHHa, a60 3 DOBInbHOO qACTOIO MrrATmMyTb lamnoQKMOHITopa 3aprady (ES8162), nHnDKatop Hn3bkoro pIBH zapryd/INmKATOp CTahy 3aprKn (ES8161).
POMnTe BOOIO 3OBHIHc NIKBOBE NOKPITTA.
BpntBa aBOMaTuHOB BMKHeTbCnPbNmHo yepe3 20 cekyHd, a6o Bn MoXeTe camOCTiHO BMKHyTN II, HATNCyBUn HA KhoNkY “BKn./ BUNK.
3HIMtB 3OBHIwHe NIIIBKOBe
NOKPITr86PITBU, HATNCIHb I npnptpmaite KhoNKy «BKn./BKn.
6bnBw2 C6eYHaI DnA AKTNbBauii
WbNdkICHOPEXmMy BbpaJIiHoro
WuueHHa, Ta nPOMHTe NIIKBoBe
NOKPITr8 NiD CTpyMeHEM BOHy
Hacyxo BuPTB 6PITBy cyxHO
TKAHINHO Ta Bucywi8 6e3
3OBHIwHbORe NIIIBKOBOro NOKPITr8
YnCTHTN 6pNTby 3 BIKOPNC- TAHMH WbNdkICHO BIPauiHORO YnueHH peKomeHDoBaHO nCna NOBn HA PK-dicnnei CmBOy BOaHOro KpaHa (a) (ES8163).
UHENHHTKOHO
HaTnCHiB Ha KHONK BiIMNKAHH 3axnCHOI pAMKn 3 NIIIBKOHO Ta nIDHmIb pamky BROP, uo6 3HTn II (DHB. Man. 9). No Uepz33HITb BHyTIpiHNIe3a, MiUHO 3dABINBwn X3a 06nDbA KHIJI i NotARHyBUn HA ce6e. 3DInCHiB YmUeHHN 3OBHIuHbO rno IIOIBKOBOrO NOKPNTR, KopnyCA 6pntBnI HoXJr NIOPIBHOAHBn DOBroIO OITKOHO (DHB. Man. 10). BnOpNCTOByTe KOPOTKY OITKy dnn CHueHHN BHyTIpuHix Ne3, 3dINCHIOUpyx NtIOKO HnAPMkY, kNn NOKa3aHO Ha Man. 11 (A). He pyxaTe 5tIKy B HnAPMkY, kNn NOKa3aHO Ha Man. 11 (B), 0o MoKe npNBecTr Do nCyBaHHNe3 i 3HnKeHHN RKOCT roINHH. He BnOpNCTOByTe KOPOTKY OITKy DnRA YmUeHHN 3OBHIuHBO rNIBKOBOrO NOKPNTT B6pNTBeHO CTCTEMM.
3aHa KOMIOHeHTIB 6pntBeHOi rOJIbKn
3 MeToIO NiITpIMaHH ONTMMaHb HnX pOooyu XapAKTePncTik 6pNTN peKOMeHNDoBaHO 3MHO BAtN 3OBHIWe NIIKBOE NOkPnTTA He MeH, HIX pa3 Ha PIk, a BHyTPiUH Iesa - He MeH, HIX pa3 Ha 2 POK.
P078-118_ES8163_62_61_EU
05.2.21
11:18
116
3aMHa 3O8nHbHoro NIIIBKO-BORO NOKpTTA
(ДИВ.МАЛ.8)
CTNCHITb KONKU, IO p03MNAIOb 3aTbOP KpINNEHNOBHIuHBO rNNIBKOBO NOKPTTA BnPTBeHO CNTcEMn, 3HIMITb CNTcEmy. 3aKpinitb HObe NNIBKOBE NOKPTTA, HATNCHYUN HA HbORe, DOKHe NOVcTe KNauAHn.
3aMiHa BHyTpIwHix Ne3 (mB.Mn.9)
CTNCHTb KHONK, 10 p03MnKaIOTb 3aTBP KpINNEHRA 3OBHIuHbO rNIIKBOKOBORo NOKPTTA BpNTBHeOI CNTTEM, i 3HIMITb 3OBHIuHE nNIIKBOE NOKPTTA BpNTBeOH CNTTEM. 3HIMITb BHYTpIuHi Ie3a, MiHO 3dABuBmIX 3a O6nDa KIni i NotarHywn Ha ce6e. He TopKaItec MeTaneBoi NoepBXHi BHYTpIHix Ne3.
No Yep3i BCTaHOBIT HoBI BHyTpIuHi ne3a, YtpmYUOu iX 3a 06nDa kInui, I 3akpinitb ix y 6pntBti, HAITCKAQUH Na ne3a, DOKn He noHyTe KnaauHH.
3axo#n 3 oxopOHHaB-KoHnHbOro cepeOBuHa n ytniiaui MaTepiAniB
YKOMNNEKT 6pNTBn BXOINTb NITIOHNM akymyntop.
3a6e3neTe yTnIi3aIIO akymyIraTopa y ophiuiHOn npinHaueHOMy Micui, RaTO take icHy e B BauHkpaHl
BudaneHH B6yobaohoi aymyaTropho 6bapei nepeyytunniaic06pntbn (DVB.MAN.12)
3ACTEPEXEHHr He Hamaratec 3amHHn AkyMnATOPHy 6batae 3 MeTOO noaIbWo RIKOpNCtHaHH 6pTbn. Bn pnsKyyte BnKNIkATn Noxkxy a60 ypaXehH eNEKTPuHHMM CTpyMOM
Akymyntopha 6atapera, BCTaHOB- nehaBn Hpmbti, he nIINRAe 3amHni Cnoxnbayam. Odnak 3amHy 6atapei MoXHa 3diCHNTB oOphiHOMy cepbICHOMy eHTpi. KopcTytEceh HabeDeHMM NHeKv HcTpykUIMn dNn BuDaneHHA akymyntopHnx 6atapei 3 MeTOO xHboHaneXhoYtyniau. Ipeed BuDaneHHM akymyntopHnx 6atapei 6pmbTA MAc 6yTN BiKnIOHeHa Bid MEpexi XNBHeHHa. Ipeed BuDaneHHM 6atapei BiEdnHae Tbe 6pntbn shyp KMBneHHa.
2.BnBnHTtBnHT (a) HxKhboi Kpnwn.
3. 3HIMITb HNKHIO KpMUKy (b).
3.4CytbTeTbHy naHEnb (c) Ta 3HIMtB II.
5. P03φikcyu Te φikcaTop 6bataeHoro BiCicy (d).
6. BiDrBnHTiTb TOpTnPn BnHTa (e).
7.3HIMITb6aTapeuHHn Bicik B (f).
8.ПИДИМITbБаТAPEIO(g)Ta BnDANITb II.
3ano6ixhi 3axo
3a60pOHHcB 3dHOBATn 3apKky akymyToppo 6pTNbN iπ npMIM BnHOBm COHrHORO cBtna, 6iN dKepeNa TENHOBI eHepri, N bYMOBX nDhuehoI BONFOCT.
3apAnktaN akyMnIaTOp 6pNTBn [ES8163] [ES8162] [ES8161] onyckaTebCnHwe 3a donomoro 3apAnHoro aadntepa RE7-25,00 BxOanTb y KOMPJIeKT BiINOBiDHO6pNTBn.
-пелегд заряковбрту
NobhiCTO BnCyWHTb.
-Пд ус рбови abo 3ардк
6рптва та щадпгел docho
HarpiBaHTbC, Ondak ue He e
HecnpaBicHTO.
He donyckaite KOHTAKTy aanTepa 3 BDOIOI 6eipITcB 3a Hboro Niue cyxMn pykAM.
BnMaIOH3aPAnHn aAdTep 3 po3eKn nepeMInHO rOCTpyM, 6epiTbCn nIne 3a Hboro; He TARHb 3a Hyp XNBHeHH, TOMy ITO TAK NOro MOXHa NOWKoDHTN.
36epiraTe 3apAnHn aanTep ycxomyMi cié,DuBinbde 3axhuéHmBid NowKOdxEHN.
He po3TAYnTe, He cKpy-HyTe Ta He 3aarrnHae WHyp KJbNeHHnPi ND roCTPIM KYTOM.
He 60mOtuyTe uHyp KINBHeHH HABKONO 6pNTBn 3aHaTTo Tyro.
B pasi nowkoJxehnH HEmoXKnIbO 3amHtN nWe hHyK XNBENH.
Y ybmy BnnaKy 3BepaTneCb do ofoiuiHoro cepichoro ueTpry.
Bpa3i noBN iN qac po60tn a60 3apnKn ctaunHnx nepuokod TeneBi3iHOMy npHOMy BcTpOMiTb aanTpep y iHwy pos3kY.
He TopkaTecb KpaHn (MeTaneBoI qaCTnH) BHyTpIHbORe naea.
HeDToPImaHnHa ciE BIMOrn MoKe np3BecTn Do nopIsiB.
- PpomBaIte 6pTBy BOIOnpOoiHO BOIOHO. He BnKOpNCToByTe MNHepani3oBaHv KNINHEHY BOY.
He BnKopnctOBynte MNoChi 3aoc6n, np3Haeheni Dn8 o6p06Kn TyanetIB, BaHnIX Nk KyxOHnIX npnAaB. He 3aHypoIte 6pTbY b Yo h TpBaIin Yac.
He npotnpaIte KOMnoHEnTH 6pTbN pO3uHHNKOM, 6eH3HOM 4n CNPTOM. Ⅱn uIeHNr 6pTbN BUNKOpNC-TOByIte TKAHHY, 3MOUeHy B MInbHi BODi.
He po36bpaTne Kopnyc 6pntBn, 106 yHnKHyTN NOrO po3- repMeTn3auii.
3a6oPOnHaTbCa BONOE YnueHH 6pntBn, NkOo BOHa 3'EnHa3 3UHypOM XKIBNeHH.
- PnBONORomyuHHe 3HIMaTe BHyTpIuHIXNe3.(KkOo 3HATN ONGHe BHyTpIuHIXNe3, 3'ABNTbCRe HEOHPMaBbHmWyM,i 6PnTBA MoKe noUKoHTnC).
36epiraTe npncptiy HeDocxHOMy dNn diTe miCi.
36epiraTe ihctpyKuio y 6e3neHOMy Micui.
P078-118_ES8163_62_61_EU
05.2.21
11:18
118
LcBnBip6p30p6bnHn BnKIOUHO
dnnnoBbTOBO BnKOpCTAHnH.
BCTaHOBENH BnPO6HnKo TepMin
Cnyk6n (npdaTHOChTI) bOro
BnBOpyDopBIHOC7 POKAM 3 datn
BnROTOBNEHRA yMOBN,IO BnIP6
BnKOpCTOBYETCBy CYBOPi
BiNObiNDHO tdo DInCHOI INCTpyKuII
3 EKnIyataaII TaTexHIhIX
CTaHdaptBIOy.
20 BoTO BnPOy.
Daty BnroTOBneHHa3HaueHO Ha Bnpo6i.
AkyctnHnn ym:67 (a5(A) biin. 1pW)
Maucycita EneKtpk Bopkc,JTd. 1048,KaIOMa,Ocaka 571-8686, RaonHia
