Spacy Timeline Modell 1 - Watch Detomaso - Free user manual and instructions
Find the device manual for free Spacy Timeline Modell 1 Detomaso in PDF.

| Technical Specifications | Details |
|---|---|
| Watch Type | Analog Watch |
| Movement | Quartz Movement |
| Case Material | Stainless Steel |
| Case Diameter | 40 mm |
| Case Thickness | 10 mm |
| Glass Type | Mineral Glass |
| Water Resistance | 3 ATM (30 meters) |
| Strap Type | Genuine Leather |
| Strap Width | 20 mm |
| Additional Features | No additional features |
| Usage | Everyday watch, suitable for daily use |
| Maintenance | Battery replacement every 2-3 years |
| Safety | Avoid strong shocks and prolonged water exposure |
| General Information | 2-year warranty, after-sales service available |
Frequently Asked Questions - Spacy Timeline Modell 1 Detomaso
User questions about Spacy Timeline Modell 1 Detomaso
0 question about this device. Answer the ones you know or ask your own.
Ask a new question about this device
Download the instructions for your Watch in PDF format for free! Find your manual Spacy Timeline Modell 1 - Detomaso and take your electronic device back in hand. On this page are published all the documents necessary for the use of your device. Spacy Timeline Modell 1 by Detomaso.
USER MANUAL Spacy Timeline Modell 1 Detomaso
natural_image
Shield-shaped emblem with a central 'T' symbol (no text or numbers)DETOMASO
DIGITAL
BEDIENUNGSANLEITUNG
MANUAL
MANUEL D' UTILISATION
Inhaltsverzeichnis
Allgemein
Vorwort 4
natural_image
Technical line drawing of a mechanical component with directional arrows indicating movement (no text or symbols)Start Split Split release Stop Clear
("SPL" angezeigt)
Zwei Zeiten
Knopf D Knopf C Knopf D Knopf C Knopf C
Waterproof properties ......23
Instructions for care 24
Various Models
Spacy Timeline Model 1 25
Spacy Timeline Model 2....26
Spacy Timeline Model 3 ...... 27
Spacy Timeline Model 4 28
Digital/Analogue combination (DT1009) 29
Digital/Analogue combination 2....33
Atomic watch 36
Guarantee 37
EN
Foreword
Congratulations on the purchase of your new watch. You are now the owner of a high precision time keeper characterised by its innovative design.
We keep a long term stock of the most important spare parts for all our watches, guaranteeing repair over a period of many years.
In order to ensure that your new watch functions properly for many years, please read the following instructions carefully.
Shortening a metal link bracelet
Please have your metal bracelet shortened by a specialist. Improper adjustment of the bracelet may lead to your guarantee becoming void.
Bracelets with pins:
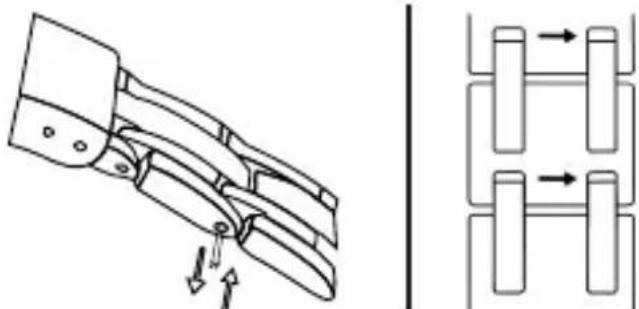
natural_image
Technical line drawing of a mechanical component with directional arrows indicating movement (no text or symbols)In order to shorten the bracelet, push out the pins on the side of the bracelet using a sharp object. Please observe the arrows engraved on the reverse of the metal bracelet or on the labels. After the bracelet has been shortened (links removed) simply push the pins back into place.
Bracelets with screws:
Use a suitable screwdriver to release the screws, shorten the bracelet (remove links) and then screw the bracelet back together.
Waterproof Properties
General Information on waterproof properties
Waterproofness is not a permanent characteristic; it should be tested annually and in particular before the watch is put under exceptional strain, as the seals deteriorate gradually in daily use.
| Specification Instructions | ||||||
| Case back Dial | Wash, Rain, Splash Shower Bath Swimming Skin-Diving | |||||
| WATER-RESISTANT | no yes no no no no | |||||
| WATER-RESISTANT 3 ATM | no yes no no no no | |||||
| WATER-RESISTANT 5 ATM | 50m yes no yes no no | |||||
| WATER-RESISTANT 10 ATM | 100m yes yes yes yes no | |||||
| WATER-RESISTANT 20 ATM | 200m yes yes yes yes yes | |||||
The seals are the important factor in guaranteeing the waterproofness of a watch. These age naturally and are also affected by perspiration and acids. The level of waterproofness is given in ATM (atmosphere) and noted on the case back of the watch.
Watches are considered water resistant if they are resistant against sweat, water droplets, rain etc. They have to remain watertight for a period of 30 minutes when submerged in 1 m of water. These watches are for normal everyday use and are not suitable for use in conditions where the water pressure and temperature vary considerably.
EN
An additional specification of pressure, such as “3 ATM”, means the test conditions have been tightened. The specification “3 ATM” is not to be confused with the diving depth; it is simply the definition of the inspection pressure. An inspection pressure of 3 ATM is reached at a depth of 30 meters.
In some cases a short-term higher pressure than the guaranteed inspection pressure may be enforced on the seals, for example when swimming or diving into water.
Watches are at particular risk when the wearer dives into water after sunbathing. The combination of the impact pressure with the negative pressure caused by the sudden drop in temperature can quite easily cause damage.
It is important to check and, if necessary, replace seals when the battery is replaced.
Instructions for care
Your watch is a high precision electronic and mechanical masterpiece and should serve you well for a long time.
Please note that your guarantee will be void in the event of improper use, unauthorised tampering and improper battery replacement and does not cover glass breakages.
In the event of a guarantee claim please submit your invoice and the guarantee card. Please keep your watch away from magnetic fi elds, heat, water and chemicals. Do not submit it to sudden impact or abrasion. Watches should not be worn in bed.
If a battery operated watch stops or the low battery indicator shows, it should be taken to a specialist as soon as possible to prevent the battery from causing damage in the watch or the environment. Batteries should be replaced by a specialist at regular intervals of approx. 1 – 1 12 years.
The seals can then be checked and, if necessary, replaced at the same time.
In the event of condensation forming underneath the glass (misting), the watch should be taken to a specialist as soon as possible to prevent the moisture from causing further damage. The crown should always be firmly pressed in or screwed tight during use. The leather watch strap is subject to normal wear and tear and, being a natural product, is particularly susceptible to moisture, perspiration, chemicals and abrasion.
It is not indefinitely durable and for reasons of hygiene should be replaced every 6-12 months, depending on how often it is worn. The retaining pins should be checked and, if necessary, replaced at the same time.
Spacy Timeline Model 1
C. EXAMPLES
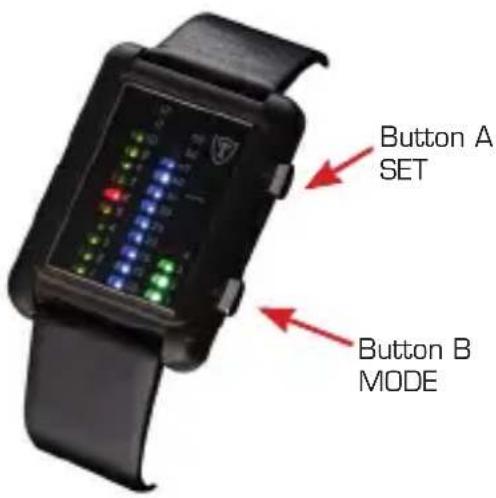
A. FUNCTION
- LED time display with hours, minutes, month and day
- 24-hour time display with two-colour LED
B. INSTRUCTIONS
Time and date display
- Press button A or B to activate the time display. Press button B to display month and day. Press button B again to return to the time display mode.
- The LED display switches off automatically if nothing has been entered for 5 seconds.
Setting the time and date
- Press and hold button A for 3 seconds while in the time display mode in order to enter the time/date setting mode. The hour LED fl ashes. Press button A again to enter the next setting.

flowchart
graph LR
    A["Hour"] --> B["Min"]
    B --> C["MonthDayReset"]
    C --> D["End"]
    D --> E["End"]
-
While the LED is flashing, press button B to adjust the settings.
-
In the setting mode as well as later on in the set display the hour leds are shown in red for am and in yellow/green for pm.
Time display Date display

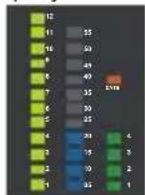
Yellow/green for am, red for pm. The LEDs for 5 and 10 o'clock are illuminated in a different colour for easy reading!
Model: G30723A, G30723B
Time display Date display
11:51 17:49
24. Dez
11. Aug
Yellow for am, blue for pm.
Model: G30723S, G30723R
EN
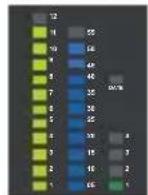
Spacy Timeline Model 2

A. FUNCTION
- LED time display with hours, minutes, month and day
- 24-hour time display with two-colour LED
B. INSTRUCTIONS
Time and date display
- Press button A or B to activate the time display. Press button B to display month and day. Press button B again to return to the time display mode
- The LED display switches off automatically if nothing has been entered for 5 seconds.
Setting the time and date
- Press and hold button A for 3 seconds while in the time display mode in order to enter the time/date setting mode. The hour LED fl ashes. Press button A again to enter the next setting.

flowchart
graph LR
    A["Hour"] --> B["Min"]
    B --> C["MonthDayReset"]
    C --> D["End"]
    D --> E["End"]
- While the LED is flashing, press button B to adjust the settings.
- In the setting mode as well as later on in the set display the hour leds are shown in red for am and in yellow/green for pm.
Examples
Time display Date display Time display Date display

6:34

16:47

8. Aug

31. Dez

6:34

16:47

8. Aug

31. Dez
Yellow/green for am, red for pm.
Yellow/green for am, blue for pm.
Modell: G-30730-BK, G-30730-S
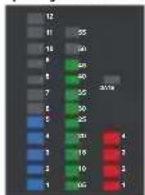
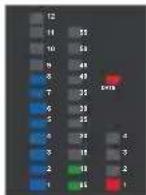
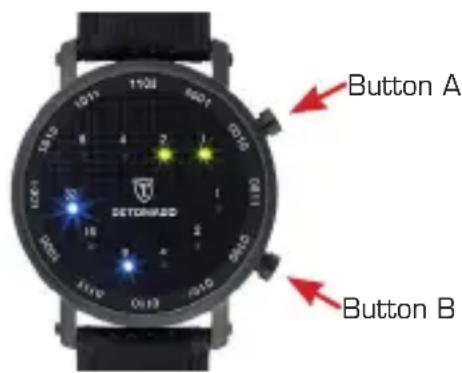
Spacy Timeline Model 3
A. Function
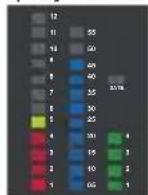
Binary LED time display with hours and minutes. Binary LED date display.
B. Display of time and date
Press button A or B to display the time. While time is displayed press button B to display the date. Press once more to display the time again. The last illuminated LED of the outer ring displays either the hour or the month. In order to figure out the minute or the date please add the digits of the inner ring. After 5 seconds without input the display will stop automatically.
C. Setting the time
Press button A for 3 seconds when you are in the time display setting. The LEDs for the hour will flash. Press button B to set the hour. Press button A to switch to the minute display and set with button B.
D. Setting the date
Press button A and B in sequence and then hold button A for 3 seconds. The LEDs for the month will flash. Press button B to set the month. Press button A to switch to the date display and set with button B.
Examples
Time display Date display

5:28

21:14

17.9.

31.3.
The hours are displayed in red for am and in yellow/green for pm.
EN
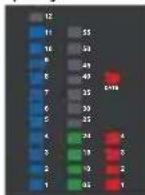
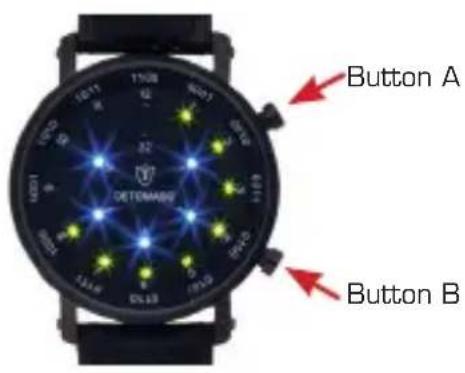
Spacy Timeline Model 4
A. Function
Binary LED time display with hours and minutes.
Binary LED date display.
B. Display of time and date
Press button A or B to display the time.
While time is displayed press button B to display the date.
Press once more to display the time again.
In order to figure out the hour, minute, month or date, please add the digits above the illuminated LEDs.
After 5 seconds without input the display will stop automatically.
C. Setting the time
Press button A for 3 seconds when you are in the time display setting. The LEDs for the hour will flash. Press button B to set the hour. Press button A to switch to the minute display and set with button B.
D. Setting the date
Press button A and B in sequence and then hold button A for 3 seconds. The LEDs for the month will flash. Press button B to set the month. Press button A to switch to the date display and set with button B.
Examples
Time display Date display


21:17

27.9.
31.3.11:43
The hours are displayed in red for am and in yellow/green for pm.
On the watch model DT2016 the hours light up in yellow in the mornings and in blue in the afternoons
Digital/Analogue combination (DT1009)
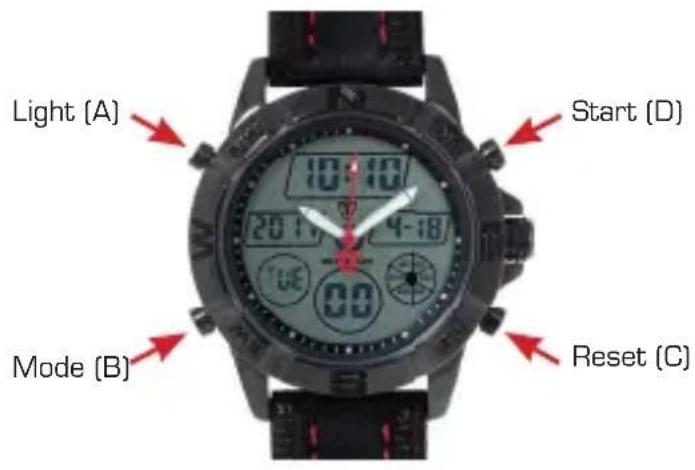
A. FEATURES
- 13 digit LCD display: hour, minute, second, month, day, week and year (2000 to 2099).
- 5 different alarms and hourly time signal
- Timer function.
- Snooze function
• Choice of 12 / 24 hour format
• Automatic calendar
• 1/100 second chronograph
• Display of 2 time zones - EL Backlight
EN
EN
B. OPERATION
- Press the B key to choose a mode. Press the A key (in any mode/display) to turn on the EL backlight for 3 seconds.
- Setting the digital time
In the time mode press and hold key C for 2 seconds until the seconds flash. Use key B to choose which feature you wish to set:
Hour -> Minute -> Year -> Month -> Day ->
- In each sequence use key D to make the required settings.
- Press key D to then return the seconds to O
- Press key C to return to time mode.
• 12/24 hour format:
In time mode use key D to change between a 12-hour and 24-hour display.
3. Setting the analogue time
Pull out the crown on the right – the seconds hand stops moving. Turn the crown clockwise to move the hour and minute hands. When the crown is pushed back in the seconds hand starts to move again.
4. Alarm Function
You may choose up to 5 independent alarm functions. Start with the settings for hour, minute, month and day. When the alarm function is active a signal sounds for 10 seconds as soon as the current alarm time is reached. You may also activate an hourly time signal. In this case the watch bleeps twice on every full hour.
The alarm number (AL1 to AL5) is shown in the alarm display. In alarm mode press key C to turn this display ON / OFF.
In alarm AL1 mode press key C to select the snooze (SNZ) alarm. Press key C to turn the snooze function ON / OFF and activate the display. When the snooze function is turned ON the signal is repeated 5 minutes later in the AL-1 function and then stops automatically after 1 minute.
Press key C to turn off the snooze function.
The following alarm types may be selected:
1 One-off alarm (set hour, minute, month, day):
Alarm signal sounds once at the preset date/time.
2 Daily alarm (set hour, minute):
Alarm signal sounds daily at the preset time.
3 One-month alarm (set hour, minute, month):
Alarm signal sounds daily at the preset time, but only in the preset month.
4 Monthly alarm (set hour, minute, day):
Alarm signal sounds every month at the preset day/time.
Setting the alarm:
In alarm mode press key D to select which alarm is to be set.
a. After the alarm has been selected press and hold key D until the hour display flashes.
b. Press key B to make the following displays flash and make the settings:
Hour -> Minute -> Month -> Day -... [back to Hour]
c. While a display is flashing use key D to change the setting. To activate an alarm without a month (eg. daily alarm) press key D while the month display is flashing until the "-" sign (between 12 and 1) appears. To activate an alarm without a day (eg. Daily alarm, one-month alarm) press kex D while the day display is flashing until the "-" sign (between 31 and 1) appears. Press key C to return to alarm mode.
Turn ON / OFF snooze and time signal:
a. In the alarm mode (AL1) press key C to turn snooze function ON/OFF.
b. In the "AL:00" mode press key C to turn the time signal [((((•)))] ON/OFF.
c. SNZ : shows that the snooze function is turned ON.
d. (((•))) shows that the hourly time signal is turned ON.
e. If any alarm type is activated this will be shown in the display when you change to a different mode.
- Timer Function
The countdown timer can be set for any period between 1 minute and 24 hours. When the count-down reaches 0 a signal sounds. The final signal sounds for approx. 10 seconds or until any other key is pressed to stop it.
Setting the countdown timer
a. In countdown mode press and hold key C until the hour display of the countdown timer flashes.
Press key A to change between automatic repeat ON (☐ is displayed) and OFF (☐ is not displayed).
EN
B. INSTRUCTIONS
b. Press key B to move the flashing displays in the following order and make the settings:
c. Press key D while a display is flashing to set it.
d. Press key C to return to countdown mode.
e. to set the start of the countdown time to 24.00 hrs set it at 0:00 00.
Timer operation
a. Press key D to start or stop the timer. Press key C to return to the initial start position when you are finished.
6. Chronograph
The display range of the Chronograph is 23 hours, 59 minutes, 59.99 seconds.
Elapsed time
D Key
D Key
D Key
D Key
C Key
Start Stop
Re-start
Stop
Clear
Spilt time
D Key
C Key
C Key
D Key
C Key
Start
Split
Split release
Stop
Clear
("SPL" displayed)
Two Finishes
D Key
C Key
D Key
C Key
C Key
Start
Split
Stop
Split release Clear
- Two time zones
a. Press and hold key C for 2 seconds to enter the 2-time zone mode. The hour display flashes. Press key B to select the following sequence:
b. Press key D to set the flashing displays.
c. Press key C to return to 2-time zone mode.
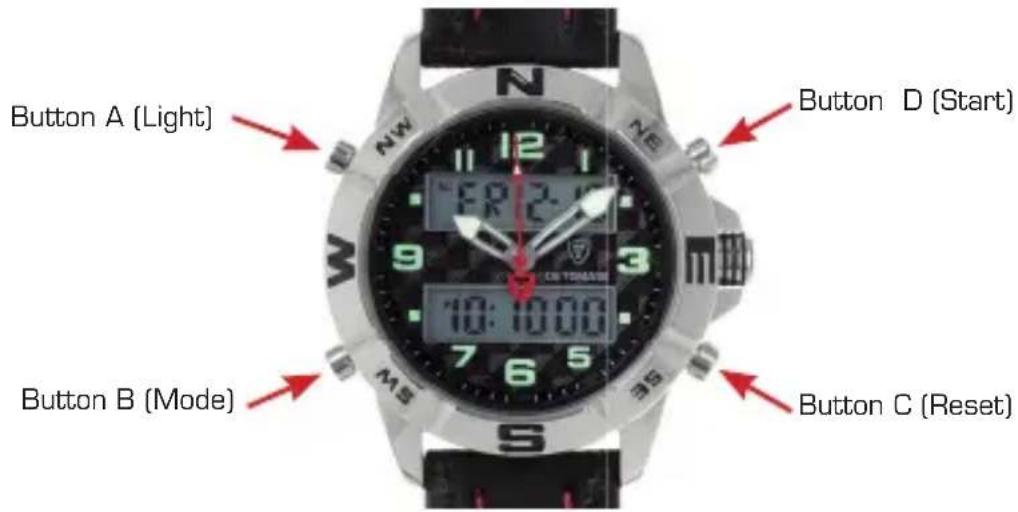
Digital/Analogue combination 2
EN
FEATURES
• 12 digit LCD display: hour, minute, second, month, day, and week
• Alarm with snooze and hourly time signal (chime)
• Choice of 12 / 24 hour format
• 1/100 second Chronograph
- EL Backlight
OPERATION
- Press the B key to choose a mode (as pictured above)
- Press the A key (in any mode/display) to turn on the EL backlight for 3 seconds.
- Setting the Time
EN
To set the Digital time, first press the B key to change the mode to stopwatch mode, alarm mode and then the change time mode (seconds indicator will be flashing).
Hour -> Minute -> Month -> Day -> Day of week -> Second ->
In each sequence use key D to make changes
SECONDS - When seconds are between 0-30, pressing D reduces back to zero. When seconds are in the 30-60 range, pressing D will increase the minutes by 1.
HOUR – H display is for 24 hour time, A & P are for AM/PM in 12 hour format
MINUTES - Press D to increase by 1
MONTH/DAY /DAY OF WEEK – Press D to increase by 1
When complete, press B to return to normal Time Mode.
To set the Analogue time pull out the crown on the right – the seconds hand stops moving. Turn the crown clockwise to move the hour and minute hands. When the crown is pushed back in the seconds hand starts to move again.
4. Chronograph
The display range of the Chronograph is 23 hours, 59 minutes, 59.99 seconds.
elapsed time (as per DT1009)
D Key D Key D Key D Key C Key
Start Stop Re-start Stop Clear
Spilt time
D Key C Key C Key D Key C Key
Start Split Split release Stop Clear
Press the B key to exit to normal time display.
5. Setting the Alarm
To change the setting of the Alarm or hourly chime, first press the B key to move from time display into the Alarm time mode. Then press C to select either hours or minutes (indicated by flashing), and press the D key to adjust the hours or minutes. When the alarm is set, press key C to confirm. By pressing the D key in Alarm mode, you turn the Alarm and/or Chime function on and off. ON is indicated by AL (Alarm) and CH (Chime) next to the date on the left. Press the B key to return to normal time mode.
When the Alarm sounds, press C or D keys to stop, and the B key to Snooze. The Snooze function will sound the alarm 5 minutes later and auto stop after 20 seconds.
EN
Atomic watch
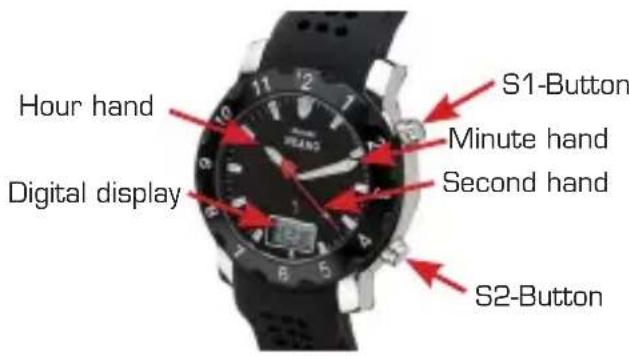
Features
- Analogue time display showing h, min, sec
• Digital time display showing h, min, sec - Fully automatic date display showing day, date, month
• Radio signal reception (DCF 77.5 KHz)
• Signal reception either manual or automatic
• 24 hour time display
Digital display
There are four main feature modes.
Use the S1 button to display the various modes in the following order:
Time — Date — seconds/weekday — time zone
Automatic reception
The signal status is checked automatically every day at 3.00 am local time. If the signal cannot be found, the automatic check is repeated at 4.00 am and then again at 5.00 am. If the signal still cannot be found, the next check is the next day at 3.00 am again. Placing the watch near a window may improve signal reception.
Manual reception
In any mode, press and hold the S1 button for 3 seconds to start the manual reception search. The RC tower symbol fl ashes while the search is running and the bar symbol shows the signal strength. If the search is successful, the tower symbol remains in the display. If the reception is too weak or cannot be found within 3 minutes, the tower symbol disappears.
Setting/adjusting the time
Press and hold the S2 button until the digital display fl ashes. Press the S1 button until the desired time zone (EU) appears. Press the S2 button to choose the time zone. To set the year, press the S2 button fi ve times. Use the S1 button to choose the year.
Press the S2 button again to show the month and date. Press the S1 button to change the month and date. Set your entry by pressing the S2 button. Press and hold the S1 button for at least 3 seconds to set the hands to the 12 o'clock position. The watch now searches for a signal and automatically sets the time zone.
IMPORTANT
Press and hold the S2 button for 7 seconds to return all three hands to the 12.00 position. Then use the S1 button to adjust the hands if necessary. Press S1 briefly to adjust slowly and press and hold to adjust quickly. Press the button again to stop the quick correction. Press the S2 button again to exit the correction and start the signal search. Once the signal has been found, the analogue hands move to the same position as the digital time and the two movements run synchronously. Place the watch near a window to improve signal reception.
GUARANTEE
We (see address on reverse of these instructions) guarantee that your watch is made with top quality materials. Extensive quality controls ensure that the watch is checked before it leaves our premises. Material defects cannot, however, be completely ruled out.
We issue a guarantee for a period of 24 months from date of purchase on all material and manufacturing faults. This guarantee is valid worldwide and any warranty claims prescribed by law shall remain unaffected by this guarantee. The guarantee covers the function of the clockwork and the proper workmanship of the watch.
The following are not covered by the guarantee: batteries, wear and tear of the casing, glass or wristband and damage due to improper use (accident, glass breakage, water damage, crown pulled right out).
Manufacturing faults will be rectified free of charge within the guarantee period. If the watch is irreparable we will replace it with a comparable model.
Liability for collateral or subsequent damage is excluded.
To make a guarantee claim please send the watch to the address stated on the reverse of these instructions, together with your name and address and a copy of the sales receipt.
Table des matières
Généralités
Avant-propos 40
natural_image
Technical line drawing of a mechanical component with directional arrows indicating movement (no text or symbols)A. FONCTION
A. FONCTION
natural_image
Close-up of a black wristwatch with illuminated blue and green lights, no visible text or symbols on the watch face.A. Fonction
A. FONCTIONNALITÉS
According to European guidelines [1], used electrical and electronic goods and batteries are not to be disposed of with unsorted community refuse, but must be collected separately.
The symbol displaying a dustbin on wheels advises of the necessity for separate collection. You can contribute to environment protection by ensuring that this item and batteries are disposed of correctly. The symbol displaying a dustbin on wheels advises of the necessity for separate collection. You can contribute to environment protection by ensuring that this item and batteries disposed of correctly. The public waste management organisations have special collection points for this purpose where you can dispose of old appliances from private households free of charge. Please check your refuse collection calendar or contact your local authorities for information on when and where old appliances can be collected or returned.
[1] GUIDELINE 2002/96/EG OF THE EUROPEAN PARLIAMENT AND COUNCIL on used electrical and electronic equipment.
GUIDELINE 2006/66/EG OF THE EUROPEAN PARLIAMENT AND COUNCIL from the 6th September about batteries and accumulators plus old-batteries and old-accumulators.
natural_image
Shield-shaped emblem with a central 'T' symbol (no text or numbers)DETOMASO
Service Center
Temporex GmbH Wilhelm-Beckmann-Str. 19 D-45307 Essen Germany service@temporex.de


www.facebook.com/DetomasoWatches