AllInOne B2200 - Bread maker BLACK & DECKER - Free user manual and instructions
Find the device manual for free AllInOne B2200 BLACK & DECKER in PDF.

| Brand | Black & Decker |
| Model | AllInOne B2200 |
| Product Type | Bread Maker |
| Power | 600 W |
| Voltage | 120 V |
| Frequency | 60 Hz |
| Bread Capacity | 1.5 lb (0.68 kg) or 2 lb (0.9 kg) |
| Number of Programs | 10 (Basic, Rapid Bake I/II, Sandwich, Whole Grain, Sweet, Quick Bread, Dough, French, Jam) |
| Crust Setting | Light, Medium, Dark |
| Delay Timer | Up to 13 hours |
| Keep Warm Function | Up to 1 hour after baking |
| Ingredient Add Alert | Yes, approximately 30 minutes after start |
| Display | LCD Digital Screen |
| Non-stick Coating | Non-stick bread pan |
| Included Parts | Bread pan (B2200-01), kneading blade (B2200-02), measuring cup (B2200-03), measuring spoon (B2200-04) |
| Care and Cleaning | Pan and blade dishwasher safe; wipe exterior with damp cloth |
| Safety | Polarized plug, non-loosening screw, automatic shut-off if problem |
| Warranty | 1 year limited (United States and Canada) |
Frequently Asked Questions - AllInOne B2200 BLACK & DECKER
User questions about AllInOne B2200 BLACK & DECKER
0 question about this device. Answer the ones you know or ask your own.
Ask a new question about this device
Download the instructions for your Bread maker in PDF format for free! Find your manual AllInOne B2200 - BLACK & DECKER and take your electronic device back in hand. On this page are published all the documents necessary for the use of your device. AllInOne B2200 by BLACK & DECKER.
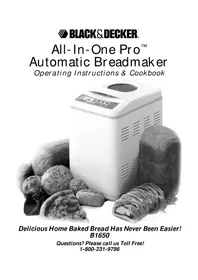
USER MANUAL AllInOne B2200 BLACK & DECKER
PLEASE READ AND SAVE THIS USE AND CARE BOOK.
VEUILLEZ LIRE ET CONSERVER CE GUIDE D'ENTRETIEN ET D'UTILISATION.

BLACK&DECKER
All-In-One Pro
All-In-One®
Automatic Breadmakers
Robots boulangers

USA/Canada 1-800-231-9786 Mexico 01-800-714-2503
www.blackanddecker.com
Accessories/Parts (USA/Canada)
Accessories/Partes (EE,UU/Canada)
Accessories/Plieces (E-U,Canada)
1-800-738-0245
Models Modèles
□B2200
□B2250
TABLE OF CONTENTS
IMPORTANT SAFEGUARDS 2
GETTING FAMILIAR WITH YOUR UNIT 4
Part Names 4
Control Panel 5
Program Settings 7
HELPFUL HINTS FOR USING
YOUR BREADMAKER 8
GETTING STARTED 9
1 Remove Baking Pan 9
2 Attach Kneading Blade 10
READY TO BAKE 10
Adding Ingredients into Bread Pan 10
1 Insert Bread Pan 11
2 Select Settings 11
3 Start Kneading/Baking Cycle 12
SPECIAL FUNCTIONS 12
KeepWarmFunction 12
Delay-Bake Timer 12
RECIPES 14
CLEANING 30
STORING 30
IMPORTANT SAFEGUARDS
When using electrical appliances, basic safety precautions should always be followed, including the following
Read all instructions.
Do not touch hot surfaces. Use handles or oven mitts.
To protect against a risk of electric shock, do not immerse cord, plug, or other parts of this breadmaker in water or other liquid, except the mixing paddle, which may be immersed when removed from the bread pan for cleaning.
- Close supervision is necessary when any appliance is used by or near children.
Unplug from outlet when not in use and before cleaning. Allow to cool before cleaning, putting on, or taking off parts.
- Do not operate any appliance with a damaged cord or plug or after the appliance malfunctions or has been dropped or damaged in any manner. If the product requires attention within the warranty period, call the toll free number on the cover of this manual for information on examination, repair, or adjustment.
The use of accessory attachments not recommended by the appliance manufacturer may cause injuries.
Do not use outdoors.
- Do not let cord hang over the edge of table or counter, or touch hot surfaces.
Do not place on or near a hot gas or electric burner, a heated oven,
Extreme caution must be used when moving an appliance containing hot contents or liquids.
To disconnect, turn any control to "off," then remove plug from the wall outlet.
Do not use appliance for other than intended use.
- Avoid contact with moving parts.
SAVE THESE INSTRUCTIONS.
POLARIZED PLUG (120V Models Only)
This appliance has a polarized plug (one blade is wider than the other). To reduce the risk of electric shock, this plug is intended to fit into a polarized outlet only one way. If the plug does not fit fully into the outlet, reverse the plug. If it still does not fit, contact a qualified electrician. Do not attempt to modify the plug in any way.
TAMPER-RESISTANT SCREW
Warning: This appliance is equipped with a tamper-resistant screw to prevent removal of the outer cover. To reduce the risk of fire or electric shock, do not attempt to remove the outer cover. There are no user-serviceable parts inside. Repair should be done only by authorized service personnel.
GETTING FAMILIAR WITH YOUR UNIT
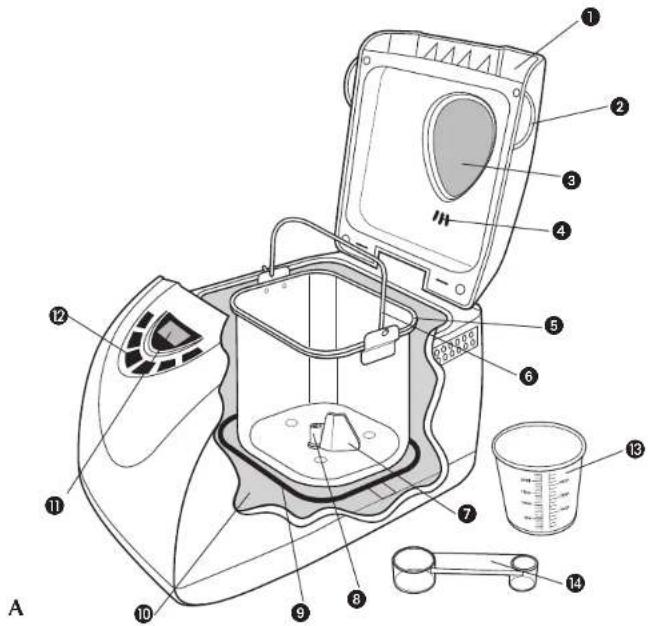
Part Names
-
Lid
-
Lid handle (one on each side)
- Viewing window
- Steam vent
† 5 . Nonstick, bread pan (Model B2200 Part # B2200-01 / Model B2250 (B2250-01)
6. Wire handle
+7.Kncadingblade(Part#B2200-02)
- Rotating shaft
-
Heating element
-
Oven chamber
- LCD digital display
- Control panel
- Measuring cup (Part # B2200-03)
- Measuring scoop (Part #B2200-04)
† Consumer replaceable/removable parts
Control Panel
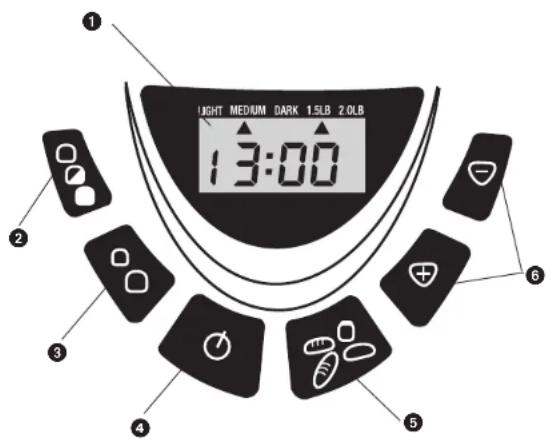
B
Note: Actual button position may vary according to model.
1. LCD Digital Display

Shows the following:
Number for each program setting selection (1-10) with preprogrammed baking time
- Crust color (Light, Medium or Dark)
- Loaf size (1.5 LB or 2.0 LB)
- Minute-by-minute countdown of remaining time for selected program
2. Crust Color Button

Lets you choose your preferred crust color: Light, Medium or Dark.
3. Loaf Size Button

Press to select the loaf size (1.5 LB or 2.0 LB).
4. Start/Stop (I/O) Button

Press to begin the cycle and to display the total time for the selected bread to be completed. To cancel the cycle, press and hold for about 3 seconds until you hear a beep. The unit beeps to indicate that it has stopped.
Important: Do not press Stop (0) when checking the progress of the bread; it will cancel the program. Once a cycle is canceled, you will have to start over again.
5. Menu Button

Press this button to select the baking cycle you want. A beep sounds each time you press the button.
6. Timer Buttons

Press these buttons to set the time for delay bake (up to 13-hour delay). For example, you can time your bread to be ready for dinner or when you wake up in the morning. Set it by selecting how much time you want to pass before the bread is completed. For example, if it is 8:00 p.m. and you want the bread to be ready at 7:00 a.m., set it for 11 hours.
You can also use these buttons to adjust the time of the cycle. They adjust up or down in 10-minute increments. Changes must be made before the unit begins operation.
Program Settings
The following program settings will make it easy for you to make a great variety of breads and fruit preserves. For each selected setting, the baking time has been preprogrammed. The recipes provided on pages 14-21 (Model B2200), 22-29 (Model B2250) will help you determine which program setting you should use.
| Program Menu # Baking Time Description Setting Displayed Displayed 1.5LB 2.0LB | |
| Basic 1 2:53 3:00 You can use this setting for most recipes that use white flour. | |
| Rapid-Bake I 2 0:58 N/A Quickly bakes 1.5-lb size loaves of white bread. | |
| Rapid-Bake II 3 N/A 0:58 Quickly bakes 2.0-lb size loaves of white breads. | |
| Sandwich | 4 2:55 3:00 Bakes bread for sandwiches with thinner crust and lighter texture. |
| Whole Grain | 5 3:32 3:40 Bakes bread that contains a large amount of wheat flour. This setting has a longer rise cycle. |
| Sweet | 6 2:50 2:55 Bakes bread that contains sugar and eggs. |
| Quick Bread | 7 1:40 1:40 Bakes bread that contains baking powder instead of yeast. |
| Dough | 8 1:30 1:40 Prepares dough that can be shaped to make coffee cakes, rolls, pizza and other breads baked in a conventional oven. |
| French | 9 3:40 3:50 Bakes bread with thin crust and light texture. |
| Preserves | 10 1:20 1:20 This setting is to make jams from fresh fruit. |
How to Use
This unit is for household use only.
- Follow the directions: The liquid is always the first ingredient. Dry ingredients follow and the yeast is added last. Make a small well in the center of the flour and place the yeast there. This is especially important when using the delay-bake function to avoid activating the yeast too soon.
- Measure carefully: Use the appropriate measuring tools and measure carefully. The measuring scoop included should be used for dry measurement only. Spoon dry ingredients into the measuring scoop and level off with the straight edge of a metal spatula or the back of a knife. Measure liquids in a glass or plastic measuring cup designed for liquids. Use measuring spoons for liquid and dry ingredients. Level off with a metal spatula or the back of a knife.
- Keep it fresh: Use fresh ingredients at room temperature. In Canada, use All-Purpose Flour or Bread Flour; in the USA, use Bread Flour. Use yeast that has an expiration date of at least 6 months in the future. Avoid using perishable ingredients (such as milk, eggs and cheese) when using the delay-bake function.
- Perfect dough: In very humid weather, bread may require a little more flour. Check the bread toward the end of the first rise. If it seems sticky, add 1 or 2 tablespoons of flour to the second kneading cycle until the dough forms a smooth ball. If the bread seems very dry or knocks in the kneading cycle, sprinkle room temperature water into the bowl, 1 teaspoon at a time, until dough forms a smooth ball.
- Look but don't open: The glass in the cover is there to monitor the process. Do not open the lid during the baking process. In the initial mixing you may open the cover to use a rubber spatula to blend in any ingredients that have stuck to the sides of the bread pan or to open the cover to add ingredients at the "add ingredient" beep.
- Patience: Wait at least 20 minutes before slicing freshly baked bread; it will still be deliciously warm but easier to slice. If you like a crisp crust, remove the bread as soon as the baking cycle is complete. To make another loaf of bread, let the unit cool completely.
- Save it for another day: To freeze freshly baked bread, cool completely on a wire rack. Wrap securely in plastic wrap and then foil using a drugstore close. To serve, remove from foil and defrost in microwave. For that freshly baked flavor, reheat in the oven.
-
Adding ingredients: All functions except Rapid Bake I and II, allow for the addition of ingredients, such as dried fruits and nuts; the beep sounds just before kneading is complete. This happens about 30 minutes into the program.
-
Avoid delay: The delay-bake function cannot be used for Rapid Bake I and II or the Dough setting. It is not recommended for Whole Grain, Quick Bread or Preserves.
- Test the water: For most breads, use water that is 80^ to 90^ F (26,6^ to 32,2^) ; for Rapid Bake breads, use water at 110^ F to 120^ F (43,3^ to 48,8^) .
11. Some note-worthy solutions:
If bread is:
too brown - select a lighter crust.
- too light - select a darker crust and do not open the unit during the baking cycle.
too coarse - make sure you add salt.
too heavy - use less flour (1 tsp. at a time).
too low - use less flour or more yeast or water that is not too hot, or check the date on your yeast.
too high - try less yeast (1/4 tsp, at a time).
- collapses in the center - dough is too wet or flour is not strong enough, or amount is too great for the unit.
GETTING STARTED
- Unpack your unit and remove packing materials.
- Peel off clear protective film from control panel.
- Wash all parts as instructed in Care and Cleaning.
- Select a location for the unit. Make sure you have enough space above the unit to open the lid.
1 Remove Baking Pan
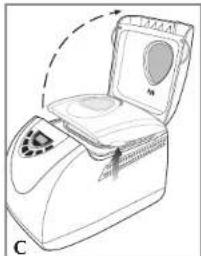
- Using the lid handle, lift and open the lid (C).
- Grasp the sides of the bread pan and turn left (No unlock, then pull straight up on the handle to remove the bread pan (D).
Tip: You can look at the back side of the oven chamber for direction.
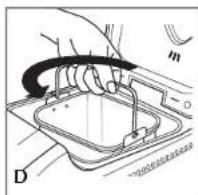
2 Attach Kneading Blade
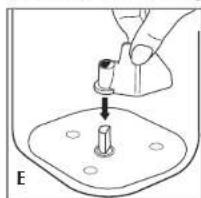
- Align the flat side of the hole in the kneading blade with the flat side of shaft (E).
Gently push blade onto the shaft until securely in place.
READY TO BAKE
Note: You can select one of the recipes and specific instructions provided on pages14-21 (model B2200), 22-29 (model B2250).
Adding Ingredients into Bread Pan
- To measure liquids, use a see-through measuring cup and check measurement at eye level.

- When measuring dry ingredients, use standard dry measuring cups or measuring spoons and level off with the straight-edge of a knife or metal spatula.

- Add ingredients at room temperature.
- Add ingredients in order listed: liquid - then dry - then yeast (always last).
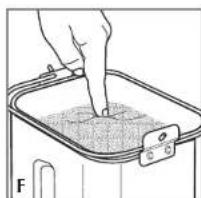
- Make small indentation with your finger in the top of the dry ingredients and add the yeast to the indentation (F). Do not let the yeast touch the liquid below.
1 Insert Bread Pan
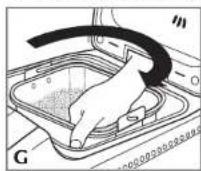
- Place the bread pan into the unit in a diagonal left position as shown (G).
- Turn the bread pan to the right (▶until it is securely in place. Bring down the handle.
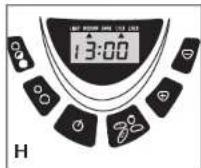
- Close the lid and plug the unit into an electrical outlet. The unit beeps and the program setting 1 (Basic) displays as the default setting (H).
2 Select Settings

=CrustColorbutton

=Loaf Size button

= Start/Stop (I/O) button

= Menu button

= Timer button

= Timer button
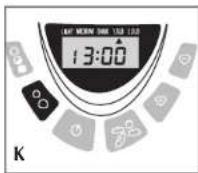
- Press the button to select the desired loaf size (1.5 lb or 2.0 lb) (K).
3 Start Kneading/Baking Cycle
- Press the button. The glass window lets you watch the process of the bread as it is mixed, kneaded and baked. If additional ingredients are in the recipe, listen for the beep near the end of the kneading cycle (about 30 minutes into the program).
- When the baking cycle is complete, you hear a beep. Press the button.
- Open the lid and using oven mitts, turn the bread pan left ( ) and gently pull the pan straight up and out to remove.
Caution: The bottom of the bread pan is very hot. To avoid burning counter surfaces, make sure to place it on a rack or on its side.
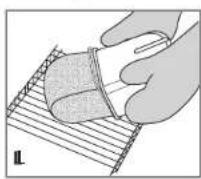
- Invert the bread pan over a wire rack and shake to remove bread. If necessary, use a nonstick spatula, gently inserted along the sides of the pan to loosen the bread (L).
Important: Metal utensils might scratch the nonstick surface.
1
- Turn bread right side up and let it cool for about 20 minutes before slicing.
Important: The breadmaker will not operate again until it has cooled down.
SPECIAL FUNCTIONS
Keep Warm Function
The keep warm function automatically begins when the baking cycle is completed--for up to one hour. Remove the bread and press button. The crust softens if you let it stand in the unit.
Delay-Bake Timer
You can set the timer to delay the completion of your bread for up to 13 hours. To Set the Timer
- Add your recipe ingredients to the bread pan.
- Select your settings.
-
Set the amount of time in which you want your bread to be ready. For example, if you set the timer at 8:00 p.m. in the evening and you want to wake up to fresh bread at 6:00 a.m., that is 10 hours.
-
Select the appropriate program setting according to recipe instructions.
Note: If you make a mistake in your selection, you have to go through the remaining program settings then start over to select the correct setting.
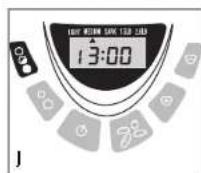
Press the button to select desired crust (Light, Medium or Dark). The arrow on the screen moves to each selection every time you press the key (J).

Use the button to advance the time in 10-minute increments until the display shows 10:00. This means that your bread will be completed in 10 hours (6:00a.m.).
If necessary, use the button to decrease the time.
Tip: To advance the time quickly, press and hold down the buttons
RECIPES
MODEL B2200
BASIC
RAPID I Orange Poppy Seed Breakfast Bread
RAPID II Herbed French Bread
SANDWICH.. Cracked Wheat Sandwich
WHOLE GRAIN Whole Wheat Currant Bread
SWEET Cheesy Cheese Bread
QUICK BREAD .Craisin Nut Bread
DOUGH Dinner Rolls
FRENCH . Sundried Tomato Parmesan Bread
PRESERVES . Strawberry Kiwi Preserves
Program Setting: 1 (Basic)
CHILI CORN BREAD
1 cup water (80 to 90^ )
1 cup well drained whole kernel corn
2 tbsp. butter or margarine, cut into pieces
2 tbsp. well drained canned green chilies
2 tbsp. instant minced onion
2 tbsp. sugar
1%tsp.salt
1 tsp. chili powder
1/2 cup corn flour
4 cups bread flour
1%tsp. active dry or bread machine yeast
1. Measure ingredients into bread pan in the order listed.
2. Insert bread pan securely into unit; close lid. Plug unit into wall outlet.
3. Select Basic setting and appropriate loaf size (2 lb.) and color.
4. Press Start button.
5. The Complete Signal will sound when bread is done.
6. Using pot holders, remove bread pan from the unit and carefully remove bread from pan. (Kneading blade may remain in bread. Remove blade when bread has cooled.)
7. Allow bread to cool on wire rack until ready to serve (at least 20 minutes).
Program Setting: 2 (Rapid Bake I)
ORANGE POPPY SEED BREAKFAST BREAD
1 cup water (110 to 120^ )
1/4 cup fresh orange juice
2 tbsp. dry milk powder
2 tbsp. butter or margarine, cut into pieces
2 tbsp. sugar
2 tbsp. poppy seeds
1 tbsp. grated orange peel
3/4 tsp. salt
3 cups bread flour
4 tsp. active dry or bread machine yeast
- Measure ingredients into bread pan in the order listed.
- Insert bread pan securely into unit; close lid. Plug unit into wall outlet.
- Select Rapid Bake I setting, appropriate loaf size (1 1/2 lb.) will appear and select desired color.
- Press Start button.
- The Complete Signal will sound when bread is done.
- Using pot holders, remove bread pan from the unit and carefully remove bread from pan. (Knceding blade may remain in bread. Remove blade when bread has cooled.)
- Allow bread to cool on wire rack until ready to serve (at least 20 minutes).
Program Setting: 3 (Rapid Bake II)
HERBED FRENCH BREAD
2 cups water (110 to 120^ )
2 tbsp. instant minced onion
2 tbsp. chopped fresh parsley
1/2 tbsp. finely chopped garlic
1/2 tbsp. sugar
1/2tsp.salt
512 cups bread flour
2 tsp. active dry or bread machine yeast
- Measure ingredients into bread pan in the order listed.
- Insert bread pan securely into unit; close lid. Plug unit into wall outlet.
- Select Rapid Bake II setting and appropriate loaf size (2 lb) will appear and select color.
- Press Start button.
- The Complete Signal will sound when bread is done.
- Using pot holders, remove baking pan from the unit and carefully remove bread from baking pan. (Mixing paddle may remain in bread. Remove paddle when bread has cooled.)
- Allow bread to cool on wire rack until ready to serve at least 20 minutes.
Program Setting: 4 (Sandwich)
CRACKED WHEAT SANDWICH BREAD
2 cups water (80 to 90^ .)
3 tbsp. dry milk powder
3 tbsp. butter or margarine, cut into pieces
3 tbsp. honey
2 tsp. salt
112 cups whole wheat flour
212 cups bread flour
1 cup cracked wheat (bulgar)
4 tsp. active dry or bread machine yeast
1. Measure ingredients into bread pan in the order listed.
2. Insert bread pan securely into unit; close lid. Plug unit into wall outlet.
3. Select Sandwich setting and appropriate loaf size (2 lb.) and color.
4. Press Start button
5. The Complete Signal will sound when bread is done.
6. Using pot holders, remove bread pan from the unit and carefully remove bread from pan. (Kneading blade may remain in bread. Remove blade when bread has cooled.)
7. Allow bread to cool on wire rack until ready to serve (at least 20 minutes).
Program Setting: 5 (Whole Grain)
WHOLE WHEAT CURRANT BREAD
114 cups water (80 to 90^. )
2% tbsp. unsalted butter or margarine, cut into pieces
2 tbsp. honey
2 tsp. graled orange peel
1% tsp. salt
1/3cups whole what flour
212 cups bread flour
3 tsp. active dry or bread machine rise yeast
2 tsp. vital wheat gluten (optional)
1. Measure ingredients into bread pan in the order listed.
2. Insert bread pan securely into unit; close lid. Plug unit into wall outlet
3. Select Whole Grain setting and appropriate loaf size (2 lb.) and color.
- Press Start button.
- The Complete Signal will sound when bread is done.
- Using pot holders, remove bread pan from the unit and carefully remove bread from bread pan. (Knearing blade may remain in bread. Remove blade when bread has cooled.)
- Allow bread to cool on wire rack until ready to serve (at least 20 minutes).
Program Setting: 6 (Sweet)
CHEESY CHEESE BREAD
3/4 cup water (80 to 90^ )
1/2 cup cottage cheese
1/2 cup shredded Swiss cheese
1/4 cup grated Parmesan cheese
1 tbsp. butter or margarine, cut into pieces
2 tbsp. sugar
1%tsp.salt
1 tbsp. instant minced onion
1 tbsp. chopped parsley
3% cup bread flour
2 tsp. active dry or bread machine yeast
- Measure ingredients into bread pan in the order listed.
- Insert bread pan securely into unit; close lid. Plug unit into wall outlet.
- Select Sweet setting and appropriate loaf size (1 1/2 lb.) and color.
- Press Start button.
- The Complete Signal will sound when bread is done.
- Using pot holders, remove bread pan from the unit and carefully remove bread from pan. (Kneading blade may remain in bread. Remove blade when bread has cooled.)
- Allow bread to cool on wire rack until ready to serve (at least 20 minutes).
Program Setting: 7 (Quick Bread)
CRAISIN PECAN BREAD
2 cups all-purpose flour
1 cup sugar
1/4 cup softened butter or margarine
1 tsp. baking powder
1/2 tsp. baking soda
2 tsp. grated orange peel
1/2 tsp. salt
1 cup buttermilk
2 large eggs, at room temperature
1 tsp. vanilla extract
1 cup dried cranberries
1/2 cup chopped pecans
1. In large mixing bowl, combine ingredients in order listed.
2. Spoon batter evenly into bread pan.
3. Insert bread pan securely into unit; close lid. Plug unit into wall outlet.
4. Select the Quick Bread setting.
5. Press Start button.
6. The Complete Signal will sound when the bread is done.
7. Using pot holders, remove bread pan from the unit and place on wire rack. Allow bread to cool in pan for 5 minutes. Carefully turn bread out of bread pan and turn right side up. (Kneading blade may remain in bread. Remove blade when bread has cooled.)
8. Allow bread to cool on wire rack until ready to serve (at least 20 minutes).
Program Setting: 8 (Dough)
DINNER ROLLSS
1/4 milk (80 to 90^ .)
1/4 cup water (80 to 90^ F.)
1 large egg at room temperature
1/4 cup sugar
2 tbsp. butter or margarine, cut into small pieces
1/2 tsp. salt
2 1/2 cups bread flour
2 1/4 tsp. active dry or bread machine yeast
- Measure ingredients into bread pan in the order listed.
- Insert bread pan securely into unit; close lid. Plug unit into wall outlet.
- Select Dough setting.
- Press Start button.
- The Complete Signal will sound when bread is done.
- Using pot holders, remove bread pan from the unit and place dough on lightly floured surface.
-
Invert large mixing bowl over dough and let rest for 10 minutes.
-
Shape into your favorite dinner rolls shapes such as braids, Parker House or clover leaf.
-
Cover and let rise until doubled in size (about 30 minutes).
-
Bake at 375^ for 12 minutes or until golden brown.
Note: If desired, brush with melted butter or beaten egg and sprinkle with sesame, poppy or fennel seeds.
Variation - Cinnamon Rolls:
- Roll out dough on lightly floured surface to 9 × 14 -inch rectangle.
- Brush with about 2 tbsp. melted butter. Sprinkle with a mixture of 3 tbsp. sugar and 3 tsp. ground cinnamon. Top with 1/4 cup raisins.
- Roll up jelly-roll style, starting at long end.
- Cut into 1-inch slices and arrange in greased 9 × 12 -inch baking pan.
- Cover and let rise in warm place until doubled in size (about 45 minutes).
- Bake at 177^ (350^) for 30 minutes or until golden.
- Remove from oven and cool on wire rack.
Program Setting: 9 (French)
SUNDRIED TOMATO PARMESAN BREAD
1½ cups water (80 to 90°F.)
1/4 cup olive oil
1/1 tsp. salt
1/2 tsp. garlic pepper
2/3 cup grated Parmesan cheese
3% cups bread flour
2%tsp. active dry or bread machine yeast
1/3 cup chopped sundried tomatoes
3 tbsp. chopped Italian parsley
1. Measure ingredients into bread pan in the order listed.
2. Insert bread pan securely into unit; close lid. Plug unit into wall outlet.
3. Select French setting, appropriate loaf size (2 lb.) and desired color.
4. Press Start button.
5. The Complete Signal will sound when bread is done.
6. Using pot holders, remove bread pan from the unit and carefully remove bread from pan. (Kneading blade may remain in bread. Remove blade when bread has cooled.)
7. Allow bread to cool on wire rack until ready to serve (at least 20 minutes).
Program Setting: 10 (Preserves)
STRAWBERRY KIWI PRESERVES
2 cups coarsely chopped strawberries
1 cup coarsely chopped golden or green kiwi
3/4 cup sugar
1 tbsp. fresh lemon juice
1 pkg. (1.75 oz.) powdered pectin
- Measure ingredients in order listed into bread pan.
- Insert bread pan securely into unit. Close lid. Plug unit into wall outlet
- Select Preserve setting and press the Start button.
- The Complete Signal will sound when the preserves are done.
- Using pot holders, remove bread pan from the unit and cool on wire rack. Carefully pour jam into clean jars.
- Place in refrigerator to set.
- Store in refrigerator for up to 3 weeks.
Makes about 3 cups
RECIPES
MODEL B2250
BASIC Gluten Free Bread
RAPID I Multi Seed Bread
RAPID II Italian Garlic Herb Bread
SANDWICH Lunch Box Sandwich Loaf
WHOLE GRAIN Whole Wheat Currant Bread
SWEET Cinnamon Raisin Bread
QUICK BREAD .Banana Macadamia Bread
DOUGH Pizza/Foccacia
FRENCH Herbed French Bread
PRESERVES Pink Grapefruit Marmalade
Setting: I (Basic)
GLUTEN FREE BREAD
1½ cups water (80 to 90°F.)
3 large eggs, at room temperature
1/4 cup vegetable oil
1 tsp. cider vinegar
2 cups white rice flour
2/3 cup dry skim milk powder
1½Lsp.salt
1/2 cup potato starch
1/2 cup tapioca flour
1/3 cup cornstarch
3 tbsp. sugar
1 tbsp. xanthan gum
2%tsp. active dry or bread machine yeast
- Measure ingredients into bread pan in the order listed.
- Insert bread pan securely into unit; close lid. Plug unit into wall outlet
- Select Basic setting and appropriate loaf size (1%) and desired color.
- Press Start button.
- The Complete Signal will sound when bread is done.
- Using pot holders, remove bread pan from the unit and carefully remove bread from pan. (Kneading blade may remain in bread. Remove blade when bread has cooled.)
- Allow bread to cool on wire rack until ready to serve (at least 20 minutes).
Program Setting: 2 (Rapid Bake II)
MULTI SEDED BREAD
1% cups water (110 to 120^ )
2 tbsp. dry milk powder
2 tbsp. butter or margarine, cut into pieces
2 tbsp. sugar
1/4 cup sunflower seeds
2 tbsp. flax seeds
2 tbsp. sesame seeds
2 tbsp. black sesame seeds
3/4 tsp. salt
3 cups bread flour
4 tsp. active dry or bread machine yeast
- Measure ingredients into bread pan in the order listed.
- Insert bread pan securely into unit; close lid. Plug unit into wall outlet
- Select Rapid Bake 1 setting, appropriate loaf size (1½lb.) will appear and select desired color.
- Press Start button.
- The Complete Signal will sound when bread is done.
- Using pot holders, remove bread pan from the unit and carefully remove bread from pan. (Kneading blade may remain in bread. Remove blade when bread has cooled.)
- Allow bread to cool on wire rack until ready to serve (at least 20 minutes).
Program Setting: 3 (Rapid Bake II)
ITALIAN GARLIC HERB BREAD
1% cups water (110 to 120^ )
2 tbsp. dry milk powder
2 tbsp. butter or margarine, cut into pieces
2 tbsp. sugar
1/3 cup pine nuts
2 tbsp. instant minced onion
2 tbsp. chopped fresh parsley
1 tsp. dried basil
1/2 tsp. salt
314 cups bread flour
4 tsp. active dry or bread machine yeast
- Measure ingredients into bread pan in the order listed.
- Insert bread pan securely into unit; close lid. Plug unit into wall outlet
- Select Rapid Bake II setting, appropriate loaf size (2 lb.) will appear and select desired color.
- Press Start button.
- The Complete Signal will sound when bread is done.
- Using pot holders, remove bread pan from the unit and carefully remove bread from pan. (Kneading blade may remain in bread. Remove blade when bread has cooled.)
- Allow bread to cool on wire rack until ready to serve (at least 20 minutes).
Program Setting: 4 (Sandwich)
LUNCH BOX SANDWICH LOAF
1 cup water (80 to 90^ )
112 tbsp. butter or margarine cut into pieces
1/2 lsp. salt
3 tbsp. dry milk powder
3 tbsp. sugar
3 cups bread flour
3/4 tsp. active dry or bread machine yeast
- Measure ingredients into bread pan in the order listed.
- Insert bread pan securely into unit; close lid. Plug unit into wall outlet.
- Select Sandwich setting and appropriate loaf size (1 1/2 lb) and color.
- Press Start button.
- The Complete Signal will sound when bread is done.
- Using pot holders, remove baking pan from the unit and carefully remove bread from bread pan. (Kneading blade may remain in bread. Remove blade when bread has cooled.)
- Allow bread to cool on wire rack until ready to serve (at least 20 minutes).
Program Setting: 5 (Whole Grain)
WHOLE WHEAT CURRANT BREAD
1% cups water (80 to 90^ )
2% tbsp. unsalted butter or margarine, cut into pieces
2 tbsp. honey
2 tsp. grated orange peel
1% tsp.salt
112 cups whole what flour
2% cups bread flour
3 tsp. active dry or bread machine yeast
2 tsp. vital wheat gluten (optional)
- Measure ingredients into bread pan in the order listed.
- Insert bread pan securely into unit; close lid. Plug unit into wall outlet.
- Select Whole Grain setting and appropriate loaf size (2 lb.) and color.
- Press Start button.
- The Complete Signal will sound when bread is done.
-
Using pot holders, remove bread pan from the unit and carefully remove bread from bread pan. (Kneading blade may remain in bread. Remove blade when bread has cooled.)
-
Allow bread to cool on wire rack until ready to serve (at least 20 minutes).
Program Setting: 6 (Sweet)
CINNAMON RAISIN BREAD
1 large egg, at room temperature
Water (80 to 90^. )
2 tbsp. firmly packed brown sugar
2 tbsp. dry skim milk powder
1 tsp. ground cinnamon
1%tsp.salt
2 tbsp. butter or margarine, cut into pieces
3/4cups bread flour
1% tsp. active dry or bread machine yeast
3/4 cup raisins
- Place egg in measuring cup; add water to measure 2 cups.
- Measure ingredients, except raisins, into bread pan in the order listed.
- Insert bread pan securely into unit; close lid. Plug unit into wall outlet.
- Select Sweet setting, appropriate loaf size (1/2 lb.) and desired color.
- Press Start button.
- At "Add ingredient" beep, add raisins.
- The Complete Signal will sound when bread is done.
- Using pot holders, remove bread pan from the unit and carefully remove bread from pan. (Kneading blade may remain in bread. Remove blade when bread has cooled.)
- Allow bread to cool on wire rack until ready to serve (at least 20 minutes).
Program Setting: 7 (Quick Bread)
BANANA MACADAMIA BREAD
2/3 cup milk
1 cup mashed banana, about 2 medium
212 cups all-purpose flour
1 cup sugar
1/2 cup softened butter or margarine
2 eggs, slightly beaten
2½tsp. baking powder
1/2 tsp. baking soda
3/4 tsp. salt
1/2 cup chopped macadamia nuts
1. In large mixing bowl, combine ingredients in order listed.
2. Spoon batter evenly into bread pan.
3. Insert bread pan securely into unit; close lid. Plug unit into wall outlet.
4. Select Quick Bread setting and desired color.
5. Press Start button.
6. The Complete Signal will sound when the bread is done.
7. Using pot holders, remove bread pan from the unit and place on wire rack. Allow bread to cool in pan for 5 minutes. Carefully turn bread out of bread pan and turn right side up. (Kneading blade may remain in bread. Remove blade when bread has cooled.)
Allow bread to cool on wire rack until ready to serve (at least 20 minutes).
Program Setting: 8 (Dough)
BEST EVER PIZZA DOUGH
1½ cups beer or water (80 to 90^ .)
1 tbsp. honey or sugar
2 tbsp. extra virgin olive oil
1½tsp.salt
4 cups bread flour
2 tsp. active dry or bread machine yeast
- Measure ingredients into bread pan in the order listed.
- Insert bread pan securely into unit; close lid. Plug unit into wall outlet
- Select Dough setting.
- Press Start button.
- The Complete Signal will sound when bread is done.
- Using pot holders, remove bread pan from the unit and place dough on lightly floured surface.
- Invert large mixing bowl over dough and let rest for 10 minutes.
- Divide dough in half. Set one half aside and keep covered. Lightly brush 2 large pizza pans with olive oil and sprinkle with cornmeal; set aside. On lightly floured surface, roll out half of dough to fit prepared pan. Top with desired topping ingredients such as sauce, cheese and vegetables. Bake in preheated 425^ . oven for 20 minutes or until edges are golden and cheese is bubbling.
- Repeat with remaining dough.
Makes 2 15-inch thin crusted pizza
For Foccacia: Brush 1512× 1012 -inch jelly roll pan with olive oil and sprinkle with cornmeal. Roll out dough on lightly floured surface and fit into pan. Cover loosely with plastic wrap and set aside until doubled in size, about 40 minutes. Using oiled fingertips press indentations into dough about 1/2 -inch deep and about 1-inch apart. Drizzle with 3 to 4 tbsp. olive oil and sprinkle with 1 tsp. coarse or sea salt, 3/4 cup mixture of freshly grated Parmesan, Romano and Asiago cheese and 1/3 cup mixture of fresh chopped herbs such as parsley, rosemary, basil and oregano. Bake in preheated oven at 425^ until crust is golden and bread is puffed, about 20 minutes
Program Setting: 9 (French)
HERBED FRENCH BREAD
2 cups water (80 to 90^ .)
2 tbsp. instant minced onion
2 tbsp. chopped fresh parsley
1^1 /tbsp. finely chopped garlic
112tbsp. sugar
112 tsp.salt
5% cups bread flour
2 tsp. active dry or bread machine yeast
- Measure ingredients into bread pan in the order listed.
- Insert bread pan securely into unit; close lid. Plug unit into wall outlet.
- Select French setting and appropriate loaf size (2 lb.) and color.
- Press Start button.
- The Complete Signal will sound when bread is done.
- Using pot holders, remove bread pan from the unit and carefully remove bread from bread pan. (Kneading blade may remain in bread. Remove blade when bread has cooled.)
- Allow bread to cool on wire rack until ready to serve.
Program Setting: 10 (Preserves)
PINK GRAPEFRUIT MARMALADE
3 medium pink grapefruit (about 3 lb.)
1½ cups sugar
Peel of 1 lime, cut into julienne strips
1/2 tsp. almond extract
1 pkg. (1.75 oz.) powdered pectin
- Measure ingredients in order listed into bread pan.
- Insert bread pan securely into unit. Close lid. Plug unit into wall outlet.
- Select Preserves setting and press the Start button.
- The Complete Signal will sound when the marmalade is done.
- Using pot holders, remove bread pan from the unit and cool on wire rack. Carefully pour jam into clean jars.
- Place in refrigerator to set.
- Store in refrigerator for up to 3 weeks.
Makes about 4 cups
Note: If desired, add 1 drop red food coloring to intensify pink coloring to marmalade.
Care and Cleaning
This product contains no user serviceable parts. Refer service to qualified service personnel.
CLEANING
- Unplug the unit and let it cool.
- Grip the kneading blade and pull straight up to remove. If you have trouble removing the kneading blade, place warm water in the bread pan for 10-15 minutes to loosen the blade.
- Wash the bread pan and kneading blade in warm, soapy water or in the dishwasher.
Important: Do not use abrasive cleansers or steel wool to clean the bread pan or kneading blade. These could damage the nonstick coating.
- Wipe the outside of the unit with a damp cloth. Do not immerse in water or other liquid.
STORING
- Make sure the unit is unplugged, clean and dry.
- Store the unit with the lid closed.
- Do not place heavy objects on the lid.
TABLE DES MATIÈRES
PROTECTIONS IMPORTANTES 32

FAMILIARISEZ-VOUS AVEZ VOTRE APPAREIL 34
Noms des pièces 34
SANDWICH Pain a sandwich
GRAIN ENTIERS . Pain complet raisins de Corinthe
For service, repair or any questions regarding your appliance, call the appropriate "800" number on the cover of this book. Do not return the product to the place of purchase. Do not mail the product back to the manufacturer nor bring it to a service center. You may also want to consult the website listed on the cover of this manual.
One-Year Limited Warranty
(Appplies only in the United States and Canada)
What does it cover?
- Any defect in material or workmanship; provided; however, Applica's liability will not exceed the purchase price of the product.
For how long?
One year after the date of original purchase.
What will we do to help you?
- Provide you with a reasonably similar replacement product that is either new or factory refurbished.
How do you get service?
- Save your receipt as proof of the date of sale.
- Check our on-line service site at www.prodprotect.com/applica, or call our toll-free number, 1-800-231-9786, for general warranty service.
If you need parts or accessories, please call 1-800-738-0245.
What does your warranty not cover?
- Damage from commercial use
- Damage from misuse, abuse or neglect
- Products that have been modified in any way
- Products used or serviced outside the country of purchase
Glass parts and other accessory items that are packed with the unit - Shipping and handling costs associated with the replacement of the unit
- Consequential or incidental damages (Please note, however, that some states do not allow the exclusion or limitation of consequential or incidental damages, so this limitation may not apply to you.)
How does state law relate to this warranty?
- This warranty gives you specific legal rights, and you may also have other rights that vary from state to state or province to province.
BESOIN D'AIDE?
Copyright © 2006 Applica Consumer Products, Inc.
Pub.No.1000002857-00-RV00
Made in People's Republic of China
Printed in People's Republic of China