
B1561 - Bread maker BLACK & DECKER - Free user manual and instructions
Find the device manual for free B1561 BLACK & DECKER in PDF.


| Product Type | Bread Maker |
| Brand | Black & Decker |
| Model | B1561 |
| Dimensions (L x W x H) | Approximately 14 x 10 x 12 inches (35.6 x 25.4 x 30.5 cm) |
| Weight | Approximately 10 lbs (4.5 kg) |
| Power Supply | 120 V, 60 Hz, 800 W |
| Bread Loaf Size | 1 lb, 1.5 lb, 2 lb |
| Programs | Basic, Whole Wheat, French, Sweet, Rapid, Dough, Jam, Cake |
| Crust Control | Light, Medium, Dark |
| Delay Timer | Up to 13 hours |
| Keep Warm Function | 1 hour automatically |
| Viewing Window | Yes |
| Non-Stick Bread Pan | Yes, removable |
| Kneading Blade | Removable, dishwasher safe |
| Measuring Cup & Spoon | Included |
| Cleaning | Wipe exterior with damp cloth; wash pan and blades in warm soapy water |
| Safety Features | Auto shut-off, cool-touch handle, non-slip feet |
| Spare Parts Availability | Online via Black & Decker or authorized retailers |
| Warranty | 1-year limited warranty |
Frequently Asked Questions - B1561 BLACK & DECKER
User questions about B1561 BLACK & DECKER
0 question about this device. Answer the ones you know or ask your own.
Ask a new question about this device
Download the instructions for your Bread maker in PDF format for free! Find your manual B1561 - BLACK & DECKER and take your electronic device back in hand. On this page are published all the documents necessary for the use of your device. B1561 by BLACK & DECKER.
USER MANUAL B1561 BLACK & DECKER
Automatic Breadmaker
Operating Instructions & Cookbook
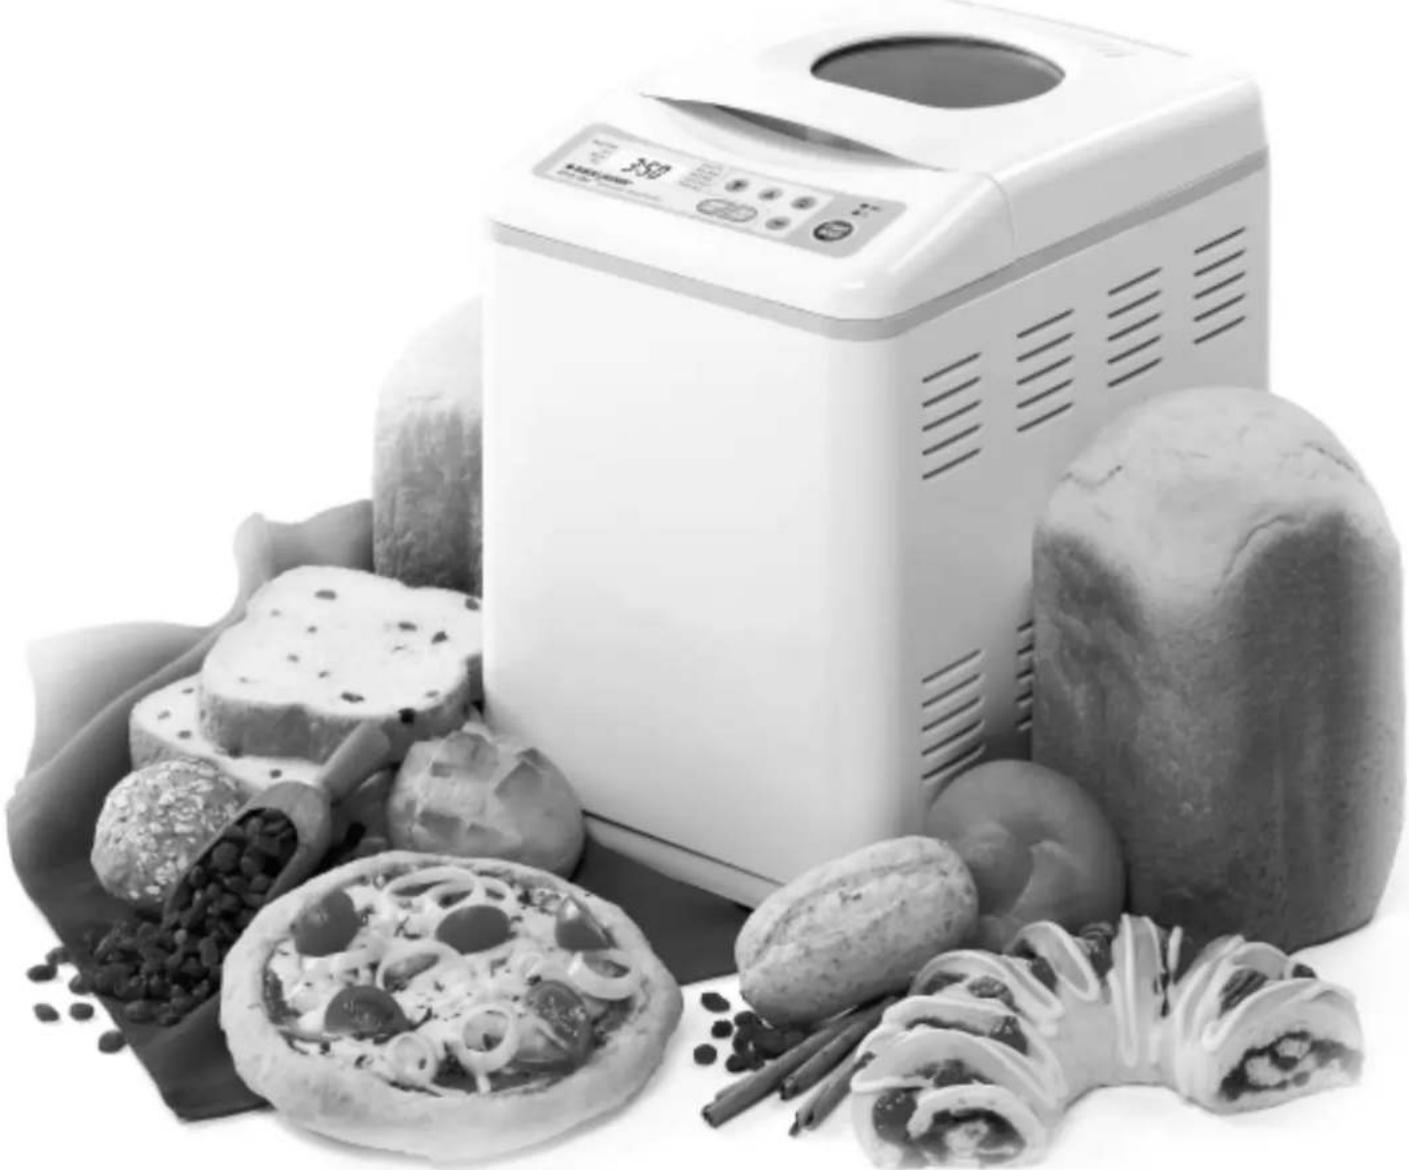
natural_image
Black-and-white photo of a small organic bread machine with various food items including sliced bread, potatoes, and bread rolls (no visible text or labels)Delicious Home Baked Bread Has Never Been Easier! B1561
Questions? Please call us Toll Free!
1-800-231-9786
Important Safeguards
When using electrical appliances, basic safety precautions should always be followed, including the following:
Read all instructions.
- Do not touch hot surfaces. Use handles or oven mitts.
- To protect against a risk of electric shock, do not immerse cord, plug, or other parts of this Breadmaker in water or other liquid, except the Mixing Paddle, which may be immersed when removed from the Baking Pan for cleaning.
- Close supervision is necessary when any appliance is used by or near children.
- Unplug from outlet when not in use and before cleaning. Allow to cool before cleaning, putting on, or taking off parts.
- Do not operate any appliance with a damaged cord or plug or after the appliance malfunctions or has been dropped or damaged in any manner. If the product requires attention within the warranty period, call the toll-free number on the cover of this manual for information on examination, repair, or electrical or mechanical adjustment.
- The use of accessory attachments not recommended by the appliance manufacturer may cause injuries.
- Do not use outdoors.
- Do not allow cord to touch hot surfaces or hang over the edge of table or counter.
- Do not place on or near a hot gas or electric burner, a heated oven, or on top of a microwave oven.
- Extreme caution must be used when moving an appliance containing hot contents or liquids.
- To turn off, disconnect from outlet by grasping the plug. Do not yank on cord.
- Do not use Breadmaker for other than intended use.
- Do not use Breadmaker for storage purposes nor insert any utensils as they may create a risk of fire or electric shock.
- Avoid contact with moving parts.
- Do not remove the Baking Pan during operation. Press START/RESET and hold until you hear a beep if you need to stop operation.
- Do not pour any ingredients directly into the Breadmaker—only into the Baking Pan. It is important to remove the Baking Pan from the unit before putting ingredients into the Pan (except when using the “Add-Ingredient” function, see pg. 10) to avoid accidentally spilling ingredients into the oven chamber.
- Before operating, the Baking Pan must be in place to avoid electric shock.
- Place the Breadmaker at least 2 inches (50 mm) away from any walls or from under cabinets to allow for steam from vents.
- Do not cover the Breadmaker with towels or other material that may prevent steam from escaping. Some steaming from vents is normal.
- Do not clean with scouring pads. The Baking Pan and Mixing Paddle have a non-stick coating. Refer to the “Care and Cleaning” section of this book.
- Do not operate in the presence of explosive and/or flammable fumes.
- This product is intended for household use only and not for commercial or industrial use. Use for anything other than intended will void the warranty.
- To avoid damaging the machine, do not place the Baking Pan or any other object on top of the unit.
Save These Instructions

natural_image
Close-up of a single white square block resting on a slice of bread, resembling a sandwich or instant (no text or symbols visible)Important Safeguards

Things You Should Know About Your Breadmaker
POLARIZED PLUG
This appliance has a polarized plug—one blade is wider than the other. To reduce the risk of electric shock, this plug will fit into a polarized outlet only one way. If the plug does not fit fully into the outlet, reverse it. If it still does not fit, contact a qualified electrician. Do not attempt to defeat this safety feature by modifying the plug in any way.
TAMPER-RESISTANT SCREWS
This appliance is equipped with tamper-resistant screws to prevent removal of the outer cover. To reduce the risk of fire or electric shock, do not attempt to remove the outer cover. There are no user-serviceable parts inside. Repair should be done only by authorized service personnel.
ELECTRICAL CORD
The cord length of this appliance was selected to reduce safety hazards that may occur with a longer cord. If more cord length is needed, an extension cord with a polarized plug may be used. It should be rated not less than 10 amperes, 120 Volts, and have Underwriters Laboratories (U.L.) or Canadian Standards Association (CSA) listing, depending on the country. When using a longer cord, be sure it does not drape over a working area or dangle where it could be pulled on or tripped over. Handle cord carefully for longer life; avoid jerking or straining it at outlet and appliance connections.
Product may vary slightly from what is illustrated.
BEFORE FIRST USE
There's nothing like the aroma of fresh-baked bread. With the Black & Decker All-In-One® Automatic Breadmaker, you can have the old-fashioned goodness of homemade bread with today's automatic convenience. That's because the All-In-One® Breadmaker does the work for you. Even if you've never made homemade bread before, you'll rise to the occasion with this Breadmaker.
Please take a few minutes to read this Use & Care Instruction/Cookbook and to find a place to keep it handy for reference. Pay particular attention to the safety instructions provided for your protection. Review the product warranty and service statements and fill out and mail in the owner registration form.
Carefully unpack the Breadmaker and remove all packaging materials. To remove any dust that may have accumulated during packing, wipe the Baking Pan, Mixing Paddle, and outside surface of the Breadmaker with a clean, damp cloth. Do not use scouring pads or any abrasives on any part of the Breadmaker.

natural_image
Black-and-white photo of a bowl of porridge with a spoon, next to a textured rock and a cylindrical container (no text or symbols visible)Table Of Contents

Important Safeguards 2
Polarized Plug 3
Tamper-Resistant Screws 3
Electrical Cord .... 3
Before First Use .... 3
Getting To Know Your Breadmaker ....5
Quick Tips....5
Names of Parts 5
Control Panel Settings & Functions .... 6
Bread Type Setting Descriptions 6
How to Use Your Breadmaker ....7
Using the "Add-Ingredient" Function 10
Setting the Timer 10
Troubleshooting 11
Troubleshooting Guide 12
Slicing & Storing Bread 13
Care & Cleaning 13
Storing the Unit 13
Easy-Lift Grips 14
Service or Repair 14
Full One-Year Warranty .... 14
COOKBOOK SECTION
Bread and Dough Ingredients 16
Tips for Getting the Best Results 17
Tips for Handling Dough 17
Recipe Index 18
Recipes 19
Need Help? (Questions and Answers) 33
1-800 Number ....35
Getting To Know Your Breadmaker

Quick Tips
- Your breadmaker makes large 1.5 lb (700 g) loaves.
- There are five settings including one for dough or pasta.
- The “Super Rapid Bake” setting can produce variations of basic white bread in 70 minutes. This setting can only be used with recipes supplied (see pg. 21). You cannot use the timer with this selection. This setting cannot handle heavier recipes such as whole grain because of its shortened rising cycle.
- Depending on the recipe you select, the "Dough/Pasta" setting will let you produce dough that can be shaped into dinner rolls, pizza, long loaves, challah, pretzels, filled braids, or more. For Pasta, be sure to use pasta or semolina flour. Pasta dough should be processed through a pasta maker or pasta shaper to form the desired shape. Consult the Cookbook section of this manual.
- The Crust Control function lets you choose "Regular" or "Dark" crust on the Basic, Super Rapid Bake, or Sweet settings. It cannot be used on the Whole Grain or Dough/Pasta settings.
- The "Keep Warm" function begins automatically after bread is baked. It keeps baked bread warm up to an hour after the baking is done. This function stops after 60 minutes or when the unit is unplugged, or the Start/Reset button is pressed.
- An “Add-Ingredient” function signals with beeps when it’s time to add ingredients such as fruits or nuts to recipes used with any setting except Super Rapid Bake. A beep signals before kneading is completed to let you know when to add ingredients. This feature helps keep fruit or nuts whole (See “Add-Ingredient Function” pg. 10 for more details). If you use the TIMER to delay baking, you may add all ingredients at once and bypass this function, however, your fruit or nuts may get “chopped” and blended into the bread.
- Do not cover the breadmaker with towels or other material that may prevent steam from escaping. Some steaming from vents is normal. Because of escaping steam, you should keep the breadmaker several inches (more than 20 cm) away from cabinets while making bread.
- Do not place any objects on top of the breadmaker.
- IMPORTANT: Add ingredients in the order they are specified in the recipe. For best results, accurate measuring of ingredients is very important. Do not put larger quantities than recommended into the Baking Pan as it may produce poor results and may damage the breadmaker.
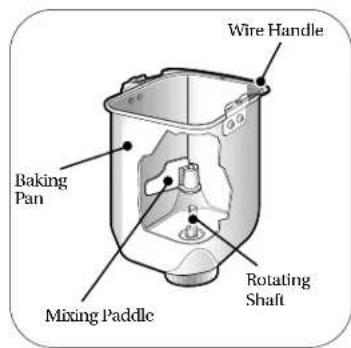
Names Of Parts

Control Panel Settings & Functions

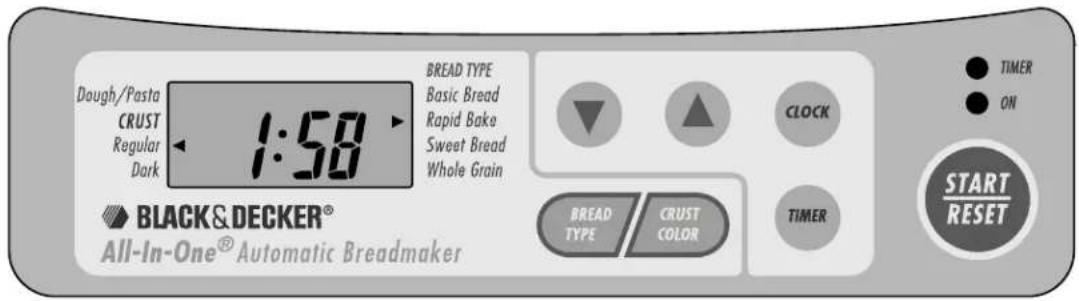
NOTE: When using the touch pad control, be sure to press the pad until you hear a beep.
1. Display
- The black arrow at the right side of the display indicates your bread setting choice; the left side arrow indicates the Dough/Pasta setting and Crust Color choices.
- The digital clock shows either the current time of day, or, when the breadmaker is operating, the time it will take for your bread to be completed under the selected setting.
• Shows minute-by-minute time countdown. - Indicates troubleshooting message in the Window (see "Troubleshooting" pg. 11)
2. Clock Button
Use when setting the current time of day.
- The CLOCK button is used with the "Up" and "Down" arrows to set the 12 hour "AM" or "PM" digital clock.
3. Timer Button
Use when setting the TIMER to delay baking.
- The TIMER button is used with the "Up" and
"Down" arrows to set the time you wish your bread to be complete (up to 13-hour delay).
4. Start/Reset Button
- Press to start operation and to display the time it will take for your bread to be completed under the selected setting.
- Press and hold to cancel the breadmaking operation. The red "on" light goes out & unit beeps (DO NOT press when you are just checking the progress of your bread or you will cancel your program).
5. Indicator Lights
- The red "on" light indicates that the breadmaking operation has started. When the cycle is complete, the red light will flash for 60 minutes in its "Keep Warm" cycle. If you do not remove the bread after 60 minutes, it will simply remain on to show you that the unit is still plugged in.
- The green "timer" light indicates that the timer function is on. When the actual breadmaking operation begins, the green light will go off, and the red light will come on.
Bread Type Setting Descriptions
NOTE: The number in parentheses following each setting description represents the total baking time. Each setting begins with a preheat period which delays the mixing cycle until the desired temperature is reached within the oven chamber. The preheat cycle does not add time to the Bread program.
BASIC BREAD/Regular Crust or BASIC BREAD/Dark Crust (3:50 hours) This setting is used for breads which primarily use
white flour, though some recipes may include small amounts of whole wheat flour as well. In the U.S., be sure to use Bread Flour; in Canada, you may use Canadian All-Purpose Flour or Bread Flour. Follow recipes carefully. Basic Bread/Regular Crust will produce good results when you are using ingredients such as cheese, nuts, or cornmeal as they tend to brown easily. Choose Basic Bread/Dark Crust, to produce a loaf with a darker crust without lengthening the baking time.
Bread Type Setting Descriptions

SUPER RAPID BAKE /Regular Crust or SUPER RAPID BAKE /Dark Crust (1:10 hours)
This setting is used only to make variations of basic white bread quickly whether you choose a “Regular” or “Dark” crust. Refer to the recipe section of this booklet for a complete list of all recipes that can be used with this setting. This setting cannot be used successfully to make breads other than those specified due to the shorter rising time of this cycle.
SWEET/Regular Crust or SWEET/ Dark Crust (3:50 hours)
Use this setting for recipes that use fruit juice, large amounts of sugar, cheese, or added sweet ingredients such as raisins, dried fruit, or chocolate. Baking temperature is lower to prevent burning.
WHOLE GRAIN (4:10 hours)
This setting is used for recipes with significant amounts of whole wheat or rye flour, oats, or bran. This setting has a longer rise cycle and preheat cycle to allow heavier grains to expand. Generally, whole wheat/multi-grain breads are shorter and denser than Basic or Sweet breads. You cannot use the Crust Color selections with this setting.
DOUGH/ PASTA (2:00 hours)
This setting makes bread-style dough and pasta dough. Dough can be shaped to make pizza, rolls, pretzels, long loaves or braids that must then be baked in a conventional oven. It can also prepare pasta dough that must then be processed and shaped through a pasta maker. Pasta dough should be removed from the Breadmaker after the "Add-Ingredient" signals (in 40 - 45 minutes). Follow pasta recipes on page 32 for specific directions.

natural_image
Black-and-white photo of two bowls with eggs and a textured food item on a wooden board, no visible text or symbols.How To Use Your Breadmaker
The four bread making settings in this unit will combine ingredients, knead, and bake bread from start to finish – automatically. The
Dough/Pasta setting makes dough for a variety of recipes but you must shape and bake the dough yourself in a conventional oven or process it in a pasta maker. To delay completion, the Automatic Timer may be programmed to make bread while you are at work or asleep. (See “Setting the Timer” pg. 10)
The Cookbook section of this book includes recipes that have been thoroughly tested in Black & Decker's own test kitchens both in the United States and Canada to ensure best results. Flours, cornmeal, and a few other ingredients vary widely between the two countries.
NOTE: The term, "All-Purpose Flour" for example, is applied to two totally different types of flour depending on whether it is purchased in the U.S. or Canada. Canadian "All-Purpose Flour" will produce
good to excellent results in this Breadmaker; whereas American "All-Purpose Flour" will produce poor results.
Therefore, each recipe is presented with two sets of ingredients – one for each country. Since ingredients are different, it is important that you double check to be sure you are following the recipe appropriate for ingredients in your country (U.S. or Canada) before using your Breadmaker.
Most North American national brand flours and yeasts will produce good results. Keep in mind that the recipes included here have been created by our Home Economists specifically for this automatic breadmaker (Model B1561) and may not produce acceptable results in other similar breadmakers.
How To Use Your Breadmaker

For all SETTINGS (including Dough/ Pasta) follow these instructions:
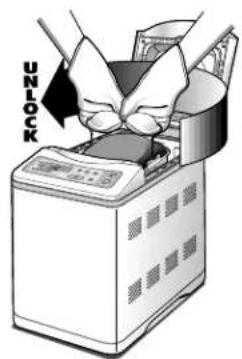
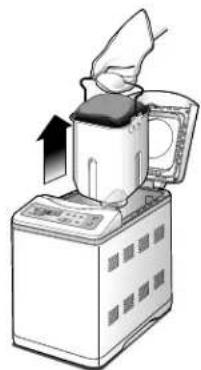
1 Open the lid, grasp the wire handle with two hands, and turn the Baking Pan to the left "Unlock" position, then remove it by pulling straight up on the handle. It is important to remove
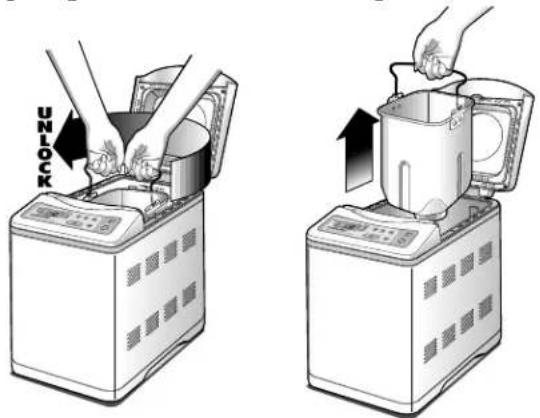
the Baking Pan from the unit rather than add ingredients into the Pan while it is in place to avoid accidentally spilling ingredients into the oven chamber.
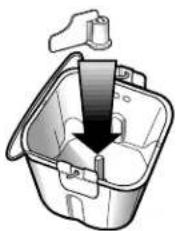
2 Attach the Mixing Paddle onto the shaft inside the Baking Pan by lining up the flat side of the Paddle with the flat side on the shaft. Gently push the Paddle onto the shaft.
natural_image
Diagram of a container with a downward arrow indicating flow or movement (no text or symbols)3 Select a recipe from the Cookbook section of this booklet. When following the recipe:
- A _lways add ingredients into the Baking Pan in the order they are listed.
• Measure ingredients carefully & accurately. To measure liquids, use a see-through measuring cup and check the measurement at eye level.
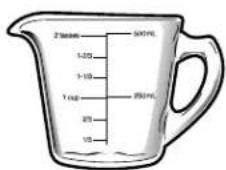
- When measuring dry ingredients, use standard dry measuring cups or measuring spoons and level off the ingredients with the straight-edge of a knife or metal spatula.
Inaccurate measurements, even if only slightly off, can make a difference in results.

natural_image
Illustration of two hands pouring a spoon from a metal bowl (no text or symbols)
natural_image
Illustration of hands using a spoon to lift a cup of food (no text or symbols visible)- Yeast is always added last. Be sure that the yeast does not touch the liquid ingredients, salt or shortening.
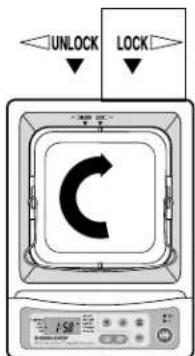
4 The Baking Pan can be installed in TWO POSITIONS. There are notches on two sides of the rim of the Baking Pan. Be sure to have a notched side facing toward you when you put the Pan into the oven chamber. Place the Baking Pan into the unit in a left diagonal position as illustrated. Using both hands, rotate the Pan in a clockwise

natural_image
Illustration of a hand pouring liquid into a microwave oven using a pitcher (no text or symbols visible)
natural_image
Illustration of hands operating a microwave oven with a digital display (no text or symbols visible)
TOP VIEW
UNLOCKED
TOP VIEW
LOCKED
direction until the notch on the Pan lines up with the lock arrow on the back wall of the oven chamber. Fold the handle down and click into place.
How To Use Your Breadmaker
5 Close the lid and plug into an outlet (120 volt). Two ARROWS will come up in the display window indicating BASIC BREAD TYPE with a REGULAR crust and 12:00 AM will flash in the display window. If you wish to use the TIMER to delay baking, you will first have to set the correct time of day. However, if you want to start the breadmaking operation now, it is not necessary to set the CLOCK.
6 To bake a Basic loaf of bread with a Regular Crust, simply press the START/RESET Button. However, you can choose a different setting for your

recipe by pressing the BREAD TYPE button on the pad. Each time you press BREAD TYPE, the arrow in the display window will point to the next selection (i.e. Rapid Bake, Sweet Bread, etc.) If you are using a recipe that calls for the

Basic, Rapid Bake, or Sweet Bread setting, choose a crust color by pressing the CRUST COLOR button until the arrow in the window lines up with either "Regular" or "Dark."
7 Press the START/RESET Button once until it beeps and the red "on" indicator light comes on. The flashing 12:00 AM will be replaced by, for example, 3:50, if you chose a recipe for the Basic Bread setting (regardless of whether you chose "Regular" or

"Dark" crust). It will count down the remaining time in one-minute intervals (3:49, 3:48, etc.) until the bread is done. When the baking is complete, several beeps will sound to alert you that the bread is ready and the red indicator light will begin flashing. In addition, a flashing 12:00 AM will reappear in the display screen.
8 This Breadmaker is designed with a Keep Warm function that automatically begins when baking is complete. The red light will continue to flash for up to 60 minutes after baking is complete and will keep bread warm during that time. At the end of the hour, the Keep Warm cycle will end and the light will remain on constantly, indicating the unit is still plugged in. The bread should then be removed as soon as possible to avoid getting soggy. You may remove the Baking Pan any time during the Keep Warm cycle. To turn off the Keep Warm feature before the 60 minutes are up, simply press the START/RESET button and hold it until the display time clears.
NOTE: The Keep Warm feature does not function for the DOUGH/PASTA setting since baking is not involved in this program. If you leave finished dough in the unit over a period of time, it may over-rise and produce poor results. For best results, remove dough at the end of the program and follow the recipe directions for shaping, rising, and baking.
9 This unit has a convenient Viewing Window so that you may watch the progress of the bread as it is mixed, kneaded, and baked. Occasionally, some moisture may form in the window during the rising cycle. If moisture forms, you may lift the lid to look inside during the mixing and kneading stages, however, DO NOT OPEN THE LID DURING THE BAKING CYCLE (approximately the last hour) or during the Super Rapid Bake setting as this may cause the bread to underbake. Most of the moisture should disappear during the baking cycle.
10 To remove the Baking Pan, use pot holders or oven mitts, grasp the wire handle with both hands and turn the Pan to the left until the notch in the pan lines up with the unlock arrow on the back wall of the oven chamber. Pull straight up on the Baking Pan. Fold and lock the wire handle down. Turn the pan on its side and gently shake the bread
How To Use Your Breadmaker
out onto a wire cooling rack. The Baking Pan and Mixing Paddle have a non-stick coated finish so that the bread should come out easily. Do not use metal utensils to remove bread as they may scratch the non-stick coating. If you have
natural_image
Illustration of a microwave oven with a blender and fan, showing the lid and base (no text or symbols)
natural_image
Illustration of two hands holding a cup with a dark liquid, no text or symbols presentdifficulty removing bread from the Baking Pan, slide a flat rubber or plastic spatula along the sides of the pan to loosen the loaf. Turn the pan over and shake the loaf out. Allow the bread to cool before slicing. If the Mixing Paddle remains in the bottom of your loaf, allow the loaf to cool then use a plastic spoon or rubber spatula to remove the paddle. Do not use a knife or other sharp metal object as this will scratch the non-stick coating on the Mixing Paddle.
Using The "Add-Ingredient" Function
1 All settings, except for Rapid Bake, have a built-in "Add-Ingredient" function which signals with beeps when it's time to add ingredients such as fruits or nuts. The beeps sound before kneading is complete to let you know it's time to add the ingredients. The actual time of the beeps can vary up to 5 minutes depending on the room temperature at the time when you started the bread making program. The following chart can be used for reference:
| Setting Signals | When to add Time Displayed Ingredients after Starting Program | when Beeper Signals |
| Basic Bread | 30-35 minutes into program | 3:15-3:20 |
| Sweet Bread | 30-35 minutes into program | 3:15-3:20 |
| Whole Grain | 37-42 minutes into program | 3:28-3:33 |
| Dough | 40-45 minutes into program | 1:15-1:20 |
2 This function lets you add ingredients so that they don't get chopped up by the Mixing Paddle and blended into your loaf. If you are using the TIMER to delay baking (perhaps while you are asleep or away from home), you may bypass this function by ignoring the signal and adding ingredients in the order called for in the recipe, however, you may end up with somewhat broken pieces.
3 To add ingredients, raise the lid and carefully pour the ingredients into the Baking Pan. CAUTION: It is important to avoid spilling ingredients into the oven chamber.
Setting The Timer (For Delayed Completion)
Use the TIMER when you would like to delay the completion of your bread or dough/pasta. This feature allows you to delay bake time for up to 13 hours. For example, it lets you set the TIMER at 7 PM one evening so that you can wake to fresh bread by 8 AM the following morning. NOTE: The TIMER cannot be used with the Rapid Bake setting.
To set the TIMER, follow these instructions: NOTE: Be sure you have followed the “How to Use Your Breadmaker” steps 1-6 in preparing the ingredients in the Baking Pan. It is not recommended that you use the “Delayed Completion” function and TIMER with recipes that call for fresh ingredients that might spoil such as eggs, fresh milk, buttermilk, or cheese.
1 To use the TIMER, you must first set the digital clock to the correct time of day. To change the flashing 12:00 AM, first press the CLOCK button. While the "12" is flashing, the hour can be set by immediately pressing the "Up" and "Down" arrows to change the time in 1 hour intervals. Make sure the "AM" or "PM" displayed is appropriate. While the correct hour is flashing in the display, press the CLOCK button again to set the minutes. If the hour display has stopped flashing before the minutes have been set, press the CLOCK button twice. While the "00" is flashing, the minutes can be set by pressing the "Up" and "Down" arrows. You may hold either arrow to rapidly change the time in 5 minute intervals, or press and release to change 1 minute at a time.
2 Once the clock is set, the TIMER can easily be set following similar steps. To wake up to the aroma of fresh baked bread at 8:30 AM for example, press and hold the TIMER button until TIMER appears on the display, and the "12" of 12:00 AM
How To Use Your Breadmaker

flashes as it did when setting the clock above. While the “12” is flashing, press the “Up” or “Down” arrows to change the “12” to “8”, checking to make sure “AM” is displayed. To set the minutes, press the TIMER button while the hour setting is flashing. If the hour setting has stopped flashing before the minutes have been set, press and hold the TIMER button. With the hour setting flashing again, immediately press the TIMER button to set the minutes.
While the "00" is flashing, the minutes can be set to "30" using the "Up" or "Down" arrows. When the "30" stops flashing and the current time is displayed, the timer is set.
3 To start the delayed completion timer, press the TIMER button. The completion time will flash briefly and be replaced by the current time in the display, and the green TIMER light will come on. If the green light does not come on, and "13 Hr TIMER ERR" appears on the display, you have set the TIMER for longer than the maximum 13 hour delay. To reset the TIMER hold the TIMER button until the hour setting flashes, and the time can be changed using the "Up" and "Down" arrows. If the green light does not come on, and "0 Hr TIMER ERR" appears, the TIMER has been set for a delayed completion time which is shorter than the actual bake time (for example 3:50 is the bake time for Sweet Bread). Reset the TIMER for a longer delayed completion time.
4 To cancel the TIMER function, press the TIMER button and the green light will go out.
5 To check the completion time while the green TIMER light is on, press the TIMER button twice. To check the completion time while the red light is on, press the TIMER button once.
6 When the actual breadmaking operation begins, the green “timer” light will go out, the red “on” light will come on, and total bake time (3:50 for Sweet Bread) will appear on the display. The bake time will count down in one minute intervals. When the end of the countdown is reached, a beeping signal will sound and your bread is complete. The red light will now begin flashing to show the Breadmaker has automatically activated the 60 minute “Keep Warm” function.
Troubleshooting
Specific questions about the breadmaker functions and problems with ingredients or recipes are addressed in the “Need Help?” section beginning on pg. 33.
- If there is an operational problem with the unit, you may see a hyphen, colon, double hyphen (- : --) message in the display window. This means there is an operational/mechanical malfunction. DO NOT USE THE UNIT. Unplug the unit and contact your local service center for repair. Call the toll-free number on the cover of this booklet to ask for the location of the Black & Decker service center nearest you.
- If the START/RESET button is pressed and the word "HOT" appears in the display window, it indicates that the unit has not cooled sufficiently after baking to use immediately again. Open the lid, remove the Baking Pan and allow the inside of the unit to cool. Once the unit has cooled sufficiently, pressing the START/RESET button will immediately start the breadmaking operation.
- For specific problems with Bread/Dough results, see the Troubleshooting guide on the next page:

natural_image
Black-and-white photo of sliced bread slices on a wooden plate with cherry tomatoes and cheese, no visible text or symbols.Troubleshooting Guide
NOTE: The number one cause for poor results is improper measurement of ingredients (see page 8). The checklist below offers several possible solutions. Try one adjustment at a time and only make one change per loaf. If results do not improve with the first adjustment, move to the next possible solution.
| POSSIBLE SOLUTIONS\RESULTS | Loaf Rises Then Falls “Cratered Loaf” | Loaf Rises Too High “Mushroom Loaf” | Loaf Does Not Rise Enough | Flat Loaf Little To No Rising | Crust Too Dark | Uncooked Or Partially Cooked | Not Mixed Or Partially Mixed | Gnarly Knotted Top | Loaf Core Texture Heavy & Dense | High Altitude Adjustment | ||
| MEASUREMENT | FLOUR | ↑ | ||||||||||
| ↓ | 2 Tbsp. 2 Tbsp. 2 Tbsp. | |||||||||||
| WATER OR MILK | 2 Tbsp. 2 Tbsp. | |||||||||||
| ↑ | 2 Tbsp. 2 Tbsp. 2 Tbsp. | 2 Tbsp. | ||||||||||
| SALT | ↑ | 1/4 tsp. 1/4 tsp. | ||||||||||
| ↑ | 1/4 tsp. | |||||||||||
| SUGAR OR HONEY | 1 tsp. 1 tsp. | |||||||||||
| ↓ | 1 tsp. 1 tsp. | |||||||||||
| YEAST | 1/4 tsp. 1/4 tsp. | |||||||||||
| ↓ | 1/4 tsp. 1/4 tsp. 1/4 tsp. | |||||||||||
| INGREDIENT | WATER OR MILK | Not Enough Water Or Milk | ✓ | ✓ | ✓ | |||||||
| Liquid Too Hot Or Too Cold | See Page 17 | |||||||||||
| FLOUR | Too Old | ✓ | ✓ | |||||||||
| Low In Gluten Content | See Page 16 See Page 16 | |||||||||||
| Too Fine | See Page 16 | See Page 16 | See Page 16 | |||||||||
| YEAST | None Was Added | ✓ | ||||||||||
| Out of Date Code | See Page 16 | |||||||||||
| Used Fresh (Wrong Type) | See Pages 16 & 17 | See Pages 16 & 17 | See Pages 16 & 17 | See Pages 16 & 17 | ||||||||
| SALT | Forgotten | ✓ | ||||||||||
| Too Much | ✓ | ✓ | ||||||||||

Increase Amount

Decrease Amount
How To Use Your Breadmaker

Slicing & Storing Bread
For best results, allow loaves to cool on a wire rack 15 to 30 minutes before slicing. You may use an electric knife (such as the Black & Decker Slice Right™ Electric Knife Model EK300) for even slices. Otherwise, use a sharp knife with a serrated blade. For sandwich slices, place the loaf on its side and slice across.
Store bread tightly covered (resealable style bags or plastic containers work well) at room temperature up to three days. If weather is hot and humid, store in the refrigerator. For longer storage (up to one month), place bread in a tightly covered container in the freezer. If you store the bread in the refrigerator, leave it out to bring it to room temperature before serving. Since homemade bread has no preservatives, it tends to dry out and become stale faster than commercially-made bread.
Leftover slightly hardened bread may be cut into 1/2" or 1" (13-25 mm) cubes and used in favorite recipes to make croutons, bread pudding, or stuffing.
Care & Cleaning
CAUTION: To avoid electric shock, unplug the unit and allow the Breadmaker to cool before cleaning.
For best performance and maintenance, it is recommended to clean the breadmaker after each use as follows:
Outer Body and Oven Chamber:
Wipe the outer body of the unit with a damp cloth or slightly dampened sponge. Use a damp sponge or cloth to wipe out any flour, crumbs, or other materials from the oven chamber.
Lid
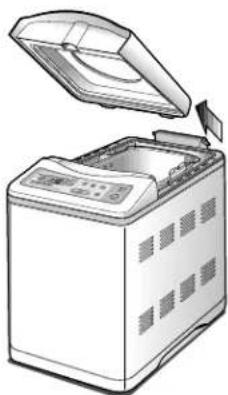
This unit has a removable Lid for easy cleaning. Open the Lid halfway and pull it out towards you. Wipe it with a damp cloth or slightly dampened sponge. DO NOT IMMERSE THE LID in liquid. Clean the viewing window with a moist soft cloth (not paper towel), then be sure to wipe it dry.
CAUTION: DO NOT clean window with a commercial glass cleaner!
natural_image
Illustration of a microwave oven with lid open, showing internal components and ventilation slots (no text or symbols)When reinstalling the lid, be sure the slots on the lid are fully inserted into the posts on the hinge of the Breadmaker. This will prevent damage when closing the lid. If you feel resistance when you try to close the lid, stop immediately and reposition it. The lid should close easily without any force being applied.
Baking Pan and Mixing Paddle
Both the Baking Pan and Mixing Paddle have a non-stick coated surface. Do not use any harsh cleaners or utensils on these parts as scratching may occur. Over time, the non-stick surface may change in color due to moisture and steam. This is normal and has no effect on its use or quality.
Remove the Baking Pan and Mixing Paddle from the oven chamber before cleaning. Wipe the outside of the Baking Pan with a damp cloth. Be careful not to damage the rubber seal under the shaft. NEVER TOTALLY IMMERSE THE BAKING PAN in water. You can hand wash the inside of the Baking Pan with soapy water. The Mixing Paddle should be removed from the shaft and the depressed area under the Paddle cleaned. If the Mixing Paddle is hard to remove from the Baking Pan after baking, fill the Pan with hot water and let soak for 30 minutes to an hour. Next, pour out the water, turn the Pan over and wiggle the Paddle loose while holding the winged coupling on the bottom of the Pan. Using a toothpick or soft kitchen brush clean out any dough left in the hole of the Paddle.
CAUTION: None of the breadmaker parts are dishwasher-safe. DO NOT place the Baking Pan, Removable Lid, or Mixing Paddle in the dishwasher.
Storing The Unit
Be sure to dry all parts before storing and wipe any moisture from the Viewing Window. To prevent loss, you may want to store the Mixing Paddle on the shaft. Close the Lid and do not store anything on top of the Lid.
Care & Cleaning
Easy-Lift Grips
If you are storing the unit in a cabinet or closet, use the handy built in grips at the bottom of the unit to help you lift the breadmaker easily.
Service Or Repair
For service, repair, or any questions regarding your appliance, call the "800" number on the cover of this book. Do NOT return the product to the place of purchase. Do NOT mail the product back to the manufacturer nor bring it to a service center. You may also want to consult the website at: www.householdproductsinc.com.
Full One-Year Warranty
Applica warrants this product against any defects that are due to faulty material or workmanship for a one-year period after the original date of consumer purchase. This warranty does not include damage to the product resulting from accident, misuse, or repairs performed by unauthorized personnel.
If the product should become defective within the warranty period, or you have questions regarding warranty or service, call Consumer Assistance and Information toll free at: 1-800-231-9786.
This warranty gives you specific legal rights and you may also have other rights which vary from state to state or province to province.
Answers to any questions regarding warranty or service locations may be obtained by calling or by writing:
In the U.S.A. or Canada
Consumer Assistance and Information
Applica Consumer Products, Inc.
6 Armstrong Road
Shelton, Connecticut 06484
1-800-231-9786
120 V, 60 Hz, AC Only, 600 watts
Listed by Underwriters Laboratories, Inc.
and Canadian Standards Association
Copyright ©1995-2000 Applica Consumer
Products, Inc.
Pub No. 168633-42-RV01
Printed in People's Republic of China

Applica Consumer Products, Inc.

BLACK&DECKER®
Bread Recipes

natural_image
Black-and-white still life photo of dairy products including milk pitcher, bowl of milk, and wheat stalk (no text or symbols)For Black & Decker Breadmakers
Model B1561
Bread & Dough Ingredients
Many ingredients differ between Canada and the United States. Cheese, confectioner's (icing) sugar, and cornmeal are just a few ingredients that vary between the two countries. The major difference is in flour.
Flours
Canadian flours are milled from harder wheats so breads can be successfully made from national brands of both All-Purpose Flour and Bread Flour. U.S. “All-Purpose Flour” will produce poor results and should not be used with this unit. In the U.S., it is important to use “Bread Flour” for tall, even-textured loaves.
- Bread flour is processed from hard wheat and is high in the protein substance called gluten. When mixed and kneaded, the gluten stretches and incorporates air bubbles to produce a light, fine-textured loaf. The stretchy resilience of gluten makes this kind of flour most tolerant to high temperatures, altitude, or high humidity.
- Canadian "All-Purpose Flour" is easy to find and has been extensively tested with the Canadian recipes included in this book with good results. Canadian Bread Flour may also be used with good results.
- Whole wheat and multi-grain flours contain the bran and germ of the grain. Although higher in fiber, these flours are lower in gluten than bread flour. Rye flour does not contain any gluten and therefore, must be used in combination with other flours. Whole wheat, multi-grain and rye flour typically produce shorter, denser loaves. Whole wheat flours vary greatly between the United States and Canada. Be sure to consult the recipes for tips on successful whole wheat breads. The recipes have been developed and tested using nationally available brands of flour.
Fat
- Butter, margarine or vegetable shortening are often interchangeable in most bread recipes. Fat adds flavor and tenderness to the dough. Low-fat (diet) margarines are high in water content but may be substituted with acceptable results for people on a low fat diet.
Salt
- In very small amounts, salt adds flavor and controls the rising action of the yeast, allowing the dough to rise evenly. In high altitude areas, additional salt may be needed to improve bread results, however, keep in mind that too much salt may prevent the bread from rising.
Liquid
- Milk—whole, 1% or 2% fat, skim, buttermilk, or reconstituted (powdered) dry milk, and water are the most commonly used liquids in bread recipes. Milk provides a soft crust, and gives bread a velvety texture. If your recipe calls for powdered milk and you prefer to use fresh milk, simply substitute the milk for the water and powder. Water makes a crisper crust. Some recipes call for juice to be added as a flavor enhancer.
Sweeteners
- Natural sweeteners, such as white or brown sugar, honey, and molasses help the yeast in a recipe to grow. Sugar serves as food for the yeast. Without sugar, the yeast will not grow and the bread will not rise. The balance of sugar, salt, and yeast is a very important part of the bread making process. Sweeteners enhance the bread flavor and the browning process. If you prefer to use a sugar substitute, your baking results may vary with the type and amount of sugar substitute used.
Yeast
- Yeast is a heat-sensitive plant that feeds on the sugar in dough. Too much heat will kill the yeast, too little will slow the yeast action. Check the expiration date to be sure the yeast is fresh. The recipes in this cookbook have been tested with Bread Machine yeast. If you prefer to use Traditional Dry yeast, Rapid Rise yeast or Quick Rise yeast, you will have to increase yeast amount by 1/4 teaspoon in your recipe; for example - if your recipe called for 1 teaspoon of yeast, increase the amount to 1-1/4 teaspoon. See the test for yeast freshness on the next page.
Bread & Dough Ingredients
The following test can be used to determine whether your yeast is stale and inactive:
A) Place 1/2 cup of lukewarm water into a small cup or bowl.
B) Stir 1 tsp. of sugar into the water then sprinkle 2 tsp. of yeast over the surface.
C) Place bowl or cup in a warm area and allow to sit for 10 minutes undisturbed.
D) The mixture should foam and produce a strong yeast aroma. If this does not occur, fresh yeast should be purchased.
Tips For Getting The Best Results
- Use only fresh ingredients.
- I n the U.S.: Use Bread Flour; In Canada: Use All-Purpose Flour or Canadian Bread Flour.
- Use lukewarm water – not cold water.
- Measure ingredients accurately and level off dry ingredients with the flat side of a knife or metal spatula. (See page 8 for measuring techniques).
Tips For Handling Dough
- When recipes call for a "lightly floured surface," use about 1 to 2 tablespoons flour on the surface. You may want to lightly flour your fingers or rolling pin for easy dough manipulation.
- Recipes referring to a “greased/oiled” bowl call for about 1 tablespoon oil or soft vegetable shortening spread on the bottom and sides of the bowl. You may prefer to use a non-stick vegetable spray to “grease” the bowl to cut down on added fats and calories.
- When you let dough "rest" and "rise" according to a recipe, place it in a warm, draft-free area. For best results, cover the dough with waxed paper and a clean, dry towel. If the dough does not double in size, it may not produce a tender product.
- Dough may be wrapped in plastic and stored in a freezer for later use. Bring the dough to room temperature before using.

natural_image
Black-and-white photo of a cut bread loaf on a cutting board with a knife resting beside it (no text or symbols visible)Recipe Index
The Basics
Basic White 19
100% Whole Wheat 19
Dinner Rolls (dough recipe) 19
Classic French (dough recipe) 20
Caraway Rye 20
Super Rapid Bake Breads (70 minutes)
Super Rapid Basic White 21
Super Rapid Cinnamon Raisin 21
Super Rapid Lemon Poppy Seed 21
Super Rapid Cornbread 22
Super Rapid Cheese 'N Onion 22
Super Rapid Italian Herb 22
Sandwich Pleasers For The Brown Bag Club
Lemon Poppy Seed 23
Seven Grain 23
Pumpernickel 23
Cracked Wheat 24
Buttermilk Wheat 24
Chunky Nut 24
Apple Cinnamon Granola 25
Cornbread 25
Oatmeal Nut 25
Dinner Favorites
Italian Herb 26
Bacon-Chive Potato 26
Cheese 'N Onion 26
Pesto....26
Cottage Cheese Dill 27
Pizza Dough (dough recipe) 27
Sun-Dried Tomato & Rosemary 27
Treats For Every Age
Cinnamon Raisin 28
Maple Raisin 28
Baked Pretzels (dough recipe) 28
Cherry Cheese Coffeecake (dough recipe) 29
Upside-Down Pecan Buns 29
International Favorites
Raspberry Braid (dough recipe) 30
Hot Cross Buns (dough recipe) 30
Swedish Tea Ring (dough recipe) 31
Jewish Challah (dough recipe) 31
Russian Kulich 31
Pasta Recipes
Basic Pasta Dough (dough recipe) 32
Spinach Pasta Dough (dough recipe) 32
The Basics
These are the recipes you will bake time after time. Try these recipes first.
BASIC WHITE
| American Canadian | ||
| 1-1/4 cups water 1-1/4 cups | ||
| 1 tbsp. powdered milk 1 tbsp. | ||
| 2 tbsp. shortening 2 tbsp. | ||
| 1 tbsp. sugar | 1 tbsp. | |
| 1 tsp. | salt 1 tsp. | |
| 3-1/3 cups | white flour* | 3-1/4 cups |
| 3/4 tsp. | yeast | 3/4 tsp. |
-
Measure ingredients in the order listed into Baking Pan.
-
Insert Baking Pan into oven chamber, twist to secure. Close lid.
-
Select: Basic Bread Setting.
-
Select "Regular" or "Dark" crust.
-
Press Start - There will be a 15-minute preheat delay before mixing begins.
-
Using oven mitts, remove bread when completion beeps sound.
-
Cool on a wire rack before slicing.
Time: 3:50 hrs
100% WHOLE WHEAT
| American Canadian | ||
| 1-1/4 cups water 1-1/4 cups | ||
| 2 tbsp. powdered milk 2 tbsp. | ||
| 2 tbsp. shortening 2 tbsp. | ||
| 1 tbsp. | honey | 1 tbsp. |
| 1 tbsp. | molasses | 1 tbsp. |
| 1 tsp. | salt 1 tsp. | |
| 3 cups | whole wheat flour | 3-1/4 cups |
| 1-1/4 tsp. | yeast | 1-1/4 tsp. |
-
Measure ingredients in the order listed into Baking Pan.
-
Insert Baking Pan into oven chamber, twist to secure. Close lid.
-
Select: Whole Grain Setting.
-
Crust setting is pre-selected.
-
Press Start - There will be a 25-minute preheat delay before mixing begins.
-
Using oven mitts, remove bread when completion beeps sound.
-
Cool on a wire rack before slicing. Time: 4:10 hrs
▲Helpful Tip
U.S. whole wheat flour results in a shorter, denser loaf than Canadian whole wheat flours. You can substitute one cup of white flour for one cup of whole wheat for a lighter, yet delicious wheat taste!
DINNER ROLLS
| American CanadianDough Recipe | ||
| 1-2/3 cups water 1-2/3 cups | ||
| 2 tbsp. powdered milk 2 tbsp. | ||
| 2 tbsp. shortening 2 tbsp. | ||
| 2 tbsp. sugar | 2 tbsp. | |
| 1-1/2 tsp. | salt 1-1/2 tsp. | |
| 4-1/2 cups | white flour* | 4-1/3 cups |
| 1-1/4 tsp. | yeast | 1-1/4 tsp. |
| GLAZE: | ||
| 1 | egg, beaten | 1 |
| 1 tbsp. | water 1 tbsp. |
-
Measure ingredients in the order listed into Baking Pan.
-
Insert Baking Pan into oven chamber, twist to secure. Close lid.
-
Select: Dough/Pasta Setting.
-
Press Start - There will be a 25-minute preheat delay before mixing begins.
-
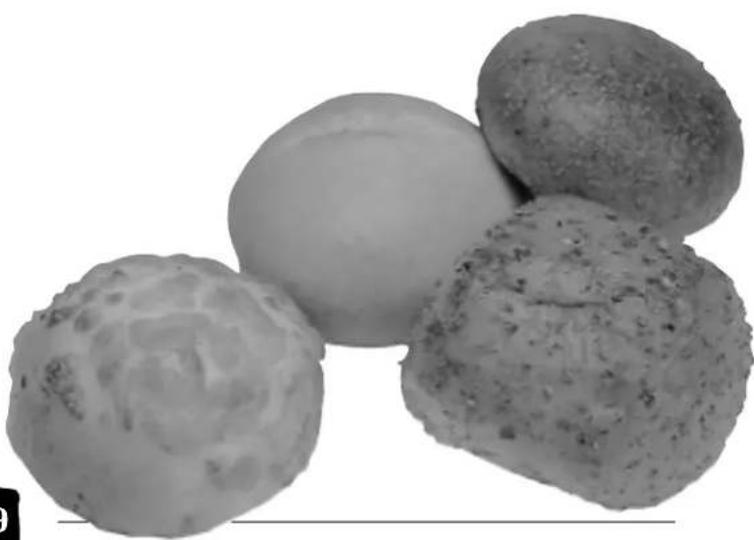
When cycle is complete remove dough from machine to a lightly floured surface. If necessary, knead in enough flour to make dough easy to handle. Divide dough into 12 - 18 pieces. Shape each piece into a smooth ball. Place balls, almost touching in two greased 8 inch square cake pans; cover and let rise for 30 minutes or until almost double in volume. Brush with glaze. Bake in 350^ (177°C) oven for 20-25 minutes or until golden brown and bottom sounds hollow when tapped. Remove from pans and let cool on wire racks.
▲Helpful Tip
This recipe can be formed into cloverleaf, crescents, parker-house or bread sticks.
natural_image
Close-up of four round, textured, round objects with no visible text or symbolsThe Basics
CLASSIC FRENCH
| American CanadianDough Recipe | ||
| 1-1/4 cups water 1-1/4 cups | ||
| 1 tbsp. | sugar | 1 tbsp. |
| 1-1/4 tsp. | salt 1-1/4 tsp. | |
| 3-2/3 cups | white flour* | 3-1/2 cups |
| 1-1/4 tsp. | yeast | 1-1/4 tsp. |
| GLAZE: | ||
| 1 tbsp. cornmeal (optional) | 1 tbsp. | |
| 1 tbsp. | oil | 1 tbsp. |
| 1 | egg white, beaten | 1 |
| 1 tbsp. | water 1 tbsp. | |
- Measure first 5 ingredients in the order listed into Baking Pan.
- Insert Baking Pan into oven chamber, twist to secure. Close lid.
- Select: Dough/Pasta Setting.
- Press Start - There will be a 25-minute preheat delay before mixing begins.
- When cycle is complete, remove dough from machine to a lightly floured surface. If necessary, knead in enough flour to make dough easy to handle.
- Divide dough in half and roll each half into a 10"x8" inch rectangle. Beginning at long end, roll up tightly as for jelly roll. Pinch seams and ends to seal. Taper ends by gently rolling back and forth.
- Place each loaf, seam side down, on a greased baking sheet sprinkled with cornmeal (optional). Lightly brush each loaf with oil. Cover and let rise in warm, draft-free place until double in size, 20 to 30 minutes. With a sharp knife make 3 or 4 diagonal cuts about 1/4 inch deep across the top of each loaf. Lightly beat egg white and 1 tablespoon water; brush some of egg white mixture over top of each loaf. Bake at 350^ F (177^) for 20 minutes. Brush again with remaining egg white mixture.
- Bake 5 to 10 minutes more or until done. Bread should sound hollow when tapped. (For even browning when baking two loaves, switch positions of sheets halfway through baking.) Remove the breads from the sheets; cool on a wire rack. Yield: Makes 2 loaves.
CARAWAY RYE
| American Canadian | ||
| 1-1/4 cups water 1-1/4 cups | ||
| 2 tbsp. powdered milk 2 tbsp. | ||
| 2 tbsp. shortening 2 tbsp. | ||
| 1 tbsp. brown sugar 1 tbsp. | ||
| 1 tbsp. molasses | 1 tbsp. | |
| 1-1/2 tsp. | salt 1-1/2 tsp. | |
| 3/4 cup | whole wheat flour | 3/4 cup |
| 1-3/4 cups | white flour* | 1-3/4 cups |
| 1/2 cup | rye flour | 2/3 cup |
| 2 tsp. | caraway seeds | 2 tsp. |
| 1-1/4 tsp. | yeast | 1-1/4 tsp. |
-
Measure ingredients in the order listed into Baking Pan.
-
Insert Baking Pan into oven chamber, twist to secure. Close lid.
-
Select: Whole Grain Setting.
-
Crust setting is pre-selected.
-
Press Start - There will be a 25-minute preheat delay before mixing begins.
-
Using oven mitts, remove bread when completion beeps sound.
-
Cool on a wire rack before slicing.
Time: 4:10 hrs
Helpful Tip
This crusty french bread, with its chewy texture makes a delicious garlic bread. Just slice lengthwise, top with garlic butter & broil.

Super Rapid Bake Breads
All the breads in this section will take only 1 hour & 10 minutes to complete.
For Super Rapid bread recipes, ingredient amounts are the same for Canada and the U.S.
SUPER RAPID BASIC WHITE
1-1/3 cups water
2 tbsp. powdered milk
2 tbsp. shortening
2 tbsp. sugar
3/4 tsp. salt
3-1/4 cups white flour*
4 tsp. yeast
- Measure ingredients in the order listed into Baking Pan.
- Insert Baking Pan into oven chamber, twist to secure. Close lid.
- Select: Rapid Bake Setting.
- Select "Regular" or "Dark" crust.
- Press Start - Mixing begins immediately.
- Using oven mitts, remove bread when completion beeps sound.
- Cool on a wire rack before slicing.
SUPER RAPID LEMON POPPY SEED
1-1/4 cups water
2 tbsp. powdered milk
2 tbsp. shortening
2 tbsp. sugar
3/4 tsp. salt
3/4 tsp. lemon juice
3-1/4 cups white flour*
1/4 tsp. nutmeg
1 tsp. grated lemon rind
1 tbsp. poppy seeds
4 tsp. yeast
- Measure ingredients in the order listed into Baking Pan.
- Insert Baking Pan into oven chamber, twist to secure. Close lid.
- Select: Rapid Bake Setting.
- Select "Regular" or "Dark" crust.
- Press Start - Mixing begins immediately.
- Using oven mitts, remove bread when completion beeps sound.
- Cool on a wire rack before slicing.
SUPER RAPID CINNAMON RAISIN
1-2/3 cups water
3 tbsp. powdered milk
3 tbsp. shortening
3 tbsp. sugar
1/2 tsp. salt
4-1/4 cups white flour*
1-1/2 tsp. cinnamon
1/2 cup raisins
4 tsp. yeast
- Measure ingredients in the order listed into Baking Pan.
- Insert Baking Pan into oven chamber, twist to secure. Close lid.
- Select: Rapid Bake Setting.
- Select "Regular" or "Dark" crust.
- Press Start - Mixing begins immediately.
- Using oven mitts, remove bread when completion beeps sound.
- Cool on a wire rack before slicing.
Helpful Tip
Super Rapid Bake loaves use 3 to 4 times more yeast than other bread types in order to have bread rise in such a short time period.
Super Rapid Bake Breads
SUPER RAPID CORNBREAD
1-1/4 cups 1 egg+water to =
2 tbsp. powdered milk
1 tbsp. shortening
2 tbsp. honey
1/2 tsp. salt
2-3/4 cups white flour*
1/3 cup cornmeal
4 tsp. yeast
- Measure ingredients in the order listed into Baking Pan.
- Insert Baking Pan into oven chamber, twist to secure. Close lid.
- Select: Rapid Bake Setting.
- Select "Regular" or "Dark" crust.
- Press Start - Mixing begins immediately.
- Using oven mitts, remove bread when completion beeps sound.
- Cool on a wire rack before slicing.
SUPER RAPID ITALIAN HERB
1-2/3 cups water
3 tbsp. powdered milk
3 tbsp. shortening
3 tbsp. sugar
3/4 tsp. salt
4-1/4 cups white flour*
1-1/2 tsp. dried marjoram
1-1/2 tsp. dried basil
1-1/2 tsp. dried thyme
4 tsp. yeast
- Measure ingredients in the order listed into Baking Pan.
- Insert Baking Pan into oven chamber, twist to secure. Close lid.
- Select: Rapid Bake Setting.
- Select "Regular" or "Dark" crust.
- Press Start - Mixing begins immediately.
- Using oven mitts, remove bread when completion beeps sound.
- Cool on a wire rack before slicing.
SUPER RAPID CHEESE 'N ONION
1-2/3 cups water
3 tbsp. powdered milk
3 tbsp. sugar
3/4 tsp. salt
4-1/4 cups white flour*
2 tbsp. dried onion flakes
1/3 cup shredded old cheddar cheese
4 tsp. yeast
- Measure ingredients in the order listed into Baking Pan.
- Insert Baking Pan into oven chamber, twist to secure. Close lid.
- Select: Rapid Bake Setting.
- Select "Regular" or "Dark" crust.
- Press Start - Mixing begins immediately.
- Using oven mitts, remove bread when completion beeps sound.
- Cool on a wire rack before slicing.

natural_image
Black-and-white photo of a bowl of porridge with a spoon, next to a textured rock and a small cylindrical object (no text or symbols visible)Sandwich Pleasers For The Brown Bag Club
This selection of recipes will have you looking forward to noon!
LEMON POPPY SEED
| American Canadian | ||
| 1-1/4 cups water | 1-1/4 cups | |
| 2 tbsp. powdered milk | 2 tbsp. | |
| 2 tbsp. shortening | 2 tbsp. | |
| 1 tbsp. | sugar | 1 tbsp. |
| 1-1/4 tsp. | salt | 1-1/4 tsp. |
| 3/4 tsp. | lemon juice | 3/4 tsp. |
| 3-1/4 cups | white flour* | 3 cups |
| 1/4 tsp. | nutmeg 1/4 tsp. | |
| 1 tsp. | grated lemon rind | 1 tsp. |
| 1 tbsp. | poppy seeds | 1 tbsp. |
| 3/4 tsp. | yeast | 3/4 tsp. |
-
Measure ingredients in the order listed into Baking Pan.
-
Insert Baking Pan into oven chamber, twist to secure. Close lid.
-
Select: Basic Bread Setting.
-
Select "Regular" or "Dark" crust.
-
Press Start - There will be a 15-minute preheat delay before mixing begins.
-
Using oven mitts, remove bread when completion beeps sound.
-
Cool on a wire rack before slicing. Time: 3:50 hrs
SEVEN GRAIN
| American Canadian | ||
| 1-1/3 cups water 1-1/3 cups | ||
| 2 tbsp. powdered milk 2 tbsp. | ||
| 2 tbsp. shortening 2 tbsp. | ||
| 2 tbsp. honey 2 tbsp. | ||
| 1-1/2 tsp. | salt 1-1/2 tsp. | |
| 1 cup | whole wheat flour | 1-1/4 cups |
| 2 cups | white flour* | 1-3/4 cups |
| 1/2 cup | seven grain cereal | 1/2 cup |
| 1-1/4 tsp. | yeast | 1-1/4 tsp. |
-
Measure ingredients in the order listed into Baking Pan.
-
Insert Baking Pan into oven chamber, twist to secure. Close lid.
-
Select: Whole Grain Setting.
-
Crust setting is pre-selected.
-
Press Start - There will be a 25-minute preheat delay before mixing begins.
-
Using oven mitts, remove bread when completion beeps sound.
-
Cool on a wire rack before slicing. Time: 4:10 hrs
▲Helpful Tip
You will find that 5 grain or multi grains work well in this recipe. These are available in many grocery stores. In some areas of both countries, you will find an excellent selection at bulk or health food stores. Make sure you choose the unsweetened grain.
PUMPERNICKEL
| American Canadian | ||
| 1-1/4 cups water 1-1/4 cups | ||
| 2 tbsp. powdered milk 2 tbsp. | ||
| 2 tbsp. shortening 2 tbsp. | ||
| 1 tbsp. honey 1 tbsp. | ||
| 1 tbsp. molasses | 1 tbsp. | |
| 1-1/2 tsp. | salt 1-1/2 tsp. | |
| 1/2 cup | whole wheat flour | 3/4 cup |
| 2 cups | white flour* | 1-3/4 cups |
| 1/2 cup | rye flour | 1/2 cup |
| 2 tsp. | cocoa 2 tsp. | |
| 1 tsp. | instant coffee granules | 1 tsp. |
| 1-1/4 tsp. | yeast | 1-1/4 tsp. |
-
Measure ingredients in the order listed into Baking Pan.
-
Insert Baking Pan into oven chamber, twist to secure. Close lid.
-
Select: Whole Grain Setting.
-
Crust setting is pre-selected.
-
Press Start - There will be a 25-minute preheat delay before mixing begins.
-
Using oven mitts, remove bread when completion beeps sound.
-
Cool on a wire rack before slicing.
Time: 4:10 hrs
natural_image
Black-and-white photo of a whole bread roll with sesame seeds, a cut of onion, and a white cheese block (no text or symbols visible)Sandwich Pleasers For The Brown Bag Club
CRACKED WHEAT
| American Canadian | ||
| 1-1/4 cups water 1-1/4 cups | ||
| 2 tbsp. powdered milk 2 tbsp. | ||
| 2 tbsp. shortening 2 tbsp. | ||
| 2 tbsp. honey 2 tbsp. | ||
| 1-1/4 tsp. | salt | 1-1/4 tsp. |
| 3/4 cup | whole wheat flour | 1 cup |
| 2 cups | white flour* | 1-1/2 cups |
| 3/4 cup | cracked wheat | 3/4 cup |
| 1-1/4 tsp. | yeast | 1-1/4 tsp. |
-
Measure ingredients in the order listed into Baking Pan.
-
Insert Baking Pan into oven chamber; twist to secure. Close lid.
-
Select: Whole Grain Setting.
-
Crust setting is pre-selected.
-
Press Start - There will be a 25-minute preheat delay before mixing begins.
-
Using oven mitts, remove bread when completion beeps sound.
-
Cool on a wire rack before slicing.
Time: 4:10 hrs
▲Helpful Tip
The crunchy texture & slightly nutty flavor of this bread makes it a treat with luncheon meats. Look for Bulgar or cracked wheat in large grocery stores, bulk & health food stores.
BUTTERMILK WHEAT
| American Canadian | ||
| 1-1/3 cups | buttermilk | 1-1/3 cups |
| 1 tbsp. shortening | 1 tbsp. | |
| 2 tbsp. | sugar 2 tbsp. | |
| 1-1/4 tsp. | salt 1-1/4 tsp. | |
| 1/3 cup | whole wheat flour | 2/3 cup |
| 2-1/3 cups | white flour* | 2-1/3 cups |
| 1-1/2 tsp. | yeast | 1-1/2 tsp. |
-
Measure ingredients in the order listed into Baking Pan.
-
Insert Baking Pan into oven chamber, twist to secure. Close lid.
-
Select: Whole Grain Setting.
-
Crust setting is pre-selected.
-
Press Start - There will be a 25-minute preheat delay before mixing begins.
-
Using oven mitts, remove bread when completion beeps sound.
-
Cool on a wire rack before slicing.
Time: 4:10 hrs
CHUNKY NUT
| American Canadian | ||
| 1-1/4 cups water 1-1/4 cups | ||
| 2 tbsp. powdered milk | 2 tbsp. | |
| 1 tbsp. | olive oil | 1 tbsp. |
| 1 tbsp. honey | 1 tbsp. | |
| 1-1/4 tsp. | salt 1-1/4 tsp. | |
| 3-1/4 cups | white flour* | 3 cups |
| 1 tsp. | yeast | 1 tsp. |
| 1/4 cup | ADD INGREDIENTS: sunflower seeds, raw, unsalted, shells removed | 1/4 cup |
| 1/4 cup | walnuts, chopped | 1/4 cup |
-
Measure first 7 ingredients in the order listed into Baking Pan.
-
Insert Baking Pan into oven chamber, twist to secure. Close lid.
-
Select: Whole Grain Setting.
-
Crust setting is pre-selected.
-
Press Start - There will be a 25-minute preheat delay before mixing begins.
-
Add sunflower seeds & walnuts when "Add Ingredient" signal beeps.
-
Using oven mitts, remove bread when completion beeps sound.
-
Cool on a wire rack before slicing. Time: 4:10 hrs
Helpful Tip
Omit salt when using salted sunflower seeds. Rinse roasted sunflower seeds in hot water to remove oil and dry well.

natural_image
Black-and-white photo of a sliced bread next to bananas and olive oil, with no visible text or symbols.Sandwich Pleasers For The Brown Bag Club
APPLE CINNAMON GRANOLA
| American Canadian | ||
| 3/4 cup apple juice, unsweetened 3/4 cup | ||
| 1/2 cup applesauce, unsweetened 1/2 cup | ||
| 1 tbsp. shortening 1 tbsp. | ||
| 1 tbsp. honey 1 tbsp. | ||
| 1 tsp. | salt 1 tsp. | |
| 3/4 cup | whole wheat flour | 3/4 cup |
| 2 cups | white flour* | 2 cups |
| 1/4 cup | granola | 1/3 cup |
| 1 tsp. | cinnamon | 1 tsp. |
| 1-1/2 tsp. | yeast | 1-1/2 tsp. |
| 1/4 cup | ADD INGREDIENTS:raisins | 1/4 cup |
- Measure first 10 ingredients in the order listed into Baking Pan.
- Insert Baking Pan into oven chamber, twist to secure. Close lid.
- Select: Sweet Setting.
- Select "Regular" or "Dark" crust.
- Press Start - There will be a 15-minute preheat delay before mixing begins.
- Add raisins when "Add Ingredient" signal beeps.
- Using oven mitts, remove bread when completion beeps sound.
- Cool on a wire rack before slicing. Time: 3:50 hrs
▲Helpful Tip
Try different flavors of granola for a variety of tastes.
CORNBREAD
| American Canadian | ||
| 1-1/4 cups | 1 egg+water to = | 1-1/4 cups |
| 2 tbsp. | powdered milk | 2 tbsp. |
| 1 tbsp. shortening 1 tbsp. | ||
| 1 tbsp. honey 1 tbsp. | ||
| 1-1/2 tsp. | salt 1-1/2 tsp. | |
| 3 cups | white flour* | 2-2/3 cups |
| 1/3 cup | cornmeal | 1/3 cup |
| 1 tsp. | yeast | 1 tsp. |
- Measure ingredients in the order listed into Baking Pan.
- Insert Baking Pan into oven chamber, twist to secure. Close lid.
- Select: Basic Bread Setting.
- Select "Regular" or "Dark" crust.
- Press Start - There will be a 15-minute preheat delay before mixing begins.
- Using oven mitts, remove bread when completion beeps sound.
- Cool on a wire rack before slicing. Time: 3:50 hrs
OATMEAL NUT
| American Canadian | ||
| 1-1/4 cups | water | 1-1/4 cups |
| 2 tbsp. | powdered milk | 2 tbsp. |
| 2 tbsp. shortening | 2 tbsp. | |
| 1 tbsp. | molasses | 1 tbsp. |
| 1 tbsp. honey | 1 tbsp. | |
| 1-1/4 tsp. | salt | 1-1/4 tsp. |
| 3/4 cup | whole wheat flour | 1 cup |
| 2 cups | white flour* | 1-1/2 cups |
| 1/3 cup | oatmeal, quick cooking | 1/3 cup |
| 1-1/4 tsp. | yeast | 1 tsp. |
| 1/4 cup | ADD INGREDIENTS: walnuts, chopped | 1/4 cup |
- Measure first 10 ingredients in the order listed into Baking Pan.
- Insert Baking Pan into oven chamber, twist to secure. Close lid.
- Select: Whole Grain Setting.
- Crust setting is pre-selected.
- Press Start - There will be a 25-minute preheat delay before mixing begins.
- Add walnuts when "Add Ingredient" signal beeps.
- Using oven mitts, remove bread when completion beeps sound.
- Cool on a wire rack before slicing. Time: 4:10 hrs
▲Helpful Tip
Small flake rolled oats gives a traditional oatmeal bread texture. Do not use "instant cooking" oatmeal.

natural_image
Black-and-white photo of sliced corn on a white plate, no text or symbols visibleDinner Favorites
These selections will add zest to any casserole or entrée.
ITALIAN HERB
| American Canadian | ||
| 1-1/4 cups water 1-1/4 cups | ||
| 2 tbsp. powdered milk 2 tbsp. | ||
| 2 tbsp. shortening | 2 tbsp. | |
| 1 tbsp. sugar 1 tbsp. | ||
| 1 tsp. | salt 1 tsp. | |
| 3-1/3 cups white flour* 3-1/4 cups | ||
| 1 tsp. | dried marjoram | 1 tsp. |
| 1 tsp. | dried basil | 1 tsp. |
| 1 tsp. | dried thyme 1 tsp. | |
| 3/4 tsp. | yeast | 3/4 tsp. |
-
Measure ingredients in the order listed into Baking Pan.
-
Insert Baking Pan into oven chamber, twist to secure. Close lid.
-
Select: Basic Bread Setting.
-
Select "Regular" or "Dark" crust.
-
Press Start - There will be a 15-minute preheat delay before mixing begins.
-
Using oven mitts, remove bread when completion beeps sound.
-
Cool on a wire rack before slicing. Time:3:50 hrs
▲Helpful Tip
Delicious with spaghetti or lasagna. Vary the herbs to suit your entrée.
BACON-CHIVE POTATO
| American Canadian | ||
| 1/2 cup | instant potato flakes | 1/2 cup |
| 1-1/4 cups water 1-1/4 cups | ||
| 1 tbsp. | oil | 1 tbsp. |
| 1 tbsp. sugar 1 tbsp. | ||
| 1/3 cup | cooked bacon, finely chopped (about 5 slices) | 1/3 cup |
| 1-1/2 tbsp. | freeze dried chives** | 1-1/2 tbsp. |
| 3/4 tsp. | salt 3/4 tsp. | |
| 3-1/2 cups white flour* 3-1/3 cups | ||
| 1 tsp. | yeast | 1 tsp. |
-
Measure ingredients in the order listed into Baking Pan.
-
Insert Baking Pan into oven chamber, twist to secure. Close lid.
-
Select: Basic Bread Setting.
-
Select "Regular" or "Dark" crust.
-
Press Start - There will be a 15-minute preheat delay before mixing begins.
-
Using oven mitts, remove bread when completion beeps sound.
-
Cool on a wire rack before slicing. Time:3:50 hrs
** Or use 1/3 cup snipped fresh chives.
CHEESE 'N ONION
| American Canadian | ||
| 1-1/4 cups water 1-1/4 cups | ||
| 2 tbsp. powdered milk 2 tbsp. | ||
| 1 tbsp. sugar 1 tbsp. | ||
| 1-1/4 tsp. salt 1 tsp. | ||
| 3-1/3 cups white flour* 3-1/4 cups | ||
| 1 tbsp. | dried onion flakes | 1 tbsp. |
| 1/4 cup | shredded old cheddar cheese | 1/4 cup |
| 1 tsp. | yeast | 1 tsp. |
-
Measure ingredients in the order listed into Baking Pan.
-
Insert Baking Pan into oven chamber, twist to secure. Close lid.
-
Select: Sweet Bread Setting.
-
Select "Regular" or "Dark" crust.
-
Press Start - There will be a 15-minute preheat delay before mixing begins.
-
Using oven mitts, remove bread when completion beeps sound.
-
Cool on a wire rack before slicing. Time:3:50 hrs
▲Helpful Tip
1/4 cup chopped fresh onion can be substituted for the dried onion flakes for a milder onion flavour. Purchase 1-1/2 oz or 35 g of a good quality, sharp flavoured Old Cheddar Cheese for a strong cheese flavour. Dough Variation: Prepare this recipe using the dough/pasta setting Form into 6 hamburger buns following the instructions under the Dinner Rolls recipe, & enjoy at your barbecue.
PESTO
| American Canadian | ||
| 1 cup | water 1 cup | |
| 2 tbsp. | olive oil | 2 tbsp. |
| 1/4 cup | finely chopped fresh parsley | 1/4 cup |
| 1/4 cup | grated Parmesan cheese | 1/4 cup |
| 2 tsp. | dried basil leaves, crushed | 2 tsp. |
| 2 tsp. | sugar 2 tsp. | |
| 1 clove garlic, minced | 1 | |
| 1 tsp. | salt 1 tsp. | |
| 3-1/4 cups white flour* | 3 cups | |
| 1 tsp. | yeast | 1 tsp. |
-
Measure ingredients in the order listed into Baking Pan.
-
Insert Baking Pan into oven chamber, twist to secure. Close lid.
-
Select: Basic Bread Setting.
-
Select "Regular" or "Dark" crust.
-
Press Start - There will be a 15-minute preheat delay before mixing begins.
-
Using oven mitts, remove bread when completion beeps sound.
-
Cool on a wire rack before slicing. Time:3:50 hrs
Dinner Favorites
COTTAGE CHEESE DILL
| American Canadian | ||
| 3/4 cup | water | 3/4 cup |
| 2/3 cup | cottage cheese | 3/4 cup |
| 1 tbsp. | shortening 1 tbsp. | |
| 1 tbsp. sugar 1 tbsp. | ||
| 1-1/4 tsp. | salt 1-1/4 tsp. | |
| 3 cups | white flour* 3 cups | |
| 1 tbsp. | dried onion flakes | 1 tbsp. |
| 1/2 tsp. | dill seeds | 1/2 tsp. |
| 1 tsp. | yeast | 1 tsp. |
- Measure ingredients in the order listed into Baking Pan.
- Insert Baking Pan into oven chamber, twist to secure. Close lid.
- Select: Basic Bread Setting.
- Select "Regular" or "Dark" crust.
- Press Start - There will be a 15-minute preheat delay before mixing begins.
- Using oven mitts, remove bread when completion beeps sound.
- Cool on a wire rack before slicing. Time:3:50 hrs
PIZZA DOUGH
| American CanadianDough Recipe | ||
| 1 cup beer 1 cup | ||
| 1 tbsp. shortening 1 tbsp. | ||
| 1 tbsp. sugar 1 tbsp. | ||
| 1 tsp. salt 1 tsp. | ||
| 2-3/4 cups white flour* 2-2/3 cups | ||
| 1-1/4 tsp. | yeast | 1-1/4 tsp. |
| OPTIONAL INGREDIENT: | ||
| 2 tbsp. | cornmeal | 2 tbsp. |
- Measure first 6 ingredients in order listed into Baking Pan.
- Insert Baking Pan into oven chamber, twist to secure. Close lid.
- Select: Dough/Pasta Setting.
- Press Start - There will be a 25-minute preheat delay before mixing begins.
- When cycle is complete, remove dough from machine to a lightly floured surface. If necessary, knead in enough flour to make dough easy to handle.
- Grease pans- (two 12-inch/30 cm, one 14-inch/35 cm or one 15x10-inch)- and sprinkle with cornmeal (optional). Roll out dough and place on pan or pat in pan.
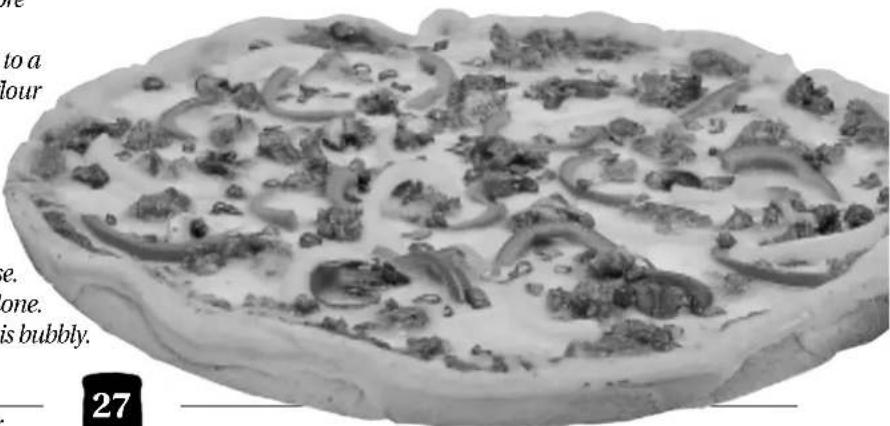
- Top each pizza with sauce, meat, vegetables and cheese. Bake at 425°F (218°C) for 15 to 25 minutes or until done. Pizza is done when edges of crust are golden and cheese is bubbly. Yield: Makes 1 large or 2 medium pizzas.
SUN-DRIED TOMATO & ROSEMARY
| American Canadian | ||
| 1-1/4 cups | water | 1-1/4 cups |
| 3 tbsp. | unsalted dried tomatoes,snipped(do not use oil pack) | 3 tbsp. |
| 1 tbsp. | shortening | 1 tbsp. |
| 1 tbsp. sugar 1 tbsp. | ||
| 1 tsp. salt 1 tsp. | ||
| 3-1/3 cups white flour* 3-1/4 cups | ||
| 1 tsp. | rosemary, crushed | 1 tsp. |
| 1/4 tsp. | paprika | 1/4 tsp. |
| 1-1/4 tsp. | yeast | 1-1/4 tsp. |
- Measure ingredients in the order listed into Baking Pan.
- Insert Baking Pan into oven chamber, twist to secure. Close lid.
- Select: Basic Bread Setting.
- Select "Regular" or "Dark" crust.
- Press Start - There will be a 15-minute preheat delay before mixing begins.
- Using oven mitts, remove bread when completion beeps sound.
- Cool on a wire rack before slicing. Time:3:50 hrs
▲Helpful Tip
Sun-dried tomatoes vary in different areas of both countries. If they are too hard to snip, just soak in cold water, drain & dry well before using. Basil, dill or oregano may be substituted for the rosemary for interesting flavor variations.
Helpful Tip
Water can be substituted for beer in the recipe. Add 1/2 - 1 tsp. basil or oregano to the ingredients in the Baking Pan for a spicier crust.
Treats For Every Age
Enjoy these recipes for a change of pace!
CINNAMON RAISIN
| American Canadian | ||
| 1-1/4 cups | water | 1-1/4 cups |
| 1 tbsp. | powdered milk | 1 tbsp. |
| 2 tbsp. shortening | 2 tbsp. | |
| 2 tbsp. sugar 2 tbsp. | ||
| 1-1/4 tsp. | salt 1-1/4 tsp. | |
| 3-1/3 cups white flour* 3-1/4 cups | ||
| 1 tsp. | cinnamon | 1 tsp. |
| 1 tsp. | yeast | 1 tsp. |
| 1/4 cup | ADD INGREDIENTS:raisins | 1/4 cup |
- Measure first 8 ingredients in the order listed into Baking Pan.
- Insert Baking Pan into oven chamber, twist to secure. Close lid.
- Select: Sweet Bread Setting.
- Select "Regular" or "Dark" crust.
- Press Start - There will be a 15-minute preheat delay before mixing begins.
- Add raisins when "Add Ingredient" signal beeps.
- Using oven mitts, remove bread when completion beeps sound.
- Cool on a wire rack before slicing.
Time: 3:50 hrs
MAPLE RAISIN
| American Canadian | ||
| 1-1/4 cups | milk | 1-1/4 cups |
| 2 tbsp. | butter or margarine | 2 tbsp. |
| 1 tbsp. | brown sugar | 1 tbsp. |
| 1-1/2 tsp. | maple flavouring | 1-1/2 tsp. |
| 1 tsp. salt 1 tsp. | ||
| 3-1/3 cups white flour* 3-1/4 cups | ||
| 1 tsp. | yeast | 1 tsp. |
| 1/2 cup | ADD INGREDIENTS:raisins | 1/2 cup |
- Measure first 7 ingredients in the order listed into Baking Pan.
- Insert Baking Pan into oven chamber, twist to secure. Close lid.
- Select: Sweet Bread Setting.
- Select "Regular" or "Dark" crust.
- Press Start - There will be a 15-minute preheat delay before mixing begins.
- Add raisins when "Add Ingredient" signal beeps.
- Using oven mitts, remove bread when completion beeps sound.
- Cool on a wire rack before slicing.
Time: 3:50 hrs
BAKED PRETZELS
| American Canadian Dough Recipe | ||
| 1 cup beer 1 cup | ||
| 1 tbsp. butter 1 tbsp. | ||
| 2 tbsp. sugar 2 tbsp. | ||
| 1 tsp. salt 1 tsp. | ||
| 2-3/4 cups white flour* 2-2/3 cups | ||
| 3/4 tsp. | yeast | 3/4 tsp. |
| 1 | GLAZE: egg, lightly beaten | 1 |
| 1 tbsp. | water | 1 tbsp. |
| coarse salt or sesame seeds |
- Measure first 6 ingredients in order listed into Baking Pan.
- Insert Baking Pan into oven chamber, twist to secure. Close lid.
- Select: Dough/Pasta Setting.
- Press Start - There will be a 25-minute preheat delay before mixing begins.
- When cycle is complete, remove dough from machine to a lightly floured surface. If necessary, knead in enough flour to make dough easy to handle. Roll into a 14" x 9" (36 cm x 23 cm) rectangle. With sharp knife, cut into eighteen 14" x 1/2" (36 cm x 1.27 cm) strips. Gently pull each strip into a rope 16 inches (41 cm) long. To shape into pretzels: Curve ends of each rope to make a circle; cross ends at top. Twist ends once and lay over bottom of circle. Place on greased baking sheets. Do not let rise.
- Combine lightly beaten egg and 1 tablespoon water; brush on pretzels. Sprinkle with coarse salt or sesame seeds. Bake at
350°F (177°C) for 18 to 20 minutes or until done. (For even browning when using two sheets, switch positions halfway through baking.) Remove from sheets; cool on wire rack. Yield: Makes 18 pretzels.

Treats For Every Age
CHERRY CHEESE COFFEECAKE
| American | Dough Recipe | Canadian |
| 1/3 cup | milk | 1/3 cup |
| 1/3 cup | water | 1/3 cup |
| 2 | eggs, beaten | 2 |
| 1/4 cup | butter, cut in pieces | 1/4 cup |
| 1/4 cup | sugar | 1/4 cup |
| 1-1/2 tsp. | grated lemon rind | 1-1/2 tsp. |
| 3/4 tsp. | salt | 3/4 tsp. |
| 1/4 cup | toasted, chopped almonds | 1/4 cup |
| 3-1/2 cups | white flour* | 3-1/3 cups |
| 3/4 tsp. | yeast | 3/4 tsp. |
| CHEESE FILLING (FOR ABOVE): | ||
| 2 (250g) pkg. | cream cheese, softened | 2 (250g) pkg. |
| 1/3 cup | sugar | 1/3 cup |
| 2 tbsp. | flour | 2 tbsp. |
| 2 tbsp. | milk | 2 tbsp. |
| FILLING: | ||
| 1 cup | Cherry Pie filling | 1 cup |
| 2 tbsp. | toasted, sliced almonds | 2 tbsp. |
- Measure first 10 ingredients in order listed into Baking Pan.
- Insert Baking Pan into oven chamber, twist to secure. Close lid.
- Select: Dough/Pasta Setting.
- Press Start - There will be a 25-minute preheat delay before mixing begins.
- When cycle is complete, remove dough from machine to a lightly floured surface. Divide dough into 2 equal portions. Place each portion into 2 greased 9-inch (23 cm) round cake pans. Grease top of batter and spread evenly onto bottom and sides of pans.
- Spread half of Cheese Filling in center of batter in each pan.
- Let rise in warm, draft-free place until doubled in size, about 30 minutes.
- Bake at 350^ F ( 177^ C)† for 25-30 minutes or until done. Remove from pans onto wire racks.
- Spread evenly 1 cup cherry filling or cherry jam over each coffeecake. Decorate with extra toasted sliced almonds. Yield: 2 coffeecakes.
Time: 3:50 hrs
† If using dark Teflon or Pyrex pans, lower oven temperature to 325°F (163°C).
UPSIDE-DOWN PECAN BUNS
| American Canadian Dough Recipe | ||
| 1 cup water 1 cup | ||
| 2 tbsp. skim milk powder 2 tbsp. | ||
| 1 egg, beaten 1 | ||
| 2 tbsp. butter 2 tbsp. | ||
| 3 tbsp. | sugar | 3 tbsp. |
| 1-1/4 tsp. | salt | 1-1/4 tsp. |
| 3-2/3 cups | white flour* | 3-1/2 cups |
| 1 tsp. | yeast | 1 tsp. |
| 1/4 cup | BROWN SUGAR-NUT SYRUP: | |
| butter 1/4 cup | ||
| 1/2 cup | brown sugar, packed | 1/2 cup |
| 2 tbsp. | water 2 tbsp. | |
| 1/2 cup | pecan halves | 1/2 cup |
| FILLING: | ||
| 3 tbsp. melted butter | 3 tbsp. | |
| 2/3 cup | brown sugar, packed | 2/3 cup |
| 1 tbsp. | ground cinnamon | 1 tbsp. |
| 3/4 cup | chopped pecans | 3/4 cup |
- Measure first 8 ingredients in the order listed into Baking Pan.
- Insert Baking Pan into oven chamber, twist to secure. Close lid.
- Select: Dough/Pasta Setting.
- Press Start - There will be a 25-minute preheat delay before mixing begins.
- Meanwhile, prepare syrup (recipe above). Boil together butter, water and brown sugar for 1 minute. Immediately, pour into a 9 x 13-inch (23 cm x 33 cm) pan; tilt pan to cover bottom evenly. Arrange pecans, flat side up, on syrup.
- When cycle is complete, remove dough from machine to a lightly floured surface. If necessary, knead in enough flour to make dough easy to handle. Roll dough into a 12 x 18-inch (30 cm x 46 cm) rectangle. Brush with melted butter. Sprinkle evenly with a mixture of brown sugar and ground cinnamon. Sprinkle chopped pecans on top. Starting at large side, roll up jelly-roll fashion. Pinch edge to seal. Cut roll into 12 equal pieces. Place over Syrup. Cover and let rise 30 minutes or until double in volume. Remove cover.
- Bake at 375^ F ( 191^ C) for 35 minutes. Loosen edges and invert onto serving tray.
Yield: Makes 12 buns
Time: 3:50 hrs
International Holiday Breads
Bake extra to give as gifts to your friends & relatives!
RASPBERRY BRAID
| American Canadian—Dough Recipe | ||
| 1 cup | milk 1 cup | |
| 1 egg, beaten 1 | ||
| 2 tbsp. | butter 2 tbsp. | |
| 3 tbsp. | sugar 3 tbsp. | |
| 3/4 tsp. | salt 3/4 tsp. | |
| 3-1/3 cups white flour* 3-1/4 cups | ||
| 3/4 tsp. | yeast | 3/4 tsp. |
| 1/4 cup | FILLING: raspberry jam | 1/4 cup |
| 2 tbsp. | butter, melted - cooled | 2 tbsp. |
| TOPPING: | ||
| 1 tbsp. | butter, soft | 1 tbsp. |
| 2 tbsp. | white flour* | 2 tbsp. |
| 1 tbsp. | brown sugar | 1 tbsp. |
| 1/4 tsp. | nutmeg | 1/4 tsp. |
- Measure first 7 ingredients in the order listed into Baking Pan.
- Insert Baking Pan into oven chamber, twist to secure. Close lid.
- Select: Dough/Pasta Setting.
- Press Start - There will be a 25-minute preheat delay before mixing begins.
- When cycle is complete, remove dough from machine to a lightly floured surface. Divide dough in half. Roll each half into a 14" x 9" (36 cm x 23 cm) rectangle. Spread with 1/4 cup raspberry jam lengthwise down center third of rectangle. Make diagonal cuts from outer edges one inch (2.54 cm) apart and three inches long. Fold alternate strips of dough over filling. Place on greased baking sheet. Brush with melted, cooled butter. Cover & let rise 30 minutes or until double in volume. Sprinkle half of butter, sugar and flour mixture over each dough braid. Repeat with second half of dough. (see diagram below)
- Bake at 350°F (177°C) for 30-35 minutes. Yield: Makes 2 braids.

natural_image
Simple line drawing of a rectangular sheet with diagonal hatching (no text or symbols)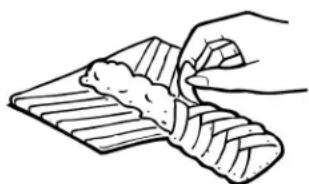
natural_image
Line drawing of a hand cutting a textured surface with a knife (no text or symbols)* In U.S., use Bread Flour; in Canada, use either Bread Flour or All-Purpose Flour.
HOT CROSS BUNS
| American Canadian Dough Recipe | ||
| 1-1/4 cups milk 1-1/4 cups | ||
| 1 egg, beaten 1 | ||
| 1/4 cup butter 1/4 cup | ||
| 1/4 cup sugar 1/3 cup | ||
| 1-1/4 tsp. salt 1-1/4 tsp. | ||
| 3-2/3 cups white flour* 3-1/2 cups | ||
| 1 tsp. | cinnamon | 1 tsp. |
| 1/2 tsp. | ground cloves | 1/2 tsp. |
| 1/4 tsp. | nutmeg | 1/4 tsp. |
| 1-1/2 tsp. | yeast | 1-1/2 tsp. |
| 3/4 cup | ADD INGREDIENTS:raisins | 3/4 cup |
| 1/2 cup | GLAZE:icing sugar | 1/2 cup |
| 1 tbsp. | milk 1 tbsp. | |
| 1/4 tsp. | almond flavoring | 1/4 tsp. |
- Measure first 10 ingredients in the order listed into Baking Pan.
- Insert Baking Pan into oven chamber, twist to secure. Close lid.
- Select: Dough/Pasta Setting.
- Press Start - There will be a 25-minute preheat delay before mixing begins.
- Add raisins when "Add Ingredient" signal beeps
- When cycle is complete, remove dough from machine to a lightly floured surface. If necessary, knead in enough flour to make dough easy to handle. Divide dough into 18 pieces. Shape each piece into a round, slightly flattened bun. Place 2 inches (5 cm) apart on greased baking sheets. Cover and let rise 30 minutes or until double in volume.
- Combine 1 slightly beaten egg with 1 tablespoon of water and brush on buns. With sharp knife, make two cuts 1/4 inch (.64 cm) deep on top of each bun to form a cross. Bake at 350° F (177° C) for 15 to 18 minutes. Remove from oven and immediately drizzle cross with glaze. Yield: Makes 18 buns.
Helpful Tip
Candied pineapple & a half teaspoon of finely grated lemon peel would give the hot cross buns an interesting flavor.
International Holiday Breads
SWEDISH TEA RING
| American Canadian—Dough Recipe | ||
| 1 cup | milk | 1 cup |
| 1 | egg, beaten | 1 |
| 1 tbsp. | butter | 1 tbsp. |
| 3 tbsp. sugar 3 tbsp. | ||
| 3/4 tsp. | salt 3/4 tsp. | |
| 3-1/3 cups white flour* 3-1/4 cups | ||
| 3/4 tsp. | yeast | 3/4 tsp. |
| FILLING: | ||
| 2 tbsp. | butter | 2 tbsp. |
| 2 tsp. | cinnamon | 2 tsp. |
| 1/2 cup | brown sugar | 1/2 cup |
| 1/2 cup | raisins | 1/2 cup |
-
Measure ingredients in the order listed into Baking Pan.
-
Insert Baking Pan into oven chamber, twist to secure. Close lid.
-
Select: Dough/Pasta Setting.
-
Press Start - There will be a 25-minute preheat delay before mixing begins.
-
When cycle is complete, remove dough from machine. Divide dough in half. Roll each half into a rectangle 14 x 9 inches (36 cm x 23 cm). Spread each half with the butter and sprinkle with half brown sugar, cinnamon, and raisins. Roll up, beginning at wide side. Pinch edge of dough into roll to seal well. Stretch roll to make even. With sealed edge down, shape into ring on lightly greased baking sheet. Pinch ends together. With scissors, make cuts 2/3 of the way through the ring at 1-inch (2.54 cm) intervals. Turn each section on it's side. Cover & let rise until double. Repeat with second half of dough.
-
Bake at 350^ F ( 177^ C) for 15 to 20 minutes. If desired frost with Sweet Icing and decorate with nuts and cherries. Yield: Makes 2 Tea Rings.
Sweet Icing: Combine 3/4 cup confectioner's (icing) sugar, 1 tablespoon milk and 1/4 teaspoon almond flavoring until smooth.
JEWISH CHALLAH
| American Canadian Dough Recipe | ||
| 3/4 cup water 3/4 cup | ||
| 1 eggs, beaten 1 | ||
| 3 tbsp. shortening 3 tbsp. | ||
| 3 tbsp. sugar 3 tbsp. | ||
| 1 tsp. salt 1 tsp. | ||
| 2-2/3 cups white flour* 2-1/2 cups | ||
| 1-1/4 tsp. | yeast | 1-1/4 tsp. |
| GLAZE: | ||
| 1 | egg yolk | 1 |
| 1 tbsp. | water 1 tbsp. | |
RUSSIAN KULICH
| American Canadian | ||
| 3/4 cup water 3/4 cup | ||
| 1 eggs, beaten 1 | ||
| 2 tbsp. | powdered milk | 2 tbsp. |
| 2 tbsp. | butter | 2 tbsp. |
| 2 tbsp. sugar 2 tbsp. | ||
| 1 tsp. salt 1 tsp. | ||
| 2-1/2 cups white flour* 2-1/3 cups | ||
| 1-1/4 tsp. | yeast | 1-1/4 tsp. |
| 2 tbsp. | ADD INGREDIENTS:slivered almonds | 2 tbsp. |
| 1/4 cup | raisins | 1/4 cup |
| 1/4 cup dried mixed fruit | 1/4 cup | |
-
Measure first 8 ingredients in the order listed into Baking Pan.
-
Insert Baking Pan into oven chamber, twist to secure. Close lid.
-
Select: Sweet Bread Setting.
-
Select "Regular" or "Dark" crust.
-
Press Start - There will be a 15-minute preheat delay before mixing begins.
-
Add almonds, raisins and dried mixed fruit when "Add Ingredient" signal beeps.
-
Using oven mitts, remove bread when completion beeps sound.
-
Cool on a wire rack before slicing. Time: 3:50 hrs
Helpful Tip
Traditionally an Easter bread but delicious any time of the year.
- Measure first 7 ingredients in the order listed into Baking Pan.
- Insert Baking Pan into oven chamber, twist to secure. Close lid.
- Select: Dough/Pasta Setting.
- Press Start - There will be a 25-minute preheat delay before mixing begins.
- When cycle is complete, remove dough from machine to a lightly floured surface. Divide dough into 6 equal portions. Roll with palm of hand into long smooth strips. The pieces should be thicker in the middle & gradually taper towards the ends. Braid the 6 dough strips. Place on lightly greased baking sheet. Cover & let rise 30 minutes or until double in volume.
- Beat egg yolk with one tablespoon of water and brush over challah. Bake at 350^ F ( 177^ C) for 30-35 minutes.
Helpful Tip
Shaping this dough may take some practice, but it is well worth it.
Pasta Recipes
For the do-it-yourself Pasta Lover.
BASIC PASTA DOUGH
American Canadian
Dough Recipe
1/4 cup water 1/4 cup
1 egg, beaten 1
1 tbsp. olive oil 1 tbsp.
- Mix water and egg with a fork.
- Add water-egg mixture and remaining ingredients in order listed into the Baking Pan.
- Insert Baking Pan into oven chamber, twist to secure. Close lid.
- Select: Dough/Pasta Setting.
- Press Start - There will be a 25-minute preheat delay before mixing begins.
- Allow to mix until the "Add Ingredient" signal beeps (in 45-50 minutes).
- Press Start/Reset button to STOP cycle.
- Remove pasta dough from the Baking Pan and divide into 3 portions. Cover the 2 portions waiting to be rolled.
- Set smooth rollers of a pasta machine as far apart as possible. Feed through one piece of dough. Fold in half both lengthwise and crosswise as required and re-roll 4-6 more times until smooth, shiny and elastic. Start to roll dough thinner by increasing number setting, until dough is 1/16"-1/8" (.16 cm - .32 cm) or desired thickness.
- Move handle of pasta machine to desired cutter blade and roll through onto lightly floured towel. Repeat with remaining 2 portions of pasta dough. Dry for 30 minutes. Cook, or cover and refrigerate for use within 24 hours or freeze for use within a month.
- To cook pasta: Bring a large volume of water to a boil in a large pot. Add small amount of salt and oil to the water. Add pasta and bring back to the boil. Continue to boil 3-5 minutes or until pasta is al dente (firm, but cooked). Drain and add favorite sauce.
SPINACH PASTA DOUGH
American Canadian Dough Recipe
3 tbsp. water 3 tbsp.
1 egg, beaten 1
2 tbsp. frozen spinach, drained finely chopped 2 tbsp.
1 tbsp. olive oil 1 tbsp.
- Mix water and egg with a fork.
- Add water-egg mixture and remaining ingredients in order listed into the Baking Pan.
- Insert Baking Pan into oven chamber, twist to secure. Close lid.
- Select: Dough/Pasta Setting.
- Press Start - There will be a 25-minute preheat delay before mixing begins.
- Allow to mix until the "Add Ingredient" signal beeps (in 45-50 minutes).
- Press Start/Reset button to STOP cycle.
- Remove pasta dough from the Baking Pan and divide into 3 portions. Cover the 2 portions waiting to be rolled.
- Set smooth rollers of a pasta machine as far apart as possible. Feed through one piece of dough. Fold in half both lengthwise and crosswise as required and re-roll 4-6 more times until smooth, shiny and elastic. Start to roll dough thinner by increasing number setting, until dough is 1/16" - 1/8" (.16 cm - .32 cm) or desired thickness.
- Move handle of pasta machine to desired cutter blade and roll through onto lightly floured towel. Repeat with remaining 2 portions of pasta dough. Dry for 30 minutes. Cook, or cover and refrigerate for use within 24 hours or freeze for use within a month.
- To cook pasta: Bring a large volume of water to a boil in a large pot. Add small amount of salt and oil to the water. Add pasta and bring back to the boil. Continue to boil 3-5 minutes or until pasta is al dente (firm, but cooked). Drain and add favorite sauce.
▲Helpful Tip
Remember, pasta dough will be ready when the "Add-Ingredient" signal beeps. That means you will have pasta dough in about 45-50 minutes. If your pasta dough is sticky, simply add a little more semolina flour or chill before shaping.
Need Help?
Questions About The Breadmaker :
Q1:
What do I do if the mixing paddle stays in the loaf? Is this normal? How do I remove the paddle?
The mixing paddle may stay in the loaf when the bread is removed from the bread pan. This happens because the crust forms around the paddle during the baking process.
Allow the loaf to cool before removing the mixing paddle (the inside of the loaf is VERY HOT- you may burn yourself if you try to remove the paddle too soon.) When the loaf has cooled, use a plastic spoon or rubber spatula to remove the paddle. Gently insert the spoon/spatula into the bottom of the loaf and loosen the crust from the paddle. Pull the paddle out. DO NOT use a sharp object (knife, metal utensil) as it will scratch the non-stick coating on the mixing paddle.
Q2:
What do I do if the mixing paddle is hard to remove from the baking Pan after baking?
Remove the Baking Pan from the unit and fill with hot water allowing it to soak for 30 minutes to an hour. Next, pour out the water, turn the Pan over and wiggle the Paddle loose while holding the winged coupling on the bottom of the Pan. Using a toothpick or soft kitchen brush clean out any dough left in the hole of the Paddle.
Q3:
Is there any time that I should not use the delayed start feature?
Yes, when the recipe calls for perishable ingredients such as milk, cheese, buttermilk, or eggs. These foods should not stay at room temperature for an extended period of time. With some recipes, you may substitute powdered milk.
Q4:
Can I open the lid while the breadmaker is operating?
This breadmaker is designed with a window in the lid to let you watch your bread's progress. Quick checks are fine in the early stages of operation and of course to add ingredients when the beeper sounds. However, don't open the lid too frequently during operation as the change in air temperature may cause the loaf to fall. Avoid opening the lid once the baking period begins—the last hour of the cycle. Sometimes condensation forms on the window after initial mixing and kneading. It usually disappears once the baking cycle starts so you should be able to get a clear view of your rising loaf.
Q5:
Where is the OFF button?
Since the breadmaker shuts off its "processing" automatically once the bread or dough cycle is complete and the "Keeps Warm" cycle ends, there is no OFF button. However, the power light will remain on until the unit is unplugged or the Start/Reset button is pressed and held.
Q6:
If the power goes out while I'm in the middle of a breadmaking cycle, will my Breadmaker continue to process my bread once the power comes back on?
The breadmaker will only finish making bread if the power returns within 20 seconds. Unfortunately, if your power outage is longer, you will have to discard the unfinished bread and start the process from the beginning.
Questions About Ingredients/Recipes :
Q7:
When do I add raisins, nuts, etc. to the bread?
This breadmaker has an "Add-Ingredient" function that signals with an audible tone to let you know when you may add raisins, nuts, caraway seeds, etc. (NOTE: The time of the tone varies from one setting to another. Consult the "Add-Ingredient" chart on page 10.) The "Add-Ingredient" feature helps reduce the breaking up of added foods. If you are using the Timer and it is more convenient, you may add ingredients at the start.
Q8:
May I use a sugar substitute in place of sugar?
Sugar is necessary for the yeast to produce a light loaf with a good height. Results may vary with the type and amount of sugar substitute used. If you are going to use an artificial sweetener choose one that is aspartame based rather than saccharin based.
Q9:
May I omit the salt or sugar from the recipe?
No, both the sugar and salt play an important role in the bread making process. Salt prevents the yeast from over-reacting and the bread from over-rising. The combination of sugar, salt, and yeast is a very important part of the bread making process. Remember that the total sugar and salt amounts are divided among all the slices, so the amount of sugar and salt per serving is small.
Need Help?
Q10:
When I make dough, it is very sticky and difficult to work with. How can I handle it more easily?
Dough may be somewhat sticky at the end of the dough cycle. This is normal. For best results, turn it out of the Baking Pan onto a floured surface, cover it and let it rest for 10 minutes. Lightly flour the board and your hands when handling the dough. This will make it easier to shape and divide. Once shaped, the dough must be baked in a conventional oven.
Q11:
Can I bake products formed from doughs in my microwave oven?
No, once shaped, the dough must be baked in a conventional oven.
Q12:
How do I know when dough is ready to bake?
Dough should have doubled in size.
Q13:
How does the pasta come out of the Breadmaker?
This breadmaker includes a setting to make dough for pasta. However, once the pasta dough is completed, it must be removed and shaped just like any dough must be rolled, braided, or otherwise shaped. You may use a pasta maker or pasta shaper (there are special pans—similar to muffin tins—to shape ravioli and some other kinds of filled pasta) to shape your pasta. Pasta dough does not need to rise, therefore it can be removed from the breadmaker according to the instructions in the recipes, see page 32.
Q14:
Why do the loaves vary in height and weight? The whole wheat and multi-grain breads are frequently shorter. Am I doing something wrong?
No, it is normal for whole wheat and multi-grain breads to be shorter and denser than basic white breads. Whole wheat and rye flours are heavier than white flour, therefore, they don't rise as much during the bread making process. They also typically have added ingredients, such as oats, bran, nuts and raisins, which contribute to the shorter height and denser texture. A 7-8 inch (19-21 cm) height for 100% whole wheat bread and other multi-grain breads is considered normal while 8-9 inches (20-23 cm) is normal for white or other basic breads.
Q15:
What is gluten?
Gluten is the protein in flour that makes dough elastic and allows it to stretch and expand. It gives your bread structure. The amount of gluten varies from one flour to another.
Q16:
Can I use my favorite bread recipes in my bread machine?
Yes, but you will need to experiment to get the right proportion of ingredients. Become familiar with the unit and make several loaves of bread before you begin experimenting. Never exceed a total amount of 4-2/3 cups (U.S) or 4 cups (Cdn.) dry ingredients (that includes flours, oats, cornmeal, bran cereal, cracked wheat, etc.). Use the recipes in this book to help determine the ratio of dry ingredients to liquid and amounts of yeast, sugar, salt, and shortening (or butter/margarine) to use.
Q17:
Why does some flour occasionally stick to the side of the bread?
There are many factors that may affect whether a dough mixes completely or ingredients stick to the sides:
- Dough may be too dry (ingredients may have been measured incorrectly).
- Mixing Paddle was not placed correctly in the Baking Pan. Be sure it is pushed securely onto the shaft.
- Baking Pan is not placed in the unit correctly. Be sure to "lock" the Pan into place.
- Ingredients were not added in the recommended order. It is very important to add ingredients in the order listed in the recipe and to measure accurately. Sometimes during the initial mixing period, small amounts of flour and dry ingredients may get stuck to the sides of the Baking Pan. When the loaf rises and bakes, the dry ingredients may stick to the bread. Once the loaf is removed from the Baking Pan and has cooled 10-15 minutes, the dry ingredients may be scraped off the loaf easily with a knife.
Q18:
Can I make cakes and quick breads (breads that do not use yeast) in my breadmaker?
No, the breadmaker is designed to mix, knead, and bake yeast breads. It is not recommended for use with non-yeast foods, such as cakes, cookie dough or quick breads. These foods use leavening agents (baking powder, and/or baking soda) that react best with short mixing and baking. If you are looking for something to satisfy your sweet tooth, there are several recipes in this book for sweet breads.
Need Help?
Q19:
Why does my bread rise and then collapse or form craters?
Your bread may be rising too fast. To decrease the rate of rising, try reducing the amount of sugar, increasing the amount of salt slightly, or reducing the amount of yeast. Refer to the “Trouble Shooting Guide” on pg. 12 for correct adjustments.
Q20:
Is it important for ingredients to be at room temperature before adding them to the Baking Pan?
No, as long as ingredients are not extremely cold or hot. Milk, eggs, butter/margarine, and yeast can be added directly from the refrigerator with good results. When a recipe calls for water, use lukewarm water since it's easy to get from the tap.
Q21:
Which kind of yeast is the best to use?
Yeast specially packaged for Bread Machines, Traditional Dry Yeast, Rapid Rise, or Quick Rise Yeast, can all be used with good results. The most important thing is to be sure the expiration date is not up. All the recipes in this cookbook were developed using Bread Machine Yeast. If you prefer to use Traditional, Quick Rise or Rapid Rise Yeast, increase the amount of yeast you use in the recipe by 1/4 teaspoon.
Q22:
Sometimes when I cut my bread, it's too sticky and it falls apart or it starts to mash down and won't slice cleanly. What can I do?
If your bread is sticky or mashes down, it may be too hot! Be sure to allow 15 to 30 minutes for your bread to cool before slicing. Place finished bread on a wire cooling rack to let air circulate around it. You may want to try using an electric knife to slice bread instead of cutting it manually. An electric knife has blades that slide back and forth to let you slice straight through bread and avoid mashing it down by putting pressure on the top of the loaf.
Q23:
Why did I end up with a short, dense, doughy bread? Why didn't the bread rise?
The most common reason for unrisen bread is the yeast. Maybe you forgot to add the yeast. Perhaps the yeast was bad or expired (always check expiration dates). Also, if the mixing wasn't complete, you may have rising problems. Did you check to see if the mixing paddle was moving at the beginning of your cycle?
Q24:
What will happen if I leave the bread in the Baking Pan after baking?
This unit has a 60-minute “Keep Warm” cycle that lets you leave the bread in the pan for up to an hour after baking is completed. Once that warming cycle is over, it’s best to remove the bread immediately or the bottom of your loaf will absorb moisture and become soggy. The soggy part of the bread will not be as tasty when it dries out and it will go stale quickly. The sides of the bread may also become moist and mushy.
Other Questions?
Please Call Us Toll Free! 1-800-231-9786
Notes


- Automatic Breadmaker
- Operating Instructions & Cookbook
- Important Safeguards
- When using electrical appliances, basic safety precautions should always be followed, including the following:
- Read all instructions.
- Save These Instructions
- Things You Should Know About Your Breadmaker
- POLARIZED PLUG
- TAMPER-RESISTANT SCREWS
- ELECTRICAL CORD
- BEFORE FIRST USE
- Table Of Contents
- Important Safeguards 2
- Getting To Know Your Breadmaker ....5
- Names of Parts 5
- Bread Type Setting Descriptions 6
- How to Use Your Breadmaker ....7
- Care & Cleaning 13
- Service or Repair 14
- COOKBOOK SECTION
- Bread and Dough Ingredients 16
- Recipe Index 18
- Recipes 19
- Need Help? (Questions and Answers) 33
- 1-800 Number ....35
- Getting To Know Your Breadmaker
- Quick Tips
- Names Of Parts
- Control Panel Settings & Functions
- Display
- Clock Button
- Timer Button
- Start/Reset Button
- Indicator Lights
- Bread Type Setting Descriptions
- SUPER RAPID BAKE /Regular Crust or SUPER RAPID BAKE /Dark Crust (1:10 hours)
- SWEET/Regular Crust or SWEET/ Dark Crust (3:50 hours)
- WHOLE GRAIN (4:10 hours)
- DOUGH/ PASTA (2:00 hours)
- How To Use Your Breadmaker
- For all SETTINGS (including Dough/ Pasta) follow these instructions:
- Using The "Add-Ingredient" Function
- Setting The Timer (For Delayed Completion)
- Troubleshooting
- Troubleshooting Guide
- Slicing & Storing Bread
- Care & Cleaning
- Outer Body and Oven Chamber:
- Lid
- Baking Pan and Mixing Paddle
- Storing The Unit
- Easy-Lift Grips
- Service Or Repair
- Full One-Year Warranty
- In the U.S.A. or Canada
- BLACK&DECKER®
- Bread Recipes
- Bread & Dough Ingredients
- Flours
- Fat
- Salt
- Liquid
- Sweeteners
- Yeast
- Tips For Getting The Best Results
- Tips For Handling Dough
- Recipe Index
- The Basics
- Super Rapid Bake Breads (70 minutes)
- Sandwich Pleasers For The Brown Bag Club
- Dinner Favorites
- Treats For Every Age
- International Favorites
- Pasta Recipes
- These are the recipes you will bake time after time. Try these recipes first.
- ▲Helpful Tip
- Helpful Tip
- Super Rapid Bake Breads
- SUPER RAPID BASIC WHITE
- SUPER RAPID LEMON POPPY SEED
- SUPER RAPID CINNAMON RAISIN
- SUPER RAPID CORNBREAD
- SUPER RAPID ITALIAN HERB
- SUPER RAPID CHEESE 'N ONION
- This selection of recipes will have you looking forward to noon!
- These selections will add zest to any casserole or entrée.
- Enjoy these recipes for a change of pace!
- International Holiday Breads
- Bake extra to give as gifts to your friends & relatives!
- For the do-it-yourself Pasta Lover.
- BASIC PASTA DOUGH
- SPINACH PASTA DOUGH
- Need Help?
- Questions About The Breadmaker :
- Q1:
- What do I do if the mixing paddle stays in the loaf? Is this normal? How do I remove the paddle?
- Q2:
- What do I do if the mixing paddle is hard to remove from the baking Pan after baking?
- Q3:
- Is there any time that I should not use the delayed start feature?
- Q4:
- Can I open the lid while the breadmaker is operating?
- Q5:
- Where is the OFF button?
- Q6:
- If the power goes out while I'm in the middle of a breadmaking cycle, will my Breadmaker continue to process my bread once the power comes back on?
- Questions About Ingredients/Recipes :
- Q7:
- When do I add raisins, nuts, etc. to the bread?
- Q8:
- May I use a sugar substitute in place of sugar?
- Q9:
- May I omit the salt or sugar from the recipe?
- Q10:
- When I make dough, it is very sticky and difficult to work with. How can I handle it more easily?
- Q11:
- Can I bake products formed from doughs in my microwave oven?
- Q12:
- How do I know when dough is ready to bake?
- Q13:
- How does the pasta come out of the Breadmaker?
- Q14:
- Why do the loaves vary in height and weight? The whole wheat and multi-grain breads are frequently shorter. Am I doing something wrong?
- Q15:
- What is gluten?
- Q16:
- Can I use my favorite bread recipes in my bread machine?
- Q17:
- Why does some flour occasionally stick to the side of the bread?
- Q18:
- Can I make cakes and quick breads (breads that do not use yeast) in my breadmaker?
- Q19:
- Why does my bread rise and then collapse or form craters?
- Q20:
- Is it important for ingredients to be at room temperature before adding them to the Baking Pan?
- Q21:
- Which kind of yeast is the best to use?
- Q22:
- Sometimes when I cut my bread, it's too sticky and it falls apart or it starts to mash down and won't slice cleanly. What can I do?
- Q23:
- Why did I end up with a short, dense, doughy bread? Why didn't the bread rise?
- Q24:
- What will happen if I leave the bread in the Baking Pan after baking?
- Other Questions?
- Please Call Us Toll Free! 1-800-231-9786
- Notes
Brand : BLACK & DECKER
Model : B1561
Category : Bread maker