
B6000C - Bread maker BLACK & DECKER - Free user manual and instructions
Find the device manual for free B6000C BLACK & DECKER in PDF.


| Product Type | Bread Maker |
| Brand | Black & Decker |
| Model | B6000C |
| Power Supply | 120 V, 60 Hz |
| Maximum Capacity | 1.36 kg (3 lb) |
| Available Bread Sizes | 0.7 kg (1.5 lb), 0.9 kg (2 lb), 1.4 kg (3 lb) |
| Number of Programs | 11 automatic programs |
| Programs | White, Whole Wheat, French, Sweet, Low Carb, Gluten Free, Quick Bread, Jam, Dough, Rapid Bake, Bake Only |
| Delay Timer | Up to 13 hours |
| Crust Color | Light, medium, dark |
| Keep Warm Function | Yes, up to 1 hour |
| Power Failure Memory | 7 minutes |
| Display | Digital |
| Pan | Nonstick, removable |
| Kneading Paddles | 2, removable and dishwasher safe |
| Included Accessories | Measuring cup, measuring spoon |
| Replacement Parts | Pan (B6000C-01), paddles (B6000C-02), cup (B6000C-03), spoon (B6000C-04) |
| Care and Cleaning | Hand wash or dishwasher for pan and paddles. Do not use abrasive cleaners. |
| Safety | Polarized plug, hot surfaces, do not immerse appliance |
| Warranty | 2-year limited (United States and Canada) |
Frequently Asked Questions - B6000C BLACK & DECKER
User questions about B6000C BLACK & DECKER
0 question about this device. Answer the ones you know or ask your own.
Ask a new question about this device
Download the instructions for your Bread maker in PDF format for free! Find your manual B6000C - BLACK & DECKER and take your electronic device back in hand. On this page are published all the documents necessary for the use of your device. B6000C by BLACK & DECKER.
USER MANUAL B6000C BLACK & DECKER
Accessories/Parts (USA)
1-800-738-0245
For online customer service
and to register your product, go to
www.prodprotect.com/applica
natural_image
White black-and-white photo of a black-and-white BANDBR feedstock (no visible text or labels on the device body)BREAD MAKER QUICK START GUIDE
- Before using your bread maker, always wash all pieces first to remove any sediment or oils left behind from previous use and to eliminate any odd tastes due to the residue that may be on the bread pan.
- When following the recipe:
• Always add ingredients into the bread pan in the order they are listed.
• Measure ingredients carefully and accurately.
- To measure liquids, use a see-through measuring cup and check the measurement at eye level.
- When measuring dry ingredients, use standard dry measuring cups or measuring spoons and level off the ingredients with the straight-edge of a knife or metal spatula.
- Inaccurate measurements, even if only slightly off, can make a difference in your results.
- Yeast is always added last. Be sure that the yeast does not touch the liquid ingredients, salt or shortening.
- The following test can be used to determine whether your yeast is stale and inactive:
a) Place 12 cup of lukewarm water into a small cup or bowl.
b) Stir 12 tsp. of sugar into the water then sprinkle 2 tsp. of yeast over the surface.
c) Place bowl or cup in a warm area and allow to sit for 10 minutes undisturbed.
d) The mixture should foam and produce a strong yeast aroma. If this does not occur, fresh yeast should be purchased.
- Do not cover the bread maker with towels or other material that may prevent steam from escaping. Some steaming from vents is normal. Because of escaping steam, you should keep the bread maker several inches away from cabinets while making bread.
- Do not place any objects on top of the bread maker.
- IMPORTANT: Add ingredients in the order they are specified in the recipe. For best results, accurate measuring of ingredients is very important. Do not put larger quantities than recommended into the bread pan, as it may produce poor results and may damage your bread maker.
TIPS FOR GETTING THE BEST RESULTS
- Use only fresh ingredients.
- In the U.S.: Use Bread Flour; In Canada: Use All-Purpose Flour or Canadian Bread Flour.
- Use lukewarm water—not cold water.
-
Measure ingredients accurately and level off dry ingredients with the flat side of a knife or metal spatula.
-
When recipes call for a "lightly floured surface," use about 1 to 2 tablespoons flour on the surface. You may want to lightly flour your fingers or rolling pin for easy dough manipulation.
- Recipes referring to a "greased/oiled" bowl call for about 1 tablespoon oil or soft vegetable shortening spread on the bottom and sides of the bowl. You may prefer to use a nonstick vegetable spray to "grease" the bowl to cut down on added fats and calories. Place the ball of dough into the bowl and turn it over so that the dough is lightly greased on all sides.
- When you let dough "rest", form the dough into a ball and place it on a clean dry surface. Invert a large clean bowl over the dough and let it stand as directed in your recipe. When you let dough "rise" according to recipe directions, place it in a warm, draft-free area. For best results, cover the bowl with a clean, dry towel. To produce a tender product, make sure the dough rises until double in size.
- Dough may be wrapped in plastic wrap and stored in a freezer for later use. Bring the dough to room temperature before using.
9. Important to note that "RAPID BAKE" will make a denser loaf of bread TIPS FOR HANDLING DOUGH
- When recipes call for a "lightly floured surface," use about 1 to 2 tablespoons flour on the surface. You may want to lightly flour your fingers or rolling pin for easy dough handling
- Recipes referring to a "greased/oiled" bowl call for about 1 tablespoon oil or soft vegetable shortening spread on the bottom and sides of the bowl. You may prefer to use a non-stick vegetable spray to "grease" the bowl to cut down on added fats and calories.
- When you let dough "rest" and "rise" according to a recipe, place it in a warm, draft-free area. For best results, cover the dough with waxed paper and a clean, dry towel. If the dough does not double in size, it may not produce a tender product.
- Dough may be wrapped in plastic and stored in a freezer for later use. Bring the dough to room temperature before using.
BREAD AND DOUGH INGREDIENTS B2000\*
Some ingredients differ between Canada and the United States. Cheese, confectioner's (icing) sugar and cornmeal are just a few ingredients that vary between the two countries. The major difference is in flour.
Flours
Canadian flours are milled from harder wheats so breads can be successfully made from national brands of both All-Purpose Flour and Bread Flour. U.S. "All-Purpose Flour" will produce poor results and should not be used with this unit. In the U.S., it is important to use "Bread Flour" for even-textured loaves.
Bread flour is processed from hard wheat and is high in the protein substance called gluten. When mixed and kneaded, the gluten stretches and incorporates air bubbles to produce a light, fine-textured loaf. The stretchy resilience of gluten makes this kind of flour most tolerant to high temperatures, altitude, or high humidity.
Canadian "All-Purpose Flour" is easy to find and has been extensively tested with the recipes included in this book with good results. Canadian Bread Flour may also be used with good results.
Whole wheat and multi-grain flours contain the bran and germ of the grain. Although higher in fiber, these flours are lower in gluten than bread flour. Rye flour does not contain any gluten and therefore, must be used in combination with other flours. Whole wheat, multi-grain and rye flour typically produce shorter, denser loaves. Whole wheat flours vary greatly between the United States and Canada and from one brand to another. The recipes have been developed and tested using nationally available brands of flour.
Fat
Butter, margarine or vegetable shortening are often interchangeable in most bread recipes. Vegetable oil should not be substituted for shortening, butter or margarine (fat adds flavor and tenderness to the dough). Low-fat (diet) margarines are high in water content but maybe substituted with acceptable results for people on a low fat diet.
Salt
In very small amounts, salt adds flavor and controls the rising action of the yeast, allowing the dough to rise evenly. In high altitude areas, additional salt may be needed to improve bread results, however, keep in mind that too much salt may prevent the bread from rising.
Liquid
Milk—whole, 1% or 2% fat, skim, buttermilk, or reconstituted (powdered) dry milk, and water are the most commonly used liquids in bread recipes. Milk provides a soft crust, and gives bread a velvety texture. If your recipe calls for powdered milk and you prefer to use fresh milk, simply substitute the milk for the water and powder. Water makes a crisper crust.
Sweeteners
Natural sweeteners, such as white or brown sugar, honey, and molasses help the yeast in a recipe to grow. Sugar serves as food for the yeast. Without sugar, the yeast will not grow and the bread will not rise. The balance of sugar, salt, and yeast is a very important part of the bread making process. Sweeteners enhance the bread flavor and the browning process. If you prefer to use a sugar substitute, your baking results may vary based on the type and amount of sugar substitute used.
Yeast
Yeast is a heat-sensitive plant that feeds on the sugar in dough. Too much heat will kill the yeast, too little will slow the yeast action. Check the expiration date to be sure the yeast is fresh. The recipes in this cookbook have been tested with Traditional Dry yeast but you may also use Bread Machine yeast.
Please Read and Save this Use and Care Book
IMPORTANT SAFEGUARDS
When using electrical appliances, basic safety precautions should always be followed including the following:
○ Read all instructions.
○ Do not touch hot surfaces. Use handles or knobs.
To protect against electrical shock do not immerse cord, plugs, or appliance in water or other liquid.
○ Close supervision is necessary when any appliance is used by or near children.
○ Unplug from outlet when not in use and before cleaning. Allow to cool before putting on or taking off parts.
Do not operate any appliance with a damaged cord or plug, or after the appliance malfunctions or has been damaged in any manner. Contact Consumer Services for examination, repair or electrical or mechanical adjustment. Or, call the appropriate toll-free number on the cover of this manual.
The use of accessory attachments not recommended by the appliance manufacturer may cause fire, electric shock or injury.
○ Do not use outdoors.
Do not let cord hang over edge of table or counter, or touch hot surfaces, including the stove.
○ Do not place on or near a hot gas or electric burner, or in a heated oven.
Extreme caution must be used when moving an appliance containing hot oil or other hot liquids.
To disconnect, press and hold the STOP button for 2 seconds, remove plug from wall outlet.
○ Do not use appliance for other than intended use.
○ Avoid contacting moving parts.
SAVE THESE INSTRUCTIONS
This product is for household use only.

Caution, hot surfaces: This appliance generates heat and escaping steam during use. Proper precautions must be taken to prevent the risk of burns, fires or other injury to persons or damage to property.
POLARIZED PLUG (120V Models Only)
This appliance has a polarized plug (one blade is wider than the other). To reduce the risk of electric shock, this plug is intended to fit into a polarized outlet only one way. If the plug does not fit fully into the outlet, reverse the plug. If it still does not fit, contact a qualified electrician. Do not attempt to modify the plug in any way.
TAMPER-RESISTANT SCREW
Warning: This appliance is equipped with a tamper-resistant screw to prevent removal of the outer cover. To reduce the risk of fire or electric shock, do not attempt to remove the outer cover. There are no user-serviceable parts inside. Repair should be done only by authorized service personnel.
ELECTRICAL CORD
a) A short power-supply cord (or detachable power-supply cord) is to be provided to reduce the risk resulting from becoming entangled in or tripping over a longer cord.
b) Longer detachable power-supply cords or extension cords are available and may be used if care is exercised in their use.
c) If a long detachable power-supply cord or extension cord is used,
1) The marked electrical rating of the detachable power-supply cord or extension cord should be at least as great as the electrical rating of the appliance,
2) If the appliance is of the grounded type, the extension cord should be a grounding-type 3-wire cord, and
3) The longer cord should be arranged so that it will not drape over the countertop or tabletop where it can be pulled on by children or tripped over.
Note: If the power supply cord is damaged, it should be replaced by qualified personnel.
POWER OUTAGE
7-Minute Power Failure Back-Up
Your Bread Maker has a 7-minute power failure back-up feature. If the electricity goes off, the memory will store your course selection for up to 7 minutes. If the power comes back on within this time, bread making will resume where it left off.
If the bread maker loses power for more than 7 minutes and you are using any dairy products, perishables or meat in your bread, you should discard the contents of the recipe and start again with new fresh ingredients due to health and sanitary considerations. For nonperishable recipes you may try starting the bread maker at the beginning of the course again. However, this may not always produce an acceptable loaf of bread.
For recipes that do not include dairy products: If you are not sure when the outage occurred and the baking cycle has not yet started, remove the dough ball from the bread pan and place in an oven-safe baking container. Allow to double in size and place in a preheated (350°F/177°C) oven for 30 to 45 minutes or until done. The bread will sound hollow when tapped on top of the loaf if it is done. Again, this may not always produce an acceptable loaf of bread. If the bread has already begun to bake when the outage occurs, you must begin with new ingredients.
Important: If your recipe includes dairy products and you are sure when the outage occurred, we recommend starting the recipe over with new ingredients.
Important: Power failure back-up does not cover surges. If you experience frequent surges, please use a surge protector.
Product may vary slightly from what is illustrated.
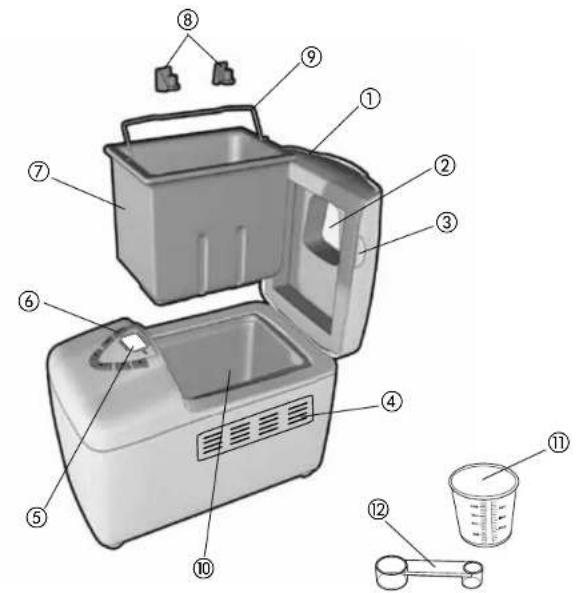
- Lid
- Viewing window
- Lid handle
- Steam vent
- Digital display
- Control panel
† 7. Nonstick bread pan (Part # B6000C-01)
† 8. Kneading paddles (Part # B6000C-02) - Wire handle
- Baking chamber
† 11. Measuring cup (Part # B6000C-03)
† 12. Measuring spoon (Part # B6000C-04)
Note: † indicates consumer replaceable/removable parts
CONTROL PANEL
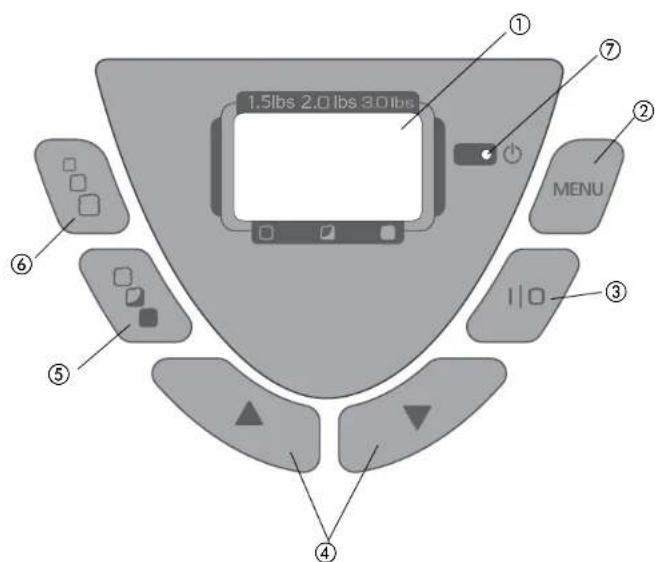
1. Digital Display
Shows the following:
☐ Number for each program setting selection (1 – 11) with preprogrammed baking time
□ Crust color (Light, Medium or Dark)
☐ Loaf size (1.5-lb., 2-lb. or 3-lb.)
☐ Minute-by-minute countdown of remaining time for selected program
2. Menu Button
Press this button to select the baking cycle you want. A beep sounds each time you press the button.
3. Start/Stop (I/O) Button
Press to begin the cycle and to display the total time for the selected bread to be completed. To cancel the cycle, press and hold for about 3 seconds until you hear a beep and the red LED light turns off. The unit beeps to indicate that it has stopped.
Important: Do not press Stop when checking the progress of the bread; it will cancel the program. Once a cycle is canceled, you will have to start over again.
4. Timer Buttons
Press these buttons to set the time for delay bake [up to 13-hour delay]. For example, you can time your bread to be ready for dinner or when you wake up in the morning. Set it by selecting how much time you want to pass before the bread is completed. For example, if it is 8:00 p.m. and you want the bread to be ready at 7:00 a.m., set it for 11 hours.
You can also use these buttons to adjust the time of the cycle. They adjust up or down in 10-minute increments. Changes must be made before the unit begins operation.
5. Crust Color Button
Lets you choose your preferred crust color: Light, Medium or Dark.
6. Loaf Size Button
Press to select the loaf size (1.5-lb., 2-lb. or 3-lb.).
7. Red LED indicator light: Start/Stop (I/O) indicator
Program Settings
The following program settings will make it easy for you to make a great variety of bread dough and preserves. For each selected setting, the baking time has been preprogrammed. The recipes provided on pages 20 -35 will help you determine which program setting you should use.
| Program setting | Menu # displayed | Baking time displayed | Description | ||
| 1.5-lb. 2-lb. | 3-lb. | ||||
| White 1 3:13 3:18 3:25 You can use this | setting for most recipes that use white flour. | ||||
| Program setting | Menu # displayed | Baking time displayed | Description | ||
| 1.5-lb. 2-lb. | 3-lb. | ||||
| French 3 3:30 | 3:32 3:35 Bakes bread with | thin crust and light texture. | |||
| Sweet 4 3:17 | 3:22 3:27 Bakes bread that | contains sugar and eggs. | |||
| Low carb 5 n/a | 4:30 n/a Used for recipes | that are lower in carbohydrates. | |||
| Gluten free | 6 2:49 2:54 | 2:59 Used for gluten | free recipes. | ||
| Quick bread | 7 1:17 1:20 | 1:23 Bakes bread that | contains baking powder instead of yeast. | ||
| Jam | 8 1:05 (size s preset) This setting is to make jams from fresh fruit. | ||||
| Dough | 9 1:30 (size s preset) Prepares dough that can be shaped to make coffee cakes, rolls, pizza and other breads baked in a conventional oven. | ||||
| Rapid white 10 | 2:12 2:17 2:24 | Quickly bakes | a loaf of white bread. | ||
| Bake only | 11 | 1:00 | Used if crust is too light or you wish to bake pre-made dough. | ||
How to Use
This product is for household use only.
- Follow the directions: The liquid is always the first ingredient to be placed in bread pan. Dry ingredients follow and the yeast is added last. Make a small indentation in the center of the flour and place the yeast there. This is especially important when using the delay-bake function to avoid activating the yeast too soon.
- Measure carefully: Use the appropriate measuring tools and measure carefully. The measuring cup included should be used for dry measurement only. Spoon dry ingredients into the measuring cup and level off with the straight edge of a metal spatula or the back of a knife. Measure liquids in a glass or plastic measuring cup designed for liquids. Use measuring spoons for liquid and dry ingredients. Level off with a metal spatula or the back of a knife.
- Keep it fresh: Use fresh ingredients at room temperature. In Canada, use All-Purpose Flour or Bread Flour; in the USA, use Bread Flour. Use yeast that has an expiration date of at least 6 months in the future. Avoid using perishable ingredients (such as milk, butter or margarine, eggs and cheese, fruit or fresh herbs) when using the delay-bake function.
- Perfect dough: In very humid weather, bread may require a little more flour. Check the bread toward the end of the first rise. If it seems sticky, add 1 or 2 tablespoons of flour to the second kneading cycle until the dough forms a smooth ball. If the bread seems very dry or knocks in the kneading cycle, sprinkle room temperature water into the bowl, 1 teaspoon at a time, until dough forms a smooth ball.
- Look but don't open: The glass in the cover is there to monitor the process. Do not open the lid during the baking process. In the initial mixing you may open the cover to use a rubber spatula to blend in any ingredients that have stuck to the sides of the bread pan or to add ingredients at the "add ingredient" beep.
- Patience: Wait at least 20 minutes before slicing freshly baked bread; it will still be deliciously warm but easier to slice. If you like a crisp crust, remove the bread as soon as the baking cycle is complete. To make another loaf of bread, let the unit cool completely.
- Save it for another day: To freeze freshly baked bread, cool completely on a wire rack. Wrap securely in plastic wrap and then foil. To serve, remove from foil and defrost. For that freshly baked flavor, reheat in the oven.
- Adding ingredients: All functions allow for the addition of ingredients, such as dried fruits and nuts; the beep sounds just before kneading is complete. This happens about 25 minutes (8 minutes for Rapid White) into the program.
-
Avoid delay: The delay-bake function cannot be used for Rapid White or the Dough setting. It is not recommended for Whole Wheat, Quick Bread or Jam.
-
Test the water: For most breads, use water that is 80° to 90°F (26.6 °C to 32.2 °C); for Rapid White breads, use water at 110°F to 120°F (43.3 °C to 48.8 °C).
- Choosing crust color: The first time bread is baked, select the light setting. If you like a darker crust, make a note and select a darker crust for future breads on that cycle.
- There is a 30-minute delay on the whole wheat program.
- Some noteworthy solutions: If bread is:
□ too brown – select a lighter crust.
□ too light – select a darker crust and do not open the unit during the baking cycle.
□ too coarse – make sure you add salt.
□ too heavy – use less flour (1 tsp. at a time).
too low – use less flour or more yeast or water that is not too hot, or check the date on your yeast.
□ too high – try less yeast (1/4 tsp. at a time). - collapses in the center – dough is too wet or flour is not strong enough or amount is too great for the unit.
MENU
Note: If at any time during bread making process you need to turn bread maker off, press and hold the MENU button for approximately 5 seconds, then unplug the unit.
Note: If bread is not removed immediately after baking and STOP button is not pressed, a controlled 60-minute Keep Warm cycle will begin (except during Quick Breads, Doughs and Jam). For best results, remove bread immediately after baking process is complete.
White Bread
Used for breads that primarily include white bread flour, although some recipes may include smaller amounts of whole wheat flour.
Whole Wheat Bread
Used for recipes with significant amounts of whole wheat or rye flour, oats, or bran. Whole wheat course begins with rest period during which flours or grains
absorb liquid ingredients. Soaking causes flour or grain to soften and helps ingredients to combine. Generally, whole wheat and multi-grain breads are shorter and denser than white, French or sweet.
French Bread
Traditionally, French bread has crispier crust and lighter texture than white bread. Recipes usually do not include butter, margarine or milk.
Sweet
Used for recipes that contain eggs, fruit juice, additional sugar or added sweet ingredients such as coconut flakes, raisins, dried fruit or chocolate. Baking temperature is reduced to prevent burning.
Low Carb Bread
Used for recipes that are lower in carbohydrates.
Gluten Free Bread
Used for gluten free recipes.
Quick Bread
Used for recipes that contain baking powder or baking soda, rather than yeast, to make bread or cake rise. Cake recipes made from scratch must be specially designed for this course. Use this course to prepare prepackaged cake and quick bread mixes.
Jam
Add fruit, sugar and lemon juice for homemade jam – a great topping for homemade bread, waffles and ice cream.
Dough
Use to prepare dough for making bread or rolls which are shaped and allowed to rise before baking in a conventional oven. This program blends and kneads the dough and takes it through the first rise.
Rapid White
Used for White breads to decrease time by approximately 1 hour. These breads will usually use more yeast than regular white bread recipes Bread may be shorter and denser.
Bake Only
Used if crust is too light or you wish to bake pre-made dough. Especially useful if your bread, sweet bread or cake is not quite done. Check every few minutes. Bakes for up to 1 hour.
KNOW YOUR INGREDIENTS
| FLOUR & OTHER GRAINS | |
| All-Purpose Flour | All-purpose flour is a blend of refined hard and soft wheat flours ideally suited for making quick breads and cakes. |
| Bran | Bran (unprocessed) is coarse outer portion of wheat or rye grains that is separated from flour by sifting or bolting. It is often added to bread in small quantities for nutritional enrichment, heartiness and flavor. It is also used to enhance bread texture. |
| Bread Flour | Bread flour typically has higher gluten concentration than all-purpose flour. Using bread flour will produce loaves with better volume and structure. Bread flour should be used for all yeast bread courses. |
| Cornmeal and Oatmeal | Cornmeal and oatmeal come from coarsely ground white or yellow corn and from rolled or steel-cut oats. They are used primarily to enhance flavor and texture of bread. |
| Cracked Wheat | Cracked wheat has very coarse texture. It comes from wheat kernels cut into angular fragments. It gives whole grain breads a nutty flavor and crunchy texture. |
| Rye Flour | Rye flour must always be mixed with high proportion of bread flour, as it does not contain enough gluten to develop structure for high, even-grained loaf. |
| Self-Rising Flour | Self-Rising Flour is NOT RECOMMENDED for use with your bread maker. Self-rising flour contains leavening ingredients that will interfere with bread and cake making. |
| 7 Grain Cereal Blend | 7 grain cereal blend is a blend of cracked wheat, oats, bran, rye, cornmeal, flax seeds and hulled millet. It is used primarily to enhance flavor and texture of bread. |
| Vital Wheat Gluten | Gluten is manufactured from wheat flour that has been treated to remove nearly all of the starch to leave a very high protein content. (Gluten is the protein in wheat that makes dough elastic.) Gluten is available at most health food stores. It can be used in small portions to increase volume and lighten texture. |
| Whole Wheat Flour | Whole wheat flour is milled from the entire wheat kernel, which contains the bran and germ. This high fiber flour is richer in nutrients than all-purpose or bread flour. Breads made with this flour are usually smaller and heavier than white loaves. Many recipes mix whole wheat flour with bread flour or vital wheat gluten to produce high, light-textured bread. |
Tips on Flour Storage
Keep flour in a secure, airtight container. Store rye and whole wheat flours in a refrigerator, freezer or a cool area, to prevent them from becoming rancid. Allow flour to come to room temperature before using.
Note: Flours, while visibly similar, can be very different in how they are ground, milled, stored, etc. You may have to experiment with different brands of flour to help you make the perfect loaf. See RECIPE TIPS to assist with these experiments.
YEAST
Active yeast, through a fermentation process, produces carbon dioxide gas necessary to make bread rise. Yeast feeds on carbohydrates in sugar and flour to produce this gas. Three different types of yeast are available: fresh (cake), active dry and quick-acting. Quick, rapid rise and bread maker yeasts are quick-acting. Fresh (cake) yeast is NOT RECOMMENDED for use with your bread maker.
Tips on Yeast
Ensure your yeast is fresh by checking its expiration date. Ideally, yeast should be used several months before the expiration date. Once a package or jar of yeast is opened, it is important that the remaining contents be immediately resealed and refrigerated or frozen for future use. Often dough that fails to rise is due to stale yeast.
Note: Basic bread and dough recipes in this booklet were developed using bread maker yeast. You may use chart below to substitute any quick-acting yeast (quick rise, fast rise or bread maker yeast) for active dry yeast.
Conversion Chart for Quick Rise Yeast
^3/_4 tsp. active dry yeast = 12 tsp. quick-acting yeast
1 tsp. active dry yeast = 3/4 tsp. quick-acting yeast
1½ tsp. active dry yeast = 1 tsp. quick-acting yeast
2¼ tsp. active dry yeast = 1½ tsp. quick-acting yeast
1 tbsp. active dry yeast = 2 tsp. quick-acting yeast
Rapid Course Yeast
Rapid course setting for White decreases time for making bread by approximately 1 hour. The bread may be shorter and denser.
| ADDITIONAL INGREDIENT NOTESImportant: Exact measurements for ingredients are the most important part of baking. It is the key to getting great texture and consistency in your bread.Make sure to measure all ingredients exactly. | |
| Baking Powder | Double acting baking powder is leavening agent used in quick breads and cakes. This type of leavening agent does not require rising time before baking, as chemical reaction works when liquid ingredients are added and again during baking process. |
| Baking Soda | Baking soda is another leavening agent, not to be confused or substituted for baking powder. It also does not require rising time before baking, as chemical reaction works during baking process. |
| Eggs | Eggs add richness and velvety texture to bread dough and cakes. When recipe calls for egg(s) at room temperature, large egg(s) should be used. |
| Fats | Shortening, butter, margarine and oil shorten, or tenderize, the texture of yeast breads. French bread gets unique crust and texture from the lack of fat added. However, breads that call for fat stay fresh longer. If butter is used directly from refrigerator, it should be cut into small pieces for easier blending during kneading process. |
| Liquids | For most breads, use water that is 80° to 90°F (26.6 °C to 32.2 °C); for Rapid White breads, use water at 110°F to 120°F (43.3 °C to 48.8 °C). All liquids should be warm 80°F/27°C to 90°F/32°C for all recipes. Liquids, such as milk, water or a combination of powdered milk and water, can be used when making bread. Milk will improve flavor, provide velvety texture and soften the crust, while water alone will produce a crispier crust. Vegetable or fruit juices and potato water may be used for flavor variety. |
| Salt | Salt is necessary to balance flavor in breads and cakes; it also limits growth of yeast. Do not increase or decrease amount of salt shown in recipes. |
| Sugar | Sugar is important for color and flavor of breads. It also serves as food for yeast since it the supports fermentation process. Recipes in this book that call for sugar require granulated sugar.Important: Do not substitute powdered sugar. Artificial sweeteners cannot be used as substitute, as yeast will not react properly with them. |
High-Altitude Baking
In high-altitude areas (over 3,000 feet) dough tends to rise faster, as there is less air pressure. Therefore, less yeast is necessary. For more information on High Altitude Baking guides contact:
Colorado Cooperative Extension Resource Center
Toll free: (877) 692-9358
E-mail: CERC@vines.colostate.edu
Website: www.ext.colostate/edu/depts/coopext
In dry climates, flour is drier and requires slightly more liquid.
In humid climates, flour is wetter and will absorb less liquid, so less liquid is required.
GETTING STARTED
- Remove all packing material, and any stickers from the product.
- Remove and save literature.
- Please go to www.prodprotect.com/applica to register your warranty.
- Your bread machine is partially assembled in the box.
• Take the appliance apart:

To Remove Baking Pan:
• Using the lid handle, lift and open the lid (B).

- Grasp the sides of the bread pan and pull straight up to remove (C).
- Wash all removable parts as instructed in CARE AND CLEANING section of this manual. This will remove any traces of dust or residue left from manufacturing and shipping.
- Place on a dry level counter. Make sure you have enough space above the unit to open the lid.
ATTACHING THE KNEADING PADDLES

- Align the flat side of the hole in each kneading paddle with the flat side of the shaft (D).
- Push the paddle down firmly onto the shaft to secure in place.
READY TO BAKE
Note: You can select one of the recipes and specific instructions provided on pages 20 -35.
ADDING INGREDIENTS INTO BREAD PAN
- Add ingredients in order listed: liquid, then dry, then yeast (always add last).
- To measure liquids, use a see-through standard measuring cup and check measurement at eye level or use an angled measuring cup.
- When measuring dry ingredients, use standard dry measuring cups or measuring spoons and level off with the straight-edge of a knife or metal spatula.
- Use room temperature ingredients.
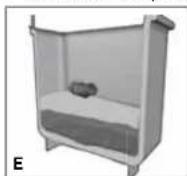
- Make small indentation with the back of a spoon or your finger in the top of the dry ingredients and add the yeast to the indentation (E). Do not let the yeast touch the liquid below. This is especially important when baking cycle has a delayed start.
SETTING YOUR BAKING CYCLE
1. Insert Bread Pan
- Insert bread pan into the unit and push down firmly until it is securely in place.
- Close the lid and plug the unit into an electrical outlet. The unit beeps and program setting 1 (White) displays as the default setting.
2. Select Settings (F)
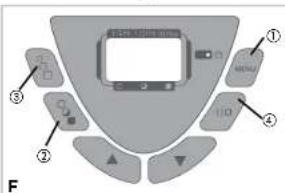
- Press MENU to select the appropriate program setting according to recipe instructions (F1).
Note: If you make a mistake in your selection, you will have to go through the remaining program settings then start over to select the correct setting.
- Press the crust color button to select desired crust (Light, Medium or Dark) [F2]. We recommend selecting the Light setting the first time you bake bread. The arrow on the screen moves to each selection every time you press the key.
- Press the loaf size button to select the desired loaf size (1.5-lb, 2-lb, or 3-lb.) (F3).
3. Kneading/Baking Cycle
- Press the I/O button (F4). The power indicator light will come on to show the appliance is running. There is a 30-minute delay for Whole Wheat. The glass window lets you watch the process of the bread as it is mixed, kneaded and baked.
Important: Do not open the lid during the rising and baking process.
- If additional ingredients are in the recipe, listen for the beep near the end of the kneading cycle about 25 minutes (8 minutes for Rapid White).
4. After Baking
- When the baking cycle is complete, you hear a beep. Press the I/O button; the red LED light turns off. For best results, remove bread immediately after baking process is complete.

- Open the lid and using oven mitts, pull the pan straight up and out to remove (G).
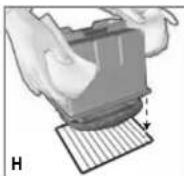
- Invert the bread pan over a wire rack and shake to remove bread. If necessary, use a nonstick spatula, inserted along the sides of the pan to loosen the bread (H).
Important: Metal utensils might scratch the nonstick surface.

- Turn bread right side up and let it cool for about 20 minutes before slicing (J).

- If paddles remain in bread, allow bread to cool. Turn on its side and pull paddles out. It may be necessary to use a paring knife to remove baked bread from around the paddle. Use care to avoid scratching the nonstick coating on the paddles (K).
Caution: The pan is very hot. To avoid burning counter surfaces, make sure to place it on a rack once the bread has been removed.
Important: The bread maker will not operate again until it has cooled down. SPECIAL FUNCTIONS Keep Warm Function
The keep warm function automatically begins when the baking cycle is completed. Bread can be kept warm for up to one hour. After one hour, remove the bread as instructed under section 4, After Baking. Note: The crust softens if the bread stays in the unit.
Delay-Bake Timer
You can set the timer to delay the completion of your bread for up to 13 hours.
To Set the Timer:
- Add your recipe ingredients to the bread pan. Avoid perishable foods, such as milk, butter or margarine, eggs and cheese.
- Select your settings.
- Set the amount of time in which you want your bread to be ready. For example, if you set the timer at 8:00 p.m. in the evening and you want to wake up to fresh bread at 6:00 a.m., that is 10 hours.
- Use the ▲ button to increase the time in 10-minute increments until the display shows 10:00. This means that your bread will be completed in 10 hours (6:00a.m.).
- If necessary, use the ▼ button to decrease the time.
Tip: To increase or decrease the time quickly, press and hold down the appropriate buttons.
Care and Cleaning
This product contains no user serviceable parts. Refer service to qualified service personnel.
CLEANING
- After each use, unplug the unit and let it cool.
- If the kneading paddles remain in the bread pan, grip the kneading paddle and pull straight out to remove.
- If you have trouble removing the kneading paddle from the appliance, add enough warm water to cover the paddles in the bread pan and allow to soak for 10 - 15 minutes to loosen the blades.
- Wash the bread pan and kneading paddles in warm, soapy water or in the dishwasher.
Important: Do not use abrasive cleansers or steel wool to clean the bread pan or kneading paddles. These could damage the nonstick coating.
- Wipe the outside of the unit with a damp cloth. Do not immerse in water or other liquid.
STORING
- Make sure the unit is unplugged, clean and dry.
- Store the unit with the lid closed.
- Do not place heavy objects on the lid.
RECIPES
Program Setting: 1 (White)
WHITE BREAD, 3-lb. loaf
2 cups water (80 to 90°F)
4 tbsp. butter or margarine, cut into pieces
2¼ tsp. salt
4 tbsp. dry milk powder
1 tbsp. sugar
5½ cups bread flour
1¼ tsp. bread machine yeast
-
Measure ingredients into bread pan in the order listed.
-
Insert bread pan securely into unit; close lid. Plug unit into wall outlet.
-
Select White setting and appropriate loaf size (3-lb.) and desired color.
-
Press Start/Stop (I/O) button.
-
The complete signal will sound when bread is done.
-
Using pot holders remove bread top from the unit and carefully remove bread and turn right side up. (Kneading paddles may remain in bread. Remove paddles when bread has cooled.)
-
Allow bread to cool on wire rack until ready to serve (at least 20 minutes).
Program Setting: 1 (White)
GOLDEN POTATO BREAD, 2-lb. loaf
^3/_4 cup potato cooking water (80 to 90°F)*
12 cup warm mashed potatoes
2 tbsp. unsalted butter or margarine, cut into pieces
3 tbsp. dry skim milk powder
2 tbsp. potato starch
1 tsp. granulated sugar
1½ tsp. salt
1 large egg, at room temperature
4 cups bread flour
2¼ tsp. bread machine yeast
-
Measure ingredients into bread pan in the order listed.
-
Insert bread pan securely into unit; close lid. Plug unit into wall outlet.
-
Select Basic setting and appropriate loaf size (2 lb.) and desired color.
-
Press Start/Stop (I/O) button.
-
The complete signal will sound when bread is done.
-
Using pot holders, remove bread pan from the unit and carefully remove bread and turn right side up. [Kneading paddles may remain in bread. Remove paddles when bread has cooled.]
-
Allow bread to cool on wire rack until ready to serve (at least 20 minutes).
*Place peeled potatoes in saucepan of cold water. Bring to boil; reduce heat and cook until fork tender. Drain, reserving liquid. Mash potatoes without any additions of salt, butter or milk. Cool water from 80 to 90^ . and allow mashed potatoes to stand covered at room temperature for use.
Program Setting: 1 (White)
SPELT BREAD, 3-lb. loaf
2 cups water (80 to 90°F)
3 tbsp. butter or margarine, cut in pieces
^3/_4 tsp. salt
14 cup dry milk powder
14 cup sugar
4½ cups spelt flour
2 tsp. bread machine yeast
-
Measure ingredients into bread pan in the order listed.
-
Insert bread pan securely into unit; close lid. Plug unit into wall outlet
-
Select White setting and appropriate loaf size (3-lb.) and color.
-
Push Start/Stop (I/O) button.
-
The complete signal will sound when bread is done.
-
Using pot holders, remove bread pan from the unit and carefully remove bread from pan. (Kneading paddles may remain in bread. Remove paddles when bread has cooled.)
-
Allow bread to cool on wire rack until ready to serve (at least 20 minutes).
Program Setting: 1 (White)
FAMILY FAVORITE WHITE SANDWICH LOAF, 3-lb. loaf
2 cups water (80 to 90°F)
3 tbsp. butter or margarine, cut into pieces
1 tsp. salt
3 tbsp. dry milk powder
4 tbsp. sugar
5½ cups bread flour
1¼ tsp. bread machine yeast
-
Measure ingredients into bread pan in the order listed.
-
Insert bread pan securely into unit; close lid. Plug unit into wall outlet.
-
Select White setting and appropriate loaf size (3-lb.).
-
Press Start/Stop (I/O) button.
-
The complete signal will sound when bread is done.
-
Using pot holders, remove bread pan from the unit and carefully remove bread from pan and turn right side up. (Kneading paddles may remain in bread. Remove paddles when bread has cooled.)
- Allow bread to cool on wire rack until ready to serve (at least 20 minutes).
Program Setting: 2 (Whole Wheat)
MULTISEEDED WHOLE WHEAT BREAD, 3-lb. loaf
1 cup water (80 to 90°F)
^3/_4 cup milk (80 to 90°F)
3 tbsp. butter or margarine, cut into pieces
3 tbsp. honey
2 tsp. salt
4 cups bread flour
^3/_4 cup whole wheat flour
12 cup hazelnut flour
2 tsp. bread machine yeast
12 cup sunflower seeds
3 tbsp. golden flax seeds
2 tbsp. sesame seeds
2 tbsp. black sesame seeds
1 tbsp. grated orange peel
1 tbsp. fennel seeds
1 tbsp. poppy seeds
- Measure first 9 ingredients into bread pan in the order listed.
- Insert bread pan securely into unit; close lid. Plug unit into wall outlet
- Select Whole Wheat setting, desired color and appropriate loaf size (3-lb.).
- Push Start/Stop (I/O) button.
- At "Add ingredient" beep, add next 7 ingredients.
- The complete signal will sound when bread is done.
- Using pot holders, remove bread pan from the unit and carefully remove bread from pan and turn right side up. (Kneading paddles may remain in bread. Remove paddles when bread has cooled.)
- Allow bread to cool on wire rack until ready to serve (at least 20 minutes).
Program Setting: 2 (Whole Wheat)
SEEDED WHOLE WHEAT BREAD, 2-lb. loaf
2 cups buttermilk (80 to 90°F)
14 cup water (80 to 90°F)
2 tbsp. unsalted butter or margarine, cut into pieces
2 tbsp. maple syrup
1 tbsp. grated orange peel
2 tsp. salt
2 cups whole wheat flour
4 cups bread flour
3 tsp. bread machine yeast
2 tsp. vital wheat gluten (optional)
12 cup flax seeds
2 tbsp. sesame seeds
- Measure ingredients except flax and sesame seeds into bread pan in the order listed.
- Insert bread pan securely into unit; close lid. Plug unit into wall outlet.
- Select Whole Wheat setting and appropriate loaf size (2-lb.) and color.
- Press Start/Stop [I/O] button.
- At "Add ingredient" beep, add flax and sesame seeds.
- The complete signal will sound when bread is done.
- Using pot holders, remove bread pan from the unit and carefully remove bread from bread pan. (Kneading paddles may remain in bread. Remove paddles when bread has cooled.)
- Allow bread to cool on wire rack until ready to serve (at least 20 minutes).
Program Setting: 3 (French)
HERBED GARLIC FRENCH BREAD, 3-lb. loaf
1½ cups water (80 to 90°F)
3 tbsp. instant minced onion
3 tbsp. chopped fresh parsley
2 tbsp. finely chopped garlic
2 tbsp. chopped fresh basil leaves
1 tbsp. chopped fresh thyme
1½ tbsp. sugar
1¾ tsp. salt
5¾ cups bread flour
1½ tsp. bread machine yeast
12 cup sunflower seeds
-
Measure ingredients, except sunflower seeds into bread pan in the order listed.
-
Insert bread pan securely into unit; close lid. Plug unit into wall outlet.
- Select French setting and appropriate loaf size (3-lb.) and desired color.
- Press Start/Stop (I/O) button.
- At "Add ingredient" beep, add sunflower seeds.
- The complete signal will sound when bread is done.
- Using pot holders, remove bread pan from the unit and carefully remove bread from bread pan and turn right side up. (Kneading paddles may remain in bread. Remove paddles when bread has cooled.)
- Allow bread to cool on wire rack until ready to serve (at least 20 minutes).
Program Setting: 4 (Sweet)
CINNAMON RAISIN PECAN BREAD, 3-lb. loaf
2 large eggs, at room temperature
1½ cups water (80 to 90°F)
14 cup dry skim milk powder
3 tbsp. firmly packed dark brown sugar
1 tsp. ground cinnamon
2 tsp. salt
^1/_3 cup butter or margarine, cut into pieces
5 cups bread flour
2½ tsp. bread machine yeast
1 cup raisins
^1/_3 cup chopped pecans
Confectioners' sugar Frosting
- Measure ingredients, except raisins and pecans into bread pan in the order listed.
- Insert bread pan securely into unit; close lid. Plug unit into wall outlet.
- Select Sweet setting and appropriate loaf size (3-lb.) and desired color.
- Press Start/Stop (I/O) button.
- At "Add ingredient" beep, add raisins and pecans.
- The complete signal will sound when bread is done.
- Using pot holders, remove bread pan from the unit and carefully remove bread from bread pan. (Kneading paddles may remain in bread. Remove paddles when bread has cooled.)
- Allow bread to cool on wire rack until ready to serve (at least 20 minutes).
- Before serving, coat top of bread with confectioners' sugar frosting and sprinkle with additional chopped pecans, if desired.
Program Setting: 5 (Lo Carb)
LOW CARB SEED BREAD, 2-lb. loaf
1½ cups water (80 to 90°F)
3 tbsp. heavy cream (85°F)
4 tsp. molasses
^3/4 tsp. salt
1¼ cups whole wheat flour
^2/3 cup vital wheat gluten
^2/3 cup almond flour
^2/3 cup barley flour
^2/3 cup oat flour
3 tbsp. soy powder
2 tbsp. vital wheat gluten
2¼ tsp. bread machine yeast
^1/3 cup unsalted pumpkin seeds
^1/_3 cup unsalted sunflower seeds
1. Measure ingredients into baking pan in the order listed, except pumpkin and sunflower seeds.
2. Insert bread pan securely into unit; close lid. Plug unit into wall outlet
3. Select Lo Carb setting and appropriate loaf size (2-lb.) and medium for color.
4. Push Start/Stop (I/O) button.
5. At "Add ingredient" beep, add pumpkin and sunflower seeds.
6. The complete signal will sound when bread is done.
7. Using pot holders, remove bread pan from the unit and carefully remove bread from pan. (Kneading paddles may remain in bread. Remove paddles when bread has cooled.)
8. Allow bread to cool on wire rack until ready to serve (at least 20 minutes).
Program Setting: 6 (Gluten Free)
FRUIT AND NUT GLUTEN FREE BREAD, 3-lb. loaf
1 12 cups water (80 to 90^ F )
3 large eggs, at room temperature
1 tbsp. freshly grated orange peel
2 tsp. almond extract
1 tsp. cider vinegar
2 cups white rice flour
12 cup potato starch
12 cup dry skim milk powder
12 cup tapioca flour
13 cup sugar
1 tbsp. xanthan gum
1½ tsp. ground cinnamon
1½ tsp. salt
1 tbsp. bread machine yeast
12 cup toasted slivered almonds
12 cup dried mixed fruit bits
1. Measure ingredients, except almonds and fruit bits into baking pan in the order listed, making sure yeast does not touch the liquid.
2. Insert bread pan securely into unit; close lid. Plug unit into electrical outlet
3. Select Gluten Free setting, appropriate loaf size (3-lb.) and desired color.
4. Push Start/Stop (I/O) button.
5. At "Add ingredient" beep, add almonds and fruit bits.
6. The complete signal will sound when bread is done.
7. Using pot holders, remove bread pan from the unit and carefully remove bread from pan. (Kneading paddles may remain in bread. Remove paddles when bread has cooled.)
8. Allow bread to cool on wire rack until ready to serve (at least 20 minutes).
Program Setting: 6 (Gluten Free)
LEMON PECAN BREAD, 3-lb. loaf
1¼ cups water (80 to 90°F)
2 large eggs, at room temperature
2 tbsp. canola oil
1/3 cup maple syrup
2 tsp. grated lemon peel
1 tsp. cider vinegar
1½ cups quinoa flour
^3/_4 cup brown rice flour
12 cup cornstarch
12 cup rice bran
1 tbsp. xanthan gum
1½ tsp. salt
1½ tsp. bread machine yeast
1 cup chopped toasted pecans
1. Measure all ingredients, except pecans into baking pan in the order listed; making sure yeast does not touch the liquid.
2. Insert bread pan securely into unit; close lid. Plug unit into electrical outlet
3. Select Gluten Free setting, appropriate loaf size (2-lb.) and desired color.*
4. Push Start/Stop (I/O) button.
5. At "Add ingredient" beep, add pecans.
6. The complete signal will sound when bread is done.
7. Using pot holders, remove bread pan from the unit and carefully remove bread from pan. (Kneading paddles may remain in bread. Remove paddles when bread has cooled.)
8. Allow bread to cool on wire rack until ready to serve (at least 20 minutes).
* Suggest using Medium crust color setting.
Program Setting: 6 (Gluten Free) GLUTEN FREE BREAD, 3-lb. loaf
2¼ cups water (80 to 90°F)
4 large eggs, at room temperature
13 cup canola oil
1½ tsp. cider vinegar
3 cups white rice flour
1 cup dry skim milk powder
2 tsp. salt
^3/_4 cup potato starch
^3/_4 cup tapioca flour
12 cup cornstarch
4½ tbsp. sugar
1½ tbsp. xanthan gum
3¼ tsp. bread machine yeast
-
Measure ingredients into baking pan in the order listed, making sure yeast does not touch the liquid.
-
Insert bread pan securely into unit; close lid. Plug unit into electrical outlet
-
Select Gluten Free setting, appropriate loaf size (3-lb.) and desired color.
-
Push Start/Stop (I/O) button.
-
The complete signal will sound when bread is done.
-
Using pot holders, remove bread pan from the unit and carefully remove bread from pan. (Kneading paddles may remain in bread. Remove paddles when bread has cooled.)
-
Allow bread to cool on wire rack until ready to serve (at least 20 minutes).
Program Setting: 7 (Quick Bread) CLASSIC DATE NUT BREAD
1 cup boiling water
1 cup chopped dates
1 tsp. baking soda
2 large eggs, at room temperature
1¾ cups unsifted all-purpose flour
^3/_4 cup firmly packed dark brown sugar
1 tsp. baking powder
12 tsp. salt
14 cup softened unsalted butter or margarine
1½ tsp. vanilla extract
1 cup chopped walnuts
-
Pour boiling water over dates in small bowl. Add baking soda. Let stand at room temperature for 20 minutes.
-
Transfer date mixture to bread pan. Measure remaining ingredients, except walnuts into bread pan in the order listed.
-
Insert bread pan securely into unit; close lid. Plug unit into wall outlet.
-
Select the Quick Bread setting.
-
Press Start/Stop (I/O) button.
-
At "Add ingredient" beep, add walnuts.
-
The complete signal will sound when the bread is done.
-
Using pot holders, remove bread pan from the unit and place on wire rack. Allow bread to cool in pan for 5 minutes. Carefully turn bread out of bread pan and turn right side up. (Kneading paddles may remain in bread. Remove paddles when bread has cooled.)
-
Allow bread to cool on wire rack until ready to serve (at least 20 minutes).
Program Setting: 8 (Jam) MIXED PEPPER JAM
1 bunch green onions, sliced
1 medium red bell pepper, seeded and diced
1 medium green bell pepper, seeded and diced
4 large jalapeno peppers, seeded and diced
12 cup chopped cilantro
12 cup chopped sun dried tomatoes
4 cups sugar
1 pkg. (1.75 oz.) powdered pectin
2 large cloves garlic, minced
1 cup cider vinegar
-
Measure ingredients in order listed into bread pan.
-
Insert bread pan securely into unit. Close lid. Plug unit into wall outlet.
-
Select Jam setting.
-
Press the Start/Stop (I/O) button.
-
The complete signal will sound when the preserves are done.
-
Using pot holders, remove bread pan from the unit and cool on wire rack. Carefully pour jam into clean jars.
-
Place in refrigerator to set.
-
Store in refrigerator for up to 3 weeks.
Makes about 3½ cups
Program Setting: 9 (Dough)
3 large eggs, at room temperature
6 tbsp. granulated sugar
6 tbsp. unsalted butter or margarine, cut into small pieces
^3/_4 tsp. salt
4¼ cups bread flour
3 tsp. active dry or bread machine yeast
-
Measure ingredients into bread pan in the order listed.
-
Insert bread pan securely into unit; close lid. Plug unit into wall outlet.
-
Select Dough setting.
-
Press Start/Stop (I/O) button.
-
The complete signal will sound when bread is done.
-
Using pot holders, remove bread pan from the unit and turn dough out onto lightly floured surface.
-
Invert large mixing bowl over dough and let rest for 10 minutes.
-
Shape into your favorite coffee cake or dinner rolls.
Variation - Lemon Cheese Braid:
- Prepare filling: In bowl, cream together 1 cup creamy cottage cheese, 3 tbsp. granulated sugar, 1 tbsp. flour. Stir in 1 egg yolk, 1 tbsp. sour cream, 1 tsp. grated lemon peel and 1 tbsp. lemon juice.
- Divide dough in half. Roll out half on lightly greased baking sheet to 9 x 16-inch rectangle.
- Spread half of the filling down center third of oblong. Cut 16 slits in dough along each side of filling making strips about 1-inch wide. Fold strips at an angle across filling, alternating from side to side.
- Cover and let rise in warm place until doubled in size (about 45 minutes).
- Bake in preheated oven at 375°F until golden brown, about 20 minutes.
- Remove from pan and cool on wire rack.
- If desired, combine 1 cup confectioners' sugar, 1 tsp. grated lemon peel and about 1 tbsp. lemon juice. Frost cooled cake.
Pineapple Cheese Swirls:
- Combine 13 cup cottage cheese, 1 egg yolk, 1 tbsp. granulated sugar and 12 cup well drained crushed pineapple.
- Roll out half dough onto lightly floured surface to 16 x 12-inch oblong. Cut lengthwise into 12 one inch strips. Take hold of each strip at the end and twist in opposite directions. Coil twist on greased baking sheet; tuck and seal end. Repeat with remaining strips of dough. Place about 1 tbsp. filling in center of each swirl.
- Cover and let rise in warm place until doubled in size (about 45 minutes).
- Bake in preheated oven at 375°F until golden brown, about 20 minutes.
- Remove from pan and cool on wire rack.
- If desired, drizzle with confectioners' sugar frosting.
Program Setting: 10 (Rapid White)
OATMEAL BREAD
1½ cups buttermilk (110 to 120°F)
2 tbsp. butter or margarine, cut into pieces
2 tbsp. maple syrup (not pancake syrup)
1 cup quick cooking oatmeal
1 tsp. salt
4 cups bread flour
4 tsp. vital wheat gluten
3 tsp. rapid rise yeast
- Measure ingredients in order listed into bread pan.
- Insert bread pan securely into unit; close lid. Plug unit into wall outlet.
- Select Rapid White setting, appropriate loaf size (2-lb.) will appear and select desired color.
- Press Start/Stop (I/O) button.
- The complete signal will sound when bread is done.
- Using pot holders, remove bread pan from the unit and carefully remove bread from pan. (Kneading paddles may remain in bread. Remove paddles when bread has cooled.)
- Allow bread to cool on wire rack until ready to serve (at least 20 minutes).
| POSSIBLE SOLUTIONS\RESULTS | Loaf Rises Then Falls "Cratered Loaf" | Loaf Rises Too High "Mushroom Loaf" | Loaf Does Not Rise Enough | Flat Loaf Little To No Rising | ||
| MEASUREMENTS | FLOUR | ▲ | ||||
| ▼ | 2 Tbsp. | |||||
| Water Or Milk | ▲ | 2 Tbsp. | ||||
| ▼ | 2 Tbsp. 2 Tbsp. | |||||
| Salt | ▲ | 1/4 tsp. 1/4 tsp. | ||||
| ▼ | 1/4 tsp. | |||||
| Sugar Or Honey | ▲ | 1 tsp. | ||||
| ▼ | 1 tsp. | |||||
| Yeast | ▲ | 1/4 tsp. | ||||
| ▼ | 1/4 tsp. 1/4 tsp. | |||||
| INGREDIENT | Water Or Milk | Not Enough Water Or Milk | √ | |||
| Liquid Too Hot or Too Cold | Use lukewarm water only | |||||
| FLOUR | Too Old | √ | √ | |||
| Low In Gluten Content | Use Whole Wheat or Multi-Grain Flours | Use Whole Wheat or Multi-Grain Flours | ||||
| Too Fine | Use Bread Flour for best results | Use Bread Flour for best results | ||||
| Yeast | None Was Added | √ | ||||
| Out Of Date Code | ||||||
| Used Fresh (Wrong Type) | Use Traditional Dry Yeast or Bread Machine Yeast only | |||||
| Salt | Forgotten | √ | ||||
| Too Much | √ | √ | ||||

Increase Amount Decrease Amount
| Crust Too Dark | Uncooked Or Partially Cooked | Not Mixed Or Partially Mixed | Gnarly Knotted Top | Loaf Core Texture Heavy & Dense | High Altitude Adjustment |
| 2 Tbsp. 2 Tbsp. | |||||
| 2 Tbsp. | |||||
| 2 Tbsp. 2 Tbsp. | |||||
| 1 tsp. | |||||
| 1 tsp. | |||||
| 1/4 tsp. | |||||
| 1/4 tsp. | |||||
| √ | √ | ||||
| Use Bread Flour for best results | |||||
| Use Traditional Dry Yeast or Bread Machine Yeast only | |||||
Frequently Asked Questions
Q: There was a power failure while my bread maker was operating; what do I do?
A: Most of our Bread Makers feature a power failure protection system – anywhere from 7 minutes to 1 hour. This system will save your program settings for a short time after a power outage, so if you are within that time bread making can resume after the power returns (you may need to press the start button). To find out what length of time your power failure protection covers, please refer to your Use & Care Manual.
If the bread maker loses power for more time than the power failure protection covers and you are using any dairy products, perishables or meat in your bread, you should discard the contents of the recipe and start again with new fresh ingredients due to health and sanitary considerations. For nonperishable recipes you may try starting the bread maker at the beginning of the course again. However, this may not always produce an acceptable loaf of bread.
If you are not sure when the outage occurred, remove the dough ball from the bread pan and place in an oven-safe baking container. Allow to double in size and place in a preheated (350°F/177°C) oven for 30 to 45 minutes or until done. The bread will sound hollow when tapped on top of the loaf if it is done. Again, this may not always produce an acceptable loaf of bread. If the bread has already begun to bake when the outage occurs, you must begin with new ingredients.
Q: Why does the kneading paddle stick in the bread loaf when I remove it from the bread pan?
A: Even though the kneading paddle is nonstick, it may happen that it becomes lodged in the loaf during baking and comes out with the loaf once it is removed. Simply turn the loaf over on your cooling rack and use nonmetal tongs or any nonmetal utensil to remove it from the bottom of the loaf.
Important note: Use caution, as the kneading paddle will be hot.
Q: I pressed the PAUSE button, but nothing happened. Why does my machine not pause?
A: Some of our bread makers require you to press and hold the PAUSE button in order to start the pause function. Try holding the PAUSE button for about 2 seconds. This should activate the PAUSE function.
Q: Why did my quick bread tear as I removed it from the baking chamber?
A: The most common cause for a quick bread tearing is that the kneading paddle stuck in the bottom of the quick bread as it baked. While normal breads will bring the kneading paddle with the bread as you remove if it gets stuck, the texture of quick breads means the loaf may tear instead.
To prevent this, simply PAUSE your bread maker and remove the kneading paddle prior to the beginning of the baking cycle.
Q: Can I set my delay bake timer for less time than the full amount possible?
A: In many cases, yes. Most of our delay bake timers are designed so you can adjust the amount of time you want the bread maker to delay, usually in ten-minute increments. For example, our 13-hour delay bake timer can be set anywhere from 10 minutes to 13 hours, depending on the amount you need delayed. If your bread maker has an adjustable delay bake timer, you can find specific instructions for using the timer directly following the regular operating instructions in your Use & Care manual.
Q: Can the delay bake timer be used with any bread making cycle or setting?
A: The delay bake timer can be used on any cycle, with the exception of jam. However, the delay bake timer should not be used or should be used with caution (i.e. do not delay for too long) on any recipes that have perishable ingredients, such as fresh milk, eggs and the like.
Q: Can the Rapid setting be used with any bread making cycle?
A: Depending on your bread maker, the Rapid setting may be limited to a specific setting. In general however, white, whole wheat, French and sweet cycles can have a rapid setting. Most rapid settings on a bread maker will reduce the total bread making time by about one hour. Specialty settings such as quick breads, dough, gluten-free, low carb and jam cannot be done with a rapid setting.
Q: Why do the cabinets/walls around my bread maker get hot when I use it?
A: In order to ventilate the baking chamber of your bread maker properly, there are usually vents on both the sides and back of your bread maker. Always ensure there is a few inches of space between your bread maker and any vertical surface when it's in use.
Q: Where do I get replaceable parts for my bread maker?
A: Some parts of your bread maker are replaceable. You can look in your Use & Care manual to find out which parts can be replaced and to get a part number reference. Then, visit prodprotect.com or call 1-800-738-0245 [Monday-Friday, 8:30 a.m. to 8:00 p.m., ET].
Breadmakers
About The Finished Loaf
Q: Why does height and shape of bread differ in each loaf?
A: The height and shape of your bread may differ depending on the ingredients, room temperature and length of timer cycle. Since each type of bread you make will have different ingredients, the loaves will be shaped differently. When making the same bread, even the room temperature can cause the loaves to be shaped slightly different.
Q: Why does my bread have an unusual aroma?
A: Stale ingredients may have been used or too much yeast was added. Always use fresh ingredients. Remember, accurate measurements are essential to make delicious bread, particularly when measuring the yeast.
Q: Why is the texture/consistency of my bread not as I expected?
A: The most common reason is that the ingredients weren't measured exactly. When measuring dry ingredients, make sure to tap and scrape the measuring cup to ensure you have exactly the amount you need. For liquids, make sure to measure at eye level on a flat surface; the center of the meniscus (the curve you see at the surface of the liquid) should be even with the measuring line. For more information, please see the Measuring Ingredients article in the Baking Tips section of our website.
Q: Why does my bread have floured corners?
A: Sometimes flour in the corner of the bread pan may not have been completely kneaded into the dough. You can simply scrape it off with a knife.
Q: Why does my bread have a slightly soggy quality to it?
A: Your bread loaf was most likely left in your bread maker after baking was completed. Bread left in its loaf pan after baking that is not cooled on a wire rack can have a soggy quality to it. Although your bread maker has a 60-minute keep warm cycle, it is recommended to remove bread immediately after baking.
Breadmaking Ingredients
Q: Why do I keep the dry/liquid ingredients separated in the bread pan before I place the pan into the baking chamber?
A: The main reason is to keep the yeast separated from the liquid ingredients. As a live substance, yeast will start to react with any liquid ingredient as soon as it comes into contact with it. You want to keep the yeast away from the liquids until it's ready to be mixed by your bread maker to provide the best taste, texture and consistency in your finished bread. This is especially true if you're using the delay bake timer.
Q: Can ingredients be halved or doubled?
A: No. If there is too small an amount of ingredients in the bread pan, the kneading paddle cannot knead as it's designed to work. If there is too large an amount, the bread rises out of bread pan and spills over the sides.
Q: Can fresh milk be used in place of dry milk?
A: Yes, but you will need to make some adjustments to keep the volume of ingredients the same. Decrease the amount of water used equal to the amount of milk being added to ensure the volume is the same. Also note that fresh milk is not recommended when using the delay bake timer, because it may spoil while sitting in bread pan.
Q: Can I substitute butter for oil?
A: Yes. Simply melt the butter (cool to room temperature before adding) and add it in place of the oil. Since both of these are liquid ingredients, the volume will be the same and no adjustments need to be made.
Q: Can I use prepackaged bread and cake mixes in my bread maker?
A: Yes. When using a prepackaged bread mix, simply select the bread making cycle that best fits the type of bread you're making (e.g. WHITE cycle for white bread). For cake mixes, use the QUICK BREADS baking cycle.
Q: What is the difference between regular types of bread and low-carb or gluten-free?
A: Low-carb breads are designed to substitute lower-carbohydrate alternatives for high-carbohydrate flours. In most cases, regular flours typically used in bread making are reduced or eliminated completely from the recipe using alternative ingredients like flax and whey powder. These breads are typically used to support a low-carb diet, so the dieter can continue to eat bread products.
Gluten-free breads are those that completely eliminate any ingredients that contain gluten. Common sources of gluten in baking include wheat, barley and rye. As such, alternative types of flour, such as rice flour, potato starch flour and soy flour are used as substitutes. To learn more about Gluten-Free Baking click the link to read a full article in our Baking Tips section.
mAchine À PAin – GuiDe De RÉFÉRence RAPiDe
Colorado Cooperative Extension Resource Center
Sans frais : 877 692-9358
For service, repair or any questions regarding your appliance, call the appropriate 800 number on cover of this book. Please DO NOT return the product to the place of purchase. Also, please DO NOT mail product back to manufacturer, nor bring it to a service center. You may also want to consult the website listed on the cover of this manual.
TWO-YEAR LIMITED WARRANTY
(Applies only in the United States and Canada)
What does it cover?
- Any defect in material or workmanship provided; however, Applica's liability will not exceed the purchase price of product.
For how long?
- Two years from the date of original purchase with proof of such purchase.
What will we do to help you?
- Provide you with a reasonably similar replacement product that is either new or factory refurbished.
How do you get service?
- Save your receipt as proof of date of sale.
- Visit the online service website at www.prodprotect.com/applica, or call toll-free 1-800-231-9786, for general warranty service.
- If you need parts or accessories, please call 1-800-738-0245.
What does your warranty not cover?
• Damage from commercial use
- Damage from misuse, abuse or neglect
- Products that have been modified in any way
- Products used or serviced outside the country of purchase
• Glass parts and other accessory items that are packed with the unit
- Shipping and handling costs associated with the replacement of the unit
- Consequential or incidental damages (Please note, however, that some states do not allow the exclusion or limitation of consequential or incidental damages, so this limitation may not apply to you.)
How does state law relate to this warranty?
- This warranty gives you specific legal rights. You may also have other rights that vary from state to state or province to province.
BLACK&DECKER is a registered trademark of The Black & Decker Corporation, Towson, Maryland, USA
Made in People's Republic of China
Printed in People's Republic of China
BESOIN D'AIDE?
© 2011 Applica Consumer Products, Inc.
2010/12-6-24E/F


- BREAD MAKER QUICK START GUIDE
- TIPS FOR GETTING THE BEST RESULTS
- Important to note that "RAPID BAKE" will make a denser loaf of bread TIPS FOR HANDLING DOUGH
- BREAD AND DOUGH INGREDIENTS B2000\*
- Flours
- Fat
- Salt
- Liquid
- Sweeteners
- Yeast
- Please Read and Save this Use and Care Book
- IMPORTANT SAFEGUARDS
- SAVE THESE INSTRUCTIONS
- POLARIZED PLUG (120V Models Only)
- TAMPER-RESISTANT SCREW
- ELECTRICAL CORD
- POWER OUTAGE
- 7-Minute Power Failure Back-Up
- Digital Display
- Shows the following:
- Menu Button
- Start/Stop (I/O) Button
- Timer Buttons
- Crust Color Button
- Loaf Size Button
- Red LED indicator light: Start/Stop (I/O) indicator
- Program Settings
- How to Use
- MENU
- White Bread
- Whole Wheat Bread
- French Bread
- Sweet
- Low Carb Bread
- Gluten Free Bread
- Quick Bread
- Jam
- Dough
- Rapid White
- Bake Only
- Tips on Flour Storage
- Tips on Yeast
- Conversion Chart for Quick Rise Yeast
- Rapid Course Yeast
- High-Altitude Baking
- GETTING STARTED
- ATTACHING THE KNEADING PADDLES
- READY TO BAKE
- ADDING INGREDIENTS INTO BREAD PAN
- SETTING YOUR BAKING CYCLE
- Insert Bread Pan
- Select Settings (F)
- Kneading/Baking Cycle
- After Baking
- Important: The bread maker will not operate again until it has cooled down. SPECIAL FUNCTIONS Keep Warm Function
- Delay-Bake Timer
- To Set the Timer:
- Care and Cleaning
- CLEANING
- STORING
- RECIPES
- Program Setting: 1 (White)
- WHITE BREAD, 3-lb. loaf
- GOLDEN POTATO BREAD, 2-lb. loaf
- SPELT BREAD, 3-lb. loaf
- FAMILY FAVORITE WHITE SANDWICH LOAF, 3-lb. loaf
- Program Setting: 2 (Whole Wheat)
- MULTISEEDED WHOLE WHEAT BREAD, 3-lb. loaf
- SEEDED WHOLE WHEAT BREAD, 2-lb. loaf
- Program Setting: 3 (French)
- HERBED GARLIC FRENCH BREAD, 3-lb. loaf
- Program Setting: 4 (Sweet)
- CINNAMON RAISIN PECAN BREAD, 3-lb. loaf
- Program Setting: 5 (Lo Carb)
- LOW CARB SEED BREAD, 2-lb. loaf
- Program Setting: 6 (Gluten Free)
- FRUIT AND NUT GLUTEN FREE BREAD, 3-lb. loaf
- LEMON PECAN BREAD, 3-lb. loaf
- Program Setting: 6 (Gluten Free) GLUTEN FREE BREAD, 3-lb. loaf
- Program Setting: 7 (Quick Bread) CLASSIC DATE NUT BREAD
- Program Setting: 8 (Jam) MIXED PEPPER JAM
- Program Setting: 9 (Dough)
- Variation - Lemon Cheese Braid:
- Pineapple Cheese Swirls:
- Program Setting: 10 (Rapid White)
- OATMEAL BREAD
- Frequently Asked Questions
- Q: There was a power failure while my bread maker was operating; what do I do?
- Q: Why does the kneading paddle stick in the bread loaf when I remove it from the bread pan?
- Q: I pressed the PAUSE button, but nothing happened. Why does my machine not pause?
- Q: Why did my quick bread tear as I removed it from the baking chamber?
- Q: Can I set my delay bake timer for less time than the full amount possible?
- Q: Can the delay bake timer be used with any bread making cycle or setting?
- Q: Can the Rapid setting be used with any bread making cycle?
- Q: Why do the cabinets/walls around my bread maker get hot when I use it?
- Q: Where do I get replaceable parts for my bread maker?
- Breadmakers
- About The Finished Loaf
- Q: Why does height and shape of bread differ in each loaf?
- Q: Why does my bread have an unusual aroma?
- Q: Why is the texture/consistency of my bread not as I expected?
- Q: Why does my bread have floured corners?
- Q: Why does my bread have a slightly soggy quality to it?
- Breadmaking Ingredients
- Q: Why do I keep the dry/liquid ingredients separated in the bread pan before I place the pan into the baking chamber?
- Q: Can ingredients be halved or doubled?
- Q: Can fresh milk be used in place of dry milk?
- Q: Can I substitute butter for oil?
- Q: Can I use prepackaged bread and cake mixes in my bread maker?
- Q: What is the difference between regular types of bread and low-carb or gluten-free?
- mAchine À PAin – GuiDe De RÉFÉRence RAPiDe
- TWO-YEAR LIMITED WARRANTY
- (Applies only in the United States and Canada)
- What does it cover?
- For how long?
- What will we do to help you?
- How do you get service?
- What does your warranty not cover?
- How does state law relate to this warranty?
- BESOIN D'AIDE?
Brand : BLACK & DECKER
Model : B6000C
Category : Bread maker