DCD5505W1 - Tumble drier DANBY - Free user manual and instructions
Find the device manual for free DCD5505W1 DANBY in PDF.

| Product Type | Tumble Dryer |
| Brand | Danby |
| Model | DCD5505W1 |
| Load Capacity | Up to 11 lb (5 kg) of dry laundry |
| Power Supply | 240 V, 30 A, single-phase |
| Power Cord Type | 3 or 4 wires (depending on outlet) |
| Number of Programs | 10 drying programs including automatic and timed |
| Moisture Sensor | Yes, with drying level indicator |
| Anti-Wrinkle Function | Yes, cool tumble cycle after drying |
| End-of-Cycle Cooling | 10 minutes automatic cooling |
| Drum Interior Light | Yes |
| Lint Filter | Yes, clean after each use |
| Moist Air Exhaust | Via 4 in flexible hose (not supplied) |
| Adjustable Feet | Yes, for leveling |
| Noise Level | Not specified |
| Dimensions (Height x Width x Depth) | Approx. 85 cm x 60 cm x 60 cm (estimate) |
| Weight | Not specified |
| Warranty | 1 year parts and labor, 5 years drum corrosion, lifetime stainless steel drum (parts) |
| Maintenance | Clean lint filter after each cycle; vacuum interior annually |
| Repairability | By authorized technician only |
Frequently Asked Questions - DCD5505W1 DANBY
User questions about DCD5505W1 DANBY
0 question about this device. Answer the ones you know or ask your own.
Ask a new question about this device
Download the instructions for your Tumble drier in PDF format for free! Find your manual DCD5505W1 - DANBY and take your electronic device back in hand. On this page are published all the documents necessary for the use of your device. DCD5505W1 by DANBY.
USER MANUAL DCD5505W1 DANBY
SAVE THESE INSTRUCTIONS CAUTION: Read and follow all safety rules and operating instructions before first use of this product.
natural_image
Line drawing of a white front-loading washing machine with control panel and side-mounted door (no text or symbols)CLOTHES DRYER
Owner's Manual 3-15
• Important Safety Instructions
• Electrical Requirements
• Installation Instructions
• Control Panel Features
- Operation
CLOTHES DRYER Limited Product Warranty (In-Home Service)
This quality product is warranted to be free from manufacturer's defects in material and workmanship, provided that the unit is used under the normal operating conditions intended by the manufacturer.
This warranty is available only to the person to whom the unit was originally sold by Danby or by an authorized distributor of Danby, and is non-transferable.
TERMS OF WARRANTY
The limited warranty period listed below is based upon the selection of brand name of product purchased.
Any electrical parts of this product found to be defective will be repaired or replaced, including labour, at warrantor's option for the ORIGINAL purchaser, covering service listed below per product selection. Consumable parts (i.e. light bulbs) are not warranted or guaranteed for any length of time.
The product warranty coverage is as follows:
Parts and Labour Coverage
One (1) Year
Corrosion on Cabinet (No labour after 2nd year)
Five (5) Years
Stainless Steel Drum (Parts Only)
Lifetime
TO OBTAIN SERVICE
Contact your dealer from whom your unit was purchased, or contact your nearest authorized Danby service depot, where service must be performed by a qualified service technician. If service is performed on the unit by anyone other than an authorized service depot, or the unit is used for commercial application, all obligations of Danby under this warranty shall be at an end.
EXCLUSIONS
Save as herein provided, there are no other warranties, conditions, representations or guarantees, express or implied, made or intended by Danby Products Limited (Canada) or Danby Products Inc. (U.S.A) or its authorized distributors and all other warranties, conditions, representations or guarantees, including any warranties, conditions, representations or guarantees under any Sale of Goods Act or like legislation or statute is hereby expressly excluded.
Save as herein provided, Danby Products Limited (Canada) or Danby Products Inc. (U.S.A), shall not be responsible for any damages to persons or property, including the unit itself, howsoever caused or any consequential damages arising from the malfunction of the unit and by the purchase of the unit, the purchaser does hereby agree to indemnify and save harmless Danby Products Limited from any claim for damages to persons or property caused by the unit.
GENERAL PROVISIONS
No warranty or insurance herein contained or set out shall apply when damage or repair is caused by any of the following:
1) Power Failure.
2) Damage in transit or when moving the appliance.
3) Improper power supply such as low voltage, defective house wiring or inadequate fuses.
4) Accident, alteration, abuse or misuse of the appliance such as inadequate air circulation in the room or abnormal operating conditions, (extremely high or low room temperature).
5) Use for commercial or industrial purposes.
6) Fire, water damage, theft, war, riot, hostility, acts of God such as hurricanes, floods etc.
7) Service calls resulting in customer education.
8) Damage to porcelain tubs due to foreign objects.
Proof of purchase date will be required for warranty claims; so, please retain bill of sale. In the event warranty service is required, present this document to our AUTHORIZED SERVICE DEPOT, or contact:
Danby Products Limited
PO Box 1778, Guelph, Ontario, Canada N1H 629
Telephone: (519) 837-0920 FAX: (519) 837-0449

Danby Products Inc.
PO Box 669, Findlay, Ohio, U.S.A. 45839-0669
Telephone: (419) 425-8627 FAX: (419) 425-8629
IMPORTANT: Please complete and return the enclosed registration card within thirty days for warranty coverage.
CP 1778, Guelph, Ontario, Canada N1H 6Z9
Téléphone: (519) 837-0920 Télécopleur: (519) 837-0449

Danby Products Inc.
PO Box 669, Findlay, Ohio, U.S.A. 45839-0669
Telephone: (419) 425-8627 FAX: (419) 425-8629
Thank you for your trust and for buying our tumble drier. We hope it will successfully serve its purpose for many years.
This appliance was designed for drying clothes, for home use only.
IMPORTANT: Please read and follow all instructions provided inside this manual and observe all safety rules and operating instructions before attempting to use this product. SAVE THESE INSTRUCTIONS:
Before Use 4
Important Warnings 4
Important Safety Instructions...... 5
Positioning and Installation...... 6
Door 9
Drying.... 10-12
Cleaning and Maintenance.... 13
Trouble Shooting Guide.... 14

Before Use
Wipe the interior of the drum with a soft cloth and mild liquid detergent. Do not use aggressive cleaning agent which could damage the surface.
WHEN YOU FIND YOUR APPLIANCE IS OUT OF USE AND NO LONGER NEEDED, TRY NOT TO BURDEN THE ENVIRONMENT WITH IT. CALL THE NEAREST AUTHORIZED "COLLECTING SERVICE FOR USED APPLIANCES".
Useful Hints
Avoid drying large laundry loads, as this causes garments to easily crease and dry unevenly. (A maximum drying load should not exceed 11lbs dry-weight)
Drying very delicate laundry items such as woolens and silk garments is not recommended as they may shrink or lose their shape.
Synthetic curtains, fabrics with metal threads,
nylon stockings, as well as lingerie with prevailing foam rubber components or rubber-like materials, should be dried at a low temperature setting (delicate laundry programs or time setting programs). Place delicate fabrics in a laundry sack, when drying together with other laundry. When drying is finished, immediately remove all laundry from the dryer to avoid excessive creasing.
When drying laundry in the dryer, there is no need to add conditioners. Conditioners are added only when rinsing synthetics to neutralize static electricity.
When buying clothes, especially underwear, do not forget that they may shrink during washing as well as during drying.
Clothes marked with a "no tumble dry" label, are not suitable for tumble drying.
Energy consumption when drying laundry is essentially increased if the spin speed of your washing machine is set to operate lower than 800 r.p.m.

Important Warnings
- Only laundry washed with water can be dried in this dryer. Never try to dry laundry washed or cleaned with any flammable cleaning agents, (e.g. benzine, trichlor ethylene) as it may cause an explosion.
- Close supervision of children is always necessary when any appliance is being used. Never let children play on or near this appliance while it is operational.
- Frequent cleaning of the lint filter is necessary when using a clothes dryer. We recommend cleaning the filter after each time a load is finished. (It only takes a couple of seconds) After cleaning, the lint filter must be reinstalled back inside the air duct, located in the inner door panel. Operating the dryer with damaged filter or without the filter is dangerous and can cause fire.
- Never let children or pets enter (the drum of) the dryer
After use always switch the tumble dryer off and cut the power supply to the appliance. - All service interventions on the machine should be left to an expert. Never attempt to service the dryer yourself. Call an authorized service
agent if your dryer is in need of service. For the location of the closest service agent in your area, check the service listing enclosed with the appliance, or contact the retailer, or contact the manufacturer direct at 1 800 26 DANBY for customer service.
- The data plate with all essential (technical) information about the dryer is located on the front side of appliance.
Important safety instructions
WARNING - To reduce the risk of fire, electric shock, or injury to persons when using your appliance, follow basic precautions, including the following:
- Read all instructions before using the appliance.
- Do not dry articles that have been previously cleaned in, washed in, soaked in, or spotted with gasoline, dry-cleaning solvents, or other flammable or explosive substances, as they give off vapours that could ignite or explode.
- Do not allow children to play on or in the appliance. Close supervision of children is necessary when the appliance is used near children.
- Before the appliance is removed from service or discarded, remove the door to the drying compartment.
- Do not reach into the appliance if the drum is moving.
- Do not install or store this appliance where it will be exposed to the weather.
- Do not tamper with controls.
- Do not repair or replace any part of the appliance or attempt any servicing unless specifically recommended in the user-maintenance instructions or in published user-repair instructions that you understand and have the skills to carry out.
- Do not use softeners or product to eliminate static unless recommended by manufacturer of the fabric softener or product.
- Do not use heat to dry containing foam rubber or similarly textured rubber-like materials.
- Clean lint screen before or after each load.
- Keep area around the exhaust opening and adjacent surrounding areas free from the accumulation of lint, dust, and dirt.
- The interior of the appliance and exhaust duct should cleaned periodically by qualified service personnel.
- Do not place items exposed to cooking oils in your dryer. Item contaminated with cooking oils may contribute to a chemical reaction that could cause a load to catch fire.
Save these instructions
GROUNDING INSTRUCTIONS
This appliance must be grounded. In the event of malfunction or breakdown, grounding will reduce the risk of electric shock by providing a path of least resistance for electric current. This appliance is equipped with a cord having an equipment-grounding conductor and a grounding plug. The plug must be plugged into an appropriate outlet that is properly installed and grounded in accordance with all local cordes and ordinances.
WARNING-Improper connection of the equipment-grounding conductor can result in a risk of electric shock. Check with a qualified electrician or serviceman if you are in doubt as to whether the appliance is properly grounded.
Do not modify the plug provided with the appliance-if it will not fit the outlet, have a proper outlet installed by a qualified electrician.
Positioning and Installation
Your clothes dryer must be placed in a room with adequate ventilation.
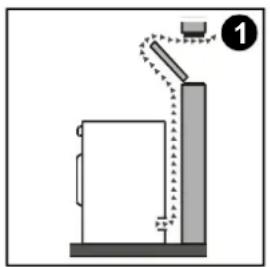
Choosing the Right Place
The most appropriate space is a room with a window or built-in ventilation fan (Figure 1).
In closed, smaller rooms without adequate ventilation there is too much moisture in the air, the drying time is increased and so is energy consumption.
If during the drying procedure there isn't adequate ventilation in the room, we recommend you direct moist air out in the open by means of vent pipe (Fig. 2).
natural_image
Diagram of a mechanical device with a lever and base, showing motion direction (no text or symbols)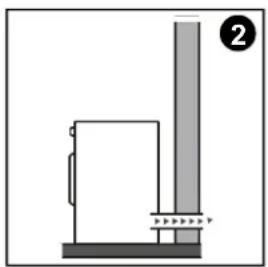
natural_image
Simple line drawing of a mechanical assembly with a vertical rod and base (no text or symbols)Vent pipe can be bought in any local hardware store.
Positioning
This dryer is a self standing appliance and can stand alone, or it can be placed either together with a washing machine or in the kitchen as a kitchen unit.
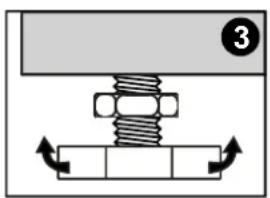
If the floor is uneven, use the adjustable feet to level the machine.
natural_image
Mechanical assembly diagram showing a bolted joint with directional arrows indicating motion (no text or symbols)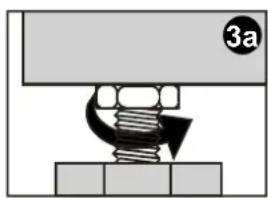
natural_image
Diagram of a mechanical assembly with spring and base components (no text or symbols)Undo the nuts. Rotate the feet to level the machine (fig. 3).
Lock the nuts (fig. 3a).
- Do not remove the adjustable feet. The machine must be placed horizontally.
- Do not put the dryer on a thick rug thus preventing the possibility of air circulation.
Moist Air Outlet
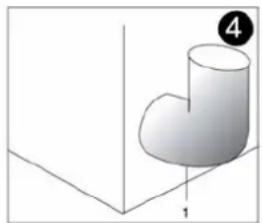
The ventilation opening for venting out humid air, is located at the rear side of the dryer. Fig. 4-5 (bottom left-hand corner) The ventilation opening is designed to accept standard 4 inch, flexible or solid exhaust pipe. (not included with the dryer) The ventilation exhaust can be purchased at any local hardware store.
The distance between the dryer and venting opening (air duct or window) must not exceed 80 inches, otherwise condensation can accumulate in the tube, (Fig 5).
natural_image
3D diagram of a corner pipe fitting with numbered callouts (1 and 4), no text or symbols present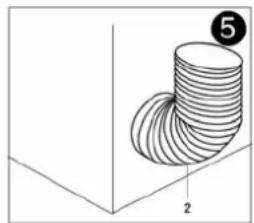
natural_image
3D diagram of a curved cylindrical object with numbered annotations (2 and 5), no readable text or symbols present.1 Solid Piping
2 Flexible pipe
Connecting to power supply
IMPORTANT NOTE: This dryer does not come complete with an electrical power cord. Electrical power cord kits must be purchased by the consumer and are available at most local hardware stores. Before purchasing a power cord kit for your dryer, you must first establish which type of power cord plug is required (compatible) to fit the electrical receptacle in your laundry room. i.e. 3 wire - 4 wire. (See Fig. 6)
When purchasing a 3-wire or 4-wire power cord kit with strain relief, make sure the cord meets the following requirements:
- UL listed dryer cord kit
• 240 V minimum rated - 30 A rated
- type SRD or SRDT
- minimim five feet long
- closed-loop terminals or open-end spade lugs with upturned ends
This dryer has a pre-installed (rear mount) external junction box to facilitate easy connection of the power cord kit with suitable plug.
| 4-wire receptacle (14-30 R) | If you have 4-wire receptacle, like this, a 4-wire dryer cord must be purchased locally. |
| 3-wire receptacle (10-30 R) | If you have 3-wire receptacle, like this, a 3-wire dryer cord must be purchased locally. |
Fig. 6
Electrical connection
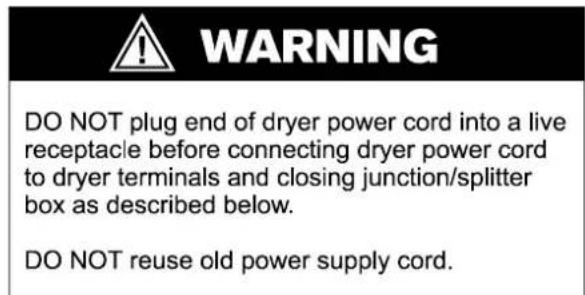
WARNING:
This dryer is manufactured with the cabinet-ground conductor connected to the NEUTRAL (center) of the supply cord at the terminal block.
Only a 4-conductor cord shall be used when the appliance is installed in a mobile home or
an area where local codes do NOT permit grounding through the neutral. Use »FOUR-WIRE CONNECTION« instructions.
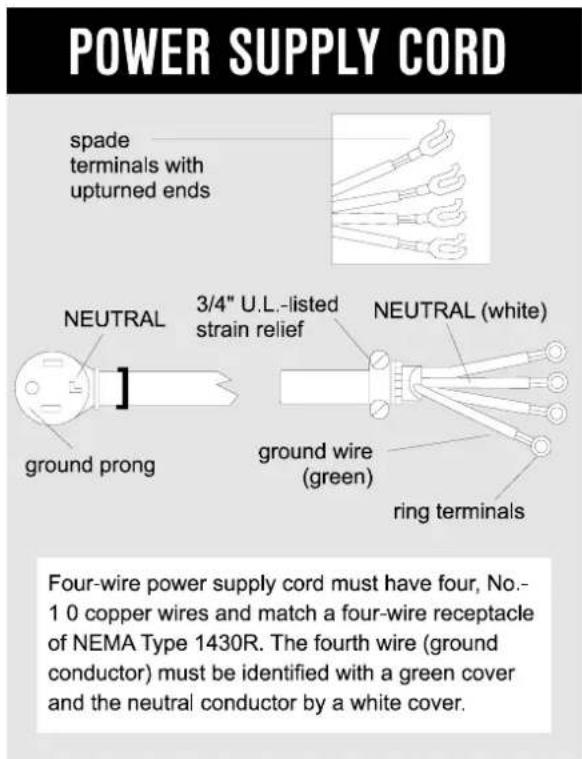
Four-wire connection
Junction box
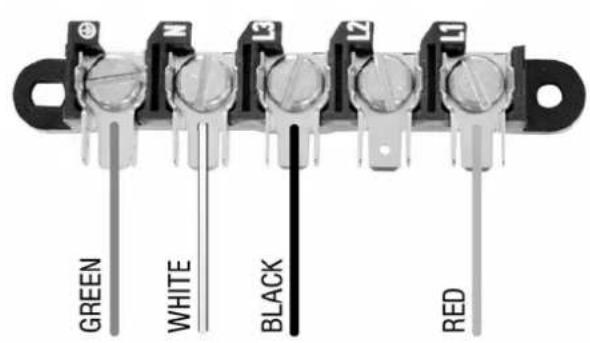
Fig. 7
To connect power cord:
- Remove the screws from the cover of the junction box located at the top rear of the dryer.
- Loosen/remove the two screws on the strain relief clamp and remove from 4-wire supply cord.
- The strain relief splits into two indentical parts.
- Insert the large flange of both sections into the hole located on the left side of the junction box housing. The short flange of both sections and screws must remain positioned on the external side of the junction box housing.
INSTALLATION INSTRUCTIONS
- Insert the 4- wire supply cord through both sections of the strain relief and re-install strain relief screws, do not fully tighten until electrical connections are complete.
- Attach the power cord ground conductor (green wire) to the ground terminal marked with the ground symbol. Tighten screw until ground conductor is secure. (See Fig. 7)
- Attach the power cord neutral conductor (white wire) to the neutral terminal. (marked N) Tighten screw until neutral conductor is secure. (See Fig. 7)
- Attach the power cord phase conductor (black wire) to the phase terminal (marked L3). Tighten screw until power conductor is secure. (See Fig. 7)
- Attach the power cord phase conductor (red wire) to the phase terminal (marked L1). Tighten screw until power conductor is secure.(See Fig. 7)
- Tighten the screws on the strain relief so that the power cord cannot be moved.
- Re-install the cover of the junction box and secure with four screws removed earlier.
- The dryer is now ready to be connected to the power supply receptacle.
Three-wire connection
POWER SUPPLY CORD
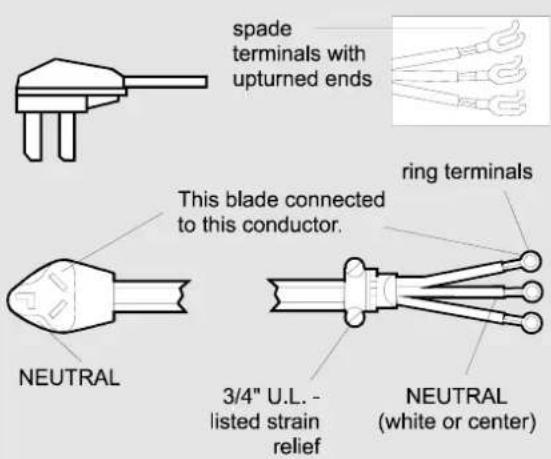
Three-wire power supply cord must have three, No.-10 copper wires and match a three-wire receptacle of NEMA Type 10-30R.
Junction box
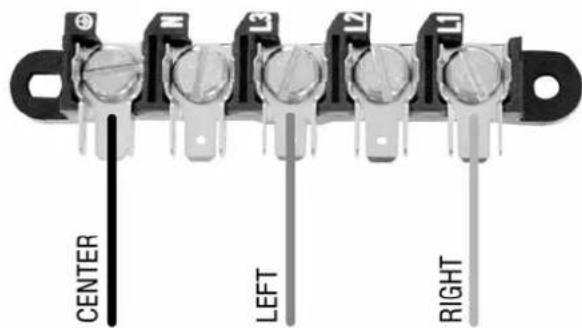
Fig. 8
To connect power cord:
- Remove the screws from the cover of the junction box located at the top rear of the dryer.
- Loosen/remove the two screws on the strain relief clamp and remove from 3-wire supply cord.
• The strain relief splits into two indentical parts. - Insert the large flange of both sections into the hole located on the left side of the junction box housing. The short flange of both sections and screws must remain positioned on the external side of the junction box housing.
- Insert the 3-wire supply cord through both sections of the strain relief and re-install the strain relief screws, do not fully tighten until electrical connections are complete.
- Attach the power cord ground conductor (green wire) to the ground terminal marked with the ground symbol. Tighten screw until ground conductor is secure. (See Fig. 8)
- Attach the two remaining power cord phase conductors (left = black wire and right = red wire) to the phase terminals (marked L3 & L1). Tighten screws so that the power conductors are secure. (See Fig. 8)
- Tighten the screws on the strain relief so that the power cord cannot be moved.
- Re-install the cover of the junction box and secure with four screws removed earlier.
- The dryer is now ready to be connected to the power supply receptacle.
Note:
The receptacle should be located so that the plug and receptacle will be accessible with the dryer in its installed position.
Additional Grounding Procedure
Some local codes may require a separate ground. In such cases, the required accessory ground wire, clamp and screw must be purchased separately.
Never ground the dryer to plastic plumbing lines, gas lines or hot water pipes.
Door
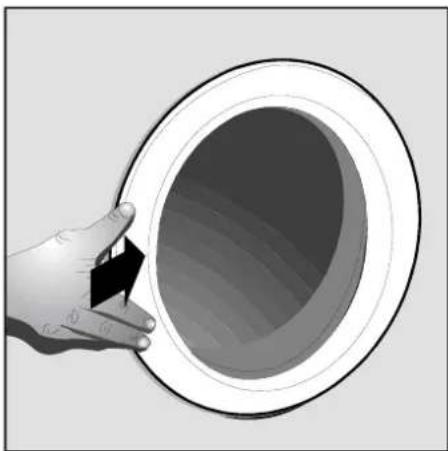
Door of the dryer can be opened by pressing the door frame against the machine, as shown in the figure.
The door is closed in the same way, If the door is not closed properly the machine will not operate.
natural_image
Illustration of a hand holding a circular object with a black arrow pointing to it (no text or symbols)Be careful not to pinch the laundry with the door as it might get damaged.
natural_image
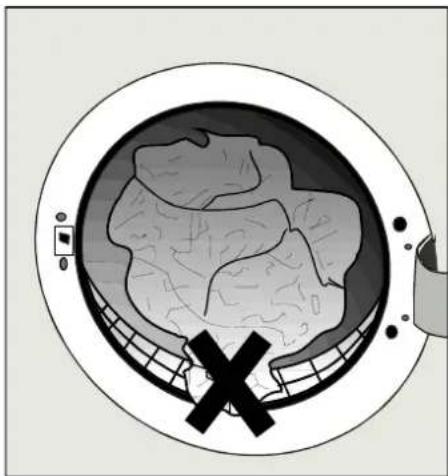
Cross-sectional illustration of a human brain inside a circular anatomical structure (no text or symbols)IMPORTANT
- The door may be opened during the drying process. The program is interrupted and is resumed as soon as the door is closed again and the START button is pressed.
Drying
Drying program selection elements are set in the control panel as well as the indicator light which is on during the operation of the machine.
Preparing the Laundry for Drying
- Sort the laundry before drying according to type of the laundry.
- Fasten buttons, zippers, tie loose strings and turn pockets inside out.
- Very delicate laundry (fine underwear with laces) should prior to drying be put in a special sack so that it won't get damaged by buttons, zippers and pins.
- We recommend loading the drum with items of different size. Larger pieces of laundry can get tucked during drying. So we recommend you take them out, shake them and then put them back.
- When drying large sheets (bed sheets, table cloths) put 2 to 3 pieces for one load and when drying delicate smaller items (shirts, blouses) fill only 5 to 6 pieces for one load (max 4.5 lbs).
- Never put dripping wet laundry inside the dryer. (electrical hazard)
- Most clothes nowadays have labels marked with recommended drying mode.
| DRYING | |
| Drying in tumble drier allowed | |
| Wring, hang on clothes line and dry | |
| No wringing, drip dry | |
| Wring, dry flat | |
| Drying in tumble drier not allowed | |
| Drying at normal temperature | |
| Drying at lower temperature | |
ON - OFF button
The appliance is switched on and off by pushing the ON/OFF button.
Signal lamp operation
Signal lamp illuminates when the appliance is in operation.
Prior drying
- Switch the dryer on by pressing the ON/OFF button.
- Before first selecting a drying program, set the program selector knob to the STOP/0 position. (for 1 second)
- Set the program selector knob to the desired drying program. The signal lamp, adjacent to the selected program will illuminate. (except when using timed dry programs)
- Press the "START" button to start the program. The beginning of operation is signaled by a beep. The program signal light goes off and actual humidity level indicator light turns on.
- If you wish to change the selected drying program after the machine has been put into operation, set the program selector knob back to the STOP/0 position. (for 1 second) You may select any desired drying program, and start it by pressing the START button. In case this procedure is not performed, the machine will continue executing the originally selected program, notwithstanding the position of the program selector.
- If the preceding program has been completed (indicator light END and ANTI-CREASE signal light will illuminate), you may select a new program and start it with the START button. It is not necessary to set the program selection button to the STOP/0 position.
Drying program selection button
The appropriate program is selected by operating the program selector knob, which may be turned in either direction. There is a basic choice of three drying groups:
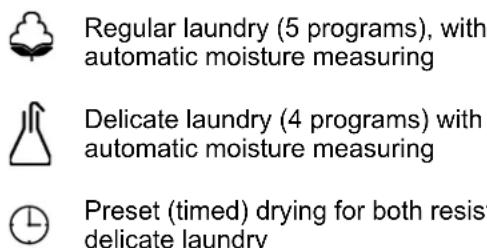
Regular laundry (5 programs), with automatic moisture measuring
Delicate laundry (4 programs) with automatic moisture measuring
Preset (timed) drying for both resistant and delicate laundry
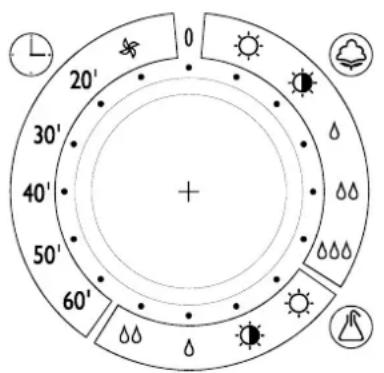
The drying temperature is selected automatically by the selection of the drying program, and it is lower for delicate laundry than for the resistant one. During the drying program with preset time the temperature is the same for both the delicate and resistant laundry.
Drying stage indicator
| Damp for machine ironing | |
| Damp for ironing | |
| Mildly damp | |
| Dry for storage | |
| Very dry | |
 | Anti crease |
| End |
The drying stage indicator displays the actual drying stage at any given moment. This is signaled by the indicator light, illuminated adjacent to a particular drying stage symbol. The end of drying is signaled by the indicator light END or ANTI-CREASE.
START button
This button starts the operation of the appliance. In case of program interruption (open door, voltage failure, condensation receptacle full), it serves to continue the actual program, after the cause for interruption had been removed.
Drying
Drying time depends upon the selected program and the quantity of laundry. If you selected time defined drying the machine stops upon the expiry of set time. If you selected any of the programs for automatic determination of moisture, drying time will largely depend upon the quantity of
laundry and the extent of moisture present in the laundry (after the final spin stage of the wash program).
Actual stage of moisture during the program is indicated by the moisture stage display, so you may remove particular pieces of clothing you wish to remain damp at any time during the program. When you open the door (add or remove pieces of laundry) the drying program stops automatically and the drum interior is illuminated. When you close the door the light goes off and the program continues by pressing the START button.
In case of a power failure during a selected program, the drying operation stops. When the power is reinstated, you must to press the START button to continue the program.
Each program concludes with a 10 minute cooling down period, to prevent extracting hot laundry from the appliance and to improve the anti-crease function.
Drying programs are complete when the signal beep sounds and the indicator light "END" and "ANTI-CREASE" illuminate at the end of the program. This indicates that the laundry is dried to the point of the preset moisture stage, or the preset drying time has expired. The drum stops and laundry may be removed from the machine.
NOTE: If the laundry is not removed immediately after the drying cycle is completed, (and the machine is not switched off) the dryer will automatically start a special anti crease program. ANTI-CREASE PROGRAM: Consist of:
- 5 minute "OFF" (dormant) cycle
- 5 second "ON" tumbling cycle (ho heat)
This program helps to prevent laundry from sitting idle in the same position and helps to reduce creasing/wrinkling. The “anti-crease” program stops automatically after one hour of operation, but may be interrupted at any time by opening the door or turning the appliance off.
After drying
- Open the dryer door. Remove and clean the lint filter. If the filter is not cleaned regularly, the air circulation is obstructed. This obstruction will increase the drying time and may cause the unit to overheat and fail.
- Reinsert the filter.
- Remove laundry from the drum.
- Close the door and disconnect the power supply.
The program chart
| Program Type of laundry Exa | mple of laundry | |
| White/colored regular laundry [cstv] | (1)loading: 11 lbs | |
| Very dry ⚙ | Thick or multi-layer laundry requiring to be dried out | Terry cloth, bath robes, etc. |
| Dry for storage ⚙ | Equally thick laundry, not requiring ironing | Terry cloth, knitted wear |
| Mildly damp ▲Thin laundry, needing ironing | Knitted wear laundry, thin cotton T-shirts | |
| Damp for ironing ▲□ | Cotton or flax, normally thick Bed linen, table cloth, etc. | |
| Damp for machine ironing ▲□□ | Cotton or flax for machine ironing Bed linen, table cloth, etc. | |
| Synthetic and mixed fabric laundry, improved laundry [IMAGE] (1)loading: 4,5 lbs | ||
| Very dry ⚙ | Thick or multi-layer laundry need to be dried out | Pullovers, suits, blankets |
| Dry for storage ⚙ | Thin laundry, not needing ironing | Shirts, blouses, bed linen, socks, children clothes, etc. |
| Mildly damp ▲Thin laundry, needing ironing | Knitted wear, T-shirts, table cloth, etc. | |
| Damp for ironing ▲□ | Laundry, needing ironing Shirts, blouses, bed linen, table cloth, etc. | |
| (2)Preset timed programs [L] (1)loading: 11 lbs | ||
| 20 to 60 minutes Single | pieces of thick laundry, requiring to be dried out | Bath robes, bathing towels, pullovers, small quantity of laundry (up to 0,5 lbs),etc. |
| Airing of laundry | ||
| Cold air – 10 minutes [IMAGE] | Laundry needing to be aired, or straightening of mildly creased clothes | |
(1) weight of dry laundry;
(2) drying temperature is lower, like for the mixed laundry programs.
Economic use of the dryer
Time and energy will be saved with your dryer, if the following is considered:
- spin the laundry as much as possible – the higher the number of spin revolutions the shorter the drying time, the lower the energy consumption;
- by setting the adequate drying temperature, over-drying of laundry can be avoided and consequently difficult ironing;
- Always load the dryer maximally as this is the most economical. At the same time you can dry the laundry for "dry, ready to be stored" and "moist for ironing" by taking the latter out when it is still adequately moist for ironing;
- By regular cleaning of the filter an optimum drying time with minimum energy consumption can be ensured.
- Dryer consumption when used at a lower electric power rate can save additional energy cost.
Cleaning and Maintenance
Before cleaning, always disconnect the appliance from power supply.
Exterior Cabinet
Wipe the cabinet with a soft wet cloth and mild cleaning agent. Do not use aggressive cleaning agents which could damage the paint surface.
Cleaning dryer
If your drier is installed in a room with poor air circulation or if operates daily, dust deposits will accumulate in the interior bottom of the appliance and in the ventilation exhaust pipe. This accumulation of dust can lead dryer malfunctions. So once a year, clean the dust in the interior of the drier with a damp cloth and check the exhaust ventilation for blockage.
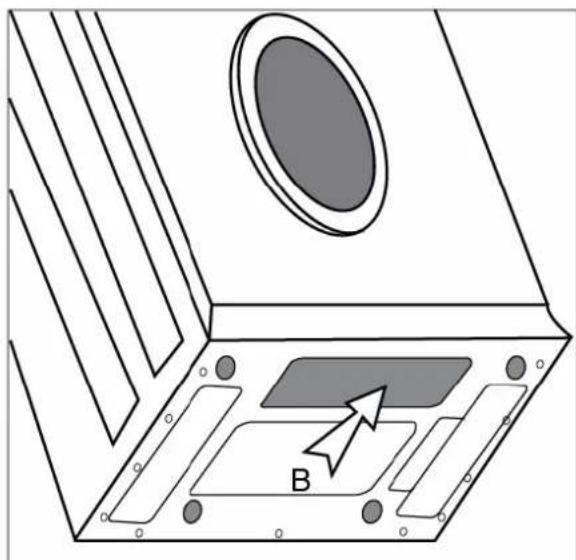
Cleaning procedure
- Disconnect the dryer from the power supply.
- Undo the screws and remove the cover (B).
- Clean (with a vacuum cleaner) the bottom of the drier and parts on the bottom.
- Reinsert the cover in reverse order.
natural_image
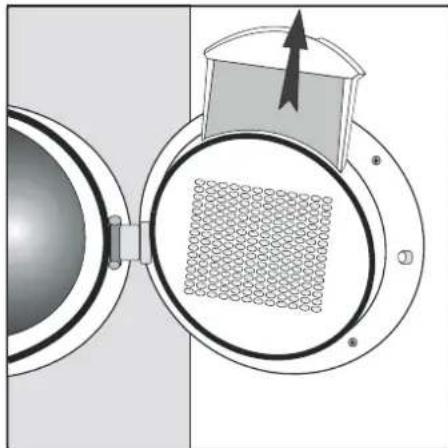
Diagram of a device casing with labeled components and an oval opening, showing internal layout and mounting holes (no text or symbols)Lint Filter
After each drying cycle, remove the lint filter trap located inside the inner door and gently wipe over the filter with a soft cloth or soft brush to remove any accumulated lint. Clean the filter cabinet as well.
The lint filter can also be cleaned under running water; however, it must be thoroughly dried before being replaced.
natural_image
Diagram of a mechanical or electrical component with a grid pattern inside, showing directional arrows (no text or symbols)NOTE
The accumulation of lint on the lint filter is a consequence of normal (wear and tear) laundering and has nothing to do with drying in the machine.

Trouble Shooting Guide
Some problems are minor in nature and can be easily resolved without having to call for service. The following guide list some of the problems you should check before calling for service.
If you are unable to resolve the problem after checking this guide, call our Toll Free Number (I 800 26 DANBY) and ask for assistance.
| Malfunction | Check the following: |
| The machine doesn't operate: | – Check the supply in the outlet socket and the fuse.– Make sure the cable cord is correctly plugged into the socket. |
| The socket is energized, but the drum doesn't rotate: | – Is the door correctly closed (if not, push them towards the machine).– if the program is started by pressing the START button;– if the correct drying time is set, or if appropriate program is selected. |
| Wet laundry: | – Is the fluff filter clean?– Is the amount of loaded laundry too large?– Is the vent pipe too long?– if the laundry loaded into the appliance had been dried enough, or if the appropriate program has been selected. |
| Laundry not uniformly dried: | – Is the amount of loaded laundry too large?– Does the load consist of only large pieces of laundry (always load smaller and larger pieces together).– Does the load consist of laundry made of different materials (always load clothes made of similar fabrics). |
After you have considered all the above stated instructions and the problem still cannot be eliminated. Please call the nearest Danby authorized service agent or call our Toll Free Number (1 800 26 DANBY) and ask for customer assistance.
Any claim or malfunction caused by improper installation or misuse is not covered by the manufactures warranty. All repair costs shall be covered by the user.
WE RESERVE THE RIGHT FOR MODIFICATIONS WITH NO INFLUENCE ON THE OPERATION OF THE APPLIANCE.
THIS INSTRUCTION MANUAL CANNOT BE A REASON FOR A COMPLAINT.
natural_image
Diagram showing a mechanical setup with a lever and a block, no text or symbols present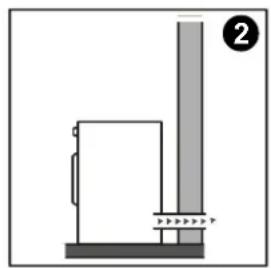
natural_image
Simple line drawing of a vertical pipe or column with a rectangular base and a wall, no text or symbols present.natural_image
Mechanical assembly diagram showing a bolted joint with directional arrows indicating motion (no text or symbols)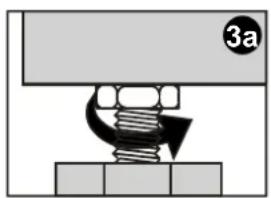
natural_image
Diagram of a mechanical assembly with a spring and base, no visible text or symbolsnatural_image
3D diagram of a pipe elbow joint with numbered callouts (1 and 4), no text or symbols present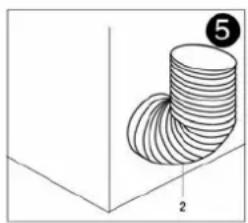
natural_image
Diagram of a 3D geometric structure with layered curved surfaces and numbered annotations (no text or symbols)1 Tuyau rigide
2 Tuyau flexible
natural_image
Illustration of a hand opening a circular pipe with a black arrow indicating direction (no text or symbols)natural_image
Cross-sectional diagram of a human brain inside a circular anatomical structure, with no visible text or symbols.IMPORTANT
natural_image
Technical diagram of a device casing with labeled components and an oval opening (no text or symbols beyond label)Filtre à peluches
natural_image
Diagram of a mechanical or electrical component with a grid pattern inside, showing directional arrows (no text or symbols)For service, contact your nearest service depot or call:
1-800-26D-anby to recommend a depot in your area.
The model number of your dryer is found on the serial plate located inside the door.
All repair parts available for purchase or special order when you visit your nearest service depot. To request service and/or the location of the service depot nearest you, call the toll free number listed to the left in Canada and the U.S.
When requesting service or ordering parts, always provide the following information:
- Product Type
- Model Number
Danby Products Limited, PO Box 1778, Ontario, Canada N1H 6Z9
Danby Products Inc., PO Box 669, Findlay, Ohio, USA 45839-0669