
DDY040D4WDB - Tumble dryer DANBY - Free user manual and instructions
Find the device manual for free DDY040D4WDB DANBY in PDF.

| Type | Ventless Front Load Dryer |
| Model | DDY040D4WDB |
| Brand | Danby |
| Capacity | 9 kg (19.8 lbs) |
| Power Supply | 208-240 V, 60 Hz, 30 A (requires 16 A fuse/breaker) |
| Power Cord Type | 3-wire (NEMA 10-30P) or 4-wire (NEMA 14-30P) UL listed, 240V/30A, minimum 5 ft (152.4 cm) |
| Drying Programs | Normal, Outdoor, Towels, Mix, Warm Refresh, Air Fluff, Time Drying, Ultra Hot, Baby Care, Delicates, Perm Press, Bedding, Sports Wear, Express, Shirts |
| Auxiliary Functions | Drying Level (Extra, Regular, Damp), Level Adjustment (+1/+2/+3), Delicate Drying, Delayed Start (1-23 h), Child Lock, Anti-wrinkle (60/120 min), Buzzer Cancel, Temperature Level (Low/Medium/High) |
| Drum Light | LED, automatic on door opening |
| Lint Filter | Clean after every use; wash with warm water if buildup occurs |
| Water Tank | Empty after every use; optional direct drain hose (max height 31.5 in / 80 cm) |
| Condenser Cleaning | Every 30 cycles or monthly; warning indicator on display |
| Humidity Sensor | Clean metal surfaces 4 times per year with vinegar |
| Door Reversal | Possible, 180° rotation; included hardware |
| Stacking Kit | Included with drawer/shelf for stacking on washing machine |
| Operating Temperature Range | 41°F to 95°F (5°C to 35°C) |
| Clearance Required | At least 1 inch (3 cm) on sides and rear; 1 inch under counter |
| Child Lock | Activate by pressing Options and Anti-wrinkle simultaneously for 3 seconds |
| Warranty | 24 months limited in-home; plastic parts 30 days |
Frequently Asked Questions - DDY040D4WDB DANBY
User questions about DDY040D4WDB DANBY
0 question about this device. Answer the ones you know or ask your own.
Ask a new question about this device
Download the instructions for your Tumble dryer in PDF format for free! Find your manual DDY040D4WDB - DANBY and take your electronic device back in hand. On this page are published all the documents necessary for the use of your device. DDY040D4WDB by DANBY.
USER MANUAL DDY040D4WDB DANBY
Do the right thing.*
MODEL • MODELO
DDY040D4WDB
VENTLESS FRONT LOAD DRYER
Owner's Manual....1 - 21
Danby Products Limited, Guelph, Ontario, Canada N1H 6Z9
Danby Products Inc. Findlay, Ohio, U.S.A. 45840
www.Danby.com

*Trademark of Danby Products
* Marque de commerce de Danby Products
* Marca comerciales de Danby Products
2023.10.05
Printed in Turkey
Imprimé en Turquie
Impreso en Turquía
Welcome to the Danby family.
We are proud of our quality products and we believe in dependable service. We suggest that you read this owner's manual before plugging in your new appliance as it contains important operation information, safety information, troubleshooting, and maintenance tips to ensure the reliability and longevity of your appliance.
You are entitled to the warranty coverage as described in the owner's manual provided with your new appliance.
- Please write down your appliance information below. You must keep the original proof of purchase receipt to validate and receive warranty services.
- Register your product online and receive a FREE 2 MONTH WARRANTY EXTENSION after filling out a product survey, at www.danby.com/support/product-registration/
Model Number:
Serial Number:
Date of Purchase:
Need Help?
- Read your Owner's Manual for installation help, troubleshooting, and maintenance assistance.
- Visit www.Danby.com to access self-service tools, FAQs and much more by searching your model number in the search bar.
- For the Quickest Customer Service, please fill out the web form at www.danby.com/support. Your submission will go directly to an expert on your particular appliance. Our average response times are between 20 minutes and 2 hours, during EST business hours.
- Call 1-800-263-2629 - please note that during peak hours, hold times can exceed one hour.

Important Safety Information READ AND FOLLOW ALL SAFETY INSTRUCTIONS
IMPORTANT WARNING
DANGER: Risk of child entrapment. Before showing away an old appliance:
- Remove the door or lid.
- Leave the shelves in place so that children cannot easily climb into the appliance.
GROUNDING INSTRUCTIONS
This appliance must be grounded. In the event of an electrical short circuit, grounding reduces the risk of electrical shock by providing an escape wire for the electrical current.
ELECTRICAL INSTALLATION
The clothes dryer installation must be performed by a qualified installer.
- Install the appliance according to the manufacturer's instructions and local codes.
- To reduce the risk of severe injury or death, follow all installation instructions.
- If local codes do not permit the 3-wire power supply cord connection, only 4-wire power supply cord must be used.
WARNING - Improper use of the grounding plug can result in a risk of electric shock.
Consult a qualified electrician or service agent if the grounding instructions are not completely understood, or if doubt exists as to whether the appliance is properly grounded.
DO NOT USE AN EXTENSION CORD
Do not connect your appliance to extension cords or together with another appliance in the same wall outlet. Do not splice the power cord. Do not under any circumstances cut or remove the third ground prong from the power cord.
If the power supply cord is damaged, it must be replaced by the manufacturer, its service agent or similar qualified person in order to avoid hazard.
SAFETY REQUIREMENTS
Ensure that component parts are replaced with like components and that servicing is done by factory authorized service personnel, to minimize the risk of possible ignition due to incorrect parts or improper service.
This appliance is not intended for use by persons (including children) whose physical, sensory or mental capabilities may be different or reduced, or who lack experience or knowledge, unless such persons receive supervision or training to operate the appliance by a person responsible for their safety.
Children should be supervised to ensure that they do not play with the appliance.
Do not place items exposed to cooking oils in the dryer. Items contaminated with cooking oils may contribute to a chemical reaction that could cause a load to catch fire. To reduce the risk of fire due to contaminated loads, the final part of a tumble dry cycle occurs without heat as a cool down period. Avoid stopping the dryer before the end of the drying cycle unless items can be immediately removed and spread out to allow the accumulated heat to dissipate.

natural_image
Warning symbol of a flame inside a triangle (no text or numbers)Items that have been soiled with oil products can ignite spontaneously, especially when exposed to heat sources such as in a tumble dryer. The items become warm, causing an oxidation reaction in the oil. Oxidation creates heat. If the heat cannot escape, the items can become hot enough to catch fire. Piling, stacking or storing items that have been soiled with oil can prevent heat from escaping and create a fire hazard.
SAVE THESE INSTRUCTIONS!

Important Safety Information READ AND FOLLOW ALL SAFETY INSTRUCTIONS
- Do not dry articles that have been previously cleaned in, washed in, soaked in or spotted with gasoline, dry-cleaning solvents, or other flammable or explosive substances, as they give off vapours that could ignite or explode.
- Do not reach into the appliance if the drum is moving.
- Do not install or store this appliance where it will be exposed to the weather. This appliance is not intended for use outdoors.
- Do not tamper with the controls.
- Do not use heat to dry articles containing foam rubber or similarly textured rubber-like materials.
- Clean the lint screen before and after each load.
- The interior of the appliance should be cleaned periodically by qualified service personnel.
- Do not place the appliance or power cord near heat sources such as radiators, heaters, air ducts or direct sunlight. Do not place open flames such as candles on or near the appliance.
- Do not block any ventilation openings. Ensure that vents are not covered by newspapers, tablecloths, curtains, carpeting, etc.
- Do not run the power cord under floor coverings. Keep the power cord away from high traffic areas where it can become a tripping hazard.
- Do not misuse the power cord. Never carry or pull the appliance by the power cord. Never pull the power cord to unplug it from the outlet, instead, grasp the plug and pull to remove from outlet.
- Do not operate the appliance if it has a damaged power cord or plug. If the power cord is damaged, it must be replaced by the manufacturer, its service agent or similarly qualified persons in order to avoid hazard.
- Do not attempt to repair, disassemble or modify the appliance. The warranty becomes void if the unit is not serviced or repaired by qualified personnel. There are no user-serviceable parts inside.
- Do not over load the appliance.
- Ensure foreign objects do not find their way into the appliance. Remove all objects from pockets such as lighters, matches, hairpins, coins, etc.
- The door window may be hot after a long drying cycle. Ensure that children are kept away from the appliance.
- Opening the door before the cooling process is finished may expose you to hot air.
- If the dryer is not stack mounted using the provided kit, ensure that it is placed on a flat, firm surface in a dry, well-ventilated place. Use the adjustable front legs to assist in leveling the appliance if necessary. Do not place the appliance on any soft material such as foam, plastic or carpeting.
• After turning the power off, wait 2 minutes before attempting to turn the unit back on.
- Remove the transport packaging from the back of the unit before first use.
- Do not install this appliance behind a lockable door, a sliding door or in such a way that opening the dryer door is restricted. Do not install in a tight fitting cabinet.
- Use this appliance only for laundry with a label that indicates it is suitable for drying.
- Never spray or pour water onto the dryer to clean it.
SAVE THESE INSTRUCTIONS!
INSTALLATION INSTRUCTIONS

- Dryer Top
- Control Panel
- Dryer Door
- Ventilation Grills
- Plinth Opening Slot
- Leveling Legs
- Plinth
- Ratings Plate
- Lint Filter
- Drawer Cover
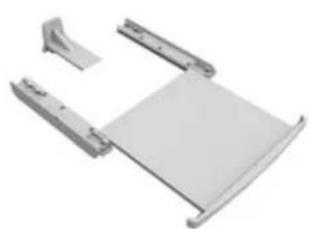
natural_image
3D rendered image of a white plastic mechanical component with multiple arms and a flat base (no text or symbols visible)Stacking Kit with Drawer/Shelf
See instruction guide for more details
INSTALLATION INSTRUCTIONS
LOCATION
Check the information in the user manual to make sure that th electrical installation and water outlet is suitable. If they are not, call a qualified electrician and a plumber to have the necessary adjustments made.
It is the customer's responsibility to prepare the dryer's installation place, as well as the electricity and waste water installation. Before installation, check the dryer for damage. If damaged to not have it installed. Damaged products may endanger your health.
• Install the dryer on a stable and flat surface.
- Run the dryer in a dust-free environment where the air ventilation is good.
- The clearance between the dryer and the floor should not be reduced with objects such as carpets, wood or tape.
- Do not block the ventilation grills found on the plinth of the tumble dryer.
- The appliance must not be installed behind a lockable door, a sliding door or a door with a hinge on the opposite side of the dryer, in such a way that blocks the full opening of the dryer door.
- Once installed, the connections must remain stable. When installing the dryer, make sure that the rear surface is not leaning on anything (e.g. tap, socket).
- The operating temperature of the dryer is 41^ F to 95^ F ( 5^ C to 35^ C). If operated out of this temperature range, the performance of the dryer will be affected negatively and the product will be damaged.
- Be careful when carrying the product as it is heavy. Always were safety gloves.
- Always install the product against a wall. The rear surface of the product should be placed against the wall.
- Leave at least 1 inch (3 cm) of space between the sides and rear of the appliance.
- The dryer must be level to operate more quietly and without vibration. Use a level when adjusting the leveling legs.
- When the dryer is placed on a stable surface, to ensure stability, use a level. If not level, adjust the leveling legs to level the appliance. Repeat this process every time you relocate the product.
- Do not place the dryer onto the power cable.
- Install the clothes dryer according to the manufacturer's instructions and local codes.
Under Counter Installation
- Leave at least 1 inch (3 cm) of space between the side and rear walls of the product and the underside of the worktop when installing the dryer under a counter.
- Assembly/disassembly under the counter if necessary must be done by authorized servicers.
IMPORTANT
To stack the dryer on the washing machine, use the stacking kit with drawer/shelf included with the dryer, between the two appliances. The stacking kit with drawer/shelf must be attached following the instructions provided.
For stacked installation, ONLY the provided stacking kit & instructions, MUST be used. If a stacking kit with instructions, was not included in the dryer package, contact customer service to acquire.
INSTALLATION INSTRUCTIONS
LEVEL THE APPLIANCE
There are four leveling legs, one the each of the four corners of the appliance.
Adjust each leveling leg by turning it to the left or right until the dryer is level and balanced. The applianced should not be placed on sloping, crooked or uneven floors.

CONNECTION TO WATER OUTLET (with optional drain hose)
In appliances with a condenser unit, water accumulates in the water tank during the drying process. The accumulated water must be emptied after each drying cycle. There is an option of using a water drain hose to directly drain the water which replaces the requirement to manually drain the water tank.
Connecting the Water Drain Hose
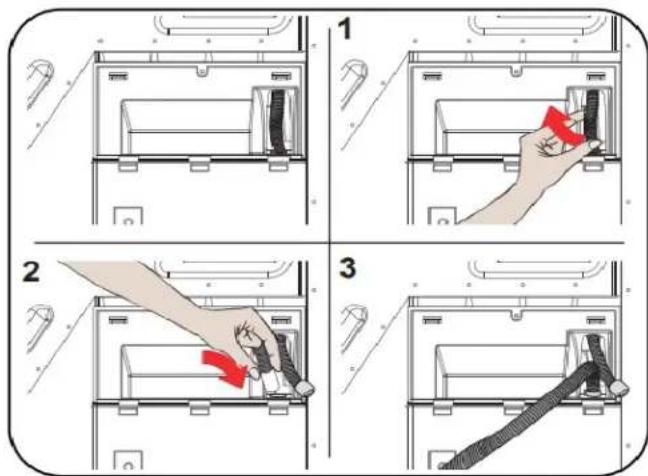
Pull and take out the end of the hose at the back of the dryer. Do not use any tools to take out the hose.
Fit one end of water drain hose to the slot where you removed the hose.
Fix the other end of the water drain hose directly to the water outlet or sink.
NOTE:
The hose must be connected in a manner that it cannot be displaced. If the hose is displaced while draining it can result in flooding in the home.
NOTE:
The water drain hose must be installed at a height of 31.5 inches(80 cm) maximum.
NOTE:
The water drain hose must not be bent, folded or stepped over.
INSTALLATION INSTRUCTIONS
The dryer is set to 208-240 V and 60 Hz.
The dryer requires a special plug. This plug must be connected to a grounded outlet protected by a 16 Amp fuse or breaker as indicated on the ratings plate. The fuse/breaker rating of the power line to which the outlet is connected must also be 16 Amps. Consult a qualified electrician if you do not have the correct outlet, fuse, or breaker.
Our company cannot be held responsible for damages resulting from usage with grounding.
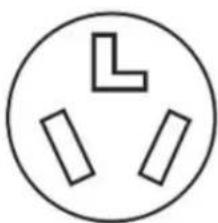
PLUG AND POWER CORD SELECTION
Select receptacle type.

natural_image
Simple electrical circuit symbol for a three-pin socket (no text or labels)4-Wire receptacle (14-30R)
natural_image
Simple electrical circuit symbol with three connected components (no text or labels)3-Wire receptacle (10-30R)
4-WIRE RECEPTACLE
Requires UL listed NEMA 14-30P 240V / 30A 4-wire supply cord with ring terminals or spade terminals with upturned ends. Supply cord must be type SRDT and at least 5 feet (152.4 cm) in length.
3-WIRE RECEPTACLE
Requires UL listed NEMA 10-30P 240V / 30A 3-wire supply cord with ring terminals or spade terminals with upturned ends. Supply cord must be type SRDT and at least 5 feet (152.4 cm) in length.
4-WIRE POWER SUPPLY CORD ELECTRICAL CONN

WARNING
- Before the connection, disconnect the power.
- Use UL listed 240V / 30A power supply cord.
The dryer is equipped with strain relief. Use this strain relief for the connection.
- Remove the screw and terminal box cover.

natural_image
Technical line drawing of a mechanical assembly with two views (top and side), no visible text or symbols- Remove the clamp of the strain relief which is attached on our machine. Pass the clamp through the supply cord and put the supply cord through the main body of the strain relieve. Ensure the wire insulation of the cord is inside the strain relief.

natural_image
Technical line drawing of a mechanical connector assembly (no text or symbols)- Remove the terminal block screws which are indicated by A and the grounding screw which is indicated by B. Neutral ground conductor (central terminal) is provided in the dryer as a closed loop.

INSTALLATION INSTRUCTIONS
-
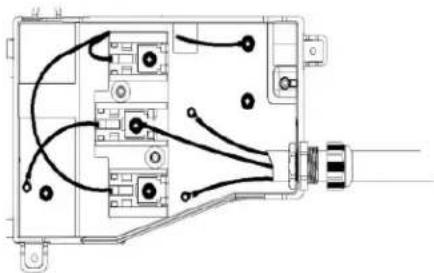
Connect the ground conductor (green wire) under the terminal B. Then connect the neutral wire (white wire) to center of the terminal. Neutral ground conductor of the dryer should remain on the center terminal. Ensure the neutral ground conductor of the dryer and neutral wire of the supply cord are connected to the center terminal together. Tighten all screws.
-
Connect remaining wires under the outer terminals of the block and tighten all screws. After every connection is completed, tighten the strain relief clamp in order to secure the supply cord. Finally, cover up the box cover.

natural_image
Technical line drawing of an electrical enclosure with wiring and components (no text or labels)3-WIRE POWER SUPPLY CORD

WARNING
- Before the connection, disconnect the power.
• Use UL listed 240V / 30A power supply cord.
The dryer is equipped with strain relief. Use this strain relief for the connection.
- Remove the screw and terminal box cover.
natural_image
Technical line drawing of a mechanical assembly with no visible text or symbols- Remove the clamp of the strain relief which is attached on the machine. Pass the clamp through the supply cord and put the supply cord through the main body of the strain relief. Ensure the wire insulation of the cord is inside the strain relief.

natural_image
Technical line drawing of a mechanical component with threaded end and flanged ends (no text or symbols)- Remove the terminal block screws which are indicated by A and the grounding screw which is indicated by B. Neutral ground conductor (central terminal) is provided in the dryer as a closed loop.

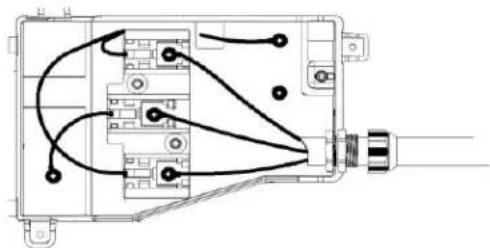
- Remove the neutral ground conductor from the central terminal and connect the neutral wire of the supply cord under the central terminal of the block. Tighten the screw.
natural_image
Pure electrical circuit lines without any symbols- Connect the neutral ground conductor under the screw B. Then connect the remaining supply cord wires under the outer terminals of the block. Tighten all screws. After every connection is completed, tighten the strain relief clamp in order to secure the supply cord. Finally, cover up the box cover.
natural_image
Pure electrical circuit lines without any symbolsOPERATING INSTRUCTIONS
OPERATING INSTRUCTIONS
- Dry items of similar fabric & fabric weight for more even drying performance. If you must dry a mixed fabric load, timed dry is recommended for better drying performance.
- For best drying performance, do not dry small items with bulky items such as duvets etc. It is best to dry these in separate loads.
- It is recommended that items be added to the dryer one at a time to avoid tangling which can result in uneven drying.
- Check the pockets of all items to be dried, ensure that foreign objects do not enter the unit such as lighters, hair pins, coins, etc.
- Tie fabric belts, apron laces etc. to each other or use a laundry bag.
- To get the best drying result, sort the laundry according to the textile type and drying program.
- Dryer heat may permanently set stains, ensure all stains are removed prior to putting items in the dryer.
- Woven goods such as t-shirts and knit clothes generally shrink in the first drying. Use a protective program.
- Do not over-dry synthetics. This will cause creases.
- Do not add items to the dryer when it is in operation.
- If drying large items such as blankets or heavy loads of laundry, it is recommended that you periodically pause the program, open the dryer door, shake the large item or turn over the heavy load and then restart the drying cycle. This will ensure even drying.
- The appliance cannot function while the door is open. Once the door is closed, press the Start/Pause button to resume operation.
IMPORTANT
Delicate fabrics, embroidered fabrics, woolen/silk fabrics, clothes made of delicate and expensive fabrics, airtight clothes and tulle curtains are not suitable for drying in the dryer.
LOAD CAPACITY
It is not recommended to load the dryer with more laundry than the amount shown in the figure below. When overloaded, the drying performance of the dryer will decrease resulting in possible damage to the dryer and the laundry.
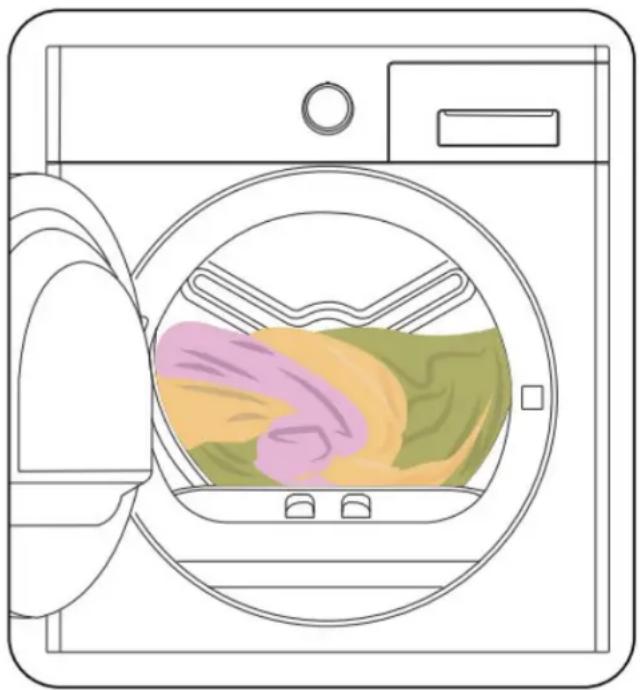
natural_image
Line drawing of a washing machine with clothes inside, showing internal color scheme (no text or symbols)OPERATING INSTRUCTIONS
Follow the instructions on the labels of the laundry to be dried. Only dry items that have a statement/ symbol that indicates they can be dried in a dryer.
 Suitable for drying in a dryer Suitable for drying in a dryer |  Does not need ironing Does not need ironing |  Sensitive/Delicate drying Sensitive/Delicate drying |  Not suitable for drying in a dryer Not suitable for drying in a dryer |
 No drying No drying |  Do Not Dry Clean Do Not Dry Clean |  At any temperature At any temperature |  At high temperatures At high temperatures |
 At medium temperatures At medium temperatures |  At low temperatures At low temperatures |  Heatless Heatless |  Hang to dry Hang to dry |
 Lay flat to dry Lay flat to dry |  Hang wet to dry Hang wet to dry |  Lay flat in shaded area Lay flat in shaded area |  Dry Clean Only Dry Clean Only |
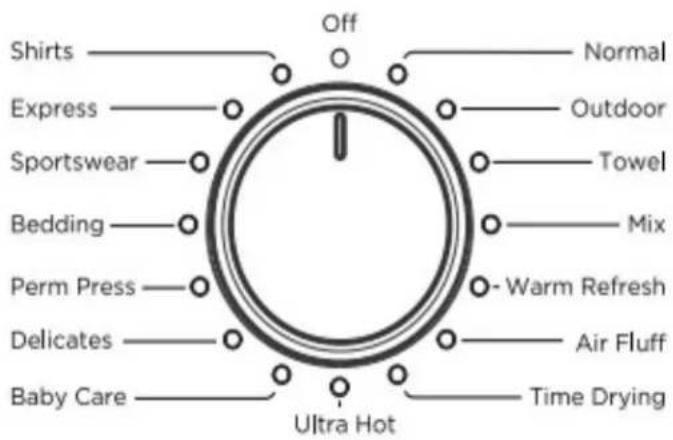
CONTROL PANEL

- Program Selection Knob
- Use the program selection knob to select the desired drying program.
OPERATING INSTRUCTIONS
2. Electronic Indicator Display
| Symbol | Symbol Meaning | Symbol | Symbol Meaning |
 | Water tank warning indicator |  | Delay Timer |
 | Lint filter cleaning warning indicator |  | Antiwrinkle 60' |
 | Condenser cleaning warning indicator |  | Antiwrinkle 120' |
 | Delay start indicator |  | Buzzer Cancel |
 | Delicate | ||
| Drying Step Display: | |||
 | Drying |  | Regular dry |
 | Damp Dry |  | End |
| The electronic display shows the drying steps throughout the program. Every time a program step starts, the relevant drying step light turns on. Once the drying step is complete, the relevant drying step light turns off. | |||
| Energy Consumption Display |
| The energy consumption display shows the energy consumption of the selected program. The bigger the display, the more energy consumption. The energy consumption level increases or decreases depending on the fabric type, duration of the selected program, the drying level and the tumbling speed. |
OPERATING INSTRUCTIONS
Program Selection and Consumption Table
Press the Start/Pause button to start the program. The Start/Pause LED that indicates the program has started and the Drying LED will come on.
NOTE
Not all programs listed available on all dryers
| Program | Load (kg/lb) | Washing machine spin speed (in RPM) | Approximate amount of remaining | Duration (minutes) |
| Normal + Regular Dry | 9/19,8 | 1000 | 60% | 158 |
| Outdoor | 2/4,4 | 800 | 40% | 43 |
| Towles | 3/6,6 | 1000 | 60% | 71 |
| Mix | 4/8,8 | 1000 | 60% | 81 |
| Warm Refresh | - | - | - | - |
| Air Fluff | - | - | - | - |
| Time Drying | - | - | - | - |
| Ultra Hot | 3/6,6 | 1000 | 60% | 59 |
| Baby Care | 3/6,6 | 1000 | 60% | 68 |
| Delicates | 2/4,4 | 600 | 50% | 41 |
| Perm Press + Regular Dry | 4,5/9,9 | 800 | 40% | 61 |
| Bedding | 2,5/5,5 | 800 | 60% | 127 |
| Sports Wear | 4/8,8 | 800 | 40% | 53 |
| Express | 2/4,4 | 1200 | 50% | 29 |
| Shirts | 0,5/1,1 | 1200 | 50% | 12 |
Auxiliary Functions
Drying Level
Select the drying target suitable for your laundry.
- Select Extra Dry for thick and multilayer laundry that takes time to dry.
- Select Regular Dry for regular, single-layer laundry.
- Select Damp Dry for laundry that you wish to leave damp, ready for ironing.
Level Adjustment
The dampness level obtained after drying can be increased by another 3 levels in addition to the standard setting. This way, it is ensured that the laundry is drier. Levels can be selected apart from the standard setting.
$$ \begin{array}{l} + 1 \quad (\text { low }) \ + 2 \quad (\text { medium }) \ + 3 \quad (\text { h i g h }) \ \end{array} $$
After selection, the light of the relevant drying level illuminates.
OPERATING INSTRUCTIONS
Delicate Drying
Delicate fabrics are dried in a longer time at a low temperature.
Delayed Start
Delay the start of a program by selecting a time between 1 and 23 hours. You can press Start/Pause to activate the desired delay time. When this time has elapsed, the selected program will start automatically. During the delay time, options compatible with the program can be activated/deactivated. If you press and hold the Delayed Start button, the delay time will change continuously.
Cancel Audible Warning
The dryer will give an audible warning when the buttons are pressed, when the program selection knob is turned and when the program ends. To cancel the audible warnings, press and hold the "Antiwrinkle Option" for 3 seconds. When you press this button, you will hear an audible warning that indicates that the option has been activated and the audible warnings stated will be cancelled.
Time Drying
If the program knob is turned to Time Drying, press the Time Drying option button to select it, pres Start/Pause to start the program.
Child Lock
There is a child lock option to avoid changes in the selected program when keys are pressed during the program cycle. To activate the child lock feature, press "Options" and "Anti-wrinkle" buttons simultaneously for 3 seconds. When the child lock is activated, all keys will be deactivated. Child lock is not automatically deactivated at the end of the program.
To deactivate the child lock at the end of the program, set the program selection knob to the "Off" position, then to the first position. Child Lock is still active. To deactivate, press "Options" and "Anti-wrinkle" buttons simultaneously for 3 seconds. When activating/deactivating "CL will appeare on the display for 2 seconds and then turns off. An audible warning will sound.
WARNING
When the dryer is running or the child lock is active, if you turn the program selection knob, you will hear an audible warning and "CL" will visualize on the display for 2 seconds and then turn off. If you turn the program selection knob, you will hear an audible warning. Even if you set the program knob to another program, the previous program will continue to run. To select a new program, deactivate the child lock and then set the program selection knob.
Anti-wrinkle
If you do not open the door of the dryer at the end of the program, the anti-wrinkle option will be active for 60 minutes except for the normal program. When the anti-wrinkle option is selected it, will be active for 120 minutes.
Temperature Level
For the laundry to be dried, temperature level can be adjusted with low, medium and high options.
NOTE
Not all options listed are available on all models
OPERATING INSTRUCTIONS
Starting the Program
The Start/Pause LED will flash during program selection. Press the Start/Pause button to start the program. The Start/Pause LED indicates that the program has started and the drying LED will come on.
NOTE
Not all programs listed available on all dryers
Normal
Suitable for cotton laundry including bedsheets, pillowcases, pajamas, underwear, tablecloths etc.
Outdoor
Suitable for outdoor clothing, waterproof jackets, jackets with inner insulation, etc.
Towels
Suitable for thick cotton laundry such as towels, bathrobe, etc.
Mix
Suitable for cotton-synthetic mixed garments that do not discolour to make them ready to wear.
Warm Refresh
Helps wool textiles to remove excess water after washing by applying low temperature and gentle tumbling of the drum.
Air Fluff
Used to remove bad odors with 10 minutes of tumbling without heat.
Time Drying
To reach the required drying level at a low temperature, you can use the time programs of 10 min. to 150 min. Regardless of the drying level, the program stops at the desired time.
Ultra Hot
Suitable for fabrics which need hygiene requirements.
Baby Care
Provides hygienic drying for delicate infant clothes at a low temperature.
Delicates
This program dries delicate clothing/fabrics like shirts, blouses, and silk garments at a low temperature to make them ready to wear.
Perm Press
Dries synthetics such as shirts, t-shirts, blouses at a lower temperature compared to the cottons program.
Bedding
Used to dry single duvet with feathers, down or synthetic fillings.
Sports Wear
Used for synthetic sport garments like shorts, t-shirts at low temperature.
Express
2 Kg (4.4 lbs) of cotton shirts spun at a high speed in the washing machine are dried in 29 minutes.
Shirts
2 - 3 shirts are ready to be ironed in 12 minutes.
IMPORTANT
Do not open the dryer door while the program is running. If you have to open the door, do not keep it open for a long time.
OPERATING INSTRUCTIONS
Selection Stand By
After 15 minutes without user action in selection mode, the dryer goes to energy-saving mode due to decreased energy consumption. No LED activation on display. While in energy saving mode, dial LED remains on while selection will not appear in Display.
To restart the dryer it will be necessary to move turn the knob to the OFF position and re-select the program.
During the Program
If the door is opened while a program is running, the dryer will switch to standby mode. Once the door is closed, press the Start/Pause key to resume the program.
Do not open the dryer door when the program is running. If you have to open the door, do not keep it open for a long time.
Program End
At the end of the drying cycle, the warning LEDs for Start/Pause, water tank level, filter cleaning and condenser cleaning will turn on and an audible warning will sound. The laundry can now be removed from the dryer.
NOTE
Clean the filter and empty the water tank after each use.
NOTE
If the laundry is not removed from the dryer after the program has ended, the 1-hour Anti-wrinkle cycle will automatically be activated. This program roates the drum at regular intervals to prevent creases.
Drum Light Information
This product includes an LED Drum Light. The light works automatically when you open the door. It will turn off automatically if door is left open.
NOTE
- The dryer light cannot be turned on or off by user.
- Do not try to replace or modify the LED light.
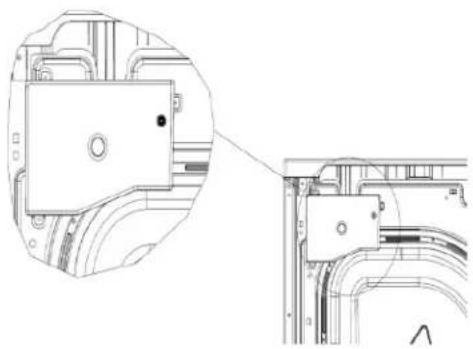
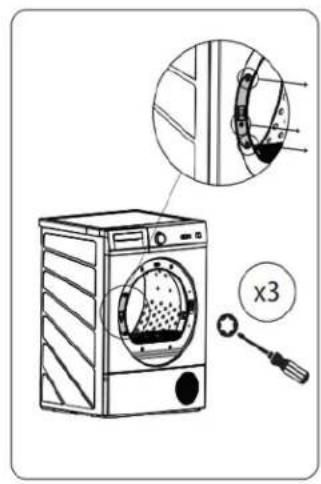
DOOR REVERSAL

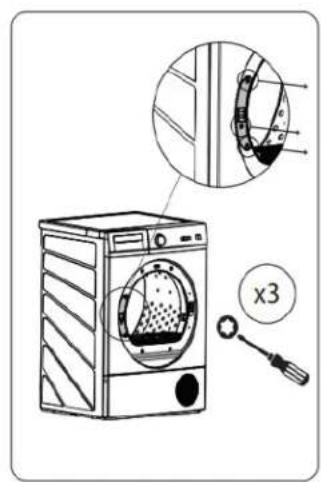
- Remove door and door hinge

- Remove inner glass from door
natural_image
Line drawing of a washing machine with a close-up inset showing internal components (no text or symbols)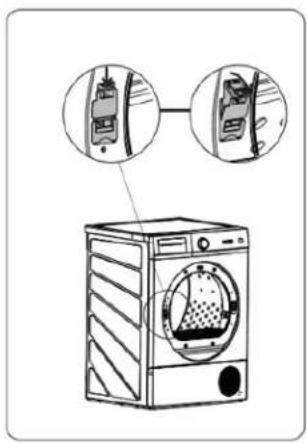
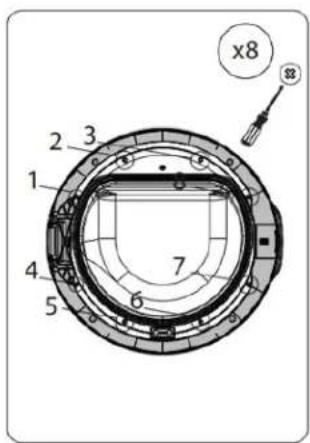
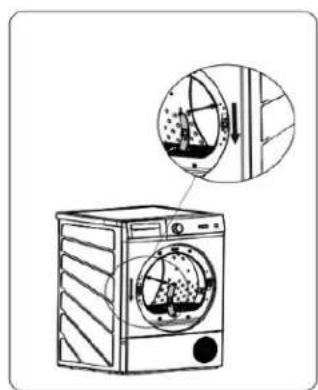
- Remove door closing mechanism

natural_image
Technical illustration of a mechanical component with angular measurement '180°' (no text or symbols beyond the label)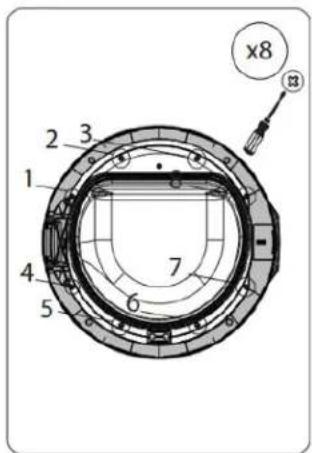
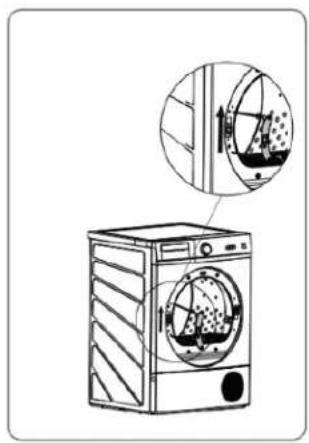
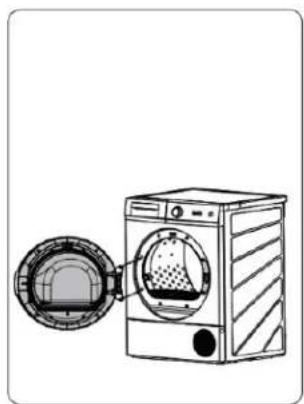
- Turn door 180 degrees and re-install the inner glass

natural_image
Line drawing of a washing machine with a close-up inset showing internal components (no text or symbols)- Install door hinge and closing mechanism on opposite sides of door opening
natural_image
Line drawing of a washing machine with a lid removed from it (no text or symbols)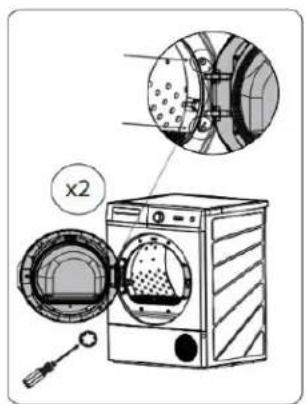
- Re-install door
CARE & MAINTENANCE
NOTE
- Do not use industrial chemicals to clean your dryer.
- Do not use a dryer that has been cleaned with industrial chemicals.
Cleaning the Lint Filter
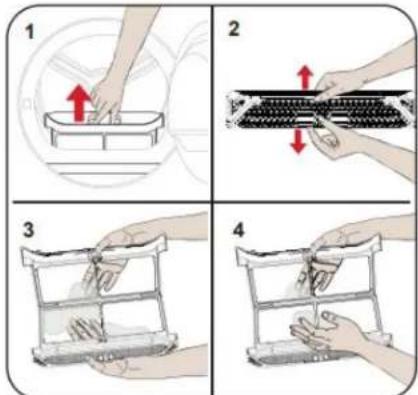
- Open the dryer door.
- Pull up the lint filter to remove it.
- Use your hands or a soft cloth to clean the lint.
- Replace the lint filter and close the dryer door.
NOTE
The lint filter MUST be cleaned after every use.
After continued use, a build-up on the surface of the lint filter that reduces airflow, may occur. Wash the filter with warm water to remove build-up.

natural_image
Illustration of a hand using a tool to clean or store food items on a conveyor belt (no text or symbols visible)Emptying the Water Tank
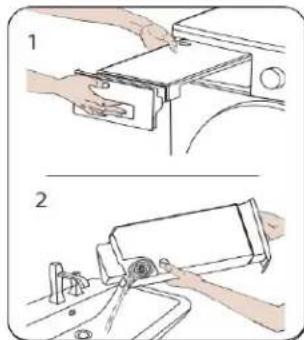
- Pull the drawer cover, carefully take out the tank.
- Empty the water in the tank.
- If there is lint accumulated on the discharge cap in the tank, clean it with water.
- Replace the tank.
NOTE
- Do not remove the water tank when a program is running. The water in the water tank is not suitable for human consumption.
• The water tank MUST be emptied after each use.
Cleaning the Inner Surface of the Dryer

natural_image
Illustration of hands cleaning a washing machine with a cloth (no text or symbols)Open the dryer door and clean all of the inner surfaces including the gasket with a soft, damp cloth.
CARE & MAINTENANCE
Cleaning the Condenser
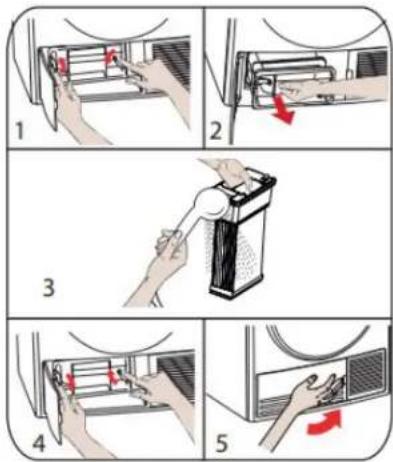
If the drying process is completed, open the dryer door and wait for it to cool down.
- Open the plinth and release the 2 cover locks.
- Hold the condenser by the plastic part and pull it out.
- Clean with a showerhead and wait for the water to drain off.
- Fully insert the condenser into its seat and lock the 2 cover locks.
- Close the plinth cover.
NOTE
Clean the condenser when you see the warning "Condenser Cleaning".
NOTE
The condenser should be cleaned after every 30 completed drying programs or once a month even if the warning has not activated.
Cleaning the Humidity Sensor
Inside the dryer, there are humidity sensors that detect whether the laundry is or is not dry.

natural_image
Illustration of a hand placing a yellow substance into a car interior (no text or symbols)- Open the dryer door.
- If the dryer is still hot due to the drying process, wait for it to cool down.
- Using a soft cloth soaked in vinegar, wipe the metal surfaces of the sensor and dry them.
- Replace the lint filter and close the dryer door.
NOTE
Clean the metal surfaces of the sensor 4 times per year.
NOTE
Do not use metal tools to clean the metal surfaces of the sensor.

WARNING
Due to the risk of fire and explosion, do not use solution agents, cleaning agents or similar products when cleaning the sensors.
TROUBLESHOOTING
The dryer is fitted with systems that continuously perform checks during the drying process to make adjustments as required and warn of malfunctions.

The laundry that comes out hot at the end of the drying process generally feels more humid.
| PROBLEM POSSIBLE CAUSE | |
| Dryer does not operate • The appliance is not plugged in.• The circuit breaker tripped or a blown fuse. | |
| Dryer drum does not turn. • The door is not fully closed.• The power plug is unplugged.• The outlet does not have power. | |
| ERROR CODE | SOLUTION |
| E00 | Contact the nearest authorized service provider |
| E03 / [IMAGE] | Empty the water tank, if the problem persists, contact the nearest authorized service agent |
| E04 | Contact the nearest authorized service provider |
| E05 | Contact the nearest authorized service provider |
| E06 | Contact the nearest authorized service provider |
| E08 | There may be a power fluctuation. Wait until the power is suitable for operating the dryer |
LIMITED "IN HOME" WARRANTY
This quality product is warranted to be free from manufacturer's defects in material and workmanship, provided that the unit is used under the normal operating conditions intended by the manufacturer.
This warranty is available only to the person to whom the unit was originally sold by Danby Products Limited (Canada) or Danby Products Inc. (U.S.A.) (hereafter "Danby") or by an authorized distributor of Danby, and is non-transferable.
TERMS OF WARRANTY
Plastic parts are warranted for thirty (30) days from the date of purchase, with no extensions provided.
First 24 months During the first twenty four (24) months, any functional parts of this product found to be defective, will be repaired or replaced, at warrantor's option, at no charge to the original purchaser.
To obtain service Contact the dealer where the unit was purchased, or contact the nearest authorized Danby service depot, where service must be performed by a qualified service technician. If service is performed on the unit by anyone other than an authorized service depot, all obligations of Danby under this warranty shall be void.
Boundaries of in-home service Danby reserves the right to limit the boundaries of "In Home Service" to the proximity of an authorized service depot. Any appliance requiring service outside the limited boundaries of "In Home Service", will be the consumer's responsibility to transport at their own expense to the original point of purchase or a service depot for repair. If the appliance is installed in a location that is 100 kilometers (62 miles) or more from the nearest service center, it must be delivered to the nearest authorized Danby Service Depot by the purchaser.
Transportation charges to and from the service location are not protected by this warranty and are the responsibility of the purchaser.
Nothing within this warranty shall imply that Danby will be responsible or liable for any spoilage or damage to food or other contents of this appliance, whether due to any defect of the appliance, or its use, whether proper or improper.
EXCLUSIONS
Save as herein provided, by Danby, there are no other warranties, conditions, representations or guarantees, express or implied, made or intended by Danby or its authorized distributors and all other warranties, conditions, representations or guarantees, including any warranties, conditions, representations or guarantees under any Sale of Goods Act or like legislation or statute is hereby expressly excluded. Save as herein provided, Danby shall not be responsible for any damages to persons or property, including the unit itself, howsoever caused or any consequential damages arising from the malfunction of the unit and by the purchase of the unit, the purchaser does hereby agree to indemnify and hold harmless Danby from any claim for damages to persons or property caused by the unit.
GENERAL PROVISIONS
No warranty or insurance herein contained or set out shall apply when damage or repair is caused by any of the following:
1) Power failure.
2) Damage in transit or when moving the appliance.
3) Improper power supply such as low voltage, defective house wiring or inadequate fuses.
4) Accident, alteration, abuse or misuse of the appliance such as inadequate air circulation in the room or abnormal operating conditions (i.e. extremely high or low room temperature).
5) Use for commercial or industrial purposes (i.e. If the appliance is not installed in a domestic residence).
6) Fire, water damage, theft, war, riot, hostility, acts of God such as hurricanes, floods etc.
7) Service calls resulting in customer education.
8) Improper Installation (i.e. Building-in of a free standing appliance or using an appliance outdoors that is not approved for outdoor application, including but not limited to: garages, patios, porches or anywhere that is not properly insulated or climate controlled).
Proof of purchase date will be required for warranty claims; retain bills of sale. In the event that warranty service is required, present the proof of purchase to our authorized service depot.
Warranty Service
In Home
Danby Products Limited
PO Box 1778, Guelph, Ontario, Canada N1H 6Z9
Telephone: (519) 837-0920 FAX: (519) 837-0449
1-800-263-2629
04/17
Danby Products Inc
PO Box 669, Findlay, Ohio, U.S.A. 45840
Telephone: (419) 425-8627 FAX: (419) 425-8629
natural_image
Warning symbol of a flame inside a triangle (no text or numbers)natural_image
Metallic mechanical component with attached brackets and a flat base (no text or symbols visible)Kit apilable con cajón/estante
natural_image
Simple line drawing of a three-pin electrical socket (no text or symbols)4-Wire receptacle (14-30R)

natural_image
Simple electrical circuit symbol with three rectangular components (no text or labels)3-Wire receptacle (10-30R)
RECEPTÁCULO DE 4 CABLES
natural_image
Technical line drawing of a mechanical assembly with cross-sectional views (no text or symbols)natural_image
Technical line drawing of a mechanical connector assembly (no text or symbols)natural_image
Technical line drawing of an electrical enclosure with wiring and components (no text or symbols)natural_image
Technical line drawing of a mechanical assembly with no visible text or symbolsnatural_image
Technical line drawing of a mechanical connector with threaded end and side view (no text or symbols)natural_image
Pure electrical circuit lines without any symbolsnatural_image
Technical line drawing of an electrical enclosure with wiring and components (no text or symbols)natural_image
Line drawing of a washing machine with clothes inside, showing internal compartments and washers (no text or symbols)Normal + Regular Seco (Normal)
Refrescar (Air Fluff)

natural_image
Line drawing of a washing machine with a magnified inset showing internal components (no text or symbols)
natural_image
Illustration of a mechanical lock or latch with a 180° angular indicator (no text or symbols on the diagram itself)

natural_image
Line drawing of a washing machine with a magnified inset showing internal components (no text or symbols)natural_image
Line drawing of a washing machine with a circular vent and lid removed (no text or symbols)
natural_image
Illustration of a hand using a handheld device to clean or store items on a food tray (no text or symbols visible)natural_image
Illustration of hands cleaning a washing machine with a cloth (no text or symbols)natural_image
Illustration of a hand cleaning a car interior with a yellow brush (no text or symbols)Danby Products Limited
PO Box 1778, Guelph, Ontario, Canada N1H 6Z9
Danby Products Limited, Guelph, ON, Canada N1H 6Z9 Danby Products Inc., Findlay, Ohio, USA 45840
*Trademarks of Danby Products Limited and/or its subsidiaries
* Marques de commerce de Danby Products Limited et / ou de ses filiales
* Marcas comerciales de Danby Products Limited y / o sus subsidiarias
- Welcome to the Danby family.
- Need Help?
- Important Safety Information READ AND FOLLOW ALL SAFETY INSTRUCTIONS
- IMPORTANT WARNING
- GROUNDING INSTRUCTIONS
- ELECTRICAL INSTALLATION
- DO NOT USE AN EXTENSION CORD
- SAFETY REQUIREMENTS
- SAVE THESE INSTRUCTIONS!
- INSTALLATION INSTRUCTIONS
- LOCATION
- Under Counter Installation
- IMPORTANT
- LEVEL THE APPLIANCE
- CONNECTION TO WATER OUTLET (with optional drain hose)
- Connecting the Water Drain Hose
- NOTE:
- PLUG AND POWER CORD SELECTION
- 4-WIRE RECEPTACLE
- 3-WIRE RECEPTACLE
- 4-WIRE POWER SUPPLY CORD ELECTRICAL CONN
- WARNING
- 3-WIRE POWER SUPPLY CORD
- OPERATING INSTRUCTIONS
- LOAD CAPACITY
- Electronic Indicator Display
- Program Selection and Consumption Table
- NOTE
- Auxiliary Functions
- Drying Level
- Level Adjustment
- Delicate Drying
- Delayed Start
- Cancel Audible Warning
- Time Drying
- Child Lock
- Anti-wrinkle
- Temperature Level
- Starting the Program
- Normal
- Outdoor
- Towels
- Mix
- Warm Refresh
- Air Fluff
- Ultra Hot
- Baby Care
- Delicates
- Perm Press
- Bedding
- Sports Wear
- Express
- Shirts
- Selection Stand By
- During the Program
- Program End
- Drum Light Information
- DOOR REVERSAL
- CARE & MAINTENANCE
- Cleaning the Lint Filter
- Emptying the Water Tank
- Cleaning the Inner Surface of the Dryer
- Cleaning the Condenser
- Cleaning the Humidity Sensor
- TROUBLESHOOTING
- LIMITED "IN HOME" WARRANTY
- TERMS OF WARRANTY
- EXCLUSIONS
- GENERAL PROVISIONS
- Warranty Service
- In Home
- RECEPTÁCULO DE 4 CABLES
Brand : DANBY
Model : DDY040D4WDB
Category : Tumble dryer