
TSP203 - Docking station DENVER - Free user manual and instructions
Find the device manual for free TSP203 DENVER in PDF.
| Brand | Denver |
| Model | TSP203 |
| Product type | Portable Bluetooth speaker with karaoke function |
| Power supply | AC adapter 100-240 V, rechargeable lead-acid battery 12 V / 2600 mAh |
| Battery life | Approximately 2 hours of continuous playback (depending on volume and conditions) |
| Charging time | Approximately 3 hours for full charge |
| Connectivity | Bluetooth, USB, 3.5mm LINE input, microphone input |
| Functions | Bluetooth playback, USB, LINE IN, FM radio, karaoke with echo adjustment, equalizer (Flat, Classical, Pop, Rock, Jazz) |
| Display | Red LED for status |
| Output power | Not specified (estimated: 20-30 W) |
| Dimensions | Not specified (estimated: 300 x 200 x 150 mm) |
| Weight | Not specified (estimated: 2-3 kg) |
| Box contents | Main unit, AC adapter, user manual, shoulder strap |
| Care and cleaning | Unplug before cleaning; do not use liquid or spray detergents |
| Safety | Do not expose to water, heat sources, open flames; leave 10 cm of space around for ventilation |
| Repairability | Do not attempt to repair yourself; contact authorized after-sales service |
| Energy saving | Automatic standby after 20 minutes of inactivity, automatic shutdown |
| Warranty | Legal warranty of conformity (2 years in Europe) |
Frequently Asked Questions - TSP203 DENVER
User questions about TSP203 DENVER
0 question about this device. Answer the ones you know or ask your own.
Ask a new question about this device
Download the instructions for your Docking station in PDF format for free! Find your manual TSP203 - DENVER and take your electronic device back in hand. On this page are published all the documents necessary for the use of your device. TSP203 by DENVER.
USER MANUAL TSP203 DENVER
SAFETY INSTRUCTIONS ....3
POWER CONNECTION....4
RECHARGING 4
BLUETOOTH CONNECTION 4
FM RADIO....5
USB PORT 5
LINE IN....6
SING-A-SONG 6
SOUND EFFECTS 6
TROUBLE SHOOTING....6
CAUTION 8
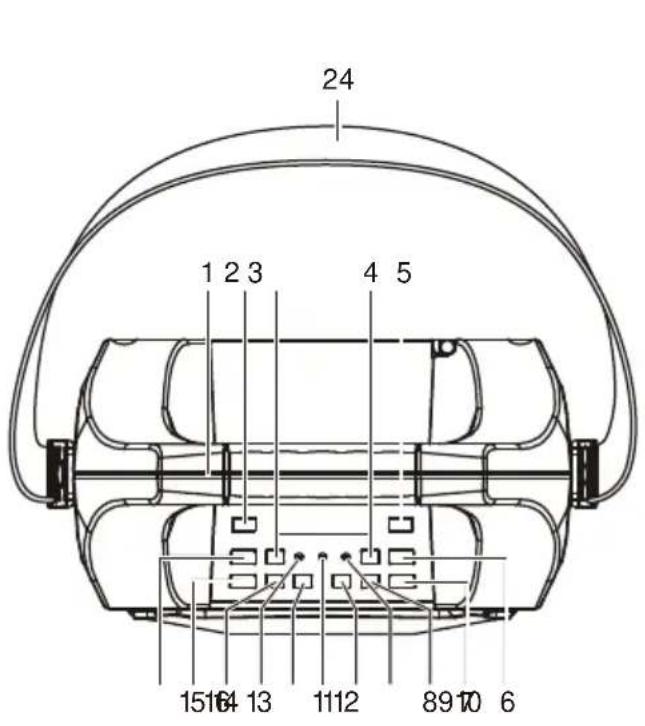
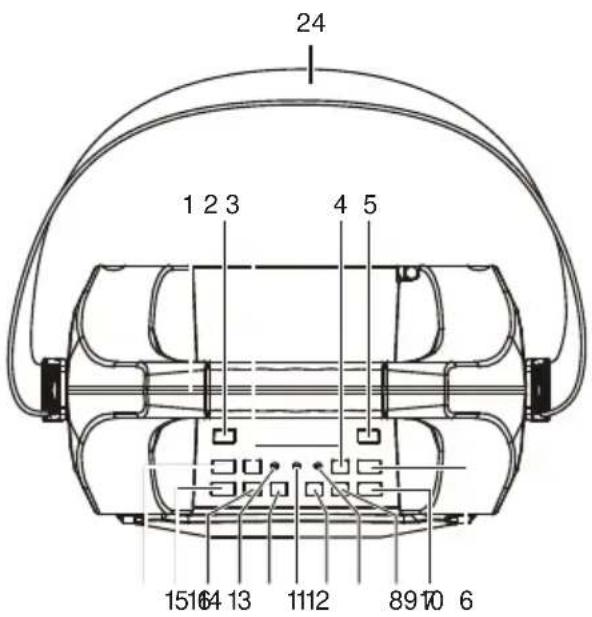
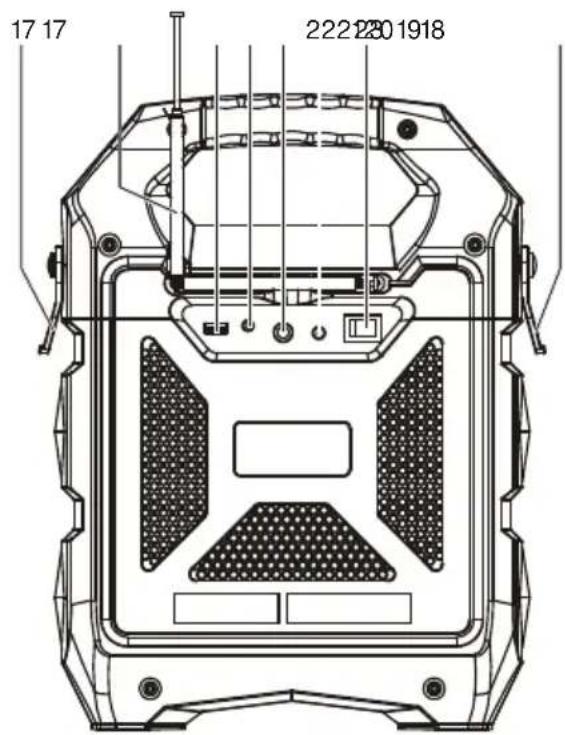
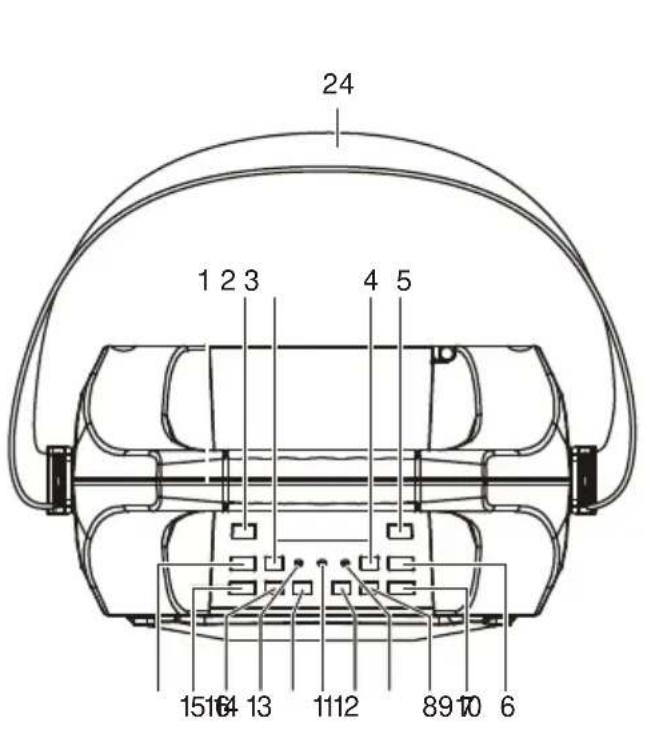
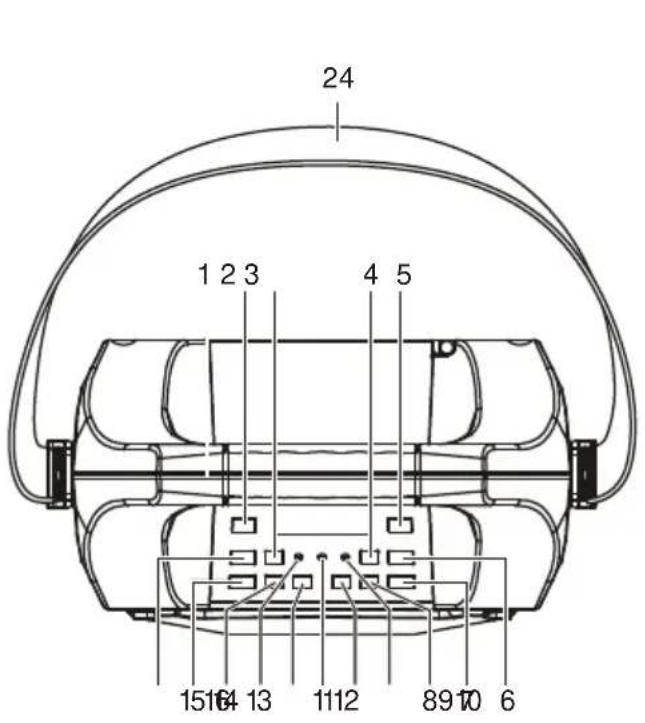
- HANDLE
- EQ KEY
- TUNING UP
- ECHO DOWN
- REPEAT KEY
- ECHO UP
- MIC VOLUME UP
- MIC VOLUME DOWN
- BATTERY INDICATOR
- VOLUME UP KEY
- BLUETOOTH INDICATOR
-
VOLUME DOWN KEY
-
POWER INDICATOR
- PAUSE/PLAY/BT OFF
- SOURCE
- TUNING DOWN
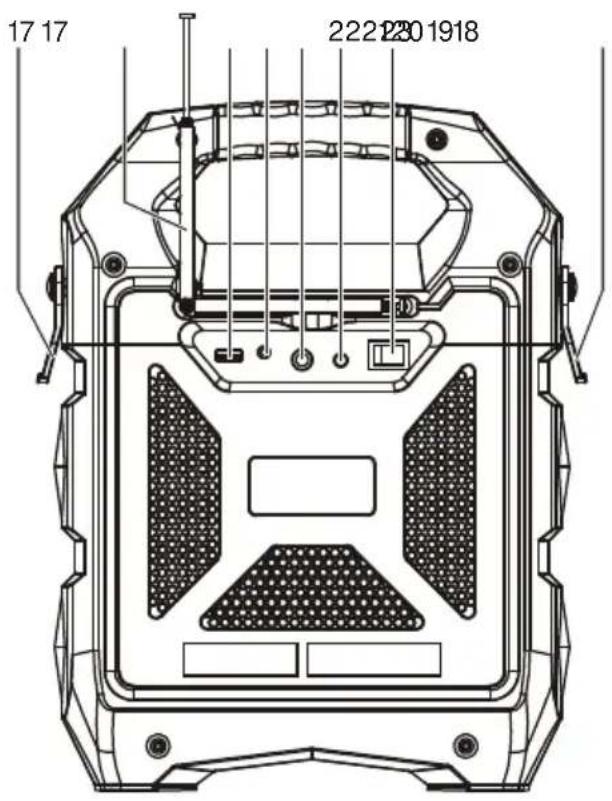
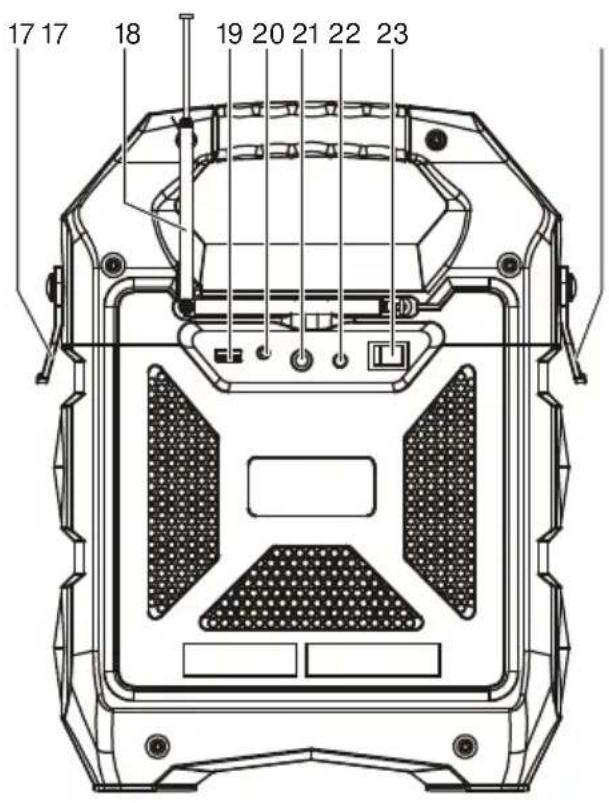
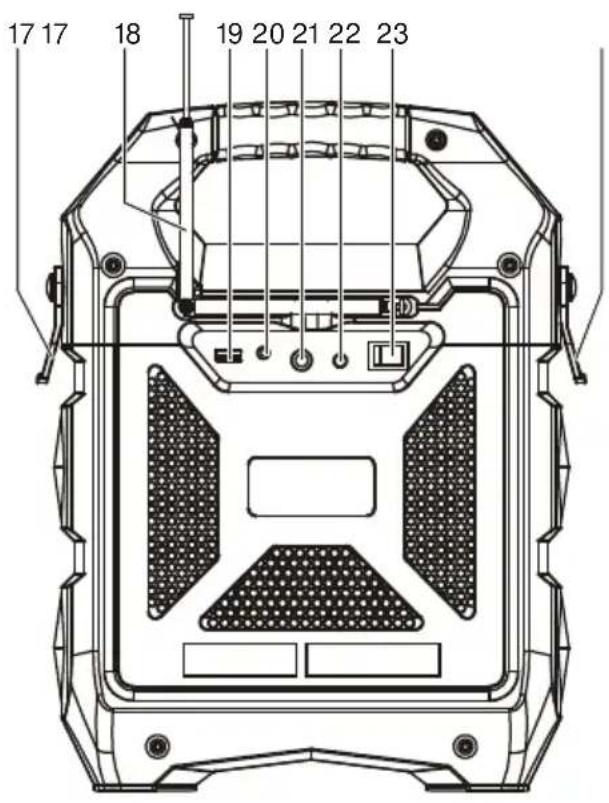
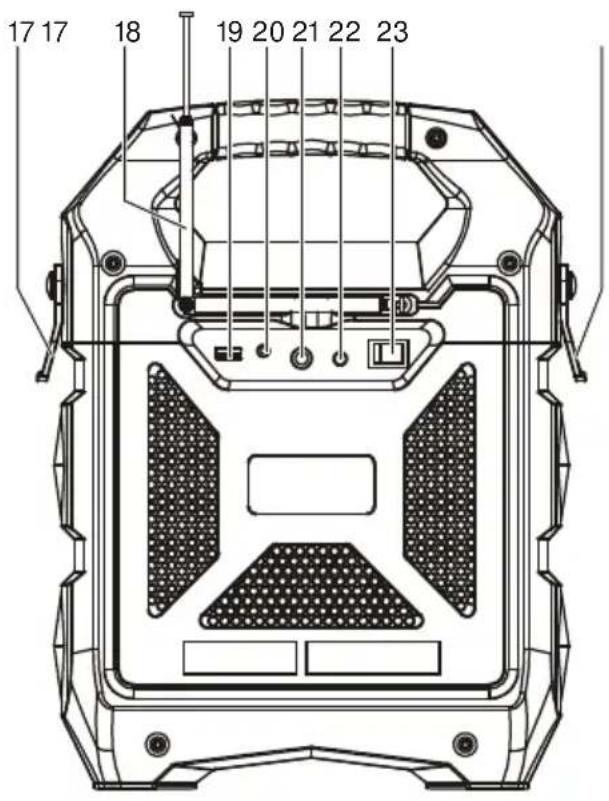
- BALDRIC CLIP
- FM ANTENNA
- USB PORT
- LINE IN
- MIC PORT
- DC (15V 1.0A) INPUT ⊖-C⊕
- POWER ON/OFF KEY
- SHOULDER STRAP
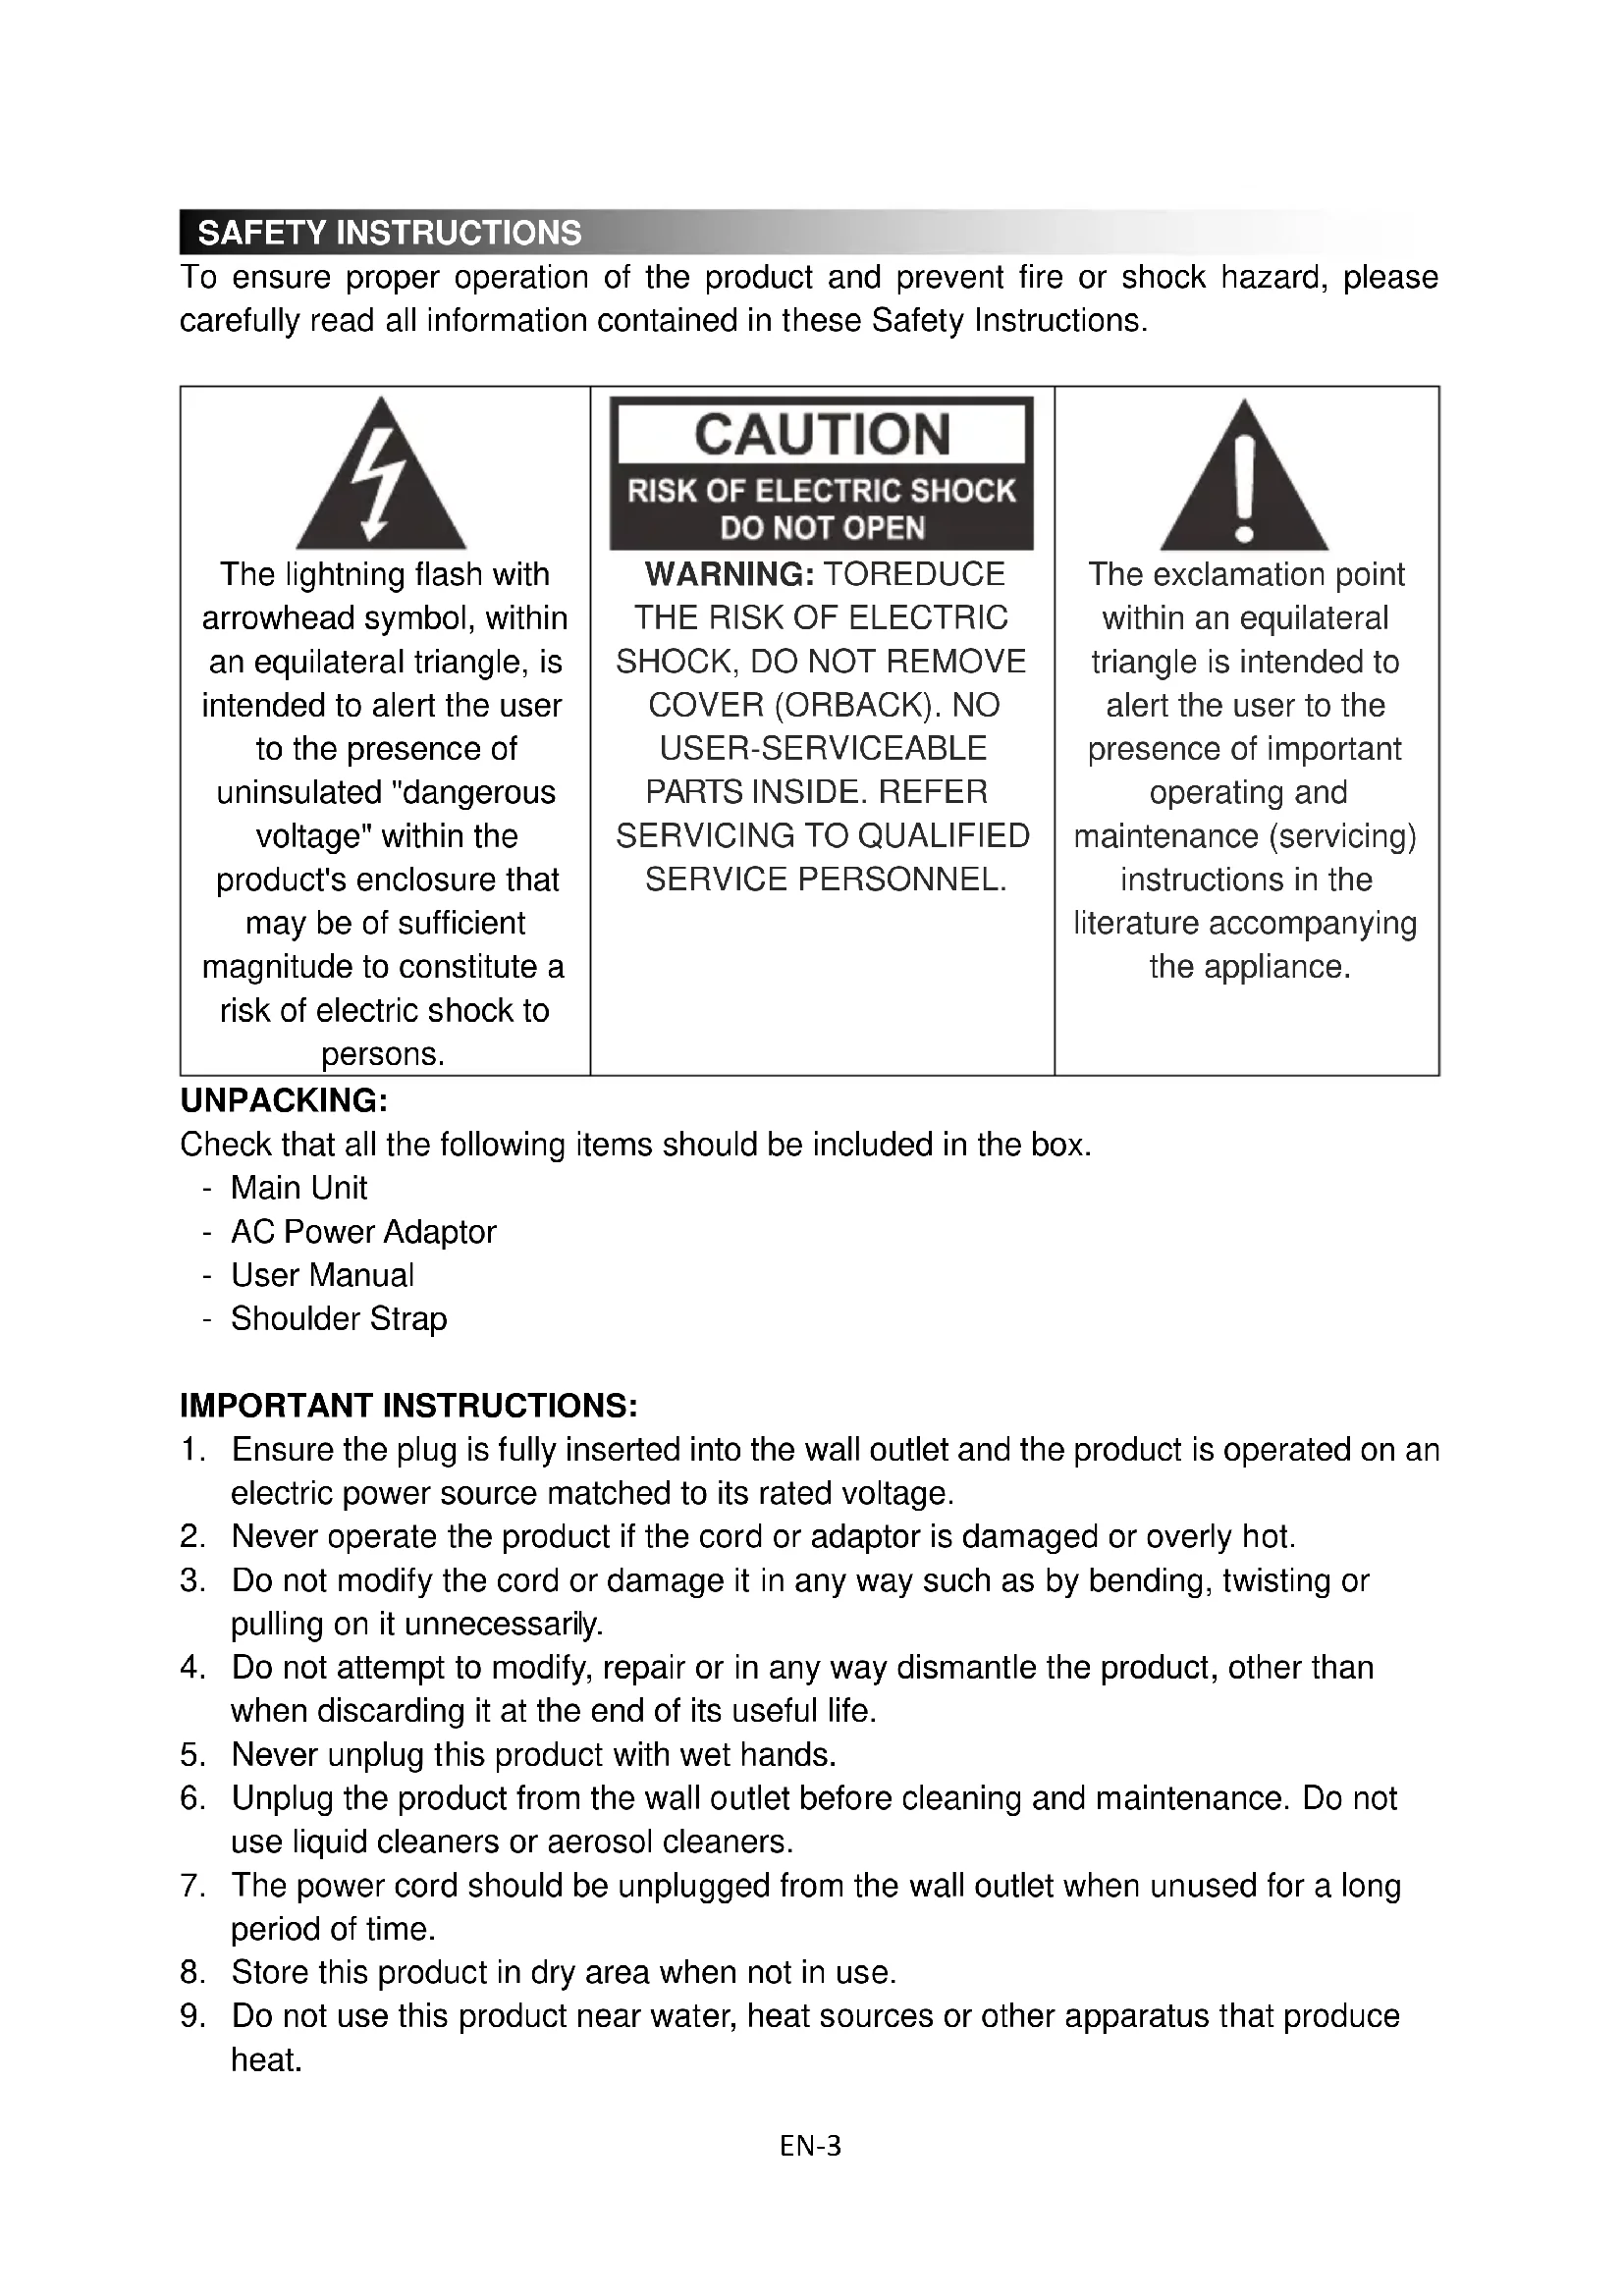
SAFETY INSTRUCTIONS
To ensure proper operation of the product and prevent fire or shock hazard, please carefully read all information contained in these Safety Instructions.

The lightning flash with arrowhead symbol, within an equilateral triangle, is intended to alert the user to the presence of uninsulated "dangerous voltage" within the product's enclosure that may be of sufficient magnitude to constitute a risk of electric shock to persons.
CAUTION
RISK OF ELECTRIC SHOCK DO NOT OPEN
WARNING: TOREDUCE THE RISK OF ELECTRIC SHOCK, DO NOT REMOVE COVER (ORBACK). NO USER-SERVICEABLE PARTS INSIDE. REFER SERVICING TO QUALIFIED SERVICE PERSONNEL.

The exclamation point within an equilateral triangle is intended to alert the user to the presence of important operating and maintenance (servicing) instructions in the literature accompanying the appliance.
UNPACKING:
Check that all the following items should be included in the box.
- Main Unit
- AC Power Adaptor
- User Manual
- Shoulder Strap
IMPORTANT INSTRUCTIONS:
- Ensure the plug is fully inserted into the wall outlet and the product is operated on an electric power source matched to its rated voltage.
- Never operate the product if the cord or adaptor is damaged or overly hot.
- Do not modify the cord or damage it in any way such as by bending, twisting or pulling on it unnecessarily.
- Do not attempt to modify, repair or in any way dismantle the product, other than when discarding it at the end of its useful life.
- Never unplug this product with wet hands.
- Unplug the product from the wall outlet before cleaning and maintenance. Do not use liquid cleaners or aerosol cleaners.
- The power cord should be unplugged from the wall outlet when unused for a long period of time.
- Store this product in dry area when not in use.
-
Do not use this product near water, heat sources or other apparatus that produce heat.
-
Battery shall not be exposed to direct sunlight or fire.
- Do not attempt to replace the battery. For repairing and servicing, please consult from the store of purchase or customer service centre designated by the store.
CAUTION: Danger of explosion if battery is incorrectly replaced. - Do not use any other power supply other than the one specially designed for this product.
- Keep this operating instruction in a safe place.
- Contact an authorized service centre if you have any inquiry about this product.
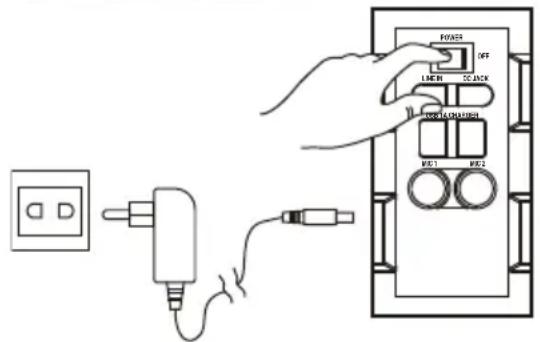
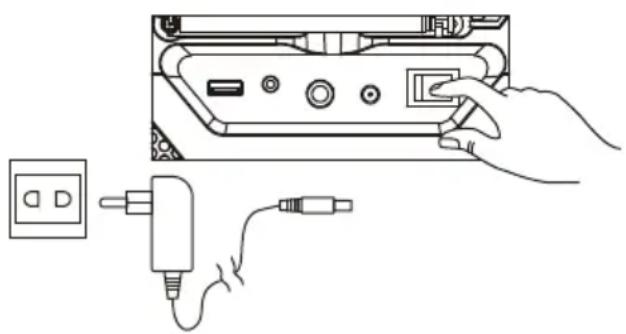
POWER CONNECTION
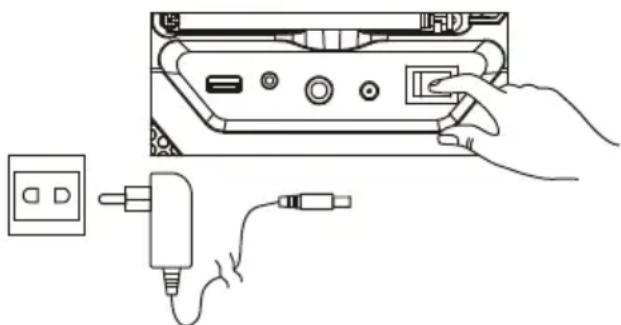
- Unpack this product, ensure the power ON/OFF switch is on "OFF".
- Connect the supplied AC adaptor to this product, plug the AC adaptor to the wall outlet.
RECHARGING
- Unit comes with a battery indicator alert.
- If Battery LED flashes, it means the battery level is low and recharging is required.
- By connecting the AC power, the Battery LED will turn red, it means the unit is under recharging.
- When the Battery LED becomes green, it means the battery is fully charged.
natural_image
Line drawing showing a hand inserting a plug into a device with a power outlet nearby (no text or symbols)It is recommended to charge the battery about 6 hours before you start using the unit for the first time.
Energy Saving: If this product is idle for about 20 minutes, it will go to standby mode automatically. It will auto power off
Caution: To keep the rechargeable battery in good condition, users should check the unit and be sure to turn the Power On/Off switch on the back panel to "Off" every time after using and before storage, it is highly recommended that users should fully recharge the battery at least once every two months.
BLUETOOTH CONNECTION
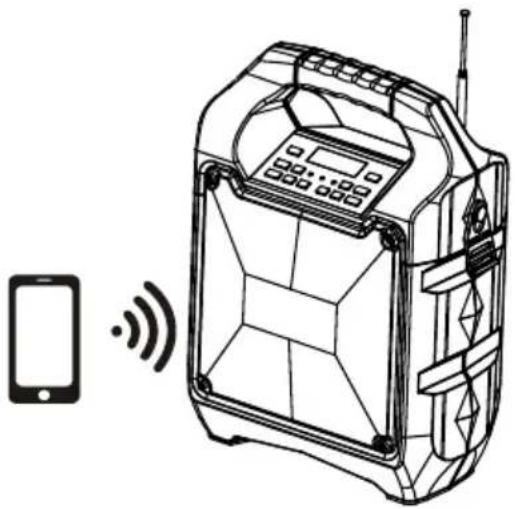
- Once the power switch is turned to "On", Bluetooth "BT" mode is set as default
- Blue LED indicator will be flash in pairing mode. The red LED display will show "bt"
- Turn on the Bluetooth function on your device and search for "TSP-203" then press to connect.
- Connected sound signal will be heard and the blue led connection indicator will stop blinking and stay steady.
- Bluetooth connection is completed.
- Select the music from your Bluetooth device and start playing.
- Holding the BT OFF key to disconnect paired device and enter pairing mode.
natural_image
Line drawing of a mobile device with a smartphone and wireless signal icon (no text or symbols)FM RADIO
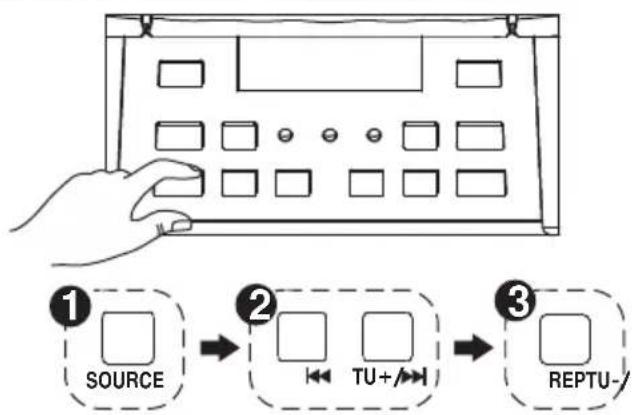
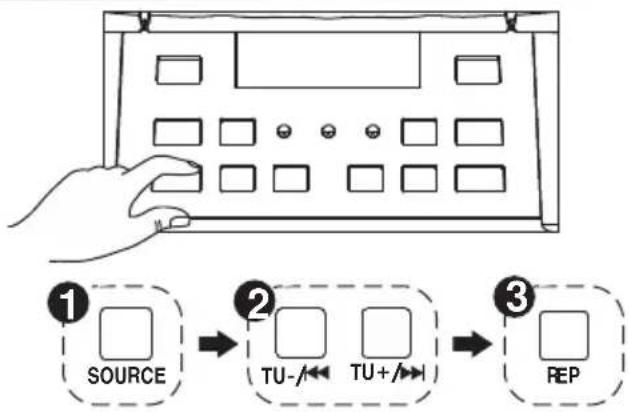
- Press the "Source" button and select Radio, the FM Radio Frequency will show on the red LED display.
- Press play/pause key to auto search and store.
- Press and hold the TU ◀◀ or TU ▶◀I buttons to choose the next stored available station. Short press them to fine tune.
USB PORT
- Press the "Source" button and select USB. USB will show on the red LED display.
- Insert the USB stick.
- Select your favorable music by pressing TU or TU
- Press "REP" to repeat once for the current song, Press again "REP" to repeat all songs. press the button three times to enter the random play mode.
It will automatically switch to USB mode once insert the USB stick.
Important: The USB port is intended for data transfer only. Other devices cannot be used with this USB connection. The use of USB extension cords is not recommended.
LINE IN
- Press the "Source" Button and select LINE. LINE will show on the red LED display.
- Plug in your 3.5mm cable into the LINE Input on the back panel and the unit will enter into LINE IN mode.
- You can connect any audio device that has 3.5mm audio output jack and playback any audio from the connected device.
natural_image
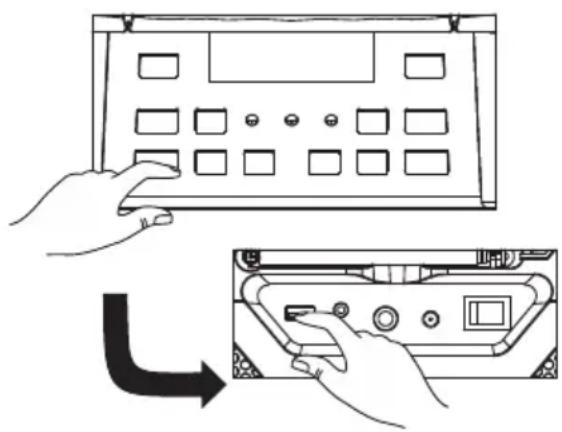
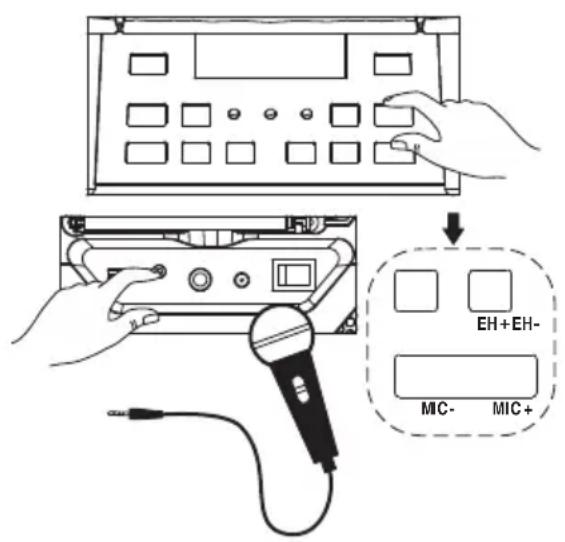
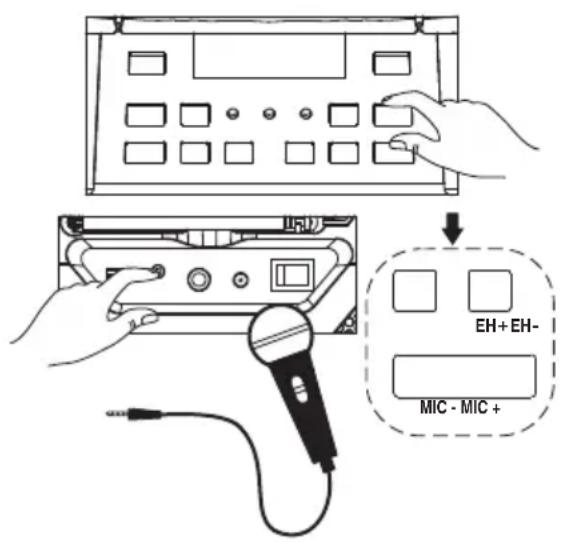
Illustration showing hands interacting with a device panel and a close-up of the internal components (no text or symbols)SING-A-LONG
- This product allows you to sing-a-long with the songs that are playing either on BT, USB or LINE IN mode.
- Plug in your Microphone cable into the side panel marked "MIC"
- Adjust the MIC Volume "MIC + / MIC - " or main volume on the top control panel.
- Adjust the Echo level "EH + /EH - ".
- Start to sing
| WARNING: - If the MIC Volume and ECHO level set too high or to the maximum, be caution with the high pitch reflection tone. |
SOUND EFFECTS
- "Customer's model" has a built in Equalizer
- Press and select the preset sound effect for your music; FLAT, CLASSIC, POP, ROCK and JAZZ
TROUBLESHOOTING
General
No power
- Check that AC adaptor is securely inserted in the unit and the electrical outlet.
- Check the Power On/Off switch is turn to On position.
- If battery is flat Plug in the AC adaptor to charge and operate.
Keys no response
- Turn the Power On/Off switch to Off, and then On again to reset the unit.
- Unplug the AC adaptor and plug it back again.
No sound heard
- Make sure the LINE connected volume is turn to reasonable level.
- Make sure the Bluetooth connected device output the audio via BT out.
- Make sure the Bluetooth connected device volume is turn to reasonable level.
Bluetooth Operations
Audio quality is poor
- Bluetooth reception is poor. Move the Bluetooth device nearer to the speaker.
Cannot pair to Bluetooth device
- Make sure both Bluetooth device and speaker are not connected to any other Bluetooth device.
- Make sure the blue LED on the speaker is flashing quickly (Pairing mode).
- Turn Power switch to Off, and then On again, Press and hold BT off button for 2 seconds to enter into pairing mode.
CAUTION:
- The AC/DC adaptor and main unit shall not be exposed to dripping or splashing and that no objects filled with liquids, such as vases, shall be placed on the apparatus and AC/DC adaptor.
- Minimum distance of 10 cm around the apparatus for sufficient ventilation.
- The ventilation should not be impeded by covering the ventilation openings with items, such as newspapers, table-cloths, curtains, etc.
- No naked flame sources, such as lighted candles, should be placed on the apparatus.
- When the mains plug of AC/DC adaptor is used as the disconnect device, the disconnect device shall remain readily operable.
To be completely disconnected the power input, the AC/DC adaptor shall be disconnected from the mains completely. - The AC/DC adaptor should not be obstructed and should be easily accessed during intended use.
- Do not use the apparatus in tropical climates.
About Sealed Lead-Acid Battery:
This unit works either on the battery pack (Model no.: Tianchang 6-FM-2.6, 12V, 2600mAh) unplug the AC Power adapter from the DC input jack to work on the battery pack (after fully charged); plugging the AC Power adapter while the battery pack is attached initiates the charging of this battery. The charged LED indicator lights red during charging, when the battery is fully charged the indicator is green. Fully charging an empty battery pack may take 3 hours. A fully charged battery pack can last approximately 2 hours of continuous playback. This playing time may vary with the surrounding environment, the volume level of the speaker and the battery condition. It is advised that you wait 10-20 minutes before recharging the battery pack if it has run flat during operation.
ALL RIGHTS RESERVED, COPYRIGHT DENVER ELECTRONICS A/S
DENVER®
www.denver-electronics.com

Electric and electronic equipment and included batteries contains materials, components and substances that can be hazardous to your health and the environment, if the waste material (discarded electric and electronic equipment and batteries) is not handled correctly.
Electric and electronic equipment and batteries is marked with the crossed out trash can symbol, seen below. This symbol signifies that electric and electronic equipment and batteries should not be disposed of with other household waste, but should be disposed of separately.
As the end user it is important that you submit your used batteries to the appropriate and designated facility. In this manner you make sure that the batteries are recycled in accordance with legislature and will not harm the environment.
All cities have established collection points, where electric and electronic equipment and batteries can either be submitted free of charge at recycling stations and other collection sites, or be collected from the households. Additional information is available at the technical department of your city.
Imported by:
DENVER ELECTRONICS A/S
Omega 5A, Soeften
DK-8382 Hinnerup
Denmark
www.facebook.com/denverelectronics
Hereby, Inter Sales A/S declares that the radio equipment type TSP-203 is in compliance with Directive 2014/53/EU. The full text of the EU declaration of conformity is available at the following internet address:
http://www.denver-electronics.com/denver-tsp-203/
TSP-203
TRAGBARER
BLUETOOTH-LAUTSPRECHER

BEDIENUNGSANLEITUNG
INHALTSVERZEICHNIS
AUFLADEN
natural_image
Line drawing showing a hand inserting a plug into a device with a power outlet nearby (no text or symbols)natural_image
Line drawing of a mobile device with a smartphone and wireless signal icon (no text or symbols)UKW-RADIO
natural_image
Illustration showing hands interacting with a device panel and a close-up of the internal components (no text or symbols)MITSINGEN
SOUNDEFFEKTE
PROBLEEMOPLOSSING......6
OPGELET 8

- HENDEL
- EQ-TOETS
- AFSTEMMEN OMHOOG
- ECHO OMLAAG
- HERHAALTOETS
- ECHO OMHOOG
- MIC VOLUMEVERHOGING
- MIC VOLUMEVERLAGING
- BATTERIJINDICATOR
- TOETS VOLUMEVERHOGING
- BLUETOOTH-INDICATOR
-
TOETS VOLUMEVERLAGING
-
AAN/UITINDICATOR
- PAUZE/START/BT UIT
- BRON
- AFSTEMMEN OMLAAG
- CLIP VOOR SCHOUDERRIEM
- FM-ANTENNE
- USB-POORT
- LIJN IN
- MICROFOONINGANG
- DC (15V 1,0A) INGANG
- AAN-/UITTOETS
- SCHOUDERRIEM
VEILIGHEIDSINSTRUCTIES
OPLADEN
natural_image
Diagram showing a hand inserting a CD to a device via a cable, with no visible text or symbols.natural_image
Line drawing of a mobile phone connected to an electronic device with wireless signal waves (no text or symbols)FM-RADIO
natural_image
Illustration showing hands installing a panel layout with a right-hand arrow indicating rotation (no text or symbols present)KARAOKE
GELUIDSEFFECTEN
EFFETS SONORES......6
DEPANNAGE....6
ATTENTION 8

- POIGNEE
- TOUCHE EQ
- RECHERCHE HAUT
- ECHO BAS
- TOUCHE DE REPETITION
- ECHO HAUT
- VOLUME MICRO HAUT
- VOLUME MICRO BAS
- INDICATEUR DE BATTERIE
- TOUCHE DE VOLUME HAUT
- INDICATEUR BLUETOOTH
-
TOUCHE DE VOLUME BAS
-
TÉMOIN D'ALIMENTATION
- PAUSE/LECTURE/ARRET BT
- SOURCE
- RECHERCHE BAS
- ATTACHE DE BAUDRIER
- ANTENNE FM
- PORT USB
- ENTREE HAUT-NIVEAU
- PORT MICRO
- ENTREE DC (15V 1A) ⊖-C⊕
- TOUCHE MARCHE/ARRET
- BANDOULIERE
CONSIGNES DE SÉCURITÉ
REDUIRE LE RISQUE D'ELECTROCUTION, NE PAS RETIRER LE COUVERCLE (OU LE REMETTRE). VOTRE APPAREIL NE CONTIENT AUCUNE PIÈCE
RÉPARABLE. POUR TOUT PROBLÈME, APPORTEZ VOTRE APPAREIL À UN CENTRE DE SERVICE COMPÉTENT.

RECHARGEMENT
natural_image
Line drawing of a hand inserting a plug into a device with a power outlet (no text or symbols)natural_image
Line drawing of a mobile device with a smartphone and wireless signal icon (no text or symbols)RADIO FM
flowchart
graph TD
    A["Hand pointing to a device panel"] --> B["SOURCE"]
    B --> C["TU-/- ↔ TU+/- ↔"]
    C --> D["REP"]
natural_image
Illustration showing hands interacting with a device panel and a close-up of the internal components (no text or symbols)KARAOKE
EFFETS SONORES
RICARICA
natural_image
Diagram showing a hand inserting a plug into a device with a power outlet nearby (no text or symbols)natural_image
Line drawing of a portable electronic device with a smartphone and wireless signal icon (no text or symbols)RADIO FM
natural_image
Illustration showing hands interacting with a device panel and a close-up of the internal components (no text or symbols)CANTA INSIEME
EFFETTI SONORI
RECARGA
natural_image
Line drawing showing a hand inserting a plug into a device with a power outlet nearby (no text or symbols)natural_image
Line drawing of a portable electronic device with a smartphone and wireless signal icon (no text or symbols)RADIO FM
natural_image
Illustration showing hands interacting with a control panel and a device casing (no text or symbols)SING-A-LONG
EFECTOS DE SONIDO
RECARREGAR
natural_image
Line drawing showing a hand inserting a plug into a device with a power outlet nearby (no text or symbols)natural_image
Line drawing of a portable electronic device with a smartphone and wireless signal icon (no text or symbols)RÁDIO FM
KARAOKE
EFEITOS DE SOM
ZŁ CZE BLUETOOTH....5
RADIO FM....5
PORT USB....6
WEJ·CIE LINIOWE....6
- PIEWANIE ....7
EFEKTY D·WI·KOWE....7
ROZWI• ZYWANIE PROBLEMÓW....7
OSTRO·NIE 9


- RACZKA
- PRZYCISK KOREKTORA
- DOSTRAJANIE W GÓRĘ
- ECHO W DÓŁ
- PRZYCISK POWTARZANIA
- ECHO W GÓRÉ
- GŁOŚNOŚĆ MIKROFONU W GÓRĘ
- GŁOŚNOŚĆ MIKROFONU W DÓŁ
- WSKAŹNIK AKUMULATORA
- PRZYCISK GŁOŚNOŚCI W GÓRĘ
-
WSKAŻNIK BLUETOOTH
-
PRZYCISK GŁOŚNOŚCI W DÓŁ
- WSKAŻNIK ZASILANIA
- WYL. PAUZA/ODTWARZANIE/BT
- ŽRÓDŁO
- DOSTRAJANIE W DÓŁ
- ZACISK PASKA
- ANTENA FM
- PORT USB
- WEJŚCIE LINIOWE
- PORT MIKROFONU
- WEJŚCIE DC (15 V 1,0 A)
- WŁĄCZNIK/WYŁĄCZNIK
- PASEK NA RAMIE
WSKAZÓWKI BEZPIECZE• STWA
ŁADOWANIE
natural_image
Line drawing showing a hand inserting a device into a device with an AC power plug and cable (no text or symbols)natural_image
Line drawing of a mobile device with a smartphone and wireless signal icon (no text or symbols)RADIO FM
• PIEWANIE
EFEKTY D·WI·KOWE
SIGURNOSNE UPUTE ....3
MREŽNO SPAJANJE 4
PUNJENJE 4
POVEZIVANJE PUTEM BLUETOOTHA ....5
FM RADIO....5
USB PRIKLJU· AK....5
ULAZNI PRIKLJU· AK 6
SING-A-LONG 6
ZVU• NI EFEKTI 6
RJEŠAVANJE PROBLEMA....6
OPREZ 8
- RUČKA
- TIPKA EKVILIZATORA
- UGAĐANJE NAVIŠE
- SMANJENJE EHA
- TIPKA ZA PONAVLJANJE
- POVEĆANJE EHA
- POVEĆANJE GLASNOĆE MIKROFONA
- SMANJENJE GLASNOĆE MIKROFONA
- INDIKATOR NAPUNJENOSTI BATERIJE
- TIPKA ZA POVEĆANJE GLASNOĆE
- BLUETOOTH INDIKATOR
- TIPKA ZA SMANJENJE GLASNOĆE
- INDIKATOR NAPAJANJA
- PAUZA/REPRODUKCIJA/BT OFF
- IZVOR
- UGAĐANJE NANIŽE
- SPOJKA ZA REMEN ZA NOŠENJE
- FM ANTENA
- USB PRIKLJUČAK
- ULAZNI PRIKLJUČAK
- ULAZ ZA MIKROFON
- ULAZ DC (15 V 1.0 A)
- TIPKA NAPAJANJA UKLJUČENO/ISKLJUČENO
- NARAMENICA
SIGURNOSNE UPUTE
PUNJENJE
- Uređaj se isporučuje s indikatorom napunjenosti baterije.
- Ako LED lampica baterije treperi, znači da je razina napunjenosti baterije niska i da je potrebno punjenje.
- Kada se uređaj spoji na izmjeničnu struju, LED lampica baterije svijetli crveno što znači da se uređaj puni.
- Kada LED lampica svijetli zeleno znači da je baterija potpuno napunjena.
natural_image
Line drawing showing a hand inserting a plug into a device with a power outlet nearby (no text or symbols)Preporu• uje se da punite bateriju oko 6 sati prije nego što po• nete koristiti ure• aj prvi put.
Ušteda energije: Kad se ure• aj nalazi u stanju mirovanja, automatski prelazi u stanje pripravnosti nakon 20 minuta. Automatski se isklju• uje.
natural_image
Line drawing of a mobile device with a smartphone and wireless signal icon (no text or symbols)FM RADIO
- Kada pritisnete tipku „Source“ i odaberete Radio, na crvenom LED zaslonu pokazat će se FM radio frekvencija.
- Pritisnite tipku reproduciraj/pauziraj za automatsko pretraživanje i pohranjivanje.
- Pritisnite i držite tipke TU ili TU kako biste odabrali sljedeću pohranjenu stanicu koja je dostupna. Kratko ih pritisnite za precizno podešavanje.
USB PRIKLJU·AK
- Pritisnite tipku „Source” i odaberite USB. USB će se prikazati na crvenom LED zaslonu.
- Umetnite USB memorijski ure• aj.
- Odaberite svoju omiljenu glazbu pritiskom na tipke TU ◀◇li TU .
- Pritisnite „REP“ za jednokratno ponavljanje trenutne pjesme; ponovo pritisnite „REP“ za ponavljanje svih pjesama. Pritisnite tipku tri puta za ulazak u nasumičnu reprodukciju.
flowchart
graph TD
    A["1 SOURCE"] --> B["2 TU-/-"]
    B --> C["3 REP"]
Tako • ete automatski prije• i na USB na• in rada nakon što umetnete USB memorijski ure• aj.
natural_image
Illustration showing hands installing a panel layout with a right-hand arrow indicating rotation (no text or symbols present)SING-A-LONG
- Ovaj Vam proizvod omogućuje da pjevate uz pjesme koje se reproduciraju bilo na BT, USB-u ili LINE IN načinu rada.
- Priključite kabel mikrofona na bočnu ploču na mjesto s oznakom „MIC”.
- Podesite glasnoću mikrofona „MIC +/MIC -” ili glavnu glasnoću na gornjoj upravljačkoj ploči.
- Podesite eho razinu „EH +/EH -”.
- Započnite s pjevanjem.
| UPOZORENJE: - Ako su glasno•a mikrofona i razina eha postavljeni previsoko ili na maksimum, pripazite na odjek previsokih tonova. |
ZVU·NI EFEKTI
- „Model za kupce” ima ugrađen ekvilizator.
- Pritisnite i odaberite unaprijed postavljeni zvučni efekt za vašu glazbu: LAGANA, KLASIČNA, POP, ROCK i JAZZ GLAZBA.
RJEŠAVANJE PROBLEMA
Op·enito
Nema napajanja
- Provjerite je li AC adapter pravilno umetnut u uređaj i zidnu utičnicu.
- Provjerite nalazi li se prekidač napajanja Uključeno/lsključeno u položaju On.
- Ako je baterija prazna, priključite AC adapter za punjenje i rad.
Tipke ne reagiraju
- Prebacite prekidač napajanja Uključeno/Isključeno na Off, a zatim ponovno na On kako biste resetirali uređaj.
- Odspojite AC adapter i priključite ga natrag.
Nema zvuka
BÄRBAR HÖGTALARE MED BLUETOOTH

BRUKSANVISNING
INNEHÄLLSFÖRTECKNING
BESKRIVNING AV DELAR....2
SÄKERHETSINSTRUKTIONER....3
STRÖMFÖRSÖRJNING 4
LADDNING 4
BLUETOOTH ANSL....5
FM-RADIO 5
USB-PORT......5
LINE IN....6
SJUNG EN LÂT 6
LJUDEFFEKTER 6
FELSÖKNING....6
VAR FÖRSIKTIG....8
- HANDTAG
- EQ-KNAPPEN
- FINJUSTERING UPP
- ECHO NED
- KNAPPEN UPPREPA
- ECHO UPP
- MIC-VOLYM UPP
- MIC-VOLYM NED
- BATTERIINDIKATOR
- VOLYMKNAPPEN UPP
- BLUETOOTH INDIKERING
-
VOLYMKNAPPEN NED
-
STRÖMINDIKATOR
- PAUSA/SPELA/BT AV
- KÄLLA
- FINJUSTERING NED
- BÄLTE MED SPÄNNE
- FM-ANTENN
- USB-PORT
- LINE IN
- MIC PORT
- DC (15V 1.0A) INGÅNG ⊖-C⊕
- STRÖMKNAPPEN PÅ/AV
- AXELREM
SÄKERHETSINSTRUKTIONER
LADDNING
natural_image
Line drawing showing a hand inserting a plug into a device with a power outlet nearby (no text or symbols)natural_image
Line drawing of a mobile phone connected to a device with wireless signal waves (no text or symbols)FM-RADIO
flowchart
graph TD
    A["Hand pressing source"] --> B["② TU+/→"]
    B --> C["③ REPTU-"]
natural_image
Illustration showing hands interacting with a device panel and a close-up of the internal components (no text or symbols)SJUNG EN LÂT
LJUDEFFEKTER
OPLADNING
natural_image
Line drawing showing a hand inserting a plug into a device with an AC cable (no text or symbols)natural_image
Line drawing of a portable electronic device with a smartphone and wireless signal icon (no text or symbols)FM-RADIO
natural_image
Illustration showing hands interacting with a device panel and a close-up of the internal components (no text or symbols)SYNG MED
LYDEFFEKTER
LATAUS
natural_image
Line drawing showing a hand inserting a plug into a device with a power outlet nearby (no text or symbols)natural_image
Line drawing of a mobile device with a smartphone and wireless signal icon (no text or symbols)FM RADIO
natural_image
Illustration showing hands operating a control panel with a close-up of the device's internal components (no text or symbols)SING-A-LONG
ÄÄNITEHOSTEET
TILKOBLING AV STR∅M 4
LADING....4
BLUETOOTH-TILKOBLING .... 5
FM RADIO....5
USB PORT 5
LINE IN....6
SYNG MED 6
LYDEFFEKTER....6
FEILS∅KING 6
FORSIKTIG....8

- HÅNDTAK
- EQ-TAST
- TUNING OPP
- ECHO NED
- GJENTA-TAST
- ECHO OPP
- MIKROFONVOLUM OPP
- MIKROFONVOLUM NED
- BATTERIINDIKATOR
- VOLUM OPP-TAST
- BLUETOOTH-INDIKATOR
-
VOLUM NED-TAST
-
PÅ/AV-INDIKATOR
- PAUSE/PLAY/BT OFF
- SOURCE
- TUNING NED
- STROPPFESTE
- FM-ANTENNE
- USB PORT
- LINE IN
- MIC-INNGANG
- DC (15V 1,0A) INNGANG
- PÅ/AV-TAST
- SKULDERSTROPP
SIKKERHETSINSTRUKSJONER
LADING
natural_image
Line drawing showing a hand inserting a USB into a device with an AC power outlet (no text or symbols)natural_image
Line drawing of a portable electronic device with a smartphone and wireless signal icon (no text or symbols)FM RADIO
natural_image
Illustration showing hands interacting with a device panel and a close-up of the internal components (no text or symbols)SYNG MED
LYDEFFEKTER
- SAFETY INSTRUCTIONS
- CAUTION
- RISK OF ELECTRIC SHOCK DO NOT OPEN
- UNPACKING:
- IMPORTANT INSTRUCTIONS:
- POWER CONNECTION
- RECHARGING
- BLUETOOTH CONNECTION
- FM RADIO
- USB PORT
- LINE IN
- SING-A-LONG
- SOUND EFFECTS
- TROUBLESHOOTING
- General
- No power
- Keys no response
- No sound heard
- Bluetooth Operations
- Audio quality is poor
- Cannot pair to Bluetooth device
- CAUTION:
- About Sealed Lead-Acid Battery:
- ALL RIGHTS RESERVED, COPYRIGHT DENVER ELECTRONICS A/S
- DENVER®
- TSP-203
- TRAGBARER
- BLUETOOTH-LAUTSPRECHER
- INHALTSVERZEICHNIS
- AUFLADEN
- UKW-RADIO
- MITSINGEN
- SOUNDEFFEKTE
- VEILIGHEIDSINSTRUCTIES
- OPLADEN
- FM-RADIO
- KARAOKE
- GELUIDSEFFECTEN
- CONSIGNES DE SÉCURITÉ
- RECHARGEMENT
- RADIO FM
- EFFETS SONORES
- RICARICA
- CANTA INSIEME
- EFFETTI SONORI
- RECARGA
- EFECTOS DE SONIDO
- RECARREGAR
- RÁDIO FM
- EFEITOS DE SOM
- WSKAZÓWKI BEZPIECZE• STWA
- ŁADOWANIE
- • PIEWANIE
- EFEKTY D·WI·KOWE
- SIGURNOSNE UPUTE
- PUNJENJE
- USB PRIKLJU·AK
- ZVU·NI EFEKTI
- RJEŠAVANJE PROBLEMA
- Op·enito
- Nema napajanja
- Tipke ne reagiraju
- Nema zvuka
- BÄRBAR HÖGTALARE MED BLUETOOTH
- INNEHÄLLSFÖRTECKNING
- SÄKERHETSINSTRUKTIONER
- LADDNING
- SJUNG EN LÂT
- LJUDEFFEKTER
- OPLADNING
- SYNG MED
- LYDEFFEKTER
- LATAUS
- ÄÄNITEHOSTEET
- SIKKERHETSINSTRUKSJONER
- LADING
Brand : DENVER
Model : TSP203
Category : Docking station