EnMotion Recessed - Vending machine Lotus - Free user manual and instructions
Find the device manual for free EnMotion Recessed Lotus in PDF.
| Product Type | Recessed Automatic Towel Dispenser |
| Brand | Lotus |
| Model | EnMotion Recessed |
| Recessed Cavity Dimensions (H x W x D) | 38.1 cm x 26.67 cm x 10.16 cm |
| Power Supply | 4 D/LR21 batteries (1.5 V) |
| Dispense Modes | On Demand (ODM) and Hold Mode (HM) |
| Sheet Length Adjustment | ASL: Short (S), Medium (M), Long (L) |
| Dispense Interval Adjustment | ATD: Short, Medium, Long |
| Low Paper Level Indicator | Yes (light indicator) |
| Low Battery Indicator | Yes (right side of lens) |
| Anti-Jam System | Open cover for access |
| Door Opening | Standard left-hand mount, reversible |
| Material | Plastic and metal |
| Weight (approx.) | 2.5 kg |
| Included Accessories | Key, 4 D batteries, 4 #8 wood screws, instruction manual |
| Maintenance | Clean with a soft cloth; check for jams |
| Replaceable Batteries | Yes, by user |
| Warranty | Consult the manufacturer |
Frequently Asked Questions - EnMotion Recessed Lotus
User questions about EnMotion Recessed Lotus
0 question about this device. Answer the ones you know or ask your own.
Ask a new question about this device
Download the instructions for your Vending machine in PDF format for free! Find your manual EnMotion Recessed - Lotus and take your electronic device back in hand. On this page are published all the documents necessary for the use of your device. EnMotion Recessed by Lotus.
USER MANUAL EnMotion Recessed Lotus
enMotion® Recessed Automated Stainless Steel Dispenser Instructions Manual
natural_image
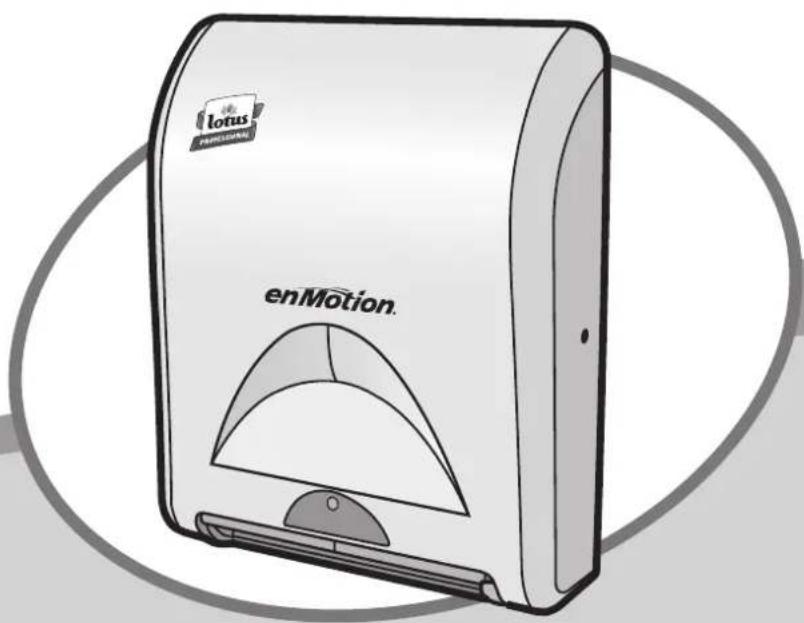
Illustration of a lotus electronic device labeled 'enMotion' with a semi-circular top (no additional text or symbols)Congratulations on choosing to improve the hygiene and cleanliness of your washroom. Lotus Professional's exciting new touchless recessed enMotion handtowel dispensing system uses tomorrow's innovation and increased hand drying capacity to answer today's need for more efficient hygienic solutions. Your choice has conveyed a commitment to providing a hygienic washroom environment and a quality image, and to improving the service in your washroom.
TOOLS AND SUPPLIES
- Screwdriver
• Power Drill - Pencil or Pen
• Spirit level (recommended)
• 4 ea. #8 Wood Screws included
STEP ONE
Locate listed components:
• 1 enMotion recessed handtowel dispenser
- Dispenser Key
• 4 "D/LR21" Cell Batteries
- Instruction Guide
- Screws
STEP TWO
Assembling enMotion recessed handtowel dispenser
- Locate key on right side of dispenser and open dispenser.
- Unwrap cellophane from batteries.
- Load 4 "D" cell batteries in battery compartment located in the rear of the dispenser.
- Close dispenser.
STEP THREE
Determining the wall location
- Determine mounting location for dispenser. When placing dispenser, allow at least 10 cm clearance on all sides.
- Notice the metal static ground clip on the left side of the backplate. This must be in contact with the wall to properly ground the dispenser. Failure to properly ground the dispenser will cause damage to the unit and may cause unit to become inoperable.
- If installing directly to the wall, a cut out of 38,1 cm high x 26,67 cm wide x 10,16 cm deep will be required.
Notice: The door comes mounted on the left side of the housing. If there is not enough clearance for the door on the left, refer to the directions below to switch the door from the left to the right side.
Directions to switch door opening:
- Use a Philips head screwdriver to remove the silver hinges on the left side of the dispenser and save the screws. Once removed, the hinges should separate from the black back plate.
- Next use a Rat-head screwdriver to remove the 2 crescent push washers on the hinges so that the door can be lifted off the hinges. Save these washers.
- Now use a Philips head screwdriver to remove the lock assembly and move it to the opposite side of the dispenser. Remove the silver cap from the non-lock side and snap it into place on the opposite side.
- Finally, reattach the hinges, adding the push washers from the previous step to ensure that the door cannot be lifted off its hinges.
STEP FOUR
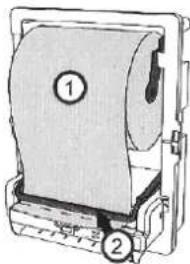
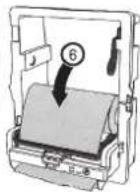
LOADING FIRST ROLL
(see step 1-4)
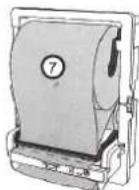
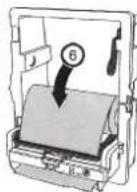
- Place the roll as indicated at picture 1.
- Lift the transfer bar and tuck the paper behind it. Fold up 2.5 cm length of paper at the end of the roll (transfer bar teeth should rest in crease).
- With the transfer bar in place, press the blue
auto feed button on the lower right of the dispenser (paper will be
text_image
Technical diagram of a mechanical device with labeled parts 1 and 2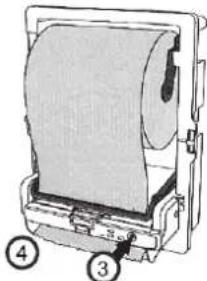
natural_image
Illustration of a mechanical device with a rolled paper sheet and labeled parts (no text or symbols on the object itself)automatically loaded).
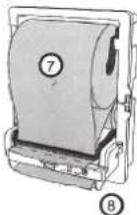
- Once the paper feeds through the bottom, tear of the sheet and close the cover.
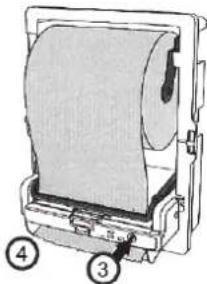
LOADING REPLACEMENT ROLLS (see step 5 - 8)
- When the low paper indicator is lit, add a new paper roll.
- Move the partial roll (approximately 7,5 cm in Dia.) to the bottom roll holders (rewind any excess paper back onto the roll).
- Follow steps 1 through 2 to load a new roll in the top bracket.
- Close the cover.
⑧
Note: When the transfer option is used, the dispenser will double feed paper toward the end of the partial roll.
STEP FIVE
Operating the dispenser (see instructions on the inside of the front cover)
- Dispensing enMotion towels
A. In On-Demand Mode (ODM), wave hand approximately 5 cm across front of the dispenser. An enMotion towel will be dispensed.
B. In Hang Mode (HM) an enMotion towel will be presented automatically, a few seconds after the cover is closed or a towel is torn off.
C. Once towel is dispensed, a short delay will occur to avoid paper waste. After the delay, the next towel can be dispensed.
Note: To adjust the delay, see Step 6, "Adjusting Settings".
2. Replacing batteries
A. The "low battery" light located on the right side of the lens indicates that the battery power is low.
Note: Once this light appears, dispenser will continue to operate for a limited period of time.
B. Replace batteries with 4 "D" cell batteries. Load batteries as outlined in diagram located on inside battery compartment.
3. Loading replacement rolls: see step 5.
4. Should you wave your hand 2-3 times inside the sensor range and not receive a towel, open cover and check to see if the paper is properly loaded. Then check inside the paper chute to see if there is a jam. If necessary, clear the jam and load paper properly. Once completed, close the cover and the dispenser should function normally.
STEP SIX
Adjusting Settings
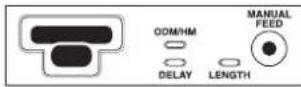
-
The enMotion Dispenser's "Adjustable Sheet Length" (ASL) system allows for adjustments in the towel length. The ASL system is located inside the cabinet just to the right of the sensor. Sizes are:
-
Left setting - "S" Short towel (maximum number of hand dries)
- Middle setting - "M" Medium towel (optimal hand dry capacity)
- Right setting - "L" Long towel (largest available towel)
Note: The ASL system is pre-set at the "L" option. To change setting, locate the ASL system inside the cabinet just to the right of the sensor.
- The enMotion Dispenser's "Adjustable Time Delay" (ATD) system allows towels to dispense at different time intervals after a towel is removed from the dispenser. Settings are:
• Left setting - Short Delay
• Middle setting - Medium Delay
• Right setting - Long Delay
Note: The ATD system is pre-set at short delay. To change setting, locate the ATD system inside the cabinet just to the right of the sensor.
- The enMotion Dispenser's "Adjustable Dispense Mode Range" (ADMR) system allows for adjustment in how the towel is presented to the end user.
Settings are:
- "ODM" - On-Demand Mode (the towel will feed from the cabinet after the user has activated the sensor)
- "HM" - Hang Mode (the towel will always be showing. After tearing off one towel, another towel will present itself.)
Note: The ADMR system is pre-set on the On-Demand Mode. To change setting, locate the ADMR system inside the cabinet just to the right of the sensor.
natural_image
Technical line drawing of a mechanical device with labeled parts (no text or symbols present)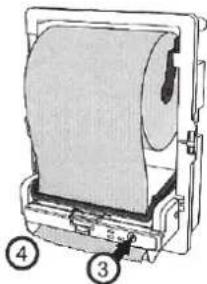
natural_image
Diagram of a printer with paper roll and labeled parts (no text or symbols on the diagram itself)EINSETZEN DER
natural_image
Technical line drawing of a mechanical device with labeled parts (1 and 2), no readable text or symbols beyond labels
natural_image
Technical illustration of a mechanical device with labeled parts (no text or symbols present)natural_image
Technical line drawing of a mechanical device with labeled parts (no text or symbols present)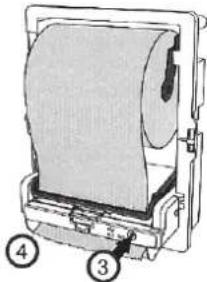
natural_image
Diagram of a mechanical device with labeled parts (3, 4), showing internal components without any readable text or symbols.natural_image
Technical line drawing of a mechanical device with labeled parts (no text or symbols present)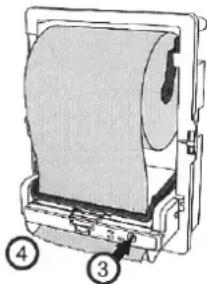
natural_image
Diagram of a mechanical device with a paper roll and labeled parts (no text or symbols present)CARGAR ROLLOS DE REPUESTO (véanse pasos 5 - 8)
natural_image
Technical line drawing of a mechanical device with labeled parts (no text or symbols present)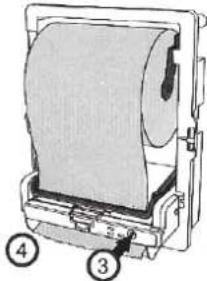
natural_image
Technical illustration of a mechanical device with labeled parts (no text or symbols present)CARICARE I
natural_image
Technical line drawing of a mechanical device with labeled parts (no text or symbols present)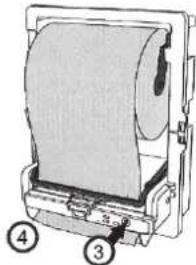
natural_image
Diagram of a printer with paper roll and base, labeled with numbers 3 and 4 (no text or symbols on the diagram itself)natural_image
Technical line drawing of a mechanical device with labeled parts (no text or symbols present)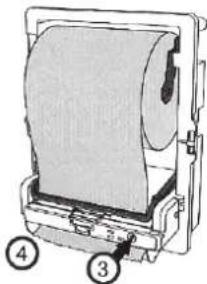
natural_image
Technical illustration of a mechanical device with labeled parts (no text or symbols present)ILÆGNING AF NYE PAPIRRULLER (se trin 5 - 8)
text_image
Technical diagram of a mechanical device with labeled parts 1 and 2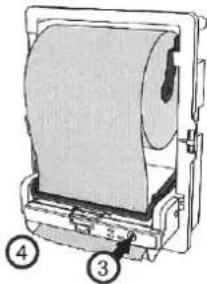
natural_image
Technical illustration of a mechanical device with labeled parts (no text or symbols present)LEGGE INN UTSKIFTINGSRULLER (se trinn 5 - 8)
text_image
Technical diagram of a mechanical device with labeled parts 1 and 2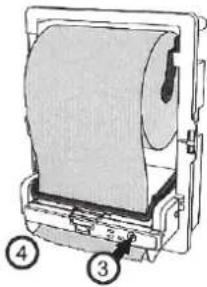
natural_image
Illustration of a mechanical device with a rolled paper or sheet, labeled with numbers 3 and 4 (no text or symbols on the device itself)SÄTTA I NYA RULLAR (se steg 5-8)
Ukseava vahetamise juhised:
natural_image
Diagram of a mechanical device with labeled parts (1 and 2), no readable text or symbols present.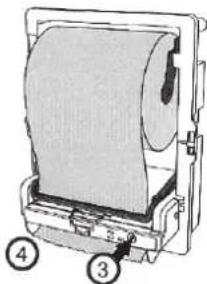
natural_image
Diagram of a printer with paper roll and labeled parts (no text or symbols on the diagram itself)ASENDUSRULLIDE PAIGALDAMINE (vt sammud 5–8)
natural_image
Technical diagram of a mechanical device with labeled parts (no readable text or symbols)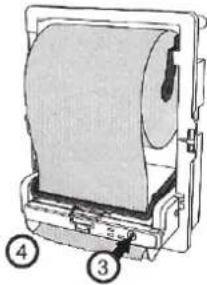
natural_image
Diagram of a mechanical device with labeled parts (3, 4), showing internal components without any readable text or symbols.ZAVÁDĚNÍ VÝMĚNNÝCH ROLÍ (viz krok 5 – 8)
natural_image
Technical line drawing of a mechanical device with labeled parts (no text or symbols present)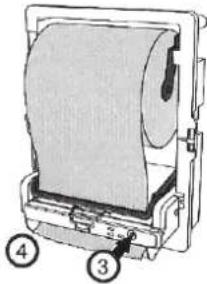
natural_image
Diagram of a mechanical device with a rolled paper sheet and labeled parts (no text or symbols present)text_image
Diagram of a printer with labeled parts, showing page number 1 and page number 2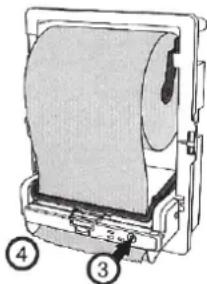
natural_image
Diagram of a mechanical device with labeled parts (no text or symbols present)natural_image
Illustration of a mechanical device with two labeled parts (1 and 2), no visible text or symbols.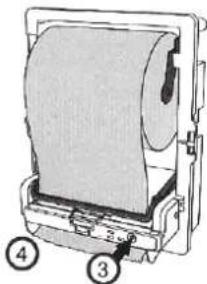
natural_image
Diagram of a mechanical device with a rolled paper or sheet, labeled with numbers 3 and 4 (no text or symbols on the device itself)KAIP |KELTI ATSARGINIUS RULONUS (žr. 5 – 8 žingsnius)
natural_image
Technical line drawing of a mechanical device with labeled parts (no text or symbols present)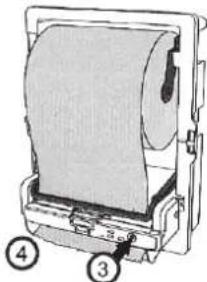
natural_image
Diagram of a mechanical device with labeled parts (3, 4), showing no readable text or symbols beyond labels.MAINAS RULLU IEVIETOSANA
(sk. 5. - 8. soli)
natural_image
Technical line drawing of a mechanical device with labeled parts (no text or symbols present)
natural_image
Technical illustration of a mechanical device with labeled parts (no text or symbols present)UMETANJE zAMJENSKIH ROLNI (vidi korake 5 - 8)
- Kada se upali pokazivač niskog nivoa papira, dodajte novu rolnu papira.
- Pomaknite djelimičnu rolnu (otprilike 7,5 cm prečnika) na donji držače rolne (sav preostali papir namotajte nazad na rolnu).
- Pratite korake od 1 do 2 da biste umetnuli novu rolnu na gornji nosač.
- Zatvorite poklopac.
Napomena: Kada koristite opciju za prenos, aparat će poslati dvostruki papir prema kraju djelimične rolne
KORAK PETI
A. Korištenje aparata (vidi uputstvo sa unutrašnje strane prednjeg poklopca)
B.
C. 1. Izbacivanje enMotion ubrusa
D. U načinu rada On-Demand (ODM), mahnite rukom otprilike 5 cm ispred prednje strane aparata. Ubrus enMotion će biti izbačen.
E. U načinu rada Hang (HM), ubrus enMotion će biti automatski izbačen samo nekoliko sekundi nakon što poklopac bude zatvoren ili nakon što ubrus bude otkinut.
F. Nakon izbacivanja ubrusa doći će do kratke pauze kako bi se izbjeglo rasipanje papira. Nakon te pauze može biti izbačen naredni ubrus.
G. Napomena: Da prilagodite trajanje pauze, pogledajte Korak 6, "Prilagodavanje podešenja".
H.
-
- Zamjena baterija
natural_image
Technical diagram of a mechanical device with labeled parts (1 and 2), no readable text or symbols present.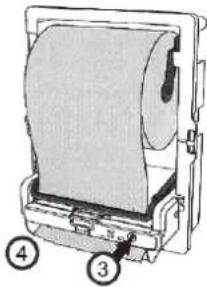
natural_image
Diagram of a printer with paper roll and labeled parts (no text or symbols present)PUNJENJE
zAMJENSKIM ROLAMA (vidi korak 5 - 8)
natural_image
Technical line drawing of a mechanical device with two numbered components (1 and 2), no visible text or symbols.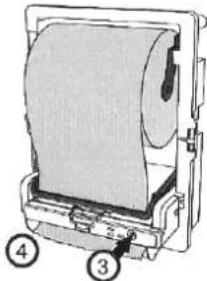
natural_image
Technical illustration of a mechanical device with labeled parts (no text or symbols present)NAMEŠČANJE NADOMESTNIH zVITKOV (glej korake 5 - 8)
text_image
Technical diagram of a mechanical device with labeled parts 1 and 2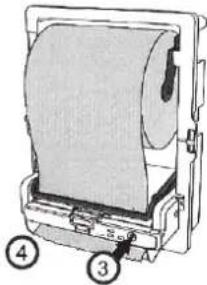
natural_image
Diagram of a mechanical device with a roll and labeled parts (no text or symbols present)STAVLJANJE REZERVNIH ROLNI (pogledajte korak 5 - 8)
natural_image
Technical line drawing of a mechanical device with labeled parts (no text or symbols present)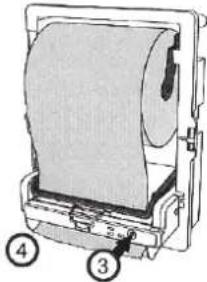
natural_image
Diagram of a mechanical device with labeled parts (3, 4), showing internal components without any readable text or symbols.VENDOSJA E RROTULLAVE TE
ZEVENDESIMIT (shihni hapin 5 - 8)
natural_image
Technical line drawing of a mechanical device with labeled parts (no readable text or symbols)
natural_image
Diagram of a printer with paper roll and labeled parts (no text or symbols present)natural_image
Technical line drawing of a mechanical device with two numbered components (1 and 2), no visible text or symbols.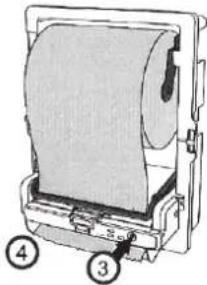
natural_image
Diagram of a printer with paper roll and labeled parts (no text or symbols on the object itself)ЗАРЕЖДАНЕ НА РЕЗЕРВНИ РОЛКИ
(виж стъпка 5 - 8)
natural_image
Technical line drawing of a mechanical device with labeled parts (no text or symbols present)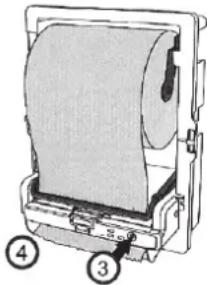
natural_image
Diagram of a printer with paper roll and labeled parts (no text or symbols beyond labels)МЕСТЕЊЕ НА НОВИ РОЛНИ
(види чекор 5 – 8)
natural_image
Technical line drawing of a mechanical device with labeled parts (no text or symbols present)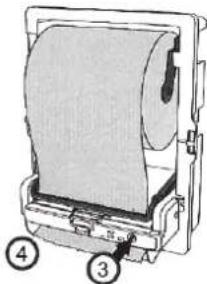
natural_image
Diagram of a mechanical device with a roll and labeled parts (no text or symbols present)text_image
Technical diagram of a mechanical device with numbered components, likely an optical or printing tool.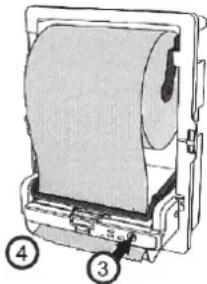
natural_image
Technical illustration of a mechanical device with labeled parts (no text or symbols present)natural_image
Technical line drawing of a mechanical device with labeled parts (1 and 2), no readable text or symbols beyond labels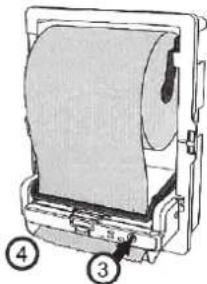
natural_image
Illustration of a mechanical device with a rolled paper sheet and labeled parts (no text or symbols on the object itself)YEDEK RULOLARIN YERLEŞTİRİLMESİ
$$ ⓜ = \text { Battery } $$
PASUL TREI
natural_image
Technical line drawing of a mechanical device with labeled parts (no text or symbols present)